Transcripts
1. Blender 4 Modeling and Geometry Node Workshop: Welcome everyone to the
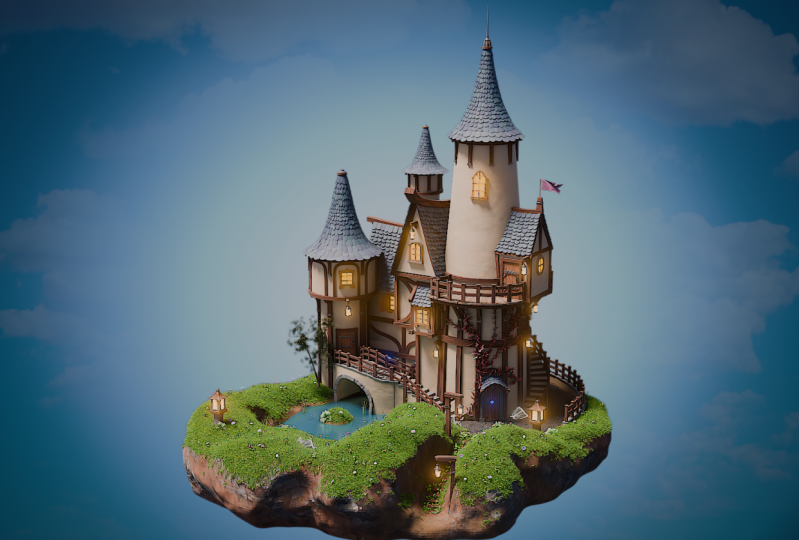
Blender four Modeling and Geometnowshop. I'm Neil from three D Tudor, and I'm excited to guide you on a captivating journey into the realm of fancy architecture. In this nearly 30
hour long course, we'll honors the full
power of Blender four to create a
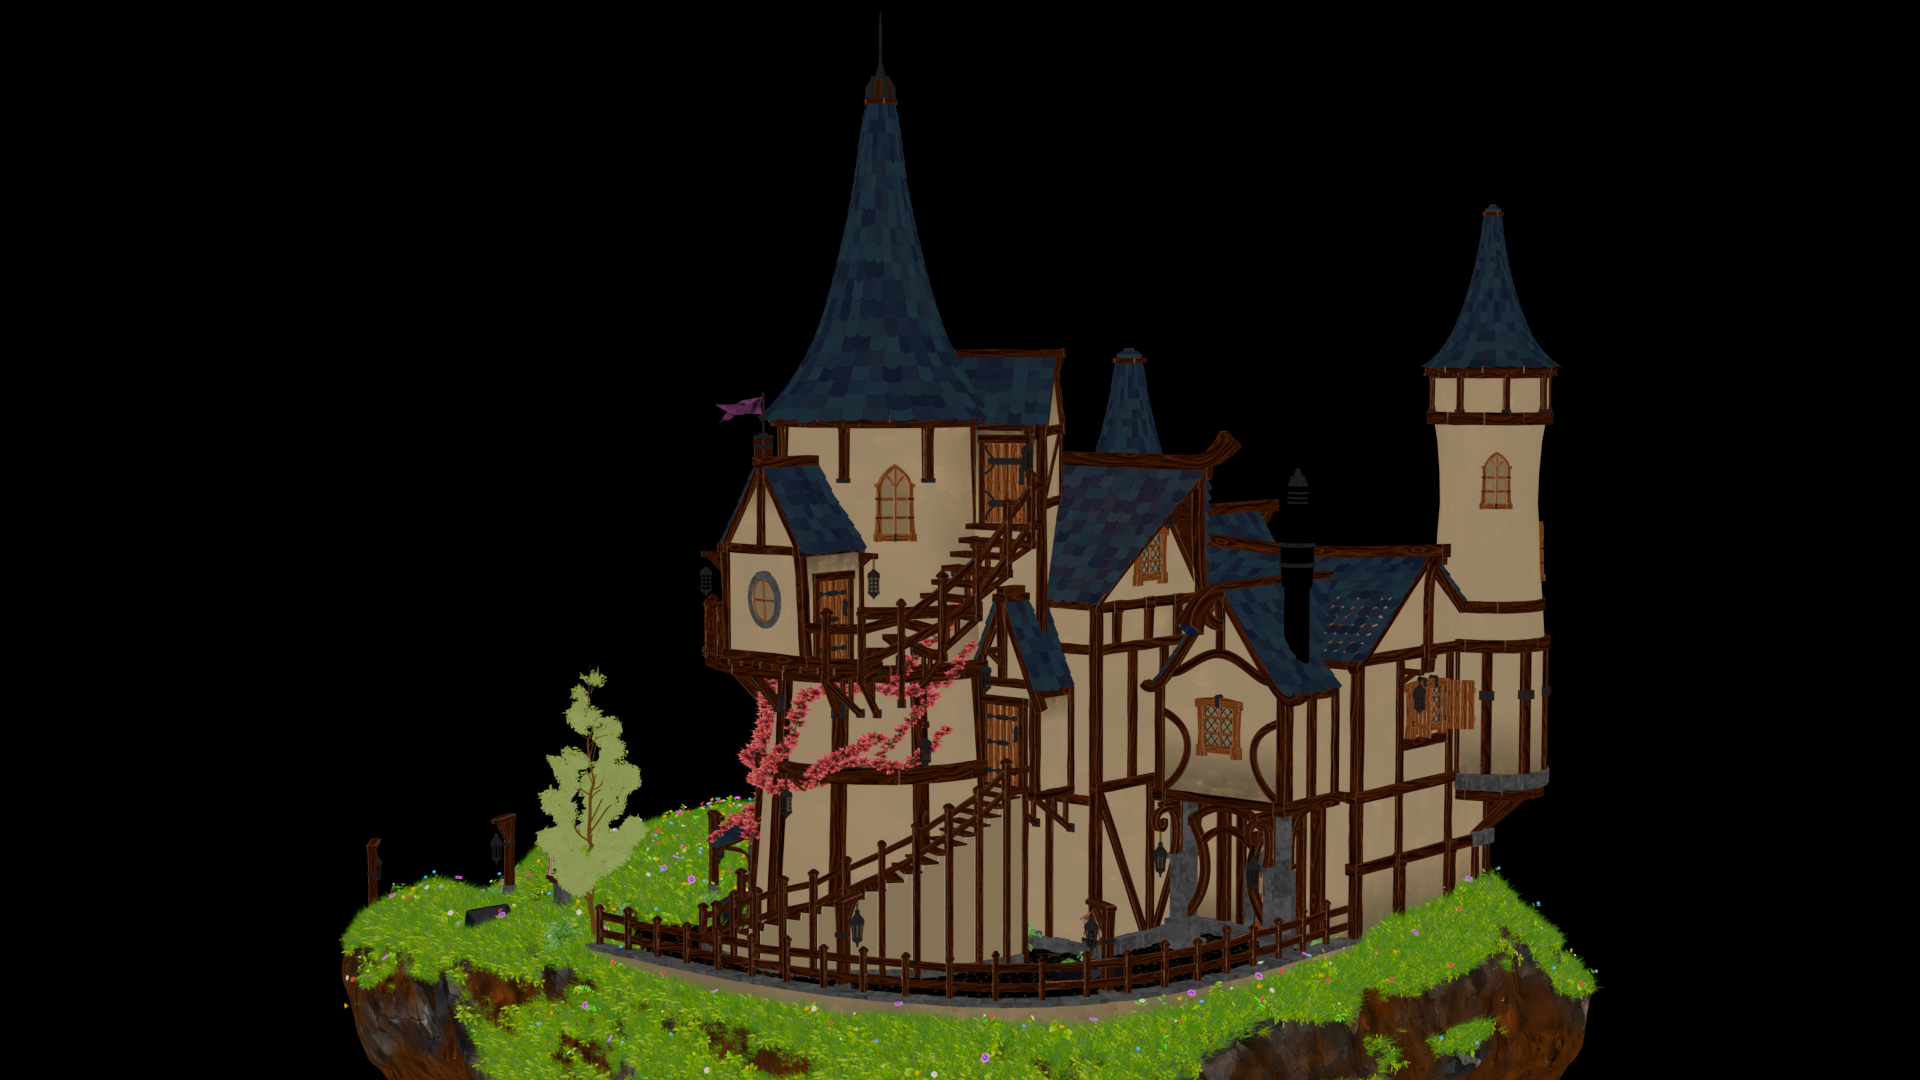
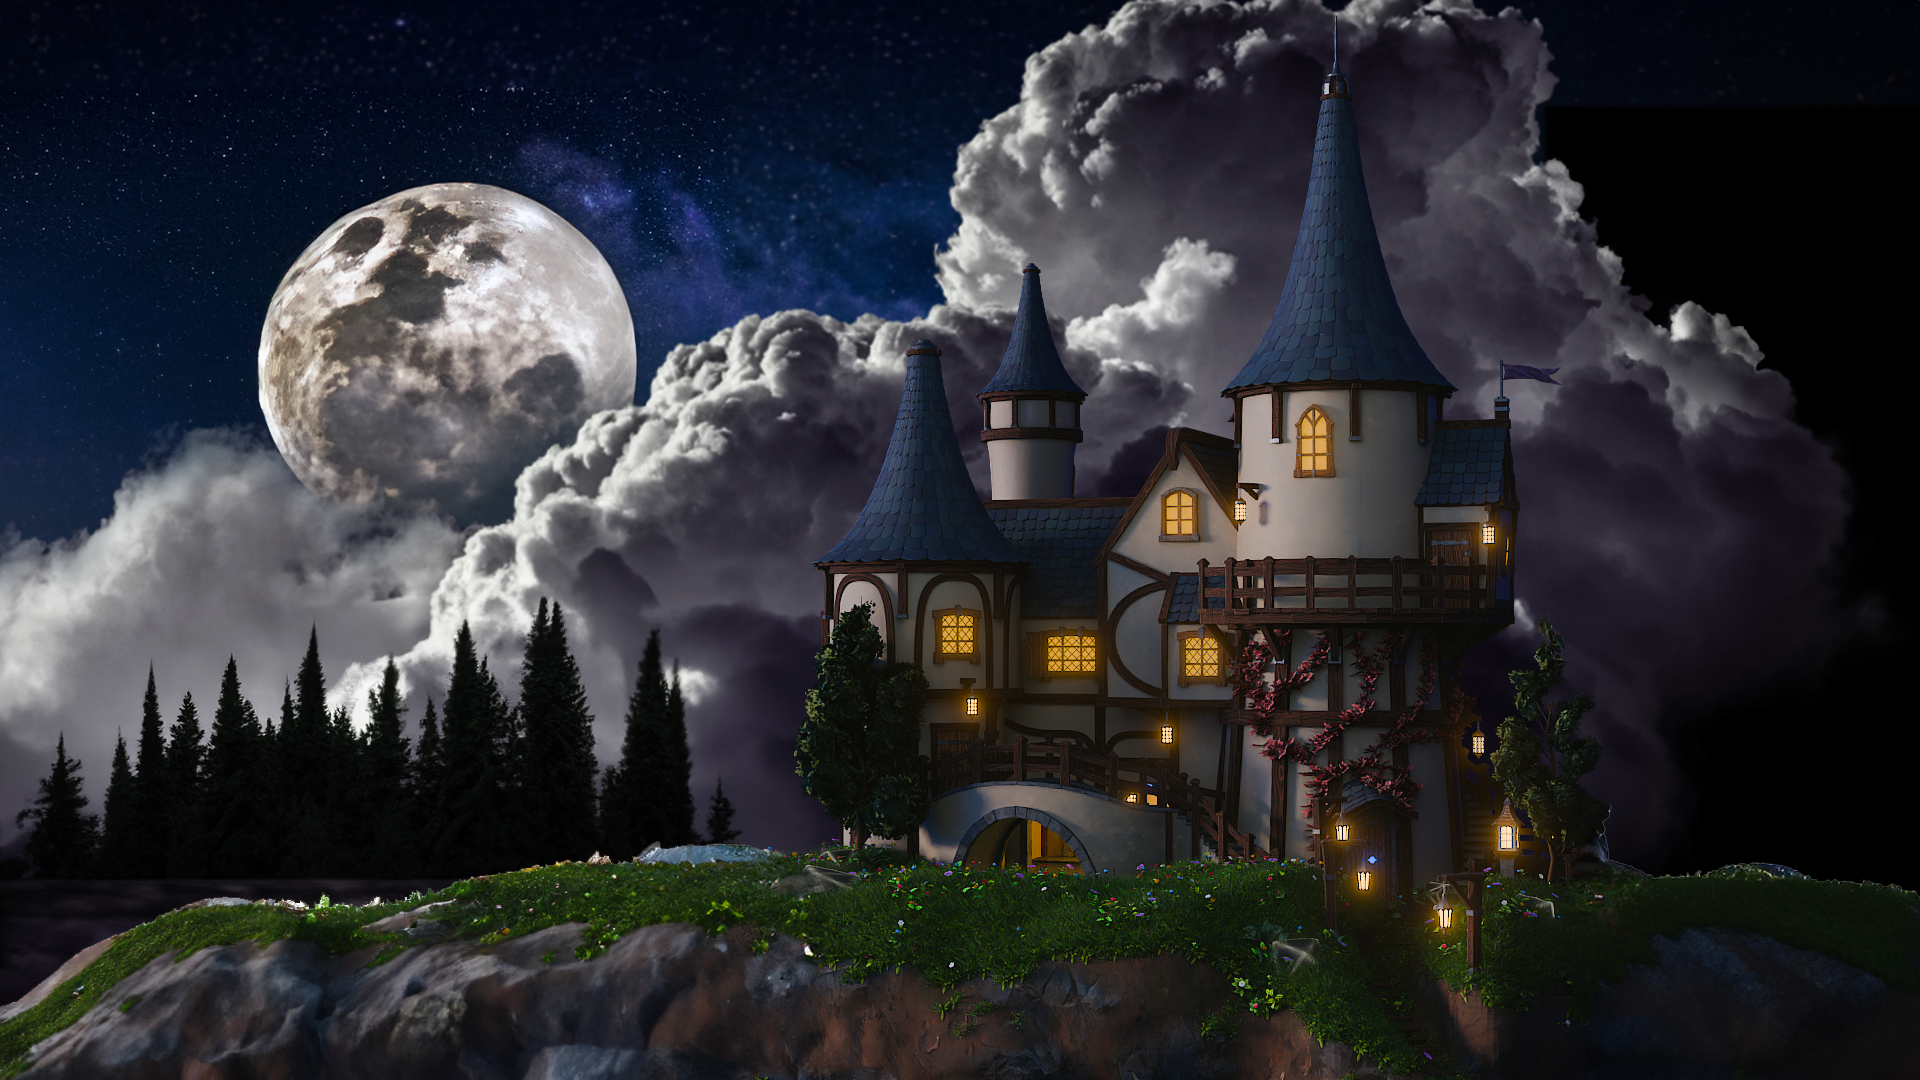
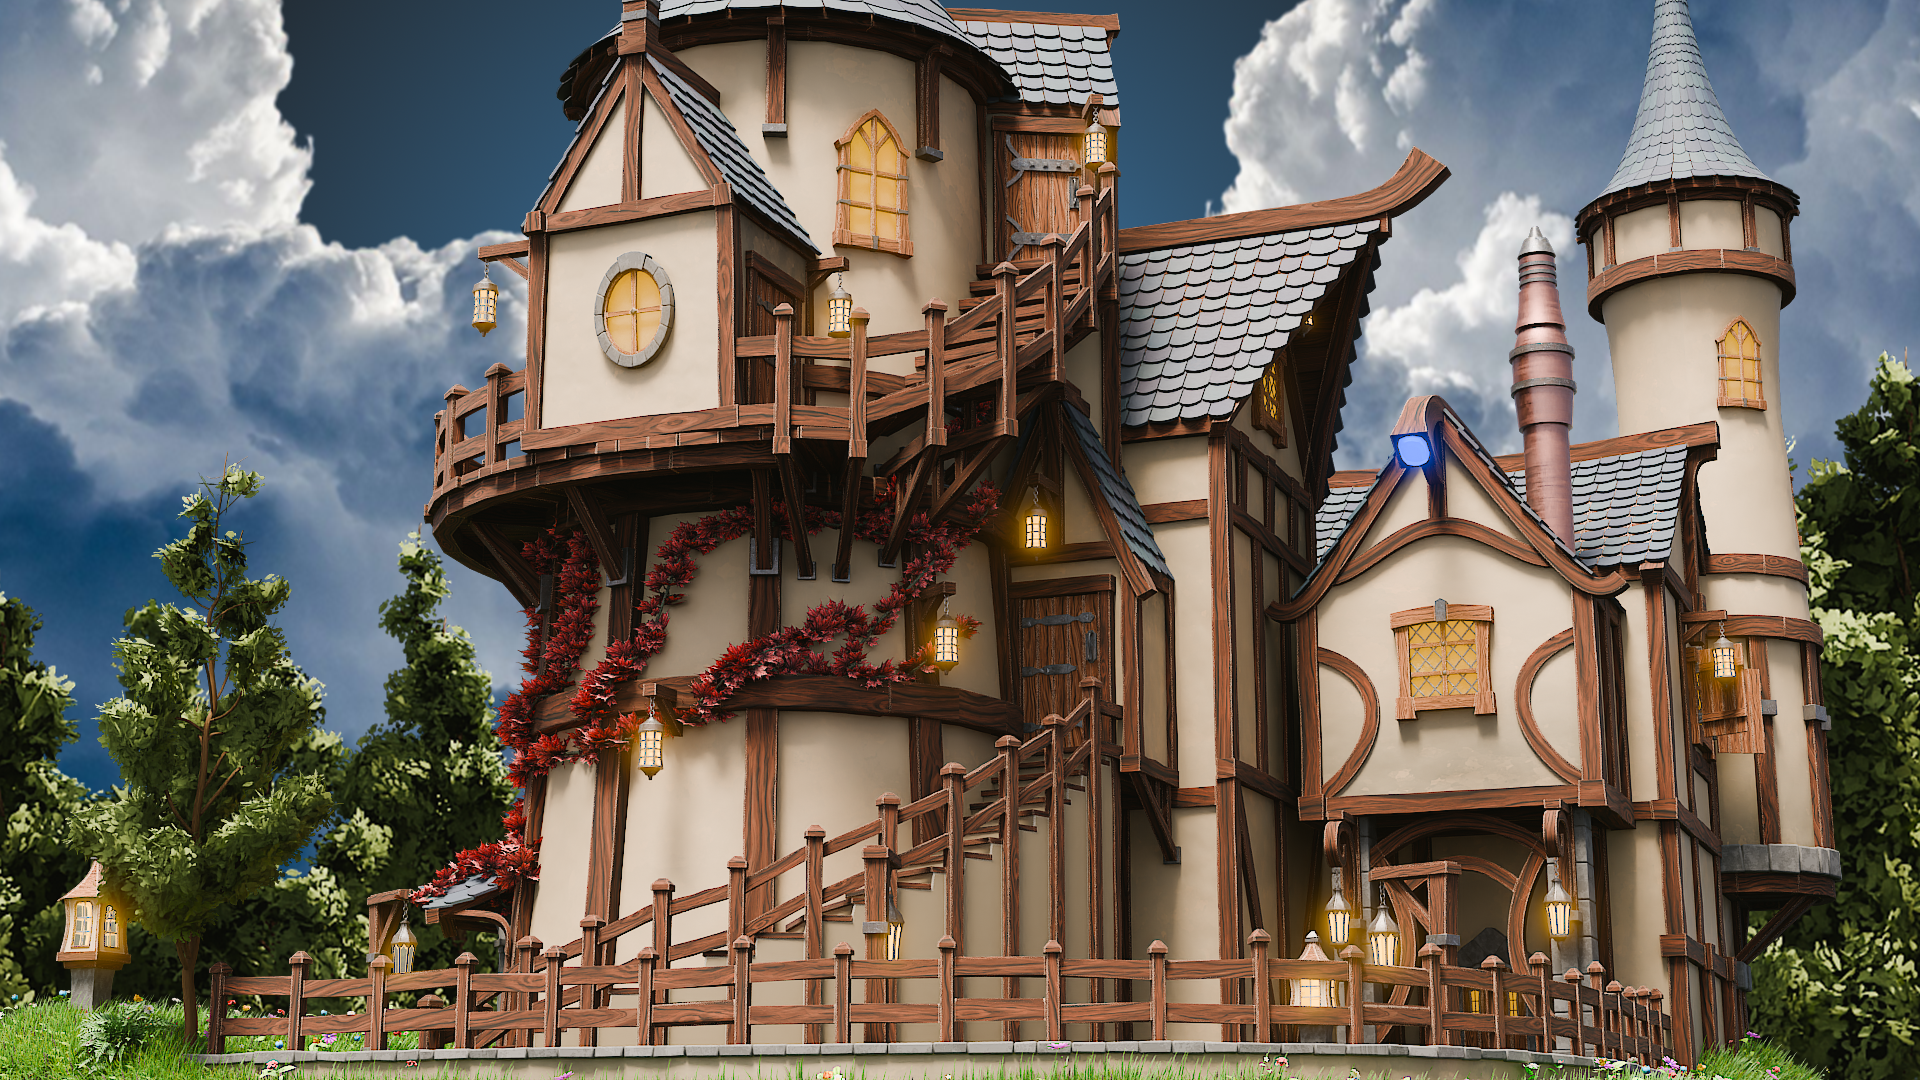
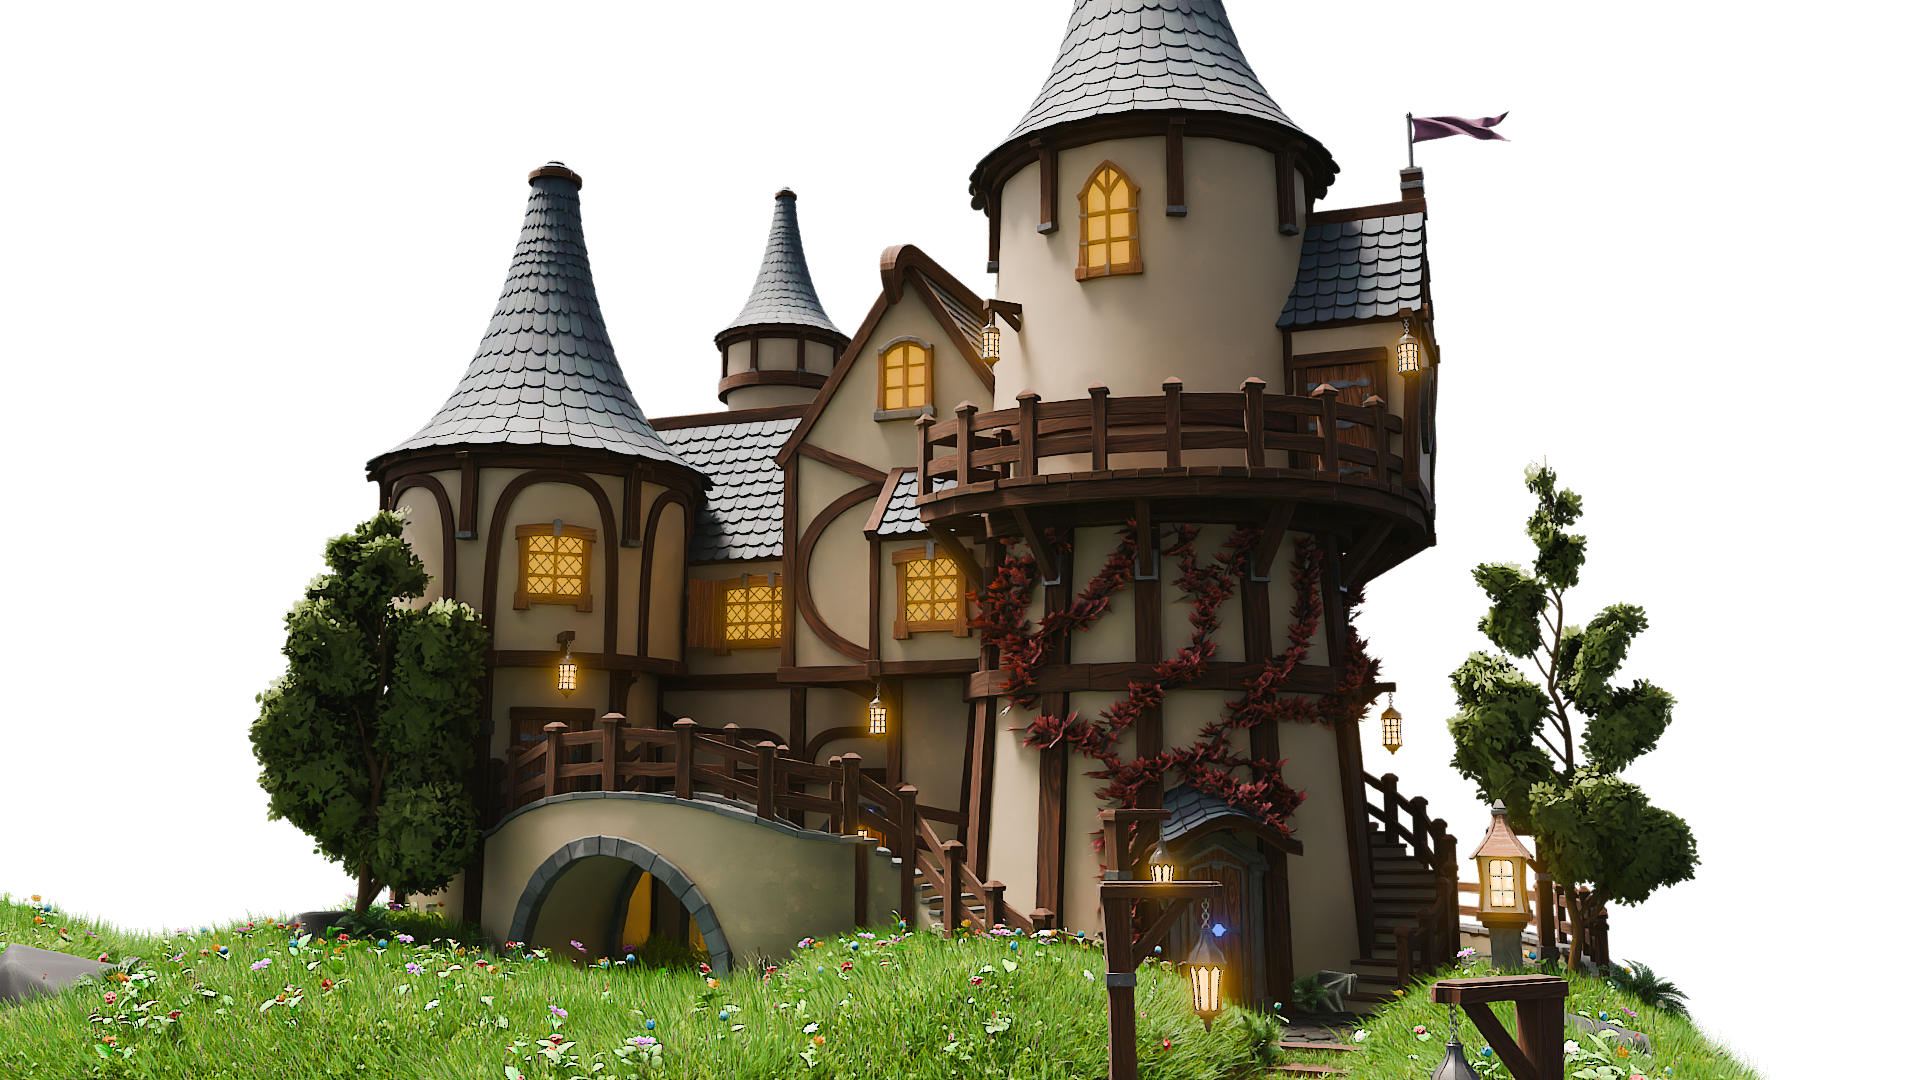
magical Wizards Tower, combining ancient sorcery with modern three D
modeling techniques. Now let's dive into what
this course has to offer. We'll start with a comprehensive
referencing guide. You'll learn how
to source images, how to draw your own buildings, and use tools like pure
rep to organize images for everything from mood settings to forest environments and
architectural lighting. Next, understanding
the importance of a strong foundation
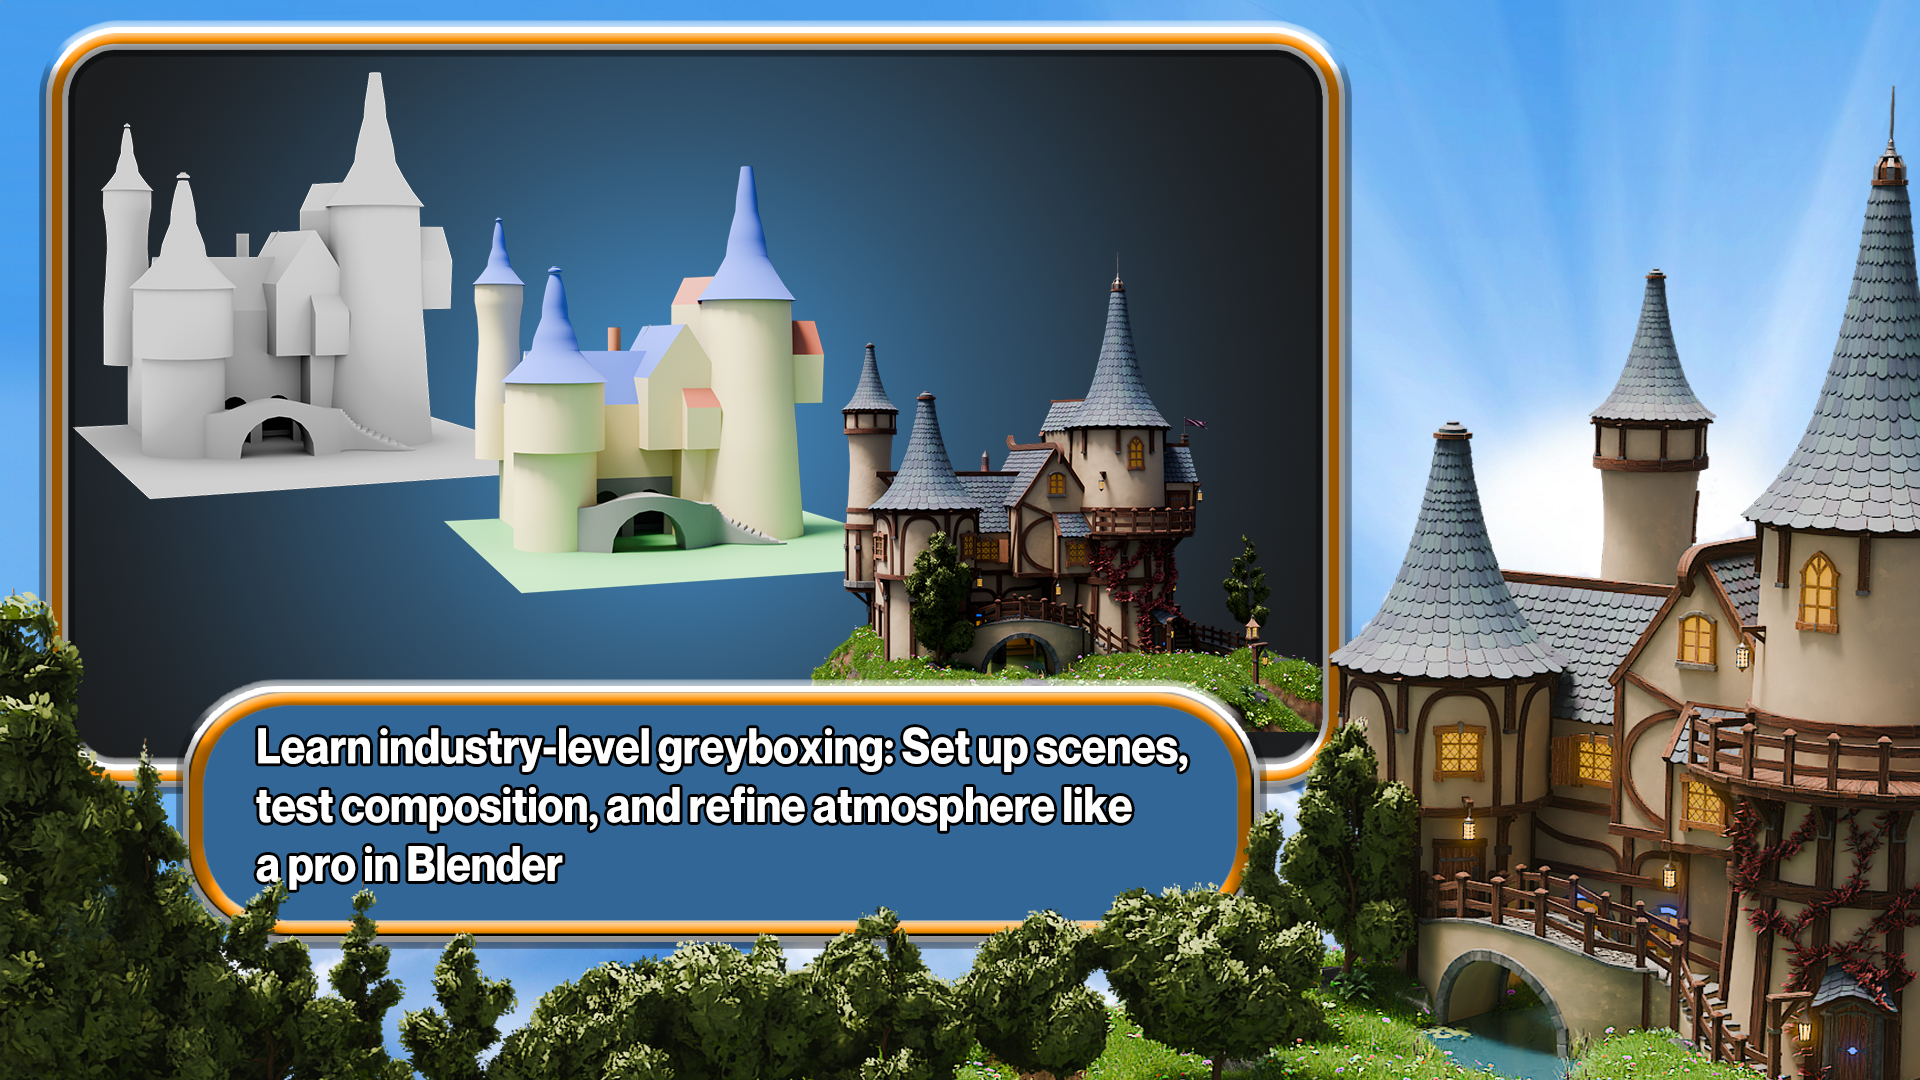
will cover gray boxing. How to lay out gray boxes that not only
structure your model, but also tell a story. Every game you've ever played always starts
with a gray box, and we'll integrate lighting and ambient occlusion right from the start to create
amazing scenes that lays the groundwork for
your fancy buildings. Modeling is at the
heart of this course, from simple stone blocks to intcrate stairways
and fancy lamps. We're building everything
alongside each other together. And that means you'll
learn the very basics of modeling all the way up to
professional techniques. We'll cover everything from
shaders and UV mapping. All of this done in real time
with nothing missed out. This unique course also includes
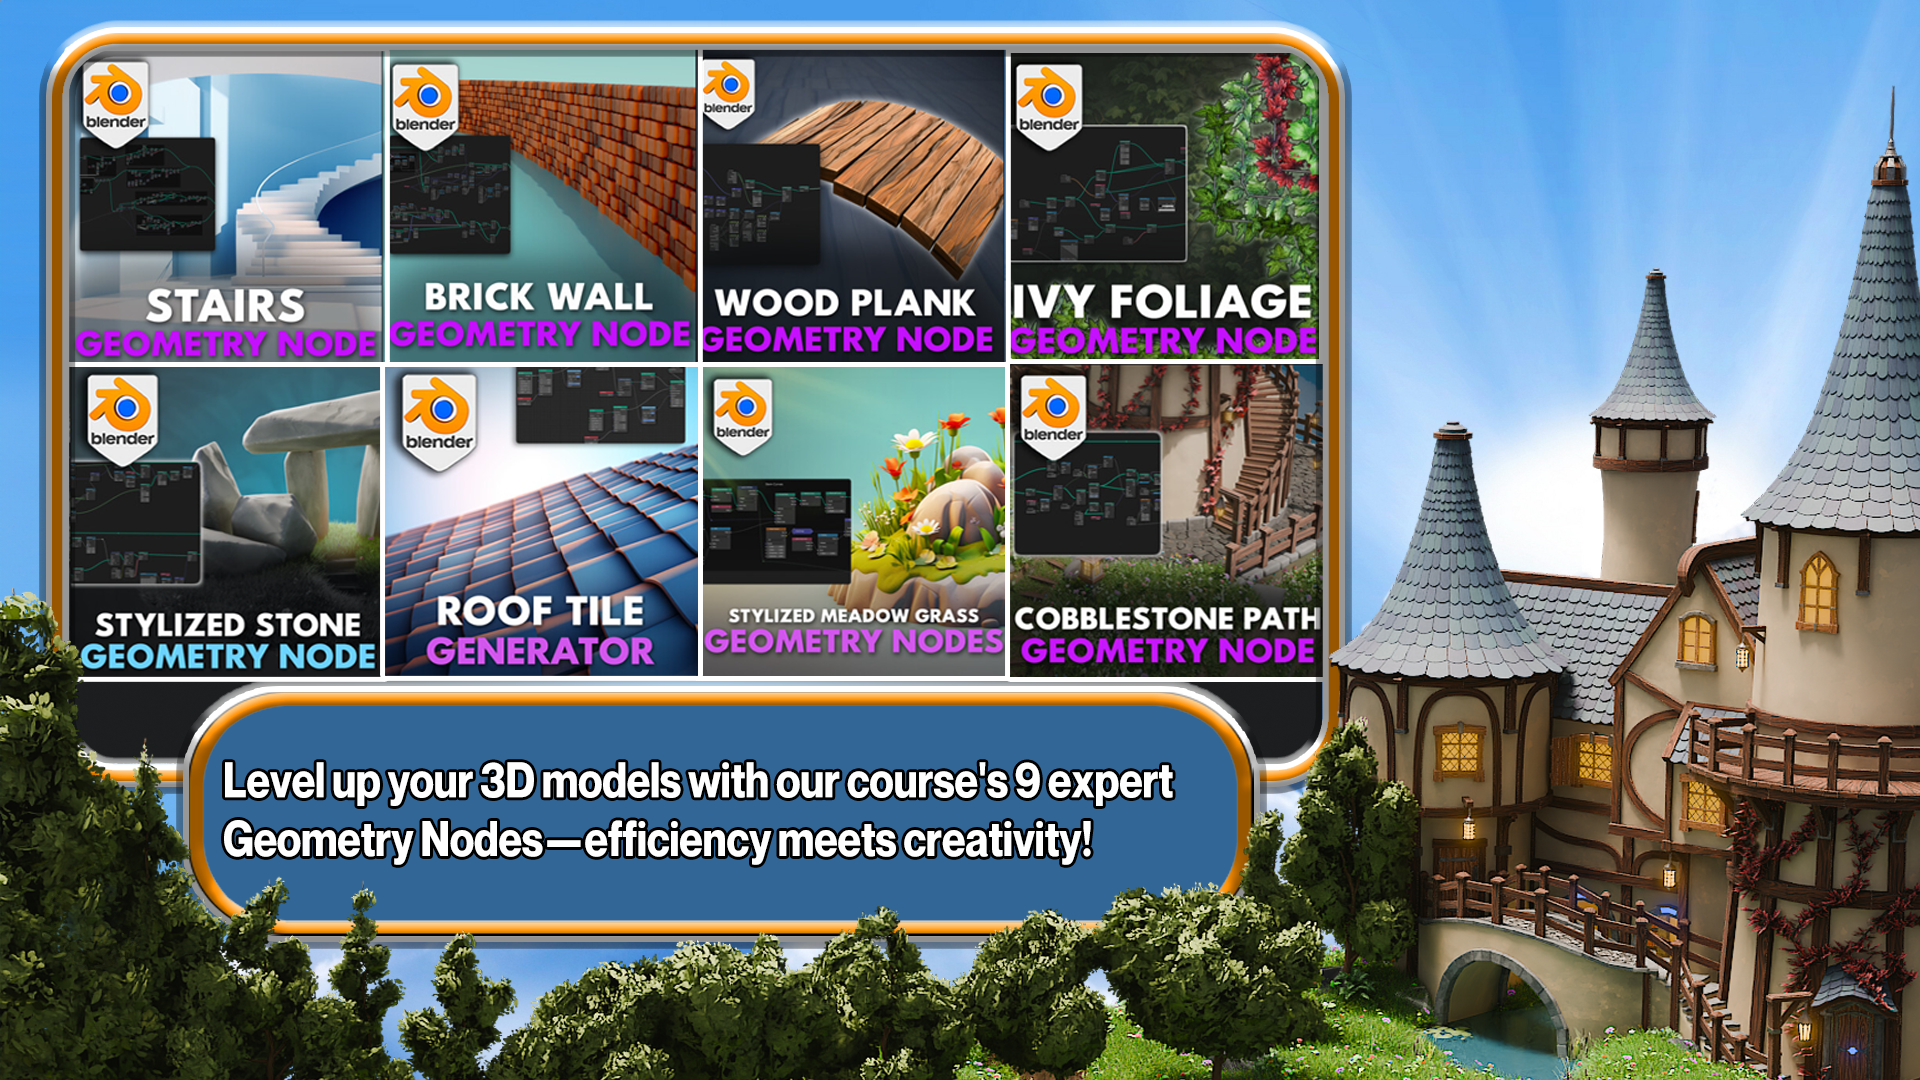
a complete resource pack with eight custom geometry nodes created here at three D Tudor, making tasks like roofs and stair building as
seamless as possible. Professionals
created these nodes for other professionals, which means they're
incredibly easy to use. And what's more,
you can use them in all of your future
personal projects. This will quite simply
revolutionize the way that you approach modeling and
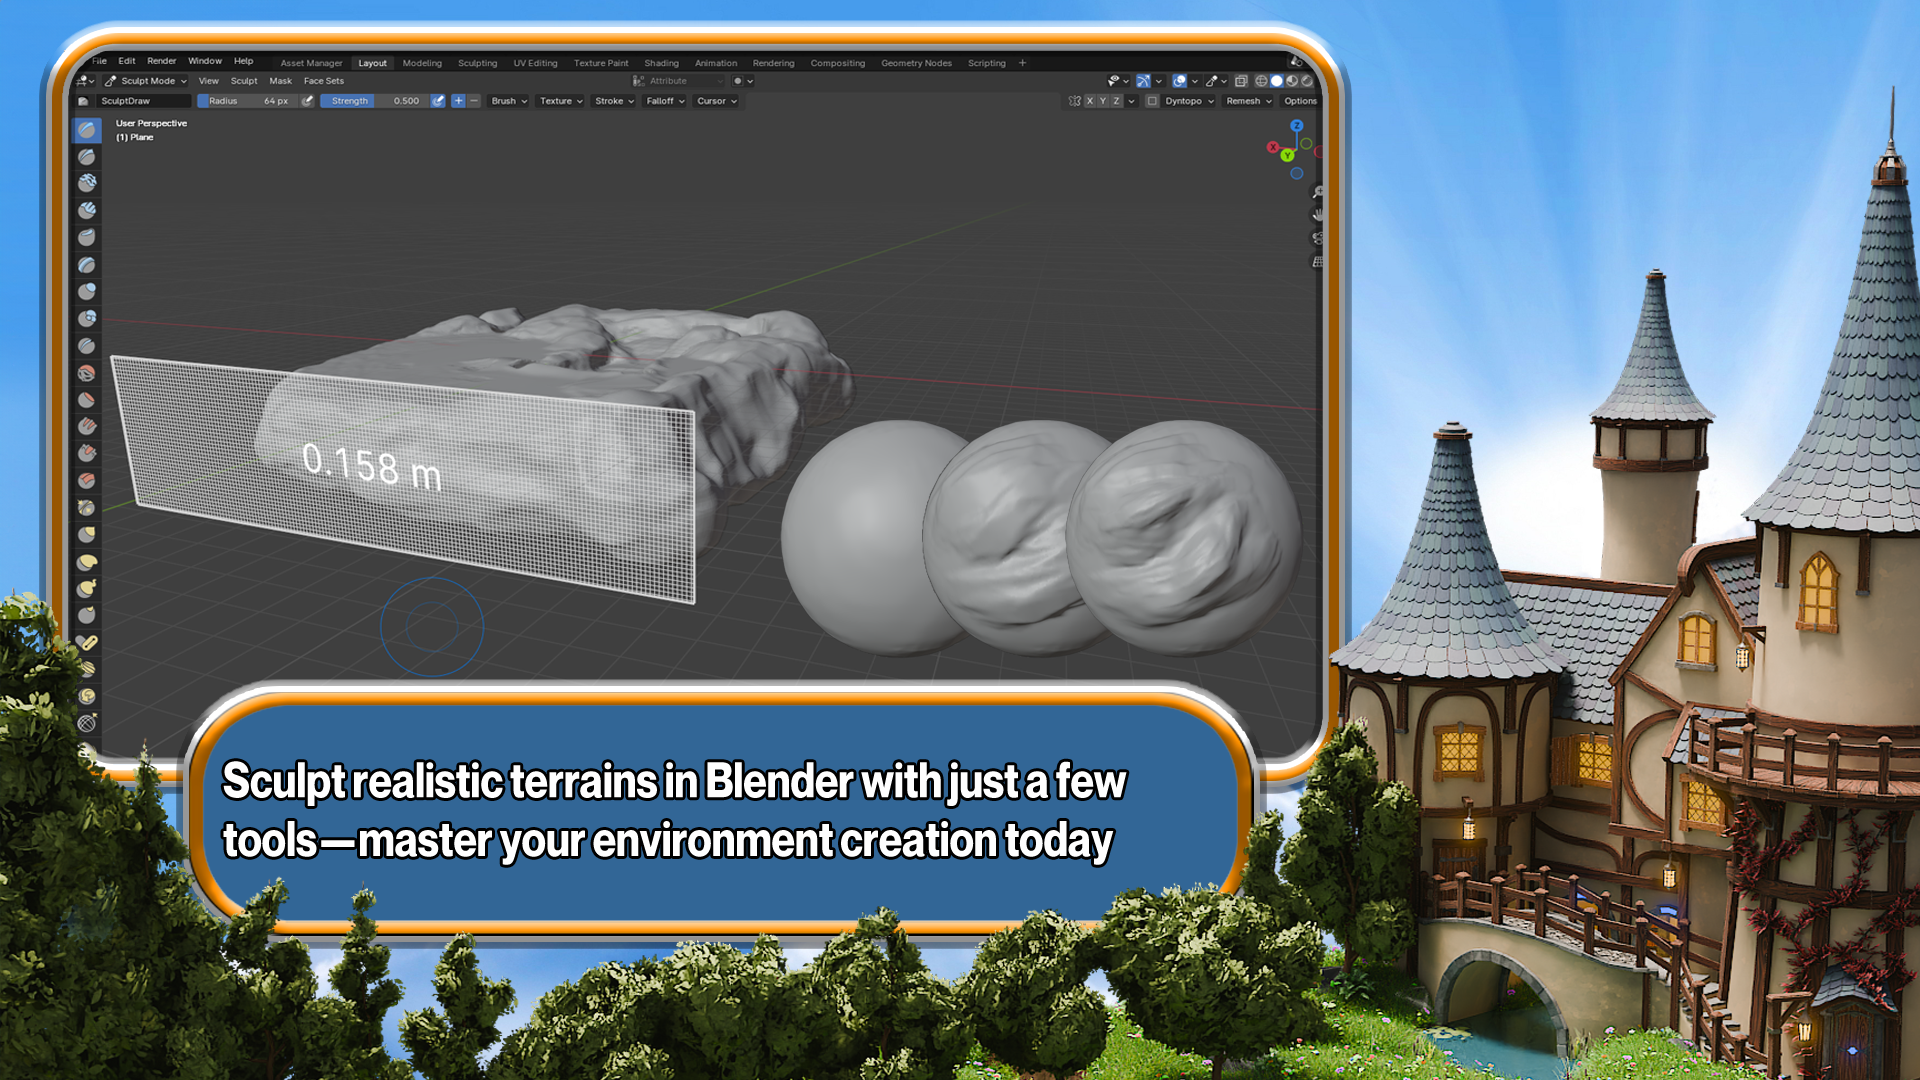
scenes in the future. Next, we'll be delving
into environment sculpting using blenders
robust sculpting tools. I'll show you how a few
brushes and techniques are all you need to craft stunning
rock and soil landscapes. Plus, the mystique of
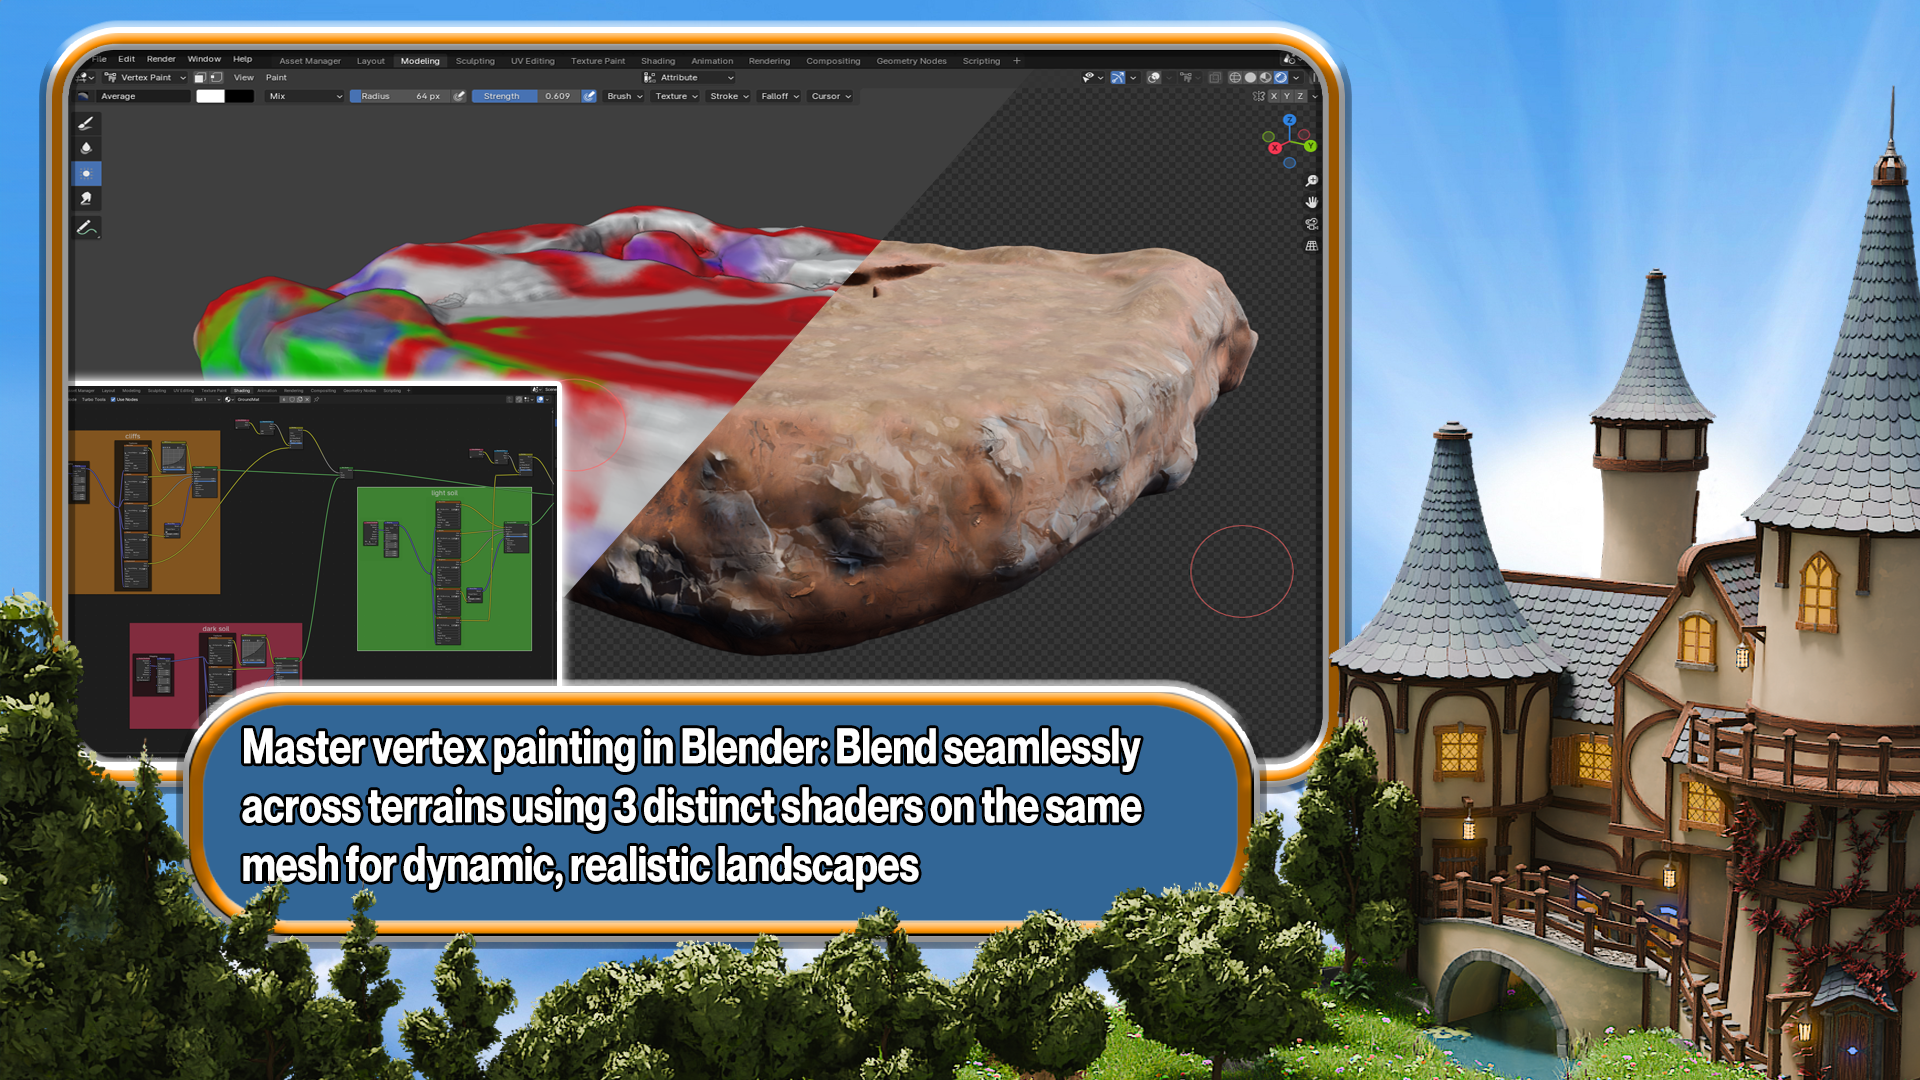
vertex painting will no longer be a mystery because
we also cover in this course, our full vertex shader setup. With this, you'll
learn how to blend terrain textures
directly and blender, creating intricate pathways
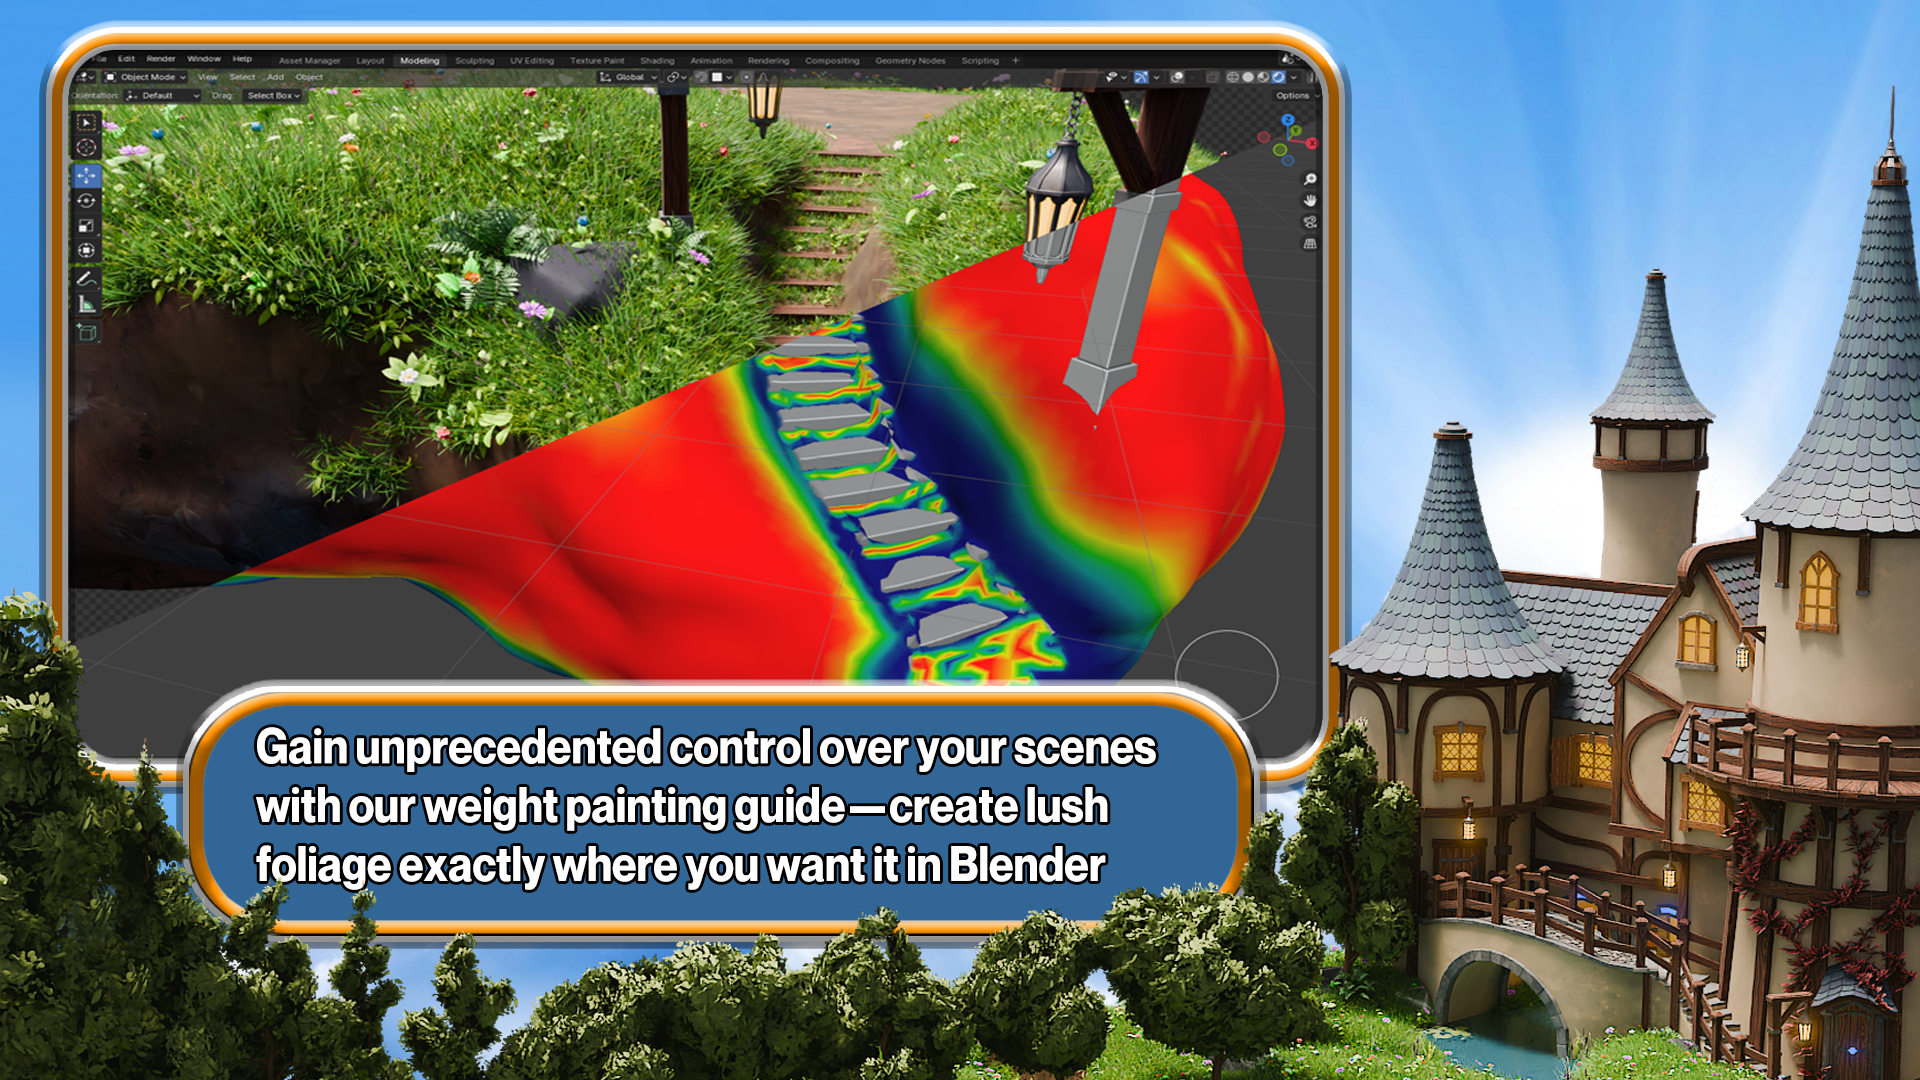
and rocky terrains. For those looking to add
vibrant life to their scenes, our introduction to weight
painting will teach you how to create lush meadows
and blooming flowers. You will learn how to pair geometry nodes with
weight painting, mean you'll never
be stuck again, creating beautiful scenes
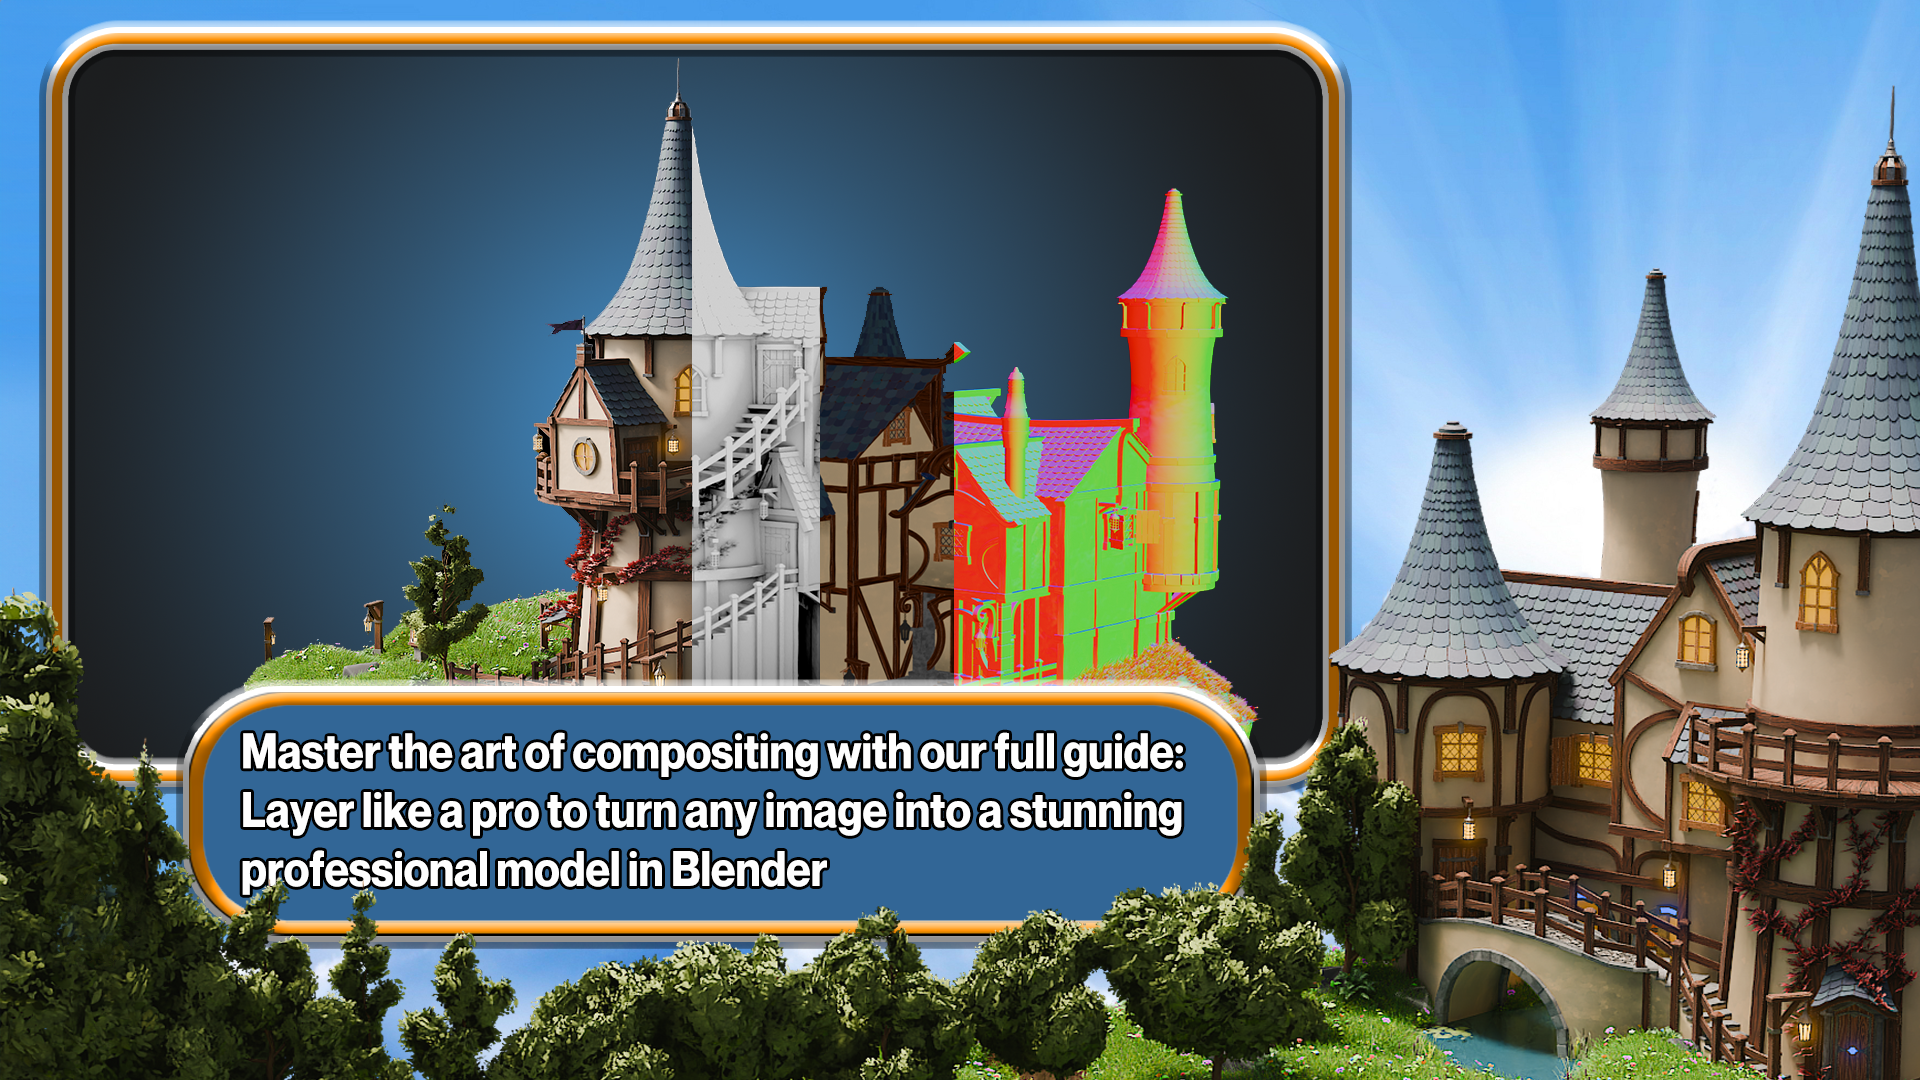
that really come to life. Lastly, the art of
compositing and rendering will take your
projects to that next level. Our complete compositing
guide covers everything from layering
scenes to mastering emission, and ambient occlusion setups. Not to mention effective
color grading techniques, which will add that final touch of atmosphere to your scenes. So if you're ready to
start your journey with me into the realm
of Blender four, then let's get started. Happy modeling,
everyone. Cheers.
2. Exploring Blender's Resource Pack and References: Welcome everyone to Blender four Modeling and Geometry
nodes workshop. And here you can see, I'm actually in the brand
new or this time, brand new Blender 4.1 better. But anything really over Blender three should be absolutely
fine for you to use. That is because we
have asset manager and all that great stuff that's come along with Blender three. There isn't much change
really from what we will be doing from Blender
three to Blender four. There are some intricate
details in there. But for the most part, you should be absolutely fine. I would recommend
though that you do download something above
blender four, if you can, because that is the newest
version with all of the new things that we're probably going to
be touching upon. Now, first of all,
let me show you what comes with
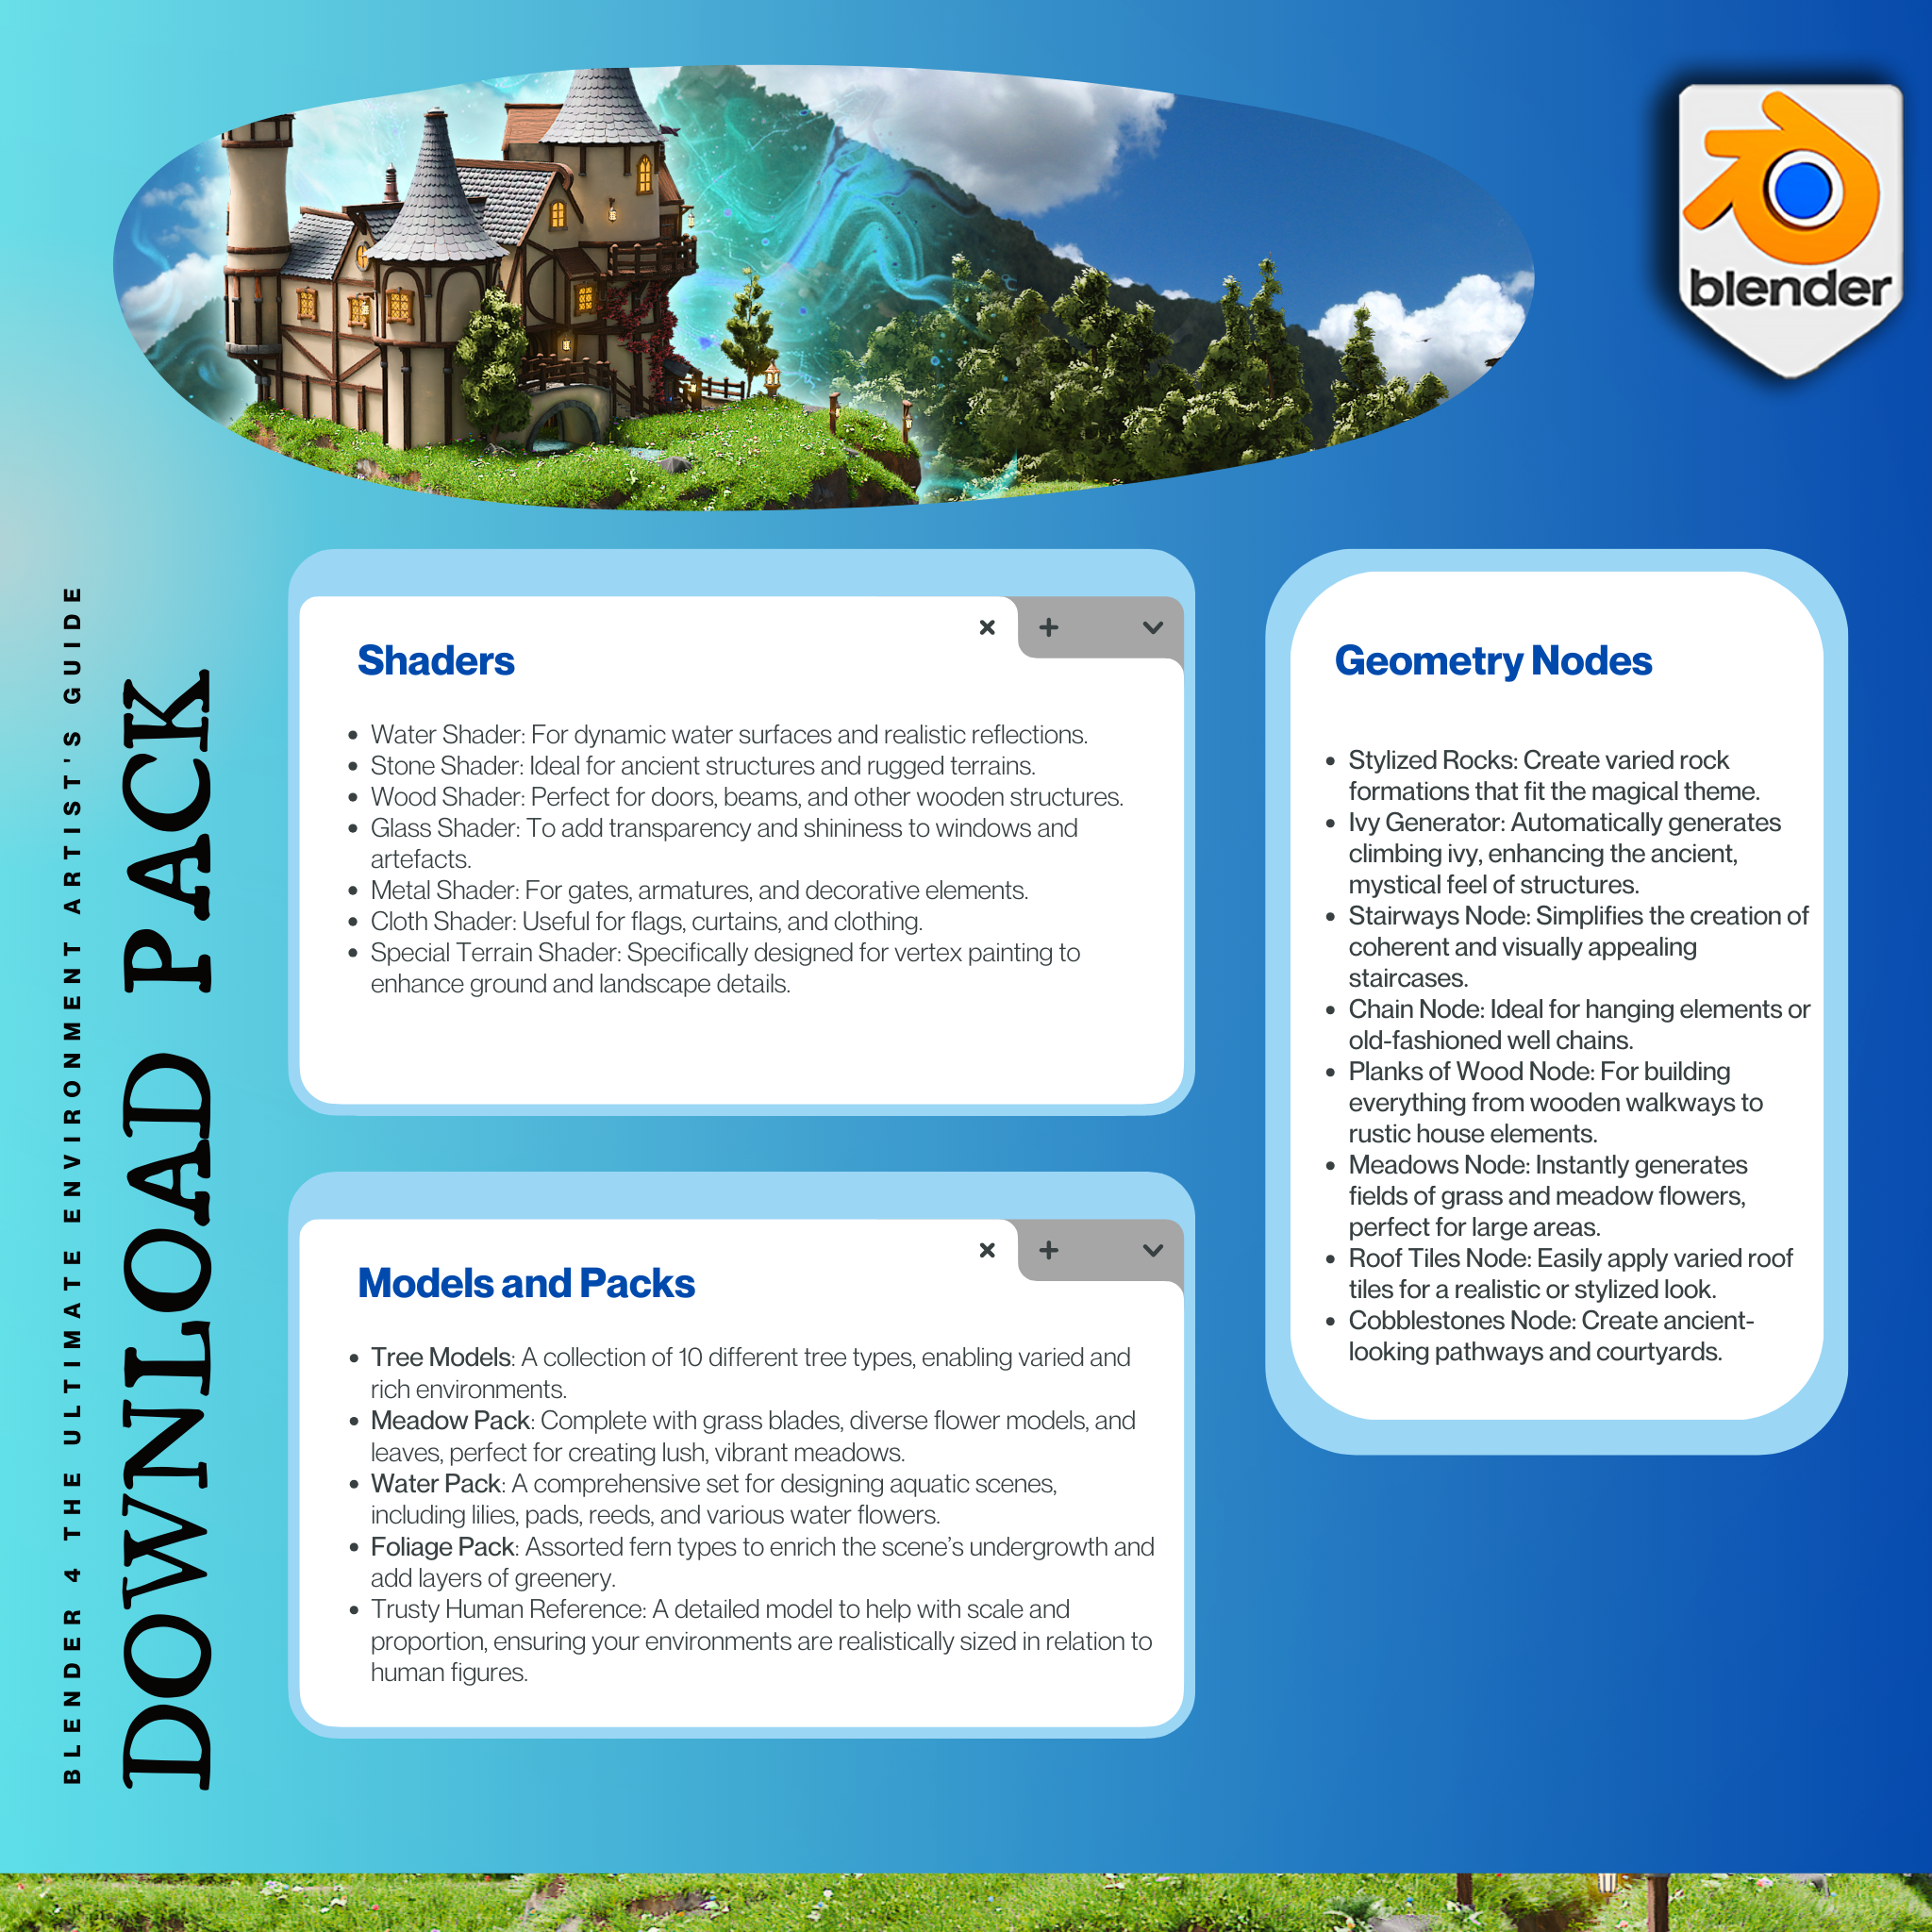
this actual cost. So that's the resource pack that you're going to download, and it's truly an
amazing resource pack. So let's go into that now. Okay. So when you
download the pack, you will receive
something like this. These three files. One of them is the composite
background. We're not going to worry
about that too much. All it is is a background that
we're going to put within our composite when we come
to render out our scene. Next of all, we've got our
doors and windows reference. I'm going to show you
that in just 1 second. And then you've got the
actual resource pack. So within this resource pack is all of the good
things like materials, and I'm going to show
you that as well. But first of all, let's take a look at the door and
windows reference. So what we've actually
done this time is we've actually created
a reference guide for all of our doors
and windows just so you can follow along
a little bit easier. And you can see they're
all laid out here. So when we come to create our doors, we'll be
telling you, okay, we're going to be
creating door three, and then we've got a reference
guide to actually use. And of course, it's up to
you if you want to tread off the beaten path and
create your own doors. But this is a good reference
to actually work too. Alright, next of all, then, we've got the actual
resource pack, which I'll show you now. So here we are in the
actual resource pack. And trust me guys, this has everything you're going to
need to create this scene. And you're also
going to learn how to use things like
geometry nodes, things like foliage that
you can pretty much either create yourself
or you can find on many, many places online, most of them or some of them
for absolutely free. So let's now actually
take a look at this. So the first thing
we've got is all of our materials that
we're going to be using. As we actually work
through the course, we will be going through
these materials, and we will be, you know, discussing how they're
actually together. Don't worry, you'll be learning
how to create materials, how to bring in texture maps and all that good stuff to make your models really,
really pop out. Next of all them,
we've got a tree. This is the tree that
we're going to use, but I've gave it so that you can have many variations of trees, and of course, I'm going to show you how to bring
all of these in. We've also then
got a meadow pack that comes with
this actual course. And you can see
in here, it's got a lot of flowers,
a lot of grass. And I'll talk about why we've got that in there
in just one moment. The same for the ivory leaves. We've got pretty much four different variations
of ivy leaves. And both the meadow and the actual leaves are going to be used within
our geometry nodes, which I'm going to
move on to soon. Next of all, then we've
got our water plants. So you can see from
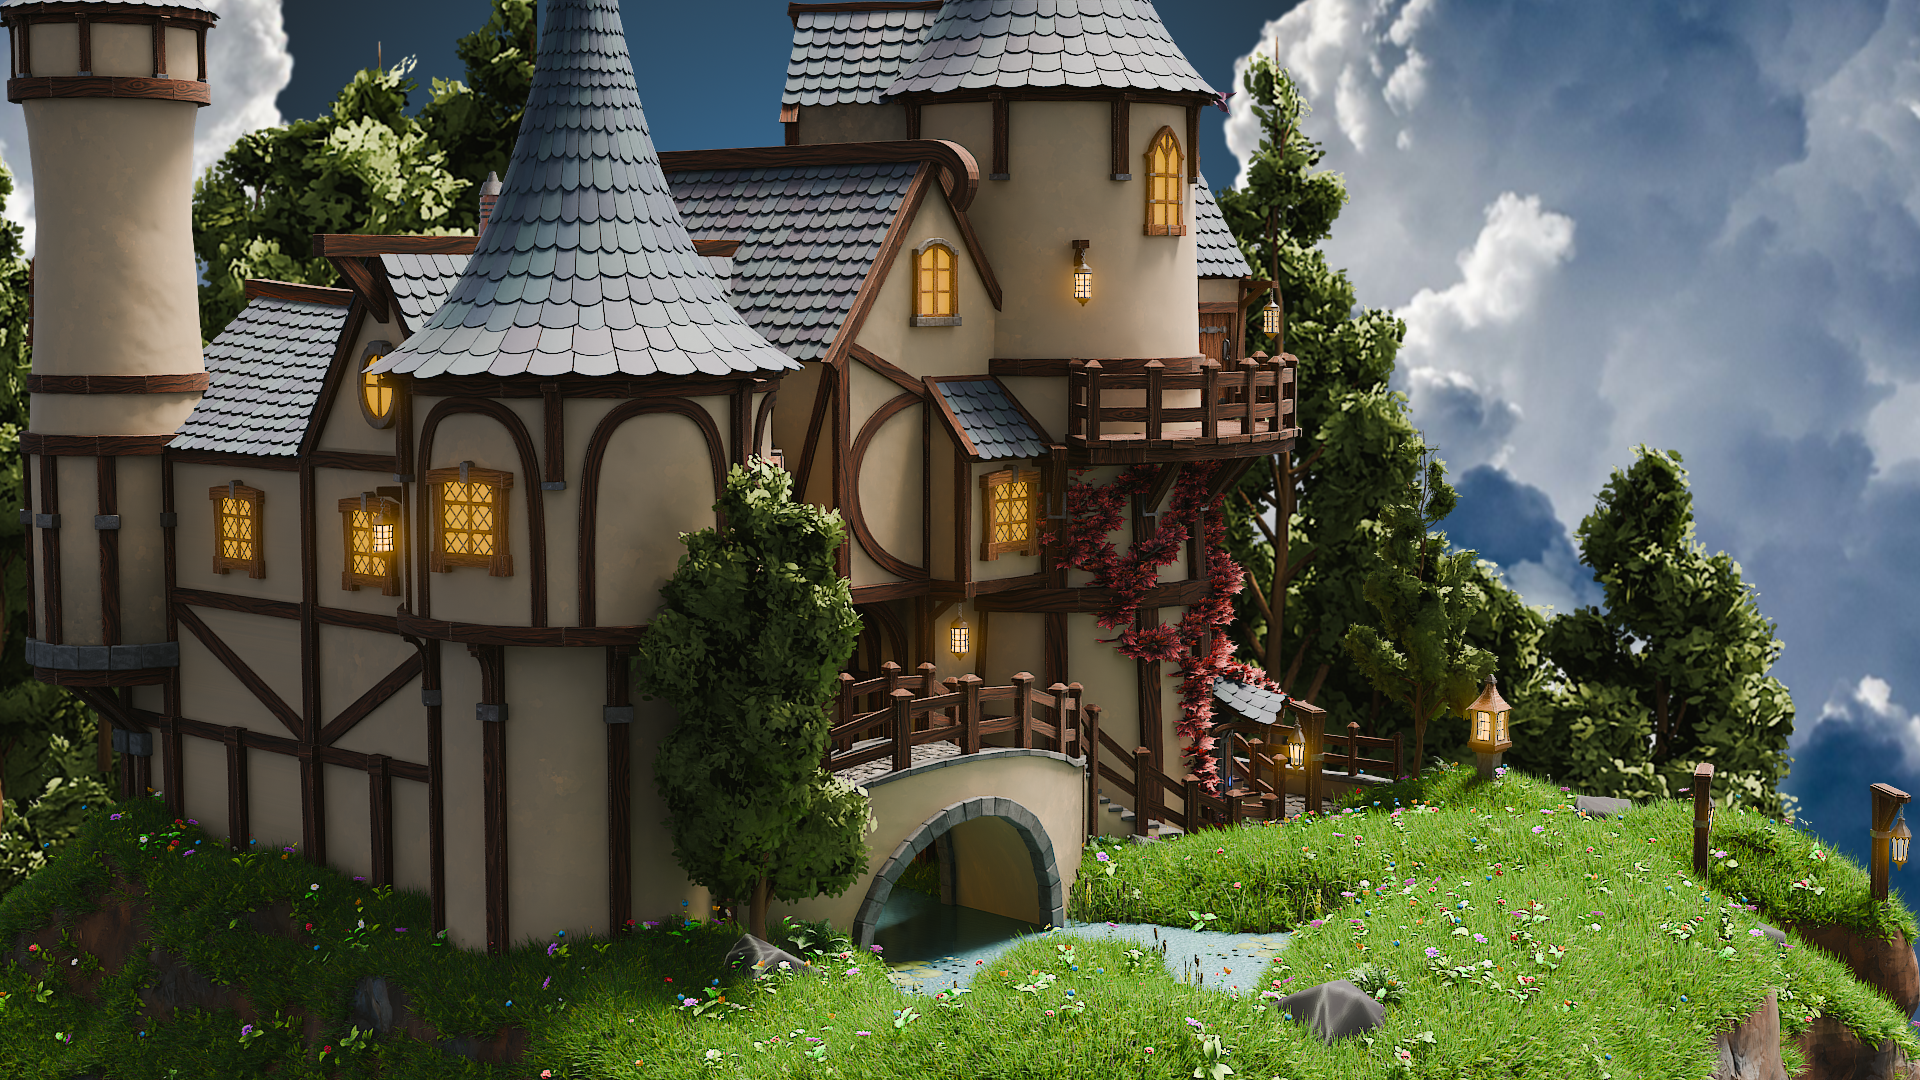
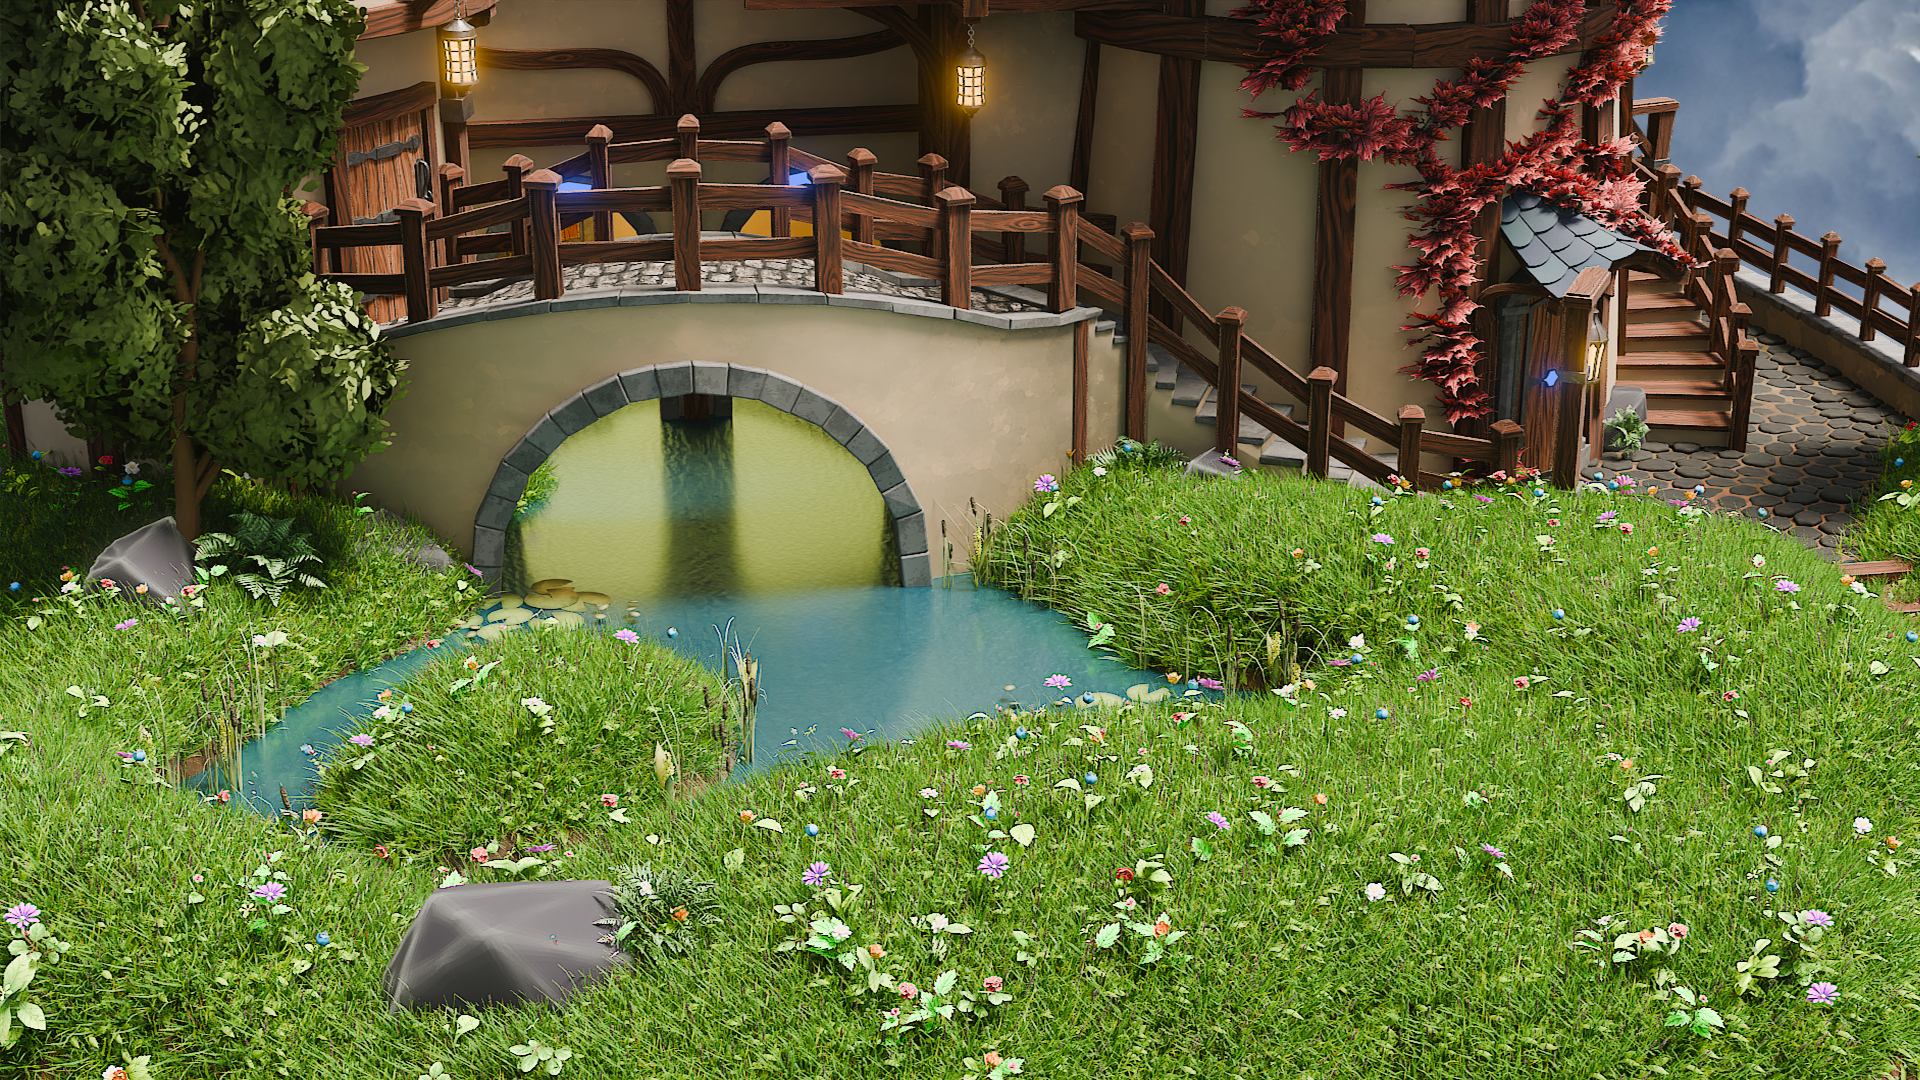
the actual reference of this course, the image, the main image of this course, that within our actual pond, we've got a lot of, you know, plants and really, really
bringing things to life. This really makes it easy
if you can grab packs or create your own of
foliage or plants. These are some that we've
actually created ourselves. And then you can just
bring them in to many, many different types
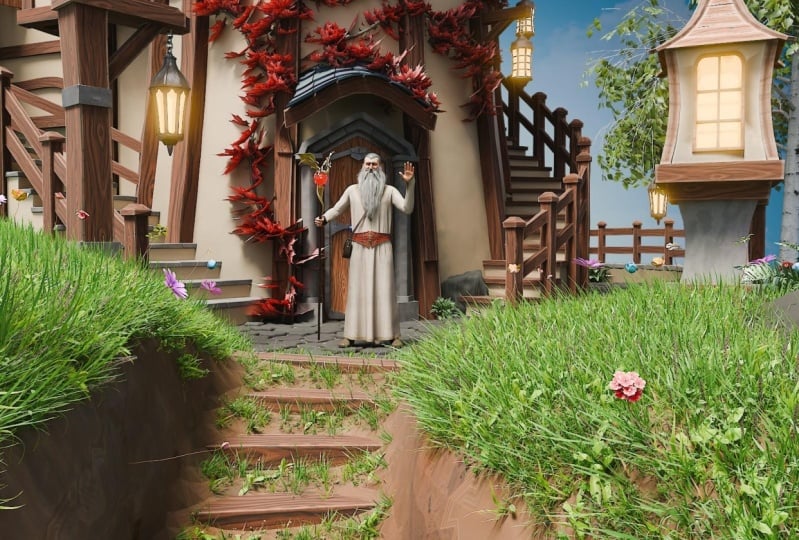
of environments. Next of all, then, we've got
our trusty human reference, which we always have at three D Tudor and this is just to make sure
that when we start, we start the right way and everything is built
to the proper scale. So we're going to start
things the right way, and you're going to learn
everything from the ground up to take you to that
professional level. Next of all, then,
We've got our foliage. Again, like the
actual water plants, it's a good idea if you can grab some foliage for free or
make your own foliage, and then you'll be able to bring that into your environments. Basically, the more
actual foliage and plants and trees and things like that you have
available to hand, the easier you're
going to find it to bring that
environment to life. Because what you'll find is the environment looks pretty stark, Even if it's highly, highly modeled, you know, model to a really high level. But if it's got no
plants and foliage and trees or vines
and things like that, it's going to really
look a little bit stock. So this is why we're
actually supplying you in the actual resource pack with all of these
things available. And from there, you can
actually build off of that. Now, it wouldn't be
geometry workshop without actually supplying you
with our geometry nodes. We're going to be
using these pretty much throughout the course, and these really are
going to help you not only realize how powerful
geometry nodes are, but also help you in creating a really,
really nice environment. So the ones here,
we've got our rocks. I'm going to show you as
we work through these, how to use these, how
we put them together. We're not actually going to
be building geometry nodes, but you're certainly going to learn how powerful they are, and now we've actually
put them together. You're also basically going
to get these for life. So basically in all of your
environments in the future, you are free to use these
non commercially, of course. Alright, so we've got our
rocks, we've got our chain. We've got our IV.
We've got our stairs. We've got planks here. We've got our meadow,
which we spoke about. So this meadow basically
works off of this pack here. We've got our IV, which is over here, and this
works off these leaves here. We've got our roof
tiles, and of course, we've got our brand new node, which is our cobbles. All of these then are
really going to help you not only create
this environment, this Wizard tower,
But in the future, you'll be able to use
these to create wells or just beautiful stylized
environments because all of these geometry nodes
are aimed at stylization, because that was what
we're focusing on today. But in the future, of course, we will be creating
a lot more realism within our geometry nodes. Now, for those of you, brand new to blender, on
the next lesson. What we're going to be doing is, we're going to be going through how to navigate around blender, as well as the basic modeling techniques because
that's something you're going to
need to know before doing actually anything. And for those of you who
already know all that, just skip ahead to
the next lesson, which will be our referencing
guide because it's really, really important before we start anything that we actually get tons of references to know what we're going
to be building. So in the future, you'll
have all of these, which I'll show you how to
point in your asset manager, you'll create a reference guide. And from there, you should be
able to build something at the same level as what we've
created here. A, everyone. So I hope you enjoyed this short introduction
to the resource pack, and I hope you can
see that you've got all the tools available to what you're going
to need to build this, and I'll see you
on the next one. Thanks, everyone. Cheers.
3. Mastering Blender's Viewport Navigation: Welcome back, everyone
to Blender Fall Modeling and Geometry Nodes workshop. And this isn't
where we left off, but this is where
we're going to start. So the first thing we
need to know is how to get around blender,
how to move around it. So what I'm going to do now
is going to pay you a short, well structured tutorial on
how to get around blender. And if you already
know all that, then just simply skip
to the next lesson. All right, everyone. I'll
see you on the next one. Thanks, cheers. Welcome everyone to the
basics of Blender navigation. Now, before we begin, it's
important to understand how the axises work
within Blender. So we can see at the moment, we've got a green
line going this way and a red line
going this way. This is called the y axis, and this one is
called the x axis. We also have one
that is the Z axis, which we can't see right now. It doesn't actually come in with Blender viewport as default. But if you want to
actually set it on, you just come up to the
top right hand side, where these two
interlocking balls are and just click the Z axis. And now we can
actually see that. So how do we actually move
around the blended viewport. There's a number of
ways of doing this. One of them is over on
the right hand side here. You can see if harbor over here, it's the zoom in and zoom out. I can actually left
click and move these up and down then to
zoom in and zoom out. Or I can use the actual
mouse to actually zoom in and zoom out using
the actual scroll wheel. There's also another thing
you can do with Zoom, which is holding control shift and pressing the middle mouse, and you'll see you have
a lot more control over zooming in and zooming out. Now, the next thing you
want to discuss is actually rotating around an object.
So how to do that? First of all, we'll bring
in a cube with shift A, bring in a cube. Now, if I press the
middle mouse button and move my mouse left to right, you can see we can
actually rotate around. Unfortunately, though,
we're not actually rotating around this cube. So to actually fix that, we need to center our view
onto the actual cube. We basically want to focus our view onto this actual cube. So to do that, we're
just going to press the little dot b on
the actual number pad, and then you'll see that we
actually zoom in to the cube. Now, if I scroll my
mouse wheel out, you will see now if I hold the middle mouse boron
and turn left and right, we're actually rotating
then around the cube. And this is important because if actually bring in another cube, so I duplicate this
cube with shift D, Move it over, so bring
in my move Gizmo. And now you'll see if I
rotate around this cube, I'm not rotating
around this one. So that's fixed side,
just press the double. Again, zoom out, and now I can actually rotate around
this cube as well. Now let's look at
something called panning, which means that we're actually going to move left and right, and we do this by holding the Shift button, holding
the middle mouse, and then we can actually
scroll left and right around our
actual viewport. So now we've actually
discovered how to zoom in and the different
ways we can actually do that. How to rotate around an object
and how to actually pan. We can also come up to
the top right hand side here and use these
buttons see it. So again, remember, we're
looking at the y axis, the x axis, and the Z axis. If we come to our y
axis and click that on, you will see now that you've got a front view of the y axis. If you click the x axis, then we can change it
to that red x axis, and finally, the Z axis as well. Now, there are
other ways as well that we can actually look
around the viewport, and these involve using
the actual number pad. So if I press one
on the number pad, it's going to tap me into
that y axis or front view. If I press two, it's going to actually rotate
that slightly. And if I press two again, it's going to rotate
it slightly more. Now, if I press
the eight, it will rotate it the other way as well. Now, to go into the side
view or the x axis, we can also press three
on the number pad, and that will give
us that effect. We can also press seven to
go over the top as well. Now, what about if we actually want to go to the opposite? So instead of going from
the bird side view, we want to come to the
underside of our model. Well, that's actually
quite easy as well. All you need to do is
press control seven, and that then will take you to the bottom view of
our actual model. We can also do the
same inside view and on the x axis and y axis. So, for instance,
if I press one, I'm going to be going
into the y axis. If I press Control one, I'm going to be going into the opposite side on
the actual y axis. Now, you can also find
these options just in case you forget the top left
hand side of it under view. So if I go down to view
and go across to viewport, you can see here that this actually tells me exactly what I need to press to
get the viewpoint that I've just
actually explained. Now, we also have the button on the number pad, which
is number five. And number five button
in Blender toggles between perspective and
orthographic views. Perspective view offers a more natural and
realistic viewpoint with objects appearing
smaller as they get further away, mimicking
human vision. Orthographic view removes
perspective distortion, making all objects appear
at their true size regardless of distance useful for precision modeling
and technical work. The other thing that number
five does, for instance, if I come to my cube, at the moment, I am able to
actually zoom into the cube. However, if I press number five, I will not be able to
actually zoom into this cube no matter
how far I zoom in. I'll still be able
to move around it by pressing the little
dot button, like so. But if I actually
want to actually work on the inside of an object, I can quickly press number five, and then I can
actually go in and work around the inside as well. Now, if you're
working on a laptop or something like
that or a table, and it doesn't actually
have a number pad. You can also use
if I press five, the actual squiggle key, which is under the escape board on the left hand side
of your keyboard, and that then will
give you pretty much the same options
as we had before. So we can click the right view. We can actually
click the back view, And we can click the left view, for instance, the opposite
to what we had before. So instead of pressing
one and three, we just press the
little squiggle line, and then we can actually view
whichever side we need to. Now, we're nearly at the end
of this short introduction. There are a couple more things
that you can actually do. If you come over to
the right hand side and you see here where we've actually got the name of the actual parts
within our scene, we can also grab them from here and then press the little
dot born to zoom in. So I can grab this one, press a little dot dot born and
that then we Zoom s in. The other great thing
about this is we can also come in, shift
select them both. Press the little dot button
and then we're able to actually rotate around
both of these cubes. All right, everyone,
so I hope you enjoyed the short introduction to the
navigation within Blender, and I hope from now on, it won't be a
struggle navigating around the viewport.
Thanks a lot, everyone. Cheers.
4. Fundamentals of 3D Modeling in Blender: Welcome back, everyone
to Blender four modeling and geometry Nodes workshop, and this is where
we left it off. Absolutely nowhere because we
haven't done anything yet. But before we move
on to the next part, what we need to know now is a few things about the basics
of modeling within Blender, because what we're going
to be doing soon is creating the gray box
for our Wizards Tower. I would say that stay
and watch this short, well structured
tutorial on the basics. But if you really do
know enough by now, then of course, skip
on to the next lesson. All right, everyone, so
I hope you enjoyed that, and I'll see on the
next one. Thanks a lot. Bye bye. Welcome everyone to the basics of
modeling in blender. And this is a short
introduction just to get you started on a few of the
basics in modeling. So the first thing I want to
do is bring in a primitive. So the way that we're
going to bring into primitive is press shift and A, and then what we're going
to do is open up a menu. And you can see that
we've got all of these things along this
actual primitive menu. But the one we want to focus
on is the actual mesh. And from here, you can
see we can bring in many, many things like cylinders, cubes, planes, and the
one we want to bring in just for now is
going to be our cube. Now that we've brought our cube, the next thing I want to discuss
is object and edit mode. And you can see at the moment, over on the left hand side, we're actually in something
called object mode. And this means basically, we can manipulate
this whole object. So if I press G, I can actually move it around
my viewport like so. If I press S, the scale, I can actually scale the
whole of the object in. But the thing is we
don't really want to work in object mode necessarily, and a lot of the time, we're actually going to be
working in edit mode. So we can come up to
the top left hand side and put this in edit mode, or we can actually press the tabbton and jump
into edit mode that way. You will notice once we've
actually gone into Edit mode, we have a lot more
options to use, and more importantly,
we have a lot of the topology now to
play around with. So the first thing you'll notice the difference being is that we have now these three options up to the top left hand side. And if you have over them, it will say vertex
edges and faces. Now, vertex is going to be
these little points here. The edges is going to be these edges of my cubes
or any of the edges. And finally, we've
got the faces, which is actually the
whole polygon face. Now, you can also instead
of clicking on these, press one on the keyboard, and that them will jump
you into vertex select. If you press two, you
can go into edges, and three is going to
take you into faces. And from here, we can actually manipulate any of these parts. So you will notice
at the moment, I've got gizmo here. Now, if you don't have
the Gizmo available, coming over to the
left hand side, and you have this
little born here that says move or you can press Shift space bar and bring in your move tool like so. So now, because I'm on faces, I can actually pull
out this face like so. If I go to edges, I
can actually grab one of the edges and pull
this out like so. And if we're on vertexes, I can grab this vertex or grab the second vertex
with Shift select, and then pull this out like so. Really, really easy to actually
manipulate things once you know how to select
each of these parts. Now, before we go too
much in the weeds with actually modeling in
this actual edit mode, let's just jump back into
object mode for now. What I want to show
you is how we can actually move this
actual cube around. So, as well as moving it
with the actual gizmo here, we can also press G and actually free move
this object around, or we can press G, and y two, let's put it along
the y axis, move it around, or the x axis, for instance, and move it this
way, or even the dead axis and move
it up and down. To drop it back
where we started, let's just right click like so. So that's actually moving the location of it's
not a cube anymore, but let's just say it's a cube. We can also scale this
in as well with the S b, so we can scale it in or
scale it out like so. Now we can also press the S bon, hold the shift button, and then we have a lot more
finesse on actual scale. We can also scale this up by
let's say a factor of two, so S, two, enter,
and there we go. And of course, we can scale
it down pretty small as well. Now, the next thing I want
to discuss is rotating because if we rotate it with
r and just rotate it around, we haven't got a lot of
control over how this rotates. So what I want to do instead is, I always want to press R, then attach it to an axis, which might be the white, so the green one, and then
rotate it either by freehand, or by actually inputting the
value on our number pad. So if I want to
rotate it, let's say, by nine zero degrees, press the ends born and now rotated this round
by 90 degrees. Now, if I want to
rotate it back, I can press y, the little minus borne
on the number pad, 90, and then we can
rotate it back. Now, there is something
else that you need to know, We also want to reset
our transformations, and this is one of the most important things within Blender, because if you don't reset
your transformations, Blender still
considers this a cube, even though it's not
really a cube anymore. So what we want to do to
reset the transformations is press control, A,
all transforms, and then you'll notice
that the orientation has moved over here because it will always move to the
center of the world. From there, then we
want to actually reset orientation as well. So we want to right click, set origin to geometry, and then it's going to
put the origin right back in the center
of this object. Now, it's also important
to know resetting the transformations will also impact things like UV mapping,
things like modifiers. Basically, if you ever
have a problem in blender, always make sure that you
reset the transformations, and then most of those problems
will definitely go away. Alright, the next thing about resetting our
transformations, it makes it really
easy then to get something back to how
we add it before. In other words, if I press
S and scale this down, And then let's press r and Z and rotate it round this way. Because before this, I
actually reset my rotations, what I can now do is
press alternS and put it back to the scale that it was before I did anything, and then alter R and actually reset that rotation as well. So really, really handy, once you've actually reset your transformations in
what you can actually do. Now, moving on,
we're actually going to be looking now
at duplication. So if I come round here, I'm able to actually
duplicate this. If I press Shift D and
then press the enter born, It's now a duplication, and I can move this over
to the right hand side. So now we have
actually two objects. Now, what if you want these two objects actually combined, and you didn't mean to actually duplicate it in object mode, for instance. Well, that's easy. We can just shift
select the other one and press Control J, and now they both actually
join together, as you can see. So if I press tab now, we're able to come
in and actually work on them both
at the same time. Now, what happens if we want
to actually split them off, so we don't want the objects
to actually be together? That's also easy. Just make sure that you select
one of them first. And then all you're
going to do is press L, just to select everything. So all of these faces, then you're going
to press P. Come down to the way it
says selection, and nine if I press tab, they're both actually split off. Of course, using
the same command, if I press tab, I can
actually come in, grab a face, for instance, press Shift D. I
can actually also duplicate things with
inside edit mode as well. So we might want to duplicate
all three of these. Shift D. I can actually come in then and actually
duplicate them like so. What it also means,
though, is that these, when you duplicate
them in edit mode will be part of the
same object, of course, because in edit mode, they're not actually
claster as an object, they're classed as
the same actual part. Now, for the next
part, I'm going to bring in a brand new cube, and I'm just going
to show you some of the basic modeling
techniques within blender and go through
a few of the options. So here we have a
brand new cube. And the first one
I'm going to show you is if we come
into Edit mode, we'll always be working in edit mode to show you these things. Just make sure
you're in edit mode. I'm going to grab the top phase. And what I'm going
to do is press, and that then is going
to extrude this out. Now, sometimes you will need
to extrude something out, and it will need to be
along a axis, for instance. So all I'm going to do is go
to Egelch, grab this edge, and then what I'm
going to do is press, and you can see because
it's not tied to an axis, it's floating around everywhere. However, if I press the x born, you can see now it extrudes out following along
that actual axis, which then makes it really, really easy to manipulate it where I actually
need it to go. The next one we're
going to look at is something called beveling. And then all I need
to do is come in, and I'm going to grab my edge. So I'm going to press
two on the keyboard, grab an edge like
so, and then I'm just going to press
control B like so. And you'll notice now it's actually beveled off that side. You'll also notice down on
the left hand side here. We have something called
an operator panel. It will be close. Just open it up, and from here then with the actual bevel, we're able then to
turn the bevels down, for instance, turn them up, move how the shape of the actual bevel is going to be and all that
other good stuff. Now, pretty much
anything you do in Blender is going to give you
an operator panel like this. We're not going to go
too much into this, but basically the
moment that you press tab button to
come out of edit mode, this is going to disappear, and then you locked in
with the actual shape that you've chosen or the
insert or the extrusion. So just bear that in mind. So the moment I press tab
that actually disappears. Now, what about if
we want to bevel off vertices and not edges. So, for instance, if I come to a vertice like this
and vertice like this, press control B, you'll see
that it levels off like this. But if I come to one that are the
opposites of each other, press control B, you'll see
nothing actually happens. However, if I press
control shift and B, then we're actually
able to bevel off the actual vertices like so. So that's another handy
tip for actually beveling. Now, the next modeling
technique we want to discuss is
actually edge loops. So how do we get more
geometry onto this? So, for instance, I want to
bring some edges on here. I can press control, and that then will bring me
one edge in here. If I left click then, you can see that I can put this either this side or this side. But let's say I want it
right in the center. I'm just going to right
click on the mouse, and that then is going to
put it right in the center. Now, the other
thing I can do with the operator panel
again is then come in and turn all of these up to give me
more actual edge loops, and I can even move
them to the left. And the right. Now, I can also, if I press control,
come in, press control. I can actually scroll up on the mouse wheel to give me as many edge loops
as I actually want. Or if I want a little
bit more finesse, I can actually type it out
on the actual number part. So I can type out
120, for instance, and a 120 edge loops. To cancel at any time, just
press the escape board, and then that will
cancel it out. Now, the next modeling
technique I wants to show you requires two actual blocks
or two cubes like this. And all I'm going to do
is, I'm going to come in, and I'm going to select
opposing faces like so. And then I want to actually join these together,
for instance. So all I'm going to do,
I've selected them both. I'm going to right
click and come down to what it
says bridge faces. And now you can see I can
actually join those together. Now, if fire press controls that and just go back a minute, you can also do
this by coming in, and let's say grabbing
this edge, And this edge, and what I'm going
to do instead is, I'm going to press
the F born like so, and come down to
the bottom as well, and then grab both of these
and press the F born like so. Sometimes bridge will
not work because Bridge has to work with two edges
and nothing in between. In other words, nothing
selected there. If I come into this
one now and try right click and come down to what
it says Bridge edge loops, you will see select at
least two edge loops. So we can't actually
join it from there, and that is when
it's a good idea to use the F borne instead. And now, the final
modeling technique that I actually want to show you
is something called insert. What I'm going to do is I'm
going to grab this face here. I'm going to press the
iborne and then you can see you can actually
insert this face in. And from there, you can actually extrude it out if you want to. You can also then
press Control B and bevel it off if you want to. And you can see now
it's really easy to use all of those techniques that have actually showed you. Now, lastly, the
last thing I want to show you is the insert again. But this time,
we're going to grab this base and this base, and if I press,
it's true you can actually insert them
both at the same time. Now, the best thing
though about insert is if I press the i and
then press again, we can actually insert them separately from
each other like so. Now, I see a lot of
renders on Facebook and other social media that kind of look really,
really blocky. And for instance, if I press tab now and going
into object mode, you will see this actually
looks pretty blocky. But there's a real
easy fix for this, so it doesn't actually
have to look like that. All you need to
do is once you've actually finished, right click, come up and where it
says, shade auto smooth, and that then will shade it off based on the actual angle. So really, really easy
to either shade flat, shade completely smooth like so, or shade Auto smooth like so. If you actually are struggling
and you actually want it to shady it a little bit
smoother than what it is, you can come over
to the right side where this little triangle is. Go down and open up the
normal, and from there, you can actually increase
this and shade it even more smooth based
on a higher angle. The default is always set to 30. Just make sure you say it to 30 in case you
actually overdo it. Now, the last thing I
want to show you in this introduction is the actual cursor because
I think it's very, very important to
actually modeling. So what I'm going to
do with the man is, I'm going to make another
cube with Shift D, and then I want this cube on top of this
que, for instance. Now, if I move my
cursor over here, so shift right click, and then what I can do is I
can press Shift desk and I'm going to go selection
to cursor, keep offset, and that then is going to move the exact center of this cube or the orientation to
my actual cursor. Now, how would I get this
then on top of this cube? I would literally
grab this cube. I would first of all right click and set the origin to geometry, just to make sure that origin
is right in the center. So I would then press Shift D, cursor to selected, and that then is going to put my
cursor right in the center. And then I would grab this cube. And from there, I'm able to go Shift D, selections cursor, keep offset, and now that cube is right next to this
actual cube here. From here then, I can
actually bring this up, and let's actually
just have a quick play around of everything
that we've learned. So you can see now
if I pull this up, I'm going to join them both
together then with Control J. And then the first thing
I'm going to do is come in, grab this face, and this face. I'm going to right
click then I'm going to come down
to bridge faces. And then we're going to
bring in some edge loops. So let's bring in two
or three edge loops. Left click, right click. And then what I'm going
to do is I'm going to press Alt Shift and
click just to select all of this edge
going around here and press the Sporne and
pull it out like so. From there, then, what
I'm going to do is I'm going to level off
both of these tops. So I'm going to grab this top, shifts like this top. I'm going to press control B and actually level
them off, like so. From there, then, I'm going
to bring in an insert, so I'm going to grab
the front top here. I'm going to insert this with
the eye button, like so. And then from there, I'm
actually going to extrude out. So I'm going to extrude
this out like so. Now, let's say I want a
bigger piece on the next bit. I'm going to press
Shift B. Pull it out, so this is a duplicate
of this face. I'm going to press the S bond to make it a little bit bigger, and then I'm going to press and pull that out along that axis. Finally, then what
I'm going to do is grab this one and this one. I'm going to right click Ben
and bridge faces like so. And you can see just
how easy this really is now to actually start
building out some really, really complex models with everything that
you've just learned. All right, everyone, so
I hope you enjoyed that, and I'll see on the
next one, cheers.
5. Utilizing References for Accurate Modeling: Welcome back, everyone to blend the four Modeling and
geometry nodes workshop, and this is where
we left it off. Thereabouts. We haven't
really done anything yet, but we're going to get
there, guys. Don't worry. So we left it off here. But what I'm going to show you is whenever we start project, we always always grab loads
and loads of references. Hundreds of references. This is just a short
snapshot of me actually putting together some references for what I'm going
to build here. When I'm finished, though,
I'm going to have, you know, over 100 references, everything from lights,
everything from towers, everything I can possibly
lay my hands on. Even going so far as to put
on some background music, which really gets me, you know, in that
fantasy type space where I'm going to be building something like this
Wizards Tower. So even going that
far just to get me in the zone of what I'm
actually going to be building. Now, what I'm going
to do now is play you our well structured
referencing guide, which is going to
teach you basically how to grab all of
your references, how to put them together, what's the best software to use
and all of that good stuff. So please watch this, and I'll see you
on the next list and everyone. Thanks
a lot, cheers. Welcome everyone to our in
depth referencing guide, and it's very important that we actually
use references in pretty much any kind of modeling or environments that we're
actually going to be work on. So before we actually
do anything, before we put any cubes
down or anything like that, it's really important
that we have some really, really decent references
to actually work with. So the first thing I want to recommend is that you can use something to actually
put all your references on like photoshop or even word. But what I'm going to
recommend is that you use something called pure So
if you go to the site, that's called puref.com, you
will actually open this. And from there, you can
actually click Get PureRv and that then will take you
to this download screen. And you will see at the moment, you've got 15 seven
or custom amount. You can actually put this on zero and actually
get this for free. So it's completely free, and you can come back and
make a donation if you like. And then all you need to
do is click download. So the only things
we're going to talk about pretty much for
reference in here, are going to be free except
our mid journey part, but there are other alternatives
like Dare and a load of others out there that you can use instead of mid journey. Once you open up Pura then, this is what you will be
greeted by this screen. And if you want to right click, you can actually drag
this around to any of your screens or you can actually make it
smaller, like so. And it's a really,
really good program, this, really, really handy, highly recommend getting this. So now, let's actually think about getting our references, and there are a few
sources that we use to actually grab
references from. But generally, what you
want to do is you want to build up a kind of
reference pack if you're going to be
a hobbyist or a professional in three D
modeling or environments, where you're going
to see things, perhaps on Pinterest
or sketch up, and actually, you want
to save them in a file. So I know people with
thousands and thousands of images that they've
saved over the years. And whenever they're
coming two a project, they'll then dive in
and actually find all of the images that they've
got on that particular thing, this could be a samurai
warrior or a Chinese bell. Also, a lot of people
I know as well who are working professionally at
this will go around museums. They'll take their
own actual images, and then they'll also upload
those to the file as well. So the first point of call,
if you've not actually got your own database yet is probably going to
be actually Google. So let's open up Google, and you can see here
that at the moment I'm looking for a Victorian
delivery truck. Now what I'm going to do is,
I'm just going to go through these and get some nice
references like this one, for instance, and then
I'm simply going to right click and I'm
going to copy image. Then what I'm going
to do is I'm going to go over to Puff, so I'm just going
to open it back up, press Control V, You'll see now that I've got my
nice image in here. What we're also able to
do with purevs we're able to also pull it out and
make it bigger if needed, which is really, really
handy when we're putting in lots and lots
of actual images. Now, the next thing
I recommend you do once you've actually
got an image in there, here's what you can
do is you can left click and drag it
over somewhere. And then what you can
do is you can press Control N and you can
actually make a note. So let's call this Victorian, trucks. Let's put it trucks. Now, within my scene,
I might actually want a Victorian lamppost as well as part of the scene
or something like that. So let's actually
look at the next one. So the next point of call is actually going
to be pinterest, and let's actually put in Victorian lamppost.
So let's try that. So, let's see what we get, and we can see we've got many, many styles,
especially this one. This one's actually really nice. This one's also really nice. So what I'm going to do is I'm going to actually take this one. I'm going to right
click copy image. Go back to my Purev and then
drop the images in there, like so, and maybe make this
one a little bit bigger. What I tend to do is I gather a load of images for
each of these things. When we're actually building a scene or even just the model, you want to grab as many
images as possible. I'm talking hundreds
of images here. And especially if
you're doing a scene, you want all of
the little parts. You want everything
down to the lighting, the environment, the trees. You want to grab references for absolutely everything because it will make your
scenes just really, really look so much better if you've got some
really good references. So now, let me show
you this is one that I'm actually working
on at the moment. So I I come over
and load recent, and I'm just going to
load this one here. And you'll see at the moment, I have all of my props. I have all of my main
buildings that I'm going to be looking out
to users references. I have a ton of doors. I even have a load of foliage. I have all my windows. I have my lights over here, and I also have more importantly,
all of the lighting. In other words, it's a scene. So what time of day
is it going to be? Is it going to be, you
know, early in the morning? Or is it going to be at dusk? Is it going to be a night scene? Or is it going to be midday with that sun beating
down on my scene. Just make sure that it
actually matches the scene. There's no point having a
scene like this, for instance. So this one here, if you've got a log cabin out in the snow. You really want it to
match your actual scene. Now, before moving on,
there are a couple of other places that we do go
to use for referencing, especially something like
SketchUp, which is really, really great because you can actually come into
an actual scene. And then what you can
do is you can actually rotate around it and really, really check out how a model is put together
like something like this, which is one of our actual own. But you can see here
how easy is then to get a good idea of what actually
incorporated in this scene. And what you can
actually do from there then is we can
actually come down, and we can actually get
some screenshots of this or even RClick
and copy image. There's also let's
say if we wanted to do a Victorian truck, for instance, to keep it the same theme as
what we've been doing. You can see that
there's no end of actual Victorian or vintage
type vehicles on here. Not as many as what
there is on art station, but still a very, very good place to start looking
for reference in. That leads me onto my next one, which, of course,
is art station. This simply is one of the
biggest resources for referencing or for looking
up artists in the world. Well, let's put in a
reference of Victorian, for instance, and let's
see what we actually get. Let's search artwork. So we're going to
search artwork and let's see what it
actually comes up with. Should be lots and lots of
things to work with here, especially good if you're
looking for actual lighting, so you're looking for light
effects like this one here. Again, we can take these an actual use them
for references. And the best thing is
about art station is, we can also come down
and look at things that may be our concept to
two D or actual three D, and we can also
come down as well and look at what
subject matter it is, so it could be automotives, so Victorian Automotives, or it could be architecture
or something like that. So the possibilities with
art station are pretty much endless and you're able to grab tons and tons of really, really high quality references. There are of course
hundreds and hundreds of other places you could probably
go to grab references, but I'm showing
you these because as far as references go, these are some of the
best places to go. Let's move on then to one of the things that we
really use a lot of now, which you would have
thought actually would come into it as far as
referencing goes, but it actually is
really, really handy. So let me introduce
to you now Chat GPT. Here is Chat GPT. You can see that we
have chat GPT four, but we also have 3.5. 3.5 is actually free, and it is actually good enough
to do whatever you want. You really don't need to pay
for this. It's also free. So what I'm going to
do is I'm going to go to message, and I'm
going to type in, give me ten different buildings for a Victorian town scene. Something like that. Let's click enter and let's see
what it gives me. You can see now it's give me a lot of things to
actually work with here. And the best thing about
this is you can also say, give me ten more. And you will just then go
ahead and give you ten more. Now, these things
are really handy to use because then I can simply take these ideas and it'll
also bounce ideas to me, and I can then go
into Pinterest. Or Google search and actually look them up or try and find
something like this. And I can kind of get ideas and design my scene around
there using all of those things and especially
pure rep. We can also take them in to
our actual mid journey. Now, again, our mid
journey is paid for, I think the lowest amount is
$20 or something like that, but there are many, many free things out there. But I will still show you
what we actually do with our AI based image generator. So you can see at
the moment, this is the image that we've
actually generated. And we've called it is
Victoria a delivery van, and this is what
we actually get. If we go to my images, you will see that
we've generated a ton of images about
all of the things. Especially we use this as
well to generate textures. It's not just there to actually generate images and ideas
and things like that. You can actually use it to generate transfers
that are going to go on windows or adverts
or actual textures. And we do use this, especially
for things like curtains, because it's really,
really easy to get that look that you're
actually looking for. So you can see,
we've got a lot of ideas for living rooms. We've got a lot of ideas for bedrooms and
things like that. What we can also do
in mid journeys. We can also go and explore. And what you could do
is you could look up with a search prom Victorian. Let's put in carriage. And then we can also
get ideas from this. So if I put in
Victorian Carriage, you can see this
as what comes up. Now, if we come over to here, we can also say if
we click on here, this is the actual prompt
that somebody put in, so you can actually
take that prompt, maybe change it around
a bit and then get your own images rather than just simply copying
other people's images. It's a great place to start to actually gather
your own images. The other thing is about mid
journeys, I can come in. For instance, let's
just go back. And then what I can do is I
can hold the ship born down. I can grab all of
these, for instance. And then what I can do
is click the download born and download
all of those images. And the best thing is
about PureVs you can bring in multiple images
at the same time. So you can just drag drop them, and then they'll all appear
actually next to each other. So really, really
handy things to have. So, lastly, then,
to some don't do what I did a few years
ago where I just dive straight into blender and not
even think about references and just find references if I had to while I'm actually
building something. Don't do it that way. It leads directly into building a
beautiful gray box as well, all this, because first of all, you grab all of your references. You make sure
everything's set out. You can go and find some more references if you
need to, you know, if you suddenly have a
spark of inspiration, you want to make
something on the fly, then grab some more
references for it. But to start with, grab all V references,
have them really, really nicely laid out
and spend, you know, even half a day to a day
grabbing all those references. You can then save there as
well into individual files, and then you'll have
all other references around that particular
build in there, ready to use maybe on another
project in the future. All right, everyone, so I
hope you found this useful, and I'll hope you'll take
my advice going forward. Thanks everyone. See
you on the next one. Cheers.
6. Starting Greyboxing with Primitive Shapes: Welcome back,
everyone to blend of four Modeling and
Geometry Nodes workshop, and this is where we left off. Now, what I want to
quickly do now is just up and over to our
resource pack once more. And here we are in
our resource pack. And the reason I want
to be in here is, I just want to grab our guy, so this little human
reference here and bring him over into our actual
gray box build. So what I'm going
to do to do that is I'm going to press Control C. So just like you would do in a text document or something
like that or an image. Just Control C. And
then what we can do is we can put the
blend file down. Press Control V. And you
will see if I click on here, press Control V, that
now it actually pops in. Now, it will pop in
exactly the same place where it does in your
actual resource pack. So now, all I want
to do is I want to put our little guy
in the center. Before I do that,
though, I just want to delete all of these
things out of the way. So I'm just going to quickly
grab the cube, press delete, grab the camera, press delete, grab the actual light,
and press delete. Now, from here, what
I'm going to do is, I'm going to grab my little guy. I'm going to make sure that
my curse is in the center. So shift and cursor
to World origin, just in case it isn't, and then I'm going to press
Shift and S again. While I've got my
little guy highlighted, I'm going to click
selection to curse that then is going to put
him right in the center. Now, from here, I want to actually stand him
on the ground plane. If I press one on
the number pad, you can see at the moment is actually below where
the ground plane is. So what I'm going to
do now I'm going to move him up. Now, I
can see at the moment. There is no actual Gizmo. Now, the thing is about Gizmos. Every single time you
come on a new tab, you're going to have to
bring in your gizmo again. I don't know why it's like
that, but it always does that. So we can do it a
number of ways. First of all, you can come up to left hand side and
click the move tool. Or you can press
Shift space bar. Come down and click the
move tool that way. You will notice as
well if you press tab, you will actually have to
bring in the Gizmo again. Shift space bar, bring
in the move tool. And now you should
have the Gizmo on in object mode
and in edit mode. Now, what I want to do now is I don't really want to be in this layout tab
because we've got an actual animation
timeline down here, and that's not
something we're going to need throughout
this course at all. We're not actually going
to be doing any sort of animation except
with the flag. So really, we're not
going to need it. So what I'm going
to do is, I'm just going to come up and
put it on modeling. What they'll do is it'll set out a new viewport view without
that timeline there, giving us more space to
actually move and look around. Now, from here, what
I'm going to do, you can see again,
I need my gizmo in. Shift space bar
bringing the move tool, that is in edit mode. Press tab to go
into object mode, shift space bar,
bring in your movetl. There we go. Now we've
brought in the Move tool in the actual modeling tab which
we want, and now press one. And all I'm going to do now is bring him up and put him on our actual on top of our
actual x axis like so. Alright, so now it's done
on the ground plane. Let's actually move
him out a little bit. And what we're
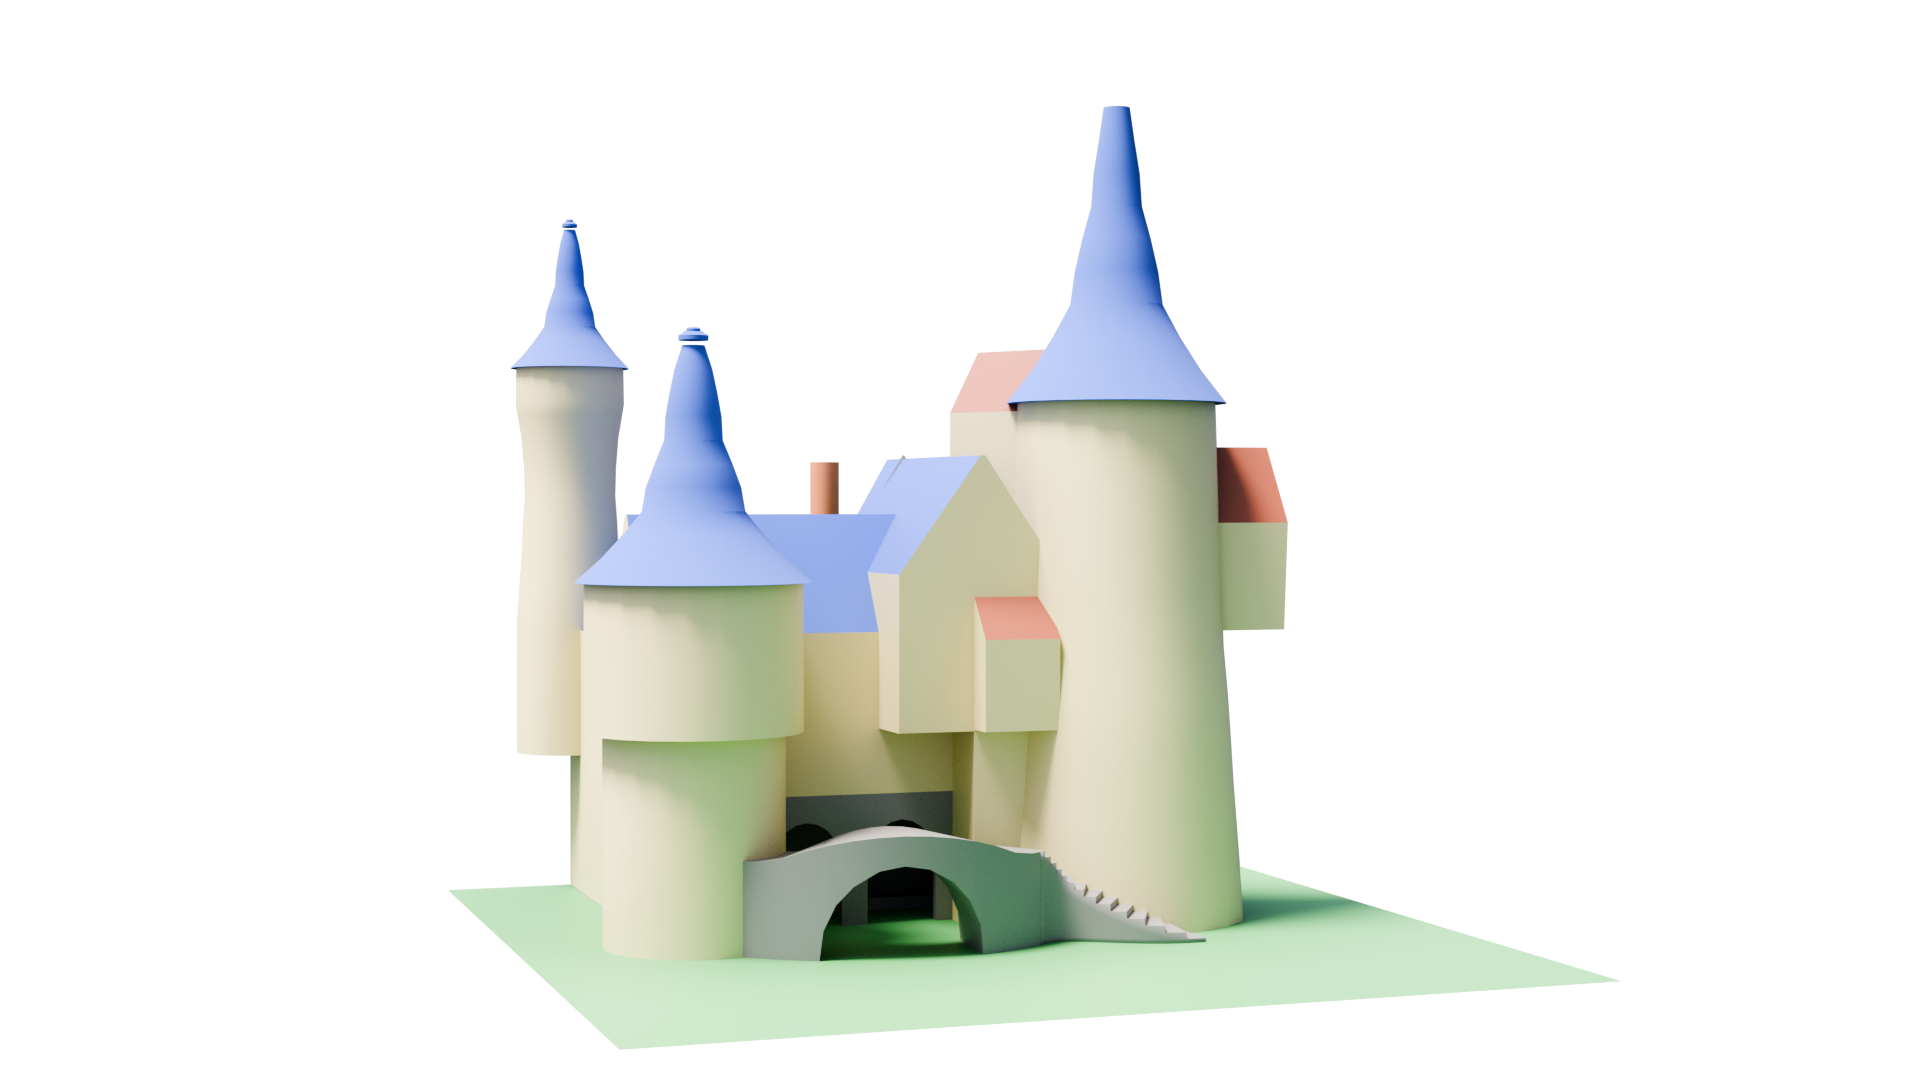
going to do now is start our actual gray box. And the gray box is really, really important because
what it does is it lays down the foundation
of your environment. So you want to keep it as simple as you possibly can while making sure that you still have a good view of how
everything's going to go. In other words, we want to
make sure, for instance, that anything
that's kind of bent like the bridge, we want
to bring that in there. If we have steps, we want
to make sure that we've got steps in there because it
does give you a better view. You can do this
thing with ramps. But for the amount of time
it's going to take to actually bring some steps in,
it's just not worth it. So you might as well, make sure that things like that
you actually bring in. Now, things where it's like
the roof tops, and, you know, the slightly boat
and stuff like that, you don't need to worry about.
Forget about those things. All we're trying to do is
lay down the foundation. So what we're going to
do is we're going to start bringing in a gray box, and then we're going to
bring in some lighting. We're going to bring
in a good material. I'm going to show how
to make an amazing material so you can see how everything's coming along and from there, then
we'll build this out. After that, then, that's when we start the
actual main build. It's very important that we
start with the gray box. You will see in all games, In all models done
by professionals, they always start
with the gray box. Even if you have a
look on YouTube, you will see that the
original overwatch, how they actually started it, was all done with the gray box. None of the textures are in, none of the materials,
nothing like that. Not even the characters
are actually in there. It's just a couple of guns
when they first started, and they were just
testing everything out, testing the game
playout and just seeing how the environment
interacted with the gameplay. That's exactly what we're doing, and that's exactly what we're
going to be doing here. So the first thing I want to do is I want to bring in
an actual cylinder. So I'm going to press shift day. I'm going to come on over and bring in a cylinder like so. Now, you will notice when
this cylinder comes in. The only thing I want to do with this cylinder is just turn
down how many vertices it has because there's
no point bringing in loads and loads of
polygons in our gray box. So what I'm going
to do is just come down to bomb left
hand side here. And you'll see at the
moment it says 32 vertices. Now, the moment you
click off there, you will see this disappears. So just make sure. And if I come back to it,
it's still not there. So make sure before
clicking off it, so we bring in a cylinder again, make sure that you
open up this sub menu. And all I'm going to do
is put this on 20 so. Then we're going to
do is press one, I'm going to bring
it up and put it just on top of the
ground plane like soap. Alright, now, this cylinder
is easy to work with. It's nowhere near
the right side. We're going to have to
pull it up a little bit. But what I want to do is
I want to bring in kind of the tower over
the left hand side. So I'm just going to
move this over here. And from there, what
I'm going to do is I'm going to
press the S borne, and I'm going to
bring it up like so. I'm going to press
one. I'm going to put it on my ground plane, like so. Now, from here, this is where we want to build out our bridge. So if I bring our
little guy over, you can see that the moment, it would be stored
with the kind of motors looking at the
course reference image. So I'm going to pull it up to something round
about about here. Now, from here, I can actually start building
out my bridge. So what I'm going to
do, first of all, is, I'm just going to bring in a temporary gray box bridge just trying to make sure everything's
gonna come together. So what I'm going to do is
I'm going to bring in a cube, so I'm going to press
Shift day bring in a cube. Let's move it over them. Now, let's pull it up then
to the ground plane again. So let's press one
on the number pad, pull it up to the
ground plane, like so. And now, if he stands on that, you're going to get a good idea. Of how much space is going
to be on our bridge. And honestly, this amount of space on a bridge is going
to be absolutely fine. We don't want it too dinky. In other words, we don't want it too thin or anything like that. The other thing is to remember, as we're building
out this ground this gray box is that
it's your own gray box. We're not going to be
giving exact dimensions. That's not what this is about. You're not really going to
learn so much building out a stylized environment
if you're just constantly giving the exact
dimensions or something. So there's a lot
of people who say, Well, why don't we give
proper dimensions? Because we want you to
build your own environment. So giving you proper
dimensions or the right exact dimensions
isn't exactly helpful. It's your own eye that needs
to do that kind of thing. I want to build it the
same way as las here, or I want to build mine
a little bit different. And it's your own eye
that's going to pick up on seeing if a door is
too small or too big. And that's why we're
doing it this way. All right. With that said, then let's pull this
out a little bit. So what I'm going to do is
I'm going to press tab. I'm going to make sure
I'm on face select, so I can press three on the
number pad, grab my face. And then what I'm going to
do is pull it out like so. Now, the next thing I want to do is I want to press tab and bring my guy down to the bottom of the ground
plane. So let's press one. We can see him in there now. Let's bring him to the
center because this is where this big kind of
oval part is going to go where the kind of small boats are
actually going to go through and then into the
back into the actual tower. So there's going to
be two openings here, and then the boats
are going to go through and into the
tower, as I said. Now, so we can see straightaway that there
is a problem here. First of all, The problem is
we've not got any real gap. So if he's coming in here in the boat, so
let's pull him back. Let's press control head. If he's coming in
here in the boat, he's probably going
to bang his head. That's okay, but the
problem is there's got no real depth to actually
hold this bridge up. If we make the hole
right up to here, you will see that there's
nothing holding it there. There's basically
not enough bricks to support the actual hole here. So what I'm going to
do is first of all, I'm going to pull
this up a little bit. So I'm going to
grab this and I'm going to pull it up, like so. Next of all, I'm going to
bring in some edge loop. So what I'm going to do
is I'm going to press control, and I'm
going to bring in, I don't know, something
like left click, right click, 11 edge loops. It doesn't really
matter where they are because this is only a gray box. Next of all, then,
what I'm going to do is I'm going to grab
the center up here. So if I press seven
to go over the top, we can see the
centers roughly here. All shift and click, just to grab them going
all the way around, you can see that looks
like the center. Now, if you can't tell, Hide this cylinder out the
way with H. Go back to it. Let's press one,
and now let's see. So we've got one,
two, three, four, five, one, two,
three, four, five. You can see then
that is the center. From there, then what
I'm going to do is I'm going to grab just
this one on the top. I'm going to come up to
my proportional editing. And what that enables me to do, if I press G now,
you can see that I can bring them all
up at the same time. If I click this off, you can
see it just brings up one. So that's what I'm hoping to do. I'm going to click this on. And what I'm going to do is
I want a nice smooth ox. So something like the cylinder
or the shop might do. So let's try the cylinder first. I'm going to grab
the cylinder, press one. And then we're
going to pull it up. And what I'm going
to do is I'm going to scroll my mouse wheel out, and what they'll enable me
to do is actually bring up this actual bridge a
little bit more like so. And you can see just how
perfectly due that actually is. So now you can walk over the
bridge and come to the end, and here is the actual door. And I think that's
looking pretty nice. All right, so I know
it's a slow start. It's going to be a slow burner because I really want to
get through the gray box. I really want to explain it well, how we're
going to do this. And I think it's
really important that we get it right
from the very beginning. All right, everyone. So
I hope you enjoyed that, and I hope you're
gonna learn a lot over the next few lessons, and I'll see on the next one. Thanks a lot. Bye bye.
7. Using Boolean and Bend Modifiers for Styling: Welcome back to everyone
to Blend thefor Modeling and John
Chin's workshop, and this is where we left off. Okay, so now we've
got our bridge. Let's think about now
bringing in this hole here. So what I'm going to do to
do that is, first of all, I'm going to press Shift,
curse to selected. That makes sure then that when
I bring something else in, I can actually bring it in right in the center
of the bridge. Next of all, what we're going
to do is I'm gonna press Shift A. I'm going to
bring in a cylinder. I'm going to spin
my cylinder around. So x and 90. So we spun it around the x axis. I'm going to make it a
little bit bigger like so. And what I want to make
sure, first of all, is that this cylinder is going
to be all the way through. In other words, poking
all the way through. So I'm going to press S and y and just pull it out
slightly like so. Now we need to decide how
big this is going to be. Now, the way to do
this, first of all, I want to actually hide it out the way and bring
MGI a little bit further forward and then press lth to bring it back,
and there we go. Now we can actually
see what we're doing. Now, this cylinder, so you're
going to have it where the actual water is right
up to this point here. So do you really want it
bending round like that? I think for this fancy
themeed type thing, normally, a bridge it would
be straight round, and then from here, would
drop straight down. In other words, if
I press sensed, it would be more like
this actual shape here. Now, we don't really
want that, so I'm just going to press Control
D and just go back. What we want to do is
actually it to be round, come round, and all the way then down to here,
rounded like so. So I think this is fine. All I think is we need
to make this much, much bigger, like so. And then what I'm going to
do is I'm going to drop it down just a little bit
like so, and I think, actually, something
round to there, and then we've still
got a little bit of bend in there like so. Alright, so I'm happy with that. And now, what I want to do is I actually want to pull this back a bit because
you can see at the moment this is going round, it's flat here, and then it's going round here and it's
not really flat here. So let's pull it over across s to get that bit into place. Now, you can see, On this end. Unless I actually pull this
out a little bit more, you can see we're going to
have a problem in that. It's not actually touching
the actual cylinder here. We will deal with that in a bit. The first thing we
want to do, though, is get this actual hole in here, making sure it's the right size. So what I'm going to
do is I'm going to come to my bridge now. I'm going to press Control A
to reset all the transforms, because at the moment, Blender still thinks this
is an actual cue. And I need to tell Blender that, Hey, this is not a cube anymore. It's been shaped, and it's this weird kind of
bridge shape now. So all I'm going to do is press Control A, all transforms, and now Blender understands that this is a different shape. And then you'll see
Whenever you do that, the orientation is always put
back to the world origin. We don't want that. So
what we want to do is right click Set
origin to geometry, like so, and now it's been set in the center
of this object. From there, then, let's actually put this
hole into place. And the way we're
going to do that is using our first modifier, which will be a Boolean. So if I come over to the right hand side, adding a modifier, come over to where
it says, generate, and you'll see one that says Boolean. Alright,
with that done. Now, all we need
to do is come over a little pipette
and I'm going to select this actual cylinder. And then you'll see we've
already got a hole in there. And as I said, we want it
going all the way through. So just make sure yours
going all the way through. And then finally, what I'm
going to do is there's a number of ways of actually
applying this modifier, but the easiest way is just pressing control a
hovering over it. Now, you can also click the
Danner and click apply. Or, like I said, press
control lay over and over it, and then that we put
that in place for you. Now, at the moment, if
I pull this out now, you will see that
we've got a nice, beautiful hole in there, and it's the right size
to what we want it. And I think that is a good
job because remember, we're going to put some
bricks on here as well. Now, let's think about
bending our bridge. So that's the next
problem we've got. We actually need to
bend our bridge. Now, luckily for us, because we came in and we gave ourselves lots and
lots of edge loops, this actually shouldn't be
too hard to bend because it can only bend if it's
got edge loops in there. If it has no edge loops,
it can't actually bend, but we've got loads of
edge loops in there, so that makes it easy for us. The other thing at the moment is you'll see it's very blocky. Now the thing is
about a gray box, you don't want the blockiness
in there because you're trying to look at how it's
actually going to you know, conform how everything's
going to look, how the lighting is going to
bounce off certain things. So what you want to make
sure is that you right click and shade smooth by angle. Now, those of you using something
less than blender four. You'll have to put shade
Auto smooth, I think it is, and then come over to where
this little arrow is, this little triangle is
on the right hand side. And under one of these menus, I think there's one
that's called normal. You click it open, and then you're going to
put AutoSmoth on. But for all of us,
using blender four now, we can just simply come
up shade smooth by angle, and then you'll see that all
of these kind of disappear. You will still have some down here because this is
still quite low poly, but then you've got another
sub menu that opens up here. And from there, you can
actually turn it up like so to really smooth or really
blocky, and there we go. We can do the same
thing on here as well, right click Shade Auto
Move, and there we go. All right, so we've got
everything ready now. Now, all we want to do, it's coming over, adding
another modifier, and this time, we're
going to go to deform, and we're going to
go down to where it says, simple deform. This one here, simple deform. And what this modifier is
going to do basically is it's going to deform our mesh
in the way that we want it. So we want to come
over to bend and we want to come
over to the Z axis. And now you can see that it's
actually bend it this way. And that's exactly what we want. So we can bend it more
or we can bend it less the other way, or
wherever we want it. So let's now pull
it out into place. Now, I think that's
looking a very nice place. I think it needs bending
probably a little bit more. So let's bend it a
little bit more. Let's pull it more into place. And we can see now how we're actually going
to bend this round. So I'm saying that we can bring this part out now and put
it into our cylinder. Now, before we do that, we want to make sure that
we get a door in here so we can see exactly how far we need to pull this out. So
let's do that next. So what I'm going to do is I'm first of all
going to bring in a cube, shift a cube. Let's bring that in. And
then what I'm going to do is I'm just going
to drop the cube down. Over here, I'm going to pull
my little guy over here. And what I want to do
is now I want to make this kind of the right
scale for an actual door, just as a kind of placement. So what I'm going to
do is first of all, I'm going to press S and y, bringing the depth, and then we're going to pull
it over to my guy. Now, you can see at the moment, my guy, he's got his arms out. He's like a little bit
of a body builder, and you can see that he's taking up a lot of
the door anyway. So as long as you kind of stick between this and this one, you will have enough room, and it will look right
as an actual door. So what I'm going to do is
press S and X, like so, and this now is a
good size for a door, and don't forget you're also
going to have the kind of wooden parts that are going to go around the door as well. All right. So
that's a good size. What about the height, though? Well, the height looks a
little bit too low for me. You can see he's gonna crack his head on top of it. We
don't really want that. So let's pull it up a
little bit, like so. Let's make sure he's actually on the ground plane, so like so. And we can see he might
want a little bit more. I mean, he's an average
sized guy, but normally, you'll have a good
foot ahead above you, at least, you know, to actually go in a doorway. So we're gonna pull
it up a little bit. So what I'm going to do
is going to edit mode, grab the top of here
with face elect, like so, and then pull
it up a little bit. Without the proportion and on, let's turn that off, pull it up a little bit, and there we go. All right. So now
we've got that. Now I'm going to do is I'm
going to put this into place. Before I do that, though,
always the same Control A, reset all your transforms, right click the
origin to geometry. And now let's bring it into
place. Let's spin it round. So R Z 90, spin it round into place, and just put it where
it's going to be. So I want it right
on top of here. I'm going to pull it over here. And then all I'm going to do is, I'm just going to press R z rotate it round on the Z axis, and just put it
into place like so. Now, that's looking pretty good. I'm happy with that door. It just needs pulling this way. Now, at the moment, you can
see if I pull it this way, it's going to pull
in a weird angle. We don't want that.
So what we're going to do is put
this on normal, and now you can see that I
can pull it over nice and easily where I actually
want it to go. Alright. From here, then, what
we need to decide is, is this big enough. Now, I think that
this tower part here is perhaps it's not quite
in the right place. So if I go over the top, you can see it needs
moving over a little bit, so let's grab our tower. Let's press G and
just move it over. Now, you can see
it's kind of fit in with this point here
and this point here, a little bit better in place. I think it needs to
be a tiny bit bigger, so I'm just going to press S and make it a little
bit bigger like so. And then we're going
to press one and just make sure again that it's
on the ground plane. We can worry about
dropping it down the ground plane, you
know, below here. Once we've actually got our terrain in and
things like that, at the moment, we don't
need to worry about it. Now, the one thing you'll see is the door has
slightly come out. So let's come back to our door. Let's pull it out a little bit, like so, and there we go. Now, that is looking good. Now, now, the next thing we need to do is we need to
bring up this tower above the actual
door because it's actually going to come
up and then come out. So what I mean is, I'm
going to bring it up. I'm going to grab the face here, pull it up. Like so. And then what I'm going
to do is I'm going to press enter S to extrude it out, and there we go, that is
what we're looking for. Now, again, with
things like this, it's how far do you
want to pull it out? Do you want it to be
actually pulled out, or do you want to
straight tower up there? I think for me, it looks
really nice like this, so I'm going to
keep it like this. I'm not sure if this is going
to be higher yet or lower. I'm going to check that out,
once I finish my gray box. But for now, what
I'm going to do is, We're going to pull
it up to where we actually want it, like so. Now, on the next lesson, what we're going to
do is we're going to actually put in a window. So a window is going to be a bit smaller than an
actual door, of course. So we're going to
bring in a window. And then what we can do
from there is we can see how big this part
needs to be as well. But I think for now,
if I press tab, it's a pretty good start
on the actual gray box. All right, everyone, so
I hope you enjoyed that, and I'll see on the next one. Thanks a lot. Bye bye.
8. Advanced Greyboxing: Towers and Staircases: Welcome back, everyone
to blend the fall Mdling and geometry,
no workshop. Now, I think the other
thing that I forgot is I need to show you how to
save. So let's go out. Let's come down to Saves, and let's save it
out as something. So all I want to do is call
yours, whatever you like. This is what I'm
going to call mine, and then all we're
going to do is click Save As, and then
it's saved out. From now on, after
every single lesson, just make sure you come up
and save it out like so. Now as we move on these lessons, I'm going to be
giving you more and more tips as we move forward. I don't want to give you
more at the start and just totally front
end everything. And like, I'm really burn out
your brain trying to work out all of these
different things and do it slowly over time. Just in case you think, Oh, this could be done
a better way, yes, it probably will be done a better way as we move
through the course, but for now, we're
trying to keep it as basic as possible. Alright, so now we've got this, let's actually come
to this part here. And what I'm going to do is
I'm going to duplicate it. So I'm going to press
Shift D, enter. I'm not going to
move it anywhere, and then I'm going to
pick it up like so. I'm going to pull it out
then into the place. And now I'm going to do
it, and I'm going to make sure this is the
size of a window. Now, we can see if I grab my guy and pull him over,
so I'm going to press one, press the G button
jaws to move him over, we can see that this would be some window, massive window. We don't really want
that. So I'm going to grab this part, press sons head, and pull it down, like so, and now it's more the right
size for an actual window. So from here, we're going to be using these for the windows
and this for the door, and that then is just
going to be our gray box. Alright, so now
we've got this bit. What we can do now is just
give this some kind of top, some kind of actual roof. So what I'm going to do
to give this a roof is, I'm just going to come
to the top of it. Make sure I've grab this top, I'm going to press enter, pull it out, like so, and then, pull it up like so, and then S pull it in, like so, and that
is the basic roof. Now, I know that on this roof, there's going to be
you know it's probably going to be bent in
and things like that. Not going to worry
about that at all. All we want at the moment is our basic gray box, as I said. Okay, so now the next
thing is pass this wall, there's another wall with
two actual arches in there. So what I want to
do now is I want to bring in that part of the wall. So all I'm going to do
is bring in a cube, and I'm going to put
it set it back here. So I'm going to press Shift S, cursor Shift S, cursor to
world origin, like so. Shift, let's bring in our cube. Let's pull our cube up
to the ground plane, so I'm just going to pull it up to here, something like this. And then what I'm
going to do is I'm going to set it back like so. Now, the furthest
it can go back, it cannot go past here. So we want to make sure that it's actually into
this cylinder. So we have got a little
bit of room to play with, but not too much because
once we actually start, you know, pulling
it out this way, you will see that it starts popping out the wall
round and about here. So there's only a little
bit of room to play with, and I would say that's the most room we actually
going to play with. From there, then, the
other thing to take into account is the intricacy
of the building. The more intricate
a building is, the better it's going
to look basically. If you've got really
plain building, which is just a cube, it looks really boring. It
doesn't look realistic. So you need to make
sure that you're making your building as
intricate as possible, but with that comes
a lot of complexity. So what I'm going to do now is I'm going to come to my cube. I'm going to go
to the top of it. So grab it just the top, and I'm actually going to pull
it up into place like so. So I'm going to pull
it up kind of halfway up this actual
cylinder part here. And then what I'm going to do is I'm going
to come around to this front side and I
need to pull this out. Now, how far do
we pull this out? Generally, when I'm
pulling something out, I will make sure that I can fit a window in this part here. So how do we get a window? We're going to grab
this window here. I'm going to press Shift D. I'm going to pull this
window back like so. And then what I'm going
to do is I'm going to reset the transformations
but in a different way. Because the transformations
have been reset on here, if I press Alt r, you will see that it actually
spins it round and puts it nice and straight for me back to the original what it was. In other words, if I press
and rotate it like so, if I press Altar, I can actually reset it back
to the transform. If I press S, like so, and press alts, I can reset
it back to the transform. However, if I press S and
then press Control A, reset all the transforms, Blender will take this
scale and keep it. So I'll never be able to go back to this size, for instance. It will always go back to the size that we just
scared it up at. Now, all I want to do is press
and 90 and spin it round. And from there, then,
what I can do is I can press control three and come round now to the
back of my building. Now, what I'm going to
do is I'm going to put this window round about here, lower it down a little bit, and that's where I'm going
to have this window. And from there, then I can
see this is a nice scale. And from there, then what
I need to do is I just need to pull it back
into place like so. Alright, now what
I want to do is I want to come back
then to my wall. Put on a grammar wall, we tab in edit mode, grab the top of it, pull it up just above this window, like so. And then what I'm going
to do now is I'm going to press and pull it up
again up to here. And then finally, what I'm going to do is I'm
going to press S and y and pull it together. And then you can see now
we've got an actual roof. Now, from here, then what I
can do is I can come now, grab this side and
this side of it, and then all I can do
is I can pull these out into place where
they're going to go. Now, at the moment, I'm going to leave them there because we've got another roof that's actually
going to come this way. And again, this is why it's
so difficult for this part, getting everything
where you actually want it because
you've got, you know, this is going to go back into another room and
everything like that. It's pretty complex, guys. So don't worry if you don't
get it right the first time. Now, from here, what
I'm going to do is I'm going to bring in
another cylinder, and I'm going to put this for the main tower that's
going to be up here. Now, the problem we've got is we need some steps coming
down here as well. So we need some
steps kind of coming down and actually
coming around here. So let's first of
all, make our steps, and then we can actually put some kind of n
for those steps, and then we can pull
everything else into place. We can also do things like decide if this bridge
needs coming out more, which I think it
actually will do. Let's bring in our
steps first, though. So what we need to
do is we need to bring steps from here. So from this part here, all the way down to our
actual ground plane. So if I put my guy,
just on top of that, we need steps coming
all the way down, rotating round onto
this ground plane here. So the way that we're
going to do that is basically going to
come bring in a cube. So I'm going to press
Shift A, bring in a cube. I'm going to put my cube on
the ground plane, like so. And then what I'm
going to do is I'm going to make it a
little bit bigger, making sure that hits
the top of here, so you can see here is
where it's going to start, and now how far do we actually
want it to come along. I'm thinking that if I bring
it over to roundabout here, that should be a good
actual size for some steps. Alright, to check
that out though, what we can also do is
we can now bring in. So if I bring this
just over here, we can now bring in
our main actual tower and then put our
steps against it. So I'm going to come back
to this cylinder here. I'm going to grab
the bottom of it. I'm going to press Shift D. And then what I'm going
to do is I'm going to put this back onto
global now because I want to move it
along the x axis, I'm going to pull
it over. Like so. And then from there,
what I'm going to do is I'm going
to make this much, much bigger because
it is the main tower, so much bigger, like so. Let's pull it back then to
where it's going to go. And I'm thinking if I pull
this to here, you can see, I'm trying to get it
into this building here, but I don't really want
it going quite that far. So all I'm going to do is, I'm just going to pull
it here for now. And then as we build around, we'll be able to
check out the size. Then what I'm going
to do is I'm going to press and pull it up, like so. And now what we're starting
to do now is actually get the sides of it laid out. Now, I still think
that's a little bit big. So what I'm going to do now
is come back to my steps now. So I'm going to grab my steps. Now what I'm going to do is I'm going to come into Edit mode, press Control B and
bevel this off. In fact, before you do that, I'm just going to press
Control A or transforms, right clicks at origin geometry. And now I'm going
to press Control B, bevel it off, like so. Now, you'll notice that as another actual pop up
menu appears here, if it doesn't, just open it up. And then what we can
do is we can come down to it says custom and you'll see that the preset
should be on steps. So put it on steps,
and there you go. That's what you've
got now. And now if you increase these segments, you will end up with
something like this. And there we go. There we
have our actual steps. Now, they're kind
of rudimentary, they're not the right scale
or anything like that, but we don't want to worry
about that right now. All we want is just
some basic steps. I'm just going to see actually, if I can increase
the amount of them, and I don't think
we actually can. So what I'm going to do is going to leave them
like that for now, and I think they'll be due as a good gray box actual idea. Alright, from here, then, You can see we have another
problem at the moment. In that, we have no kind
of segments in here. This segment down here as
well isn't working properly. So what I'll do is
I'll just press and pull that down a
little bit like so. And then what I'm going
to do is I'm just going to grab the
whole thing with A, and I need to bring in
some subdivisions in here. So what I'm going to do
is I'm going to press right click triangulate faces, and then right click
and I'm going to go to tries to quads like so. Now we've actually got
some segments in here. We should be able to bend this a little bit into how
we actually want it. So what I'm going to do now
is I'm going to press tab. Control or transforms, right
clicks the origin geometry. Adding the modifier, and again, we're going to go to deform. And we want to bring
in simple deform. But rather than do
that, we might as well, grab our steps, shift
select our other bridge. And then what we can do
is we can press Control L and come down and we
can copy modifiers. And there you go.
You can see now we've actually
copied the modifier, so it's been exactly
the same way. Now, of course, we don't
want it to bend that way. We want it actually,
not this one. Sorry. We want it to
actually bend the other way. So all I'm going to do is just
bend it that way, like so. And from there, you can see now we've actually got a
really, really good idea, if I rotate this round of how our steps are going
to fit into place. Again, it's a gray
box. It's only rough. That's all we want.
We're just trying to get it in some kind
of place like so. Now we can get a good idea if we come to our cylinder of where this cylinder is
needs to be and where our door needs to be and kind of build this
out from there. All right, everyone, so
I hope you enjoyed that. Let's actually say
about our work, and I'll see on the next one. Thanks a lot. Bye bye.
9. Refining Object Alignment in Greybox Models: Welcome back, everyone to
blend the four modeling in Geometry Node workshop, and
this where we left off. Now, at the moment, you can
see that these two here, both highlighted in yellow, are actually joined together. We don't really want
that because we want to work on these independently. So what I'm going to do is, I'm actually going to press the tab. I'm going to come on over
then to this one here. I'm always going
to make sure when I'm selecting everything
that I'm always in this edge select here because then it's
easier to select everything. So if I press L now, I can actually
select everything, and then it will select
all of these islands. Then what I can do
is I can press P, come down and separate
by selection. And now you'll see that this one and this one are actually split. Now, if I come to this
one, and first of all, going to reset all
the transforms, right click the
origin to geometry, and then I'm going
to go over the top with seven on the number pad, pressing the G born, and bring this into place next
to my steps here. Now, from here, this looks
to be in the right place. All I need to do
now is make sure I'm happy with the actual size. I think it's a little bit
too big at the moment, and I also think that it
needs bring it in at the top. So first of all, let's make it a little bit smaller and I'll show you a different
way to do that. So rather than actually pressing
this and bringing it in and then having to reset it
back on the ground plane, let's come into edit mode. Come to our face select
Alt Shift click. And instead of pressing S, if you press Alt S, what they'll do is it'll
bring it in like so, which keeps it the same
actual height on here. So we're just bringing
in the width of this, and it's much cheesiy as you can see to actually wit with. From there, then, I can actually
bring it across like so. Now, the other thing
I'm going to do is I'm going to come
to the top of here, I'm going to press the S born and just bring it
in a little bit, like so, because I know that's where it's
gonna want to be. Now, I'm not going to put a top on this or anything like that, because what I want
to do is build out this part here as well. So what I'm going to
do now is I think I'll come in and I will build
my next roof out on here, going down, so how far
is it going to be out. And then from there,
I can realize where we actually need
this to actually be. So all I'm going to do is I'm going to grab this part here. I'm going to press
shift, like so. I'm going to press R, Z
90 and spin that round, and then I'm going to bring
this then into place. Now, of course, this bit is
going to come down to here, but it is going to be poking
out much much further. And I also want it
to be higher up. So the first thing I'm
going to do is I'm going to pull it up a
little bit, like so. And then what I'm
going to do now is, I'm just going to check out
if I'm happy with the height. I think I'm happy
with the height. So what I'm going to
do now is just pull it across slightly, like so. And then what I'm
going to do is now, I'm going to bring in
an edge loop because I want this part to come
out from roundabout here, so you can see just
above my guy's head. So if I come in,
tab press Control, left click right click
to drop that in place. Press one on the number pad. I want it to come out
just above his head. So something like here, so it's not going to bang
his head on anything, but it's going to come
out to roundabout here. Now, the next thing I
want to do as well is, I also want to pull out
half of this as well. So I want to make it you know,
this bit here to come out. So what I'm going to do is
going to press Control. Left click, right
click, like so. And now I can do is
I should be able to come in and pull this part, this part, this part, this part and this part out a little bit. So what I'm going
to do now is press, pull them out to the
actual stairs like so. And you can see now already
that's looking pretty nice. Albeit, This part here needs to come out a little
bit more, as you can see. So this part on here, we're going to have a
little bit coming out here. But I think all in
all, at the moment, that is looking pretty
nice like that. And yeah, I'm happy with
how that actually looks. Alright, so from here now, we get a better idea of where
this part needs to come. So what I'm going to do
is I'm going to come. I'm going to pull this
out a little bit. So it needs to come round about there as you can see
to fit everything in. It also needs to make
sure that the top of here isn't quite
so pulled out. And then from there,
what I can do is I can also pull this up now. So if I pull this up, we can get a good idea of
where our actual kind of, you know, tower needs to be at. Now, as well as
that, from there, I can see that these steps, they are going way way to in this part and not
enough along here. So, in other words,
these steps need to travel kind of round
here, like so. Now, at the moment, we don't have our geometry node in there, which is what we're going to
use to create those steps. So what I need to
do is I need to just pull this
back a little bit. So making sure that this
part here is still in there, so let's pull it a
bit further forward. And then what we
can do from there, It's kind of hide this
with another little part. So you can see at the moment, I can bring this
slightly over as well. So I'm going to bring it
slightly over like so, and then I'm going to hide this with another little
part in here. So the way I'm
going to do that is I'm going to come
back to this part. I'm going to grab
this part here. And then what I'm going to do
is I'm going to press Shift D. To duplicate it, pull it out, like so. And then what I'm going
to do is I'm going to pull this probably, I think it's still a little
bit high long there, so I'm just going to press S and's and pull it down like so. And then what I'm
going to do is I'm going to pull this
into my wall now. So I'm going to press to pull
it back into my wall again. And let's now think
about pulling it out a little bit
further, like so. And let's also, I think,
actually you know what? I think that's gonna
be okay there. It does look a little bit different from what
I built before. Well, yeah, I think that's
gonna look a little bit nice. So what I'm gonna
do is, I'm just gonna pull this
down a little bit. And then we're going to press
and pull it up, like so, and then I'm going to come
to the front of this, so this part here and
pull it back into place. And there we go. That's
our actual part. And you can see that it's
actually looking pretty nice. From there, as well, what I can do is I can have my kind of, you know, it's a
kind of platform, which is going to go around
there to this part here. Now, what I'm trying
to just work out, I feel like this bomb part, we are going to have to
bow it a little bit of thing just to get a clear idea of how
this is going to look. So let's do that now. So what I'm going to do is I'm
going to come to this part. I'm going to grab
the bottom of it. I'm going to press the S bon, just to pull it
out a little bit. And then I'm going to
bring in some edge loops. So control, left click, and we're going to
bring in, I think, five, so one, two,
three, four, five. Left click, right click. And then all I'm going to do is I'm going to grab
the center one. So shift and click. Come on over to
proportional editing. Let's put this on shot for now, I think that'll be good enough. And then all we're
going to do is press the S bon, pull out. So. And whenever I'm doing this, I'm always looking, is
that going to look right? I always pull it right in. I don't think so. So
when you're going to try the root, and there you go. That's actually looking better. Now, you can see the
top of this is way way too big at the moment. So I'm just going to pull
it into there, like so. And then I'm going to go to
the top now and grab the top, and let's just pull
that bit in as well. Like so. And we will
obviously refine this more. We just get in the actual shape nailed down here. All right. So from here, I've
got a nice shape, how far do I want
this to come out? If I pull this out to let's
say round here somewhere, I actually think that's probably going to look a
little bit better. In fact, you know what? I'm going to pull it
out a little bit more. To there so that this bit is just actually in
this structure here, and I think that's
actually going to look much, much
bare like that. Now, of course,
we've got a problem with our bridge and our steps. So let's now bring these out and see where
we can get these two. So we can see now that if
we pull them out there, we've got a lot more visual on these two arches
in there as well, which is going to
be really nice. So yeah, I think that's going to look much bare like this. All I've got to do now though is bend this a little bit more. So I'm just going to
come to this. I've still got my modifier arm. And what I'm going to do is I'm going to bend it a
little bit more. Now, you can also see Then I need to rotate
it a little bit. So let's rotate it. Let's
put it back into our wall, go back into the wall, like so. And I'm thinking, this is
looking better than it was. Now, I'm also going
to pull this out. So I'm going to pull
this out, put it in place, rotate it around. So all dead into place like so. And that looks
much, much better. Now, the one problem we've
guys, as you can see, is that this part here
isn't going into the wall. So what we're going
to do is we're going to come to this part. I always find it easier
actually if you turn it off. So if you turn it off like so, and then what you can
do is you can come in, you can press the
button, pull it out. And then if I go back now and
right click Shade Smooth, I can come back now and turn it on and you'll see now
it bends into place. So really, really
easy to do that. And there we go thinking
that, in, much, much better. And again, We're going to be refining this
a little bit more. Now, the other thing is now that because we've moved
this all this way, this bottom part here, the steps really wanted
to come up to this part. Near enough, it's a little
bit too far, the gap on here. So what I'm going to do now is, I'm going to grab
just this part, so I'm going to press L, and I'm just going to press P selection, like so control A
all transforms, click set origin to geometry, and then I'm just going
to pull it out this way while I work on this part. Now, these steps, unfortunately, the problem is that they
need to wind around. At the moment, we've not brought the ohms node in, so we're
not really seeing that. So all I'm just going
to do is I'm just going to put them into place
and going to bring that in, I can wind them around there. The main thing is,
though, I want to make sure that this is
out far enough. And at the moment, I think
it's a little bit lacking, and it needs to come
out a little bit more. So I just need to be careful
that I don't bring it out too much so that you know, we've completely ruined
the effect of this. So let's come in now
and grab all of these, and let's pull them
out a little bit without portion
editing on like so, and I think that is
looking much better. And now what I'll do is I'll
grab this part and I'll pull it back into place like so. And I think now that is perfect. So that is what I'm
actually looking for. I'm thinking I'll pull it down
a little bit, maybe there. Then I'll put my
guy on the floor. There we go, let's
have a look at that. Yes, and I think
that's a really, really nice gray box now. Alright, so what we'll do
then on the next lesson is, we'll get these two archers
in there because we need to actually create kind of
a part inside of here. So we'll get the
archers in there, and then we'll
actually get this part here taken out as well. And then from there, we can actually start
building the back. Luckily, the back is much
easier than the front. The front is quite a
complex piece, actually. Alright, so let's
save out our work, and I'll see you on the next
one, everyone. Thanks a lot. Bye bye.
10. Enhancing Details in Greybox Wizard Buildings: Welcome back everyone
to Blender for Modeling and Jump workshop, and this is where we left off. Alright, a thing I'll
do now is I'll come around to this side over here. And what I'm going to
do is I'm going to pull this little bit
out a little bit, so we're just going
to come to this bit. Now, if you want to
see through there, you can actually click on this. And then what you'll be able to do is see through there and grab all of these parts like so, and that makes it a lot
easier to actually work with. Alright, if I turn this off
now and pull these out, I'm going to pull
them out this way. Now, the one problem
we've got is, as you can see, is that the whole thing is kind
of come in this way. I don't actually
want that. I want it to actually all
come together. So what I'm going to do is, I'm just going to grab
the tops of here. I'm going to grab then
the center of here. And now if I pull this out, it should pull it out
more evenly like so. Again, this is a gray box, so we're going to come in and fit this once we've
actually done it, but we just want it
to look relatively okay without bending
it too much. Alright, so that's looking good. Now, the next thing I want to do is I want to bring this back. It's a little bit
too far forward. So I'm just going to
grab all of these. And then I'm going to do is
I'm going to pull it back to just in front of this. So just in front of
this one here, like so. And then what I'm
going to do now is I want to bring
this part out. So I want it over
hanging a little bit. What I'm going to do
is, I'm gonna come in. I'm gonna grab these two here. And then we're just gonna
pull them out, like so, and then that's going to
be over hanging like so. And I think that's gonna
look pretty nice. All right. So the next thing we can see
we've got a problem with, is that the bottom of he isn't going down to
the ground plane. So let's sort that out first. Again, I'm going to
put on this x ray, and then I'm going
to grab this one, not that one, this
one and this one. Turn it off, press one. Let's pull it down then
to the ground plane. And I think we need to see through there again.
Yes, there we go. Pull it down to
the ground plane, like so, and there we go. All right. So that's
that bit done. Now, before we actually
harry on on this bit. What we need to do is, first
of all, bring out this part. So we need to decide how far this part is
going to go because inside here is going to be
an actual room, like I said. So what I want to do is, I really want to pull
this part out. So what I'm going
to do is I'm going to cm to this part here. And I'm going to grab this part. And we can see at the
moment how far that is in. So you can see it's
all this way in. We don't really want that. We want it to kind of come
out a little bit further. So what that means is, it's probably easier to
grab this part. So grab this part, press shifty, to duplicate it, OZ
90 to spin it round. And then what I want
to do is I want to put it into place like so. Now, I do want it to
come against this wall, but I also want it to come right at the end
of this wall here. So what I'm going to do
is I'm going to go in, and I'm going to press S and
X and pull it out like so. And now you can see, it's
flush against this wall, and it's relatively
flush against this wall. And finally, then, all I want
to do is pull this down. So I want to pull this down, making it a lower roof
than the other one. The other thing, of
course, is we can see at the moment is this needs
pulling all the way back. So we don't want
this stuck out here. We want to pull it all
the way back, like so. And there we go, if I double
tap the A now, you can see, we've got a little
bit of flashing, that's going to
happen, but you can see now that's
looking pretty nice. Now, you can also see
Mbolians down here, and it shouldn't be down here, so let's pull it over this side. Now, the other thing is, how far do we want this to come out? Well, around the back of here, we've actually got another part that's going to be an
actual doorway here, and then we've got
a kind of roof coming down here and a
chimney coming up here. Lots and lots of intricacies. So we need to now decide
how far this is coming out. Now, the way to do that,
I'm going to grab my door. I'm going to press shift. I'm going to bring it
out. I'm going to press T and R just to
reset the rotation. And then I'm going to press
R Z 90 to spin it around. I'm going to press three
on the number pad, and now I'm going to
put my door into place. So this is the big
walkway, really, this part here, so
I'm just going to pull it into place like so. Into there, and now I'm looking how much room
I've got on each side. I think even I'm going to pull
it out a little bit more, which means now I've
got a good idea. This distance here needs to be the same on
this side roughly. So what I'm going to do now is I'm going to grab this
one and this one, hold them out a little bit, press three on the number pad, and then just make sure the
distance is roughly the same. Again, when we're building
things like this, we don't need it to be perfectly accurate or anything like that, we want it to be more haphazard. It's not building a luxury
condo or something. It's building a
stylized wizards tower. So we do need to take
that into account. Alright, from here, then,
let's think now about the top, what's going to go over here. So what I'm going
to do is I'm going to now bring in another cube. So I'm going to press
Shift A, bring in a cube, and I'm going to place my cube just over my door, like so. Now, with the door and
this placement here, it is actually better if we put this right in the
center of the door. So if I come to my door, press Shift S, cursor selected, come to my cube, Shift S, selections cursor, then that'll drop it
right in the center. And from there, then I can
actually bring this out now. So how Far Do want this out. So this is going to be a beautiful kind of
entrance way here. What I'm going to do
then is press S and y, pull this out a little bit, right to the sides like so, and I'm also thinking how
far out do want this. I think actually, this
should be fine like this. Maybe a little bit more. So what we'll do is we'll
just grab the front, pull it out on the x
axis a little bit more. And then what I'll do is now, I will create the
top of the roof. So I'm looking how high this is up there, if I'm
happy with that. So let's pull it up
roundabout to here. And then what we'll do is
we'll press, pull it up. Something like here, and then S and y and pull it in. Like so. Now, this is how I
want mine to be. Obviously, if you want yours to be a little bit different, then it'd be better. You know, do it
however you want. Just make sure it
all fits together, and that's what we're
doing this gray box for. So I'm going to pull
that back to there. And I think, yes, I'm happy with how that looks. Having a good look round. Making sure I'm happy
with everything. And yes, I think I
am happy with that. Now, we will have some
stairs, you know, leading up here and all
crazy things going around. But I think, yeah,
this is looking good. I think the one thing I need to do is just pull that
up a little bit. Like, so. All right. So now, let's bring
in another cylinder. So what I'm going to do is
I'm going to press Shift S, urster selected. Shift A. Let's bring in another cylinder. So another cylinder, and let's
pull that over this side, so I'm going to press
S, pull it over, where I actually want
my chimney to be. So I'm going to say I want my chimney to
be round about here. I'm going to pull it down, and then I'm going to grab the top, and I'm just going to pull that up where I actually
want it to be, which I think will be
something like this. Alright. That's looking so far so good. While I've got these here, I might as well put
the supports in because it is going to give
me a good reference for that. So what I'm going to
do is press Shift A, bring in a cube. Press the S born, then all I'm going to do
is slot these into. So if I press control seven
into the corner here. So I'm going to
bring it to here. I'm going to bring
it down into there. Then all I'm going to do is
grab the bottom in edit mode, press in one or three
down to the ground plane, and then we press L Shift D, and then just bring it
over here, like so. All right. So far so good. I think that looks really cool. And now, we've got our main
building actually built, which means we can
now start work on this part here because we can see that these
two buildings now, we could probably
join them together, and then it will make us able
to create this kind of part in here along with the actual, you know, build room that's
going to go in here as well, because I've got enough room in there now, as you
can see, before. It was just this tiny space, but now we can see them go
all the way back to here. All right, so let's join
these two together. So this one and this one, Pest Control D, and there we go. So we're really, really
mulching along now. It's really starting
to come together. It is a difficult build. I think before we end this, before we end this,
let's actually have a look at the front of this. So I'm always looking at the silhouette of the building
when I get to this stage. So I'm looking at how
it's all coming together. You can see it's a beautiful
silhouette at the moment. However, it is missing
this part on here. So I'm going to
come to this part, grab this top part,
enter S, pull it out. So and then, pull it up. While I'm looking at this view, as you can see, and
then S, pull it in. Like so. And from here then, you can also get an idea of how far you want
to pull it up. And now you can see that
is a very nice silhouette. And if you look
from any angle now, it's looking pretty nice already without even
finishing this. The one thing, if we're
looking around the back of it, I would say that this needs
to be a little bit higher. So you can see from here, this needs to be kind
of here somewhere. So let's actually
do that. So what we'll do is we'll
grab the top of here. We'll jaws, pull it up. Yes, and that's looking
much, much better now. Like so. Alright, this
is looking pretty nice. So what we'll do then
on the next lesson is, I think we can finally get
onto these archers here. And from there then,
we can actually start working on the back of
it and pretty much then, Once we've done that, we're then going to move on to the terrain. Because once you've got
the gray box in there, the terrain can be built out. It's much easier. Once
you've got the terrain in to actually visualize
everything as well. So we're going to
finish this gray box. We're going to add
in some materials. We're going to
check the lighting, and then we're going to
come to the terrain. All right, everyone, so
I hope you enjoyed that. I'm going to save out my file, and I'll see you on the next
one. Thanks a lot. Bye bye.
11. Designing Functional Entrances and Exits: Welcome back with
one to Blender fall Modeling and mitre
nodes workshop, and this where we left the art. Alright, so now
it's time then to put these little arches in here. So if I press one
on the number pad, we can see that these need to certainly be a
little bit smaller. So I'm going to make
them this kind of size, basically just big
enough to allow boating. I'm also then going to
put them into place. So let's put this one
into place like so. And we're going to want two
of these in here as well. And the other thing is,
we only really want to create the arch here because you're not going to actually
be able to go into there, so it doesn't need to
have a lot of depth. So what do we actually mean
by that I mean that I might as well on this block
here, delete the floor. So let's delete the floor first. So if I delete this floor, this floor. So this
one and this one. Let's press delete and faces. And we can see we've already got a problem as well with
this floor here as well. We've also got a problem with this wall here. We
don't really need it. So what I'm going to do is first of all, I'm going to come in, and I'm going to delete
this main wall out of here, delete and faces.
And there we go. So then we've got
a nice big room to actually work with,
in this part here. And I think apart
from this part, so this part here, we'll also have to delete
this as well. Now, remember, when we come to actually build our properly. We're not going to have
all of this mishmash of parts in here, overlapping parts and
things like that. We're going to make
it much, much neater. But at the moment, we're just
going to work around this. So what I'm going to
do is I'm going to come in, delete this floor. So delete faces, delete
this floor out the way. And then I can see
that I also need to probably delete this wall here as well. So I'm
going to come in. I'm just looking where it
is, if it's not, you know, showing anywhere and
delete this one as well. So we should have
now a nice space. In there to actually work with. You can see I do have one
that's this one here as well, but I don't actually want
to delete that because I delete that it's going to
delete all of this up here. So I want to do is just
delete this part here. So to do that, I'm just going to bring in an edge
loop, so control. Left click, bring it over just in front
of this wall here, and then finally I can
come in, grab this part. I can see that there's
not going to be anything showing and
delete that part there. So delete faces,
and there we go. So now, if I go over the top,
I know it's hard to see. But what you can see is now that we've got a big
empty space here, which is what we can
actually work with. Alright, so that's looking good. Now what I want to do is I've got the right size for this. Where's the actual height. So how high they'll want it. Now, I want to be able to see
these archways from here. So from this viewpoint here. So I'm going to want one
roundabout in there, and I want to make sure I can get a second one in as well. So I'm going to actually
bring it in a little bit. So I'm going to press S and X, bring it in a little bit, like. So then if I press Shift D, you will be able
to see that I can actually put one
at the side of it, and that's exactly what I want. They're a little bit
bigger these than the ones that had in my original
because I think, actually, I should have
gone a little bit bigger. So that's why I'm doing that. Now, before 0.1 at the side, I want to make sure
that, for instance, I want to delete it out
the way because I've not got it set up the
way that I want it yet. So first of all, I'm going
to press delete on that. Then I'm going to
come to this one. And what I'm going to
do is pull it out. And with the arches on here, I actually don't want them to come around like the bridge. I don't want them
to be like that. What I want them to do is actually come down from
the straight part. So where this goes around
to the straight part, I then want to drop them down. So what I'm going to do is
going to grab this part, this part, press delete, faces. And then what I'm going to
do is I'm going to come in. To the part that drops down. So you can see from here going all the way
around to here. For press one now, you can
see now these are straight, so nice and straight
from there to there, press delete and faces. From here, then, what I want
to do is I want to come in. I want to grab this one
and this one, press one, and I want to press
E and Z and pull them down past where
this is going to be, so you can see it slightly past because this is going
to be a boleum. Now, from there, I can press the F born to make
a face on here. So F. And then what I can do is I can press
Shift and click, press the F born, come
around the back then, and then Shift click, press the F born,
and there we go. Alright, let's reset
them all the transforms. So Control A, A transforms, right click, set
origin, geometry. And now let's see if I
pull this into place, what it's actually
going to look like. So I'm going to
pull it all the way back all the way back to here, and this is what it should
actually turn out like, so you can see have gone arch. Now the thing to remember
about these arches Is that? How high do you
actually want them? Because you're going to have some bricks going
around there as well. So just take that into account. You're gonna have some
bricks going down the side, so you don't want it to be
too close to this wall. So let's have a look. If
I bring another one in, so shift D, let's pull it over. So, is that going
to fit in nicely? I think actually that is
going to be pretty nice, so I'm going to go with this. If you want to make
them a little bit thinner, grab them both. Just make sure that
you're on instead of medium point that you're
on individual origins. And then what you can do
is you can press S and X and pull them in a
little bit like so. And I think actually that's
looking a little bit better. From there, then let's join
them together with Control J. And then what I'm going
to do now is I'm going to come to this wall that
I've actually prepared, and then I'm going
to press Control A, A transforms, set
origin to geometry, add modifier, and
then we're going to go to generate an a
Boolean, like so. The Boolean, of course, is going to be these that
we've just created. And I always tend to
if it goes like that, just put this on fast, and then normally it
actually fixes that problem. Normally, this happens because
this isn't a full block. In other words, this
is just a phase, and so it sometimes doesn't
work it out properly. So what I'm going to do
now is I'm just going to come over, press Control A, and delete those out of the way, and then come back
to Maboan now, and you can see here's Mbolian. So here you can see
when I select them all, it's going to select them
going all the way around. And this is one of the
problems that we have B Boolean. So now
let's fix that. So what I'm going to
do is going to press Shift click Shift click. And you going to come to all of these parts that want
to delete, like so, and you will have some other problems where
you'll have to come in and delete some
more parts, like so. So Old shift click,
Old Shift click, press delete and faces. And now you can see
that hopefully, we should have got
rid of everything, and all we'll have now left is these two bullions and
if you delete those, you will end up with
something like this. Now, you can see that we've
still got this part here, which we didn't
take into account. So what I'm going
to do is press tab. I'm going to come
to this part, press delete faces. There we go. All right. So that is
looking pretty nice. Now, you can see, as
well. It's getting a little bit harder
to see in there. And but the thing is,
because it's a great box, we really don't
need to worry about the inside of here
at the moment. But what we do want
to do is create how far back it's
actually going to come. And we also probably better off creating a floor that's
going to come out here. So what I'm going to do
is I'm going to actually use a cube to actually do that. So I'm going to press Shift
D because you can see, Mcurse you know what? We'll actually just bring in a cube and see where it comes. Shift D. Let's bring in a
cube, and we'll bring it in. We'll go over the top
with Control seven. And I'm just looking.
Can I actually see, No, that's not going to help? I can't see anything
from that view. So what I'm going to
do is, I'm just going to put it round about here. Like so I'm going to press
sensed, pull it down. Oh, so it's into there. And then I'm going to pull
it back a little bit. And this, you'll find is
the easiest way to do this. And then what I'm going
to do is pull it down all the way down, so
it's touching in there. And then what I'm going to
do is pull it back. Like so. And then I'm going
to grab this edge on here, pull this out. Like so, because
the actual river will be or moat will
be just above here. And then what I'm going to do is I'm going to pull this now. Into here, and we're going to pull this back
to where I want it. So I'm thinking something, something like that, I
think should be fine. And now you can see what
we've actually done there is enabled
ourselves, if I come in, let me come out, enabled
ourselves to actually have control over where we're
actually going to put this room. So now you can see
if I go in there. It is a little bit hard to see. You can see now I've
grow all like this. Now, for me, what I want to do is I want to create my room. So what I'm going to do
is I'm going to come in. Press Shift H. That then will hide everything
else out of the way. And then we're
going to press tab, press control law, left
click, right click, and then I'm going
to press Control B to bring in the bevel
and I'm going to pull it out all the way to give us some thickness
on our room. From there, then, what I want to do is scroll the
mouse wheel back, like so, and then we've just got those edges on the
outside, like so. And then what I'm going to do is another edge loop control law. Going this way this time, pull it all the way to the back. So. And finally, then what I can do is I can grab
each of these now. Like so and then press
and pull them up. And there you go.
That is a room. And now you can press
l tag in object mode. Like so. And there you go, now you can see you've
actually got our room. Now, we're not
going to put a roof on there or anything like that, but we're able now to get a
good idea of how the room in there is going to actually
look like because we are going to have you
know some steps in there. And the door over here. But that looks very nice.
I'm happy with that. Now what we can do is we can move around to the other side. First of all, before we finish, let's just bring
a door because I just want to put a door in here. So I'm going to pair
a shift D on my door. I'm going to turn it around.
So Alt and R like so. And then all I'm going to do
is put it into place here. So I'm going to make sure first of all, it's on
that ground plane. And I'm then going
to spin it round, so Rs spin it around
into place, like so. And then finally, I'm going
to just pull it back. So I'm going to make
sure I'm not normal. Let's pull it back
into place. Like so. And this now is really, really starting to come along. All right. You can also see that the steps are way way too big at the moment
I mean he's got to jump down them
like some giant. And again, we'll be
fixing that once we've actually got this
gray box finished. Okay, so on the next lesson, we're going to start
working around here. I just want to make
sure that my door. I think my door has to come a little bit over
here, actually. Yeah, I think it needs to come, which means we
need to rotate it. Because, while I'm also going
to do is have some more, you know, another kind
of steps going up here. And then what we're
going to do is going to have a ramp going from here, and then going up to another
load of steps up here. So to really, you know, bring out that intricacy. So this is the next
hard part now, but we're nearly not far
off done with our gray box. All right, everyone. So again, I'm going to save on my work, and I'll see you
on the next one. Thanks a lot. Bye bye.
12. Expanding the Wizard Tower with New Extensions: Welcome back if you
want to blend the fall modeling and geometry
node workshop. Alright. So with this
now, you can see, pretty much we've laid down
the main foundation of it. It's looking really,
really intricate, but we want to push it
a little bit further. So always in your
own gray boxes, try and push it a
little bit further, try and make it as interesting
as you possibly can. And I think the way to do
that is we'll also add on some steps
leading up to here. And then we'll also add on some steps leading down to here. This will be really good
as well, from a viewpoint. You can see the top of
the spiral over here, and then they'll be a kind of
step crawling around here. And then finally,
there'll be another step. Coming up here somewhere, which I think will make it
really, really interesting. And finally, then
we can actually have a fence going around here, some steps going down
here and just really, really finish off the piece and make it look
really enticing. Alright, so let's do that first. So, the first thing
then I'm going to do is I'll put a part on here, and from there we can work
with the door on this part. So let's bring in a cube. So all I'm going to do is
I'm going to press Shift A, bring in a cube. Let's bring it around them. And the other thing is, well, people might ask, well, you know, the gray box took
so long to actually create. But this is, like, one of
the most important parts. You should really take
your time doing this, so don't worry if
it's taking you know, a little longer than
you thought it would. Alright, so from here, then what I'll do is I'll pull this. I'll start with it all
the way down there. I can move it around
if I actually need to because I'm going to put
another block on here as well. So let's actually
bring this up now. So all I'm going to do
is, I'm gonna press tab. I'm gonna go into face,
let's grab this top face and let's pull it up
into place like so. And what I want to do is here. I want it to actually
be into the roof. So rounda here into the roof,
So what I'm going to do is, first of all, though, I'm going to pull it
out a little bit, so I'm going to pull it
out a little bit, like so. And then what I'm going
to do is I'm going to put this part below the roof. So this part below and then press and pull it up to
the top of this roof. And finally, let's
press S and X, and it should be on normal. I should have stated that
it should be on S and X, and then you should
be able to pull it in because it's based
on its normals. Alright, so, something like that looks good. We might need to. Pull the whole of this out. So I'm just going to
grab the whole thing. I'm going to press S&X and jaws widen it a little bit, like so, and I think then that will be enough room
because basically, if somebody's
walking into a door, we've got to remember there's
going to be a door here. So once I put my door on, you've got to have
enough room for them to walk into the door and
then go somewhere. We can't have it where it's
really thin down here. They walk into the door,
and then they just stood against a
wall or something. So we have to think about that as we're
actually building it. Now, let's grab this
actual door here. I'm going to duplicate
it with shift, and I'm then going
to pull it out. And all I'm going to do then, is I'm going to press
tar and rotate it round, and then I'm going to
press R and Z and rotate it around to the
same axis as this. Now, we can use snapping
and things like that. We're not going to do that
because it is just a gray box. So let's just get
it in place first. And then from there, we can see if it's actually
going to fit in. So if I pull my door here, you can see there it's
fitting in very nicely there. Albeit, it's going to be a little bit tight down each side, but I'm absolutely
fine with that. I think maybe, maybe we might want to pull
it out a little bit more. So all I'm going to do is
grab this one and this one, pull it out a tad more, and then grab this one
and just pull it over, like so. All right. So now what we're
going to do then is work on this bottom
section here. So there's going
to be some steps that are going to come down to here down to this
other part on here. And finally, then
there's going to be another part around here. So let's do that part now. So what I'm going to do again, I'm going to grab
a cube, so a cube. I'm going to put it right
over here this time, so bring it right over here. I do want it face in
against the x axis. That's absolutely fine. And then what I want to do
is bring it up from here. So I'm going to bring
it up probably. I want it to be the
top of the roof here. Maybe just just below, like so. And then what I'm going to do is I'm going to pull it out, so S and y this time. Let's pull it out. Like
so, and there we go. It's going to be
something like this. And then finally, I want to come to the top now and
bring that in. So if I press S net,
I can bring that in, and there is going to be my
roof going against here. From there, then, let's
bring it down to here. W it. I think coming down past here
will be a little bit low. What I'm going to do is, I'm just going to
grab the top of it. I'm gonna press, pull it down, like so, and then I'm going
to bring my door now. So I'm going to bring
this door again, so shift D. And you see
what I mean with the doors. They're so handy giving
you kind of a reference, and that's why I
actually use them. So, tar, let's bring our door. OSD 90. Let's spin it round. And then what we're
going to do is we're going to put it in place now. Alright. Also, we're moving
pretty fast as well. But we have got key
commands down here. And for those of you who are, you know, struggling,
just rewind and go back. There's nothing wrong with that. It's always going to
happen in the beginning. Don't expect to learn everything
straight off the bat. We can't go super super slow because it will make the course, you know, exponentially long, so we can slow things down. That's no problem. We
can always do that. Alright, so I'm going to
put this round about here, which means now I need
to lift this one up. So I'm going to pull this
up to round about here, and then we're going to come in and actually lift this one up like so into there. So, this should be in there. This should be hidden in here. And now we can see we can have some steps going all
the way round to here. As you can see, we've got some steps coming all
the way round to here, and now is another part on here. It it's not the final part because we've got
our tower over here, but it will actually finish
off kind of this piece. Alright, so let's come in now
and bring in one more cube, so cube bring in a cube, and let's bring it over here. And then what we need
to do now is we need to work out where it's
going to actually go. So I would say that it's
probably going to be good to go at the top of this roof. So right at the top
where this roof is, that is where we should
be putting it, I think, so I'm just going to pull
it out, pull it out, and then I'm going to pick it up now. From round about there. Yeah, something like
that. And then what you can do is you know, the part that's
going to come round here so the platform can come all the way then round to kind of the top of this roof. And why I do that is because the wooden parts then can
all kind of slot together. So we'll go more into detail about that as we
actually carry on. But it's always thinking about, Okay, what we actually
going to do this. Alright, so I've
got this here now. Again, I'm going to
bring in my door. So if I grab my door,
shift and then going to bring it over 90, and it's going to be
in the side here. So we're going to
want one door in the side and one door in here. Now, the important
thing to remember is here that when we put
this door in place, not only does it need to
fit in this space here, but it also needs
to have enough room to actually do something
inside of here. So, in other words, if
a guy walks in here, he should be able to open the
door to walk in there and walk in another door to
come out and up here. So we need to think of that
and take that into account. I think on my
original I made this a little bit too thin,
to be honest with you. Alright, so I'm gonna pull
my door up a little bit. Like so. Put it in place. Let's grab my door
again, put it in place. And then what I'm going
to do from there, I'm going to press shift D. I'm going to bring
in another door and just put it the other side. And now here we can see that these probably going to
be a little bit too thin. So grab my cube, press S, and y, pull it out a little bit, pull my door this way. Like, so pull my door this way. Like so. And yeah, that's looking absolutely fine. Now what we'll do is we'll
bring up the top of this, so I'm grabbing the
cube, pull it up. Like so, making sure there's some nice clearance
there, pressing. And then what I'm going
to do is press S and X, and pull it in,
like so. Alright. So now that's on. We're pretty
much done with this side, and we're pretty much
done with the backside. We just need to now put on this little tower that's
going to go on here. So to do that, what I'm going to do is I'm going to
come into this part. I'm going to grab
this part here. I'm going to press Shift
S, cursor selector to move my cursor there
to make it easy for me. And then we're going
to press Shift D, I'm going to bring
in a cylinder. Now, at the moment,
my cylinder comes in at 32 because I
restarted blender. I'm going to put this down to 20 again and just put it
where I actually want it. So I'm thinking something
roundabout there. And I know I keep saying something roundabout
there, but again, I really want you to
create your own building, so don't worry about it if it doesn't turn out, you
know, the same as mine. Let's press S then
and pull this out. And then what I'm going to do
is pull it all the way up. So I want it to be
higher than this tower, but not as high as this tower, since this is the main one,
and then that will give us a really nice shot and silhouette
of our actual building. So now, if I grab
the top of here, like so, pull it up to
something like here. And then what I'll do is
I'll press and pull it out. I always tend to when
I'm doing roofs, I don't just press and
pull it straight up. I press first, and then
S pull it out like so, and then pull it up, and then S, pull it in. And that I tend gives me a better idea of what my
tower is going to look like. Alright, let's right
click then and Shade Smooth, and there we go. This is what we've got.
Now, we don't need to really do anything else on here. We just want to have
a quick checkground just to make sure that we're actually happy with how this is. And I'm thinking
that all of this, we can see this
beautiful archway now. We can get a good idea of our you know, our actual bridge. And you know what?
I think actually this is looking better than the one I originally
made. Yes, I do. So now, what we'll do
is on the next lesson, we'll actually start bringing in our sky texture because it's
no point having a gray box. If you've got our
sky texture in then, you can't see any
of the lighting. And I'll also show you how
to bring in a material, which is going to kind of show you how everything
is going to be, you know, the ambient
occlusion on there, because that then makes
a real big difference. So you can actually see shadows and now it's actually
going to look. Alright. Before we
do that, though, let's save it out.
And I'll see here. On the next one,
everyone. Thanks a lot. Cheers. M.
13. Basic Techniques for Render Preview in Blender: Welcome back, everyone
to Blender fall modeling and Guat node workshop, and this is where left off. Now, at the moment,
you can see that we are in our viewport, and we're also in object mode. So we really want to
be in render view. So we've got material view
here, which is this one. Now, obviously, we've got
no materials on here, so it is just going to be white, and I don't actually
like the way that the it actually looks. So what I tend to
do, first of all, is go to my render view. And at the moment,
you will see that we've got absolutely
no lighting here, and we're also on EV. Now, I tend to work in
Blender cycles because the field like I get
a much better view of what it's going to
look like towards the end of the actual build. So that's what I tend to do. Also, I tend to use sky texture because I feel like
I have a lot of control over that sky texture, and it saves me a lot of
work looking at HDRI. That is not to say that sky
texture is better than HDRIs. I'm going to go into sky
texture in a minute. But it's up to you how you
really want to light it, but we will be using sky texture because that is in built
within blender as well, which has that added bonus. The problem with the sky texture is it doesn't work
so well as I said in EV and it's mainly
working in cycles. All right, so let's
go over to our world. You'll see here on a world at the moment. This
is what we've got. So we've got our world here. If I come over then and
change this to red, you'll see that the
whole world goes red. Now, this is just
the basic cell. Of course, we want
to change this. So the way we're
going to do it is go over to shading panel. We're going to load that
up. We're going to put it back onto the EV render. And then what I'm
going to do is I'm going to click this button here, which is going to
give me a new world. Then what I'm going
to do is just put in sky, environment, like so. And then all I'm going to do now is zoom out a little bit, and you can see that
I've got nothing here. And the reason I've
got nothing there is because I'm still in object. This is basically
for your shaders, the actual materials that go onto your actual building
and things like that. So let's come over
and put this first of all on Wild, and there we go. This is what we've
got. So this is our sky environment
at the moment. And if I come in and
delete this background, like so, you will see
everything goes black. Now, let's come in and
press Shift D. And what I'm going to do is I'm
going to search for sky. Texture, bring that in, plug it in, and straightaway, you will see now we actually
have something that we might be able to work
with or start to work with. But you can see it
actually lights it up really, really nicely. Now, we've not finished yet
because once we actually put some of these options on and you can play
around with these, by the way, once
you've put them in. So first of all, let's
look at the sun size. Now, this su size, you're probably not going
to find it hard to see, but when I actually turn around, I'm looking for my
son at the moment. I think my son is
actually around here. So if I make this really, really small, let's have a look. I'm going to point
to zero, actually, and then I'll show you what
it does once we've actually set these up because you might be able to see it a
little bit there. So let's turn first of all, this sun intensity
down to not 0.1. And you should see
that doesn't have a big impact on
our scene at all. And this is because what
I was saying before, it's actually in v. So
let's actually go over now and let's turn this to
blender cycles, like so. And now you'll see if I come to my son and put this way up, you can see now it has a huge
effect on our actual scene. Now, I'm going to
put this on 0.16. So I recommend you do the same. And then what I'm
going to do is I'm going to turn my
sun size up now. Let's see if I can
actually see my son now. Generally, it's round in
the sky there is my son. Okay, so now we can
see that we can turn the sun down or we
can turn it up. And this is really handy if you want an actual sunset
or something like that. So it also has that in built
within the sky texture. Alright, so let's now go round. And what I'm going to
do is, first of all, I'm going to turn
my sun elevation up to around 68,
something like that. And you can see now
we've actually got some shadows because the
sun is higher in the sky. Next of all, we've
got the sun rotation, and you can see ours,
we turn this round. We start to get some really nice shadows again, obviously, because the sun is changing
direction in the air. Now, the next thing
we've got is altitude, and this is basically
how the sun looks. But we're about the
actual model is. So if you want your
model on top of Mount Everest or
something like that, two, then you need to
put this altitude up. And what'll happen is, it will change the actual atmosphere. So if I put it this
to let's say $20,000, you will see now,
this is what it would look like up the
top of the mountain. Because it's 20,000 meters
up is what it's registering. Now, I'm going to
set this to zero. I want it at sea
level, basically. So let's put it back down there. Now we're going to mess
around with the air, the dust, and the ozone. And these just have
different effects on how the actual scene
is going to look. So, for instance, it could be a very deserty
scene or something. You can turn the dust
right up and you can see what kind of effects
you're going to get. You're not going
to get dust within the air or anything like that, obviously, because
that would, you know, require a particle
system or something, but you certainly can
start to get that kind of atmosphere and from there you can actually
work with it. So, I have a number
of settings that I actually use for my particles, sorry, for my actual
sky textures, and I'm going to set
my air to not 0.5. I'm going to set
my dust to 1.769, and then I'm going to set
my ozone to 6.923, like so. And there we go. That, I
feel for me is a really, really nice mixture of
all of these things. I think I get some lighting. Always at the end, though guys, I always, you know,
mess around with these. It's not like I just set these in stone or anything like that. But to begin with, I
always set them up. So we are going to
go more in depth on cycles and EV a little
bit later on in the course. But for now, what
we want to do is we want to make sure
that if we can, we're using our
GPU, not our CPU. In other words, we're
using our graphics card because it is much, much faster, especially
if we're looking at, you know, our scene
in real time. So let's come over, first
of all, and go to edit. We're going to go
to preferences, and we're going
to do a couple of things on here because we've reached the stage now where we're moving past the great box, and we really need
some information, and we really need our render
engine actually set up. So what I'm going to do is
I'm going to come to system, first of all, and you can see, I've got all of these
options on here. This Optics x is the one
that I actually won. Now, the thing is, I want to turn on my
graphics card here, so you can see this
is my graphics card, and this is my CPU, which is my processor. So what I want to do
is I want to turn it onto Kuta or Optics X. Any of these will be great
if you have any of these. If unfortunately a non, you can't really do
anything about that, but just turn this
onto optics X or Quta. Optics x should be the
new cycles render engine, which means that
it should be much, much faster to actually
render things out. Now, once you've done
that, you will have the ability now if
I close this down, so let's close it down. By the way, I'll just
go back and say, I used to think that ticking
both of these on was the best way because I thought if it wasn't using
ographics card, it would start using your CPU. It turns out at the moment from some information
that it's actually better picking just
geographics card. So just pick tick
that one on and leave the other one off.
Let's close that down. And now we can do is we can
see this is the sample rate, how quickly it's actually loading these before
it gets done, if I turn this round, you
can see how quick that is. And then if we come down here
now and put this on GPU, Now you can see
how fast that is. So look at the
difference in speed, and this is because it's using
our graphics card instead, so much, much faster, and that is exactly
what we want. Alright, so what
we'll do now is we'll actually look at one more
thing before we finish. So let's go to edit preferences. And the other thing
I want to show you is if we come to interface, Come down, you've got one
that says status bar. Now, the moment down on the bottom right hand
side you can see, it's blender 4.1 0.0 beta, and this is because
at the moment, I've got my blender version on. I recommend turning
all of these on. All of these things
are really important. Scene statistics
when I turn that on, as you can see,
shows me the number of vertices in the scene,
the number of triangles, and the number of objects,
the scene duration, as you can see, shows me the number of
frames that are there. We've got system memory. And one of the most
important ones is the video memory.
So this is V RAM. Now, VR is when you're getting
problems with rendering, and it'll say out of memory
or or out of memory. This is generally down to
how much V you're using. So generally, you'll
have to turn things down if you haven't
got a lot of V RM. But you can see at the moment, my V RM is being used here, 5.2 out of 8 gigabytes. So it says I've got 8 gigabytes. Now, the V RM is something that's normally on
the graphics card. So there's not a lot you
can do to actually bring that up apart from buy
a new graphics card. So, so let's close that down. And then what we'll do on the next lesson is we'll
start going through the ambient occlusion
and how we can actually get a good idea of what this is
going to look like, even more than what
we've got here. All right, everyone, so
I hope you enjoyed that, and I'll see you on the next
one. Thanks a lot. Bye bye.
14. Implementing Ambient Occlusion for Depth: Welcome back everyone
to Blender for Modeling and Geometry
node workshop, and this is where we left off. Alright, so let's actually go in and look at the
material we can use on here to really bring
this thing to life and actually check how good the
gray box is going to be. Now, there are a couple
of ways of doing this within cycles, and with EV. I am going to show you both. And again, later
on in the course, we are going to go
a lot more in depth into the render
engines of Blender. So first of all, let's come to the EV one because this
is the easiest one. At the moment, you can see the sky doesn't look very good. It's not the same as in
cycles, for instance. But what we can do with EV is, we can put on ambient occlusion. And then what we can
do is we can open this up and change this
around like so. So now you can get a little bit of ambient occlusion
as you can see. You can also drop this
down, or turn it up. We can turn it up even more like so and bring in lots
and lots of shadows, like so, and you can see it does make a little
bit of difference. As I said, with the
HDRI though, In here, it is going to make
more difference, but I prefer to use the
cycles render engine. We can also got some
other options within EV, which is screen space
reflections for water and metallic
and also bloom, which is going to
actually light things. So if you've got some
lights in the scene, it's automatically going
to add bloom to them. So it's very good for
real time rendering, But now, let's move
over two cycles. You notice as soon as
I click cycles on, we are going to lose a
lot of those shadows. We don't have any
options here to put in ambient occlusion or bloom
or anything like that, but luckily, we are able to
wing it in a certain way. So what I'm going to do is
I'm going to go to object. I'm going to click
on this first tower. And then what I'm going
to do is I'm going to come over to my materials panel, which is here. I'm
going to click new. I'm going to call this
ambience Mcclusion Now, from here, what we can do
is we can actually bring in something called
an ambient occlusion. So if we go in, shift A, type in ambient occlusion, so ambient with an M, like so, ambient occlusion
is here and drop that in. Next of all, what
we're going to do is we're going to bring
in a color ramp. Color ramp like so. Now, what this enables
us to do now is adding ambient occlusion to
our actual model here. So if I come in, drop
this in the fac, drop the color then into
the base, and there you go. Now, what we can do is
we can turn this up, and as you can see now, we're getting all of this
shadow underneath here. Now, I recommend don't
turn it up too much. Instead, you can bring
in so you can see here, I can move this
white up and down. And what that's doing
is it's basically distributing the shine from here and just pulling
it up towards those, you know, inner
parts where there should be some kind
of depth there. But what I want
to do is I always recommend pressing control and clicking and bringing
in one more and turning this then a little bit
more gray than what it is. So if you bring this
down a little bit, you'll see now we've
got a lot more control over how this is going to look. And now you can see
this is looking much, much better with these
kind of shadows in here. Now, what you can do is finally, you can grab everything
except the guy. Let's just hide the
guy out the way. We don't want to give him
any ambient occlusion. We can grab
everything like this, grab this part last. So make sure we shift
select it last, and then we can
see that we've got our ammentocclusion in here. And then all you're going to
do is you're just going to press Control L and
you're going to copy or link materials
like so. Double tap the A. And now we've got a load of
amment occlusion in there, and you can see jaws down
nice, this actually looks. And more importantly, you've got a real idea of
what this is going to look like from
the actual gray box. You can see all of this
darkness down here. Alright, so let's now
go back to modeling. And then what we can do
is we can press S tab, And the other thing
you can do as well, is if you come up here
to this board here, you can see that I can
turn this off and then I've gone even better like you've got no what's it
called wire frame on here, no axis or anything, and now you can have
a real good view of what everything's
going to look like. The other thing I recommend
you do is as well, if you come over here
to the right hand side, where your cycles render is, make sure that you put de
noise in on in the viewport, and you will see that it
actually softens everything out. So when I'm finished with
something like this, what I tend to do is then
I'll tend to come over, turn off this, and now I'm looking round from
all of the angles, what it's going to
look like, getting a real good view of how
everything's going to go. Now, I can see that
we've got a lot of darkness in this part here, and that might not actually
work out too well. So what I'm saying
is with this part, especially here, might come in, turn this on again,
and let's move it closer in and see what
that's going to look like. And this is why, of course, we are creating our
actual gray box to make sure that we're
getting everything right. And now we can
see, for instance, that this is looking
a little bit better. You can see that we've come a little bit too close to here, So I'm just going to look again. I'm going to actually
put this back again and let's have
a look where it was. But it was all the
way over there. Just got to be careful
of this part here. Now, the one thing I would say is that this part
here is not too bad? It's just this part
here, which tells me, probably going to be better off making this a little bit bigger. So what I'm going to do
is press shift and click, Altern just pull it out, Altern, pull it
out a little bit. L so have a look now. That's looking much,
much better now. We've not got as much in there. I'm also thinking though, is it going to be better pull it out a little bit as well. And yes, it is. And yes, I'm thinking that's
looking bare now. And when I'm looking
from here now, it just looks a little
bit bare and what it did. Now, of course,
we're going to have some wood in there as
well, so that's fine. I'm also looking at this part over here and where it's going
to go through my roof. And I think that this part just needs to go
up a little bit higher, so I'm going to
press Shift click. And I'm going to pull it
up. Now, you can see there, we're pulling up at an
angle. We don't want that. So let's press control plus. And what we'll do is we'll
also put this onto global. And then what we'll do is
we'll pull it up slightly. So when we've got a piece
of roof wood coming here, it's not going to intersect
with this too much. You know, you're not going
to have a piece of roof tile stuck out here. Now,
that's looking good. And what I tend to do
now is I go all the way around looking at my angles. So you can see here
if we take an angle from here, this is
looking very nice. You can see the composition
is really, really nice. And I think this part
here is pretty much done. I'm very happy with
how that looks. I can imagine how I'm going
to support all of these. Okay, so that's looking good. Now, let's come round the back and do the
same thing here. So imagine that there's going to be some kind of steps
going down here. There's going to be
some steps coming up here and going
all the way around. And yeah, I think this is
looking really, really good. So hopefully, you've
got something like this with a fair
amount of intricacy. I'm looking at this
bit in here as well. And I think if you've got
anything close to this, it's going to turn out
really, really nicely. Alright. So what we're going to do now on the next lesson, we're going to first
of all, save this out, so I'm going to go
to save this out. Now I'm going to just bring up the resource pack once more. And you will notice at the
moment, the resource pack, if we come over to
our collections, we have some collections, but a lot of it isn't in
the place it should be. Now, I really want
to show you how to actually put all of this in
order. And I think it's good. If first of all, I show you
a video on the next lesson, which is going to explain
all of the asset manager. And then from there,
we will actually put these in their own
asset manager. I think that will be the best way to do it
because then you'll really get a good grasp
of how to do this. From there, then, what
we'll be able to do within, you know, our own Tower scene. We'll actually be
able to pull all of these things in
whenever we want them, including all of the materials, all of the grit nodes, and all of the water plants
and things like that. All right, everyone. So I hope you're gonna enjoy that, and I'll see you
on the next one. Thanks a lot. Bye bye.
15. Introduction to Blender's Asset Manager: Welcome back, everyone
to Blender four, Modeling and Job,
you knowed workshop. And now what I'm going to
do is I'm going to play a quick tutorial all about
the Blender Asset Manager. I early said new
Blender Asset Manager. But it's been around
since Blender three, so it's not exactly
new at this point, but it's still an
amazing amazing thing that you should really
learn because it's really, really going to speed
up your workflow. So I'm going to play
that now, everyone, and I'll see you on the
next one. Thanks. Bye bye. Welcome everyone to the
Blender Asset Manager Guide. And based on what we're
going to do in this one is just go through the asset
manager, show you how it works. It does seem fairly complex
on when you first start this, but actually it's quite simple once you get your
head around it. So here you can see, I've
got a standard scene here, and I've actually brought in some actual assets,
and they're named. This is important, actually, that just make sure you
name the assets before you actually put them
into the asset manager. Now, you will notice when
you first come into Blender, whether that be Blender
three or blender four. At the top here, it doesn't
actually say asset manager. So that's the first
thing we want to do. So to do that, all we need to do is come to the
little plus born. We're going to come across
to where it says general, and then we're
going to go down to where it says asset manager. And once you click
that on, you'll actually be taken into
the asset manager, and this is the easiest way
to actually work with this. And the thing is now you'll
see at the moment we have our asset manager down here with all of the files
on the left hand side, and in this, this we'll be
populating all of our assets. Let's actually just pick
this up a little bit, then. And then what we're going
to do is you can see at the moment we have current
file and we have essentials. And under essentials is
basically all of the assets that Blender has decided to put into the asset
manager as default. What we want to do is we want
it to be on current file. So now I'm going to
do is I'm going to come to my first asset, which is going to be my tree. And now what we're going to
do is we're going to add this into our current
file asset manager. With this selected it it come over to the
right hand side, you can see here it says tree. If a right click,
you'll see here, it says one that
says marks asset. The moment we actually
mark this asset, you will see now that actually appears in this space down here. You will also see that if we
put this onto material mode, and now if I come in and
actually drag this out, you will see that it
actually comes out with materials
actually attached, which is really, really handy. So now let's delete
this out of the way. And what I'm going
to show you is now, if we focus on our actual car, let's press shift in space bar
just to move it over here. And then what I'm going to do
is I'm going to come over, right click and I'm going
to mark this asset, and you'll see now our
car appears there. Now, if I come up and right
click and put clear asset, and then spin this round, R -90, like so, right click Markers asset, you'll see it appears
exactly the same way. So to actually change the rotation in the
asset manager itself, what you need to
do is you need to now reset all of the transforms. So what I'm going to do is, I'm just going to
clear the asset, and then we're going to put
control all transforms, right click set
origin to geometry, and then right click
and I'm going to come down, markers asset. And now you'll see it's actually rotated
that round for you. You'll also see as well. Now if I pull this out, it comes in with all the materials. We can actually do some
other things as well. We can actually also
save out materials. So what I'm going to do,
first of all, though, is I'm going to come down and click the little plus button. And what I'm going to
do is I'm going to call this assets, like so. I'm going to call the
next one materials. Like so. Now I'm going to do is, I'm just going to
save out my work, and then I'm going
to go to unassigned. And you'll see at
the moment we have these two assets that
we put in there. We can simply shift select them both or shift
select them all, if you've got a
lot and drop them then into our actual assets, and now they're going to
appear in our assets. Now, let's move on. And if
we click on this bench, what we'll do is we'll
come over to our material. And we can see we've got
two materials in here. So let's click this one, markers asset, the same thing. And then what we'll
also do is come to this one and we'll right
click and markers asset. Now, you will see when
you've marked them as asset that we've got
this little book here, the same as we've got up here. And now you'll see we haven't got any assets in
there at the moment. So these two materials
didn't go in there, and that is because they
will be in unassigned. Now, let's grab both
of these materials. Now, drop them into our
materials, and there we go. We've got materials,
and we've got assets. Now, the best thing
about asset manager. What you can also
do is you can also use this for things
like geometry nodes. The only thing that
you can't use it for at the moment is animations. But pretty much everything else, you can use it with
the asset manager. Now, the next thing
we want to look at is actually doing that then with
an actual geometry node. So I'm going to do
is press Control V, and here is a geometry node
that I've actually created. You can see here that if I pull this up over on the
right hand side, you can see it's actually
a geometry node. And at the moment,
if I press tab, you'll see it has
actually no mesh or any kind of topology because it's obviously
a geometry node. Now, what I want to do
is I want to come up, right click Markers asset, and now you'll see that I've got something that
says unassigned. So let's make one more
now and what we'll call this is geometry
or Geo node. Like so, and then I'm
going to come to it on a sign and put it into
my geometry node there. So you will see now
if I bring this in, it actually comes in as a
geometry node, which is really, really handy if
you've got loads of geometry notes and you want to bring them and drop
them in your scene. Now, let's first of all, come up to file and save because this is
all great in that, but actually, how do we
use this in other files. So the way that we
can do that is we can come up to a new blend file. So let's open up
a new blend file. So here is our new blend file. And what I want to
do, first of all, I want to come up and
add in my asset manager. So plus asset manager. And at the moment, you'll see
there's nothing in there. And what I want to do now is, I want to go up to edit, I want to come to preferences. And within preferences, you will have one that
says file path. And this is basically
going to tell Blender where it needs to go to look for asset manager. So let's actually come in, and what we'll do is
we'll click the plus. And then all I'm
going to do now is find where I've
actually saved out that previous file
and I saved it in something called Blender
Asset Manager, which is here. So this is the one that
I'm going to add it to. You'll see here that
it doesn't show any blend files or
anything like that, and then all you need to do
is add asset library like so, and then we can actually
close that down. Now what I can do is I
can come down and you'll see that I've got one that
says Blend asset manager. And here are all of those actual files that
I actually put in there, as well as where it says assets, geo nodes, and materials. So now I can simply come in, drag and drop my
actual truck in there. I can actually turn
on the materials. And now you can see once again, it actually comes in
with all the material. Now, the best thing is,
if I actually bring in a cube now and
just drop that there, shift space bar just to move it. And then what I can also do is I can come to where my materials are drag and drop straight
on to my actual cube. Let the actual shader compile and load up, and there we go. Now we can actually drag
and drop materials as well. Let's come to our
geometry node then, and I'll show you
that that also works. So now we can see we've got a geometry node that
we can actually use, which is really, really handy. And now you can see just how useful the actual asset
manager really is. Now, the other
thing, if we go up to edit and go to preferences, you will see that we
are able as well to add many, many asset libraries. Just make sure that you
save your blend file. So if I bring this over
here just to show you, make sure you make a file, and then within
there, you're going to actually save
your asset manager. Because the most
important thing actually is when you're actually
saving it in here, you will see that what else comes in is an actual text file. This text file gives
blender all of the data that it needs to
actually set up these groups. So very important, If you're moving your asset manager
to a different file. Make sure you move this
text file as well. All right, everyone. So
let's close that down. And lastly, before I finish,
what I will show you is, if you come to Com file where
we don't have anything, you can also select all of
the things in your scene. Right click, go down
and mark as asset. And then you'll see
that they all get poured into the asset manager. All right, everyone, so
hope you enjoyed that, and I'll see you in the next
one. Thanks a lot. Cheers.
16. Organizing Projects with Collections and Layers: Welcome back, everyone to Blend the four Modeling
and Join workshop, and this is where we left
off after the asset manager. Now I'm going to play as
one more short tutorial, and this tutorial
is going to teach you all about collections
and things like that, because we're really
going to need that to actually deal with this
actual resource pack. Once we've done
all of that work, then on the next lesson, we're going to dive into
this resource pack, get it all s out ready for actually bringing in to
our Wizards Tower scene. All right, everyone.
So I'll play that now, and I'll see you on the
next one. Thanks. Bye bye. Welcome everyone to
our collections guide. And you'll notice over the
right hand side in blender. You will have something that's called theme
collections over here. And this is basically how the old blender used to
actually handle laying. So with different layers, you would have different scenes or different objects in place. It's changed a little bit now. And in the new blender, 2.8 onwards, we're now dealing with scenes
and collections. So the first thing
you'll notice is over here that we've got one
that says collection. Let's call this
collection plane. And then what we'll
do is we'll actually put our plane into
that collection. Now, at the moment, you can
see within this collection, our plane is actually here, and we don't actually
want the other three. We want them basically into
a different collection. So what I'm going to do is
I'm going to right click. I'm going to go and
click New collection. And then what I can do is I
can call this cube. Like so. And then what I can do is I
can left click and drag and drop my cube into
the new collection. And then what you can actually
do is you can actually close these up and you
can see how neat that is. Now, what we're going
to do is I'm going to show you the other way
of doing this now. So if we come to
our actual sphere, what I'm going to do is I'm
going to press the button. I'm going to then
click New collection, and I'm going to click sphere. Like so press enter or hit
the K boron, and there we go. Now we've actually
got a new collection with our sphere in there. The other thing is
you can also come, you can press the n button, and then what you
can do from there is you can actually
click on one of these, so let's say we wanted
this cylinder in the cube, and it will automatically put
the cylinder in the cube. Now, if you don't want that, you can press the n button again, new collection, and
let's put cylinder. So, and then click Okay. And then we go. Now
we've actually got a really nice collection
sorted out really fast. Now, what about the
objects in there, then? Well, what you can
do as well, is, let's say we want to change
the name of this cube. We can come on over to it. And instead of actually going
in here and renaming it, what we can actually do
then is press F two, and there you go, the
object name comes up. And if we change this to
cube 33, press center, You will see now if we go
to the right hand side, this cube is called 33. Now, it's important in large scenes to actually
put things into collections because
that way you can actually increase the
performance of blender, or you can hide certain
things out of the way. Because what you
can also do is you can grab multiple objects, press the button again, drop them in a new scene. So I press M, new collection, and let's call this one objects. Like so, and there we go. We have our new one with all of the objects
actually in there. Now, you can see as well that because nothing
is left in there, we've not got this
little arrow there, so all of these are now empty, but it's quickly and
easily able to just press M and put them in their
own collections once more. The other reason why
this is actually important is because many of the displacements
or particle systems and lots of other things within Blender or even omg nodes, you can actually use
collections to do certain things to a certain
bunch of collections. Okay, so the next thing
we're going to look at is over on the
right hand side, we're also able then to
hide any of the collection. So if we click the
little on here, that will mean that this
collection has been hidden away from
the viewport view. Now, it's important
to distinguish between viewport and Cam review. So the came review basically means that if I click this off, when I actually come
to render this scene, everything within
this collection will be hidden out of the way. It won't cast any shadows
or anything like that, it will all be hidden
out of the way. Now, the other one we've got
is this little tick born. If I select this, you will see that it just
turns both of them off, so it won't be visible in the
viewport nor in the render. Now, the other thing to look at is if we click this
little down arrow, we also have a few
interesting ones here. So we have one that
says indirect only. We have one that says hold out. But the ones we're most interested in is
actually this one here. So if I click this
little arrow here, You can see now we
get a new option. And if I come and
click it on here, you will see now that
if I come across, these will still be
rendered in the viewport, still rendered in the render, but I'm not able to
actually click on them, which makes this really
handy if you're trying to grab a load of actual assets or objects that you
won't actually be actually selecting this
collection on top of that. Now, the other thing
is if I turn this on, I can also do a search
here for let's say cube, so if I typing cube. So I'm able now to quickly and easily find it within
my actual scene. The other thing is over on
the right hand side as well. The double tap, the able and to deselect everything
also actually works. So let's turn this off now. So now, let's have a
quick look at this in actual action
in a real scene. So you can see here,
we have a scene here with many,
many, many parts, which aren't named,
and we need to basically put these into
their own collection. Because you can
imagine a scene like this with thousands
of parts all in the same collection
is obviously having an impact on the
blender performance. So what I'm going to do is I'm just going to hide the floor, hide this part of the
floor, hide maybe this car. And then what I'm going to do is I'm going to go over the top. And all I want to do now is just make sure that I'm
not going to select anything else apart from
this actual building here. And then all I'm going to do is, I'm just going to press B
and just try and select everything on that
actual building like so. Just make sure I've not got my camera selected or
anything like that. And then what I'm going to
do is I'm going to press the born new collection, and let's call it butchers Shop. And then press Enter and click. Okay. And now what
I'm able to do is I'm able to now come all
the way to the top of here, so I go all the way to
the top and then let's start closing up these
collections like so. So we've got square
building there. We've got bookshop and butchers, and now we've got
the butcher shop, which is the one that
we've just made. And now you can see,
just how quickly, I can actually
clean all that up. So I've come along and
I double tap the A. So I've not got
anything selected. I bring back my floor, like so, I double
tap the A again. And then what I'm going
to do is just close the hide the butcher
shop out of the way. And you can see this is the parts that I've actually missed. And then all I can
do is I can select these three parts or
four parts like so, press M, and let's drop
them into our butcher shop. And then they'll be
hidden out the way, leaving the other
parts that are left, which I actually missed. So butcher shop again,
and there we go. So now we're able to
hide the butcher's shop, or we're able to bring
it back into the scene. So from there, going a little
bit more advanced now, what we're also able to do is hide all of our
collections in one go. We just need our mouse
in the view port, and then all you need
to press is number one, and what they'll do is hide
all of these collections. From there, what
you can actually do is you can press number two, and what that'll do
is actually bring in the gray box or the second
collection on there. Number three then brings in
the third actual collection, and so on and so on and so on. As you can see, upturn maximum, I think of even nine or zero. So you can see very, very easy once
you've put them in collections, to rename them, to actually increase the
performance within blender, to hide them in the actual viewport or
hide them in the render. And then also once you've
done that to select them. I'd have to be a very,
very big scene to have more than ten collections. Within the collections as well, you can also add
in a collection, so I put new new here. And you'll see if
I open that now. We've actually got a
new butcher shop one. So within the collections, you can also have collections
within themselves, and you can build a really, really large
hierarchy from there. All, everyone. So I
hope you enjoyed that. I hope you found it useful. Thanks everyone. Cheers.
17. Preparing Your Asset Manager with a Resource Pack: Welcome back everyone
to BlenderFo Modeling and Jo Mcino workshop. And now that you've
watched those two videos, you should have a really, really good idea of out set up your collections and out
set up your asset manager. Now, I'm going to go
through this with you, setting up this resource pack because I think it's important of not just watching but
actually doing at the same time. And also, I'm going
to talk about how you can add things
into this resource pack. And make it even better. Basically, this can be
your resource pack, which you use in all of your future projects and
things like that. Or you can even split it
up into geometry nodes, into materials, into foliage and trees and
things like that. That's what we do here at
three D Tudor as well. We actually split them
up. So we have many, many blend files with all of these kind of
resources in there, and from there, we're
able to drag and drop them into any of our scene. And that's what we want
to be able to do here. So what I'm going to
do, first of all, is I'm going to come to my actual let's do these
first the geometry nodes. So if I come to
these, first of all, I'm just going to hide
just these texts. So I just want you
to hide these texts at the moment. So hide
them out of the way. And then what we're
going to do is going to come to this one first. Now, the first thing
I'm going to do is I'm going to
grab all of these, and I'm going to put them
into their own collection. So just grab all
of your geometry nodes, including the sphere, and let's press M, and
let's press new collection, and let's put it into geometry. Nodes. And I'm also going to come along and
just select all of this, press Control C, and
then just click Okay. And I'm going to show you why I'm going to do
that in a minute. Alright. So now we
should have if we come over to the right hand
side to our collections, we should have one that
says geometry nodes, and there they all are. Now, we can see one of these actually has these little
kind of books in there. That means, for some reason, this one's already
a geometry node. We don't really want
that. So let's right click and clear the asset. And then what we're going
to do now is rename them. So we'll come to this one first. We'll press F two
on the number pad, and we'll call this rocks. And then space, not ox, rocks. Space. Control V, press the
enter born and there we go, you can see now it's renamed. Let's come to this one then, and we're going to
press F two chain. Control V. There we go.
Let's come to this one. This one's already named. This one needs naming stairs. So F two stairs. Main Control V, and there we go, and then we'll
come to the plank. And I know this
might seem tedious, but trust me, in the end, it's going to make a
lot of sense and it's going to make your
workflow much much faster. So let's just keep
going down them. So cobbles. Like so. Let's come then to this one, which will be meadow. So I'll call it meadow. Paint, because that one is the painted on one and which we'll go into a
little bit further, and this one should
be curve meadow. So I'm just going
to rename this. I'm going to call
it meadow curve. And then I know
which one's which. And this one we're
able to draw on. Finally, then, this one,
which is the roof tile. I'm going to press
F two, roof tile. Like so. All right. The only one we don't
need is this sphere. So what I'm going to
do is I'm going to put this into its own
actual collection. I'm just going to
call it not needed. It's just there so that we know where to
draw on something. So, in other words, if I come in and just move
this out of the way. So if I press G, you'll see now those curves
are still on there. So that's all it's there for. Alright, so now we've
got all of these. We can actually close this up. And then what we can also
do is we can come to our ummage nodes and hide
them out the way like so. Now, you will see
in here as well, if I press tech and bring
back all of the text, we should now be
able to just come in, hide the other way, hide that other the way,
and then we're just left with these
texts here like so. Alright. The next
thing we're going to do is just hide the
floor out the way, and then we're going
to come to my trees. So I'm going to grab this tree. I'm going to shift, select
all of these trees, and then I'm going to
press, new collection, and let's call it trees. Like so. Then what we're going to do is going
to close that up. You can see as well
on these trees. Again, we've got the
same problem where they're already been
putting the asset manager. Just select them all, right click clear asset,
and there we go. Now we can close all of those up and hide them out the way. Ext of all, then,
we've got foliage. Let's press M, new collection, and we'll call it foliage. Like, so, click Okay,
and there we go. There's our foliage. Now,
before we go any further, we'll hide these out the way. And then what we
want to do is now we want to save
this out the way. So if I go to file, save our. Now, you can see here at
the moment, I put this, so you've got your original
resource pack here. I recommend saving this
out somewhere else. So what I'm going to do is, I'm just going to
delete this one. This is what I called it. I'm going to select a new one, and I'm going to call
it course resource. Pax. And that's just so
I know which one it is. You can call it
wherever you want, and then I'm going to go in, and I'm just going to call
it resource pack course. Like so. All right. Like that. And the reason I'm doing that
is because when I come to save this out with the
actual asset manager, you will get a little TXT file which we're
going to go into, which I think I've showed you in the video anyway, but
that's important. So let's first of all come
in though and carry on. So I'm going to grab my
little human reference. I'm going to press M. I'm going to call
it human reference. Like so. Enter and there we go. And then we close that up,
hide him out of the way. Now, let's come to water plants. I'm going to grab them
all. Water plants. Press the er button, so, hide them out
the way. Like so. Now we're coming
to these things, which need to be in the
collection they are. So you can see here we've got
all of these collections. And the only thing I
want in these is to have these meadow packs and
all this stuff in there. I don't want anything else, and I don't want to actually change the name of
these collections. And the reason is
these collections are named for a reason. And if we come back, so if I press Altag to
bring back everything, and then let's go
back to our meadow. So where is our geometries and we'll just unhide all of these. You can see that if I come
to this, for instance, go down, you can see that
this is based on collections. But we don't really want
to change that because we still want it to be
based on collections. So I'm going to leave
that as it is for now. Now, let's go back to it, then, so we should have now, water plants is the
one we did last. These ones we don't want
to mess around with, as I said, and finally, we've got now material. So if I come, two man materials. Before I put them in their
own kind of collection. What I want to do is,
I just want to make sure that all the
materials are named. So if I come to this one, you can see it's
ground material. You're just going to go through them and make sure
they're all named. This is what you should do
when you're putting anything into your asset manager because
you really don't want it, where you're going to be
bringing in things like this, where it's got two
materials on there. This one is obviously fabric. It's also got in dark on there, so just minus that off, and you want to make sure that everything is named correctly. This one, again, has
black metal on there. Let's minus it off.
It should be brass. And from there, then you
can just grab them all now. You can press the n button, and you can put them
into a new collection called materials. So. Enter twice,
and there we go. Now, what I'm we just going to check now before carrying on, is just to make sure
none of these have been already put into
an asset manager. So you can see all
of these don't have those little books
at the side of them, and that's what I'm
just making sure of as I go down these now, none of them are going
to be like that. I'm not going to check those. These should be absolutely fine. And then what we're going to
do on the next lesson is. I'm going to press AaltH
bring back everything. Let's bring all these
things back on, like so. And what we're going to
do on the next lesson is then we're going to set up our asset manager
and bring all of these parts into
the asset manager. First of all, let's save it out. And I'll see you
on the next one, everyone, and by
the end of this, you'll know perfectly well how to sell your
own resource packs. All right, everyone. So
hope you enjoyed that. I'll see on the next
one. Thanks a lot. Bye bye.
18. Importing and Utilizing External Assets: Welcome back to
everyone to blend the phone Modeling and
geometry note workshop. Now, if you watch the
asset manager guy, which I hope you did, then you'll know exactly what
I'm going to be doing next, but this will be kind
of a follow along just to help you understand
it even better. So, the first thing
is, you should have the asset manager here. If you haven't, it's
on the little plus. You go to General, and you can see one that says asset manager. And from there, we
just move it over. So right click reorder to front. Let's now hop on over
to our asset manager, and let's first of all
put this to current file. So in the current
file, there shouldn't be anything here at the moment, and that's exactly what we want. All right, first of all,
then what we're going to do is we're going
to pull these up, so I'm going to pull
this down, pull them up, J, so I can actually
see what I'm doing. And then if you remember,
I talked about how the text file is really important when you actually
come to save this out, and it will be showing
you why that is. So first of all, though,
let's go to geometry notes. What I'm going to
do is I'm going to grab all of these
geometry notes, so we've actually got
them in a nice collection now all nice and ordered neatly, and then'm going
to right click and I'm going to mark them as asset. And then what I'm going
to do now is I'm going to come down over here
where assigned is, and you'll see now
that we've got all of these marked as actual assets. So first of all though, I'm just going to
remove all those. So let's clear assets. And now all I've got here is
stylized stone and tree box, which I'm also going to remove. So actually, you know what? Let's actually clean
this up first. So we've got a composite. I'm looking why these are. So what I'm going to do is
I'm going to take these out. So clear assets, like so, and they're also going
to come to these. I'm going to clear
the assets like so. Alright, so there
we go. Now we've got all of these parts. You know what? Let's
clear everything. Let's just clear everything
and start again. So clear assets like so. Now, what I'm going to do is
I'm going to first of all, come to these parts, right
click Markers asset. And here we are. Now we've
got all of the Jumptondes. Now, from here, when we actually go back to our Wizards tower, we will be able to
bring all of these in now basically whenever
we want them. That is exactly what we
want. But before doing that, let's put them in
some sort of order. So all I'm going to do is
put this as geometry nodes. Like so. And then what
I'm going to do is go to assigned, grab all of these. So all of these with shift
select and just drop them into geometry
nodes, like so. And now when I click on this, you'll see they're in there. Now all we do is save out
the files so save like so. Now, because we actually named this and we gave it a
new kind of branch, and we also saved it out. What happens is now, if I bring this over, you will see in there, we actually have a
blender text file. And this base is
going to store all of this information about
these actual groups I'm actually saying up here. So it's really important that we don't delete this
out of the way. Alright, so let's move on now. So what I'm gonna do,
I'm going to come. I'm gonna hide that
out of the way. And then what I'm going to do
now is I'll come to trees. Let's do our trees next. So I'm going to grab
all of my trees, right click, and we're
going to mark as as set. In fact, you know
what? We'll first of all name this tree. So we'll call it main. Tree. And then I will know that that is the tree that I want
to use within the course, and I'm going to select all of these right click
and markers asset. Nothing happens in here because they've all
gone to assigned. So now we want to
do is you want to come over here where the
little plus bone is, click the little plus bone
and let's call it trees. Like so, come to
assign, grab them all. And then we're
just going to drop them into our trees,
and there we go. Now we can actually hide
these out the way as well, and let's move on down. So now we've got foliage. So let's do exactly
the same thing, right click markers assets. Let's create a new one, we'll call it foliage.
Okay. Like so. And then we'll also
while we're here, create another one, and we'll
call it human reference. Like so. And then water
plants, plus water plants. Like so. And then finally,
we've got materials, which probably is one of
the most important ones. Materials. Like, so. Alright, let's go up
and save out our work. So we're just going
to save that out. And now in on the sign,
we've got our foliage. So let's grab all
of our foliage. Drop it into our top one, which is the foliage, and
let's work our way down now. Human reference, right
click, Markers asset. Let's drop them into
human reference. And let's go now
to the next one, which is water plans. Grab the more. Right
click, Markers assets. Drop them all in then to our water plants,
which is down here. And then finally,
let's put that up, and we've got a last
one, which is materials. And then all I'm going
to do is right click markers assets, and there we go. Now, the one thing is
about these materials, it's actually putting them in, as you can see, as spheres. And the reason is for that is because we don't want to
do it actually that way. There's a little bit more to this when you're
doing materials. So what I'm going to
do is I'm going to right click, clear assets. And instead of that, what we're going to do is we're
going to come to each one. Hold this up a little bit. Let's close that up, coming
over then to your materials, materials, which is here. And now what you
want to do is just right click Markers asset. And you'll see here now
that you've actually got it as the actual sphere still, but it's actually
called the right thing. Now, when I bring this in now, it's not actually going
to bring in a sphere, it will actually just bring
in something where I can drop onto a cube, for instance. So if I press shift day bring in a cube, let's move it over. Let's put it onto material. Another moment, this
cube has no material on, as you can see, but now I
can drag and drop that on. Now, if you only have it on
a sphere, so in other words, if I come in and
right click this as a markers asset.
So markers asset. Here is my sphere with
my terrain on it. If I drag and drop this, it will just bring
in the sphere. That's not what we
want. So that's why we're doing it the
way that we're doing it. So what I'm going to do is
right click clear the asset. I'm going to delete both of these out the way. I'm
not going to need them. And then what I'm going
to do is just work my way across. So I'll
pull that up again. I'll come to this one, right, click Marker's asset and
just work my way across. And unfortunately, this is the quickest way of
actually doing it, I think. Maybe someone can say if
there is a quicker way, but this is the way that
I've been doing it. Like so. Like so. Like so
and two more so. At least we haven't got
a lot of materials, so markers as set,
and there we go. Now, let these just
actually load up. There's just one
to load up there. And then what I can do is
I can grab all of these and drop them in two
man materials, like so. Finally, then all I'm going
to do is save this out, so file, save this out. And now what we can do is we've got everything done
now that we needed to. We're not going to
mess around with the meadow packs or anything like that. We don't need those. Once we bring in our meadow, John Cindi will bring
all of these in anyway, so that's absolutely fine. So now I'm going to do is, I'm just going to close
this down now. So I'm going to close that down. And then what I'm
going to do is now come back to my actual gray box, as you can see, and we'll
just give this a quick test. So first of all, let's
put it on material. We haven't got asset manager
up here as you can see, and we really, really need that. So what I'm going to
do is click the Plus button, general asset manager. And then what I'm
going to do is right click and reorder to the front. And now I'm going to do as
you can see at the moment, this is the user library. If I click on here, there
isn't anything current file. There isn't the
resource pack on here. So what you need to
do now is you have to go over to edit preferences, go down to file paths, close the user library. We don't want that on there.
Click the Plus button, Okay. And then what you're going
to do is you're going to find that resource pack now. So we can see we've
got a resource pack, where is it course
resource pack here it is. And then what I want to do is add that as an asset library. So if I add this now, like so, and then close this down, you will see now if I go over. I've got one that says
course resource pack. And within here,
if I open this up, you can now see that
we've got foliage, John Cos, human reference. And the best thing is now
that I can now just drag him out straight into actual
project I'm working on, or I can come to, let's say, materials,
where's materials, here it is, and let's
drop this on here, for instance, and there
you go, as simple as that. So that is the way that
we use asset manager. That is what we're going
to be doing from now on. And on the next lesson, I'm thinking that we're probably going to start building
some of these out. And I think we should start with something a
little difficult, which will be this bridge, and then we can actually
start with the actual steps. The one thing I'm going to
look for, first of all, before doing anything is
just make sure I've got my human In here, there he is because I
will need him, of course, to actually create these steps, because at the moment,
they're way way too chunky. All right, everyone, so I'm
going to save out my work. I hope you enjoyed that.
I hope you learned a lot, and I'll see you on the next
one. Thanks a lot. Bye bye.
19. Bridge Modeling: Techniques and Tools: Welcome back everyone
to Blender for modeling and Jo C's workshop, and this is where we left off. Alright, so first of all, what I'm actually going to do
is bring in a ground plane. So I'm going to press Shift S, cursor to World origin. Shift A. Let's bring in a plane. Let's bring the
plane out, like so. And let's also give this
plane some material. So all I'm going to
do is grab this one, press Control L and
link material, like so. That gives a little
bit of darkness down there and gives us something a little bit better
to work with. Now what I tend to do is I
start blocking things out. In other words, I start blocking the things out that
I actually you know, want to actually work on and break it down this
structure down into parts. So what I'll do
is, first of all, this will be in its
own collection. So it doesn't actually need
to be called something, but I'm just going to call
it for now ground plane. So just keeping
things nice and neat. And once we've done that, we
can hide it out of the way. Next of all, then
we've got the bridge, so I'm just going to
press M new collection, bridge Like so, click
okay, and there we go. And then we can hide that
out of the way as well. Next of all, then, we've
got the front tower. I'm going to call it the front
tower, not the main tower. I'm going to grab all
of these parts then. And then what I'm
going to do is M new collection front Tower. Like so. Click okay.
Hide it out of the way. Then we've got now the
main kind of building. So I'll call this main building. M. Again, doesn't really
mal what you call them. So don't worry too
much about it. So main building so,
hide it out of the way. And then we've got
the side tower. So we'll call this side tower. Like, so, hide it out the way. And now we've also
got this part here, and you can see this on
there was the window. I'm not really going to
need this at this point. So all I'm going to do is
just delete it out the way. Now we've got a human reference. So let's put him. He should
actually be. No, it's not. So let's put him in his own. So M new collection,
human reference. And I will tell you
something else as well. Human reference, the way that I found him on
here, by the way. So for instance, at the moment, if I scroll up, I can't
really see where he is. But if I come over here, The same thing works
in the viewport. If you press the little dot
born on the number pad, you can zoom into him like so. If you're coming over to the right hand side in
the collection, press the little dot born, you can also find him
that way as well, which makes it really,
really handy both ways. All right. So now let's
come to the main tower. With the main tower, I'm going to grab all of these parts. And what I'm going to do is
press M bullet Main Tower. Like, so hide it out of the way. Now, we have go door
there that I missed, so I'm just going
to press again, put it in the main tower, which is all the way down here, and then I'm going to hide
that out the way as well. Now we've got the rear entrance. So we'll call it
the rear entrance. So I'm going to grab
all of this, like so. And then call it rear entrance. Like so. Okay, hide
it out of the way. Then we've got the
main kind of building. Now, I do think I want
to split these off. So first of all, I'm going
to call these parts here. So these parts like this. If I press G and then press right click and drop
that back into place. I'm just making sure
I've grabbed it. And what I'm going
to do is I'm going to call it side building. So side, building. Like so. Hide it out of the way. And then finally, we've
got the small buildings. So I'm just going to make sure that I've
grabbed them all, press the button, and
we'll call it small. Buildings. Like so, and we can also hide
them out of the way. And that's everything now
hidden out of the way. And now I can do is I can
just put these parts up. Like so, and this enables me then to
block everything out. So now, if I press TH, bring back everything,
I'm now able to come. Select one of these,
for instance. And what I can do is I can
hide it out of the way with H. I can press l TH
to bring it back. Or I can come across, for instance, for this one. So let's go to the front
tower. So this one over here. I can grab all of
these, like so come in my view port press
Shift and H and hide everything else out of the
way now except this tower, which makes it really, really easy to work with everything now because it's really
working with it in blocks. Let's press TH and bring
back everything now. And what I'm going to
do now is I'm going to come to my first part here, which is these parts
here, so I'm just going to grab both of
these press shift, hide everything
else out the way. Double tap the A. Let's
go into object mode. Now, the next thing
I want to talk about is it's really
hard at the moment, if I just bring back
everything just for the time being,
and I'll show you, A really easy tip to get a better visualization of what you're looking at
in object mode. So if you come over to
the right hand side here with this little
drop down menu, make sure you're in object mode. And what you want to do is
come and put cavity on, and now you can see just what a transformation
that actually makes, making it really, really easy
to see what you're doing. Let's come in now, go
to file, go to save. There we go. Now, next
time you load up blender, that cavity mode should be on. Now we can actually come
back to this press shift H, bring it back, and what we're
going to work on first is, of course, this actual bridge. So let's come in first of all, and what we'll do is
we'll bring in a cube. We need to keep it the same. That's the point of
using a gray box, so I'm going to bring it
down to something like here. And then we're going
to pull it out, so S and next, pull it out, and then we just need to make sure that it is going
to be the right size. Now, you can see,
we're a long way off. The other thing is
what we've got to take into account is this
is going to be going into the floor because
it's not going to be just floating on the water here, so we've got to take
that into account. And once we've done this now, all I'm going to do is go in, press control and bring in
a few edge loops like so. So left click, right click. I brought in ten edge loops now. It's probably going to be
better off if I put the sit 11 because then we're going
to actually get a center one, so I can just come in, put this sit at 11, and there we go. Now, the next thing I want
to do is I want to bring this up to be round about
the height of this. And then from there,
I can bring it up to make this kind of nice bump
that we actually want. So the way we're going to
do that is we're going to select this edge over
here or this face, control select this face, and then just bring them up to be round about the same
level as what we had it. You can press one as
well to make sure that you can get it
to the right level. So there we go. That's
the right level. Now, at the moment, we can see this is probably not
going to be long enough. Don't worry about that.
We are going to do that once we've actually
brought the curve in. The main thing at the moment is we want to bring this out. And we want to bring it up to have that beautiful
curve over there. So what we're going to do is
we're going to press tab. In fact, before we do that, we'll just reset all the
transforms with control A. Right click set
origin to geometry. And then what I'm going
to do is press tab. Come to the top
right in the center. So I want to make sure I've got selected right in the center. Press one again. Then
what I'm going to do is bring in map
proportional editing, and let's actually bring it up. Now, you can see that we can bring it up with
the actual shot, but we do end up with
this problem here. So although it
looks pretty nice, it's not really what we want. So let's press Control Zed. And then what I want to do
is I'm going to put it on. Let's try. I'm wondering, you can just go through
these and try them anyway. It doesn't really
matter. So you can see that one is probably
going to do it. Now, the problem we've
got is, as you can see, when I bring this up, it brings up all of this, and
I don't really want that. So there is actually a
little trick we can do here. What we can do is we can come, grab the bottom, so
grab this face here. Control, select this face here, press control plus, and then we'll grab them
going all the way up. From there, then
you can just press H, hide them out of the way. Let's come back now,
grab the center one, press one, and
let's pull them up, because now we're
actually going to be interfering with those
ones down there. Now, from here,
you can see we've got a slight bend
on these parts, and we need to pull
these out flat. So let's deal with that next. So what I'm going
to do is going to press l tate just to show you. And now you can see
that's completely flat. That's what we actually wanted. And now we want to do is going to come to each of these sides. So this side and this side. And then all I'm going
to do is press enter. So we've extruded it, but we haven't actually
pulled it out. We want to turn
proportion editing off. You want to come up then to
where it says medium point. So I'll put that medium
point and then press S and X and pull
that out slightly, to give us that nice
flat edge at the bottom. Now I want to do is
I want to come in, right click, shade smooth
by angle, and there we go. We've got a beauty
beautiful bridge there. It's got a really nice you know, top to it, much, much better than
one one they had, which is what it
should be, of course. And now what we can do
is on the next lesson, is we can start getting
the bend into place. And from there, then we can
actually start, you know, kind of building this
bridge out completely. And that's what I
recommend we actually do. So we take in certain chunks of this now that we split up, and we're going
to build them out separately and bring
it all together. All right, everyone, so I
hope you really enjoyed that. I'll see you on the next
one. Thanks a lot. Bye bye.
20. Crafting Detailed Stone Slabs in Blender: Welcome back everyone to
blend the phone modeling and geometry know it's workshop,
and this is where we left. Alright. So now what
I want to do is, I want to actually
bend this around, getting it to
something like this. I think I'm going to do that
actually before putting in the kind of hole in there. I think
it's going to be bed. I think it actually
looks, you know, it kind of gets
big here and then small as it goes to the back.
I don't really like that. So what I'm going to do is
I'm going to bend it round, and then I'll put that
actual boolean in there. So, let's first of all,
get the right pen. So again, I'll press control a right click, set
origin, geometry. And then what I'll do is
I'll come add in a modifier, and the one we want is
going to be deform, and it's going to be a
simple deform like so. We're then going to go to bend. And what I want to
do is put it on the Z axis, and there we go. We've got our beautiful
bend in there, and now we can actually see if it's going to fit into place. So now I'm going to do is I'm
going to increase the bend, increase the bend, and then I'm going to go
over the top now. Rotate it round a little bit, so Ronstad and I'm going
to put it round about there and just try and make sure that it's
fitting into place. Now, from here, what I
can do is I can actually get rid of this
initial bridge here. I don't really need anymore. And from here, then
I can actually build the steps on there and things like that and get it really nice and
neatly into place. I'm also going to press tags just to bring back everything, just to make sure
everything's fitting in. As you can see now, it's nice. It's got a nice kind of bump
to it and things like that. And I recommend also at this point that we
work on putting on our fence over the top of it before we do
anything because then the fence will actually
bend with the actual bridge, and that's exactly what we want. Alright, so let's come
back to these two again. Let's spress ltHide sorry, Shift H, just to hide
everything else out the way. Double tap the A, and now
let's come to this part again. Let's first of all, now we know we've got it
in the right place. We need our steps
in the right place. So actually, you know what? We'll just make sure these steps are going to be in the
right place first. So you can see, At the moment, I'm going to have
to come in with the jump node and kind of bend these steps going around
all the way around to here. It's going to look really nice. It's just a problem at the moment where we can't really get an idea of where these steps are actually
going to come to. So, you know what? We'll just not worry about those right now. I'll just work on
my bridge for now. I think, yeah, I'll put the actual fence going
all the way to there. So what I'm going to do
is press Shift H again. I'm going to come in, hide
the curve out the way, and let's actually start now
putting in our actual fence. Now, the funny thing about this is it's slightly
bent at the moment. We don't really want that.
So what I'm going to do is just press tar and
just straighten it up because it does mean that
it's going to make it way way easier when we bring
our actual fence in. Now, the other thing
is, before we start, I always recommend
just pressing OH, bringing your guy in cause
he's going to give you an idea then of actually how high
your fence wants to be. So what I'm going to do is, I'm just going to
position him on here. I know it's a stylized scene, and I know it's, like,
you know, a bit lumpy. It's going to look really nice. We just need him
in there, really, to give us an idea of how
high this fence needs to be. I'm going to grab my
bridge once more, press Shift H, hide everything
else out of the way, and now we're ready to begin. So first of all, the
fence is going to be sat on some kind of actual
stone slabs on here. So let's come in
and do those first. So easy way to do that is
we'll just grab this one here. So this edge, control,
select this edge, and then no longer new is
press Shift and D. So. And then now I'm going to press
E and Z and pull that up, and there we go, This is the start of our stone
slabs, as you can see. So you can see now it's going
all the way over there. They're quite the
right thickness. And now all I want to
do is press L on them, press P, selection, so. Now I'm going to do
is and I'm just going to come out into object mode, grab these stone slabs, press control A or transforms, set origin to geometry. And now what I'm
going to do is Now, I'm going to come in and
take off this simple deform, because I don't really want
that on at the moment. So I'm just going
to take that off adding another modifier,
and this time, it's going to regenerate
and it's going to generate a solidify which is going to
give this some thickness, and that's exactly
what it wants. So now let's bring out
the thickness first so you can see, and luckily here, we've actually got a problem, and it's got that problem
popped up because you might have this problem and
not know how to deal with it. Now, these problems happens with modifiers to normally
always two things. There's always two things that
I mess up your modifiers. The first, There is one more, but we'll talk about that after. The first is going to be whether you've reset
your transformations. The second is going
to be about normals. Now, let's actually
discuss normals, and then we'll move on to
the last point. So normals. If I come up to here, come down, you'll see face orientation. And what this is is basically which side is the face facing. So you can see these are the
moment of facing outwards. In other words, this face here, the front of it is
facing outwards. If it's facing on the inside, it's going to be red
like this one here. Now, it's important that when we take this through
to a games engine, that all of our faces
are facing outwards. Because if they're
facing inwards, then the render engine
within something like real engine will just come up and
it'll be invisible. You won't be able to
see the structure because all the faces are
facing the wrong way. Now, we also wax in blender where if they're
facing the wrong way, it will try and solidify it in the opposite way.
And we don't want that. So if we come into this now, press A to grab everything,
press Shift and, and what they'll do is that will recalculate all of the normals, like it says down here
to be on the right side. And now you can see this
looks absolutely perfect. Now, the last thing
that might mess up your modifiers is
down to topology. If you have really,
really poor topology, lots of triangles in there, it's going to be really hard for Blender to level things off, and that is one of the
problems you will face. But we will come across that a bit later on in the course, and then we'll show you
how to deal with that. All right. So for now, Let's take off our face orientation, and let's actually come in, press the tab bon, and let's get these into
the right place. You can see the hanging over here, and we don't
really want that. Luckily, there is an offset born within Blender
where we can bring it down to let's
say minus or zero. And what they'll do is it'll
put it halfway between. And now when we bring this out, you can see that we
can bring it out in a much more even fashion. Now, we don't really want this
to be right on this edge, you know, half on
the edge, half off. That's not normal. So what
we want to do actually is bring it over like so. Just so. It's over the edge like that. Okay. You can also
see our guy now he's got plenty of room to walk up here. The
fence would look. Okay. So now what we can
actually do is we can actually start
splitting these up once we've actually
applied this nifier. So we can see that these are
looking pretty nice now. They're going to go
up to the edges, like so, and I'm quite
happy with those. So all I'm going
to do now is come back to these. I'm
going to go over. I'm happy with the
thickness of my bricks. I'm just going to
press the control A and actually apply that. Now, what I want to
do is I really want to split these off from
each other because we don't kind of
want this where it's going over here and
little lumpy bits. So the first thing is, if
we shade to smooth like so, you can see that what you'd end up with is kind of a piece of cement going over here, and
we don't really want that. We want it to be
into actual blocks. So what I'm going to do is,
I'm just going to come in. And I'm going to grab this one. So I'm going to select it shift and click going
all the way around. Select it going there because
I want to keep this face, and then shift
click Shift click, and just work your way along. And all we're going to do
is split the map like so. Now, the reason I want to keep that back face is
for the next part, if I press y now, That is basically going
to split them up. If you press G after the y, you can see now the split. Now, you will notice
if I press G, that inside of every
one of these is a hole, and that is because we've
actually split them up, and we need to fill
those holes in. So the easiest way to do
that is to press control Z, put them back into place, press A to grab the hole, and then all I'm going
to do is go to mesh, come down to where
it says clean up, and then I'm going
to fill holes. And now you'll see that all
of those holes get filled. I'll just grab this one,
for instance, pressing L, pressing G, and you
can see inside there, all of those holes
are filled now. Now, the next thing I
want to do is I want to right click Shade Auto smooth. The next thing is I
want to make these smaller but it's not going to be done in the
way that you think. We don't need to
come into each of these and actually
make them smaller. What we can actually do is
bring in another modifier. So I'm going to press
Control A, all transforms, set origin to geometry, add in a modifier,
and this time, we're going to bring in a bevel. And as soon as we bring that in now you can see exactly
what that does. Now, what I tend to do
with these is with stone. I tend to most of the time
turn up the segments. So as you can see it when we
turn up the segments, now, they look a lot more
like stone and rocks. And then what I'll
do is I'll turn this down to something like
that, and there you go. You can see that looks much, much nicer. It's up to you. Just remember the
more segments you add the more geometry you're
going to put in there. So let's turn it down once more. Let's turn up the
segment, and there we go. I think that looks
very, very nice. Now, I'll just show you I
won't actually apply this. But if I come in, you
can see at the moment that I've got two segments on there, but we can't
actually see this. But if I apply this, so
don't apply, but just watch. So Control A, now you can see we've got two
segments on there, and it creates a lot of
geometry as you can see. Now, the other thing is if I
go back and press Control Z, You can see at the
moment as well that we've got sharp edges on here. So if I come in and right click shade auto smooth,
keep sharp edges. You can see that on there.
We don't really want this on because what it does is
apply sharp edges on here. If I come in and instead of that press right click, sorry, press control because
we're in face select and clear sharps, now you can see it looks
way way different now. We've got a little
bit of roundness on these stones, which
is what we want. Shade auto smooth,
and there we go. It's looking really, really
nice without sharp edges on. Now if the press tab, you'll see that sharp edges are back. And even if I tick them off, it just seems to
bring them back, which I don't really like. I don't know why it's
actually doing that. Anyway, I think it's something
with the new blenderes. It likes to add sharp edges. But anyway, I think the
next blender version, it won't be doing that,
adding those sharps on, 'cause I don't
really like adding sharps on when I've
not asked it to. Either way now,
we've got these now. Now, all we want to do is actually make sure
that these are uneven. So on the next lesson, what we're going to
do is we're going to make these a little bit more uneven because
at the moment, they look way way too straight, and that's not
something we want. All right, everyone, so
I hope you enjoyed that. I'll see on the next one.
Thanks a lot. Bye bye.
21. Dynamic Use of Mirror Modifiers for Railings: Welcome back everyone
to Blender por modeling and Jumpde workshop and
this where we left off. Alright. So now
let's actually get this bridge actually fixed. So all I'm going to do
is I'm going to come in now and show you how to
randomize them a little bit. So the first thing you can do to randomize is make sure
you've selected them with A, and then you're going to come
over to mesh, transform, come down to what it says randomize and then just turn
this down a little bit. So if you turn this
down to maybe 0.1, like so press the taboard and now you can see they're
very, very uneven. And that's the easiest
way to do this. You can even go in
and do it once more. I always find that
sometimes makes it a little bit better
turn it down again. Because it will be completely
random, and there you go. Now you can see they're a lot more uneven than what they were. Alright, so we've got that now. Let's pull them over
to this side now. So all I'm going to do,
I'm going to press shifty. I'm going to drag it over, and I'm going to
press R z hundred 80, and now it's just going to be a bit different to
the other ones. So let's pull it over, like so. I'm not even going
to use the mirror or anything like that because they don't need to be too even. I just want to make sure that these bricks are
actually uneven. Now, the thing is actually
not actually I'm thinking that these maybe
I'm just looking. Let me just move my
guy out of the way. Yeah, actually,
they do look fine. I'm just overthing this. So I was thinking maybe
these look too similar, but I think they actually
look fine. All right. So now let's come to our bridge. So our wooden parts that
are going to come up here. So let's bring him
back into the middle. Let's press Shift
D, cursor selected, so we select the actual guy
and put the cursor there. Let's press Shift A, and I'm
going to bring in a cube. So let's bring in our cube. And what I'm going to
do is I'm going to place this where I want it. Perhaps not right in the middle, 'cause if I place it
right in the middle, as you can see,
it's going to be, yeah, kind of messy if
we do it like that. So what we want to do
is we want to decide where is this actual walkway, so the actual fence going to be. And I think here and maybe here would be a good
place to put it. So what I'm going
to do now is it doesn't matter if it's so even. All I want to do though is I'm going to put it
over to this side, I'm going to put
it down into here. I'm going to make sure that
I'm happy with the thickness. So this thickness for my actual fence looks
absolutely fine. And then what I'm going
to do is bring it up now. Now, I'm going to
bring it up like so. And then I'm going to
bring my guy over, like so, and I'm going to look then how high this actually is. So you can see how thick it is, you can see how high it is. And you can imagine a piece
of fence going over there. And whenever I do
things like this, so whenever you're looking at, you know, balconies
and things like that, I always imagine that the balcony We someone leaning over, the minimum it wants to be is around where
your belly button is. So around here would be the minimum because then
you're not going to fall over. It doesn't want to be
down here, for instance, near the groin area or
down near the knees, because they're just going
topple straight over it. So the minimum place you want it to be is around
the belly button. All right. So now
we've got that. Let's actually make this
then into an actual fence. So I'll come back to my fence. I'm going to press S, bring it out, and then, to bring it up and then
to bring it up again, and finally, the S,
and we're going to bring it in like so,
and there we go. Just a simple, simple fence
is all we want for this. Now, next of all, we
want to array this over to get it nice and even
going all the way over. And then from there, we can actually start
building our fence. What I'm going to do is
I'm going to come in, and I'm going to
add in a modifier. Before we do that,
though, let's just reset all of our
transforms and the origin, add in a modifier,
generate an array. And now let's move
the array over. So you can see on the x factor, this is one, which is
moving it over here, and we do want it going
across here, like so, and then let's just
increase the value like so. And what we want
to really do is we want it to come right
to the end of here. So I need to pull this
out a little bit like so. Now, pretty much on here, We've got it really
nicely in place. You can see all of
these are in the kind of center of the stones
except this part here. Now, it's up to you
whether you want to move these a little bit
this way and this way. I think it's probably a
good idea to do that. But for me at the moment, I'm just going to leave
them as they are. So what I mean is this one at the moment is like halfway
in this stone here, and this one is also
halfway in this stone here. So I think what I'm going to
do is just mess around with these blocks a little bit once I've actually
got these in place. Alright, for now, though, Let's actually get our fence in place. Also, are we happy
with our these looks? In other words, do we have
too many at the moment? Is there too many of these? I think, actually, I think
maybe let's reduce it by one, and let's pull it out
a little bit more. Like so, and now we'll end up with one right in the center. And actually, I think
that's going to look better than what it did. Alright. So now what we do
is we need our planks award. Now, our planks award need to follow these kind of fences. So I'm going to actually
apply this array now, so press control A. And then what I'm going to
do now is bring these up. So I'm going to press L, bring this up and sit it into place, bring this one up and this one up and sit them into place. We don't actually
want to bend them. We just want to sit them
into place like so. And then finally, this one and this one and bring them up. And sit them into place like so. And there you go. That's
looking pretty nice. Now, at this point, you've
still got the ability, if you want to to drop
them down a little bit. I think, honestly, they're
a little bit too high, so all I'm going to do is
just grab the tops of them. I'm going to then
press control plus on the number pad a few times
just to get underneath it, and then all I'm going to do
is just pull them down very, very slightly, and a thing that looks a little bit better. Alright, so now the planks of
wood, let's bring those in. So first of all, I'm going to
press Shift S on this one. So Shift S s to selected. Shift A, let's bring in a cube. Let's make the
cube, much smaller, and let's pull it into place like so, press the dot button. Let's make it the right
thickness, so S, and y. Like so. And let's
bring it down. Like so. Let's press S and to make
it a little bit thicker. And now all we want
to do is just create the right kind of balance
now in the thickness. So I'll think this
is a little bit too thicker at the moment.
So let's pull it out. And then all I'm going
to do is just grab this, pull it over, and
then pull it up. Now, what we're looking
for here is to keep kind of the same distance
from here to here. So, this one's looking fine. So what they'll do now is
press L. I'll press one, and then I'll press Shift D, bring it over, pull it
up, and into place. It doesn't need to be perfect. It just needs to be
round about that. And then all I'm going to
do now is put on my x ray, come round to this
side, press one again, and then just pull it up. Like so. And then we're
going to grab this again, shift D, bring it over. Like so. And then we're
going to come to this side. Bring it up. And then
come to this side, press one, bring it up. Like so. And that then
is looking pretty nice. Now, we can just, I guess, copy these, so I could
just grab each of these, press shift, bring them
over and then rotate them, but just make sure
that run medium point. So RZ 180, spin them
around, put them in place. And there we go,
you can see now, they're looking pretty nice and they're at the same level. Now, the one thing I would say, though, don't do that. Like move them
around a little bit. You don't want them
all to be the same. So even at the
bottom at this end, just move them a tiny bit. It will make a big difference. And now from here,
what I'm going to do is I'm going to
press shifty again. I'm going to then
bring them down, and this will be then
the bottom part. Now, on the bottom
parts, I want them, of course, to look different
from the top parts. So I'm actually going to take the time to actually make
them a little bit different. Like, so, Because I definitely don't want
them to look the same, and I want them to look a
little bit uneven and all it is about is just moving
them around just a little bit, like so, and it doesn't take
longer. Well, there we go. Let's move this one down. And let's turn this off. Double tap the A,
and there you go. You can just see how nice
that actually looks. And now, What we
can do is we can grab all of these and all of our little planks
of wood, like so. Join them all together. So Control J, join
them all together. Control A then, all transforms, right click, set
origin to geometry. And now what I'm going to do is, I'm just going to move
them over the other side. So Shift D, move them
over the other side, or 180 to spin them around, put them into place them
wherever you want them, like so. And now you can see they're looking different
from each other, which is exactly what we wanted. All right, so let's now think about first of all,
bevel in them. So I'm going to
grab this one here. I'm going to come on over a
modifier generator bevel. I'm going to turn this down to naught point naught at three. And there you go,
you can see, it's got a beautiful bevel on there. You can see the difference
from this one to this one, and that's looking pretty good. Now, do you want to come in? Grab them all, mesh, come down to transform, randomize, turn this down
all the way down. At 0.1. Let's check what
that looks like. And I think, yeah,
that's added a little bit more to those. Now we're going to do is grab
this one, grab this one, press Control L link or
copy modifiers, like so. Come back to this one now. And again, we're going
to do the same thing, Mesh come down to
clean Mesh Cleanup, transform, come
down to randomize. And then let's turn this
down to Noah point at one, like so, and there we go. That is the bridge near enough
D. Now on the next lesson, what we need to do is we need to join all of this together. Including this, this will
also need to be leveled. And then finally, we can use
the bend on there as well. And then we can bend
all of this together, which should actually then we should be able to actually bring in the boolim. All
right, everyone. So I know it's a slow start, but I've got a lot of
stuff to get through. You know, as soon as we
start on other things, we'll be able to
pick up that pace. But now I need to get
through this stuff, and it will be a little
bit slow in the beginning. All right, everyone,
so I'll see on the next one. Thanks a lot. Bye bye.
22. Mastering Seams and Sharps for Clean Modeling: Welcome back everyone to
Blender Fall Modeling and John and China's workshop. And by the way, the seams and the sharps and
things like that, we will be covering very soon. As soon as we've
actually got this into place and the way that
we actually want it, then we'll actually
be doing that. Alright, though, for now, let's come back and what
we'll do is turn the bend on. And then what I'm going to do
is, I'm just going to see, If I can grab all of these,
so let's grab them all. I'm just looking at the bevel. The problem is, we've
got a bevel on here. I don't really want
to join them all together because this bevel on here is not point North three. This bevel is not point
North one with two segments. So we just need to
be careful of that. So what I'm going to do is
join both of these together, join then both of
these together. And then what I want
to do is I want to add the same curve on these. Now, unfortunately, if I grab, let's say this one and
this one, press Control L, you will see if I
copy modifiers, it's going to bend
it the other way, which is what we don't
want, and as well as that, it's going to also
get rid of the bevel. So we don't really want that. So what we want
to do instead is, let's work this a little bit slower than what we're doing. So let's come to
these, first of all, add it, close this one
up, add a modifier, and we're going to
generate a where is it a deform and we're going to have simple
deform like so. All right, you can see now
it's bending that way. We don't want that want
to bend and we want it on Z and we want it actually to
come the other way, like so. We can see now we've got a little bit of a
problem in here in that it's not all
bending the same way and that's what I was actually
worried about, actually. I really really don't want that. What I'm going to do
instead is, I'm going to, I think, apply my actual
modifiers instead. Sometimes we'll end
up having to do that. Now, the best thing before you actually apply and modify
is because it's a bevel, there will be issues
with the material. So I'm going to play you now, the actual seams and shops setup before
I do anything else, because I think that's important to actually
go through there. So you'll understand what
we're doing when we're actually applying
seams and shops. And then what I think I'll
do is on the next lesson, we'll go through the
textures and shaders. And so you're up to
date on that as well. At the moment, though
what I'm going to do is, I'm just going to
turn this one off because I think I want to actually turn this all together. All right, everyone, so
I hope you enjoyed that, and I'll play this for you now, so it'll be the
seams and sharps and I'll see you on the
next one. Thanks a lot. Bye bye. Welcome everyone to the short introduction
to marking seams and sharps
part of the course. So before I give you examples of what I'm actually
talking about, let me just briefly
explain what they are. Seams you can think of like
seams on a piece of clothing, like a shirt or a
pair of trousers. The main job of seams
is to make sure the texture that
you're trying to place on your mesh
goes on correctly, but more importantly, gives you control of how that
texture will look. Sharps are marked like seams, but serve an entirely
different purpose. We use sharps to
give us control of how sharp and soft angles
are on our measures. This makes them look realistic. It is also important we do this not only for
rendering and blender, but also sharps carry on through other software
or games engines, we want to use, like substance painter or
real engine as an example. With all that said,
let's get started. So here we are in blend
with our starting cube. Now, if I click on my cube
and go to my UV editing, you'll see that the cube is basically unwrapped
in this actual way. So basically, it
unwrapped like a present. Now, if I come across
and I grab this cube, and I press Shift D,
and then we press Shift space bar to bring in our gizmo and we move it across. And now let's say I want to
alter this cube a little bit. So what I'm going to do is I'm going to press the tab button. I'm going to go interface elect, click the top face
Shift space bar to bring in the move
tool, bring it up. So. Now, let's say I
want to unwrap this. Now, if I grab this
with L just to grab everything and I press
the U button for unwrap, you'll see that it unwraps
exactly the same way. Even if I reset the
transformations of this, it will still unwrap
exactly the same way. Now, let's mark some
seams and see how that has an actual effect on
our actual lung wrap. Let's grab the top and we'll
come down to the bottom. And what we're going to do is we're going to press control. And then come down to
where it says, Mark seams. Now, it's important
to remember that it's control leap to mark
seams in face select. But if for instance, we're in Edge slick, so
if we come to this edge, if we press Control leap, you will get this option
up as well, mark seams. But you can also right
click in Edge select, and you can also see we can
mark seam this way as well. So for now though I'm not going to actually
mark this scene. What I'm going to do
is I'm going to grab the whole thing with L, like so, and now I'm going
to press Unwrap, and you can see it unwraps
completely different. Now, let's bring
in some textures so you can see what
exactly I'm talking about. So if I press tab, I'll come up to my
materials panel up here and I'm going
to give this material. So I'm going to come across
to the right hand side, click on my material button. So let's now bring the material
I've already prepared. So if I come across
this little down arrow, come on down, you can
see, I've got one here called wood, and
let's click that on. Now you can see what's happened. We've actually applied our
material to this object, but you can see it's
pretty much a mess. The top of it looks fine, but the bit going around the
side is all bent and skewed. So if I zoom out and
I press tab now, you can see that the
reason is that it's not actually UV unwrapped correctly.
So how do we fix that? If we come up to edge select, I'm going to grab
this edge, and now I'm going to do is I'm
going to right click. Come down to mark seams, and now grab the
whole thing again. I'm going to press U, Unwrap, and now you'll see it
unwraps absolutely fine. You can see that
woods looking really, really nice actually
on this mesh now. So what this does, the seams do is actually gives you control of how this actual texture
is placed on this mesh. You also need to take
into account that this is basically
an infinite loop. So if I come round and I look
at this face and this face, you can see that
they're going around. If we have no seam, when I
talk about infinite loops, it's basically going
round and round and Blender doesn't actually
understand how to unwrap it. So you'll end up with
that mess we had before. Now, the other
thing to take into account is if I turn
this wood around, for instance, I'm
going to do it. I'm going to come over
to the left hand side, the viewport of my UV editing, press A to grab everything
90, spin it round. Now, the other thing
I want to show you is that where we join
these actual seams up is also really
important because you'll never ever get
it perfect on here, where there's an actual seam. So let me exaggerate
this a little bit. So what I'm going to do is
I'm going to press tab. I'm going to make this a lot
smaller and I'm going to move it into the
center of my UV map, and then I'm going to press tab. Now you can see that
these edges don't line up whatsoever against
this other side. So this texture here doesn't
line up with this texture. And the reason is because
we've got a scene down there, and that is the actual
break in the texture. Yet if we come
round to this side, and I spin this round. So if I grab it or 90 and now go to this
one where we can see, you can see that these
line up perfectly. And the reason is
because obviously there's no seam there.
The seam is here. You need to take that into account on your own measures and objects that when you're
applying textures and materials, try and put seams where
you're not going to see them. So if it's on a door
handle, for instance, try and put them on the inside where no one's actually
going to see them. So always bear that in mind when you're actually
marking your seams. So now, let's discuss sharps. So if I bring in
a new primitive, so if I press shift A, I'm going to go across the mesh, I'm going to bring
in a cylinder. Now you'll notice
that this cylinder has all these little
edges around there, and let's say you want to
make a cup or something. The last thing that you want is all these hard edge
faces in there. Now, there are things we
can do to sort this out. So the first one we can do is we'll bring in
another cylinder. So I'm just going to move
this one out of the way. So shift space bar, bring in Mgzmo move it out of the way. Shift A, bring in a
another cylinder. And this time, I'm going to
come down to where it says, add cylinder and turn
up the vertices to 100. And now, you'll notice that
we do have a round edge. But the problem is
that we've brought in 100 vertices to
actually achieve that, and that's not
something we want. We want to use as
few polygons as possible while still getting
a really good looking mesh. So how do we achieve that? Well, there are a number
of things we can do. First of all, we can come
across to this right hand side, what we can do now
is come to where it says normals and
click on Auto smooth. Then we can right click on the viewport and click Shadesm. Now you'll notice it's
actually been smoothed off. But the problem with this is, if I turn up my auto smooth, you can see if I turn
it up all the way, it goes really, really funky. That is because at 170 degrees, Blender decides that these edges along here needs moving off. So it doesn't give
us a lot of control. If we do this on the other
one, so grab this one, right click, shapes
move, Autos move on. You can see again, even with
lower amounts of polygons, we're still able
to smooth it off. But if we turn this off, we're still going to end up with the same problem as
what we had before. So how do we solve that? Well, if we come in now,
press the tab button, come to the top, grab the top, shifts
like the bottom. Press control because
we are in face elect, and we'll come in
and mark a shot. And now you'll notice
if I press tab, that nows got hard
edges on there. This gives us control. So this is why we
actually use shops. No matter what I turn
this up to 180 degrees, which is the highest it goes, it will not get rid of
those shops that we mark. We can also mark shops
around the edges as well, sea grab this one and this one, and now because we're in edge
select, we can right click. Come down, mark a shop. Press the tab and now you'll see you've got hard
edges on there. So it's very important
that you mark sharps, where you're going to
actually want hard edges. It's also important
that you get into the habit of making sharps, when you're actually
marking seams. And then what happens is, when you join two
objects together and you turn up the
auto smooth if needed, you're not going to end up
with some measures like this. Okay, for one. So
I hope you enjoyed that introduction to
marking scenes and sharps, and as they say,
on with the show.
23. Shader Basics for Realistic Materials: Welcome back to
everyone to blend the four Modeling and
Jury node workshop, and this is where we left off. So, now you've seen the seams
and shops who should have a good idea of how to
actually mark seams, how they work, and especially how they work on the UV map. And now I'm going to play
you is the next one, which is textures and shaders. And this then is going to
bring you up today for when we bring in our own
textures and shaders, how we bring those in with the node wrangler and
all that good stuff. All right, so I play that now, and I'll see on the
next list and everyone. Thanks a lot. Bye bye. Welcome everyone to the blender shading and texting
introduction. And you can see here within my scene I have
actually brought in a few shaders just to kind of explain how
they actually work. So first of all, what
is an actual shader? A blender shader is a
type of material that can be applied to three D
models within blender. Shaders define the
way surface of objects appear under various
lighting conditions, simulating a wide range of materials and effects
such as metals, glass, plastics, wood, and more. Essentially, shaders tell
blender how to render the surface of an object based on its
properties like color, transparency, shyness,
texture, and reflection. So within Blender,
we use actually a no based system for creating
and customizing shaders, particularly within its
powerful rendering engines like cycles and the newer
EV render engine. Now, it's important to note
that the actual shaders within Blender react differently to each of those shaders. So at the moment,
you can see that I've actually got this on EV. But the moment I
put this to cycles, these actual shaders,
some of them, at least, will
react differently. So now you can see that
our emission here that we had that was glowing
doesn't glow anymore, and that's what happens in
typically in blender cycles. Also, the glass now, we can actually see
through the glass and see this is actually
a glass shader. So it's important to
know straight off the get go that some shades will work in EV and
some in cycles. Now, next of all,
we need to look at the different types of
shades within blender. So some are created entirely in blender
through node systems, which we're going to look
at in just 1 minute, and the others are
created through textures. Generally, these will
be PBR text Now, a PBR texture is a physically
based rendered texture, and it's a texture map
designed to mimic the way light interacts with
surfaces in the real world, based on physically
accurate models. These textures ensure
that materials react to lighting conditions in
a realistic manner, making them essential
for creating life three D models and
environments within blender. So now, enough of all the
back story on textures. Let's actually go up then. And first of all, we want
to bring in an add on. Now, this add on is in
bill within blender. In other words, it
comes with blender. I wish they would
actually turn this on a standard, but so far, you have to actually enable it, but trust me want
to say it's one of the best add ons that
Blender ever produced. So let's go to edit. And what we're going to do
is come to preferences. We're going to go
over to add ons, and the add on we want is called the node wrangler.
So, type in node. Make sure the node
wrangler is turned on, and then all you need to do
is just close this down. Next of all, we're going to
go over to our shading panel, which is this one over here. And then what we're
going to do, we're going to click on this cube, which at the moment,
doesn't actually have a shader on it
or any material. We know that because if you come over to the
right and the side, where our material
panel is here, you can see this is
completely empty. Also, in the shader panel, you can also see if I zoom out, this is also completely empty. If you do happen to
have a shader in here, and then there's
nothing in here, just zoom out as far as you can, and then you'll find
all of the nodes. Now, what I'm going
to do, first of all, is adding a new shader, and what we'll do is
we'll double click it and we'll call it wood. Like so. And now you can see
here is actually set something up within blender, just a basic principle BSDF. Now, this basically
is the super node. It's where all of the
texture maps will plug into. This is the main node that
you will be using. All right. So now what I want
to do is, I just want to click on this node. And what I'm going
to do is I'm going to press control, shift, and T. And what then that
will enable me to do is open up my actual
computer file. And from there, I just
want to find my textures. So here are my textures that I'm going to use as an example. And you can see here
we've got wood grain. And you can also check out
what these actually look like by coming over to the right hand side here
and clicking this on, and now you have a good idea of what these are actually
going to look like. We can also make them larger
as well if we need to. So you can see here at the
moment the size is 128, and we can just bring that
up to actually make them bigger and see exactly
what textures they are. Now, to bring them in, all I need to do is select
the first one. Shift select the last
one, so we've got a more selected and click
principal texture. And what Blenders
going to do from there is is actually going to bring them all in and set
them up for us like so. So you can see now because
of the node wrangler, everything is set up for us. Now, within our actual
shade in panel, you will see over
the left hand side, we actually have a UV map here, and it's not actually showing
anything at the moment. But if we come on
over and we select one of these actual
textures like so, you will see if i zoom, we've actually selected this
actual metallic shader. I can also come down and select the roughness,
for instance, I can select normal, or I can select the actual
image texture like so. So just remember, if
it's on the wrong one, it's probably because
you've got one of the textures or the wrong
texture actually selected, and I generally want to
have it on the base color. Now, with blender four,
comes a new principled BSDF And now, a lot of
the options are actually hidden behind
these little tabs here. So emission, for instance, is now hidden behind here, so I can turn this
up, as you can see, bring it down and change the
color of it if I saw one. So just remember that some of them might actually be hidden. Now, because this
is a basic video, we're just going to
go through a few of the actual options
that we normally get within our actual textures. So a PBR setup normally
consists of a base color known as the albedo or cut just a color map,
and metallic map, a roughness map
and a normal map. There are more maps, but they take a
little bit of work to actually set them
up within blender, and this is the basics video, so we won't be going into those, but we will be going into
those later on in the course. So the first one, which
is the albedo map, it just defines
the basic color of the material without any
lighting or shading effects. It represents how the material looks under natural lighting. If we go to the next
one, we've got metallic, and this map defines
which parts of the texture are metallic
and which are not. Influencing how the
material reflects light. Metals have a high reflectivity and distinct coloration
in their reflections. Now, you will notice if
I click on this one, it's completely black because this wood has
absolutely no metallic. If this was completely white, all of this wood would
be completely metallic. And if it has kind
of graze in there, that then is defined
the roughness of the actual metallic. In other words, those
little spots that you see when you shine
light on something. The next one is roughness, and this isn't to
be confused with metallic because roughness
is how shiny something is, and metallic is
obviously how metallic something is generally
as well with metallic, either something's
metallic or it isn't. You don't really get in the
real world half and half. So the roughness map
controls how rough or smooth the surface of
the material appears, affecting how sharp or
blurred the reflections are. A lower value results in a smoother surface with
sharp reflections. Why a higher value leads to rough surface with
diffused reflections. Now, when I'm talking
about values, I'm talking about
these values here. So the more sharp this is or
the more blurred this is, or the more darker
these little spots are, that will give you the result that you
actually are looking for. And finally, we're going to
go now to the normal map, perhaps, one of the
most important maps, and the normal map simulate
small surface details and textures without
actually changing the geometry of
the three D model. It affects the way light
bounds off the surface, creating the illusion
of depth and detail. And this is used
a lot in games to actually look as though there's more geometry than
what there is. Now, let me show you
how that works, then. So if I come down to this
strength at the moment, you can see that we've
got our wood here, and it's kind of defined. So if we look from here, it
kind of looks like it's, you know, three D and these
little grooves are going in. But if we turn this
all the way up now, you can see that's the
effect we actually get. So you can see now it looks as though it's much more
rip along the edges. We can see big grooves
going down there, and this is what the
normal map actually does. Now, at the moment, with
our actual cube here, you can see we've only got
one actual material on there. And what about if
you want to put multiple materials
onto an actual object. So what I'm going to do is, I'm just going to
click the plus button. I'm going to click
the down arrow, and I'm just going to
choose one like glass. I want to click the
plus button again. Click the down arrow,
and this time, I'll choose one that says stone. Now, if I go into my cube and press the tab button
in actual edit mode, come over, select
one of these faces. It only works on faces. By the way, you can't select an edge and apply a
material on there. You have to select a
face or multiple faces. So what I'm going to do
then is come down to glass. And finally, then I'll
click a sign like soap. Then I'll come around
to the other side. I'll click this
face and this face. And what I'll do
is I'll come down, click the Stone
and click a sign. And there we go. Now
we've actually got stone, we've got wood, and
we've got glass. And if we put this on
our rendered view now, you can see exactly how
that's going to look, and you can see how the light is interacting with all
of these surfaces. If I come over just to
the right hand side quickly and turn around
my sun rotation, we can get a clearer view of
what we're talking about. If I come even further do and bring it to the front light, so you can actually
see that glass then is actually starting
to be seen through, and you can also see
that actual normal map working on the
inside of this cube. Now, let's quickly
go back to our wood. So to do that, what I'm
going to do at the moment, you can see that we're
probably on the stone in this one in this
shade of view here. It says actually stone here, I can actually come down
and click on my wood, for instance, and
then it will take me and put the wood
on there as well. So that's another way
to actually apply them. Instead of the stone,
it's actually just put on wood instead,
as you can see. Now, what I do want
to do is I want to come in to my actual wood. So that's the one that
we actually brought in this one here
and just show you, for instance, we can actually interact with all of
these texture maps. Now, there's thousands of
nodes available in blender. And the way that you
put them all together, it can become
extremely complex with huge hundred node
maps and shaders. So I'm just going to
show you something of the basics just
to get you started, and that will be an RGB curve. So an RGB curve, as those of you may know
who use photo shop changes basically how the actual
image is actually lit, darker spots, lighter
spots, things like this. So if I come in and
press shift day, search RGB and you can see, I've got an RGB curve here. Now, just before we do that, if you do press shift
day, you can come down. You can just get a flavor of how many nodes there are
actually within blender, and you can see also how many shaders there
are within blender. Let's discuss that after. But first of all, we're
going to go with RGB curves. Bring that in and drop
that down like so. And from here now, you can see
that I can actually affect the color of this actual wood on the fly in real
time, like so. We can also put this onto the metallic onto the
roughness and even onto the normal to get
different effects and different ways that the metallic or roughness actually work. Now, the next thing is we want to discuss is just shaders. So as I said, this is the
main shade within blender. This is like the one
ring of shaders, and basically, this will be the main one that
you actually use. But of course, there's
plenty of shades. So depending on what you want
to do, if you come down, you can see, we've got diffuse, we've got emission shaders, we've got glass glossy
and a whole range of other shaders that you can
actually try out and use. Now that we've discussed that, let's actually come over. Two are actual shaders that
I've got to set up here. Now, you can see
with this glass one, it's just a very
simple shader of glass and got some roughness on, and of course, an IOR value. Next of all, then, we've
got an emission shader, and you can see now this
is using texture maps, and it's slightly more complex, and you can see how all
of these things plug in. In other words, what
I'm showing you is that Shaders can be very, very simple or get
to be very complex. So the next one is the metal, and you can see this
gets even more complex. The next 1 stone, and
you can see again, this is slightly more complex, and the final one is wood, and you can see
things like this. So we can see that
we've actually got some edgeware on this wood, and all of this is actually
done within blender again, with quite a big
setup for the nodes. But it's unbelievable
really what you can actually do
with these shaders. Once you've actually
got your head around how to set up
the node systems. Now, we really are just
scratching the surface in this blender shaders and
texting introduction. And even on the right
hand side here, you can see you've got
all of these options as well to play around with, as well as the fact
that you can actually put these into your
asset manager as well. But this is just a
basic introduction just to get you started. All right, everyone, so I hope you learned a lot from that, and I'll see you
on the next one. Thanks a lot. Cheers.
24. Applying Textures to Architectural Elements: Welcome Microphone
to Blender for Modeling and Jump workshop. So now you should have a very good idea of what you're doing
with seams and shops, so how to unwrap things, and more importantly, though, a better idea as
well of how shaders actually work within Blender how we can bring in
the texture maps, and how we can use
the node wrangler. So, the first thing I'm
going to do is go up to hear preferences and I'm going to bring in my old
node wrangler. So let's bring it in. Node,
Wrangler, this one here. Let's actually close that down. And now what we'll do is we'll bring in our first material. Now, the moment you can see, we've still got our bevel on, which means that
if we unwrap this, so if I grab all of these, so a to grab them all, Smart UV project, click. Now, if I go over to
my UV editing map, you will see just how nicely everything
is unwrapped here. And let's do the same thing
with the stone now as well. So I'm going to grab
all of these with A, U, Smart UV project, click, and there we go,
that's the Stone. Now, let's come over
to our asset manager. And what I want to do is press a little dot first to zoom in, and I'm going to first of
all, put in the stones. I'm going to grab the stone, drop that on there,
let that load up. That's looking beautiful.
And then for the next one, I'm going to grab the planks, drop that on my fence,
and there we go. Now, on the fence, you can see, The resolution looks a
little bit low to me. So what I'm going
to do is, I'm just going to go over
to my UV editing, click on my fence. I'm going to open this
up a little bit more just so I can actually
put it on material, so, press the tab bottom and
then come over to UV editor, press A to grab everything, press the S bond, pull
it out a little bit, and now you'll see that that's looking a little bit
better than what it was. We can actually see some
resolution in there. It's not looking as small and greener or
anything like that. It's looking much,
much nicer now. All right. So why
did we do all that? Well, the thing is we did
all that because now, If I come here and
apply my bevel, at the moment, you can
see if I unwrap them, you can see that we've only got kind of one kind of face here. For instance, if I come in
though on press Control A, Press the taboard now, press A to grab everything, now you can see we've got loads and loads and loads
of faces on there, because, of course, we've
got this bevel on there. Now, if you try and
unwrap this, now, it probably will break
all the mesh up, it will separate all of
these bevels and things. But if you look now,
actually, at it closely, you can see it's done a pretty good job of breaking these up, and that's why we
did it because it's basically kept it the same UV rather than unwrapping it again with all of those
bevels attached, and that's why we're
actually doing that. Now, the other thing is, if we come over to our
shading panel now, zoom in, put it on material. Let's actually have a
look at this shader. So first of all, you can
see with this shader, we had our standard principle like you saw in the Tutorial. And then what we
did was, we brought in those texture maps
for the planks of wood, which we created here
at three D Tudor. And then what we did was,
we're able to now change the way they look with a
gamma and an RGB curve. Now, we'll come back
to that in 1 second. What I've also done here is
I've created another load. So basically, I've
copied, duplicated this. And from there, then
what we've done is we've actually
added a bevel on them. What that does is,
if I go in now, you can see it adds edgeware
on to our actual wood. So when you actually zoom out and you take an
image of this now, you can see that you've
got edgeware on this wood. And the way that it
works is basically part of this is going
to be lighter wood. Part of this is going
to be darker wood. And when you join them together, You then tell them
about the bevel. So you've basically
got two levels here, and you tell them how big
this bevel needs to be. And then you can actually change the darkness and the lightness. So if I bring this up,
so if I come into here, you will see if I bring
this down I'm able now to control how much
edgeware've actually got, and that is what we're
actually looking for. And that is the
way that we do it. So it's basically two lots of texture maps joined together, and then one of them will
be slightly lighter, one darker and then told we look on the edges,
it needs to be lighter. That's basically
what this set up is. On the stone, it's much simple. It's just one
actual texture maps joined up and added
with a noise, so a noise texture, just to give us that little
bit of noise in there, extra noise in
there, I should say. And if I come and
turn this down, you'll see that all of
that noise disappears. So this actually
controls the noise. This controls the darkness
and the light patches. This actual noise texture controls how much noise
is actually on there. And then finally, we've got a little bit of randomization
on each island. You will notice, for instance, this color looks different. This color looks
different to this. And this is because we've
also enabled it so that We can randomize. But
just put that back. Randomize the colors
of the actual block. So you can see here,
look how dark, this one looks to this one, and it's because
of this node here. Then finally, we join
all these together. So you get random islands based on these colors,
so these colors here. And then we also get more
noise in the stones. So that's how we've
actually done that. And they're all from
simple texture maps, so just a stone texture map. Alright, so now we've
discussed that. Let's get back to
the main thing. So what we want to
do with this is we want to apply our bevels. But I'm going to show you
a different way out to apply multiple bevels
at the same time. If I grab my actual bricks here, and then what I'm
going to do is I'm going to come over to object, come down to where
it says to convert, and we're going to
convert it to mesh. So now if I convert it to mesh, you will see that
those bevels have been added into place
already. All right. So the next thing we
want to do is we want to prove do we want to
pro Bevel on here? I don't think we want to pro
bevel on here at the moment, but what we certainly want
to do is we want to add this and this and this all
together, press Control J. And then what we're
going to do is click that on, and there we go. Now we have our bendy bridge
all done perfectly for us. Alright, so I'm really,
really happy with that. Let's now Press tag and
bring everything back, and this is what we
should be left with. Now, you can see that it's a little bit to
bent at the moment, as you can see that happens sometimes when you
join things up. So first of all, let's come in, press control a ball transforms. Let's press right click, set origin to geometry. And now what we're
going to do is we're just going to level
this up a little bit. So first of all, I'm going to
pull it back a little bit. I'm going to press art and Z
and then just level it up. Like so, making sure
that these parts. So these parts,
these chunky pits of wood, and here these fences. We need to make sure that
they're not in place. So instead of doing that all I'm going to do is just press one on the pad and then just
pull those out. Like so. I'm also going to rotate
this a little bit more. So Z rotate it a
little bit more. Like so. And then I think I'll
pull it out s to tad more. Like, so Jos making that
sure that's up to there, making sure this
one's up to there. There's a little
bit of a gap there, which, do we really
want that or need that? I think we don't
want that gap there. So Jos going to play around with this just to get it into
the place that I want, which is roundabout there. And this door obviously
can be moved. And we can also change the bend on here to
be not quite as much. Oh, something like that. Art and Z, pull it
round into place, and just play around with it until you've got it near enough. Perfect, which I
double tap the A now. That's pretty much
perfect. All right. So we can see though
now these steps, we're going to have
to work hard and gain these steps down to here, That is something that I think we'll do actually
on the next lesson. We'll bring in our
first geometry node. Also, this part here, I think, actually, before
we leave this lesson, what we'll do is we'll come in and we'll grab
this bottom part, press you, Smart
UV project, click. And sometimes there will be an issue when you wrap things
like this with Smart UV. But we will see. We'll see if we've got
a problem with it. So we'll go over
to asset manager. We'll come down to our wall, we'll grab our wall,
we'll drop it on there. And there we go. You can
see everything changed. Now, the reason that is, is
because if we come over here, at the moment, we've only
got two of these on here. Now, I need to come
in, press the plus b, come on over, drop
that in place now, and now we've got
three materials. If I come back now to this and click a sign, and there you go. There is your actual
wall on there. Now, let's have a quick
look while we're here at our rendered view and just see what we've actually done
there, and there we go. We can see that's
looking pretty nice. Albeit, it's a little
bit brighter the moment. What I tend to do
is first of all, before you do anything with in rendered view, always
save out your work. Coming over then
to the actual sky, and you can actually control your sky texture
from here as well, which is really, really great. And what I'm going to do
is, I'm just going to turn the sun rotation round just
to get a better view of that. Now you can see if
I double tap the e, that's looking pretty nice. So I'm just going to make sure I'm actually
happy with that, all of this under
here, I'm happy with. And I think once we've got
the actual hole in here, the dolian, I think it's
going to look fantastic. Alright, so I'm really
happy with that. One thing I want to
do before finishing, shift space bar,
bring in my move. Let's put it on to normal, and let's just move that a
little bit more to the side. Let's put it a little bit
back. Double tap the air. And there we go. That
looks fantastic. Alright, one. Let's
save about our work, and I'll see you
on the next one. Thanks a lot. Bye bye.
25. Designing Curved Staircases with Geometry Nodes: Okay. Welcome back, everyone to Blender for modeling and geometry node workshop, and this is where we left off. Alright. So now,
let's go back to modeling because it will make
it easier for us to work. We're going to press
the tap board, just to get out of
edit mode there. We're going to come in over
then to our actual stairs. I'm actually going to delete
these stairs out the way. I'm not going to
really need those. And what I need to do now is try and make sure I can fit
everything in place. Now, this is why we kept the modifier on because
if we need to bend this, because it's not fit in place,
properly, we can do that. And it's also why we're
actually checking out our stairs now to make sure we can actually get them
into the right place. 'cause the bend here might
be a little bit too much, which means that we
might need to move. Everything over. Or we might need to pull this out a
little bit depending. So that's why we're doing
this bit first because it is the most difficult bit
to actually get right. From this central point then, it's basically like that with any kind of model like this. You have a central point. And once you've got the
central point nailed down, you can kind of
build off of that, including the terrain, actually. Alright, so now we've done that. Let's then come in
and do our stairs. So I'm going to put this at
the moment on object mode. And then what I'm going to
do for the next part is, I'm gonna press shift day, I'm going to bring
in a curve because Ms stairs is actually
going to work off curves. So this is the first Joe
node we will be using. This Joe node created by here at three D Tudor and you're free to use it in your own
personal projects. You will need to buy a license if you want to use
it commercially, but it's the same with all of the nodes that come with this, of course, you're free to use
them in your own projects. Alright, so let's come
down and come to path. Let's bring in our path. Like so. And then we're just going to go over to
our asset manager. And then what we're going to
do is go to Geometry notes. And then all I want to do
is drop on the one that says stairs onto this one here. Now, you can see, it
came in like that. That's because I didn't
actually set these right. For some reason, I set
them as geometry notes. It's absolutely fine because we can kind of do that with these, but we will probably
need to go to our resource pack to
sort these out properly. So let's actually do that now. Let's actually go
over there now. So here we are in
our resource pack. And what I need to
do, first of all, I need to come down and
come to my geometry notes. And what I'm going to do is
I'm going to delete these. So I don't want to really delete them. It's not deleting them. It's just clearing
the assets like so. Now, instead of that,
what I want to do is, I want to come to
unassigned now. Come over to let's
say my stairs. I want to see
stairs grid method, right click and what we're
going to do Markers asset. And now we've got actually
a geometry note there. That's exactly what
we want to do. Now, I just want to come
to each of these now. Right click, Markers asset, where is this one that's verlo. Now, for some reason,
this roof tile doesn't want to be
marked as assets, what I'm going to do
is just take that off, add in a geometry node. Let's click the Down arrow. We're going to look
for roof, which is going to be a look. We've got a roof. There we are. Roof tiles geometry node. Click that on. Right
click, Markers asset. There we go. Alright, let's
come to the next one, right click, Markers asset. The next one, right click. This one, again, is not on
there for whatever reason. And this one here
is the Meadows. So I'm going to click
here Markers asset. Hubbles click, Markers asset. We've got the stairs, I
think, so yep stairs. I'm going to come to
Planks right click, Markers asset to the chain. And this one,
again, you can see, for whatever reason, it's not being able to
mark this asset. So what I'm going
to do, take it off, adding the modifier got node. We're going to look for chain. So chain node, right
click Marks asset. Then we're going to come
to the IV, same thing. And then finally the rock, same thing, and there we go. All of the omit
nodes are done now, I'm going to come,
save that out. Now, the moment I let this
save out and close this down, it should update in
our other files. Let's close this down,
come back to our file. And now I'm hoping that if I refresh this, we'll see Yeah. You know, the one
thing I forgot. They're all in on the sign. So I'm going to go back and fix that, and then
I'll come back. So you just want to put these, not in on the sign
into Geomet no. Though, here we are back
in our resource pack. And all I'm going
to do is get the unassigned and drop
them into my got node. Let's save them out.
Wait for it to update. And hopefully, now,
close that down. We shouldn't have any problems. So let's now refresh. Nothing in unassigned Get
nodes all here. Hurry. They're all there. All right. So the one we want
is the stairs. So let's bring in the stairs, drop it on, not
that one onto here. Hopefully. There we go. There's the stairs. And
then what we want to do is want to bring
one of these sides up. So let's go back to
Modeling for now. And then what we're
going to do is we're just going to go to our stairs, and you'll notice that
curve is still there. Now, if fire press shift
space bar bringing the move tool because
we're dealing with curves. Put this onto global
bring this up, and you can see it's
the wrong way round. So let's bring this
one down instead. And what we want to do
is create a stairs. Now, I think for us here, it's going to be easier
just to spin this round. So I'm just going to
go into object mode, Oz 180, spin that round. Yes, this is going the wrong
way. So we don't want that. We don't want that. We
want to pull this up on Global. Let's pull it up. And then what I want to
do now is, you know what? It's not actually
working properly because I think I need to
resell my transform. So I resell transforms
set origin to geometry. And now I'm hoping that
if I pull this up. I' going to work the
way that I want it, which isn't actually doing that, so let's pull this one up. There we go. That's
what I want. All right. Let's spin it around.
So I'll add 180. And you know what?
Before I carry on, I'm actually going
to do that again. So I'm going to show
you exactly what I did. So first of all, I'm
going to minus this off and you can see the moment you've got
that uptick there. I'm actually going to put that
back down. You know what? I'm going to put that
back down and show you from the beginning what
I actually did there. So first of all, I'm going to
delete this out of the way. Then I'm going to
bring in a path. I'm going to move my
path over here, like so. I'm going to resell
the transform. So control layer transforms,
origins geometry, add in a modifier
general geometry node, click the down arrow,
and the ones we want are stairs.
And there we go. There is our stairs. Now,
if I now bring this pot up. So if I bring this part up, you can see that
we've got stairs. And now, what I
want to do is turn it round to it's
facing this way. So I head, 180, turn it round like so. Now, let's first of all, go
through this geometry node. So this is an amazing
stairs geometry node. You can make it as tall. You
can actually move it around. So if I move it over here, you can see you can
actually slant it all. You can actually come in as well and turn the base
off if you want to. We can also turn the stairs off. We can turn the hand rails off, and finally, we can turn the
poles off if we want to. Now, we don't actually
want these poles. We don't want these
banisters on here, but I will show you what they
do before turning them off. So with the polls, you can actually
increase the resolution, so you can make
them more rounded or more square, for instance. You can also change
the x radius. You can change the y radius. You can change the rotation of these things if
you really want to, change the resolution of
them. Many, many things. You can also have
them every other two, for instance, if you want to. But we don't need
to do that. We can also offset them as well. So lots of things you
can do with those. Now, let's turn those off. And now we come
to the banisters. And all we do is the
hand rails here. We can either turn them off on. We can actually shade
them motto smooth. We can actually bring up the heights or
wherever we want them. We can turn the radius out. And best of all, we can also
rotate them if we wanted to. Now, we don't need
those on either, so we're going to
turn those off. Now we've got basically
these stairs. We don't even need
these parts on, but I will show
you what they do. Turn them off, turn them on. We can also then turn the
width of them up or down. We can turn the height
of them up or down, and we can turn the depth
of them or pot down. Again, I'm going
to turn those off. Now, let's get this into place. So first of all, I'm going
to move it into place. Like so, and we can see straightaway that we are
going to have a little bit of a problem in the fact that it's not going to be
it needs to be much, much higher as what I'm saying. So what we're going to do
is we're going to come. We're going to bring
it down to the height that we want it, first of all, so something like that, and that's the first thing
we're going to work on. The other thing we're
going to work on is not just how high because we want this to come all the way
down to the floor. So the more I bring
this down to the floor, as you can see, it comes
all the way down there now. And now the next
thing we want to work on is pulling this out. So you can see that. We've
got it to the right place. But we also need to make
sure it's the right width. So the width really
needs to come to the same near enough length
over here as this part. So what I'm going to
do is I'm going to come to my stairs over here, and we've got one
that is actual width. So now I can do is I
can bring this out, and now you can see, just how
nice that actually looks, and how easy it is to do that. All right. So now let's come in. And think about moving these
bits out a little bit. So all I'm going to
do. I'm just going to move them out just a
little bit, like so. And then what I'm going
to do now is I'm just going to try and straighten
them up a little bit. So I'm going to move
these this way. For instance, pull it out, pull this one out then, here, and we just have to be careful that we don't bend
them too much. We don't want them
bending too much. We want a nice,
smooth transition. So, I'm just looking now. I think I need to pull
it down a little bit. What you can see
is just how easy it is to work with
this geometry node, and how easy it is to get
things done like this. We could never have done
this before, actually. Now, the one thing
I would say is they're a little
bit uneven on here, and that sometimes happens, but we can straight them up. That's no problem to do that. The main thing we're looking at, though is just to make sure that they're
in the right place. You can see here, I need to
move them over a little bit, so I'm just going
to move them over and just get them just
behind that crack there. And now let's have
a look and see how high these stairs are
because the other thing is, we're also able to if I
put them on the stairs. Have a look, go back to this. Like so. And we're able to
increase the actual length. So how thick or how many
steps are actually are. So as you can see,
we can make many, many steps if we need to. And that is the beauty
of this geometry note. All right, so I'm
really happy with that. We're going to click on Shad
smooth, and there we go. You've got a good idea of what
that's going to look like. And from here now,
on the next lesson, and we're able then to actually put the kind of
stone steps on here. Now, this is not quite right, so I'm just going to think, I'm going to fix this a little bit better
than what it is. Like so. And then on
the next lesson now, we're actually putting the
stone steps on top of you. And then there'll be another job done. All right, everyone. So I hope you really
enjoyed that one. You can see just how
powerful this is. Make sure you've got a nice kind of turn going down there. Also make sure the
guy before we finish, is able to, you
know, stand on here. For instance, he's
not going to be, you know, stood
walking down here and there's not going to
be enough room for him. If you put him on here, you'll see that the fence is
going to come down here. He's still got plenty
of room there, and that's exactly what we want. The one thing I did
forget to do, by the way, before finishing
is I did forget to take this fence and
actually keep these parts. But I'll just steal this one. I don't think I've
done that much to it. I've veled it, of course, but this is going to be
pretty straight anyway, and these parts we can rebuild. So we'll get that done, though. We'll get it going down
to the bottom of here, and I'll show you
how to do that. All right, everyone, so
I hope you enjoyed that. It's really coming along now. Thanks a lot. See on
the next one. Bye bye.
26. Adding Railings to Staircases in Blender: Welcome back everyone
to Blender full Mueling and John inode workshop, and this where we
left off. All right. The first thing I
think I want to do then before doing
anything else, is just turn this
down a little bit, so you can see this
side and this side a little bit sticking out.
Don't really want that. So let's come in and turn
down the width a little bit, so turn it down, turn it down. Just so they're poking in there. Just make sure that
everything's fit in place. Double tap the A if you need to. And that's looking pretty nice. Now, the next thing I
want to do is apply this. Now, on some of John you can
come in and click Apply. But you'll see it doesn't
actually work with the curve. So what you want
to do is you just want to make sure
you've got selected, come up to object, convert
to mesh, and there we go. Now, it's actual
mesh. Look at that. Now, the first thing
I want to do after that is delete this
line going down here. This is just to make sure
that when we've got a bend, we've actually got
some resolution in there to actually bend it. So I want to get rid of that. So what I'm going
to do is come in, shift and click, delete
and dissolve edges. So this one here, dissolve
edges, and there we go. Next of all, you
can see that we've got some slight bending on here. You can see here it's slightly bent. We don't
really want that. So what I'm going to do is,
I'm just going to grab these two and show you how I can fix that. So we're going to come in. First of all, put
this on normal. We also want to
make sure that this is on individual origins. And then what you want
to do is you want to press S and Z is normally. Now, if you press Y you'll
see, it's a different axis. We want the S ZD and
then it should be individually done,
straightening those up. So let's come to these here. We can do the Sclar same thing. So's straighten them up, so. Same for these then. We'll just work our way up, so we're just going to
grab these ones here, N's, straighten
them up, like so. And you can see now, wow
that's looking pretty nice. Alright, let's straighten these
ones up a little bit more. And then that's finally
come to these ones here, and then press S and
said, straighten them up. And there we go. We've
got some really, really nice straight
beautiful stairs there. Okay, so next of all them, we need to make some
parts on top of here. So we want to base them
on the actual step. So, in other words,
we want some steps on top of the We want some blocks like these on top of the steps. So let's actually
go on with that. So what I'm going to do is I'm going to grab each of these, the tops of them. Like so. And then what I'm going to
do is I'm going to press Shift and D, duplicate them. I'm just going to
pull them up for now. And then what I'm also
going to do is now. I need to make sure
as you can see, we've got some problems
in these parts here, which will make it so
that we won't be able to put some
subdivisions down in, and we really want to do that. So what I'm going to do now is I'm going
to split them off. So P selection split them off. Let's grab them, press Shift and H to hide everything
else out of the way. Let's press control
A or transforms, right click origin geometry. Now, let's see if we can actually subdivide these.
So you can see now. We've got these here. We want
to really subdivide them. So let's come in, press A,
right click, subdivide. And then you can see though, we do have a little bit of
problem if we do it that way. We don't really want them going across the cuts
going here and here. So actually, it's
going to be better if we come in control law, left click, right
click Control law, left click, right
click Control Law. And you can see here
what I'm doing is, I'm actually
distributing them out. In a different way. So you can see all of
the steps will actually look a little bit
different from each other because of the way
that I'm doing this. It's kind of making
them very, very uneven, and that is exactly
what we want, and we want to do it the
easiest way possible, which is what I'm doing here. Control law, control law. And even if let's say
Control three left click, you can even move them across as well if you want to make that even more uneven
so, Control law so. Now, what we want to
do now is we want to actually split
each of these up. So the way we're
going to do that, let's see if we
can grab them all. Let's see them go to mesh, and let's see if we
can go to sorry, select, and we're going to
select checker de select. Let's see them do it that way. And that's not going to work. So all we're going to
have to do is go into each one and just select the middle ones out of these to actually
split them up because we're going to be
doing the same thing as what we did with our bridge. So we're just going to
be splitting them up. L so Like, so, press the y button, press G, and make sure you've got a gap in every one, which we have. And then finally, all
we're going to do is press A and then bring
them up. Like so. And there we go. Now, finally, what we want to do is
control A or transom, set origin to geometry, add in a modifier, and we're going to
generate a bevel. Let's turn this down to
nut point naught three. Like so. Let's turn it
up to two segments. Let's turn it up a little bit higher if we need to. Like so. And finally, let's press TH, bring back everything,
grab all steps, pull them down into place now. Like, so. Now, the
one thing we need to do is we need to pull these out a little bit
because at the moment, they're right on top of these, and we don't really want that. So what I'm going to do is
press A to grab the mole. I'm going to make sure I'm
on individual origins. I'm going to press S and Z. And it's not going
to work like that. So I'm going to press S and Y. Let's see if it works like this. There we go. Let's pull
them out like that. Maybe maybe that was
a little bit too far. So let's pull them
back a little bit. So S and pull them back
a little tap more. And there we go that
looking pretty nice. Now, let's have a
look where that looks like, double tap the A. There you go, as simple as
that to make some steps. Now, the thing is, you can also see because we did it that way, it's randomize them all,
which is what we wanted, and the one thing we
want to do now is we want to pull some of them
up because at the moment, they're a little bit too even. Also, you can see on these ones, we shouldn't have done it
on there because it's made them very, very uneven here. So let's just go back
for just 1 second. So before we did
that, there we go. Let's press S and Y. Sorry, let's just
minus these off. So if I press Shift and L. So shift L on each of
these, deselect them. And then what we're going
to do is press S and y, pull them out a
little bit, like so. And then what I'm
going to do is, I'm just going to check
make sure they're a little bit uneven on certain
parts, which they are now. And then what I want to
do is now come in and put on this one here,
which is random. So if I come in now and grab
this one, for instance, I can pull these up, like so
and make them a bit random. Like so. And there you go. Now you can see we've got some random steps
going out there. And now we go to the next part, which is this part here. So I'm just going to grab these
and with random on again, it's just going to pull
some of them out. L so. So. And so, and there we go. Now I've got the maging
over the edge slightly, and I'm just looking
I think I need to pull them down
a little bit more. And I think we're
nearly done with these. So let's first of
all, turn this off. We'll just grab
this one, this one and this one and this one. We're going to pull them
out now over there. We're going to pull one
back one out maybe. And let's have a
look at what we've got here, we'll tap the A. And there we go. They look like really, really nice steps. Now what we need to do is we
need to bring in the fence, so where do we want
the fence up to. So let's first of all
grab one of these. So I'm just going to grab this
one here, as you can see. And I think I'll also grab
this part of the fence. I'm going to press Shift D. And then what I'm going to do is just put this onto global, I'm going to move
it over like so. And you can see we've also grabbed the other side.
Don't worry about that. I'm going to press P selection, and where is it gone? There
it is. It's over there. I'm going to turn off on this one. I'm going
to select this one. Turn this off, and there we go. It's back where we wanted
it in the right place. Alright, so for now, let's come in and just split this off. So I'm going to press
P. Split that off, and then I'm going
to press G. What I'm going to do now
is I want it to be round about the same sort of distance between this
one and this one. It's not going to
be perfect because obviously, we've
got a bend here. So all I'm going to do though
is bring it into place. So I'm going to press
control A or transforms, right click, origin geometry,
and drop that into place. Now, unfortunately, we are going to have to do this
by hand, pretty much. But again, what we want to make sure is the same
as this one here where it comes up to a
minimum of the fence, comes up to his belly buttom. We want it to actually
this bit here. You can see comes up to just
round about the center. So the core part of you is
where that's coming up to. We want to make
sure that wherever we put this fence on here, that is also going
to be the case. So let's say if he stood
on this step here, He also wants to be coming up to round about
that part here. So, in other words, I need
to bring this up there. All right. So that's what I'm going
to be happy with that. The next one then I'm
going to bring over. So shift, seven,
go over the top. I'm going to put it
into roundabout here. And then what I'm going
to do is press Shift D. Bring this one over
to round here, and then Shift D, bring
it over to round here. And then finally, Shift D, bring it over to
here. All right. So these are all looking good. Now, I'm just going to rotate them round so they're in place. So you can see the
stuck out round here. So if I come in and stick
this one out as well. So seven go over the top, Z. Rotate it round, kick it out a little bit. Same for this one. Like
so this one Z to Tad, and then this one and Z. Like So move this
one in a little bit, and there we go. All right. So now let's get the
other parts done. So all I'm going to do is I'm
gonna bring this guy out. Like so. And we could have done this
probably with a curve, but honestly, I think it's let's bring it down,
actually into place. I think it's actually
bare if we don't. So I'm thinking with these because we know the
height of them. We can see on this one. It's
on the top of the step. So I'm thinking if we put
these to the top of the step, we know roughly, we're always going to get the right
kind of height there. Bring it down. Let's bring this one down. And there we go. Now, let's come into the bomb of these then
before we finish, and all we're going
to do is just bring these down into the floor, like so, and then we're going
to do the same on this one. I'm going to grab the boy. Now, one problem we've
got is actually here. Let me just go back because I can see there that because
we've got a bevel on, we need to actually grab we need to grab it and
then press control plus just to get
over that bevel. All right. Hey, let's
come to this one. Same thing again. Control plus. And then same on this
one, control plus. And the same on this one. Bring it down. And
the same on this one. I can get there.
So Control plus. Bring it down, there we go. All right. So that's
looking good on this part. Now, we are going to need one over this part and then
going into the wall. But obviously, we'll do
that on the next lesson. All right, everyone,
so I hope you enjoyed that, and I'll
see on the next one. Thanks a lot. Bye bye.
27. UV Unwrapping and Texturing a Staircase: Welcome back everyone
to Blenfor Modeling and one O workshop, and this
is where we left off. Alright, let's work now
on these planks of wood. So first of all, we're going to just put them into
some sort place. So Z, let's actually press
control o transforms, set origins,
geometry, Art and Z. And what we're going
to try and do is, as I said, put them
in some sort place. So something like this.
Let's them bring this down. And you can see it's way way
out of place at the moment. So all I'm going
to do is come to the front of it,
press control plus. Now, this could be a little
bit of a problem for us because of the fact that
we've got a bevel on here. So we could instead of that, grab this part here. I'm just wondering if I if I want to work with
the bevel on there, it will make it a little
bit harder because we have to press control
plus every time. There's no way really
to get rid of it. If I come in and press delete
and limit to dissolve, you can see it doesn't
actually get rid of them. So that's not something
we want to do. We can, of course, come
in and grab all of these. So shift and click and
do the same on the bott. So let's try the bott as well. L shift and click. And let's press delete and dissolve edges. We can do it that way, but you can see we end up
with a bit of a mess. So finally, let's just press Shift S. Cursor
selected Shift A. Let's bring in a cube. So we're going to
bring in another cube. Let's press the S borne, and all we'll have
to do when we finish this now is just make sure that we actually
add in a bevel. So Rs, let's rotate it round. Let's go over the top seven. And then all we're going to
do is squish this in now. So just make sure that
you're on normal, and then we're going
to press S and X or S and y or SN Z, and Z. There we go, and
bring it in, like so. And it'll be so small
that most people won't be you won't be
able to tell anyway. Let's now bring it back into place so wherever we want it. So we're going to put
it round about here. And then all I'm going to do
is grab the bottom of it in face elect and then just pull
it down into place like so. And now I'm just
going to make sure it's in round about the center. So it looks to be
a little bit out. So let's pull it this way. A little bit, like so. And then finally, we're just
going to pull this this way down into place like so. Now, because we're
working with the normals, it can actually bend it a
little bit, as you can see. So I'm going to pull this down just to make it the right
kind of length, like so. Now, from here, what I
can do is now I can and press control or transforms, right clicks the
origins geometry. And now I can actually
grab this, press Shift D, and then rotate it round into the rough place
where I actually want it. So I'm going to put it
into roundabout here. And then on Z. And this
is the fiddle bit. This bridge is going
to be a little bit fiddlier and then I'm going to press Shift D, bring it over. Shift D, bring it over. And finally, shift D
and bring it over. Alright, I'm just going to
leave those there for now. I'm going to work on
them then individually, so I'm going to grab this one. I'm going to grab
the end of this one. Like so. I'm going
to pull it down. And then what I'm
going to do is pull it out and then down again. Like so, and then I'm
going to grab this one, pull it down into place like so. And it all adds to the stylized view of this
anyway with it being like this? So, that's good.
That's one good thing. And what we're going to do
is pull this, this way, like so. Like, so. And again, we could have
done this with curves. We could have just made this and just followed a
curve or something. But I think actually this is the best way to do it because of the fact that all of
them look different. So that's why we're
doing it this way. But let's pull this one out. Let's also come to the top
and rotate this round. So Z and then let's press G. That looks to be round
about it in the right place. And then all I'm going
to do is grab this end. I'm going to pull it
out then into place. Like, so. And then
finally this one. I'm going to pull
up and into place. And then I'm also going to
pull it this way. Like so. I'm also going to
put on my x ray and pull this one into a
bit better place as well. And then I'm just going to make sure that I'm happy
with all of these. I think this one here. Yeah, actually, you know what? It looks good. It's just this one's a little bit out of place. All right, so let's
press ours head, rotate it round, push
it back into place. Let's check that out, and
I think that's perfect. A look. Double tap the A. This one's just a little
bit high, I think, so what we'll do is
we'll just come in, and we'll just pull it down
into a bit bare place. Tab, double tap the
A. And there we go. Alright, now what we'll do
is we'll grab all of these, and we'll bring them
down, so shift D. D here. Like so. And now, finally, all we're going to do is just mess around with
them a little bit. So x ray on again. And we don't need normal on because we're only
moving them up and down at this point. Like so. And, like so, and let's
have a look at that. Turn this off. Double tap the A, and there we go. That is. Look in. Pretty nice. Now, there's one
other part that we need to put in here,
which is this part here. So I think what I'll
do is I'll just grab. In fact, you know
what? I'll just grab this part going
all the way around. So shift and click. This has got Bevelon,
which is absolutely fine. So we're going to
press Shift and D. Just on that big
going round there, so you can see the part
that I've got here. We're going to put
this into place. We're going to rotate it round. So n's he rotate it round, seven to go over the top. And then what we're
going to do is just push that in there to where we actually want
it underneath this step. So I'm just going to put
it back onto normal. I'm going to pull
it then this way. That then is going
underneath there, and that is also going to hide that part that we
don't want to show. So that join there. We don't
actually want to show that. Let's put it onto global. Pull it down into place. Now, you can see
that this steps not quite coming out as
far as I want it to. So all I'm going to do is I'm going to come to my step now. Put it onto normal
and finicky bits, get them fixed, and there we go. All right. Double tap
the A, and that is it. That is our stairs, nearly done. Okay, one of the hard bits,
and we're nearly there. So let's actually just
have another look around. So let's now join
all of these up. And then what we'll do
is bevel these off, and it's easy to do that because they're going
to just press Control J. I can then join
them up to here. You can see, nope, this hasn't got a bevel on. So
we're going to keep it. All we're going to do then
is press control A all transforms the
origin to geometry. Adding the modifier. We're
going to generate a bevel. Put it on naught
point t naught three, and there we go,
that's the bevel on. Now, let's put it on material. And what I want to do is
re unwrap all of these, so I'm going to press tab, A, smart UV Pj, click Okay, and then going to grab
this one, shifts this one. Press control, and we're
going to link materials. That's not the
materials that I want. For some reason, this one's
got two materials on. We don't want that, so
let's take that off. Let's take this one off. Let's come to these and take this one off and this one off. And there we go. Finally,
we've got our wood in. And now, Let's actually deal with all of
these parts here, because you can see some of them are a little bit stretched. So I'm going to grab
these two first, A, smart UV project. Let's come in then and
grab all of these. And then tab A,
Smart UV project, click, and there we go. They're all different now. And now let's come to
our actual stone steps. So A, Smart UV project, click K. And let's actually minus off this base
and this part. Click the down on the one we
want is going to be wall. So there you go,
there's your wall, and you can see it's
a little bit dirty, this side in comparison
to this side, that's not what we really want. So what I'm going to do is
I'm going to go over to my UV editing. I'm
going to make sure. Now, sometimes, this happens where it's the wrong U V.
So if you click on it, though, you'll see
that it all changes. Now, the bit we want
is this one here. So if I spin this round, like so, and then
move this over here. Let's see if it is
this part first. Is it this part?
Let's have a look. Let's press the tab. It doesn't look I think it's
the inside of there. So let's actually just
grab these parts here. So we can see they're over here, which is this part
here, so a look. And then let's press
G. There we go. Now we've got the
darker parts there. So let's put it
there. Let's have a look at what that looks like. And now we can see that's
looking tons, tons bare. Is it dark enough, though? That's the question.
Let's have a look. So I'm thinking I'll
spin it around, so R 90 and let's press
G. Let's bring it out. And there we go. That's
looking much, much nicer now. And now we've done the stairs. All we need to do now
is these parts here, so I'm just going to
press A, Smart UV, Pj. Click OK. Let's go over
then to the material. We're going to click off
base in object mode, like so, down arrow, and we're going to put in
stone. Double tap the A. Let's go back to our modeling. Let's put on our rendered view. And there we go. There is the stone bridge with the steps. That part of it, at
least, actually done. Now, it's up to you whether you want to put a part in here, kind of going around here. I think on the next lesson, it might be worth it
because I think it will just make it look a little bit better than
what it does now. I think that bit missing. It's nice they can actually come and, like, look down there, I guess, but I think it
would look better with that. So we'll do that actually
on the next lesson. All right, everyone, so
I hope you enjoyed that. I'll see on the next one.
Thanks a lot. Bye bye.
28. Creating Arches with Boolean Modifiers: Welcome back everyone
to Bendaf Modeling and John Mode workshop, and this is where we left off. Alright. So now I want
to just bring over. So I'm just going to put this on object mode just for now. I want to bring over
one of these parts. So I'm just going
to grab this part. I'm going to press L. I'm
gonna press Shift and D. And then all I'm going to
do is just move it this way. So I'm going to move
it this way, like so. I'm actually I'm going to just take off normal
minutes and put it on global. And then all I'm going
to do is just put it going in to
something like this. And now we can have a piece of wood there, a piece
of wood here, and I think the
piece of wood can actually go into the wall here. So I've got this
pretty much done now. I'm just going to rem wrap it, might as well ram here. That means it'll look
different from that one. And now let's grab
these two here. So I'm going to press
L and L shift and D, and then all I'm going to do
is bring them over seven. Let's drop it into
place like so. And now again, we know that
we can actually grab this. You can see it's main tower because it's actually
hidden in there, which means I can actually
hide that other the way. I can also then come in
and come to this one, which is this one
here, side building, hide that out of
the way, and now I can really see what
I'm actually doing. What I'm going to
do now is I'm going to first of all,
come to the top one. I'll grab the top one. Again, we've got no bevel
on there, so that's okay. We do need to remember,
though, to put the bevel on. So we'll do that
in just 1 second. First of all, though, we'll
get these into place. Sou they look good. Like so. And then we'll do this one, and we're trying to keep them near enough as level
as this one. Like so. Like so and like so. And into place, Like, so. And now, finally,
let's bring these two. So we're just going to
bring them both here. So shift D and then just
bring them this way. Put them into some
sort of place. So we're going to have
to move them down as well. Like so. Put them into place, and then
we can deal with them now when we bring back
our main tower, which is this one here. There you go. All right. Now, let's fix these though, because they don't
look right yet. Let's bring this one down. Let's bring this one down. And let's bring this
one up a bit and this one also up a bit and let's have a look at
what that looks like. Let's turn this off. Let's
press tab, double tap the A. And now you can see just
how nice that looks. The only thing is these need really come in
around a little bit. So we're going to grab both of these edges, hold them out. Hold them into place there. And there we go. Now, they're
looking much, much better. All right. So let's actually have a look at what
that looks like now. Let's go on to material mode. And what we need
to do now is just rewrap these 'cause they're all going to be the
same, of course. So, Smart UV
project, click Okay. And they go now they're
all looking different. And finally, let's level these off 'cause they
still don't have a bevel. Oh, yes, they do.
They have a bevel, but we just didn't apply
it. So that's good. They'll tap the A. Let's have a look now what
we're looking at. And there we go. That's
looking fantastic. I'm really happy with how
that looks, actually. So that's looking
good. The one thing I would say is maybe. If we go over the top, maybe want to bring these
in a little bit more, or are we being too finicky? Let's put it on
material mode now. And now we want to do is
we really want to think about creating our
actual boolean. Now, the thing is
we've got to remember that this here is
going to be water, so it actually needs to drop
below the actual water. So what I'm going to do is, I'm just going to grab my bridge, press Shift S, ursa selected. I'm then going to
bring in a cylinder. And from here, I'm going
to put the cylinder on 20 because 32 is
just way too high. I'm going to press r and
x and rotate it round. So Rx 90, let's bring it in
some sort of place then. Like so. Let's press S and y and really pull
this out, like so. And then finally, we want
to rotate this round. So if I rotate this round now, we can see that's about
the right you know, direction that we've got now. And then all we need to
do is make this bigger. So if I make this
bigger, like so, we can see now that's
looking pretty nice already. I think also I'm going to
pull it out on the axis here. If you look, though I've
actually rotated it, so I need to make sure
that I'm more normal. And then all I'm going to do is press S and X and pull it out. So now I can see it's got a little bit more
of relief there. I'm also going to press
S ands not S and S and y and then pull it like that and then put it more
down into the ground. So I'll think here, now
this is looking much, much nicer, and we can also
do the stonework around here. Now, the other thing is, if
I hide this out the way, you will see once
I've done this, I really need to drop this down because this then
will be in the water. We don't really want this having floating up there or
anything like that. So what we're looking at now
is making sure that this is in kind of the right
direction, looking into there. So at the moment, we can
see it's a little bit out. If I press R and Z, Sorry. Let's go back to that. Let's pri on the
object. There we go. Okay, if I press
on global and Z, I can then turn this around, but you've got to make sure that it's looking right from
the front as well. So you can see now
that's looking right. It's looking into there
in the right place, and I think actually this
is going to be pretty nice. Alright, so let's come
back then to our bridge. And what we want to do
now is come on. Okay. Adding the modifier.
Let's generate. We could, at this
point, actually apply this simple
deform. I think we will. So we're just overrun over it, press control A and then
come back to our bridge now. And what we're going to do
is adding another modifier, I'm going to generate a boolean, and we're going to click
on the Boolean here. We're going to click on fast
to get everything back. I told you sometimes it
doesn't work properly. And then all I'm going to do now is is just hide
this out the way. So I'm just going to
hide that out the way, and now I can really see how this is actually
going to look. You know what? It does look better than the
first one I built. Much, much better
actually. You've got a lot more view in
there of everything. So yeah, I'm happy
with how that looks. All right, so let's
come back to it. Let's surpress control
and apply that. Let's right click and
shade Auto smooth. Now, you can see, We actually do have a problem now with the
bridge with Auto Smoove on. So Auto smooth as
you can see here. We need to really
bring this down, but then we have a problem
with the actual bridge. No matter how much
we bring it up. So we can see that it's probably due to the sharp
we've got on there. So let's just come in, press L. And then what
I'm going to do is, I'm just going to press control, and I'm going to
clear the sharp. Let's see what this
looks like now. So all I'm going to do is
right click shade AutoSmooth and I'm going to turn
this down to 30. And we've still got a little
bit of an issue in there. So I'm going to fix that, I think before doing
anything else. It's because of the bend
actually going around here. Now, these edges on ear are caused by the fact that these, as you can see, if we come in
here and put it on vertex, these are not actually
touching each other. And that's what's causing this
problem because basically, there's no geometry there. So we have a number of
ways of fixing this. First of all, you can try coming in and putting
this on face. And then you can
come in and you can put it on triangulate faces, and then put it
on tries to quos. Now you'll see that it's done absolutely nothing near enough.
Let's try it again then. I'll see if I can actually
shade smooth. No, I can't. So all I'm going to
do is just go back, and I'm going to
try something else. I'm going to select all
this. I'm going to press P, first of all to separate it off. And then we're going to do
is just try that again. So I'm going to go right
click, triangulate faces. There you go. It's not
really done a lot. Let's try shade and
smooth. Nope, not done it. So let's try the other
little trick that we've got. So we can grab all of these. And then what we can do is mesh, we can come to clean up, and we can go to
merge by distance. And all I'm going to do
then is turn this up. And every time I turn this up, you will see that it actually starts to get joined together. And now, you'll see that we've
actually fixed that bit. We do have a problem
with this bit, however, as you can see, and round the back
of it, say, L, the back has all been fixed, that's all nice and smooth. So all we really
need to do now is fix this one here, and
now do we do that? Exactly the same thing.
We come to mesh. We're going to clean up, merge
by distance, turn it up. Turn it up another
one, another one, another one, and there we go. Now we can see that
we've actually fixed that without destroying
the actual loop, and now it's nice
and actual smooth. Now, if we come in
now and go right click and triangulate faces, you will see now we've
actually lost nothing, and it's a beautiful face
now to actually work with. Now, before carrying
on, the main thing is, as I said, we want to make sure that these are going
into the ground. So let's come in, and what we'll do is well, first of all, right click tries to quads, just to make it a little
bit easier to grab. And then all I'm going to
do is I'm going to come in, and I just want to grab all
of this bottom part on here. Now, the other thing is,
I'm just looking to this. I'm just going to hide
this one out the way, so I'm just going to come
in, hide this out the way, and I can see that the
thing is with booleans, they always make a mess of mesh. So just take that into account. It will always be the same. It's most of the time, better off just coming in, grabbing all of these. So grabbing all of these,
going all the way around. Like, so shift clicking them, just pressing delete
and faces, like so. So you should be left
with something like this. And then all we're going to
do is we're going to come in, l shift and click, and we're going to join
all of this up again. So I'm going to press
Alt Shift click going all the way
around here and here. And also, as well, go to press Shift date just so
I can see what I'm doing. Now, we're going
to bridge these, but we don't actually
want to have bridging on this or this edge because you
need a gap in there, so if a right click
and bridge edge loops. And you can see that it's also causing a little
bit of a problem. Always the same with with
Boolean always the same. So instead of that,
all we're going to do, we're going to come
in and we're going to press J to join those together. If J doesn't work, press F. Let's come to this
one and this one, F. And now we should be able to bridge each of
these independently. So all I'm going to do
is shift and click. Click this new one that I did, press the F boron,
come to this one, l shift click, click this one, press the F one, and then come up to this one
now that we're going to do. And this side as well. So this side and this side minus off these
two, right click. And hopefully, Bridge edge loops is going to work now,
and there we go. Now, let's right click
Shade Auto Smooth. And there's our actual bridge. Now we've sorted out
the actual smoothing. What I want to do is now. I want to really apply
my actual boolean. So let's come over it. And let's see if we've
actually applied it. So I'm just going to
get rid of this now. And then I'm going
to look where I actually want this
to come down to. So the first thing
we're going to do is grab each of these. So I'm going to
grab each of these. I'm going to press Ns. And what that's going
to do is it's going to actually flatten
them out, like so. And then what I want to do is I really want to
pull these down, but when I pull them down, I have to be very careful, I'm not going to be
breaking any of the meshes. You can see as I pull
these further down, it actually straightens
all of this mesh up here, which isn't too bad, actually. You can see it actually
looks quite nice. So I'm just making sure though, it's okay on the
back end as well. You can see it's kind of
breaking this little part here, and we don't really want that. So let's put it back a int. And let's go back. And
instead of doing that, what we'll do is
we'll just press and pull them down instead, like so. Alright, let's now
press Shift and H, and we should end up with
something like this. Let's right click shade Auto
smooth, and there we go. And the reason why we've got a line round
there, of course, is because we've got this for some reason, the sharp
going round there. We don't really want that.
So let's get rid of the sharp on both of these edges
going all the way around, L so, like so. And right click and what we're going to do is clear the
sharp, and there we go. Now, that's looking
better. All right. So that's looking better now. I'm just looking
at this edge now. We need to have actually a
sharp on these points here. So let's right
click, mark a sharp. And there we go.
Perfect. That's looking much, much better now. All right, so that took some
time to get that right. But now we have got it right. If we press Altag, we can see now just down nice
that's gonna look. We can see in there. And now what we're gonna do
on the next lesson is we'll start point our
rocks around this part here. All right, everyone, so
I hope you enjoyed that. I'm going to save out my work, and I'll see on the next
one. Thanks a lot. Bye bye.
29. Modeling Stone Edge Slabs for Bridges: Welcome back, everyone
to blend thefm Modeling and John Mind workshop, and this is where we left off. Now, think before we
actually do our rocks here, what we'll do is
we'll come in and add another material onto here. Or we could change the
actual color of this. But I would sooner just add
kind of a ground plane. I feel once you've
had a ground plane, it kind of reflects
that light back off, especially when you're actually going into the rendered view. So what I'm going to do
is, I'm just going to come in to this bottom
one minus it off. Click new, and I'll just
call this ground plane. And we're going to have
this just until we actually start developing
the actual terrain that's going to be around here. We've got a long way to go
till we get to that point, so we might as well do this now. So what I'm going to do
is just bring this down. So I've added in a new material. I'm going to come to
the right hand side. I'm not going to go into the
shade or anything like that. I'm going to come
there and bring down the actual color, like so. I'm going to go into
the rendered view, and then all I'm going to do
now is turn up the metallic. And then what I'm
going to do is turn either the roughness up
or the roughness down. So you can get some
real shine on there if you want to, really,
really up to you. And then I'm just
going to go back and bring down the
color a little bit. And you can see now
what that's done. It's really much clearer
visual to see what's actually happening within the scene and see how everything's
kind of coming together. Now, from here as well,
we can see as well, how far these come down. And I think for me, I'll take my bricks down to
roundabout here, I think. So what I'm going
to do now is I'll go back to object mode. And then what I'll do is I'll
come to my actual bridge. I'm going to press Shift and H just to hide everything
else out of the way. And then from there
now, I'm going to come in and kind of put my bricks on. So let's first of all come
in because it's going to be a little bit messy going around here
as you can see, because we've got
some that are a little bit closer together, but we need to kind of keep
that kind of roundness there. We need to be the same. So what I'm going to do is
I'm going to come in. I'm going to grab this one, going all the way
around to here, and then go to come
to the back one. So shift select, control select control select
control select, and control select like so. Alright, from there, then
what I'm going to do is I'm just gonna press Shift D, and then I'm going to
press P straightaway, selection like so, and then just grab your bridge
and hide it out the way, and you should be left with a
couple of things like this. Alright, so you will
notice now that within these, if I come in. Let's first of all come in
and press A to grab them all. Let's press Control E. And what we're going to do is just
clear those shops off for now. And now we should have a better visual of what we're
actually doing. And you can see here that they're all kind
of nice and even, but you have got some
parts which are like this, which aren't even stones, for instance, and we
need to sort these out. So what I'm going to
do is, I'm just going to come in. I'm going
to grab them all. I'm going to press
delete, and I'm going to go down to limited dissolve. And what that should do is
now it should make them, so they're all pretty
even in between, like so. And if you look on
here, actually, you've already got the
workings of your bricks. Now, what I recommend we do is because you can
see on this one, we've not done this one or
it's not actually worked. So let's come in and
we'll fix this one. So I'm going to go
limited dissolve, and you can see we've
still got an issue there. So what I'm going to do
instead is, I'm going to come, and any that are like this, you can see on this one, it's a bit more obvious
where the issues are. So on this one, what
I'm going to do is, I'm just going to grab
this one, grab this one, right click, and what we're
going to do instead is, we're going to merge vertices, and it's going to
be at the last one. That then is going to merge it. And then I can simply come
to this one to this one. And instead of just going
through the menu again, I can just press Shift R and that will do
basically the same thing. Then to this one, shift r then
to this one and this one, shift r then finally, that's it. Alright, so now we've got
these all laid out perfectly. What I want to do is
these bricks are going to be a bit big if I use them the way they
are at the moment. You can see here they're really, really big, and we
don't really want that. So what we're going
to do instead is, we're going to press A. We're gonna right click, and
we're gonna click subdivide. And now, if we come
over to our vertices, you can see now we've got all
of these vertices in here. And what that's going to
enable us to do is just split up all the bricks and make them look a
little bit nicer. All right, you can also
see from here that we've actually got some
bending here as well. So let's have a look
what's the causes of that. So we're just going to press tab l tate to bring everything back. And I'm looking and here is our bend on there and the bend. Let's have a look
at the front of it. The bend is also. Let me just check
with them. I'm just going to grab my
bridge a minute. And come in and look
at where the bend is. So the bend is
coming down there, and the bend is coming
down here, like so. So it's good that it's
actually falling along. So I'm going in, press now is
lth, bring back everything. And now what I want
to do is I want to grab the inside of here. So I want to grab this inside and this one that
we've just made, which might be a bit
tricky actually to grab. So I'm going to do is hide
my bridge out the way. Grab this part, and
before I do anything, I'm going to press
control A or transforms, right click the
origin to geometry. And then what I'm going to
do is add in a modifier, and we're going to
bring in a solidify. Now, the problem with
the solidifier is, we won't be able to bring it in straightaway because we've
actually only got a two D, so a line instead of
a three D. Let's go in anyway and add
in A, solidify. And now this is what I'm
about so you can see here, we've got our solidify in. If I move the offset like so, you can see not a lot happens. If I increase the thickness, you will see that it
actually comes out like so. And this is really,
really not what we want. If I bring down then this, you can see it just does that. So let's first of all,
before we do anything, let's come in and
actually make this. A actual three D object, or at the moment, I would
say it's a one D object, so let's go to a two
D object instead. In other words, a
plane. Let's do that. So I'm going to do this.
I'm going to press tab. I'm going to press A. And then what I'm
going to do is press and y and just pull
that out, like so. And then what I can
do is with this one, I can actually bring this
into place once I've actually fixed what I want
to do with these. All right. So now, we should be able to press control all transforms, right click Set origin to
geometry, add in a modifier, generate and bring
in a solidify, bring it up a little bit. And again, you can see
we've got those issues. Now, we don't need to go in to check to see if the
normals are not right. You can see quite
clearly or not. So all I recommend
you do is press tab, A, shift and n, and spin those around like so. From here, then I can press
ltH and bring back my bridge, and you can see now
that we need to move these kind of back into place
before we do anything else. So what I'm going to do is I'm going to come first
of all to this one. I'm going to press L,
and I'm just going to pull it back into place
because then from there, I can decide how thick these
bricks are going to be. Now, let's go around
the other side, and I'm going to
pull this one out. So I'm going to click
on one, press L, and pull that one out, like so. Alright, so now it's time to get the thickness of
my actual bricks. You can see the quite thin here. At the moment. And
also, don't worry. They're not looking like
bricks at the moment. I know that, but
we're going to solve that out in just a minute. So let's bring them
out, first of all. Let's make them thinner, sorry, thicker, and let's
bring them out. So if we bring this
up, you can see now I can pull them into
place like so, and I think I'm going to make them actually a
little bit thicker. And then I'm just going
to make sure that I'm happy with them or
the scaling of them. And I'm just going
to take a step back. And you know what? I think
they look really nice. Now, let's go underneath
and you can see here, that the underneath of them isn't going enough
into the water. So I would say, come in, and what you want to
do is you want to grab the bottoms of these. Js, come in, grab
the bottom of this, the bottom of this one, the
bottom of this one here, you can see, grab the wrong bit. So the bottom of this
and the bottom of this. And then all you're
going to do is just press E and Z
and bring them down. Like, so into the
water. And there we go. Now, from here, we
should be able to come in now and apply our solidify. What I want to make sure though, first before doing that is
that these are thick enough. I think at the moment, they're
not quite thick enough. So what I'm going to do is
I'm going to press tab, I'm going to press A, and then
I'm going to come over it. I'm going to make sure I'm
on individual origins. And then all I'm going
to do is press S and y and pull them
out a little bit. Now, we have to be
careful when we're doing this, because
as you can see, if I pull them out too far, It's bending it instead
of what I want to do. So instead of doing that, what I'm going to do is, I'm
going to come to this one. I'm going to press
shift and click, going all the way around here, and I should then be able
to pull them out like so. And then from there, I'm going to pull
them back into place. Let's do this one first, though
before we go any further. In fact, you know what we can do now, we can grab the bridge. So this and this shift H to hide everything
else out of the way. And now it's much much easier to work with
as you can see. Alright, so now I'll
do is, I'll come in. At shifting click, grab this
side, pull it out like so. And now all I want
to do is just make sure that this is
kind of in place. You can see here on
the outside of here, it's a little bit in there. Now, I know we're not
going to see the inside, but it's still good to find
out how to actually fix that. So all I'm going
to do is come in, proportional editing
on, put on smooth. And then all I'm
going to do is just pull this out with
proportion editing on, and you can see it's rather easy to actually fix
that if needed, like so. Alright, let's make sure this
front is actually perfect. It's perfect already.
All I need to do with the front is just
move it back a little bit. So I'm just going to come in, grab my front with L, and then just pull
it back without proportioning on to where
I actually want it, which will probably be somewhere
around there, like so. Alright, then. So from here
then, let's come in now. And what we'll do is
we'll apply our solidify. So control, apply a solidify. And then on the next lesson, what we're going to do is
we're going to split these up and turn these actually
into stone blocks. Alright, everyone, so I hope you enjoyed that, and I'll
see on the next one. Thanks a lot. Bye bye.
30. Crafting Decorative Wood Framework: Welcome back everyone
to blend for Modeling and Jobs workshop, and this is where we left off. Alright. So now,
we've actually got a full actual topology. So, in other words, it
is a three D object. And now we want to do is
really split them off. So all I'm going to
do as I did before, so it's Shift click, grab this one, and then just shift click going
all the way over. So heading all the way
down to this one here. And let's do the same on the
other side while we're here. So t shift click, Shift click, grab this one, and then just
keep going all the way over. So all the way down to this one, and then you're just
going to press Y. And when you press Y, always just press G just to make sure you've grabbed them
and then just right click and drop them in place. And as well, I did notice that my actual lod screen
commands aren't on. They're back on now,
so don't worry, guys. They won't be lost
forever or something. I'll just turn them
off to something else, but now they're back on, so we shouldn't have any more
problems with that. And now what we're going to do is we're going to
actually come in, grab everything
with A, go to mesh. We're going to go
to clean up, and we're going to fill holes. Now, we know what's
happened already with this. Now, if I press control A, all transforms right click. Origin geometry,
adding a modifier, add in a bevel. Let's bring the bevel
all the way down. So all the way down, like so, and you can see just what
we've actually done there. Let's turn up the segments one. And there we go,
Let's have a look where that's actually
looking like and I think. That is looking pretty
nice, the way it is. Let's just double
tap the A. Yeah, and there we go. That's
looking pretty good. Now, the one thing I would
say, with the front of it, especially is the fact that we need to kind of randomize
it a little bit. So all I'm going to do to do that is do what I did before. If I grab one of them, I might be able to get
away with pulling it out with random
proportional editing. So if I pull this out
now, as you can see, we're pulling some
out, pulling some out, like so, and it's randomizing
them a little bit. So let's have a look now. Now, you can see they're
a little bit more random, a little bit more jagged, and that's exactly what
I'm looking for. I'm not going to do it on the back because you're
never going to see that. So I'm just going to
leave it like this. And the other thing
you can obviously do if you grab them all, you can also come
transform, and again, we'll come down
to where it says, randomized and then
just drop this all the way down because you only want it a tiny, tiny little bit. Maybe even that's a
little bit too much. Let's press the tab and have
look. But you know what? I think that's actually okay. I'm going to leave that A is, I'm just looking now
to keep the rounders. So what I'm going to do
is, I'm just going to come in with click on them. Click on proportional
editing once more. But this time, I'm going
to put it on smooth. And the last thing I'm going to do is I'm just going to come into these edges here so
you can see this edge here, and I'm just not that one. This one on the inside.
Let's grab this edge. So this one on the
inside of here. And what I'm going to do is I'm just going to pull this up. So I'm going to bring it all
the way in just pull it up, make it a little bit
more rounded like so. And then I'm going to do the
same on this side as well. Like, so, and then
the same on this one. And I think then. We've actually
got it. So there you go. It's following a bit more.
Oh, another one here. Let's pull that one up. Following that line going
all the way around. So now you can see, it's got that kind of jagged
look while still keeping this kind of symmetry
that we're looking for. Maybe maybe one more on here as well, which
I think I'll do. And it's up to you,
how far you want to push this And there, that's looking much
much nicer now. Alright, I'm happy with that. Now what we need to do is
we need to unwrap these so we can unwrap them with
the bevel on as we know. So and Smart UV
project. Click Okay. And the great thing here is
if we put this on materials, we've already got
a material here, which we can actually use. In fact, they've already got that material on if
they're coming over, because we had it on you know, on our bridge, which has
the three materials on. The first one luckily
for me was this one. But just apply the stone
material to your own. Alright, then, let's press
saltat bring back everything, double tap the A,
and there you go. That's what we've
actually got left with, and now we're kind
of motoring along. So now let's
actually come in and start building this
part out, I think. I think that'll be the
next part we build out. So all I'm going
to do is, I'm just going to come over
press saltate. And you can see, because we actually hit it within
the collection, when a press saltat it doesn't
actually bring that back. So all I'm going to do is
just click this on so. Now, the next point is, we need to actually start
building out this with wood. Now, there's a couple
of things I do when I'm actually creating things like
this to make my life much, much easier, and I'm going
to show you those right now. So first of all, for
a piece of wood, I'll press Shift A.
I'll bring in a cube, so let's bring in a cube. Let's make it smaller, like so. And what I want to do is I want this cube to be round about the right size of what my actual piece of
wood are going to be. So what I'm going
to do is I'm going to grab my piece
of cube like this. I'm going to press sd
and pull it out like so. And then this will be my
base for my piece of wood. Now, you can see at the moment,
it's way way too thick, but the thing is, you know, it's too thick on
these bits, let's say, but on the actual struts that are actually
supporting the building, this might be the
right thickness. What you need to think about is where are these
most likely to go, and they're most likely go on, you know, the ups
strips up here. So, let's come in, though and actually make it a
little bit thinner. Now, rather than pressing S and scaling it,
let's just come in, shift and click, and then alternS without
proportional editing on. So S, and then let's bring it in that way,
and there we go. That looks more reasonable size. Now, from here, what
I tend to do is, I won't actually come in
and add in a material. I will add in a material, but not this material. And the reason I don't want
to do that is because I want to know which ones have unwrapped and which
one I haven't. So all I'm going to do is
add in a basic material. So basic material, I'll
call it basic wood. Like, so, and all of these things are designed to
help you with the process. So speed up your
process immensely. So what I'm going to
do now is just put this on a basic brown color. Let's make it a
little bit darker. And now it's fairly obvious that this piece of wood hasn't got a material on while
still being able to have a look and see what it actually looks
like in real time. And that's the whole
point of this. Alright, so let's go back now. And what we're going to do now is we're going to
press Control A, all transforms, right click
Set origin, geometry. And then what I'm going
to do now is I'm going to come to my modifier, adding a modifier, and I'm
going to generate a bevel. We're going to put
the bevel then on at point naught three,
and there we go. That is the piece of
wood all done and ready. Now, it's up to you
whether you want to turn up this bevel on here. For me, I always tend to
have it just a little bit, just a little bit because I find if you turn it up too much, it kind of does it look as good like that? I'm not so sure. So that's why I
always put it on uh 0.3, but it's up to you. Whatever you set
this at, though, is going to be the
standard across the whole building. So
just remember that. Alright, so now what
I want to do is, I just want to put
this over to the side, like so, and now I'm
going to create one more. So I'm going to press shift A, and this time, we're going
to actually bring in a path. So we're going to
bring in a path. We're going to move
it over to this side, like so, and this is going
to be my next piece of wood. So again, I'm going to spin
it round, first of all, so r y 90, let's spin it round. And the reason I want
to create this one, is because we have a lot of rounded wood in our scene,
as well as straight wood. So what we want to do is we
want to kind of get this to be the same as this while being able to bend
it quite easily. Rather than getting this
and then, you know, subdividing it and
having to bend it, it just makes it
much, much harder. So if we have two of these
primitives that we can use, over and over again, it makes things really,
really easily. Plus, it keeps the structure pretty much the same
because you're going to have the same width or
pretty much the same width, and you're not going
to end up with pieces of wood that are really, really thin or
anything like that. Alright, so let's then
come to our curve. So curves work a
little bit different. If we bring in a curve and come down to our
right hand side, you will see we have
another option down here. Now, what we want to do, we've got all of these options here, including a resolution,
texture space geometry. Don't worry about all
of this at the moment. What we need is the geometry, and the one we want
is the extrude. So let's actually bring out
the truude and what you're going to end up with is
something like this. Now, it's still a two D
object at this point, but what you can see if I come to this is
that it's really, really easy to actually bend it. Now, let's actually
go back. So let's just put that back a minute. And what I'm going to
do now is I'm going to come over adding a modifier, and this time, it's
going to be a solidify. And from there, I can
actually bring this up now. I can also right click and shade flat so I can actually
see what I'm doing. And there you go,
now you can see Jaws tow nice that
actually looks. And then from here, what we
want to do is put this up, add in another modifier, and this time, it's
going to be a bevel. And the bevel, of course, is
going to be on nut point, nut three, and there we go. Now we've got two pieces of wood that pretty
much look the same, but this piece of wood,
we're able to bend. Anyway, we want so. And you can see just how easy that is now to bend this wood. Alright, so let's put that back. And then what I'm
going to do is I'm going to make another
collection here. So I'm going to press
F two, not F two, so I'm going to press M.
And then new collection, I'm going to call
these primitives. So, click Okay,
and there we are. We've got our
primitive in there. Now, let's call this one bendy Wood or something like that. So Bendik just in case
we need to find them. And then what I'm going to
do is come to this one. I'm going to press, put
it in my primitives, and then press F two, and
we'll call the straight Wood. So. Now, what we want to do
is every single time then, we want to build on any of this. We want to be using these pieces of wood because it's just going to make it that much
easier. We will as well. I think probably as we
work through the course, we'll probably actually
make one of these. Instead of keep reusing them, we'll make one, we'll put it
in our primitives as well. All right. So the
last thing then we want to do is this part here. You can see at the
moment the top of here, if I going into material for view, shouldn't
be like this. It should actually
be cobblestone. So let's actually come
into our asset manager. Let's click the
down and I think, let's see, I've not got
my current file on. That is because Blender crashed, which an I need to
go to preferences. I need to go to file paths. And then what I need to do is add in that file path again. So the file past should be
on the course Resource pack. Fix, click Add, and then all we can do
is close that down, add in our course resource
pack, and there we go. Alright, so the one
we want is this one, which is the stone bricks. So this one here. And
then all I'm going to do is I'm going to come
over to my materials panel. Click the plus. And then
this onto the like so. And then on the next lesson, what we're going to
do is we're going to apply that to the top of here, and then we can actually start working on the
wood part of this. And then finally,
just start working our way up all the
way along here, up to the roofs and we'll
actually get this part, I think, finished before
we do anything else. All right, everyone,
so I hope you enjoyed that, and I'll
see on the next one. Thanks a lot. Bye bye.
31. Building Framework for Structural Extensions: Welcome back to blend the for
modeling and in workshop, and this is where we left off. Alright, so now we want
to do is we want to actually start building
out this part. But before we do that, let's
go back to this part now. So what we said is, we're
going to grab this part. Let's put it on material so
we can see what we're doing. Grab all the way over to here. Just making sure I've
got this one as well, all the way over,
press you and unwrap. So we're just going
to unwrap that again. And then what we're going
to do is we're going to assign our stone steps, like so and you can see
already Dad's looking. Alright, so let's
just have a quick look at it on render view, and then we can start
building out our wood, and there you go,
much, much nicer. Alright. So now let's come in and think about our
wood going on here. So I'm going to just put
it on material again. I'm going to put on modeling.
I'm going to press tab. And then what I'm going
to do is I'm going to also include the
material on here. So if I grab this one,
and grab this one. I'm going to press Control L, and I'm going to link
materials like so, and then I'm going
to come to this one. Now, it's important that
we press Shift D on here. We don't actually
want to bring it over because we want to save these obviously to actually
be able to work on. So we need to keep
reusing these. The other thing is the
bridge is basically done, so we may as well now as well. I'm thinking maybe we
need just one in here, but I think I think what
we'll do is we'll grab. Let's have a look
here, I can grab this one and just slot that
in place along here. I think that's just going
to finish this off, so we might as well
finish it off. So I'm going to press L. I'm
going to press Shift and D and just bring that
over to this side, and then seven to
12 over the top. I'm going to rotate it so
art and Z rotate it around. G. Let's put it into
place where we want it. I'm going to then bring it down. Let's put it also on normal, so I can actually
move it correctly, like so, and let's
put it into place. Like, so and then all I'm going to do is I'm going to pull it up and see if it'll
fit under there. So just a little bit
more as you can see, so let's put it into place. Just like that.
Double tap the eight, and there we go. That's
that bit finished. Now, with these bits, I might
as well make a new one. So I'm going to put
them in the bridge. We've also got our
bridge in here, but you can see there's
nothing in here. So to do that, all
I'm going to do is just grab all
of these pieces, and then just press M. Once
I've grabbed most of them, and then I can see
what's left over. So if I press M now, and we're going to
put them in bridge, like so, and then just hide
the bridge out the way, and you'll actually
see what's left. So M again, bridge,
and there we go. Now we can actually do
a little bit of work. So let's bring this one
over, first of all, And what I'm going to do is
I'm going to first of all, put this part in
the corner here. Now, once I've got this
here and in the corner, I can keep reusing this
piece of wood over and over again so I can
actually put it into here. And this then is
just a simple grab from over here next time
I need a piece of wood. So if I press Essence ad, let's pull this up then
and get it into place. Like so we're going to put it into place
round up out there. And then what I'm
going to do is I'm going to actually
grab this again, and I'll put another
piece in this corner. So Shift D. Let's drag it over, put another piece in
the corner like so. And then I'm going to
need two more bits now. So I'm going to press Shift D. And I'm going
to bring it over. And with this one, I'm going to make it a little bit smaller. And you'll see why
that is in a minute. So I'm gonna press sad. Bring it down, put it
into place like so. And I think that's probably
not going to be high enough. So what I'm going to do is I'm going to pull
it up a little bit. We need some supports
basically on here. So what I'll do is I'll
leave that there for now. I'll press Shift D, bring
it up, rotate it round. So RX 90, rotate it
round, press S and X. Bring that in, and
then let's just fit it into there. Very snugly. Let's pull it back a
little bit as well, so it fits in there beautifully, as you can see, and then let's pull it up to
where it's going to go. So I'll think
something like this, as you can see, it's
looking pretty nice. And now I just want
to put in a support, which is going to go
underneath here and all the way over to here
to kind of support it. Now, before I do that, let's
put a support in here. So what I'm going to do is
I'm going to press Shift D. And then we're
going to bring it out. I'm going to press
one on the number pad so I can see what I'm doing. Again, we can press
G because it will follow that axis on the Z, and we're going to
put it into place. Like, so. From here, then, let's bring in
our supports now. Now, for this, we can use these parts that we
spoke about. Shift D. This is the bendy
one, of course. So all I'm going to do now, I'm going to press sensed without normal on because it's
giving me the wrong axis. So sensed, pull it down.
Then let's press one. And then all I'm going
to do now is just pull it into some sort of place, like so and I'm going
to grab the top of this with
proportional editing on, and we only want it on smooth. And then what we're going
to do is just pull it away. Like so. Now, the thing is, you'll notice at the moment, I start to bend a little bit. If I press so control
or transforms, you'll see that it actually straightens it all
back out again. That is the main thing. Just
don't forget to do that. Then what we'll do now
is we'll grab this bit, we'll pull it up. Like so. And now it's just a
case of just messing around with it and getting
it to where you want it. So I'm just going to pull
this bit up as well. Like so. And I'll level this up I think. I'm going to level this
bit up a little bit, and then let's pull
them both down and let's get them into place.
So let's pull them over. If I grab just this one, I'm going to pull
it over. Like, so. Now, once I've got it
into some sort of place, I'm going to put it then back into where I want it.
So I'm going to press tab. I'm going to press
Control A again, all transforms, right click, set origin to geometry, and then let's put
it back into place. Like so wherever we want it. Now, the main thing is,
we've got it into place, but now we need
to move it around without the proportion
editing non part. So if I grab this now,
you'll see if I press one, I can now freely
put it into place. And sometimes it just makes it easier to actually work
with it, as you can see. Now, we have to pull
it back past there. So make sure that it's in
there, as you can see, and we want to make
sure that it actually looks as though it's
supporting something. So I'll think on here,
I'll pull this one down, I'll just a little bit like so, and then that enables me
then to pull this one down, like so, and bring
it all into place. And there you go.
Now you can see that's looking
pretty supportive. We can bring that out,
bring it forward, up to you while you want it. And now I want to do
is just grab this, press shifty and bring it over into the other
side. Like so. Alright, then. So from here now, we can actually start coming
back to this part of wood. Now we've got this structure, and we can put this
going this way. So into this part here.
So I'm going to press 50. I'm going to bring it out. D 90. And then what we can
do is bring it over. Like so. And we can also
bring it into place. Like so. And this is the
basics of actually building. You can see that I'm
going to need to make this probably a
little bit chunkier. So what I'm going to do is I'm going to press Alt Shift and click alterns and
then bring it out. Like so, and then
I'm going to grab the front of this and just
pull it out over there. And then what I'm looking
for is just making sure that little bit of the
lip as you can see, is below and above
because then it looks as though the wood is actually
slotting into place like so, and the same for the back
then and come now to the back and pull it all the way over into where I need it. And then we can have one
more piece coming up here, and we can have a support
coming along this part here, which will support
this window going up. Now, the next thing we want to do before doing
anything else then, is we want to come
into these parts and I want to grab it and
pull it up into place. Now, you can see that it's going a little bit in
front. We need that behind. So all I'm going to do then,
is just bring it back. And then what I'm going to
do then is press shift. Grab the next one and just
pull that one into place. Double tap the A, like so. Now, it might be a
better idea actually, if then we move this one over. So if I move this one over to here and then position this one, Jost over to there like so. And I think the other thing that we should do is grab this one, pull it over a little bit, like so. Grab them both. So let's press Alt Shift
and click Alt Shift click, so we're just going
around the outside of it. Press alternS and then we should be able to pull
them out a little bit, making them a little bit bigger and finally pull them back. Into place. Hold in
the shift bon because the shift button will
actually slow it down. So if I pull it out like this, and then I grab it and
start pulling it in. I I hold the shift b, you'll notice that it's
really, really slow, and it makes it
really easy then to position it where you
actually want it like so. All right, double tap the A. And there we go. Now, what
we can also try and do, so this is something
else we can try, let's give it a try
on this chunky piece. So if I come into
this chunky piece, press control, bring
in some edge loops, like so, left
click, right click. We know we've already
got a bevel on there. But what we can now do is we can come in, grab everything. Come on over, press mesh, and then we can go to
transform and randomize, and then just put this all the
way down to let's say 0.1. And you'll see now that
actually makes it really, really uneven, and that's something I think that
we should be doing. Now, if we can do that already
on these as well, Now, I think when we come then
to add in our materials, what we'll do is we'll do
that all at the same time. So then we've got a way of making these really,
really uneven. So if you know it's now, I'm
just going to take all of those subdivisions away because I'm going to do them
all at the same time. So what they'll do is I'll do it in, you know, kind of part. So the first part will be
this kind of frontier. We'll put those all together. You know, the front
of this part, and then we can have them,
you know, wood done. And that will mean basically
the wood has been beveled. It's been randomized. It's had the material put on and all that
sort of good stuff. So that's the way that
you want to work it to make sure that you're getting everything done
at the same time. Alright, so we've got that now. So what we'll do now is quickly
just bring this one back, so I'm going to press shift. I'm going to bring it
to the bottom off here, so right to the bottom off here. And then what I'm going to do is I'm going to try and bend it. We'll not bend it, but
actually bring it to the top. So I'm going to press tab, I'm going to come
in with my x ray, grab the top of there,
and then just pull it back into place like so. And now you can see already just how fast they are
actually moving along. Alright, so on the next one, what we're going to
do is we're going to continue building all of
this out. So all of this. And then I think what
we'll do is we'll actually start to get we'll
finish with the wood, so we'll get the wood all
bent and things like that. And then from there,
we'll actually bring in our first roof, I think, and then we'll start with the
windows and doors because once you've kind of got all of those bits nailed down on this, it's actually really easy to actually build
out the rest of it. It's just basically
getting the gray box out, and then basically building
around the gray box. So that's what we're doing. Alright, everyone, so
hope you enjoyed that. I'll see on the next one.
Thanks a lot. Bye bye.
32. Constructing Detailed Roof Frameworks: Welcome back everyone
to blend for modeling and Jomo workshop, and this is where we left off. Alright. So now what we're going to
do is we're actually going to continue building
out this part, and then once we've done
that, we'll actually get some materials on
our walls as well. So I think what we'll do, first of all, is
grab this part here. We'll press shift. And then what we're going to
do is drag that up. Shrink it down a little bit with SX and then all I'm going to
do is position it in place. So Oz 90 position
in place like so. And then all I'm going to do
is pull it out a little bit. And then pull it up,
so it's into place. And then I think with this part. Yeah, I'll keep it actually. You can see it has to come
out down to this part here, and that's absolutely fine. The first thing is, though,
let's actually pull it back. There's another reason
I don't actually come in and subdivide everything straightaway because actually we need to pull it back and it makes it a little
bit harder work. So if I pull it back to
there, then pull it down. You can see, look, I've got
to play around with it a little bit just to get it into the places where I want it. So I'm just going
to pull it down. To something
roundabout, like there, and then I'll grab
the back of it now and pull it up like so. Now, the thing is, what
I didn't do there. What I should have done is, I really shouldn't
have bent it yet. I should have actually
straightened it out first. The other thing is,
I'm thinking that this is probably a
little bit too high. So what I'm going to do
just put this on normal and then just pull it back into
place a little bit like so. Now, the other thing is, do I want to actually round
this off as well? In other words, do I want
this at a different angle? Let's put it on globe, and
you'll see what it means. So if I grab this now, press R and x and
rotate it round like, so you can see it actually looks a little bit
better in that way. All right. Let's pull this
the back a little bit. I'm just going to pull
this back just a tad, so. And then from there,
all I'm going to do is grab this now, press shifty. I'm going to pull it
across into place. I want it over hanging this bit slightly so we can actually put a piece of wood
going up there, and then I'm going to
grab this part and then just pull that into
place like so. And I think I'll pull it out. So it's going a little bit out more than where
it needs to be, grab this part then and
bring that part back in. And then you can see,
gives us that kind of uneven look that we're
actually looking for. Alright, so now we've got that. Let's pull this bit out a little bit more, so
we'll put it on normal. So we're going to
be swapping between global and normal
a fair amounts. You can see, I'm going to
pull that out a little bit, just to pull it out a little bit longer than this one, like so. And there we go.
Now, let's move on. So what we'll do is
we'll grab this one. We're going to press 50,
and we'll bring this one up into place,
going straight up. To just underneath here, so I'm just going to
pull it up, like so. I'm going to pull it then
across into place like so, and then I'm going
to grab the top of here and pull it down. Just so it's coming
under that part there. Now, you'll see, I
can just get it in there without it popping
through the top of this. Also remember that we're going to have a roof on here as well. So we've got that in place now. And now let's just keep
working our way around. For the next bit what I'm going to do is I'm going
to grab this part. I'm going to crash
shift D, bring it over. And then I'll just put
it into place. Like so. And the one thing I
want to make sure with this part
that's coming out is that there's a little bit of a gap on the bottom and the top. Just so if I double tap the A, you can see it's looking
quite nice like that. You can see that we've got it going all the way back here. And that's fine because
we really want that. The only thing we
want to do is make sure that it's coming
all the way to the back. So if I grab this back piece
and I'm going to pull it back into place,
double tap the A. And there we go, that's
that bit sorted. Now what I'm going to do
is just grab this part. I'm going to press
shift I'm going to pull it over into place. Now, you can see here, we're going to have a
little bit of problem. We need to actually
bend this out. I'm also going to pull it out a little bit before
bending it out, and now I'm going to
grab the front of it and as pull it into place. Like so, and I'm going to grab the back of it and
pull that into place. Now, the thing with the
back is, as you can see, it's not exactly following
this, the way that I want it, so I'm going to pull it
all the way over like so, and then I'm going to
pull it into place. Like so. Double tap the
A, and there you go. Now you can see that's
fitting quite nicely. Okay, so let's just carry
on then going round. So I'll grab this part again. Shift D, bring it over Z 90, and you can see again
because I've got normal on, I need to put that
back on global. So RZ 90, spin it round. And let's get this into place. In between those two. And then let's press sens make it
a little bit thinner. There we go. That's that
part. Double tap the A. Always double tap the A
and have a look round, and then you'll be
able to see exactly what you need to do next. And now I think
we'll actually look at this part along here, 'cause this actually is
quite a difficult part, and then we can kind of
pull it all together. So I'm going to
save that my work before doing anything
else, actually. And then what I'm going to do is I'm going to grab this part. Now, the thing is
about the top of it, do we want to grab that part? That's the question,
because I might want to actually round this bit
off. So, you know what? Instead, we'll come to our bendy one shift,
bring it over. And let's pull that then
into place. We want it. First of all, I'll put it in some sort of
place, press one, and then all I'm going to do is press R and y and
rotate that round. Just to get it to
the right place, so the right place is
going to be a roundabout there then r and y so. And then what I'm going
to do is I'm going to pull this bit out, I think. So if I can pull this
bit out a little bit, if I put it on normal, I
should be able to pull it out then and then
just bend it like so. And then what I'll do with
this bit is I'll pull this more into this part here
so we can actually have, you know, that
nice top on there. And I'm also wondering
about this top. I think I need to bring
it in a little bit first, so I need to make it
a little bit thinner because it's a real big
chunk of wood on here. And I don't think it should
be actually that thick. So all I'm going to do is
just turn off my x ray, grab both for these
and these and this. And then all I'm going
to do is press S and X and just bring
them in like so, and I think that sort of size of wood is going to
be much, much better. Okay, from here, then, I need to then bring this
part back into place. So I'm going to grab
the whole thing. I'm going to pull it just in front of here as you can see. The little bit of bend
now we've got on there. That looks beautiful. And then all we want
to do is probably pull it back a little
bit into place like so. Now, before going
on any further, we might as well put the
top on here as well. So again, I'll just come in and grab my straight piece
of wood, per shift. Bring it over. And then what I'm going to do is
rotate it round. So x and 90. In
fact, you know what? Let's press R x 90 like so, and there we go, and
let's pull it into place. Now, the thing is with
this piece of wood, we can actually make
it bigger overall. So, in other words,
we can just grab it, press the S button, and make
it bigger overall like so. And then I'm just going
to put it into place. And from there, then,
I should be able to get a good idea of bending this. So it just goes under there. Also, I'm going to press S and X and just pull it
out a little bit. Like so. And I do want the front of this probably
bend a little bit. So what I'm going to
do is I'll show you no technique of how to do that. First of all, though,
let's get this into place. So t's pull this into place
without too much ben. You can see here, we've got a kind of a lot of bend there. So let's make sure we actually straighten it back
up a little bit. And let's make sure it's kind of even going all the way
down because we have some roof tiles to
put in there and we need it to go under
there, like so. So let's come back
to this part now. S and X, pull it
out a little bit. And there we go, that's
looking near enough, perfect. And finally, then let's
come back to this part. And all I'm going to do is just pull it up into place like so. Now, we have one
on the other side, so we can put that one
straight in the other side. And then we should be nearly
finished with this part. We'll just bend it at the end. All I'm going to do
is I'm going to press Shift D once I've put
this back on global. So shift D, let's bring
it over. Let's rotate it. So As hundred 80,
rotate it around. You can see when it rotates. It's actually come
out a little bit, so let's put it back
into place, like so. Nothing really needs
to be even on here. We're not actually
looking for that, so don't worry too
much about that. We're going to put it
back into place. Like so. Now, the thing is
with the underside. There's certain
techniques we can do to actually stop
this happening. In other words, we can
cut these if we want to, or we can put another
block in there. But either way, you don't really want them crossing
over like that. So we're going to
fix that as well. Now we'll actually
bend this bit up. So all I'm going to do is I'm
going to press control law. I'm going to bring
in one edge loop, left click and then just
drag it over to here, since this is where we
want the bend to start, and then we're going
to press control law. And bend it over light. So, and there is
another technique. I can show you on here to
actually, kind of bring it out. But with this one, we don't actually want
to bend it that much. So all I'm going to do with this one is grab
the front of it, put it onto
proportional editing, press r and x and
jaws rotate it. And we rotate it on the
x. Let's see if we can. I want to rotate it around. So let's try that again.
Oh, R. There we go. RN X is rotating it now, and then I want to pull
it all up a little bit, like so, and that's the first
way of actually doing it. I'll show you the other
technique of doing this. So we've got all those
there. That's really nice. Now, let's think though, the other technique, I'll
show you on this side. So when we come to this
back bit over here, we'll just for now
actually come in and bring the back bit
without portion editing on, just the back bit over
to this part here. So round about there.
And then on this bit. When we come round to that, I'll show you the other technique. Alright, so we've got this now. Let's come in then
and think about this top bit on here. So,
what I'm going to do? I'm going to grab
this one. And this is another reason why I don't join anything together yet, as well. We're going to join
it all together. Once we've got this
first part nailed down. And from there, then you're
going to find it's quite easy to actually
build this thing out. Alright, so we're going to
put this part in place here. Obviously, we need to drop
this down a little bit. So what I'm going
to do just grab the front and just drop it down. You can see it's dropping
the whole thing down. So I just need to be
careful I don't do that. So instead of doing that,
What I'm going to do is just grab this edge here and
pull it down that way, and then I'll come in and
grab the back edge and just pull it up like
so. And there we go. Alright, so that's
looking quite nice. The one thing I do want to
do is just make sure that this one on face let is just going to
go back a little bit, so you can see here,
just want to pull it back a little bit into
place, and there we go. So now we've got enough room
for our roof tiles on there. And of course, we're
probably going to want piece of
wood under here, but I recommend, first of all, bringing in our roof tiles. So on the next one,
we'll put in one here, we'll put in one here, and we'll build out just this
bit a little bit. So this bit here before
finally we'll get in our roof tiles on
this big bit on here, because the reason
we want to do it on the big bit is because we
really want to lay down. This is how our roof tiles
are actually going to be. So that's why I want
to put it on there. The other thing is
as well, you can see that all of my primitives. So all of these have
gone into here, and that's not something
that I really want. So when we've finished
building this out, we will be moving these into
their own kind of area. And from there, then
we can actually split them up in
a good nice way. Alright, everyone, so
hope you enjoyed that. Our speech on the next one.
Thanks a lot. Bye bye.
33. Decorating Extensions with Wooden Framework: Welcome back on to
Blender for modeling and jump in workshop, and this
is where we left you. Alright, so what
we said is we're going to carry on building
this out a little bit. So I'm going to grab this one.
I'm going to press shifty. I'm gonna drag it out on global. So we'll grab it out on global, like so, and let's then
pull that down into place. So I'm going to grab
the top of here, pull it down into place
below or as low as I can, that piece of wood that
we've already got there. And then we'll also pull
this one back a little bit. So I'm going to pull it
back. Just like that, making it a little bit thinner, so it all fits into
place in there. Then what I'm going to
do is, I'm just going to pressure D. I'm going
to drag it over. And then, of course, I'm going to put it
in the wall there. Grab the top of it and s, pull it up into place. So now, with this one, we might need to pull it up
into place and then grab this one and then pull it out a little bit, so I'll
come to normal. I'll pull it out a little bit. Just in front of
there, making sure all the time that this is
nice and even which it is. And I think also I'll
have to pull it across. I'm just wondering how
far to pull it acros. You know what? I'm not going to pull it
across any furtherthan that because I think it
actually looks quite nice. I'm just looking
then at this one. Maybe this one can come
out a little bit as well. Like so. All right. There we go. Now, let's
finish these two parts here. So we'll put in
one going up here, one going up here, and then
we'll finish this top part. So we'll finish that
top part and then we'll go a roof on.
So let's come in. We'll grab this one. So shift we'll bring it up all
the way up to here, so we'll bring it over then
to the corner and we'll make sure that it's in that corner
really nicely, which it is. And I always
recommend when you're doing corners like this
that you always have it a little bit thinner than the wood top
or the roof top. So what I mean by that is, if you come in and
just pull this just in front of this one
here, as you can see. So just in front of there,
and then drop this down, and then you'll always find
that it looks pretty nice. And again, with the front here, we need to pull this back a
little bit, so pull it back. And then press tab, double tap the A, and that
is how it should look. So you can see now it's fitting nice and flush against there. Everything is fitting
in. Maybe maybe we want to pull this
back a little bit. Actually, you know
what? You can see here, it's like joining here there's a little bit of a
gap, so that's fine. Now, let's bring this part over. You know what, as
well. Let's actually hide this part out of the way. So if I come to this, you can see this is the front tower. Let's just hide the
front tower out the way because it is getting
in the way a little bit. And then what we'll do now
is we'll grab this one. We'll press shift D. We'll bring it over into this
corner, like so. And then we'll have probably another one coming
down from here, another piece of wood, but we're not going to
work on that yet. Alright, so we've
got these two parts. Now, I recommend that you
always think about when you're creating something
that any spaces on your wall, especially if it's a really
big space like this, you always do something with it. So with this, for instance, what we can do is press
Shift D, bring in this part, and then all I can do
is I'm going to just grab the top and pull it over this way into this
part here, like so. And you can see now
that is just adding to the overall feel of what we're actually
trying to create here. You can also see these ones
down here, these ones. They need pulling
back a little bit, so we'll grab both of these. We'll put it onto global. And then what we'll
do is now pull them back just a little bit, so they're in front or
behind that one there. And then what we'll do is
come back to this one, grab the bottom of it
and just move it over. And then finally, finally, let's grab the front of
this and then just pull it back just so it's in
front of this one here. Alright, double tap the A let's have a look
what we've got. That's looking pretty good. I'm just wondering if I should make this a
little bit thicker, you know, if it should be
a little bit more chunky. I think actually it should. So all I'm going to do, I'm just going to grab this part here. So this part in front here, put it onto normal, and then just pull it out and make it a little bit chunkier. Without it sticking in.
You can see that it's sticking through there a little bit. We don't really want that. So all I'm going to do
is just pull it back. So it's not sticking
through there while keeping this kind
of thickness there. So now you can see,
we've got a bit of variations on the
thickness as well. Okay, so now what
we'll do is we'll add another part in
going across here. So, again, it wants to
look random because it is, after all, it's a Wizards Tower. You know, it was
either put together magically or some guys
came out and built it, but they didn't build it all
in one go. Let's press 50. Bring this over, press
part and y and 90. Let's then bring
it up into place. So I'm thinking probably
going to come from here in the corner here. Let's just put this on
global just for a second. Press tab, grab this part, pull it back, and then
let's pull this into place. So I'm going to
put it into there. And now I'm trying
I'm going to fit it all into place. So
I want that in there. I want to make
sure that it's not sticking in front of
here, like you can see. So I'm as going to pull it
back, so it's behind there. And then last of all, I'm going to come now and pull this down. Like so into place to look like it's actually got
a nice structure there. Now I'll press tab, I will
in fact, you know what? Before I press tab,
I'll just turn off my x ray. And there we go. We've got a really, really
nice view of it now. And finally, finally, then, let's put the last
piece of wood in before we actually do
anything with the roof. So we'll come to our
bendy part shift. Let's bring it over. Let's press one on the
number pad and bring it up. And then what I want to do is, I just want to make a kind of circle bit from here to here. So what I'll do
is, first of all, I'll make it a
little bit smaller. So Essence he make it
a little bit smaller. I'll then pull it over
to this part here. And then what I'll
do is I'll get the correct shape before
I'm doing anything else. So I'll grab the top of here, put this on
proportional editing. And then what I'll
do is bring it round and down to there, and then I'll bring this
one round and up. To there. And then finally, I'm
going to drag all three of these back a little bit like so. And then I think I'll bring
this one up a little bit, and I'll bring this one down a little bit. And there we go. Now finally, let's just bring
them a little bit this way. J so it's jaws touching there. I think that looks pretty good. Now, the other thing you can do because you've
actually got it as a curve is you can make
it thick quite easily. So if you want to make
it thickness this way, or if you want to make
it thickness this way, all of that is easy to do. We just come to the thickness and you'll see we're making
it thicker that way. Or we come down to the curve. And what we can do is we can use the extrude to make it
thicker in that way, holding the shift born again. And now we can put
that into place. And you'll see how nicely that actually gets into
place, and there we go. That's looking
really, really nice. Now, you might want as well, because the good thing
about the curves. You can also come in, grab this one with the
proportionality, just pull this bit
out a little bit. Again, adding to the
uneven thickness. Okay, so that's that part done. Now what I'll do is
we'll bring in our roof, and then we'll join
our roof together. So we'll set out what our roof is actually
going to be like. So to do that, again, I'm going to save out my work. Now what we're going to
do is we're going to bring in then our roof tile. So I'm going to press Shift A. And what I'll do is
I'll come over to mesh, come to play, and bring in the plane which we're going
to attach the ognode two. Now, what we'll do is go
over to our asset manager. We'll zoom out a little bit, and what we've got
here is our roof tile. So under ometnodes, just
make sure you've got your course resource pack on
under otos drag and drop. And it will disappear. And the reason it's
disappeared is just because this count horizontal just
needs sting up to one. Now, from here, let's go
back over to our modeling, And what I want to
do is I want to bring my guy out because it's important that you
do this before doing anything with
the roof tiles. Press Shift S, cursor selected. Grab your roof tile, and
you're going to press Shift S and selection to cursor. And then we're going to
press dot on the number pad. And the reason we're doing that is because as you can see, of this roof trap. It looks like a mouse
trap or something. It looks so big. We need
to make it smaller. Now, we can get away
with having them slightly bigger, than
what they normally would. And this is because of
the fact that we're dealing with something
that's stylized here. But still, roof tiles, even this big are still too big. So I'm going to pull it out now. Now I know I've got
the right size. And then you can see, on the right hand
side we've got all of these options that
we're going to go through on the next lesson, and then we can finally get
this roof tile into position. All right, everyone.
So it's really fun actually working
with these roof tiles because they're so so invaluable for anything you're going
to build in the future, and we're going to go through
all of the geometry now. What's more, as well as I said, you can use these in your
future projects that comes with the actual course as long as it's not
commercial use. All right, everyone, so
I'll see on the next one. Thanks a lot. Bye bye.
34. Utilizing Geometry Nodes for Roof Tiling: Welcome back everyone
to blend the fall Modeling and geometry
nodes workshop, and this is where we left off. All right, so we can see that
we've got our roof tile in. Now, the first thing to look
at is the subdivisions. Now, if you can't really see the subdivisions
at the moment, but if you put
this on wireframe, then you can see
these subdivisions, if I turn this up for instance, you can see we add more or less down to basically nothing. So let's leave it
on for the moment. Nine. Because then we can work from that as
we work forward. Let's also put this
on material mode, and at the moment,
you can see that we haven't got a material in here. Now, let's bring in the
material straight away. So what we'll do
is we'll come on over to our asset manager. We'll come down
to our materials, and the one we want
on there is the roof, so I'm going to drag
and drop that on there. Now, you can see at the moment, I can't drag and
drop that on there, and I've also not
got it in there. So what I'm going
to do instead is, I'm going to grab my roof, drag and drop that on there, like so. Now, nothing happens because everything
is controlled from the geometry node but
you will see that now the roof is actually
in the material, which means that
now I can come in, get the drop down
menu and add in roof, get the drop down menu, and add in roof like so, and then it actually works. Now the thing is, with this actual gomtrde
we have allowed it so that you can actually have materials odd and
materials even. So that's why I had to drag
and drop it in both of those. Or you can get rid of
this one and then put another material in
and you'll be to have different colored roof
tiles and things like that. Alright, from here then,
I can actually come over and actually minus this material off,
and it's still there. Now, what we're going to do now is go back to modeling,
and from here, I'm going to press
the tab button, and now let's go through
some of these options. So, the first thing
we want to look at, we've got the tile length
and the tile width, there's self explanatory. As you can see, we
can actually make it wider or smaller or whatever. The next one we've got
is bottom bending. Now, on my original roof, I didn't actually
bend the tiles out, and I think actually
that on this one, I'm going to bend these
out a little bit like so, and I think it just adds to the overall feel of
the actual tower. But it really is up to
you if you want to go with straight or if you
want to go with ben. Now, the way that works is obviously based on subdivisions. If I start turning this
down, as you can see, they become a lot more harder, like so, and you can
see that you can actually end up with
something like this. I don't really like this
style too much, but you mind. I'm just going to bend mine out to the minimum I
can get away with. And the reason for that is because you don't want to have too many
subdivision on here, because what will
happen is it'll actually cost a lot because there'll be a lot
of polygons on here because you're gonna have
hundreds of roof tiles. So just remember, Don't turn up the
subdivisions too high. Do the least you can get away with while still being smooth. So you've got an auto
smooth born here, which will smooth it
off as you can see. So if I turn this on and off, you can see the difference
there it smooths it off. And then from there, once you're happy with the shape
of your roof tile, let's now bring out
how many you want. So we're going to
bring up this amount. And you can see
straightaway that we also have the next problem that we're going to come across. And I'm going to bring this down just a little bit to show you. And the reason why that is
happening is because we've got it on odd and even. So you can see it
odd and even offset. Just set this down to
zero just for now, and then it will line
them all up perfectly. Now the next thing we want
to do is obviously come up, and we want to actually
bring out the horizontal. So let's bring out the
horizontal. No, too much. We just want something
that we can work with and that we can
actually save out. Alright, so that's
looking pretty nice. Now, the next thing I
recommend that you do is you come down and you can see you've got one that says gaps. And what that's going
to do is it's going to place a gap between each one. Now, you will see that we have actually got some
random size on here. So what I'm going to do for now, I'm just going to
put this gap on 0.5, like so, making it very, very thin, as you can see now. And we do want some offset
on each of the sides, and we do want some
difference in the tile sizes. So I'm going to
double tap the A, and that's what you can
see. We do want that. But do we want that right now? So if we don't, let's come on down. We've
got random size. Let's turn this down or up. You can see what's
happening there is. It's actually distributed now the upwards and the
downwards motion. So if I put on random size, you can see if I pick
that up or down, it's actually increasing
the thickness going that way and that way. We also have tile thickness, so we can actually control how thick the actual tiles
are, as you can see. I'm happy with the actual
thickness of the tiles. We've also got randomized width. Now, this is the thing that's actually controlling the width. You can see the difference
in the width here, So if I bring this
all the way down, you can see now they're really,
really nice and straight. That's not something
we really want. We actually want to randomize the width just a little bit, like so, and you can
see what happens. The best thing about this is, it's not going to push
at these on the outside. And that's what we want
because when we're doing our rounded roofs like this
one here or this one here, we need to be really careful how we actually
join them together. So it's good that we've
actually got that option. Now, let's work our way down. We've got random shape.
You can see, again, that was the one that
was talking about, so I'm going to leave
that one as it was. And then we've got offset, Even offset offset even again. So if we bring this out now, you can see that we can
offset them, like so, or we can offset them like so and really get some
randomization on there. Now, I don't
recommend doing that. What I recommend
doing is coming to the offset and turn it
up very, very slightly. So very, very,
slightly, like so. So the edge of your actually roofs is going to have this kind of uneven look, and that is what we're basically
looking for. All right. So next of all, then, we've got I think we've
got tile length. So we have tile length
randomness as well, which means we can actually make them really, really random. And I think you should
actually make them a little bit more random on
the tile length as well. And now you can see already
we've got a really, really nice roof that took
seconds to actually create. Alright, so the next
thing moving down, We're not going to talk
about yet the bending. We're not going to use that yet. We're going to use that a little bit further on the course, but you can see we do have the option to
actually bend these. So we'll just quickly show you that we can actually bend
these roof tiles if we want. But the one we want
is the roof angle. So we want to change not
the roof bend angle. We want to change the
roof angle on here. So the rotation of
the roof basically, we want to be able to move
it up and down like so. We can also come in, of course, and rotate it like
this or like this. We can also do it
that way as well. But I prefer to use this
to actually bend it on. So what I'm going to
do, first of all, I'm just going to bend it
in roundabout you know, something like this, which
I know is going to be good. And then I'm going to
grab my roof tile now. I'm going to press
shifty. I'm gonna drag it over here and put it
with my primitives. So I'm basically going
to press M. Make sure that it's in my
primitives, and there we go. Now, from here, then I
can actually come with this roof tile with
these roof tiles, and let's put it going this way, on the other side, and
then on this bit here. And from there, then we can
carry on building on round. So all I'm going to do I'm going to drag it up. I'm
going to spin it around. So s -90. And then what I'm
going to do is put this into some sort of place. And again, the reason
why I like using this rotation is
because it gives it a lot of thinness on what
we're actually doing. Now, for now, what
I'm going to do is, I'm just going to hide this
big building out the way, and then I'm going to pull
this up and back into place. So let's pull it back into place where we actually want it. So let's bring it up. And because we made the
unevenness on the actual length, you can see now we've got a
very, very uneven length, and we've got a
very uneven sides which makes it that much better. Now, from here, let's bend
this out a little bit. So if I come over
and bend this now, you can see it bends
from From down here, from here all the way up. So now I just need to increase the vertical count up to
where I actually want it, and there you go, you can
see how easy that was. Now, let's just make sure it's not hanging over
the top too much. I think, actually, it
needs to hang over here. Just a little tad more. So what I'm going to do
is I'm just going to increase the vertical
count one more. And then I'm going to come
in now put it onto normal, and you can see that's
not going to work. Let's try it on local.
That's not working. So I'll just have
to move it just a little bit down into place. Like so. And there we go. Now, one of the things you
might be asking yourself is, well, we can see this white
kind of patch underneath it. Yes, we're actually going to fix that. We don't
really want that there. The other thing is
you can see now, I can see where I need
to pull this into place, and you can see at
the moment that this, so this part here, the top of it needs
coming in more. So what I'm going to do
is, I'm just going to grab these all going along, press S and X without
proportion editing on. So S and X, pull them in, and there you go, now it's
looking much much better. And from here now, I can actually bend it a
little bit more. So I'm going to come
in back to my roof, I'm going to bring this down a little bit and
sit it on that roof, like so and now you can see
it's fitted in like a charm. All right. So now, let's
increase the horizontal. So I'm going to
increase the horizontal holding the shift button. I'm going to move it more
to the middle. Like so. And what I want to make
sure is that the end of here is stuck out to round
about the end of this. So you can see right
at the end of here. This is where the
roof actually starts. We want to make
sure that this is stuck out right around there. We also want to make
sure that we've got no gap down the
inside of here. So we want to pull it out
jaws to tiny bit, like so, making sure they fit
nice and flush in there, and there you go, there's
your actual roof tile. Now, before doing anything else, And want you just to come in, hide the roof tile out the way. Save out your works.
Let's file and save. And what we're gonna do
now is we're going to grab the top of
this actual roof. So we're gonna grab
this one and this one. And then this one and this one. And we're gonna
press P selection and grab them and split them
off from the rest of it. Then what I want you
to do is press Shift H and hide those out the way. I'm going to save out my work. I'm gonna see you
on the next one. I'll leave it to you to guess what we're actually going to do. Alright, everyone. So
hope you enjoyed that. I'll see you on the next
one. Thanks a lot. Bye bye.
35. Adjusting Shader Settings for Roof Tiles: Welcome back everyone
to Blender for modeling and geometry node workshop, and this is where we left off. Alright, let's go over to
our asset manager because I think that we have planks
and we have window wood. I think actually we're going to use these planks on
the top of this. So I'll go back to
modeling now because I'm fairly sure that we've
actually got those already. What I'm going to do then
is go into Edit mode, press A to grab
everything Unwrap. Come over to material, and let's change this
material to our plank. So this one here, let it
load up, and there you go. So that is what we're going
to put underneath the roof. And the reason we're
going to do that, if we press oltge now, bring it back, double tap the A. You can see now you can't
see that under there, and it actually looks as though there's some kind of
structure under there, and that's what we're going for. Alright, so we've
got it that side. So now what I want
to do is Okay. I want to actually convert this from a geometry node
into my actual roof. The way that I'm
going to do that is I'm going to come up to object, go down, convert and to mesh. Now, before I do that, let's just quickly hopping
over to the geometry node. Now, you can see, if I zoom in, if you want to get
into omg nodes, it's You're going to have to start at level one and
start with something very, very small because these
jom nodes we're creating here are incredibly,
incredibly complex. But if you ever
get into Jo nodes, it's always a good idea
then to go back and have a look at just how we're
actually creating these things. But trust want to say they're incredibly,
incredibly complex. You can see also simple
things like set material. You can see how we've
actually done that. And you also need to
make sure that you're putting something in that is
called realized instances. And what that's
going to do is it's going to enable you
to change it from a Josh node into
an actual object. Alright, we're not
going to go in building this Jode or
anything like that. That's for another
course entirely. It's going to be a ten hour
job to rebuild this for sure. So let's go back
over to modeling. What we're going to do
now is grab our Jode, come up to object,
go down to convert, and we want to convert
this to mesh like so. And you will notice as
soon as we've done that, the actual roof gets added. So the roof material
gets added to it. Let's minus the top
one off because that's just an empty material,
and there we go. Now, if we put this
onto our rendered view, you will see already that it's come in with different
actual roof tiles. So, in other words, the
islands have all been changed. Now, before we go into there, let's actually come up
and unwrap these first. Now, what I tend to do
with roof tiles is, I want to unwrap them together. So I'm going to grab
them all, press. Smart UV project. Click Okay. And there you go. Now you can
see they're all unwrapped. Let's go over then
to our UV editing. Let's come to our roof tiles. If I press dot on my roof tiles, press the tab born and here
is my actual roof tile. Now, one of the things
you might be asking is, well, this is orange
and yours is blue, and that is because we
actually changed it in in our actual shader. Now, if I grab this with
G and put it over here, you will see then that if I
put this on rendered view, that we actually start to get some more dot patches
on here as well. But the main thing is that because this is quite stylized, we don't really want a lot of
detail in there, actually. What we do want
is the ability to change the color to whatever
we want it and have the ability to change each of the roof tiles to be its
own kind of separate color. And how do we do that?
So if we go over now to the shading panel,
and if we go in, so if you press dot again, come round to our roof tiles, let's pull this up so you can see what's
actually going on. So first of all, we
have that texture that orange you know, a texture map that
you actually saw. And then you can see that
we've got our roughness because the thing
is about roof tiles is to put this back on, you might want to create them, so they're actually
really, really rough. And this is how we control this. So we've got an RGB in here, and this then we'll control the roughness of our
actual roof tiles. Now, the other things on here you don't
really need to know, but what you do need to know is how we actually
did the color. So you can see here we've
got a random per island, and then we've got the
different colors set down here of the different
variations of blue. And then we've got an
overall color change. So you can see if I
put this right the way down here, we
actually get a much, much deeper color, based
on our actual texture. Then simply we're
going into principled, and then the principle is going to be attached to
the other principle, which is our textures here, and then all of this is going to be kind of
joined together. Now, you will see if I
start bringing this down, we start getting
that orange color, we start getting
all of this kind of little bits in there
from our original shade. But if I bring it up,
you can see that I can start changing the
color like so. And what I tend to
do is just bring it up just a tiny bit,
and there you go. That is how we
achieve that look. Alright, now we've
done that. Let's go back on over then
to our modeling. Now, the other thing is, let's actually duplicate this and then put it over
the other side. To do that, though,
what I'm going to do is first of all,
grab this part, press Shift D, cursor
selected, grab this part then. I'm going to press Control
A, all transforms. And then what I'm going
to do is going to right click and set the origin
to three D cursor. And then what I'm going to do is I'm going to come on down. To my little spanner
here. Adding a modifier. And this time, we're going
to bring in a mirror. So let's bring in a mirror. Now, you can see
it's slightly out. But the main thing is
what you can see is that it's actually put it
right where this other one is. So at the moment, you
can see that this part here is actually slightly out
based on where my roof is. So why is that? Let's
first of all come in. Well, hide this out the way. And then what I want to do
is I want to put it right, smack bang in the center
of this part here. So I'm going to come
to this part here. So this part here, and
grab it. There we go. And then what I want to do is I want to grab both of these, so press Shift S,
cursor selected. And now let's see if I move
this or this part to here, right clicks at origin
three D cursor, now you can see, A
they're still not fit. You know what? We're
going to do it a different way because
it's simply not working, and sometimes it doesn't because the roof is
a little bit uneven. So good job it did that, actually, because I can
show you how to fix that. So all we're going to
do is take this off, and then we're going to put
it on the material mold makes it a little bit
easier to work with. And then what I'm going
to do is press Shift D. I'm going to rotate it round. So Rs 187 to go over the top, and then I'm simply
going to press G, and I'm going to line it up. So, and I'm just going to make sure that
it's sat in there, okay, because at the moment, you can see it's all
sat outside there, so let's pull it back, pull it back, just in front of there. Let's go round to
the other side. And there you go. Now
you can see along here, It's still a little bit out. It still needs moving a
little bit of this way. So let's actually fix that.
So all I'm going to do. I'm going to write click the
origin to three D cursor. And now I can actually
really get in there and see what I'm doing. You can see if I pull
it over this way, it's still coming up the
edge a little bit here. So all I'm going to
do is press R and y and rotate it round, like so, and then I'm
just going to pull it out into place like
so. All right. So that's looking pretty good. Now, what I recommend
we do is well, a little bit later on is
we start deleting a few of these roof tiles out because
they are cost in a lot, you know, For our computers
to run all these things, so the more you can get rid of the better it is basically. But for now, let's just
press our teach and bring back our main
wood that was on there. And now you can see already
just down that looks. Finally, then, let's come
in, render that out. And there we go. All right. So now let's actually think
about our roof tiles on here, and from there, then
we can actually get our wall structure
in there as well. So again, we'll put
it on material. We'll save out our actual work. And you can see
here we're prepping everything so that this is kind of a front loaded build where all of the hard
work is up from, and the easy work is, you know, going through and creating all of the towers and
things like that. It gets easier as we go along. The only thing that's hard
on the rest of this course, really is actually
creating the terrain. But once you've kind
of got you know, how to create a gray
box from there, how to create these
pieces of wood, and all of that stuff, you basically go
away and build many, many of your own things. Alright, so let's come
back to this roof. Now, the first thing
I've noticed is, this is not high enough up.
So I'm going to come in. I'm going to grab the top of it, and I'm just going
to pull it up. Now, if it is sticking
out there a little bit, just pull it down just
a slight bit, like so. And then what we'll do is
now we'll come with my roof, Shift D because we
want to keep that. And then what I'm going to
do is put this into place. Now, on this one, it's
such a tiny roof that all I'm going to do is just going to pull it into place like so, as you can see, and then
we're going to press R and y, sorry, R x, rotate it
round, just to get it in. And then what I'm going
to do is pull it up. And pull it into place just so, my roof tiles are
sticking over this just. So so they sticking over it. So again, pull it up back. And there you go, now, you can see the just
sticking over there. Now, the next thing I want to do is I want to lower
down the horizontal, so I'm going to turn that down. Like so. Bring it down again. Maybe maybe one more.
And there we go. And then what I'm also going
to do is I'm going to press S and X and just shrink
them in a little bit. Just so these bottom ones
actually fit into place. And then finally, I'm going
to bring down the vertical, so keep bringing it down. Double tap the A,
and there we go. Now, let's hide this
out of the way. Let's grab this part now. So grab this part, and let's
press P to separate it, and then I'm going to
come to this part, press tab, A, on the wrap. Because it's just
one little piece. And then finally, what
I'm going to do is I'm going to hide the roof
out the way over here, grab this one and this
one, press Control L, and we're going
to link materials like so, and it's
as easy as that. We don't even need to worry
that these are really big and these are really
small on the UV map. You can see the resolution here. And the reason is because
we're actually just having a roof over the top and no one's going to be able
to see in there anyway. Now, the one thing we do
need to sort out though. You can see we've got
some white patches here. We need to make sure that when we've got a wall on that they're not going
to be in the way. So I think at the moment, it needs rotating just
a little bit more, so I'm just going to press
R and x and rotate it, and then all I'm going
to do is pull it up and out a little bit and then rotate it a
little bit more. So Rx to get it in that
perfect sweet spot. Like that. Alright, so now you can see
that's looking much much. Now, finally, then, let's think about our actual wall
on the next lesson. So I'm going to split these
off and just do the walls, and then we can finally
think about, you know, making this wood a little bit warped and things like that, and just bringing it all
together once we've done that. All right, everyone, so
I hope you enjoyed that, and I'll see you on the next
one. Thanks a lot. Bye bye.
36. Cleanup Techniques for Wizard Tower Extensions: Welcome back everyone to
Blender fall Modeling and Geometry Old workshop. Now, let's come to
this part then. So what I'm going to do is
I'm going to actually come. I'm going to split off
all of these parts. So all of these parts
going round to there. I think that this part
isn't part of it, as you can see, so
all I'm going to do is just press P selection. Then we'll come
to the next part, and we're going to do
exactly the same thing on these parts here. So I'm going to press
underneath here as well. Don't forget that as well.
And let's press P selection. And then we'll
work our way down. And all I want on this one is this part and this part here. I'm going to press P,
selection, split those off. Now, from here,
And first of all, I'm going to grab each
of these parts now, and I'm going to put them
in one that's called wall because I really want
to separate them out. So what I'm going to do
is I'm going to press M. I'm going to go
to new collection. Let's call walls, like so and we'll put all
of our walls in there. From there, then I'm going
to also do one for wood. So I'm going to grab all of
these little parts here. And it will make it
easier as well to select all of these parts and
work on them individually, which you'll find out soon. And as we keep updating this, it's going to be much
easier to actually get to grips on this
quite large project. And once we've got those,
we're going to press surg. Just move them away and you can see where we've missed one, right click to drop them back. Grab the one you've missed, press P. So not press
P new collection, and we'll call those wood. Like, so, press. And now you'll notice that our
primitives are all here. So we've got the bendy
wood, the plane, the actual roof, the plane,
which is the roof here. So this roof, as well,
these need moving out. So I'm going to put
these into roof. So I'm going to grab this roof, this roof, and this roof. I'm going to press M. I'm going
to make a new collection, and I'll call it roofs. Like so. And there we go. Now, everything should
be updated and really, really easy to actually
select what we actually want. Alright, so double tap the A. Let's come to our walls then. So if we come now
down to our walls, we can select all
three of these, press Shift H, hide everything
else out of the way, which makes it
really, really easy. And then what we can do is we can come into each of these. So if I grab this one, for instance, now you will
see if I go back, actually, if I just press H,
bring back everything, I have got a fairly, fairly large chunk missing
here, which is this one here. So I'm just going
to grab this one, P selection, grab it again. M. Let's put it in our
walls, and there were done. Alright, let's grab
all of these again. Shift H then tied everything out the
way. And there we go. That's what we've got
left, and now from here, let's come to this one first. All I'm going to do is press A, and let's do Smart
UV project, click. And also, then I want to come in over and bring down our walls. So come and look for walls. And there you go.
There is your walls. Now, you might not
happy with this bit of the moment over this side. We'll have a look once
we've actually got them in. But from here, I can
just grab both of these, press tab, A to grab everything. Smart UV project, click. And then I can simply press tab to go back into object mode. Grab this wall here, press Control L, link materials, and it's as simple as that. And you can see just how nice this is going to
look when I press takes, so bring everything back, double tap the A, and there we go. You can see if I put this on rendered view now,
let it load up. And he presto, we're really
starting to motor along now. You can see just how
quick and easy that is. Alright, so now let's deal
with our actual wood. Wood is a little bit
harder to deal with. So what we want to do now is we want to come back
to object mode. And instead of trying
to grab all these now, we've already done the hard
work, so we can put this up. We can come down
to our wood now, and all I'm going to do
is grab all of these, but should grab all of these. And then I'm just going
to press Shift H, hide everything else out
the way, and there we go. Now we've got all of these wooden parts to
actually work with. Now, we do have a problem
in that we can't join all these at the moment because some of them are
actually bendy wood. So like this one, you can
see, it's quite bendy. We know this one then
is our nerves path, which means that it's
actually a curve. We know these two
are curves as well. So now, what I'm going
to do with these is, first of all, is bring down
the amount of resolution. So if I bring this down, as you can see, you can
get lower and lower. Let's right click and shade
smooth, for instance, how far can we bring it down before we're going to lose this? You can see here, we've
got all of these edges. I think six should be fine. So then what we'll do
is we'll come to these, and then we'll bring
this down to six. And then I'll come to this one, bring it down to six, like so. And then finally,
what I'm going to do is I'm going to
grab all of these. And I'm going to
go up to object, come down to where it says
convert, convert to mesh. And then what I'm going
to do is press Control J, join them all together, and then I'm going
to right click and shade smooth by angle. And now you can see that
we've got the bevel on there. You can see the
bevels actually being added onto there as well. So if I go on to object
mode, for instance, you can see we've
got a nice bevel that matches all of these parts. Now, there is a problem
obviously adding the bevel on. So I'm actually
going to go back and before actually joining these
together or applying these, you can see, we've got
to solidify on here. We've got our curve
on here still. And realistically, we
don't actually want that. Now, the problem
you've got here, if I come over and
try and add that, we can't add it to the curve. So what I'm going
to do is instead is, I'm just going to come in. I'm going to minus my bevel off. I'm going to come to this
one, minus my bevel off, come to this one,
minus my bevel off? Because they're just there as a view to see what it's
going to look like. Once I've done that, then I'm going to grab all
three of these. I'm going to come
to object, convert, mesh, and then press Control
J, enjoy them all together. Now, you will see now if I right click shade
or to smooth, it's smoothed off beautifully. However, there's no bevel on. So why did you do that, Neil?
What was the point of that? Well, if we're coming over
now and generate a bevel, let's put it on naught
point naught three. You can see now, we're
going to object mode, it's got the same
level on there. However, now, when we
come to unwrap it, we don't have any problems
with that bevel being there, because as I showed you
earlier, At the moment, if I press tab, you can see that we've not
got bevel on there. But the moment I
actually apply this, so control a press tab. Now we've got all of these
other edge loops on there, which are going to cause us problems when we come to unwrap. So that's the reason
I'm doing it that way rather than doing
it the other way. I like to leave it something called non destructive workflow, which means that you're
leaving as many modifiers on as you possibly can while
you're actually building. Not only will it save
you on performance, but it will also save you a
lot of time because then you can come in and
you can either add those modifiers on
or leave them off. It doesn't really matter. But with something
like the curve, in order to unwrap it, we actually first have
to convert it to a mesh, and that's the reason
we did it that way. So now what we want
to do is we want to move now over to
the other parts. So I'm going to hide these
out of the way just for now. And what I'm going to do is
being as none of these are, you know, basically
made of curves. There's no curves
or curves in here. I can basically grab them all, join them together
with Control J, and then you can see here, this is one with the curve. So luckily, it didn't join it altogether,
so we can come in. Grab all these. And now, all of these should
still have the bevel on, as you can see, which
is really nice. So all we need to do
now is come to these, and we're going to convert these now into the actual
water as well. So I'm just going to
grab both of these. Press Control J,
join them together. You can see the mono press Control J and join them
together. It did that. I don't really want
it to do that. So instead, what we're going to do is going to come to object. Come down to convert to mesh, and now I can join
them together. So Control J, and there you go. All right, so that's
the curved ones. Let's hide these out the
way you just for now. Oh, before we do that, actually, let's actually bring
in a bevel on these. So we'll bring in the bevel. So bevel. Not 0.3. And there we go. That's those ones. So let's
deal with these ones first. So what do I want to
actually do on these? This one here, I'm not
going to do anything with yet because I still need to
do the outside of there. So I'm going to leave that one. But the rest of them,
I'm going to come in, and I'm going to
bend some of them. So if I press control law, I'm going to bring
in some edge loop, so control law, bring
in some edge loops. Just completely random,
bring in some edge loops. You can even bring in edge loop, press left click,
bring them down. It doesn't really matter,
because all we're going to do is just make them
a little bit nod. Null is in weathered look in. Now, the thing is the
longer the plan obviously, the more edge loops you're
going to need, like so. And the other thing is, there is no quicker way really
of doing this. It's just kind of going through them and picking which
ones you actually want to, you know, look a little bit nod. So it doesn't take
too long, actually. So it's a shame that we can't, you know, bring
in a subdivision. The problem is, if we
bring in a subdivision, it's going to put a division down the center of it as well, and we don't really want that. So it's better to do this
sort of thing by hand. And I think that is
going to be okay. Next of all, then we
can just grab them all. Come over to mesh, transform, and we're going to come
down and randomize. This is another
reason why we don't want to randomize with
the bevel actually attached because what that's
going to do is it's going to randomize all of
those edges as well, and we don't really
want that, so let's come to mesh, transform, randomize, turn it down to not 0.1 or
something like that. Maybe maybe with these you might be able to get away
a little bit higher, but also you can
see straightaway what's actually happened there, and it looks a ton bare. Everything looks kind of uneven with very, very little work. Alright, let's press Old
TH, bring back everything. And all I'm going to do now, I'm going to come to my wood again. I'm going to grab all three of these shift H just to hide
everything out of the way. And now, finally, I'm just going to come to both for these parts. I'm going to press Control
J, join them all together. And finally, then what
I'm going to do is, and we're just going to come
in and have a look at these. Now, you can see with these, there's a lot of
geometry on here. Especially on something
like this one. And that's simply down
to the fact that I forgot to turn down the
amount of resolutions. Now, it should still be okay. So what we'll do
is, we'll come in. We'll go to mesh, transform, and we'll go to randomize. But you can see there's a lot more variations on these because of the fact we've got a lot more geometry to actually transform. So let's now turn
this down to 0.1, and it might even turn this
down to not 0.5, like so. Not 0.5 0.5, like so, and there we go, I think that's
actually going to do it. Alright, let's right click
and shade Auto smooth. And I think that's actually
going to look pretty nice. Alright, so on the next
lesson, then, finally, what we can do is we can
start getting in all of the actual wood
texture and really then start to bring this to
life, at least this part. Alright, everyone, so I
hope you enjoyed that, and I'll see on the
next one. Thanks a lot. Bye bye.
37. UV Unwrapping Complex Wood Frameworks: Welcome back everyone to
blend for modeling and geometry node workshop, and
this is where we left off. Let's put this on material. And what I'm going to do is
I'll do these ones first. I'm going to grab
them mole, press U, smart UV project. Click Okay. And then I'm going to come over, adding a material
and the material I want is going to be my planks. Let's press tab and low
what they look like. And straightaway, you can see that we do have a little
bit of a problem here. In these ones that
actually bend, the wood doesn't look too good. The wood on here,
though looks fantastic. It's just this wood
going around here. Now, of course, we
don't need to do the inside of these
wooden pieces. So let me show you how
to actually fix that. So what I'm going to do
is I'm going to come in. I'm going to come all
the way around, like so. I'm going to go then
to my UV editing. And this is what it looks
like on the screen. Now, what we want to do is we want to straighten these out. So there's a few ways of actually doing this. Let
me just find where it is. The first one is to come in
and grab the edges off here. So if you come in, you can press Alt Shift click, grab the edges. And from there,
then what you can do is you can
actually straighten. You can see that
straightens it out. And then what you can do is
you can grab the top one, control select all
the way around. You know what? I'll grab
it from here, actually. So shift and click. You can grab that. There we go. Alt Shift click going
all the way round. And then what I want
to do is I want to minus off. No, I don't actually. I want to grab all those,
right click, straighten out, and then G and x and just move it over like so,
and then S and Z, pull it down into place like so, and let's have a look now, and you can see that is
looking pretty nice. Now, unfortunately, we've got the actual Let's just turn
it around. It's be easier. Z hundred 80 you know what
Rs hundred 80 spin it round. I'm just going to
show you, I'm going to spin it back, so don't worry. I just want to show you
what's actually happened. Now you can see just down
nice that wood looks now. And if a press control, you can see that's what
it looked like before. So complete difference. Now, there is an easier
way of doing this as well. If I go to edit, go to preferences
and go to add ons, there is an add on that
you can actually down now, called UV UV squares,
which is this one here. And UV squares makes it
incredibly easy to do this. So let me just show you
first before I do anything. So all I'm going to do is,
I'm just going to come. To both of these, because
the thing is you can also come in and
grab all of this. So if I press L and L, we can see now that
we've got this one here. And all I have to do
is press alter and that then will straighten it
out for me, as you can see. Let's press controls head and go back because I've
got this one as well. Now, this add on
is actually free. So just prev squares, it's actually a free add on that you can actually download. Before that, though,
I'm going to show you one of a way where you
can actually do this. So if you come in, And grab, let's
say this one here. So let's press Shift H,
hide the rest of them out. Let's grab this one here
all the way down to here. Making sure that the last one, so the one that's in the whiter means that that is
where you know, the last one is grabbed,
in other words. So if I press you now, go down to LightMPPa click. And then if I press you again, go down to flow active quads, it's going to follow
the quad from here. So if I press,
follow active quads, click, now you can see that
it's straightened out. And now I need to do is
press A 90 spin it round. Make it a little bit smaller. And now you can see if I
place that around there, it does exactly the same
thing, as you can see. The good thing is though about UVs squares is that it
can actually come in. Where is it grab all of these, like so, and then drop in, grab this one, let's say
this one and this one. Let's press Alt and knee, and we can straighten all
those out at the same time. Albeit, I just need
to spin these round. So 90. Finally, I'll grab this
last one that I did, so L, and then S, make it the same size. And there we go, now you can
see being straightened out, albeit except this
one, for some reason. I don't know why that one
didn't get straightened out, so let's grab this one,
Alter straighten it out. So the thing is you're
either able then to grab the add on I told you, or you're able to
use lightmap pack. And then follow active quads. Or you even able to straighten
them out over here, grabbing an edge, right click and auto line or straighten. So there's a lot of ways
to actually do this. From now on, I'm
going to be using UV squares because it
is the easiest way. But if you're just you've
only got those options, then you can now unwrap them
yourself as well properly. Okay, so now we've done that. Let's come back
then to modeling. And then what I want
to do now is press. In fact, I won't do.
That what I'll do is, I will bring this one back. So just this one back, like so. And then what I'm going
to do is grab this one. And with these, it's much
easier because obviously, nothing's really bent
apart from this one here. So I'm going to actually
leave this one, so I'm just going to
press Shift L on it, and then I've got all of these. I go to press U,
Smart UV project, click Okay, and then
bring in the material. So it's going to be planks
planks bring that in, and there you go
as simple as that. And you can see that's how
it's actually looking. Really, really nice.
This one here. I'm not sure if I need
to make it a little bit smaller on the UV
map, as you can see. So let's actually try
that while we're here. So I'm going to go
over to my UV map. Let's see what we're looking at, and let's grab all of these and make them
a little bit bigger. Now let's look when we
go back to modeling. Let's see what that looks like. Yeah, and I think actually they need to be made
smaller, not bigger. So I'll go back
to you V editing, grab them all,
make them smaller, go back to modeling.
Let's have a look. And now I think that looks actually. All right.
So there we go. Now, let's press all Tag, bring back everything,
double tap the A. Let's put the rendered view on, see what cure looking at
now, and there we go. Now we've got this. I'm just going to actually file and save. And what I'm going to do is
I'm going to come and just turn my sun round so I can
actually see what I'm doing. There's two ways of
doing this, actually, rather than I like
the sky, you know, the way it is, but
I'm still going to come around and turn
around the rotation. There is another
way what we can do. We can bring a sun in
and shine on there, but I tend to try and
leave it as I'm going to as I'm building out the
way that it's going to be. So, in other words,
the lighting, that's why I set it
up straightaway, just so I've got
some nice lighting here and just so it gives
me a good reference. So now, if I come in and I turn the rotation
of the sky around, you can see now this is what
it's going to look like, and it's really, really
coming together now. Alright, so on the
next lesson, then, I think what we'll do is we'll
now build this part out. So just this part
going up to here. So this front of here, we'll start building that out, and then what we can do
once we've done this. So we've got the inside of
this room to do as well. That's a fairly big job. Once we've actually done that, then we can actually start putting in some windows
and some doors. Okay, so let's actually
come to this part, and what I'm going to do
is, I'm going to again, because I like splitting them
off to actually work with. So I'm going to come all
the way around to here. I'm going to grab
this one. All the way around to there because I'm not going to need
the inside of there. I'm going to need the bottom of here, the bottom off here, like so, and I've got my
room in there as well, which you can see is
a different part. So I'm going to press P
selection, split that off. Then what I'm going to do is I'm going to come to this part here. You can see this is
my room in here. So I've got this
one and this one, press Shift H, hide everything
else out of the way, and that is what
we're left with. And now, because we've
done it in that way, you can see it's kind of easy
now to work with this part, and that's exactly
what we want to. Alright, so let's actually
work on this part first. So, in other words, we've got the water that's going to
be going across there. Now, of course, this wants to come down much much
further than where it is, because we want to actually
add something in there. In other words, let me show you what I mean before
doing everything. So what I'm going to do
is I'm going to come. And I want to bring
this part down first. So t shift and click. Let's pull this
part down, like so, and you can see here,
didn't grab the back of it. Did we grab the back? No, it's certain angle, as you can see. You know what? I think there's
an easier way to do this. Alright, let's do
it the easier way. So what I'm going to do is I'm going to hide
this part of the way, and then I've just got
my little box here. And from here then, I'm going to actually, kind of recreate this. So all I'm going to do is, I'm just going to press control, bring in another edge loop,
and drop it down to there. And then what I'm going
to do is I'm going to right click and I'm
going to mark a seam. And as we know, that
enables me now to come in, grab the whole top
of it just with L. And then what I can do
is I can split this off. So if I press y, I should be able to split off, come down then to the bottom, press L, and then press
Delete and vertices, and I should be able
to delete that off. From there, then I
should be able to come round now, grab
the bottom of it. All shift and click. Let's
put it on material more, because that's making
it a little bit harder. And what I'm going to do
is I'm going to put this now just below the
ground plane, like so. And then what I'm going to do
is I'm going to press E and Z and pull that down a
little bit further like so. Alright, so that
then should take us down into the depths
of the water. And now I want to
do is I basically want to bring in a couple of edge loops to make kind of the stand where people
are going to stand on. So what I'm going to do
is I'm going to again, press tab, I'm going to bring back those
other other parts. So I need to press lth,
bring back everything. And then what I'll do is I'll
grab this one and this one, press Shift H and hide
them out of the way. And there we go.
Now, I've actually got a reference to work with. So now the question is, where do we want First of all, the little point to come where somebody is going to be stood
on getting on their boat. So what I'm going to
do is I'm going to press Control, left click, right click, come to this side, Control, left click right click. And I now know that I've got these bang in the center
of each of these. So now if I come to
this one, Shift click, I've got both of these
selected, as you can see. And now I can do is I can press Control B and pull them
out at the same time. And I think something
like that with a little stand along here is
going to be absolutely fine. Alright, so now we can actually create a face out of these. So if I grab this one and I
grab this one and I press F, and there we go.
There is our face. Now, the thing, as you can see, it's still kind of on. This part of the land, so it's
still on the ground plane, we actually need it then to go a little bit into the water, come out and then have a lip on there. So we'll do that now. So what I'm going to
do is I'm going to press y, just to split it off, and I'm going to press to pull it down a
little bit, like so, and then I'm going
to press to pull it up just above
that ground plane. And then we're going to
have some kind of bricks along here or something like
that or even some wall. And now from here now, we can actually pull this part out and give it an actual lip. So, in other words, if I
come to the top of this now, grab the top of it, so just
grab the top of it, press y. And then what I'm able to do is I'm able just to pull
this up a little bit. Grab this edge and then
pull it out a bit like so. And there you go, now,
you've got your lip. And finally, finally, we
don't want to actually extrude it out yet because we need to do a bit
more work on it. Now, once we come back
on the next list, and we'll just check to make sure all of this
is in the water, and we'll also check to see how high this
is above ground. And then what we'll do is
we'll get this part finished. All right, everyone, so
I hope you enjoyed that, and I'll see you on the
next one. Thanks a lot. Bye bye.
38. Modeling Water Entrances in Blender: Welcome back everyone to
blend por modeling and geometry node workshop, and
this is where we left off. Alright, as we said,
then, let's press tab. Let's press ATH bring
back everything. And you can see now, this
is what I'm talking about. So you can see this
part here now. This is how out of the water. It's actually going to appear. I think it should be perhaps
a little bit higher. So all I'm going to do
is I'm going to come in to this part, so
you can see here, I can grab Let's actually have a look so we can grab
all of this part like so and I so be able
to actually pull it up altogether like so. Or we can do it a
different way where we actually pull this
up a little bit, like so, and then
just grab this edge. And if I grab this edge, you can see I'm pulling the
whole thing down, like so. Press L. I should
be able to grab the whole thing and then
pull it up into place. And there you go.
That is how we do it. Now, the water is going
to come up to here. Remember, we've got this kind
of path, on the top of it. Now, with this path, we could use the cobblestone got
node that we've got. But I think on this, we'll
actually make just kind of a stone path structure, or we could even use
the path that we've actually got on top of our bridge. We
could do it that way. So many, many options on this. But I think what I will do is first of all, grab
the top of this, press P selection, and
then come in and grab it with shift H. And now we can actually
freely work on this. First of all, then, let's
reset all the transforms. So set origin geometry. And now I'm going to do it,
I'm going to press Control. And bring in a few slabs, like so, so left
click, right click. And then one going
down here, so control. Left click, right
click, and there we go. Now what we want to
do is you want to split these up from each other. So I'm going to grab
each of these, like so, and it's better to do it this way where you grab
each of these, press the y, and then
hide them out the way, and then grab each
of these, press y, hide them out the way, and then it's just every other one. Press y, and then
you don't need to hide them out the way because
everything's splitting out. So lt bring back everything. There we go. Let's press A then. And then what we want
to do now is bring these up to give us
some structure to them. And now all I'm going to do
before doing anything elses, I'm going to come in,
put it onto a random. And then I'm going to come
into something like this part, pull it out a little bit and
just random them all up. Like, so, Like so. And like so. And the main thing is when
you're actually modeling, you see so many peoples where
it just looks too sterile, and we're trying to avoid that by doing all of
these little things. So we're just kind of, you know, bringing them up and
taking the time just to make it so that things are uneven like this as you see now. Alright, so, finally,
then, let's come in. Don't think with these
that we're going to need to use the randomize.
I don't think so. But what I want to do now
is just again, control A, set origin geometry,
adding a modifier, bring in a bevel. Put this bevel up on the segments because it is
stone, and there you go. You can see it's already
looking pretty nice. Now, let's grab them all. So A, smart UV project, click Okay, and then we'll
add in the material, which will be stone. So this one down here, stone. Let's have a look at what's? Oh, yeah, stone
bricks is that one. So that's okay. Let's press tab. And there we go. Let's put it on rendered view. And there you go. Now, you can see, really,
really nice even actual slabs. Alright, so let's go back now. We've done that.
Now. Let's press Tab TH bring back
anything that's there. It's not there. So T bring
back this part then. And now what we'll do is
we'll work on this part here. So this part here you can see, it's going all the
way over there. I'm going to press
and Smart UV project. Click Okay. Down arrow, and let's put on
our actual wall. So it's going to obviously
put the wall on everything. That's fine, but now you can get an idea of what this is
actually going to look like. So it's looking really nice. We're going to need some wood
in these corner bits here, and I think down this bit here. And for something like this, I'm just going to simply come, steal this bit of wood
that I've already got here because
it's on the inside. No one's ever going to see it. And then what I'm
going to do is, I'm just going to press Shift D. I'm going to make sure
proportionality isn't on. I'm going to bring it
out. I'm going to press P selection just to
separate that off. Grab it again, press
control or transform, set origin, to geometry. And now let's pull that back into place while we can
actually see what we're doing. So we'll pull it
back into place. I know it's going to be
too big at the moment. Way way too big. That's fine.
I mean is in the height. But all I want to do is just put it in some
kind of place, so we've got a wooden
structure there, so it looks like it's
actually being supported. All right. So next of all, then, what I want to do is I want
to make it a lot smaller. I'm going to hide my
actual ground plane. I'm going to grab this
one, press S and Z, and pull it down, pull
it into place, like so. And now let's bring
it over this side. So Shift D, bring
it over this side. I always tend to put them
in the corner and then press R Z 90, rotate it round. And then the actual UVs are going to look a little bit
different from this one. And then finally,
let's put one more in. So Shift D, let's bring
it to the center. So if I press one, you
can see now I can put it right in the center of there. And then let's pull it out. So S and x let's pull it out a little bit, make it
a little bit thicker. And there we go. That's the
inside structure of here. Now we've got a problem
on that, the walls. You can see here the
textures and materials, they don't actually
look too good. Same as maybe same
as these as well. I'm not actually sure if
it should look like that. And I think all
this is down to is the fact that I need to
reset all the transforms. But before doing
that, Obviously, I need to make the
top of this on here. Now, the thing is about the top. You could be real sophisticated to make a dome top
and things like that. But honestly, there's not
really any point in that. And the reason is 'cause no one's gonna see
inside there anyway. We're not going
to have a camera. And even if the camera
does go in there, it's not going to be
looking up at the ceiling. So all I want to do with
this really is just join this side and join
this side together. Now, I could press F here, but what happens
is that I've not actually got those
actual points in there. So, in other words, this is
an endgon and if you can, avoid engons because of the problems it might
lead to down the line. So as a beginning, it's
best of to avoid engons. So we have triangles. We have quads, and
we have engons. So a quad, for instance, would be something like this. So you can see here, I
select this, this is a quad. If I come in and
press K for my knife and just cut in half, Presenter. Now it's a triangle. Triangles and quads,
absolutely fine. Engons are when you come in, and you've got more
than four sides. So anything more
than four sides. So you can see,
if I put this on, we've got one here, one here. So we've got one, two, three, four, round the other
side, five, six, seven, we've got
eight sides to this, which makes it an ng. We
don't really want that. We want to avoid that if we can. Well, don't be scared of guns. If you have some
guns in there and you're not going to
be animating it, and there's no issues
with the shading, you're absolutely fine
to use them. All right. So rather than do that, though, let's just press delete for
this now, so delete faces. And then instead, I'll
show you another way. So if I grab these three, grab these three, right click, and instead of that, we'll
just bridge edge loops. Now you can see that's
formed very nicely. Now, the other
thing is just make sure If you right
at the lowest part, you can still just see the
roof. That's absolutely fine. That's exactly what
you want. All right. So now we've got that
what we want to do now is we want to
grab this part. We want to press
control A transforms, right, clicks the
origin to geometry. And then what I want to
do is I want to press A. And finally, Smart UV project, click Okay, and there we go. There is the actual
wall actually done. All right, so that bits
looking really, really nice. And now we actually need to
start work on this part here. Now, this part here, he's going to have something going across here to kind of
break it up a little bit. I actually think it'll
be easier to start work on this part
going across here, and then we have a good understanding
where we're going to be. And the reason for that is
is that we need to actually split this part off to
get some depth into here. So some depth into
this part here. So what I'm going to do
is I'm going to come in. I won't be able to actually
come in and actually add in a edge loop because
if I press control, can't do that because we've
already got these parts here. So what I'm going
to do in steadies. I'm going to press one
on the number pad. I'm going to press A
to grab everything. And what I'm going to do is
I'm going to come up to mesh. Come down and we have
a little tool called bicyc that's nice
and hidden away, one of the best
tools in Blender, and it's hidden away like that. I don't know. Let's
pull it over, like so. So left click drag and now you'll have this
menu that opens up. Now, first of all, this, which is one of
the lowest point. It could be on the y as well. Always set this to zero, and what that's going
to do is it's going to straighten up that line, so
it's perfectly straight. Now, the best thing
about the bisect is, you can actually
clear the inner, you can clear the outer, or you can do what
we want this for, and all we want to
do is put a line there so that we
can split these up. So what I'm going to do now I can actually pull this down. To where we actually want it, I can even move around
and do the same thing. And the place I
want it is just a slight bit higher than
the center of here. So, something like
that. And then I can put a nice piece of wood going all the way over there and that's
going to look pretty nice. Now I want to do is
I'm going to come face select on this part here. And what I want to do is
give this some actual depth. So I'm simply going to press
y, just to split it off, and then I'm going to press and pull it out a
little bit like so, and then that's going
to give it some depth. Some chunkiness, and then right click and
shade autos move. And there we go. Alright, so we've got all of that in place. Now what I recommend we do is so you can see it's coming
out all the way to there, but this is going to
be hit by the tower. And again, we're going to be splitting these walls up anyway, so don't worry about
this little piece here. So let's concentrate on
one part of the time. So on the next
lesson, what we'll do is we'll split
this off, I think. So L P selection, split it off. And what we'll do
on the next lesson is we'll actually start, you know, putting
the walls in there, putting the actual
stone in there. And from there, then
we can actually start putting the wooden
sections that are, you know, either side of here, and then find the big
wooden section over here. All right, everyone, so
I hope you enjoyed that, and I'll see you
on the next one. Thanks a lot. Bye bye.
39. Crafting Underwater Entrance Frames: Welcome back everyone to blend the fall modeling
and germ workshop, and this is where we left off. Alright, so let's first of all, press a shift H on here, and then we've got this
to actually work with. We're probably not going to
need the bombs of there. No one's really going
to see in there. I'm just going to actually
before I do that, press Salt H and just have a look where these come down to. You can see that these
are going to need to come down further on
the front because they need to actually
probably come down to roundabout here just to
show that the water, you know, it doesn't end
where the water comes in. So let's think about that.
So all I'm going to do, first of all, is I'm
going to press tab, I'm going to grab each of
these then on face look, so I want to grab each of
these faces underneath you. If you can't see them,
just put your x ray on, and then you should
be able to grab them like this and like this. And you don't just want
to pull them down. You want to press Xtra.
Because if we pull them down, you can see we start to actually probably bend things and we
don't really want to do that. You know what, actually? I think there's a line on
there or something. You know what? That
actually might work. Yeah, let's pull them down then if it's going
to work like that. Alright, that looks
actually pretty good. That's exactly what I wanted. Okay, so now let's
press Shift H. Let's come in then.
What we're going to do? I didn't think they'd actually
pull down, but they did. Let's turn our x ray off. Let's grab them all then. Let's press U. Smart
U V project click. And we're going to change
this over then to our wall, like so, and there we go. There's our wall. That's
looking pretty nice. Now, the one thing
about this is, you've got a dart patch on here. Now, realistically,
with the water, this dart patch is going
to be down at the bottom. So what I'm going to do
is I'm going to come in, grab the front of here, and you can see it's
full of engons again, but it's a flat side, so we don't need to worry the
fact that there's engons. We don't need to,
for instance, go in, triangulate faces, churn
the tries to quads. We don't need to
actually do that. We're not going to animate this. It's going to shade
really smooth and nice because it's
just a flat side. So don't worry about it. Don't worry about going through your entire model and you know, making sure it has no engons. The only parts you want to make sure I'll reiterate again, is anything that you're animated or if the shading is not
going to look right? In other words, if it's
got a lot of bend and things like that in
the actual object, then try and make sure
that it's got quads. Triangles are actually really funny as well when
it comes to shading. So try and always
make sure it's quads, I think is a bit better. Alright, so now we've got this. Let's come over to
the UV editing. And you can see here, this
is what it looks like. Now what I'm going to do is I'm going to come
around to this side. I'm just trying to
see where it is. I'm going to come
around to here anyway. I'm going to press A 90, and then 180, spin it around. And what I'm going to do is I'm going to drop this into place. Now, I'm looking why can't I see properly what
this is going to look like? Because it's on the rendered
view. Let's put it on there. And there we go. Now
we can see we've got those dark patches right at the bottom and that's
exactly what we want. Now, if we come back
to modeling now, you will see that's
where it looks like. And that looks a little bit better than
what I did before, because the water might
be lapping, you know, when the boat goes past, it will come up here and
lap on the walls. And there are things that you
need to take into account. Alright, so now we've got that. Let's come in and think about then our actual stone walls. So what I'm going to do, first
of all, I'm going to come. I'm going to grab
it going all the way round there
with control click. Same on this one,
then, going all the way around, control
clicking away. And then what I'm going to do is I'm going to press shift. To duplicate that and then going to come out
and expand them. So if I press R and y,
pull them out like. So the next thing I
want to do is make sure that I've got some
stones going down here, which are about the same
size of these stones here. The other thing on
this one, I want to make sure that the
center of this one. So this one here also is
going to look a little bit different from the actual stone work
going around here. So you'll see what I
mean as we work on. Let's press control,
bring in a few edge loop. So that looks about
the right sort of scale compared
to the other ones. So left click, right click. We can see it's six. So all now I need to do is
press control law. Six on the number pad, enter, enter again,
and there you go. Same thing on here. So
Control law six, no enter, and then control law, six, no enter, and there we
go. A simple as that. All right. So now what we want to do is we actually want to expand these out before
splitting them up. If we split them up and
then we use solidify, it tends to actually
break the mesh. You'll end up with stone
coming out in this direction, a stone coming out
of this direction, a big gap down here. So we don't actually
want to do it that way. What we want to do, first of all, though
is split them off. I'm going to grab both
of these P selection, split them off, grab them again. Control A or transforms, set origin to geometry. And what we're going
to do with these. Instead of it being wool, we're going to set it
down to stone like soap. Alright, so now, let's just
put it on object mode, so we can really see
what we're doing. And then what we're
going to do now is bring in our modifier, which is going to be solidify. Let's turn it up then
or down the other way. Let's pull these now
back into place. So if I go over
the top of these, I can see now how they're
going to fit in place like so. And they're looking
pretty nice already. I don't want them too
thick going around these. I only want them fairly thin. The other thing you can
do as well is you can come in and change the offset to pull them all the way back. I'm going to pull them
back a little bit, and I think the actual thickness there maybe maybe a
little bit too thin, so let's bring it up
just a little bit, like so, and I think now
they're looking perfect. So now what I can do
is I can come in apply my modifier and now I can
start splitting these off. Now, as I said,
these two top ones, I want to press Shift click
on both of these because I want these to be a little bit different from the rest of them. So all I'm going to do
with these is I'm going to press y, hide
them out the way. From there, then, I'm just
going to work my way round. So shift click going all the
way down to these ones here, like so, and it should actually
do the same thing now. So going all the way down, meaning that we don't actually have to grab the bottom as well. So now let's do the other ones. So all the way down. Like so and this one
all the way down. Like this. And then
all you want to do is why bring back everything. So Alt Shift and click,
grab everything, and then mesh come
down to clean up, and we're going to
fill holes, like so. Let's press tab. Let's
press right click. And what we're going to do
now is shades move by angle, and there you go, that's
what you should have. Now, let's press Control
A or transforms, right click the
origin to geometry. And we've got
lumpiness here now. And obviously,
that's because we've actually brought in You know, we split them all up
and put the faces on. But the moment we come over
here and generate a bevel, now you can see once I
actually turn this up, it will all start to make a little bit of sense.
So there you go. Now you can see, just down
nice, they actually look. Now, before we do anything else, what I want to do is I
want to bring these out. So I'm going to come
in, shift click, l Shift click, like so. And what I'm going to do
now is press Alt and S, and I'm going to pull these
out a little bit like so. And the reason I'm
pressing alter and S is because then we still keep
those gaps down there, and that is exactly
what we want. Now what we want to do is, I want to hide these out
the way at the moment, because I don't really
want to alter these. I do want to randomize these
a little bit, but not these. So what I'm going to do
is I'm going to come in. I'm going to grab all of these
and hide them out the way. And then I'm going
to come in and press A to grab everything, and then mesh coming up, transform and we're
going to go randomize. And then all I'm going
to do is turn that down maybe to t point. Maybe even 0.1
actually should do it. Let's have a look at 0.1. Yeah, and that's going to do it. We can even come in
again, transform, randomize, turn it
down again to 0.1. And I find that's probably
a better way of doing it. Let's put it on a point at five. Like so. And let's
have a look at that. And now you can see that's
looking a little bit better, and you can see
that these haven't been touched, and
that's the main thing. Alright, I tach, bring
back everything. You know what? We
didn't want to do that. We'll come into it. And then
tach, bring back everything. Now I want to do is want to
come to both of these here. And all I'm going to do with
these is I'm going to give them a little bit of an insert because what I
want to do inside here, I want to actually put
some kind of blue in here. So, what I'm going to
do is I'm going to press for insert, and I'm
going to bring them in. Like so. And then
what I want to do is now I'm thinking
I'll extrude them back. So if I press and just
pull them back, like so. And because these are actual crystals or
supposed to be crystals, the best way to do
this is now if you press again and bring them in, and then you press and
pull them out like so. And then what you're
going to do is just press the S button and
just shrink them in, like so, and now you'll find these crystals will actually
look a little bit bare. The other thing I want to
do before finishing this then is actually just pull
back the edges a bit, so to make them more
crystal like if you like, so grab this edge, this edge. Grab this edge and this edge. And then all I'm going
to do. Just make sure you've got your edges
is pull them back. So if I pull them back, so, and there we go. All right. So that's looking pretty nice. Now, finally, we can put
this on material mode. We can see, Oh, we've got a
lot of problems on here now. So let's come in and
just unwrap them all. So, Smart UV project, click Okay. There's the stone. And now let's come
over to our materials. And what I want to
do now is actually attach another material to here. So I'm going
to click the plus. And then what I'm going to
do is go to asset manager, and now I've got my
little gemstone, I'm going to drag and
drop that on there. And then I'm going to
go back to modeling. And now, finally, I'm going
to come into these crystals. So what I'm going to do
is, I'm just going to select both the top
ones, the front ones. And then what I'm going
to do is press control plus to go all the way
back, not to that one. So just once I think
will be enough, click the data at
this Gemstone blue, click a sign, and there we go. Now, what do they
actually look like? Well, the moments are truth. Let's press tag, bring
back everything, double tap the A, put our rendered view
on, and there we go. Now, at the moment, you will see that if I
save out my work, The problem is in cycles, you're not going
to see the bloom. You're not going
to see that bloom effect until you actually start using the composite, which we're going to be using. But if you really want to
see what it looks like, put it onto V instead,
and you will, or you should, if
I put bloom on, get some actual bloom. Now, also screen
space reflections. Let's see if there's
actually any bloom there. So I just want to ring up. My intensity. You can see
there is something there just. Now, what you can do now is
coming over to your material. And you will have
one if you scroll down here without actually
going in anything where you can turn down
this or turn it up like so and get the kind of look that you're
actually looking for. Though, I recommend
that we leave it on 13, but just in case you want to see what that looks
like, you know, Arias got a kick out of putting the bloom really high
and seeing, you know, that bloom effect like fog around my buildings and things, you might
want to do that. Now, though, I'm just
going to go back. I'm going to put it on cycles. As that is what I
like to work in. And on the next lesson,
what we'll do then is, we'll start building this
part over with the wood, building this part up towards where the actual
windows going to go, and then putting the roof
on here and on here. So we're just going to
continue building it round. All right, everyone, so
I hope you enjoyed that, and I'll see on the
next one. Thanks a lot. Bye bye.
40. Framework Setup for Window Placement: Welcome back
everyone to blend of four Modeling and
Jump in Old workshop, and this is where
we left it off. Now, I think it's a good idea. First of all, if we just press tag and bring back
this tower here. So it's this front tower here. If it doesn't work with Voltage, just bring it back over here, the little ie to unhide it. And then what we're
going to do rather than grabbing a piece of
ward from over here. I'm going to grab
this piece award or this piece of wood
to create this part. Not only then, I go, so I know exactly where
I need to go up to. But I also know which pieces of wood I'm going to need to actually unwrap
and things like that. So let's press sir shift. Let's bring it over. The
other thing, of course, is all of these
pieces of wood now, as you can see, have actual
subdivisions in them. So that's another reason why
we're doing it that way. Okay, so just make sure
that this piece of wood, if you press tab is the actual wood that's
not the bendy wood, so not done with a curve. And then all I want to
do is r and y and 90, and then let's start putting this into place
somewhere like this. And you can have a
lot of fun placing these pieces of wood around,
to be honest with you. So just make sure though
that they all fit together. In a realistic way. You know, you don't want
anything like over hanging here. And if you do, just make sure that this part here is coming
all the way down to here, so it fits in properly. Don't have it where
it's just, you know, over hanging like
this, for instance. It just doesn't look realistic. So just bear that in mind whenever you're
building these out. So what I'm going to do is,
I'm going to put it here, I'm going to pull it
down a little bit. So Essen pull it down
a little bit like so, and then pull it out this way. So it's just in the woot. So I'm not really wasting
any of the wood. And then I'm as going to pull it out a little bit
because I want this to be quite chunky this piece because it is
a supporting beam. Then what I'm going to do
is going to come across. I'm going to bring
it all the way over two into this corner, so you can see I'm
Jaws going to pop it into that corner like so. Next of all, then, I'm going to grab this piece of wood again. I'm going to press Shift D. And then what I'm going
to do is I'm going to press R and y and
90, spin it around. I'm going to reset my
transformations on this one. So all transforms, right click, set origin to geometry. And then what I'm going
to do is I'm going to put it right in
the center here. Now, when it comes in the
center here, obviously, it needs to be a lot smaller, first of all so S and Z. But it also needs
to make sure that it's going to be coming down
into the water as well. We don't want it just stuck on the bottom of the water.
It should be in there. So what I'm going to do is
I'm just going to press S and y and pull it
back a little bit, just so it's under
there as well. And then I'm just going to
grab the bottom of this. So as come under there. Grab the bottom of it, and I'm
going to pull it down into the water round about the same place as where
all the rest of them are, and then I know it
can be hidden away. Alright, so next of all, then we need a piece of wood in here. So I may as well use this one. So Shift D, let's bring it over into this place
here, like so. And there we go. Now, what I might
as well do being as I've got a piece of
wood already this side. I've got a piece
of wood this side. I might as well then just
bring this piece up as well. So what I'm going
to do is just press Shift D, bring it up, and then send bring it down into place and
just sit it under there. Now, the flat pieces of the houses are always
going to be much, much easier than
these round pieces. And that's why
we're leaving these for now. We're going
to come back to these. They do take a little
bit more skill to actually create these things. And also, the next
thing is we have to think about this window here. If you look on the reference, is actually a kind
of not a bay window, but it actually has
shutters on there, so we have to take
that into account. Now, we did get rid of
the window round here, so we just need to make
sure that we've got enough room for this
window to sit on there. So we're going to be doing
the windows next as well. The next thing that I
want to do is you know, place this in the right sort of place where it's going to go. So to do that, what I'm
actually going to do. I'm going to press Shift and A. But what I want to do first is, I just want to press
one on my number pad. And then what I want to do is press Shift and A and come down. And what we're looking
for is images to planes. But you won't actually have
that in here at the moment, and that's because you
need to first of all, come up to edit,
go to preferences, and you're going to look for
images or image as planes. This one here, and
it really does make life easy when
you bring that in. So now I'm going to do
is close that down, and then go to put my cursor
over here, so at the moment. I don't even know Oh,
there's my cursor up there. I'm just going to
shift and right click, put my cursor over here. Then I'm going to
press Shift and A and then come down to images, and you'll have now
images as plane, and then that's going
to open up where we're actually going to
find this image as plane. Now, in your resource
pack, of course, resource pack is where is
it resource pack is here. Let me just find where
the actual doors are. Here they are doors and
windows references. This is the one that
we're going to need. Now, if you double
click this, you'll see that you've got all of these references and all of the windows and doors that
we're going to build out. And I think this is the
easiest way for you actually to build them out and
to get the right scale. So what I'm going to do is, I'm just going to first of all, turn this on, and then
we'll be able to see. And if we press you
can't press control and, you know, scroll the mouse
wheel like you do in windows. What you can do, though is
come down and go to size, and you can then turn
the size up like so. So now we can actually see
what we're looking at. This is the one
we're looking for. So this then gives us the right
scale on swift scaled it. So if I bring this in now, You can see that it
comes in like this, and then all I need to
do is rotate it round. So if I press r x, 90, rotate it round,
and there we go. Now, if I pull this over here, what I want to do now is get
this to be the right scale. As you can see, the window
at the moment is tiny. So if I press one
and then press S, I can bring this
window out and get it roughly to the right
scale that I actually want. So you can see somebody looking
through this window now. That looks about
the right scale, and it's also going
to fit in there. And then what I'm going to do
now is put this into place. So I know it's roughly
about the right size, and let's see how much
more we can get away with. So if I put this up here, you can see that if I put
it just roundabout there, so you can see that I'm
going to be able to get in place with these
actual windows here, I can sit it in there
quite comfortably. If I put this on
object mode instead, I can really then see
what I'm actually doing. And the other thing you
can do if you really want to is you can press one,
press the tab button. Let's put it back
on material, sorry. And then all we're
going to do then is just bring in an edge loop. So if I bring in this edge
loop here and bring it up, And then bring in
another edge loop, so control, bring in another
edge loop, drop it there. And then what I can do is
actually delete both of these. So delete both of them off because you're not
going to need them. And there you go, now,
you've got a much, much bearer idea, put
you an object mode, where it's actually
going to sit. So you can see straightaway, it is a little bit
out, so it needs to come all the way back. And then down below there. And if I put that on, now you can see that's where
it's going to sit, maybe a little bit
further down like there. Now, from here, that
enables us then, just put in that
there to build out this bottom part here and work out where
everything's going to go. And then on the
next few lessons, what we're going to do is we're going to actually be creating these windows to the scale that we've just
actually highlighted. So now what I'm going to do
is I'm going to come in. I'm going to grab this part. I'm going to press Shift D, and I'm going to bring this
up into this place here. I'm going to press S and X and pull it in, and
then pull it over, and I just want it sitting in there against this point
here, as you can see. Now, with this one, I don't
want it going in front of it. You can see it going
in front of it there. What I want it to do is
actually go behind it. So I'm going to press S
and y and pull it in, and then pull it back a little bit and just have it
in there like so. And if you want
to see it better, just put it on object mode, and you will be able
to see it much, much better then and I
can pull it out like so. And then finally, I
want to make sure that this bit, is
in the right place. In other words, it's
above this part here. So if I then come in and pull it up and might
be able to get away where it's jaws
looking as though it's holding onto
this part as well, and you can see that will
enable it to all come together. So if I press S and Z, pull it out a little
bit, like so, pull it up. And there we go. And then what I'm
going to do is, I just want to make sure now that it's actually
going into there. So if I now pull
it out on the X, so and X, you can see now, everything is kind of
fitting into place, and that is looking
very, very nice. Now what we need is we
need to figure out, we want a piece going in here. It's going to look a little bit different
from the reference, but I still believe it's going to look really, really nice. Let's bring out this
part then, so shift, we'll bring it up, we'll
press S's and pull it down. Put it into place, like so, Essen a little bit more like so, and you can see now, it needs
to come back a little bit. So I'm going to pull it
back into place like so. Alright, so what
we'll do then on the next lesson is we'll make some wood that's
going to go this way and this way, same on this side. And then as we're going
to work our way up, we're going to put
a piece of wood under our actual roof here. Now, generally, You always want piece of wood under
here under these roofs here. We're going to put a piece of wood under this roof as well, because it just supports
this part under here. You wouldn't really
have it where a building goes up to the wall, and then you just
see the roof tiles. You would have some support, you know, piece of
wood under there. Or there's all this wall that's not really being
supported at the top. So you would have it
there to support it. All right, everyone. So
let's say that I'll work. And on the next one, we'll get this part probably finished. And then we can get
the materials on and get it looking really weathered like we've
done with these. And then finally we can start work on creating our windows. All right, everyone.
So thanks a lot, and I'll see on the
next one. Bye bye.
41. Modeling Main Roofs in Blender: Welcome back everyone
to Blender for Modeling John Conde workshop, and this is where we left off. Okay, so let's come over to our Bendiwood, which
is this one here. We can tell it because it's actually got the curve on there. And what I'm going to do
is just press Shift D. And the first thing I'm
going to do with this is, I'm going to You know
what? Before we do that. Let's come to it. Let's go over, and let's bring down
these resolutions. So let's bring it down
something like six. And then we can start with
that, and that should be fine. Now I'm going to do is press 50, bring it over, and let's
put this into place then. So I'm going to press
one on the number pad. I'm going to then press R and x. So let's no R and y, 90. Let's spin it around. Let's make it a
little bit thinner, so I'm going to press S and x, pull it down, and then I'm going to pull it in some
sort of place. So I'm going to put it
around here at the moment, and then I'm going to press tab. And then what I'm going to do
is press tab, pull it down. So if I pull this one down then, so into place, and then
pull this one out. Reset the transform, so control. A transforms. That then
we'll straighten it all up. And then finally, I
want a little bit of a bend in this part here. So if I bring this down, you can see now we're getting a little bit of a bend in here. Let's pull this bit across. So I kind of want it a little bit more flat
going into there. I think that looks
much bare which means that I need to pull
the whole thing across. So what I'm going
to do is grab all of these, pull them all across. So, pull them into my wall, and then finally this bit here. I think I'm actually
going to be happy with it going in like that. Now what I'm going to
do is, I'm just going to reset the origin. So right click, set origin, geometry and finally then
let's put it into place. You can see we're a mile out. I knew that would be the case. We just have to pull
it over a little bit. So let's pull it a little
bit more into place. L so, Let's grab this one, and then it's up to you
whether you want to extrude it with or whether you just
simply want to pull it out, going into this
piece here, like so. And I think, actually,
that's looking pretty nice. Now, you could have it going
up into the corners as well, completely up to if
you want to do that. So let's now put it
on the other side. So what I'm going to
do is just press 50, bring it over to the
other side, press art, 180, spin it round, and then let's just drop it
in to the middle, like so. And you can see, it's a
little bit out there, but that's absolutely fine because of what
we're dealing with. So in other words,
it's a little bit shorter on this side,
but that's fine. As long as it's actually in the wood roundab the same as the other one,
that should be fine. Alright, so that's that bit. Now what we want
to do is we want a bit underneath this roof. But before we do that, let's
actually bring in this roof. Now, we actually created our roof here, which
makes it really, really easy then to put it onto place over this one, of course. So what I'm going to do then is just going to come in, shifty, duplicate it, and then pull
it into place like so. And we've got a little
bit of haywire there. Let's pull it up. Let's get it into some sort of
places to go much, much higher. And there we go. We're starting to
get somewhere now. So now I'm going to do is,
I'm actually going to just hide this tower out the
way as for a second, and then I'm going
to make sure that this is kind of against
where I want it. So you can see here
they're just over hanging there a little bit, and that's exactly what I want. So now, if I come over
to my geometr node, I can mess around now with the rotation and pull
this up the right way. I can then increase the vertical count up to where I want it. And then finally, I can make sure that everything
is in place. You can see it's a little
bit out here still, so I'm just going
to come back and pull it down into place. Like so. Now, we can also
see that it needs you know, it needs to come out
a little bit here, so let's pull it
out a little bit. Let's bend it around
a little bit, making sure it fits
into place. Like so. And now let's move it over a little bit because
we know we've got it rowfully in
the right place. We don't want to go past
this point, obviously. And then all I want to do now
is increase the horizontal. But that's going to obviously
pull it out a little bit. So if we increase this
holding the actually, I don't actually
know I don't think Shift born works
on geometry notes. But what I'm going to
do is just increase it this far and
then pull it out, like so, and then
increase it again. Like so, and once more. And I think that is
going to be absolutely fine because we
are going to have some other pieces of
wood coming down here. And I think as well that we
will put these pieces of wood in because I think it's important to get it
in the right place. Alright, so we've
got this here now. So what we want to do now is, I'm not going to put this
over the other side yet. What I'm first of all going
to do is create the top, and I'm going to steal
this piece of wood here. I'm going to press Shift D. I'm going to bring it
up then to the top. I want it right in the center. So I'm going to grab this
part, grab this part, shift cursor selected,
grab this part then, and shift selection
cursor, and there we go. Now, let's make this a
little bit chunkier. And I think for doing that, all we need to do is press the S born because we do want it to be a little bit bigger as well. And then what I'm
going to do is just pull it up onto there, like so, and then
let's pull it back into place, Jost into there. And then finally, let's come
in and grab the end of this. So just make sure you've
got your end selected, pull it out, like so. And then what we're
going to do is we're going to do a support here. Just to kind of
finish this side off. So what I'm going to do then
is just grab this, so shift. I'm going to make it
much, much thinner, so S and X, pull it in. And then what we're
going to do is we're going to make it a
little bit smaller now. So S, and then I'm
going to pull it down. And then finally,
then we're going to have it going into here. Now, we're going to
move this a little bit once we've got these
wooden parts here. So just bear that in mind
when you're doing this. And then let's twist it round. So all I'm going to do is
r and y and spin it round. And it's going to go
into this roof part, something like this. So
something like this. But before we do that,
let's just regrab this part because what I want
to do then is put it going down each
of these sides. So I'm going to grab it, so shift D. And then what I'm going to do is I'm
going to press alter r. So put it back to how it was. And then we're going to bring
it in to this place here. Like, so I think I'm going to make it a
little bit thinner. So S and y, make it a little bit thinner. Put it into place, so it's
going to go up to there. Now, the other thing is it
needs to go kind of halfway, or we need to, you know, split them once we've
got them there. So what I'm going to do is,
I'm just going to press tab. I'm going to grab
the bottom of it. Press let's see, Control three again. Let's
bring it down. Pull it into place. Like, so, And I think we'll have it going
over slightly over there. And you can see again
that we do have the same problem as we
always going to have with these pieces of wood
near the roof in the fact that we need to bend it so it's
going the right way. Okay, so now, let's come
in and just go on X ray. Let's put it into the
right place, like so. So we're going to pull it
in to the right place, making sure that let's
take X ray off, actually. Put it on object. There we go. Making sure that
these roof tiles are actually on top of these. And the other thing
is, as I said, There is a chance that the
roof tiles need to come out, which I think they're going
to, or we pull this back in, but I don't think we're
going to pull it back in. Instead, what we'll do
is we'll just grab it, we'll press S and X and just make it a little
bit thinner and then pull it out a little
bit just so it's sat across the end of
the wall, like so. And I think that's
looking pretty nice. You can see we have
a problem here with this part sticking
through the wall. We don't really
want that, but I'm not actually going to
alter this at the moment. Now, what I'm going to
do is I'm just going to come and bring my roof
tile a little bit over. So bring it over, pull
it out a little bit. So S and X, just pull
it out a little bit. Never be scared to do
that, if you need to. And then what we'll do is
we'll just pull it back now, so it's just over
hanging there, like so. Alright, so that's
that part done. Now what we want to do
is we want to actually cut this part to make it, you know, nice and even. So what I'm going to do is I'm going to press control three. I'm going to press the tab
button to grab it all. I'm going to make sure
I've got my x ray on. And then what I'm going
to do, first of all, I'm going to put it
right down the center. So right down the
center of here. I also need to make sure
that I've not got this part. You can see this part. It's
a little bit too long. So let's first of all
come over to bisect. And then what we'll do is we'll
cut this part down first. Once you've got bisect
on and pull it out, you can also use the space bar and put it
wherever you want. So I'm going to put
it rounda there. Like so. I'm not going
to change any of these because it's basically in the right position
that I want it, and all I'm going to
do then is clear the inner or the outer,
whichever one is the case. I'm going to clear the outer. And then I'm going to press A, and I'm going to
do the same thing. So mesh sect, and let's
going across this way. Like so. Let's then turn off
clear outer, clear inner. And there you can
see now we've got a nice straight piece of wood. You can also from
there, as well, don't forget pull
this down as well. Just remember that you're
going to go past that little know that little
piece that's there. But you might actually
want it like this. You know what? I think this
looks quite nice like that. So I'm going to
keep that as it is. Alright, so to get that
off, just press tab. Take off your x ray. And now what we want
to do is you want to pull it onto the other side. You can see that we are
going to need probably a piece of wood in the center
here coming down to here. And also, I think we'll actually drop this
down a little bit now. So I'm going to come
around to this side first. I'll come to the back of here. So this one, this one here. And then what I'm going
to do is just drop this down a little bit, so
it goes past there. So it's now supporting you know the supports
are going past there over the top of
it for turning it off you can see, that's
exactly what I want. And then what I need to do is put another piece
of wood in there. So again, I'll grab this one, so shift D, Alt and R, just to reset the what
is it? The rotation? And you can see, for
some reason now, that's not actually that's
not what I want, really. Let's press l test,
see if it's that. There we go. Now we're
straighten it up. Now we can press sens d, and you can see as we're
pressing sens head. It's pulling it down to
there. So let's not do that. Let's just delete
that other way. Let's grab this
one here. Shift D. Let's bring this
into place then. You can see my cursor is
still in the center there. I might as well
use that actually. So Shift S selections cursor, and let's bring it out and
get this bit into place. So I'm going to pull
it roundabout there. I'm going to have it
then go in just in. So I just want it into here, which means I need
to put sensed, make it much, much thinner. Bring it back then
into place like so, pull it up, and then N's. And then what I'm going to do is pull it back a little bit. So x, And then finally, once I've got it the
side of that one, I'm going to press S and y
and pull it out, like so. And there you go. There we go. Now, you can see, we
do have a problem in that it's going to have
to come further out, or this is going to have
to come further back. So I think on this
occasion, you know what? These are actually hanging
over a little bit too far. So we're going to do
that on the next lesson. We'll pull it all into place. I think this needs to
come back past here, and then we'll have
a good idea where these roof tiles need to
come because at the moment, I think they're hanging
over a little bit too much. All right, everyone, so
I hope you enjoyed that, and I'll see on the
next one. Thanks a lot. Bye bye.
42. Building Support Frameworks for Roofs: Welcome back everyone to
blend the poll Modeling and Join workshop, and this
where we left off. Alright, so let's first of all, bring this back a
little bit 'cause there's only so much
chunkiness you can have, and this is about
the upper limit of how chunky it can be. So all I'm going to do is
press S and X and pull this back a little bit and then pull it into place behind that, so it needs to fit in like that. From there, then you can
see that these towels probably hanging over
a little bit too much. I don't just want to pull
them back though this way. I just want to
make them smaller. So all I'm going to do
is just grab these, press S and X and
pull them back. S a little bit. Like so. And now let's have
a look at that. And you can see now
that's fitting, much, much nicer into place. Alright, so that's pretty nice. Now, the one thing
is, I would say, is that it's hanging
a little bit, if you look control three into the actual wood, and
we don't really want that. So what I want to do is, I want to pull them out slightly, so I'm going to pull this
one out very slightly. You can see that I'm
probably going to have to bend them in a
little bit more. So I'm going to come in and bend them jaws to tad like so, and now they're not stuck in there as much. And there we go. That's pretty much
finished now this part. So what I'm going to do now is put those up the other side. So to do that, first of all, I need to actually convert
this, so convert the roof. So what I'm going to do is
I'm going to go to object. Did I have my materials on. You can see materials or
stolons. That's great. So object, convert and mesh, and then I'm going to
control or transforms, right click Set origin, two, three D cursor. And then finally, one I'm going
studies I'm going to come on over, adding a mirror, so generate a mirror, like so, put it on the y, and there we go, turn off the X. Just don't forget. Turn
off the x or you'll end up with double over each side. Now, the other thing
is, you will notice that these will be
exactly the same. So you'll notice
that this side and this side will be exactly the
same when it comes to here. So what you can
do is instead is, once you've actually
applied that, so let's apply this mirror now, so control A. Go
over the top of it. And what we're going
to do is press tab, and then I'm going to
go into wire frame. And what that enables me to do is just select all of these. It will go all the way through. So if I press B box select, and then can select
all of those. Now, if I wasn't in wire frame, so I'll just quickly
show you what I mean. If I double tap the A, press B and do the same
thing, box select. Not only can I not
see one selecting, but it will not select them
going all the way through. So that is why we're actually
doing this in wire frame. So go back to
wireframe, press B. Box select, going all
the way through like so. Now what I want to do is I
want to mirror this over. So I'm just going to press
P selection, split it off, and then I'm just going to put
this on object mode again, grab this again, and now I want to mirror it over this side. So it's going to be, as
you can see, on the x. So let's come on over object, transform, sorry, mirror
on the x, like so. And now if I pull this over, it should be now. Different from the other parts. So you can see here, this
part here goes in to here, and you can see this part
here is kind of level. So you can see now they're actually different on each side. If I go over the top now, I should be able to come
in and level these up a little bit bare so level this one to this one,
and there we go. Alright, that's the
hard part done. Now what we want to do
is we want to come to this part and we want to do
pretty much the same thing. So right clicks the
origin three D cursor. Adding a modifier
and we're going to generate a mirror, like so. We're going to
press it on the y, turn off the X, and there we go. There is our actual roof
part actually done. Now, let's take stock of what
we actually need to do now. I think that we're pretty
much done with this part. We're not going to
carry on down here yet. We're just getting
this part done. So let's bring in our main
tower or front top with tag. Let's make sure then everything
is fitting in place. What I'm doing is I'm
going around, making sure. I'm going to pull my
window back a little bit, so I can see what I'm doing. Now you can see it's just in
there where that wood is. You can see if I put
my window on there. I can have, like the windows
coming out either side. And yeah, I think
everything's core with that. I'm just wondering where
this part has gone. I did put it over the other
side. I'm not actually sure. Where that part's
gone, actually. Let me just see if it's in
there. Yeah, there it is. It's gone right back
there for some reason. So let's put it in to
where it needs to go. Press A tach, and there we go. And that's why it's
a good idea to always have a little bit of a check around your scene just to make sure
everything's going okay. Alright, so now we've
got all that done. Now it's time to do
what we did before. So, the first thing
we're going to do is we've got some
curves on here. We might as well apply those. So we're going to grab
these apply our curves. Now, remember, we've got
actually a bevel on here. And as I said, it's better
to come in first of all, and take off the bevel.
So take off the bevel. Coming over then to object, convert to mesh,
and then what we'll do is we'll reapply
our bevel now, so add. In fact, join them
together first, because then it'll do them
both at the same time. So Control J, control
or transforms, right click the
origin to geometry, add in a bevel, and let's put it at 0.3. So have a look at our Bevel, actually make sure it's working. 0.3, and there we go. I'm just actually wondering if this bevel is working,
I don't think it is. You can see here, as
I'm turning it up, nothing's working. That's fine. There is an easy way
to get around that. If we come down to geometry, you will see you've got one
that says clamp overlap. Turn that actually And then what they'll do is they' enable Blender to actually
then bevel it. The reason that comes
on there, by the way, is to stop these edges crossing over into each
other and breaking the mesh. But if you say it pretty
low point, three, most of the time,
not all the time, but most of the time,
you should be fine. Let's then right click shades
Move, and there we go. That's those parts done. Now, let's put it back on material and work our way round. So basically, what
I want to do is, I want to grab all
of these, like so. And I want to basically
join them all together. I think I'll do the front ones first.
I'll press Control J. Join them all together. We
will keep them the bevels on. And then what we'll
do is we'll come to the roof and we'll join
all of these together. Now, you can see on this one, we've still got our mirror on. Very important if
you've got your mirror on, just to check that on. So Control A, apply it, and now we can join all of
this together with Control J. Now, next thing
we're going to do, as we know, like
we did last time. We're going to actually come
into these parts first. Press M, and we're going
to put them into our wood. And then we're going
to come to this one, press M, put them
into wood, like so. Now, let's come back
to these parts. And all I'm going to do, I'm
just going to hide this one out the way with H.
Come back to these, and then I'm just going to press Control and bring
in some edge loops, same as we did before, Control. Control, bring in a lot of
edge loops on that one. Control. And then control
And then control law, bring in the edge loops like so. Alright, that's that one
done. Now, let's do this one. So we'll bring in a lot
of edge loops on here. And then Control then
did I join that one? Yeah, I've actually
not joined this one. So all I'm going to do is
just join them with them. Control J. And there we go. Control, bring in some edge
loops, and then control law. And finally, did I actually add, Yeah, you can see here
we do have a problem. Good job of spot that as well. So if we come then
to these parts here and grab both
of these, shift ate, hide everything else
out of the way, and you can see that the
problem is with this one is that we haven't got a proper
base to start from one here. So you can see here,
It goes to there, and this is an gone. And if you've got an
ngon or triangles, you can't actually
put in a subdivision. Easy fix on that. All we're going to do is press
control three. And then what we'll do is
we'll come on over to mesh, and we'll bring in the bisect, and I can probably get away with bisecting these
at the same time. So if I pull it down to there, you can see now I've done both
of them at the same time. I can then pull it down
to where the problem is, so just above it, like so. And then finally
what I can do now is can come in press Control. So if a press tab,
then tab again, press Control, and now you can put in an
edge loop like so. We'll do the same thing
on this side now. L so. Alright, so
that's that done now. Let's press O TH, bring back the
rest of the parts. And now let's come to this
part and work on this part. So all I'm going to do, I've
got the same materials here. I'm just going to press tab, A, U, Smart UV
project, click Okay, and then I'm going
to grab this one, grab this one with Shift select, Control and we're going to
link materials like so. And there you go. It's
as simple as that guy. It's really, really easy
to actually do that. Next of all, then,
before we finish, we're just going to
grab all of this. We're going to come
up then to mesh, transform, randomize, and we're going to put
this on point at one. I think it will be, have
a look if it's that. Yeah. No point, naught one. And there we go, now you can see you've
got some blocking this. Let's press the render born
just have a quick look. Well tap the A, and there we go. We can see that's looking
really, really nice. Okay, so now let's come
back to material mode. We'll come back to these
now. Exactly the same thing. So first of all, press tab, A, Smart UV project click. Now, you might have a problem
in this because generally, when you're unwrapping
a really chunky piece, big long piece like this, it makes everything on
the UV map smaller. So if I go to UV, you will see that this part here is
like this and the other parts, they're quite long, but they
get kind of shrunken down. So, in other words,
always try and unwrap. So let's say unwrap
this piece on its own. So you'll see what I'm
saying if I do it this way. If I grab just
this piece with L, press U, Smart UV project click okay. It's
gonna wrap like that. If I then hide this out the way, press A, u, Smart
UV project, okay. You can see now it
makes them much, much bigger because it's not contending with this part here. So now, basically what I
can do is I can press A and just move these over because
these are seamless textures. So if I press l tags now, we've got something
like this, and let's actually have a lot
what that looks like now. So I'm going to grab my wood. I'm going to press
Control L. I'm going to link materials,
and there we go now. You can see that's looking
really, really nice. Now, the one thing is,
I can see on here, if I press age, I need
to bring these back. Hide out my tire out the way. You can see I've still
not done these parts, and we'll do those on the next
lesson because obviously, they're a bit bendy as well, so we need to do those properly. All right, everyone. I just want to check
something as well. I'm just going to
check my roofs, and my roofs are
looking nice already. I don't think I'll need to
do anything with those. They're absolutely fine. Alright, so let's put
it onto material mode. Let's save that our work, and we'll leave it in the
UV space because we will be using that obviously
for these parts here. All right, one, so I
hope you enjoyed that, and I'll see on the next one. Thanks a lot. Bye bye.
43. Starting Window Designs from References: Welcome back everyone
to Blender por Modeling and G node workshop, and this is where we left off. All right. So we've
got these now. We know they're already
actual mesh, not curve still. So what we can do
now is just press A. Smart UV project, click
Okay, and there we go. Now, let's come and join
them to these, obviously. So Control L link materials. And last of all, I
just want to make sure if I press M are in wood, which they are now
even if there wasn't. And then I'm just
going to press tab. And what I'm going to
do now is zoom out, and I want to make sure
that each of these, let's have a look,
each of these. I'm just going to
check one thing because I think if
I pull this out, Yeah, I've still
got my bevel on, so my bevels still on
there, so that's great. So what I'm going to
do is just press tab. I'm going to come then to this
one here, this one, here, this one here, this one here, alternate and split them up. Now, you can see that
sometimes with UV squares, it actually messes
it up a little bit, so you can see now they've
joined together like that. I don't really want that, so I'm just going
to press controls. Put them back together,
and generally, it's because this is
what's causing it. You see this bit
with a joint here. Generally, if I come
in, grab this one, press T, you can see
then it splits them up. So let's come in, T, L, T, and L, and, and then let's
spin both of these round. So if I grab both
of these are 90, spin them round, like so. Alright, now you can see they are looking really, really nice. And we just want to add good, then round our
scene for a moment. Just to make sure we've
got everything in place. So if I double up the A now, let's actually
bring in our tower. So let's bring in our
tower and just look at where we are on
this. You know what? Before we do that, let's do the walls first because they're really important, actually. So I'm going to at the moment, split off these walls. So you can see here
at the moment, I've got this large
wall going across here. I've got this wall here. And I've got this wall here, and these will be the three
walls that I actually do. So what I'm going to do
is I'm going to first of all press P selection,
split those off, and then I'm going to
come to this part, and I'm going to press M and
drop them into my walls. And then from there,
what I'm going to do is I'm all, so I'm
going to split these off. I'm going to grab this
one, y to split it. So if I press G, now you
can see this one split, this one, y to split it, and finally, this
one, y to split it. From here, then I can
actually come in, grab them all, press,
Smart UV project. You can just unwrap them, by the way, they're
just planes as well. We can do it that way. And then all we're going to
do now is grab them. Grab a wall here,
press controller L, and link materials,
and there you go. Now, we do have a
problem in these two. So I think probably with these two going all the way
down. You know what? I think we'll also add
this wall in here as well. So what I'm going to do is,
I'm just going to come in. I'll grab this wall as well. I'm going to press P selection. And then what I'm
going to do now is I'm probably going to have to
unwrap all of these together. And the easiest way to
do that now because we've split them up is another
trick that I'll show you. So if I join these now to this, so control, J, join
them together, you will see when I come in
now and pull this one out, it's split, this one, split, and they're all split. So we need to kind of
unwrap these together. So what I'm going to do is
grab all three of them. I'm going to press Control
three to go into front view. And what I'm going to do
instead is, I'm going to press. Come down to where it
says, project front view, and then you'll see now we've unwrap them, and
they're all nice and neat. Except this one
because it hasn't got the same material as these. So all I'm going
to do is just come on in through my material. Down here, and I'm going to take off my ambient occlusion, minus it off in object
mode, so minus it off. And there you go, you've got a really nice, beautiful wall. Alright, so that was
really easy on the wall. We just have to make sure
that this part is hidden. Let's press altage, bring back my tower, and there you go, you can see now it's all nice and id and the walls
all opened up. Finally, then, before
we check this, let's do one more
thing, so we'll hide this tower out
the way once more. Hide both of these
roof parts out the way once more,
grab the roof. And what I'm going
to do is put these, of course, in my roof. I'm going to press M. Make
sure that they're in roofs. So this roofs here. And then
I'm going to press tab, A, Smart UV project click, okay? And then all I'm going to do
is change the material over now for my actual wood. So it'll be I think it's planks. Yeah, that's the one it is. And now I'll take
bring back everything. And there we go. We should be now up to date with everything. If I put it on rendered view, now we can have a look
round and now you can see exactly what it's
going to look like. You can see here we've
got kind of a gap here. And we've got a gap here, but they're going to be
filled up by windows. You can see my
first window here. If I bring in my bridge now, you're going to get a really
good idea of how it's starting to really come
together. You can see in there. Once we've put the windows in, I think we'll put some
lighting coming through there. And you can see, even
if I look through here, just how nice that's
actually going to look, especially when it's got
some lighting in there. Moving around them to the
other side, you can see, now we're starting to really motor along with
getting this going. You can see just
how easy as well, it is to put it all together once you've got the
parts in place. Alright, so now we've got that. Let's go back to
object to object mode. We'll do that. In fact, we can't go to object. Mode,
you know, why? Because we actually need this to actually
create something. So now what I'm going to do is I'm going to
leave that there. I'm going to press Shift D.
I'm going to pull it out, and we're going to make a
start on our actual windows. Now, I recommend
when you're doing this, save out your work before. And I also recommend that
you start all the way over here just so you haven't
goal this kind of, you know, stuff in the way. You could go in and
hide all of this out. You can hide it all out and just keep this, but
I don't want to. I just want to
pull it over here, and then I'm going
to press Shift and S cursor to selected. If I then zoom in with
a little dot born, So let's now create
our actual window. I think the best
thing we can do is start with this top
band over here. So let's press one.
Let's press Shift A, and let's go into. In fact, you know what?
Before we do that. I'll show you one more thing.
If we go into wireframe, it means that this whole
thing actually disappears. So there is another option to actually stop that happening. What I'm going to do is I'm going to show you the other way. So I'm going to press Shift A. Come down and bring
in you can bring in, where is it image
reference image. So let's bring in
a reference image. Let's go to them, our doors and window references and let's
bring in the same image. So we're going to bring
in the same image. We're going to put
that over there. And now you'll see if
we're going wireframe, we can still see
what we're doing. So basically, we use these
images planes to like I showed you where you can put
them over the top of something and really
see what you're doing. But the reference image is much, much better to use if you actually want to create
something from this reference. Now, let's put them onto
material. Let's grab this one. And what I want to do is
I want to bring it down then to be round about
the same size as this, which it is, and then I can just delete this
one out the way. Now, what that enables
me to do is work with this even in object
mode like so. But if I now press Shift S, cursor selected, Shift A, I'm going to bring
in then I think we'll start with a cube. So let's start with a cube. Let's press the S button. And all I'm going to do then
is just line that up into the center or roughly into the center of here,
and then bring it up. And from there, then, I'm
going to press Shift S, urster selected, and now everything is going to be
based from this center point. Alright, from there,
then, let's pull it out. So what we're going
to do is going to press S and X, pull it out. And you will see now, I've
pulled it out to there. If I put wire frame on, I can still actually
see everything, which makes it
much, much easier. Let's press S and Ed then, make it a little bit thinner. And then all I'm going
to do now is press tab, press control, bring
in some edge loop. So left click, right click. And then what I'm going to do
is lift up this center one. So I'm going to lift
up this center one. So shift and click, put proportional editing on,
and then just pull it up. So, pull it out,
maybe a little bit. And then I'll grab
the whole thing. Like so, and then
pull it all down. And you can see, roughly, roughly, we're right
about in the right place. Let's do one more pull
portion of it to. Like, so. Let's make
it a little little bit thinner as well without
proportionality on. So turn this off. So S and Z. And there you go, you can see, we're
just about there. I'm pretty happy with
how that looks anyway. Alright, so now we've got that. Let's put it on object mode. And now I'm going to do
is I'm going to press Shift A. I'm going
to bring in a cube. So let's bring in a cube. And then I'm going to
make this smaller, bring it into place like
so. Press the S button. And then what I'm going
to do is pull this out. So S and X. Pull it out like so. Alright. And then we're
on to the next part. So I want to create
these parts now, so I'm going to press Shift
A. Cube, make it smaller. As long as you keep this in
place, it's really easy. So let's pull it into place. And remember that these a lot of the time when
you're getting references, they aren't like straight on. You can see here it's
not straight on really. So just take that into account whenever you're
building everything. What I want to do with
this is, for instance, I want to bring it up, first of all, to be
the right height. So bring it up. To the
top of here, like so. And then what I want to do is I want to pull it out slightly. So grab the bottom of it, press Sinex, pull it out. But then what I want to
do is I also want to pull this part out a lot
more than that part. So I'm just going to come in. I'm going to grab this,
pull it out, like so. And there you go. That's what
I'm actually looking for. Now what I want to
do is I want to put another cube right in
the center of here. Now, the thing is we're going to lose where we actually
put our cursor, but we can put it back
there. That's no problem. So what I'm going to do
is I'm going to come in. I'm going to grab
the top of here. I'm going to press,
You know what? We don't actually
need to do that. Instead of doing that,
we'll just press shift. We'll press the S
button to pull it in, and then all I'll do, I'll
press and pull this out. Now, what I want
to do is, I want to keep this
relatively straight, but I want to bend
these parts in. So what I'm going to do is I'm
going to press controller. Bring in a few edge loops. Left click, right click. Press one on the number pad, and then let's have a
look how these bend in. So if I go to y
frame, we can see that these bend in nice
and straight here. And I can actually
come in and copy that, so I can just come
in, press one. And this is a
really, really good exercise to work
with references. So if I bring this into here and then bring my
next one into here, let's say, Like so. And then bring this final one. So this final bottom one. I'll press one into here, and then I'll whip my way up, bring this one into here. And then finally bring this
one into here, like so. Now, on the other
windows, I think we won't follow the
reference so closely, and we'll actually try creating them without the
actual reference because I think then
you'll get both of the skills that
you actually need. Alright, so what I'm going to do is going to save up my file, and I'll see you on the
next one, everyone. Thanks a lot. Bye bye.
44. Styling Windows with Custom Textures: M. Well, come back, everyone to Blender por Muddling
and John Chino workshop, and this is where we left off. Alright. So now,
let's think about these parts here and these
parts going across there. But before we do that, what we really want to
do is actually have a look and make sure what we're looking at first
looks pretty nice. I think actually it's
all looking really good. Maybe maybe this is a little bit too far stuck
out at the moment. So what I'm going to
do is just press S and y and pull it
back a bit, so. But I think the rest of it
is looking pretty nice. Alright, so what I want to do
now is grab both of these. The both already
together, so that's good. Let's reset all the
transforms, first of all. Right click the origin to three Dcursor add in a modify and we're going
to generate a mirror. So generate a mirror.
Scontraight over that side. That's absolutely
fine. Now I want to think about is
these parts here now. So let's start with those. So what I'm going to do
is I'm going to press Shift A. I'm going
to bring in a cube. I'm going to make it much,
much smaller like so. And then what I'm going to do is I'm gonna drop that into place. Now, you can see we've
got these chunky bits kind of going over the top. We need to over to
be smaller, though. So I'm just going to press
one on a number pad. I'm going to press the S born it right about into
place like so. And then what I'm
going to do is I'm going to place it
somewhere in the middle. And then we're going
to press N's head and pull it out into place, making sure that it
goes in there like so. Maybe S a little bit
more. And there we go. All right, from here
then, I want to make sure that these are relatively thick coming out just
backwards from there. So these are supposed
to be further in front. So roundabout here
is absolutely fine. And then what I
want to do now is I want to press tab control, bring in some edge loop. So left click, right, click. Grab that center one then, and then I want to
bring them in slightly. So I'm going to put
parocial editing on again. I'm going to press one, to
make sure in front view, press S and then bring them in. Like so, and you can see that
looks really, really nice. Now I want to do is I want
to mirror it over this side. So I'm going to grab this one. I'm going to then
join it to these, so control J, join it
together, and there we go. That's that part done.
And now I'm going to do is I'm actually
going to grab this part. So I'm going to press L. I'm
going to press Shift D then. I'm going to move it
over here slightly. Now, you're going
to have a problem with the mirror being on. But what I want to do
is press P selection and just take that off. And then what I'm
going to do is come back to this one and
remove my mirror. So remove my mirror. And then
what I'm going to do is, I want this right in the
center base of this one. So all I'm going to
do is press Shift S, selections cursor, but
it's not going to work. And the reason it's
not going to work is because my orientation
is already there. So first of all, I want to
set origin to geometry. And then from there, I
want to press Shift S and selections cursor. And now I want to do is bring
it down, rotate it round. So ry 90, like so, put it into place wherever
it's going to go, and then I'm just
going to simply press S and X and
pull that one out. And there you go, that's the
second part D. Then what I'm going to do is
just place this in the right place
because at the moment, it's a little bit
too close to these, so I'm as going to
come in like so. And then what I'm going to do is press Shift and
D, bring it down, press one on the number pad, and then just put it into
place where I want it like so. Let's bring this one down, as to Tad, like so, and then we go
unhappy with those. Okay, so now what we need
is these parts here. If you look at the reference. So if I just press wi frame, you can see on the
reference, we've got some little knobby bits
on this part here. Let's actually do those now, so we'll go back to object mode. You can see if I come to
these that this one here, for instance, it needs to have a couple more edge loops
going in there and here. Or we can actually just
bring in, you know, a cube. I think just bringing
in a cube is going to be much, much
easier to be honest. What I'm going to do is,
I'm just going to press s shift A, bring in a cube. We can also as well come down. Instead of bringing
in cubes that are 2 meters big, just
bring this down, and then every time we reopen blender again, this will reset. But every time now
we bring in a cubes. If I bring this down,
bring in another cube, you'll see it's
exactly that size now. So it's just a little bit
easier to work with those. Alright, so what
I'm going to do is press one and the
number p again. I'm going to press the S bottom. I'm going to then pull
this one into place, so I want it right in
place round about there. Maybe a little bit smaller.
Pull it into place. And then all I'm going to do is just pop that out of there. I'm going to press
S and y. Like so. Get it into the place
where you want it, and then all you're
going to do now is maybe a little
bit thinner as well. So S and was make it
a little bit thinner, and then all I'm going to
do now is bring it out. Press, first of all, to insert it, to bring it out, and then S to make it a little bit smaller,
and there you go. That's as simple
as that as well. Now, let's press one, and what we're going to
do is press shift. Bring it down into
place, like so. And finally, then just
grab all of these and join them to your mirror. So not this one, we want
to join them to here. So press Control J, and then it's just going to mirror
them over, like so. All right. So that's the
hard bit really done. Maybe except if we
look on the y frame, we might as well, I think, we'll do these parts next, and then we'll come
to these parts, which they look difficult, but actually, they're
really, really easy. So let's do these parts first. So I'm going to go in, I'll keep it on ire
frame, actually. I'll press Shift A. I'll bring in a cube. Let's pull it over,
and let's just make it the right
sort of scale first. So S, bring it in. And then S and say, pull it up. To something like that, and now we'll go back into object mode. And what I obviously want to do is I want to make sure that this is coming all
the way out here. So S and y, pull it all the
way out, like so. And then the top of
this, I want to grab it and pull it up. So all I'm going to
do is press control. Left click, right click. Grab the top of there, pull
it up into place, like so. There you go.
Really, really easy. Now, let's put this
over the other side. So again, can just
join it to these, so Control J, join it to there. And there we go. Alright, now we need to think about
our actual window. So what I want to do
is I want to actually create this part, as
you can see here. I want to create this style of what's it called
lead windows, if that's what you
want to call them. So all I'm going to do is I'm going to first of all,
bring in a plane. So mesh plane spin it round. So x 90, spin it round. Let's make it smaller then,
so it fits into place. Let's press one on
the pad as well. So S, bring it into
place and then S and Z. We don't need it
perfectly because we can actually pull these out
a little bit as well. So something like this, I
think is going to work for us. And then I'm just
going to pull it out just in front of
my windows like so. Now, this is then going
to be the kind of, you know, the glass that's
going to go behind you. This is just simple glass that we're going to put in here, so we don't need to
worry about, you know, creating unwrapping it with all other lead and
things like that. We could do that.
But at the moment, you could just have it as this glass just being behind it. Now I'm going to do now I've got that is I'll
make another one, so I'll press shift,
and I'll bring it out, and I'll show you how
we're going to do this. So at the moment, you will
see if I come in and I try and come to face,
and poke faces. You'll see we end up with
something like this, which actually makes it really easy to
create lead windows. If I press one now on here, put it into wire frame. You can see already we've got this band going across here. Now, we don't
obviously want that. What we want to do is
create more of those. So I'm just going to
press control d a minute and just get
that off, so Controls. Let's take it off. Let's
press control then. Two, left click,
right click Control, two, left click, right click. And now if I come in
and grab all of that, come to face and poke faces. Now you'll see that we're
actually getting somewhere. You can see though, there's too much there's not
enough lead in here, which means that we need
to actually double it up. So first of all,
before doing that, we'll just press
control lead again. We'll pull these out
into place then, so you can see here these
into play, S and X. Let's put it on medium point. So, S and X, pull them
out into place, like so. We'll also do the same
thing with these as well. So you can see, this
one's lined up perfectly. This one's not, so I'm
going to pull that up. And then what I want to do now is bring in other edge loop. So Control, left click,
right click, Concho, left click, right click, Concho,
left click, right click. And now you'll see if I come in, grab them all. Same thing again. Face hope faces. Now you can see we're
starting to get somewhere. Albeit, we have an
actual line down there, but don't worry about
that because we're actually going to
fix that as well, because what we're going to
do is we're probably going to level these parts instead. Or we could just actually
use these parts and then move them over to the different windows.
That also works. But you can see at
the moment, what we've got is we've
got some really, really nice leading already. You can see this leading
going across there, this leading coming down here, and you can see it's fitting
pretty nicely at the moment. I would say that we might need another one in
the middle of here. So let's press Control head. Let's press Control, left click, right click, and let's
try that once more. So let's go to face, poke faces, and there you go, now you can see that
we've actually got it pretty much how
the original was. Alright. So now what we want to do is we want to
actually turn this. So this art here into. You can also see that we do probably have a slight problem with these being a bit thinner. Let's just go back
before putting that in. Let's press tab, Control or transform trip clicks
at origin geometry. And let's go back in instead of bringing in two,
we'll bring in three. So l shift click Shift click. Delete dissolve edges,
Control art one, two, three, left click, right click, and there we go. Let's give this a try now. So face, poke faces. And I think now if we
go and look press one, you can see now that
it's pretty much the same as what we
have on the other one. And that is how we actually
created this effect. Now what we want to do is we
want to actually level these or at least take them out of here so that we can actually
create this leading in here. So the way that I'm
going to do it is, I'm going to come in,
go to object mode. And if I press, you can see
we start bringing them in, but if we press again, you can see now that
we can actually start, bringing them in, like so. Now, the problem we've
got here is we've got a lot of center
points on here. So before doing that, what we want to do is get
rid of these first. So l shift click, we want to go to all of these and kind of delete
them out the way. So these center points,
we don't really want them in, and we're
going to delete them. So if I come to these, press
delete, dissolve edges. You can see now we can
get rid of all of those. Same for all of these.
L so and delete edges. And there you go. That's
what you're left with. And now if you press A,
press the eye button, press the eye button again, you'll see now that
we've actually got that lead that we're
actually looking for. From there, then
what we can do is we can actually delete
all of these, so I can press delete and
faces, and there we go. Now, if I pull these out now, you'll see that they all
fit in place beautifully. Now, we don't need
the outside of these, so we might as well
get rid of those. So all I'm going
to do is just come in and get rid of
all the outside. I think if we come in and
press control, can we do that? No, we can't. So we just
have to go down them. Like so just select
the boundaries. And then from there,
we'll actually create these windows for us, so delete and faces. And then all I'm going to do is press A and then grab them all, pull them out. Like so. And let's pull them
into place now. So we'll pull them into place. We want them, double tap the A. And there you go, There
are your lead windows as easy as that. Okay, so I'm happy
with how they look. I'm happy with the other part. I'm just actually looking now on my reference on my
references here. I've got pretty much
everything on except these planks of wood and
these hinges, of course. I'm just now before finishing. I think I'm going to
bring in my materials. We do have a window
wood here as well. Now, the last thing
I want to show you just before finishing, if you don't like the
thickness of these, what you can also
do is just come in, press A to grab everything
very, very slowly, then, press AlternHld
in the shift born you can actually bring them
in a little bit like so. Just make sure that
you pull them back. Into where the window
actually starts. So, something like that, and you'll see now that
they're actually a bit thinner and a bit pointier on the ends
of them like that. And I think actually, I
like them better like this. Alright, so what we'll do now is we'll actually
save out our work. And on the next
lesson is then we'll get all of the
materials onto here. And then what we'll do is we'll create these shutters as well. Alright, everyone, so I
hope you enjoyed that. I'll see on the next one.
Thanks a lot. Bye bye.
45. Texture Application Techniques for Windows: Welcome back everyone to
blend of fall modeling and Jump you know workshop,
and this is where we left. Alright, so now,
let's first of all, come in, and what I want to do now is give this some material. So all I'm going to
do, first of all, is we've got the
materials on here, so we should have three
materials on here. So what I'll do is I'll
come to this one first. In fact, you know
what? Before we do anything, Let's
supply everything. So all I'm going
to do, I'm going to grab all of these parts, all of these parts here,
all of these parts here. I'm not going to be grabbing the lead or
the actual glass. I just want to make sure
that when I press G, that's all we've got left. So just this part here. And then what I'm going to do is I'm going to go to object, convert mesh like so, and now I'm going
to press Control J and join them all
together like so. From there, then
what I'm going to do, I'm going to put it onto. Object mode just
for the time being, and then I'm going to go to add modifier, generate a bevel. And you can see here we've
got some problems in. It's not actually
allowing the bevel. So what I want to
do is I want to come down to geometry again, clamp overlap on and then put this at at point Naught three. Now, it could be the
case that it's not beveling because I just need
to reset all the transforms, so reset all the transforms, right click the origin geometry. And let's turn that off and
see now it actually works. So you can see now we've got
an amazing bevel on there. We can also at this point, just pull this back out the way. We're not going to need that
at the moment so much there. And you can see now this is
what our window looks like. You can also see that
we need to come in, right click shade smooth. And there we go, we've got our
bevel on or smoothness on, and now we can actually
start adding material. So what I'm going to do is I'm going to come over to
my material panel. And the one we want is
going to be planks. It's going to be
planks, planks two, I think it's called
or Window Wood. So I don't think we've actually
got window wood on here. So I'm going to
click Plus on here. I'm going to go over
to my asset manager. And then what I'm going
to do is I'm going to open that up and you
can see, not great on. So let's come to put it back on. So preferences, file
paths, plus little down. We're looking for
course, resource pack and it's this
one here, like so. Close that down. Bring it in, and there we go, There's
all my materials. Now, the one we're looking
for is this window wood. So let's press dot
to zoom to it. And we're gonna add
in our window wood. We haven't run
wrapped anything yet, so don't worry if it
looks a bit crazy. And now we want to do
is we need iron Dark. So I'm going to click
the plus button. I'm going to look, first of all to see if we've got iron dark. And then I'm going
to look on here. This is the dot. We've not
used it on anything yet. So let's actually drag
that across onto here. Then we've got the window glass. So plus, bring in
the window glass. So, and they are the three materials that we
should be using. Alright, so now, let's
come to this part here. I'm going to grab all of this. So all of this, press,
Smart UV project. Click Okay. And there we go, this, the actual windows. Then what I'm going to do
is come to each of these. So I'm going to grab each of these front parts and then just click Control plus
to go all the way back. In Dark, click a sign. I'm going to grab these
parts then with L and L. In Dark, click a sign. And there we go.
Now we're starting to really get somewhere,
as you can see. Now, the final parts, we're going to need
the leading on here. So let's come to the
leading and then A, and I'm just going to press
Smart U V project, click. Little down arrow, and we're looking for on Dark.
Click that on. Double tap the A,
and there we go. And now finally, the glass. So click the down arrow. We're looking for glass lit. There we go, and you can see, that's not going
to work like that. Let's actually sort this out. I'm going to actually
come into here. I'm going to press
control, and what I want to do is bring
in a few edge loops, just to split this off a little bit because it's
going to make it so that We can unwrap
it a little bit easier. So let's come in and
put on our x ray, and then I'm going to press tab. Control, left click, right, click Control B, bring that out, and then control Left click, right click Control
B, bring that out, and then just finally
move this one. So just this one
up a little bit. So shifts base bar,
move it up into place. Now finally, what I can
do is I can press U, and I can click Smart
UV project, click Okay. And now, nothing really happens, but you'll see
when we go over to the UV mapping that we have
all of these blocks now, which makes it much,
much easier to unwrap. So what do I mean by that. If I grab it all now. So if I grab it all, like so. So let's go in on face leg, press A to grab it all. I can then actually see now
all of these and grab all of these and press the S p on and make them smaller. Like so. And then what I can
do is I can come to each one individually, like so, and just drop them in
the middle of here, making some dirt some
dirt on the edges. Like so. Like so. And you're really not
going to see this, so don't worry too much about, you know, the actual
dirt or anything. It just wants to make sure that the pans look a little bit
different from each other. That's all I'm
trying to do there. All right. So that's
the actual main window. Now, the moment of truth, then, let's go back to modeling. And then what we're going
to do is go to render view, and let's have a look
what they look like, and there you can see how
nice that actually looks. So I hope you're really happy
with those. I think I am. And what I'm going to do now is I can join it all together. Now, that, of course, means, that I'll have to apply
my modifiers on here, so the bevel, because we don't want to add a bevel on here. It's wasted topology. It's too much topology for what it is, so
there's no point in that. So all I'm going to do
is just press control A and then grab my lead. You know what? I'm not
going to do that yet. I'm not actually
going to do that yet. I'm not even going to
apply the bevel on. And the reason is because I want to create the
other windows, and I might want
to use this lead in my other windows or
any of these other parts, so I'm not actually going
to do that right now. I'll join them
together at the end. Now, what we want to do
now is that we want to actually create these
actual doors on here, and we want to
create the hinges. So if I press one
on the number pad, let's put it back
onto material view. No, let's put it back
onto wire frame, and now let's press tab. Double tap the eight, and now I can actually start
on these hinges. So I'm going to
press shift eight. I'm going to bring in a cube. I'm going to bring it over,
bring it into place then. Let's make it a
little bit smaller, like so, and then let's grab it. And I'm going to
bring it a little bit smaller now on the outside. So I've just grabbed it going around the outside, like so, and then I'm going to press
alterns and bring it in, like so and place
it where I want it. Like, so, press S and Z. There we go. Now, let's deal
with the top parts first. So all I'm going to do is I'm going to grab the top parts, grab this part, press one. I'm going to make sure I'm on medium point E S and Z and
then S to pull them in. Now, you can see as I
pull them in with just S, they're kind of coming
down to the center. We don't want that, so we want
it on individual origins. Then press the S born,
and there you go. Now let's bring in a
couple of edge loops. So Control two, left
click, right click. Control B for Beverly in, so. And then all you're
going to do now. If you first of all, bring it out, and go back to it. Press Enter. And instead of pressing S, you're going to press tes, and you should be able then
to bring it in, like so. And there you go. Simple
as that to make a hinge. All we want to do now
is level this off. So control A, all transforms, set origin to geometry, add in a bevel, so generate a bevel. And there you go,
that's your hinge. Now, if I pull this into place, so if I pull this into place, like so, I'm going to pull
it down a little bit. I don't quite want it
there. If I press one, put it onto wire frame. You can see this
is where mine is, but this obviously
comes out a lot more. So I think I'm just going to
pull it over a little bit, like so and then I'm
going to press Shift and D. Pull it down
into place like so. Now what we need is
these parts here, so we need, kind of the bits
that I'm going to open up. So again, I'll come
to object mode. And I don't really need my
reference at this point so much because I can do pretty
much all of this on my own. So what I'm going to do now
is just bring in a plane. So I'm going to press Shift A. And this is how I do it. It's up to you how
you're going to do it. So rx 90. Oops. Let's try that again, R x, 90, and let's
bring it into place. So S bring it into place. Now, I'm just going to bring it first of all,
to the right height. So in other words, it
needs to be roundabout, it needs to cover the
window, basically. It doesn't matter
if it's a little bit out at the top or whatever. I just needs to make sure
this window is covered. The other thing when
you're thinking about creating parts like this is it needs to come to the halfway point because the window shutters
are going to shut. So if they're short,
it means that it needs to shut not over
the top of each other. So I always tend to
do this part first, where I'm just kind of measuring it out to where they're
going to go to. Now, the thing is with
windowshutter is, you are going to end
up with a piece of wood here and here, and I'll show you why
that is in a minute. But as long as you've
got the right scale now, you can work with that. Alright, so from here, What I'm going to do now is
I'm going to grab this part, and I'm going to
rotate it round. So I'm going to put
this part here, jaws to here, like so. And then what I'm going to do
now is rotate it all round, and I want to rotate it
realistically round from here. So what I'm going to do is press Shift de, cursor selected, tab control A or transforms, right click Set origin,
three D cursor. And from now, I should be
able to press art and Z and rotate it round from
there, as you can see. And now you can
see it's actually opening up in the right place. Now, before I do that, I'm just going to put
it back a minute. I want to actually add in some
planks of wood going over here and actually
create what I'm actually kind of making here. What I'm going to do is
I'm going to come in, and I'm going to put in, I think we'll have one going
across here. So control. Left click, bring it
up, and then control. Left click, bring it down. For press one, you can see roughly roughly the
right in the center. From there, then
I'll grab them both. Control B, bring them out. Just So they're a little bit
smaller than the hinges. And then what I'm going to
do is I'm going to press Y. No, not y. I'll press
Shift D. So I'll press Shift D and pull these
out a little bit like so. From there, then we're
going to expand them. So S and X, pull
them out, like so, and then we're
going to press and pull them into place like so. Now, you can see they're going to have to come out a little bit more 'cause they've
gone through there, and we don't really want that. So let's pull them out
to let's say here. Let's then hide those
out of the way. And let's come
back to this part. All I'm going to do
is Is press delete, let me to dissolve, and then I one maybe three or
four planks in here. So control one, two, Let's Let's have
four planks in here, so left click, right click
four planks in there. And then we'll finish this on the next lesson, 'cause
we're running out of time. All right, everyone. So
let's save that our work, and I'll see you on the next
one. Thanks a lot. Bye bye.
46. Variations in Window Modeling: Welcome back and on to
Blend four Modeling and John Chind workshop, and
this is where we left off. Now, before we do
anything with these, what we want to do is right click and we're going
to mark a scene. And then what we're going
to do is going to press Control and add in a few
edge loops going down here. Left click, right
click, and there we go. Now, the reason I'm
doing these is to get some variations
within these wood. So what I'm going to do now
is actually split these up. So if I press L
on here, on here, press the y button, and then what I can do
is I can press A. Come in and make sure this
sound of individual origins, press S and X and pull
those out like so. And finally, then, what I'm
going to do is I'm now going to use my randomize to
randomize these a little bit. So if I come in now
where is it face, come down to where
it says, in fact, not face, mesh,
transform and randomize. There we go. Let's turn this
all the way down to 0.1. And now we can see we've got
some variations in the wood, and they're looking pretty nice. Now, let's pull these out. So if I press now and pull those out to get some
chunkiness to them, And then finally,
you can see now, we don't even have to
do anything with them. You can see they're
already done pretty much. The one thing we
do need to do is right click and shade smooth. So shades move,
and there you go. Simple as that, guys. You can see though we do have to come in and just
pull these bits out. So H let's come in, pull these bits out a
little bit, like so. We might need to make those
a little bit thinner, but for now they're
looking pretty good. We've also got our
rotation on here as well. So let's press art and
Z and rotate those out. And then you can see, we do have a little bit of a
problem in that. We need to pull them into
the hinges now, like so. So we into the hinges. There we go. There we
go. As simple as that. Okay, so now, let's first
of all, bevel these over. So Control A all transforms. Let's come over add in a bevel. Let's turn it down to not 0.3, like so 0.3, like so. And now we just want to mirror
them over the other side. So we need to mirror everything
over the other side. We've got a bevel on here, which is not 0.1, and we've got a bevel on
here, which is not 0.3. So let's first of all, see if we've got materials on here, I
don't think we have. So let this load up. Let's
come to this one and this one. Join them both together
with Control J. Press the tab button A. And then what we're
going to do is Smart UV project click. And I'm going to now
join this with this. So the materials
from here to here. So control L link materials,
come back for these then, and instead of it
being that material, we want to press
tab, and we want to put an iron doc and there we go. And last of, we want to
make sure that these are smooth shaded
smooth, like so. And finally, then we need
to do the wood as well. Join them all together,
so we can join this one. You'll see we've still
got the bevel on here. So we need to mirror that over there and then find this
one mirror over there. Let's first of all,
grab this and this, press Control L, link materials. Let's come back to
this then, press tab, A U, Smart UV project. Click Okay. And there we go. There is the correct
material on there as well. Okay, so now, let's mirror
them over this side. And the way we're
going to do that is first of all, come
to this part here. So right at the center here, shift desk selected,
back to this one then. And what I'm going
to do now is right click to origin to
three D cursor. Right clicks the origin
to three D cursor. Adding a modifier, and we're
going to generate a mirror. That's that one.
Adding a modifier, generate a mirror,
and that's that one. And there you go.
Now what we can do is we can actually
I think with these, we can actually come
in, grab all of them, come up to object, come
down and convert to mesh. Like so. All right. The one thing that I'm not happy with is we need to
actually unwrap these again because
you can see here these are looking to
similar to each of these, and we really don't want that. So now we can actually before
join them all together, we've added in all
of the modifiers, so I can just come to this one
now, press the tab button. So just this one. Let
me just have a look sf. Yeah, they're just
all joined together, so we can come in, select them all
separately. Like so. Come over to our
UV map UV editing, grab them, press A, and then just G and move
them, and there you go. Now they look different
from each other. Okay, so let's go back
to modeling once more. And finally, let's see what they're going to look
like on our rendered view. And there you go. They
look pretty good, right? All right. So that's the
first window actually done. So what we're going to
do now is go to object, we're going to go to file.
We're going to save it out. And now I think from here, you can actually come in and
you can change this image. So you see where it says Window five here, click
the plus button, and instead of it
being Window five, we can bring in Window three and just change it over like so. Now, this window is near enough, the same as this window. Apart from this window has obviously been stretched
out a little bit. So we might be able to use
a lot of the parts from this one to make this
kind of smaller window. And also, because we
brought it in like that, and we're going to
actually have to make it a little bit
smaller as well. So let's get it to the
right scale that we want it roughly around
the same ens here. But a lot of these parts from this window, we can
now use on this one. So what I'm going to do now is I'm going to come to this one, and I'm going to grab
the parts that I want. I'm going to come over
Another reason why I didn't want to apply
the bevel yet, as well. So L on here, L on this, L on this, L on this part, L on this part, L on this part, and L on the bottom. And there we go,
Let's press Shift D, bring them over
just over to here. You can see I've not
bought the wires in the wire frame leading
or anything like that, and yet, I'm just going
to fix this part here. I'm going to press
P then, selection. And now I'm going to do is put these into place. So
I'm going to come in. I'm going to grab this one and this one and this one, this one. Fist. So I'm going to pull
those into place first. And as you can see,
We're a mile out, but you can see some of it is actually fitting into place. Let's now grab this
part first, then. So L S and X, pull it into place. Like so. And what do you
know? It's kind of fitting into place,
isn't it, you know? So let's pull those into
place let's have a look. I think they'll be
absolutely fine, actually. I'm just going to grab this one, press N's head, pull
it up a little bit. Like so. Let's grab
this one then. So L, S, X, pull that one into place. Like so. And then it's
like it was meant to be. It's like I did this
before and just, you know, did exactly
the same thing. That's exactly what
I did actually. So what I'm going to do
now is just grab this one, Shift S, cursor selected. And then what I'm going
to do is split this off, this off, and press P selection. Grab both of these control A. A transforms, set origin, three D cursor, and
add in A, modifier. So add modifier. It's going to be a mirror. Put
it over that side. Alright, now, let's
work on these parts. So I'm going to grab tab,
I'm going to grab this one, this one and this one, and then I'm going
to press shiftiness and selection to cursor. And then what I'm going
to do is pull these down into the rough place where they need to go. So
something like that. I can see that this
needs pulling back. So I'm going to pull it all
back into place like so. And then finally, what
I'm going to do is I'm going to pull this part. So this part down a little bit. So I'm going to
press one. And I'm going to actually
look where it goes through. So it goes
through to there. So I'm actually thinking
instead of doing that, I can just pull all of it
down into place like so. So, look, Yeah, and you can see we're a
little bit out though. So js gonna pull it to the side. Like, so. And now we've
got just this one here. So we've got 2 bars in here. So I'm just going to press L. I'm going to press
one on the number pad. I'm going to pull
that into place, and then I'm going to press
S and X, pull it into place. Pull it up, so it all fits nicely together,
so you can see here, it wants to fit in this
place here. Like so. And then what you
want to do is press Shift and do exactly
the same thing. Pull that one into place, and finally then grab
this part, L, Shift D. Pull this part into place. Like so. All right. There we go. That's the main
part of the window, D Now, let's come
to the leading. So I'm going to press sir shift. I'm going to bring it over.
And I'm going to look at what this actual leading looks like or where we
actually want it. So if I pull it over to here, you can see that from there, this actually looks pretty good. So this kind of all fits into place really,
really nicely. It's a little bit
off on this part, but we can sort that out
by just lifting it up. A little bit and maybe
stretching it a little bit. So Essence let's pull it into
place and then pull it up. And there you go, you can see
it all fits into place now. Let's put it this way a
little tiny bit more. It's just this bit now that we need to make
sure it's in place. But I think from this, it's looking pretty good. Now what we want to do is
we just want to come in and we want to come in and
actually delete all of these. Like so. Like so. Like so. Press delete, delete
and vertices. We don't want delete verts. Actually, we want
to delete faces, delete faces. There we go. And now let's see if
we can grab all of this, delete and faces. Now, let's come into this one. Control A or transoms clicks
the Origin three D cursor. Add in the modifier. We're
going to generate a mirror. Double tap the A. There
you go. Simple as that. Alright, now let's
come to our windows. Zachla same thing. If I
press Shift, bring it over. Put it into place
wherever I want it. Let's put it into place there. S and Z, pull it up a
little bit, like so. And then all I'm going to do
is just delete these parts, so delete and faces. And now let's have
a look what that looks like on the material. So we can see this center part just needs pulling this way. Alt Shift and click. Pull it into the center. So, double tap the
A, and there we go. Now, is there anything I've missed on here?
Let's have a look. I don't think so. So the one
thing we can see though is, we've got a lot of variations. Not many variations in the wood. So what we'll do
on the next lesson is we can also see I
don't like these pits. We're exactly the
same down here, so I'm going to re
wrap these parts, and then I'm going to unwrap these parts as well.
Alright, everyone. So again, I'm going
to save my work out, and that's the second window
pretty much nearly done. All right every one.
I'll speak to the next one. Thanks a lot. Bye bye.
47. Circular Window Design and Modeling: We'll come back
everyone to plan for modeling and Join workshop, and this way left it off. Alright, so let's come in first of all and sort this part out. So I'm Jos going to come in, grab this part, and
I'm going to press. In fact, I'm not
going to do that. I'm going to go over to U V in. And instead of doing that, I'm going to move this
up a little bit. Just get rid of those kind
of circular bits on there. And then what I'm
going to do is I'm going to come to this one here. And I think I'm going to
unwrap all of this again. So I'm just going to press A. And then Smart UV
project, click OK, Unwrap all of those like so, and I think that's actually
looking a little bit bare. Then we'll do the same
on these as well. So you can see there's a
mirror attached to these. So let's press control A. Then let's grab them
all, Smart UV project. Click K, and there we go. I think I'm going to
grab these and make them just a little
bit smaller as well, like so on the UV map. I can see that these two
are very similar still, so I'm just going to grab them, press G, move them down
away from each other. And there we go. Now
you can see that that is looking much,
much better now. So they're looking very, very different from each other.
Nothing is the same. Alright, from there, then, let's come back then to modeling. And now we're going to do is
bring in the next window. So we might as well,
have a look and finish these windows because the other windows are
actually easier. So I I come over to here. Let's go to open up our window, and you can see
that we have one, two, three different
windows to do. Let's start with something a little bit different just
to break it up a little bit. You can see also
we've got four doors, and we've got three kind
of lights to do as well. So let's do the
windows first, though. So we'll do this window here. Let's again, move it
over to the side. And as you can see
this window is pretty easy to make in comparison to the things we've
already done. So we're going to make
short work of this. I'm absolutely sure of that. So what I'm going to
do is just press one, I'm going to shrink
it down again because they always come in a little
bit bigger than we need. So something like this,
the things going to be round about the right size.
Then all I'm going to do. I'm just going to grab
the center of it roughly, so place my mouth over there, shift right click,
and now we can start. Let's first of all, then
bring in a cylinder. So we're going to
bring in a cylinder. We're going to spin
it round, so y, sorry, R x 90, spin it round, make it smaller, and then I'm just
going to get it to be round about the same
on the sides of here, and then Essence pull it out to the kind of size
that I actually want to. From there, then, what I'm
going to do is I'm going to try and make it the same
thickness as these windows here. So I'm gonna press S and y. Bring it in. Oh, S and Y. So. And the reason we're making these windows
so thick, by the way, is when you put them
against the wall, you don't actually want to be hiding the glass or
anything like that. So you can see we've
got a lot of, you know, depth to this to actually
put it against the wall, and that's what we're
trying to do with this. All right, next of all,
what we want to do is we want to bring
in a new add on, and this one's going to
be called loop tools. So if I come up to
edit preferences, add ons, I'm looking for loop. So loop tools, this
one here, click it on. And what this
enables me to do now is I can come in and
basically grab this. So I'm going to come in
at the moment, as well. What I wasn't actually
too much thinking about is the amount of
parts going around here. And I should have
really thought of that a little bit further through than what
I've actually done. I'm going to leave it for
now because we can still get away with using these
blocks with 32. But in general, try and
bring it down a little bit. So we'll do that
on the next one. So what I'm going to do
is I'm going to come in. I'm going to press the
ye button to insert, and you'll notice that
the front and the back. So I'm going to
insert them like so. If I press one on
the number pad, I want to make sure
that if I am inserting them and bring them roughly
to where these are, you can see it's
roughly about there. It doesn't need to be exact
or anything like that. And finally, then,
what I'm going to do now is I'm going to just
put an object motor, you can see what I'm
doing. Right click. And if I come to loop tools now, you can actually
bridge both of those, and you'll lend up with something like this,
which is really, really easy way of actually creating the inside of here without actually
bullying it off. Alright, from there, then what I'm going to do is I'm going to create this inside part
here, as you can see here. And the way I'm
going to do that is I'm gonna press controller, pull it out, like so. And then what I'm
going to do is I'm going to press the F button. And finally, I'm going to
press the insert button, like so, just to
insert it like that. Now what I want to do
is I want to kind of make some piece of wood that
I'm going to go this way, and they're going
to go down here. So what I'm going to
do is, I'm not going to look at my reference
actually at the moment. I'm going to use this bit
of wood that I've got. I'm sorry, this actual
model I've got. And what I'm going to do is I think I'm gonna grab this one. I'm going to grab this one. I'm going to press the J board. And what that's going to do is just create some mesh for me. Same for this one
then. So this one, J. And then now we're going
to go to the other side. So this one and this one, J, and then this one and this one. And J, and there we go. So now we've got a piece
of wood there as well. So let's now actually
split these off. So I'll grab this one going
all the way down here. I'm going to press y. And then we're gonna grab this
one and this one, and I'm going to press y. And pretty much similar
to what we did before. So now, let's build this out. So now we've got
our windows here, what we can use as well. And what I'm going to do is I'm going to press lt
shift and click, and I'm going to
extrude this out. First of all, though,
before doing that, just make sure that
you split it off away from these
actual rocks here, so I'm going to press
y to split it off, and then to pull it out, and that's going to give me that wooden weight going
all the way around. Now, you can see,
Because I split it off, I've actually able now to click on the back
and the front of it, in other words, it's
a solid object. That's exactly what I wanted. And now let's come
into this one. So if I grab all of this, I should now be able to press
S and X and pull it in, and we're going to do pretty
much what we did before, where we deleted
limited dissolve. Press control law and
brought in some edge loops. Now, you can see, we've
got a little bit of a problem here in the
fact that we've got still one of the vertices
in the top and in the bomb. So let's delete those
off. So delete. And we're going to try and
delete dissolve vertices so. Let's try this one as well, Dissolve vertices like so. And now we should
be able to press control law. No,
still can't do it. So let's have a look
what's going on there. Let's try once more to
go in and grab this one and press delete
Limited dissolve. And now let's see if I'm
bringing an edge loop. And I still can't
bring in an edge loop. And you know what? I don't actually
know why that is, because as far as I'm concerned, this is one piece of mesh. I'm unsure. Unless
there's one up there. Let's press sons d. There we go. It's up there. That's the
reason I couldn't do it. So let's come in, delete this. So dissolve zs. And now I should be able to come in control and there we go. Left click, right, click. And that's exactly
what we want to. Okay, so let's grab all of this. Let's press N's Ed, bring it up into place. So, let's make it a
little bit thinner, so S and X, like so. And that looks about right. Now what I can do is I can
come to the center one. Using proportional editing
then click this on. And then what I'm
going to do is press S and X and bring it in. Like so. Alright, so
now on to the next bit, so I'm going to grab
this one and this one. I'm going to press the F button. So F so. And then I already
know that this one, this one, and this one are
already split off. So y? Let's split them off. S and D, let's pull them down
without that on. So S and D pull them down. And we're going to have
exactly the same problems with what we had
with the other one. So I'm going to make it a little bit thinner first, like so. I'm going to pull
this one out so I can actually see what I'm doing. And then what I'm going to
do now is I'm going to press delete Limited
dissolve, like so. And then what I'm going to
do is delete both of these. So shift select both of these
and dissolve the vertices. Now, let's press Control
R, and there we go. We need one in the center. So left click, right
click grab this one, like so, and then proportion editing back on sens.
And there we go. That should now be perfect. So to extrude it out, and let's pull it into place. So let's grab it all with L. No proportional,
it's not needed now. Pull it all into place.
Just where that wood is, and just make sure
that it goes all the way up to the edges. As you
can see here, it's not. So S and X, pull
it out into place. And now let's do the same
thing with this one. This one will have come in
actually into the front of it. So we're going to
come to the back, put it right on the back
just there down here, look. And then we're going to press,
and we're going to pull it out into place in
front of this one. So we want it in front of this. So. And if it's all like this and we still need to pull it back a little bit
away from there. Just come in, face
grab one of these. So select one of these,
control select one of these, so then you've got
all of them selected and then just pull
them back like so. And there you go. All right. So the next thing is, then
we need one of these parts. So all I'm going to
do is just steal one of these parts with
L. I'm going to press Shift D. Drag this across and be near enough in the
center, and you can see there. Not grab that properly.
Let's do that again. So we're going to press L
to grab it all. Shift D. And here we go. Alright,
now we've got it all. So now, if I press one, we should be able to put
this right in the center. So first of all, P selection, grab it again, Control
A, or transform, set origin to geometry, shifting S selection, to
cursor, and there we go. It's right in the center there. We just need to probably make
it a little bit smaller. And we're also with this
one, go to rotate it round. So 45. Like so. There you go. A thing that's fitting
in absolutely perfect. Alright, so that's
actually nearly the window done a pot from the stones
and the actual glass. So on the next lesson, we'll actually put these
window panes into place. And then what we'll
do is we'll actually, you know, create these
stones going round it. We'll actually make sure that we highlight this center
stone as well, and then we can get
our materials on. Alright, everyone, so I
hope you enjoyed that, and I'll see on the next
one. Thanks a lot. Bye bye.
48. Adding Decoration to our 3D Windows: Welcome back everyone to Blender porn Modeling
and Germin Old workshop. That's where we left it off. Alright. So now
what we're going to do is we're going
to actually come in and sort these parts out. Now, I recommend that
we grab each of these, and we press to xtrude,
press the enter born. And then you want to be
on medium point here, and then EsnsEd and just pull those up into place, like so. And then what we're going
to do is just make sure that they're actually going
over here as you can see, the coming out of this
way a little bit. So we'll sort those
out in a minute. First of all, they'll
just make sure they're going tucked in to that
actual wooden bit. So Essen, Ed, pull them
down a little bit more. Next of all, let's just press S and X and pull them out
a little bit, like so. Now, I know we've got money even a little bit along there. That's fine. We don't
need to worry about that. All we want to do now is grab
all of the edges this way. And we're going to do
pretty much the same thing. So, enter S and X, and pull them this way, just so they go behind there. Now, you can see
again that we have some problems in
the bottom parts. So all we need to do now
rather than doing anything, just press S and Z and pull them down into
place. And there you go. That's the actual
window glass dump. Now, let's come to our stones. So this part here should be split off from the
rest of it, which it is. And what we want to do now is, if we look on this bit, we've got like going all
the way round to here. So Alt Shift and click Alt
Shift click, you can see, we can use that to
actually create this stone relief bit here. So all I'm going to
do is right click, I'm going to mark a seam. Now what I want to
do is I want to go round every single double one, and I'm hoping I'm really hoping that they actually
level up at the bottom, which they do, so that's good. So work your way round right
click and mark a seam. Alright, so now's the time. If I press one now, just to make sure that
they're all even, which they are, and now what we can do is we can
split these off. So if I come in and press
L on every other one, So you can see here
we've got two together, so all we're going
to press is y, and then grab this next one, press y again, and there we go. Okay, so now we just want to actually put faces on these on the inside because we
already know that if I press S with
individual origins on. So if I press S, you can see
none of these have faces on. So that's the first
thing we want to do. So I'm going to come to Mesh. I'm going to go to
clean up, fill holes. I'm going to try that again. Is it going to be able to work? It should do because they
should. It should work. Let's try and select
where is it mesh. Clean up. Holes. And for some
reason, that's not working. And it's because there we go. It's because we've actually got a edge loop
going down there. So, you know what
we're going to do before actually
splitting them off. We're not going to
split them off. We're going to actually
get rid of that edge loop. So I'm just going to
hide this out the way. So let's hide it out of the way. And then it's this edge loop here that's causing the issue. So I'm going to come
in, shift and click, and you can see that
still split off, so I need to go back and make sure that I've not
split them off. So let's go back a bit more
before spliting them off, and I think now this
should be okay. So H hide them out the way, Alt Shift and click
on this edge, should go all the way
around now, which it does, and then delete is all
edges, and there you go. Now when we split them off, we shouldn't have any problems
filling in the faces. So all I'm going to do now is L, go all the way round, like so. Ill I come to this part, y and then L on this
one, and then y. And then you go, we should
have them now, all split off. I'm hoping that this
one here is split off. Alright. So now if I come
to each one of these now, press the S point again, You can see now they're
all split again, and then we can go to mesh, clean up and they'll holes. And there we go. Hey,
they've actually worked. Okay. So let's first of all, though make this one
a little bit bigger. So we want to pull this
one out a little bit. So all I'm going to do is shift
click around these sides. I'm going to minus
off these two here. I'm going to then
press alterns and I'm going to pull them
out slightly like so, and that's exactly what I want. Now, from here, what
I want to do is now, I want to actually level them off and then pull
them all together. So I'm going to come in. Again, I'll split
all of these off. Now, this time, because
we've got faces filled, and we've got all of these, inside, we need to
actually come in with edge select this time just to make sure that we're
actually selecting them all. Okay. Like, so we're going
to then press P selection, and then we're going
to come back to them. Now I'm going to do is I'm
going to grab them all. I'm going to press the S poorne and pull them out together. Like so. And we should end
up with something like this. And now all we want to do is right click shade AutoSmve and then come in
and add in a bevel. So add in a bevel. Let's
turn these segments up. Let's then turn this down. There may be 0.2.
And there you go. You can see already just
how nice that looks. And now let's come
back to the next part. So we're going to right
click Shade Auto Smooth. This one's already
got a bevel on. These haven't got a bevel on. So let's add in a bevel.
So generate bevel, Put it down to naught point
naught three, like so. And there you go, there
is your bevel on there. That's looking really nice. And I think pretty much with this, we're basically done now. We just need to add in
all of our materials. So what I'm going to do is I'm going to grab all of these, and then I'm going to
grab my window over here. I'm gonna press Control
L and link materials. And then we're going to put
it onto our material view. Let it load up. It's going
to get a bit slower. The more things that you're actually going to have in here. And then what I'm going to do
is come to this one first. These one to be stone. So I'm going to first of
all, grab them all. U, smart UV project, coming over then, and then
let's put it onto stones. Let's click Plus
button down arrow. And we want the one that
says stone, like a sign. And there we go,
that's that part done. Now, let's come to these parts. So I'm going to press
lt H, first of all, I'm going to grab
this one, this one, this one, and press
U, Smart UV project. Click Okay. And then they've
already got the stone, sorry, the windows on here. Now, you can see
that we are going to have a problem
in this one because the simple fact is it's not
going to be able to unwrap properly because it's going
from here all the way around. So the easiest way to deal
with this is to press Shift H, just hide everything
else out the way. Come over to the UV editing. Press the dot one to zoom in. And then what I want to do
is check this one here. So you can see if I come in and press Alt
Shift and click, this is what we've
got at the moment. Now, we don't want it
like that because what it means is we can never straighten this out because
it's a full circle. So what we want to do
instead is we want to bring in a seam. So, right click Mark Sam,
and then come in again. All shift click. They're
going all the way around and on rap
and there we go. Now, we've actually managed to select one of these. We
don't really want that. So let's press Control d, and let's do that
again, minus this off. So they're going to press
on rap, and there we go. Now, let's grab this one, press alter to straighten it out, this one, Alter,
straighten it out. And then all we want to do
now is rotate this one round. So 90, rotate it round,
and there you go. Now your windows looking
much, much nicer. Now, let's come into these ones, and we're going to actually
grab all of these. We're going to press on wrap. And then what we're going
to do is go down and we want it on window
glass, click a sign. And then finally, we want
to make these smaller with the S button and put
them into place. I'm going to put
this one over here. I'm going to grab
this one, put it over here, grab this one. Put it over here, and
finally this one. I'm going to put it over here, like so. There we go. Alright, let's press all
tapes, bring back everything. And that is looking pretty good. So that's the second
window down now, when that one was a little bit different
from the other ones. Let's do out a little bit. Just make sure we're
happy with it. And now, let's move
on to the next one. So let's get all
these windows done. So, we're going to move
on to the next window, which will be this one here. Alright, so let's
move across again. We can actually make it smaller. Let's press one and get
it to be the right size. I think, yeah, I think something like maybe a little bit bigger. Something like this is going to be round
about the right size. And again, this
window is relatively easy to create
because of the fact we've already done
most of the working. I'm going to show
you a little bit of a different technique now to
create this actual window. So what we're going
to do, we're going to first of all
save out our work. And then what I'm going
to do is I want it right in the center somewhere
just to start with. So somewhere like this. I'm
going to press Shift A, and I'm going to
bring in the plane. I'm going to rotate
my plane round, so r x 90, rotate my plane round,
press the S borne, and I just want to get it roughly to be round
about the right side. So I'm going to pull
it down to there. I'm going to grab the top of
it in wire frame, so tab. Grab the top of it,
pull it up to here. So, let's bring in one, two, three, four edge loop. So control R, one, two, three, and four left
click, right click. And now let's just
pull those into place. I'm just going to pull this up. And then what I'm going to
do is put it onto select, grab both of those, and
pull them up like so, and then grab each one of these and just pull
them up slightly. Like so. Doesn't need to be, you know, exact or
anything like that. Alright. So from here, then
we'll call this lesson over, and then the next lesson. I'll show you actually how to create this part,
especially in here. All right, everyone, so
I hope you enjoyed that. I'll see on the next one.
Thanks a lot. Bye bye.
49. Single Frame Window Modeling Techniques: Welcome back everyone
to Blend fall, Modeling and Jump in a workshop, and this
is where I left off. Now, what I want to do before moving on with this
window is I want to actually come in and press control and bring in one
mortgage loop there. So, left click right,
click right in the center. And then I'm just going to
grab the whole thing and I'm going to press the
iborne and bring it in. Now, if it's coming
in like that, just press the iborne again. And what you want to do now
is bring it in like this. So you can see now we've
got some edging along here. This is what we
want, and we have some edging in the corners. Now, if you're not
happy with how this is, just pull it out a little bit. So just press S and X and pull it out a
little bit, like so. And then you can also press son's head and pull
it down slightly if you want that or son's d and
pull it up a little bit, just to get it into
the places we want it. And I think that, even
though it's not following it perfectly, is what
I actually want. Okay, so from there,
then we've got everything really for
this part that we need. So what I'm going to do now
is create these parts first. And then I'll create
the outside of it, and then finally we'll
move on to the inside. So what I'm going to
do is I'm going to come and I'm going to
select all of these. I'm going to press y, and then I'm going to
select all of these. So control select, y, select both of these, y, and then finally select the bomb 'cause we want
to split going down the middle is while we're
doing this as though these windows open
out on the realm. So that's why they're
like that. So all we're going to do is select
this one to here, y, this one, to here, and y. Alright, now we're going
to grab the inside of it. We're going to separate it
off from the rest of it, so P selection, and there we go. Now we can come back to these
parts. So these parts here. So if I select these parts, and then what I can do
now is I can come in. Press the a born,
press the e born, and pull those out into place, making it quite thick. Now what we want to do is we
want to create these parts here and they want to be around about the same
thickness as this. So let's start with
the bottom one. Let's start with that.
So if you press one, we can come now and
bring in a cube. So shift A, let's
bring in a cube. Let's bring it down into place. You can see it's roughly
near enough the right size. So send a little bit difference. Let's press S and X
and pull them out. Like so, and there we go. And now we want to make
sure that as I said, the right thickness
to these ones here. So if I go over the top, you can see that I need to kind of pull all of these back. So let's pull them
back a little bit. Then let's grab
that bottom part, press S and y and pull it out. So it's round about the
same thickness as these. And then you can see
that we need to kind of pull it all together once
we've got everything in there. So we're just going
to build this, So we're just going to build this outside structure first. So if I press one now, I need to put these parts in going up to these parts here. So let's do that now. So
what I'm going to do is, I'm just going to press
shift in A, bring in a cube. Let's put it down to
where it needs to go. So I'm going to split
these up I things, I'll do them separate, so
I'll do this one first. I'm just going to press S and pull it down to
where I want it to go, which is right on top. You can see here this line, right on top of these blocks. I'm going to pull
it over. Like so. Yeah, I'll think I'll
put that one there, and then I'll use that same one, so shifting D, bring it up. And then Essen head,
pull it out like so. Now the thing is
they're going to be a little bit out,
as you can see, so I need to pull
them into place, and the other thing
is, I need to make them a little bit wider. So S and Y let's pull
them out, like so. Now what we want
to do is want to create the wooden part
that's going to go in there. So the easiest way to do that actually is just to
grab both of these. Press control J, join them
both together because we know that they're actually
the same kind of size. So then what I can do
is I can come in now, grab the bottom one, grab the top one out here, and all I'm going to
do is right click and we're going to
bridge bridge faces. And there we go. Now we
can split these off, so I can just press
y, split them off. I can then press alternS
and bring those in. Now, the thing is,
you are going to lose the bottom of here
and the top of here. So we need to replace those, so I can just replace
them as easy as anything. I just press A and
then come in mesh, clean up, fill holes,
and there we go. All of these holes now
have been filled in. So now, the next
thing, as you can see, it's coming over
to this part here, so we need to pull all
of these into place now. So let's pull them over
into place, like so. And then finally, I need
to pull this part in. So all I'm going
to do to do that is I'm going to press control. Bring in a few edge
loops like so. Make sure there's one in
the center left click, right click, is the one
in the center there. It's good enough, I think. And then what I'm
going to do now is I'm going to first of all, pull out this part here. So I'm going to
pull out this part here just a little bit, like so. And then what I want to do is I want to kind of shape this so it's bending around
and coming out this way. Now, the way that I'm
going to do that, Is I'm going to
grab all of these, and then I'm going to
press Shift and in fact, I'll grab this and this as
well, so this and this, and then I'll press Shift H to hide everything
else out the way. And then what I can do is now I can come to this
bottom one here. I can put proportions on, make sure connected only is on. Press one on the number pad, and now I can actually pull
these out, as you can see. So I can pull these
out and make in that beautiful bend,
which is what we want. So now we've got
a beautiful bend. Now, I do think that it's
actually selling the wrong one. So let's try a root instead. Pull it out, and then we got a thing that's bending a
little bit bere for us. And then what we'll do
now is come to this part, press one again, and then we're going to pull
this one out as well. Bring it in. Like so. Now, the moment of
truth when I press tag, it should be bent like this. Now, I'm still not
happy with this, so sometimes you
might need to go in and just correct it
yourself, just a little bit. This band here, as you can see. It means generally
that I've used kind of maybe the wrong
proportional editing, so I'm just going to
correct it myself. And there we go. You know what? That's looking
absolutely fine now. And now, finally, the top part. Now, the top part,
I might as well come in and use this part here. So this part along here. But you will have a problem in that I won't be able to
grab it all the way along. It will only come to this part here because this
is actually split, so I'm going to
grab all of these. And then what I'm
going to do is press Shift D, bring it up, and I will show you
what I mean that these two five press
G are actually split. So what I'm going to do is I'm going to grab both of these now. I'm going to press P
selection, split them off. Come back to it. Press
the tab, press A. And what I'm going
to do is mesh, clean up, and this time, we're going to
merge by distance, and you'll notice two
vertices merge together. And these are these two here. So now you can see
the join together. Now, from here, what I can do is I can create that stone now, so I can press S and y, pull it out, like so. And then this will
be that stone top. So now I can do is just pull
it down into place like so. And you can see my
window is here, they're going all the
way around to here. Now, rather than extrudinA
or anything like that, I would sooner
actually use solidify, makes it just a little
bit easier, I think. So what I'm going to do is,
I'm just going to come back, press control a or transforms
the origins geometry. Adding a modifier,
and this time, it'll be a solidify. Let's pull it up the other way, so it's going into place, like so, and there you go. Spulls that. Now, let's come over and mirror this over
the other side then. So just this one here, right click the Origin three D cursor. Adding a modifier, bring in a mirror. And we go to the door. The window is nearly done. So now we need the center and we need these
two lines on here. Now, if you think about this, we could actually
we need two parts, so we need it splitting
straight down the middle. We also, if we look at this, we can see it's a
little bit out. It's not actually straight,
and we can fix that. By coming into each of these, pressing N x, and there you go, you can see it
actually straight out because we've got it
on individual origins. Now, we do want to bring
these in closer together. So all I'm going to do
is go to medium point, press N X, and then I can bring them closer
together like so. And then sons Hold them
up again, like so. Now, let's think about the two on here for going to wire frame. We've got one going
across there, so control. You can see again,
we've got a problem. If I put that up there,
it's not going to be level, but we can do the same thing
as what we did before. So as long as we've got
this on individual origins, we can press ns d, and we can really, really
straighten that up. So it's another good technique
to straighten these up. Now, from here, then,
what I'm going to do is I need another one
now down here, and we're going to
have, of course, the same problem of that. So if I press control, you can see a little bit
of the same problem. I'll just drop it there for now press ns d, straighten it up. Like, so. Like so. And now I want to
do is I want to create the actual pieces that
are go to occur over there. I'm just going to
press Control B, pull it out, and there we go. Alright, so that's what we
should be left with now. These parts here,
these parts here. And on the next lesson, then, we should be able to get
this finished quite easily. Just got the rocks
and, you know, the stones and things
like that to do. But it should be fairly straightforward now.
Alright, everyone. So let's save that I'll work. And I'll see you
on the next one. Thanks, L one. Bye bye.
50. UV Unwrapping for Small Windows: Welcome back if
you want to blend the ball modeling and
John Mitchin workshop, and this is where we left off. Alright. So now, with these, we don't actually I'm
not going to bend them in like I did with
these ones over here. So what I'm going to
do with these is, I'm just I think I'll
split them up with Y. And then what I'll do is I will press delete and
limited dissolve. And then what I'll
do is I'll just pull them out into
place like so. So we want to a bit more solid looking than the other ones. Next of all, then, I'm
going to use this one. So I want to come
in with this one, and you can see that now they're actually split, So
all I want to do, first of all, is I
want to press and pull them out into place in front of the
other ones like so. And then from there,
what I can do is I can now fill in each of these. So if I come to both
of these, like so, I can actually go right click
and bridge faces like so, and then you would never
really know the difference. Now, what we do need to do, though, is we want
to split these off. So I'm going to show you
how to do that in a minute. Maybe, maybe I should
have done that before. But hey, let's not
worry about it. So, let's now come in. And what we'll do is we'll
grab all of these. You can see it's still as
well attached to these parts. So what I want to do is I want
to split all of these off. All of these off from there, y. And then we can come in
now and grab all of this. I can press P selection, and there we go, now I
can actually work in it. So if I press Shift H now, I should be able to
work on just this bit. You know what? I need to
actually press AltH In fact, Shift H, let's hide
everything all the way. There we go. And then what I can do is now split these off. So all I'm going to do
is split them off is I'm going to come down
all the way down to here. I'm going to press
the control plus, and that's then I'm going to
go all the way to the side. And then I'm going to press Y. And then finally,
what I'm going to do is hide this one out the way. You can see now I I'm going to have a little
bit of a problem. So all I'm going to
do is just delete off these, delete bases, and then I'll actually join this face here and
this phase here with F. And then what I'll
do is I'll press Alt Shift and click going all the way around,
press the F button. And finally, I'll just press
Delete and Limited dissolve. And I'll show you on the next one, why I've
actually done that. So if I just hide this
one out the way now, so L, hide it out of the way. Now, we want to put split straight down the
middle of here. But we want to do it the
easiest way possible. So the easiest way
is to first of all, delete these off,
so delete bases. We're not going to be bending
this or anything like that, so we don't really need
these edge loops in here. So all we're going to do is join this one and this one with F, and then we're going
to join this one and this one with F and finally, then, we've still got these edge loops and
we don't need them. So we're going to
grab everything, pre delete and limited dissolve. And now, you'll see that
that is a solid piece. And if I press tag
tab, tag again. You'll see we end up with
something like this. But the moment we
come in here now and actually bring in a bevel, we can put it on 0.3, and now you can see
we've got actually a nice gap down there, looking as though we can
actually open these windows up. So that's really
nice. Now, let's work on these actual stones. So pretty much the same
thing as we did before. We're going to apply our
solidify, control A. And then all I'm
going to do then is shift click Shift click. Y, split these off. A. Don't even need
to look at them. You can just come to
mesh. Clean, merge. Not merge. Not merge. We definitely don't
want to do that. Clean up, fill holes. And then all we're going to
do is right click shade. Smooth, add, generate, and
a bevel. Let's turn it up. Let's turn this down. Something more
reasonable like this. You've got your actual
stonework in there. Alright, let's do the same
thing with these as well. It was really easy to do that one. Same thing
with this one. We'll just first of all,
bring in some edge loops. So left click, right
click four edge loops. Let's then split them off. So all I'm going to do is
grab this one and this one. Y, A to grab everything. Mesh. Clean up. Bellows. Tab. Grab this one. Press Control J, join
them all together. And there you go.
There's your stone. Easily and quickly done. Now, let's finish then. So all we'll do now we want
these to have a bevel. We don't need the mirron
anymore, so let's apply that. Let's add in a bevel. So generate bevel. A point, Nutt three, and there we go,
there's the bevel on there. That's looking good. Now
we've got this part. This one's already got bevel on. Let's do this part first. A I'm going to do is join
this with these. I think I've already
split all these off. So I'm going to press
Control J, and there you go. There is, I split it up. There is the little
joins there now. And then finally,
just this part here. A I'm going to do is press
tag, bring back everything. I don't want to grab all of
these. So both of these. I'm going to press P selection. Grab this one. Grab this, press Control J.
Join them together. And Mary's your little
bevel on there. And now, finally, we can
get in the materials, 'cause basically,
we're done with this. But all I want to do now is just grab Let's start
grabbing it from here. So if I grab this
one and this one, I can press control L, and I can link materials, I can go to my material
view. Let it load up. And there we go. We've got the wrong
materials on, first of all. So let's come in and
grab these, press A. Mart UV project. Click Okay. Put it on stone, click a sign. That's those. Let's
come to these now. These all want to
be wood, of course. These also want to be wood,
but we'll do this separate. So we'll grab all of these. And then what we'll
do is we'll press Control L link materials, and then come back to these, press A, Smart UV project. Click Okay. Now, we do have
some iron on these as well, which are these ones
and these ones. So we need to fix those. So L L, L and L
on, click a sign. And then finally, we've
got this and the glass. So this one here,
click on this one, Control L, link materials. So. And you can see, also, these are looking really
kind of just repeating. We don't want that, so we're going to sort all
these out as well. So what I'll do is
I'll grab these first. Smart UV project. Click Okay. And it's because
they're a bit too small or too big on the UV map, so we really need to fix those. So what I'm going to
do is I'm going to come to these parts here. I'm going to press A
just to grab them all. I'm going to go to UV editing. I'm going to zoom to it with a little dot b. I'm
going to press A, and then all I'm going
to do is I'm going to press S and just bring
them out a little bit, so now you can see that
just look at tons bare. Let's also come into this
one here. Do the same thing. So A, S. Bring it down, like so and let's come
then to these parts, so you can see these parts here. So if I press L on
these parts here, you can see that all
of these are bent. All I'm going to do is press L, lt and, and let's actually
do them all together. A T. L t and L and, and then let's spin
this one round. So L 90, spin it round. There we go, you can see, that's looking
really, really nice. Now, I'm looking
at this part, yep, that looks nice. This
part looks nice. All of it looks good now. All we need is the
glass on there then. So we're just going to
come into our glass. We're going to press A. Let's
press just unwrap on these, and then let's put
it onto glass. So if I just click the down now, we're looking for
glass, and there we go. And then what I'm going to do now is put these into place. So first of all, A,
make them smaller. Like so, and then
just grab each one. So we're just going to
put them each out here. So L G. Like so. And let's put that one up there, and let's put this
one down here. And there we go.
Double tap the A. And there is the
next window done. Alright, so we're now
onto the final window. So let's go back to modeling. And then once we've
done the final window, we are going to do
some more building. On our actual main build before we actually start doing the doors or the lights
or anything like that, just to kind of break you up because I don't
know about you. I'm a little bit tired of
making windows right now, so I'm going to actually
come in and yeah, do something a little
bit different. Alright, so let's change this
over to the final window. So we're going to click the
little down arrow here, and the final window is
going to be this one. And you can see, basically now I left one of the hardest to last. And this window basically
is about getting this wooden type
structure into place. And the way we're
going to do that, is by moving it across first, getting the shape of the
overall window and then shaping how these parts are actually going
to come into place. And yeah, it should
be quite easy. So let's pull this
back into place now, pull it back round about there. I'm just looking at this, One of the things,
as you can see, this window set
back a little bit. Now, these, for sure, when I put them in the window, you're not going to
have a lot space, as you can see here, between putting these in the
window and actually, you know, having a gap
between the walls. So we need to make
sure that is okay. And the way we're going
to do that is we're going to come in to
these ones first. You can see all of
this is the same. This frame is going
to sit you know, absolutely fine in there, but you can see that Yeah, these parts here need moving
forward, same as the glass. So let's do that now before
we do anything else. So what I'm going to do is I'm
going to grab all of this, and then I'm going to
grab all of my windows. So I'm going to grab
my windows as well. So there we go, grab
everything, grab all of these. Same for these, and
we're just going to then pull them forward
a little bit like so. And then what we're
going to do is now, we're going to actually
pull all of these back. So all of these are
going to go back a little bit because we need to make them a little bit tighter or bigger, going
back to the window. So pull them back
to there. And as looking now to make sure
everything's still in place. And then what we're going
to do is now this part, and we're going to grab
just the backs of these, the backs of these and just work your way down,
grabbing the bags. And then what you want
to do is you want to pull these out like so. Now what we want
to do is we want to do the same with
the stone as well. So we're going to
come into the stone, grabbing all of our stone, and we're going to pull
them back as well, like so. And then the stone at the bottom looks absolutely fine anyway. So I'm thinking that is
looking pretty nice. Now, we can see we've also got some repeating
on these as well, and we really don't want that. It looks kind of silly. And I'm wondering if I
need to pull these stones back even further so they
go into actual wall. So I'm going to pull
them back to there. I'm going to grab
all my stones in. I'm going to press you and
just look real wrap them. And the reason I
want to rem wrap them is because they were all stretched,
same as these on here. So I'm going to come
to my wood here. Now, before I rem
wrap all these, remember that I have
to fix these as well. So, unfortunately, we're just going to
have to do that again. But before I do
that, I'm just going to look, we've got the bevel on. Let's just reset all the
transforms before we do that. Like so. And then what
we're going to press is A, smart UV project, click. And there we go,
you can see that look a ton better already. You can see now we've
not go that stretching. Let's fix these parts then, so we're just going to
come into these parts. We'll go to UV editing. And then we'll just press L T, and then L and n. Like so. And there we go that looking absolutely Tons better.
Tons better now. Alright, back to modeling, and we're gonna do now. We've brought in
this new window, double tap the What I want
to do now is create this. But obviously, it's gonna
be on the next lesson. Alright, everyone, so I
hope you enjoyed that, and I'll see on the next
one. Thanks a lot. Bye bye.
51. Modeling Unique Window Variations in Blender: Welcome back everyone
to Blender for modeling and jump node workshop, and this is where we left
off. Okay, let's press one. And what I want to do is shift right click right in
the center there, something like that,
bring in a plane. So I'm going to
bring in a plane. The other thing, of course,
about the plane is, you can also rotate it. So let's say we want
to rotate it on the X, so let's rotate it by
90 degrees on the X. So every time I bring
in the plane now, it should be rotated
by 90 degrees, it's making it a
little bit easier to use when we come
to make our doors. Hopefully, unless I shut blender down or my blender crashes
or something like that, it should be relatively
easy to use. Now, let's press the S button. And what we're going to do is
we're going to bring it in. We're going to then pop it down. And then what we're going to
do is we're going to bring it up to this point here. And then what I want
to do is I want to now bring these parts up. So what I'm going to do
is I'm going to press Control R. In fact, I'll do it in a
different way this time. We'll press left
click, right click, drop it right in the center. And then what we'll do is we'll press Control B this time, and we'll bring it out and then add in a couple more edge loops, and we'll do it
that way instead. So I'm looking now, can I
actually bring these up? I'm going to add in another
edge loop on each side. Left click, right click. And now I'm going to do is come in and fit this into place. So I'm going to put this Yeah. I'm going to grab
these two, put them, so, grab these two, put them here. Like so. And I think I need
one more edge loop in here. So Control. Let click, right click, Control. Let click, right click, and then bring them up. So bring these up now, we get that beautiful slanted look that we're
actually looking for. Alright, let's put this on
wire frame because we can see that we do have a, you
know, a slight problem. We do need to make sure
that this is coming down. So what we're going to do now to make this a little bit
easier for ourselves. First of all, we'll
press Control. You can see again, we've got
a problem with this part, but we want to put it in the
middle and then press son's head and just straighten
it out. Son's head. Straighten it out,
Esnsd and of course, there's many many ways to do this now, which you've
found out about. I'm going to put that
one right in there. I'm going to do the same one in here and it should be coming in. It nearly comes in straight. You can see the reason is because this isn't
straight here. Important that straighten that out before doing anything else. So all I'm going to do,
I'm going to come in. Oh, shift, click. Said,
straighten that out. S said, straighten it out, and then and said, and
that should be enough. Then if I bring
that in, like so, and now I I bring
the next one in, it should be
relatively straight. Let's put that in the middle. Now, I'm taking the
time to do this because I want to create
these bands going across. So these bands are going across, and I also want to create
this inside of here. And this is quite a
complex thing to do, so we really need to think about what we're
actually doing here. So what I'm going to do now is I'm going to
come and I want to bevel all of these out once
I've got this one in place. So first of all, I'm going to come with my little knife tool, and I want to do it so
that it's each side. So the easiest way to do that
actually is to come in now. Grab all of these
going down here. So all of these, all of
these, all of these, all of these, and
just delete and bass. Now I want to do is I want to mirror this over
the other side. So I'm going to press
tab, add modifier, generate in a mirror, like so, and now we've got
it over the other side because our center point
was right in here. And then what I want to do is now I want to create
this part here. So I'm going to come, I
think from here and just cut it going up to this point
here. So let's come in. Let's grab from here. So I'm going to press
K. Grab it from here. Now, you will notice,
With the knife tool, it always wants to magnetize
onto here, but however, if you hold the control button, it won't actually
magnetize there. So I'm going to put
it round about here. So right on here. If you
want start from there, better off starting
from here if you want. But let's start from here. And then what we're going to
do is we're going to go all the way to here, like so, and then press
enter. And there we go. We've got that bit on
there. Alright, so let's create this part now. So what I'm going to do
is I'm going to come in. I'm going to grab
this line here, because remember, we've
got a mirror on there, so we're going to grab it
all the way over to here. We should be able to
grab the center point going all the way
down here, like so. And we should also be able to grab this going all
the way over to here. And this one going all
the way over to here. Now what we should be able
to do is press Control B, and we should turn it down,
be able to pull these out. Now, you can see, I've got a
problem with my line here. And sometimes sometimes
this will happen with the center line because of the fact we've actually
got the mirror on. So instead of beveling
it out right now, what I want to do is
apply a mirror first, so control a planer mirror. And then what I want to
do is now bevel it out, and you'll see now that all
bevels out really nicely. Turn down your bevels though, so it actually all comes out. Interplace like so, and I think something without
bending too much, something like this
is about right. Alright, so now you can
see that we've got this. Now, the easiest
thing to do from here is actually
to pull these out. So if I press, I'm going
to pull them out like so. And then what I'm
going to do now is, I'm also going to pull
out this center point. So if I come in, grab the center all the way
down to the bottom, I'm going to press again
and pull those out like so. Let's put it on object mode so we can
see what we're doing. And that is what we should end up with,
something like this. Now, from here, we want to make even more complexity to this. So what we're going to do is
we're going to grab all of these going all the way over. To here and to here
and to here and to here all the way over. Like so. And then what I'm going to
do is I'm going to press the eye button and try
and bring them in. Now, sometimes you
will end up with measures actually break in
like that as you can see. And sometimes when that happens, you're going to
have to go in and actually fix some
of the measures. So you can see, we've got a
nice gap between them all. It's just these measures that are really
messing us up on this. But we can fix
those quite easily. So how do we fix those? You can see they're
on here as well. Let's come in and fix
those then first. So we can see on this one, for instance, we have points going all
the way over there. Now, I think, as well, You know, what we're gonna do is we're not going
to do it that way. We're going to do
it a different way. First of all, if I try
and grab all this, it's all still together,
and we don't want that. So what we're gonna do, we're going to grab each
of these again, and we're going to
split them off away from the other ones because
it's going to make it much, much easier to deal
with these parts. So we're just going
to grab them all, and we're going to press y. In fact, you know,
what we'll press P and split them off that way. Then we can actually
come in, hide this out the way,
grab this again. And now we can actually
just press A to do that. We can press then. And now you can see that we're gonna
have a much easier job. Of joining all of
these parts together. So, where do we want
to join them together? That is the other
problem we've got. So you can see here
we want to join these into these parts here.
So, let's come in now. And what we'll do,
we'll grab this one, grab this one, merge
vertices at last. And there we go. Now you
can see they join together. Same as this one. We can grab. And what I want to do
now is insert from here. Now, you can see I'm getting some flashing on here as well. So what I'm going to do is
I'm going to first of all, mesh, I'm going to
come to clean up. And then what I'm going to
do is merge by distance. So we're going to
clean up those. I'm just making sure
nothing's there. I'm also going to
turn this up one, and you can see two
vertices got merged. Then, what I'm going
to do is gonna click delete and
limit to dissolve. Just to delete
everything off of there. And I'm going to see you
can see this is the issue. I've actually got
a for some reason, I've got an extrude
behind there. So what I'm going to do just
to fix that is pressure f D, bring those out, like so. And I don't actually know why I had that extrusion in
there. You know what? I'm going to go back
before doing that because I don't want to leave you not knowing how
to actually fix this. So I'm going to
come to mesh again, clean up, merge by distance. We're going to turn this up. H. Now what I'm going
to do is actually, I'm going to come
in and insert them. I'm going to insert
them separately just to make it life a little
bit easier for myself. Before I do that
though, I want to press A. I want to
make sure I've got no extra vertices in here so you can see we've got some
extra vertices in here. I want to delete and limited dissolve and
just delete those off. It's going to make it
easier in the long run. For us with things like this. You can see here we've got
two in need joining really. So I'm going to
grab both of these. I'm going to merge
vertices at the last. I'm going to do the
same thing here, shift art instead,
and just do that, and then we've got those fixed. I'm looking for
any other vertices that might cause issues, and I'm going to actually
do this one first. So if I come to this one, I'm going to insert now, and you can see now we have no problems whatsoever because we've fixed all those issues. Let's grab them all now. And come in and press
the eye button, and we're going to
insert them all and see. We do have another issue. Let's actually have a look at that in these two that
are joining here. So, I'm just going to grab
this one, this top one. So shift or right click merge
vertices at last, like so, and let's do this one, or
this one, and then this one, shift there we go, hopefully, hopefully, we shouldn't have
any other problems. Press, grab everything, y and you should now be able
to actually bring them in. Now you've actually
fixed everything. Alright, let's press tech,
bring everything back. So let's press tab. Old
Tech, bring everything back. And now we should have
something like this. Now what I want to
do is I want to grab all of this and I
want to pull it back. So we'll pull it back to there. And then what I'm going to
do is I'm going to split now the actual window
panes from the rest of it. So I'm just going to split
these off with P selection. And then finally, finally, I want to actually create now these parts
going around here. So you can see these
parts going around here. Now, it's up to you
whether you want to put a split in yours or not. I don't think I'm
going to do with mine. All I'm going to do is press A, and I'm going to pull
them out into place, making sure that they're behind these parts
here as you can see. So just behind those, and then you'll lend up with something that looks like this. Really, really nice
as you can see. Alright, from there, then,
what I want to do now is on the next list and I want to actually start
building this out, 'cause if I press tag, I've got nothing
really to work with. And that's made it a
little bit harder for me, but it's also made it so
that we're going to learn more how to fix things like that as
well at the same time. Alright, so I'll see
on the next one, everyone. Let's
save out our work. Thanks everyone. Bye bye.
52. Modeling symmetrical window decorations for frame: Welcome Microphone
to Slender por Modeling and geometry
node workshop, and this is where left off. Now, what I'm going
to do, first of all, is I want to grab all of this. Now, if I press A,
I'm going to grab everything in the scene, so
I don't want to do that. So I double tap the A.
Just select, like so. And then what I want to do
is, I just want to press S and y and I want
to start pulling these out a little bit
because I'm not happy with the actual thickness
of each of these. And then I'm going
to come to this one, and I'm going to
pull it into place. You can see, All of this
is part of the same one. So that's actually fine.
It's this one here then. So we just want to press S and y and start pulling
it out like so, and then drop it into place. And you will notice now it looks a totmbre because there's actually some
thickness to there. Alright. So now let's think
about the top of here. So what I'm going
to do is I'm going to grab all of these. So all of these This one, this one, this one, this one, this
one, and this one. I'm going to press Shift D them. And then what I'm going to
do now is press S and y and pull these out because
this is going to be the top piece of
wood going on there. So something like this. And
then what I need to do, obviously is filling
these parts. So I'm going to
come in, press P to start with P selection,
split them off. Shift H, hide everything
else out of the way. And then all I'm going to
do now is fill these in, like so with F. And then F, And then F fill them in. And then finally, I just
want these parts here. And all I'm going to
do with these parts is just press enter S and
X and pull them out. If they're not coming out, just make sure medium point is on. So S and next, pull them out. Now, let's go back, press tag, bring back everything, and we can see this is
what we've got so far. And I think actually with these, I'm going to lower them
down a little bit. So each of these ones, I'm going to lower down. So
I'm just going to come in. You can see I've got
everything selected. I don't want that. I'm going
to come in, grab these two. So this one and this one, and then just lower
them down a little bit. And I think that actually
looks a little bit better. And then finally, I'm going to press control, transform origin, geometry, add in a modifier, and we're going to
bring in a solidify. Let's bring it out
then, like so. Let's make sure even
thickness is on just so it's nice and even
going on all over there. And the other thing
is you might want this part here to be kind
of pointy like this. And I think it should be because we're dealing with
a wizard's tower, and I think pointiness
is all part of that. So what I'm going to do is, I'm just going to press control, bring in an edge loop like so, and then I can actually bring that edge loop up so
I just means then that I just need
to grab the top of here and pull that
up into place. Like so, and I'm hoping
that I grab the back of it, so let's grab both of these on face elect
and pull that up. And there we go, that, Is
that now looking very nice? And the rest of it is looking very nice. I'm just wondering. Yeah, I think, actually, I'm just wondering about
the thickness. I think it's just not
quite thick enough yet. So I'll just come
back to this part. I'll bring out the thickness
a little bit more. And I think that looks
tons better, like so. Alright. So now let's think about these parts
coming down here. I think they need to come
out a little bit more. A I'm going to do. I'm going
to come to each of these. I'm going to press S and X and just pull them out
a little bit more. Like so. I'm also going to pull them down a
little bit, like so. And now I'm going to do is start work on these parts here. So let's first of all come in, bring in our bottom bit. So I'll press tab, press
Shift A, bring in a cube. Let's bring it down into place. So S and X, pull it out like so. And then what I'll do is now
I'll bring in another cube. Shift A, let's bring in another
cube, pull it into place, make it a little bit bigger, and that's going to be
this point over here. Something like this,
making sure it's probably going to be better if it's s just on the edge
of there like so. And then I need to now
bring up a piece of wood from here that's going
to attach to this point here. So let's see if we can
actually do that now. I might as well, I'll use
this as a center point. Shift A, bring in a cube. Let's move it over to the side. Let's press S and X and
pull it in a little bit, and let's put it into place
before we do anything else. And then all we're going to
do is bring this up now. So I'm going to bring it
up. Into place on here. So bring it up into place. You can see that we're a
little bit out on this one. So I'm just going
to pull it back a little bit underneath
there, like so. You can also see I've
pulled it up a little bit too much there, so
let's bring it down. You can see it's just nearly. Let's pull it up,
poking through. And that I think
is a good start. And I'm also looking at how
much gap I've got there. I think I need to pull
it back a bit like so. And then what I'll do is
I'll pull it into this bit. Like, so we can see that edge is right on there, and
we don't want that. So let's pull it a little bit. This way. There we go. That's all fitting
in really nice. And now I really want
to do is I want to bend this so it's coming
out against here. So I'm going to press control, bring in some edge loops,
left click, right click. I'm going to come then
and do what I did before. I'm going to grab this part
all the way down to here. Shifting, hide the
rest of it out. Come in then, just grab
this bottom part down here, put proportion it in. Let's try going with the sphere, see if that actually is any
better. So let's pull it out. No, it's going the wrong way, so we'll actually come
in and put it on. Let's try sharp. There we go. That is what we're looking
for, actually, like so. And I think now. I know I've
not kept to this quite, but I actually think
this looks better. At the moment, apart
from the fact that this probably needs to come out
just a little bit more again. All right. So that's fine. Let's press Alt, bring back the other
part, and there we go. And then let's finally come
and bring this out even more. So let's press S&X
without proportion SN X, let's pull it out even more. And there we go, Yes,
that's looking pretty nice. Now, the last thing I want to do is I want to make sure that this wood is coming
back a little bit. So if I pull this on
the inside there, and then I'll come to this part, and we know that we've
got solidifi there. So we need to actually grab it going all
the way around here. So lt shifting click going
all the way around there, and then just pull this out into place like so,
and there we go. And then what we want now is We want some beautiful
parts of these, these and this part on here. But let's bring those in now. So they look like just like little arrow heads, I
guess you could call them. So what I'll do is I'll press
Shift A, bring in a cube. I'm going to put those over
there. I can pull them out. I just need to get the
right scale in first. So I'm just looking
to press one. They want to be just in there. I'm going to press the S born. And I'm looking. Oh, it's got solidify on. That's why because
it's joined to that. So let's actually
Separate this off. So I'm just going to
make sure I get it. P selection. There we go. Take off to solidify. And now, I should, if I grab I lost it. I don't
know where it's gone. Let's bring it back.
Let's start that again. I'm just going to
delete it out the way. Let's press Shift A,
bring in another cube. Pull it over there, and now we should be able to get that
into the right scale. Alright, that's working bad now. Let's press S sd Let's
put it into place. So round about here, and then let's pull
it out from here. So I face select. Pull it out. And let's pull it
back. There we go. And now let's pull this up. So sens pull it up. And then let's bring in a
couple or three of these. And then lt shift and click. And then let's put on
proportion editing, and let's press S
and Z, bring it in. Like so. Now, you can
see it's trying to make that sharp. We
don't really want that. What we want is a nice
smooth kind of arc. So let's see if root will do
it or if that's going to be. Yeah, I think, actually,
you know what? If I grab both of these, and then press S and
Z. There you go. That's the world
we're looking for. L. Alright, let's press one. Let's press shift. Bring
it down to the next one. And there we go. And
what I'm wondering is, should we do on this bomb one or just an actual cube on there? Probably going to be better off. Yeah, you know what,
we'll keep it the same. So we'll press shift D.
We'll press Shift S, selections cursor.
We'll spin it around. So Ry and 90, we'll bring it down
then into place. And then what we'll
do is we'll pull it out. Let's pull it out. Interplace. Now, we want it obviously going over
the top of here, so we're going to
pull it out there. We're going to pull it up. Like, and you can see
this one's going to be have to be a little bit
bigger. So no problem. We'll just make it a little
bit bigger, like so, and then we'll pull it down and into place.
And there you go. Now you can see, that's
actually looking quite nice. We'll pull it to the
back. And there you go, now it's really starting
to come together. So now what we need to do
is we need to grab all of these parts,
including this part. And then what we need
to do is press control, join them all together,
and then right click the origin
to three D cursor. And finally, now adding
modifier and its course, it's going to be a mirror to
put it on the other side. Double tap the A,
and there we go, This is the final window
actually looking really nice. Alright, so on the next lesson, then, What we'll do is we'll
add in all of the bevels. We'll add in all
of the materials. And that guy, is our windows done because they are all the windows we're going to need. Now, of course, as I said, there is going to be four doors. There's going to be three
different types of light, but we're really going
to split those out now. We're not going to be
creating all of those in one go because they do get
a little bit tedious. So now we've got
those out of the way. Let's move on once we finish this window and start building
out our tower a bit more. Alright, everyone, so I
hope you enjoyed that. I'll see on the next one.
Thanks a lot. Bye bye.
53. UV Unwrapping and Testing Window Placement: Welcome back
everyone to plan for modeling and John
China workshop, and this is where
we left it off. Alright. So now
let's come in and actually add in the
materials on this. So first of all, you can see
we've got a mirror on here. Let's press control
and apply that. And I'm just making sure I've
got nothing else on here, like a solidify on here. No mirrors on here,
no mirrors on here. Everything else looks
absolutely fine. So now what I'm going
to do is, first of all, going to come in, grab the
whole thing, right click, and we're going to
shade Auto smooth, first of all, because we haven't any stones or anything
like that on there. It's pretty much
now ready to go. So all we need to do now
is press Add modifier, generate and a bevel. We're going to put
this at point, t three, as we do
with everything. I'm going to put
this on object mode, just for now just to see where the bevels are that I need, so we can see here here the
bomb here, this one here, and maybe this one here, and then we're going
to press Control L and link copy modifiers. And there we go. Now we've got modifiers and all of those. I'm just looking at the
inside of here as well. So Control L copy modifiers double tap the A.
And there we go. We should have modifiers, the bevel modifier on
all of these parts, and just give me a little bit of quick check on everything else. And I think now
that's looking fine. So now let's bring
in some materials. So what I'll do is
I'll grab this one. I'll grab this one, press
Control L link materials. And then what we're going to do is going to grab this one, press A, Smart UV project. Click Okay, and there we go. Now, we can probably get away
with these parts on here, as you can see,
they're not too bad. The next part, however, probably might cause a little
bit of issues. So I'll do is I'll grab this. Grab this one, press Control
L and link materials, and there you go, you
can see probably going to have some problems
on these parts here. So let me just
actually grab these A, smart UV project, click Okay, and let's actually have a look. So you can see many, many of these are actually
going the wrong way, and I don't really want them
going the way that they are. The other thing is,
you can see that they kind of tiny on the UV map. So let's go over to our UV map, and we can see what
the issues are here's basically
because they're really, really small and tiny. So let's actually
find our window. Let's also press shift H,
just to come into these. And what we really want
to do on something like this is we want to
actually split them up. And unfortunately, it means that we're
going to have to come round and split all of these up. So if I press T shift and click, we're going to mark in a seam on all of these actual
corners like so. So just the same on this one. And all I'm doing
is pressing lt. Shift and click, so right
click and mark a seam. Now, these ones here
are kind of easy. You're just going to
grab all the corners, so shift and click in
all of those corners. And that then is just going to split all of these up for us. And you'll notice as
soon as I've done this, we're going to have a
huge difference in these. And sometimes you
just have to come in and actually mark
seams on things. You're not going to be
able to get away with everything without
marking any seams. So it's good that you actually know how to actually
mark seams as well. I think that's a fundamental
learning process. So let's bring these
in then, Mark Sam. Let's grab everything,
Smart UV project. Click Okay. And now you can see, they look just tons, tons bar as you can see. Now, there is a problem
in this one here, so you can see that we've
got one with a problem here, and I think it's going
to be. Let's have a. Let's see which one it is. So is it going to be this one? I think it's this one here. So this one here, Mr. Sam out
on there, as you can see. So right click, Mark Sam
A grab everything again. Smart UV project, click
Okay, and there we go. Now you can see everything
is done properly. You can also see that
all of the wood, except maybe these parts is
going the right way now, and it just looks really, really, much better
than it did before. So what I'm going to do now is, I'm just going to press tag, bring back everything,
and there you go. Now that's how it looks. And then what we're going
to do now is grab this, grab this, press Control L, link materials, grab this, grab this, press Control
L, and link materials. Now, let's grab both of
these at the same time. Press tab, A, U,
Smart UV project. Click Okay, and there we go. And now you can see, we have a little bit of problem
with these parts here, so I'm just going to
Come in, press L, alter k, and straighten them up, and I'm going to do the
same thing on this, alter k and straighten it up. And there we go. Now you can see just down nice that looks. Now, from here, we also want
to make sure that these, for instance, are going
to be the right material, so you can see, I'm going
to have to come over. Put in in dark, click a sign, and there we go. And now we've just left
with this bottom one. So A, smart UV
project, click OK. Drop it onto here, so
control L link materials. Let's go into this one because it looks a
little bit of a mess. And the reason that looks
a mess, by the way, is because we need to
reset all the transform. So right click
origin to geometry. Tab, wrap, and you can see, Smart UV project, and there we go. Now
it's looking better. Albeit, it needs to be coming
down a little bit smaller. Like even actually
smaller than that. There we go. Let's take
our proportionality off. We don't need that one anymore. Finally, then, we've
got this part, and I don't think this
has a modifier on. Oh, it does. Okay. So we'll
actually unwrap that as well. Like join it to these so
Control L link materials. And finally, make sure it's
got the right material on, so we're just going
to click this one. We'll grab this
one, click a sign. And there we go. Alright. So that's it. Now we all
need is just the glass. So I'm going to
comb to my glass, so it should be this one here. I'm going to press A, unwrap. There's my glass, and let's
add in our glass as well. You can see now how quick
it is to actually do this. And honestly, guys, just take your time making sure the
materials are correct on these, because the thing
is you're gonna be using these windows a lot. And you want to make
sure that, you know, the correcting any of your
projects and things like that. So make sure the
wood grain is going the right way round.
All of that stuff. I see a lot of people posting
things, and it really, really does let down the
overall scene when you've got, you know, not very
good texturing or wrapping and
things like that. So just make sure you really, really take your time and bother actually trying to
get those things, right? Alright, so let's put them in. One of the main
thing is, you will notice and you will
pick up with your eye, even if you don't realize it is when the wood grain is
actually going the wrong way. In other words, if
this wood grain was going this way instead, you really would pick
that up with your eye. It's just something that you can actually
fix fairly easily. Alright, so there are windows. Now, let's come in
and delete this out. The way, we're not
going to need that. In fact, you know what? We'll keep it in because we might be using it for our doors. Let's come over
then to modeling. And then what I'll do now is I'll come in and just
grab all of these. So I'm going to
grab all of these. And then what I'm going to
do is I'm going to actually apply all of the modifier. So I'm going to
come up to object, I'm going to come
down to convert. And you can see how
it's grayed out. That is because we haven't
actually got one selected. So we just need to shift, select any one of them to
make them yellow, and now we should be able
to convert and mesh, and that then means
they're all converted. From here, then,
what we're going to do is just going to
select this one. We're going to press
B. We're going to press Control J, join
it all together. Come to the next
one. Well, we'll select the next one, then B. Control J, join it all together. Select the next one, B, Control J, join it all together, and the same and
the same and the same because we now
want to join all these together to put them in ready to be used so you can see here, I'm going to
select that one. So I'll select it first. B, Control J and join
it all together. Now, just let me make sure
before I join all this together is that the thickness of this. I think
it's going to be fine. Yeah, we've grown
up thickness there, so we should be fine. Control J. Join it all together.
And there we go. All right. So now we've got
All of our windows done. Now, what we can do with these
windows is we'll just move them over to the side near to the other
parts that we've got. So over to here, like so, and then we'll just
actually rename them. So we'll call this large window. So to rename them, F two large window. Like so. And then we'll call this just the small
window because then we'll know that this one is part of that, so small window. And then we'll call this
one obviously round window. So round window. Like so. And then we'll call this what should we call this
arched window. So F two arched window. And then finally, church
window, we'll call it that. And then we'll know
which ones these are. And then finally,
we're just going to put these all in two. If we're lucky, we've
got primitives. Primitives is really where it wants to go because
everything's in there. I think actually, you know what, we'll make a new one. We'll
just call it windows. And then they're
split up because then we can have one
for doors as well. And then they're
easy as well for you to bring them into
your other projects. All right, double tap the A. And now what we can
do is the first one, We can actually bring over here, and if a press one, I should be able to
put this into place. I'm going to press G. I'm
going to drop it right where we had our
actual this here. I'm going to leap that way. And then all I'm going to do is I'm going to pull
it back into place. Press the little
dot one, pull it back into the wall first
before I do anything else, all the way into the wall, like so, and now you'll see. Wow, it's really starting
to come to gever now. And we'll also put
in the next window. Now the thing is, I do want to make a
duplication of that. I actually want to
press shifty because I meant to actually make a
duplication before doing that. I'm just going to put this where the others are now.
Back to where they are. And the next one I'm
going to actually do I will be creating a
duplication for it. So the next window is
going to be this one here. So again, I'm going
to press Shift D, I'm going to bring it over. And then I'm going to put it just roughly in where
it's going to go. And the next window is going
to be the rounded one. So I'm going to press Shift D, and I'm going to put
that one around there. And what I want to
show you is, really, what it's going to do to the
scene once you've actually got some windows in after all that work that
you actually did. So I'm just going to put
these where they need to go. First of all, so there. And then what I'm going
to do is press one. I'm just going to make sure then that they're in the place. Now you can also see
that my windows. They haven't got the
orientation set properly. So I'm just going to grab one
of them, press Control A, A transoms right click, set origin geometry, and now they've all
got them in there. These two or these three, as well, I'm going to
do the same thing. So control a A
transoms right click, set origin to geometry. And now when I come to this one, I can see I can actually
move it round properly. Now, all of these windows look like the roundabout
in the right place. I'm just going to make sure that they're in the right place. Double tap the wet A and
file and save out my work. And finally, finally, let's have a look at
what this looks like. So let's put it
on rendered view. And there you go. Finally,
we've got our windows in. Now, of course, we're in
cycles view at the moment, so we're not going
to have any emission coming out of these or
anything like that. If you look on here, though, if you go here, you can see
there is emission on there. It's just it's not going to pop out on your actual
rendered view. So just take that into account. Alright, so on the next lesson, then what we're going to do is, I think we'll actually start working on this part round here. So if I come round to here, We'll actually start
building out the wall round here or the
steps around here. So building up these
steps around here, I think we'll start doing that because then what
that means is we can actually start working on
this actual tower part here. All right, everyone. So
I hope you enjoyed that, and I'll see you
in the next one. Thanks a lot. Bye bye.
54. Creating Curved Staircase for the back of tower using Geometry Node: Welcome back, everyone to blend the four Modeling
and Jomo workshop, and this were left off. Alright, what I'm
going to do is, I'm just going to now move these a little
bit further over here. So I'm just going to
pop those over there. It gives me a little bit
more room to work with. Now, when we're
doing the stairs, we're going to be doing them the same way with the Jochen, because it does
make it a hell of a lot easier to actually
do it like that. And the other thing
is we need to think about where our stairs are
actually gonna come from. So I recommend that they're
gonna come from kind of here, where the door is
that we set it up. And the other thing is,
I think that the door here might need to go
up a little bit higher, but we'll see once we actually start putting
this together. Just might need to go up a
little bit higher, I think, and maybe pull down this roof a little bit and make it a
little bit less slanted. What we're going to
do, first of all, though, where are the
stairs going to come to. So let's say they
come from here. I recommend they come
from roundabout here. That then gives us a
nice view of the stairs actually going up from here so you can see the
stairs going up here. And even if you
move around here, the stairs are going to be here, so you've got a nice view of everything from
this kind of shop. And that's the thing that
you always want to be thinking about when you're
actually, you know, creating models like this all about how everything's
going to come together, what it's going to
look like visually from every single angle. So even this angle here, you can see it's
quite interesting. We've got a lot of
spires on there. We've got this part
sticking out here. You're going to be
able to see the moat and things in the fence
that goes around here. So even the rear of the building is going
to be interesting. Alright, so with that said, then let's bring in our stairs. So first of all, let's bring in a curve, and we'll
bring in a path. And my paths all
the way over here. And then what I'm
going to do is, I'm going to put it down. And then what I'm going to do is I'm going to pull it
out a little bit. So S and X, let's pull it out just
a little bit like so. And from there, then we're
going to add on the omgde. Now, because we've already
created this omgnde, it should already
be in our list. So if I had modify it come to Jonode click
the down arrow. We should have one that is, I think it's Ogin one. Let's see. No, it's
not Origin one. Let's try the other one. Maybe it's not in here because
we actually applied it. That's the other thing. Yeah, I think that's what
the issue will be. So what we'll do is
instead of doing that, we'll just go over to
our state manager. Geometry, no, press
a little dot one, go to our little curve here. And the one we're
looking for is stairs. So let's bring in our stairs. Drop it on there, like so. Now, let's see if we
can pull up this bit. So shift space bar
just pull it up. So and you can see
now, it's actually pulling up the wrong way again. So we know already that
sometimes happens. So let's press control all transforms right clicks
origin geometry. And now we should
be absolutely fine. If I pull it up from this end, you can see now it's
pulling up absolutely fine. All right. So now, let's bring it over to where we
actually want it to be. So all I'm going to
do is press dead 90. And what we'll do is we'll pull it round to the place
where we want it. So we have it come in, I think, just under here, so
round about to there. And then what I'll
do is I'll spin this we'll move this
around where it can. So if I press seven
and go over the top. I'm not going to worry too much about the height
of the moment. All I want to worry
about is it's actually all moving
round in one place. So if I bend this here, like so. Like so. Like so. And so you can see now we're already starting to
get it into place. And as take your time
with this because we want it to go Nice and
smoothly against here. So you can see here this
one needs to come round. This one perhaps needs to
come out a little bit. Like so. You can see it's
nowhere near high enough, but we're not
worried about that. What we want to try
and do, really, is make sure this banister
is all into the wall. That's the main thing
we want to try and do. So if we can pull it a little bit this way,
as you can see, like so, And we're keeping them nice and even at the moment, as you
can see, as well. So all we're trying to do, just pull it all into the wall. Same for this one. You can see that there's a
bigger gap on this, like so, and there we go. I think that's going
to be about right. Now, what I should be able
to do is lift this up now, and all of them should follow along as you can see,
and that's great. That's exactly what we
want. And the final thing is we're going to
put it into place. We're going to
delete this door off out of the way because we
don't actually want that, and then we're going
to check and make sure that we're actually
happy with that. And I think actually, I'm
very happy with that. Let's pull it down
now into place, so into our ground plane. Go back around and let's pull this part up now
into place like so. Now, the other thing about this, this part here is, I've got
a bit of a gap on there. I'm going to leave
this gap on here. But the main thing is I
want to make sure that it's coming out enough that the
doors going to be in place. In other words, this step, this flight of stairs
at the moment, may need to be a bit wider. First of all, though,
let's come in, and what we'll do is
we'll actually take off the hand rail because we're not going
to need the hand rail, and we're not going
to need the poles. Now, what we are
going to need though, if we think about it is
if we look at the pools, we can see that the
poles do follow along. In other words, they also have the angle following
along of my stairs. What a mine want to do
is keep these poles for my actual fence that's
going to go round here. Now, you would think that
would be easy to do, but the problem is that
the fence has some, you know, wooden parts going through here
and here and here. So it's probably actually
not the best way to do this. So what I'm going to do instead
is, I'm going to come in. I'm going to turn my poles off. I'm going to come in
over to modeling. I'm going to press dot to zoom
in, zoom out a little bit. And then I'm going to come around and check
what we've got here. All right. So this is
looking pretty good already. I think what I'm
going to do then is create my own curve
going around here. Using the curve that
I've already got. I think that'll work
out perfectly for me. I just want to make sure
everything's okay on here. So first of all, let's come
in and we'll shade smooth. So we'll shade that smooth. With the stairs, then we'll change the height I think it is. Let's change the
height a little bit. Let's change the depth
for a little bit, pull all those out. I'm Jos looking now to make sure that they're
all coming out, like. So I think You can
see on some of them, they're coming out a little
bit further than others. That's fine. So on these, we might need to pull
these back a little bit. Pretty nice with some kind
of wooden planks on here. And the other thing
is how wide are they? Well, they're just
coming out past there, so I think that's also okay. So basically, this will be
made of, you know, stone, and then they'll be the
wooden steps on top, and I think that
will be pretty nice. I'm just concerned about how far these ones
are coming out. You can see here. These are coming out a little bit
further than the other ones. Let's pull them
back a little bit, so let's change the
depth. And pull it back. And you can see now
that these ones are, you know, a little bit
short on these parts. So I think we'll go in and edit those manually. That's that. And then the other
thing we want to think about is how
many stairs there are. So you can see we've
got a length on here. If we pull this this way, let's increase the
length like so, and I think it would be
better on this if it's actually quite a lot of
stairs leading up there. I think that looks
pretty nice. All right. So next of all, let's
grab our little guy. And let's see how big
each of these stairs are. So if I put them up
the bottom stairs, you can see that
basically these would be quite easy to walk up.
I'll put them on there. Like so, and you can
also see they'll look really nice going up
there like a flight of stairs. Alright. So now what I want
to do is I want to come in, and I want to use
this part here so you can see that this curve
is what I want to use, but I want to use the
curve in a different way. So I want to use it to
actually create my fence. So what I'm going to do is I'm hoping that it'll
actually do that, by the way, because
at the moment, I'm not actually
sure if it would. You know what? We'll create
a different curve thing. I think we'll create a
different curve from this. I think it will be easier
than using this one. So what I'm going
to do now is I'll grab this now and I'm going
to turn it into mesh. But before I do that, I think I'm just going to have one last look over it
just to make sure, and I think you
should do the same. Just have one last look over it. And make sure
everything is good. Because at the
moment, you can see this tower is a little bit out, and it needs pulling down, so it's actually underneath
this ground plane. So I'm going to
quickly just do that. I want to make
sure everything is perfect on this before
doing anything else. You can see it shift and click. Let's pull it down into
the ground plane like so. All right. Now, let's come
to our geometry node. Then let's turn off our
yeah, let's turn off this. Let's come to our geometry node. Let's go to object. Let's come down to convert an
mesh, and there we go. Alright, so now we've got
that. Let's make this curve. So now we've got a curve
that we can actually use, which will be this. But
all I'm going to do. I'm going to come in and
I'm going to press Shift H. And I'm going to come
in and grab all of this, like so, going all
the way around here. And then I'm going
to press Shift D. And I'm going to
pull this up like so, and then I'm going to press
P selection, like so. And then what I'm going
to do is I'm going to press Control A or transforms, right click, origin geometry. Now, I'm hoping that this
curve I can use with my array. But what I'm going to do now is I'm going to create that
fence that I had before. I'm going to create that,
so I'm going to press th and then I'm going
to create a fence, which is going to be the
right hide former guy. So it's going to be
a fence like this, and then we're going to
array it and hopefully we'll get it to go all
the way around here. Now, we do want it to be a
little bit uneven, I think. It doesn't need to be perfectly even or
anything like that. So let's give that a try. So first of all, let's press
shift, Kursta selected, and then what we'll do
is, we'll just bring in the first base on this lesson. So I'll make it that small, so you can see
that it's going to be around the same
size as this one here. So if I bring this over here, you can see it's roughly roughly around the
same size as this one, and that's exactly
what I want. Alright. That looks about right. Now,
let's get the right height. So all I'm going to do
is get at the top of it. Pull it up. Like so. I'm going to press one. I'm
going to press Control. Take off portion of it in. Now, pull it up. D here. And then we're going
to press enter S, pull it out. Like so. And then, pull it up. And then, and then
S, pull it in. Like so. All right. So that's going to be my
main fence at the moment. And then what we'll do
on the next lesson is, we'll just create the
wooden struts on here, and then we'll see
if we can actually array this around
this curve here. All right, every one, so
I hope you enjoyed that, and I'll see on the
next one. Thanks a lot. Bye bye. M.
55. Adding Railing onto curved staircase using array and curve modifiers: Welcome back, everyone
to blend the form, Muddling and Domtin
Old workshop, and that's where we left off. Alright. So what I'm
going to do now is make the actual planks here. So let's also put
in an object mode. It's much much easier to see. So what I'll do now is press
Control or transforms right, click the origin geometry, Shift S and cursor selected. Shift A, and let's
bring in a cube. And then what I'll
do is I'll make this cube a little bit smaller. So S and X, pull it in, like so. And then I'm just going to
pull it out a little bit, so we'll press S and y,
pull it out a little bit. Something like this. Now,
I know at the moment, once we've actually put this on, I think I'll need to need
it a bit wider first. Then we will obviously have to come in and pull these
down a little bit. So I'll have to pull them
down to follow the curve. Or we might be able to actually pull this curve down,
and it all follows long. I think what it'll do is
it'll slant the mole down. So I don't really
want to do that. So what I'm we going
to do is press shift. Join them all together, like so, and just create something
that looks like, you know, a little
bit of a fence and a hand rail that
it can hold onto. Then what I'm going to do
is join them all together. So punch all J, join
them all together. And now let's put them
in some sort of place. So if I bring them around here, 97, bring them over the top, so I want it to really
start around here. And then what I'm going to
do is pull it up. Like soap. All right. The next thing
I'm going to do then. I'm now going to array it. So I'm also going to
press add modifier, um node, not jump. Add modifier, generate an array. And then we want the
array to not be on the x. I think we want
it to be on the y. Yes, on the y, like
so. Let's pull it out. Let's increase the count then, so we're going to
increase the count, and then we want it to basically
calm down to round here. So let's see if that
actually is going to work. What we're going to do is
turn this into a curve. So this one here
that we've actually got at the moment it's mesh. What we can go up to object, convert to a curve. And then what I can do is
hopefully attach this to this. So let's see, add
modifier, generate. I think it'll be under
deform, actually a curve. There we go, and
the curve object is going to be this one here. Now, we can see that it's actually pulled it out
of place at the moment. So let's see if we can put
it along the not not the y, let's try the Z. I'm going to try either one
of these and I know, we'll get it right eventually. So you can see here, it's
nearly actually right there. Let's try the Y.
Nope, not that one. I think it's going to be the very first one we
tried, which was the X. And I think all I
need to actually do is pull it out into place. So you can see now, I've
pulled it out into place. Now, if I pull one of these, there we go, it actually
follows along, as you can see. But let's put that into place. Let's also increase it, so we'll just
increase the count. And it's not increased the
way that I wanted it to. But hey, we can pull it back. So let's increase
the count one more. And then we go,
that's it sticking out of that wall
there, there we go. Now we've reached the
end and we can have a one pull that comes down here. Now, if I grab both of these, I can actually bring
them down to actually start putting them
into place, like so. Now, let's see if
I pull this end down, what actually happens. So if I come to this end, proportion it in and
start pulling that down. You can see if I pull
pull pull pull pull, what's going to happen is it's starting to start
slanting them down, moving them round and
things like that. We don't actually want that. So all we want to do is
just get these into place, and you can see now they're perfectly in place along there. We're going to make
sure that the jaws sticking through like this, so you can see this one
is jaws sticking through. And before we finish, we want to make
sure that they're probably right even on
this corner here, I think. So the way we're
going to do that is we'll just move them with the little red and pull them over roundabout to
there. All right. That looks pretty nice. Okay, so now let's
apply our curve. So control, apply our curve. In fact, no, we can't
do that. You know what? Instead, we'll convert to
mesh, and there we go. Now we can get rid
of that curve. We don't need it anymore. And now what we can
do is we can focus on bringing these down
to each one of these. So you can see at the
moment, each one of these. I'm thinking that there might be a little bit of a
better way to do this. So what I'm going to
do is just going to go back just before
I apply that. And on one of these. So on this one here, I'm just going to
apply a subdivision. I think I'll put it
there. And let's see if I press tab now
where it's going to go. So you can see, it's
just round about there. If I press it on wire frame, not wire frame, here we go. Wireframe. You can
see if I press one, it's just above there
as you can see. What I'm going to do is just
go back and pull it down a little bit without
proportion of it, pull it down, tad. And there you go. You
can see just upper tad Okay. And there we go. We can see it's right level
with the step. That then tells us
that every single one of these now can be level with that actual little kind
of notch I put in there, and then we'll get
a perfect kind of distance between
all of these. All right, so let's
give that a choice. Let's go to object.
Go to convert mesh. Delete my curve out the
way I don't need anymore, and now let's come to
each one of these. So before moving any of
these planks of wood, I'm going to just focus
on these parts here. So all I'm going to do is bring this down to the part
that I told you. I'll just bring it down
to each one of these, they don't need to be perfect. It's better actually if they're
not absolutely perfect, we're just going to
keep bringing it down. And we should get
the right height for all of these for
not a lot of work, actually, because
it's made it quite simple to do something
that is quite complex. And I think actually,
it's going to have a good result, so. And then we've got all
of these planks of wood, which we're going to bring down, and I'll show you how to do
that in a minute. Like so. And then let's bring
the last one in. And hopefully, it should
be right on the edge of the right on the edge. And I'm just wondering if I want to pull this one back
a bit. You know what? I think I'd do,
but first of all, let's see if I'm back at
pull it back. Yes, I can. I'm just going to
pull that back. There like so. Alright, that's
looking pretty good. Now, let's focus on
these parts here. And you can see that we're going to have a little bit
of work to do here because we need to kind of pull
them not only above there. I think, actually, we might need to make these
a little bit higher. So let's start with
the first one. And what we'll do is we'll
bring these into place. Let's put it onto global. And bring them into place. So you can see here, we've got one that's going to be
all the way up there, and then we've got one
that's going to be here. So we have to move
both of these out. Now, let's see if
we can actually bring them out first
and see how they look before deciding anything else. So what do I mean by that? I'm going to come in and grab the backs of each of these.
So each one of these. I'm going to turn this off, and then what I'm going to do now is pull them up into place
like so. And you know what? It's actually going to work. So we'll do that now
with the others. So all I'm going to
do, first of all, is just bring these
two down into place, something like that, and then we'll just work our way along. Bringing them down into place. And again, you don't
want them exactly even. You just want to get them in a roundabout way
because we do want to come in and actually make them a little bit
uneven as well, though something like that. And then just work
our way around. Just above that step,
as you can see. Like so. Like so. Like so. Now, there is another
difficult part with these. So there's another kind
of difficult steps to do. But once you've got this kind of way of doing it nailed down, it's not that difficult anymore. But let's come in, and
what we'll do is we'll grab now these two, and
we'll just pull them up. We just want to get them
kind of into, you know, a rough place where
they're going to go and we miss these two. So we're just going
to come back to them. Same thing again. Let's make them a
little bit uneven. So now, this one, Like, so. Like so. And you
can see that I'm not trying to get them even at all. I'm
not trying to do that. I'm just bringing them
up into a rough place because I think
they'll look better if they're a little
bit uneven, actually. So let's pull these up. And let's when we've done this, we'll see exactly what
it looks like and see if that has turned out well. So There we go. All right. Now, let's
have a look at what that actually looks like.
So we'll turn this off. We'll press double tap the A. And there you go. That
looks really, really nice. I think these top ones, these need to come down a
little bit, but I think, you know, how it
flows is really cool. Alright, so that's looking good. Now, let's bring these two down a little bit, then,
so I'm coming in. I'll grab these two, like so. Bring them down a little bit. Double tap the A. Turn off
the X ray, and there we go. I think we're pretty much done
with the actual handrail. And I think all we need
to do now on the next one is actually bring these
down into the floor. So down here, bring
them all down. And there's actually an
easy way to do that. I'll show you how we do
that. All right, everyone. So I hope you enjoyed
that. I'll see you on the next one. Thanks
a lot. Bye bye.
56. Adjusting Staircase mesh and adding texture: Welcome back to
everyone, Blender fall, Modeling and geometry
node workshop, and this where we left off. All right, so let's come in. And what we'll do is
we'll grab this one, this one, this one, this one, and we're just
going to work our way round down to all
of the bottoms. So, And you know what? I'm going to press tab.
I'm just going to hide this floor away
because it is making it a little bit harder for me. Then I can press
the tab again on these. And I can
grab all of them. That one's in the floor anyway, so we don't need to
worry about that. And now all we want to do is we just want to
pull them all down. So this last one goes
in the floor like so. And then what I'm going
to do is press A and one, just to highlight all of them. And then I'm just
simply going to come along with my bicyc
tool and just cut it over nice and flat
where the ground plane is. So round about there,
that will be fine. And then what we'll do is
just set this to zero. Pull this down
then a little bit, just so it's actually
in the ground plane, as you can see. And then all we don to do is either clear the
inner or the outer. And you know what,
for good measure. Let's fill them in
as well. Why not? Okay, so there we go. Now
they're all down even level. And now, what's left is, we're going to hide these
out the way, first of all, and we're just going
to come to our steps now because some of these steps, as we know, first of all, they don't they're not
actually even as we can see. So these ones here, actually,
I'm looking at these. You know what? Yeah, these are a lot more pulled out
than the other ones. What I'm going to
do is I'm going to come too much steps now. I should be able to, you know, grab each of these,
for instance, and let's see if
it actually works. So let's put it on normal. Let's put this on
individual origins. Let's press S and y. And you can see I don't actually think. Oh,
it works that way. Let's see if on S and y. Yeah, you can see it's actually
not going to work. We can see though,
we can come to them individually and just pull
them back individually. So I do think that these steps, it will be worth just going
in and just pulling them back a little bit. Like so. And then what we'll do just
to tight this up before we finish is we'll actually come in and fix I don't think I
pulled that on back right, and fix the middle part, so you can see this middle
part going through there. We'll just delete
that out of the way. And that we'll tide them
up a little bit more. We want them to be a little
bit uneven anyway. Like so. And So we're just a little
bit overhanging too much. You can see here
as well that we've got a problem with
the backs of these. I'm just looking where
they actually start, and it starts really from here. So I think I'll just pull it this way a
little bit as well. You might as well, why you here. You know, if there's an issue, you might as well tidy it up, why you there because
it'll look there anyway, you know, in the long run. So let's pull this one
back and then at this one. Here, as you can see.
And on this one, you could actually probably
just grab them all. Let's put it on. Yes,
we need it on normal, so we can't grab them all, so we need to grab them individually. And so, and I think we've got
four more steps to do. And then we've done
pretty much with the steps after we
fix that middle part, and then we can start
getting the materials on Randomizing the planks of
wood a little bit, I think. And then from there,
we've actually got another another
major part down, and then we can probably
start work on the tower. Hey, there we go. Alright.
That's looking good. Okay, let's pull that one out a little bit. Alright.
There we go. Now, let's press Let's
actually come in first. And what we'll do is
we'll come to this part. So L shift H, and all I want to do now is
kind of get rid of this. So shift and click
going all the way up. Dissolve edges, and there we go, that's
straighten those out. They look Toms
stones better now. Now, let's press O T. Let's press tab.
Let's press TH again. And finally, now we're
on these pieces of wood. So let's come in to
these pieces of wood. And all I'm going to do is I'm probably just going
to select them all. I think it'll be easier to just split them off
for the time being. Like, so And then I'm going to press P
selection, split them off. Grab them again, shift H, and now all I want to do is it might be easier with these. I'm just thinking. Yeah, think it'll actually be easier just to bring in some edge loops. So control law, control law, and just bring in some
edge loops like so. I'll do the bot ones first. It'll be actually quicker. It's not going to
take that long. It seems like when you're
actually doing it, but it's only a few
seconds, really. So I'll just have one in there. Control law. And then
just whip my way around. And all we're going
to do now with these is just make them
a little bit unven And work our way back down now. And I don't think
you can press, sir. Shift, I think. Nope, you
can't do it on there. Because he actually
goes to that one. We don't Even if we're
hovering over here, it just puts it straight
back to the other one, so that's not a good idea. It would be nice to be
able to do Shift ar, just hovering over something,
but we can't do that. So we'll just leave
him like this. All right. So here we go. Alright. There we go. Now,
let's grab them all, press A, and let's come up to mesh, transform, and we'll
go down to randomize. Then we'll turn this
randomized down all the way down to maybe 0.1, like so, and press the tab. I know it's only
something small, but it will make
all the difference, shade them off smooth. Press oltge to bring
everything back. Double tap the A,
and there we go. Now, what I want to do is I want to bring in
some materials. So I'm going to grab
these parts first. I'm going to press tab, A, Smart UV, bjt click. And then I'm going to
start with Mmterals. I'm going to put it onto
material so I can see what I'm doing. Let it load up. And then the materials we
want on here are going to be where is it
hand rail planks? I think they're going
to planks, that's have. Yep they are planks,
so that's fine. Come to these ones next, A, and then we'll
do the same thing. So we're looking
for planks here. So planks like so. Then we'll come to these ones. And we've already got all of those selected, so that's good. So I'm just going to press
Smart UV project click. Okay. I haven't
unwrapped those ones. I forgot. So let's do that now. So on these ones,
let's minus all of these off in object mode. Like so. And then
let's look for planks. Which are where is it
planks, this one here. Let's click plus down arrow,
and we're looking for wall. The walls, this one here. And then we'll come in,
grab this part this time. Smart UV project, click, and then assign the
wall, and there we go. And then finally,
these ones here, did I actually unwrap them? I don't think I did,
so I'm just going to Smart UV project, click. And there they are. Now,
they're all unwrapped. Double tap the A, and that's what we're
actually left with. And I think I think that's
looking really, really nice. Alright, so let's
have a look actually what that looks like
on a rendered view. And there we go, guys. That is what it's
going to look like. And I think I'm happy with that. One thing is, I think I need
to shade this off smooth. Yes, right. I'm also going
to shade these off smooth. And finally, then what I'm
going to do now is the bevel. So I'm going to come in.
I'm to join it together. That will make it easier. So just press Control J. Join it together. G, just to make sure you've
grabbed it all. Control all transforms, right, clicks the origin to geometry. And the other thing is, you can see that
we've actually lost, and sometimes sometimes
this happens. You can see now
we've actually lost the It's a bugging blender. Don't worry about
it. You can see how we've got textures on here. On this bit, we have no texture. It's because of the way
that we joined them. And sometimes you can
see how that happened. So sometimes that happens.
I'm not sure why. Let's join these with
these, press Control J. You can see that's fine now. The moment that I join this with this, will it change them? So let's press Control J. This time, it's changed these. So we'll actually wrap
these ones again. So what I'm going to do. You can see now when I press tab, it's really weird,
how it does it. I'm actually going to
grab it all, press A, press shift just to make sure all my normals are okay.
So I'm going to go down. Let's put it onto object
mode. Let's go down then. And then I'm going
to now press tab, where is the button for it? Let's come down, and
we're looking for. Where is the button for it? Back face calling,
that's not where I want. That's a field. That's
not what I want. I'm looking for my
normals. And it's on here. There we go. All right. So face orientation. You can see they're
facing all the right way. So let's go back.
Now we've got that. Let's turn that off. We
know that's not the issue. Let's go back to material. And all I'm going
to do then is just grab a few well, all of these. I'm actually going to hide
these steps other way. It's going to make it
a little bit easier. So the main bulk of it,
and then I'll come in. Now, hopefully, on your blender, you won't have had that problem. I don't know what's causing it, but I've had it happen before, so it is just a little bug
'cause that shouldn't happen. There's no reason why
it should happen. So, let's grab all the press U, Smart UV project, click
Okay, and there we go. All right. So now you can see
they're working properly. Now, let's press tab, ATH,
bring back everything, double tap the eight, and now
it's all joined together, as you can see.
Everything's fine. So now let's come
in, add modifier, generate, and we're going
to generate a bevel. Let's put it on
object just so we can see that bevel at work,
which is working. And let's put this
then on Naught 0.3. Press the end to
button. And now, finally, let's take a look at what we've actually got here. And there we go.
That is looking, really, really nice
now as you can see. All right, guys. So
we've got that bit down. Now, we just need to make sure that our door
actually fits in there, and we also need to make sure
that this is not too far out to the side because
you can see here it's stuck out a little bit
too far from my liking. So all I'm going to do
before finishing is, we're just going to
grab the whole of this. So I'm going to press
L. And what I'm going to do is I'm going
to press S and y. And I'm going to pull
this in like so and then pull it to the side
into place like so. And I know this walls sticking straight down
here, but actually, I think that looks even nicer like that rather than it's
sticking around here. So I'm actually pretty happy with how that looks. All right. The other thing is, I
just want to make sure that Yes, it is. It's actually in the wall, so I just wanted to
make sure of that. But apart from that, I think the way that it starts
over here is really nice. The way it flows around
here is really nice. So now what we'll do
on the next lesson is, we'll actually start work
on this tower over here. We'll start building
it up from the bottom, work our way up to
here and then finally, we'll be able to get the
first actual tower on. All right, everyone, so
hope you enjoyed that. I'll see on the next one. Thanks a lot. Bye bye.
57. Working on wood framework for round tower: Welcome back everyone
to blend for modeling and John
China workshop, and this is where we left off. Now, what I want to do is not have it on rendered
view to start with. I'm going to put
it on object view. And when you're doing
anything with a towel, what I want to do
is I want to press Shift H and just hide
everything else out of the way, just so I've got nothing else, you know, kind of in my way. And then what I want to do
before doing that, though, I actually want to press
Alt, bring everything back. I want to grab this, and I want to grab two
pieces of wood. So I'm going to grab both of
these shift. Drag them over. So drag them over near my tower, and then I'm going to
grab my tower as well. Shift H, hide everything
else out of the way. Now, I've got one, which is the bevel and one,
which is the curve. I want to use the
bevel one first. And what I want to do is
if I press one on here, I should have a line
going straight down here, which shows me the
straight line, you know, the straightest
line down here. So what I should be
able to do is come in, press Shift, cura selected. And then what we'll do is
I'll grab this one first, Shift and selection to cursor. And now I know that
this is straight. So I know that this is straight. So now, when I come to put these parts going
all the way around, as long as I work
from this point, I should be absolutely fine. And you're going to find
out what I mean with that. The longer we actually
start building this out. So now, let's come
in and first of all, create this bit under here. So this is going
to be a big chunk of wood going all
the way around, and I think it would be bad
actually if we split this up. On my original building, I didn't actually split this up, but I think it's going to be
bad if we actually do that. So what I'm going to do
is I'm going to come in. I'm going to grab this PC going all the way
around, like so. I'm going to press Shift
D. Just do you know, split it off from there, and
then we're going to press E and Z and pull
it down, like so. And then the next
thing I'm going to do is press shift and click, going all the way around
there, press P selection, split it off, and then
let's come back to it. So control A, all transforms, right click to origin
to geometry, like so. Now, the next thing
I need to decide is, is this round enough? We've got a little bit of
chunky pieces on there. So let's come in first of all, and see if we can actually generate a subdivision surface, which is going to give us a few more to actually work with, and I think that's
actually going to make it a little
bit easier to work. If I right click now and
shade smooth by angle, yeah, you can see it's
kind of nice and smooth. Alright. So now let's come in
and apply that subdivision. And the reason I
want to apply it is because I want to get
rid of this middle line. I don't really need it,
so I'm going to come in, shift click, delete, and we're going to
dissolve edges like so. Alright, so I think we can
actually work with this now. So what I'm going to do
is I'm going to come in, add modifier, generate,
and solidify. And then what I'm going to do is pull this out a
little bit like so. And this is going to be like the support of the rest
of the towel going up. So I need to pull it up, and
I need to make sure that now these parts under the underneath of here are supported you
know, going up to this. So this is basically the
main support of the towel. So I'm going to pull this
out, a little bit more, and then go to
offset a little bit. But I still want to
make sure that I've got a fair amount of chunkiness to actually stand
things on there. So I need to pull it out a
little bit more. Like so. And then you'll
notice the inside of this is also fairly chunky. All right. That may be
a little bit too much. Let's go back, tire
just a little bit. Like so. And let's pull it
out a little bit, like so. And I think that's going
to be just about right. Alright, now we've got that.
Let's supply our solidify. And then what we want to do
is we want to come in now, and we want to go every other
one, so every fourth one. So if we miss out
one, two, three, and Shift click, like so, then what you can
do is you can press control shift, and plus. And what they'll do is they'll try and select the
next one for you. So then you can press
Control Shift and plus, like so, and then
control shift plus, and just keep going all the way around until you get back, to the beginning,
which is there, and then you'll see that now I know exactly where
they're going to all be. So I can just press old
Shift click now on each one of these without even thinking
about it, as you can see. And that then just makes
it a little bit easier, rather than v to think and
work out all of these. It's really actual quick. Once you've got the hang
of that, and there we go. Now, let's right click and what we're going to
do is mark a see. And from here, then all we're going to do now is
split these off. So L, every other one, All right, so, y, G, just to make sure
they're all split off. A, and then all we're
going to do is mesh, clean up and fill holes. And there we go. Now, let's right click and
shade smooth tingle. And finally, then, let's press
control A or transforms. Set origin geometry,
add in a modifier, and we're going to
add in a bevel. Turn this down to nut point
at three, and there we go. That is our wood, the support all the
way around here. So now we know roughly where we can actually support
these, so you can see here. Although it's not in place yet, we will be putting this in place to support
this actual tower. So now, the next thing
to do is you can see that these are touching
a little bit too much. So maybe I want to increase
that a little bit more. I think it's probably
going to look a little bit better like so. Yeah, I think that looks
a little bit bare. And the next thing I'm going
to do is just grab the mole, come to mesh, and I'm going
to give it a randomize. So randomize it a little bit, and then just turn
this down all the way down to maybe 0.1. And there we go, now they're
a little bit randomized. And now we're onto this pot. So now what I can do is I can actually start with this pot. First of all, I'm going to
make it a little bit bigger. So S, just to pull it out. Then I'm going to put
it into the floor. Remember, it has to
be quite chunky. It's a point in a
whole tower here. And then what I'm going
to do is just grab the top and pull
that up into place. I'm not going to worry.
At the moment about, you know, underneath here, anything like that, or how
it all lines up because I'm actually going to be moving this around to these parts of it. So just take that into
consideration. All right. So the next thing I'm going
to do is we know already that this one here has got a bevel on it, so we might
as well use it. So I'm going to press Shift
D. I'm going to press R x 90. And then what I want
to do is pull it in. So S and X, let's pull it in. We've still got normal ons. Let's put it back on global. So S and Y There we go. Let's pull it into place. Let's pull it up. Let's make
it a little bit smaller. Like, so, and we want it. We don't actually want it
coming all the way out of here. So I'm going to make it
a little bit smaller, like so, pull it out.
Pull it up into place. S S and Z, make it a little bit
thinner, like soap. So we want it supporting it. Let's pull it out
a little bit more. So. Now, let's finally then, think about this bendy one. So I'm going to use
this bendy one. Now, obviously, at the moment, this is way way too
many subdivisions, sorry, resolutions on here. So at the moment,
I'm just going to come in and delete all of these, so delete vertices, and you should be left with just
this little one here. And from there, you
can add some more in. So all I'm going to do now
control A or transforms, set origin to geometry. Shift S, and then cursor
selections cursor. Let's put that in place. And from there, I'm hoping you can see it's
going a little bit out, which I don't like, but
I'm going to put in place. Like so. I'm going to also
make it a little bit smaller. And then finally,
what I'm going to do now is come to this part, grab both of these, right
click and subdivide. And from there then, I should be able to start pulling
this out, like so. Now, you can see that it's
messed up a little bit. And if that happens, just
press control, all transforms, set Origins geometry, and what it should enable
it to do is bend again. So I'm going to bring in now
more subdivisions, like so. And again, I'll press control a A transforms, set
origins geometry. And now let's bend
it a little bit more. Sometimes that happens. I don't know why it is, but I'm not actually happy
with how this is. So you know what
I'm going to do. I'm just going to not do that. Instead, I'm going to press lth. I'm going to come over,
do my actual curve. I'm gonna press Shift D. And instead of doing that weight, I'm not actually going to
take away any vertices. All I'm going to do now
is I'm just going to press Shift S,
selections cursor. Put that right in the middle. And then I'm going
to press S's d and pull that down into place. I'm gonna pull it up. And
then what I'm going to do is bring down the scale of it either by pressing
the S born, like so. Let's give that a try
now. See how this bends. So now you can see how nice that actually bends. That
is what we're looking for. Again, now we can press
control A all transforms, and there we go, it
actually bends really nice. Now, let's press right
click origins geometry. Let's put it back into place. And now let's pull it out to
where we actually want it. So we want it to be
roundabout here. So what I'm going to do is
pull both for these down, pull this one down then,
so it's nice and flat. Pull them up, put it into place and see it's
a little bit wide. That's absolutely fine.
And the other thing is we need to now
pull these out. So it's nice and
flat against there. Like so. Now, that's
looking good. Now, all we need
now is just to come in and bring the
scale of it down. So at the moment,
we've got our extrude, we can see we can bring that in just to make it a
little bit flatter, like so, and we've also got a solidify on which
you can bring down. Not our bevel sorry
solid pie. There we go. And we can bring
that down, like so, and then fix it more into the place where we want
it put it into place. And do we want it a
little bit wider? I think we do put it into
place roundabout there. Alright, so now we've got that. Let's come in then and
make cast steel bit. So what I'm going to do is
we're gonna come to this part, Control bring it to round
about there, press control B. And I'm just going
to pull that out, hold in the shift bond
so press the born, enter alterns then I should
be able to pull that out. And then this should be
able to sit on top of that. Now, don't be afraid to
just pull this part out, so just the end part, p
that out a little bit. Like so. And there we go. That is the main support
that we actually want. And this is what we're going to use around each of
these points, I think. All right, everyone, so
let's save out our work. And then what we'll
do on the next lesson is we'll get this into place, and then we can actually
get them on wrap. Before we do that, we might as well bring in the materials, and then it's easy to actually, you know, change the UVs once
we've actually done that. So let's do that on the next
one. All right, everyone. Thanks a lot. Bye bye.
58. UV unwrapping bottom section of tower: Welcome back to Blender for Modeling and
John ind workshop, and this is where we left off. Now, let's come in.
And what I want to do with this is
before carrying on. I just want to turn down the
number of the resolution. As you can see now, we
can bring that down. Let's then come over to it and go to object, convert to mesh. And finally, we've now, yeah, we've, Let's
have a look on there. So let's see how well this rates because I did it the
wrong way round. Actually, You know what I'm
going to do before that. I'm actually going to
take the bevel off, like we do every other time, convert to mesh, and then I'm going to add
that bevel back on. So generate a bevel. Put it on naught point, uh three, and there we go. Now, let's do the same with the. So we're going to join
all of this up together now with a Control
J, and there we go. Right, click shade AutoSmooth. And there we go. That's
what we've got left. Now, the next thing, let's
put it on material mode. And what I want to do
when this loads up is I want to give it these
materials. So let's come in. We've got basic wood. We need to change
that for planks. So let's change that
to planks, like so. Let's grab the whole
thing, press U, smart UV, project, click. And then finally,
we want one more, which is going to
be the where is it iron dock and the iron dock then's just going to
go around this part. So if I grab this
going all the way around, press control plus, and then all I'm going
to do is click Iron doc, click a sign, and there we go. That is what we're looking for. Now, the best thing about the
way that we've done this is that now we're able to put this going around the
points that we want it. As longas we select
the center of this press Shift S
cursor selected, I can now grab this and not
do anything else except press a little sideways
V next to question Mark and you're going
to go three D cursor. And then whenever I rotate
this round now, you can see, I can rotate it all around
this tower like so, making it really, really easy to put these things
where I want them. But if I press and
Z and put this, you know, here, where the doorway is going
to go, for instance, or a little bit to the side, where the fence is
completely up to you, where you want to put it, but
I'm going to suggest that actually I'm going to
put it under these. So I'm going to
grab this as well. I'm going to press arms
head and move this around, so move it around like so. Let's see where this one is. You can see, they don't quite
line up, unfortunately. Let's see if we line them
up any better than that. So let's put them around here. Let's see if they go at the
side of the doors, actually. That would be perfect if
we're going to do that. So all I'm going to do I'm going to put
it on object mode, actually, because I can see a little bit better
what I'm doing. And then I'm going
to press art and Z. Let's see if I can
move this round. You can see it's going
to interact with the door too much, so you
know what I'm going to do. I'm just going to
put it here because the door as well
is also going to be supported by
some wooden parts up here. Then what
I'm going to do? I'm going to press Shift D
to duplicate it art and Z, and then I'm just
going to pull this around to the other side here. And I think in there
is actually going off. I don't think I'll need
another one of these. And now I want to do is have
it going all the way around. So I want it kind of
supporting these parts here. You can see it's halfway between each of these roughly.
Let's do it again. So shift D Z. Let's put it at roughly,
whatever this is going to be. So if I put it
roughly around there, that is going to be
-45. So let's put -45. And then I can do Shift
Z -45. And there you go. Now you can actually
shift D, Z -45. And then, you can see you can
do it all the way around. Now, do we want another
one in this part here? Or are we happy we have just a piece of wood going
in there, for instance, I think just a piece of wood in there would actually
be good enough, like this piece of
wood we've got here. So let's come in. And what we'll do is we'll
grab this piece of wood here. I'm going to pas shifty, bring it over out here, and then let's put
it into place. So we're going to
put it in place, so we'll also change this now. So press a little sideways V
again. Individual origins. Now we can turn it
around. I say 90, and let's put it back
into place in there. Like so. And then
let's also pull it up. Do here. And then finally, let's press sens head and
pull it all the way up now. Deep and jaws fit it
under there, like so. Alright, that's
looking all good. Now, let's bring back on material so we can
see what we're doing. And then all we're going to
do is just grab all of these. Like so L so and so. And we will see we can join
all of these together now. And if we go to the UV
map, now, you will see. So let's go quickly to our UV map that they're all
the same UVs, of course. So press press tab press A. You can see if they're
all exactly the same UVs. But what we can do now is We can come in and
grab all of these. And then what we can do is
we can come and where is it? Pack islands. So we
can pack the islands. We can make sure we don't rotate them because we don't
want to rotate anything. So just turn that
off. We can make sure that we don't
scale them in any way. And so we don't want to distribute the
scale to be different. So I can now click Okay. You're going to have
to wait a little bit, and there you go. It's going to distribute
them all over. It's not going to
worry about the scale, and now you can
see that we've got something really,
really nice like this. Now, you will see
though that we've got kind of overlapping here. We don't really want that.
So what we're going to do is we're going to bring
this down. Like so. And now you can see, just how easy that was to actually
do all of those, and just how nice that looks. Alright. So that's that bit. Now what we're going
to do is we're going to go back to modeling, and we're going to
come to these bits. And all I'm going to
do is grab them all, A, U, Smart UV,
project. Click Okay. I'm going to change this
ambient occlusion then or planks. And there we go. Alright, so the
final bit on this, then, is let's come to
just this part here. I'm going to grab all of this
part going around here now. I'm going to leave this bar because it's always
I need to have, especially as you
wake up your tower. And then what I'm
going to do is I'm going to press, You know what? I'm actually not
going to do that. I'm going to actually
do this myself. So what I'm going to do
is I'm going to come in. I'm going to press
shift and click, and that's going to go all
the way then up this tower, as you can see, and
I'm going to right click and mark a seam. So
just mark a seam there. And I'm doing that just so I can actually come in
and do this wall. So with this wall, then, I'm going to come in Oak
shift click Control plus, and then all I'm
going to do is I'm going to press P selection, and that then is going to split this tower off from
the rest of it. That means then I
can come in now, press A, U, Smart
UV project, click, and I should now be able
to put this onto wall, and it should should look good. And we've see we've got
the seam here. So no. We don't want a seam there,
so that's not worked yet. So let's come in Oak
shift and click, Unwrap. And there we go, now we've
got no seam on there. That's exactly what
we're looking for. So what happened there was,
it's Smart UV unwrapped, but it basically didn't take advantage of
the seam we created, and it just unwrapped it
all wherever it wanted. What we did was,
instead of doing that, we actually grabbed
just this part grain around here, press U, and instead of Smart UV,
we just clicked wrapped, which means now if
we go to UV editing, you can see now it's
unwrapped like this, which is perfectly nice. All right. So that's
looking good. Now, let's go back to
modeling and we'll have a quick look at
what we've done here. So let's go for rendered view. And on the next And
on the next lesson, then, what we'll do
is we'll actually work on this part here. Similar sort of process. You know, we've got we know
where these are going to be. We can now put these. We're going to have some
little rings going around, and we can actually place them going around each of these. I think that's
going to look nice. They might not
distribute all evenly, but we're not really looking
to distribute things evenly. Now, the one thing I'm
looking at here, is, I think, do I want to pull
these in a little bit more? That's the one question
before I finish? So what I'm going to do
is just grab this one, this one and this one because
we did join them all up. Unfortunately, let's
join, grab all these. Let's also press a
little sideways v, I'm a little cursors down there. So And then what I can do now is I can move them
over slightly to Z. Let's move it over
into the wall. If I press tab,
double tap the A. And I think actually
that's going to look bad. Yeah, it's gonna
look bad like that. So let's now look at this one. So now we'll come
to this one, L, L, L and L, and then R and
Z move it into the wall. Like, so tab, double tap
the A, and there we go. Now it's looking a little bit better than where
it was. All right. So these are all looking good. I'm just wondering, Yeah, they've actually got some they've lost some of
the hard edges on here. You can see some of the hard edges have been
lost like these here. That's easy to fix as well. All we need to do we have
got let's have a look. We've got our bevel. Now, we actually apply the
bevel with a look at it. Let's have a look. Yeah, we've actually applied
the bevel on there. So what I'm going to do is,
I'm just gonna grab them all. I'm actually going
to right click Shades Move and just
turn the angle down. And then you'll notice
now that they've got much more harder edge on most of these and they look
much, much better. I can see, it's made a
hard edge on all of those. Alright, so let's not worry
too much about those. All I'm going to do then
is save out my work. So file Save, and I'll see you
on the next one, everyone. So thanks a lot. Bye bye.
59. Modeling stylized cone shape rooftiles with roof generator and letuce modifier: Welcome back, everyone
to Blender four Modeling and John Chen Old Workshop, and this is where
we left it off. Now, let's hop back
into object mode. And what we're going
to do now is we're going to make a start
on this one here. So let's come in and
grab our actual roof. So I'm going to press a
shift D, drag it over, and I'm going to
put it into place roughly where the
roof is going to be. So and a rough size of an angle of what it's
actually going to be. So let's first of all, put
it down to where we want it. I'm going to come on over
then to my geometde options, and I'm going to bend the
rotation round, like so. I'm going to then increase
the number of vertices. So vertical count. So let's go up to
where we want it. Maybe it's something like that. And then what we
want to do is we want to now bend it around. Now, I did tell
you that on here, we've got one that
says bend roof angle, which we've already seen. But if I put that back and
just press control head, and instead of using that, I'm just going to save up more word before
doing this, actually. Instead of using that,
use the compress button, we can then actually
compress it this way or we can
compress it this way. Now, if we put this on -180, that'll mean it as a full compression round,
as you can see. Now, you can also see that
we do have a problem here. In that these get
really, really squished. Now, there's a few things we can actually do to fix that luckily. The first one is we
can actually come down to where the bend
was so this bend, and we can bring it out. And what will
happen is that then we reduce those, you know, actual those actually
break in at the top. But the other thing we can
also do is we can also come up and increase
the horizontal count. So if I increase the
horizontal count, you can see now how it's
actually come much, much better. Then what we can do is
we can actually put this into the place where
we actually want it. So somewhere around here, as you can see, and I want to then bring that
down a little bit. To get it to come up
to the right size. Now, the other thing is, we
can also scale this as well. So what I tend to do with this, I will actually come in and bring it into
each other first. So we've got you know, we've got it going
around two, 180. We can't actually alter that. But what we can do
is increase the horizontal or increase
the vertical like so. So if I decrease the vertical
and then bring this down, you can see then I
can actually get away with a little
bit more like so. Now, when we're doing
the top off here, it's always the
case that we might need to make them a
little bit smaller, so you can see we can make
them a little bit smaller to actually get them to
fit into place like so. Now, what I'm going
to do is I'm going to actually increase
the vertical count just one more like so. I'll come over the top again. I'll make sure that they're
in line with each other. And that's looking pretty good. Now, the next thing we can do is we can increase the tile width. So we can increase the tile
width as well, like so. And then what we can
do is we can bring this down a little bit, like so. So we've got lots of options
to actually play with. We can also as well bring
this down a little bit, and that is also
going to help us get this into the right size
that we actually want it. Now, let's just fiddle
around with this bit a bit and try and bring it down to the place where
I actually want it. So I'm going to bring this down. I'm also going to increase the vertical count just one and then going to press the S
button and bring it down. And then what I'm
also going to do once I've got them right size is press S and Z and bring them
up a little bit like so. And I think there is
looking pretty nice, and I'm also going to try
and bring them a little bit more down without
trying to break them. I really don't want to break them any more than
what I need to. So something like this
is looking pretty good. Let's bring down the
horizontal count now, like so. And there we go. We're nearly actually in the right styles that
I actually want them, and let's press SM's bring it up a little bit
more. You know what? I think that's looking
just about right. Now, with the tiles,
we don't actually need to bring them all
the way up to here, because we are going
to have a top on here, which is going to hide
that out of the way. What we need to focus on is actually getting these into
the shape that we want them. So I'm just so I'm just going to hide this
part out of the way. So hide the top of it, like so. And then what I'm going
to do is I'm just going to go over the top now, like so. I'm going to grab this one, I'm going to press shift. And I'm going to
bring it over now, and I'm going to press R, dead, 180, spin it around. And then I'm just going to put this into place where
I actually want it. And you'll notice because we've actually done what we did, we should be able to fit
these in place pretty nicely, like so, let's move
it over jaws to Tad. And what we want
to do is we want to hide this part going up here. In other words, we don't want it to look so straight
going up here you can see it doesn't look that straight. We're
also going to hide it. With the wood underneath
here as well. Now, once we've got it here, the best thing to do now
is we need to bring in something that's
actually going to bend these in the way
that we want them. And that will be a lattice. So using a lattice is the best
way to actually do these, and it's like a magic, you know, piece part in
blender that really, really helps you bend steps and roofs and all
that good stuff, so that's what
we're going to use. So what I'm going to
do is I'm going to actually grab the
center off here, so you can see, I've got
the center off here. I'm going to press Shift A. I'm going to come down
down then and bring in Maltte and then I'm going to bring my lattice up into place. I'm going to press the S button. Like so. I'm going to press
one on the number pad, and what I want to do
now is make sure that it's coming out to the
outside of this roof. We don't want to miss any of this roof. So I'm going
to put it like that. I'm going to press
Send then, like so. And now you can see, I've pretty much got
all the roof in. If I press seven then,
I can go over the top. I'm just making it
sure again that it's in the center so that
when I come to bend this, everything is going to
bend at the same time. Now, if I press one now, what I can do. I can
come to my roof. I can press this little
arrow, that will put that up, and then I can add in a generate
and what we want to do. And then I can add in a deform, and the one we
want is a lattice, and the lattice, of course, is going to be this, like so. Now what we need
to do is we need to do the same thing
on the other one. So all I'm going to do is, I'm just going to come
round to the other one. Put this little arrow, press it, add modify a deform, bring in a lattice, and the
lattice is going to be this. And now, when I
move this lattice, it should move the rest of
the roofs both together. So let's come in then
and give that try. So I'm going to come
to my lattice now. We'll have a different set of options down on the
right hand side here. And what we want to do is
normally turn up the W. So you can see once
I turn up that W, I end up with a load of kind of edge loops
going around there, and that then is going to enable me to actually
bring this roof in. So if I now press one
on the number pad, tab. And if I come in with
proportional editing on, and I, let's say, grab the top of
this and I press the S button. I should be able to bring it in. Now, one thing I forgot to say is when you're dealing
with the lattice, you can't actually
use proportion editing on these parts
for some reason. I think you can in
the old blender, but in this new one, you
can't actually do that. So what I'm going to
do is I'm going to try and now get this
to be the right bend. Now, to do that, before
I do anything else, I'm just going to press TH, bring back my main roof. And then what I'm going to do is I just want to hide
this part here. So all I'm going
to do is press L, And that's not going to work. So I'm just going to
press Alt TH going round and press P selection, and then grab it again,
hide it out of the way. And now I have something a
little bit more to work with. Now, at the moment, I'm not looking to get this perfectly in line with this roof because I can scale it
and things like that. What I'm actually trying to
do is get the right shape. So that's all we're
focused on here. So, what I'm going
to do is I'm going to come back to my lattice now. I'm going to grab all
of these, like I said, and then go to press the S
button to bring them down. And then what I'm going to
do is grab all of these. So I'm going to work now a
little bit on this one here. I'm going to press the S button, and I'm going to shape it now. So I'm going to
grab all of these. I'm going to press the S button. I'm going to grab all of these. Press the S button, and I'm looking for that nice,
beautiful shape. So I'm going to press the
S button and bring it in. And then I'm going to
bring both of these in a little bit. Like so. Bring it in. Bring
this one in. Like so. And that's looking
pretty nice already. And then we'll work
on the bottom. So we'll bring that
out. Bring this one out a little bit.
Bring this one in. And you can also see as you're working on this, like the line. You can see this line
here, how it's going. So you can actually work on the line to actually shape
it so you can see we've got a nice slope here coming up and you can see as well where the actual bends
are going to be. So now you can see that's the actual shape that
we're looking for. You can see this one
is a little bit out, so bring it in a little bit. And now we've got
that nice, beautiful shape that we're
actually looking for. And now you can see
just how that looks. Now, the good thing
is from this, we can actually as well, scale this out as well. The other thing is, I can also
come if I press one again, come down to the bottom
and grab all those, I can actually also
pull those up, which really, really helps like bring in this to life and
bring it out like so, and you can see it's nice
and flat on the top. Maybe I've got a little
bit too much there. Alright, so all that is
looking pretty nice. Now the next thing is we want to actually not scale it yet, but what we can
also do is now we can actually come in and
still alter this on the fly. So if you come on over
to your geometry node, open up your jumpi node here. And then what you can do is you can decrease the
horizontal count, for instance, like so, and make these a
little bit bigger. You will have to join it
obviously back together again, but you are going to
keep this actual shape. What we can also do is decrease the vertical
count as well, and we can do that
then on the other one, bring them together, and then you should
have that really, really nice, beautiful roof. So all I'm going
to do is increase the vertical count,
get them together. And the last thing is we can also increase the
to width as well, which will obviously pull it out and make these a little
bit bigger at the top. Alright, so I'm happy with mine. So what I want to do now is, I want to scale all this, but I want to keep this actual I don't know if I want to keep this lattice to make
it easier to do the other ones or if I want
to just create a new lattice. I'm not actually sure. So instead of what
I'm going to do is, I'm just going to grab
the whole thing like so. So I'm going to grab this
and the lattice, like so. And what I'm going to do is
just move them over here. So, shift D let's
bring them over here, and then we've got
this in case we need it for either of our roofs, where we can actually make
it a little bit different. Just so we haven't got to go
through all that work again. Then what I'm going
to do is now, I'm going to come
to both of these. I'm going to go to object. I'm going to come down to
where it says, convert, convert to mesh,
and then finally, I can delete this
lighte out of the way. So delete it out of the way. Come back to these now and then just press Control
J, join them together. And now what I'm going to
do is I'm just going to now shape it into the kind
of height that I want. So I'm going to press
s and pull it up, like so, pull it down
then into place. And there you go. Now, I do
need to make sure as well, that it's actually
in the center. So we've got our
center point in here. So what I'm going to press
is Shift S selection. In fact, you know
what? We need to press control eight
transforms, right click. Set Origins geometry, Shift
S and selections cursor. Let's put that down
there. And there you go. It's as simple as
that to do that. And then now all we need to do is put a top on on
the next lesson. Now, I'm happy with this shape. On this shape. I'll make it a little bit different, I think. But for now that's
looking pretty nice. Let's have a quick look though before we finish as
we should always do. Yeah, and that's looking
about exactly as I wanted it. Alright, you can
see it's got that wizardi witchy type feel to it, and that's what we're
actually going for. Okay, so now, let's
save about our work. And on the next one,
what we'll do is we'll start getting all
of this into play. I'll actually think I'll put a top on this before
doing anything. And then we can have
one more look at it. Make sure we're happy with
it before finalizing it. Alright, everyone,
so I'll see on the next one. Thanks
a lot. Bye bye.
60. Modeling roof wood support frame: Welcome back everyone
to Blender for Modeling and John workshop, and this is where we left off. Alright. So now let's
come in and put the top onto this part first. So what I'm going to do is I'm going to do similar
to I did here, but a little bit
different obviously, it needs to be
much, much smaller. So, as well, I also need
to put the inside of here. So if I come to this part now, did I actually delete
it, let's press tag and see even bring
it back. So tag. There we go. I can bring
it back, so that's good. Now what I want to do then is, I want to actually shape this to be in line with
this part here. We can hide it still under this part because we're going to put a piece of wood into there, but this definitely needs to be shaped so it goes
all the way up. So the first thing we'll do is we'll just grab the top of it. So grab the top of this
can actually grab the top. Look, is there actually
a top there? Let's see. Oh, it's a different top. You can see here,
this is this part. So let's come in. Delete that the way. So delete vertices. And then we'll do is now come back to this and grab the top. We'll actually put the top
on there shift and click. Then all we'll do
is grab the top. Press. Pull it in, pull it up into place like so. Turn off proportion
it in just for now. Alright, so let's press
one on the number pad. And what I'm going to do is
bring in some edge loops now. So bring in some edge loops like so. Left
click, right click. And then all we
want to do is get these edge loops
to just come in. So I'm just going to press
the S born and just get them to come back past
the actual tiles. That's all we want to do here. Any of that sticking through, press S and bring them in. You don't want any
sticking through. Take your time with this
because it's just going to be the wood behind the roof. So it is really going to actually hide the fact
that there's nothing, you know, behind that roof. So it's all basically
an illusion, like most of the
three D modeling is. So Alt Shift click
S, bring it in. L shift click and S and
bring it in, like so. And now we've done that.
Let's actually have a look at it in material view, and we can see once we bring in our roof, what it's
going to look like. So all I'm going to
do is I'm going to come and hide the
roof out of the way. So let's just hide this
roof out of the way. Grab this then, and
I'm just going to mark a seam on the top because I want that obviously
to be split up. So shift click,
Controy mark a seam. Let's go down the
back. We've got a seam already going down there. And from here, then I should
be able to just grab it all, press you and unwrap. And then that's
bringing our planks. So bringing a material, and we're looking
for planks, like so. And it doesn't even mouth it swirling because you can't
actually see that in there. So when we do something else, I'll show you actually out
and wrap that correctly, you know, if we need to
do something like that. But for now, just press lth, double tap the A, and
there you go. You can't. You can just make out some kind of dark ward or
something in there. Alright, so now, let's come in, and what we'll do is we'll
use the top of here. So we'll just grab
the top of here. I'm going to press shift then. And then what I'll
do is I'll pull this out into the
place that I want it. So I want it round about
something like this. And then what I'll
do is I'll press the eye button to bring it in. And now I'm looking
for is just to go past where those actual
roof tiles come up, and then I'll press
delete and faces. Now, with this, what
I'm going to do is, I'm just going to
create the kind of wooden parts that are
going to go round there. So all I want to do now is
just get an even amount. So I think if we go four
and then four this way, and then this way,
and then miss four, so you can see that I should actually be able to split
them up in that way. So four, four, and
let's go four, and then we'll go four
here, and then press y. And then they should
all be split up now. Now, the next thing
is, let's just split it off away
from the other pox. I'll make it a
little bit easier. So I'm going to press P
selection, split it off. Control A or transforms, right click, set
origin to geometry. Then what I'm going
to do now is, I'm just going to press tab, A, pull it up, like so, press the tab borne,
and now let's In fact, before we do that wards, we'll just press
A and unwrap it, so smart UV project. Okay, and there we go. And now let's bring
in our actual bevel, and we'll also shade it smooth. Alright, bring in a bevel, add modifier, generate a bevel, Nut point, not naught
three. And there we go. We might want to just make
them a little bit smaller. So I'm just going
to grab them all, make sure them on
individual origins, press the S born just to bring
them in slightly light so. Okay, I'm happy with that. Now, let's put our
actual top on there. So all I'm going to do is just going to grab the top off here. So I'm just going
to grab this top. I'm going to press
Shift D. Bring it up, like so, into place, and then I'm going to
press E, bring it up. And then what I'm
going to do is press the eye button to bring it in. And then I'm just going to lift that up a
little bit like so. And then finally, I'm
gonna press control. Bring in like two,
something like that, two or three. Yeah,
bring in three. I think you'll make it
a little bit better. Bring this one in. And then
bring the second one in. So, so, as a nice
curve going up. And then finally, let's put
a top on there as well. So I'm just going to
press the eye bon. To insert to bring
it up, and finally, then just level the top of
it with Control B L so. Alright, now we're going
to do is we're going to bring in the material. So I'm just going to grab this. I'm going to press.
Smart UV project, click. And I'm just the material
I'm going to give this is just going to be
the roof tile material. So I'm coming over plus down
arrow roof, type in roof. And then you're
just going to press tab and a sign like so. Double tap the A
and there you go. That should be that
piece actually finished. And I'm also thinking, you know, on this one, is
going to be a spire. But on both of these, I wants to keep them a little bit simpler. So that's why I've
done it like that. Alright, so let's have a
look at our rendered view. And there we go, you can
see, just down nice, that's actually looking
with that wood on there. And now let's work our way
down then to this part here. And I think once we've
actually done this part here, we can then move on and
actually start working, start working on
our actual terrain. I say, start working because we're actually going
to finish the terrain. We're just going
to get the kind of outline of it laid out. And this is because it
just keeps you invested in this because you can really start to see the
model come together, which means that
you'll really want to carry on and
actually get this finished because
there's so much to learn on this course
that you'll really, really want to carry this on. Alright, so now we've got
that Let's come in then. We'll put this back
onto material view. And then what I'll do is
I'll bring this up now. So I'm going to bring this up, shift D, bring it up into place. And what I want to do is I
want to rotate this round now, so R and Zed rotate it round just so it's not
the same as this one. And then on this, we're going to have two actual pieces of wood. So there's going to be one
piece of wood like here. So from here coming up to here, and then there's going to be another piece of
wood on the outside. So if I press and D, let's pull this piece of
wood up and make it much, much bigger. Drop it into place. And then what I'm
going to do is I need another piece of wood now. So I'm going to bring
this one up again. So shift, bring it up. And what I want to do now is I want to bring these
out, you know, kind of make these a little bit bigger on kind of
the outside of them. So the way that I
might be able to do this is if I come in and grab all of these and
might then be able to come in and go to select
and select similar, and we're going to
select by normals. Let's do that. No, that's not going to do it. So
let's try another one. So we'll go to select,
select similar, polygon sides. Not
going to be that. Let's try one more,
select similar. By perimeter. And there you go. Alright, so that
one's going to do it. And now if I press alterns, I can actually bring those out and make them thicker,
as you can see. So now I'm going to do is, I'm just going to bring that up. I'm going to put it
into place then, which is going to be
right, right, under here. You can see we do have
this little bit in here, which is the top, and I'm
going to delete the other way. So L delete. And you can see I
don't want to do that. So what I'm going
to do is just press Shift H. Come on up, and shift click and
then delete faces. And here we go. Let's
press lt H, bring it back. And now we need to
do is bring this out a little bit further
than what it is. Again. So I'm just going to come in and I'll
grab it again. Press alterns, bring it
out a little bit further. Like so. And then I'm also thinking I'll make this a
little bit thinner as well. So all I'm going to
do is grab it all, sens head, make it a
little bit thinner, and then just pull it
up into place like so. And finally, finally, once
I'm actually happy with it. I'm going to rotate
it round as well. So our head rotate
it round, like so. And then what I'm going
to do now is rewrap it. So, Smart UVP j. Click Okay. And now what we should have is something like
this, and you can see, we do have a problem
with this one, and I'm just going to actually
have a check on my UV map. And I'm not actually
sure why that is. I think it's this one here, so let's actually have a look. What is actually causing that. Let's put this on material
view by pulling this over. And let's see what's actually causing that so we can see here. Here it is. It's this one here. Let's have a look. This one all the way up here,
for some reason. Yeah, it's split these
up, as you can see. It's because actually,
we've got the seams on. So if we press A, press control, and what we'll do is
we'll clear the seams. And then what we'll do is press. Smart UV project, click. And let's have a
look at that now. We're still getting kind of. Kind of the same problem. Let's just have a look what else we've got on here. Do we have? Yeah, we still have our
bevel on, so it's not that. Let's actually reset
all the transforms. Now we've messed around with it. Let's try that again now. So you Smart U V project. Click Okay. And no, we're
still having a problem. Let's come in and
just have a look, see if there's
anything behind there. And no there's not
nothing behind there. So what I should do then is I probably rather than
have all of these issues, and we're just going
to check this one out. You can see here, this one is
This one's absolutely fine. Actually, I'm just making sure so we don't
have this issue. And what I'm going to do just go back to modeling a minute. And I don't really want
to create these again. But you can see on some of them, we do have a lot
of issues on them. So, you know what?
On the next lesson. What we'll do is we'll
get these fixed. First of all, we'll
grab them both. Shift H. So shift and H. Hide everything
else out of the way. And then we can really
see what we're doing. You see here, we've got one here. We've got a problem here. So yeah, there's definitely definitely
going to be issues. We've also got a
problem in here. Not sure what happened that. I'm going to pull that
out on the next one. And I'm just going to take a start of what we've got here. And yeah, we've got some issues. So let's fix those on the next lesson. All
right, everyone. I promise you we can fix them, so we'll fix them
on the next one. Thanks a lot. Bye bye.
61. Ading decorative wood framework onto tower using solidify, bevel and mirror modifiers: Welcome back,
everyone to Blenderf modeling and jump in workshop, and this where we left off. So, let's come in, first of all, and fix this one.
This is an easy fix. We can just come,
grab this edge, put this on normal.
Maybe a worker normal. If not, we can still just
pull it out into place. If we careful with it, we should be absolutely fine with this. Pull it out into place. Like so. Alright. So now what we're going to
do is going to come and grab just the inside
of each of these. So if I come in, put
this on wire frame, for instance, and grab
one of the sides. I should then be
able to come out, select similar by area. Nope, that's not going to be it. So let's try select similar
perimeter, and there we go. Alright. So now what we
should be able to do is, we should be able to mark
a seam on all of these. So let's now press
control and eat and let's mark seam on each
of these, and there we go. Let's put this then
on object mode. Let's press ltates
bring back everything. And now let's just make sure we're grabbing
just this one. You can see all the seams
hopefully. Are marked. I'm just looking at
this one. No se mark, so control, Mark Sam. Let's work our way around. And we've missed some out. I don't know how that happened, but anyway, we'll mark seam. I think it's the Perimeter
didn't select them all, but all I'm going to
do is just come in and making sure that
all of them are marked. There's actually a lot here, so control mark Sam. But I do know from doing this, it will actually fix
that issue. All right. So now I'm going to
do is come in with Edgelch and I'm going to press Alt Shift click
going along here, just on the inside, like so, all the way around. And just follow them round. And I think I've got
that one and that one, right click and Mark scene. Alright, the moment of
truth, let's press A. And instead of Smart UV project, click on wrap and let's go to material view and tab
and there you go. Alright, they are working out absolutely fine now
apart from this one. So this one, normally, it's because it's actually got a problem with the seams
not being marked properly, so let's actually
have a look at that. Though the seams
are marked there. The seam is not marked here
as you can see. That's it. So control, Mark seam. Make sure it's marked on
the inside, which it is, grab them all again, on wrap. Put it on material view. And there you go. All of them wrapped
absolutely perfectly. Now, let's hide that one out of the way, and
let's come to this one. We can see, do you
have any problems with this one? Let's
have a look round. Yes, we've got a problem
with that there, I think. No, it's not actually. Yes, we've got a
problem with it there. So let's do the same thing on here. So you can see already. These are all got
the seams marks, all I need to do on this
one is just come in, shift click on each of these
on the inside. Like so. And then right click
and Marco sin, grab them all, A, on rap. And you can see that it said
objects as non uniform. That all that means is reset your transformations
And that's press tab, and on rap, and there you go. No problems down there. Have
a look round just to make sure that everything is fine
with this, and there we go. Now what we can do is we can use these on other
ones if we need to. Now, we've done them correctly. Let's press altpes then, bring back everything,
and here we go. This is what we're
actually looking at. Alright, so now we want
to do is we want to create something to actually
support these parts, and then kind of a round part that's
going to go in there. And in between those, we're going to actually put
some windows as well, 'cause I think it would
be nice if it could have a window in this kind of part
here, something like that. So yeah, we'll actually
try and do that. So what I'm going to
do, first of all, as we did on these ones down here, we're
just going to come in. Well, first of all, put that band that's
going to go over there. So what I'm going to do is I'm
going to grab this window, and I'm also going to
grab the bendy wood. And then what I'm
going to do is, I'm just going to put
this back on global. I'm going to press Shift D. I'm going to pull them over like so. Now what I'm going to do is I'm going to grab this one here. I'm going to grab the center, Shift S, urs to selected. And then grab my
window, shift as, and selection to cursor,
put that into place, and then now the bendy wood needs to go from here to here. So, I'm just going to leave this over here for
now, pull it up. And then what we want to
do is we want to start with the bendy wood
going up to here, and then have a mirror coming
from here and going down the other side just to make sure that it's going
to work out properly. So I'm just going
to press sons so. I'm going to pull
this over them. Pull it down into place, and
then I'm going to come in now and just bend
it over like so, and then bring them both up. Like so into place. And let's bring this one
up as well. Like so. Like so, and then
just make it so it's kind of flat
there as you can see. Alright, so that's looking good. Now we need to do is just
make sure this is in place. So I'm going to pull
this into place, and the one thing you can see is the problem you're
going to have is that this needs rotate in. So all I'm going to
do is press art and Z and rotate it now
into place like so. Now, you'll also see that once I bring this other part in, they're kind of going to be out here and we don't
really want that. So because it's a bending wood, it enables us then to
actually pull it into place. If it's bending like that, all you need to do is just
press control or transforms, and it should should put it
back into place for you. Also, you can press three
as well to pull it out. I tend not to do that, though, what I'm going to do is
just try and pull these two out a little bit like
so. And there we go. You can see that's
looking pretty nice. And we also want to make
sure that they can be supported up on the top of here because that's
the idea of those. And then once you've got it in, just make sure you have with it. You're never go to have
it perfect, by the way, so don't think it's going to look perfect because
it's not because it's obviously a cylinder that
we're actually working on. But as long as we've got it, near enough in the right place. I think I'll just pull this
back just a little bit, just so it's under there, so maybe even a little bit more. So, and there we go. I think I'm actually happy with that. Alright. From here, then what
we can do is we can control a transomst clicks at
origin to three D cursor. And then what we'll do is
we'll bring in a mirror now. So we've got to
solidify on here. We've got lots of things
on here, actually. Let's bring in a mirror,
so we're going to come over, bring in a mirror. And now you can see this is what I'm talking
about where we can actually join them
together or move them over. So what I'm going to do is, I'm just going to grab this one, press A, and I should be able then to just move them
very close together. I don't actually
want them joining. I want to join them
actually after. But you can see now how we've actually
created that shape, and that is the shape that we're actually looking for. All right. So now we've got that.
What we want to do now is apply the mirror, so apply the mirror,
and we can't do that. So all we want to do is
just minus the bevel. We don't want that
one, as we know, and then let's come over
to our actual resolution. It's already on six, so that's absolutely fine.
Let's go to object. Convert to mesh like so. And from here now, let's
join them together. So we can see here, we've
got these two here. Let's just come in and delete these faces.
So delete faces. And then we're just
going to press Shift and click, l Shift click. Right click, and
we're just going to bridge edge loop, bridge. Where is it Bridge edge loops? There we go. All right. There we go. And
you can see that's not worked out for us. So what that means is if we
press Shift H, we can see, that because it's from behind, let's straighten this up
a little bit as well, so we can see it's a little
bit of a mess from there. Let's just press
controls d. Bring everything back before
we actually did that. So Controls before we
did the edge loops, shift H, and let's have
a look at the issues. So we can see here, these are the issues.
So let's come in. Put it onto x ray. Let's grab this one here, for instance, and this one here. Let's see if we can actually
press S&X and bring them together with medium point. S and X, there we go, S and X and S and X. And there you go, You can see that's
looking better already. And now we want to
do is we really want to join these together. So all I'm going to
do. You can see here, we just want to select
these top ones. So if I double tap
the A, press B and just select
these two top ones, like so, right click, we're going to merge at center, and then we're going to do
the same thing on these. So just select one, B, right click, merge at center. You can also, of course, come in and use your cleanup as
well. We can do it that way. And then what I think we'll do is actually merge these two. So we'll go right
click, merge at center. And finally, on the last one, we're just going
to press Shift R, and then we'll merge
them at center. Alright, so we get something
like that from here them, because now we've joined
them in that way. What we can do instead is, we can just pull them
back a little bit. So if I press seven
to 12 over the top. I can actually pull them back and make them a bit smoother. And then I can also
press control B and make them even
smoother, like so. Let's right click
and shade move. And finally, then, let's
bring in our bevel. So I'd modifier generator bevel. Let's put this on naught
point naught three. And now let's press A, Smart UV project. Click Okay. Let's turn off our
X ray as well. And let's finally finally change this basic
ward to planks. Like, so now, let's come in and fix these bits because
the wood doesn't look right. It looks okay on the
inside, on the outside. You've got a bit of a seam
there, as you can see, which we might actually
want to come in and fix, better off on things like
this to fix things like that. So all they'll do is I'll come in I'll mark a seam on the bomb, so control, mark seam. And then what we'll
do is we'll go now all the way
up each of these, and we're just going to
mark a seam on all of them. So right click. Marker seam. So we've got a
seam going all the way round, all the
way up to here, and then A and and
on RP there you go, you shouldn't have any
seams draining in, but you will have a problem now with how the woods
actually going to look. So now we're going to do is
just go over to V editing, and you can see here
this is the problem. I'm going to grab this
one first, press T, grab this one, L, E. And hopefully, hopefully,
these will straighten out. I've never tried straightening
out something like this. So let's give it a
try T. There we go, and L and T, and there we go, and now grab them both, and then R and 90,
spin them around. Now, let's actually have a
look at what that looks like. And we can see there, It's
actually looking pretty nice. All right. I'm really happy with how that actually came out. Okay, so that's that one there. And now, basically,
we can go back to modeling, press altage, bring back everything,
and double tap the eight. And there we go. Dad is
looking. Pretty cool. I put this some rendered view, there's what it's actually
going to look like, once you've got your
windows, and that part in. Now what we need to do
is we just need to bring in some supports under the roof. And then once we've done that, this part actually is
near enough finished. So I'm just going
to go save my work, and I'll see you on
the next one everyone. Thanks, lot. Bye bye.
62. Manually adding in radial symmetry onto wood framework to wrap around tower: Welcome back everyone
to niform Modeling and JoJo workshop, and
this is where we left off. Alright, let's put this on
Object mode just for now. And then what we're going to
do is rotate this around. So what I want to do
is I want to come to the bottom V like
we've done before, grab this one, shift D to
selected, come back then. And then what I'm going to
do is set the orientation, or you can actually just press the little V like we've
done many times before. And now when we
rotate this round, it will actually rotate around our actual cylinder or tower perfectly, and
that's what we want. So what I'm going to do
is I'm just going to rotate it round to
this part here. So rnd rotate it round and maybe have it just fit
in in this part here. We'll see in a minute how we're
going to fit them all in. Now, the next thing I want to do is I want to bring
in another part. So what I'm going to do is I'm going to come to
this part again, grab this part, Shift
D, Kursta selected. And then what I'm
going to do is just move my window down. And now I'm going to press Shift A and bring
in, You know what? We're not going to press shift
a. We're going to bring in these bendy woods and these
other piece of wood here. I'm going to use
those in as well. So Shift D. Press the little V again just to get it back
to individual origins, and then move these over
to the side here, like so. Now, let's start with
the non bendy wood. So this one here. What I want to do is I
want to bring this down. So I want to scale
it down first. So N's Ed, scale it down. Shift S, selections cursor. And then all we're
going to do is pull that up into place. Now, when it this
pulls into place, it should be behind this part, and then the part on
top should be rounded, come in just off for here
to really shape this out. So I'm going to press
N's d a little bit more, and then we're going to
press S and y, pull it back, and then just put it under
there into place like so. And then what I'm
going to do now is I'm going to bring
in this bendy wood. First of all, I'm
going to press N D, make it a lot lot
smaller, like so. And then what I'm going to do is press Shift S and
selection cursor and just try and then
put that into place. You can see as well that it's not quite the correct size yet. So Ns, let's pull it
down a little bit. Let's pull it out now. And then all I'm going
to do now is bend it in the right way that
I actually want it. So I'm going to come in
and start bending this. Around. And again,
all you need to do control all transforms, and then you actually get
the shape that you want. Don't worry if it's misaligned
or anything like that. All we want to do is get
this shape first of all. So I'm going to come in, bend this down, like so, bring this one up a little bit, like so, and then let's
bring the whole thing out. So you can see here, we
need to right click, S origin to geometry. And now let's bring
it out a little bit. Put it into place
where I want it to go. And we can see the thickness is a little bit
of an issue here, and we want it to be
supported under there, or looking as though it's
supporting under there. So we can see that we need to let's deal with the
actual thickness first. I think that's going
to make it easier. So I'm going to come
to my solidify, bring it down a little bit. So thickness is not working. So all I'm going to
do come back to this, bring the extrusion
down. There we go. Now it's actually working. And then what I'm going
to do is now try and line it into place.
So let's put it in. Let's pull these three out. Like so. And let's think about pulling this
part back in as well. And just really focusing
on the actual shape of it. And it actually holding
something into place. So I think I'll grab this
one. And then this one. Like, so. And then what I'll do is just grab this
one and this one. And then this one.
Finally, then this one. Let's pull it out a little bit. Like so. And there we go. That's looking pretty cool. Alright, now, let's
bring down the bottom. Let's also put it into place. So let's put it into a
little bit be place. Let's grab the bomb then, and then we'll pull
that down. Like so. And then let's just
strain this last bit up. By s pulling it back a little
bit. So. And don't worry. We can straighten these up
even more if we need to. So we can just basically
delete this one. So if I come in,
press delete versus, you'll see that
straightens it up, and you might want to
do it that way instead. But I think now that's
actually looking fine. So now what I'm going to do is just come to the
bottom off here. I want to grab this part here. So this is the bottom of it. I'm going to press Shift D, and then I'm going to
press the S button, and then I'm going
to pull it out a little bit into place. So it just comes there, press
the boron and pull it down, like so, and then they
go there, sat on there. Maybe maybe pull them
in a little bit. So S and X. Like so, and there we go. I think that's going to
look really, really nice. So yeah, that's looking good. Now, let's join it all together. Now at the moment, as we know, this one here has the bevel on. Let's come in, remove the bevel. Let's also come in and go
to object, convert to mesh. As soon as we join
it to this one then, it will actually
inherit the bevel. So let's press control all transforms, that
origin geometry. Join it to this one then. So Control J. Join
it all to the right click and shade smooth by
angle, and there we go. That's that part
done. Now, let's bring in just the material. So I'm just going
to grab it all. Smart UV project, click Okay. Let's change it from
basic wood to planks. Let's also add in the other
one, which will be the metal. So we'll come down
to where it says, iron dock. I think
it's iron dock. Is it iron dock that we've been using? Let's have a
look on this one. Yeah, on dock. And then what we're going to do
is just go to material. And we can see that we need
to wrap it all, I think. Is it wrap? So let's
try Smart UV project. Okay. Let's try reset
all the transforms. So set origin to geometry now. And finally, let's
try again, U V, Smart UV project, click
Okay, and there we go. Now, it's on wrap
the correct way. Alright, so everything's
on wrap there correctly. This part here, you can see they're not right,
so we'll fix those, and this part, of
course, should be metal, so we'll grab all
of this. A sign. And then what we'll do is
we'll come now to this part. So just these parts
going around here. We should be able to
see them on the UV map. Anyway, here they are. So
we'll just grab this one, alter, grab this
one, alter like so. I don't know why they've
come at different sizes. We can spread them
out with S and y, so you can pull
them out like so. Let's have a look
what they look like, and they're looking
absolutely fine. The one thing I would
say is just make these a little bit smaller on
the UV map because I think that the
resolution on them was a little bit too high
in comparison to these. But now I think they
look absolutely fine. Alright, so now, let's go
back over to modeling. And now we've basically
got the support on there. So all I want to do now is
actually come to the bottom. I want to grab this part again. Shift S, cursor
selected on this part, sorry, Shift S, cursor
selected, like so. And now I can put this into whatever place I
actually want to. So now it's time just to
work out where you're actually going to have these how far apart
they're going to be. So if I grab this one now, press a little sideways V and
put it on three D cursor. I can then R Z and pull it
round to where I want it. So if I pull it round to
here, as you can see, this is the support
in between here, so R and Z so. From here, then, I can decide how far over the
other side I want it, and then move these around. So for instance, I can
now grab both of these. And what I can do is,
I can press Shift D, like so, and then r
z -45 for instance. Now, that's not obviously
going to be enough. So what I tend to do is, I'll tend to instead of doing that, I'll just press R and Z and move them to
where I want them. So something like this, trying to even them out. You can see here these
are quite even now, and then look down on
here and put this at -65, something like that,
and there we go. Alright, that's
looking pretty nice. We can see this is
a little bit out, which means that I
should really move this. I'm thinking 65. So if we do another
one, so let's say 50, Z -65, and then shifty, Z -65. I just want to see where
this actually takes us to. And you can see it's probably going to be halfway between. So 50 Z -65 or -60. Yeah, let's put it -65, like so, and you can see, it's going to be halfway between. Do we really want that? I'm not actually sure if we want that. I think I think
what we should do. I definitely want
this part in here, which means that there's
going to be one in here. So, don't worry, though. We can actually
work through these. And get them to be
right. So all I'm going to do is just delete
all of these off. I think there's one in
there. Let's have a look. There's one in there.
Yes, there is. So delete that off. Let's press stage,
bring everything back. And then what we're
doing is instead, I'll grab this one, shift D, and then r and Z
just bring it round, where we actually want it. So in the roof like this, you can see there's a little
bit more of a gap there. So r and Z bring
it round, like so. And I think that looks
really nice now. And now let's bring them
round. To the other part. So I can also join
these together as well. Now I've got them
like this. So I can just should join them
together. You know what? I think I'll just
press Shift D and then Art and Z and bring them all the way round to
this part round here. So let's bring them
round to there. And then rt and Z, I'll bring this into place, holding this part together. And then what I'll do is,
I'll just hide this one, and I'll delete this one out the way we don't
need that there. Alternate, bring
everything back. Now, from here then,
what we can do is we can bring this round so
we can press Shift D, r and Z, and then
try and line them up so that they're going to be kind of even
space from here. So I'm just wondering how
many I can get away with. So Shift D, r and
Z line them up. L so, and we've got a
big gap between these. So we need to go a little
bit closer, I think. So r and Z We need to go much, much closer like
so, and then will we be able to get
more of those in? That's the question. So
we'll grab both for these. We'll press R and Z. Like so. Maybe a bit closer, r and Z. Like so. And then can I get one more in? That's
what I'm looking for. So Let's grab both for these. 50 r and Z. Let's see how close
we're going to be. So we're going to
be pretty close, but I think we can
actually do it. So we're going to grab this
one and this one r and Z. Like so. And then finally, this one, can we
actually achieve it? So Art and Z? Yes,
and there we go. We've actually got them
into place where they're going all the way
around like so. They don't need to
be even as we said. Well, that is
looking pretty nice, and I think I'm happy without
that looks. All right. So now what we can do is on the next lesson is. We
can bring in our walls. We can bring in this window now and put it
wherever we want it. So we could have, for instance, a window here, and then
a window out here. And then from there,
we're going to actually make a start
on our terrain. Alright, everyone. So
let's go up. Let's file. Let's save it out. And I'll save the render view until
the next lesson. Once we've got the windows in. All right, every once,
I'll speak to you on the next one. Thanks a lot. Bye bye.
63. Starting sculpt process of terrai, creating base shape and remeshing it to get consta: Welcome back in to
Bnform Modeling and John inode workshop, and
this is where we left off. Now, if I pull this up, we should still on the
actual wall, like so. And now, if I press art and d, we should be able
to put this into place where it's actually
going to fit so R Z. And then just decide how high up you actually
want your window. And I think we can
drop this down, maybe a little bit like so. From there, then we can
press Shift and then Art and Z and bring it
round over here. So let's put it on this
part here, R and Z. Get it in the center,
and there we go. Finally, then, let's come
to this actual wall here. And all I'm going
to do is basically, I think I'll mark a seam
on the inside of here. I think it's just going
to make it a lot easier. So if I come back to this now. We've already got
a seam in there. So if I just grab this
shift and clk press unwrap. And then what we'll do is
change this over to wall, so wall there we go, and let's have a
look, make sure we've got no joining seams anywhere. And tag, double tap the
e. And there we go. Now, let's have a
quick look around, see what that looks like. Always before you put
your render on now, save out your work
because it is going to be a lot more cost on your
actual blend file. Also, at this point, I will tell you if your
blender is crashing, it's normally something
to do with V RM. You can see it's
using a lot of V RM. It will use the most
amount of RM it can use. But if you're struggling, so you'll notice when
I go back now, you've still got
that quite high. If you actually save out
your file and then come in and open recent and
just reopen it again, you'll see that it'll
drop down dramatically. So there's a little tip there. All right, so let's have
one more look then, see what that looks
like, and here we go. So you can see now that is really starting
to come together. Alright. So now we're on to actually starting
with the terrain, which is going to be
it's quite difficult to, you know, work with terrain, a lot of the time because
of the fact that we've got to make sure that it's all going in the correct place. So we need to make
sure that we've got enough room here for the
actual lake coming out. We've got enough room for, you know, how far is it going
to come over, for instance. We've got some steps that
are going to come down here. So the easiest way
to start this is, first of all, get the
outside scale of it. So the outside scale, where is the fence
going to come from. So we can see from here, we're going to have
probably coming from here, and then the fence is going
to be coming round to here, and then it's going to
be going all the way out here and it's going to
be like kind of square, but a little bit pulled
out at the same time. So let's work that out first. So all I'm going to do is I'm going to come to this part here, I'm going to minus
off the material. And then what I'm going
to do is press tab, and then I'm going to come in
with my actual knife tool. So I'm going to come
in with my knife. And then I'm just going
to be cutting this out. So don't worry. It's only
really rough at the moment. So we're just cutting it out, really, really rough
at the moment. So I'm going to have
it come in kind of out here, like so. And then I'll have
it come in out here because there'll be some
steps coming from these. So some steps will be coming
down to here, probably. And then let's cut this away, so we want a little
fence coming round here. And then going round to
here, All the way round. Now, we will need some
terrain for the rocks and things coming out here. So
we'll have that on there. And then coming round here. And then going back to
this part here, like so. And then finally,
what I want to do now is I want to just get
rid of the outside, so I should be able to
select the outside, shift select this outside, rest delete and faces, and you should be left
with something like this. And now what you
want to do is you want to make a basic part. For the actual pond. So where the pond is
actually going to be. Let's put this on. Yeah, we
can't really see through it. So let's see if we can put it on wireframe and actually
see a little bit better. And this is the
hard part because we've got to actually build
terrain in this part. So we just want to
make a hole in here to actually start to make it a little bit easier for ourselves. So what I'm going
to do is then I'm going to press K again. I'm going to start
from this part here. And then what I'm going
to do is have my pond and where do I want my pond to
come from, maybe over here. And now you can see this
is the point of the steps. So I want my water to
probably come around here. Going to here, like so, and then going around here. Like, so I back then
to the beginning. Now, of course, that's not
going to be entirely accurate. We just want something
to work with. So you can see we've got
something like this. Now, let's actually have
a look at what we've got. So you can see here
this is the pond. I don't think this
pond is going to be nearly nearly big enough, but we're going to fix
that as we move on. So you can see here I've not got it perfectly or
anything like that. You can also see that
this bit is way way out. You can see it doesn't go
far enough back in there. But all I'm going to do from this then is grab
the whole thing, so press A, and
then I'm going to press and pull it
down into place. So we're going to pull
it quite far down because from there, we
can actually work on it. And this all needs to be kind of rocks and
things like that. And just to have a look,
now, you've got a much, much better visual on how it's all kind of going
to come together, including the fence around here. Now we're going to
do is we're going to come back to this part here. And then I'm just
going to press and pull this down to the bottom. So to the bottom up here, where those stones are,
where they come down to. So somewhere around
there, and there we go. All right. So now
we've got that. All we need to do now
is press Control A, A transforms, right click, set origin, two
geometry, like so. And again, save out your work because it might
crash at this point, because the modify we using can crash if you
put it up too high. So I'm going to
bring in a new one, and the one I'm going to bring in is going to be called remesh, bring in your remesh,
and there you go, you should end up with
something like this. Let's apply that
remesh straight away. We don't need to
worry really about how many polygons
there is or anything. And if a press tab now, you will see you end up
with something like this. Alright. So now we're
on two sculpting part. So With the sculpting part, the first thing I
recommend that we do is start just pulling out the
parts that we really need. So you can see the
lake, for instance, we're going to need, where is the stones going
to come up to? You can see here, we've got a little bit of, you
know, a gap down here. Do we want the water
to come up to here? Do we want this to
come down to here? All these things we
have to think about as we're actually creating
this out. You know what? I think, actually,
a lot of this is already done pretty
nicely, for me, at least. But now what we'll do is
we'll go over to object, and then I'm going to
go to sculpt mode. And once we enter scalp mode, you'll see that we have
a entirely tirely new, set of tools and
things like that. Now, the first thing I
want you to do is just press R. And what
you'll do there is, let me just show you
that, so I'll go here. So R. You can see
that we can bring down this actual
topology, like so. So moving your mouse, you can
bring it up, bring it down. We're going to bring
it down, something that's a bit more easier to use. So something like that,
and then press controller. And then what will happen is as you go in and you can see now, we've got a lot less topology
to actually work with. As in old sculpting, it's better to start very, very low and then work your way up as you add more
and more detail. And you'll find doing that
enables you then to create things like faces or terrain
or anything like that, get the major
components done first. Alright, so here we are.
Let's come in then. Press tab, and let's
go to our first one, which will be our move tool. So we've got many many
move tools along here. The one I want to use
is just this grab. And again, to make your circle, so your radius bigger. It's the same as photoshop. You can press surplus on the little bracket keys to actually bring
it out, like so. And then what we can do is
we can actually start to pull this back into place. So all I'm doing is, I'm just going to pull
this under because I know my water is going to come
down to this point anyway. So I'm just going
to pull it back. Like, so don't worry because you're going to read
apologize it as well. Now, same as photo shop.
I think it's photoshop. Now, the same as Z brush, we can also use
the shift button. And what they'll do is that
will actually smooth it out. So I tend to pull
this back into place, press the shift button, just to smooth it
out a little bit, and then just keep pulling
it back into place. So I just want it
to come under them, pressing Shift bond, just drop
that down, as you can see. And we're just
working with this. If you need to go a
little bit closer in, just go a little bit closer in. It's going to be a fairly,
fairly long process this to get this just into
the way that we want it. But all I'm trying to
do at the moment is just pull these
parts out like so, so we've got any terrain
kind of in the way. So I'm going to pull
it all the way out and then pull it down. Like so. Let's pull it a little bit more. And we can also come in as well and hide some of the
buildings out the way soon. So I'm just going
to shift select it just to smooth it out, pull it out, pull it
down, and there we go. Let's pull this one
out a little bit. And first of all, you'll notice, I'm just shaping this
kind of pond area here. I think I'm happy with
how that looks for now, and now I'm going to come
round to the outside of it. So when I'm doing
this, I'm thinking, where is my actual water
going to come up to? So I think it shouldn't come
directly up to these parts. There should be a little bit of a gradual drop down on here. And I'm also thinking how big the actual lake and the shape of the
lake is going to be. So I'm just going to pull this
out a little bit like so. I'm going to pull it up
a little bit like so. And then what I'm going
to do is bring that in. Like so. Something like
this looks pretty nice. And now we've we've got some steps that are
going to come down here. So I think the steps, if I come and think
they will, you know, maybe come from here, leading down, which means that this might want to come
out a little bit like so. Alright, now we'll
work round the sides. I think I've got enough room
to work with along here. And I'm just making sure
if I had a fence here, I'll just pull it out
little bit more to make a little bit more room for the fence that's
going to go on there. I think I'll tighten
that back up in a bit. But for now, that's how
I'm going to have it. Alright, so now once
we've done this bit, what we want to do now is
come to our clay strips. Now I want to make my brush
a little bit smaller. And I'm going to show
you, by the way, the way to do this with
the least amount of brushes because most
people's mistake in the beginning is using, you know, every brush
that we've got available. And it's simply not
the best way to do it. There's a few brushes that are really going to give
you that, you know, that professional look,
and the rest of them are only really used in
specialized areas. So, you know, it could
be the cloth brush, which is only used
really with cloth or it could be the crease brush, you know, which is used main, you know, for armor
and things like that. You don't need to
use every brush. So I'm going to show
you really, really good ways of using the brushes, and using the minimum amount of brushes and getting
an amazing result. All right, everyone,
so I hope you enjoyed that, and I'll
see on the next one. Thanks a lot. Bye bye.
64. Using claybrush and smooth brush tool for sculpting terrain: Welcome back everyone
to Blender for modeling and umpton
node workshop. Now, as the title states, this is not actually
a sculpting workshop, but I'm going to
do my best to show you how to create
terrain at least. It's not going to teach
you how to create characters or arm or
anything like that. But I think with this course, you should actually
know what you're doing with terrain
at the very least. So now let's go through a little bit of the
more options or the more nuanced options
when it comes to sculpting. We have, mirror, which we
can create a mirror then, but this is not
really, something that needs to be symmetrical, so we can't actually use that. We've also jumping
back over here, got the radius, but you know I already how to change that. We've got the strength. Okay.
And we've got the fall off. Now, the fall off is
an important one. You can see we can
have a smooth fall off a spear fall off, and it's basically the outside, so you can see the
outside of here. So this little
circle, you've got an inside and you've
got an outside, and that determines what
the falloff is going to be. Now, the next thing we've
got over here is dye topo. This is an interesting one. It's like the Zbrush one. If I just put this for now onto my clay strips,
click this on. You will see if I click this on, let me have a warning.
Yeah. Okay, that's fine. If I click this on and come
over now and draw on this, you can see that we get this amount of
detail at a moment. However, if I come over
and drop this all the way down to something
like seven, you will see now, if I
come back and draw on, we get a lot more detail. In other words, this can
be used to add detail onto measures that haven't got a lot of resolution on them, or onto measures that have a lot of resolution on them,
it doesn't really matter. So in other words, it
doesn't take into account the amount of resolution
that's on the mesh already. This can control it separately. So I'm just going to press controls ahead and
get rid of those, I'm going to turn those off. And then, of course,
we've got the remesh, which is kind of
the option that we already have. So we're
going to use that now. If we press, we're going to increase this now just
a little bit like so. And now whenever I come
in and draw on this, you'll see we've got
a lot more options to actually draw on
this thing like so. Alright, let's make the brush a little bit smaller,
and there we go. So now what I tend
to do is I tend now to work out how
I'm actually going to, you know, kind of sculp this
and all of that good stuff. So what I'm going to do
is I'm going to come in. I'm going to sculp it a
little bit of a time, working my way through all of these parts all the way around. And then we're not actually
going to be smoothing it off. You don't need to smooth it
off, but I'm going to go to show you a few brushes that will make a little bit of difference. Now, the first brush I want to show you
is called inflate, and inflate is mainly
used when you've got a problem with the actual
thickness of the mesh. So you can see it when
I start to inflate it, it will inflate the mesh out. And from there, you can
just press control. And actually repologize it, and then that should
fix any issues where you've got with
holes in your mesh, for instance, or, you know, you've got a bit of thin
topology there and you would need to expand it and
then just remesh it, and then that should be fine. From here as well, we've
also got to place it on. So let's go back to
our play strips. If I put this on, you can see we end up
something like this. If I press the control button, you can see we can
go in as well. So we've got the option to press control press and go in like so. And then, of course,
we've got the option to smooth now smooth, should only be used,
in the beginning. So when you actually
sculpting something, you should then use the smooth, and then you should sculpt it a little bit less on top of it, and you will end up with
a much better shape. What you don't want to have
doing is going over this and just shade smoothing it up. I see that's what every beginner does to start with. You
don't want to do that. You want to get
out of that habit. The only time you want to use
smooth is in the beginning, just to smooth off once
you've got the actual shape. So you can see, I've got a shape here, I've smoothed it off, and now all I'm going to
do is turn my brush down, and now I'm just
going to come in and actually build it out like so. The other thing is a
tablet is helpful in this. I'm not going to use a
tablet because a lot of people out there
don't use a tablet. If you do use a table, though, come up to edit, go to preferences, and
you will have one. Let me just see where it is. It's under three button mouse. I think, let me overlook
it's on one of these. And it's over the input. So if you come to input, you need to make sure
you tick this on. That then will enable you to
use your tablet correctly. Once you finish turning it off, or you won't be able to select things in the viewport
and things like that. Just turn that on
if using a tablet, and if not, don't
bother with that. Alright, so let's crack on with what I'm going
to be doing then. So first of all, I'm going to
turn this up a little bit. I've got my little
clay strips on. You can, of course,
test out any of these, but I'm saying I'm
using clay strips. And what I'm going
to do, first of all, is bring out this
part here. Like so. I'm going to also shape
this part here so you can see this
part here. Like so. So we've got a little bit of you know where the water
is going to come up to. It's never going to be
perfectly straight like that. I'm going to turn this down
a little bit, and jaws keep Doing this bit first. So this is going to be kind of
where my pond is. So I'm going to want something that's going to
come out like this. And as I said, once
you've actually got the shape of it, then
you can smooth it off, and then you would go over it, basically. That's
what you would do. And give it a nice shapes because the water is a
little bit see through. You can see here, I'm
struggling a little bit on the amount of detail, but that's absolutely
fine because this is just the first kind
of passover on this. Don't forget, as well. You can also use the control button. So I'm going to have this
sloping down like so. And also, it's a good idea. When you get so far and
you've got bits like this. You will see the morgue over
them. It starts breaking it. Press control, and
just remesh it, and then you should
be okay to go again. So something like this. I
think it's looking good. Let's make this then this
little island in the center. So all I'm going to do is
just create a little island. And I think to create
a little island, I'll come in and use my inflate. So I'm just going to inflate. I'm going to turn up
my size quite big. I'm going to inflate this out, first of all, L then I'm
going to press control. And then what I'm
going to decide is where it's going
to come up to, so I'm going to make this
a little bit smaller. I can see here, I've got the
right kind of shape now. Going to create a piece of
land in the center here. And you can see, it's
going to poke out, and that's exactly what I
want something like this, like this, and then
control again. Like so. All right. So now this bit, I'm just
going to come in and make it very uneven because we don't want the ground to be
even on the inside. We want it to be uneven like so, because it's a lake after all. And now let's work our way
on the inside of here. So, exactly the same thing. Work your way under
here. Like so. And then this is the point now where we can actually
pull these down, it's in the control bin. Aim for this one, so control, get rid of those parts. And there we go. All right. So we've got pretty
much all of that done. Now we want these parts here because we don't want
them straight like that. We do want them to
have, you know, a little bit of size
and shape to them. So let's first of all come in and just turn that one down. Like so. Let's bring
this one up. Like so. There we go, and let's
come in with this one. Especially in that part there. We don't want any straight
lines, in other words, let's bring them out. Okay. Like so. Alright, so
that's that bit done. Now what we can do is we
don't actually want to know if we can help it
re apologize too much because we want to
do that all at the end, then we want to start
actually bringing in the finer details of
the actual scope. So I'm not I'm going to try and get away from repologizing
until the end. So all I'm going
to do is just work my way over now and look
at where I want the, you know, paths and troughs so I think I want this bit
a little bit higher. I'm going to work
my way around here. Now, the thing is
on this bit here. Remember, we're going to
have cobblestones here, so just don't go
too far if you do. Just hold the shift button down, and then we're going
to pull that back. And what I want to do is just have a little bit over here. Make this a little bit here and work out where I'm
going to come back to. So I think my fence
should kind of come round to maybe
something around here, and we're just going
to smooth that off maybe something
around here, like so. And then what I'm going to
do now is I want to actually sculpt out where my path
is actually going to go. So I'm going to have it coming
down here and down here, and then all the way down here, like so, and that is, I think, going to
be my actual path. Now, again, we're going to
do this over a few lessons. So don't worry if's
not looking the same. Just keep plugging away it. And what I'm going
to do now, so I want my path down here and
then what I'm going to do is just going to come
in and make it even more. So I'm just going to have coming down even more
and looking at the slope. And yeah, I think
something like that actually is going to be really
nice especially with this. It might be a little
bit too high, so I'm just going
to use control. Like so. And on here, I'm going to press control ar
just to re shape all that. And there we go, and
I think my path will end somewhere around here. This looks a little
bit steep on this, but as you can see,
have it not so step, and let's end it around here. All right, so, so control again. Smooth just on this bit. Let's have a look
at how that looks. And we can see now we've got quite a nice path going
down there with some, you know, kind of rocks coming
up each side. All right. So now let's work on this
part of the terrain. So first of all, because
the paths there, let's have it coming up
a little bit on this, just to give it The
more parts of that. You can see here, this is
what I'm talking about with where you want
to use your inflate. You definitely want to
use the inflate here. First of all, come in and use your inflate before you
actually read apologize it. So just use your inflate
a little bit on there, press control, and then use your inflate a
little bit more. What happened was it's
trying to take some. It's too thin here. I'm just going to inflate it. Press Control again,
and there we go. Alright, so that's how
far we've got now. What we're going to do now is we're going to actually come up, file, save our work. And I'll see on the next one, everyone for more sculpting. All right, everyone.
Thanks a lot. Bye bye.
65. Continuing to create stone design for terrain and addaing staircase onto shape : Welcome back, everyone to
blend for modeling and jump node workshop, and
this is where we left off. Now, before carrying
on with the sculpting, let's go back to object mode. And what I want to
do is now bring in some water because I've
basically finished around here and need an idea
of the height of the water to make sure all of these are the right height and
things like that. Just to make sure it all
really comes together. So what I'm going to do is
just bring in a plane now. So shift, bring in a plane.
My plane will come here. Now, remember,
we've probably got that little sideways V on. So we'll put it on
individual origins. And then what we'll
do is we'll bring out my plane into place. Now, from here, I'm going
to make it much bigger. And we can see here now we have an idea of where our water is
actually going to be up to. So I'm thinking that it's probably going to
come up to there. We can see maybe, let's see how far it
comes this way, first. So what we're going to
do is just pull it over, just so it goes into there, and that is the right height from our water as we can see. Now, what we can see now,
we've done that is we can bring this out into place, so I can pull it out all the
way over into place like so. And we can see now the water
is looking really nice. That's about the right height. And what we can see
is we probably need to come a little bit
higher on this bit, just to have it drop
off a little bit. We can see we've got
a little island here, and maybe we need to do a little bit more work on there because I always think like
we want some depth to this and things like that. And we can also now
get a good idea of the shape of
our actual water. So now let's come back
to our actual sculpt. We'll go back to scalp mode. And now from here,
we should be able to come in and
actually bring it up. Let's put it onto clay
again. So bring it up. And now you can see,
because I've done that, how easy it is now
to build this up. Like so. Let's also make a little bit of a
kind of big bit on here. So to give it some shape. There we go. That's
looking good. And now we're working on
kind of the rocks out here. When I do rocks on the outside, I tend to just go
round like this, long sweeping strokes, and you'll find that when you come
to actually finish these, It will actually look
really, really nice. Now, underneath, I
always go control and just long strokes again just
to shape that underneath. I'm not worried about, you know, breaking anything or
anything like that. I'm just doing long
strokes at the moment. And what I'm looking at though
is shaping this bit now, so you can see, we've got
a really nice shape here. Do we actually want this bit to come in so much? I don't
actually think so. So all I'm going to do
pull it out a little bit. We want a nice shape. But we don't want
it in too much. So we want to keep
this standard shape, but not too much in. Alright, so now
let's do this bit. We have a look at
what that looks like. So from here, we can see
that we've still got a very, very good view of this. We definitely want this to
come out a little bit more, so we're just going to add a
little bit more onto this. So I'm thinking that's Yeah,
that's looking fine. Mm. I'm just wondering
whether to add a little bit more onto it. Make it a little bit higher. There we go. And now
let's think about this. Now, this is a bit
too rigid over here, so I'm just going to
hit control and just round it off a little bit more. And instead, what I'll do is, I'll bring it out on the bottom, so I'm just going to
bring it on the bottom. Press control to remesh it. Press control then. There we go. We've got a nice and a
round a bit on there. Like, so, and then the
bottom control and just bend it in. Like so. And then just work our
way around this bit now. Alright, that's looking
quite nice there. And remember, we've got
some rocks as well, which we can also add on. I think this one
as well, we'll add in a little bit of depth on here as we come out here. Like so. Now the thing is we've
also got a tree down here, so we're going to put a
tree somewhere around here. So just think about where
the trees going to go. And I think we'll also
bring this out just to the Like, so. And now we come in round. To this bit round here. Again, long sweeping
strokes, as you can see, there's not a part on here, apart from the underneath
that we don't want to touch. So just take that
into account as well. So what we'll do round here is, we're going to bring
long sweeping strokes. And generally, when you're
dealing with rocks like this, you'll actually bring it in
first, so you'll bring it in. And then on the bottom, it will come out a
little bit further. So you can see on
the bottom here, it's going to come out further. So it's going to be
a nice gentle slope as you can see, coming out. Like, so. It only has
to be a little bit. It doesn't need to be too much, but it definitely needs to come out a little bit
from the bottom. So on here, look, we
can bring that up. Like so. And then as we
come kind of out here, we can bring it out like so. Alright, so that's
looking pretty nice. Now, let's work our way along. Again, we'll start
uneven in this. And then as we get
round to this part, we'll hold control and
then bring this part out. Like so. You can see now we've got a lot of variation. Let's smooth this in. Especially on these
bits, we want to give the idea or the
illusion of steepness. Especially around these
outside bits, Like so. All right. That's looking good. On this one, I'm just
going to smooth it out a bit before reapplying it. I'm going to press
control as well, because I can see I've
got a lot of breaks in my mesh. And there we go. And then on this bit, we've got a round kind of point here. We really want to pull
this out just to match that a little bit.
Let's just pull it out. Like so. And there you go. You'll see now that when we
come to flatten this out, it'll actually look really
nice because it's more. You can see how it looks now
when we've got that bit in. I think I'll even go a little
bit further, actually. Like, so, control. You can
see if you zoom out as well, you're able to actually make
your brush bigger naturally. So use that as well. Okay, let's press control. We've got some
breaking in this mesh, so let's just move that off. And don't worry, as I said, this is not the
final version yet. So, alright, let's
bring this bit out. Let's bring this bit in. Yours a little bit. Like so. And let's bring this bit in. And now let's do the
sweeping strokes. All this. And again, we're not worried
about this part. We come in round now
to this part here, and on this part, this is where the actual fence
is going to come out. So again, I really want
to bring this part in where the fence
is going to be, and then pull it
out on the bottom. So long steeping
strokes like so. And just so it
looks like there's a bit of a drop off
going on there. So down, as you
can see, to here. And hopefully, there's going
to be enough room there. It's have a look. So
there's enough room there really for
him to walk round. This is where the
fence is going to be. And then we've got a bit
of a drop off down here. And this one's a little bit
steeper as you can see. All right, let's have
a look around there. We've got a bit here that we
need to kind of fix as well. Like so. And then
I'm just having a look round now at what
we've actually got. And if I'm actually
happy with that. As a first iteration. And I can see here
press control a lot. I'm just going to smooth
that off a little bit. Like so. All right. That's looking good. And yes, I think I'm actually
happy with that. Alright. So from that bit now, now what we want to do
is we want to kind of put in some steps
going down here. So before we do anything else, we want to put in
some steps going down here and make sure that this is going to look
pretty nice going down. You know, you can see
already he's going to be walking up here.
Is this steep enough? How wide do the
steps need to be. And once we've got that then, we can actually carry
on sculpting that out. So let's actually do that now. So, first of all, we'll go
back over to object mode. We'll actually save
our work, so save. I'm just going to
check, actually, down at the bombard an side, how many actual
polygons this is. 361,000. You can see
it's quite high. Now, it is high
in the beginning, but we can actually
bring that down by a fair amount once we've
actually texted it as well, so we can really, really optimize this
mesh much, much better. So, for now, though, let's
come in, like we said, And let's bring in let's press
shift right click first. We'll bring in a plank of wood. So Shift A, you know, we could actually use the
steps on here as well. We could use the
geometry node for the steps and use that
to bring it down. So let's actually see if
we can actually do that. So what I'm going to
do is I'm going to come in, bring in a path. I'm going to pull
it up a little bit. And then what I'm
going to do now is press control
and A Control A, A transoms set
origin to geometry. And then now I'm going to come
over to my asset manager. Bring in my geometry no then
for my steps. So here we go. Let's bring in steps. So stairs. There we go. Put that on, and then I should hopefully be able
to pull this one up. Yes, and there we go. Now I'm going to do is, I'm just
going to spin it round. So I'll 90 spin it round. I'm going to minus off the base. I'm going to minus
off the hand rails. I'm going to minus
off the poles, and I should be left with
something like this. Now, of course, we can see these away weight, not thick enough. So let's come in and actually come just to our stairs here. We want the height to be march, much higher and thicker. We want the depth. To be pulled back like so. And so we can also
change the length still. We can still deal
with the length, so we can actually
bring that in like so. We're going to change the width as well and make them wider. And now all I'm going to
do is put them into place. So I'm going to go
to modeling now. I'm going to come in and put this into place where I want it. So let's grab this and let's see if this is
actually going to work. So first of all, I'm
just going to get these to be You know, going the right
way, first of all, so I'm just going to press
seven quel over the top. And then what I'm going
to do is I'm going to grab this one. I'm
going to turn them. I'm going to press
to pull them out, to pull them out,
to pull them out. And then to pull them out, and finally to here, like so. And then from there, I'm actually going
to pull them down. So you can see now I
can pull them down. So you can see, really, really not working like
that, but it will do. It just takes a little
bit of patience, and we have to come in
and start from the front. We also a good idea if you put posh editing on and
pull that out a lot, and then you'll see
now we've got a much, much smoother angle to that. And then we can
just come in again, bring it in a little bit. Like so. And then just
come in and pull those up. Like, so, pull this one up, pull this one up, and slowly, slowly get out what
we actually need. So let's pull these
down. Like so. And I think this is looking pretty
good because we've got all of this part hidden. So now I'm going
to do is just try, take off proportionality, and now just pull
all of these up. Like, so, apart from that one, we don't
want to grab that one. I want to grab this one instead. Hold them all up from here, and that's looking really nice. And then finally, now we just need to bring
these down a little bit, so you can see here, we
need to bring these down. Bring this one down,
bring this one down. And you can see that they're not wanting to drop
down for some reason. So let's bring them
down with this. All right. And let's finally, see if we can bring this down a little bit more. There we go. All right. So now, what it is is the reason why they
won't come down in noise is because it's trying to follow a certain type of steps
to keep the angle, so steep, but I think that is looking pretty good for now. And I know it's
going to you know, take a little bit of time to get all of these
things into place. So what we're going to do?
We'll just save that out now. And then the next lesson,
then what we'll do is we'll get these
more into shape, get them into place,
and then we'll start sculpting around these because that's
going to make it much, much easier for us. Alright, everyone, so
hope you enjoyed that, and I'll see on the next
one. Thanks a lot. Bye bye.
66. Refining sculpting form: Welcome Microphone to blend for Modeling and Jomon workshop, and this is the way
it left it off. Alright, so now what you want to do is you just want to make sure that all of these
are evenly spaced apart. So we're going to do this,
obviously with the length, like so and just make sure
that when you bring your guy, he's going to be able
to walk down them. Let's bring him over properly. Walk down them quite easily. You can see here he's able to step down them quite easily, all the way down to there. You don't want it where there's actually
tons of them because we're going to put some grass in between all of these as well. Now what we want to
do is we want to. Now we've got steps in.
We've got our water in, we've got everything
in that we need. Now we can time to sculpt
this out a little bit more. But before we do that,
let's come over, first of all, to our sculpting. And then what we're
going to do is we're going to sculpt this bit out first before we finish. So we can see that we've
got steps on here. Let's first of all, drop
this down a little bit. Like so. So we're going to
drop it down into these bits. First of all, I'm
doing the steps. I'm just going to
get the steps done. And then from there, once I know there's enough room for
all my steps to go up, as you can see,
I'm going to come, and I think I'll actually bring this out as
well a little bit. Like so. And then from there, what I'm going to do
now is the sides. Now, before I do the sides, I'm actually going to
turn up the resolution of my actual of this. So
I'm going to turn it up. So what I'll do is I'll
press turn this up then. I'll turn it up a
much higher level. So something. Something
like 0.7, I think. Let's try that and then
control. And there we go. Alright. So now you can see we've got a lot more vertices. I think if I press tab, you should be able to see now, what have we got 828. So more we've nearly
trebled it, actually. So now what we're going
to do is come in with our sculpting and now we're just going to bring
these out, like so. Well, now it's
going to look much. Like, so, and we can see we've still got that
problem in there. I think what I'll
do is I'll come in. You bring that out a little bit, and then it apologize it. I'm going to smooth it off. I'm going to bring
it out. Bring out my tool just make it
a little bit bigger. Just to get us over
that and then control, smooth everything off,
and then reapologize it. Alright, so this
is looking good. I'm just looking
round Mt build here. Now I'm going to
do is come back to my clate and I'm going to make my brush a
little bit smaller. I'm just going to now come in and build these out
a little bit more. You can see if I'm going a little bit too much
on some of it. Don't worry. We'll bring it
back as well a little bit. See here, nice, step kind
of sides and then come in, make them brush a little bit
smaller and then come in and control these parts as well. And the thing is
we don't want this two jagged. You can
see at the moment. I think I'm going
to have to turn up the subdivisions a bit
once I've actually got this, so I'm thinking I'll
bring this one down. And on here as well. Like, so. Alright, now, let's read
apologize it once more. I'm gonna press Sorry, I'm gonna press R. So
let's bring it all the way down now to
something like 0.3. Then let's press control. And there we go, now, when I come to actually read apologize, sorry, not read apologize. When I come to putting these,
you can see now just how easy it is to actually get
some really nice effects. So all I'm going to do now
is just come in like this. And bring in this
rock like this. And from there, then,
what you want to do now is you want to actually
come into the flat. So flatten, and all we're
going to do then is go over these parts
with the flatten brush, and now you'll see that
we get some really, really nice shapes without
doing a lot of work. So you can see here now using the flam brush
instead of smooth, you can see the kind
of shapes we get, and you can see it looks a lot more like rock and
things like this. So again, we're just going
to alternate between the play strips and The flattened brush so basically I'm going
to bring this in, like so, and I'll
just show you on this bit here like this. And at this point,
we don't really want to keep read apologizing. We just want to be using
now the flat brush. Like so. We're going to flatten it under here. Like so. There we go. I think actually, I've got my strength set a little bit too
high on this part. I think I'm just going to come
in and bring in some more, so bring in some more. Yeah. And then come with a flat. Like, so underneath.
There we go. All right. So now, all I want to do is
just come in and flan any edges. I kind of in the way. Like these, we don't want to square block there or
anything like that. We just want to fly
it out. We're going to work our way round quickly. And the reason is
we're not using the smooth is because
if we use this, we get a lot more
realistic looking terrain, whereas the smooth just
tends to smooth everything off and we lose all of
that kind of detail. If I use smooth on here, for instance, can you see
how quickly that goes down? We don't actually
want to do that. So we just want to go
over the top of them. Like, so, I'm going to work on the outside
first, so all of these. We can also press
control as well, and you can actually bring
them out a little bit. I'm going to come on over. Quickly come in this
bit this bit. Like so. And the other thing is,
if you really want you know that kind of
realistic looking view, what you want to do is
you want to come in now. And let's say we're using the clay strips, for
instance, or the clay. You can see now we can bring
in a little bit of clay. And we can bring in
this brush as well, bring in the clay like so. It's up to you which way
you want to do that, and then come in with
your flatten brush so the flatten and just make sure you're really up
to it real close, and you can see now how you can get a lot more detail on there. The rocks look a lot
nicer as you can see, and this would be the way
that you would actually make something a little bit more realistic as you can see, so you can see now
the closer we get in more actual realism we
can start to add to this. But we're actually going
to cover this with grass. We're also going to
obviously cover it with, you know, some
terrain and texture. So we do need to take
that into account, so we can get away with a lot less detail
on here, let's say. That's why I'm
taking a step back. And what I'm doing is, I'm just coming from this
part kind of thing. And on these bits, I
think on this bit, especially, I'll have
to re go over that. I don't think there's
enough on there. And also, we don't want to take too many lessons up on
actually doing this. We just want it to be right. This is how you kind of do it if you want to go away and
create your own masterpiece. You know, we won't be creating a masterpiece in the course, but I will be showing you
how to do everything. Alright, that's
looking pretty nice. Let's just have a check in here. I think they're
all looking nice. Anyway. Let's come right round then just to this part that
looks a little bit flat. And then what we'll
do is I'll do. What I was talking
about on this part. So what I'll do is I'll
come in play strips. So, Like, so and so. Let's bring this bit out. There we go, and let's put
a bit out on here as well. Like so. All right. Now, let's
come in with our flatten. And then I'll come
in really close. And start flatting this off. Just like this. All right. So just this last
little bit then to do. And then from there, we can actually bring
in some terrain. Just a simple terrain,
just for now. We don't want to put in the
grass or anything like that. That should be near the end. But this is going to give us an idea of what we're actually building and a better
view of everything. So we're bringing
our water and we're bringing some color
on the terrain, which you can see now. If I look from this
kind of angle, you can see now just how nice
this is all going to look. The other thing is as well. At the moment, we haven't
got a material on here. You can also come up and change the material to
something like studio, and you might then
have a better idea of how this is going to look, especially in object mode. So let's just put that back on, come in and change that back to flat or McCAP then
from there as well, you can also change the
materials and things like that. And then from there, you can actually change how
it actually looks, and it might make it easier
to actually bring out. Also, if you come over here, you'll see that you've got your brushes over here as well. So you've got all
your brushes on here. If you look on these,
you'll see that this is your brush that
you've actually got. You can change a
lot of the things on here, including the hardness, including the radius
of it and change, you know, the fall off of
it and all that stuff. So falloff is here,
for instance, everything can be done for here. Alright, but that is the most we're going to be doing
with the sculpting. We've pretty much finished
the sculpting now. So what we're going
to do now is move on with the actual built. So what I'm going to do
is going to go back now to object mode, and here we are. I'm also going to make sure that run object mode at the
moment, I'm kind of not. And the reason is, of course,
because I'm in sculpting. So let's go back to modeling, put that back on, let it
load up, and there we go. Alright. So this is
really, really nice. You can see we've got a
lot more detail on there. I think that's come
together really nice, and I'm just looking around now. And once we've got
our terrain on there, it is going to look
really, really good. Now, the one thing
I'm worried about is if I go to sculpting
mode from here. Yeah, it actually
looks bare on there. So when I was doing it
in the sculpting mode, for some reason, it actually
didn't look the same. So I'm just going
to have a look, actually, with my flabruh. I'm just going to come
back, go to my flam brush. Yeah, and I think it
was in the wrong one, and now you can see that
we're starting to get a much, much better detail on there. For some reason, it was
not detail in it properly. So yeah, on the sculpt option. But anyway, it looks
better now as you can see. I think I'm going to
leave this as it is. I think I'm happy
with it. I think it's going to look
really, really nice. You're going to smooth
off these little bits, with the flattened
tool. Like so. Went way around here, especially around this bit here with these lumpy
bits as you can see. And you can see how easy it is to get those rock formations, the way that I've showed
you how to do it. With a couple of brushes. And I think the last
thing is then we'll just flatten this bit off
because on here obviously, we're going to have
our cobblestones, so we just need to make sure
that especially on this bit, for instance, that
it is dropping down, so the grass is dropping down. D here. Like so. And then on this
bit, there we go. Okay, that's looking good. I don't think I
need to do anything else on here, apart
from saving my work. I'm gonna save my work out. I'm going to actually put
it back onto object mode. And then on the next lesson, then, we'll get that
material on here. We'll get our water in,
and we'll go from there. All right, everyone. So
I hope you enjoyed that. I'll see on the next one.
Thanks a lot. Bye bye.
67. Adding water and refining staircase engraving within terrain: Welcome back everyone
to Blender for Modeling and Jump
Conde workshop. Now, let's come first
of all to our terrain, and we're going to bring
in a simple terrain. So all I'm going to
do is, I'm just going to come over to my material. And I think actually,
we'll go over to asset manager because our
terrain will be over there. Now, I say it's simple, meaning that we're not actually going to be
doing anything with it right now apart from
just dropping it on there. So you'll see at the
moment we do have one, which says, ground material. This one here. This is the
one we want to drop on. So the moment I drop
that on, hopefully, It's going to take a little bit of time
to think about it, and then it's going
to work like this. Now, the moment, it
doesn't really look like anything at the moment. Let's put it on to render view and have a look what it
looks like on there. So let it load up.
And there we go, There is our simple terrain. Lots and lots of problems
with it, as you can see. Now, we're not going to
jump into this right now. When we come to
actually texture this, so if I go to my shading panel, I can show you how
this is all set up. This one is a little
bit more complex and it is actually three
different materials. But for now, what
we're going to do is we're going to build it
out a little bit more. So build out the kind
of structure a little bit more before
coming back to this because this is a little bit harder to do than the
other actual material. So what I'm going to do now
is also bring in my water, so I'm going to come in
to asset manager again. And then this time,
we're going to bring in our water, which
is this one here. So stylize water. Drop that on there,
and there we go. We can see that's
what it looks like. Now, again, I'm going to press Control or transoms right click, origin geometry,
press the taborn and just make sure it's
wrap correctly. So unwrap. And there you go, you can
see it looks like this. Now, let's make
sure, first of all, that it's actually going into all of those nooks and crannies where it
should be going into. So this is looking pretty good. This is obviously on our
rendered view as well, so you can see just how nice, that's actually
going to look now. And the other thing is that
we should do before moving on now is work out like whereabouts this door is going to go, is it
going to go there. Now, the other
thing we should do, before actually
tackling this big tower here is we should
actually bring in our actual support that's
going to go all the way around here and then bring
it up to our actual door, which is going to
be around here, because from there,
we can actually start building this out. This is the hardest
tower, by the way by far, just because of all
the little intricacies to there. All right. So what I'm going to do, though, I think before starting that, I can see I still
have a little few problems in where my stairs are. This is a little bit too small. This is not coming up high
enough, as you can see. So I'm just going to go back to modeling before doing that, and just finish off
these properly. It's a little bit too small going down there,
as you can see. We can see we've got some really large gaps going down there. So I'm going to do is press tab, grab this and I'm
just going to put it again onto scalp mode. And then what I'm
going to do now is just kind of finish this off because I want to make sure this is right before doing anything. So all I'm going to do is just pull this
back a little bit. I'm going to zoom in
a little bit more. And then what I'm
going to do is make this a little bit smaller and kind of build this
out a little bit. So I want to get away
from also, as well. I don't want to actually do too much because I've
basically finished this. So all I want to do is
just make sure that this like these gaps in here
are coming up a little bit, because we are going to
add some grass in there. So we just want to make them
slightly hidden, like so. And we certainly don't want
to have them, you know, we can't even walk down
the steps because there's not enough gap here like
this one here, for instance. So basically, I'm just making sure there's enough of a gap, and then I'm just going to slightly cover them up like so. And then what I'll do
is I'll re apologize and we should not
lose any of that, what we've actually
already done. So you can see I'm
quite zoomed in here. Like the grass will cover up a lot of
this, so that's good. Like so Like so and
the final one then. Like so. All right. Now, let's press control. Let's see if we actually lose
any detail. So control law. Let it think about
it and looking to see if we lost any
detail, and no we didn't. We didn't lose any detail. So that's really nice. So all this now
is actually done, and it's a perfect actual floor. Now, if we go back now and
put this on object mode. And then we go to render view. We should have a good idea now what these steps
are going to look like. And just looking to make sure there's a little
bit of a gap there. I don't think I'm going to
worry about warm little gap. And I think actually that's
looking pretty nice. Alright. So now, let's
come back then and we'll start on this
support over here. So to do that, let's bring in our planks
geometry note first. I just want to make
sure as well that this here is the right shape. I think at the moment it can probably come in a little
bit more on this part, so Just actually fix that. So what I'm going to do
is just press control, bring in another one,
shift and click, and let's just bring
it in a slight bit. So just slightly,
bring in this part, s a slight bit. And then bring in this part. Like so. And I think that
then looks a little bit bad. Now, right click and
shade Auto smooth. We've got a big line down there, but we're
gonna saw that out. I'm not actually sure
what's causing that. Oh, it's the sharp on
there, so I'll just press control lee and we'll clear
the sharp. And there we go. Now we've got a good idea of
what that's gonna look like. And I think that's
gonna look pretty good. Alright, so let's bring
in our planks of wood. So I'll come in over.
To asset manager. I don't think we've
used our planks of wood yet, so
let's bring them in. I'll put it on
object mold instead. I'll turn off the X ray. And then what I'll do is I will come on over to my
geometry nodes. And the one we want is planks this one here.
So let's bring in. I think it works
with. I'm not sure if this works with planes or cubes. So let's just bring in the cube, put our plank on it, and let's actually have a look if that's actually
going to work. I think I'll put it on
my guy. Yes, I did. I put it on my guy. So let's
just put it on the cube. There we go. Alright,
we've got our planks. Let's go back over to modeling. And then what we're going
to do is just press tab. I'm going to go over the top. And first of all,
I'm going to make sure these planks
are the right size. You can see that probably probably a little
bit for polling. Actually, they look about right. Yeah, they look right about
right size for planks. Maybe we want to
make them a tiny, tiny bit thicker, so let's
come over to our planks. And on this um you know, the first thing
we're going to do is just mess around with the whip. So we've got a width here,
and we've got a length. So if we mess around
with the length, we can pull that out. Now, let's go over the top. Now we know that
the right length, the right thickness,
looks about right. We can pull them up now into place where
they're going to go. So if I go over the top,
bring it into place. And what I want to make sure is that they come to this door. So if I spin this round, 90, spin it round. To this door. Like so. Let's put them into place. That's where they're
going to go. Like so. And then
we'll build to see. They want to come really just to the outside of here, like so. Around about
something like that. And we might as well, probably just carry them
going all the way along. So I'll think what I'll do is, I'll bring them actually
all the way to here, all the way to there,
and then we'll use a curve to bring these
to the right way. I think I'll have to
use the curve after. I don't think I'll be able to
curve them round from here. So what I'll try and do is
while I've got the jump you know there is I'll try and use the curve
at the same time. So let's do that now. So what I'm going to do is
increase the count. Obviously, it would be
going the wrong way. So I'll say 180, spin it around. Let's increase the count
even more like so. And let's see if I can
actually use a curve then. So what I want to do is I'm going to put
over the top of here. I'm going to press Shift S,
cursor selected shift A, and I'll bring in
a bezier curve. Cause the thing is, we have
got some bending on these. Not bezier curve, sorry. We're going to bring in a
curve, but it'll be the path. So we'll bring in
a path. And then what I'll do is I'll
just bring it up. I'll press S and bring it out. I'll press R, t and 90, and just then bring it across. And the reason is because the thing is we have got
some bending on these, you can see bending,
but it's not actually going to be
bending it around here. So we have got a curvature
but you can see it's not really going to curve it around exactly as we need it. So that's why we don't
want to use that. By the way, if you ever set one, you're not happy with it, just come down and
reset default value, and then it'll just
reset that for you. Alright, so let's first of all, see if this curve
actually works before we go into anything on here. So what I'm going to
do, I'm going to come, put this up, add modifier, and we're going to generate
deform and go to curve, and the curve is going to
be this nervous path here. Then what I'm going to
do is bend it round. So if I come now to
my nervous path, then this around, so you can see now it's actually
going to follow that. So that's great news. But what I can do now
is I can actually bend this curve going round, come back to my planks, and then just put
them back into place. So I want them against my tower, and I'm going to pull them
back into place like so. All the way over s to
the start of here. Now, before finishing,
I do want to make sure that these are going to go all the way to
where I want them. So they're going to come
all the way out to here. And then what I want to
do is come to my curve. And I want to pull
this curve out. I'm going to press and x and pull it out a
little bit, like so. And then what I want to
do is now I want to pull these all going back
to my actual tower, so you can see something
something like this. Not quite though, because we
need to get in like this. And we just want it
to follow that tower. And I'm also thinking, I I can rotate it, can
I rotate it round? No, I can't I can't
rotate it round. So let's pull it
back into place. Let's then pull this
into place like so. Let's pull it into. Like so. And let's pull this
one out. Like so. And let's also pull
this one out. Like so. And then you fiddling
around with it? Like so. And I think I want it
to go Jost up to there. And I'm just looking
now at this side. I think we'll do is actually. I'll add some more in before. So before going any further, let's increase the count, and then we'll pull
that back this way. Just to the start there again. And then from there,
what we can do is now, we can work out how thick we
want these planks of wood, how uneven we want them. And
you'll see at the moment. It doesn't really
look like anything. But as soon as we actually start pulling this all together, you'll realize just
how powerful this is. All right, everyone, so
hope you enjoyed that, and I'll see on the next
one. Thanks a lot. Bye bye.
68. Modelling Second Floor of wizzard tower, balcony walkway: Welcome back everyone
to Blender fall modeling and Jumping workshop, and this where we left off. So we can see here now, we have got some problems
with our curves. So let's come back to the curve. Let's maybe put
another one in here, so right click, subdivide. That maybe make it a little bit easier to get the kind
of angle that we want. So we're going to
pull it into there. Let's pull this one
across a little bit, making sure it's still on there. And then we'll want to do is I probably going to want
to extrude this out, just to bend it a little bit. So if I come over the
top again and I press, I can extrude that out. And then what I can do is
I can pull these back. So back to my planks.
I know it's a lot. Fiddling about, but you
are going to get much, much better look if
you actually do this. So now we'll come
back to our curve. We'll grab this curve here, and now you can
see I can actually bend that into place
the way that I want it. Alright, that's
looking pretty good. The only thing is that
I can see that this needs to probably come
out a little bit. Same as this one needs
to come out a little bit or move over
here a little bit, like so, and then let's
pull this one out. Like so. And like so, and then let's pull
this one over. Like so. And there we go. I think that looks as good
as it's going to look. And now we just need to
pull them up a little bit. So I'm going to come
back to my planks, pull them up, where
I want them to go. And then I want to
increase the number, so increase the count to round
about there, under this. Now, this is the time
when you need to decide, are you happy with
the height of this? So in other words, I
can pull these up right now and have them draws
going over the top of there. It just means though
that I'm going to have to pull this up and the door, just a tiny bit to sit
on top of that like so. Now, now we've got that
in the right place. The next thing we
want to do is want to come to this geometry node. And now I'm going to go through all of the
options on here, because it's going
to make a game changing difference
to how this looks. At the moment, it looks
a little bit sterile, I know, but we're
going to change that. So first of all, let's
come in to our resolution. So the resolution, if I
turn this all the way down, you'll see if we go
into the wire frame, you can't see anything on there. If as soon as we start
turning this up, we've got a lot more resolution to this. And we want that. We want actually some resolution to get that nice pen for us. Let's put this on
object mode, then. The next thing
we're going to do, is the gap between the plants. And we can bring
this gap all the way down to nothing or bring
it all the way up, and we can have much, much
bigger gaps in there. Now, think for me, I'm
going to leave it on 0.15. I think that's absolutely fine. And the other thing is,
we're able with this got no two kind of change the gap so they're a
little bit more uneven. Next of all, then, we've
got the thickness. Now, I think that actually these need to be a
little bit more thick, so I'm going to
bring them out, make them a little bit chunkier, and then just pull them
down a little bit more. And then what we're going to
do is the thickness random. We're going to change
that a little bit, just make them a little
bit more uneven, like so. You can see already now it's starting to
really come together. I might have got a little
bit too much on this. I'm going to come
and bend it down. Getting them slightly uneven. You don't want too much when you're doing
things like this. Next of all, then,
we've got the width, and we already know
what the width does. It's like the thickness of that. I'm just going to put
that back to what it was. So I'm going to leave the width because I'm happy
with the width, and all I'm going
to do is change up the width randomness
to make them a little bit uneven like so. And then finally,
we've got the length. And the length is obviously,
how far these come out. I'm happy with the length of the moment because they
fit right along here, but I just want to
increase the length, randomness, and I think that then makes all
the difference. Finally, then, as we
come down here now, we've actually got one
that says bend minimum. And you will see now we can actually bend these up and down. And it is, of course,
You can see it's quite lumpy here because it's
based on this resolution. As I turn that up, you can see that we've got a lot
more resolution. Let's just go back though and put this down
to what it was. So we're just going to
before we bend them, and we've also got a bend
maximum and a rotation. So let's first of all
come in to the bend. We're going to turn it up very, very slowly or very
down, like so. We're going to
turn the other one down a little bit, like so. Now we've got a lot of
unevenness on there. And then finally, we're
going to go to the rotation. Now, the rotation is going to rotate these things up and
down and not bend them. So you can see it's looking
pretty crazy like that, but let's just turn
up the rotation, randinss just a slight bit. Like, so, slight slight bit, and then let's turn up this one to the side, as a slight bit. So I'm just going to
put on 0.5, maybe. And there we go. Alright,
Dad is looking really, really nice. I'm
happy with that. And now what I need to do
is I need to actually put some kind of supports under here before
doing anything else. So I need a really, really large support coming under
the outside of here, going all the way around here. Now, we've already
got a curve in here, so we might as well use
that because that'll be the perfect way to actually get this support going in
there. And what's more. We can also use this
curve to create a kind of fence rail that's also going
to go around there. So we're going to do
that now. So, what I'll do is I've already
got this here. So this will make a great thing. We've also got the
curve one as well. We could also use that and we
can curve it around there. But let's give it
a try with this because it might make
it a little bit easier. So what I'm going to do is
press Shift D. I'm going to then bring it up into place. I'm going to rotate it round. So x 90, rotate it round. I'm going to press S and Z. Sorry, S and y, to pull it out, like so. And then all I'm
going to do now, is basically, I'm going
to add in some edge loop. So control, add in some
edge loop because if not, we won't be able to
bend it around there. And then what I'm
going to do now is I'm going to add it to this. So I'm going to come
in, add modifier. We're going to look for a
generate sorry, a deform, and we're going to
look for curve, and the curve, of course, is
going to be this curve here. And then what we're
going to do now is bring this back, hopefully. So let's try and
bring it back now, and hopefully it will curve. Exactly we want it. Now we can pull it down. Now, of course, we want
this to be on the outside. So you can see on
the outside of here, so you can see and
bring it down. I can also bring it in or out. So right on the outside
of here and you can see how it follows it
around beautifully. And the other thing
is, if I press tab, I can also then press A. I can press S and y and
pull it out even further. So S and y, pull it out, and then press tab and you can see how we've
got it going all the way to this end
of where we want it. Now, I think it should only really come up to
roundabout here. But rather than decide now,
we'll just pull it out, and what we'll do is
we'll pull it all the way out just to this part, just so it goes under this part, so I'm going to pull
it all the way out, so it goes under this
part here, like so. Then what I want
to do is just make sure that it sat
underneath there, like so, and all of these
parts are sat on there. Finally, then, I
think I also want to make sure that it's got maybe. I don't actually, you know what? We'll leave it like that
because the subdivisions on here are probably
going to work out bare for us because we can probably do what we did
with this one over here, where we've got
the split like so. And I think I will do
that on this as well. Alright, so it's going
all the way around there. That's absolutely fine. So now what we'll do is we'll actually come to the next part, which will be the
actual fence then. So let's do the fence now, which is going to
run on top of here. Now, I said, I
would make a fence, and I never did in the end, to use, and we keep making them and not
actually keeping any of them. And unfortunately, then, we
actually end up bending them, and then we don't have one
straight one to actually use. So what we'll do is we'll press shift A, we'll come in over, bring in a cube, And then what I'll do
is I'll make this the same size as the
fence down here. And we will want to
make this fence because we're going to want it
going around there as well. So this time, we're going
to actually make our fence. I'm going to pull
it up into place, make it a little bit smaller. So something round
about this size, and then I'm going to press tab, grab the top of it,
pull it up without portion hurting on to where
this one is going to be. I'm going to press S, pull it out, and then, and then S, pull it in, like so. And now you can see, it's a little bit bigger
than this fence. So let's make it a
little bit smaller. So I'm going to press tab, S make it a little bit smaller. And then what I'll do
is I'll pull it up. And now you can see
the round about the same size just
needs pulling down. Here, into the floor, like so. All right, so we've
got this part. Now, let's create this part
here. So kind of like this. And all I'll do is I'll
press control A or transforms, right
click SurrogenGometry. Shift S, cosa selected. Shift A, and then all I'll
do is create another cube. Press the S borne,
bring it down, and then I'm just
going to pull it out and see what that's
going to look like. So SN then just pull
it out, like so. Now think this. That's going to be
about the right width. And then I'll just
grab it again. Shift And then let's join
it together with Control J. Control or transforms,
origins geometry. And now let's level it off. So add modifier,
generate a bevel, uh point or naught three. And finally, then let's come in, tab A U Smart UV project, click, and let's bring
in the material. So the material is going
to be planks. Like so. Let's have a quick look at what that's
going to look like. And you can see now
because we've got more things in the actual scene. It's taking much, much longer
to actually render it out. The one thing is that
this if we hide this, so let's put this actually in terrain before we
do anything else. So I'm going to do is go
to uclection terrain. And then I'm going
to click Okay, and then that's going
to drop down there. And from here, then I'm going to hide that
out of the way. And you can see now it's
going to work much, much faster than what it was. Alright, so this
is looking good. So let's then put this over
with our piece of wood. So I'm just going to
put this over here. I'm going to also call
it a primitive as well. So I'm gonna pull it
up to where these are. Then what I'm going
to do is press M, and I'm going to drop it
in my primitives. Like so. From there, then I'm just
going to grab it again, shift D. And before I finish, I just want to make sure it is I press one, the right scale. So if I drop this down here, that is perfectly
the right scale. Alright, so let's bring it
up and on the next lesson. We're going to array this, and we're going to get it
fitting around here like so. All right, everyone, so
I hope you enjoyed that, and I'll see on the
next one. Thanks a lot. Bye bye.
69. Balcony Curved Section, adding railings and refining shape: Welcome back everyone
to Blender for modeling and John
Conard workshop. And this is where we left off. Now, at the moment, we haven't going subdivisions
in this part here, which means that when
we put it around here, it's not actually going to bend. These are going to
be pretty straight. So just take that into account when you're
actually doing this. I'll show you what I mean as
we move on further into it. But first of all, let's put
it where it needs to go. So I'm just going to pull it up, so it's going to be
placed on here somewhere. So we've got a good place of work to start on top of that. And then what we're gonna
do is we're going to come over to modifiers. Put the bevel up, add modifier. It's going
to be an array. You can see that ray is fitting in near enough perfectly,
so that's quite good. Let's pull it back one like so. And then what we're
going to do is a rate a few more times. And then we're going to add
in another one on deform. And that, of course,
will be our curve. Let's come to our curve. Let's put it into place like so. And now we've got the
problem of it is, did I reset my transforms? I think I did. So I
think I just need to change where it's actually
going to go in here. Can see, that's nearly it.
It's following really nice. It's just the wrong way round. Sometimes this will happen. Don't worry if it happens. We just need to find the
right one, so x is not it. It might be the first one, or it might be this one.
Let's see if it's this one. See if I can actually pull
it round, and there we go. Now they're upside down though. So I need to change them round, so let's put it on Zed.
It must be the first one. So let's put it on X. And
instead of doing that, let's spin it around, so
our Zed 90 and there we go. Alright. Finally we got it into the place where we want it. Let's pull it out
then. And there we go. Let's put it into place. And we want that basically coming near north
into this here. So just into here. And there you go.
That's actually fitting really,
really nicely for me. Now, you can see,
if I double tap the A that these are
really, really straight. But what you can do to fix
that is if I come in to this, because it's a raid, I can
actually get away now. We've add in some edge loop. So add edge loops in here
for left click right clip. Press the taboid and now you'll see they
actually bend round, and I think that actually
makes it look, much nicer. Alright, so you can see now, that if you put on
your render view, this is really, really starting now to come together
as you can see, so you can see we've got
this coming out here. People are going
to walk down here. The one thing I would say is, this is not far enough in. I don't know if I move
this out or something, but this is definitely
not close enough in now. So what I'm going to do
is I'm going to actually move this in a little
bit, so this curve. I want it to be moved
all the way in. So I'm going to hide
the top of here. And split it off because this is the detrimental
point of this part. So Control plus P selection. And then what I'm going
to do, go back to object mode, and I'm
going to hide this. So H, hide it out of the way, seven to go over the top, and now I can really see where I need to get
this curve up to. Can I see where I need
to get this curve up to? Actually, it's not
really helping too much because 'cause I think it's
'cause we haven't go top on, so I'm going to have
to do it the other way, come into my curve, press the tab button,
and then let's get this curve into place so we can see we're miles
out on this part. So miles and miles out,
let's bring it in. Bring it in, bring this part
in. Bring this part in. Let's look at this part. Let's bring this part
in this part in. There we go. Now, we want to actually pull this
out a little bit, so I'm going to
grab my curve here. Like so. There we go. Now we can actually pull maybe this part in a
little bit like so. There we go. Everything
has followed along. So that's really good. And now let's have another look
at what that looks like. So double the A on
our rendered view. Now you can see that's
looking just tons, tons, bad. Alright, I'm happy
with how that looks. We've got enough room in there. The one thing I'm
thinking is maybe, and this is the time
when you really want to change things
if you're going to. Maybe we should
put our door here. And maybe we should
bring this back a little bit because it looks a little bit too thick
at the moment. So what I'm going
to do is I'm going to come to my actual wood, and all I want to do, I think it's the width.
Let's see the width. No, it's not the width.
So what it's going to be, let's go to material instead. We're going to change down.
It's either the depth, it's going to be the length,
so it's gonna be the length. So let's turn that
down. And there you go, now you can see, I
can pull that back. And then what I'm going
to do now with my curve. So I'm going to
come to my curve. I'm going to actually
move the whole thing into place. Like so. And now you can see that
this is going to have to be moved along a little bit and then taking
some of these off. Same for this. I'm just looking now
I'm thinking that it is looking a little bit better because it's a little
bit thinner on there. And I know it seems
a bit of extra work. But what I'm going to do
is, I'm just going to pull this back just a slight bit. Like so. I'm also then
going to pull the fence. Just back. Like so. Just so it fits in
a little bit bare. And I'm also thinking
that I need my fence now to probably come one
less or one less, and then let's bring
it round into place. And then I want this now
to start round here. So with this one as well, I'm going to pull this round
into place, not on there. I'm going to use the
green, I think it is. There we go. And
then on this one, I'm going to reduce
the amount of counts, but let's reduce it by two. Maybe one more.
Let's try one more. And I think actually looks bad, not actually joining that. I think let's turn it down one. Yeah, I think it looks
bad just like this. So yeah, I'm going
to do it like that. One thing I do want to do is p this in a little
bit. There we go. And this one here I can get
rid of it if I don't need it. And finally, then just these
are we happy with these? You can see it needs coming
over slightly from here. So I'm just going to
bring it this way. Onto here, like so. And there we go, I
think, actually a much, much happier Who that looks now. Let's put it on rendered view. And yeah, it looks
much, much beater. It was too wide. And now it
looks much bare from this, as you can see, from this view. It looks just a ton bare. So yeah, I'm happy with that. Alright, so now what
we're going to do is, we're just going to go back to object mode. We've
got our planks on. Let's come to these
now, first of all, and now we'll start implementing these parts into it because I think we've pretty
much finished on here, so all we need to do now
is tidy all of this up, you know, get another plank
of wood going across there. And just tied it
all up in general. So all I'm going to do,
I'm going to come to this. We've got a bevel on here. So I'm going to come actually, I've got a curve on here, so I'll apply my fa so control, apply my curve Control right
click shade Auto smooth. And then what I want to do is, I want to make these a little bit uneven as well. So
I'm going to come in. And I don't really do I
want to make them uneven, I do want to make them just
a little bit more rough. I think what we'll
do is we'll come in, we'll grab one of them and
just pulled it down, like so. We'll grab this one. And with actual proportional editing on, make sure connected only is on. We can then just pull
them up like so, and we'll just do it this way, just to make them a
little bit more uneven. So we're just pulling them
down lightly as you can see, And it's just those
little extra touches that do make a large difference. So you see here, let's
pull this one up. And finally, let's
pull this one up. And there we go. All right. Let's look in a bit
more and even now. And then finally
we can come in, A, and we can come to mesh, transform, and we're
going to go to randomize. And then we're just going
to turn this down. 0.1. And there we go.
They're looking good. And then finally,
we're just going to come in and press U, Smart UV project click Okay. And now let's have a look
at what we've got there. All right. They're
looking perfect. That's that bit done.
Now, let's work our way down then to
these planks of wood. All of the planks
look really nice, we've got a plankre which
I'm not sure about. I think we'll need
to keep that because we'll need some
stairs going up here. These are the hardest
stairs, by the way to do. So I'll think we'll keep that. All we'll do then
is come to object. We'll come down to
convert, convert to mesh. And you know what,
before doing that, we'll actually take these. And what we'll do is
we'll press Shift. And I'm just going
to drag them over, and they're going to look like
that because all I want to do then is minus off my
curve, and there we go. I'm just going to
put these over here, so we've got some planks of wood in case we need
them for anything else. So we're just going to
put them over here. Press, put in our
primitives, and there we go. We don't need to
worry about those. And now, finally, let's
convert these planks. So I'm going to go to
object, convert to mesh. So. Now, let's look
at our planks. So first of all, They haven't got a bevel on them. So
let's sort that out. So all I'm going
to do is come in, press control or transforms
the origin to geometry, add modifier, generate a bevel, Naught point, aunt three, like so, and then let's
add a different material. So I'm going to come in Planks. So PL planks minus this one off. And there you go. There's
your planks of wood. And they should be already unwrapped because we
made the geometry notes automatically is wrapped within the geometry node itself. So you can see they're
looking pretty nice already. Alright, so now what we
need then is this part. We're gonna do this
part on the next one. We'll actually
make sure that all of this then comes together. We're going to
need another piece of wood that's going
to go in here, for instance, and
then it's really, really going to start
coming together now. All right, everyone, so
I hope you enjoyed that, and I'll see on the
next one. Thanks a lot. Bye bye.
70. Adding Second Floor staircaise using geometry node staircase generator: Welcome back to everyone
to Bendap Modeling and Join Old workshop, and let's carry on then
working around here. Now, first of all, this is
going to be way too long. But what I want to do is
just apply the curve. Now, I can't apply the curve. Oh, maybe I can actually cause this wasn't a
curve in the beginning, so maybe I can just press
Control A and apply that. And then what I want
to do is obviously cut this down two sides. So I think I'm going to bring it to here and then pull
this back a little bit. So let's give that a try first. So I'm going to press Alt
Shift and click Control plus. Bring it back to
the delete faces. And then what I'm going to
do is bring back this now. So if I come in, lt
shift and click, I should be able to put
this on to normal and then pull that back into place
with the right one, which I think will
be the blue one. All right. Something
like that. And then what I'm going to do is just
put this back on global. And now we're going to
split this wood up, so shift and click, l shift click, and then just
t shift click around here. I'm going to split
this up just so these pieces of wood
can going together. And then what we can
do from there is we can use some pieces
going into here. I think actually, what
I'll do is instead of every I'll have
them every other one. I think they'll work
out bare for us, especially with the support. So we'll have it
Something like this. I'm just wondering if we
want it to on this one. I think actually
this will work out fine for us the way
it is like that. So all I'll do is
right click Markosam. From there, then what I'll do
is I'll split these up now, so I'm just going to press L
and then come into each one, so you can see here
that this one. You know what? I'm
going to press Shift H. Hide everything
else out of the way. And I'm wondering, Under here, if I press L on here. So L. Yeah, that's it.
Goes to that one so I'm going to
press L on this one, and then L and every other one. Like so. Like so. And then I'll split
them off, so y. And then finally, what
I'll do is I'll press A, and I'll come in and mark a seam once I've
actually cleaned them up, so clean up, fill holes. And then I need to
now split these off or we should already have a seam on each
of these, I think. So if I come in, just tide
this one out the way. I should have a seam there as you can see, so that's perfect. Now all I want to do is put
a seam on each of these, so control, mark a seam. And then what I'll do is I'll press Altag bring
back everything, and now we want one more seam on the underneath on the inside. And might as well do
it here, actually, because this is facing
those pieces of wood. So right click Marcin, A. And I'll reset the
transformations first. Control A all transforms, right clicks origins geometry, right click shade AutoSmooth. And then finally,
what we'll do is now we'll bring in our bevel, because it looks as
though this bevel, I'm not sure if it's
actually gone on. Let's turn it up a little bit.
Yeah, it's actually there. It's just we need to make
them a little bit smaller. So I'll just press
controls head. I'll press A, and
then all I'm going to do make sure this is
on individual origins, press the S born without
proportionality on, make them a little bit smaller, so they're not quite touching. And so, and there we go, that's exactly what
we're looking for. Finally, then we can press
unwrap because we've marked all the seams and let's change this basic wood out for planks, so planks. L so. And then we should end up
with something like this. Let's press Saltge bring everything back.
And there we go. That's looking pretty nice. Let's have one look then
on our rendered view. So let's have a look
on rendered view. Yes, and there you go.
You can see that's just looking really,
really nice now. I like the fact that it's
been split up there. You can just see where it's been split up just in
those little things. And I think now
on the next part, we should first of all,
finish off this fence, so we should get this
fence pulled over. And then on the next part, we should work on this part here. The reason I want to do that
is because then we're able to start creating this
entire tower up to the top. Once we've got the
tower in place, then we can actually
start on this door here. Now, the rest of the build from this is much, much easier. This is really the hardest
part of the build. So once we've actually
got this bit in place, we can really motor along. We've actually
creating these parts. So let's do this fence first. So what I'm going to do is go to object mode. I'm
going to come in. Save. And the other thing is, I might still keep this
because I might still need it to actually come into this part here
and bend it round. So I'm not sure if I
will or if I won't, but I'm just going to keep
it there just in case. I'm just going to put it up
here or something like that. All right, so let's come in, and what we'll do is
we'll come to this part, we'll grab just this part. And I'm going to
put it on normal and see if I can
actually move it across, which I can, so shift D
and then move it across. And I'm wondering why
it's moving that way. We don't want it
to move that way. Can we actually
move this? No, we can't actually move it
across for some reason. So all I'm going to do, I'm just put it to prate back on global. And instead of doing that,
I'm just going to move it across the normal way. And all I'm going to do is
just put it near this one. Like so, and then bring in
a couple of planks of wood. Now, I don't really want to use these planks of wood because you can see that they're bent. We don't really want
it bent on here. So all I'm going to
do is shift desk to selected shift D.
Let's bring in a cube. Let's make the cube smaller.
Let's spin it round. So s spin it round.
Let's pull it out. We should be able to
now move it on normal, so we should be able
to move it out. Can we actually move it on norm? Let me just put this on
to medium point instead. There we go. That's
what we want in. So let's rotate it round
a little bit more. On the X, I think it is. No, I'm going to put this back on global
just for a minute. I'm going to line
it up with this. So I head, there we go. Now let's put it back on
normal and we should be. No, we're not. We're
still not good to go. We're just going to
place it in there. We're going to grab this face. And hopefully,
hopefully, there we go. Now we can actually
pull it out into place. Alright. That's what
I'm hoping for. Now, we can see that this
one's a little bit out. This one also is
a little bit out. We need it to go a
little bit closer first. So all we'll do, we'll just
grab the whole thing and just move it out just a
little bit like so. And then finally,
what we'll do is we'll make this a
little bit thinner. So ln grabbing it
all the way around. Sorry, shift shift
and click and then ln S. And then we should be able to make this a little
bit thinner like so. Now, what we want to do
is we obviously want to make it the same thickness
as the other one. So we're going to bring it up. Like so, and let's bring
it down, and then grab it, so Li D, and then let's bring it down into place like
so. And there we go. All right. So now, hopefully, this won't be the same material. It has got a bevel on them. I'm just going to check to make sure it's got the
bevel on there, because it's part
of the same thing, and it also should have
the material on there. It should just need
unwrapping again. So I'm going to grab
this one, this one, and this one, press
and Smart UV project. Click Okay. And there we go. We can see that this, unfortunately, is A little
bit small on the UV map. So let's go in to the UV map. And what we'll do
is just press A, S, make it a little bit smaller. So I meant a little bit big because it's a little bit
high on the resolution. Let's press dot, and it's not really the same as the rest. Now you can see it is. Alright, let's go
back to modeling, and that's that bit done now. The next hardest part is getting our steps
to go from here. All the way up to
our other door, which is up near the top here. And I'm thinking that we'll
use our stairs again. So I'm thinking I'll
use our stairs. I don't actually have my stairs, so I'll just have to
create a new one, so we'll do that now. So we'll press shift day.
We'll bring in a curve. We'll bring in a path. We'll move it out of here. We're going to reset
the transformation, so control or transoms
origin to geometry. And then what we'll do is
now we'll first of all, bring in our geometry node. Now, I don't think let's have a look, see if
it's still there. We might have the one
that says stairs. Yes, stairs is there,
so that's good. Let's rotate it round. So our 90, and I should be able to then put
it into place over here. And all we're going
to have with this one is just going to be the actual. If I pull this up, And I
pull it up without that. Let's put it up on
global. There we go. All we're going to have is
just these stairs here, so they're the ones going
to lead up to that. So we now need to
fit this into place. So all we're going to do
is get rid of the base. We're going to get
rid of the handrail, and we're going to
get rid of the poles. And then what I'm going to
do, is bring down the length. I want the length
to be not so close. I also want the stairs,
the width to be more. I want the height to be probably a little bit
higher because they are going to have to be
pretty thick and I want the depth to come
back a little bit. Now, the main thing on this is, I want to keep them kind of the same distance
from each other, and that's going
to be quite hard when we start bending
these around. So what I'm going to do
instead is I'm going to turn this around so
sd spin it around, like so. I'm going
to go over the top. And then what I'm going to
do is, I'm just going to put these into place like soap. Now, let's come in and
actually bend these round. So we're going to try
and bend them around. Going up to this part here. So all the way up to here, as you can see, and then
going to bend this one round. You can see already we've kept near enough
the same distance. So let's bring these
ones round now. Like so. And we're just
going to see if we can actually keep
them into place. Like so. And then
what I'm going to do is I'm going to bring
the whole thing down. And I think we should
from this one here. We've got a plant
coming out here. We can basically start it coming from this
one here, I think. Now, let's bring them up. So all I'm going to do is bring it up to this one here. Like so. And then what I'm
going to do is just pull it back a little
bit because I'm going to put another plank
in there as well. I think also we need to now
just get them into place, so they're all going to
come back into place. Like so. And if they're
not going in there, we can increase
the width as well. So let's increase the width. Just a little bit. And I think now that is looking pretty good. As long as they're
all in the wall. That's the main thing
that we want to do. So let's pull them back. Like so make it so they're actually going to be able to
actually be walked up. Let's pull them
back into the wall. Let's pull this one out here. Let's pull this one in here and let's pull this one as
well in here a little bit. And I think, yes, now we
can actually do that. I think we're going to pull
this down a little bit. So we can actually
start from this one. And I think if I put
another piece of wood here, then they're able to
actually walk up there. And I think that's actually
looking pretty good. The one thing we of course, we're going to have is that
we probably need to extrude this out a little bit
more or we'll put just another piece of wood
in there to finish that off. I think that actually
is going to be better. And then what I need to do now, I just need to think, like, how is this all going
to be supported. On the original, actually, I put some fences
down each of these, and that might be the way
to go and then from there, I actually used the
support on each of these. Now, I think I think actually, it did turn out really nice. So yeah, I think I'm going to do that, what I've
just spoke about. Alright, so what I'm
going to do, I'm not going to use a
curve on this then. I'm going to make this perhaps a little bit harder for myself. The one thing I
want to do though before doing that is I just want to make sure the thickness is right because
you can see here, these are a little bit thicker. So if I come in and just bring
this up, to that, like so. And then I can see
the thickness here. So if I come in now
and not the depth, sorry, the actual height. Bring this up again.
And there we go. It's about the right height now, and now we'll mess around with Have we got anything else we're going to mess around
with let's have a look. So we've got the
resolution offset. I don't think we can actually change anything else on there. So yeah, let's go with that. So what I'm going to do is
going to come to object. I'm going to convert
to mesh like so. And then I'm going to
come to this one here. So I'm going to just go to
press L and L on this one, delete and vertices there we go. That's what
we're left with. Now what we want to do is
we want to first of all, I don't think we'll do
a curve at the moment, or should we do a curve?
That's the thing. I want to bring I think
I actually want to do this individually
without using a curve, just to show you how
to do that as well. In case you have a
really, you know, weird situation where
there's something like this, and it requires a little bit
more work to get this right. Alright, we'll do that on the
next lesson anyway for now, we're just going to
save out our work, and I'll see on the
next one, everyone. Thanks a lot. Bye bye.
71. Modelling wood supports for staircase on 2nd floor: We'll come back
everyone to Blender for Modeling and Jumpton
old workshop. So now, let's grab this top. What we'll do is we'll press
Shift S, cursor selected. And then what I'll do is I'll
grab this guy over here. I'm going to press Shift
S and selections cursor. Let's put him up
on this door then, so he's jaws going to be
start on this top step. And then what I'm
going to do now is I'm going to come over and
grab this part here. I'm going to press Shift
D, 'cause I might need it for the fence that's
going to go around here. And what I'm going to
do is press Shift S and selection to cursor. And that's going to
easily then be enable me to drop that into
place around here. Now, we can see From here, if I put it that height, it's going to be
about the d height. But the thing is we want to make sure that this is dropping
down a little bit. And from there, as well, that it also is able to
go into this part here. So we need a little bit
of a fence in here. And not only that, we
also need to make sure that it's supported
going down here as well. We want some support
going down here. So what I'm going to do
is I'm going to come in. I'm going to grab
the bottom of it and pull it down to roundabout here. And then what I'm going to do is I'm also going to
make some support. So I'm going to bring this down, like so into here, just for now and then bring this one down a
little bit into here. Maybe that's a little bit. Maybe maybe we'll
need three on this. Let's just try three,
so I'll bring it down. Yeah, and I think three
should actually do that. And then what I'm
going to do now is put a support on the
underside up here. So let's make the support that's going to
support all this. And then as we move this round, we'll have actually supports
that are going to go down into the wall underneath.
So we'll do that now. So what I'm going to do is,
I'm just going to press Shift S and cursor to selected, I'm going to then press shift A, bring in a cube because then we'll have a
bevel on it. If we do that. Let's bring the cube down, so it's actually a size we can actually work with, and
we'll bring it down. Around about this size. I can then make it a little
bit smaller, like so. And then what I can
do is I can pull this near enough into my wall. So I'm going to pull
this into my wall. Now, I've got no doubt
that some of these, for instance, like here, they're not going to
fan the wall properly, and we're going to have to
bend them a little bit, but I don't want
to bend them yet. So all I want to do
here is get it to the right place and then
get my supports in here. So that's what
we're going to do. So what I'm going to
do now is I'm going to get a support going
into the wall now. So I'm going to
come, grab this one, shift D, bring it down. And then with this
one, I'm going to press Alt shifting click
going around there, AlternS and bring
it down like so, and then bring up this
part into place like so. Then what I want to
do is I want to come round to this part
round here now. I can't really see it, so I'm just going to turn off my x ray, and then I'm just going to
now grab it and pull it down into place
where it's going to look like it's actually
going to support something, which you'll be round
about here, I think. Next of all, then, I
want to bring this back a little bit because you can
see it's right in there. We don't want that. We
want it actually to be near enough a little
bit back like so. And finally, then, now, I've got where they
actually need to come. I got near enough where they're going to
be into the wall. You can see they're a
little bit into the wall, a little bit too
far into the wall, as you can see they're going
into the wall like so. So what I want to
do now before doing anything is just bring
these back a little bit. So I'm going to
grab this one, I'm going to pull it back so it's actually just touching the wall or just out of the wall like so, and then go to do the
same with this one, so bring it back like so. Now, for me, I'm going
to press Shift H, hide everything else
out of the way. And then I'm going to make the supports that are
going to go in there. So all I'm going to do with
both of these is I'm going to press enter S,
and pull them out. Now, you can see, because I'm doing them
both at the same time, I am going to need it
on individual origins. Then press the S button, and then all you're
going to do is press and pull it this way, and then we can make the
supports from there. Alright, now, before we move on, let's unwrap these again. So I'm just going
to grab all these Smart UV project, click. And I'm also going
to come over and add in a another material, which will be my Iron Dark. And from there then, I'm
going to turn this off now. I'm going to come in, grab
the back of each of these. I'm going to press
control plus twice, and then Iron doc I'm going to click a sign, and there we go. That should be now.
A good support except we need
something in here. So let's do that part next. So all I'm going to do
is I'm going to grab this part with Alt Shift
and click Shift D, and then r and x and 90, and they're going
to make it smaller and fit it into place. So. Make sure it's not too
thin. We don't want that. So S and pull it into place, like so, and then S and
y pull it out, like so. And then we'll make another one. So Shift D, So, pull it into place, S
and Z. And there we go. Now that should be looking as though it's
actually supported well. So now if I come in, and then
I'll unwrap these again, Smart V project click. And there we go, that's
looking pretty nice. Now, let's see if we
bring back everything, if we bring this now
down to the next part. So you can see that
the bottom of here. So what we're going
to do is we're going to grab each one of these, and I'm going to grab the
bottom of here and I'm going to put this right at the bottom of the step. So
right at the bottom. That tells me then every single
one I bring across here, Not only after I've
got to rotate it, but first of all, let's get
the right actual height. So what I'm going to do is I'm going to come to this part here. I'm going to press control
one to go around the back. And then all I'm going to
do is I'm going to press Shift D and bring it to this one here and bring it down to
this bomb step, like so. And I think from
there, then we can actually work out
how to do this. So I'm going to press Shift D. I'm going to bring
it to the next one, which will be down to here,
down to the bottom step. Like so. And I'm hoping we don't have to put
another one in there. I don't think we will. I think we can actually
do it with this. So we'll press Shift D, bring it down to here, down to this bottom step
like so, and then shift D, and I'm hoping that we can
get one more in there and down to the bottom
step, like so. All right. That is
what I think we'll actually work. All right. So now what we need
to do is we need to actually rotate these
around now obviously, because we need to have
them in the actual step, so you can see here,
not really in the step. So we'll come to this one first. Well, we've got this one just on the outside of the
step, which is okay. And now what I need to do is just rotate each of these round, depending on if they
need to be rotated. So you can see this one here, just needs to be in the step. Same for this one, we're
going to move it in place. And then what we're going
to do is rotate it. So r and Z rotate it round. And we're going to
put this on normal. And then we're going
to put it just so it's in the step, like so. And maybe maybe we can move that one up a little
bit further forward. Now we come to this one.
We'll do the same thing. So and Z rotate it round. Seven to go over the top. And what we want to do is
just follow this angle now. So I'm going to press G,
put it into place like so. And there we go, make
sure it's in the step, and then the final one,
let's move it over first. And let's press seven, to go over the top and Z. Rotate it round,
move it into place. Like so just into the step. And you should have near enough, these things going
in the right place. So I think we need maybe
one more on top of you. Maybe one more. Now what I'm
going to do is pressure D. Bring it out, and then let's
put this where I want it. So I'm going to have
it here I think. And I'm going to rotate
it round, of course. So R and Z rotate it round. Let's put it into place. G, put it into place. Like so. And I think that
will be absolutely fine. Now, let's grab
our guy a minute. Let's put him down to here, and I'm hoping this
all works out. Let's put him on to
this top step here, and then we'll see
the height of this. And I think it's
a little bit low actually on this bottom part. On there needs to
come up a little bit to run there, I think. And I think we can
actually work with that. So we've got this step here. And now all we need to do is
actually move these around. So all of these needs
to move around now. But I think, yeah, we can get rid of probably this bottom one. I just need to make sure everything is falling
in together now, so you can see quite
a complex structure. We're going to have a lot of things to move
around here because of the complexity of
the actual cylinder. But let's first of all come in and work on
these bottom ones. So I'm going to put in an
object mode to work on. I'm going to put it
on here like so. And then what I'm going to
do now is bring this down on lobal and we'll get them into place first,
so you can see now, if this is here,
it's supporting all of those steps, the
same for this one, if I come to this
one, grab this one, and if this is here, it's going to be supporting
those steps. So I'm going to put it
into place. Like so. And we'll also take
this off a minute, just to pull it
into place like so. And now you can
see that we've got some supports in here
on each of these steps. You can see this ones
a little bit out. We'll come to that next. We'll do the front ones first. So I'm going to
grab this one into place, and then grab this one. Into place, and then just pull it forward and then
just pull it sideways. Like so. Pull it back a
little bit. There we go. And now this one is an easier one because we
can just pull it that way. And then pull it down. Like so. And then this one, I think
we can actually get rid of. We can get rid of
this one altogether. I don't think we're
going to need it. So L delete vertices. And yeah, that's probably
going to look good. Now, let's work our way on the next lesson then
from the other bits. So what we'll do is we'll
bring these up next or down, depending on where
we need to put them. So you can see this one. Probably going to
need to come down a little bit more and
just kind of line these all up and they look haphazard and that's
what we actually want. So it's good that we're
actually doing it this way. All right, everyone,
so I hope you enjoyed that and I'll
see on the next one. Thanks a lot. Bye bye.
72. Adding additional wood supports to staircase and refinining their attachment to tower: Okay. Welcome back,
everyone to blend the form, Modeling and John in workshop, and this where we left it off. Alright, so let's come in, and what we'll do is
we'll come to this one. We'll put it onto so we
can see inside there, and we're going to
bring it down. Like so. Bring this one down a
little bit. Like so. And we're just trying to
now level them all up. The other thing is, I
think at this point, we can grab them all
pretty much join them all together because it will make it a
little bit faster. So Control J, join
them all together, press tab, double tap
the A, and there we go. Now we can actually see
really what we're doing. So we can see here We can probably bring this
one up a little bit, just to kind of level
them all up going round. We can certainly bring
this one up as well, like so, and there we go. Now, let's work on
the next part then. So you can see the next part is going to be this one here, and we want to leave enough room realistically to have three. So can we actually
get away with three? We're going to look at
what that looks like. Now we've took this
off, and there you go. Is that going to look right?
I think actually, it does. So now I'm going to do
is just grab these two, pull them down into place. And then what I'll do is
I'll pull them out and in. And then down a bit more. Like so, and you can
see this one's way out. So I'll pull also,
this one is way out. So let's pull those down. I'll grab these two.
Pull them down. Like so. I'm just looking and wondering if I actually
need a middle one. If I do need a middle one,
do I need a middle one? I'm just going to come in and actually delete both of these out of the
way just for now. Delete You know what? I don't even think we
need a middle one. I don't think we need it. So what we'll do is
we'll just get rid of these two, delete vertices. And then we can
come, grab this one. Put it into place. Like
so. Grab this one. Put it into Like so, and then grab this one,
put it into place, bring it down, pull it back. Pull it in place, so into place. Like, so there you go. This has made it quite
simple doing it like this. Now, the only thing is,
I think this one now should come into
place around here. And then maybe we'll
have one more post. I'm just wondering if we'll
have one more post here, and then they will
then go into the wall. So what they'll do is, I'll
just grab all of this. I'll grab all of this as
well. So we've got it all. I'll press Shift D.
I'll go over the top, and then I'll press G and put this into place
round about here. And then I'm just going
to rotate it round. So my guy is a little
bit in the way there, so I'm just going to
move him out, come back to this, and
then rotate it. So our Z rotate it. Now, you can see they're
rotating weirdly, it's because we're on
individual origins, so let's rotate it now, and it should work
out perfectly. Okay, so let's get this
one into place. Like so. And I'm thinking maybe this is a little bit
too far into this wood, so I'm just going
to pull it out. And then these parts here now, I can come in and just
grab each of these. So if I grab this
one and this one, should now be able
to pull them out and now put it take this
off, and there we go. Now, let's have a look
at what that looks like. So now the next thing is
we need to make sure that all of these little back
parts are in place. But let's have a look what
it looks like, first of all, before doing anything else to make sure that
it's looking good. So all we're going to do is
have a look at it from here. And, yeah, it's it's
looking pretty nice. I'm glad it's actually a
little bit wavy like that. I'm just wondering whether to bring these
down a little bit, because it is looking like something is missing
a little bit. So what are I'm
gonna do? Just come into this one and then press L and bring
it down slightly. And you know what? That
might act might do it. So let's bring this one down slightly as well. Well,
let's bring it down. And let's do the same thing
with this one, bring it down. And then the same with this one and this
one and this one, bring them all down
together. Like so. And I think as well, what I'll do is I'll lift
this one up a little bit. So I'll go back to object mode. And then we'll just grab this because it's a little
bit too far out, and then this one as well. Like so. And now let's
have another look at it. So save out your work again, and then go to render view. Double tap the A, and
there we go. All right. So let's look from this angle. Yeah, that actually
looks pretty good. And it looks like
it's well supported. And it also looks like it's fairly complex and
how it's supported, which I think is
really good, actually. Now, the one thing
is that I think I need to rotate
these parts around. I don't like them so much
bumped bunch together. I do like this one, you know, these two here, this one here
that I want to move around. So all I'm going to do is
I'll just grab this here, press Shift S, Kura selected. And then what I'll do is
I'll just grab all of this. So. Press a little sideways V and put it to three D cursor. And then all I'm going to
do is put to press art and Z and move it round like so. Now I think actually, that's looking perfect.
Same on this one. We'll come here, Shift S, cursor selected, and
then grab all of this. And then all we're going
to do is rotate it. So Art Z, rotate it round, but it's actually in
there, supporting like so. Now, from here then, I can
put it back on object mode, because I'm happy with it now. And all I want to do is
pull out these parts now. Just pull these out you know, just to bring them
back a little bit. So I'll do this pretty
slowly as well, just to make sure I get it right because it's kind of
final bit on here, apart from the odd
touches here and there. But it is looking really nice. It's just those
parts that I need to figure out how to do those now. So what I'll do is I'll come in. I'm thinking I'll put
it onto X ray again. In fact, I can't put
it on X ray yet. I'll press tab, then
I'll put it on X ray, and now I can really
see what I'm doing. So if I grab the
back one off here, the problem is once
you've got them, you have to keep
turning this off, as you can see, press a
little sideways V again, individual origins,
and then just pull it forward. Like so. And this one, we can actually
grab going round here. So if I press shift and
click Control plus, we should then be able to
pull this one out like so. Now, let's go to the other ones. So if I come into here, I'm going to grab this one
here and this one here. Control plus, like so. Turn it off, and then
all you're going to do, put it on object mode, and then all you're going to
do is pull these out. Now, I'm hoping, yes, some of them need pull it
out a little bit further. I'm going to put those
there, and then this one, O shift click Control plus
all that one into place. Like so. All right, let's do this one first because we can see this ones
a little bit easier. So I'll shift click
Control plus, pull it out, and then let's
come to this one now. Control plus control
plus, turn it off. Pull it out, and there we go. And now where's the others. So all these others are
actually nearly in place. This one's a little bit out
as we can see. Control plus. Let's pull it back.
Can I put this on normal to do
this? Yes, I can. That's going to make it a
little bit easier for me. And then I'm looking
at this one. Control plus. And there we go. And then this one, control plus. And there we go. All right. So looking from here now. Let's put it on
rendered view and have a look what that looks
like, double tap the A. You can see we've
still got a little bit of gap in these ones here. The rest of them are in. It's just these ones here,
so I'm going to come in. Oh shift click Control plus. Pull it back into place,
and then same for this. Like so you can see
just how easy it is to see it actually on
your rendered view. It's much easier when you've
got shadows and stuff. Like so then, I think we're
actually done with that part. So let's go to object mode. And there we go, guys.
That's actually done. That was pretty hard to do. Now, let's come to this door and just move it over slightly. We need to make another piece. That's actually going
to join on here. And then we have to think about what's actually going
to support this piece, and you can see that this one is a little bit further forward. So from here, what I tend
to do, because this part, we haven't done the actual
supports round this part yet. So we need to think about how we're actually going
to support that. And we also need to support
going under here as well. So we also need to think about that
because these parts here, might actually need
coming out further. So we need, kind of a support under here where everything's
going to go into. So I think what we'll do is, first of all, we'll
do that first. So I'm going to grab
this one over here, Shift D. I'm going
to bring it over. I'm going to press R and just rotate it round just so it doesn't look
anything like that one. And then what I'm
going to do is I want to get it into
the center of here. So let's go back before
we finish the global, Put it over here, and now let's grab the
center of this part. So if I come in, I
can grab this line. So press two, shift click
Shift S, cursor selected. Now come in with this Shift
S and selections cursor, and then let's just
make this bigger now. So if I pull this out like so
and pull it up into place, now I'm going to
have a good idea of how things can
actually go in there. The other thing is, I
think I want to make this a little bit higher as well, and then pull it down
because it needs to be something really chunky
to support these. Now you can see on
the next lesson, we can pull these parts out. Into holding onto here. So, it makes it
even more tangled, even more interesting
if you think about it, and that's exactly what
we're looking for. All right, everyone. So
I hope you enjoyed that. I'm going to save about my work, and I'll see you
on the next one. Thanks a lot. Bye bye.
73. Finalizing Staircase: Welcome Macavon to
Blandfor Modeling and John chino workshop. And now, let's actually
put these into place. So you can see here
that this one here, for instance, is going
to need to be moved up. So let's do this one first. So L, L. Make sure you
get the supports as well. And then all we're
going to do is just move it up on top of there, like so, and then
just make sure you come underneath and pull
this part up as well. So gonna grab this part here. I'm going to pull
it up into place. So you can see it's
stuck a little bit, and we don't really
want that either. So let's just rotate the
whole thing round just a tad, so sad rotate it round. Like so, and there we go. And now let's look
at the next one, so we can see this one here. Probably going to have to
come down a little bit. So pretty much the same thing. We'll just drop this
one down a little bit. Like so, and then with this one, we'll just pull it down
into place like so, and we're just basically
tied in all of this up. Now, with this one
here, it's up to you, whether you move it up or
whether you move it down. I think with this
one in particular, probably better off if
we pull this one up, so it's actually
supporting this. So what we'll do is we'll come in, we'll grab all of this. And then what we're going
to do is just pull it up here, like so. And then what we'll do is
we'll grab this part here, pull it back, pull
it back into place. Into here, so it's
touching there. And then finally, we'll come
back to this bit and we'll pull this part up
into place like so. Alright, with this one, then, probably want it sat on
the top of there as well. I think it's going to
be a better support, but the problem is
before we do that, we need another piece
of wood in here. So all I'm going to do then is I'm going to come
to this part here. We should already
have a bevel on, which is on there,
so that's good. And then what I want
to do is, I just want to put another
piece in here. So I'm going to press Shift D. I'm going to bring it over then. I'm going to see if I'm pretty normal if it'll come over there. No, it won't. So we'll just
keep it on the global. And then what we'll
do is we'll just pull this into place like so I'm going to rotate it
round Z rotate it round. Just so it's touching in that
part there, as you can see. And then from here then,
all I'm going to do now, is make this easy on myself, so I'm just going to
come in and delete these edge loops
because then I'll have a nice flat
piece to work with. So dissolve edges,
and there we go. And now from here,
I can actually pull this back into where I want it. So I'm going to want it round about here and I'm going to want this bit pulled back nice
and flat against the light. And you can see, just down nice that actually
fits into place. The one thing is we need
to bring this face back, so let's put it on this one, and we're looking for face
select and we want this face. Is that it? Is it this one? There we go. That one there,
and then just pull it back. Then it off. And there we go. Now, that's all into place. And the final thing I think is, I want to make this bit
a little bit thinner. So it goes on there. So all
I'm going to do come in, pull this back. Here. Like so. And then pull this one
out here. Like so. And then finally,
let's lift this up a little tiny bit onto there. Like so. All right.
There you go. Now what we want to do is
pull this last one up, so it's actually going to be supporting this part
here just a little bit. So what I'm going
to do is I'll come into this part, and
I'll grab it all. Like so. And then I'm going
to pull it up to place. And I'm also thinking
whether I want to bend this a little bit
more round to here. So actually, so it goes in a little bit more. And I
think, You know what? I'm going to do that as well. So I'm just going to move this, just a little bit over. So now you can see that looks as though it's
really supporting that. The only thing is
we need to bring these back into place now, so I'm just going to pull
it out and then pull it in, pull it up a little
bit. Then for this. Pull this one here. Pull it out, pull it in, pull it
up a little bit. Okay, something like that. Now we'll go in and we'll
bring both of these out now, so we've got actually supports
in this wood as well. I think they'll look better. So let's actually see
if it does though, let's actually go in
and find where we are. So let's put it onto
this, and there they are. So let's grab both of
the back ones on here. Control plus, control
plus. Let's turn it off. And let's see now if I
can put this on normal, canna hold them out
in that direction. And maybe, maybe. So let's see. There we go. Hold them out. Like so. And I think with these ones
actually, It might be beat, if we can rotate them, if I can rotate them
on individual origin. So let's try art and
head or art and y. Yeah, and I think
actually it's going to be bet if they
rotate a little bit, double tap the A. There we go. I think we've actually
finished With that part, it all looks like it's
supported really well. It looks like it's supported
in the wall as well, and it looks like it's supported by these pieces of wood here. And I think that looks good. Now, just this last part then, which is this part here.
We'll come in then. We'll grab this
part, we'll press L, we'll press Shift
D. And then what we'll do is we'll
bring it along here. Now, we've got normal on.
We don't really want that. Let's put it on local. Maybe that will be a little bit easier for us. And yes, it is. And then what I'll
do is I'll put it onto normal now and pull it out. Can I actually pull it
out let's have a try? No, I don't think that's
going to let me pull it out. So instead of doing that. It's in the water. It's
in there now anyway. So all I want to do is just
really pull this out here, so I'm just going to
put it onto global. I'm just going to pull that out, so it's kind of the same
length as here as you can see. And then finally, I just want
to pull this piece over, so I'm going to grab
this edge. Pull it over. Like, so. And there we go. Alright. So now we
just want one kind of plank down here,
one plank on there. We are pretty much done
with this, I think. Alright, so let's
come to this part. And what I'll do is I
will grab this part here. I'm going to press Shift D.
I'm going to bring it out. I'm going to press
to pull it down. Like so. I'm going
to press L then, and then I'm just going
to put it into place. And I'm hoping that it
needs to just be made a tiny bit thicker. So S and y. And then let's just pull it out. And then let's pull
it into place, pull it back into place
again. And there we go. Now, that's a little
bit too thick, I'm feeling, so I'll
just pull it down. Like so. And then I'll press L, Shift D and then pull
this into place. Like so. And finally,
I think, Yeah, I think actually that looks as though it's going
to hold there. But I don't think I actually need to do anything
else with that. We've just got one
piece over here now. And I think with
this one, actually, I can just grab this Shift
D seven to go over the top. Z, straighten it up, G, pull it into place. And then I can strain it up
now properly, like this. So R and Z like so, and then let's just pull
this back again on normal. That should work fine now.
All right, that's that one. Now, let's grab it again, and then I'll just put
this back on global, shift and then bring it down, put it into place,
just above there. So, double tap the
A, and there we go. Now, let's have a look what that looks like because we
might need to do a little bit more on
wrapping just to finish. So let's have a look. Well, it looks amazing
going around there. Really happy with
how that looks. It's all starting to
come together now. And we just want really some support coming
out of here now, you know, because this is not really supported at the moment. But the stairs going up
there look fantastic. The one thing is
that we do need to now re unwrap all of these, and of course, we need to
unwrap these stairs as well. So let's do that now. So all we'll do is first
of all, put on material. We'll go then to the stairs. We'll save out our work
once more, so save. And then what we'll
do is press tab. We'll press U, Smart UV
project. Click Okay. We haven't any
modifiers on here, so let's put on our level. So let's put it on Naught
point, Naught three. So, let's bring in our material to minus both of these
off in object mode. Click the down arrow, click P
L planks and there's those. Now, let's come to these. And what I want to do now is
unwrap them all together. Press takes, just in case
you've got anything hidden. Press A, then, U,
Smart UV project, click Okay, and then they
should all be different now. And I'm just making
sure that I've still got my iron on,
which I should have. And there we go. Alright. That's that bit in
place. Pretty much done. We have a little
bit more down here, but we'll do that
with the rest of the building out of the wood. And the next thing that
we just want to do then, on the next lesson is we
want some simple supports, which are going
to come from here and they're going to
go into the wall here. And then once we've
got those in place, I think the rest of it for this bit at least
should be pretty easy. So we're not going to we
might actually be able to These ones are quite thin. I think we need
some thicker ones. So I think we'll create
a support just going in, then we'll create
them with a bit more thickness than these ones. I think they're a little
bit thin going up here. This one is actually supporting
an entire balcony with, you know, kind of door on there. So, yeah, that's what I think we'll do. All right, everyone. So I hope you enjoyed
that. Don't forget to say about your work at
the end of each lesson, and I'll see you on the next
one. Thanks a lot. Bye bye.
74. Adding Wood Supports around Large tower Section: Welcome back, everyone to
Blend the Form Modeling and Jode workshop and this
is where we left off. Alright. So I think
now what we'll do is we'll just put
this on object mode. And what I'm going
to do before putting in our supports along here. We will come in and
grab this one here, which is our Bendiwood
and then press shift and bring this
over to this part here. Now, what I'm going
to do first of all is get the right thickness. You can see that
this is going to be not thick enough,
nowhere near. And what I also want
to do is if I press one is get the front of
where this can lie on. So it's going to be around
this part or this part here. I think this part we'll
use this part here. So shift S, cursor selected,
grab my bendy one, Shift S, and selection
to cursor like so. And you'll see well
we're using that because it is going to be quite
a big bend on there. And also, we need it to be a fairly bit
thicker than this. So let's first of all come in and see if it's
on the extrude, which it is, so we
can extrude it out. And then what we're going to
do is now pull this down. So I'm going to pull this down
all the way down to here, and then I'm going to
pull it out into place. Like so all the way
into the floor, and then finally,
I'm going to pull this one back, like so. Then I'm going to pull
this one back and just get it into a nice straight line. Now, you can see here we do have a problem.
It's not straight. So all I'm going to do
is just delete these, delete sorry, delete vertices. And now you can see it straight. But we have a problem now in that we can't
bend it very well. So all I'm going to
do, right click, subdivide, right
click, subdivide. And now, if I grab this top bit, put it on proportional editing,
and then pull this back, we should, be able to pull that back into place
really, really nicely. I'm going to pull it
back to there, and then I'm going to pull just this one back that again, pull this one back just a little bit to bend it
slightly up at the top, and this is what you
should end up with. All right. So now what we need
to do is we need to rotate this around this
actual cylinder. I'm going to come to this
part here, grab the bot part. So let's just scrab
the bottom part here. Shift and selection two cursor. And then we'll come
to bendy wood. And then all I'm going
to do now is click the little sideways v3d cursor, and then R and Z and I should be able to
put this into place. Now, I do want two at the
side of each of my doors. So something like this. I do want probably
one coming down here. So I'm going to press
Shift D and then R and Z and bring this one round to here just so it
fits into there. Like, so might have to pull this one out or pull
it back a little bit. We'll do that in a minute.
And then what I want to do is I probably
want another one, maybe another one in here. Let's see what that's
going to look like. So Shift D and then r and Z, let's put it in the
center of here. So somewhere around there. And then I'll work
my way around, so I'm going to
grab this one now. I'm going to put it the
other side of my door. So shift D, Z, pull it out to the
other side of the door. L so Now before moving on, I just want to see if I actually do need
this one in here. So let's have a quick look
at what that looks like. And I think actually it's going to look better
if that is in there, 'cause we've got a lot
of wood around here. These bits are also going
to need a lot of wood. A lot of this is
going to be covered with IV as well, for instance. So yeah, I think it
looks bad like that. So what it means I can do
now, put this on material. And then what I'll do is
I'll pull this around. So I'll grab this one, Shift D, and then I'll go r and Z and move it to
somewhere like here. And I've got a degrees
on here, 35 degrees. So let's put it on 35 degrees. And then all we have
to press is shift D, and then RZ 35, and then shift D, Z 35. Follow it round then, and hopefully I'll come to
here or nearly there. So shifty Z 35, and there we go, we're
nearly in there. So I'm just going to
move this slightly over. Like so. Move this one
slightly over. Like so. And there we go. Now
I'm going to do is. I'm just going to join
all of these up together. So I'm going to
grab all of these. Like so. So, like
so, and like so. I'm going to press
Control and J, hopefully, can join
them altogether. No, we can't, so
we can't do that. So instead of that, what
we're going to do now, Because these are
the bendy wood. We're going to come to
let's come to our bevels, first of all, and
turn these off. So I'm just going to turn the
bevels off on all of those. I don't think if I grab this
one, grab this one last, press Control L link
or copy modifiers. And, yes, that
actually might work. So what I'll do is I'll
grab all of these. They've all got the bevel on, and we'll grab this one last, and then we'll press Control
L and copy modifiers, and that should then take the modifiers off
for everything. Now, from here, what I
can do, I can come in. And grab all of these. This one, last,
check first of all, to make sure my resolutions
quite low, which it is. And then what I'll do
is I'll come to object, convert to mesh, join them
all together, control. And then what I'll do
is I'll press control, I'll transform, set
origin to geometry. And then what I'll do finally
is add in that bevel again. So add in my bevel, Nut 0.3, come over to my materials, change the material to plank. And then finally,
unwrap them all. So tab, A, Smart UV project. Click. And there we go. Now, let's make
them a little bit. On the transform, randomize
them a little bit. So let's randomize
them tiny bit. Let's bring it down to 0.1. Like so. And let's have a look
then what that looks like. So put it onto my rendered view. Let's have a look going
all the way around. And again, just be
careful on here. The best thing you can do if it is going to be a
little bit slow when you're viewing this is just going over, save out your work, and just put it onto V for now, if it's becoming a little bit hard work
because you'll still be able to have a good view what everything's looking like. The one problem you're
going to have is the sun. So just bring in a sun for now, so bring in a sun
and you can see now already it's
lighting that up. Now, you can see that my
cursory is over here. Little sideways V, individual
origins are X, pull it up. And then you should
have a little bit more light on there. Now, for me, I'm not
going to be using EV, but that's what I
recommend you doing if it is slowing
down your computer. The other thing you
can do is as well, is you can actually
optimize a lot of things, and we'll go about that
in the next lesson. I'll show you how to
do performance and optimization because I think that's actually going to be
important at this stage. But before we do that, let's actually finish this wall off. So what I'm going to do now, I'm going to come round
to the back of it. So Shift H, it's going to
be round the back off here. And then I'm just going
to grab this edge. So old shift and click
going all the way up there, right click and I'm
going to mark the seam. And I'm also going to
keep the bomb off here, but I'm just going
to take it off. So I'm just going to go
P selection like so. And then why I'm using
that obviously is because if we've got other round things along our right shore tower, we need to make sure that
we can go round the point, and this is why it's
perfect for that. All right. So now
let's bring a wall in, so I'm going to press A, unwrap. And let's see if this is too big to actually do that with
which it may be the case. So we're just going
to go look for wall. Like so. Press the tab, and there you go, you can
see it's actually there. Let's press all Tage, D tap the A. Like so. And I'm thinking I
might split this wallb. Let's have a look where
it looks like first on our cycles on our cycles, so I can see what it
actually looks like. And we've got rid of our sun. Let's have a look round there.
You know what? I think. I think that's actually
going to look pretty good without doing
anything else. I think that
actually looks fine. I'm looking at a little bit of things in here because
the other thing we can do is we can actually
come in and split this up. So again, if I just
have a mouse over here, press shift and press tab, you can see that it's
round about here. We record, split the wall up. So if I grab this one here, right click, Mark Sam, what will happen is now I
can grab the whole thing, Unwrap, and then it's
just going to split them up and give us a bit of
higher resolution on there. You can see the seams
still round here because that's where our
seam is on both of these, but you can see we've got a
little bit of a break there. So if i press l take now,
bring everything back, it should be still hidden by this piece of
wood under there. And I think now
that's looking good. So what we need to do now on the next lesson is
we need to Sorry, on the next lesson,
we're going to look at performance
and optimization. And when we come back
from watching that, then we'll actually put in these major supports under here. All right, everyone,
so you can see we've nearly got the
front actually done. It's looking fantastic, and I
hope it's really motivating you to actually
get this finished because it will all come
together at the end, and you'll be really, really glad that you actually
finished this one. All right, everyone.
Hope you enjoyed that. S on the next one.
Thanks a lot. Bye bye.
75. Blender Optimisation for performance basics: Welcome back, everyone
to Blender for modeling and Jump
you know workshop. Now, what I'm going to
do is I'm going to play a quick video all about performance and
optimization in blender. It's gonna be something
that's really, really handy to you for this project and in
future projects, and it's really going
to help you out. I'm going to be using a
lot of these tips and tricks as well as I work along. One of them, for
instance, is the noise. So you can see at the moment, we have something called
D noise over here, and I just want to make sure
that mine is tiped off. By the way, at the moment, I actually have an add on on here, if you're wondering
what this is, and it's called turbo tools, and just speeds up the process of actually rendering
things out. I'm going to turn that off
when we come to rendering. So if you see that
and you're thinking, haven't got that,
that's the reason why. All right, I'll play
this video for you now, guys, and I'll see
you on the next one. Thanks a lot. Bye
bye. Welcome everyone to our performance and
optimization guide. And a lot of times when
you're dealing with really, really complex scenes
or even simple scenes, if you've got a low end machine, you will come across
things like Cuda out of memory or Blender
actually crashing. And there are lots and lots of ways we can actually
deal with that. And I think it's important for all of you guys to actually know what things we can actually do to stop
this happening. We probably won't be able to
get rid of it altogether. There'll still be times
when Blender crashes, but we can do a lot
to actually increase that performance
to get our scenes where we want them to be
and more importantly, render out beautiful images. So the first thing we're
going to discuss is RAM. And now, if you look down
at the Bob right side here, you will see one
that says memory, and you will see
one that says RAM. Now, the most important
thing is that, first of all, you understand
now to bring these on. So what we're going
to do is we're going to go up to preferences. We're going to go down
then to interface. And under interface,
you'll have a status bar, and you can actually
click all of these on. So we've got system
memory and video memory. And these are some of the
most important things. So let's just close that down a minute and let's
actually go through these. So basically, you can see here
that down the b We've got how many triangles we've got in the scene and
how many objects. These directly correlate
most of the time to how much performance
your computer will need to actually
run this blender scene. So the more faces,
which are polygons, you have in your scene, the more performance
you're going to need. Same thing goes for
the amount of objects. If you've got a ton of
objects in your scene, then it's going to
come at the cost of actual performance. So now let's move on
to the actual RM, which is how much RM your
actual computer actually has. And I recommend a
minimum. A bare minimum. You need 8 gigabytes
of RAM to run blender, and it comes down to the more, the better the performance
from your machine. So I would say aim
for 16 gigabytes. Now, also, we have something
that's also very important, which is called V RM. And this is normally the RM that comes with your
actual graphics card. And basically, the higher
this is on the graphics card, the much smoother time
you're going to have. So where I tendency problems myself is with the actual
memory on your computer. If it's too low, you have
problems in the viewport, and where I see the problems
arise with the V RM is normally when you actually come to render out complex scenes. The next thing we
can do to actually limit the amount of
performance needed is actually put everything
in a nice neat order in collections and make sure everything's
just named correctly. What we can do from
there, then we can close certain parts
of our scene down. Which means that we can either render them out a
little bit of a time and then lay them on top of each other or especially
in the viewport, what we can actually
do is close parts that we're not working
on at the time, especially in large scenes, and then this then again, will limit the
actual performance. Also, it comes down to your
CPU as well, your CPU, the better it is, you know, the better time you're going
to have with all of this. Let's now say we've got
all of that sorted, and we're still
having some problems. Let's now going into a few of the options that we can
actually mess around with. So what we're going to do is we're going to go up to edit, go down to preferences. And the first thing I
want you to look at is system and on the system, make sure that you've got this
set to whichever you can. So it can be cutter,
Optics x or one of these. Just make sure it's not a non. And then once
you've got the ones selected which you want to use, just make sure both of
these are ticked on, and blender then will
take advantage of those. Also make sure that
you haven't got undo step set at
250 or something, This has a huge actual
impact on performance. So if you're really,
really struggling, I recommend turning these undo
steps down to five or ten. But the problem obviously is that you're not going
to be able to press control head and go back
far if it's set too low. So I recommend all
of these things. I'm actually showing you
try and play a miranda with it till you've got that
kind of perfect setup, and then you shouldn't
have or you should have less problems
in the future. All of these other things we can mess around with as well. I don't recommend these unless you're absolutely
really struggling. I think you should keep
these what they're set to. This is the only
one, and this Tikton is the only one as far
as I would go on here, messing around with those. Alright, so let's
close that down, and let's now come over
to the right hand side. And you can see
here at the moment, if a scroll an blender
render engine cycles. And it's important to know that to have an easier
time, it's much, much easier to put this onto V, which is basically a
real time render engine like unreal or unity or
something like that. And that then makes
it much easier if I come to render
this or click on my render view to
actually move around the scene while it's
actually being rendered. So the thing is, if
you're on EV as well, there also are some
things that you can actually turn off to
increase performance again. But normally with EV. Unless you've got a
very low end machine, you shouldn't have any problems. If you're having
problems, however, just make sure that viewport denoising is
actually turned off. This is one of the
heaviest things actually denoising both on blender and cycles that actually really increase
that performance needed. So you can turn the
viewport denoising off. You can also turn the
ambient occlusion of And you can also turn the blue off and especially screen
space reflections. Make sure that is
also turned off. Now, pretty much
everything in EV, You shouldn't need to mess
around with anything else. Once you've turned these off, you should have a
much easier time. Now, let's move on
over then to cycles, which is a little bit different. So if we come over to cycles, you will see even my machine, it's quite a high end machine, or it was maybe two years ago or something,
sometimes struggle, especially with large
scenes like this with a lot of textures and a lot of
sand and things like that. So if you look over
here at the moment I actually have in my
viewport dendes on. The first thing I recommend
doing is turning this off. This then will increase
performance no end. Once you've turned that off, it's going to take
a little bit of time to actually apply
that as you can see here. And then you can also turn the denise off in the rendi vw. But I don't recommend
that because then you're going to end up
with a very grainy render, and that's maybe something
that you don't want. Now, you can see already that I'm really, really
struggling here, even with the de noise turned off because this
is quite a large scene. It's got a lot of
displacement on there. So I'm just showing
you just how pixelated that is and just how
long we need to wait. So what I'm going
to do now while I actually fix a few things, I'm just going to put
this onto material mode, and that leads me on
to my next point. So when you're working in
Blender, it's important, even though it looks really, really nice to be working
in Blender cycles, it actually comes
at a huge cost. You can see already working in material mode over here
is actually really, really helping me
navigate around my scene. Now, if you're
struggling even more, what you can do is
you can come and put this just on object mode, and then you shouldn't actually have any problems whatsoever. It's also important to note, Before you click
this render born, so the render image born, make sure that
you're on wireframe. And the reason is because you
don't want to be rendering out the scene in cycles, on viewport shaded, and
then render it out again. That is more than likely
going to lead to a crash. So what I always do,
before I actually hit that render boron is put
it on wireframe. This is the lowest amount that blending needs to use
in the actual viewport. Now, it's also
important to remember that everything comes at a cost that you
put into blender. This could be things
like geometro nodes, particle systems, simulations. Some of them have larger
costs than others, but everything down to the smallest object
has some kind of cost. So when you've got a scene that's just crashing
all the time, it's generally down to something that's quite a large
cost on performance. Now, the other thing to note
is when you're actually bringing in textures to your scene, It's
important to know. So if we go to this
one, for instance, and we go to our shading panel, this is quite a complex shader. The more complex the shades are, the much higher performance
it's going to need. The other thing is, when you're actually bringing in textures, be very careful that
you're not bringing in really, really
large textures. So I recommend four
k be the maximum. But honestly, if
you can stick to two k textures or one k
textures are much better, it's going to make
a much easier time for you making large scenes. This is why a lot
of game companies, especially mobile,
use only, like, 512 or one k
textures so they can handle the performance and keep that optimization pretty high. The other thing is
about textures. If you're using
seamless textures, that is better than
using something that you've gone out and you've painted in substance painter. So it's just much easier to use seamless
textures because they can be used over and over again and limit
that performance. Also make sure on
the right hand side, if you come up to
this lel arrow, you can see that light in our scene lights and
scene world make sure they are turned off as well because they will also
cost you performance. And last of all, before we move on to the
cycles part of it, if you come over to
your actual world, If you're using a HDRI within.
We're not on this one. We're using a sky texture. If you're using a HDRI, that's also going to
come at a cost of performance and require a
large cost in comparison, something like the sky texture. So if you can make sure that you're using something
like the sky texture, as you can see, it's
just one node here, and I know it's very
nice to use HDRI. But if you need to
control optimization, try and learn how to use
the sky texture instead. Alright, so,
finally, then moving over then to our cycles. We can see, first of all, that the device I'm
using is my GPU. It's always fair to use
your GPU over your CPU. It will make it much, much faster because
it's relying on a lot of V RM from your
actual graphics card. And as we discussed moving down, we can also turn
off the D noise. This is one of the
best things you can do to actually
increase performance. The next thing you
can do is you can come down to where
it says light paths, and all of these come
at a cost as well. The low you set these, the better it's going to be. I recommend messing
around with these last. So last of all, after you've done
everything else, this is why I would be clicking off or turning down,
especially caustics. They're also quite high
on the performance. Last of all, let me show you one of the best things
you can also do, which is if we've
got a rendered mode, we're on actually cycles. We've turned on D noise again. You can see how nice
this actual sand looks, but it comes a huge cost. So just remember this
comes a huge cost. Now, if I come over and down
and just scroll down here, we have one that says simplify. Click that on, and
then what you'll have access to is all of
these options here. Now, one of the main
things we can do here is the texture limit and the
maximum subdivisions. The maximum
subdivisions, if you go over that subdivisions
in your modifiers, you can actually reduce
that or override that over here and simplify and turn them down
to one or something. That then will reduce the polygon count right
across your scene, wherever it's over
six or five or whatever you set this to
increase in performance. And one of the
last things we can do is we can turn down
this checked limit. If I turn down the text limit, something like 256,
you'll see after a while, what it'll do is,
it'll turn down all of those textures right across
your scene down to 256. So even if they're four k or eight k, if you turn this on, you can turn them all down then, And then you'll see, look how grainy now this
actual sand looks. Look how bleary these looks. And the reason is because
we've turned down our texture limits all
the way down to 256. The other thing
is if you haven't problems rendering
out your seam, you can also come
in and turn them down in the actual
render as well, which really significantly
helps with crashes, cuter of memory and
things like that. Alright. The last thing
then we can do is, especially when we
come to actually rendering now is you can see here that if
you hover over here, it says, use compact
deviate structures. It uses less RM but
renders slower. So if you are having
problems with crashing, I recommend turning this one on. And if you go to the next one, you'll see it for
hover over this. It says, U special type BV
H optimized for curves. It uses more RM but
renders faster. Turn that one off. Also turn persistent data off if
you need to as well, because what it means is that
Blender is caching all of that data of the scene to save on basically
having to redo it all. So if you turn this
off, what it's going to do is a fresh
start every time, and it's not saving so
much in the memory. I don't actually know whether this one is bed to
turn on and off. Again, I would ever
play around with it. Now, something that is a
little bit more sophisticated, so we're not going
to go into it here, but you do have the option
that you might want to look into of baking
out your scene. So, in other words,
you can actually bake all of your scene out onto a UV map for all the lighting and all the textures
and things like that. But mainly for lighting, to make sure when you
come to render it, everything is already
rendered out, and then all it's going to do
is render out the objects, or the textures and
without the lighting. So that then makes it much, much easier on your machine to have a fast render
without crashes. So last of all, what
I want to say is, if you're building large
scenes within Blender, try and use the shader
panel more than actually bringing
in actual textures. That also is going
to save you a lot of performance and optimize
things really nicely. The only problem you're
going to have, obviously, is if you're sending
things out into unreal or unity or
another games engine, you obviously won't be able
to use those materials, so you will need
textures for those. So this primarily is based on rendering and building large
scenes within blender. A, everyone, so I'll help
you found that handy. I know if I was
just starting out, I'd really want to know
this stuff because it would have made my life so
much easier in the beginning. All, everyone. Thanks
a lot. Cheers.
76. Reinforcing Second Floor structure: Welcome back,
everyone, Blender for, Modeling and Geometry
node workshop. And I hope you enjoyed the
performance and optimization. I think it's really,
really handy to have. I also think that a lot of
courses don't include that. So I think it's just something that really adds something to this course just to get you
to create larger scenes, larger environments,
and things like that because depending on what machines you're
going to be running, you're always going to
come across problems. Alright, so now we've
done that, then. Let's actually bring this part here. So I'm going
to press shift. I'm going to bring this
then over to here. And what I want to
do is think about the structure going
around here first. So I think what I want
to do with this is I want some like pieces
going along here. So going along to this part. And then what I want
to do is pull those out in certain places
where they need to go. So I think I'll do
before we do that, let's just right click and
shade auto smooth on these. And then we'll grab this part. And I'll put it where
I want it to go. So if I grab this, I'm
going to put it a thing. This one's pretty straight on, so I'll put it against
this one here. So Alt Shift and click
Shift S, ur selected. Grab this one, then, Shift S and selection two cursor then
what I'll do is I'll come in. I'll rotate it
round first of all, so Ry or Rx in this case, 90. And then S and y then let's put it into place
where I want it to go. I'm going to pull it into there. I'm going to pull it up
then into place like so. And then from here, We can have kind of another
part coming down here. So first of all, though,
let's press S and y and bring it in a
little bit further. And then S and y because I just want the back
of it to actually look like it's actually kind
of sticking out the way, double tap the A
now you can see, it's got a little bit
of a break there. That's what we're
looking for. And now what I'll do is I'll press 50. And then I'll rotate
it round so R and x then we'll have it going all the way up
to this part here. And then we'll grab the
back of it with face elect. And pull that down without
portion editing on, of course, pull that down, and then let's put
it into place. So something like this. And as well as that you can see that we've got some
flash in there, so we need to
definitely bring it in. So S and X. Like so. And there we go. I think that's going to be fine. I think that looks as though it's actually supporting this. Maybe maybe. We might want to put it a
little bit further down. So let's just see what it looks like a little bit further down. So if I grab this, pull it down a little
bit, turn it off. Yeah, I think that
actually looks a little bit better. All right.
So we've got that. Now, it's up to you whether you're going to put them in
the wooden supports here. It might actually look bad rather than in every
other one like this. So let's give that Let's see what that actually
looks like, first of all. So I'm going to do is control. And you can see if I bring an
edge of your pin like this, is it really going to
look right like that? I'm not actually so sure. So what I'm going
to do instead is, I'm just going to
bring in a block. So if we're pulling
it over here, though, it's going to be a
little bit different because it's going
to be in this bit, and then it wants a block. So I think what I'll do is I'll put my block
round about here, and then I can give it a try. So I'm going to come
to this part still. Press Shift S, urs
selected shift, and I'll bring in a cube. Let's pull the cube out then. And then what we'll
do is we'll pull our cube round about here. I'll make it a little
bit bigger, like so. I'll press S and y
then and pull it in. And then finally,
what I'll do is, I'll press S and
pull it up, like so. And I just want to
make sure that it's all fitting in there. Like so. I don't really want something
stuck at the bottom of here as you can see it would be
if I'd left this like so. I'm just going to pull
it down a little bit. And what I'm going
to do, I think, is cut this part away. So I'm going to come
back to this part. This part here, pull
it up a little bit, and then grab this part
here, press control. I'm going to bring
it down then to round about inside
there, like so. And then finally,
what I'm going to do is I'm going to grab
the outside of here, press delete and faces. Now, I know, already, I've
left this face in here, so I'm just going
to delete it with vertices, and there we go. That's that part. Now, we can see it's miles
away from this one. That's fine because I think
I'm going to put it on to this one here. But
let's press control. And then what we'll do now
is just give it an unwrap. So A, U, Smart V,
project, click. And then what I'll
do is I'll join it with these here.
So I'll grab this. I'll press control L and
I'll link materials. I'll go onto my material
then and have that looks like. Do will tap the A. And you can see here it's
not wrapped properly. So let's press control A or transforms the origin geometry. Now on wrap it. So, Smart UV P click Okay, and there we go. It's rap much, much nicer. Albeit, it's wrap the wrong
way because it's really, really large at the
moment on our UV scale, but we're not going to worry about that because the thing is, we're actually going to be unwrapping a load
at the same time. So for now, let's
just put this on dot, so I'll click a sign,
and there we go. Now we're going to do is
come on the underneath. Grab this one. Shift
D, Cursor selected. Grab the little sideways, V, three D cursor, and then we'll come back
now to this part. And all I'm going to do then is R z and move it to this
part here, like so. And there we go. You can see
that's looking pretty good. Shift, bring in
another one, R z. Let's move it over
to this one here. Like, we want a little
bit more centered, I think so are Z. Like so. And then Shift D,
and then Art and Z. Bring it on all the
way over to here. Right into here.
Actually, this might actually look quite
nice in there. Double tap the A. You know what? That actually I think
that's going to stay. I like that, I think. So let's now actually pull this down. So I'm going to
grab this top part. I'm going to press a little
sideways V. Just for now, just put it there, and
then let's pull it down. You can see that we do have a problem with this part here. S wondering, whether
I want to pull this part down as well and
pull it back into this part. So I'm going to put it on normal just for
now because I just want to get this bit fixed,
and I'm going to pull it up. And can I pull it into
place? You know what? Instead of doing that, I
brought that bit down. I'll just grab this bit with L. And then what I'll do is I'll just press one on
the number pad, and I'm just going to bisect it across there because I'm messing around too long
with that anyway. So just bisect it going across, set this two zero, and then just clear the
inner or the outer, clear the outer,
and there we go. Alright, that be looking good. Now, let's move on
to the next bit. Little sideways again,
go three D cursor, and then all I'm going
to do Shift D and then Art and Z spin
this going here now, like so, and then
shift Art and Z, and we're going to go
into the other way. Like so, line it up a
little bit there. Like so. And then one more Shift
D and then Art and Z bring it over to
this part here. So RZ, Like, so. Alright, double tap the A, and there we go. Dad
looks fantastic. Okay, so now, let's join
all these together, and then we'll rem wrap
them all at the same time. So just grab them
all. Press control J. Tap, A, grab them all, U. Smart UV project click. Okay. And there we go. Double tap the A.
And I think this bit we are near enough,
actually done with. So I think now, what we'll do is we'll just have a quick
look on the rendered view. Let's have a look round. And you can see now that
is looking pretty nice, especially from this angle. It does look really,
really nice, actually. So now what we need to
do is we need to think about the next part going up. And I think on this part here, we'll have a bit coming
out of this top here. We'll have a one
coming round here, and then we'll have
some kind of supports. We might even use the same
supports on this top bit. I think that's going
to work really, really well for us,
so we'll do that. And then from there, we can
actually get the roof on. I think we'll create a new
roof, I think, actually. We've got our roof over here. Yes, we saved it
out, so that's good. So we can actually
put that on there. We can make it a
little bit, you know, less maybe less pointy
or a little bit bigger. We'll see anyway,
how we can do that. I'm sure we'll get
the hang of it. Okay, that's looking
pretty good. Alright, everyone. So I'll finish it here. Hope
you enjoyed that. And then on the next
one, as I said, we'll start on this bit here and then get the roof done
and follow on from there. I think eventually, once
we've done this bit here, what we'll focus on
then is all the doors. We'll get all the
doors done in one go. And then from there, we've
just got the lights to do. And the rest of the
building is pretty easy in comparison to this
anyway, as I've said. Alright, everyone. So I
hope you enjoyed that. I'll see on the next one.
Thanks a lot. Bye bye.
77. Adding Additional Detail like windows and wood supports to upper section of main towe: Welcome Mon to
Blenderport Modeling and Geometry Old workshop, and
this is where we left off. Alright, let's put
this on object mode so we can actually
see what we're doing. Let's save that I work.
Don't forget to do that. And then what I'll do is
I'll bring up this one. I'm going to put this
underneath here. So on here, I'm going to want one kind of big one, and
then one underneath. So we'll use this one first. We'll press shift.
We'll bring this up. Then I'll press a
little sideways V. C two individual origins, and then bring it up into place. Now, you can see way way
too big at the moment. I'm going to shrink
it down, like so. I'm going to bring
this out then. So I'm going to
bring it up to here, press SNsd so, pull
it down. Like so. And then I'm going to pull it
out a little bit, like so. So I'm going to have something,
something like that. And then for the next one, I'm going to press Shift and D. I'm going to bring it down. I'm going to actually
rotate it around then. So RN's D rotate it so
it's in the middle. And then what I want
to do is I want to grab the outside of it
and bring the outside in. So what I'm going to
do is I'm going to see if and grab all of these, and then go to select and we'll select
similar by perimeter, and I'm hoping that if
I select jaws these, I'm going to look in there. These ones here, like so. You can see here, these
are the ones that have not got selected, all of those. Then I should be
able to now come in. And actually shrink that down. So if I press lns, sheho'd be able to bring
that down, like so. And now I can bring
the whole thing up into place where I want it. Press sens, like so, and that is what I actually
want, something like this. Now, I'm not sure whether I actually I'm just wondering
whether I want to use this. You know what, I'll give it
a try. So I'll grab this. I'll press shift,
and I'll see if I press altenar and I
can. So that's great. I can actually rotate it round
so it's actually straight. And then what we'll
do is now we'll come to a center part, this one here. You can see I can press
Shift, Custer selected. And then what I can
do is I can come back to that part now. And then what I can do
is, I can just press Shift S and selections cursor. And then I can bring it all the way up into where I want it. Now, actually, I've messed
up there a little bit, I think. So let's
try that again. So I'm going to
grab this Shift S. I just want to select
this one here. Oh, Shift S. Cursor
selected. Grab this one. Shift S. Selection to cursor. There we go. Alright, now,
let's pull it out and see. Wrong we pull it out
and see if we can actually get this to work
with what we've actually got. And I think, yes, the answer is, we will be able to do that.
Let's pull it to there. Let's pull it out a little bit. And let's slam
bring up this top. Like so into place. Like so. Making sure
everything's level there, double tap the A,
and there we go. Alright, that's
looking pretty nice. Now, what I want to do
is I want a window on the front of here
and round here. I want the same type of window. I don't think we've used
this window before. So all I'm going to do now
is just rotate this round. So I'm going to come
down to my bottom. Do the same thing. So
Shift S, cursor selected. Come back now to this part, little sideways, V again, and let's put it on three
D cursor and then art Z, rotate it round just for now. And then what I'm going to do is I'm going to come down
and grab my window. So this window is
the one that I want, so I'm going to press Shift
and D. Let's bring it over. Let's little sideways
V once more. And then what we'll
do is we want to place it out in the center, so I'm just going to come again. Shift D, cura selected, grab my window, Shift S
and selections cursor. Why did that do that? Didn't
mean, let's try that again. Shift S, urster selected. No, we don't want curse
selected one selections cursor. No, it's 'cause I've got
a little sideways beyond. That's why I'm
getting so confused. Okay, Shift S, urster selected. Why is it not selecting it
there? Let's try that again. I think it's because we've
got actually two selected, little sideways v,
individual origins. Shift D, cursor selected. Finally, finally,
Neil, you got there. Shift Desk selections
cursor, and there we go. Now, you can see that
we've got a little bit of a problem here in this bend. It's not really bending it
that well, as you can see, and that is the thing that was actually
talking about with these kind of cylinders
and things like that. And that is another reason why we made our window so thick. So what I'm going to
do with this one is, I'm going to pull it up
to roundabout there. And now I'm going to
do is I'm actually going to give it a modifier. So I'm going to
bring in a modifier. And this time, we're going
to bring in a deform, and we're going to bring
in a simple curve. So simple deform this one here. Put it on bend, and then
we want it on maybe the Z. Let's try the Z,
and there we go. Now we can actually bend it. Now, you can see we have
a problem in this part. Now it's probably
because we have no edge loops going down here. So if you come to this
part, press control, bring in a few edge
loops, left click, right click, and now you
can see problem going away. So as simple as that,
no problem there. Let's just bend it back
a little bit though it doesn't need to
be that actual bend, so just into there, like so. And there you go. There's
the actual window in place. And I think we're going to put another window. Around here. So, you know, as they're
coming up the man be able to see in there,
that'll be quite interesting. And I think as well, we'll just pull this up a little bit. Now, let's as well. Now we've got this. Move it
around and pull it down. So we'll just come back to here again. We'll grab this one. So this face on the bottom, we'll press shift
Kirst to selected. We'll come back to
our window now, little sideways V. Not going
to get confused this time. And then all I'm going
to do is shift D and then Art and Z rotate it around. Something that looks
quite interesting. So R and Z, rotate
it round to here. And then what I'll do is
little sideways via again, origin geometry, and then let's pull it down to
something like that. Now, while I'm here, I might as well delete this out the way, we're not going to
need this no more. And the other thing
is on this one, at least, you can see that it's actually showing
through the window. It's not there, but it is on
this one, as you can see. So what I'm going
to do is just bring down the bend a little
bit, so bring it down. And hopefully it'll
still be there. If not, I'll bring up the bend. I'll bring it to there
and then try and pull it out just to Tad, like so. And there you go, now, you
can't actually see it. Just make sure it's
stuck to the wall, which it is, and that's
looking pretty good like that. There are more complex ways
of doing this, of course. We can use the shrink route. We can use snapping
many, many ways, but I find with just this, it's easier just to
use the simple deform. All right. So now
what we're on if we press a little
sideways V again, three D cursor, and let's now move this over to this side. So if I then move
this, if I press 50, and then zed, move it over to
this side where I want it, so it's going to be roughly
somewhere around there. We can see then this should
be on 45 degrees, like so. Now, let's press Shift,
OrzD 45 degrees. And then shift z 45 degrees. And then shift zed, 45 degrees. And we can see here, I might want to move my
window a little bit more. Or I might want
to move this one. Let's see where
they all line up. So shifty, 45 degrees. And I think actually, yeah, I want to move them I
might move this window. Let me see if I can. Maybe I can get away with 40 degrees instead or even more. So I just want to move them around a little bit
because what I want to do, I really want this one to be
kind of right next to there. I think that's
going to look good. My door fits in there, which it shod or I could
miss this one out. So let's just leave that off. Let's move this a
little bit, so I'll. Let's move here a
little bit to the side. Like, so. It doesn't need to be, you know, even
with any of these. And you know what? I'm going to have a
piece of wood in there. So actually, it might be okay. So now let's go the other way. So shift, s -45. And then shift s -45. No one fits in there.
Perfect. So. Yeah. Yeah, I'm happy with that. I think I'll move it
a little bit out. No one's gonna know
a little bit of an angle difference.
Double tap the A. And there we go. All right. Next of all, we want to bring
one of these parts down. So I'm just going
to grab this one, shift D, and what I'm going to do little sideways, V again, individual origins, and let's
bring this down to here, and then all I'm going
to do is pull it out into place like so. I'm going to press S
and and pull it up. And I think that just adds
a little bit to it so the fence is actually attached to this, double tap the eight. And I think once
we've got a wooden, you kind of structure in there, it's going to look pretty good. I'm just making sure
that this bit here. I think I'll have to move
these up a little bit. I know it's a little
bit messing around, but I think actually it looks bad with that on there for sure. I think whether I
need to move it up, let's just see if
I can move it up a little bit to there instead. Let's have a luck if
that's doing Yeah, that might be better to put it there because
everything looks as though it's fitting in
place, except this one. You can see this one. It could
come out then onto here, and I think that'll
look pretty good. Let's have a good look at
this before carrying on. The other thing is, as well, we can see it's
kind of the same. So let's come in first of all, and press art and's
head and move it around somewhere else like
double tap the eight, and let's just
have a quick look. Let's save it out and
have a quick look, what that looks like
before carrying on. Yeah, I think I think that
is just looking, right? I think we need another
piece of wood maybe in here to finish this
piece off for sure. And if I go round,
if I look over here, L, it just looks much better. It looks like it's
more built up. So yeah, I'm going to
leave that part in there. Up to you, whether you do it or not, it's a little
bit more work. So now I'm going
to do is I'm going to go back to object mode. And I'm going to before
just finishing this lesson. I'm just going to
pull this part. So this part here,
you can see just out, so you can see this part's fine. It's got a bit of metaling so I should pull that
part out as well. So, you know what? We'll just
come in, double tap the A, put our x ray on, and then we'll just grab
this from the back. Control plus control plus. Take it off, and then
let's just pull it out. Can I pull it out like so? Yes, I can. There we go. And then let's just put it on
again. Let's grab this one. Control plus control plus. Turn it off, and then let's
just pull this one out, pull it up a little bit. Like, so, double tap BA. And there we go. I think that
looks much, much better. Like, it's not just a, you know, uniform or
anything like that. We've really gone to
trouble to make it really, really interesting,
especially from the back. And, yeah, I think that
looks just so much better. Alright, so we've done that bit. Now, on the next lesson, then, I think we can start work
on our roof on this one. And then from there,
we can actually work on this building here. I think then we can work
on this building here, and then we can actually
create our doors. I think that's the way that we should actually look at this. Alright, everyone, so
save out your work, and I'll see on the next one. Thanks a lot. Bye bye.
78. Modeling Stylized Cone Shape Rooftop usisng geometry node and letuce modifier: Welcome back everyone to
blenderful modeling and Got you know workshop, and
this where we left off. Alright, so let's start
on this one here. So what I'm going to do is
I'm going to come over here, grab all of these, and hopefully, hopefully, we might be able
to make this work. I'm just wondering
if on this part, I should actually be
using it like this. I think actually, you know
what we will go ahead. What we'll do is, you know what? I'm just wondering whether
I should be doing that. Let's press S and make
it a little bit bigger. You can see here, we're
going to have huge, huge problems, I think with it. I think we'll use this
on the small one. I'm just wondering if we
can even use it on that. I think we'll just have to. I mean, we've only
got two more left. So I'm just wondering
the best way to do this. We could we could instead
just delete off the array, and then we'll end up with that. I think we'll do
the array again, is what we think we'll do. We'll bring it into place
and we'll get that. Yeah, I think we'll
do it that way. We'll even get rid of this part because we've still
got this part here. So yeah, we'll put
that part in place, get it roughly into where
we actually want it, which will be
somewhere like that. We'll bring it down.
We'll pull it out. And then what we'll
do is we'll just hide this piece at the
weight at the moment. And now what I'll do is I'll
bring down this rotation. So bring this
rotation down a bit. Bring up the horizontal, so bring it down
something like that. And then obviously,
we'll have to make this probably a
little bit taller. Let's see if we increase
the vertical count like so. Wondering from here,
can we make this work. Let's see if we can
actually bring it in. A little touch. And I think
the other thing we can do. We can also make it smaller, but I think the other
thing we'll do is we'll make just wondering
about these tiles, can I make them a
little bit wider. And without damaging
the rest of it. So I'm s going to make them
a little bit wider, like so. Turn down the horizontal then, s to get it into the right size. Like so. That looks about right. And I think I can
actually do the rest then because we're going to have a big part
on there as well. And I think I'm
going to do the rest then with the lattice. All right. Let's go with that. So what I'm going to do
is I'm going to press 50, bring it out. Spin it round. So s a 180, spin it round, get it into place. Like so. Let's put it into place. Like, so, and there we go. We can line it all up. Once we've got
everything in there, make it smaller and
things like that. And what I'm going to do now is, I think, I'll come
to this part here, so bring in a lattice
from there. So shift a. Let's bring in a new
lattice. Let's bring it up. I know it's a little
bit of messing around, but I really think we can actually it'll be better
if we do it this way. So if I bring it here,
pull it out a little bit. And that looks near
enough about right. So, something like that.
Go over the top of it. Just make sure
everything is in there, so you can see all
of this is in there. Come to a lattice. And
I think, honestly, if anything, it's just, you know, it's fair of practice
with the actual lattice. So let's bring in
our lattice work, so And then what I'll do is I'll press one,
I'll press tab. In fact, I can't do
that yet because I need to actually add
the lattice to this. So we'll put this up. Put this one, come to this one. Add. We've already got a lattice apparently
added, so that's good. Do the same on
this one. Like so. Now, if I move this lattice, will it actually
bring them all in? So we'll give that a
try. And yes, it does. So that's great. Alright, let's work on the bom part first then. So all I'm going to
do, I'm going to pull this bom part out I'm going
to pull it up like so. And then what I'm going to
do is work my way along, Hull in this one in
Hall in this one in. Okay. Like so. Like so. Like so. Like so and
finally a top one. Like so. And then I'll
grab this middle one. And with the lattice,
I don't actually think this can work. In other words, this
proportionality. It doesn't seem to work
on it. So I won't use it. What I'll do is I'll just
bring it in on my kind of own and just try and work on
something. Get it in. Not that. Let's press B. Like so. Bring it in. And S. And there we go, I think that is looking
roundabout right. And then from here, let's
just pull those up a bit. And let's bring this one
down a little bit. Like, so. And then this one
down a little bit. Like so. There we go. Now, is that looking too similar to this one? I
don't actually think so. I think what I want
to do, though, is maybe make make it
all a little bit taller. So if I come and
grab all of these, can I actually do that? So if I press one, press Send. There we go. I can make
it a little bit. Like so. And I'm just looking to make sure it's all follow
and everything. Let's just hide this lattice
out of the way with H. Let's put our rendered
view on and let's have a lot that actually looks
like. Yeah, there we go. That's looking pretty nice. And it does look a
little bit taller. It does look like a top hat. So, yeah, I think
I'm happy with that. That looks, and a
little spire on top of that is gonna look great. Alright, let's come
back to these then. What we'll do is
apply our lattice, so control A, and I'm
not going to do that, actually. I'm gonna
press control. I'm going to grab them both. And instead of doing
that I'll just come to object, convert to mesh. Alright. There we go. Let's
put it back on object. Press saltge, bring
back our lattice. We're going to delete
that out the way now. We can also come in
now to this part here. And what we'll do
is well, as well. We can see that a little
bit out on this one. With this pi here. So now I can make it a little bit smaller. You can see I need to
join them both up. So let's join them both
together. Control J. Now, let's make them
a little bit smaller. Let's just hide this
out the way for now. And then what we'll do is
we'll pull this up now. So if presence, I
can pull it up now, and there we go, that
looks much, much better. Let's put it in place and
see where we need to be. So we can see, is it right over the top.
That's the next question. So what I'm going to
do, first of all, I'm going to grab this with
control layer transforms. Set origin to geometry. Now, is that going to set it right to the center
of this geometry? It certainly looks like it. And then what I'm
going to do is, I'm just going to press Shift and S and cursor sorry,
selection to cursor. And then what I'm going
to do is bring it up. And hopefully,
hopefully, this should now be in the perfect
place as we can see. So let's bring it down. Like so. And there we go. That's looking
pretty much Perfect. It looks a little bit
bigger than the other one. And from here now,
I can actually press tag, bring back this part. And then what I'm
going to do is, I'm just going to grab the
inside to the top of here. Grab that inside, put
this onto global, bring it up to the top, like so. And then I'm going to
bring in some intro loops. Control. Left
click, right click, and now just work my way
down, bringing them down. So I'm just going to press one on the number pad. Bring it in. So S, and then just work your way down,
bringing them all in. Like, so, and
they're only there. Again, just to hide the fact there's nothing
behind this roof. So we don't need to
worry too much about it or them being too close
or anything like that. We just want to get a
nice part in there. So I'm just going
to bring this part. I'm going to bring
it there, actually. And then I'm going to
grab this bond part, rest the S bon, and bring it in. Alright, now we
just got the top. Bring it in, and there we go. Now with this part,
let's just grab it. A, Smart UV project, click Okay. Let's put our material on, and then let's add
the material in. Once it's loaded
up, so down arrow. And we're looking for planks,
which is this one here. Double tap the A.
And there we go. That's looking
fantastic. All right. So now we can do that
on the next lesson is, we can actually start
on the top of here, and we can make our little
tall spire that's going to go up into the sky and really set this
apart from this one. And yet, I think that's looking
really, really cool now. All right, so I'm just going
to press tab, actually, double tap the A. I'm just
making sure I can't see anything under
there. And I can't. So we'll save our work. And I'll see it on the
next one, everyone. Thanks a lot. Bye bye. M.
79. Modeling Decorative piece for rooftop and starting modeling process for Door: Welcome back, everyone to blend four modeling and
jumping workshop, and this is where we left off. So let's now come in and grab this little piece of wood here that we've already
actually created. And what we'll do is we'll
press Shift and D. And then what I'm going to
do is press Shift and S and selections cursor. And then let's pick
it up into place. I I press a little
dot board now, we should be able
to zoom in and drop that right at the top
of this actual spire. Let's make it a little
bit smaller, like so. And then what we'll
do from here, we can actually work
on building this out. So Shift S, cursor
selected. Shift A. Let's bring in then a cylinder. Let's turn the cylinder
down to something like 24. Let's then bring it down. So I'm going to bring it
down into place like so. And then from here,
what I want to do is I want to pull it up
to round about here. And then I want to
pull this down. So I'm just going to
pull this down like so. And then what I want
to do is press, bring it up, and then,
bring it in like so. Now I want to create some
structures that are going to, you know, be kind of steel that are gonna come out of here. So let's first of all, though, yeah, we'll do that now. So what I'm going to do, is I'm going to select every two. So miss two, select every two, and we should be able to get back round to the start and have
two there the same. Hopefully. That's what
we're hoping for. So let's see if that's
going to be true, and there we go. It is because we've put on 24. Then we'll press enter
AltnS, bring them out. And there we go,
that's exactly what I'm looking for
something like this. And then what I'll do
is now grab this top. I think I'll press Shift D, just to duplicate it, and then press the S bon. I can pull that out then, press the bon, pull it up, like so, and there we go, that's looking pretty nice
for the part of the spire. Then what I'm going
to do is, I'm going to press the i bone. Bring it in. And then I'm
going to press the button, bring it up, like so. Now, what I want to
do here is I want to bring this in and I
want it to all bow in. So if I bring this
in like there, then what I can do is I can put in bring in some edge loop. So left click, right click. Grab the center
one, shift click. Put on proportion let it in. Let's put it on inverse square. And let's see. Now, if I
bring this all the way in, I can get that lovely, beautiful bend that I'm
actually looking for. And then from here, I'm
going to press Control B, bring this out, drop
it back to just one, and then press Enter. Turn off proportional editing, alternS, bring it out, and there we go. That's
what we're looking at. Let's put it on object mode so we can
see what we're doing. Let's also shad smooth.
And there we go. We're nearly there now. So let's come in
to the top of it. What we're going to do is press, bring it in, and then
press, bring it up. Then press, bring
it in once more. And now let's create that spire. So for the spire, I'm just
going to pull it up, like so. And then what I want to do is, I just want to take a step back, double tap the A and just feel like where actually how
high do I actually want it? I think if it comes
to about this height, so looking from here, that height looks about right. So let's now go back into it. And then what we'll
do is we'll bring it up to that height, like so. And then from there,
what I'm going to do is, I'm going to press control. And I'm going to
bring it up to here. And then I'm going to bring this top of it in a little bit. So I'm going to press
the S born, bring it in, like so, and you can see now that's looking
really, really cool. Let's go to material. And then what we're
going to do is going to press control or transforms. I'm going to add in a bevel. So I'm going to come in, add in a bevel. So bevel. And we'll put it on, look at the bevel on here. Most of this is
going to be steel. So sometimes with steel, you can get away with a little
bit of more of a bevel. So what I'll do first
of all, though, is I'll come in and press A, Smart UV project click, and we'll bring in
the actual metal. So we'll look for iron. The one we want is iron dark. And then press tab
double tap the A, and I'm not just happy
with it like that because I want these insides to be. So these ones here. I'm going to see if I can actually
select those the same, so I'm going to go to select
select similar perimeter. It's selected some of them. It might be just quicker
just to select them all. And what we're going to
do is we're just going to create these So, they're actually just
going to be the wood. So we'll do these
ring them round. Like so. Like so. Like so. And then all I'll do
is click Plus down, and then look for planks Like so and click a
sign, and there we go. All right. That is what
I'm actually looking for. Finally, then, let's see what
that actually looks like. I think it's going
to look really cool. Let's move that hard the
way. Shift right click. And there we go,
guys. Let's actually bring in not terrain so
we can see that as well. Let it load up a little bit. And there you go.
You can see really, really again somewhere
now. All right. So I think now we will
focus on this part here. So we'll focus on this part here and just carry on
working our way round, but it's coming together really, really nice now, as you can see. Alright, let's go
to object mode, then. Let's save our work. So save out our work. And
as I'm looking around, I'm looking at which bits
we're going to do next. And the thing is
on these two bits, we've got a lot of doors now, which we really need to
start putting into place. So I'm thinking, actually, it might be that time
to start those doors. So, you know what? Let's
bring our guy over, and we'll bring him
over to this part here. So I'll just grab this Shift S, cursor selected, and then grab my guy Shift S,
selections, cursor. I'm going to press one
on the number pad, and what I'm going to do, bring them both down to
the ground plane. So let's just bring
them both down. Once I've brought
my door in then, I can actually
rescale it the door, that is, and then we can
actually build it out. So let's come in, and what we'll do is we'll go to our image. Open up our image, and the one we'll do first. So I think we'll start
with the most simple, which is this one here. So we're going to
start with this one. And you can see just how
simple this door actually is. And I'm going to
scale it up though, just so it can be
the right size. So I think if I bring this over, we can see that if we pull
the door up a little bit, that's going to be round
about the right size for us. All right. So let me show you then how easy the
doors are to do. Especially doors like
this, they're much simpler than what we did
with the actual windows. So what I'm going to do is I'll shift right click,
just bring in a plane. So shift A, bring in a plane. I'm going to also rotate
my plane round on the y. No, it's not it's the X,
I think it is. So 90. There we go. So now when I bring in an x plane,
it should be that way. I'm going to press the S
bond then, first of all, and I'm going to bring it in until I've got the right size, which will be
somewhere around here. So and X, pull it
out a little bit. Sns, pull it up like so, and maybe bring it down
just to tad like so. Alright, so from
here, then what we'll do is we'll make
our actual door. So what I'm going
to do press tab, press Control, bring
in a few edge loops. So left click, right click. And then what I'm going to do
is right click and Markosm. Then what I'm going
to do is control law, bring in a few more edge loops,
left click, right click. And the reason I've
done that, of course, is just so we can
actually randomize it. So now I'm going to
do is split these up, so L, L L, and then I'm going to zoom
into it, my little dot born, press the y bom, press A to grab everything, to
pull them all out. And now, finally,
let's randomize the We'll bevel it first,
then we'll randomize. So add modifier,
generate a bevel. Let's put it on point at three, like so, and let's now come in, grab everything
and come to mesh. So make sure you just
press A just to grab it all mesh, transform, and then you're just
going to go to randomize, turn it down to 0.1, maybe something like that. And there we go. Now,
let's grab them all. Again, make sure that we're
on individual origins, press S and X, and then we just
can bring them in. And now you can see that's
looking pretty good already. You can see we've got a little
bit of warp in on here. Let's make maybe a little bit more using our
proportional editing. So I'm just going
to grab this one, proportional editing, randomize, and let's just pull
it out a little bit. Now, the problem as you can see, we need connected
only turned off. And now when I pull this out, so I can just pull this
out so just a little bit. Just a tad, like so,
and there you go. Now we've got that look
that we're looking for. Right click and shades moth. And there we go. Now,
this is the first bit. So if we pull this out,
we're going to see the rest of it is just
these parts here, and then we've got the actual
outline of the actual door. So let's do the
outline of the door, and then we can create
these parts separately. So what I'm going to do is, I'm just going to press Shift S, cursor selected shift A and just create a
simple top and bomb. So I'm going to put this
right at the top here. I'm going to press one
to see how big it is, N's to bring it down, S and y or x to bring it out, like so, and there we go. And then all I'm going
to do is press Shift and D. Y 90, spin it round. Let's put this in place then. Press the S born and bring it down into place under there, and then just grab
the bottom of it and pull it down
without portioning on, especially not randomized
into place through the floor. We definitely want to go
in through the floor. Now, we're not
going to mirror it. We're just going to grab
it and then press shift. Pull it over to the
other side, like so. Now, with these
doors, I tend to, put them into place like so. And then what I'll
do is I'll bring in some edge loops now, so control. Left click, right click, Control, left
click, right click. Grab one of them, put
proportionality on. And then what you can do
is just slightly slightly, pull it out, like so, and you will see if you do that, you'll end up with a
little bit of variation. Same with the top controller, one in the middle,
and then just grab it shift click and then
just bring it down. It's only very, very slight, but it does make a
huge difference. And then what I want
to do now is pull the door back because we
definitely want it behind there. And finally, finally,
we might want to think about pulling this door then back a little bit
more so I'm just going to come to these parts
and grab this part, pull it back a little bit
without portion editing on, of course, just so it goes
into the wall nice and neatly. And we don't have to worry about the door going through the
wall or anything like that. So let's just pull them
back. So a little bit thicker than what
they should be. Alright, so now what
I'm going to do is I'm going to join
these with these. So for press Control J, they will inherit the Bevel. Let's press Control or transform
set origin to geometry. And now on the next one, guys, we're just
going to create this. We'll create the door handle. And this door handle
is going to be used for at least one
of the other doors, so it does make it easy. But this bit here is
quite easy to create, so we'll get that done next. Alright, everyone, so we're
going to save out our work, and I'll see you on the next
one. Thanks a lot. Bye bye.
80. Continuing modeling for door, adding hinges using subdivision techniques, creating ha: Welcome back everyone to BlenFo Modeling and Jode workshop, and this is where we left off. Alright, let's hide this out
the way. Let's press one. And then what we want to do
is create these parts here. So I think the easiest
way to do these parts is, I think we'll just
we'll just use a plane. I think that's gonna
be the easiest thing. So bringing a plane, did my
plane come in the right way? No, it's not rotated. So we'll just rotate
it round again. We'll press the Sb Don't know why it didn't
come in like that, but Ah let's put it into place. Let's press send
then, bring it down. Let's put our x ray on, and now we can see
perfectly through there. Let's grab our plane,
and pull it into place. Let's press the taboid and then all I'm going
to do now is just pull it out all the
way to here, so. Then what I'm going
to do is bring in some edge loops now. So left click, bring
in an edge loop here. Control law, bring in an
edge loop here, like so. Control law then,
and then it's bring in a couple, three edge loops. Left click, right click.
Control, another edge loop. Control law, another edge loop. Three in the middle.
So control law, one, two, three, left
click, right click. Control one more edge
loop, and then from there, bring in another maybe three, one, two, three, left
click, right click. Alright, let's grab
then both of these. And then what I should be
able to do is come in now. Let's try root and see
if that actually works. So sons bring it in. Like so. And there we go. Roots, I don't think
roots going to work. Let's try inverse square. So N's. That's
actually looking bad. That's the look I actually want. And you can see just
how easy this was. And then what we're going to
do now is we'll do this one. And I think with this one, we can grab the middle one again. So send, let's bring that in. And actually, you know what? That actually might look bad. Let's try the end first, so sad. Yeah, but I'm not sure
which one looks bad. I think that actually looks bad. We'll leave it like
that. I think that looks actually good enough. Now, this one, as you can tell, all it is is just this
one cut off here, so we can get that done. Now, now let's before
we finish, come in. Turn this off. This is
our piece mesh then. We press tab, A, and then, pull it out, like so, and we can cut
it for the other bit. Don't worry about that.
We just want to make sure then that we can
actually smooth this off. So shades move by angle. The other thing is,
I think we need to probably probably
before doing that, before pulling it out,
actually, we'll just go back. Let's just try and come in, adding a modifier and we'll generate a subdivision surface. Let's generate a
subdivision surface. Now, you can see that we do
have some problems with this. And this is mainly down to the fact that we haven't
brought it out yet, and we didn't point
the ends on it. In other words, I I press
controller on this. You can see now we can
actually bring that out and make it
really hard edge. Same with this. If we
press control B on these, you can see it really hard edge. So all you want to do now is just come to
these parts here. Press Control B.
And there you go, you can bring those
out, like so. And now you can see just how much bare that actually looks. Let's also come to this part here, and
I'll do it from here. So Control B, rating
this bit out. And then what we'll do is
add one edge loop in here. So control, left click,
and there we go. And see, now, that's
looking pretty good. Do you want it a bit
tighter at the end? Are you happy with
these being so rounded? You know what? I think
they actually look good. Let's just try now
pulling it out. So all I'm going
to do is press A, E pull it out. You know what? In fact,
before doing that, we'll actually apply
the subdivision. So apply the subdivision
in object mode. Now we can bring it out,
so bring it out with. There we go. And now we can
actually bring in our bevel. So I'd modifier,
generate a bevel. Let's let's have a look right
click shade auto smooth. Yeah, and there we go.
That's looking pretty good. And I think because
I've done it like this, what I'm also going
to do is just add in Maybe maybe just a little bit more so I'm just going
to grab these ones, and these ones going into
here, here, to here. And then the front
one I'll grab from here to here to here to here. And then all I'm going to do
is press and bring it in. And then what I'm going
to do is just press and pull those out a little bit just to make it a
little bit better, right click shades move. Yeah, and a thing that's looking just a little bit better, like so. All right. So now what I can do
is I can come now and finish this part off because
I want this to be like this. So what I'm going to do is
I'm going to grab this one. Press control layer transom
set origin to geometry. Shift D then, let's bring
it down into place on here. And then finally, let's
press Shift D and bring it up onto here, like so. And then what we'll do now is we just need to
cut this part off, so I'm going to press kshift
and click Delete bases, grab this part, L,
delete vertices. And then what I'm going to do is just join this edge up now. So k shift click going
all the way around, press the F button, like so, and then I'll just make a
another join in the center. So in the center here
to this one here, press the J born like so. And then what I'm going
to do is just right click shade smooth, like so. All right. So the last
thing, I think, you know, why I'm quite happy with
the bevel on this one. On this one, though, I'm
not actually happy with it. So I'm going to do is
going to turn this down. So, just keep turning
it down to not 0.3. Let's try that. Or
not point, one. Let's try that. There we
go. That's looking better. Alright, now they all
look about right. Okay, so let's press Ath
bring them all back. And we're going to
bring our door back then and just drop
these into place. So they're gonna
drop into place, like so, and there we go. That's looking,
really, really nice. Now we need is the
actual door handle. So again, we can now we don't want to join all these up
together at the moment. Because of the fact
we've got this bevel on. We'd soon actually do that after once we've actually
brought the materials in. So what I'm going to do now
is just press one again, and now I'm going
to make my handle. Now, we can't see what this
handle actually looks like. It doesn't really matter
because we can really, really easily make a handle. We'll create it with I'm just wondering whether to
create it with a curve, we'll definitely use a curve, but which we can even
use a bezier curve. I haven't really showed
you a Bzzier curve, so I think we'll use that. We'll press y 90 press
S, bring it down. You will notice it's
a Bzzier curve. It actually comes in
like this at this angle, which is already a good start actually for our actual handle. So s 180 spin it round. And then what I'm
going to do now. I'm not going to look
at that right now. First of all, I'm
just going to get how I actually want
this handle to look. So if I come in, Bring bring down the
resolutions, first of all, bring it down six or something, turn up this time
the depth of it, and there we go, we've already
started to get a handle. Let's come in then and turn it up a little bit more like so. And then what I'll do now,
I'll show you how to use this. So first of all, if I press
three on the number pad, you can see now I'm
in the side view. This here just basically moves the curve around
as you can see. Let's just turn off
proportional editing. Now, these here are
called the handles, and you can actually
really start to manipulate how this looks, using the handles and
the actual curve. So unlike the path
where you can't actually rotate them rom because you don't
have these handles, these ones actually allow that. So what it allows
for, For instance, if we put another subdivision in here and right click subdivide, what it allows for, if I grab this one now and then press G. What it allows for
is things like this. Then what I can do
is I can press, pull it out like so, and you can see now we can get quite a nice angle on that. So I'm going to
pull this one out, rotate it around then, and you can see how nice
that's actually going to look. So it's a really, really
nice way of creating Adle. So one thing I'm going to do, I'm going to bring
that up to there. I'm going to kind of bring this in then, bring it
out a little bit. And what we don't want
We really don't want there to be kind of
scritching up. I'll call it. We want it to be
nice and smooth, so I'm going to make it really,
really nice and smooth. And then what I'm
going to do now is try and bring this one back like so, and then bend it a
little bit, like so, and then move it a little bit, like so, and you can see now. Pretty nice and easy to
make a really nice handle. Alright, so I'm happy with that, the other
thing you can do. First of all, there is an
option here to fill caps, which means that we're
filled the ends, which we really want. And the other thing you can do is You can grab the main part on these and you can press alterns and actually
squeeze it in. So that's even better as well. So now you can see what a
beautiful handle we have there. Now, let's think about
the rest of this then. We can actually come in
and do the same thing, but actually bring this out, so you can see already
looking very ordinate, looking like a wizard's
you know door handle. So what we'll do now is we'll just press control
ate or transforms, right clicks the
origin to geometry. Bring in another
piece of metal then, so I'm going to bring in a mesh. I'll bring in a plane.
I'll spin my plane round, so x 90, let's spin it round. Let's make it much smaller, first of all, and get it into
the place where I want it. So I'm going to have it
somewhere like this. S and X bring it in. And I think from there, I can just bring down
this little bit here. Like so, and there we go. We've nearly got our
door handle completed. All we want to do
now, as you'll see, is create this part, and I'm going to show you
a really, really nice way of actually doing
this. All right, everyone. So I hope you enjoyed that, and I'll see you
on the next one. Don't forget to save
about your work. Thanks a lot. Bye bye.
81. Continuing hinge modeling process to create another variation: Welcome back everyone
to Blendf modeling and geometry know workshop, and
this is where we left off. Alright, so let's come in and
grab all of these corners. And what I'm going to do we can't press control B on these. You'll see nothing happens, but what you can do is you can
press Control Shift and B, and you can actually
start to bevel those off. Now, they're not
beveling correctly, because I need to reset
all of my transforms, like so, set Agins geometry.
Now come back to them. Control, Shift and B. And there we go. Now, what
else can we do with this? Well, first of all, we
can turn up our segments. Second of all we can turn down the shape of them
to bring them in, like so, and there you go. There, you can see just
how easy that is to do. Now, from here, what
I'm going to do is I'm going to bring them out. So first of all, I'm
going to pull this in. So I'm going to press the
iborn to pull it in, like so. And then what I'm
going to do is I'm going to grab the outside. I'm going to press the born
to pull it out, like so. And then we go War nice door. Then what I'm going to do is I'm going to go around the outside. So lt shift and click
and just pull that back. Like so, and I'm thinking as
well because we've still got that curve in there that I
just want to, you know what? I'm going to leave it
like that. I'm not going to do anymore to this. The only thing I'm going to do is right click
shade Auto smooth, control or transform
set origins geometry, and then I'll just
add in a bevel. So generate a bevel
and we'll put it on uh 0.3 or Not point, not one, and there we go. This curve then, I've
finished with it. Let's go to object,
convert to mesh, and you'll see now it's
a beautiful curve. And then what I can do is I
can join this all together. Once I bring my door back, I'll just pull this out a little bit. Press saltag, bring back my
door, pull it all together. Let's put it into place then, and we'll make sure it's
the right size as well. So if I pull this over, I can see now where the size is going to be. Let's bring it up. Let's press the S born
to make it a little bit smaller. And there we go. And let's now see
what that actually looks like once it's in place, so bring it into place. So double tap the A, and there you go one or
eight, simple door. And that's pretty nice. Okay, so let's put
it on material. And let's now start
bringing in some material, so let it load up. There we go. Let's
grab the whole thing. So all I'll do is
just grab all of it. I'm going to press
the tab just to see what we've grabbed of this, all of this and these. And then we're going
to do is press A, smart UV project,
click Okay, like so. Now, you always have
the option with things like this of deleting
the backs of them. If you want to save UV space or you are putting
this in the game, you can save a lot of polygons by deleting the backs of these. I tend not to do that
because, you know, a lot of games engines nowadays, it doesn't really matter so
much about polygon count. The thing that matters
more than anything really is the materials. So the materials and shaders. They're the thing
that really costs a lot in video games right now. And the way they can
get those down is by using these seamless textures
like we're doing here. So if you're using
seamless textures, you haven't got such
an issue with UV space because you can put things
over the same UV space. But if you are going
to be take them in substance painter and things like that and
painting them there, then you will have a small
amount of UV space to use, so you want to basically
make sure that all of these back parts are
actually deleted out the way. All right. With that
little bit said, then, let's come in, and
what we'll do is we'll come in now and add
in our materials. So first of all, I'm going
to add in plus down arrow, and we're going to
look for planks. So planks, I'm not sure
whether I actually want to use the wooden planks
or the window wood. So I'll come to this
part here first. I'll go down and I'll put in
window Window wood, like so. And I'm just going
to look. I think, actually, would it be different? The windows are a little bit
different. I think I will. You know what? I think I'll use this type of wood like so. We could do the outside
having a different wood. So if we grab all of these, we could click plus down planks, bring in the planks,
click a sign. Like so. We could
do it like that. That actually might be the way. And then what we'll do
with these is we'll come down arrow and we'll
put in iron on dark. And then what I'll do is
I'll grab all of these now. This one last. In fact, this one last. There we go. Controll link materials double tap the A, and there we go. Now, let's see what
this door looks like in render view before
doing anything else. And there we go. Yeah,
that It looks amazing. So we're happy with
that. Alright, let's put it onto object mode now. Let's just bring our door over because I don't
want to actually join it altogether yet because we might need certain things off of here. And the thing is if I
join it altogether, it's going to be mu
harder to split apart. So what I'm going to do is
just move it over to the side. And then what I'm going to
do is open up my new door. I'm going to come in,
open up my new door, and the one one
is this one here. Now, as you can
see, this one here, pretty much the same as the other ones except
this part here. So, I can actually just take
near enough everything. Even the door and I'll just make it a little bit different
on these parts. So all I'm going to do to do that is I'm just going
to press shift day. I'm going to bring in a plane. I'm going to spin it around so Rx 90. I'm going
to come in then. Make it a little bit
smaller, like so, press one on the number pad, bring it up into place. And then we're going to make
this a little bit smaller. So S bring it in and then
pull it over to here, grab this edge on here, pull it over to here, like so, and then I'll just do
this manually as well, because it's good if you can
actually do it both ways. So if you press control
law, not that way. Control bring in
some edge loops, grab the first two edge loops, S bring it down. Next one, S. And then
next one S and Z. The more you do this, obviously, the better you're
going to get with it, and then finally this one. So and, And then S and Z, bring it down, and there we go. Now, let's pull this out because we're going to be
using it twice anyway. In other words, the
bottom one is going to be pretty much
exactly the same, so let's pull it out like so. And then this snaking bit here. It's just done with
another curve. So we have put this
two a curve now, so what we'll do is we have
to bring in another one. So all I'm going to
do is press one. I'm going to then
press Shift date, bring in a curve, and I'll
bring in a bezier curve. I'm going to press R, 90. And then what I'm going
to do is press, 90. I'm going to make it a
little bit smaller, like so. Press one on the number pad. And then what I'm going
to do is bring that out. Now, there is a
difference in these in the fact that I
didn't make it round. In other words,
this one down here, the depth makes it round, as you can see. We don't
actually want that. Well, all we want to
do is extrude it. So you'll see now I've
extruded it a little bit, and then from there,
we're going to go in and add in a solidify. So let's just turn this off a minute so you can
see what I'm doing. Turn up thethickness then
to wherever you want it. Right click, and
you're just going to shave flat and there you go. Okay, so let's get it into
the shape that this is, so you can see, it's a
lot thicker than that, so I'm going to turn
up my thickness. And then all I'm going
to do now is come in, and I've got where is my
top and bottom there. So I'm going to
grab both of these. I'm gonna right
click, subdivide. That's the first thing
I'm going to do. And then while I'm facing on, I'm just going to
press the G button, bring this into place, press the G button, bring
it into place. And then all I'm going to do
is mess around with these. And you can see, as I
start to pull these out, you can see we're getting in
a really, really nice shape. Now, before we do that, Let's just reset all of
the transforms, and you will see as soon
as I reset the transforms, you're probably going
to have an easier time actually bending these
in place as you can see. So I'm going to adjust
Middle around with this. I'm going to put
it back to here. I'm going to put this
one then down to here. I'm going to bring
in another one, so grab the middle and middle of this one, right
click, subdivide. And now let's put the x ray on, and let's put this one back in place first. I'm going
to put this here. I'm going to press
G, put this here, and then G. Put this here, and then just work our way up. And then with this one,
I'm going to come to the top of G, bend it round. And then G and put
it into there. So that's going in and following this all
the way around now. Now, this one, let's bend
it a little bit first. So G and then G, pull it into place, and
then G bend it round. And there you go, you can see just how
easy that was to do. Now, let's increase the
thickness very, very slightly. You can see at the moment the
thickness isn't going up. Because we reset
all the transforms, let's just press control shift
ins head and put that in. Because we increased all the transforms as you can see now, sorry, because we reset
all the transforms. You can see now
what it did was it actually reset the
solidify as well. So instead of the solidify now, we have to come in and we need
to turn this extrusion up. So I turn this off now, you can see that
Jaws got to turn the extrusion up and then we'll make it a
little bit thicker. Now, let's pull it
over into place. Let's just press control head. Pull it into place.
So, and there we go. Now, if I press one, you can see they pretty much
line up perfectly. Let's make this a
little bit thicker. So S and y pull it out. And let's now put all of
these back into the door. Now, the other thing
is about this, you can see that
I do want to turn down the amount of resolutions. I really don't need it so high. And now what I'll do is
I'll pull it into place. Like so, and there we go. Obviously, we need our
door in there as well. So I'm just pull it into
place just to actually get it to see where I'm going to put it. So
something like that. And then what I'll do
is I'll just press one and I need obviously
this rotating round. So I'm just going to
press Shift and D, bring this down, and then I would just rotate
this one down. Now, before we do that,
we may as well put in these little kind of
knobby bits on there. And then once we've done that, we can actually bring
this other door across, and that will be that door done. All right, everyone. Let's
save at our work then, and I'll see you
on the next one. Thanks a lot. Bye bye.
82. Modeling stone framed door: Welcome back everyone
to blend for Muddling and jump workshop,
and this where I left it off. Now, what we'll do then is put these little knobby bits in. And I think also
it's a good idea to have at least like three
or four windows and doors, different ones,
and the same with the lights in pretty
much any environment. They're not all going
to be the same. So I think as long as you
have that as a bare minimum, you should be okay,
and I think you can get away with most
bills just with that. So what we'll do
now is we'll press shift A and we'll
bring in a cube. So let's bring in a cube. Let's press S and get it to
the same scale as these ones. I'm just going to get it to roughly the same scale.
Then all I'm going to do. Pull it up into place, like so, and then I'm going to just
scrim and press S and y, bring it down, press
one, go into front view. Make sure it's roughly
in the middle. And then from there,
press a little dot born. Make sure it's in place. Grab the front of it, so
press three. There we go. And then we'll do is I'll press, and then and then
and there we go. And then what I'll do
is just press one, and we're just add
in a quick array. So add in modifier
generate an array. Move it out a bit, so
hold the shift born. One, two, three, four, and then move it out a
little bit more like so. And actually, I think that
should be absolutely fine. Let's put it out,
maybe a little bit more so it's in between
each of these plans. So what if it's going
to go in there, it looks better like that,
I think. And there we go. All right, let's apply
the array with control. Let's join this back to here. So back in front behind here, like so, and then let's
join it together. So Control J, join it together, add in a modifier, be a bevel. No, 0.3, and then let's just press
control or transformed. And you can see
when we did that, how we actually
leveled these parts. You can also see
that I didn't join this part because it's
still an actual curve. Let's go to object,
convert to mesh. Join it to this, control J, and there we go, Let's right click and shades move by angle. And let's also turn this down, 0.1, and there we go. Now, let's press one on
the num pad Shift D. Let's click origin to geometry. I'll set origin to geometry, and let's bring this
one down into place. Now, we can see on this one. Jaws need to turn
this one round. So I'm going to do that
now, so I'll come into it. L. And then what I'll do
is I'll just rotate it. Well, I've got it, so Rx
hundred 80, rotate it round. Then just pull it into place
where it's going to go. You can see I'm probably
going to have to go back a little bit on these. So I'll do that in a minute. What I'll first of all do though is just pull
all of these out, right click origin, do
geometry, pull them all out. And then all I'm going
to do is grab my door. If I press, you can see it's
just this part of the door. That's the only part we want. We'll put a door
handle in after that. So all I'm going to do
is just press shift. I'll bring it over. And then what I'll do is
I'll bring these over. I'll just press G and bring
them over into place. So I want this to
be kind of there, and I think I want these
to go into the door. So I'll saw that in a minute. Let's pull these
into place. L so. And then what we'll do is we'll pull I'm just wondering this
is right on the edge here. I think what I'll do is here, so I'll just press
S and X and just pull it back a little bit more. So I think that looks
a little bit there. And then all I'm going to do then is just come to this part. So I'll come to this part. I'm just going to
put it onto normal, and then I'll just pull it
this way into the door. I'll do the same then on
this one, into the door. Like so double tap the A. And there you go. That's
looking pretty nice. Finally, then, let's
grab this door handle. We might make it look a little
bit different on these. I think we will, actually.
So we'll just press shift. We'll bring it over pop
it into place. Like so. And the other thing is, I'm just wondering whether I want to pull these up so I could pull
them up a little bit higher. Pull these down a
little bit lower, and then just pull that
into place like so. Alright, now I've got
that there. I'll just press Shift, Kursta Selected. Shift A. I'll bring in a plane. Spin the plane round so Rx 90. Press the S borne, bring
it in right in like so, and then Essen Ed pull it out, and because we grow
normal, it's not working. So EsnsEd and there we go. And then all I'm
going to do with this one is just going
to be a more simple one. So I'm just going to
press to pull it out, and then I pull it in. Now, you can see when I brought that in, it's very uneven. And the reason is because I need to reset all my transforms, so I'll set origin
to geometry. Tab. Press the i born. Like so, press the born to pull it back, and then just bring the
handle then into place. Like so. I'm going to probably
pop it down a little bit. There we go. And then all I'll do is I'll
bevel this as well. So control al transform,
set origins geometry, adding the modifier, not a
geometry node, generate bevel. No 0.1, and there we go. Now, let's pull those
back into place. Double tap the A.
And there we go. Two very different
looking doors, although most of them
are the actual state. All right. So let's move on something a little
bit more complex. Let's go up to file,
and we'll save it. Let's have a look at
our windows then. So if I come to this one, I'm going to go to open, and let's see what
we've got left. So we've got this door here
and we've got this one here. Both of them fairly
complex, actually. I think the most complex one is probably going to
be this one here. So I think we'll
do this one first. So we'll bring this one in. Now, the door should be. If we look, it's near enough. The same size of these
a little bit bigger, which is absolutely fine, but we are going to
have to make this one. Basically, we're going to have to start this one again because we actually there's a lot
of work to do on this one. So that's what we'll
do. So first of all, we'll get these pillars in. So let's do those first. So what I'm going to do is
I'm going to put it right to the center for C. And then I'm going to
press Shift and A, bring in a cube. I'm going to press the S button, and I'm just going to
pull it out and get it to round about the
right size first. So round about the right size. So something like that,
The other thing is, I just want to make sure that it's going to be thick enough, so in other words, going
back thick enough. So I'm going to probably pull it back a little bit
further on this part. I'm just going to grab this Pull it back a little bit
further, like so. Alright, let's now pull
it back into place. And then what we'll
do now is we'll press Shift S. So shift and S, Kursa selected Shift A, and let's bring in
now a cylinder. So let's bring in a cylinder. 24 should be okay. Let's have a look so
you can see here we want it to be kind of
these points on there. Now, if you want
that, it's better to turn it all the way down. And then bring it up, like so, and then you can
actually see now we can actually get something
like what we've got there. So actually it is
going to be you know, you're going to see those sides. We don't want to actually
smooth out this cylinder. Alright, so once we've got
that, let's come back to it. Let's press the S button.
Let's bring it into place. And then what I'm going to
do is I'm going to bring it up like so. And then
going to press one. I'm going to press's
d and bring it down into place like so. And then the next thing
I want to do is just make sure that it's
nearly nearly touching. And from there, then what we can do is we can come to the top, so grab just the top, press one. Put this on. And then
all you're going to do is press the ibt to bring it in. So not the S b, the button, bring it in. Like so. And then what you're going
to do is press one again, and you're going to pull
it up to this one here. And then you're
going to press S, pull it out. Like so. And then E Z pull it up. Like so. Then all you're going to do is grab
this bottom one now. So this bottom one down here. So if you put this down here, you can see Tifton D, bring it up into place like so, send and then just drop
that on top of here, like so, and you can see
now it's all fitting in. Really, really nicely. Alright, so that's
the first bit. The next bit then is going to be these
planks of wood here. So the way I would
say do this is again, put your cursor
right in the center. You're going to
then press Shift A, and you're going to
bring in a plane. I'm going to rotate
it round so RX 90 as we've done every other time
before. Press the S board. Now, I just want to
bring it in then to roughly where
it's going to go, so you can see roughly it's going to come to
these parts here. So I'm going to press S, bring it in a little bit
more, like so, And then what I'm going to do is I want this outside on here, so you can see we've
got this metal type outside after it. We really want to keep that. So what I'm going to do is gonna pull it across
a little bit like so, and then I'm going to press
S and X and bring it in a little bit because I want that metal bit going
around the outside. Alright, from there, then
what we're gonna do is, we're going to come. Bring it down to here, like so. And now I want to do
is I want to check. So I've got one, two, three, four, and
five, basically. So let's do that now. So
control. And let's have a look. So I think we'll actually move them across because they need
to come up there as well. So I'm thinking that I'll bring, I'll bring one in to start with. So let's press Control.
Left click, right click. Control B. Scroll it down, so we've only got two of
them, and then control. Left click, right
click. Control B. Bring it out, like so. And now what we can do is we can actually start
bringing these up. So bring these two up first. So all the way up to here. And then these two all
the way up to here. And then these two
all the way up. To here, and then just
work my way along. And then the center
one, so control. Left click, right, click,
all the way up to there. And there you go.
A simple as that. Alright, so one,
the next one then. What we'll do is
we'll get this split, so we've got an actual door. And then from there then,
we've just got the stone to do and the front of this
door. Sounds easy, right? But it's not that easy, but it shouldn't take as
long to get this door done with all the skills that you've built up through the
rest of the course. So let's save out of work now, and I'll see you on the next on everyone. Thanks a lot. Bye bye.
83. continuing to model stone frame door: Welcome everyone to blend for
modeling and mind workshop. I should have said, welcome
back for you get what I mean. All right. So this is
where we left it off. Now, what I want to do is I want to create this metal part that's going around the edges all the way down to here. So
let's do that next. So what I'm going to do? I'm
going to come to my door. I'm going to turn off my X ray. And I'm basically going to
click on one of these edges. I think actually, we've still
got the mirror on. So look. No, actually, we
haven't got the men. So let's see if we can click
on O edge. There we go. Control click going
all the way around. And then what I'll do is, I think I'm just wondering which would be the
easiest way to do this. I think actually what we'll
do is we'll press Shift D, just to duplicate it. And then what we'll
do is we'll press and y to extrude
it out, like so. And then from there, I can actually bring out
now this metal part. So all I'm going to do is
I'm going to split this off. So I'm going to press L on the
P selection, split it off. And then, of course, we'll just reset our transformations, origin geometry,
adding a modifier, and we're going to
generate a solidify. I'm going to press one
on the number pad then just to get what I
want, so something, roundabout like that,
even thickness on, and there we go, that's
looking pretty nice. I'm just wondering
whether I need to round these parts
of a little bit. And actually, probably
not, probably not. I think we can get
away with something like that. All right. So now we can see this
metal structure is going to come round to here, like so. It doesn't really map out
the thickness so much. It's just the width of it that
we're actually looking at, and it needs to be visible
when we actually look at it. So I think something like
this is absolutely fine. And now what we'll do is we'll actually look at our rocks. So all I'm going
to do is I'm going to apply that with control A, and then I can come in now
and kind of from this, create my actual rocks that are going to go around
the outside of here. So the way that I'm
going to do it is I want it also
going down as well. So what I'm going to do
is, I'm just going to select this going all
the way round to here, like so, and then
I'm going to press Shift D and I'm going to
bring this out then, like so. And what I'm going to
do is I only want it going in to the tops of here. I don't really want
it disappearing, you know, down here or
anything like that. So what I'm going to do is, I'm just going to press Control. Left click, right click. Control, left
click, right click. Grab them both, and then
I'm going to press one, and I'm going to pull
them up into place. Now, you see where
the red arrows. We can see that's where it's
actually going to point, so we know that they're
actually in there, as you can see. And then from there, I
can actually come in. With face legs like
this face and this face and press Delete
and faces like so. All right, so let's
create our actual rock. So I'm going to pull this
back now into place like so. I'm going to press S
and y and pull it out, like so, quite far. Something like that, I think
will be absolutely fine. Maybe a little bit further. Like so. And then we also want to think about the
outside of this as well. So what I think I'll do is, I think I will first of all, create my rocks that are
going to come out here. So the width of the rocks. And then from there,
before I split them off, then I'll create this
outside bit as well. What I'm going to do is
I'm going to press one. I'm going to press P selection. Separate it off. I'll have to
come back round, actually. Reset all the transforms as we do every time. Add modify it. I'm going to generate a solidify
going to press one then. And then what I'm going
to do is pull this out. So make sure even
thickness is on. I'm going to bring it in. Holding the Shift
board, like so. And I think with
this, we just need to play around with it a little
bit before we finish. So all I'm going to do
is I'm just going to press control leg to
apply my solidify, and then I'm just
going to come in. Grab each of these, like so. So I'm going to grab
that one in there. And I I press S and
X, you can see, if I put this on medium point, should they mail to pull them out like so and
that's where one. Let's press one and
then add S and X, let's pull them
out a little bit. Like so. And what I'm
also going to do is, I'm just going to
level off this top just to make it a
little bit more round. Now, I'm also going to level
off the inside as well. So I'm going to do
both at the same time. Control B, level them off. Like so All right,
so far so good. Now what I want to do is
I want to think about the outside of this part now. So what I'm going to do
is I'm going to come in. And select all the way over
all the way over to here, and then I'm going to press
Shift and D, like so, and then I'm going
to press S and y and pull this out
to the end there. And then we're going
to press P selection. Separate it off, grab it again, control transform, dry,
click origins, geometry, add in another modifier, and this time, it'll be well, not this time, but
the same as before, will be a solidify. Let's bring it out. Press
in one on the number pad, bring it out, where
we actually want it. So, making sure that it's
fitting in those parts there. Alright, that's
looking pretty good. Now, let's come back
to this part now. So we'll just come
back to this part. And what I'm going to
do is add the modifier, we'll generate a mirror. If the mirror is not working, just make sure you right click S Origins three D cursor,
and now it's working. Let's come back to these
two parts as well. And instead of doing
that w there is, I'll grab these two parts,
click Origins three D cursor. Grab this one last,
press Control L, and you're going to copy
modifiers, and there we go. Now, everything's over
on the other side. All right. So this
is looking good. Now what we want to do is let's work on our wood a little bit. So all I'm going to do with
my wood is I'll come down, and we're going to split
the wood like this one. So I'm going to right
click Marcosin. I'm also going to press Control, bring a few edge loops like we've done many
times before now, and then let's split these off. So L, L and L, y, and then I'm
going to press A. And then I'm just
going to press S and X or S and y
and bring them in. But first of all, I
want to make sure I've got individuals origins on. So S and X, bring
them in a little bit. Like, so. Alright, from here, then, let's pull them
back, jaws to Tad. So jaws to round about there, then press and pull
them out. Just so. They're just behind
this metal part that we've actually
created there. And then from there,
then what we can do now and see what
we've got there. We can come in then, grab
them all, go to mesh, transform, randomize, and let's just turn
that down a little bit. To maybe a look at that. Maybe not 0.2. Let's look. Yeah, that's looking
pretty nice. Let's right click Shade Smooth. And finally, then let's
bring them back together. So S and X, bring them a little
bit closer together. And there we go, There's our actual door
looking pretty nice. Now we're free to pull this
back. A little bit like so. And now let's get this
front bit on here that we actually that I've actually
created down here. So I'm just thinking the
best way to do this. So let's first of all press one. We'll go into X ray so we
can see what we're doing. We're going to
press Shift and A. What we'll do is we'll
bring in a plane. Spinning the plane
round, so our X 90 bring the plane in with
the S borne then what I'm going to do is now S
and Z and bring it up to something like this. And what I'll do first of all, is, I'll create this
part on the inside. It might be looking a little
bit different to this part. But I think creating this part, and then we'll
create this part on the inside and then think
about the top of it. So let's go to the bottom first. So make sure you've got
your plane selected. I haven't got mine because
it's disappeared in there. Let's put our X ray off, so
I can see what I'm doing. Let's hide this
wood out the way. Let's bring this
out all the way, then we can put it back on tag
and bring back everything. And there we go. Now what
I can do is I can come. Grab the two bottom ones, like so, press one. And then all I'm going to do
is press control shift and B and bring them in, like so. And then now I want
to do the top part. So I'm going to come
in, grab the top. I'm going to bring it
down to here, like so. And I think then I'll
work on bringing all of these bits up one two.
So I'm gonna press control. And we can see because we put
this bevel on the bottom, what it means it's made
it difficult now to actually bring in some
kind of edge loop. So all I'm going
to do to fix that. I'll just grab this
one on this one. Press J, and now I should be able to
bring in an edge loop. So left click, right
click, and there we go. Now, let's press
Control B to bevel it, and all we're going
to do is just pull it out into place like so, and then grab these two
parts and pull them up. Now, let's work on the next bit. So we're going to need one, two, maybe three more edge loops. Control left click,
right click, Control B. And then grab the two top ones, pull them up into place. Control. Left click,
right, click, grab the center one, pull it up into place,
and there we go. Now, let's think about
the inside of the. I think actually, I'll make it better than what
I did initially. So all I'm going to
do is just press and bring that in, like so. Now, before bringing it in, I'm going to have to reset
all the transforms again. So resettle transforms, origin
to geometry, Tab button, press the i born, and now everything's coming in
nice and neatly for me. I'm just going to
check the bomb. We can see down the bomb, we've actually got
some crossover. As we know this is
sometimes the case. Now, sometimes it's better not to work like
we're doing here, where we're trying to
use the insert key. So sometimes it's just
better to actually, you know, come grab
the outside of it. So shift and click going
all the way around it. Like so, and then press
shift and D and pull it out. And from there, we'll
delete the last one off. So L delete this. And now we're just
left with this. From here, though, what we
can do is we can actually press and y to extrude
it out, like so. And then all I can do
is they can press tab. Control will transform
set origins, geometry. And finally, then we'll
just bring in a solidify. If I press one now, we should be able to see
what's happening here. If I bring this in
now, you can see, we're still getting a
little bit of crossover, especially on the
bottom part here, but that's mainly
caused by the normal. So if I press tab, A
to grab everything, shifting And I'm hoping it spins the more round,
but it doesn't seem to. So instead of doing that, I'll
just grab these ball ones, so grab all these ball ones, shift in and then put inside and that spin them
round, grab these ones. I'm just wondering if I need to spin everything around because I'm having a little
bit of problem here. Let's press shift
in on these inside. Yeah, and I'm going to
actually have a look. Before we finish, and let's just look on our face orientation. And we can see here,
this is the problem. It's this one being caused
on the inside of here. Let's put even thickness
on, first of all. And then what do
I want to do now? Just hide this out
of the way and let's look at what's
causing the problems. You can see here. All of this is red on the inside and then
on the bottom here, it's all red as well. We
need it on the inside. So let's press Shift down
once more, spin it around, turn this back on,
and then we've still got some problems. I've not actually come
across this before, so I don't actually know While we're actually
having some problems. So what I'm going
to do Control or transforms the origin of
geometry, turn it back on. And I'm starving problems. So what we'll do then
on the next lesson is, we'll get this fixed. I assure you this will be
fixed, so don't worry about it. And I think it's probably
to do with the fact that we've got some edge loops in there that
shouldn't be there. But either way, this will
get fixed on the next one. Before we go there,
let's just turn our face orientation off because we know that's
absolutely fine. And as I said, we'll fix it on the next one.
Alright, everyone. Hope you enjoyed that. S on the next one. Thanks
a lot. Bye bye.
84. Creating Placeholder frame for gem in door: Welcome back everyone to blend the ball modeling
and Jump workshop, and this is where
we left it off. Alright, let's turn
this off a minute. Let's come to our
bomb, and all we're going to do is delete
those out the way. So delete faces. And now, if you turn it back on, you'll lend up with
something like this. Now, you can see that
at the bomb here. We do seem to be
having a few problems. If I come in now and
turn this off once more, let's see what happens if we
just join this together now. So let's press the F born, join it together.
Turn it back on. And Yeah, I don't know. This is quite a strange one. So what I'm going to
do is instead of that, I'm actually going to come in. I'm going to grab all of this
going all the way around. There's many ways to fix it,
so don't worry about it. Whatever happens, we
can get this fixed. We're going to come to mesh. We're going to clean up, and we're going to
merge by distance. And there you go. There you go. You can see what it was was. There was extra some
for some reason, some extra edges in there. And now you can see they're
looking much better apart from the fact that I think now we just need to press shift, spin it around, and there we go. And as I said,
anything can be fixed, it's just knowing
how to fix things. Now, let's press one and actually see if
this is in place. I'm just going to come in now
and see if that's in place. And I think that's
looking pretty good. We can see we've got some
inside structure in here. We've got these parts in here, and then we've got
this part in here. So let's do this part first. So what I'll do is I'll press shift date. I'll
bring in a plane. And it might seem a bit weird, you're starting with a plane, but I think actually, I'm
going to spin it around, make it a little bit smaller. Like, so, press S and
S and bring it in. And then what I'm going
to do from there is I'm going to come now
resettle the transform. So press Control A, all transforms, set
origins geometry. Press the taboard now, and I can come in and grab
each of these vertices. L so Control shift in B, and let's bring them in to
where I actually want them. So something like this. I'm
going to turn it up then. Like so. I'm not going to worry too much that it's
fitting exactly. I'm going to grab it then,
S and X, pull it in. And then finally, I'm just going to bring these parts out. So just these parts out a little bit because
of the moment, they're looking a
little bit flimsy. So sensed, pull
them out like so. From here, then what I'm
going to do is I'm going to press enter S and X, and I'm going to pull those
out with medium point on. So S and X pull those
out into place. And you can see just that my piece of metal
is here like so. And then from
there, I'm going to press sensed and pull them out. So I want them. And as I said, I'm not going to keep to exactly what this is because
it seems that these on this side are a lot lower than
these on this side. So I'm going to keep it as that. And all I'm going to do is I'm going to bring in
some edge loops now. So five edge loops. Left click. Right clip. You can see
here, five control. Five edge loops, left
click, right click. Let's grab the center one. So let's try grabbing
the center one of each. Let's put p portion
editing on and let's press S and Z and bring it in.
So let's put it out. Like so, and there we go. It's nice and smooth
now going into place. Alright, so that's
all looking good. Now, let's put it
turn off our X ray. Let's now bring this out. So what I'm going to do first? I'm going to pull
it out into place. Like so. Something, so it's
just touching the door. And then we're going to press A to extrude it out,
extrude it out. And we can see
here, we're a mile off actually these parts here. And I thought,
looking at the X ray that we're touching those,
maybe we are actually. Let's It's maybe this part here. So let's pull it out into place. Yeah, few. There actually
touching, so that's good. So let's pull it out
a little bit more. So I'm just going to turn
off proportionality, pull it out a little bit more. Then what I'm going to do is I'm going to grab the center part. So this center part.
Let's pull this part out. So, pull it out, like so. And finally, then
we'll use our insert, so I insert it into the center. And let's just
take another look. That's how it looks
exactly the same as this near enough,
and then we'll press. Pull it back, like
so. All right. So that's that bit.
Now, the easy bit, if we put our x ray back on, is going to be these
parts down here. So all I'll do with
these parts is, I'm just going to press Shift D. We'll bring in another plane, Rx 90, make the plane much smaller and let's pull
it back into place over here. L let's press S and then
put it into the metal, which is going to
be ran about there. Then we're going to press S and X and pull it out. Like so. And then finally,
I want to bend it in on these parts
that we've got here. So I'm going to press Control.
Left click, right click. Control B. Scroll
your mouse wheel in and then pull it out
to this point, Control. Left click, right
click Control B, scroll your mouse wheel out if there's too
many down to here, and then finally want one more, which is going to be actually
into here. So Control Let's put it right,
plate, control B and pull it out
into this like so. Now, then, let's think
about this last part. So all I'm going to do now
is grab these two parts. I'm going to press
shift in space parts, bring in my move tool. I'm going to bring it down
to something like here, and then bring these two down to the next point,
something like here. And finally, then these points down is something like this. Alright, so let's turn
it off once more. So our x ray off.
Let's pull this out. So A to grab everything,
pull it out. And then all I'm
going to do is set it back to the
beginning of here, press the born, and I'm going to just pull
it out to there. Like, so. Alright,
so far so good. Now, let's have a look at that. Now, all we need to do
is the top part now. So again, let's put it back on. And let's have a look
at this top part. So the top part is looking
something like this. Shift A. Let's first of all,
bring in a plane again, r x 90, S, bring it down. Let's put it into place
where it's going to go. So it's going to go
round about to here, and then we're going
to pull it up to here. And then what I'm going
to do is press tab, control, left
click, right click. I'm going to grab this
one, then, pull it up. Grab this one, pull
it into place here, grab these two, pull
them into place to here. And then all I'm going to do is press S and X and pull them in. So they're going
to there roughly, and then we'll want to bend
them just round about here. So fire press control. I'm going to bring
it down there, grab each of these outside. One to press S and X
and bring them in. And there we go.
That's that part done. Now, from here, what I
can do is I can press A, bring it all the way out seven to 12 of the top to
see where it needs to sit, so it's going to sit along here. And I think this
part is going to go actually in the top up here. So I'm just going
to sit at the back. I'm going to press, pull
it out then along here, to extrude And then what I want to do is just
do these two bits now. So if I come in, I should be
able to grab both of these. Press the eye born twice, and I should be able to
bring them in slightly and then pull them
out with extrude, so. And there we go. Alright, so
that's looking pretty good. Didn't take us long to do. And from here then, we've
still got some modifies on. So let's apply that
with control A. Let's then join all of these
up all of these control. And then all we do is
we'll press control A. You'll transforms, set origins
geometry. Right click. And what we're going
to do is shade smooth. So make sure we've
shaded those smooth. And finally, then,
let's have a look. We should be able to actually
pull this into place now. So let's press a little
dot one on the number pad. Just make sure that it's
actually side my door. So and there we go. I think that's looking
good. Like that. And I think we've
pretty much nailed exactly what we
wanted for this door. So now, finally, we can join it. I think we can join
it all together, actually. We just
need the material. So all I'm going to do
go over the top of it, go to object, convert to mesh. You can see I can't
convert it at the moment. So just make sure
you've clicked on one. So shift select, and we're
going to go to object, convert to mesh just to apply all of those modifiers
and things like that. All right, next one I'm going
to do is press Control J. Join it all together.
Control Sorry, right click, set shade
smooth by angle. And then finally,
I'm just going to reset all the transforms. Like so. And then I'm going
to grab it all pressure you. Smart UV project, click Okay. Now, let's go to our material. And I think we've got
materials on these, but we'll have to check. So let it load up and there
we go, no materials on there. So let's come to these parts. So we can see we've
got a bevel on. That's something I actually
forgot to put on there, so I'll do that in
just one moment. In fact, you know what?
We'll check that first. So I'm going to add in a
modified generator bevel. And there we go, Let me just see what the bevel looks like. And yeah, it's gone on there, absolutely perfect
on everything, so that's absolutely fine. Now we can come to this one. Put a bevel on
here. We just need to add it in our materials. So let's put it
back on material, and I'm just going to grab
each of these press tab A two on wrap Smart UV
project. Click Okay. And we'll come over
to our materials, and we're going to give
them the iron dock. So give it iron doc. And then all we need to do is press control L and
link materials like so. Alright. That's that door done. This now run to this door. I'm wondering, all of
these are split up. I'm wondering whether I can
join all of these together. I'm wondering about
the next door. I don't think actually
we need these. So I think from here, actually, we can go over the top now, so seven to go over the top. Grab this door, and
we'll go to object, convert to mesh, and then we'll press Control J,
join it all together. Control or transom set
origin to geometry. Grab this door then.
Same thing again, so object and get used
to doing this because it really does make things much
easier in the long run, and it makes it so that
you don't end up with any more mirrors or anything like that
that you don't want. Let's press Control J. Join all that together,
and there we go. And finally, well
on each of these, let's just right clicking
shades smooth by angle. And now I'll do is
I'll grab this one. It's all been joined together, which means I can grab this one, press Control L. And all we're going to do
is link materials. Now, of course, we need to sort out the materials
on the next lesson, but you can see just down ice that's actually
looking. Alright, everyone. So I hope you enjoyed that one. On the next one,
it's the final door. There are no more
doors, no more windows. The only little things we
have to do then is the light, which are quite similar
to doors and windows. It just takes it that little bit extra scale to create those. But from there, though,
we've pretty much got everything set
up now that we need. All, everyone. So I
hope you enjoyed that. I'll see on the next
one. Thanks a lot. Bye bye. And
85. Adding gem to door and creating another variation of door with windows in it: Welcome, Microphone to blend the four Modeling and
John Mind workshop, and this is where we left off. Okay, so let's come in and
add in one more material, and it's going to be
our gemstone blue. And we're going to
actually slate this and just wondering where did
it go? Let's try that again. So Los down arrow, gemstone blue. There we go. Now I should be able
to come into this. I think I actually
added it onto there. I did. So let's minus
that off of there. We don't want it on there.
And let's come into this one, click a sign, and there we go. And now we'll do is we'll
come to our actual wood. So this part's
going to be stone, which also we don't
have on here. So let's pull this down
and we're going to pick the Let's have a look. We've got stone
stone. This one here. And now what we'll
do is we'll just come into all of our stones. So each one of these
bottom one here, it's going to be
stone, this part here. This part along here actually
haven't finished yet. So I'm going to have to come
in and finish that one. This is going to be
stone. No, it's not. This one is going to be metal. So this part is it going to
be metal let's have a look? Yeah, this part's
going to be steel, and this part is
going to be stone. So let's grab all of
those, click a sign. And then we'll just come
to these parts here now. So the wood, basically,
we're going to go to each of our wood. Like so. I'm going to come down to
planks and click a sign. And I'm just wondering
on this one, do we have any need for the other you know
this part of wood? And I don't think I do, but you can see that this
part should be window wood. So let's click a sign on that, like so. All right. That's looking pretty nice. And now, Let's actually
deal with these parts. So these parts
here, we didn't do. So what I'm going to
do with these parts? I'm just going to come
in and shift age, just hide everything
else out of the way. And I want the stone to be like this is here. So,
what I'm going to do? Old Shift click Alt Shift
click Alt Shift click, Old Shift click Olshift click, right click and mark a seam. From there, then, I'm just
going to split these up now. So I'm just going to come in and grab each one of these like so, and then press in and then press G and you can
see now the split up. A then, and I'm hoping I
should be able to come in and clean up and fill holes. And finally, then, let's
just come to this bit. We're going to have to split
it off, unfortunately. So let's just split it off now. And then what I'm going
to do, you can see now the bevels been
applied to it, control A or transforms
set origin to geometry. Let's come over and
we've got Beverly. Let's turn this bevel down then. So let's turn it
all the way down. To something like this. Let's right click and
shades move like so. And let's double the eight and have a look at
what that looks like. And I'm still not happy
with how that looks like. So what I'm going to do put
this on 0.5 let's try that. And there we go, that's
looking much, much nicer now. Finally, then, you can see that I've got bevel on all of this. And I don't really I want to join this and
have the same bevel, but you can see this as 0.1. And the rest of it is, well, this part here is
point naught five. All I'm going to do is
apply this, so control A. Join it to this then, Control J. And there you go, we should
actually keep what we actually had because we
already have this beveled off. It will bevel it off again. You know, it will
come in, and you will be beveling this off again, but I'm not going to
worry too much about it on just one part like so. Okay, so that's that door done. Now, let me just reset the
transforms quickly, like so. And then all I'm going to do is pull that over to that side. And that's done. I'm just
going to have a quick look and make sure I'm happy
with how that door looks. So I've got the top
of it. I've got this coming down the steel.
I've got the stone. I'm going to look at it
quickly on my render view jaws to make sure
let it load up. And it says updating Got
nodes, and there we go. Now, again, when you
get to this stage, as I've said, you can see it's a little bit slow
on the rendering. We have got a lot
of parts in here. If it is crashing or anything, you can see down here how
much V M is being used, nearly all my V RM. Just come up and save it out and then just reload it again. And you will see if I
come in now and just go to open recent and go to
modeling ego workshop, this one here, and
reopen it again. You'll see that
drops back to this, but the moment I
come to rendering, you'll see now this should be much, much faster there you go. You can see much,
much quicker now actually loading everything
up. So that's what we want. And that's why I've done this, and that will stop
the initial crashes. And also, I've played
with the video on performance and
optimization as well. Okay, so let's come in then. We'll put it on material mode. And then we'll create
our final door, which will be if I grab this, once it's loaded up,
I will open it up. Like so, and the final door
is going to be this one here, which is kind of a mixture
of everything that we've just done kind of put together, and that's what this is
basically going to be. So you can see here, it looks fairly complex
on the outside. The first thing we'll
do then is we'll get this main door created.
So all I'm going to do Is, again, I'll put my little cursor right in the
center of this part here. Song, as, go to press
shift right click. And then we're going
to press Shift A, bring in a plane, spin
it around, so RX 90. And I'm glad this is the
last door because doors can get a little bit tier
curing so many in one go. Let's bring it down then. And then all I'm
going to do is bring it up to this point here. So I'm just going to grab it, bring it up into place. And then we're gonna press
Control R. And left click, right click, and then I'm
going to bring it up. So bring it up into place. And then we're going to
press Control on this side, left click, right click,
Control on this side, left click, right click. Grab the tops of them and bring those up into place like so. All right. So we've
got this bit. Now, we can see if we go in and put our X ray on on object mode. We can see here this is what we're actually
trying to create. So you can see, first of all, we've got some metal parts
come in around here. So let's do those first, and we can also
see that we've got some very interesting parts
in these parts here as well. Alright, so what I think is, I'm thinking that
we'll do these parts after because I want to split my wood up before doing that, and I'm thinking that I'll probably work on this part here. So I'm going all the
way out, work my way out and before finishing
with this part. So let's do that now. So
all I'm going to do is I'll come in and I'll
grab all of these parts. Like so I'm going to press Shift D. And then all I'm going to do is press and x or
y and pull them out, like so, let's split
them off then. So L. So just grab these
parts going round here, press P, selection,
split them off. Control or transom
set origins geometry, add in a modifier, and the modifier
want to bring in and of course, a solidify. Press one again,
go to front view, bring them back so they can get them nicely in place like so. And then finally, I
want to make sure even thickness is
on. And there we go. That's that part done then. We can see that's what
we've got at the moment. And now it's time
to actually create these stone blocks.
Now, I'm thinking. The easiest way is going
to be probably to start. We could do these as
a complete plane. We could do it with the plane, and we'll, you know,
pull each of these out. I think actually
we will do that. So we'll start with the plane. A I'm going to do
is press shift d. I'm going to come over,
bring in my plane, our x 90, spin it around. Let's bring it then into the scale that we
actually want it. So we're going to
put it somewhere around here to start with. And then all I'm
going to do is drop it down into place, like so. I'm going to grab the
top of this then, I'll grab the top
one, pull it all the way up into place. All right. So now, let's try and
create these parts. So first of all, we'll have an edge loop coming
down to this one. So down to here, and
then another edge loop coming down to this
one. So this one here. And then finally, we'll have one coming up to roundabout here. So control, an edge
loop coming up to here. And then we just want these
one, two, three, four. So Control four edge loops. Left click, right
click, like so. Okay, so now we want
to do is we actually want to split these off, and then we want to
actually solidify them and put them into the shape that we
actually want them. So also, I'm going to put one more edge loop
in here as well. So control, bring it down. Alright. That's pretty good. Now we want to split these off. So I'm just going to
go every other one. So select every other one, like, so leave these two together because it will be
the same stone. Press the y button, and
now they're all split off. And then from here,
now, what I want to do is I want to
pull this one out. So pull it out to the third,
which is going to go. And then I'm going to come
down, pull this one out. And then finally, this one is going to be even further out, like so, and there we go. Now, what I'm going
to do is press A? No. I think I press then. Let's
pull that one back out. There we go. Now, let's press A. And then what we're
going to do is we're going to pull them
back because remember, they have to be quite thick,
and then we're going to press and pull them
all the way forward. I think even even further
back than this, actually. So I'm just going
to, you know what? I'm gonna make this
season for myself. I'm just going to pull
them out even further, then press the A, then I'm just going to pull them
back. Into place. I'm going to turn off this
just 1 second and now you can see just how far they're actually coming out
with the met there. And I think you know what
that looks absolutely fine. Okay, so now, as we're
dealing with these, we might as well finish
these ones first, so I'm just going to press control all transoms
set origin two, three D cursor, and then
I'm going to come in, and I'm going to
add in a mirror, so we're going to put it
over the other side like so. And then we're going to
add in and modify it, I'm going to generate a bevel. And then what we're going to
do is turn this bevel down. So if I comb two of the bevel, I'm going to put
it on point, five, like so, and there is my stone. Now, you can see
the bottom ones, and these top ones in particular are actually
coming out a little bit. So I'm going to stick to that. So what I'm going
to do then is just come in to each of these first. And I'm going to pull
them out or back, should we say a little bit. Like so. Now I want to
do is grab this one, pull this one out, like
so, and there we go. And then with this one, I
want to bring this part in. So just this part in, and I'm thinking the
easiest way to do that. The thing is, I need another
edge loop in here, I think. So if I press control, let's bring in one more edge
loop really close to it, and I should now be able to
grab the outside up here. So grabbing the outside
going all the way around, pressing altern
and we should now be able to bring that down
a little bit like so. And from there, while I'm
able to pull it up into the place where I actually
want it, like that. Now, let's bring all of this over. So I'm
going to press L. I'm going to press
one on my number pad, and I'm going to
bring it all the way over so it fits on top of
those bricks, like so. Now, you can see that I'm kind of losing the
kind of height here. So all I'm going to do jaws
going to come underneath, grab the bottom of it and
just pull it into place. Double tap the A,
and there we go, that's what we
should be left with. Now, you can see, 'cause I've
brought it forward here. I'm going to have to jaws finish with bringing both
of these back. So just bring them both back. And then we go, This is looking pretty nice, and
I'm happy with that. And I don't think I need to
do anything else with it. Now, on doors, on
the actual stones, I don't really want
to use randomized. That's mainly for the
inside of the door. This is the part that's
going to be replaced often, well certainly more
than the stone. And on the next
lesson, then we'll start on this part on here. And then we'll move down
to these parts on here, and finally, then
we'll split the wood off and then get
these booleans in. All right, everyone, so be enjoyed that and I'll
see on the next one. Thanks a lot. Bye bye.
86. Modeling final door variation: Welcome back everyone to Blender for modeling and
John go workshop, and this is where we left off. Alright, let's come
to our steel bit, and what we'll do is
we'll apply this dif, because we've now great the kind of scale
that we want it. So let's just press control
eight and apply that. And then all we're
going to do is come in and grab
all four of these. And you can see what we want
to do is we want to create them into this that's
actually been created for us. We also want to make sure that if I press
shifty, for instance, and pull these up, I want
to make sure that I've also got ones that are going to come in and create this shape for us. So what I'm going
to do is I'm going to actually bring these down, first of all. I'm
going to press. Shift and select
on each of these, I want to press and, and just pull them down
a little bit because I will need to bring this
all the way up to there. The other thing
that we have here is it's not so straightforward this one in the
fact that we've got stones going across here,
which we need to think about. So let's see how we're
going to do that. It's It's a good idea to learn how to use
references in this way, anyway, so that's what we're going to be
attempting to do. So if I pull this down to here, And then what I'm going to
do is I'm going to press B, enter an S, and I should be able to pull
it out a little bit. Now, you can see at the moment, it's miles out of
what it should be. So we're going to
have to work really hard to get this in place. So the first thing
we're going to do is pull this up into
the top like so. I'm going to actually put on my x ray so I can see
what I'm doing. And we can see we've got a stone coming kind of
from here to here. And yeah, we've got a lot
of work to do on this one. So let's first of all, before we do anything
else to make this much, much easier for ourselves, instead of working
with a three D object, it's going to be a lot easier
just to work with a two D. So what I'm going to do,
I'm going to come in, and I'm going to select all of these going all the way over. And then all I'm going to
do is press P selection, split them off from
this back one, press delete, and now
we've got a two D object. This makes things much easier because it means when
I put my X ray on now, I'm able to just
grab the pots that I need these parts
here, for instance. So let's pull them
down into place. And then I'm just going
to press S and X, and I free now to pull them out and get them lined
up to where I want them. Let's deal with
these end ones now. So all I'm going
to do is S and X and pull them out and
then pull them down. Into place, and then S and X. Create them like so, and now
these parts, ac same thing. So pull them into place, and then S and X, like so. Now, you can see on
these ones, probably, I'm going to need to
put another edge loop in there, so we'll do that now. We'll bring them down
to there. Like so. And then what I'll do
is I'll press Control, click right click and then
Control click, right click. And now we know that these are going to be around
about the same, so I can press S&X
pull them out. And then pull them down, and then S and X,
pull them into place. Now, let's do the same
thing on this one. I'm going to press S and X and then down into place like so. So that's looking pretty good. And now what I want to
do is just one here to keep kind of this
form going over here. In fact, do I? You know what? I don't actually like how it comes and then
goes in like that. I'm going to leave
mine like this. The one thing I'm
going to do, though, is I'm going to put an edge
loop going from here to here, and from here to here. Now, I want to keep
them pretty similar. So the easiest way is
just to press control. Left click, right click. Control. Left
click, right click. Grab both of them. This will save me bringing in a mirror, so I can just grab both, pull them down into place. So you can see, I've
got this one here. I didn't mean to do that,
so let me select this one. Bring in another
one, so control. Left click, right
click. Let them both. Next, pull them out, pull them down then
into place like so, and then grab both of these, grab this middle one
last right click, and we're just going to merge
vertices at center like so. And then we can simply
pull that up into place. You can see just how
easy that was to do. Now, finally, I want to
level off the top of here. So obviously, I can't come
in and grab the edge of it. So what I need to do instead
is grab the top of it, control shift and B, and I can pull it
off in that way. And you can see now this is
what it's going to look like. And yeah, that's looking
pretty nice. All right. So now what we can do, We can actually come in and split these off before
doing anything else. So I can grab this one, this one, going all
the way around. Leaving this one blank
here as you can see, and then I'm going to right
click Marcosm and then come in now and press
L on every other one. These two will still be joined, so we'll have to
split these off. So I'm just going to press Y, and then I'm going to go
to one of these, press Y. And the good way to
test is just press A. Make sure that you're
on individual origins, press the S board,
and then you can see that they're all split off so. Finally, then, let's
pull this back. So I'm going to pull it
all the way back to here, and then I'm going to press,
pull it forward by so. And there we go. All right. So that's looking pretty nice. I'm just hoping that
this part is on here. I'm going to turn off my x ray. I'm going to press AltnH and,
where has that bit gone? So, let's press lth. I think, I think I actually
deleted that part, or I just used
this part instead. But no problem, we can
create that part again. Let's deal with this part fit. So I'm going to
create this pot fit. I'm going to press
control ale transforms, set origin to geometry. Adding the modifier, let's generate a bevel,
and there we go. At least that's parts done, right click shade to smooth, like so, and that's looking
actually pretty nice. Let's turn this down though, to 0.5 or somewhere
around about that. Maybe actually on this occasion, that is a little bit too
low, so let's turn it up. To a point t eight.
Let's try that. And I think, yeah, there we go. That's looking much much better. Now, let's come to this
part again and we'll create this metal part just in case we aren't learning
practice on this, so I'm just going to actually
press lth T fits there. I'll come to this part as
well. Press altH Yeah, I don't think I've
got it anymore. So yeah, we're going
to have to come in all these going around. Press shift and D, and then and Y and pull
this out, like so. And then what I'll do is
the rabbit, P selection. Control A transoms
set origin geometry, adding and modify it, and we generate a solidify press one. And then I'm just going to
bring it out into place. And there we go. All right. So we got there in the end. Now with this all
I'm going to do, I'm just going to apply
this straightaway. I'm going to put even
thickness on, first of all, press control A and apply it, and this is what we should
be left with right now. All right. Let's work
on our inside doors. So these parts on here, and I'm just going to bring
in an edge loop first of all, left click, right click,
so five edge loops. And that, of course, just able then to give me the randomized. Then I'm going to
select all of these. Right click marker Sam. And now let's split these off. So L, L, y, split them off, and then I'm going to pull these
out now for my door. So I'm going to
press A just to grab them all and pull them a
little bit further back, and then bring them
forward like so, and there is my door. And then finally, all I
want to do now is come in, reset all the
transforms once more, set origin geometry,
grab them all, and I'll come in and mesh
transform and randomize. And then I'll just
drop this down to 0.1, I think for these. Press the tab right click shade smooth And if they are touching a little bit
close, just come in again. You're just going
to make sure that you're on individual origins, S and X, and just pull them
in very slightly. Like so. Alright, that's
looking pretty nice. Now what we want to
do is we want to think about these
bars going across. I'm going to say about my work. Like so. And then the bars. But we've already done
all of that hard work, so these should be
pretty easy for us. So let's press shift A. Bring the plane, RX 90, spin it round, S, bring it down, and then just make it the size
that we want it. So something like this
size and then I can press S and X and pull it out. I'm going to pull it
out to here, like so. Then we're going
to press S and X, and pull it out to here. And then finally, S x, and pull it out to the
actual door, like so. Now, if I turn this on, Of sorry and pull them out. We should now be able to have. I'm just wondering why
it didn't extrude them. It's a bit weird. Anyway, it didn't extrude them out. It
just kept pulling them out. So instead of doing that, let's just come in, and then all I'll do is I'll
just press control. Left click, right click,
and then I'll press Control B and pull
that out there. Now, we can see we've got a center part so they come
out slightly on these, so I'm going to press control. Left click, right click.
Grab both of these. Eons d. Hold them up. And then come to the next bit. So Control law, left click, right click, Control law, left click, right click, grab them both, Esnsd, hold them up, and then
run to the final part. So these parts here, Eons d, and pull them up. All right. So now let's quickly get
those back in place. So all I'm going to do
is I'm going to press L, and then, pull them back. Like so. And then grab them now. So L, press one. I'm just going to
bring it down to the bottom, go down to here. Like so. And there
we go. All right. So we've pretty much
done with all of this, except these parts in here. So we need to make
a nice boolean that's going to go in
the center of here. And we also need to, of course, make these parts like this. All right, everyone, so
I hope you enjoyed that. Hpe you enjoy that, and I'll save out my work, and I'll
see you on the next one. Thanks a lot. Bye bye.
87. Modeling window instert for final door: Welcome back, everyone to blend the form modeling
and Got workshop. And this is where
we left it off. All right, so let's come in. Let's put this on to X ray. And then what we'll
do is we'll press ship Day and I'll
bring in a plane. I'm going to spin
my plane round so RX 90 to make it a lot smaller. And I'm going to first of all, get the right
dimensions for this. So I'm going to press
Ess pull it out. Right, so. And then what
I'm going to do is I'm going to bring in an edge
loop in the center of here. So, control, let's
press tab first, Control, left
click, right click. And now let's come in and bring these parts
where we want them. So if I bring them to here, And if I bring this
center one to here, you can see now roughly, we've got it where we want it. Now we're going to do is, I'm
going to press Controller, bring in two edge loops. Left click, right click. So if I press S and X, I should be able to
bring them in like so, and then I'm going to
bring these two out, so S and X, bring them out. And if they don't come out,
put it on medium point, so S and X, then we should
be able to come out like so. All right, that's looking fine. Apart from these parts. Now, this one's a little bit bent because
I'm going to use these or these parts
going across here. So this one's also looking
a little bit been like so. And if we really want
to straighten them up, we can actually come
in, grab them both, press son's head, and just straighten them
up in that way, might make it a
little bit easier. Same for this one, Eons
head, straighten it up, son's head, and there
we go. All right. So from this then,
we can actually make pretty much everything
that we're going to need to make our boolean. Now we need to do is just
need another boolean. So all I'm going to
do is I'm going to pull it out all the
way over to here, and then I'm going
to press tab, A, and then and x even y and pull it all the way
over to the back up here, and then just making sure
that goes in my door. Now what I'm going to
do is just press tab. I'm going to press
Shift and D. So shift. D, bring it over, and then we'll just
make this a smaller version of the one
we've just created, albeit a little bit wider. So I'm just going to
bring it to there. I'm going to press S and
X and pull it out then, making sure that it's going past this crack of this door here. Alright, from this then, all I want to do with this one is, I want to right
click Set Origin, three D cursor,
adding a modifier, bring in a mirror, to put it over the other side. And then from there,
we'll just turn this off, and this is what we
should be left with. Now, I want to keep
these booleans as well. So what I'm going to do is
join all of this together. So control J. First of all, though, let's go to
object, convert mesh. Then control J Control A or transforms set origin to
three D cursor again. Bmawod and then all I'm going to do is add modifier, generate. And this time, it's
going to be a boolean. And the Boolean, of course, is going to be these
that we've created. And there we go.
It's a total mess. But we need to make sure
that we click fast on, and there we go, it should be absolutely fine now. All right. So let's come in and let's supply that, so with control A. And now we can just
come in and hide these out the way and show you
what we've actually got. And you can see that's
looking pretty nice, right? Let's press alth bring
back everything. And then what I
want to do now is I want to use these to actually solidify each of these to create the outside of my actual window. So first of all,
before doing anything, I want to make sure that
we're just working with the outside of
these because it's going to make it much,
much easier to do that. So what I'm going to do is,
I'm just going to come in and just select the
front of these like so. So I'm just shift selecting,
control selecting. And then we're going
to press Shift, bring them out a little bit
and then grab each of these. So L L, L and L,
delete and Versus. Now we can actually come in, start with the outside. So the frame on the outside. So let's come in, grab these
going all the way around. Like so. Shift and click going all the
way round. Like so. And then I'm just going
to press Shift D. Bring these out,
press P, selection. Press tab, rub them again. Control A, transforms. Set origins geometry. Tab again, A, and
y, hold them out. And then finally,
all I'm going to do now is use my solidify. So add modifier, generate a
solidify, and there we go. Now, how thick do we
actually want them? Are they in the right
place? Let's put even thickness on first. Let's drag these back
then into place. And you can see they're just fitting in
those parts there. So I'm not sure whether
they're going the right way roundet's turn them going
the other way round. So let's have them
going this way round. There we go. That's what I want. So they're going to
go the other way round and let's make them that thick and make sure that they're come all the
way through the door. And they're going to be
a round about there. And I think also we'll make
them a little bit thicker. So going this way, like so, because it is quite a stylized
door anyway, like so. And now, finally, I can
actually bring in these parts, put them in front
of these, like so. And then what I can do with each of these is I can press A. And now I'm going to do is, I'm just going to grab all of these. I'm going to press
the eye button. I'm going to press Yeah, I'm going to put them in
there first, like so. So now we've got a little
piece of wood going around. And then what I'm going to
do now is extrude them back. So press, pull them back. And now, finally, I'm
going to press the, but press it again. And now we should be able
to bring those in like, so I make those really, really nice windows
that you saw. Alright, that's
looking pretty good. I'm really, really happy
with how that looks. And I'm just wondering
if these parts here now, I need to pull these back a bit. So I'm going to press, pull
them back a bit, like so. And then I should be
able to press on each. I'm just wondering, actually, I've pulled them back like so. I'm going to press
control and mark a seem on these just to make
sure that it's split off. And then I'm just going
to press control plus, control plus and bring
them forward, s to Tad. Like so. And there we go. All right. That's
looking perfect. That's exactly what
we want. Now what we can do is we can come in. We've already leveled
these off as we see, so we can hide
those out the way. We've already
leveled and mirrored these up so we can hide
those out the way, and let's come in and
actually level off all of these other parts
now. So we'll grab this. We'll come in, and
we'll hit a bevel, and we'll put this on
not point not three. Like, so, there we go. Let's hide that all the way. Let's come to this one now, and let's do the
same thing on here. So add generate not a
jumtdGenerate a bevel, and let's just make sure that's actually
working first of all. Let's reset all the transforms. And let's see. We've got a
few problems in this one, and it's obviously to do with our Boolean
that we've put in. So what we want to do is we want to come down
to where it says, clamp overlap and turn that off, and then really put this
down to point, three, like so and there we go, now we've got our
bevel in place, and we've got our booleans in place. That's the main thing. So now let's hide that out the way. Let's come
to these then. We shouldn't have any
problems with these, I hope. So right click, shade,
smooth by angle. We can see we do have some
problems here, and generally, I'm looking Why that's
actually happening. Let's say resell the
transforms. There we go. Click the origins, geometry, and then 0.3, and there we go. That's those parts. Hide
them out of the way. Then let's come to
the final parts. So we should have it I
hide these out the way. We should have all
of these parts. So what I'm going
to do is I'm going to come to these parts now. I'm hoping I can
select all of these, and I'm going to split
them off because I don't really want
to level these parts. I just want to level
the outside up here. Like so, P selection, and then grab them,
hide them out the way. As well, they're going
to be windows as well. Now grab the outside of here. We've got a solidify on. Let's supply that. Let's
add in a modifier bevel. Let's put it down to uh 0.3. Like so. And let's hide
those out of the way. And the final ones are
these, let's press control. Reset the transforms, add in a val and we'll put
that again on Nu 0.3. And there we go. Now, let's
bring back everything. So teach bring back everything. And this is what we
should be left with. I'm just wondering
on these parts here. Let's just turn. So
these inner parts here. Let's tin it down to 0.1. Tin it down a
little bit. I think it was a little bit too high. Purletp the eight, and I think that looks just tons, tons bare. Now on the next lesson,
then what we'll do is we'll actually get
materials on here, and then we'll join it together. And then that's the final
door actually done. All right, everyone, so
I hope you enjoyed that. I'll See on the next one.
Thanks a lot. Bye bye.
88. UV unwrapping and texturing: Welcome Mac, Blanda Form Olin and John Co workshop, and
this where we left off. Now, first of all, let's come into these parts because
we've got a mirror on. Let's apply our mirror. And then what we'll
do now is come in, and I think this last one here. No, it doesn't have
everything in we we need. So let's do it a little
bit separate on this one. It doesn't really
matter. We can we know which materials we're using
at this point, anyway. So let's come in first of all and bring in
our first material, which will be our stone. So let's go down,
find our stone. Let's come in then,
A, smart, jet click. Then we'll grab this one. It's also going to be
stone, grab this one. Control L, and we're
going to link materials. Come to this one, then
A and Smart UV project, click k and there we go
the stone on that one. Then we've got our metal
them So we're going to press A, Smart UV project. Click, down arrow. We're looking for iron
do, this one here. And then what we're
going to do now is the inside. So these doors. So A, Smart UV project, click down arrow,
and we're looking for I think this is
the window wood. So we're going down
to window wood. There we go. And we can see
here we've got a problem in there too much
crossover on these. In other words, they are
too small on the UV map. So I need to go
to my UV editing. And what I need to do is
they need to come in. Press little dot bond so
I can see what I'm doing. And then I'm going to press S and pull them out a little bit, like, so or I'm going to pull them in. I
think I'll pull them in. There we go. Now they
look much, much better. Okay, so now let's come
to these next bits. So these parts here, actually, we'll do those first. So A, smart UV project. Click Okay. Little down arrow. And we're looking for again, iron dark and now
these ones here. Now, I can see with these, it might need to come in
a little bit because we can see the wood a
little bit through here. So I'm going to
grab each of these, and I've got a bevel on. I haven't got anything else
on. I'm going to press A. And then what I'm
going to do is, I'm just going to
put this on two. I think it's it. Yes, it
is. Individual origins. And then I should be
able to just press S and bring those in
just a little bit, just to make it a little
bit tighter like so. Now, from here, the
material that I want on here is
going to be metal. So let's first of
all, unwrap them. So, Smart UV project, click, and then we'll go for the metal, which is on dock,
and there we go. And then the inside of here
want it to all be wood. So I'm going to
grab these on here, A, U, Smart UV project, click. Now, we will have a
problem in these, I know we're going
to have a problem in them because the fact is once I bring in the planks, where is it not planks,
the window wood. You can see here. It's
not so bad, actually. We can see we've got some here that kind of over
going the wrong way. These ones up here are
going the wrong way. So basically, I should
split these off. So I think we'll come in, and what we'll do is we'll go to Alt Shift and click Alt Shift click and
work your way along. Just shift click
in all of these. Same for these. Same for these. And then do the same
for these ones. Might as well do them all
at the same time. Like so. And then these ones over
here. So Alt Shift click. Work your way down and
the last two here. And then all I'm going to do
is just grab all of these. I'm going to press A 90, spin them all around,
and there we go. These ones here, You can
see my tops and my bombs. They're not performing
the same way. So let's just have a look. Yeah, there's some of them that aren't going the right
way, as you can see. So all I'm going to do just grab just these
tops and bombs now. I might as well make sure
that this looks right. As I said, we might use these
on a few different things. So I'm just going to
grab all of these. And then all I'm going
to do, I'm just going to see if I can grab one
of these, press alter. Yeah and I should be able
to straighten it out. So I'm going to do
the same thing. Straining all these out. So alter straining them all out. If straining like that, just come on, grab
them one at a time. And if that doesn't work, I'm thinking, we might be better off in splitting
them up as well. So I'm just going to
grab the ones that can. So if I grab both of these, alternate, yep, they're
also having a problem, let's try this one on its own. So alter There we go. L, ln, and working
my way around. Maybe this one will
also be okay, so. There we go. And I'm looking at the ones
that aren't split, so I can see that these
here are actually split. These ones aren't so ln. Let's. That looks like,
And yeah, you know what? I think that's good enough. I'm not going to
go right the way in and try and turn every
single one of them. Okay, so last of all them. We've got our windows. So I have to click the
little down arrow. I'm going to bring in glass. And then what I'm going to do
is I'm going to press tab. A, unwrap this time. We don't need to use Smart UV. And again, all I'm going to
do the little tiny windows. I'm just going to bring
them all the way in and then just drop them
into this one here, like so. And then we go. Alright, let's double tap the A. Let's go back then to modeling. And then what I'm
going to do is I'm going to go over the
top of it, like so, and I'm going to come in,
select one of them, object. Convert to mesh, control
J, join them all together. So now we should have
sorry, four actual doors. Let's have a look at what this final door looks like then. Again, save out your work. Let's put it on rendered view. Let's double tap the A
just so we haven't got that yellow outline.
And there we go. That's looking
pretty much perfect. That's the way that I
actually wanted it. You can see this is the
way it's on the door. Except, obviously, we've
got a little bit of blow, but all these doors
now are actually done. Now, I'm still going
to leave this in here because we are going to
be doing some lights. But what it means now is, If we put this on object mode, we can now start bringing our doors into here
and make this much, much easier to start, you know, putting things or doing the final touches on
things like that. First of all, though,
let's come in. We do have one for windows, so let's make one for door. So all I'm going to do
is select all of these. I'm going to press M, and I'm going to make
a new collection, and I'll call it doors. Like so and click. Now what I want to do is I want to bring my first door in. My first door is going
to be let's have a look. It's going to be this one here. And what I'm going
to do is obviously, I'm not just going
to drag it over. I'm always going to press
shifty, duplicate it. And then what I'm going
to do is put it in place. So if I press seven
to go over the top. I'm going to put it around
here. So I want to turn it. So s let's just turn it. Let's get it into
some sort of place, so let's lift it up. Let's delete this old
door finally out the way. And now we can actually
start pouring in our doors. Let's see if I can put
this on normal as well. Let's drag it back into place, and then down onto
the ground into here. Like so, and then I'm going to rotate it so our Z,
rotate it round. And finally, finally,
what we'll do is, we'll be using the simple
deform on this one. Now, you can see,
we've got a lot of edge loops in here already. So all I need to
do add modifier, come over to where
it says deform. And the one we want is simple deform. Let's
bring that on. Let's put it on bend, and maybe it's going to be on
Z, and there we go. Now we can see how nice that is. And now it's going to fit in
really, really beautifully. In here, and maybe maybe it's a little bit too much deformed, so let's turn it
out a little bit. So double tap the
A and there we go. Let's have a quick look. But what that's
going to look like. Let's put it on rendered view. There you go. It's
fitting in. Perfectly. Alright, so this bit
now is near enough. Done. We've got our door in, and now we can start
putting the doors in here, here, and around the other side. And from there, then
we can actually start finishing
building this out. So let's now put it
on material mode. Let's bring this door in here, exactly the same way as
we've done with this one. This is going to be
our main door here, so I'm gonna press Shift D. I'm going to bring
it then into place. So seven. G, bring
it into place. So I'm going to spin it round. So, let's spin it round. Let's delete this thing out
the way, just this cube, and let's now come back to
it, drop it into place. Now, this doors going to
be a little bit different. We're going to have
kind of a roof on this. The main thing is though we
want to get a deform on. I want to press on Z, it's something like
where we want it. So something like
this, you can see, it's a little bit out there. There we go. Let's bring in then another modify and
we'll have a deform. And might as well as
well at this point, actually apply this bevel. I don't need to worry about it, so I'm just going
to press Control A, add in my deform then. So let's look for simple deform. Let's put it on
bend. Let's press Z. There we go. There is our
door in place. All right. Now, the thing is,
I'm going to have to bring it out a bit on this
because you could see. The thing is with this
one is, actually, it comes out a little bit, so we need to take
that into account. That's another reason
actually why I put the roof on top of this just so we can't
see the bottom of it. Let's also pull it down
just a little bit, just to make sure
it's in the floor and we can't see that
bit of wall there. And there we go. That
is our door in place. Let's save that our work then. Let's have one final
look on our render view, what this part is
going to look like. So let's put it on render view. And there we go. That's
looking really nice. I have a look from back here. It's really going to
stand out that door, same as these lights over here. And then on the next lesson, then what we'll start to do is we'll start to get
a door in here, our door in here, our door in
our top, our door in here. And then finally,
we can actually start building all of that out. You can see though
now we're really making a lot of
progress on this. You can see there's still
a lot of work to do. But generally, now, the
hardest part is behind us. The rest of it is pretty easy to build out
the rest of this. All right, everyone. So
I hope you enjoyed that and I'll see you on the
next one. Thanks a lot. Bye bye.
89. Modeling rooftop and wood frame for tower extention: Welcome back everyone to blend the form modeling and
geometry of workshop, and this is where
we left it off. All right. So now, let's
think about our other doors. So all I'm going to do is
just put this on material. And I think from my reference, this do this door here is going to be the
same as this door here. I'm going to actually just grab though this one because
I've got a deform on there. I can't bother to turn it off. So I'm going to
grab this one here. I'm going to press Chip and D and drop it over there.
I'm gonna press one. And then we're going
to press G, put it roughly into the place
where it wants to be, and then we're going to
delete this one out the way. Rub this one, and then
pull it into place, pressing a little
dot on to zoom in, make sure them that
it's in place. The thing we'll want
another piece of wood, and maybe going up here or
maybe going up this part. Not a 100% sure, yet. I'm just going to get it
in place, first of all. Alright, that's
looking pretty good. Now, remember, we haven't got a wall or anything like that, so it might look a little bit. You know, kind of
white behind there. But what I do know is that I
want to now bring this over, so shifty, bring it
over into place here. Spin it round, soars, 180, spin it around and drop
this one into place. Let's grab the little bar. Let's delete it out of the way. Let's grab our door
then and put it into place like so. There we go. And then what we'll do is we'll grab the other door
and put it in here. So I'm going to delete my cue. I'll bring in my
other door then. Oh, it will be the
other one this time. So this one here. I'm
gonna press shifty again. I'm gonna press Z
90, spin it around. Press three, to go to the
other view this time, and then all I'm
going to do is I'm going to pull it over here. So this is going
to be my top door. Now, of course, I'm going
to have to rotate it. So I'm going to tons
place. Zoom in. A Z. So we've got a
normal on already, so then it just means we
can actually put it in. You can see It's
in a nice place. It's on top of thats. You can see all thing
together really beautifully. You can pull it across then. And then all we need to do
is just make sure that this then lines up with the
other part, like so. So you can see, maybe a little
bit out so I was there, a little bit about
the other way. Double tap the A once I've pulled it over. So
double tap the A. And there we go. That's
our next door in, and then we'll grab this door, and we'll also use this
in this part here. So there is pressure, D. Bring it out Rs -93
on the number pad G, bring it into place, and hopefully hopefully
we'll fit into place. Well, let's bring it
in. And hopefully it'll fit on that
top step as well. Now, do know that this one here, was a little bit harder
to actually fit in there. We might need to
just move these to the side mat. I think
that's what we'll do. We just want to make sure,
first of all, though, that this bit isn't
tucked in there, like so. So we just want to
put it in, like so. There we go, double tap the A. And actually, you
know what? I think that's fitting in perfectly. Yeah, I think that's perfect. I don't think actually we should do anything else with that. Now, the other thing is, I want to come over, and I want to bring this
part out a little bit. So all I'm going to do
is just grab this part. Pull it out a
little bit like so. S to give us a little bit
more of an angle on there, and I think that looks
much much better. And now what we can
do is we can actually start building this part around. So we're going to need a
part going around here, first of all, to make sure that it's sat on this properly. I think that'll make
it look better. And also, I'm just
wondering if it should pull this a little bit further
back at the moment as well. So I'll just grab them
both. Pull them back. Just so. The sit in
front of this part. You can see now my little, you know, planks of wood here. I'm going to put some
wood there anyway, so, you know, well, I'm not
going to alter that yet. So what I'm going to
do now, first of all, I think the first thing is
get a piece of wood on here, get our roof in, and then from there we can actually
build around this. Let's save that
our work. Let's go now then to our planks, which are these ones
here. No bending plank. We just want our level one. So we're going to press
D. To bring it out. We're going to press, 97
G, bring it into place. Let's press S and X. And if it's not working, let's make sure we're on medium point, S and X or S and y. Yes, that's why.
It's on the normal. But let's put this
on medium point. S and X, try that
again, and there we go. Now it's working.
Now, let's pull it all the way up into place. Where it's going to go, so let's press the little dot one, so I can zoom around there. Like so. Let's press S
and y then. Pull it out. Let's put it into place. And of course, we're
going to have as well a flag on here. So we just need
to make sure that that is also going to go in. The one thing I would
say with this one is, I need to come in and just
grab the inside of here, so this part inside and then press S and y and pull these in. So pull these in, so I can get
my roof going under there. I don't particularly want to make this any thicker
than what it is. All right. Now we've got that. Let's come to our roof. Shift. We don't want to use
the original roof because we want to keep
it for the rest of it. And then all I'm going to
do is bring it into place. So if I press one now, I can put it into some sort
of place and realize Like, I need to pull it that way
with the geometry nodes, so I'm going to turn
down the horizontal, like so, pull it into place. And then let's pull
it into place this way and see where it's
sticking through my roof. So I'm going to put it into
the bottom of here first. So as coming over, like so. Come to where the rotation is? Let's rotate it up into place. You see now they're
fitting under there. That's what I
was talking about. The other thing is,
we can see that we've just got these little
bit of tweles on there. I'm not sure whether
I want those. I I don't think I do. So what I'll do is bring down the vertices and three, like so. And now I can see that I need to pull them
up a little bit. So I'm just looking
where the edge goes, so you can see it's going here. Let's pull them
back a little bit. Is that going to
fit in place there? Double tap the A? Sure is. So that's looking pretty good. And then the final thing
is, I want to make sure. You see, I've got I'm going to need these
sticking out here, but what I'm going
to do is press S and X and pull it
in a little bit. Like so just so I'm going to have to
pull it out, actually. So let's press control ed. I think actually
before doing anything, I'm going to put this part out, so I'm going to pull this
part out a little bit. And then what I'm going
to do is I'm going to put the wooden parts in here first. And once I've got those in, then I can decide how this
is actually going to, you know, kind of come together. So, let's do that now. So I'll do is I
can grab this one. I can press Shift D.
I can bring it down. I can press art 90 and
pull this out into place. So this part is going to then I'm all the way
out each side up here. So if I put it into place
here, dress S and X. Sorry, and y. Pull
that out then here. I can alter it as well
as I'm working along, so I'm just going to make sure that it's in
the ground like so. And then what I'll do is,
I think I'll pull it in, so S and X pull it in, like, so, grab this one and then pull
it out a little bit, like so. Now, let's work our way up. So let's come from this one now, put another block put in, and actually we'll put the
outward one going in first. So I think with the outward one, I think we'll have it stuck
out a little bit here. Let's try that. So
we'll press shift. We'll press Z 90. And then what we'll do is
we'll pull this into place. Let's put an object mode
because I will be able to see why I'm doing much,
much better as you can see. So let's put it on
there. Also, you will be able to see better
what I'm doing as well. So let's not forget that. It's all about you being
able to see better than me. So let's put it in there. L I'm going to pull it
over and then up. Into place like so, and then wooden beams can come down there and that
can go on top. I'm just wondering if
I want to put it down there and then pull it down a little bit or pull
it over a little bit. The problem I'm having is because of the shape
of the roof here. It's making it a little
bit harder for me. So I think on this occasion, we might need to just grab the edge here and then
just pull it back. Like so, and then
grab the front of it, and then pull this one
back into place like so. And as I said, on this one, I think I want it
stuck out there, and then the roof actually
coming into this bit like so. Yeah, I think
that's what I want. So what I'll do now,
I think I can bring this out a little
but you can see here this roof actually,
you know what? I'm going to just put
this back a minute before doing that. I'm
not happy with that. And instead, what
I'm going to do is, I'm just going to pull this out. So you can see here
it's being pulled out. So now I can actually pull
this back just a little bit. There is a little bit too much. And from there, as well,
what I can do is I can pull it up into
place a little bit. I think that's going
to be much much bar and work for as much bear. Okay. So let's come
to the front now. Pull this back. D here. And then what I'll do
is I'll press Shift, bring it over to the other side, press Artz 180, spin it around. And then let's just
pull this back. Into place like so. And you can see,
it's going to have to Perhaps come a little
bit further this way. So I'll just grab this face, pull it back into place
like so. All right. So on the next list and then we'll get all of this built out. We'll get the roof
on the other side. We're not going to
do the flag yet. We can get everything
set up for that, but we're just going
to build this out. And then we're just going
to carry on and finish in these parts out first before
doing the actual flag. We've also then got the door down here. All right, everyone. So let's save out our work, and I'll see on the next one. Thanks a lot. Bye bye.
90. Additional detail for tower extentions: Welcome back everyone to
Blender four Modeling and Jumpon de Workshop. And this is where
we left it off. All right, so let's Now, come in and get this
bit finished off. So what I'm going to do is, I think I can grab
this one because I don't think I've
rotated it or anything. I'm going to press Shift
D. I'm going to rotate it round, so x 90. And by the way, if
you want to put yours into some sort of order,
just make sure you do that. We'll do that closer
to the end and put all the wood in with the
wood and things like that. I tend to do it all at the end. If you want to do it early, then that's no problem at all. Alright, so what I'll do
is, I'll press the S born. I'll bring this down, like so, s to make it so that it's
actually going to fit in there. And then, of course, I
need to grab the top now. So you grab the
top, pull it over. And interplace like so. And it wants to be obviously, a little bit bent
because the rest of this is bent in this way, so you can see how it
bends out like so. Alright, from there, then,
let's think about these parts. Do we want these fence parts in here or do we
actually want them, you know, going into the wood? I think with mine, actually, I'm quite happy
with how they are. Next of all, then what I'm going to do is just
going to grab this. I'm going to press
sift D, bring it over to this side then and
just slot it in there. And then all I'm going
to do is try and fix. Let's overlook what
we've got to fix here. So we're going to pull it
out a little bit over here. And then what I'm going
to do is grab the top. Pull that into place,
fitting that in there. If I need to pull it down, then I will do, like so, and then I could have got
a little bit more room to actually pull it out
as you can see there. And now let's think
about this top bit. So I'm just going to
come to this part here. I'm going to press Shift D. And then go to bring it up. And pull this into
place as well. I'm going to make it a
little bit smaller, so S, make it smaller, and just
let it fit in place like so. Okay, so now let's think about
this part going up here, how we're going to
fit it into here. So we've got it pulled
out quite far here, which is really handy
because it means we can put a nice solid bit in this bit and the same for
these sides as well. So what I'm going
to do is pre shift D. I'm going to
rotate it round, so, X 90, rotate it round, put it into place like so,
and then just pull it back. Grab the top of it and
pull it into place. Now we're onto the actual roof. Sorry, not the
roof, these parts. I think, first of
all, though, just pull that slightly to the side, like so, and then we're
going to press shift, and then I'm going
to press three, and I'm going to
rotate this round now and hopefully
get this in place so R and x rotate it round. Don't worry about the length of it yet. Let's just rotate it. So it's looking as though
it's going along here. Now with this one, we might
need to bend it a little bit. Let's just see because I can see the top part needs
coming up and across, so I can also see that
it's going to need to be caught and it's also going to need
to be pulled back. So let's pull it
back first and see where we are with that.
So let's pull it back. Like so. And you know what we might be able to
get away with that. So now let's come
in. Put this on to normal and let's pull
this down into place. And, yeah, I think
that's actually fitting in place pretty nicely. So now what we can do is we can actually bring our roof over to the other side and then bring our wood over
to the other side as well. So I'm going to do is press 50. I'm going to bring it over. And the first thing I'm
going to do is go to object and we'll
mirror on the x first. So let's mirror it on the x. That then we'll turn
it around that way. And then all I want to
do is now spin it round. So Rs 180, and I'm hoping from that that I can
now bring it into place, and these wooden pes look
a little bit different, let's have a look, so we can see here that they
come out come out. And then they go in
and we can see that these are looking a little bit different
from the other one, and that's exactly what I want. And from there, then
let's bring this one. So shifty, spin it around. So are 180. No, not 180. Let's come up to global, and then 180 like so, and let's put this one
into place like so, and also pull it back. Like so, and there we go. Alright, so far so good. Now, let's grab one
of our windows. So one of our round windows, let's press 50, duplicate it, and then RZ 93, find where it is and put
it into place straight on. So we're going to
put it around here. I think also it will need
to be a little bit bigger. And then finally, let's
pull it back into place. And we'll also need
to rotate this a little bit because I think
this is at an angle, if I press one, we can see
this is at a bit of an angle. So Y rotate it a little bit. Like, so let's pull
it back even further, and that's just stuck out
a little bit too much. Just don't go too
far, so it's going through your glass or
anything like that. And then finally, let's see if we need we can actually
put one on here. So, what I'll do is I'll
grab this one here, shifty. Let's bring it out.
Let's press rx 90. Let's press one on
the number pad, and let's just slot it into here and see what that's
going to look like. Into this part here. I think it should be behind
those pieces of wood like so, like so and just make sure
it's touching the floor. And then finally,
let's make sure it's also coming into this part here. So jaws going to pull it back. In place, like so. And you know what? I think
that looks pretty nice. I think it just needs to come maybe this way a little
bit on the bottom. So if I come to the bottom,
I'm not able to see it. But what I'll do
is I'll just put my x ray on, and there we go. And I can grab it.
And then I'm free to pull it out a
little bit like so. Alright, so that's
looking pretty good. As I said, we'll work on the
flag a little bit later on. What we mainly
need to do is just make sure everything's
supported, and then it's all, you know, working around each
other the sides. I should be able to
now bring that out. So five press shift D, I should be able to bring
it out to this side. And hopefully, if
I can rotate it, so x x, so look. X. There we go. Let's just rotate it. Maybe I'm going a little bit too far. Let's rotate it the other way. So let's pull it into place. And I might want to then just pull it into the
wall. There we go. And on this one, do I
want it back in there? I think I actually do, and I also want to pull it down
a little bit further. So I'm just going to pull it
down a little bit, like so. And then what I'm going to
do is just grab that bomb. So again, we're
going to edit mode, x ray, and let's just
pull it that way. So we've already got
it there, so which means now I can see what
I'm actually doing, so I can pull it
that way, like so. And I think that is this part
of the wall actually done. Now, before I go any further,
what I also want to do. If you notice on this bit here, we have a lot of
empty space here, and I'm not so sure that I actually want all of
this empty space. I want this kind of built
up pretty well because this is a big tower and it
needs a lot of support. So what I'm going to do is,
I think I will come in, grab this one here, press
Shift D, drop it down. Just under there, and I
think then that's going to support this really
nice and neatly for us. And then all I can do is I can pull it out, and hopefully, I should be able to get away with pulling it out
something like that. Let's press Aaron rotate
it around a little bit. And just making now sure that there's none of
these cracks going, you know, on any of these. And that's looking
pretty good, like so. Now, we could actually also bend kind of the top of it in, you know, just this top in, but I don't think I'm
going to do that. I think I'm going to
be happy how that is. Let's now save that our work, and we'll have a
quick look at this then before we actually
get our materials on, so let's have a look.
Let it load up. And there we go. All right, you can see already this is looking much, much
better now like this. It looks like it's supported
really, really nicely. We can see now all
of this coming across all of these
structures on here, and I think that's
looking really, really cool the way it is. And I think now what we can
do is we can actually come in and put on our walls and
turn all of this into wood, and then we can work our way up here and then finally
work our way down here. So lots and lots to do, but you can see that
it's much easier. Think what we'll do
is actually we'll do these three because I don't think we're going
to take too long. And from there, then, I could probably also
use this roof. I might actually, first of all, before doing anything, get our roofs in all of here
because I've got this here. And then what we'll
do from there is we'll build out this fence, so there's something a
little bit different. Alright, we'll get
on with that then. So all I'm going to do
then, first of all, is I'll bring these
roofs in, and then we'll bring in our
materials on these. And then finally, we can start
building these parts out. So let's put it on
object bode for now. Let's come in then
and grab our roof. So all I'm going to
do is press chip D. I'm going to bring
this over, like so. Now, this here, as you can see, is I don't know if it's
all one structure. Yes, it is. So it means
I can hide that way, hide that other way and
hide this out the way. And then I can bring this into place hopefully where
we actually want it. So let's bring it down just
into here, just for now. And let's work out
where this wants to be. So if I come in, turn
down this rotation and a should be able to pull it
all out into place, like so. And then finally, I can
drop back the horizontal. And that mine, just be
enough. Yes, it is. It's just enough,
as you can see, and then just make sure that it actually sitting
on there like so. From there, then, I'm
just going to press 50. I'll rotate it round. So I'd 180, rotate it round. Make sure that these
are kind of lining up, so they're kind of
lining up like so, and then drop that
in there, like so. And again, we're going to
be building these out. The one thing as you
can see, they're a little bit hanging over here, so I need to pull
them both back. Into a bit better place. Alright, let's now
grab this one, and what we're going
to do is press shift. We'll bring it up into place. We'll press ALTH to
bring back this part. And then what we'll do is
we'll save out our work. So file, save and on the next lesson and then
we'll put this in place. Alright, everyone. So hope you enjoyed that, and I'll
see on the next one. Thanks a lot. Bye bye.
91. Modeling framework to decorate tower: Welcome back ever want to
blend the four modeling and jump in a workshop, and
this is where we left off. Alright. So now let's press
seven to go over the top. And what we really
want to do now is line this up with this one. So s let's line it up. I'm just going to
line it up as best I can on there and press G, and then you can see we've got that beautiful line
there that we can see. So rs hold in the shift
born then and there we go. Now, let's put this back
into place like so. And then all we're going to
do is have to rotate it. But we'll have to rotate it
obviously on the normal. So I'm hoping now that I should, if I pull this out to here, be able to rotate this now. So if I press R
and X, let's try. And I should be able
to rotate it like so, because it is an
actual funny angle. Let's also then increase the horizontal count.
Let's pull it back. And maybe. One more. So, let's pull it
back into place. And don't forget,
we're going to have a piece of wood on here. But, the other thing
is, I would say that the vertical counts
a little bit too high. So we need a piece of wood going in on that part on
top of it, like so, but what I'm finding
is, as you can see, is that it's maybe hanging
over a little bit too much. So if I pull it this way, pull it back this way, I should then be able
to get that onto place. Although it's going
to be a fairly chunky piece of
wood on top of it. The other thing is, you can
see, I'm a little bit out. So let's rotate it
round a little bit. So again, hold in the shift bond to get it quite nice
and neatly in there, and then just pull
it into place. So I think I I press S and X, I can pull it out a
little bit, like so. And I think now
that's going to fit into place very nicely. Okay, so now let's press Shift D. Bring
this one out then, and I'm hoping I should
be able to bring it out, and then Rs 180, spin it round, and then
again, pull it into place. Now, we can see we're a
long way out on this one. Now, I don't think we
could mirror it over here. I think unless we reset the transforms, it's
not going to work. So I'm going to actually rotate it round this way and get
it into place manually. So you can see here, I'm
going to pull it up. And pull it into place
and it's not going to take that long to
actually do that so RX, like so and then pull it out
a little bit into place, and then let's just pull it out. Like so, and there
we go. All right. I have one last look round, and I think that is
going to be about right. Okay, so we've got
all of our roofs on. Now let's think about
this part here. So again, I will probably use this piece of wood down here because we know we've
already got it. We're going to put the
materials on, but actually, I think it's probably better off just building out these parts, get them all built
out, and from there, then we're able to, you know,
build out the rest of it. So what I'm going to
do with expressive D. I'll bring this one up first. I'm just going to
put it on global just for now just to
get it into place. So seven G, put it into place. So R and Z And from there, now because of reset
the transforms, it will mean that once I've got this into the right
place where I want it. So art and just a little bit. So it will mean
now that I should be able to pull
it out on normal. So let's try that. So
S and X or S and y. There we go S and Y. We
can actually pull it out. We can then put it into place. Like, and you can see how easy that actually
went into place there. And I'm thinking on this one. That maybe I want the wood actually going
over the sides of this. Let's actually have a
look at. You know what? I think that actually looks
pretty nice as it is. Like so. I'm thinking that I probably just want a little bit of a bend
on the end of this. So what I'm going to do
just press control law, bring it up to here,
press Control law then a few times left
click, right click, and then just put smooth
proportional editing on, so it should be on smooth
and then just grab this end, and I should then be able
to pull it up a little bit. You know what? I'm not
actually happy with that. So let's try it and y
and then pull it up. And there we go.
That's looking better. So right click shade, so
smooth, and there we go. All right, happy with that.
Now, let's work our way down. So again, we'll come in and we'll grab
another one of these. So once I've got it
facing the right way, I can build the rest
of it out from there. So shift D. Let's
bring it around. Let's rotate it, so R, y, 90. Let's press control and one, just to go to the
back view of it, and let's put it right into
place where it's going to go. So it's going to go
right about in there. Let's put it back into place. And of course, we have to rotate it to get it to the right angle. So R, Z, rotate it round. I think that is not
the right angle. Now, to see the right
angle, the easiest way, hide your roof out the
way. Bring this out then. If you go over the
top, then you can really see the angle now. So sd. You can see now we've got
that angle perfectly, and now we can actually
start putting this into place like so l takes to
bring your roof back, and then you're gonna
have a good idea of where you actually
want this to come up to. Now, this needs to be fairly chunky because it's
right in the corner. It's, you know, a
main structure. But just make sure that we
then put that into place, and then we should
be able to bring it down into this roof here. So if I grab this
one, for instance, I can then without portion of
editing on, pull this down. Like so. All right. Now, the other thing is that we haven't done yet
when we come to do these is we want to bend these pieces
of wood a little bit. So we're going to do
that right at the end, and add in some edge loops
and things like that. So first of all, though, let's get this into
place where we want it. All right. Something
like that. Now what we can do is we
can press shift D, and I should be able
to then just bring it over to the other side. Like, so. And now
let's think about our actual roof
parts that's going to be in here before doing
anything else with this. So I'm going to
press shifty again. And then what I'm going to do is I'm going to make it smaller, so Send and then pull it
up into my roof. Like so. So I'm going to pull it
out. Maybe a little bit. In fact, you know what? That
might be just out enough. And then I'm just wondering
if I can grab this now, pull it up and pull it out, and then bring all
of this back in. So let's first of all,
bring it where we want it, so it's going to kind of
hang over here. Like so. And then from there,
let's move it into place now and
rotate it around. So I'm going to put
it there for now. I'm going to rotate
it a little bit. So R and X rotate
it a little bit. You know what? I've actually got the orientation right here.
I don't really want that. Let's press right, click, and set origin to geometry. Now, I've not reset the transformations you'll
notice on there, because that still means
then that I'm able to still rotate it round
from this angle. If I reset the transformations, I wouldn't be able to do that. Let's now pull it into place
where we actually want it. You can see, it's a long
way out at the moment. So let's press R x. And let's pull it in,
to place a little bit bare and now we're
actually getting somewhere. So now we should
be able to pull it out beyond this one here. That's exactly what
we're looking for. It wants to be beyond
there. Wants to make sure everything's in there. And also, it might want to be a little bit
thicker on this one. So all I'm going to do is
just come to the back of it. And just pull it out,
so double tap the. And there we go a thing that's looking just about
perfect for us. The door might mean
moving a tiny bit. I'm going to have a little
one in here as well. So I'll just move it s a tiny bit just so it's not quite touching there,
something like that. And then what I'll do now is try and bring this over
to the other side. The other thing is,
we can see we've got a little bit there
that's not right, and I want to kind
of fix that as well. So I'll fix this first. So all I'm going to do to
fix that is, I'll press. I'm thinking the best
way actually to do that. Maybe maybe I should
just bring it down. I think that'll be
the easiest way. So I I bring it down like so, and bring it across. Like so. And then we're going to
bring the next one in, I can put some kind
of wood here to actually get rid of
these two joining parts. So shifty, let's bring it over. Let's press RZ, 180, spin it around, and then let's put it into place on
this one as well. Like so. And we can see we're a little bit
out on this one. So let's press R and x and
rotate it just a little bit. Like so. And there we go. That looks about right. And now we just want to
pull it into place. Like so don't worry
about this bit because we are going to have another chunk of wood
in there as well. So that's looking good. Now, let's think about this part here that we spoke about. So if I grab this one,
I can press Shift D, and because of the angle of it, I should be able to bring
it just straight into here, like so, pressing S
and Z then and really, really making it
smaller, like so, and then bringing
it up into place. Like, so, and I'll bring
it. You know what? I'll bring it out
further. I'll bring it all the way
actually out here, put it into place, making sure it's in the center roughly. And then what I'll do is
I'll grab this bottom part, pull it down, and then
just pull it back. Like so. There we go. Now, let's think
about this part here. So I'm going to press Shift D. I'm going to
bring this part out. I'm going to rotate it then. So, y or x 90. Let's press right click the
origin to geometry again, and then let's pull
it out, and then press X and Z, it will be. Bring it in. And then what I should be able to
do is pull this out. And finally, I should be able to pull it out a little
bit beyond those. And then S and Z, Pull it out into place, so it's covering all of
those parts like so. All right, that's making sense. That looks good. Let's now
bring it down to here. So if I press shift D, should they be able to bring
it down to this point here. And what I should be able to
do now is pull this back. So pull it back so it's
behind those parts, and then find me one last
part that we have across car. Shift D, bring it up and then r and x rotate it round
let's pull it along here. So it might be S and Z. Let's pull it along
here, like so. And then you've got
some flash in there, 'cause we just need to
pull it back a little bit, double tap the A,
and there we go. That's that bit. Done. Alright.
So that's looking good. Now, on the next bit, then, or on the next lesson, I should say, let's carry
on working our way down. So now, in fact, you know what, before, on our next lesson, we'll put a piece of
wood in there, I think. Okay. I'm just looking
where I want to go down to us into
the floor there. And then what we'll
do is we'll work our way down to this part here. We'll get all of that done. And then finally,
what we'll do is we'll look at
actually having some bend in these pieces of wood
that we've actually created, so we can join all
of those together, and then bend them,
you can see, we've got a little bit
here poking out. You know what? Before we
finish, let's just fix this. Just pull that ins
place. So I don't forget 'cause it's not going to look good if I don't forget. We've also got this part
here as you can see. Let's pull that one in place. And there we go. All right. If you see anything
like that, fix it straight away, so you
don't forget about it. All right, everyone. So
I hope you enjoyed that, and I'll see you in the next
one. Thanks a lot. Bye bye.
92. Wood decorative supports for tower extentions: Welcome back and on to blend the ball modeling and
jump in our workshop, and this is where
we left it off. Alright, so let's come
in and first of all, grab this part here. And I'm just wondering
whether I want to put this through going
down all the way there. I don't actually think I do. So all I'll do is I'll
just press shift deep. I'll bring it over to this side. And then what I'll
do is, I'll press essence head and
just make it much, much smaller and
then bring it up. Put it right into place,
right around there. Let's pull it back a little bit. Making sure it's not
popping through there, and there we go,
that's that bit done. And now let's actually
think about this bit. So luckily for us, these
ones are straight on. So these are ones that
are going to be much easier than the ones
we've done before. Both progressive D will
bring this one out. And what it means as well is
that I don't need to work on normal even on this part
here, so that's good. That makes it easy for us. Let's bring it out.
Let's press head 90. Let's press control one so
we can go into side view, and I want to put
this below here. I want to make it
much much chunkier. So we're going to
do is just press S, and then S and X and pull it in, like so, because this is
actually a main support. So if I now pull this
over into my wall, so make sure going
into the wall like so. And then what I'll do is
before rotating this round, I'll just press 50, and
I'll bring this one out. Like, so wherever I want it. So probably just
going to be in there. And then with this one,
now I can rotate it. So Rs rotate it round. Just so it's going
into place and actually fixing along there.
That looks pretty good. And now I think I'm
happy with that, we'll have another piece of wood that's
going to, you know, kind of come up these
sides and into this bit, we'll fix that bit as well. But before we do that, let's actually put a support in here. So all I'm going to
do is grab this one. 50, Z 90, make it a
little bit smaller, and let's pull it into place so it's
actually going in there. And then back into this part, and then let's pull
it into place. Like so. All right.
That's that one now, t's pub another one over here. So shift Pull it over here, and this I already be
into place like so. You know what? I'm going
to leave it like that. And we've got a support here. We need another support
coming down here then. So I'm gonna press
shift. Bring it down, and then Rx 90. Let's pull this one
into place then. So pull it into wherever
it's going to go. So it's going to go
roughly in there. And then we're going to bring
this down and pull it out. So if I grab the bottom
up here and then can bring it down. So bring it down. Do here, and then just
pull it out into place. So now you can see
you've got a really, really nice support there. All right, so that's
that bit done. I'm thinking, do we need a
support going on this bit? Because this is
just the wall here? You know what?
Probably, probably do. I think it will look better
if we put that on there. So we'll grab this one shifty. We'll make it, you
know, kind of thin, so it just goes along
that sort of thing, and then, y, 90, make it a little
bit thinner then. And then let's bring it into
place where we want it. So we want it s poking out
of there. Maybe maybe. Can we just have it just
going into this part. So hold in hold in this fence. Like so. And then,
let's pull it back. Into there, and then finally, we'll pull it all the way
down to the floor then. So we'll grab this bottom bit, pull it all the way
down to the floor, like so and N and see, it's really just starting
to come together. Now with this one, let's actually bring it
up, so Shift D. We'll bring it up. S and Z. And then I'm just going
to pull it into place. Over here, before I start
this main part of this roof, and then from here, I'm
going to pull it up. And I'm just wondering
about this bit. I think I just need a piece of wood coming from
here and going out, so I'm just going to
make sure though first, that this is going to be okay, just at the side of those. I think that looks good,
and then ship D and then 90 right clicks
at origin to geometry, bring it down, and then I'll press S and X and
then pull it out. And then press S and y and
pull it out a little bit, like so, and there you go. Diet is looking good. Now,
the one thing we need is some supports come in and
holding this kind of in place. So I'll put a support in here. Now, I might as well, I think, probably I'm just looking
at this support here. I like the way this
support is looking. So what I'll do is I'm just
looking at the angle, though, because if the angles not right, as you can see this one
here is straight on. So we might as well
use this part. So what I'm going to
do is just press L, and then just grab
these parts like so. And then what I'm going
to do is press 50. Now, these ones are already got materials and
things like that on. But let's see if we can actually make this work for
this part here. If I'm going to press ara -90. And then what I'm going
to do is put this into place along this part here. And you can see
that I've got to do a little bit of work to make it fit in, so you can see here, Should fits into place
beautifully there. Now, you can see that I've got some issues with this bottom? I actually don't think I've got bombs on here. What
I'm going to do? Come in head select shift and click and pull
this one down first, and then we're going to do
the same one and this one? Shift click, pull this one down. So, and there we go. Now you can see that it's
actually supported. And next of all, I'm just wondering, is this
far enough back? In other words, is this
actually in the wall? Can't really tell from here. So all I'm going to do is just grab three of the edges
because that'll be enough, and then I can just
pull it back and there you go, it's
into the wall. Now, finally, do you
want one more support? Let's actually have a.
Pressing Shift D. Let's click and set origin to three D cursor,
not three D cursor. Origin to geometry.
And let's have a look. Yeah, you can see that's the problem because
it's not split. So let's come in, and what we'll do is we'll
split one of them off, so I'll just come in
and press L, L and L. I should then be able to
just pull this out into place instead and make it a
little bit easier for myself. So if I put it around here, You can see, it's going to require a
little bit more work. It's going to also require a
thin part going down there. Let's just have a look back. Yeah, you know what? I think we actually need it. I think
we need it in there. So what I'm going to do
is, I'm just going to press L on this part and pull it back into place like
so, pull it down. And then with this part,
I'll have it going, Yeah, where it is, actually,
I'll just grab this part, press shifty, rotate it round, so's 90, make it more, much thinner then, and
then pull this into place. I want it in there like so
and finally pull it over, like so, double tap the
A, and there we go. Now that looks like it's
actually supported. So that's looking pretty good. Okay, so let's work
our way along. So if I grab this one now, should be spread shift D, bring this one over
here into the wall, like so, and then shift D again. And then with this
one, we'll right click Set origin to geometry,
rotate it round. So RY 90 and let's
bring it up into place, and then S and X and
then pull it out. Like, so, and then
let's now pull it. You can see here my roof. It needs pull it back this way a little bit to get
it under there, and then you can
see the problems we have with this part
here, for instance. So now we have a few choices. Let's see, first
of all, if I can grab just this one and how
far back it's going to be. So if I pull it all
the way back to there, how much room is going to be on there is what
I'm looking for. Because we don't actually
have to do it like this. We can actually instead
bring the roof down to here, and then this bit will
be completely different. So let me show you the other
way before we do anything. So I'm just going to put that back and then going to
leave this as it is, but I'm going to press
50 to duplicate it. I said 90. And let's bring
it round to here, and then I'm going
to press three just so I can see the view that map. R and x rotate it round. And let's put it into place
wherever it's going to go. So something like this. And then let's pull it out a
little bit like so, and then let's finally come
in and bring this part out. So now you can see, how that is actually
fitting in place. You can see it's fitting
in place, much better. So let's come in, face
leg, grab this face. Let's put it on normal. And let's pull this out then. And then pull it up like so. And I'm just looking if I'm actually happy
without this looking. I think I just need to
pull it out a little bit. And then what I'll do is
I'll bring this part up now, so I'm going to
bring this part up. And then finally pull this part over L so, and there we go. Now, the roof might need
bending a little bit. I'm wondering if I should
bend. You know what? It's this part here that's
causing me the problem. So let's first of all,
pull this into place. So I'm just going
to pull it back. And then what I'm going
to do is pull it out. And then finally pull it down, so it drops under there and
then back into place like so. And now you can
see that's pretty much fitting in the
place that I want. It's just this part now
that I'm actually thinking. I think what I'll do
with this part is, I'll pull it out
more, so I'll come to this part and I'll pull
it out down to there. Like so let's pull
it back as well. See if we can actually
get away with pulling it back like double tap the. Yes, Dad's looking the
way that I want it. And I didn't actually have to
mess around with the roof, which makes it even better. Now, if I can, let's see
if I can just spread 50. And let's press R, 180 it around, but we
don't want to do that. Let's put it on global first. So R z 180. And now let's put it back
where we actually want it, which will be
somewhere around here, and we should find it's
quite easy to put into place like so let's just
pull it out a little bit. And there we go. Now, the
last thing before we finish, let's just grab both of these, and let's just pull
them out a little bit. Double tap the A.
And there we go. Once we've got this
top bit on then. We've only got actually
a few more bits to do. We're going to have a
lamp on here anyway, so we don't need to
worry about that. And I'm just making sure then that all of these
parts are in place. Now, I think, just
this top bit then will be the last
thing we have to do. I'm just looking,
I think we might need one more piece going across there was like
pieces on the top. And I might put one
piece over there. So, one, two, and
three more parts, I think, and then we're pretty much done with this
part of lease. So let's say about our work. And I'll see you
on the next one, everyone. Thanks a lot. Bye bye.
93. Random offset on wood framework and uv texturing for more natural design: Welcome back everyone to
Blender four modeling and jump in a workshop, and this way we left it
off. All right, everyone. So now, let's come
in, and hopefully, I should be able to grab
let's say this one here. Let's press shift. Let's
spin it around then. So are there 180. Like so. And I put that 90. So 90, 180. Let's put it into place then. Let's put it back. And I'm hoping that I can put
it just behind there, putting this part up here. So you can see now that's fitting quite nicely into place. Need to pull it
back a little bit, pull it under a little bit, and there we go.
That's that one. And now I can press shift
deep and I can bring it up. So let's bring it up into place. Now let's rotate this round. So R z 90 again, and then let's pull it into
place wherever we want it. So first of all, I'm
going to press S and X and pull it
back into place. Here we go. Then I'm
going to pull it over. And you can see this part is going to be have to
be quite chunky. We're also going to
have to make probably a little part that's going
to cover these parts. So let's do the
chunkiness first, S and let's pull it out.
Let's pull it over. So. And then what I'm going to do is I'll put a top on here just to kind of elevate or alleviate that
actual chunkiness. So all I'm going to do then
I'll just press shift. I was going to make it difficult for myself, but there's
no point in that. So let's press and
y, bring it in, pull it back into place like so. And now, let's think
about these parts. So I'm going to press 50. And I'm going to bring it down. So, 90, bring it into place. Like, so, and I'm sure
I'd be able to pull this down into there and then
pull it back. Like so. And then I'm thinking, this part here maybe wants to
come out a little bit, so I'm just going to put
my X ray on, grab that, turn the x ray off,
and then pull it out so it's in front of those
parts, holding the shift on. And there we go. And now, finally, I'll just
pull this part out. Used a little bit more. Just to make sure it all fits
in place, and there we go. That's looking pretty
good. That's that bit. And now, this last bit, which is on here, let's
see if I can this one. No, we can't use that one. So we'll use this one, shifty and then I'll pull this one out. So I dead 90, first of all, put
this on to normal. And let's just pull
it into place. And I'm hoping I ain't got
to do too much work in this. S and Z. Let's pull it, shrink it back, pull it back, make sure it fits, pull
it back and pull it up. And maybe pull it back one more tiny bit just so
I've got that bit there. Or we pull it down. Let's see if we can pull
it back a little bit first then S and Z or S and y. There we go. We can
pull it down that way. And let's pull it down,
so it's in there. You know what? I
need to pull it up. I'm going to have
to pull it up, and I'm just seeing how far
I can pull that back. I don't really want to pull it back any further than that. So what I'm going to do
instead is I'll just come in, put my x ray on
press the tap on, grab this edge
here, turn it off. And then what I'll do
is I'll just pull it back then further than this, so you can see
here, I'm going to pull it back further than this. And then I'm going to pull
it up a little bit if I can. So let's put it
back onto global. And then we should be
able to just pull it up. Like soap. All right.
That's looking good. You can see it goes all
the way over here, though. I'm not happy about
that, what I'm going to do is I'm just going
to come to this part now. Grab this part, and I'm going to just pull it out past there. So double tap the A. And
there we go. All right. So finally, finally,
we might have one more piece over here
that might come under these. So let's grab this part. Let's press shift
D. And then what we'll do is we'll just
pull this into place, and I'm thinking that if I drop it just on the bottom of here, can look, as though this is actually being supported on
the top of a piece of wood. So let's press sen's head. Shrink it all the way down, and then let's pull
it down into place. Some jaws, go to pull
it down into there. And then I'm going to
rotate it, so rnd. Let's rotate it round. Let's grab the top of it then, like so and pull it into
the bottom of here. Now, finally, let's rotate it, so it's the same as this one. So's rotate it round like so. And then we go and finally, let's just pull this part
out with our normal on. And I'm also
thinking, let's pull this part out as
well into there. Now, let's just make sure
it's sat on top of that at the moment it's just
floating. There we go. At the A. And yeah. There we go. All right. Now the hard part because
now we need to go in and we need to grab all of the parts that are like
this piece of wood. Not as hard though as you think, because we have a
little trick hand, which is what we can do is
we can actually come in, grab one of these because we've done it the
way that we did. We can grab one of
these, and then we can go to object, sorry, select, and we can select all by type, and we should be able
to select them via. Let me just have a
select all by type. We want to select more
by material type. So I'm just looking If I can select them all by
material, there we are. There we go. That's
what I'm looking for. Alright, so now we've
grabbed all these. What we can do now is
we can press Control J. Join them all together, like so, because they've all
got the same bevel on. And then what we can do is
we can now reset all of the transforms or reset
all transforms like so, right click set origin geometry. We can also put them in. I think we had one,
which was wood. So you can see we've got
one here, which is wood. So we can press M. Go down to where it says wood, and let's
put them in there. And then what we can do
is we can press shift H, hide everything
else out the way. And now we want to come in and bring in some edge
loops for each one. So three on this one, control, bring in some edge loops. And you know what
we're going to do now. We're actually going
to randomize them. Let's put this on global so
we don't get a bit confused. We're going to come in and
randomize them a tiny bit, just to make them a
little bit uneven. And you can see doing
it this way as well, makes things really,
really easy. Because we can see exactly
which ones we haven't done. And then we're free
to come in and just work our way around
all of these parts. I'm not going to bother with the really small ones, like so. And you can see that I'm just actually just
randomizing them. You can also see again,
as we spoke about, we're not going to be
coming in and, you know, bringing in a
subdivision because I find this way
much, much easier. The one thing is,
I'm just looking, making sure that's actually in place. You know,
it looks in place. I just don't want any flashing on this one. But you know what? Before moving on.
I'll just bring this back a tiny bit rather than
get all that flashing. Put it on normal.
Move it back a tiny, tiny bit, like so, and there we go, it's in place. And then I can go back, put this onto global and
work my way around. So now we're onto the top bits. Now, I'm not going to
do these parts on here. I will, however, do
these parts under here. There the chunky parts. They're not really
going to get a lot of, you know, weather. Well, they are going to
get a lot of weathering, but it means like pieces of more going to be falling off
these in real life, rather than actually bending with the weight of whatever
they're holding up. So that's something
that I do take into account generally
when I'm doing these. Now, on this one here, I did put some in because we've actually got an end on here, so it might, you know, pull it down and warp it a little bit. So on this one, And on this one. And of course,
we're doing this to make sure that its you know, it doesn't look sterile. It looks as though there's been a lot of work taken to actually, you know, make it on the evening things when
there'shardly any work. Alright, let's press A. And then what we'll
do we'll go to mesh. We'll go down to transform. And then what we'll do is
we'll go to randomize. And then finally, we'll turn
this down all the way down to not 0.2 or not 0.1. Let's have a look at no 0.2. That might be about right. Let's press tab.
And there we go. Now, let's come in. And what I want to do is I
want to press U. Smart UV project click. And then finally I
want to come over, change the basic wood, and we're going to put it onto our let's think
plank wood planks. Let's put it onto there.
And then finally, I just want to make sure
that the planks are, as you can see, it's a little bit small on the resolution. Let's go to our UV editing. Let's press the tab. Let's press dot to Zoom into all our parts. We've actually got
these parts as well. It doesn't matter. We can split those off now, so I'm just going to
come to this part, L P, split it off. Don't want to do
anything with that. The one thing that I want
to do is if I press A, it just make these a little bit bigger on the UV map like so. Alright, on here, then,
a little bit bigger. No, I don't mean a little bit bigger. Do I mean a bit bigger? Let's save up. Let's press dot. Yeah, that one's looking fine. Let's come to the others now. So if we come to the others,
A to grab everything, A, let's zoom into them. So let's zoom into
one. So this one here. And then what we can
do is as we bring this out and see it looking a little bit bare so now that looks just tons
bare as you can see, Alright, that's
looking pretty good. Now, let's come back to modeling
and the moment of truth, so tech, bring back
everything. And you know what? We're not going to have
the big reveal yet, because first of all, before we do any of that, what we're going to do
is we're actually going to put this wall into place. So we're going to
put these walls into place all the
way around here. We'll put them in
our groups as well. We'll make sure actually
everything's in the group, and then we'll be able to see what isn't when we finish this. And then finally, what
we'll do is then we'll start on our actual
fence going around here. And then that'll
enable us to actually work out where this is
going to come out to. All right, everyone,
so I hope you enjoyed that, and I'll
see you on the next one. Thanks a lot. Bye bye.
94. Reorganizing our collections: Welcome back, everyone to blend the full modeling and jump in a workshop in this way left off. Alright, let's come
to our walls, then. So first of all, I'll grab
these. In fact, you know what? Let's just put these
under our roofs. So I'm J gonna grab all of those ones, the ones
that I've just done. So all of these,
and I'll put them under roofs that then is
going to make it easier. So I'll press I open. I've got one that says
roofs. Yes, I have. So, let's put them under roofs, and now I should be able to
hide my roofs out the way. Now, we can see that we've
got this roof, this roof. So shift select them, this roof, this roof, and then press M, put them under roofs as well,
and there we go. Now, why I've done
that is because we've got the inner
parts of the roof. So these should be
under wood really. But I think I'll call
these roof wood. Instead, it'll make it easier. So if I grab one of them, press M, new collection
and call it roof wood. And then what I can do then
from there is I can actually close that up and then just drag it and drop
it under my roofs. So we've got roofs there
and we've got roof wood. So let's hide the roof
wood out the way. And then what we'll do is
we'll come to these two, we'll press M. We'll put
them under roof wood. Now we've got these parts here. So what I'm going to
do is I'm going to split these parts
off out the way. So if I come to this one, this one, I might as
well, you know what? I might as well grab
them all together. So I'm going to grab
them all together. I'll grab this one. I'm going
to grab the top of here. I'm going to put my x ray on so I can see the
inside of this one. So I'm going to
grab this one here, and I'm going to
come round this one, this part here and
this one over here. And then finally, just
make sure I've grab the inside of this one
here and this one. And then what I'm going
to do is I'm going to press M UV project click. I'm going to turn off my x ray. And what I'm going
to do is I'm going to press P selection. Like so, split them off, and now I should be
able to grab them all. So I should be able to
grab this one, this one, and this one, join them
together with Control J. And then finally, these now, I should be able to come in
and put it onto my planks. So let's find our planks, which are here, and there we go. There's our roof. Now, what I
should be able to do now is put them on the roof
wood, and there we go. That's that bit done.
Now, let's hide. In fact, you know what,
we won't hide it. What we'll do is we'll
come to our walls now, so we can see we've got This wall is never going to be seen. So at this point, I start now to break them down
and delete them off. So delete faces. Let's see if this wall is going to be seen so you can see it's under here, so no one's ever going to
see it, so delete faces. And now I tend to
with the walls, at least, work my way
around them independently. So all I'm going
to do is press y, and then going to
grab all of these, and I'll press y. And then this one should
already be split. Now, I should be able to
grab all of these now. Press, SmartV project, click, and then I should be able to
change this to be my wall. So wall, like so, and bring that on, and then we should end up with
something like that. And we will check them
once we've done them. Once I've done it
then, I'll come down and put them under
walls, like so. And then finally, if I
come to my walls now, should be able to hide them off. There you go. Now we know that
we've actually done those. Now, we're not going to mess
around with this wall yet, but we are going to do
these three walls here. So if I come to this
part, you can see, I've got a bit of the back that I need to delete, so delete. Faces, this bit underneath. I am going to need because
you can see it under here, so people can see that under there, so we need to keep it. We've got this one, this one, this one, and this
one on the inside. So this one here. Now,
this one on the inside, no one's going to be
able to see it, so I can just press delete and faces. And now let's split these off. So I'm going to split these off. So, lit this one off, y. And then the bottom one
now should be split off, which means I can press A, smart V project, click
and then once again, drop this onto wall like so. There we go. Now you've
got the underside as well. You can see the
underside already done. Let's press M, put
it on the walls. Now, let's come to this
part here so we can see we've got this part
on the inside of here. No one's ever going to see it. We've also got this
part down here. I'm just looking at this part.
We do need this part here. I'm just looking
how far it goes. And I'm not going to worry
about that one again yet, as I said, but now I'm just
going to come to this one. We do need the underside. Even though you
can't really see it, you might end up seeing through there if you don't keep it. But the main thing
is, let's come round and actually delete
this out of the way. We're not going to need
this one, so delete faces. We'll come to the bottom one
then, and we'll press y. And then what I'll
do is I'll come to this one and press y. And now all of these
should be split. From here, then, let's press
Control A or transforms, set origin to geometry, press tab born A, and you Smart UV project, click Okay, and
finally drop this onto walls, walls like so. Have a look round, see what
that actually looks like, and then finally press M and put it in your
walls like so. Alright, so now we've
got those done. Let's actually start tidy up the scene before actually
looking at anything. So we can see we've got this
one, which is also walls. So we can press M,
put it into walls. We can see then
we've got this one, which is also walls. This one, which is walls, let's press M, put it under walls. I'm going to keep
the bridge separate because I think that's
a good idea to do that. And then what I'm going
to do now you can see, I've got all of these little parts that need
to be under wood. So the first thing I
want to do is come to wood and hide all of those
parts out of the way. And now I can see
exactly what I'm doing. But let's first of all
come to all of these, and we'll put these
all under wood. And it's up to you, of course, how you want to
tiidey up your scene, but it's really actually
important that you do do this. So M, put them under wood. And the reason is because
you can really lower down, you know, your optimization. You can get a lot
better optimization if everything is in parts. When you're rendering
it out as well, you might not be able to
look at the whole scene, but you might be able
to render it out. So you might be
able to hide all of these parts or pots that you want to but still
render them out, for instance, or even
layer in as well. Laying works with, you know, using collections and things
like that, and layers. So let's now come
in and just put all of these under wood. So I'm just going to grab all of these and work my way round. And it's a bit tedious, I know, but it's
definitely worth doing it. So then I'm going to grab these, these press M, put
them under wood. And the more that
you do it, the more you'll be able to see
where you've missed. So, put them under wood. So let's grab all of these, wood. There you go. You can see how quickly
it is to do this. Now, this is the staircase, and I think if I press G, you can see we move
the whole thing. But what I'm going to
do, I think this is also part of the staircase
same as these parts here. It might be better with this. You know what? Just putting
it under staircase. Let's put it on the staircase,
so I'll make a new one. Stan let's hide that
out the way as well. So staircase, hide
that out the way. All right. So now, this
is what we're left with. Now, you can see
all of these need really going under doors. So they should already
be under doors. Let's hide them out the way
and see what we've got. Here we go. Let's also hide our windows out the
way and see what we have. And now let's come
to these parts, and again, put these under wood. So I'm just going to grab
a few of them, press M, put them under wood, like so, and then just work my way
around on these parts. Here. Like, so,
like so. Like so. Press M. Put them under wood.
And we're left with this. So M under wood. And now we're left with this
one here, which will be M. And we're going
to put this under roof wood. And there we go. Now, we've pretty much
tied everything up. Now, you can see the
benefit of this now. We can see all of these parts that we can work
on. That's the first thing. And the other thing is
that we can also see that all of these inside parts that we're not actually
going to need as well, are going to be much
easier to delete. I'm also going to put
this under wood as well. So put it under wood like so. Okay, so now we've got
terrain split off as well. We need the water. So let's see if this has been
put under water. So I don't think I've got one. It's under ground
plane, as you can see. So let's just press
M new collection, and we'll put this on water
like so. And there we go. Now we can actually hide that
one out of the way as well. And then we've got
this one here, which should be under bridge. So let's just see if it's under the bridge. You can
see here bridge. If I hide that, it will hide
the whole thing out the way. So I'm going to
bring that down and just drop it to
the top of there, like so and there we go, now we're pretty much left
with all of these parts. Now, I don't think we're
going to need this part anymore because we use that to actually create the round parts on our actual
Wizard tower there. So I think I can leave
that out of the way. And then we've got
this one here. I think I'll call this
this part here tunnel. Or alcove even. We'll call it alcove thing. The one thing is about
this is as well, I want to do some
work on the inside. I'm just going to
bring back more wood. And you can see we've got we have got little parts
of wood in there, as you can see that I can hide. And I'm going to call
this alcove first. And then what I'm going to do is I'm going to put a door in here and probably finish this off before
doing anything else. So let's press M new collection. Let's call it alcove. So, click Okay, and
then let's see when we hide this if it hides it all. If not, we can just
grab all of these, press the born and drop those in alcove as
well, and there we go. All right, so we've pretty much broke our scene down to nothing. That's great. And we've
also got then the top of. I'm going to put this
under roofs as well. So this part here
I'll put under wood. So wood. And then this top part we'll
put under roof wood, maybe. Yeah, let's put it under
roof wood, like so. All right. Now, let's
bring back then. So from here, I can
bring back my alcove. I can bring back my
wood, as you can see, And now I can have a good
idea on the next lesson of the actual door that
I'm going to put in here because I do want a
door in place on here. I'm also thinking
whether I want to build this out just a little
bit more with wood. I know you're not going
to see a lot in there, but sometimes it might be
better if we put, you know, some planks of wood coming
under here, for instance. We'll look at that
on the next lesson. I think definitely we
need a top in here, and we'll just get this
finished off nice and neatly. All right, everyone.
So I hope you enjoyed that, and I'll
see you on the next one. Thanks a lot. Bye bye.
95. Working on outer field, modeling a fence for backside of tower: Welcome back, everyone
to Blender for modeling and jump youo workshop, and
this where we left off. So let's go first of all, and we need to
bring in our doors. So let's bring in doors. Now, these doors, we
need this one here, and all I'm going to do
then is press shifty, and I'm going to put it under
my alcove first of all, so I'm just going
to press and move it to the alcove just for now, just so I can see
what I'm doing. And then I can now put this into place. So
let's press one. Let's press the G button doors
to get it where I want it, and then let's bring
it all the way back. So I'm going to put
it all the way back, press the little
dot on to see what I'm actually doing.
Let's get in there. And then what we'll
do is we should now be able to pull it
back into place, move it around, move
it around again, pull it back into place like so. And then if I come out, now, I should be able to see where
I've actually put that. So something like that,
Los absolutely fine. I'm wondering whether
I need a part on top of here. I think I do. So all I'm going to do
is grab this piece of wood Shift D. I'm just going to finish
this off with y 90. And the other reason I want
you know, this door in there, obviously is because
if you're doing a view where you can
actually come into here, there's some light going
to be coming out of here. So we just want to make sure
that it's populated with something like a door
just to finish it off. So double tap the
A. And there we go. Now, you can see that's
looking much much better. Alright, so now we've
put our door in there. We can put it back
to under doors. So let's find our
doors. Here we are. And then what we
can do now is we can bring all of
these parts back. Like, so very easily, and we should end up with
something like this. And now let's have the reveal. So let's come in. Let's
save out our work. And let's go to rendered view. Let it load up. And
there we go, guys. That's what we've actually
done, can see now. All most or all of the hard
work is actually done. And you can see even now, you could probably get a really, really nice render of this. Now, you can see that the
terrain is nowhere near done. You can see you've
got these steps that we need to put things on. But I think the time has come to actually start our
fence going round here. So let's put this
on material mode. And then what I
want to do is start with kind of a wall
going around here. So the first thing I
think I'm going to do is I'm going to create the
wall and how high it is? Now, I have lost where my
guy is. My guys over here. So let's pull him
over. Let's grab him. Pull him over back here. I'm going to put this
on object mode as well because I'm going to find it
much, much easier to see. And then what I'm going to
do is just put him in place, so something around there. And then from there,
then what I'm going to do is I'm going to start with my
wall and my fence. So basically, I
want my fence to be kind of up elevated
a little bit. I want a wall to kind of
c Probably round to here. So going following this
all the way round, all the way round to this side
here of the wall or corn. Maybe from here, going
all the way round. From there, then, I might
need to just go in and actually work a
little bit more on that terrain to get it
all fitted into place. But we'll see that in a minute. So first of all, though, let's press Shift S, Kursta selected, let's press shift A,
and what we'll bring in is a curve and
we'll bring in a path. We'll rotate it
round. So's head, 90, let's rotate it round.
Go over the top then. And then we should
be able to see where our actual where this
is going to start. So I think it should start
somewhere around here. So somewhere around
here as you can see. And I know I'm saying somewhere
and things like that, which some people
don't find handy, but I can't tell you exactly
where it's going to be. And it's up to you, you know, where you put your
own wall, really. This is part of
actually modeling, you working out how you want it to look and you developing your own skills and your own eye to see how things should go. And maybe you have a better
eye than me, as well, and yours looks better because you did it
in a certain way. So there is no right
or wrong in this. And there's just things that look right or things
that look wrong. But you can't see that until you've actually
put them in place. So it's all about playing
around with things. So let's say pull it
out a little bit more. And then what I'm
going to do now, I'm going to come in and want to develop this so it goes
all the way around here. So what I'm going to do is
I'm just going to press and then just try and follow this going all the way around here. Like so, so like so, like so, and then go in up
to this part over here. So if I press now, so enter and then pull that out. It should come very, very close to this part here. Now, we're going to
have a top on here, so I think actually
this coming into this point here is actually going to work pretty
nicely for us. The one thing I would say is it's a bit high at the moment. So let's pull it down
into place like so. And then what I'm going
to do is I'm going to I think I'll press
you know what? I'll first of all,
extrude it out and create an actual wall
from it. Let's come in. To curve. Let's
save that our work, first of all, and
then what we'll do is we'll come down and we'll
bring down the extrude. So let's bring up the
extrude, as you can see. Let's press controla transforms. It's the origin to geometry
just to make sure. And then what we'll do is we'll
bring it down into place. So you can see this is how
my walls going to fit. You can see now that maybe
on this part in particular, do we actually want it to come a little bit
closer to the wall, for instance, than these are the things that we're
going to be working out. Now, if I put my
guy down here and into into the terrain or
the cobblestone, now, the cobblestone is going
to be slightly above here, so I'd say it's just
about there. Like so. And once we've got
a wall in as well, we can actually bring in our
cobblestone on top of that. So you can see here as well, this is a little bit hidden. So now what I think I'll do is I'll think I'll move
it a little bit up. So I'm going to come
with the extrude, pull it up a little bit more. Like so, and maybe
then just pull it up. Pull it up like so. All right. So that's
looking good. This is where we'll
have a wall then. Now what we need
to do is obviously create some Slidify
on top of this. So I'm going to come
in. Add modifier, generate Slidify, and then I'm just
going to bring it out. And you'll notice
I'm bringing it out them into the side of this wall. I'm going to right click
and I'm going to shape flat. There we go. And then what I'm going to do is now I think I'll bring it out a little bit
more because at the moment, it's not very chunky, this wall. I think I need it to be
a little bit chunkier. So what I'm going to do is
I'm going to bring it out and then bring this
offset in like soap. All right, so far so good. Now what we want to
do is we want to create the little parts on here. So what I'm going to do is,
I'm just going to press Shift D. I'm going
to bring it up. And then what I'm going to
do now is bring it down. So first of all, I'll
come to my curve. I'm going to bring this
down then because I want stone slabs on
top of this wall. And then from there, then what I want to do is I want
to come back to my solidify and bring
this up a little bit. Now, let's drop it down onto place and make sure that
it's not too far over. You can see at the moment, If I put it on top of that, these are way way too big. Also, it's not in the center, as you can see, If I
press one, should, if I hide this out the way, be able to see let's move
around a little bit. Let's see if we can actually
get a better view like this. So you can see now if I
grab this, first of all, I'm going to turn this all the way down here, in
the shift born. Then what I'm going to do
is bring the thickness down because we
want it just over, and then I'm just going to mess around with this a little bit, like so, and there we go, There is that part there. Now we need our fence on top of here before
doing anything else. Now, luckily, we did have a
fence, which is over here. I'm gonna press Shift D. I'm
going to bring that over. And what I want to do now is I want to put my fence on here, but I want to do
it the easy way. So let's come in. Shift
D. Let's bring it up. And then what I'm going
to do is instead of, you know, using this solidify,
I'm going to turn it off. And then I'm going to
go back to my wall, and I'm going to turn the
extrude down to zero, which means that we should
just have a curve now. Now, from there, I'm going
to rotate my fence round. So while there, 90, let's rotate it round. Contro or transform,
set origin to geometry. And then now I'm going to do
is just put it into place. So I'm going to put it
next to my curve like so. Let's put it so it's
actually in the wall. Like, so. And then what
we're going to do is now, let's come in and
actually array this. So first of all, let's
research transforms once more. Let's then come in and add
in an array. So an array. Let's make sure it's going
the right way, first of all, because you can see it's
not, so let's put on zero. Let's turn the x up. Let's drop it into
place like so, and then let's increase it. Increase the count,
and we want it basically going
all the way around to there. So let's add in. Let's close up the bevel. Let's keep the array open,
but add in one more, which will be deform, and we're going to deform
it against the curve. And the curve, of
course, is going to be this curve here like so. Now at the moment, we can see that we're not in
the right direction. Or anything like that.
So let's come onto y. Let's not right. Let's come
onto Z. That's not right. So let's come onto
minus x. Nope. And I'm us trying,
and there we go, that might be the right one
accepts the wrong way round. So let's press R and y
drenat spin it around. And then let's see if I can
actually pull it into place. And if I move this this way, then, is it going to go round? Yes, it is. That's
what I'm looking for. Now, the one problem is
that if I pull this up, for instance, we can see that it's starting
in the wrong place. Let me see if I can
spin this round. So if I press origin, geometry, you can see it's
still sticking over there. If I press then RZ hundred 80, and this is the problem
with things like this. You have to mess around
with them a little bit to get them to
work right for you. And now you can see that I
can bring this up, do here. Put it into place,
right around there, increase account of the array, and the array should
then go all the way down into my wall like so, and that is exactly
what I'm looking for. Now, you can see at the moment, of course, really,
really straight this. And we're going to fix
all that on the next one. We just want to make
sure that all of this is in place at the moment. You can also see a feel like these are a little bit
chunky for this part. So it's a little bit too chunky. Like I said, and I think it's maybe maybe a little
bit too high as well. So all of these
things, we can fix. Now we've actually
got it in place. But that was the main part of getting them in place first, and now we can come in
and actually fix them. All right, everyone. So
I hope you enjoyed that, and I'll see you
on the next one. Thanks a lot. Bye bye.
96. Readjusting our stone fence and offseting individual planks using proportional editin: Welcome Mayon to Blender for Modeling and JoJo workshop
in this Seft art. All right, so let's come in
then to this wall first, and let's make it a little
bit thinner, first of all. So I think it will
be On our straw. Yes, it is. So there we go. Let's bring back our terrain, as well, so we can
see what we're doing. So where is my terrain? Can I just press tag
and bring it back. Yes, I can. Just make sure then that the wall
is fitting into place. Next of all, then,
let's pull down this what's going to be our
stone into place, like so. And finally, then, let's just
pull down the actual fence. And the one thing about
the fence that I want to do is I want to make these
a little bit thinner. They look a little
bit too chunky. Now, once you press
tab, you will see that you have to
go all the way over, let's have a look all
the way under here. So first of all, I'm
going to press Shift H, press tab, and there we go. And now it's upside down. Makes it a little bit
hard to work with. But what we can do now is we can press A and shrink these down. So I can shrink
these down like so. Press the tab button, and
now you're going to have a better view of press voltage of what these are
going to look like. So I think that that
once I bring it down, looks a little bit
better, like so. And now all I need
to do is just come in and increase my array, going all the way
around to there. And I'm just wondering, am
I actually happy with that? The one thing I think
I'll do is again, I'll come in, and I'll
pull these parts out, so you can see it
going over there. I'm going to pull these out
to be a little bit longer. So I'm just going
to put my X ray on. I'm going to grab both of these. Then all I'm going to do
is just stretch them out a little bit further like
so, press the tab button. Turn off my x ray. And yeah, that's looking much, much better now like so. And it also means that
I can actually come in, turn down this count
all the way there, and I can actually
pull this cross, maybe a little bit. Into that wall over
there. And there we go. Maybe that's a little
bit too far to try it. It's not that way. Try this way. There we go. Holding the shift barn making sure the jus go in. Alright, Dad is looking much much better and much
happier with that. And now what we need to do is we need to come in and
actually bend these a little bit and make
them look realistic and also apply all this stuff. So at the moment we've
go moles curves, if I come in and grab, let's come to this one
first, at the moment, if we come in, we can
see at the moment, it's resolution of 12. Let's see if we can
actually see that. You can see here, this
is the resolution of 12. If I turn that down, we can see now we've
got it this much. Now the problem is we need it
on quite a high resolution, and the reason is
because of the fact we're going to be making
stones out of these. And the more actual resolutions
we've got in there, the easier it's going to
be to make the stones not actually split where these
actual pieces of wood go up. With the bottom wall, we don't actually need it that high. We can bring this down
because it's just basically around wall going around there. It's got no breaks in it
or anything like that. Now that we've got
that, what we need to do is we can put this
back on object mode. We can grab all three of
these then and go to object, and what we can do
is convert to mesh. And then with this one,
it's fairly simple. Let's right click and
shade auto smooth. Let's do the same on
all of them, actually. And then finally, then
what I'll do is now, I'll come to my fence first. So let's make the
fence now uneven. So all I'm going to
do, first of all, I'm going to come in,
grab one of these. Let's put this then on
proportional editing. Let's put it onto random. And then what I should
be able to do now is come in and pull
these out like so. And you can see now we can
actually pull them out. You can see though it's pulling them up a little bit too much. So I don't really want that. Let's see if I can actually
do it with anything else. So I'm just seeing,
You know what? I'm going to have
to just put this onto random. Or not random. We'll put it unconnected only, and then we'll just
put it on smooth, and I should now be
able to pull those up. Now, that's what I'm
looking for, but I need to bring
it in, of course. So if I pull it in, pull it and pull it in, you can see now we're just
pulling up the top, and that is what I want because I want to make these a little bit uneven from each other. And it can be every
other one or every one. So we definitely don't
want them even in any way. You'll notice I'm keeping
the smaller ones down here. And then this one and this
one we'll pull those up. L so now you can see they're
a little bit uneven. That looks much better. And
the next thing we want to do now is make these
parts uneven as well. So I'm going to
try first of all, If I can actually come in, and grab a few of them. So I'm just going to
grab three like this, put this that on random, and then let's see
if I can actually bring them down and
let's see if I can actually rotate them and see here can rotate
them as well. But I'm just wondering
if they'll actually end up poking out or
something like that. So all I'm going
to do is just grab a few of them then, like so. Like so. So, like so and so. And then I'll just
pull them up like so, and then I'll grab
the bottom ones. Just any of them, doesn't really matter. Then pull them up. Like so. And then this one here, this one here and pull them up. Like so. All right. So now you can see we've got that part being a
little bit uneven. And now what we need
to do is we need to go into probably a lot of these because I'm
thinking how can we actually rotate them round? Maybe we could do it on normal. So let's put it onto
individual origins. Let's put it onto normal. And then all I'll do
is I'll just come in. And I'll grab these together because that'll make it
easy then for me to view. So I'll put it on random, and then I'm just going
to press R and y. And let's see, that's
rotating in the wrong way. So r and x that's also
rotating in the wrong way, r and Z is rotating
the right way, but it's rotating more at the same time as you can
see. So we've got this. So let's now bring some of
these in, not every other one. Let's go back. So
maybe this one. This one. This one
and this one and then r and Zets sees
that the right way? Yes, it was. And then what we'll do is we'll press control plus. Hide those out the way, and then we'll come to the next one. So we'll grab this
one, this one, and we're going to rotate
them the other way. Like so. So r and Z rotate
them going up the other way. Control plus, hide those out the way. And then
we're left with these. Now, let's do the top
one. So I'm going to grab this one, this
one, this one. This one, this one, and
this one, and then Z. Like so, and then I'm going
to press control plus. Hide those out the way. And then finally, let's come in and do these the other way. So we're going to be
going this way this time. So let's grab both of these. Like so and so. And then r and rotate
them the other way. Like so. And then let's press
tag, bring back everything, and we should end
up with a very, very uneven offense like this. Now, the thing is
I don't actually want to break the
mesh on any of these, so I'm just going
to have a look. Why these actually got
a little bit broken, and I don't really want that
at all. Let's have a look. Let's right, click to smooth. I'm just looking around them. The ones, which I can see on some of these that I do
have a little bit of problem. So I'm just now come over. I'm going to grab the
ones that have a problem, so you can see, I'm
just looking around, so you can see this one here. And I think a look. This one, have a look. Yes, this one here may be. And I'm just working
my way round. These two here for
sure. You can see. And the reason why that
happened is because I actually broke the mesh because we applied
the beverlon before. So I think this
one here as well. So I've just grabbed
all of those, and what I'm going to do to fix that is I'm just going
to come to mesh, clean up, and then we're going
to go merge by distance. And just make sure
you're turning it up to 0.3, something like that. 94 vertices removed. Press the tabton and there you go that fixes that as well. Now, from here,
let's press control a transforms origin
through geometry, right click shape,
smooth by angle. And I'm just looking
on these parts here. You can see that the angle
isn't smooth enough. So let's just turn this down. A little bit, like
so, and there we go, now you can see those
are looking pretty nice. Now, on the next lesson,
then what we'll do is, let's just have a
look on our fence, first of all, And I just want to see what this
actually looks like. You can see I still have
all of these are the same. So you can see all of
these are the same. That doesn't look good. You can also see that I've got irkiny. I'm going to leave
that out the way. Press ol tag, bringing
back my fence. So the first point of
call what I'll do is I'll actually unwrap
all of these again. And then from there, then
we can unwrap our wall. And then from there,
we can actually work on our actual stone slabs. All right, everyone, so I hope you enjoyed that.
It's a bit fiddley. I know I made a mistake
there of applying my bevel. I don't normally do that,
but I did on this occasion, but at least then I was able to show you how to
fix that as well. A, everyone, so I'll
see on the next one. Thanks lot. Bye bye. M.
97. Modeling Stone Slabs: Welcome back everyone
to plan for Modeling. I'm a Join O workshop. Something else
Jochen O workshop. There we go. Alright,
let's grab these fences. Then let's grab everything. Smart UV project, click Okay. And then what I'm
going to have to do is just come in and make these. As you can see,
they're a little bit possibly too large
on the UV map. So let's come in,
go to UV editing. Let's press A. Let's press
dot to zoom into them. And then what we'll do
is we'll pull them out. So I'm going to press S.
Pull them out, like so. And I will show you another
little trick as well as Ben as we can't
really see this so well. If we come up here and
click this little born on, double tap the A over here then. What you can actually do
now is see where it is. So you can see where all of these UV maps are without
actually selecting them. So now you can actually
have a good view in there. You can press A then, make
them bigger, like so, double tap the A,
and there you go, you can see what you're
doing. All right. The one thing is I
brought all of these out, and we can see here we do have
a little bit of a problem. So what I'm going to do is
I'm going to do that again. I'm going to press.
Smart UV project. Click Okay. And I'm just
going to go in and log. Yeah, they're actually
unwrapped properly. It's just that when
I pulled them out, I actually had randomized on, so I'm going to turn that off. I'm going to leave this on then, I'm going to pull it out. So S pulled them out, like so, double tap the A, and there we go there looking
much much bare. Yeah, I'm happy with all those. Alright, from here, then, let's
go back then to modeling, and we'll come to our wall now. Now, let's see, if fi press shitge hide everything
else out of the way. If I can come in and
just split these off. So I'm going to split it here and around the back of there, doesn't really matter so
much, so I can come to here. And I can come to here, and I can right click
and mark a scene. And then what I can do
is I can now come in and delete this part,
so delete faces. Now, the underside of here, no one's going to see, so I might as well delete
that out the way. So delete faces and
the inside of there, I'm not going to see
either, so I might as well come in and delete
that out of the way. And this then is just
going to make it easier to unwrap this,
so delete faces. And then I'm going to
press A, and unwrap. And hopefully, then, I should
be able to now come in, bring in my material,
which will be walls, so wall, bring that
in, press the tapon, and we should end up with
something like this, which is nice and smooth
going all the way around. Alright, let's press tag,
bring back everything. And now let's comb
to our stone wall. So the stonewall as I said, It needs to be little stones, like you can see, going
all the way along. And what I'm going to do is
try and split them up so that we split them up so
that the stones like this. We don't want stones like
in the middle of these. So I'm just going to
split them up, like so. You can have them
close to it, but just don't have them
in the middle of it because it will not look as
good. So something like this. And it is a little bit tedious, but I think it's well worth it once you've actually
finished, like so. So like so, just work
your way around. And this is why we put in many, many resolutions of this. We want the stones to be a
little bit bigger from each other sometimes a
little bit random. Like so. And maybe right
on the edge of that one, that one will be fine as well. Let's bring it in. And I don't really want
that one like so. I don't want such a
small stone on there. But things like this
absolutely fine. Yeah, I'll do. You can see that they're getting bigger on this part here. I'm going to have to make
them a little bit bigger. This one's a bit giant, so I'm just going
to split this off. So instead of making it so big. I don't want it so big. And then on this one. Put it like so, and then on this one. You see that we've
not got a split here. So I'm going to
click, make instead, I'm just going to
let click click and then control
click, right click. I'll mark a seam
on this one then. Like so. And I think
I'll also mark a seam on there
because it's still quite chunky brick that. And then what I'll do is I add in another seam,
bring it over. Grab both of these,
right click Mark Sam. And then what I'll do
is now add in a couple of seams right click Mark seam. I've got this some normal.
Let's put it on global. Let's press control la, bring it up Markoam
and then control. Left plate, bring it to here, and then right cli marker
seam and then finally, controla click
marker Sam and then control Left click Markoam so. Alright. So now let's select
every other one of these. And then the tedious part should be out of the way.
So every other one, You also working
your way around? And then what we'll do is
split all of these up. And from there, we'll
randomize them a bit before. Well, we'll pull a beer on, and then we'll randomize
them a bit of thing. So pull them up and
things like that. All right. Well there, so, last one, and then y, and then a to grab them
all and then mesh, clean up, and then Bill holes. All right. Let's see if
that's actually worked. So I'm hoping this part on here we might have two holes on, but let's see first of all, so we've got them all like this. Let's click shades move. And then what we'll
do is we'll come in. Add in a bevel. So I add in a
bevel. There we go. Can see they're
looking pretty good. Let's also come in and
press A, Smart UV project. Click Okay. Now, that
might not work because I might need to resell
the transforms first. So let's do that. Then let's do it again,
Smart UV project. And let's add in our stone. So stone, this one here. And now what we can
do is we can come in and fix this bevel. Let's Let's bring the segments up and let's bring
the bevel down. And there we go. Now we can see they're looking
very, very nice. And now what we want to do is, as I said, we want
to randomize them. So if I come, hopefully, now, I should be able to come in and delete all the ones
that we don't need. So in other words,
if I come in now and come to limited dissolve, it will delete all of those little ledgers that
we don't need. And from here now, it
does make it easier, not the mistake
that we made with the fence before
to actually come in and put on our randomized
randomized proportion. And then when I pull them up, if I've got this on,
connected only off. Shouldn't now be able
to bring them up, so and make them uneven, much, much easier because
we're not messing around with any subdivisions in there, like we did
with the fence. So you can see here. There
is a problem in this. Let's actually overlook. Yeah, I've got still
that problem there, so let's just fix that first
before we do anything. Shouldn't be there like that, so let's come in and let's
come in and put it onto edges. And there we go. We can see
we've got a load of those in. Let's press delete
limited dissolve. That's not going to do it. So let's come in and see
if I can clean those up. So clean up, decimate geometry. That's not going
to work. Clean up. Make plainer faces. Now, it's not working
because of the fact that we've got a load of
geometry in here, and you'll notice that I've already done limited dissolve. So limited dissolve. I
can't actually delete those things apart from if
I take on all boundaries. So make sure that's ticked on, and then you're
not going to have any problems at all
pulling these out. So all I'm going to
do now is come in to put this back on. Let's leave connected only off. And now going to come
in, I should be able to bring these up now without
any problems. As you can see. And now we're not
going to get all that warp in and things like that. They're going to come up
nice and even for us. All right. So let's pull
some more of these up. Let's pull some
more of these up. Let's pull some
more of these up. And then what I'm going to do is I'm going to come to this one. And let's just see if I can
put this on individual, put it onto normal. And let's see if
I pull this out, and they're all going to
come out in the same place. I'm just going to hold the
**** but hold them out. Same on this then. Just go to hold the **** bon Athose out. Pull those out a little bit, and let's come to
these and pull them out just a little bit, like so. And now you can see that were
nearly nearly gain there. They're all uneven going
all the way around, and that is exactly
what we want. Now, we could take
this a step further, but I really don't
think we need to. What I'm going to
do now is just have a look on my view on
my rendered view. Have a look what this looks
like, and there you go. You can see as well, we've got the different colors because
of the material in between. Now, you can see
the wall down here. It's a little bit
out of the moment. And this is what I'm
talking about now. On the next lesson, what I think we should do then is just come in and make sure that we're
happy with our terrain. So we're just going
to do a little bit more terrain work on here. And from there, then we should actually be able to, you know, get this finished and get our
cobblestones in the next. So let's do that next.
Alright, everyone. So I hope you enjoyed that,
and I'll see on the next one. Thanks a lot. Bye bye.
98. Creating Cobblestone surface using cobblestone geometry node: Welcome Moon to Benderful
Modeling and Join workshop, and this is where we left off. Now, let's put this
on object mode, and then we'll come to
our actual terrain. And then what we'll
do is we'll come and put this onto scalp mode. Let it load up. And now
we're back in here. So we know exactly
what we're doing here. So now we can come
in and what we'll do is we'll just
add some terrain. I think on these bits, I'm just going to
make it a little bit more lumpy on parts. So on this part,
I'll like to press control and just bring
it down a little bit. And this is why as well, I
didn't actually, you know, finish the terrain
or put the grass on or anything like that
because I knew that the terrain should always be one of the last
things that you do because you never
know what you're going to put in your scene
or anything like that. I also can see that
this part here, I think I'm going to actually just bring it away a lot more. So I think it stuck out
a little bit too much. I think that looks
much better like so. And then I'm looking
round, having a good look. And I think now that's
looking much better. So Ans red to do is just
come in and use the flatten. I'm going to turn this
down flatten tall. And then I'm just going to
flatten these parts off. Like, so keeping that lumpiness
there as you can see, all the rocks and
things like this. And as I say, try and get out
of using this smooth tool. Try not to use it at all. It's it's not worth using it. It's it's good when you've
done some, you know, got kind of shape, and then you might use it then. But don't use it, you know, try and use it as
little as you can. It's like, one of the biggest beginning mistakes I see in doing this
sort of thing. Using that. So I'm just going to now come over and make
this a little bit bigger. And even now you can
see this is still better than using the
smooth as you can see. So now let's come in
and these parts off. So Like, so. And then we go, we've got some nice rock
formations around there. And then if you
want, just come in, make it a little bit smaller, then just harden those edges up. Like so. Again, with all this, with the flatten tall, you can see just the results you get
are just so much better now. So you can see jaws going round with a smaller brush and just flattening
these edges off. And it's actually
looking pretty nice. And all done with the built
blender tools as well. We don't need any other
extra tools or any add ons. It can be done like this. It's just about taking your time and knowing
which brushes to use. And there we go. All right. So now let's come in and
just sort this out as well. And this is where our
cobblestone is going to be. And let's also come
in and think about these parts down here
and this part on here. I think now from there, we can actually bring in
our cobblestones now. Place them out
where I want them, and then kind of use the train to go over them a little bit again because we
are going to have some grass up to here as well. So let's do that now. Let's come back over to object mode. And then what we'll do now
is we'll bring in a plane. So if I press shift day, I'm going to bring in a plane. So bring in a plane. I'm going to put it down then to
where I actually want it, first of all, before
doing anything. So I'm going to put it down
to let's say into here, so let's drop it
all the way down. Now, we have got the option then to bring it up, so
don't worry about that. The main thing is that we make sure that
it's the right size. So if I press S now, I should be able
to make it much, much bigger, and then pull it just so it covers
all of that area. So now if I put on my x ray, I should be able to have a good view of where I'm actually going
to be cutting this. So you can see if
I cut it from all going round here
and then into here, going all the way round here, and then out of here someway, and then I can actually refine
it. So we'll do that now. So all I'm going
to do is I'm going to come in and I'm going to cut it you can see here that we really don't
want this part here. So we want it to be inside
the actual walls top it. So let's just right click a minute and let's just come in, grab this edge and
put it just back. Just behind this wall, like so, 'cause we don't
want it in there. And then we'll do
is turn this off. Then I'm going to
do is press a K, and I'm going to cut
this part out first. So I'm just going to press
control all of the wall, going all the way around
in the center of it. That's where I want it to come
up to, all the way around, and then all the way
down to perhaps. Here? Like, so, press the spurn, and there's the third cut. Now, let's make the next cut. So the next cut, where do I want my cobblestones to come to? I think I want them to come Around here. So what I'm going
to do is I'm going to go from perhaps thinking
maybe from here, so from here, going all the way around to the top of here, and then all the
way around here. Like so. And then, of course, the cobblestones don't need to be in any of this bit at all. They need to be kind
of hidden away. So I'm just then go
to bring it back into here all the
way up to here. Like so press the end button. Now from here, what
I'm going to do is, I'm not going to delete
this out the way yet. What I'm going to do is just
move around. Turn this off. And now I can see if I select this again where
that's going to be. Hopefully, I'm going to have to turn it back on, actually. There we go. So we can see
it's going up to the steps. We can see it's going all
the way through there. You can see that it's a little
bit short on this part. So let's come in and
just pull this this way, so it's going in there,
and I'm also going to pull this without normal
on, just with global on. All this this way. Doesn't
need to be so neat, guys, so don't worry about that. The actual John Cind will do all the work for you as
you'll see in a minute. So yeah, I'll bring
it round to there. I'll bring this down to there, there and there. And
that's looking good. So now what I want to
do is just come in. Delete this part here. So I want to delete this part, and I also want to
delete this part here. Now, it's really weird where
you grab it, you know, when you're looking in this
view because, you know, the point to grab this one is here and the point to
grab this one is here. So just have to search
around for him and then press delete and faces. Now what you should be left with is just
something like this. Now, the important
thing to know with the cobblestones is that we
can bring it up first of all. So let's just bring
it up into place. Is that we don't actually
want any subdivisions in it. You just want to play. So
even though it's an end, that's perfect. That's
what we actually need. Let's press control
a transforms. Set origin then to geometry. And now what I'll
do is we'll save our work before bringing
in this geometry node. Now I'm going to do
is I'm going to head on over to my asset manager. The one and one is going
to be under let's see. We've not got it on. So let's
go to edit preferences. Let's bring it in again.
So file and pass, click the plus button. And now I just want to find it, so it's course,
resource pack fixed. Click add Asset library. Close that down. Open
it up over here now. And here we are. Cobblestone path is
the one that we want. Drag drop it on,
and there you go. Wow. Look at that already. It does all that work for you. Now, let's come
back to modeling. And then what I'll
do is I'll show you how this actually works. So at the moment, you
can see that we've got fill edges is one of them. Once we click that
on, it will actually fill all of those
edges in for really, really nice and beautifully,
as you can see. Now, the other thing is, let's actually bring it
down then into place. I'm going to bring
this down inoplace. I'm gonna actually
press the tab. Then I'm going to bring
it down. There we go. Now it's working
better. And then we've got to work out where
we actually want it. So how far down, do we want it? Now, you can see that
somewhere along these parts, it's not actually
sticking in place. And that means we just need to go and mess around
with the train, as I told you, a
little bit more. We just want to make sure that everything is covered in it, so you can see the
bottom of these steps, the bottom of the walls, and all of that stuff is
already covered in it, and then this looks pretty nice. From there, then,
What we're able to do is we're able to change the roundness of
the cobblestones. You can see now, I can have them really,
really hard edged. I'm also going to put this on material so you
can actually have a better view of what we're actually doing. So
let this load up. It will take a little bit
of time because obviously, we're doing my cobblestones
here, and there we go. Now we can see what we're
doing a little bit better. So for me, I want
my roundness up to, let's say not 0.8, something
like that. Let it load up. I want it something like that. I want the thickness
of my tweles. I can also put these up as you can see and
what this will do is, it'll bring them up, so I
want them up a little bit. I want the random thickness to be up a little bit as well to make them a
little bit uneven. So as I bring this up, you can see that certain
tiles up and down. Let me just put
this on object mode just to show you.
So there you go. You can see certain tiles come up and certain
tiles go down. And you see now this is
looking very, very nice. We can also change as well, the size of the sop I come
in and I bring this down. So bring it down slowly. I can change the size of these to make them a
little bit smaller. I think they're on
the two small sides. So let's put it on not 0.3. And let's bring it
down a little bit. No 0.25. And then we go I
think they look about right. And we can also
change the scale. And what the scale will do is, it'll change the gaps in
between each of these. So if I put this on
0.9, for instance, you will see now that we've got more actual gaps in there where we can actually
add our terrain under these. And I think actually that
is looking a little bit, too much gaps in between. Let's just have a look
on rendered view. So we'll let our rendered
view, let it load up. And there we go,
now you can see, Jorstwn nice. That is looking. All right. So I think
I'm happy with those. I'm just wondering now, let me change the
roundness up to 0.9. Okay. Yeah, I'm just wondering if I want them like
that, because the thing is, if I bring this roundness
down to let's say not 0.3, you will see that
we start getting some really nice
edgewar around those. Now, of course, the edgew is
based on how round it is. So the sharper angles, the easier it is to
get edgewar on those. But I think for me, this is
a little bit to, you know, I need to put it up not
0.85. Try that. Yeah. And I think this
just looks so much. It suits the scene
so much better. And the other thing you're
able to do as well, is bring in some noise. So if I bring up my noise
to let's say not 0.1, Let that load up,
and now you'll see. Let's put it up
to something like one just so you can see. And then let's put off the
offset power up to one. And there you go,
Let's turn that down. So you can see
it's based on not. So if I put this noise
up to let's say 20, you'll see now how
that actually works. And now let's really
refine this down. So if we put it on 0.1, it's going to have to be
lower than that, I think. Let's put it on 0.2.
And there you go. Now, we'll put it on 0.1.
Still probably going to be. And now you can see we're
getting a lot of noise in our actual cobblestones as well. Finally, then, let's
just bring them down a little bit into place. Like, like so. Like so. And now they're
looking very nice. And now all I need to do is come in and work on my terrain. So lower my terrain
just down a little bit. And that's actually
where you could use flattened and smoothing. But you can see now it's
looking very, very nice. So next of all on
the next lesson and then we're going to
be working on this train. I think what we'll
do is we'll pull it up a little bit. Like so. And then from there, I can
actually drop these parts down and kind of have it where it's actually
smoothed off like this. I like this effect a lot. I think it looks very nice. And I think especially round this bit where they start
to drop down a little bit. I think that's looking very, very nice like so.
You're wondering. Yeah, that's the
kind of look I think I'm actually looking for,
something like that. And I think these are a little bit too high at the moment. So let's actually bring
down before we finish the thickness to 0.4. Bring that down. Yeah. And what we'll do then is we'll bring
this down a little bit, and we'll work on our
terrain from here and try and get these
looking very nice. But they are already
looking nice. It's just these bits here, as you can see,
if I move around. You can see the terrain
here doesn't look right. That will need fixing.
The other thing is with the terrain as well. I think at the moment, what I'm going to do
instead of ground material, I'm just going to come in and put in something
like basic wood, just so I can get a
better vision of it. So instead of doing that,
I'll just press plus and I'll put new and I'll put
terrain terrain. So I'll also minus that off. It does the method like that? Don't worry about it. And then we'll do is I'll
bring this down now, bring it down even further. And now you can see I can
actually work on that. You see, you've got a lot
of shininess on here. Just turn the
roughness up, like so, and then you'll really
be able to have a good idea of how this terrain is
actually going to look. Alright, so we'll fix that on the next lesson.
Alright, everyone. So hope you enjoyed that, and
I'll see on the next one. Thanks a lot. Bye bye.
99. Refining cobblestone location using sculpt mode: Welcome back veran
to Blenfad Modeling and John Juno Workshop. Now, let's go back
to Object Mode. And what we'll do then from here is we'll come in
now to our terrain. So click on your terrain.
Let's go to scalp mode. And then what we're going to do we'll first of all come to flatten and I should
be able to come in. You can see I can flatten that. You can see it's not doing a lot on here, so I need to do. Let's try the smooth
tool, first of all. You can see my smooth
tool is working. It's just not doing
a lot on there. But what I need to
do is I need to drop this down a little bit. So I'm thinking the
easiest way probably to drop this down is to come
with my clay strips, make it a little bit bigger. So let's make it bigger, and then bring the
strength down. So if I bring the
strength down, All right. So if I bring this up now, you sure I'd be able to see
that it starts coming up. Let's bring it up again. Yeah, you can see now
it's time to come up. I was wondering, Wait a minute. That's the wrong
one. I've clicked on that one for some reason.
Let's do that again. Yeah, that's the one
and one. There we go. That's exactly one or one. So now I'm going to do is
drop my strength down. And then I'm going
to hit Control and bring it back very slightly. Like so. Just on
these large points. So on these large
points. Bring it back. And I'm going to then
bring them back all the way around where
they're actually going these little points here. I'm also then going
to come round to this and bring it back,
just going over it. L Then definitely this one, holding control, bring
all those back. Like, so. All right. So that's
looking good. Now, let's come to these
little points here. So, definitely, we
want to fix these. So what I'm going to
do bring it smaller. And then what I'm going
to do is just come on. Like so. I might turn up this strength on
this just a little bit. Like so. And then
just bring it on. And at this point,
you might need to press control and just actual what I've done there is just press control
and remeshed it. And from there now, I'm able
to come to these parts. Like so. And then build
that bit up. Like so. And then, like so build it up. Remember here, press control, bring those little bits back. Then just work your
way around. Like so. And I think, do you actually want to go
all the way down there? You might want to
come in, you know, and having the edge going down
there. I don't think I do. I'm just looking then
at this bit down here. And I think I actually like that bit there, so I'm
going to leave it. And now I've got
this. What I want to do is control larger
one more time, and then I'll bring
in my flatten to, so let it read apologize. Bring your flatten, and
let's go over these now. Let make them all rocky, A little rocky outcrops. And now you can see
it's looking a lot more natural going up
to the cobblestone. Now, let's come to these parts. Pretty much the
same thing, then. You can see here how
this is looking much, much better now. You can see. Now, the one thing
is, I think on here, it doesn't look right because of the fact we need more
lumpiness on there. So all I'm going to do, I'm going to make it a
little bit bigger. I'm going to bring that all in. Like so and then bring that up. So it looks like a gradual
slope now instead of what we had before and bring
it up and bring it up. Like, now it's looking a lot
better and bring this in. Like so and then
bring the toll down. And then bring it out,
like so, and there we go. Now you can see
that if I come in, can't troll read apologize,
make the tool smaller. And then we should.
Now if I make this to smaller. What with that. Come with the flattens
flatten. There it is. Now we should be
able to come in and make this look much more
realistic as you can see, at the top of it, at the inside, these bits here, Flatten
these parts off. And if you want to make it a bit bigger, just
for this part here, because I think it
doesn't look right, so let's make it a little
bit bigger Platten it off. So now you can see that we're
actually getting somewhere. And actually, this is starting
now to come together. All right. So that's
looking good to the top parts. These parts. And there we go. Now we've
got it going all the way up to where we want it.
We've got this bit in here. Let's bring this down
just a little bit, so I'm going to come
back to McClay, control, and just bring
those back a little bit. Like so. And there we go. I think we're done with
our actual cobblestone. Let's bring these parts
back just a little bit in. These parts. Like so. There we go. These parts. All right. Let's have a look then
at what that looks like. So we'll go to object mode. We'll then double tap the A. We'll save that
work. And then what we'll do is we'll now put it on our render view,
so let's have a look. And there's all our
cobblestones, like so. Now, remember, at the moment,
they're going to look much, much better because
you can see in this, so in my actual terrain. So, in other words,
in this cobblestone, you have got one of them, that is, can you see the
cobblestone material? I'm just going to click that off a minute just so you can see. So if I click that off, you can see now it goes white
underneath there. We need to put whatever we're putting on there,
the same terrain. Our terrain button
needs to come in here, so we need to make sure
they're all the same color. The other option is just to pull these back or pull
this up a little bit. Well, I recommend actually with this because we're going
to be using the terrain, the easiest way to do this is all these little white
spots that you see here, just come back
into your terrain. And what you're going to
do is you're going to come in. You're not
going to press tap. You're gonna come to
object. You're going to band back to sculpt. Then you're just
going to come to where your little
play strips are. Turn the strength down. And
then all I want you to do is just go in and bring
these up a little bit. Obviously, obviously,
not on rendered view. That's going to
make it very hard. So what we're going
to do is just put it on material view now. Let it load up, and
then hopefully, I should be able to
now come in and just bring these up very
slightly. Like so. Like so. Just get
rid of all of those. Like so. Like so. And it is worth doing this. And we want to do
it slowly as well. We don't want to, you know, do it too fast or anything. And we are hiding
some of these parts, so just be careful of that. You're trying to go
over these parts. And you can also come in and flatten it once
you've done that, but just make sure
that we are red. And I'm going to make it
a little bit bigger now. I'm going to increase it a
little bit faster for me. And I don't want to go too much, so I'm going to make it
a little bit smaller. I try and do it a
little bit smaller now, and then I'll just go over
those bits where it's actually been hidden and just take
it away a little bit. You're kind of
fighting with this. So Now, let's go in with our flat tool. And hopefully, we should be able to bring that
over if it doesn't. Just go in with your
clay strips again. And this time, make sure you turn your strength
down a little bit more and then control and
just go over these parts. You don't want to go
over all of them. You want to have some witches stuck in the sand and things. It's just that some of them, you can see it's coming
through there. Don't worry if it comesthrough, because all we can do is just go over it again without
pressing control. But we just want to
now bring some of these back. Like so. And this then will give you
a more realistic approach. Let's go over that one
again because you can see to actually gain these
the way that you want them. All right. So that's
looking good. Now, finally, let's
go to object and we should now hopefully
finish with this terrain. We shouldn't have
anything else really to do with the terrain
except paint it. And once we've painted it, then we can get rid of this
huge huge block in our scene. 'cause this is the moment it's costing a lot because it's very, very high on the topology. Let's save it out.
Let's come in then. Last rendered view,
double tap the A. There you go, that is what
we're actually looking for. And now you can see jaws, how nice that actually looks, and how realistic it looks
as well at the same time. Alright, so we've done
pretty much all of that. On the next lesson, then, we're going to start working around building this part out. So this part is perhaps
I keep saying it, the last difficult part
that we're going to do. But it is actually it's the last difficult part we're going to do because actually, it's a slanted roof, so it's actually going to be
cut away from here and here. And then from there we
can build that part out, and then these parts are
pretty easy in comparison. The other thing is
we want to make sure that on these parts here, for instance, we're
going to have some stone going
around here as well, going all the way
around here, just to support these parts
at the moment, there's no stone blocks
in between any of those, and we actually want to put
some stone blocks in there. If I grab this, you can
see that pretty much, we've already got the parts that are going to make
those stone blocks. So we're going to
put those in there. We need a roof on here and
things like that, as well. So plenty more to do, but we're really
getting there now. You start to see it really, really come together and hope you're happy with what
you've achieved so far. Alright, everyone, so I hope you enjoyed that, and I'll
see the next one. Thanks a lot. Bye bye.
100. Modeling stylized roof attachment with tile generator and curves for wood framework: Welcome back to everyone
to BlenderF Modeling and Jump workshop, and that's where we left off. Now, I do think, actually, before we just come to this, I think what we'll do is
we'll put the roof on here. And I'm just looking around. I also think that maybe
we should actually add in our IV just to give
us a little bit of respite from everything
that we've been doing. Alright, so let's come
to our roof then. What we'll do is
we'll press shift. We'll bring it over
then into place. And what I don't want
to I want to actually rotate it so it's actually
going to face the correct way. So all I'm going
to do is press art and because we can alter it, you know, on the flyers,
we put it in place anyway. So let's just get it
into some sort of place. So first of all, let's
bring down the horizontal. Let's bring down the
vertices as well, like so, and then let's put it into the place where it's going
to go. You can see it. If it's going to go
here, it needs to make it a little bit
smaller, first of all, and then the horizontal
needs bring it down again. And maybe again. Now, what I do want
to do with this is not only do I want
to put this, you know, in the place where
it's going to go, which will be if I put
this aren't normal, which will be
somewhere around here. Let's rotate it round again. So I'll say, get it
into the right place, so it's going to go
round about there. Of course, we need to rotate
it on this angle as well, but we'll use this to do that. So if I bring this down, for instance, let's pull it up. Let's bring it down
much more like so, and there we go, that's
looking pretty nice like so. And also, let's bring down
the vertical count once more, and let's pull it
out a little bit. And there we go, This
is looking good. Now what we want to do is we
want to come and we want to alter the bend of this. So let's first of all,
see if I can bend it out, like so, which I can do
quite easily. Like so. And then I want to actually bend it out the other way.
Now, I'm not sure. Let me see if I can actually
compress it as well. So we've got our bend
on this one here. So this is the bend on here. Let's see if I can
actually come in and click the compress,
and there we go. Now we can actually
compress it at the same time as it
being bent like so. That is basically
what I'm looking for. Let's also then
come up and change the roof angle to be not that roof angle.
That's still the bend. The roof angle here. Like so bring it down. Let's bring it up a little
bit more. And there we go. I think that is about
exactly what I want. All right. Now, I'm
looking for though, and I actually bend
it this way now. I think what I'll
do with this is, I think I'll bend it. So I want it really bending
in the middle a little bit. The ride around here, which is going to take
a little bit more. Than what we've
actually got here. So I think I'll pull it out, just get it into place
where I want it. And then what I'll do is I'll try and bend it in the middle. So we'll try and bend
it so it goes up and then goes round like
this and makes a nice, really free flowing roof. I think I've got it
right about here. So if I look at it here, it's looking about the right height, everything's looking good
with it. So let's come in. Let's go to, you
know, one thing is, let's just check our angle. So Z let's put it into place. Just making sure that's right. There we go. Now it's
looking a better angle. Okay, so now, Let's think
about applying that. So if I come in and go to
convert and convert to mesh. And then if I press alta
now it will spin it, so it's going the
right way round, which is going to make
it much easier for us. And then what I'm
going to do is, I'm just going to bring in a curve. I think
I'll do it that way. So what I'll do is
I'll press Shift S, urs to selected shift A, and then we'll just
bring in a curve. So I'm going to bring in curve
and we'll bring in a path. And it's going the
right way anyway. I'll just make it a
little bit smaller, so NX, bring it in. And then I'll grab
the center one. And all I'm going to
do is lift that up. So you can see now My curve
is looking like this. Let's bring it in
a little bit more, so S and X, bring it in. And that's basically how
I want my roof to look. And we actually do
that on this curve. So I'm going to come to my roof, I'm going to come to add
Monifier and we'll go to deform. And we'll come to curve and then click on our curve
here, like so. And then I'm hoping that I could move my roof across
and get that nice, beautiful curve that I'm
looking for, like so. Now, if I want to
squeeze this in, so I can press S and X, squeeze it in, and then bring
this roof out a little bit. Now you can see that
it's actually flattening out at the sides,
and there we go. All right, so that's looking good. We've got it right now. Now, I don't want to finish yet, because what I want to do now is bring in this bit
going along here. And I might as well, I think, use the curve that
I've already got. So if I come to
this piece of wood, shift D, let's press Shift
and space bar to go to move. Let's click and set the
origin two geometry. Let's bring it round.
I'm going to press one. And then what I'm going
to do is rotate it, so R, y, 90, rotate it round. Let's make it a
little bit smaller, so it's going into
some sort of place. And then what we'll
do now is we'll copy this curve, hopefully. Now, at the moment, this
has got no bevel on it, so I'll have to rebvel it. So what I'm going to
do is I'm going to grab this one, grab this one, press Control L, and we're
going to copy modifiers. And what we're then going
to do is we're going to come in Control L, bring
in some edge loops. Let's click, right click.
Press the taboard. And I'm hoping now, as
I drag this across, as you see, it actually
comes in for how we want it. Now, let's pull it
out a little bit. Let's drop it down, and let's press S, and, I need to reset
the transformation. So let's just put it
on global for now. Let's press Control
A, transforms, set origin to geometry, and then let's bring
it in a little bit. Like so and press seven
to go over the top, we're going to move it forward. That's the next. Bring it in. Let's right about the edge
there, and there we go. Now, let's rotate it so r
and x can I rotate it round? Should be able to pull it down, pull it into place. Like so. And then the last thing
is you can see that. I'm going to have
to pull them back. Maybe a tad, as you can see, or maybe just pull
it all the way back, like so, just to
get it into place, and then rotate it
around a little bit more because it's
actually too much. So r and X. And then we go
just so it's all sat on there. And then finally, I think I
need to pull this up a bit. So what I'm going to do is
I'm going to grab my roof. I'm going to go to
object, convert to mesh. Grab this then here, so grab my curve
right in the center, pull it up a little bit. And then we go, now it's
all going into place. Alright, I mind even as well, pull this forward a little bit. Like. Okay. That is looking
absolutely beautiful. Now what we can do
is we can come in. We can apply that. So
control. Let's apply that. Let's come in, make sure
that one's applied. And then from here,
let's also add in a generate and bevel. Put it on point t three. Like so. There we go. Now, I think we're going to need some roof parts
coming up here as well. So I think for that,
we'll use our bend roof. So sorry, our bend wood. So shift let's bring it over. Let's press the S and Z and
bring it all the way down. Like so let's then press
three to go in side view. Now I go to God side view of
it, and I need to bring it. This is the other roof. So I think I'm going to hide
these out the way for now. So hide them out of
the way. Three again. And now we should have a good idea of what we're looking at. And now I should be
able to press X. Bring it into place,
make it much smaller. And now let's bend this in. So if I bring this one down, should then be able
to start bending this into how I actually want it. So
what I'm going to do? Bring that one down first. I think also, I'll
bring down the extrude. Let's bring that down slightly. Let's pull this out. We've
got that one into place. Let's pull this one
out into place. Let's press G and move
this one into like so. Now, let's see. On this side, if I pull it in. Following the right
curvature of the roof. It just needs to pull in
this way over. So if I pull. Now, he will see as soon as I start pulling this way over, I'll start, you know, kind
of going out of shape. Just press control
A, all transforms. And then what we're
going to do now is we just need to reshape
it just once more. So I think this time, it
will be on the solidify. So let's come to the solidify and bring it down
as you can see now. And now let's just
get it into shape. So now we should
be able to pull it this way with no problems. And one of the main problems is that I actually pulled
it not from the top. So you can see if I go back just a second and just
pull that back. You can see now if I pull it
from this way from the top, you can see how it doesn't
bend it like that. It was my fault. I
actually bent it. I'm just pulling it in. You can see I'm going a little
bit of bend there. Like so. All right. So now I want to actually
straighten this up. So well, first of all, I want to obviously get it into
the right shape. So I'm still going to press
control ate or transforms, and there we go, we
straightened up. And now let's bring down our solidify again like we
spoke about, bring it down. And then finally we
can press three. Make sure it's all in place. Come to the sides if we need to, and then we can just use the up. Like so. Let's get
it into place, and now let's bend it
a little bit more. I place. Like so. There we go. Let's pull this out. Pull it up. So. And now, let's think about we will rotate it
round in just 1 minute, but I'm looking
at the thickness. I think it's a
little bit too thin. So what I'm going to
do is I'll just bring my extrude up just a little bit. Like so. Alright. Now,
finally, let's turn down. We've already turned down the
resolution, so that's fine. Let's get it then into the
right kind of at the moment, you can see it's
bent the wrong way. We need to rotate
it a little bit. So what we're going to do
is we're going to go to object to convert and mesh. And then I'm hoping now
if I press control A, transform dr plates
at origins geometry, should then be able to press R, and let's try r and y. That's not going to
work. Let's try R and Z, and that's not going
to work either. So I'm just wondering,
can I put it on normal and art and y? None of those is
going to work either. So let's just go
back just 1 second. You know what, I've
got the outside in. So what I'm going
to do instead is I'll make this actually
easy for myself. I'm just going to
convert it again. So convert We have to be
careful, though, because also, we've got our Bbolona so just take that
off just 1 second, and then convert mesh. And now we should
be able to come in. Control Control click. I'll be going all the way over. So shift click this one and
then just pick this one up. Now you can see, now we've got it into the place
where we want it. There we go. That's
looking pretty nice. All right. So that's that bit. Took a little bit of doing. Let's now put on our devil 0.3. And then we're going
to do now is we want to mirror it
over the other side. So I just want to put it in the center of
here roughly because I know I'm not going to be
able to get the center off here and might be able
to get it from this. So you can see here here
is our transformation. So let's press control A or transform set origin,
two geometry. Shift S, cursor selected. Rub this one right
pli set origin, three D cursor, and then
let's add in a modifier, which will be a mirror. And then just look around
there and see the gap, and that is Near
enough about perfect. So that is good enough for me. Now, on the next lesson, what I can do is I
can bring all this, bring it all into place, and then I can start with
the struts going down, and then we should have a beautiful doorway
going in there. All right, everyone, so I'm
going to save out my work. I'll see you on the next
one. Thanks a lot. Bye bye.
101. continuing to model roof attachment for the front: Welcome back everyone to Blender ball Modeling
and Gumino workshop, and this is where we left off. Alright, so now
we've got this here. What we want to do
then is put down some type of support along here. So what I'm going to do is
I'm going to press Altag. Bring back all these parts. I'm going to go to my Bendi one. I'm going to press Shift D. And what I'm going to do
is bring it over. Then, what I'm going
to do is press sens make it a little bit shorter. Now, it's important that
we do this at this angle. So you can see that we've
got a slight angle here, so we need to pull
it over to there. And the reason I'm
not putting it back in place yet is
because first of all, I need to make sure that these
are going to go in place. In other words, what
do I mean by that? I want to rotate it round, first of all, then I can show
you exactly what I means. So x 90, let's rotate it round. And what I'm going to do is
I'm going to get it in place. I'm going to make it
a little bit smaller. Like so. And then what
I'm going to do is put it into where I
want it, first of all. And you can see the problem
we've got is that it needs to kind of come round before it actually
starts to go down. So let's actually see
if we can do that. So first of all, let's press N d. Sorry, and Y, pull it out. And let's get it into place. It's going to be a
bit fiddly this one. And then what we'll
do now is we need to bring this around first
before we do anything. So I'm Jaws gonna pull this out, like so. And there we go. Now we can see it's starting to pm into place. Let's
pull this down. And then what I'm going
to do is I'm Jaws gonna pull that out a little
bit more like so. And then finally,
what I'm going to do is I'm going to make this
a little bit thinner. So I'm gonna come
to my solidify. I'm going to bring
that down then. Like so. Just to there. And then I'll pull this out so. It goes under there, like so. And then finally, a little bit to the side. And there we go. We're nearly in still
little bit too thick, so let's bring it down. Not that way. Let's
bring it down. Let's put a go back in place. There we go. Now, let's
bring it down on our curve. So what I'm going to
do is bring this down. Like so. All right. We're nearly in place there. Let's move it a little bit. This way, move this one. This way. Like so. Alright. There we go.
We've got the first bit. So the first bits in. Now we need to do is bring this down. So we're going to
bring this down. Pull it this way a
little bit. Like so. Like so. I'm thinking. Actually, that might be okay. That might be something
that we can work with. You can see actually
makes it a little bit thinner around here.
We have a few options. We even press alternates and pull it out to make
it a little bit thicker, so you can pull it out
that way. You know what? I think that's going
to look pretty good. Now, what we need to do is when we bring this
back into place, we need to make sure that this is going to go into this
plate, and we can't do that. Until we've actually
got this back now. So from here, I'm
going to actually have to put it into place
and then move this around. So what I'm going to do is I'm going to grab the
whole thing now. I'm going to grab
this part last. And now we should if
we go over the top, we should be able to
all this into place, and I'm just going to
see if it all fits. That's the first thing I'm
going to do. I'm gonna hide this out the way,
this out of the way, hide this out of the way, this, this, even hide the
tower out the way. And then what I'm
going to do now is come back to my part. So all of these parts,
let's grab the mole. Grabbing this part last, and then I'll go over the top, and now I can see perfectly
where it needs to go. So Ron's edge you can see I'm
pulling them all that way. I don't want to do that.
So until medium point. So Ron's g Let's
pull it in place, and then make sure
everything fits. Now, this is why I did
this because you can see, slightly out with this. So let's pull it out. And then this part here is what I mean. So this part here you can
see is slightly out now. So if I pull this out, Man, pull it this way. I can pull it this
way, actually. There we go. That's
what we want. Now you can see we've got
to level this up now, which is quite hard tasks. Let's get it leveled up. Like so let's get this one,
rotated round. Let's pull, I think we'll pull this one round and see if we can actually
get it leveled up. What I need to do is I need
to really rotate this round. Now you'll notice when
you try and rotate this, you don't be able to
rotate this round, and that's the problem
that we've got. So what we need
to do instead is, we're going to have to mess
around with these parts. So pulling them out, and pulling them and trying
to get them to go round. So if I grab this
one, for instance, you can see, it's not going to twist that round, grab this one. Like, so, Like, so, and let's pull this out. And then pull this
bit out. There we go. That's what I want.
Something like this. Okay, so this is looking
quite nice at the moment. I've just got to get this
part back in now because you can see it's come out a little bit, and we
don't really want that. So we want it like that. It doesn't matter if it
popsro there because no one can see that.
We can see now. D is looking pretty
nice like that. Now, this is quite hard
to get into this space, so don't worry if you can't
do it on the first go. It's going to take
a little bit of practice.'s have a look at this. You get this right. So then I'm going to come
in right click. Dad smooth. Just
have a look at that. And last of all, then
what I'm going to do is, I think now I'm going to
actually come up to object, convert and mesh, and then we're going to right click
and shade auto smooth. Double tap the e, and then I just want to look over there. Now, the next problem
I'm going to have is getting it over to
the other side now. Then I'm going to grab
this one. I'm sorry, I'm going to grab this one
press Shift sa selected, and I'm hoping that it goes over the other
side. Let's see. I think it will be out for sure. So let's just see if we
can actually bring in now generate a mirror. And let's right click and set Origin 23d cursor,
and there you go. Actually, it's not that far out, which tells me that this
is a little bit out. So, you know what
I'm going to do? I'm going to grab
the whole thing, and I'm going to rotate
it very slightly and tip and get it all
into place like so. So let's come up and
get this one in. So I'll rotate it round. Like so. And let's pull it back. Like so. You know
what? There we go. We might have actually
done it. All right. The last thing is,
I think I need to pull it just a
little bit this way. I'm going to grab shift clip. Going around this part here. Let's try it again
and put it on to smooth and then just move
it out, bring it in. Move this part out, and that then should move
the other side in. And there we go. All
right. That's looking. Pretty cool. Okay,
so apart from that, I don't think I'm going to
do anything else for this. I think it looks quite
nice except I need probably just one more woolen
panel coming down here. And the way I'll do that is, I might as well use these parts that I've
already got here nere. But what I'll do is I'll grab this one going
down to here, this one going down to here, like so, I'll press Shift
D. And then what I'll do is I'll press S and
Z without siting on. So S Z bring them down, and then S and Y or X. But I need to put them
on individual origins. And of course, I
need them on normal. And now I can press S. And
now I compress S and y, and I can pull them in. Like so. And then what I can
do is I can extrude them out. Like so. And then finally, then I
can pull these into place. So I'm hoping for
grab both of these, I can pull them into some
sort of space. Like so. And then adjust one to
now pull both of these. Back on this edge. Now, the way to pull them back is you don't want to pull
them back with this. What you want to do is
press G and y or x. Whichever one it's going to be it's probably
going to be the Z, and now you can see that can actually pull these
back like so. Now you can also see that these are way way
too wide of them on, so I'm going to press
L on both of them. And then S and so S and X. Yes, there we go. S and X
Nope S and y. Try that. Nope, S and. Not going to work. So instead, we'll just
do this the easy way. We'll just pull
both of these in. Hold them in like so, grab
this one all the way down. Well it cross into place. And then instead of doing that, all I'm going to do is
add it now onto here. So I'll just delete
this one out the way. And then I'll grab this
one with LP selection. Put this one then to this. So I'm going to grab
this one, grab this one. I'll press control,
and there we go. Now, right click
shade, Auto smooth. And there we go, we've
got them in place. Alright, so that is that done. Now, we could go even
further and pour an actual support in
here if you want to, you could even bring another
support around here. Many, many things you
can do with that. I think for me personally, we're done with
this because it is, of course, after all,
we don't want to push this way way too far. And the thing is when
you're building on your own not recording
or making a course, you are going to push your
models further and further. And that's the idea of
pushing something further. So when someone says,
we drew a face, and then they say, push it
further, push it further. They tell you all the
time, professional artists tell you to just push your
work further and further. And a lot of that is here, Miss trying new things
out and things like that. So we don't really want to be doing that in the
course. All right. So now with that
said, let's come in, and what we'll do
now is we should be able to grab all
of these parts then. We should in fact,
you know what, we've got bevels on there
and all kinds of things. We don't really want
to do that. Let's have a look at this one. I
got a bevel on there. This one has a mirror, so
let's come in an object. We'll just doom
separately, so mesh, what else have we
got all of these, see, these parts of the bevel. This one has got a
bevel and a mirror on. So let's just press
control A on the mirror. So now what we should be
able to do should be able to doing this one with this
one, with this one. Control J. Now let's right
click shades move by angle. And you can see getting a little bit of a problem
with these parts on here. Don't really want those. And I think it's probably
because of the bevel? Yes, it is. But let's
turn Let's press control, first of all, the
origin to geometry. And let's think about bringing this bevel
down a little bit. So, there we go. Alright,
we've fixed that. Not too hard to fix
that. All right. And the next one,
then, let's put our material on's what
we're dealing with here. We should have the roof. That should definitely be done. So you can see these parts are done, they just need wrapping. And then these parts
in here need wrapping. And then I think after that, we can take a good look at it. And I think we can actually
move on round them. I'm just looking
at the model now. Move on round then finally
to this roof here. Now, the one good
thing about the roof is, it's straight on. So we can actually work
on this roof on its own, straight on, so we can
build out the piece of wood or whatever's going
to go in there, like so. Alright, everyone, so I
hope you enjoyed that, and I'll see on the
next one. Thanks a lot. Bye bye.
102. Modeling roof that extrudes in a stylized triangular shape: Welcome back everyone to blend for Modeling and
jump in workshop, and this is where we
left it off over here. This is where we left it
off. So let's come on in. And then what I'm going to do
is just going to press tab, M UV project click. Okay. All of these are
joined together now, which means I can
just minus off this. And then what I should
do when I minus it off is just add wood
into all of these, which looks absolutely fine. Now, let's come in and see if I've done a
good job on this. Haven't done a good job on
this part, I can see that. So let's come in and
actually fix that. First of all, so we'll
come to UV editing. And we know it's a simple
task of just grabbing both of these pressing t and
Keep UVs with mess. Let's try that again. So L and Alt and E. That's not working. So which means that I don't
think I come to add ons, but UV squares is working. So let's actually see
what's going on there. And actually, it's not
because squares and on. It's the simple path but I
just need to grab these, turn this part off, and
now it should work. So if I press T,
and there we go. This was messing it up. So it meant though just wasn't grabbing this part correctly. And now I just need to make
sure about these as well. So I'm just going to
come in. I'm going to grab all of these then. And then what I'm going to do, I'm going to grab this one, to and see that's
not worked out. Let's see if this one
does, T, that one has. Hopefully. Yeah, some of these
aren't working out right, and I'm wondering if it's worth me actually
messing around with them. Let's try This one. Let's try and grab
this one going all the way over to let's
see where it is. You know what? I'm not going to mess around
actually fixing those. It's a lot of work. And I don't think we're going
to get much from it. I don't think unless
we're going to be right up to you.
You know what? Let's actually come
in. Let's hide these. So shift, hide everything
else out of the way. And then what I'll do
is I'll press Shift H, hide everything out
the way, and now I can come in and actually grab these. So let's come in, grab
these. Press you. Wrap, and then ln over
here, and there we go. 90, like so. So we can fix them
doing it that way. We'll do the same thing
with this one as well. So you wrap t, spin it around, R, 90, make it a little bit smaller, like so, and there we go. Alright, so we fix those
in the end anyway. Okay, so let's press tag. Bring back everything,
double tap the A. Let's go over them to modeling. And then what we'll do
is we'll delete this out of the way so you can
see still got our curve, delete out of the way.
We don't leave that. Let's save that our work.
And then what we're going to do is put this
onto our rendered view. Let's have a look from the side. And there you go. Can see
that's looking pretty nice. Pretty nice, indeed, on there, and I think that let's have
a look from back here. Just that adding that little
bit extra onto there. And yeah, I'm happy with that. All right. So let's move
now round to our roof. And I think the first
thing we should do with this roof is we should actually pull these out a little bit. So I'm just going to go
over the top with seven. I'm going to press S and y
and just pull these out. Just a little bit, give me a little bit more room
to work with on here. From there, then what
I'm going to do is I'm going to pull this up. So what I'm going to do
is I'm going to come in. I'm going to press, like so. And then what I'm going
to do is pull it up. So, rotate it round. So Rx rotate it round. And then what I want
to do is control, bring in some edge loops, maybe five, and then
bring this down. So if I bring this down
now, not like the shop. We don't want it like
that. Let's try a root. See if we can do it with a root, bring it down in
some sort of shape. Now, this doesn't seem to be working, so you know
what I'm going to do. I'm actually going
to get rid of that. I'm going to come in. I'm going to bring my
curve in, so shifty. Go to make it much, much easier. Let's bring it into place. So I want it right in
the center up here. And how do I find the center? Let's see if I can
find a center point. So I want basically to be
right in the center of here. You can see these are
a little bit out, actually, and it wants to
be the center of the roof. So get two of these roof parts, grab this one and this one
shift cursor selected. He should put it roughly in
the middle of there for me. Then when I cans and grab this shift and selections
cursor, rotate it around. So x 90, make it a little
bit beefier, like so. And now let's get it into place. So we can see we're a
little bit out here. So let's put it into the center. Let's bring it into place, so we're going to
want it into place. So let's lift it
up a little bit. And I'm also thinking let's
put it a little bit closer. Like so. Now, let's deal
with the back of this first. So what I'm going to do is I'm going to grab the back of it, and I'm going to turn
off proportional so. And then what I'm going to do is I'm going to go to side view. I'm going to press E, pull
it out to maybe here. Now the thing is when
I'm pulling that out. I'm not pulling
it out correctly, pull it out here, and
then we'll do it again. So, y, pull it out. And then from there then we
should be able to bend it up, like so From there as well, we can press alternates and
we can then pull it out. Make it look a little
bit different. Alright, so that's that fit in. Now we want to do is we
want to bit that's going to go from here from
the top of here. We're going to have
another piece under here going all the way over to here. So basically, come round, coming round all the way down to here. So let's come in then. Let's say about our work first. Let's grab this
piece of wood now. We've already got
a cursor in there, so we've got a cursor
right in the center here. So let's press chip D, and
then Chip S selections cursor. And now we should be
able to move this part. No, we can't cause I've
done the same thing. So let's come back to this. Let's right click
the origin geometry. Shift D, and then Shift S
selections cursor. There we go. Now we've got it in
place. All right. So now, let's bring this
in to where we want it. So what I'm going to do is
I'm going to pull it down. It's going to start round
somewhere around here. First of all, though, it's
a little bit too fat, as you can see, for this bit. But we're obviously
going to pull it over and cut it a little bit, so I don't think we need to
worry about that right now. The main thing is,
we want to get it, so it's just like at
the front of there. So once we've got that
in, let's first of all, bring it over to the side and get it the
right kind of angle. So if I bring it
over to this side, you can see the angles a
little bit out on there, and that's the first
thing that I need to fix. So if I come in, I can
see now on top of it. I'm going to fix
that actual angle. I'm not going to
worry about sticking in where it shouldn't
be at the moment. So I'm just going
to bring it in, bring it down, bring
it over, like so. And then with this part, I just want to make sure that
this part is just in place. Like, so, just in
front of those towels. Now, from there, what
I want to do is, I want to bring it back, like so, so I want to
bring it all the way back. But it's stuck in place like so. And from there, then,
what I want to do is I also want to bend
it going this way. So if I now press control, bring in a few edge
loops, left click, right click, and then I'm
going to turn this off. I want to grab my middle one, and you can see here
this word looking at. Let's actually, you
know, we make it easier. Let's grab all of
these, including this. And then we'll just
press shift H, hide everything else
out of the way. And now we can really
see what we're doing. Let's put it on object mode. And now we can actually
see something. Now what we want to do is you
want to grab one of these, and then you just
want to come in, put your proportion editing on and pull it
back a little bit. So bring it in, bring it all the way out,
all the way out. And then what we want
to do is just slope it. Just gradually. Like so. So I'm just sloping
it as you can see. And then let's also bring
the front of it now. So can I slope the front bits? Let's come under. Let's
bring it out like so. And now you can see, it's
sloping This bit here, though, you can see
a little bit rough. You know what? We'll
just go back a minute. And before I actually
pull that out, we'll just go back to where
I actually pulled it out. So this part here, let's
try different ones. So let's try our spear
spear. Let's bring it in. You can see they
might wear this one. So let's try it out. We'll
pull it out, pull it out. Let's just slope
it a little bit, like so, and then let's
just bring it forward now. So bring the whole
thing forward. There we go into place like so. And now we can see we've got a nice slope going
down to there. All right. So that's
looking good. I've got it at the
kind of corner here. It's poking through there. It's coming out in the
place that I want it. And yeah, that's
looking quite nice now. Now, what I need to do, I'm
thinking this part here, probably, we'll put in another
piece of wood under there. The first thing though,
we'll cut this, and I think also we'll cut
this going this way as well. So if I press one, one
on the number pad or control one to go to the rear
view, press the tab bon. Hey, grab it, and then
what I want to do. I want to come in
with my bisect, and I'm just going
to cut it down here. So going at this angle like so. In fact, you know
what, we'll go at this angle because then
we'll go into the wood. So this angle like so, and then we'll clear the inner
or the outer. So like so. And then I'm going to press he and I'm going to
cut it down here as well.'ll mesh, bisect. Put it down here. Let's turn
it the other way this time. So let's also hit our fill. And then I'm just wondering
now if I can pull it down or pull it
back a little bit. So I can also change
the angle of it. So I might just change the angle and then
have it like this. Yeah, and I think that is looking just about
how I want it. All right, everyone. Let's
save about our work. And then the next one, we should be able to get this
actually finished. Alright, thanks,
everyone. Bye bye.
103. Reinforcing roof structure with wood beams: Welcome back, everyone to
Blender for Modeling and Jumpon workshop, and this is where we left off. So I think what we'll do now is we're just going to have
to press salt again, bring back this
piece of wood here. And then all I'm going
to do. Same thing again, shift drag it over. And then shift this and
selection to cursor keep offset. And then what I'm
going to do is I do want to window in this part. We need to build out these
parts going down here. We'll need a part
coming in here, and then joining
all this together, quite a complex actual built. So first of all, though, what we'll do is we'll
bring this out, we'll make it a
little bit smaller. So and head, let's
make it smaller first. And then what I'm going to do is I'm going to rotate it round. So x 90, let's rotate
it round into place, and then we're going to put
it just just in place here. Now, we can see that this
is still a little bit out. So let's put it over,
get it into place. And then what we'll
do with this. We can see that this
one, for some reason. Actually, bent. I don't know
why that's bent like that. So a look. See if
this over here, I press the dot
born is also bent. Let's go over the top seven. And yeah, this is
a little bit bent. I don't know how that happened. Maybe I came in and use the
randomize on it a little bit. But anyway, what I'm
going to do instead is, I will st Come in, and I'm thinking probably
make another one. So I'm just going
to press Shift desk as to selected Shift A, let's bring in a
plane, make the plane smaller with our portion
editing on, so make it smaller. And then what we're going
to do is just move it to the side and then press and
go straight down to bomb. So, pull it down
straight down to bomb So press the tab board, and now you can see,
it's got that bevel on. Let's come over then LP
selection, split it off, control A or transform, set origin to geometry.
And there we go. We can delete the other
one out the neck way. Before we do that
though, let's press two, This is called straight wood. So let's take that to control C. Let's then
delete it out the way, grab this one, F two, and then we'll call it is straight wood if
we can, like so. And then we'll press
M, and it's going to be in our preset. So primitives, this one
here. Let's put it in there. Shift D then, let's
duplicate it. Shift S, selections cursor keep offset, which
is over here now, so I need to put it back to
this part here. Shift S. Selections cursor. Shift S, elections cursor. So. All right. Now I need
to move it into place. Let's get it back into the center roughly
like so. All right. Let's start that again then. So son said, let's pull it down. Let's them rotate it round. So x 90. And then what we can
do is we can get it into place like so. Into the place just under here, making sure that all these
roof tiles are in there, so I'm just going to pull
it over a little bit over holding the
shift born like so. And then I'm just
going to press S and Z and pull it out a little
bit, so it fits into place. And then finally, what I
want to do is I want to pull it all the way back
into my actual wall, so make sure that
it's being pulled back properly, first of all, so into the wall like so, grab the front of it, and then
we can pull that bit out. Not so far. Just to
that point there. And then finally, I think now, These are going to fit in the
place absolutely perfectly. So now I can do is I can
come and do this side now. So if I grab this, shift, bring it down, And then
press R x 90 to go straight. And then what I'm
going to do is I'm gonna bring it down
to this point. And I want this now
to come down to here. So all I'm going to
do, I'm going to pull it back first of all
to the wall, like so. Then I'm going to
grab this part, pull it over into place, pull it down and over, and just make sure
that it's fitting in there utifly like so. So let's pull it down into
place. And there we go. Now, just make sure it's not sticking out through roof
tiles or anything like that. You can see that stuck
out a little bit. None of these roof tiles, make sure it's not
sticking in there. And now, finally, we can actually grab
this part once more. So shifty. Let's bring it down. And what I want to do now is
put two of these into place. So we'll have one like
here, so one here. Like so make sure, again, that it's not
going into my roof tiles. So, y, rotate it round. So you can see there's
nearly touching the wall. Let's put this on
normal. And here we go. And then we're going
to press it D, and then we're going
to bring it down. So there we go. Now, the next point is we want
to come to both of these. We should be able to grab both of these points
and pull them back. So pull one of them back. Make sure it's through
that wall, the wood, pull this next one back, make sure it's through the wood. Now, this part, we're
just going to pull it in, like so, and then this part, pull it in, like so. There we go. That is
actually quite easy. Now, the next part is
we need to pull now This part out. So this kind of, you know, where
it comes to here, so you can see this point here. We need to kind of
pull the edge of it out to bring it in
line with this. So all I'm going to do, I'm going to just grab
this bit here, so shift H, grab this bit, grab this part here. And of course, there's a lot of tiding up to do on this as well. We're going to press, y and pull it along this place here. And I've pressed
extruded already. I'm going to pull it out. And then what I'm going to do is I'm just going
to separate it, so I'm gonna grab this P
selection, separate it up. Grab it control or transform, set origins, geometry,
add in a few edge loops, so control bring in
a few edge loops, let it right click and
then finally press th and you should be left
with something like this. So now you can see
it's just there. And now we want to do is we
want to pull this into place. Now you can see at
the moment, it's still not in front of the tiles. So what I want to do
is I want to pull it, pull it, pull it. Just so it's in front
of there like so. Making sure it's not
sticking out anywhere. And now I want to do is just pull these back into the wood. So if I grab this one, I want to pull it all the way back into that wood along there. So if I pull this back
into there, into there. Just make sure you're pulling
it back with the green. So it's going back into place. And then what this
is going to do is, it's going to actually cover up the roof tiles on
the inside of that. So you can see now they're
all covered up like so. You can see now this is how
this shape that we've got. I've got everything in place, it's going to look really nice. We've got to start now putting
this over the other side. So what I'm going to do
is, I'm just going to grab each of these like so. I'm going to join them
together, so control. And then what I'm going to
do now is come to this one. I'm going to grab
the front of it, so just the front shift de, Cursor selected, grab this one, and then I'm going
to press right click and set origins
through a D cursor. And hopefully, hopefully,
we should be able to now put a mirror
onto the other side, double tap the A, and we should be left with
something like this. Now, we can see that we have a problem with these
parts of wood touching. So what we need to
do is maybe either stretch this out or a
one more block of wood. So let's try one more
block of wood first. So I'm going to press
Shift D, bring it down. And then what I'm
going to do is press S and X, bring it in. And then finally,
bring it back now. So grab the front of it, pull it back into
place, like so. Then we go, You know
what? I think I'll lose pull this back,
as well, like so. There we go. That's looking
really, really nice. Now, the main thing is, these roof tiles, so we need
to get these into place. So what I tend to do for this is I'll grab these two parts. Just these two roof parts. I'll press Shift H and hide everything else
out of the way. And if I now press three,
I can go inside view. Put this on, and now
I can actually see which roof tiles I need to delete and which
ones I need to keep. You can see I want all
my roof tiles kind of come up and just
up to this point. So what I'm going
to do, I'm going to come to these roof tiles first. I'm going to go down then with L. So I'm going to make
sure I'm in edge select, press the L button on them, and then work my way down. So I'm going to work
this one, this one, this one, and then I'll I'll
keep this one, I think. I'll delete this one. So we're going to delete all of these. Roof tiles going this way.
I'm going to keep this one. I'm going to delete that
one, keep this one. I think I'll keep that one as well, and I'll delete that one. So I'll delete all of those So, delete and ss and
now you can see, I've got exactly the
same thing on here. So I'm going to actually
press controls head, and what I'm going
to do now yours come round and I actually
do it on the other side. I'm just wondering
whether to do them both at the same time
or mirror them over. It might make it easier
doing it like that as well. So I think what I'll do
is I'll grab this one, press tab, press one, sorry, three on the number pad. And now, what I should
be able to do is press B and go
through all of these. You can also as well press C. And then what we can
do is we can just go down these roof tiles like
this into this last one. And then all I can do is press right click
and control plus. Now, when you use C, by the way, you can as
well if you press C, you can bring it out and
push it in middle mouse to minus and left click to
actually select things. So now we've got
all of those done. We can press delete and verts. And then we should be left
with something like this. You can see, I've got a
little point in here. So let's delete that
delete vertices and this is what we
should be left with. Let's turn this off
now, and there we go. Now you can see that these two roof tiles are
going all the way down. I've now got to
get them all into a point where they're
actually coming down here. Now, this is actually
not that hard because what you do is you come to let's say the first one. And what you're going
to do is you're going to line these parts up first. So you can see here,
I've got a problem. With all of these
actually joined in. In other words, not
join at the moment, if I grab this one, you can see that it's not
joined to that one. You can also see that
I've got a problem with some of these underneath here as well that I need to fix. And yeah, You know what?
Before we do that. Let's just go back. So
before we deleted them, and I'll do the easiest thing, which is to grab them all, mesh, and we'll go to clean
up merge by distance, and there we go 18,000
measures joined. Let's press tab, right click, shade auto smooth,
and there we go. Now, all those are joined now, I'm hoping that if I
do that again now, which is a bit of
messing around, but if I put this on, press
one to going into sorry, three to go inside
double tap the a, and now I should be able
to see what I'm doing. So we're going to
delete this one, going all the way down here. We're going to come in
and work our way of. Like, like so. Like so. And then everything in between. And now I should be
able to come in, press the cmound
and there you go, you can see, we've already
got those selected. And so let's do that
again. So three. Let's come in now with C, and I should be able to go
in and grab all of these. All of these over here, like so, growing up, and then this last one here, and then just press
control plus, and we should be to grab
them all, press delete, urs. And then we go, that's what
we should be left with. Now, let's have a look
what we're left with. And we can see now
we have a little bit of work to do on some of these. But basically, we need
to bring these out now, so we need to bring all of
these tiles, bring them out, you know, mix them up a little bit and just make
them come to the end of here, just overlapping this slightly, and then we'll have our roof. But while we're here, let's press tag, double tap
the e, And there you go. You can see what we've
actually got so far. You can see that's really
starting to be nice. Now, it's got a nice
kind of curve on there. And once we've put
these tiles in, then I'll be ready to go. Alright, everyone, so I hope you enjoyed that. I'll
see on the next one. Thanks a lot. Bye bye.
104. Manually moving roof tiles to conform to stylized shape of roof: Welcome back everyone
to blend form Modeling and Jumpon workshop, and this
is where we left the off. So let's reiterate them
what we actually did. So what we want to do here is we want to create
this nice move curve. Now, in the past, all I've
done is have gone down and basically cut this
away with the tiles. But I found nowadays that
it's actually easier to do it this way because it looks actually a little
bit more realistic, plus Even then got to go in and fill all the ends of the
tiles and things like that. So that's why I'm
doing it this way. So basal, what do
you want to do? You want to cut
enough tiles away. So you've got tiles peaking past here and they form this nice slope that
we've actually got. So how do we actually do that? So let's first of all,
go into this tile. Let's move it over
to where we want it. So let's put it
somewhere over here. Let's press S and y
and pull it over. So if I pull it over, so and
then all I'm going to do is I'm going to move these
tiles up and press S and y, and just keep
pulling them along. And yes, it's a little bit slow, but it's actually
really worth it in the long run because
you're going to get a really,
really nice result. So let's pull that
one over, like so. Now, the next one again, I will bring it up to
where I want it, like so, and we can do it
this way as well, where we just bring
them up and get that beautiful slope
before doing anything. And then all we're going to
do is fill these parts in. So I'm just going to bring
all of these up because I'll show you another way I
actually do this as well. Yours, keep bringing them up, yours to get that
slope in place. And we're nearly there now
all the way down here. And so, like so, and so, and there we go. So that's the nice slope that
we're actually looking for. And now what I'll do is
I'll fill in this part. So I grab one of them, shift, pull it over to this side
and put it in place. With ones are a little bit
smaller, so ones like this. Instead of doing that what I'll do is, I'll move them over, pull them out, put
them in place, and just keep making these
a little bit bigger. So make them a little bit, pull it into place.
Grab this one. And pull it out into place. So make sure there's not
too much of a gap there. So there is just and Y again, make it a little bit bigger, and then just keep moving
your way down. So I'm going to move this one. You can also as well with this, put it on material mode. It does make it easier
to actually see it. So you can see here this wood underneath as well where it's
actually poking through. We might need to actually
sort that out in a minute. But for this one, all I'm going to do
is just pull this one over here, grab this one. And then S and Y
and pull it out. And the same for this one. What I might do with this one
is just grab one of them. So grab one of them,
if D, pull it over, pull it into place,
and then press S and y and make it smaller, like so. So it just fits into place. And there you go, you can see what we're
actually doing here. And now with this one, we just need to make them
all a little bigger. This one's already big enough. So with something like that,
I'll actually grab this one, for instance, pull it out S and y and pull
it out, like so. And there we go, and what
we want is we don't want them to be too far away from
what the other ones are. With one like this, we'll
just grab this one. Shift D, pull it over. Hold in the shift born again, pull it into place, S and y, hold in the shift
borne, pull it out. This one, we can
grab this one here. Shift D. Pull it out, and then and y. Pull it in, like so.
This one is easy. Same thing again, pull
it a little bit over, and then S and y. And just work your way down, and this one is also
relatively easy as well. I'll pull this one
over, grab this one. Press S and Y, hold in the
shift born and pull it out. So. And then you go,
doesn't take longer at all. And now you can see
the result that we've got is really, really nice. So they're following all
those down there. Like so. And I really don't think that it's worth like
cutting these away. I think this is a much, much better way of doing it as long as you keep them within this range that
I've actually got. Alright. So now, let's
move on to the other side. So what I'm going to
do on the other side. I'll just grab both of
these press Shift H and that then we'll make
it easy to work with. And then from there, I can
also press control and three, and I've got a good view of what I'm actually
doing here now. So now I'll do is, I'll just go in and I'll do exactly
the same thing. So working my way along, I'll pull this one across. I'll pull this one across so it's actually
sometimes easier. You can see this one here. It's a little bit
too wide anyway, so I'm just going to
press S and y pull it across and grab this one. It's actually
easier sometimes if You do pull them all
across because it just lays it out for you
before you begin. And it's also easier if
you can actually copy a tile instead of pulling them out. So
just remember that. This one here is a
little bit too far, so I'm just going to press
S and Y, bring it in. Like so over there. Maybe a little touch
too far. Like so. And then the final one,
bring it over there. So. All right, moving
our way back then. I'm going to probably
bring this one in. So and Y, bring it in. Grab one over here. And then shift D, bring it over and make it a
little bit smaller, holding the shift bone. Like so. Then we go holding
Shift bone again. And this one here looks like it needs a completely new tile. So shift D, bring
it over into place. I don't want to make
that one bigger. It's already big enough. So I'll just pull this into
place, and, pull it out. This one here, we'll
grab this one. Shift D ring it over. And then S and y. And just make sure
you're using your shift borne a lot to actually
control these. Alright, with this one here, let's pull it into place there. S and y, pull it out, like so. And then what I'll do
is I'll move this one down because it's also a
big relatively big one. Move the more down to
here, grab this one, and then S Y hold in
the shift born again. Pull it into place, like so. Alright, this one here.
I think I grab this one. And I'm grabbing them
over here, of course, because they're different
size tiles over here. We don't want to do
the one next to it. Like let's make
this one smaller. Let's put it into place. Like so let's grab
one from over here. And there are also
different lengths when you grab them from over there as
well, which is what we want. So hold in shift borne. This one is relatively easy. Let's grab this one.
Shift D, bring it over. And then S and it hold in the
shift. Put it into place. This one here is a
little bit harder, so let's bring it over, and
let's bring another tile in, so grab this one, shifty, bring it over, make it smaller, S and y, hold in shift. So, this one is
relatively easy as well. We can just pull that over, pull this and this over,
can also do it that way. Grab this one then,
pull it in the middle and S and yHld in the shift one. As I said, we don't want
them to be too big, so we don't want
them actually huge. So I'm just going
to grab that one, make it a little bit smaller, pull it into place, grab
the one next to it. And then S and y,
pull it out, like so. And then finally, this one. So if I make this one
smaller, so S and y, put it into place, then I can just bring another
one in from here, shifty, bring it over. Bring it over, and then
S and y, pull it in. Like so. All right, then. So we did that actually
in one lesson. Let's press Alt and H,
bring back everything, and this is what
we've actually got. So if I double tap the A now, you can see this is
looking pretty nice. Now, what I want to do then is work on our way going down here. So what I'm going to do now? I just hide this out of the way. Like, so hide all of
this out of the way, and then I'm free to
work on this part. Now, for me, and let's put it
back on to, you know what? Let's do this part first. So we've not got
this part done yet. Everything's looking
nice in there. We've got some tiles
coming through here, as you can see, and
we don't want that. For some reason, on this side, this one on here
hasn't been wrap. So let's actually
saw that out first. So we'll grab this.
We'll press you on wrap. And then what we'll do is
we'll put on our material. So if I grab this,
put it on planks, for instance, let's put that on. Make sure they're
going the right way. You can see at the moment, these ones are going
the wrong way. They should really
be going that way. So let's go to our UV
editing a 90 spin it round. Press the dot one to zoom
in and then move around. And then all I'm
going to do now is just check for the
tiles coming through. You can see it's only on this, one way they're coming through, and it's because it
hasn't got that thing on. It hasn't got the
part on there yet. So you can see it's
only on this part here. What I'm going to
do is I'm going to mirror this over
the other side. So hopefully, I've still
got this in the middle. So what I'll do is right
click Set origin, two, three D cursor,
adding a modifier, and then we're just going
to generate a mirror. And hopefully, it should
be over the other side, like so, and now we
can't see anything. Let's apply that then, so
we'll apply the mirror. Come to this one, then, L, and then just press G
just to move it round, so it's a little
bit different from the other side. And there we go. Now, finally, let's
grab this one. We need to turn it
then into mesh. Now, before we do that, let's
just check the resolution, so it's on six, so
that's absolutely fine. Now, what did we want
to do with this part? Do we want this to be kind
of coming round as well? Let's actually do that
while we're here. So I'll just go back
to modeling quickly, press a little dot born and then zoom out so I can see
what I'm actually doing. So. And then what
I want to do is, I want to bring this
out a little bit. So if I pull this back to here, press and y and pull
it out to here, and I might be able to then from there, you bend it round. Now, you can see, I
do have a problem. So what I'm going to do is. I'm just going to
bring it to there. Press and y, pull it out again. And now I should be able
to bend it round. Like so. And I think that's looking
pretty nice like that. And I'm just wondering if I should carry on bending
it round as well. So I'm just going to press enter and pull it down. Like so. And then, pull it down, and then start pulling it back. Like so, making the
next curve on there. Let's have a look at
what that looks like. You know what, I think that
actually looks pretty good. I'm just then going to
play around with pressing altern and seeing if I can pull it out in
any way or bring it in. So you can see
lens brings it in, like so, or if I want to
bring it in on the other way. I can also do that.
So let's do that. We'll leave it
like that for now. What we'll do then is
come up to object, convert to mesh, and then now I should
be able to come in. 1 second, 1 second. Before I do that,
before I do that, I need to press controls there. There we go. Okay.
Before I do that, I've actually got
a bevel on here. Let's take the vel
off because that'll make it much much harder. Now we can go to object, convert to mesh, and now
finally, let's bring it in. So if I come in,
do this part here, put it onto smooth. And then if I press
alterns I can bring it in. As you can see,
let's bring it in. Not that far. Press lens again. There we go. We want
to bring it in, but I don't think
we want to bring it on there. Let's
try the sharp. Let's press alternS and
bring it in, like so. And does that look in bare? No, it doesn't. Let's
try the other way. So S and X. Let's try bringing
it in that way. And it is a sharp on there. Does it look bare? Nope.
So let's try another one. Let's try the root,
so we'll try S and X. And there we go, now we're
bringing it in the right way. Alright, that is looking better. I think I'm happy with that. So then what we'll do is
finally, A, smart project. Click Okay. And
then what I'll do is I'll add in now my material, which will be planks. Like, so. And then all we need to do on the next lesson is
one, bevel it off. Two. We've got an
actual join here. As you can see, we don't
actually want that. Let's add in the bevel
while we're here, so we'll put it on
point, naught three. Like so. And as I said, then, on the next lesson, we'll
get this all fixed. All right, everyone, so
I hope you enjoyed that. I'll see on the next one.
Thanks a lot. Bye bye.
105. Working with wood beams for the wall: Welcome back to one to
blend the four Modeling. I'm John hind workshop, and
this is where we left off. Now, let's come and actually rap. Then there's
the proper way. So what I'm going to do is, I'm just going to grab it going
all the way around there, press you wrap, and then
hide that out the way. Then I'm going to
come to the inside. So I'm going to
grab this one here, going all the way
back to, in fact, you know, what we'll
grab it from here, going all the way back to there. Press, on rap, hide
it out of the way. Now we can just
grab both of these, press A, on rap.
And there we go. Now, let's actually fix
these. So what I'm gonna do? I'm going to come in
to my UV editing. Where is it? There it is. And then what I'm going
to do is press tab, AlternH, bring back everything. And then what I'll do
is I'll press A S, bring them out a little bit
without portion alerting on. Press S. Grab this one first. So L, G, move it
over here, Alter, and it should straight
up 90, spin it round. And then the same on this one. So L. Make sure
you move it first, because sometimes because
it's attached to another one, it sometimes just takes
them both together, so all T. And then let's
grab one of these. So I'm going to grab this
one here, hopefully. So G. There we go. Now, let's see what that
actually looks like. You can see now it's
looking much much better than where
it was. All right. So let's come on to modeling.
Let's double tap the A. And now, And what we want to do is we want to build
this part going down, and then we want to
put our wall on there. So again, let's come in and
grab our piece of wood. Let's press shift D. And
I just want to make sure, this is the piece of wood
that I created again, so you can see it's
nice and straight. But what I'll do now, I'm just looking at the other parts. So we can see here,
for instance, all of these, they're the
ones that have all been bent. I'm going to put out
an object mode just so you can see a little bit
better what I'm doing. And now what I'm going
to do is I want to bring this part up to just under here, so I'm going to
bring it to here. Now, we have to think when we're building things like this, that we don't want to, you know, have a plank of wood that's going to come all the way up to the top because it's
just not realistic. First of all, it would be
a massive tree to do that. And second of all,
cutting it to be, you know, this long would
also be extremely difficult. So what I tend to
do is take that into my mind when I'm
actually doing this. What I'll do is
I'll press shift. I'll bring it over to
this side then, so. And then what I'm going to do is make another one. So shift. Bring it over and then R Y, 90 and bring it up into place. I'm just going to put it, do the top of here just
so it's over there, and then also just make sure that it's coming
over this as well. Now, these might be a
little bit too far out. So what I'm going to
do is just drop these back instead of this
top one here, light. Now, let's pull this one
out a little bit as well. So I'm just going
to grab this end. Pull it out, making sure
I'm going along there. Just to the edge, so
this part is poking out. And I want to do we
actually want to probably bring this up a
little bit in line with this. So if I press control and one, so to go to the back,
and what I'm going to do is I'm just going
to uneven it up. So I'm going to lift it
just above this line here, and then you can see it's
a little bit uneven, grab both of these
grab the tops of them. And then all I'm going
to do is just pull them up again into
place like so. Now what I want to do using the same ones is I'm just
going to press shift D first. I'll bring them both up
onto the bottom of there, and then I want to put
these into place now. Now we can see that they're
probably going to have to sit back a little bit to
actually go into place. So let's just grab
one of them first. In fact, you know what,
we'll grab both of them and see if they actually go
into place and you know what? Okay. They've actually go
into place very, very nicely. Just want to make
sure like here, you can see that they're
not poking through. So you can see the poking
through a little bit. Now, I thought
this might happen. So what I'm going to do
is I'm just going to bring them down a
little bit there. And then what I'm
going to do is I'm going to look at the edges, so you can see this one's nicely in place. Let's
look at that one. It's just in place. So
that'll be absolutely fine. You can see this
one is under here, so we can see this one's also nearly under here. So I'm
not happy with this one. So what I'm going to do is,
I'm just going to come in. We grab the edge of this one, and then I'm just going
to pull it down into place so it fits
much, much better. And then the next thing I
want to do is pull these back a little bit because you can see this isn't going
to work like this. So I'm just going
to grab this one. I'm going to then pull it back. So it's in front
of this one here. Now, the problem we
might have is they might be a little bit thin,
you know, on this end. We might want to
think about pulling these out to make them
a little bit thicker. But, you know what? I'm
going to leave that there. Just going to have a look. I'm going to come around
to this front one. And the funny thing
is the front one is looking much much better. You know why? I'm going to leave that there
because I'm going to put a piece of wood in here as
well, and in the other side. So I'll check out
what that looks like. So shifty x 90, and then y, pull it in, and then let's just put it
into place where it's going to go and we'll put it going
into here, like so. And then what we'll do
is we'll pull it out out out. And then up. And there we go,
we're hiding that then out of the way like so. And then all I want to
do is pull it back, making sure it's
back below there. And now you can see
that's fitting into much, much better place, double
tap the A, like so. All right, I'm happy
with that part. Now, let's move to
this part because we will be able to see this part
from a certain position, so we want to make
sure it's right. So shift D, pull it out. Red, like so. Pull it into place in front of there like so, and you can see now because
of how we've done it, we should be able to
now pull this one back a little bit like so, hiding all that part
out of the way. And then I probably think I will pull this
back a little bit. So you can see at the moment. This one's right in here,
this one's over here, so I'll just grab
the whole thing. You're also going to move it to the side, it's
going up like that. And then I'm going to grab
this bottom part here. So this part here,
pull it up into place. And then finally, I'll
pull this back now. So this one here, You're
going to pull back. And again, it's just
fiddling around with it to get it
to how we want it. So pull it back into place. So, double tap the
A. There we go. That's looking good as well. So all that now
it's looking good. So now let's actually start
work on the next one up. So what I'll do is I'll grab. I'm looking out far the
go back, so that's fine. So what I'll do is
I'll press sift D, and I'll bring this one
up right to the bottom. So right to the bottom of here, like so, and then I'm going
to pull it back into place. And finally, then
I'll press S and X, and pull it in, just so it's not touching those edges on
the outside, like so. Then what I'll do is
I'll press Shift D. I'll bring it down to
the next part, like so. And there we go. And now, let's actually create
this part here. So what I'm going to do is I want maybe three
or four of them. I also want a window in here as well. So
I'll do that now. I'll go to file and save. And the window I want to put
in is a little square one. So this one here.
I'm going to press shift D. Bring it out, Z hundred and 80,
spin it around. Then let's press control on one, and let's press G and move it into the place
where I want it. So I want it something
in the middle of there, like so, and let's just
pull it back a little bit. And I also want in this one the light or a light
hanging from here, going over the top of it to
make it really, really nice. From here, then what
I'm going to do? I'm going to grab
this one. I'm going to press Shift S
coast to selected. And then we're going
to press right click actually set
origin to geometry. Then shift Desk coast selected. Now we've got it in the center. Shift A, let's bring in a cube. So I'll bring in a cube, press the S bond to
make it smaller. And all I want to do then is press S and X and pull
it out a little bit. And let's put it over here. So, let's make it much, much smaller than just so it's fitting around there, like so. And then what we'll
do is we'll just put another bit coming
down into here. So what I'm going to do
is I'm going to press the eye button at the
bottom of here for insert. So, insert, and then I'm going to press and pull
it down into place. And then finally, all I'm
going to do is just grab this edge and pull it
back into place like so. And now you can see it looks like it's a support structure. On the wood, like so. All right. Control one again. And then all I'm going
to do is press Shift D, bring it over to this side, press shift again,
bring it to the center, like so. And then we go. Now, let's work
our way down then. So I'm going to
grab this one here. I'm going to press Shift
D. I'm going to spin it around with Rx 90,
and you can see here. One of the main problems is, if I bring it up, I can
press control A, transform, set origin, T geometry, R, y, 90, spin it around. And then I'm going to
pull it back into place. I'm going to press S and Z
to make it a lot thinner. So let's get it into the place
where we want it S and Z. And then what I'm
going to do now is I'm going to pull
it back first of all, us it's in there, like so, and then I'll make this
one a little bit wider. So S and X, pull it out, make it
a little bit wider. Making the wood look a bit different from this
one down here. And then shifting D Like, so, let's grab this one again. Control or transom,
origin to geometry, and then shift D y 90. And this one then is going to be right in the center up here. So I'm going to put it
right in the center. I'm going to press sens edge, spring it down a little bit, pull it back into place
like so, and there we go. And now we just want
these parts on here. So shift D, bring it over. And then I'm going to press send because always when
you rotate it, you're going to lose a
little bit of length. So then I'm going
to press art and y, and you can see
what I mean there. We've actually lost
some of the length. Now, what we want to do is we want to actually
place it from here, going up into this point here. Do going to put it
into place into there. I'm going to then pull it back. Like, so, making sure
that it's all in there. And then finally all I want
to do is move this one over. So if I grab this one here, Jaws to the bond, press
control one again, and now I should be able to a come out and pull it into
place where I want it, which I'll be there, like so. Press the tab, double tap
the A. And there we go. That's all in place now. And then finally, let's put this over this
side before finishing. So Shift D, bring it
over to this side. As 180, spin it round. And then let's just pull it to get it into place
where we actually want it, which will be like this. Alright, so we made very,
very short work of this. I think on the next one then, we will have another piece
that I'll go over here. We will probably have a piece that's gonna connect
these in some way, but I think what it'll
be is underneath, so I'll be going
underneath here, like so, and I think we might
have one more piece that's gonna come down here
just to finish this off. Alright, everyone, so I
hope you enjoyed that, and I'll see on the next
one. Thanks a lot. Bye bye.
106. Final Touches to Framework: Welcome back and
Penfor Modeling and junction of workshop
in this left off. Okay, so let's grab this one. Let's press Shift D, 90. Let's pull this one
out into place. Let's press S and y and
pull it in, like so. And then what we'll
do is we'll pull it into place over here, and then back like so, and have that follow around. And now, the next one
we'll bring down. So Shift D, we'll use the same one or the same
scale, should I say. And then what we're
going to do is we want to place this underneath here. I'm going to pull it all the
way back then into place. I'm going to actually
pull it out. Maybe I can pull it out. Let's see how far it can
get to pull it out so you can see, Not much distance. So I think I'll
leave it like that. Actually, I'll pull
it into place. And then what I'll do
is I'll grab this end. I'll pull this end out
to there, like so. And then finally, what
I'll do is I'll press D x this time 90,
spin it around. You can see there it
came really weird. So let's first of
all press control, la or transform, set
origin to geometry, and then r x 90, and now it should be
right in the center. That's what we
want. Pull it down. S and Z, pull it up into place, like so, and then finally just
drop it back a little bit. So double tap the
A, and there we go. All right, so this bit is
actually finished now. It's looking very nice. Before we actually have a look and see what
it looks like. Let's come in there and grab all of these parts on Jaws
is going to put it on. So all of these parts are done. You can see these are the
parts that aren't done. All of these parts
here, basically, Jaws looking at the sides
as well. Are they done? I don't think they are. I don't think any of this
is actually done. So all I'm going to do is I'm
going to grab all of this. I'm just wondering, I'll
grab these as well. I'll grab all of this
going down, same as this. Same as all these parts
that I've picked. Like so. Like so. Like so. Then just
whip my way up. And so. And then finally, I'm just going to press Conrog join them all together, like so. Now, if I hide
those out the way, you will see that we've got everything there making
sure we've got everything. You can see also,
I think I've I've not got these structures
that look at these as well. You're making sure
they're in there. It's a bit hard to see
as well at the moment. In this view. Let's
press control, not tat. We'll bring back all
of that. And then what we'll do now
is we'll press tab, and we'll go in and I
think first of all, I'm just wondering whether
we wrap them first. I think we will. So what
we'll do is we'll press. Smart UV project, click Okay. We'll also just make sure for press object that all
the bevels are on. You can see all the
bevels are on there. You can see like so. And then what we'll do is we'll
just put it back on here, come down then to materials, and then we just want to put
it on plank, so planks so. Then we go there looking
very, very nice. And then finally, what
we want to do now, is come in and add
in some edge loop. So, left click, right
click, like we did before, really, really simple technique
to get them looking very, very nice, like so and
looking a little bit, you know, damaged, weathered, whatever you want to call it. You know exactly what
we're trying to do. So we'll just bring those in. Even if the edge loops go at angle, it doesn't really matter. Like so. And you
know what I'll do? I'll put this on object
because then you're able to see which ones have
done and which ones I haven't So so like so, and like so, and
we'll also then come. I'm going to leave these
ones the way they are. I'm going to press control
on this one, bring in two. And then what I'll
do is I'll grab all of them, come to mesh, transform and randomize,
and then I'll just turn this down to
something like 0.2, I think we'll do it,
something like that. Is have a look at
that and there we go. And then we'll just put it
onto material mode first. Double tap the A, make sure that we're
actually happy with it. And now, finally, what
we'll do is we'll come save out our work, save
out your work first. Let's put it on rendered view. Let it load up. And there we go. Now you can see just
down nicely up. You can see they're a
little bit wavy as well. That's exactly what
we want. Make them look cold and fashioned
and things like that. We're also looking to make sure our roofs not sticking
through there or anything. You know what? This is
looking pretty good. Now what we want to do is we want to go back
to object mode, and we want to split off
this as you can see here, because we're not going to
need we are going to need. I'm just looking
at the parts that were not. Certainly
this part here. If I press shift h, you can see this is
what we're left with. We definitely don't
need this part in here. So, you know what, we'll actually come in
and delete this, I'll press control plus. Elite and vertices and
delete that out the way. I can also, I think, get
rid of these parts here. So, let's press
delete and faces. And then what I'm
going to do is press Altag bring back everything, double tap the A, and now you can see this is
what we're left with. So you can see it does go through all the
way through there. It goes through
here. We've already done this part in here. We put it onto material mode. You'll see that this one's already been done,
so that's fine. So it's literally just
these parts here. Now, the thing is, we
probably want to get away with unwrapping
these two separately. So what I'll do is actually, I'm just going to
come in and press A, Unwrap. They should
wrap pretty nicely. If I go to UV editing. You can see now they've
unwrapped pretty nicely. A, make it a little bit bigger because it's
a huge part of this. And then what we'll
do is we'll come in, change this to the wall like so, and then let's come round and actually have a look at what
we've actually done there. You can see we've got an issue here in the young wrap.
Let's have a look. Yeah, where it's
actually gone back over, so let's press G, bring it down. You can see we've got a
bit of a splitting then. And this is what I was worried that would actually happen. So what they'll do
is I will come in. And I'll bring this part down. So if I press shift base
part, bring in the move tool, I'm going to bring this
part down then to there. And then what I'll do is
I'll bring this part down. Yeah, I can't really
bring this part down. So I'm just going to bring
in another edge loop. So control, bring it up and put it into place
there, like so. And I'm just splitting it off basis while I'm doing
so. Shift and click. I'm going to see if I
can bring that part down without doing any
damage to anything else. So you can see here. I'm going to bring it
down into place like so. And now I'm going to do
instead of doing that. I'm going to grab
this one on rap so, make it a little bit
smaller this time. And then what I'm going
to do is grab this one, this one and this
one, press on rap. Like so. Let's have
a look at that now. You've got a bit of
dirt over there. That's actually
looking pretty nice. And then finally, I'll grab
both of these, press on rap. Put those into place like so. And yeah, that's looking
much much better now. Let's have one final look
then on the rendered view. Like, so, and there we go. Dad is looking
really, really nice. And you can see, even
though it's a plain wall, we've managed to actually create it where it's actually
not a plain wall anymore, and it actually
looks interesting. If you look from this view here, every single part of
this looks interesting, and that's what you're
actually trying to aim for. Even at the bottom,
we're going to put some stones down there
to make it to really, really bring this scene to life. And that's the way
that you do it. You just look for parts
where it's a bit empty and you make sure that you've actually filled
them up with space. Now, you can see on
here. Maybe on here would be really nice to have some cracks going down there. That would probably look nice, but you can see
everywhere looks busy and it looks natural
and it looks alive. And that's really what we're trying to do when we
look at our composites. So from this point of view, you can see now it just looks so interesting and it
looks as though, you know, it's really been
professionally built. Alright, so now enough of that. What we'll do now is come in. And what I want to do is I actually want to start work then on my actual IV generator. So what I want to do is I'm just going to I don't actually think I've
got an IV generator. So what I'm going to do
is. I'm just going to press Shift A. In
fact, you know what? I'll shift right click Shift A. And then what I'll do is
I'll bring in a curve. We'll bring in a
bezier just for now. We'll go over then to
our asset manager, which is over here, and the
one we're looking for is IV. So the IV node let's
zoom out a little bit. And what I'm going to
do is put the IV node. Onto here, like so. Now, you can see at the moment, we've not got the collection. So I really want to
bring in my collection. I don't think it's brought
in the collection. I'm just looking for it. I'm going to look for IV leaves in here to see if it's there. And if not, we'll
just have to come. Yeah, it's just V node. So we'll have to bring
in the leaves and drop those into their
own collection. So I'm just going
to minus that off, and I'll show you actually
how this is going to work because it is
good if you know, if you know actually
how to work it. At the moment, you can
see that we've just got our actual stem on here. And yeah, we need our
ivy leaves in there. So let's come over to modeling. And then what we'll
do now is go back into the resource pack
and open that up. So here we are in the resource
pack. Here is our IV. And the easiest way to do
this actually is just grab your IV with control C. And then what you want
to do is put that down, come back to here, and then you're just going
to press control. And what that's
going to do is it's not only going to
bring all the IV in, so I can delete this
one out the way, but it's also as
well going to bring all of the collections
of these leaves. If I go on here now, put it onto material, you will see now,
that we've got all of these actual fire press do it will mean I can
actually zoom around there. So you can see now,
fi double tap the A, this is what it's going to
look like at the moment. Now, of course, we need to
do a lot of work on here. These are nowhere near big
enough for the moment, but we can see if we come over to our geometry node that it's under the
collection of leaves. And if we go down here, we should have one
that says leaves, let's have a look where
we've actually put that. Maybe it's going into the
ground plane. There we go. We've got our leaves
here, as you can see. If I close that, you can see
all my leaves are in here. Let's bring it out
and put it in there. It should still stay the same. So this is based on
collections, as you can see. And now that we've
brought our leaves in, now we've actually got
all of this in here. Now, we just need
to change it over, because at the moment, We can see our leaves
or all of these, and we only want the red one. It's up to you which
one you want to pick. You can actually turn
these on and off, or you can let them
out of the way. I think actually we
can't turn them on off. Let's have. Yeah, I don't
think we can do that. So what we'll do is on the
next less and I'll show you properly how to actually
use these leaves. I'll split these up maybe, put them in a different one. And then you can
actually see leaves one leaves two, leaves
three leaves four. First of all, though before we do that on the next lesson, we'll actually get this into shape with the scale
of the actual leaves, and now actual full
it actually is. All right, everyone,
hope you enjoyed that. I'll see you on the next
one. Thanks a lot. Bye bye.
107. Making use out of ivy geometry node to grow foliage on tower: Welcome Microphone to
Penfor modeling and Geometry node workshop, and
this is where we left off. Now, this one, if we jump
over to our geometry nodes, you will see, it's actually
rather a simple node. There are some
technical parts to it. But if you actually want
to start creating nodes, I recommend starting
with either the chain or this actual IV
geometry node because it's going to be much
easier to understand. Now what I'm going
to do is, I'm just going to go back to modeling, and we're going to talk
about these leaves then that are actually in here. So what I'm going to do is
I'm going to come over. And if I grab this
one and press M, I can make a new collection
and call it leaves. One, and then you can
come to this one. New collection leaves two. And then this one
and then press M and new collection leaves
three, Enter Enter. And then the final one, which will be leaves four, new collection leaves. Four, like so. Okay. And there we go. Got
no leaves on there now. Now we can come
back to this part, and what we can do instead now is we can come down
to our collection, so you can see our
collections is leaves. That now we can actually delete. We don't
actually need that. We can see all of our
leaves are down here now. So down here, we can
close all these up. And there you go, you
can see we've got leaves, one, two,
three, and four. And now what you can do
is you can go to the ID. Come down and put
it on leaves one. Put it on leaves two, for instance, leaves three. Our leaves four, like so. And now you can see how it actually works. Now,
think for this one. I'm going to put it
on leaves three. I like the red, and
I think it suits this actual type of building. And now what we want
to do before we actually do anything else, we really want to put it onto our actual building and see
what it actually looks like. And from there, then
we can decide how thick we want all of
this stuff to do to be, and I can actually go
through all of these parts. Alright, so now we've done that, Let me show you how
to use this then. So what I'm going
to do, first of all, I'm going to come in. I'm going to press
the tab button. And what I want to
do is come over to this left and side and you've
got one that says draw, and you want to make
sure it's actually on the surface of whatever
you're drawing on. And now, if I come over
and I just start here, and I start drawing
out, like so, you will see that it
actually starts to add the IV onto our
actual surface. Now, you will also see.
The problem we've got is that this is nowhere near big enough, and
this is why I said, put it on the building
first, and then from there, you'll be able to see
how it's going to stick out and all that
sort of good stuff. So what I'm going to do
now is come down and actually have a look at how
this is going to be out. Now, the other thing
is, don't forget, once you've actually
put it on here, you're still free to
come and pull these out. So I can still come and
pull these out like so. And I recommend before actually doing anything, just pull
them out a little bit, especially on this one,
because you're going to have a real idea of what it's
actually going to look like. I'm just going to
pull these out, like so, especially
going up to this one. So you can see here it's
going to come round here. I'm going to pull
this one out then, so it's going round here. I'm going to then
work my way around. So if I press, I can see
all where these are, and you can see I can
pull this one out. Like, so I can pull this
one out then. Like so. And finally, then I can come
up to this one, pull it out. Like so. And then finally,
I think it's this one. Let's pull this one out as well. Like, so maybe a
little bit more, but we'll see as we
actually build this up. Alright, let's come
back then to this part. Now, at the moment,
you can see that we can change but double tap the A. You can see I can change
the size of my leaves. So let's change the
scale of my leaves. I can bring them up, so now you can see that we're actually starting
to get somewhere, and now it's starting
to look much much bare. Now, the scale falloff is
basically coming up to here, and you can see how it
falls off and here. This is way way too
much of the moment. So let's bring
this down like so, and now you can see we've
got a little bit of falloff. The next thing is, we've
got the scale randomness. We can turn this up and
have these leaves much, much more random, like so. And then finally, now, we can actually look
at the density. At the moment, I feel like
the leaves are really, really dense and packed together in a way that
I'm not sure that I want. I'm just going to try this on five and have a look at that. And now you can see the
much, much less dense. And we'll mess around with
the density once we've actually got these into place because we want
to make it really, really interesting. All right. The next thing then is we've got the resolution of the stem. Now, you could see with
my stem over here. It's a little bit blocky,
as you can see here. If I turn up the resolution, you can see that it gets
actually smoothed off. So now we'll have more
resolution actually in the stem. The other thing about
the stem is the profile. And at the moment,
it's got eight, we can turn that up as well. Let's turn, first
of all the radius up so so we can actually
see what we're doing so. We're going to hold the ship
born and we're going to turn it up a little bit like so. And then we've also got
the radius falloff, which is the radius
falloff going up here. And I think that's
absolutely fine at the moment. Okay, so now, We're happy, let's say
with what we've got. Let's have a look with
it on our rendered view. So let's have a
quick look at what that's going to look like,
and you can see already, we're probably going
to have to turn up what's it called actual
density of these leaves. But before we do
that, let's actually now have it going around the place that we
actually want it. So we'll start down
here and we'll start moving it around here and
we'll go over this again. So all I'm going to do, I'm going to come in, grab it all, press delete, and
then delete vertices. And then what I'm going
to do now is come in on material mode
and add these in. So in fact, you know what, we'll do it on object mode. I think it'll be easier to see. But what I'm going to
do now is going to come into the draw, which
is this one here. And then what I'm
going to do now is actually start
drawing from here. So I'll start from here. I'll then start working
my way around here, and then I'll start
working my way up here. And you notice I'm
actually doing this in chunks because
I think it's much, much better to do it
in chunks like this, so like this and like this, and I'll have it coming
all the way from here. And what I'm also trying to
do is make it realistic. So they would kind of come from a certain
point, all of them. Coming up to the
things. Like that. And then what I'm going to do is bring it all the way over here, like so and from here. Like, so, and I'll have it also kind of going
over the roof here. So we'll have it
going all the way over here coming out to here. And then I think I'll
have another one coming out onto
the roof at least, and then another one
coming up to here. And then just working
my way along. So I'm going to have it coming
from, let's say over here. Here, like so and then here. And then it might even have a little bit come in
under these parts. Now, the problem coming
under these parts, you can see it gets
a little bit messy. So I think I'll just press tab and hide this out
the way a minute. Let's hide it.
Hopefully, the way. Let's actually have
a look at that I think there's
actually two on there. Yes, there's two on
there for some reason. I I press g see here. Let's
actually have a look. Here, you can see that
this one here has this. And this one here has this, so we can see that we've
got two parts here. What I'm going to do
just put that back. Just going to come in then
to this part, so selection. And then what I'm
going to do now is come to this part and I should be able to actually come and
actually split that off. So I'm going to come lit it off. So I'll grab this part, L and L. And P selection, and there we go, and now
we're going to move this. Should this one. Should come off on its own. I don't know why actually
that was like that, but anyway, it's a good
job. I noticed it. I'll press delete,
delete out of the way, and then I can come in and hide this one out of
the way, like so. All right. So now
back to our IV. Let's draw on more like so. And I think actually, we'll have it going all
the way up here. So under these steps as well. I think we'll look very nice. So I'm just going to press tab. I'm thinking, we'll do
it from here to here, and then from here,
going up to, like so. All right, that's looking
pretty cool like that. And then what we'll
do now is we'll actually come in and have a look what we've actually done. So let's put it on
to rendered view. Let it load up,
double tap the A. And there we go. That's looking pretty nice. Now, the one thing we can see is that we do need a lot
more density on here. So I'm going to put this on ten. Density up a little
bit, like so. And the other thing
is, wondering whether I need to
pull it out anywhere, or if I'm actually happy
with out that look, so it's going all the way up
there, all the way up there. All the way up there, like so. And I'm thinking that I'm
probably going to come in now and pull out the bits
that I'm not happy with. So if you can see
I come into these. I'm going to put proportional
editing on on smooth. And then all I'm going to do is I'm just going to
pull these out, bringing this out a little bit, like so and you can see
it brings it all out. And now that's looking much
much better as you can see. Let's do the same thing
then with this as well. We'll do the same thing, so we'll start
pulling it all out. Right, so that was the handle,
by the way I had there. That's why it's not
working properly. Let's grab this one. That's the center
of it. There we go. And then let's have a look
at this side. You know what? I think I'm happy
with this side. Now, one thing I want to do is you can see in
the middle of here, so you can see the
ivy stem on here. I think I want to make
it a little bit darker. It's a little bit too
light at the moment. So I definitely want to
make it a bit darker. So let's come up and save
out our work, first of all. Then what we'll do is we'll
go over to our shading panel. And the one we want
is the Ivy stem. So I want to do a little bit of work actually on my Ivy stem, just to make it look a
little bit better than this. And this is the point
where on the next lesson, we're going to jump
in, and we're going to actually create
an actual shader. Alright, everyone, so I hope you enjoyed that, and I'll
see on the next one. Thanks a lot. Bye bye.
108. Creating Ivy Root material shader: Welcome back everyone to
plentiful modeling and jump you node workshop, and
this is where we left off. So let's now pull this
down a little bit. Let's go round to our IV. So I'm Jaws go to zoom in to my IV, get a good view of it. Let's put it on
rendered view because then we'll be to see
much, much better. Let's double tap the A, and now let's actually
create our IV. So the first one I
want to bring in is I want to have some sort of, you know, kind of,
noise on there. At the moment it's too straight and gray, and it just
doesn't look right. So what we're going to do is we're going to press Shift A. We're going to
bring in a search, and we're going
to look for wave, and we're going to
look for wave texture. Now, this is part of
the noise texture. If you press Shift A
and you go down to, let me just find where
the shaders are. So I'm looking for, I think
that's this is the one. So you can see here
within this one, we have a fairly few
amount of noise textures. So we've got gradient textures, and all of these ones
basically affect how the actual shader is applied to the actual
mesh. All right. So now we've got
our noise shader, If I plug this then
straight into here, like so, you will see
not a lot happens because we need something to tell it where to put
all of these things. So what I'm going to do is
I'm going to pre shift A, and I'm going to bring
in a color ramp. So color. Ramp, so drop that in this
isn't doing anything. And the reason is because
this is called IV stem O one. So let's go over
and make sure we're first of all on IV stem. O one. So IV stem one. And there we go. Now we've actually got something working. So you can see at the moment, if I bring these up, we can make them darker. So we've got this
kind of pattern now. So we've got something
actually working there. So what I'm going to do now I'm just going to come
over to my wave texture. I'm going to zoom in a little bit more so you can
see what I'm doing. And what I'm going
to do, first of all, is I'm going to put
this on the Z axis. So that means it's going
to just turn these around so they're going
to different axis. That's all that this does.
So it's basically making the bands go around
each of these. The next thing I'm going
to do is I'm going to change it from bands to rings, and then you'll end
up with more kind of more things like rings
rather than big rubber bands, for instance, think
of it that way. The next of all I'm going
to change this to 150. So we're going to change
the scale to 150 like. So, Then what we're
going to do is we're going to change the distortion because
at the moment, they'll look like snakes, and
we don't really want that. So let's put this on 24. Now, what I'm going
to do is I'm going to come in and change the detail. So we'll change
the detail to 3.6. You can see now we're actually
starting to get somewhere. So what does this detail do? You can see it just
adds more detail or blows it out more. So 3.6. Let's say the change the detail scale to
1.8. And there we go. And then let's change this
detail roughness to 0.6. And finally, then,
let's change the No, we won't won't change
the phase off. I think, actually, we've
nearly got it right. We want to do is we
want to basically alter the actual color. So I'm going to drop
my black down just to the start of this bar
here, like you see here. And what I'm going to
do is I'm going to put this on a nice brown color. So first of all, it
will be all black, bring up this slider and then drop it into a nice brown color. And then you can
see now what we're actually starting to get
something like this. I think at the moment, actually, it's a little bit too brown. So going to bring it
down a little bit. So next of all, then I'm going to leave
this where it is, and we're going to put
this on a green color. So if you put this over
here, bring it down now. Now you can start to see what we're actually
trying to do here. So you can see now this
is looking pretty nice. Now what we want to do
is, We want to have a little bit of control
over saturation. But at the moment, it's
way way too green. So let's just press shift a. And what we'll look for
is u and saturation. So U and saturation, let's drop that in there, and let's turn this saturation down. And as we turn this
saturation down, you can see it goes
great because it just takes all of that
color out of it. I recommend putting
that on something like not 0.5, and there you go, now you can see
that's looking much, much better, more realistic
than what it was before. And I think I'm happy with that. I think I'm not sure
if I need more in here or if these are a little
bit too big at the moment. Jos looking at them,
thinking, are they too big? And I think what I'll do is, I've got a radius fallf
here, as you can see, so I think what I'm
going to do is, I'm just going to turn that up a little bit, not the
radius fall off. Sorry, the fall off
on the actual leaves. So let's go back to modeling first so we can actually
see what we're doing. Let's press the tab button. And let's turn up this
radius scale fall off. So if we turn this
all the way down, you can see now
we've got nothing. Turn it up. Now you can see it's looking a little bit more realistic, as you can see. And I think let's turn
down the scale randomness. Sorry, the scale. Let's turn
down the scale a little bit. Like so. There we go. It's looking pretty good now. And let's also put
the density on. Let's try it on 50.
Let's just try that. You can see way way too much. Let's work all way down to 20. Let's work our way down to 15. And see what that
looks like if it looks any bare. You know what? I still think that is too
much and I feel like it's probably too much round
this bit down here. So let's actually look
what we've got down here. If I press I can see all
of these little ones. If I come in then
to one of these, like so press delete vertices, I can actually get rid of that. And now I think
that's looking b. Now what I can do is I can
come into one of these. I've still got porting, which means then I
can just move it to the side and then
come to the bottom, move this to the side, like so. And then I think I'll pull
this one out a little bit. Like, so, and I'm just shifting
the whole thing around. Like so double tap
the A. There we go. Dad is looking pretty nice. I think I'm actually happy
with how that looks. You could carry on it going, you know, up here a little
bit. So up this bit. But I think for me, I think I'm happy with how that
looks down there. And the other thing is, let's just see if we can draw
a little bit more, you know, kind of
going around this bit. So let's see what it looks like. I'm always for
testing things out, seeing what things look like let's draw another one on there. Double tap the A. Yeah, I think, actually,
it's good enough. I don't think I need anymore. I'm just looking
around this side now and making sure that
I'm happy with this. I think I'll just
try drawing one more on there. Double tap the A. It's have a look. Yeah, and I think that one just
needs to come down here. So all I'll do is I'll
come in with my move tool. I'll grab this part of it. Then what I'll do
is I'll bring it in and pull this one
down into there. So I'll double tap the A. And then we go, I think I'm
actually done with this. And I think this part on here, maybe it wants to
be hanging over. So I'll actually see if I can do that. So
again, I'll come in. I'll grab my little draw tool. And then what I'll do
is I'll bring it over. And hang it over,
hopefully, like so. And see, it's gone all the way there. We don't
really want that. But what we can do,
bring in our move tool, grab this one, press delete
vertices. There we go. And now we can actually
just move it where it's hanging over a
little bit like so. Let's move it round. Here we go. Let's press tab,
double tap the A. There we go. I think
that's actually looking better, like so. All right. So let's take
a look at this from here. Double tap the A. Yeah, and I think that's
looking pretty nice. The other thing is about
the ivy leaves as well, you might not want
them so bright. So at the moment,
they're pretty bright. You might actually want
to come in and you can see that they're called
let's have a look. So they're called leaves. So you see this one that says leaves. You can actually then go
to your shading panel. Make sure you've got
your leaves clicked on. So if you go to material. Make sure that it's on leaves. So what I want to do is
want to click on my leaves. So let's look for actual leaves. I don't actually
want to change this. Instead. What I want to do is actually want
to find the leaves. So I'm just going to click
the plus down arrow leaves. But red leaf here,
as you can see, and if I zoom out,
this is my red leaf. And we can do
exactly what we did with the actual stem here. So I can just press shift A, do a search and saturation,
and then bring that in. And then you'll see
if I drop that down, they all go gray like so. Let's put it on 0.5 and
let's bring it up slowly. Like so to maybe not
0.9, double tap the A. Now you can see that's actually suiting it a little bit better. It was a little bit
too bright before, and I think now that is looking much, much
better than what it was. Alright, so I'm happy with that. Let's go back then to modeling. And now, what we're
going to do is, we're just going to press tab. We're going to go back into
object mode, and there we go. We're then going to
put these in the room. So I'm going to press M. Let's put it in a new collection, and we'll call it IV. Like so. Click, click. And
from there as well, we can actually hide that
out the way if we need to, which will be really,
really handy. Now, as well, because
they're actual curves, there's still a
curve this thing, which means that it's not so
heavy on the optimization. So it doesn't need to
be optimized that much. The same with any
geometry nodes, actually. The things that's costing
a lot of things in this scene right now is going
to be the actual terrain, that's for sure and also the amount of materials
that we've got on here. But we've limited the amount of materials actually
that we're using. Alright, so, On the
next lesson, then. I think what we'll
do is we'll make a start then on this part here. Now, this part here is perhaps the most ornate part
of the whole build, and it's actually a really
lot of fun to create. I think what we'll
do is we'll start with the actual chimney. And then from there,
we'll work our way down with the roof and
all that good stuff. Alright, everyone,
so I hope you're really enjoying
the course so far. We've not actually got a lot
left on the actual build, and then we'll be onto the
terrain. Thanks, everyone. Bye bye.
109. Modeling and texturing brass chimney: Welcome Microphone,
Benfor modeling and Jomon workshop, and this
is where we left off. Alright. So first of all,
then, let's do what we said. So first of all, we're
going to come in, grab this point, press
Shift S sa selected. And then what I'm going to do
is bring in a new cylinder. So mesh, bring in a cylinder. I'm going to turn this down, then, something like 24. I always like the
number 24 just to make sure that it can
still be rounded off. While we've still got enough actual topology to work with. Then what I'm going to do is I'm going to press the S born. I'm going to bring it down into place the size that I want it. So something like
this. And now what I'm going to do is delete
this one out the way. So I'm going to come in now. Bring this one up. So let's bring it up without
portion of editing on. We definitely don't
want that on. Let's bring it up to
something like there. And then what we'll do
is we'll pull it out. So I'm going to press, it. S, pull it out. Then what I'm going
to do is press, pull it up, and then S, pull it out a little bit. So. Then what I'm going
to do is going to press, pull it up to
something like here. And now, what I
want to support is a couple of bands on this point. So I'm going to press
Control R. Left click, right click Control
B to bevel it out, hold in the shift button, and then let's create
these two bands here. So I'm going to come in.
They select first band, second band, enter Alt
and S and pull that out. Like so and you see that because we're
pressing alter and S, that really, really
nice and straight. Like so. And then what we're going to do is now
the inside bit. So I'm going to come.
To the inside bit. I'm going to press
the ibonn just to bring it in a little
bit more like so, and then I'm going to press
and pull it up like so. Next of all, I'm going to
bring in a few edge loops. So left click, right
click three edge loops, and then I'm going to
come into the top of it. I'm going to put
portion of editing on, and I'm going to put it
onto sp and then slowly, slowly bring it in. Like so Like, so. But I think on this
one, actually, I want it going more
of a rounded view. So let's come in and put
it onto inverse square. Let's try that. There we go. Is it going to be come in
the way that I want it? That's not the way that
I want. Let's try this. Nope. Try the root. Nope. And I'm thinking. That may be. Yeah, there we go. So linear, you can see
now I'm bending it in. Like so. That's what I want. Now, let's turn that
off just 1 second. Let's press. So, not
rotate, S, pull it out. Like so, and then, pull it up. And now I want to create it so it's going actually in now. So control. Bring in a few edge loops. Left
click, right click. Let's come to the top. Let's try this top one, this fear now. Let's press S, bring it in. There we go. That's the kind of look we're
actually looking for. And then what we want to do is now bring it in a little bit, and now we're just
going to go to the top. So if I come in now, brought it in, let's
press and bring it up. And then I bring it in. And then, bring it up. Again, enter S, bring it out
without portion editing on. So, and then E. And then S, bring it in. And there we go. Now we're shaping the top of the chimney, so
I'm going to press. Bring it in, and then
finally, bring it up. S, bring it together. We should end up with
something like this. Now, we just want
three bands on here, so I'm just going to press In fact, you know what, as well? I think I'll put my
three bands on first. So control one, two, three, Left click, right click. Grab the top of this
with shift and click, and I just want to pull
this out a little bit, like so just a tiny bit. Now, let's grab
these three bands. So shift and click
on each of these. Press control B, pull
them out, like so. Press the dot bond,
just to zoom in, so you can actually
move around it, press enter Alterns then
pull those out like so, right click, shade, Autos
move, and there we go. There is our actual chimney, and I think I'm pretty
happy with how that looks. Now, I'm just wondering whether it needs to be
made a little bit small. It might be a
little bit too big, so let's press the S born. Bring it down a little bit. And also, then,
where do we want it? I think we want it a little
bit further back here. So I'm just looking
at the composition, how it actually looks. Yeah, you know what? I think I'm actually happy with
that. All right. So the next point
we've got to do then is give all of this
actual material. So all I'm going to
do, I'm going to put it on to material view. And the first material I'm going to bring in is going
to be my brass. Now, I don't think I've actually brought
in the brass yet. So all I'll have to do is
go over to asset manager, go down to materials, and here is our brass. And then what we're
going to do is bring in the metal
for the other parts. So let's press
dot, first of all, to zoom to our chimney. Let's put the brass
onto it, like so. Let's then come in to our
materials and click plus down, and then we'll have the metal. So it should be I think
it's iron, actually. So on dot. Let's bring that in. And now we're going to do
is going to wrap it all, so a smart UV project. Click Okay. Now, generally, when you're dealing with
things like this, you will see We've got some edge loops
in here, as you can see, we don't really want
those, but we want this nice effect with this
metal going up there. And you can see if I put
this onto rendered view, let it load up,
double tap the A. You can see already how
nice that actually looks, how it glistens up everything. But it does need breaking up with the metal as well
that we've brought in. But I'm just having a
look round here now. How this looks, making
sure everything's right. Now, I would say
that the metal at the moment is going different
ways and things like that. So I recommend on this one, at least, that we
actually come in. We split it off from
everything else, so shift H. Let's put it on object mode because
that'll make it easier. Let's go back to modeling. And what we're going to do now. I'm going to put this on
object mode is actually mark our seams because I
think it's just going to make it much, much
easier for us. But first of all,
I'm going to delete this out of the way,
so delete faces, and then go to go round to
the back of it where no one's really going to see you know what it
kind of looks like. Let's just press tag a minute. And what we want to do
really is we want to hide it as best we
can the actual seam. So I think I'm going to hide it. Let's have a look. I think I'm going to hide
it around here, actually. So around here. So all I'll do is I'll come in. Shifting click, that'll
take it all the way up. Right click Marcosne. Now, let's go back in,
shift H. And now what we're going to do is make
sure that we can actually unwrap this correctly. So you can see at the moment, we want to see what we're
actually doing at the moment, we've got all of these shops on. Can't really see what
we're doing, but however, and I think it's this one here, so this little square
block, and there we go. Shops. So let's
turn off our shops. We can turn back on in a minute. But now we've actually got much, much better view of
what we're doing. Now, let's come in and
press Shift click. And what you want to
do is you want it to be on all of these edges. So all of these edges, like so. We're just going to go up and
go on all of these edges. On the inside of this one
because it's one block. Same on this one as well. And then what we're going
to do is this one here, and then just work your way up going on each of these, like so. So l shift click on all of
these. And don't worry. I've not forgot that we've got the one on the
inside as well. Like so. And then they'll
come up to this part, Shift click Alt Shift click. You can just go round, so
all the way up to the top, right click, and
what we're going to do then is mark seam. Now, the ones on the flat areas, we don't actually want Sam on. So any which are straight on, so flat like this, so you can see where all
the flat ones are. We definitely don't
want seam on. So what I'm going to do
now is actually fix those. So if I come underneath here, on here, on here, what we want to do now
is actually get rid of those seams because then
it will unwrap perfectly. So you can see I made a mistake. But it's all the flat ones because they can
unwrap themselves. They don't need any help
with an actual seam. In fact, adding a seam on those can make it
actually worse. So let's come in on
all these flat ones. Like so way down. All the way down to Palm, and then you're
going to right click and you're going to
clear the scene. All right. So that's what
we should be left with. All of those like this
going all the way around. Now let's grab it,
press A, and Unwrap. And now it should all unwrap. Now, the other thing I need
to do is actually resell my transforms origins
geometry, rap. Now, let's go over
to our UV editing, and we should end up
with a perfectly wrap. Place that were chimney. Like so. All right. So now we can see that these
are going all really nicely. However, some of them
are a little bit bent like these three here. So let's grab one
of them. All to. Let's straighten
it up. Next one, T, straighten it up, final one, L t, straighten it up, rotate
it round, like so. And then we go, now you can
see that looks perfect. Except this part here,
so let's come in. We'll grab this part here
with shift and click A 90, spin it round, and now they're all going
the right way round, and this is looking
very, very nice. Now, the next thing
we want to do is we want to come in and
add in this iron Doc. So all I'm going to
do is I'm going to shift click just going
around each of these bands. So all of the bands shift click Ok shift
click Shift click. And then what we'll do is
we'll press Control plus. And then we'll add in
on DC, click a sign. And then what we'll do is
we'll go to the top now. So the top underneath, The very top like so and click a sign on our dock like so. And there you go. There
is your chimney done. Looking very nice. Let's
go back then to modeling. Let's press stage,
double tap the A. And now let's actually have a look at what that looks like. And yeah, now you
can see it's really, really fit in the scene nice. All right, so that's done. And now with that done,
what we can do is we can move down to
this part of the roof. And again, this is
the most ornate m building in the whole thing. And the reason why it's so
ornate is because, as I said, the front if you look
at the front here, it's very, very nicely done. It's really interesting. It's got a lot of
things going on. Now around the back, there's
not so much going on. So what we want to do instead is we want to make
things a little bit more ornate to actually make every part of this
build interesting. The only part, which
is going to be the least interesting is
going to be this tower. But on this tower, we've
actually put this here, so it actually fits
into the wall here, and again, makes it interesting. So that's what
you're trying to do. Every single part, wherever
you're looking from, on this build looks interesting. And it looks like it's going
to be composited well. So no matter what angle, let's say we're looking
from this angle, everything wants
to be interesting. We look from this angle,
everything interesting, and it's the same going
all the way around, and that is what you're
trying to do when you're building
models like this. All right, everyone, so
I hope you enjoyed that. I'll see you on the next
one. Thanks a lot. Bye bye.
110. Modeling ornate roof, curving wood supports: Welcome microphone to Bend por Modeling and JoJo workshop. Let's put this then
onto object mode. And I'm excited to
get this part done. That's why I said
that part so quickly. And let's come over
then to our bendy wood. Let's press shift
D, and then what we'll do is we'll
drag this over here. And I recommend starting with
this one, not on the roof, but starting with this part along here and then get all of this part in and then
put in the roof on after because I think it'll come
together much, much better. So let's rotate this round. So RY 90. Let's bring this into place, and I'm going to make it
much, much bigger, like so. And then what I'm going
to do is fit this. First of all, into the center of my roof, so
I'm going to pull it out. Fit it into the center, pull it down, into
place, like so. Now, with this roof,
what I want it to do is I want it to
kind of curve around. So what I'm going to do is If I start to curve this round, you'll see it's going to start curving from
this point here. We don't really want
that. So all I'm going to do is move this
point up to there. And then what I'm going to
do is curve it round and now you can see that stins
curve round from here. So what I want to do
really is I want to press and then x and pull
it out a little bit. And now I want to actually start curving it round, like so. Something like this is
how I want it to curve. And then what I'm going to
do is I'm also going to press alternS and pull this out. You can see now that's
exactly what I want. Let's then pull it
down into place. So we're going to pull it
down into place. Like so. So I want it really in the
center here. You know what? I'll actually put it in the center when I've
actually done it. I'll get everything into
place first, like so. Alright, that's the first bit. Now what I want to
do is the next bit. So I want a nice curve coming down here into this place here. So what I'll do is
I'll press shift D. I'll bring this
out a little bit. I'm going to make it a
little bit smaller, like so. And then what I'm
going to do is, I'm just going to delete
both of these off. So delete all of these vertices. And I'm hoping now
when I bend it, it's still able to bend, as you can see, and that's
what I'm working for. Now what I'm going to do is I'm going to put this into place here coming just
under and round. So what I'll do is I'll grab
this. Pull it into place. I'm going to make it a
little bit thicker as well once I've got it in there,
I'm going to pull it down. Coming from round about
here, grab the top of it, pull it into place, bend
it around. Like so. And maybe, yeah, like that, I think that looks near
enough what I wanted. Now, let's make this one
a little bit thicker, so I'm just going to come over. Then the extrude up, make it a little bit thicker. I'm also going to go underneath. I'm going to pull it this way, and then I'm going to
make it thicker the other way with this solidify on. So let's make that a
little bit thicker. Let's then pull that into place, and there we go.
And is that bit. Just make sure that this part
here is fitting into place. So you can see here, it needs
pulling up a little bit. So now what we're going to
do is we want the outside. So we want these
parts here coming up and then bending
on this part here, and then we can fit our
roof on. Let's do that now. I'm going to come do my
bending wood once more, Shift D, Bring it
over into place. I'm going to press I'm wondering,
I'll put it over there. So I'll press Shift
D elections cursor. Then what I'm going
to do is press three, so I can get a
good view of this. Rotate it round, so
Rx rotate it round. I'm going to make it a
little bit smaller then, just to get it into place, a little bit bigger than that. Let's put it so it's actually rotated the right way round. So R and XHlding the shift
born Like so bring it down. And then let's pull
it into place. And of course, we
want it right on. The edge, right on the edge. So bring it down, bring it down, bring it over, then
it's right on the edge. There. Now, don't worry
about this center bit. We're going to put
a bit down there. What we want to worry
about is this part here, so we want to actually
bring this up and round. So what I'm going
to do to do that is I'm going to seem put this
on normal and there we go. We can see we can
actually move that now. So if I press three, you can see that I can move
this down to here. And then from there,
I can actually start bending this up like so, bringing it into
place, bending it up. And actually curling it
round like so, like so. Then let's bring this
part into place. Like so. And what we don't
want to do is we don't want to really unstraighten
this too much. So we want a little bit of a bend so we can
move both of these. We can pull it into
place and just keep this from bending too much. We don't want to actually
have loads of bend here. The other thing, of
course, we can do is we can get rid of
this one, for instance, we can go to lead purchases, and that then we straighten
it up for a little bit more. So now we can pull it into
like so. And now we should Be able to make this a
little bit thicker now, and we should be able to still have our roof tiles
going over the top. So what I'm going
to do is, I'm just going to see how that's looking. So. You can see down
at this point here, it's a little bit too high up, and we need to fix that as well. So what I'm going to do, I'm going to put this onto global. I'm going to bring it down then. Pull it into place. Bring it
down, pull it into place. And now with this one,
let's pull it up. And then we might
have got that right in near enough of
the perfect place. So let's now press tab, move it into place, see
where we are with that. We can see here
looking pretty nice. I think it just needs to go
a little bit more in here, so I'm just going to
put it on normal, and hopefully if I move this, we should be able
to put it in there. Now we can see this is
what we're looking at. Our roof tiles then should
be able to go over there. And I think I just
need to move this up. A little bit like so,
and then move this one up a little tiny bit, like so, and then just move
both of these out now. Now, I'm hoping if I
move both of these out, not that way, this way. Like so. And then move them
down and then move them out. And now, finally, let's
work on just this one. I'm going to pull this
one out down then back. Down. Just get it so the roof tiles will
just go under there. And now I want to do is put
another extrusion on here. I think to bend it out a little bit more or
we can bring it back. So I'm thinking I'm
going to bring it back, bend it like so. Yeah, that's how I want it.
It's just this bit here. So what I'm going to do is,
I'm just going to add in another subdivision,
and there we go. That's made it
much, much easier. And now should just
be able to move these parts up and into place. Yes, and there we go. All right. That's what we're looking for. A bit of plane around, I know. But I think now it's
looking much better. I think I'll move this one
into place a little bit more. So. And finally, then
I'll just pull it out into place like so, and then we should be
able to just lift it up or pull it down wherever
we need to put it so. Maybe something into there. And then we can put roof tiles coming from here
all the way down. Now, let's make it thicker. At the moment, it's
not very thick. So if we turn this out, you can see that we
can make it much, much thicker. We are
going to need that. And we also want to make it a little bit thicker
on this way as well. So I'll go to my actual curve, turn up the extrude a bit. And there we go. We
can turn it down. We can also then bring
down the offset as well. Looking actually where the
offset is actually going. Oh, yes, it is
pulling in that way. So it's actually the wrong
way to where we need it. Let's put the offset
on zero again. There we go. All right. So I'm happy with that. Now what I think we should
do is I think we should turn this into mesh.
So this one here. And then from there,
I can actually pull this out a little bit. And from there, I can actually put everything kind of into place because I can base
it on the center of here. So, what I'll do is I'll come first of all, come to this part. Object, convert to mesh. Let's just make sure we
turn off our bevel first. And we'll also make sure it's
turned off on here as well. The bevels turned off and on this one here, so
let's turn it off. Let's come then to this one
object convert to mesh. We'll do this one first, so I'm just going to hide it
out of the way for now. I'm going to grab
the center of here, Shift S first to selected, bring it back then with tag. And then what I'm going
to do now is center this. So I'm going to press control,
transform, set origin, do geometry, center it, and then shift an S
and selection cursor. And then all I'm going to do is pull this out now into place. And I know that's right, centered, and that's
where we want it. From here, then it gets even easier because we don't have
to center it on here now. Or right around there. We can
just center it on the end. So if I press Shift
S goes to selected. And now what I can do
is I can grab this one. Again, we've got to object
mold, convert to mesh. And then what I'll
do is I'll grab this one now control
or transforms, right click the
origins geometry. Shift S then, selections curta now let's pull it back into
place where we want it. So now everything is
centered apart from this. Let's center this part
and then pull it out. In fact, you know
what? I don't know I don't think we will have
to center it a thing. I'm just wondering the best way to center this. You know what? Instead of doing that, what
we'll do is we'll just come to object, convert mesh, and then control a transforms, right click to origin, two, three D curse at this time. And then we'll add
in a modifier, generate, bring in a mirror, put it on the other side with y, turn off the X, and there we go, now you can see that we've
got everything in place. Let's now grab all of these, right click and shade smooth
by angle. And there we go. We've got the beginning
of our ornate roof, and I think that is looking
pretty nice. All right. So what we'll do then on the next lesson is we'll
create this part here. So we'll pull this
part out here, and then I think what
we'll do is we'll actually Start creating
this front bit here. So we'll bring in
some more curves. We'll start creating
that. We'll also bring in some straight parts. We'll create this down here, and we'll just get this part
actually all created out, and then we'll put on our roof. All right, everyone, so
hope you enjoyed that. I'll see on the next one. Let's save about our
work, so I don't forget make sure you save
that after every lesson, and I'll see on the next
one. Thanks a lot. Bye bye.
111. modeling backdoor extention: Welcome back everyone
to Blender for modeling and Jumpin workshop, and this is where we left off. Alright, so let's come and we'll grab both of
these this time. I'm gonna need them both,
bring them both out. And then what I'm going
to do is press Shift S, elections cursor and drop
them where I need them. Now, you can see
n of them, maybe. Let's have a look. N of them. I've gone in the place
where I actually want them, so you can see this one here, Shift S, selections cursor. There we go. That
one's in the center. So that one is our actual wood. Now, the other thing is, let's just put this
one down here. And then with this one now, you can see that
let's have a look. This should be my bendy wood. Let's press Shift S,
selections cursor, keep offset, and there we go. And the reason that
happened, by the way, is you want to do selection
to selections cursor. You want this one,
not to keep offset. So if you click this one on, then they'll both go into
the center at the same time. I'll act to show
you that actually, we'll put both of
them over here. We'll press shift S, selections
cursor, and there you go. Now you can see that both
actually went center. So just me pressing
the wrong button. All right. So let's
come to this one. This one's our wood. This one is our
curve as we can see, and let's work on
our curve first. So let's pull this one down. We're then just going to
spin this one around, so x 90, spin it around. And then before I do that, I'm just going to drop it down, and then I'm going to
com into this part, this part and this part. And what I'm going to do
is add on the modifier. I'm going to bring in the
bevel. I'm going to put it on naught point naught
three, like so. And then what I'm going to
do is press control and L, and I'm going to copy modifiers
onto the rest of those. Now, I can't do it with
that one because this one, first of all, I need
to plan my mirror. So I'll do that control A
and then grab these two. And then finally, this one last because that's the one where we want to copy the modifier. So control L, copy modifiers, and there we go, now they're on. Now, let's come to this part. And what I want to
do is I want to pull the end of it out
first a little bit. What I'm going to do, grab this? Come on, and let's
try inverse square, first of all, and
x and pull it out. Is that going to
be how I want it? Yours looking, and I
think it's nearly right. It's not quite right, so
let's try another one. I'll try sharp. Let's try that
one. Yes, and there we go. That one's looking much, much nicer now, really
nice and smooth. Like so if I press tab, you can see it's also
very nice and smooth. Now what I want to
do is I want to bring in some sort
of light on here. So what I'm going to
do is I'm going to press the eye button
to bring it in. Like so. And I
also want to devel off each of those before bringing it out. So
I'm going to come in. I'm going to grab each of these. Viruses, I'm going to press
control, shift, and B, and I'm just going to level those like so and
round them off. Like, so and then what I'm going to do a
little technique, I always recommend doing
when you're doing anything like this is you pull
it back first with. And then what you
do is you press to insert it, hold
in the shift form. And then finally,
you press again, and then you can pull it out. It just looks much
better if it's set back inside it
rather than like this. From there, then
we'll press control Control A. Alton Smsight
click Set origin, two, three D cursor. And then what I'm going to
do is going to grab the top, press Control B and just
level that off in back, like so, and there we go. Let's right click
Shade Auto Smooth, and that's what we
should be left with. And it's good, actually, it's
got these little points on because it should be some kind of gemstone that's in there. Okay, let's now come
to this part here, five press three, and should then be able
to go in side view. And then we're going
to press the S and y. No, not S and Y, let's put it onto global. So S and y now. There we go. Let's get it into place. Let's pull it back
into place as well. So we're going to
pull it back, as these parts into the wall. Maybe it's come back
a little bit too far. And then what I'm going to
do now is lift this part up, so I'm going to come
to the center of it, and I'm going to lift it up. Like, so. There we go. That's looking pretty cool. Now we want one
more piece in here. So we've got our wood here. Let's search shift. And then we'll press S and
Z, bring it down. We'll press three, pull it up into place
where we want it. Well, let's now come in, drop it back in place.
Now, do you want it? You know, actually come
in on to this point here. So do you want it
onto this point, and that's sticking
through there. You know what? I
think that actually might look better like that, go to pull it back a little bit. And then all I'm going to
do is I'm going to come in. Let me see through it with
x ray, grab this part. And I'm also thinking
before I do that, I'll have to give this a
few edge loop. So control. Let's give it a few
edge loops like so. And then let's come grab the front of this, and
when we pull it out, we'll leave sharp on, and hopefully we'll pull it out
in a really nice way for it. So if I pull it out, bring
out this, there we go. Right click shade auto smooth. I will tap the eight.
And there we go. You can see Jo how nice that is. Everything is working
out nice now. And now let's come in.
And what we'll do? We've got we didn't
duplicate this one, so I might need to
bring in another one. But what I'll do for
now, Rob worry about that is I'll create
this bottom part here. So two parts coming out. So I'm going to press
R and y and 90. I'm going to leave that
in place and Inm going to press D. I'm going to
bring it over then. I'm gonna press three so
I can see what I'm doing. I'm going to press G. I'm going to bring it
up in to place. I want it somewhere
around there. I'm going to press the S
bond to make it a little bit B because it is a
supporting beam after all. And then what I'm going to
do now is press S and X, pull it in, and then just pull it in to place
wherever I want it. So I want it kind of stuck out on the end of it,
just a slight bit. So S and X, like so when they can see
it's stuck out there. Now, from here, we've
got a bevel on already. So let's right click
origin to three D cursor, and let's add in a mirror. So we're going to
add in a mirror. Put it on the y, turn
off the x. There we go. That's that part
done. Now, let's use this part winner
press Shift again. I said, 90, and let's get
this part in place now, so this part underneath here in place to support
this bottom part. Like so. Let's pull
it out a little bit, and then let's press S y. Pull it into place. Like so. And now what we want
is the side parts. So we'll use this one this time. We'll press tab, a shift. And I'm going to pull
these up without portion on, turn it off. And then, y, 90, and let's grab these and
put them into place. I'm going to put them
obviously back further. Then this kind of plank
that we've got here. I'm also going to shrink this in a little bit before
doing anything else. Shift and click with face
select, going around here, and then alternHld in
shift and bringing it in, grab the top of it then
and pull it up into place. You see, we're a little
bit out on there, but we are going to
put another piece going over here, so
that's no problem. And then what we'll do
is we'll press L again. So D. Bring it over. And then, y, 90. Let's pull this one up into
place now, under there. And then we'll also
pull it out into place like so grab
the front of it. And because we've done
this all with the mirron you can see what effect
we've actually had, and we're going to pull this now all the way back past
this point here. So pass this here. And then what we'll do is now we'll grab the side
of it and pull it in, past this point here, like so, and then the roof will come down and sit perfectly on
there. You know what? I'm going to pull this
well, just to there. All right. So that's
looking good now. We need another
part. So L shift. Drag it all the way
back into place. And then one more
part now, shift, and we'll just finish it off
with a nice center point. Like, so there we go. Now on the next one then. And the next. In
fact, you know what? We've got a little bit of
time. Let's do that now. So what I'll do is,
I'll grab my bendy one, Shift D. Shift S selection
to cursor there we go. Let's see if it's in the center. Probably not. But it is. It is, so that's
good. All right. So what we can do
now is we can make these two bits now
that I want in here. So, if I press three,
I can bring this down. Make it a little bit
smaller with S and Z. And then what I want
to do is I want two actual parts going in here, so I want them
come in from here. So let's bring it down a bit first. I can show
you what I mean. Let's pull this into place.
In something like that. And then what I
want to do is pull this out, you know what? I'll pull them both
out at the same time. Hold them out, so pull
them over, hod them down. Now, I don't think I actually want it
connecting to there. But what I do need to do
now is express control ate all transforms and just
straighten it all up. I'm also going to put
that into place now. So I'm going to right
click that origin to geometry. Put it into place. Like you can see
we're struggling a little bit with this part here. So what I'm going to do
is, I'm just going to pull it out just a
little bit to there. Then I'm going to
grab this one now, and I'm going to pull this out. I'll pull the other
side out as well. Your make sure everything's
fitting in now. I got a little bit
more extra room actually to pull these out,
so I'm going to use it. And there we go. That
is looking pretty good. And now what I can do
is I can mirror that on the other side on
the next lesson. I think last of all, what I want to do is grab this window. Shift D. Spin it around then. So R z -90. Shift S, selection to
curse or keep offset. Press three, bring it down
into place where I want it. So something round about here. Let's pull it into
place. Drop it in. And then we go, now
what we need to do? Just make sure we're happy
with this. You know what? I'm actually happy
with how that look, so I'm not going to alter that. And I think pretty
much now, this bit. On the next lesson will be done. We can get in all
of our materials. And then we can move down
to the next ornate part, which is this part below here. Once we've got our roof on, of course. All right, everyone. So I'm going to save our work again. Hope you
enjoyed that one. I hope you're still
learning tons and tons, and I'll see on the
next one. Thanks a lot. Bye bye.
112. UV unwrapping and adding roof tiles: Welcome back everyone
to end the Form, Modeling and John a workshop. Now, let's come in then and
fix all of these parts. So we've got this part
here, this part here. First of all, though, let's actually mirror this over there. So all I'm going to
do is I'm going to write clicks origin
three D cursor. And I'm hoping hoping
I'm going to turn my lf. I'm also going to make sure I turn my bevel off on this one. So these are these two parts. And then this one here, a modifier, generate a mirror. Like so, put it on the y, turn off the x, and there we go. That's that part, D. Now
I should be able to do is I'm thinking that this
has got the bevel on added, which parts have added this
part. Here's got the bevel. All of these should
have bevels on, which they have, it's
also got a mirror on. Let's come in and apply
the mirror on this one. So control A. Let's hide this one out of the
way. This one now. Has a bevel on, so I can
hide this one out the way. This has a bevel. No mirror on. Hide
it out the way. So H to hide this one
here, hide it out the way. This one here, hide
it out the way. And then we should be left with this one here, just a bevel on. That's fine. Hide
it out the way. And then these two here. What I'm going to
do is I'm going to grab them both, go to object, go down to where it says, convert and to mesh, and then I can join these
two together like so. Finally, there I can right
click and shade to smooth, and then re add on my bevel. Let's set it to naught point naught three. And there we go. That's that dm. And now, if I press ltHe bring
everything back. Here we go. This is
what we're left with. So now let's come in,
and we might as well, if we can join all
these together C. You notice as soon as I
brought them all back in, I should now be able to press Control J, join
them all together, like so, and I'm just making sure that my bevel
is on all of them. We can see that we've actually
lost some bevel on this, and I don't really want that. If I press G, you can see
this is what I've got. But what I want to do now is press control A or transforms.
We'll try that first. Set origin, do geometry, which should be
right in the center, and then just come down
where it says geometry. Turn down clamp overlap off, and there we go, we
should have this on. Now, the thing is,
why didn't it work? Probably something to do with
this being a ngn in here. So it might be something
to do with that. Either way, if you turn
it down low enough, you shouldn't have
any problems turning off this clamp overlap off. Alright, so now we
want to do is we want to give this
some materials. So I'm going to put
it on to my material. I'm going to wait
for it to load up. Then what I'm going
to do is unwrap it. So I'm going to grab
all of these now, press A. Smart UV project. Click. Then what are we going to do now is going
to come to my material, minus off my basic woods
or minus that off, and we should end up with
something like this. Now, we can see we've
got lots and lots of problems with our
bendy mess in there. So let's go in, first of
all, and fix all of that. So we'll draw do them out, I'll press the taboo, and here we are solve the
problems that we've got. So now let's pick any
ones that have a bend. So you can see all of
these have a bend. All of these have a bend, and all of these have a bend. And now we can see exactly
where the issues lie. So now we can just come in, press ln and straighten
them all out, same as this one, t, and just do them individually, and now it takes a
little bit longer, but I don't think
you'd be able to get away doing them all together. And any of that have
been spun around, pin them all around at the end. It makes it much, much
faster like this one. Work your way through them. Any that are bent, like so, L E and L. Let's look. This one's a little bit bent, so we'll do that one as well. A T. And I'm just looking
got these two here. So T. This one here, L E. And the rest of them, I think are absolutely fine. So now I'm going to do is
just go into the ones that are spun round or 90, spin them back round,
and there we go, that's what we
should be left with. Now, the other thing is,
we can see on this part, these all look really nice.
Everything's looking cool. Except this one here where we've got a
problem on the top. So with this one here, all I'm going to do is
just go into it, shift and H, hide
everything out of the way. And then what I'm going to do is just unwrap this separately. So you wrap like so. And now you can see
that's looking perfect. And then probably let's do
the underneath just in case, so I'm just going
to put on T here, so I can actually see in there, grab this one and then
press you and unwrap. And then we go, that
should be done. Now, let's pull that
back across. All right. So that's looking good.
Let's have one check, so we'll save that our work. Put it onto rendered view. So move this out
onto rendered view. Let that load up and there we go. That's
what we're left with. And now we just want this
little gemstone in here. I'm just looking at my wood, making sure that's all
nice, which it is. And then we want the little
gemstone. So let's come in. Grab this part here. So
what I'm going to do, grab the center control plus, going all the way
back into there. Plus button down arrow, gemstone, click a sign. And there's our little gemstone
in there looking very, very nice. Double tap the A. All right. That's looking cool. Now we need our roof. And then what we need to do
is bring in these walls. I think, first of all, what we'll do is we'll
split these two off. So I I split these off with y I can then press and unwrap. And then what I can
do from there is I can bring this You know what? I think it'll be easier
access to split them off. So P, selection split them off. And now I can click the down
arrow and click planks. So I'm looking for my planks, and there we go, and then
come to this part here. So this is all of the roof here. So I'm just going to press shift H. Hide everything out of the way because I'm really
not going to need this bit, this bit, or this bit, will
I ever need the bottom part. So delete and faces. And then what I'm going to do is I'm going to come into these. I'll press y, come into
the bottom one, press y. And now all of this
should be split up. If I press on wrap, and then click the down
arrow and click on wall. So if I type in wall, I should be able to bring it in. Like, so press takes,
bring everything back. And this is what we
should be left with. Now, let's have a quick look
on our render view once more before carrying
on, and there we go. I think that looks
really, really nice. Now, let's bring
in our roof 'cause it doesn't look right yet because it hasn't
got a roof on it. So to do that, we'll
go back to modeling. And then what I'm going
to do is grab my roof. I'm going to press
shift, bring it over. And then what I'll do is
I'll start with this side, because this is the main side
where everyone's gonna see. So ours As hundred
80, spin it round. Let's put it on object mode. And bring it up into place and down and we'll look now to see how much room we've actually
got so we can see here. It needs. You know what? We might be able to actually
bend this roof a bit. It might make it a little
bit easier as well. Let's first of all do come in. And what we'll do is we'll
turn the vertices down, and we'll also turn
the horizontal up because you can see here
it's going to need well, maybe one more horizontal, so let's put it up one,
maybe another one. In fact, you know what
we'll do. We'll just press S and X and just pull it out
into place. Like so. And I just want it hanging
over this part here. And also, it's nearly the right actual Can I actually just bend it and get away
with just bending it? Let's see if I can bend it
and pull it into place, like so, how is
that going to look? I think I need to
bring it down a little bit and then bring it out, like so, and I
think it's going to need just a little bit of
a bend on the bottom here. So let's actually see if I can do that. I'm going to come over. I'm going to bend the roof. Like so, and there we
go in beautifully. Alright, so that's
that bit done. And now all I want to
do is obviously put this on the other side
and mirror it over. So all I'm going to do, I'm
going to come up and I'll go to object, convert to mesh. And then what I'll do is I'll press control A or transforms, right click origin,
two, three D cursor. And then from here,
I'll come in. Adding a modifier and
I'll be a mirror. Let's put it on the y, turn
off the X, and there we go. And finally, then,
what I want to do is just go over the top, apply this mirror, so control A, press the tabton and then all I'm going to do is put
this on wire frame. And we then press
B for box select, grab all of this, press
P selection, like so. And finally, then,
I just want to come back and what
I want to do is, I want to mirror this
then to be the other way. So what I want to
do is I want to really put this in
the center first. So I'm going to write clicks
the origin to geometry. And then I'm going
to go to object. I'm going to go to mirror. I'm going to mirror on the X. So mirror on the X,
and there we go. Now they're mirrored
completely the opposite way. And now we can actually
join those back together. So Control J join
them back together. Let's then turn it
onto material view. Double tap the eight,
and let's have a look at what that looks like.
And there we go. Looks fantastic.
Alright. So now what we need to think about is
the bottom part of here. So we'll actually start
that on the next lesson. Alright, everyone. So I hope you really enjoy it, and I'll
see on the next one. Thanks, lot. Bye bye.
113. Creating stylized stone support archway: Welcome back, everyone
to Blender four, Modeling and John Co workshop, and this is where we left off. Alright, so we know our window
is right in the center, so we can press Shift
D, Kursta selected. Let's just move this one. I think this is not
my bending wood. This is just my normal wood. I'm not going to
need this right now, so I'm just going to
bleed out the way. And what I'm first
of all going to do is I'm going to grab my door, which will be this one here. I'm going to press
Shift D. Rotate it, so I dead 90 rotate it
to be the right way. And then I might as well. Seven put my origin
in the center. So set origin to geometry. There we go right in the center, shift D and then selection
to keep offset om to this. So it's been put
where the window is. We don't want it
there, of course. What we want to do is put it down here into place
where it's going to go. So right in the floor here into place. Where
it's going to go. Delete this one out
the way, so delete. And then it should be right in the center of each
of these pillars. Let's pull it back into place. Like so, making sure that that
glass is not in the wall, so you definitely don't
want the glass in the wall, so pull out p double tab
the A. And there we go. It should be looking like this. Alright. So now let's
focus on these pillars. They did need to be
quite big, quite broad, but perhaps perhaps at least they're a
little bit too big. What I'm going to do is
just turn off my X ray. I'm going to press lt shifting click just to go around there, ltern then to bring
it down a little bit. And then what I'm
going to do now is pull up this bottom part. So again, X ray on, grab
the bottom up here. And then what I want to do is
shape this bottom part now. So, the way that I'm
going to do that is, I'm just going to
come in, put this on object mode again,
turn off my x ray. I've got this grab
at the bottom now, so all I need to do is press enter S and pull
this out, like so. And then from there,
I can press again, bring it down, like so. And then I'm going to bring it in now, so I'm going to come. Ide my cobblestones, my terrain, and now I can see underneath it, and then I'm going to come press the i bond to bring it in. Now, we don't want to going in as far as this main pillow. We want to a little bit set out, and then what I'm going to
do is press, pull it down. From there, then what
I'm going to do is bring back my cobblestone and terrain. So I'll take, bring them back. And now I can see how
far I need to go down. So I'm going to grab
the bottom of it. I'm going to press S, pull it out to be larger
than this one here, and then finally into the bott. So, pull it down, like so. Now, the moment I can see, It's about right, but it's
not quite touching the floor. So I'm just going
to press control plus going all the
way up to the top, and then I'm going to put
those into the floor, like so. And there we go. That is the
actual pillar that we want. Now, from here, let's bring
in some edge loops then. So control, bring
in, I would say, probably left
click, right click, six edge loops on there, and I think that then
will do it justice. Now, from here, what we
need to do is we need to split all of these up.
So now I've got this. I can come in. Delete this one out the way, so delete vertices. We're not going to
need it anymore. Come back to this one.
Let's press control A and reset all the
transforms for just 1 second. Shift H, hide everything
else out of the way. And now, what I want
to do is actually create the stonework
in this part. So I'm going to come
in. Shift click going all the way down here. So, I'm going to even come in this part here
because I want to split this rock off as
well and down to here, right click Marcosne. From there, then, let's
split it all off. So I'm going to
grab the top L, L, L and L, and then L on that
part, and then press y. And if you press G, you'll see that you've got
something like this. From there, then, what I
want to do is just press A, mesh, clean up, holes. Now, let's see the
moment of truth. Let's resell the
transforms again. Adding a modifier,
bring in a bevel. There we go. Let's
turn up the segments. Let's turn down this then, just to make them
look like stone. And I think that is looking
pretty nice, like so. Alright, so you can see just
how easy that what to do. You can see the
effect that we've got. So now let's come in. And what we'll do is we'll grab everything Smart
UV project, click. And what I'm going
to do, first of all, I'm going to put it
over the other side. So at the moment,
you can see, we've got this in the center. I press saltg. You can see it's right in the
center of that mirror. Sorry, that window.
So I can right click Set origin
to three D cursor. Add in a modifier, so we're going to
generate a mirror. We're going to
present it on the y, turn off the X, and there we go. We've got one, each side
in the correct place. So there should be just
behind this part here. You can see they're
not actually there. So what I'm going to do
is, I'm just going to press tab, e to grow everything, and then just pull them back so they're in front of
this piece of wood here. And I also want to
make sure they're not clipping on that
part there either, so I'm just going to pull
them this way as well. There we go. That's
looking pretty cool. Okay, so now we've got those. I'll apply the mirror. So control, apply the mirror, and then I'm going
to press tab A, Smart UV project, click Okay, and then I'm just going
to bring in the stone. So instead of it being this, we'll put in stone, like so. And then finally, let's
actually have a look at what that looks like
on our rendered view. And there we go. There is what we've got so far. Now what we need to do is
we need to first of all, create this beautiful arch
that's going to go in there, create them going down to here. And then we can actually create the structure to hold
all of this together. So what I'm going to do now is I'm going to go back
to object mode. I'm going to come in,
save out my work. I'm going to hide my
fence out of the way because it's going to get
a little bit in the way. And then what I'm going
to do, You know what? Rather than hiding the
fence out of the way? Let's just grab this
whole structure, grab both of those.
Grab my curve. So let's grab and where
is it? T one here. Shift H, hide everything
out of the way. And then what I'm
going to do, grab my curve shift D. Bring it over. Shift S selection to cursor, put it right in the center. And now on FS three, I can actually see what
I want to be working on. So what I want to do, first
of all, is bring it down. I want to rotate it round, so r x 90, like so, and then I want
to put it into place, so I want to bring it in. So S and y, bring it in. Just so it's touching
those there. And then the first thing I
want to do is bring this up. So I want to bring this up. Like so. Now, I actually want it to be more of a curve
when it comes up. So instead of doing that,
I'll just put it onto, let's try this, first of
all, and there you go. Now you can see
that it's actually bending in a much,
much nicer way. But still, I want it bending
a little bit better. So let's try this. There we go. Now it's nice and
round, as you can see. Now, before I do anything
else, Let's zoom out. Let's press control
all transforms. That then we'll just
straighten everything up. And then what we'll
do is we'll right click origin to geometry, and then just pull it into
place where we want it. So I'm thinking
something around there. Like, so just underneath
this block of wood here. So, just so if I press three, it just sits under
there, can even bring it down a little tidy bit, like so. And then what I want to
do is I want to increase the maybe. No, I don't
think, actually. Do I want to increase
the thickness? I don't actually think I do. I think it looks good like that. Then what I'll do
is I'll press 50. I'll bring this one down. I'll press R, x, and then just spin it around, and I want to put this into
place coming from here. So coming from here, going all the way
into this part here. I'm happy with how
this bits going in. So I'm going to press three. I just want to move this
part out a little bit. So if I bring it out, just a little bit, Now it's
fitting into that perfectly. Now, once I've finished this, I want to again, bring in my guy, make sure
I can walk through there. That's the most
important thing. So S and X, pull it in a little bit. I'm not going to
use the solidifier anything like that this time. And then what I want to do now is mirror this over
the other side. So I'm going to press
right click Set origin to three D cursor. Add in a modifier. Close the bevel up, add
modifier, generate a mirror, put it on the y, press the x, and we can see that
that's not working. So let's turn that off a minute. Let's come in, turn
off our bevel. Let's then apply everything. So object, convert to mesh, and then find what we can
do now is now try a mirror, Control A, click the
origin three D cursor, add in a mirror. It should work now,
and there we go. Now it's actually
working and in place. But now what we want to do
is we want to grab this pop. We still got everything
on this part. So what we want to do is
bring this part down, so shift and D, duplicate it, bring it down. And what we want to do is
make this one a little bit smaller so it
fits in place nicely, and then press A and S and X, can I bring it in,
sorry, S and y? Can I bring it in? No, because we're not on medium points. Let's try that again, S and Y. And there we go. That is what I want to see.
Double tap the A. There we go, you can see, what a beautiful structure that is. So what I'll do then is now just press Alt and H.
I'll let it load up. So Alt H. Bring back my guy. So where is my guy
over there somewhere? Is he stuck on the
step somewhere? It's double tap the A
last time I saw him. Yes, there he is.
Let's spin him round. So I'll head 90. Let's put him back, making sure you can go in
there quite easily, which it looks like
he certainly can. So there we go, he can
go in there really easily. No problems there. So what we're going
to do then And the next lesson is we'll
fix this part here. So we need something to actually support
these parts here. And we also then want to create
something where our kind of lanterns are going to come out of this
point here as well. So we'll create those as well. So extremely, extremely or, as I said, this pack bit. And once we've done
this, this part here is really, really easy. Alright, everyone. Let's
save out our work, and I'll see you
on the next one. Thanks a lot. Bye bye.
114. Additional detail for stone support: Okay. Welcome back get on to blend of four modeling
and Domino workshop. So I think now before
building anything else, what we'll do is we'll actually start with the
back of this part, so we need a piece of wood coming in here
for the supports, and then two piece of
wood coming down here. So, what I'll do is, I I've
already got this one in, but the thing is, I don't
really want to use that because then I'll have to, in
fact, let's have a look. You know, we might
as well use this. It's been wrapped in everything. Let's press Otage bring back
everything. Let's press out. We've still got that
bevel on shifty, and we will use it.
We'll use this part. We'll take off
proportion editing, pull it down, P selection. Rub it again, control or transform set
origin to geometry. The only reason why I didn't
want to use it, by the way, is because of the
fact that I don't know which one's been wrapped
and things like that, but I'm going to just say, like, under here, I just
need to wrap them all. So all I'll do is I'll put
this into place. Like so. That's going to fit
very nicely in there. And then shifty, spin it round. So Rx 90. Let's then bring
this support in, so I'm going to put this support jast on this side of the door. Like so, and then I'm
going to pull it back, so S and X, pull it back. Into place, so into
the wall, like so, pull it down a little bit, and then I'm going to press
S and ad, pull it up. And then I'm looking at
the size of this now. Thing that looks good like that. And then what I want to
do now is another one. So shifty pull this one
out into this part here. Now, I really want to
make sure that wherever I pull this one out to,
it's going to be enough. I can have a support that's
actually going to go into it. So what I'm going to do is, I'm just going to put it there. I'm going to press S and y
and pull it out, like so. And then I'm also going
to pull this one out now. So I'm gonna grab
it and make it just a little bit thicker
than that other one. So. And now you can see
that's looking pretty thick, pretty sturdy to actually
have this support in here. So now, with the
support in here, I'm going to want
one more piece. So I'm going to grab this one. I'm going to press ship D. And then what I'm going to do is
bring it all the way back. To this part, just in
front of this part here. Now, you can see how
everything looks as though it's really, really
nicely supported. And then I'm going to
grab this one again. Shift D cosa selected. Shift D. And what we'll do
is we'll bring in a cube, and we'll just
level the cube off and make it a piece of wood. So I'm going to pull
this out over to here. So, pull it down into place. And if I go to the front view, I can actually see if
it's centered or not. So if I press three, I can actually see if
this is centered. So I'm just going to center
it up a little bit there. And then from there, then what I'm going to
do is pull it back. So I'm going to grab
the front of it, pull it back, and then I'm
going to pull it down. So pull it down. The round about the
fourth one around here. And then from there,
then what I'll do is I'll press enter, and then S. Press
again, I think. So let's press control
head twice. Let's go back. Control Shift head, and
then enter S pull it out, and then, pull it down, like so. And then finally,
I'll grab the front of it. Pull it out like so. Now what I want to
do is I want to have a nice twisting bit that's going to come up and actually
support this bit along here. So all I'm going
to do is I'm going to press control
layer transforms, right, clips origins geometry, grab my curvy one. So just make sure
it is that one. Shift D, duplicate it, Shift S, selections curta. Press S and Z, bring it down, and then let's try and put
this into place. I'm going to put it
into place along here. Like, so let's pull it up. And let's first of all
worry about the curve. So I'm just going to
grab this part here. I'm going to pull
it down into place. I'm going to grab
the whole thing, Control A, all transforms. Now you can see got that
straight in now a little bit. Let's press right click,
set origins geometry. Now, let's put it into place, and we can see that it's way
way too thick at the moment. So all I'm going to do
is I'm going to come in and turn the
extrusion down a bit. Like so, and then pull
it back a little bit. And there you can see it's
fitting into place now. And I think it should really
be fitting just under here, so Just pull it up. Just so it's fitting
under there, like so. Now, again, with
this a press three, I can actually see
where the center is, so I can see here the center
it's around about there. So now it's centered, and I can see that this one
here, let's have a look. This one here needs to pull
in this way a little bit. So this way a little bit. Center it up, like so. Then I'm just going to
pull this one a little bit that way and look
around this side. Yeah, and that's
going to look fine. I don't really need to do
anything more with it. Alright. So now what we can
do is we can apply this, so we can apply this one,
put it over that side. We can get these over
that side as well. So we'll just work on all of these ones that we've
actually created first. This one already has a bevel on, so it should already
have a bevel on it. The only thing I need to do with that one is just go
to my UV editing. I'll let this load up, press A and then just
press G and move it over. Alright, from here
then, I'm just going to put this on object mode because I can actually,
you know what? I'm not going to work
on here. I don't think. I think I'll move
that over though slightly just to
see what I'm doing. And I'll go back to modeling because I think it's
just going to be so much easier dealing
with all these parts. So let's take the
bevel off here. So we've just got
the Slidify on. And then what we can do is
we can grab all of these. We can take the bevel
off this one as well, the bevel off this one as well, and then just grab all of them. Like so. And then
what you can do is object, convert to mesh. Then I can now put them
over the other side. So first of all, let's press
control all transforms. In fact, let's join
them together, then control A or transforms. Right click the origin, two, three D cursor, right click, shade, Auto smooth,
add in a bevel, so generate a bevel. Put it on naught point, at three and then let's add in a mirror now to get
them over to the other side. So I generate a mirror. Again, it'll be on the y, turn off the X. Google tap
the eight, and there you go. That's what you
should be left with. So now you can see, really,
really nicely supported. Now we want to do is
apply this mirror. So let's come in, grab them, press control A to
apply the mirror. Press A, grab everything. Smart UV J. Click Okay. Now let's see what material it's gone, so it's got planks, gemstones, and basic wood, so let's turn all of those off. Let's actually have a
look at the material now, and we should just have
to do this bit here. When it loads up,
you should see, is just these bits here. So if I come in
now over to my UV, as a sad now, we
can just come in, grab each of these separately. So L, OT and just
straighten all of these up, like so, and then
grab both of these L, and then rotate them on
19th around, like so. And there we go. Now they're
all straightened up. Double tap the A. And
that's looking pretty nice. Now, don't worry.
We are going to lighten up some
other parts as well. Don't worry about
that. We've got some lamps that we're
going to put in there. But everything now on
there is actually done. And then what we need to
do now is this part here. So again, I'll come
into these parts now. I think I can join
them all together. I'm not actually sure. You know what? I'm
not going to risk it. I'm going to come in then
bevel off on each of these. So the mirror I can apply. The bevel I can turn off. I've got no bevel on now, and come and grab
all of these now and then go to where is it object, convert, mesh, join
them together. Bring in a bevel, so
generate a bevel. Put it on naught
point naught three. Right click shade to smooth. Tab, A, smart UV project, click, bring in then instead of basic wood,
bring in the planks. Like, so. And then straighten
them all up again. So if I zoom in, I
should be able to. I'm just going to
try to a time. See. Doesn't work. So let's come in, T. Let's just
straighten them all up. I think if you've got none that are actually
touching, so these two here. Yeah, you can straight them up as long as they're
not touching. So these two, I
think, let's try. Let's try this one on its own. We'll go. And then like so. Alright, let's grab the ones that have been rotated round, which are all these
90, spin them round. There we go, we
should end up with something beautiful like that. All right, really,
really happy with that. So what we'll do now
on the next lesson is we'll make way for where we're going
to put our lanterns. Our lanterns are
going to be on here. And they said we'll have a chunk that comes out here and a nice, you know, kind of ornate piece that comes out here
to finish this off. And then this bit, one of the hardest parts is
done out of the way, and the rest of it, the rest of the build that is is
pretty much easy mode. I think when we've
done this, we'll actually make a start on these little stone parts that
are going to come around here and just to finish
it off around this part. And then we'll actually move on to just this simple
building along here. All right, everyone.
So I hope you enjoyed that, and I'll
see on the next one. Thanks a lot. Bye bye.
115. Modeling spiral wood supports: Welcome yon to Lena for Modeling
and Jump china workshop, and this is where we left off. Let's go back to modeling now. And then what I want to do
is come around to here. And because it's a little bit dark to see in here
at the moment. So what I'll do
is, I'll just put my scene world on so now we can see a little bit
better of what we're doing. Now, we'll be a
little bit heavier on the computer when you put this on, so just be aware of that. But generally, now we can have a much better look
and see in here, for instance, and
things like that. What I'm going to do now is I'm going to create
these parts here. So I think I'll start with
the actual with a cube. So let's bring in a cube. Let's make it smaller, and we'll start with the
stone part of this part. So I'm going to bring it down. To round about
something around here. I'm going to press S and, and we just want to main
support to actually support, you know, this whatever
we're going to put on here, which in the end will be a
beautiful lantern at the end. So we'll actually
bring this in here, and then what I'm going to do is we're going to press shift. So let's try that
again. So shift. Bring it down. Let's pull it in. So S, pull it in, like so. And then what we'll
do is we'll just pull it back. Like so. And then what I'm going
to do is come in, press Shift select this one and bring it down
to roundabout here. And then what I want
to do is I want to kind of bring this now back. And then I'll bring
some edge loose first. So let's bring in left click, right click,
something like this. And then what we'll do is
we'll bring this back. Now, what I want to
do to bring it back is I want to probably
hide the rest of it. So what I'm going to do
just select the front of it all the way down to here, Shift h, and then we'll
bring this part back now. So grab this part, put on a proportional editing,
then bring it back. Like so, and then press
alth there you go. Got a beautiful
part now. To this. Let's bring in a
little bit like so, and that then should be enough
to actually support it. All right. So now
what we'll do is we'll press aft D on this one. We'll press the S button, we'll press S and
X, bring it in. And then one of
one is a piece of wood coming from
the top of here, something from sat
on the top of there, like so, and I'll also
pull it out a little bit, a little bit into the wall. Like so. And then
grab the top of it, baelt And then what
we'll do is pull it up without proportional
editing on until t's pull it up into place
where it's going to go. It fits nicely in
there as you can see. Now, from here, let's grab
this and let's press shift. So we've grabbed it all with
L. We're going to rotate it around with r y 90. I'm going to make it a
little bit chunkier. So S and then S and y,
pull it in a little bit. And now let's pull it into place where we actually want it. So I'm thinking
something that far out. We can see if we put X ray on. It's quite all the
way back into there. We don't want that. We're
going to press S and X. Then just pull it out like so. Now, from here,
let's make sure that it's right up under
this part here. So if I turn this off, you can see it needs to be
supported under there. Now what we want is our
bendy wood once more. Come over. Actually,
we'll just grab this. Shift, selections curtor,
grab our bendy wood. Shift D, as always, Shift S, selections cursor. There we go. Now, let's press S, make it a little bit thinner. First of all, S and then, to make it a little
bit slimmer then. Then what we want to do
we want to come in out. From here and going bending
all the way around here. So what I'm going to do
is press control one. So I've got a nice side view of what it's
going to look like. I'm going to just slide
into place there. I'm going to grab the bomb part first, and I'm going
to pull that out, so it's nice like this, and then we're going to
pull this around there. You can see one of
the problems again, as always, is that we need to basically reset the
transformation. So control all transforms. There we go. We've got it back. We want it. We just
need to pull it out. So let's right click
that origin geometry. Pull it out into place. Then let's make
sure it's in place. So let's make sure this
part drops into place. We're not going to
worry about, you know, whether it's level or
anything like that right now, we're just going to now
come into this part. We're going to press
and just drag it along. E, E and E. Then finally, let's have it
tapering up as well. Like so. And there
we go. All right. That's looking pretty nice. Now, I think, just wondering whether to
bring these parts down, so I'm just going
to press control click going into all those. Bring them down a little bit. Then I'm just wondering, I just want to make that a little
bit smoother, as you can see. Now, there is something
else we can do. We can also, grab all of these. And what you can do
is you can come to segments, not segments sorry. Smooth out our segments like so. I'm hoping that it's not pulled them all
in, which is not. It's just made a lot smoother. I think I'm just going
to pull this one down just a little bit like so. And that looks
about right to me. Then all I'm going
to do is pull them into place, like so. Bacon should they all fit in. Press S and y and just
bring them all in. Again, I'm going to
press three then, just to pull them into
the center. Like so. And there we go. A thing that looks about right to
what I actually wanted. And I think I'm actually
happy with how that looks. Now I want to do again, we just want to turn off our bevel. We want to then
come over object, convert, and to mesh. We want to then join
it all together now. So all of these parts
together control J. And then what I want
to do is control A, all transforms, right click. And I want to set them
actually to this window. So Shift S, cursor selected, and then right click the
origin to three D cursor. Now I want to do is, I want to mirror them over the other side. So add modifier,
generate a mirror. Put it on the y, then off
the X, and there we go. That's on the other side now. And then finally finally, what I want to do is now apply
my mirror. Bevel them off. So add modifier,
generate a bevel, set it to North 0.3. And then the final part now is right click shade AutoSmooth now let's bring in
some materials. First of all, let's
wrap them all. So, Smart UV projects, click. And then what we'll do is
come in and change this to planks And then we'll
bring in another material, and we'll put this on stone. And then what we'll do now
is come to the bottom part. So L, L, L and L and click
a sign on the Stones. So. All right. Perfect. The only problem
we've got is we've got some problems
with these parts. What I'm going to do is just
come into these parts, so. And I'm going to I think the easiest way to do this actually is to
isolate them out. So let's press the
little question Mark Jos to isolate
everything out. And then we can press Shift H to isolate everything else out. And then I should
be able to come in now and mark some
seams on these. So shift and click
yours going all the way around the
outside of each of these. So the inside not
that way, that way. L so come around here. Like, so, right click Mark Sam, and then the final seams, which will be on
the ends of these, and of course, the underneath
of these control this time, Mark seams because we're in
face select, and there we go. Now we should be able
to grab them all, wrap very nicely, and
then go to UV editing, and then just
straighten them up. So if I press a little dot born, I should now be able to
come into each of these, so let's try you can see
this one's all joined. Actually, I must
have missed a scene. Yeah, you can see
they missed a seam. What I'm going to do is
I'm just going to come in. Shift and click, right click marker scene and there we go. I'm also just going to make sure that if I pull this over, I've got shops back on. Okay, that's fine. So then I'm just going to
grab them all again, you on rap and there we go. Now, let's grab each of these. Let's press Al There we go. Let's grab each of these, Al and, and there we go. And then let's
spin these around. So our 90, spin them all around. There we go. Now
they're looking really nice and really part
of all of this. All right. So we're pretty much finished with
this part now. We've just got a
wall, obviously, to put into where this part so let's actually do that now. So we'll come to this
part, we'll press shift H, and we can see we've got a lot of parts here
that are really, I don't think these are
actually needed at all. So what I'm going to do
is I'm going to come. And I'm going to delete
all of these off. You know what? Before I do that. Let me just check. Yeah, they're not actually needed
as we can see. So let's come back to it. Shift H, hide everything
else that way. Let's put on material. Motor
and see what we're doing. We're going to delete
these, delete and faces. And then we should be
left with just this. I'm going to grab this wall,
then, press P selection. And then what I'm going
to do is press lth, bring everything
back and I should just be left with
this wall like this. I'm just making sure that
it's going into place like so control A transforms,
origin to geometry. H A, grab it all. Unwrap, and let's change
this then to wall, I'll bring on a wall. Tap double tap the A, and there we go, we're
pretty much done with this. Let's just check that. Yeah, we're pretty
much done with this. I'm just wondering. Yeah,
the dirt's down here, as you can see, so
it's all down there. Yeah, I think I'm happy
with how that looks. Once we've put some wood in, things like that, it's going to look even better, of course. And I think now, On the
next lesson, as I said, we'll make a start on this actual stone that's
going to go around here. So it's going to come
pretty much up to here, all the way following it round
all the way around here, and then it's gonna
follow it all the way round to this point here. Alright, I'm just going to check first how far these
are pulled out. They're pulled out
quite far, so it means the stones we can actually
use and pull them back. Oh, yeah, we'll get that
done on the next lesson, guys. Alright, thanks a lot. Bye bye.
116. Improving staircase foundation with wooden slabs: Welcome back to
Benfor modeling and jumped in our workshop,
and this we left it off. Okay, let's go back to modeling. Now, it's going to
make it much easier. Let's press the
little question mark to bring back everything. And then what we'll do now
is come to this part here. So I want to basically take this over here and
create stones from it. And then I want to create stones going all the way
around here as well. Got a little bit of a
problem in this part. Let's actually have
a look at that. Just wondering, Oh,
that's my actual water. You can see this is the water. It's coming through there. And I'm just looking
where this is actually coming through and where
it needs to come through. So basically, I need to come in, press tab, press control. And what I need to do is put
in an edge loop in there. So let's actually
overlook how far this is. You can see I can't put an
edge loop in there because obviously the water
is like this. So I don't really
want to do that. What I want to do is, I want
to get it all the way up to. In fact, you know what it is. Actually, Let's put it on
object mode and so we can see. Let's also put X ray on. Let's press control.
There we go. That's what I wanted. Let's
bring it up to there then. Turn X ray mode off, and let's put it
just in under there, like so. X ray mode back on. And then let's come in and
grab this face and delete it. So delete faces out of the way. Now, let's come in background to the side
that we're working on. And hopefully, there might
still be a bit of water there. Save a look. Still a
little bit of water there. So, you know what
I'm going to do. I'm going to come
back to this part. I'm going to com then and put
in object mode, X ray on. And then all I'm going
to do is press K. Well, press tab first K, bring in a knife tool and
just cut that tiny part away. So like so enter, grab this part, elite
faces. Here we go. Alright, that's dealt with that. Now, let's see if we can
actually see that water now. So we can't see any water.
We can see our terrain. That's fine. The water
is still in there. It goes all the way up to
here, so that's fine, as well. Again, illusions,
guys, illusions. That's what we're
doing here. All right. So now we fix that.
Let's come in then. And what we'll do is we'll
grab this going all the way round two, this point here. And then what I'm going to
do is I'm going to press Shift D. I'm going
to then press P, selection, and
just split it off. And then we're going
to come back to it. Control A all transforms, right, plate set origin. Where is it set
origin, two geometry. And then what we'll
do is we'll come back and I want to actually
create my stone blocks now. So on here, the stone block, it's going
to come from there. It's going to go
up to there, but this one here is a little
bit too tight there, so I'm just going
to press control, like so. And then
what I want to do? You can see now I can get
2 stones out of here. You can see here though
I need another one. So I'm just bringing in my edge loops into
the edges of here. So that's the first
thing I'm going to do like so. You know what? As I'm doing this, I'm
just going to go back because I'm going to just
make it easy for myself. So I'm just going to take
this edge loop away. And then what I'm going to do
is I'll just do this part. So if I press Control, I can bring it up to here. And then what I'm going
to do is I'm just going to right click and
mark the scene. Then I'm going to press Control, bring it up to here. And then again, I'm going to
do that one again, actually. Control bring it up to here, hold in the shift
bon click Mark seam. Then what I'm going to do
is put this onto x ray, put it onto object, and now I can see what
I need to get rid of. So it's this point in
here, delete faces. Now, let's work on this. So Control bring it
up to this point. Control, bring it
up to this point. Like, so, move it out
a little bit. Like so. And then let's actually
delete this point now, so we can delete both of
these, so delete bases. Though I was doing it
with adding seams on, I think, is it easier
to add seams on? Not really sure. I'm
just going to bring it up and then bring it up. Pull it over. And then
delete bases out the weight. Alright, so now
we've got a pretty good tactic nailed
down for doing them. All I'm going to do now is just come in and bring them up, and then I'll delete them after. So I'm just going to press
control, bring in them up. I'm gonna press control
ar on this one. Like so work my way round. Like, so, Like, so and working my way s around
all of these. Like so. And then from there, you can
see this ones a little bit. I'm just going to
pull it back in. And if I can't do
that, I'll just press control and bring it in. Like so. Then control. And then control. And
once we've done this one, can actually make start then. This one's okay on
the straight bits, which are much, much
easier, of course. So, well, we want to keep these wooden parts
so they can be seen. So control. That one's
actually okay, probably. And then we've just
got this one here. Control. And then this
one in here, so control. Then control, bring it
up to that point now. Alright, now, let's delete
the ones we don't need. So they're going
to be all the ones basically where the posts are, so you can see where
these posts are. So just come in and delete
them all out of the way. So Like, so that
one's been deleted, so delete and faces. Alright, now we've done
that. Let's turn off this, and we should end up with
something like this. And now we should be able to bring out these actual stones. So Control A transforms,
origin geometry, add in Let's turn off
the bevel, first of all. Let's add in a solidify first, so solidify. Let's pull it out. And there we go, we
want to keep them as behind this wood, as I said, so keep them
coming out, coming out, so. Let's right click, Shade Smooth, or right click shade flat
because you're going to have a better idea of what they're
going to look like, then. Now we want to do is we want
to split off these stones. So, in other words, if I
come in and select this one, we should be able to see now where the stones
are going to go. So if I come in, left click, right click, Control
left click, right click. Control, left
click, right click, and we're just going
to basically just give them a few more edge
loops, right, so. And this will enable me then. Bring in my stones, and I'll show you I'm
going to do that. An like this, pull them out. So I want to grab this one, and I'm just going to
pull it out into place just to get it a
little bit tighter to that one. Same for this one. Like so. And then bring in an over edge loop
and then control. Like so I'm working
our way round. I'm going to move this
one a little bit. Not that way. Put it this way. So Control. Let click, right click. And then this one might be okay. Let's move this one out. Like so then Control
click, right click. And finally, then these here. Now, we can see these
are a M. So with these, I'm going to come
in facelt put it on or try and grab this face. And you can see the
problem is, Of course, I can't move it like
that because it is solidify let's pull that one back in place
and then pull it out. So let's do this one
then. There we go. You can see these need
pulling back a little bit. This ones they're starting to actually come in front of it. That's fine. We don't mind a little bit of that.
That's absolutely fine. Alright, so now
we've got all these. Now I want to do is we want
to kind of split them off. So we want to split
each of these off, where we're going
to have the stones. You can see pretty much
though some of the stones, you know, we've got they're quite uneven, so
we can use those. So all we're going to do is
split each of these off. So I'm just going to come in, and I'll split
each one of these. So I'm just going
to slit kind of the middle one on each of these. If it's like one with two, just slit both of them, like so. Same for this one. And then
the same for this one. Same for this one.
Don't forget that bit in the inside, like so. And then the same for this one. The for this one,
Tame for this one. And then on this one,
we'll select these two, like so, and this one's all one. And we're gonna
press y. And then what we're going to
do is press control, bring in a few edge
loops on this one, select the middle one, press y, and split them all off. Now, from here, then,
they're all split off, as you can see, So
what we need to do now is we need to
bring in a bevel. So add modifier, bring in
not a junction A bevel. So generate a bevel, and there we go, Let's
turn up the segments. Let's turn down these now. So turn them down a little bit, like so, to make them
look like stones. And then we go, that's
looking quite good. Now obviously, the
one problem we do have is is that these stones, they all look pretty similar. They're all the same height
and things like that. We definitely don't want that. So what we're going to do
is come to our solidify, hover over it, or click the little down arrow, click apply. And now we want to do
is we want to come in. And move all of these out. So I'm going to come in,
bring in my randomize. And then all I'm going
to do is press G very carefully just to bring them out and bring
them up a little bit. Like so. So let's
bring some of them up. Like so some of these ones, and just make them a little bit uneven going all the way around. Like so. Pushing, So
they're all uneven. So G, the mop. And then G the mop All right. Now you can see those
are quite uneven. You can see they're
looking pretty nice. Let's double tap the A. And there we go
thinking that looks. Pretty nice on these stones. I think I'm happy with them. I'm just wondering, do I need to pull any of them
out a little bit more? So let's pull some of them out
with portional editing on. Look, so And then the last
one will be this one. Let's pull it out.
And then we go. Now, let's have a look what
that actually looks like. So what we'll do is we'll
actually grab them all. We'll wait for this to
load up or grab them all, press A, u, Smart UV project, click, and then bring in minus off both of these in object
modes and minus them off. Not this one actually, we
just change it over to stone. There we go. He
the A there we go. That is what we're looking at. Now, let's have a quick look at these and decide if we're
actually happy with these. I think they're going
to look pretty nice. Let's put it on rendered view. Yeah, and I think that just
finishes it off nicely. I'm just wondering if I want to make them
a little bit bigger, so if precess and and
then pull them up. Yeah, I think they look
a little bit bigger. I just think they look so yeah, they're a bit more chunky now. They're a bit more,
you know, in place. So now what I want to do
on the next lesson is, I want to get them going
all around here as well. And then that is this
part pretty much done. And from there, then we can
make a start on this part. I just wondering if I want any more stones in here
in this part here. I might add Just
1 stone in here. Or, you know what? I
won't add a stone. I'll add actually one
of our stylized rocks. Yeah, we'll add a
stylized rocks in there. I'll do that on
the next one now, cause I think we've got
a few stylized rocks, but I'll show you the weird. We'll do that on the
next lesson. Again, it's a little bit of respite
from what we've been doing. All right, everyone, so
hope you enjoyed that. I'll see on the next
one. Thanks a lot. Bye bye.
117. Creating Stylized Stone Props using Stone Geometry Node Generator: Welcome backo on to Blenderport modeling
and Got node workshop, and this is where
we left it off. And now what I want to do is
bring in one of my stones. So I'm just going to put
it on object mode for now. I'm gonna press shift day I'm
going to bring in a cube. Where is the cube,
it's over there. Doesn't really
matter, by the way, what size it is or
anything like that. What we want to do now is
come over to Asset Manager, go over to Gordes and we should have one that says
stylized stone. That's the one that
we want to bring in. But what I'm going to do then, bring it in. Drop that on there. There we go. We have
a stylized rock. Now, let's come in over it, and let me show you how this works. So I'm just going to press tab. I'm going to put it on
my rendered view just to show you how nice this
rock actually looks like. Let's come over
to our modifiers. Now at the moment,
this is a bit dark, but we're not going
to worry about that. What we mainly want to
show you how this works. So first of all, you can change the seed. We'll change the rock. Let's put it on the object mode. Now, you've got the idea of it. I'll change the rock
into anything you look. Then we can actually change the whip or we can
change the height with these can change the minimum
scale or the maximum scale. We can actually change the
resolution of this rock. If I turn this all the way down, you'll see it base
becomes nothing. I can also change the roundness, so I can have a extremely
round, like so. I think we're going
to keep on 0.7, and mainly, we can
change the actual noise. So if I change this noise up, you can see we get a much, much cleaner or dirtier, you know, look in rocks. So really, really
handy this one. To using all of your projects
and things like that, it's also really, really simple. We can also change
down the subdivisions, and then it'll be less
heavy on your computer. I'm going to put a three. And
then what I'm going to do, I'm just going to
put this into place. So I'm going to put it at the
bottom of the steps here. And you can just
bring in another one. So if f press D, grab this one, turn up the seed. You'll see actually
doesn't affect this seed. I'm going to just
keep bringing them in and populating this thing here, so turn up the seed. Like so. Turn up the seed. Like so. You can see how easy it is. Now, which rock do you want?
I think I want this one. I'm going to come in, bring
this rock in. Like so. Let's bring it up into place. Let's put it a little
bit smaller, of course. Let's put it into place. Like so. And you can see
That's looking pretty nice. Let's also rotate here, I think, so our x, rotate it
round into place. Bring it up t so it
sticks in there, like so, double tap the
A, and there we go. Now, let's come in and actually
fix the color of these. So just delete all these, we'll come to our rock. You can see it's
called stylized stone. Make sure it's on
here, so let's bring stylized stone, this one here. And then all I'm going to
do, is I'm going to go over to my shading panel.
Let's go over to there. Let it zoom in. So let's zoom into our rock. And let's actually come in and we've got it render
view, so that's fine. Now, what I want to
do is basically, I want to change the color. Let me see if I can come in and change the
color of the rock. So color of rocks here. Let's pull this out here. Let's bring in a
hue and saturation. So search hue saturation. And let's come in
and bring that down. So that's the U, but we
don't want to change the U. What we want to do is bring
down this saturation like so. And now you can see dad's
looking much much nicer. The other thing you can
see about it is it's got a lot of hard edges
on there really, really suits the scene. Now, we're going to be
putting more rocks in. So we're going to have
a rock over here, for instance, some
rocks around here. But for now, this
is just showing you how this geometo works, and especially how
the shader works, because we did a lot of work
on making the shader really, really nice by making sure they's got a lot
of Edgeware on it. Also, something else, as well. If we bring in another rock, You should't be
able to see there's a difference in the color
variations as well. We're bringing in another rock. It's very slight, but you
will be able to see there's actually a slight difference
in how they're colored, and this is due to this
is the bevel actually. Let's have a look
at the other parts. This is due to this part here, which is randomized per island. Alright, so let's actually
I've got this rock here. Let me see if I'm going to press ship space bar,
bring it in my move tool. If I should put
this rock in here. So let's move it over.
Let's prear and Zed. Put it over here. Let's make it a little bit smaller then. Just so it goes right
at the edge of there. Let's delete this
one out the way. I'm not sure yet if I want it
in here actually like this. So I'm going to check it out. Make it a little bit smaller. I'm going to rotate
it round so I'll Zed. And I think that would be a little bit too much in
the way at the moment, so I'm just going to pull
it back into place like so, and then I'm going to rotate
it so art and X rotate it and then pull it out and then rotate it a
little bit on the y. In that way. Like
so. And there we go. That one? Yeah, that's
looking out wanted. That's looking very nice
now, very realistic. We can also add some, you know, some ferns or something
on there as well, but I just want to hide
that out of the way. We could also hide where
this actual, you know, ivy comes out of place as well, but I don't think I want
to do that at the moment. All right, so that's
that bit done. Now, let's go back to
what we were doing. So we want some rocks, also. Come in around here,
so this part here. So what I'm going
to do is actually, I will come to my
wall, grab this wall, press shift tes to selected, so I've got somewhere where
my cube is going to come in. Shift date, and then what
I'm going to do just bring in a cube to press tes. Then bring it down to the
place where I want it. Like, so. And I'm just thinking
on this one on this one. I'm going to put this into here. Like so and then press S
and y pull it into place. Then, what I'm going to do
is I'm gonna press Shift D. S and. Let's just put
these into place. Like so. And then sift D. Let's pull
this one back a little bit. Let's pull this one out, and then Ss, pull it up. Then S and y pull out, like so, so it's
nearly touching, and then shifty, bring it over. And this is, of
course, the other way, how you can do rocks. So S S and y, pull it in. Like so, and then just always always just make sure that
they're not actually, you know, the same size
and pulled out the same. So we'll spin this
one round, so, x, 90 for this one in place. Make sure it's out like so. Then shifty, bring it back. Spin it, so, X 90,
spin it round. S. Then just pull the
front of it out. Like so. Alright, now, let's join all of these together and see what
they're going to look like. Control J. And then what
we'll do is we'll press A. Come on up then mesh. Transform, and we'll
bring in a randomize. Like so. And you can see,
'cause they're nice and blocky. It's actually done
a bad job at all. And then all we're going
to do is come in and add in a generate a bevel, and then we'll put this
down on point not five. And let's turn this up one, like so, and I think
we're going to have to resell the transforms. There we go. Set
origin to geometry. And I'm going to
actually put this up. Let's have a look at
what they look like, what's at the A. I'm thinking that's going to look
pretty nice round there. Apart from this one. I
think is a little bit. Look out. Like so. All right. Now, let's see if these are a little
bit too bulky. What I'm going to do,
I'm going to bring in a material, stone. I'm also going to wrote
the mall, Smart V click. Put in our rendered view. Double tap the A. You know what? Thing that actually looks
more realistic like this with these
big stone blocks. And now we've got those
on the next part. It's going to be
even easier because I'm just going to hide
all this stuff away. And then what I'll do is
I'll just use a plane to do pretty much what I've done here and just make it
a little bit quicker. I just wanted a quick test just to see how
it's going to look. Yeah, and that's looking
really, really nice, actually. So, yeah, on the next one, we'll just go to object mode, and we'll get it
actually prepared. So what I'm going to
do? Just put it onto material or object mode
doesn't really matter. Let's put it on object mode because it'll believe it easier. Then let's come in.
Hide these out the way. I have this, this.
I these parts. And now we've got a really
nice place to actually work. So we want them come in
all the way over to here, here, here, and all the
way around to there. And then I think this bit is
actually finally finished. All right, everyone. So
let's save that out. And I'll see on the next
one. Thanks a lot. Bye bye.
118. Applying Vertex paint terrain shader: Welcome back everyone
to Blendfor Modeling and Jomo workshop, and this is where
we left it off. So, now we're going to do is just this piece here. I'm
just actually looking out. I'm just going to put
it onto object mode so I can actually
see what I'm doing. And then what I'm
gonna do? I'm just going to grab my guy here. So ShipDa selected. And then what I'll do is
I'll bring in a plane. So Ship's bring in a plane. I'll spin it around
then, so Xin too much, so X 90 so we'll
put it into place. Jaws, popping it
out through there. And then what we'll do is
we'll press S and Z and bring it down into
place. Like so. And then all they'll do is I'll pull it across to this one, making sure then
they're in the ground. Like so and roughly the
same out as this one. Then what we'll do is
we'll actually grab it. You can see when I
come in to grab it, I can't actually see it,
so let's put our ray on. Let's grab it going up
to this corner without portion editing on. Turn
that off? There we go. Pull it up into this corner. And then I'm just going
to pull it along to here. So and y, pull it along to here, s to the side of
the wall like so. And then what we'll do
is we'll press Shift, bring it over to this side. Put it into the
side of this wall. And then all we're
going to do is press and y and follow it along. To the edge of this point here, and even we'll turn this
off for the moment. Yeah, I can't really
see that at the moment, so I'm not going to worry
about it what I'm going to do, though, is press
control all transforms. And then what I'm going
to do is, I think, before I solidify it, I'll just bring in
some edge loops. And I'm just going to
bring in a few edge loops, like so left click, right click. Few edge loops on
this one, left click, right click and a few edge loops on this one, left
click, right click. And then all I'm
going to do is just break up some of these rocks. So I'll make some smaller, some bigger and just alternate the scale and size
and things like that. Of course, I want
one in the corner. Now, the thing is
with the corner one. T one's going to come out
here to roundabout here, so I'm just going to
put one there for sure. And then I'll do this
one, this one, this one. And then this one. T one. And then three
let's have one like that. Right click. Marco sin. Now, first of all, let's
get rid of this one. So delete and faces. And then what we'll do now is we'll come in to each of these. So I'm just going to press
going in every other one. And then we're just
going to split them up. So why split them up, press tab, control
late or transforms. Origin to geometry,
adding a modifier, and we'll bring in a solidify. And then all we're
going to do is pull up the thickness, and
we'll bring it this way. So. You can see that it's
actually touching there, like so, and we've got a little
bit of a gap down there. Let's bring it out
a little bit more. Like so hold in the shift born. Like so. Alright, let's
now turn this off, and this is what we should have. And then all we're
going to do now is come in add another modifier. We're going to generate a bevel. We're going to first of
all turn up the segments. And then let's just turn
them down a little bit. Now, we can see that we're going to have to pull this
one out a little bit, just to get them
all to be lined up. I'm also going to turn this
down just a little bit more to be round about the same as these
which they now are. So let's first of all
come into this one. And then what I'm going to
do is just pull this out. So it all lines up
now beautifully. And then I'm just going
to come to this one now. And what I'm going
to do is I'm just going to do it the
easy way, actually. I'm actually going to apply the solidify first,
I also control A. Let's apply that, and
then let's come in. And what we'll do is
we'll just press A, delete, and we'll go
with limited dissolve. So a limited dissolve these makes it much easier
to actually work with. Now, we do have a problem in
these ones, as you can see, they're the wrong way round, all I need to do, though,
is just come in. And because they apply
that solidify already, I'm just going to come
in and grab all these, and then I'm just going
to pull them out. Turn that off and then
I can just drop them into place like so,
and there we go. And they're going right under there as well. So
that's perfect. Now, let's then come to these ones first,
and we've got them. So I'm just going to pull
some up, pull some down, and then all I'm going
to do is pull some out, like so, and just do it
a little bit myself. First of all, before
I do anything else. So just pull them up, pull
them down, them up like so. And then what I'm going to do
is I'm going to come over, put proportionalit and on again, and then I'm going
to just grab one of them and pull them out like so, grab another one,
pull them back. There we go. So pull one out. Pull one back, and you get the point we've done this
a lot of times already. We can pull these up, like so, and now they're now some
uneven on that one. Let's do the same thing on this. Like so. There we go. Alright, so they're
looking pretty good. They look about
right with these. Everything then is
coming together now, and all that is
pretty much done. It's up to you, whether
you want to put some round there?
Don't think I do. It'd be nice to put a barrel or something in there that
would look pretty nice. But for me, I'm just going
to leave that the way it is. Now, last of all, all I want
to do is copy the material. So I'm just gonna grab this one, press Control L, and then we're going to link
materials like so. And then what I'm going to do is just put it onto material mode. And hopefully, then I should
should just need to unwrap. So let's put them there we go. Let's press tab, A, and, Smart UV
project. Click Okay. And there we go. That's that. Now, let's press TH, bring back this main part, and this is what we
should be left with. Let's save out our work
them. So save it out. And then what we'll do is
we'll put this on render view, have a good look around
what it looks like. And there you go, you can see how nice that actually looks. Now, you can see
that it's really, really stuttering right now. So as I told you before, just put this on object mode. Go to file and save it out. And then what you want
to do is just open recent and just
reopen it, like so, and you will find now once you put this onto rendered view, it will actually be quicker to move around, as you can see. But all that happens is it gets a lot of things in
the cache, I think, and that actually hinders it actually moving. And
now we've done this. Let's actually do
something a little bit different before we
actually come to this park. I've done a lot of
building right now. What I'm going to
do is I'm actually going to come to my terrain. Now, to tackle the train, the first thing I want to
do is press shift in H, hide everything out of the way, and let's put it on object mode just to make it easy
to actually deal with. The next of all, what
I want to do is I want to come in, grab my terrain, and you will see if I add a
modifier on, first of all, let's press control
or transforms, set the origin to the geometry. And then what we're going
to do is add in a generate, and we're going to
bring a decimate in. Now, you'll see straight away when I bring my decimate in. This is actually face
count at 1.4 million, which is way, way too
high for what we need. Now, there is a few
other things we can do, first of all, to bring this down that might make it easier. So if yours is this high, rather than trying
to bring this down, just go back over to scalp
mode, over to scalp mode. And then what you
want to do is press the R button and
bring this down. So there's nowhere near as high. So you can see, I
can bring it back, bring it back to something a
lot more usable like that, and then you're going
to press control. That then we'll read apologize, all of this that
we've actually got. And now, if we go
back to object mode, you will see now if I come and
adding a generator decime. You will see now we're
at 380,000 while keeping All of this a
relatively nice mesh. So the problem with decimating is that it makes it
hard for texturing. It makes it hard for
when you want to add in your plants
and things like that. So what you want to do is bring this down because
decimate, what it does, is it adds in loads and
loads of triangles, and that's not something
we necessarily need. Now, the other thing is we
need to actually unwrap this, so you've got to make sure that your computer can unwrap this, so it's low enough
to actually unwrap. At the moment, you
can see that I've not really lost a lot of my detail on here
from just doing that. So I'm going to actually bring
it back a little bit more. I'm going to go to sculp
I'm going to press control. And then what I'm not control. Sorry, I'm going to press R. And then what I'm going to
do is bring it down, bring it down, bring it down a little bit more,
something like this. And I'm looking to see if
I lose any of this detail. So control r and there we go. We've lost a little bit of
detail, but you can see still, most of this work that we
actually did is in there. And again, if I come
to object mode, and then I go to add modifier
and bring in a decimate. You can see now it's at 260,000, and I think that's something that we can actually work with. All right. So next of all,
what do we want to do? We actually want to come in now. And bring in we need to
UV unwrap it basically. So if I come in, press
tab, grab everything. And what I'm going
to do is press U V, Smart UV project, click. Now, sometimes it
won't always unwrap. So if I go over to UV, it's in, if it doesn't unwrap, instead of doing
that, just press, come down to light my
pack, click that on, then click the Smart UV project, and it should actually work. But for me, now, it's
actually worked, so we're in business. Now, the one thing
we've not got in here is our proper material. At the moment,
we've got terrain. Let's see if we've
still got ground. So what I'm looking
for is our ground. So let's scroll up. And we've not got that in there. So what I'm going
to do, I'm going to come over to asset manager. I'm going to come over
then to my materials. And the one u one is
called ground material, and I'm just going to
drop that on, like so. From there, then
I'm just going to go back over to modeling. I'm gonna press the tab. I'm going to go
into material mode. And you should see
when this loads up. Something like this.
Now, of course, this is not what we want,
but it does give us a good idea of the size
of the actual rocks. And I would say that these rocks at the moment are looking
a little bit big. So everyone is going
to be different. I would say these are a little
bit big for what we want. So what I'm going to
do is I'm going to first of all come over
to my shading panel. Now you can see,
we've got cliffs, we've got a light soil, and we've got dark soil. So we've basically got three actual materials
all added together, and what we're going to
do to paint these on is basically using our
actual vertex painting. So we're going to be
painting on the vertexes. Now, before we do
that, as I said, This at the moment
is a bit of a mess. We don't really want
that. So what are we going to do as well is
these are a little bit big. So I'm going to
comb to my cliffs. So these are the cliffs. You can see at the moment
the scale is eight. I'm going to turn
those then to eight, and you'll see now they all change over because of the size. Let's change it to six and
you'll see the difference. You can see how they're much,
much bigger now like so. And I think that looks roundabout I'm just
looking on these bits, round about the right
size of what I need. Now, this is going to
take time because we want to make sure that we
do a good job on here. I'm going to show you all
the little intricacies of this on the next lesson. And before I do that though, we're actually going
to come in and we'll just put it over here. I can show you that these
are all on seven as well. Better off if you turn
them all down to the same. If you're not sure,
but I'm just going to leave mine on
seven and seven. And then when I actually,
so seven over here, when I actually come
in and start painting, then I mine actually
going and alter them. All right, everyone, so
I hope you enjoyed that, and I'll see on
the next one lots to learn on this new one and a bit of a respite from all of that building
that we've been doing. Okay, everyone, thanks
a lot. Bye bye.
119. Painting in stone and dirt textures using vertex painting: Welcome back, everyone to Blender poor Modeling and John China workshop, and
this way left it off. So if you want to create
your own actual shades with, you know, texture environment
and things like that, then blender there are
other ways of doing this, but this is perhaps the easiest way where
you're basically grabbing three actual
different textures, and you can see here how
we join in these together. We join them into a
mixed shade here, and then we join them into
a mix shade over here. And now we're breaking them down actually is done by
color attributes. So we've got red, we've got
green, and we've got blue, and that is what
we're going to use to be actually painting it on. So you can see these
all going to here. You can see on this one,
we've got our red one. And over here, I think it is. We've got our blue one, so somewhere over here. I'm not sure where this one is. I think it just leaves it empty so that is the other
one that's going to be used. So that's what's
basically happened there. So red green and blue.
Anyway, you get the point. Let's come over to modeling. Let's then press tab. And then the moment to go
now into vertex painting, this should all
change, which it does. And now you can see we've got
this lovely mess like this. Completely not what we want. But what we can do now is we can actually come over,
find the right color. So let's have draw. Let's put it on the green, for instance, and we should be able to
if we find the right one because the only problem is that they're actually being put over the top of each other. So we just have to take
that into account. Now, what we're looking for is to paint this
on so you can see, if I put this on object mode, you can see there there's
some drawing on there. What I need to do, first of all, before actually seeing
where the rocks are. So I'm going to see
where the rocks are is find the other color. Now, sometimes when
I put the rocks on, so this is the blue,
as you can see. Now, sometimes it will be under either the other color or we'll have to come and minus
it off, and there you go. You can see now we've got the three colors that
we actually want. Now, what I prefer to start with on this is perhaps
this color here. So what I tend to do, I'll come to this because at the
moment it's drawing on. So then what we want to
do is, you know what? I think I'll leave this on here, and we'll do it this way. So you can see that the red
is going to be this like so. If I come now to the blue, you will see that I can draw
over the top of it like so. And if I come hopefully
to the green, I should be able to draw over the top of this one, like so. So pretty easy to use. Now what we're going to
do is we've got green, which is going to be this dirt. So green is dirt. Make a
note of that, if you want. Green is dirt. The blue. I'm actually also going
to make a note of this. So green is Green is dirt. Blue is going to be I think that's going
to be on my rock. So if you put it on blue,
you can see that's my rock. Blue is rock, which means that red is going to be my soil. Like so. All right. So let's come in
then, first of all. And what we'll do is
we'll put this back to my soil, which will be red. So we'll go to red, put it
on red. Put this so back. And that's not the right one.
So we'll try the other one. I'm sure I just
said this so green. There we go. Green green it is, we'll put it on green
and go over there. Like so, like so. Like so. Now, it would be fairly heavy handed when you
first come to this. So let's put this
on object mode. And now we can see it's
all green on there. So we want blue. We'll
be first of all. And what I want to
do is want to place this blue around
these parts of rock. So you can see where all
these rocky outcrops are. That is where we want
to place in our blue. Five come in, you can see
it's going to be all down there all down
here, around here. Around here, like so. And basically, we're
trying to follow the contours of this part here. So we're just going to go
all the way around here, like so, and don't worry. We're going to do a
lot more work on here. I know what you're
thinking. You know, it's not coming out right
or something like that. Do not worry about
that at this point. Just focus on getting the rocky outcrops done
first before doing anything. So we're just going to work
our way around here. Like so. And then once we've done that, then we can actually
work on the other stuff. So basically, wherever
there's a rocky outcrop, that is what I'm trying
to place on here. And I'm just doing
this to begin with. So I can actually lay down
some foundation on it. And from there, I'll show you how to work this properly
so you can see here, here, maybe here a
little bit here, like so, maybe some under here. You just work your way around with the rocks, first of all. So one here definitely
one on here. Like so. And then
one on the inside. Like so. And definitely
not any on there, but I can minus those
up in a minute. I'm not going to
focus on, you know, the inside or anything like that underneath is what I mean. On here, on here, on on here. Now, that's that bit. Now, let's put a little bit on here. Let's put a bit on this
side on this side, like so, and maybe a little
bit on here like so. All right. So now what we
want to do is we want to put on our soil. So what
I'm going to do? I'm just going to go to vertex, put it on object mode,
not object mode. Put it on material mode. And there you go, you can see where I've
got at the moment. And now we want we want
our other kind of dirt. So dirt is going to be green, hopefully, let's
put it on green. And the other thing is, if you can't find
the right color, just make sure you put
it on GB and make sure these are set to zero
except the green, of course, which
should be set to one, and then you'll get
the perfect green. Now if I draw over here, I can draw over
that, but I don't really want to do that.
What I want then. Let's try the other color, which should be red. Let's try red. And there
we go, that's what I want. Now, what I tend
to do on this is I'll come to the high
points, but without, not we Basically, wherever these high points are because these will
be the high points. What I mean is not the parts that are kind of
dropping down here. I don't want to do those parts. What I want is these high parts, including including
most of this part, which will be where my actual all of the
cobblestones actually are. So I'm going to go
over to there like so. Like so. And just
go over Like so. And especially in
where my pond is. Like so, like so, Like, so. And like so and
all around there. And then the other high
points on here where my kind of grass is going to be. So any, which is
the high points, like so, these points
going down here, and you can see I'm not
really st About getting, like, really, really
accurate or anything, all I'm trying to do is
just get it laid down because I know and in a minute, I'm going to bring
it all together. So these parts here. I'm going to go in. I'm actually
going to turn this off, so I can actually see what
I'm doing. There we go. These parts on here. L
so this part on here. I just work my way around now. Put in my dirt in
different places. Like, so, and a little
bit of dirt on there. Wait my way around. Maybe
a little bit on there. And I think you're
on these edges here. Like so. Okay. This is
looking pretty good. Let's put it over there as well. Then we've got a little
bit going over here, and all of that
looks pretty nice. Now, the next thing
we want to do, we've got a few
other options now. We've got the average
and we've got smear. I like using smear because you can see if I
grab it from here, I can kind of smear it this way. And what I tend to
do, then is just come in and smear
it a little bit. That makes it a
little bit easier. But the main one you want
to use is the blur one. So if you come in,
you can blow it out. You can make it. What's the
word for it? Less obvious. So you can just come in.
And blur it all out. And the other one you've got,
of course, is the average. So if I come in and
grab the average, I can actually really then start to drop these colors back. I tend to do this then going all the way around
now on all of the parts, just dropping them
back a little bit, just so we can blend them
in a little bit more. Now, we'll show you what
this looks like, then. So if we come and put this on render view, let it load up. And there you go,
now you can see that's what it's going to
look like you can see that. These are really, really deep, and these are a lot less. Now, what I'm going to do, then I'm going to just put this back onto my material view. And then what I'm going to do is I'm going to
save out my work. So let's save it out. And then what I
want to do is just not quite go as much
with the strength. I'm just going to turn down
the strength a little bit. And now I'm just
going to come in and kind of blur these out, like so. And then I want you
just to go around. All of these parts, especially the rocks where
you want to blow them out, and especially this
dirt because you want it to be kind of feeding
into each other. Like so especially on the edges. The edges are the
most important thing. So we want to really, really just tone down these
edges going around here. Like when you can see now, it's really starting to come together and you'll
see even more. Once we've got the grass on it, because then once we've
got the grass in it, we can really start doing
a little bit more work on this and getting it really
how we actually want it. So you can see now
we're toning them down. And especially on this edge, you can really see how
this is starting to look. Really nice. To these bits down. And these bits on
the front here. And especially these
bits on the here's tone them down. Like so. There we go, and there might be a few too many rocks in here. If there is, we're just going
to minus them off anyway. So no problem, especially
on these parts like this. Or there might be, just
a few too many rocks. And once we've got the grass in, then we can really start to
tone them back down as well. So now you can see,
is what we've got. Like I said, I think I'm happy with these parts around here. I think I'm going to tone these bits down a little bit more. Like, so, To them down. Towing all these down as well. Now you can see it's
starting to really come what we actually want it. There we go. That is
looking pretty nice. Let's come in now
to these ones here. Really start to pull those back, especially DN
they're coming up to the lake or the pond or whatever you want to
call it. There we go. Just keep toning them back. Till happy. With how it looks, Okay. That's looking pretty nice. Again, I think we might it will still need to be done
a little bit more. But now we'll do is we'll
save our work again, and we'll see you
on the next one. All right, everyone.
Thanks, lot. Bye bye.
120. Starting to work on final structure corner of wizard environment: Welcome back everyone
to blend for modeling and Jump
chino workshop, and this is where we left off. Now, let's come back
to object mode now. Let's put on these two
interlocking links. Let's double tap
the A. And finally, let's press tag and bring back our Wizards Tower.
Let it all load up. It might take a little bit of time to actually load that in. Double tap the A,
and there you go. That is what you should
be left with now. And now, it should look
a ton, ton better. So if I go over to
file, I go to save. And then what I'll
do is I'll put this. I'll turn these two
interlocking links on. I'll go in then
into rendered view. Let's have a look what that looks like when this loads up. And there we go. What a
difference that makes? Now, imagine this when it's
got a load of grass on. It really is going to
start to look nice. You can see now all of
those little rocky outcrops are really showing through now. And we can also change how
dog and things like this is, but it wouldn't do
anything to it yet because it doesn't
look quite right yet. Just fat down to
the simple fact is that we've not got nowhere near enough grass or foliage or plants or anything like that in there. This is just the base. If you basically went somewhere and you just removed all the grass
and everything, you probably end
up with something that looks a lot like this. Alright, so I'm happy with that. Now, what I'm going to do
now is come to my steps. I'm going to put it
on material mode. I'm going to come to my steps. I'm going to put my two
lit in links on again. And what I'm going to
do now I should be able to basically come in
and apply this o node. So object, go down to convert. You know what? Before I do
that, let me just make sure. I'm just looking at
my stairs, depth, base, holes, and it's only
the stairs that are on. And then what I'm going
to do with my steps is I'll just come over, object, convert to mesh, press the
tabon and there you go, you can see we've got
our stairs all in there. And then what I'm going to
do is I'm going to press A, smart UV, project, click, add in another modifier. This time will be a bevel. Let's turn it down to a 0.3. Let's come in then and add
in our material. So minus. Turn the stairs into planks. Like, so, and hey ho. That's what you
should be left with, and we're not even
done with these yet, but now we can see they look a ton better as well. All right. So now we're on to
this part round here. Now, I think the first
thing we'll do on this part is probably
get the top in. So just the top in.
And then what we'll do is we'll actually get
the roof in after that. So let's come in then. Let's
put it on object mode. It's gonna make it a
little easy to play with, and we'll save it out. Then I'll come to this one, which is obviously my wood
it's got no curve on there. Shifty. Let's bring it over. Like so. And then what I'm going to do is
rotate it round. So x and 90 rotate it round. Let's put it right in
the center of here then. So what I'm going to
do is grab this part, shift Sur selected
and grab this part, and then shift and
selections curta. And then what I'll
do is I'll make this a little bit bigger
by pulling it out, and then I want to pull
this all the way back. I also want to make
sure that my roofs actually going to be
sat underneath there, which means I want to
pull it out this way. So S and X. Let's pull it
out this way, like so. And then let's grab the
top of it and pull it back without
proportion editing on. So let's pull it
back into our roof. Now, with this part of the roof, I don't want this to be too sophisticated or
anything like that. I don't want it to be
so neat like this. I want it to be a
little bit different. And instead, all I
want is just to put a simple support
going up to here. But, first of all,
before we do that, let's get our planks
of wood in that are going to go down
each of these sides. What I'm going to do is,
I'm going to grab this. I want to press shift D, Z 90. Let's press the S born, shrink it in a little
bit, and then what we'll do is bring
it out like so. So I I bring it
out, I should now be able to press R and y, and rotate it round and get it going in
the right direction. Let's then bring it this way
by putting it onto normal. And I should then be able to pull all of this
out into place. Now, what I'm looking for is the ties jaws to hang
over the top up here, which means that I can pull
this down, pull this down. And now I can see how I need
to bend it so you can see, it's not quite in
the right place, so let's press and y. Sorry, r y. Let's press. Oh, and X, I think it is? Yeah, there we go R and X
and then we can pull it up, and the roof tiles
can go over the top. Now, from here, what we can
do is we can also come in, grab the end up here and just
pull it back to we want it, which will be something
just out of you. Alright, so now, let's come in. Rab the roof tiles before
we do anything else. So shift nearly on the last
roof tiles of all guys. So that's pretty good. The only problem I've
got is that I didn't. I don't think I did
keep the round ones. So keep these ones like this. So I'll think I'll have
to create those again. That's a shame I
didn't keep them, but Ah I'll have to
create mines again. Let's press the dot born. Let's spin this round. So I'll say 90, let's
go over the top. And then what we're going
to do is press G and drop that into place round there. Then what I can do
is I can pick it up. And we should be really, really good at doing this now. So first of all, though, let's
put it into place like so. Let's actually then
press Control one, so we've got a nice view of it, and then let's come over
to our geometry node. And what we're
going to do is then we'll bring down the rotation. So bring down your
rotation like so. You know, the only thing
that we don't really have on this roof is we've not
had a lot of bending, so real bending on them. We're probably going to do
that actually in a bit. I think we might you know, it would be a good idea
really to grab these roofs. So separately grab
these roofs and actually bend them
in a little bit. I think that would be nice. So I think we'll do that
on the end as well. First of all, though, let's
go back what we're doing. Increase the amount
of the virtues, and you can see
that's how they are. Let's increase the horizontal
count, not by that much. By perhaps that much. I think that will be
everything in there. Maybe it needs to be one less. So 23, let's try that. And let's pull them. I'm just wondering a
little bit this way. So they're just just over there. That's way too much still. So let's pull them this way, and there we go,
something like that. And then they're all in place. And I'm wondering if I can
pull these down a slight bit, so they're better
positioned. Like so. You can see though,
what's happened here is that they need kind of
pulling up a little bit, so come back to this,
pull it this way. Like, so. I'm not too concerned, actually, if the roof tiles are going into the
piece of wood. That's not what concerns me. I just want to make sure
that they're coming down to the end and hanging over
properly, as you can see. Alright, so now
we've got that one. What we can do is
we can press shift. We can press Z 180
and spin it around. And then what I can do is can
line it up with this one. So just line it up
roughly with this one and then pull it into place
to where I actually want it, so you can see now,
something like that. I'll pull it down
a little tiny bit. Like so. Now, let's
grab this one. I'm going to put it
back onto global. And then what I'm going to
do is I'm going to press control all transforms,
set origin, two, three D cursor, adding a modifier,
and we're going to bring in then a mirror. So let's mirror over the
other side, and there we go, it's fitting in.
Perfectly. All right. So I'm just making sure then that this is
going to go over, and all of this now is really
starting to come together. Now, let's deal with
these roofs first. So what I'll do is I'll hide
both of these out the way. So hide them out the way.
Come to my top then. So I just want to grab all the tops of the roofs like this. I'm going to press P
selection, grab them, and then I'm going
to press tab, A, and I'm going to
press and on wrap. Next of all, then,
I'm just going to put this on material
mode a minute. I'm going to bring
in my wood then? Then we're going to change
this from my new inclusion, to planks. Like so. And then I'm going to press tab, tag, bringing back the
roof. And there we go. Alright. That's
looking pretty cool. Now what I'm going
to do then is we'll make a start then on
this part down here. So we want to make
a start on there. I think what we'll
do, first of all, is bring in a piece
of wood here. So I'm just going
to use this part. I'm going to press Shift D.
I'm going to press R z 90. And then what I'm going
to do is, I want to place this right in
the center, actually. So control A all transform
set origin to geometry. And then what I'm going
to do is shift S and selections cursor
because my cursor is right in the center. Let's bring it out then.
Let's bring it down. Like, so and we're
going to have it come in around about here. So just under there, and then go to make it
smaller, smaller, smaller. And then what I'm going to do is press S and X and
pull it into place. Okay, so that's looking good. Let's see how far
it is into there. You can see we've got a
little bit of sliver there. That's absolutely fine. Now what I'm going to do is, I'm going to grab one of these. So I'm just going to
grab one of these pressing L. Shift D. Bring it out. I'm going to
press P selection like so. Control all transforms, right clicks the
origin to geometry, and then I'm going
to press Shift S and selections cursor. And then what I'm going to do is bring it out into place like so. And then just drop this
down over the top up here. And you can see this piece of wood generally should
be over there. If it's not, we can make
it a little bit bigger, so I'm just going to pull it
back into place. Pull it up. And you can see, I need to
make it a tiny bit bigger, so I'm just going to
pull this part up, and I'm going to pull this part. So shift click going all
the way around there, hopefully, like so, pull
it down a little bit. And there we go, that's that
piece of wood on there. And what we'll do then on the next lesson is we'll
get another piece of wood on here and we'll have it coming up and supporting
this part here. And then from there, we'll
start working our way down. I might want to pull
this up a little bit. It might be a bit too
chunky because I'm actually going to want a
window in here as well. So I'll work all that out how it's actually going
to come together. One of the main
things is though, bringing this all in together
is going to be this tower. We're gonna have to mess
around with this tower just a little bit to get it to
where we actually want it, because wherever
we put, you know, our kind of struts that are
going to come off here, it needs to fix with
the tower as well. So I think I'll
concentrate on putting the struts there and build the tower around that, actually. So let's come in, let's
say about our work, and I'll see you on
the next and everyone. Thanks a lot. Bye bye.
121. Adding windows and decorative wood frame: Welcome back, everyone
to blend thefor modeling and Jomo workshop, and this is where
we left it off. Okay, so let's now think about
bringing this part down. So what I'm going to do
I want a window in here, but I want two of these
struts coming down as well. So I want maybe one strut here, and then the window here. So let's give that a try. So
I'm just gonna press shift. I'm going to bring it
down then into place. So we could actually have it. Coming round about
where this is. I think that's going to
make it really nice. And then also, we can have one that's going to come
down kind of halfway. So if I press shift
D, I can bring it down to the halfway
point like so, and I think that's actually
going to look pretty nice. What I'll do then is
I'll grab this one. I'm going to press shift
D. I'm going to bring it down then into
place along here, so I'm just going to make sure that it's in place like so, and then I want
two of these now. Now I want them either
side of here really. Depending on where my
window is going to go. So I'm just going to
leave that one there. And what I'm going to
do is grab my window. So this one here, I'm going to press shift D, drag it over. Shift S, and then I'm going to put selections
cursor, keep offset. And finally, then what I'm going to do is rotate it round. So z hundred and 80
rotate it round. Let's put it into place, and then let's put it down to
where we actually want it. So I'm thinking something where it's going to be on
the top of here. So I want it. I think realistically,
let's have it around there and let's
pull this part up. I think that'll be ideal. So I'll just pull it down a little bit. I'll grab this one. I'll grab this, and I'm
going to pull it up like so, and then I'll grab my window. I'm going to pull it up
into place, like so. Drop it back so it's
off a C in place, and there we go, I think I
can actually work with that. Alright, from here, then we want some struts that are going
to come down each of these. So all I'm going to do, I'm going to grab this one, shift D, and then, y, 90, spin it round. And then I'm just going to
pull it over into place. So one this side
and one this side. So I'm going to press S
and Z and pull it down. You can see now, it's
actually going into place. Let'sut it on object mode so you can get a bed view
of what I'm doing. So you can see this is it. Let's pull it back a little bit. Like so. And then I've
got one this side, so I'll want one on the
other side as well. And to do that, all I'll do is right click origin
through Dcursor. And then what we'll do is
we'll add in a mirror. So let's add in a mirror over
the other side, on the y. And if it's not working, you can see is now
it's just on the Z. So we'll do it on the Z,
and now we've actually got a really good way to actually pull these down. So I'm
going to grab this. I'm going to press D. I'm going to bring it
down to the next one. I'm going to press S
and Z and bring it into place. Like so. And then what I'm going to
do now is grab this one and pull this into place
where actually want it, which will be somewhere
around there. Let's pull it back a little bit. And then finally, what we'll do is we'll grab the bottom of it and pull it all the way
down into the ground like so. Now, what I want to do is put this on the other side as well. So again, all I'll do is I'll just grab this one,
so grab this one. I'm looking what this
has got on it first. It's got nothing on
the acceptable level, so I can grab this
one, press control, and it should put the
other one there for me, double tap the A, and that's what we're actually left with. Now I want to do is I
want to grab this one. Shifty, bring it up under
my actual mirror window, and then I'm going to press S x and bring it all the way in. And finally, then, I just
want to pull it back just so it's behind
those like so, and then just have my
window just sat on it as though it's being
supported by that. Finer than with this part. We've got this big
chunk in here. We have to be very careful
how we bring these out. I don't want a big
chunk as we spoke about coming all the way from the
top of it all the way down. What I want to do is
bring these out instead. So I'm just going to
grab both of these. I'm going to grab
both of the ends. And you can see I've
got this one grab. Don't do that. Just make sure
it's just the ends grab, pull them out into place. Now, I don't want them
the same length either, so I want one, you know, a little bit pulled
out and whatnot. The other thing is, as well,
I have to think about, I haven't done any
warping on these because I thought
they were okay or, but on this new one here, I definitely want to do
a little bit of warping. I'm also going to look on these. You can see I've got to kind of warp in on these parts here, and I should really
have some on there. I'm going to deal with
this part first then. So I'm just going
to press shift age. And what I'm going to
do is I'm going to split these all up before moving on because I think
it's going to look way way bare if I do that. I'm going to press P then
selection, come back to it. And then what I'm going to
do is just press control A, I'll transform, set
origin to geometry. And then I'm just
going to come in and control and bring in
a few edge loops. So, and we'll do a little bit of warping along these parts. Just to make it look fit
in with the rest of it. And we know at this point
really easily how to do this. From here, actually,
once you build this, you should be able
to build your own scenes out pretty easily. Alright, now we've got that.
Let's grab everything. Mesh, come up, transform,
go to randomize. Let's turn it down to not 0.2, something like that. So not 0.2. Maybe that's a little bit
high let's have a look. No 0.1 because they are
quite chunky these parts. You know what, I'm
going to think, Yeah, I think I'm going
to go with no 0.2. Let's click and shade or smooth. And then let's press alt, bring back everything.
And there we go. You can see now it's just
looking that bit there. Like it just adds so much
to it for so little work. So now back to these parts. So now what I want to do is I'm going to not grab these parts. Well, I can, but
what I want to do, first of all, is
apply that mirror. Control lay apply the mirror, and then I'll grab this
part and then shifty and bring this into place right
on the corner of there. I've got to be very
careful that it's not going to you kind of
go through all of this. I'm going to grab the back
of it, pull it into place. S like that, making
sure it's all in place, like so, and it's
fitting in beautifully. And then what I
can do from there is I can bring it
down to the next one. So ship D, bring it down, and then S and Z,
bring it into place, and then ship D, bring it
down, bring it into place, and I'm hoping or I was hoping that it would
really fit along there. And I think can I pull this out and pull this
in? So let's see if we can. I'm just going to
grab both of these, and pull it out very slightly, pull this one out very slightly. Like so. I'm also going
to pull it this way. So I'm going to grab these
two, pull it out like so. There we go, that's looking. It looks pretty good now. You'd never know that that's
been pulled out like that. And it fits really,
really nicely. I'm just wondering if
I want another bit, kind of in this bit here. I think I want one
more bit. Why not? Let's just put one more bit in. In fact, you know
what? We'll grab this one here. I think
it'll be easier. So L shift D, and then R y 90 Z, 90. And this one it's been pulled back a
little bit on this edge. You can see I pulled it back without bringing the other
edge. You know what? Let's delete that.
So delete vertices. Let's come into this, so shift H. You can see I pulled these back a little bit
in the wrong place. So let's pull them all back to straighten them all
out a little bit. Well, let's go over the top. And there we go. Now
they're straightened out. We could come in and use the bicyc tool and really
straighten them out. But instead of doing
that, all I'm going to do now is grab this one, ship D, and then r x 90 and
spin that round that way. Press the tab, tag,
bring back everything, and now we're simply just
going to grab this one, press S and y, pull it in. And all I want to do
is just put it into place like so just
above that top part. And maybe I'll pull it out. So. And there we go.
It all goes together. Now, what we want is just
this final bit up here. So what I'll do is I'll
come with my bendy wood, I'll press Shift D, I'll press shift and selections cursor. And there we go.
Let's bring it in. Let's press send, bring it
down into place. Like so. I'm going to bring it down
into the center here. I know I'll probably
have to move it. We'll get it in there. Then what we'll do is we'll bend it round. Now, I'm just going
to bend it round. I'm going to bend it
up, bend it round, pull it down, and then
bring both of these up. So I'll bring them both up, bringing this one up,
bringing it down. And then what I'm
going to do now is press control or transforms. That then we'll reset
all those as we know, and then we can start
bringing this up. Like so. Now you go. You can see now it's
starting to actually appear. As though going to support it. So let's bring all
of these down. Let's put it into
place. And I think I'm going to have to put
something behind there. So let's press right
click, origin to geometry. Pull it into place and see
if we can actually see. So we might actually be able to get away with not doing that. And you can see that's
looking pretty nice. Apart from this bit, needs to be a little bit further out. So let's pull it out
just ahead of there. Like, so. And yeah, that's in. Pretty good. Now, on the next
lesson, then, of course, what we need to do is now, we need to come in and
fix all of this part. So, in other words,
we need to come in. We need to put in our
materials and, you know, make sure they're
leveled off and all of that good stuff that we've been doing many times before now. But I think if I put
this on render view now, let's just have a quick look at what that's
going to look like. And, yeah, that's
looking perfect. So you can see, it's looking
very, very interesting. Lots of lumps and bumps
and things like that. Exactly what we're looking for. The only thing I
would say is maybe, maybe it should be not
quite so straight. So maybe you want
some triangles or something in there instead of it all being like this.
But you know what? I think I actually like it, so I think I'm actually
going to keep it. Alright, I'm going to come in then I'm going to
save about my work, and I'll see you on the
next one, everyone. Thanks a lot. Bye bye.
122. Adding Random variation offset for framework and using lettuce to bend roof: Welcome back, everyone.
Planifm modeling and Jump chino workshop in
this where we left off. Let's put this then on material mode. And
what do I want to do? When it loads up is just actually check which ones are these I need to actually fix. So all of them, basically. So What I'm going to do is I've got the wall to fix first. I think
I'll do that first. So if I come in, we can see that we've got a
wall on the back here. We've got part of this
wall on the side here. Now, I think because we've got some crossover
over here as well, that we'll just press
Shift H for now. And then what I'll
do is I'll come in, grab my top of my wall. So in face to let grab the
top, grab this side then, press delete and
press faces, like so. And then what I'm
also going to do is, I'm just going to delete this wall out of
the way, as well. Delete faces. Press the tap
on the bring back everything, and we should end up with
something like this. And what we just need to do
now is just pull this over, so I'm just going to grab
it like so, pull it over. And then what I can do
is I can put one going straight down here or
somewhere thereabout. I just want to make sure
that there's no flashing, no crossover, nothing on
the back of each other. Alright, now we've
done that, then, let's split this off
from this one here. So I'm just going to
press y, split it off, like so, press A, unwrap. And then let's
bring in our wall. So I'm just going to
click the down arrow. I'm going to go down to wall, like we've done
many times before, like so, and there we go. And we can see actually,
it's worked out really nice for us because we've got
this bit of dirt on here, and this is going
to bode really, really well when we come
to put the next part in. Now, the one thing that
might upset this is that I might need to come in and re unwrap though for these
when I actually do. We can also see
we've got some white edging down on this bit here, and I think that's actually
more from the light. So if I just turn
off my scene lights, you can see probably more from my scene lights
than anything else. So what I'm going to
do, I'm just going to go to save, so file, save. Put on the rendered view, and just make sure that
that's okay before. Yeah, there you go. It's just my scene lights.
That's what I thought. Alright, so now we've done that, What we want to do is
just put this here. So we've got all of these parts here that are going
to need the wrapping. So what I'm going to
do, first of all, is grab all of these parts, so like so and if I press G, then they should all come
away from each other like so. Then I'm going to press Shift H. Just hide everything
else out of the way. Let's turn off these
interlocking links, and that sometimes gives you a better idea of what
you're actually looking at. The other thing is, as
well, a lot of these are going to have
things like severs. Have we got mirrors on, have
we got Kirby? Yes, we have. So all do is on
minus this bevel. I'll come to object, come down to convert
and convert to mesh. Then what I'll do is now
I can put this back on. I can make sure that I've
grabbed all of these, so you can see, I've
got a mirror here. Let's just press
control lay on that, and I'm just going to now
go through them one by one, making sure that they're
all okay, which they are. From there, then I can
join them all together now because they'll all have
a vel on them. Like so. I can press control lay or
transforms to origin geometry. And finally, then I can come
in and bend some of these. So what I'm going to do
is just come to these, bring in some edge
loops. Like so. Like so. And the more
edge loops you bring in, obviously, the more bend
you're going to have. So something like
under the window, you might want more
edge loops in there, just take that into account. Like so. Like so. And something that's so small, don't bother putting edge
loops in like this one, because it really
wouldn't have a lot of bend on it anyway. So and so. Now, let's grab all
of them, press U. Smart UV project, click Okay, and let's put in our planks,
which are already on there. So just minus off
then this basic wood, like so, and then
they're all done. And then finally, let's grab
all of them except this one. So if I press Shift
L on this and I'll press Shift L on this one, and finally shift
L on the top one. And then what I'll do
is I'll come to Mesh, and I'll come down
to where it says, transform and go to
randomize like so. Turn this down
something like uh 0.2. I have a look at no 0.1. Maybe not 0.2. Let's
have it on there. Press the tab born, and there we go. There
it is our wood done. Now, I do want to come in and add some edge loops on this one. So left click, right click, and I'll show you why the reason I want to do that as well. I just one moment. So now on what I'm going to do.
I've grabbed all of this. I'm going to press AlternH
bring back everything, and now I'm going to
deal with these roofs. Cause this roof here,
you can see has got all of these parts in here.
We don't really want that. A we can do is we
can go over the top. We can put this then
on object mode, and now we can see in there. I can press tab A
to grab everything, and you can see
it's still actually a mage node so we're
going to go up to object. Convert to mesh. We'll
do this one first. So a lot I'll do press tab. A, and then all I'm going
to do is come to mesh, and I'm going to go to bisect. So I'm going to come to my
bisect tool and I'm going to bisect it from round about here. So let's cut this away
round about here. Let's clear the inner then, and let's just come round a minute and envelop
what we've got. So you can see now we've
cut it away from there, and we've cut it into there, and all that then
is pretty nice. Alright, so now we've done that. What we want to do is come
round to this side now. We're going to just apply this. So object, convert mesh. And then finally, what
I'm going to do now, I want to bend this
roof actually in. So what I'm going
to do, I'm going to come first of
all to this one. So I'm going to press shift H. And I'm going to show you
how to bend your roof in. I'm going to split
this off then, so I'm going to press
P selection because we've actually already put on the material, so that's fine. So tag so we want this one. We want these two now, so we're going to
split off this. So I'm going to grab this one, this one, this
one, and this one. And then what I'm going
to do is press P, selection, split those off.
Hide them out the way. So let's hide these
out the way now. Hide this one out the way. And then I need to join
these two together. So Control J, join them
together, hide them out the way. And now we've got these. Now, what I want to
do with these is, I want to bring some
edge loops into them. So all I'm going
to do is control, left click, right click. Control, left click, right click and the same on
these now, like so. And there we go. So,
bring in some edge loops. Now what we want
to do is want to join the rest of them together. So I'm going to make sure, first of all, I've got a bevel on these. I need to apply it. So what I'm going to do is
I'm going to come to these. I'm going to go over,
apply my bevel. We don't normally,
but on this one, we're going to have
to shade smooth. And then what we're going to
do is just make sure there's nothing else on these
parts. Now, I've done that. I can grab all of these, grab this part here,
grab this part here, and just make sure
everything's grabbed. And what I want to do. The
reason I'm doing this is I want to bend it
down a little bit. The other thing is
I've missed a piece of wood along here. I
need to put that in. First of all, though, let's
join all of these together. So, let's right
click Shade Smooth. And I'm just making sure I'm
happy with all these parts. Now, one thing is,
this is not joined, so right click shade smooth. You can see there now
we've smoothed it off. So now we've got
this, and this is based at the top of
our roof, like so. You can see though that we've not joined the
underneath of the. So let's come in,
grab the underneath, grab our roof again,
press Control J. And now, it should be P press G should be able to
take the top of the roof off. Perfect. Now, let's
come back to this one. Before we carry on,
we're going to press L Shift D. And then
what we're going to do is just bring that up like so and put it jast
under the roof. I might mean to pull it back. Just a tad so it goes in there. And I also might need
to press S and y, pull it out a little bit, and then just re
unwrap it, so wrap. Or not rap. Smart V project. Okay. All right, there we go. Do I need to pull that up actually a little
bit, have a look. So I'm gonna grab it,
pull it up a little bit. There we go. Well tap
the A. You know what? I think that looks good enough. Alright, so now
we're onto this bit. Let's pressure teach them. We're going to press
Control A or transforms, right click the origin geometry, And then what we're
going to do is not that. I press Shift D, by mistake. I'm just going to
detail the way. And what we're going to
do is press Shift A, and we're going to
bring in a lattice. So bring in a lattice,
go over the top, and then what we're
going to do, we'll pull it out on the wiper. So S and it, pull it
out. Pull it into place. Making sure it covers
the entire roof. And then S and X, let's pull it out this way. Again, making sure it
covers the entire roof. And then if I press one now, we can see we need to
pull it into place, press S and and pull it out. Now, don't do it the
way we can press tab, go into it, and pull
it out that way. Do not do that because
you'll mess up. How the actual lattice work. So do it all in object mode. And then what we're
going to do now, we want it going across
this way on this one. So let's come over
to our lattice and let's increase
this one here. And now you can see that
it increases all of those. And what we want to do is
we want to press three now, and we want to bend it just in. So all I'm going to do is I'm
going to come to my roof. I'm going to hit
my modifier tab. Come down to where
it says, deform. I'll be under deform, lattice and pick our
lattice. All right. So now we can go to our lattice. And then what I'm going
to do is I'm just going to grab These three. So put on proportional editing, and the one one is
maybe going to be root. Let's see if we can
pull that down. Like maybe maybe it's
not quite smooth enough. Let's see if we can
get a better one. So let's try in square. Is that go to look better? And maybe it is. You know
what? It probably is. I just need to grab
this back one. I'm just going to
grab all of these, like so and then pull them down. And that's not the
one I'm looking for. So let's see if shop.
Maybe that ones. Just go to try a few of them just to see which one
I'm most happy with. I think it's going
to be the shop or inverse square. I'll
try the inverse square. So I'm going to bring
it down a little bit. Then I'm going to
grab the inside, bring those down a
little bit more. Grab the inside, bring them down a little bit more
light. So there you go. That is looking pretty nice. Okay, so now we've
got that. Let's press OT bring back everything. Let's hide our
lattice out the way, so just hide it out the
way, and there you go, now you can see that's
looking really, really nice. Now, I do recommend that we do this on maybe this one as well. But we don't want
to do it too much. We just want a little bit of
bending something like so. Now, you can see what
we've done here, though, is we've pulled it down. And what it's enabled us to
do is bring in our walls. So you can see here our walls been pulled
in a little bit. So all we need to do
on the next list and then is drop this wall
down a little bit, and then we should
be good to go. Alright, everyone, so I hope you enjoyed that, and I'll
see on the next one. Thanks a lot. Bye bye.
123. Modeling Lantern: Welcome back everyone
to Blender port, Modeling and Jomon of workshop, and this is where we left off. Alright. So what I'm going to do now is come to this wall. And first of all,
just go to come in. And because this is
split from this one, I should just be able to pull
this down without portion editing on pull this down
under there, like so. Then what I'm going to
do is I'm going to come round to this wall, and
you can see, again, I should just be able to
pull this down without any problems with the textures
or anything like that. Alright. So now we've done that. Everything should be
done on here now. Let's always say about your work again before
taking a quick look. Let's have a look, then. Of what this is going to look
like, and there we go. That is pretty much finished. Really, really happy with that. Okay, so what we need to do now is we've got the last tower, and we've got this round here. But the other thing we
need to do, of course, is we need to work
on our actual lamps that we're going to be
putting in the scene. So what I'm going to
do is I'm actually going to start that just to give us again a little bit of respite from building this scene out. It's a pretty difficult scene. It's a long scene, so I'm
just going to do that now. The other thing is, well, let's just check these
Ivy before going on. Because what happens is, you can see we've got a lot of dark patches under
there, for instance. And the reason is because
you can actually come over here and you've got a
button if we go down, which is, I think it's advanced. Yes, it is. No, it's not. It's not that one. I'm just looking for my light past
and my transparency. Here we are. This one here. Now, this one here controls how much shadow is actually
in these parts here. The more you turn this up, the more you'll be able
to see through there. So if I put this on, say, 100, you should notice a
difference in there now, and you can see
through more of that because these are
based on transparency. So now you can see, I think
it looks a little bit better. Now, the one thing where
you really going to see this on is when
we bring the tree in. So let's actually we're not going to bring a
tree in right now. We'll just put it on 50 for now, and then we can mess
around with that once we've actually
brought our tree in. Now, the reason why I don't want to bring
trees and things like that in is because they're very high on the polygon count. We've already got
a lot of polygons in here, especially with this. So we just have to be
careful of what we're bringing in and what
we're actually using. That's why I've not
done the grass as well, because it will make it
much, much heavier scene. So I'm very, very careful about what I'm going to
bring in at certain times. You can see that I'm
looking at this, and I'm thinking that looks really, really nice, actually. So really happy with that. Anyway, let's go
back to object mode. And then what we'll do now is come over to this door here. We're going to
change it over then, and we're going
to click on open. And the one we're
going to look for, let's put it on this so we can actually see
what we're doing. Let's actually put it also on large so we can increase
the size, like so. And the ones we want to make is this one, this
one, and this one. So I think the
easiest one to start with is probably actually
going to be this one. So let's bring this one in. Let's press the little dot
bomb so we can zoom in, and we can see this is what it's actually
going to look like. I don't actually remember
how we built this, so let's give it a try. So let's first of all,
build this part here. So what I'm going to do
is, I'm just going to press Shift S first to selected. I'm going to bring
in a cylinder. So I think we'll start
with a cylinder, let's bring in a cylinder. And then what I'm
going to do is I want to turn this down
something like eight. So let's turn it
down to eight and you'll see you end up
with something like this. Let's press the S bottom, and I'm going to move it
to the side because I don't need to get the right
scale or anything like that. I'm more interested in getting these beautiful bits
here that you can see. Alright, so what we want
to do is you can see, let's actually start
with this bit then. So what I'm going to
do, first of all, is get the right shape.
So I'm gonna come in. I'm going to grab
the bomb and I'm going to pull it in, like so, and I think, actually,
I can probably do a better job of this than what
I actually did initially. One of them then going
to do is press control I bring in a few edge loops. I want one right in the center. So that for me is
going to be five, left click, right click. And then what I'm going to do is grab the one just
above the center. Come in, put the
portion of it in on, and then we're just
going to press the S button and hopefully
bring in a really, really nice bend on
there, as you can see. Then what we want to do now is we want to bring
in these parts. So we want to bring them all in. And I'm just thinking
the best way to do this is probably. So if I press the eye button, it's going to bring them all in, so it'll bring them all in,
so that's not going to work. So what we're going to do
instead is, we'll come in. We'll grab each other one. So I'm just going to
grab each other one, so like so, and there you go. And then what I'm
going to do is I'm going to press the eye button. So press the eye. Bring
them in. We'll want them. So something like this, And then what we're going to do is we're going to go down now, and you can see we've
got one over here on the left hand side
called thickness. We're going to just copy that. Control, copy that, press enter, and then now we're going
to go to the other ones. Like so. Keep going round. Like so. And like so. And then what you're going
to do is press enter, come down to where it says
thickness, Control V, press the port, and now
you'll see that all these are Exactly the same. Okay,
so now we want to do is we want to somehow make these beautiful edges
that we've got here. What I'm going to do to do
that is, and first of all, going to come in and see if I
can grab my top edges here, just on one of them,
press control shift and B and then pull them in. And there we go. And then what I'm going to do is I'm
going to turn this up, like so, and then bring
back the shape of it. Like so. And there you go. That is how we're going
to create those edges in. And now I'm going to do
is just press controls. Go back, grab all of them. Like so. Like so, and there we go. And then we're just
going to press control shift and B, hopefully. Remember, our choice, it does. Left click, and there
we go. All right. So that's looking pretty nice. Now we're getting very
close to how this look. You can see that the
bottom ones though, are also rounded off. So we'll do the same
thing on these, so we're just going to
grab all of these ones. And I press control
shift plus Noa con. So all do we'll just keep grabbing them going
all the way around. So and so. And then what we're going
to do is we're going to press Control Shift B again. But this time, we're going
to change it a little bit. So I'm just going to
pull them to there. And then what I'm
going to do is change the shape and make
them more rounded. Like so. And there
we go. All right. So we've got this part now. Now what we need to do is we
need to pull these parts in, and then these parts
will be our glass. And from there,
then we can start shaping the other parts out. What I'm going to do is I'm going to grab all of these now. So these parts going in, I think it's
probably going to be better if I press Alt Shift
and click Alt Shift click. Like so. So I would say it's probably going to
be easier just to go round and grab them going like this because then we'll be able to select them much easier, especially when we've
got our glass in. So I'm just going to spend
a little bit of time now going around all of
these with shifting clip. G in the mall. So One more left. Didn't take too long. And there we go. Let's
right click and Mark scene. And from there
now, what I can do is I can come in and simply just press L on each of
these and grab them very, very easily, like so, like so. From here, then what
I can do is and press to Altern without
proportioning on. So AlterS now we can actually
bring them in like so. And you can see, just how
nice that actually looks. Alright, so I'm really
happy with how that looks. I'm just wondering, If I want to bring these parts out because we can also
do that as well. Anything can be done at
the moment, to be honest. I think I will. I think I'll bring this part
out down to here, and I think I can make
it look pretty nice. So what I'm going to do
now is I'm going to come in and I think I can press l
Shift click, l Shift click. And then what I'll do is l
Shift click Old Shift click. So I'm going to do
that on everyone. I'm going to go
around the top first. You're grabbing all of these, like so, And we can make this very ornate
very, very easily, actually. We're going to go to
this one, to this one, right click and Marco sin. Now let's go down
to the bottom part. So we're going to grab all of these going all the way around. So the final one,
right click Marcosne. Okay, so let's double
tap the A now. And what we should be able
to do now is come in, press the L button,
and it selects it all. And the reason is
because obviously, we haven't got the top, so I need to come in now,
grab the top one shift click. Now, if it doesn't,
just select the two. It's gonna be easy just
to select the two. So we just select two. Like so. Like so. And like so, right
click, mark a seam. Now, hopefully, I come in, should be able to press L, and it's still
selecting the mall. So I'm kind of wondering why that is how
it's getting through there. And the thing is it's selecting all of these coming down here. So I'm just wondering if I press control and I'll mark
a seam on the top. Then if I come in, is it
going to select the mall? Yes, it is. So, for some reason, they're actually getting through pretty much all of these parts. So if I select this, you can
see it selecting it all. I'm just wondering where it's actually coming in
because I'm actually interested in how it's
actually getting through here, which bit isn't marked? And I can see if I
select all this, it's coming through
these parts here. So maybe it's these top parts.
I'm just going to try one. So I'll select both of
these right click marksme. And then what I'll do
is I'll try it and come in and just
select this part. You can see how it's selected in the same part.
So, you know what? We're going to have to do
this the hard way instead, because I do want to
do this because I think it's going to look
really, really nice, so I'm just going to go in
and select them all, like so. We tried, didn't work. I'm not sure where
it's going to go in. And I think, to be honest,
it's going to be harder work. I'm just going to hide this
out of the way just for now. I think it's going
to be harder work to actually go in and
work out where it is, where we've got that
leak in our island. So instead of that,
I'm just going to come in and select
them all quickly. Like so. We can
find it, of course. It's not a question
of if we can find it. It's just time, and sometimes
it's just not worth it. Especially when this
is just going to take probably around
a minute to do. It's not a lot of time.
So I would suggest just doing that instead of
trying to find that leak. Alright, so we're
nearly already. So there we go down to here. And down to here. Alright,
now we've done that. What we want to do is
press Shift and D. And then what we're going to
do is press P and selection. Okay, so we've got something
like this right now. On the next one, then,
we're going to pull these parts out just to make that really ornate
feature on the top. And I think from
there, we can actually build out the rest
of it fairly easily. This is the only hard part. Alright, everyone. So
hope you enjoyed that. I'll save out my work, and I'll see on the next one.
Thanks a lot. Bye bye.
124. Using Chain geometry node to hang lantern: Welcome back everyone to Blendf
modeling and um workshop, and this is where we left off. Alright, so now we should
be left with this, and we should be able to grab
these parts on the inside. Let's press control
A or transforms. Set origin to geometry. Right, click shade
smooth by angle. And then what I'm going to do
is I'm going to come in and bring in a solidify. Let's then bring these out, and we can see this is
what it looks like. Let's click and just shade flat jaws for now so we can
see what we've actually got. We only want to pull
these out a little bit. We don't want to mount too much. It is stylized, so
you always pull them out a little bit more than
what you think, actually. When it's something stylized, so we can actually make out what it looks like, but there you go. That you can see is
looking very nice. Alright, let's put
even thickness on. So. Let's press control
lay on there then. And then what we're
going to do now is just right click and
shade Auto smooth. Same on this one,
then, right click shade Auto smooth,
and there we go. Now, let's start work
on the bottom part. So what I'm going to do
is now I'm going to press lth bring back this part here, and I can see the bottom
part is relatively simple. So now I can actually come in, and I can move it over. Not going to worry
about sides right now. The main thing, pull
it over the wrong way. The main thing is
that I'm just getting everything into kind of
the shape that we need it. So what we'll do now
is do the bottom part. So I'll do the bottom part. Again, we'll bring in a
mesh, bring in a cylinder. Make sure the
cylinders on eight. Now, it's not in
the center. So all I'm going to do
is grab this one, Cif D as the selected, Chi D, bring in a cylinder. It's on eight anyway, just in case you forgot. So let's put it
down on to eight. Let's press Essen like so, and let's get it in
some sort of place. So we want it really, really crunched up nearly to
those parts like so. Then what I'm going to do
is create this bot part. Now, I think we can bring
this part in first, so slightly in, and then I
and bring it in and then. And then S and bring it in. So that should be the bottom of our actual lantern up to you if you want to create
something a little bit more on. It's very easy to
do. You just press. You'd bring it out, like so. And then from there, we can
add instoH loop, so control. Left click, right click.
Grab the top up here. Let's put our portion editing
on, press the S button, and then you should be
able to bring something in and just make it a kind of a
little bit of a tear drop. Right click, shade, auto, smooth, and there we go. Now, let's think about our top. So again, I'll bring in. I could actually use this
as well. Let's press Atg. I could use this top instead rather than doing anything else. So what I'll do is I'll press Shift. And then
I'll bring it out. So what I'm going
to do is bring it out into place without
proportional editing on. So S, bring it out like so. And then what I'll
do is I'll press, bring it up into place like so, and then I'll press and bring
it up wherever I want it. And then I'm going to
bring in some edge loop. So Control I'll bring
in some edge loops. Generally five is
absolutely five. Let's click, right click, and then we'll go to
the top of this now. And hopefully, we should
be able to bring it in. So if I press S with
proportional editing on, you can see that's how
we're going to bring it in. And there we go. You can see
it's looking pretty nice. But is it the right one?
That's the question. I think it's not boding enough. So let's see if we've got a
shop, let's try the shop. That's going the other way.
So we know now it's going to be probably the root is
going to do a better job. Just trying to bring it in. And is it? Is it going to do a better job?
That's the question. Let's try the inverse square. Yeah, I think the
inverse square actually is going to do the
best job for us. Alright. Something like
that. Now, if you're not happy with it still,
just come in, grab this one,
very, very gently, then, should be able to bring it in now to what
you actually want? Go to come in this one as well. That the S born and bring it in. So. Alright, that's a nice
line then follow in there. So now what we need to do is we need to come in and
kind of level these off. So we want this to be
either brought in, probably going to be easy
if we just level this off, And I'm just wondering about
this side here, actually. You know what I'm
going to do? I'm going to split this off, first of all. So I'm going to split this off. So shifting click going
all the way around. Now, we have got a bomb on here, and I do want that as well. So I'm just going
to grab the bomb. I'm going to press
y on there then. And then all I'm
going to do simply now is just hide
this out the way. So press. Hey, just to
hide it out of the way. From there, then, let's
put sorry, a top on here. So let's just press F.
And then what we should be able to do now is
come round to the side. And I'm just, you know, well, that's pulled out enough, so it's just the top that
I actually need to do. So what I'm going to do
is, I'm going to just grab the top here, press L here, and just bring this in a little bit just for
now without portion on, bring it in a little
bit, like so. Now, it's come in like that, which means it's alter the size. So instead of doing
that, just minus the top up and press alterns
and bring it in that way, and I think that's
going to make it a little bit easier
to work with. Now I'm going to do
this. I'm going to come in and I'm going to grab
each of these then. Like so. Each of these Going all the way around. And
then what I'm going to do is just press control
and B and pull them out. Now, drop back your
number of segments. So drop them back
to one or zero, whichever one it is, so
they look like this. And from there, then
what we can do, if we look on here, we can see how they're
pulled out a little bit. That is what we
actually want to do. So all I can do then
is press enter, ln and then just pull them out, like so, and there we go,
now let's right click, shade autos move, and
there is our lantern. Now, let's come and
think about this part. So first of all, though, we want to grab the
center of here. So, I want to press S, bring it out to this point here, and then, pull it up, like so, and then I bring it in. Like so, and then bring it up. Now what we want to do is
we want to actually get it to be the right kind of size. So what I'm going to
do is I'm going to join all of this together now. I'm going to press
Control J. I'll join it all Control J,
join it all together. And you can see, did
we lose the solidify? I'm not sure if I applied that, I think I did because
everything's still there. Right, clk shade also smooth. Press the G born
and there we go. And now I want to do is
get the correct scale. So us going to make it a
little bit smaller, like so. A little bit smaller still, like so, and there we go. Alright. So that is
looking really nice. It actually looks better
than my other one, which I'm glad about,
because we should be improving all of
this all the time. So yeah, I'm really
happy with that. Now, let's bring in our chain. So what I'm going to
do is, I'm just going to press Shift S again. Sta selected. Shift A, and what I'm going to
bring in is a curve. We're going to bring in a path, and we're going to
make this path a little bit smaller, like so. And then what I'm going to
do is bring in my chain now. So let's go to asset manager. Let's go down to omg Nodes. Let's press the
dot born in here, and then let's come over and put the chain node on top of that, and we'll end up with
something like this, which makes absolutely
no sense because it doesn't look like any
chain I've ever seen before. But if we turn it round, you'll see that we can
actually use this. So R Y, 90. Let's pull it up
then into place. So all I'm going to do is shift, curse selections cursor
put it in the center. And then what I'll
do is pull it up. And I'm not worried
yet about the length. I don't want to
focus on the length. But now it's in this is a very, very simple jump node. This is one that
most of you should actually be able to
do quite easily. The other thing is I'm
worried about this part. I'm just going to apply this
lattice while I'm here. I did actually
forget about that. So let's apply the lattice, so control, and let's delete
this lattice out of the way. We don't need that in the scene. Alright, so now let's come back. Two, our geometry node. And as you can see,
it's only a few nodes. So you can see that we've just
got basically some points, and we've got some curves
that actually going in there, so we've got a radius,
another curve. So this one basically is one up, one sideways, and that's
how that is working. It's based on the
length of the curve, and I'll show you in a minute the best thing that
we can do with this. But even this should be
pretty easy to actually read once you actually get
used to the geometry nodes. Let's now go back to modeling. And then what we're going
to do is we're going to turn up the resolution. So you can see, as
we turn that up, this turns up the resolution of each of these little
points of chain. The other thing we can
do then is we can change the chain distance so we can
make them further apart. You can also hold
the shift bottom as well to bring slow
this down like so. And then finally, as well,
we've got the chain radius, which is the size of
the chain like so. We've also got the
chain thickness, which makes it a
lot lot thicker. And from there as well,
we've got the chain stretch, which pulls them out like so. So you can use this in many,
many different things. Now, what I'm going
to do is I'm going to come up with the chain
stretch just a little bit, and then I'm going
to change the chain radius down, a tiny bit. And then finally,
I'm going to change the chain distance down so They're actually going to fit into place really
nicely, like so. So you can see now the
fitting into place. Let's come down with
the chain radius again now. Not the chain radius. The chain thickness.
There we go. And let's make sure
that they're actually still touching each
other, like so. And there you go, that's
looking pretty nice. And from here then,
I can pull this up, put it into the top
of this part here. And if I come in and level
this up now with this one. So if I level it up, what
I've got to be careful of is the chain here is it needs to be quite chunky or she not going
to be able to see it. That's the point. So let's
come in now, grab our chain. More we'll do is we'll
change the chain radius. We'll make it much, much bigger. We'll then change
the chain distance, so we'll bring it down or up. Like so, and we go win there. And then what we'll do is we'll change the chain thickness, make it much, much thicker. And there we go, now you can see that's looking
much much better. From there, then,
what we want to do is we can actually delete this. So but before I delete it, I might need to use my
chain in something else. But rather than, you
know, create this again. All I'm going to do
is press Shift D and move my chain over to here, press the button,
and we'll put it into our primitives
like so. Alright. So now what we can do is we can come in and we can
grab this one, this one, this one,
press delete vertices. And there you go, that's
what you're actually left with a beautiful chain. Okay, so on the next lesson, then, we'll just
build this part out. Okay. I shouldn't be too hard. And then that is the first lamb actually down and we can
move to the next one. All right, everyone. So
I hope you enjoyed that. See you on the next
one. Thanks a lot. Bye bye.
125. Modelling wood support for lantern: Welcome back, everyone
to Blender Form modeling and Jump gon workshop, and this is where we left off. Let's create this actual stand
for our actual light then. So all I'm going to do is I'll I'll put it in the
center, first of all. So I'll just grab this
one, press Shift D, first selected shift A. And then what I'll do is
I'll bring in a cube. So let's bring in a cube.
Let's bring it down. And then what I'll
do is I'll put it round about the scale here. Also, I'm just going
to move both of these across just so I've got
it in the right place. I'm also going to pull
them down a little bit. And the one thing is I'm
just wondering whether this light needs to be
a little bit bigger. So, you know what? I think
we're going to make it a little bit bigger like so. Then what I'm going
to do is just make sure that this is going
to stick in place. Right in there, and
you can see here that this might need to
be a little bit higher. So let's not worry about
that because what I tend to do when I'm doing chain is
I'll have one facing this way, and then the one that's hanging into this kind of
post here facing the other way because
I think it looks much better than just like
from here to here. So that's why I do
that. It makes it look a little bit better I feel. Alright, so let's
bring this down. Let's put it into place
roughly around here. Let's then go in, and what we'll do is
we'll grab the top, press one again, and
we'll bring it up. Then what we'll do is
we'll press the S borne. And what I'm going
to do on this rather than just be flat like so. I'm just going to press control and bring down one more like so, and then I'm going
to pull it out. So I'm always trying
to bear whatever I do, and this is one reason that I'm going to make
it a little bit bear just by going that little
bit extra step further. From there, then what
I'm going to do is I'm gonna press the ibonne
and bring this in. And then what I'm going
to do is press one, and I'm going to bring this
up now two here, like so. Now, we can see that it's
going to be maybe, maybe. I think it's actually
the right chunkiness. I just need to pull
it out a little bit, so I'm going to pull
it out like so. Then I'm going to press control. Bring in some edge loops. Left click, right
click. Rab this one. Press one, so I can
see what I'm doing. Portion editing on,
and then let's just press the S borne and hopefully, I should be able
to bring it in and have that beautiful
curve like so. Next of all, I think I want
to pull it out just a tad. I'm going to press Alt Shift and click
going around there. Control plus, Control
plus, control plus. And then from there,
what I'm able to do is press alternS without proportion
editing on this time, and I should be able to
pull it out a little bit, making it a little bit chunkier. I think that looks
great. All right. And let's now add in this
little band on here. So I'm going to come
in, grab this one, Alt Shift and click. Control B, pull it out, like so. Then I'm going to
press Enter lns and pull it out.
And there we go. That's that part. And now let's start working
on our top part. So I'm going to grab this
part with face select. Shift and S selected. Shift A. Let's bring in a e. Let's make it much,
much smaller then. So switch sticks on
the outside of there. Let's press sens head. And make it quite chunky. So you can see here, this is the chunkiness that
I'm actually looking for. You can see that
this is not quite as tall as the other
one. It's no problem. We can pull it all out once
we've actually got this in place and seeing how it's
all going to go together. But I think this needs to
be a little bit bigger. So we'll see, we'll see. But let's pull it out
to here, first of all. Let's get an idea where
this is going to come then. So if we put it into here, then what we'll do is
we'll move this down. So we'll put this
in place like so. And then we go, that's
looking pretty nice. And then what we'll do is
now we'll come to this part, and we want to bevel this
part off as you can see, we've got a beautiful
bevel on there. Let's actually do that now. So what I'm going to do
is I'll press control A transforms the
origin to geometry. Come back to this one, grab
these sides, press Control B. Then what I'm going to do is
turn up this to maybe four, left click, and then we're just going to
change the shape, so it's actually
inwards like so. And from there, I think we
can actually move this over. So let's move this over
just a little bit. Like so. Now, the inside. So this top inside bit is relatively easy to do because
we've got the shape now. So it means that we can come in, grab the top of it,
press the button, and bring it in, like so. And then from there,
what we can do is we can press, pull it out. Like so. Then I can right
click shade Auto smooth. There we go. And then we just want this chunk award into here. So I'm just going
to press Shift A, bring in a cube,
press the S button, and then just put it into here. Where it's going to go, so
it's going to go under here, and it might as well
fix on top of here, and that's what the reason
for that support is. So if I bring it out now, and then what I can do is
I can rotate this round, so r y, rotate it round. Let's get it in place. And then what I'll do
is we'll make it a bit thinner on this top bit. So put it on normal, make
it a little bit thinner, and then we'll pull this out and pull it into place
where we want it. So something like this
is a nice support. And then I just
want to pull this down now, just this bit down. And I also want to
pull this back. So I'm going to pull
this back a little bit, and I'm going to
pull this down so it fits just on that part there. Like so. And I'm thinking now, just make it a
little bit thinner. So S and Y, bit thinner,
double tap the A. There we go, we can see that's looking really, really nice. Now, this part here, to me, this part, especially, looks as though it needs to
come down a little bit. So we've got everything
right. Just this part needs to be a
little bit smaller. So I'm just going
to press control plus going all the
way up to there. I'm going to press
one then, and all I'm going to do then
is pull this down, like so, And then we go a thing
that looks very nice now. It's about the right size
that I actually want. Now, finally, what I want to do is I want to join all of this together and then bend this
just slightly that way. So let's join all of this
together with control J. Press control A or transform
set origin to geometry. And then I just want to come
out, grab this part here. I'm going to press one
to go in side view. Grab my proportion it in, and I'm hoping that if
I grab all of this, I should be able to just
pull it out like so. Now, I don't want it
pull in like that. I want it actually pull in
a little bit different. Let's grab our sphere.
No, not like that. Let's grab our sharp.
And there we go. That's what I'm
actually looking for. So you can see now we're
pulling it kind of out, so it's actually
pulling at an angle. And then we got a
thing that just makes it look that
little bit extra. As though it's like,
you know, being a bit weathered and
things like that. Alright. So from here then, let's actually come in and
we'll add a bevel onto this. So again, control A, set origin, geometry, add in a bevel, so generate a bevel. And I'm also thinking,
can I join all of this together now and add on
my bevel on top of that. So first of all, let's
come to the chain. Let's go to object. Let's come down to
convert to mesh, and let's then
join this to this. So Control J. Let's then
finally join it to this. In fact, before we do
that, let's just reset all the transforms. And
then let's join it to this. So Control J, join it together. And then finally, we've lost our bevel on here
now, as you can see. So again, we'll press
Control A, Origins geometry. And then we're going
to put this on No 0.3. And then what we're
going to do is turn clamp overlap off. Should end up with
something like that. Now, on this one,
you can see, it's probably a little bit too high. You can see here. So
let's put it on 0.1, turn it down a little bit. And now you can see
it looks just much, much better on these parts here. Now, we could keep it separate. But I think, you know, we've
got a little bevel on there, so it does look nice. It's just the fact of
it's on this part. So let's try just one more up. No point, not not two. Well, let's just try
that. You know what? I think that looks better.
I'll keep it like that. Alright, so let's
not apply that. What we'll do is
just close that up. Then we'll come
to our materials. At the moment, we've got
a chain material on, which means it's all going
to be our chain material, which is not something
that we want. So let's let it load
up on the material. So let's come down then
and file and save. And then what I'll do is I'll come in and start
this part first. So I'm going to come in, grab
all of this part, like so. And then what I'm going
to do is press U, Mark UV project. Click Okay. And I'm going to
add in now wood. So we'll do the plank. So the planks, click a sign. And then what we'll
do is the stone. So we'll come down
to this part here. I'm going to grab
all of this part, going all the way up to there, click plus down arrow stone. A sign. And then we'll come to this part with ship and click, click Control plus just to
go up to the next part. Click the plus arrow down arrow, and we're looking for we're looking for iron
dark, click a sign. There we go. And then finally, we've got this part here. We've got our chain. So we'll have a look at our
chain in a minute. First of all, though, let's
come into this part here. And what I'm going
to do actually is I should be able
to hide all of this out the way with H. And then should be able
to come in to my chain. And hide all of this
out the way with H. And then I should just be able to
grab all of this, press U, Smart UV project, click Okay, and then click on In Dark we should end up with
something like that. And finally, one more now, so click the plus,
click the down. You're going to up the glass. So glass lip windows. And then all I'm going to do now is come into these parts here, I should be able to
press Can I press L O? I can't press L because
for some reason, all of these have now
got a seam in them. What I'm going to do, I'm
going to grab the whole thing. I'm going to press.
You know what? I can't do that either,
but it's going to be easier because if I've
got all these seams in, what's going to happen is
it's going to try and unwrap them I'm not sure, actually. We'll just go in and
select them all. I actually put a seam in then. I don't know why I've actually
marked all of these seams, but AH made a little
mistake there. So what I'm going to do
instead is I'll come in, wrap all of these, with
shift click, control click. And then what we'll
do is just press U unwrap and then click the sign on the glass like so let's go over then
to our UV editing. And you can see that
they've all been split up, and that is what I was
worried about even though I've wrapped them all,
they've all been split up. Now, the good thing is, because I've already
grabbed them all, I can press control, and I can clear all the
seams up there. Then I can press you on wrap. And now you'll see
they're on wrap perfectly well.
Now let's press A. And now all due will
actually get this shrink in, so I'm just going
to press the Sb. And then what I'm going to do is just put these into place. You can see that's still
not fin, probably, so I'm going to press the
Sb a little bit more. And then all I'm
going to do is just grab some of them,
drop them into place. You can see I've still
got portioning on. Don't really want that
on. Grab another couple. And put those into another place and then
grab another couple. You know what, those two
actually should be okay. So I'll just move
these ones, like so, and there we go, we're actually done with this actual light. Now, let's actually save out
our work. Let's save it out. Let's go to modeling.
And then what we'll do now is we'll just
put it on rendered view. Have a quick look at
what that looks like. Dile tap the A, and there we go. That is looking pretty
nice as you can see. Now, of course, we
need to work on our emissions and
things like that. I don't actually
think the glass, have a look at the glass. Though the glass
emission strengths at one point. One of the moment. The good thing is
being as all of these have the glass on them, soever there's glass, once
we change the emission, you will change the
emission on all of them. Alright, so really, really
happy with how that looks. And on the next lesson, we'll
start on our second line. Alright, everyone. So I hope you enjoyed that. See
on the next one. Thanks a lot. Bye bye.
126. Creating metal bars for lantern lighting: Welcome back, everyone
to blend the four, Modeling and jump in workshop, and this is where we left off. All right. So now let's
pull this just over here. Like so. Let's press M. And what we'll do is we'll
put it in our primitives. We'll also press F two
and call it light. I'll take that off, actually,
because we've got caps on. So we'll call it standing light. And then we'll call the
other one hanging light. So let's go to this one now, and then what we'll do
is change this one, and we're going to
go and open it up. And the one we want
now is going to be this one here. So
you can see this one. It's not as n, but it's
complex in its actual own way. So I think what
we'll do again is we'll bring in our cylinder. We'll also make it eight again, and we'll start from there
because I think this is going to be roundabout
pretty much the same. So what we'll do is
we'll press Shift D, so selected, first of all, Shift A, let's bring in. So I always when I look
at things like this, I always try and break them
down into the components. So I can see it's
got this part here. We can actually separate
these two parts on here to bring all this
kind of together, and the rest of this
is relatively easy. So it's only this that's
a difficult part to do, and that will be the part that
I actually work on first. Alright, from there, then,
what I'm going to do, press Shift A, bring
in a cylinder. Let's move the
cylinder to the side, so I've actually got
something to work with. And the first thing
we'll do is we'll create this band
going over here. So also it wants
to be quite tall. You can see it's quite chunky this the moment. So I'm
going to bring it in. I'm going to press
Essence head and get something about a shape
that I actually want. So I've got to reference here. I could keep perfectly
to the reference, but I want you guys to
create your own things. What I'm going to do is I'm going to just gonna bring it to the side and you try and create
your own in your own way. You might come up with something really elaborate,
really nice looking. It's completely up to you. Alright, so what I'm
going to do is I'm going to bring in some
edge loops, first of all. So I'm going to press control. Now, these edge
loops want to really go with what I'm
actually creating here. So if you see if I bring
three or five edge loops in, it means then that I'm
going to be bringing in left click right click.
Like five of these. Do I really want that or do I want to bring
in three of them? I think because
it's stylized and based on stylized and
not realism so much, let's bring in just three. So I'm just going
to press control, one, two, three, left
click, right click. Then what I'll do is I'll
grab the center one, put on proportions in
and then bring this in. Now, you can see,
because it's sharp, it's not coming
in the right way. So what I want to do
is I want it to be a little bit more smooth, like so. So now you can see
it's quite smooth. In that way. Now, you can see, because we've not got that many edge loops in, it's made it, you know, even
though it's smooth, it's not quite as
smooth as it could be, but I think we can
actually work with this. All right. The next
thing then we want to do is bring these out. So we're going to
bring these out. We also want to top
on here as well. So I'll think what we'll do
is bring out the top first. So the way that I'm going
to do it is I'll just grab. I'm just hoping if I grab both
of these, press control B, bring it in, should then be
able to bring it in like so. So you can see now I can
actually bring these in. I can give myself then
a top and the bottom, and that will be
the equal length from each other. You know what? I'm not going to do it that way because it's breaking
this actual curve here. So I'm just going to
do it the easy way. So I'm going to
press left click, and then what I'm going
to do is bring it up into place like so. I'm hoping that can
I change the factor? Yes, it's the actual factor. So if I come back, Put
this to where I want it. I've got at 0.644. Let's copy that then. Control C. Come down
to the bond one. So now we're going
to press Control, left click, right click, and then go with a factor, Control V. But this time it
won't have the minus on. So if I get rid of the minus, press the enter borne
it's going to put it exactly the same place
as this one here. Alright, from there,
then, what we want to do is we want to now think about bringing all of these parts out and actually level them off. So what I'm going to do
before doing anything else is I'm going to come
in to each of these, like so grabbing each of these. All the way around to the bag. And then what I'm going to
do is I'm going to press Control P. I'm going to
turn it all the way down, and then I'm going to get
something that I'm happy with, which will be
something like this. Again, the factory is important. In that, we want it
to be round about the same depth as
this part here. Alright, so now we've
got the inside to do. So what I want to
do is grab all of these and I want to come
in and grab the inside, and I'm going to press control
B and bring these out. But these ones are
actually going to be a little bit
thinner on the inside. So something like
this makes them a little bit thinner,
as you can see. Okay, so now what we
want to do is we want to bring all of this out and then bring
these out separately. So basically, I want
to split all of this off and leave in
things like this. So I'm going to leave these in. Some jaws going to come in, select my glass windows. Like so. Like so and come
round to the back of it. And then this one here. Like so. And then all I'm going to do
is just press P selection. Like so. Now, let's come
back to these parts. And then what I'm going to do
is I'm going to press tab. And now I want to
do is I want to separate these
parts out as well. I'm just going to grab
all of these parts, and we're going to separate them out from the rest of this. And that's what I'm
saying when I'm saying you look at a model, and you basically want
to break it down and look how you're actually
going to create it. That is how you
work with things. And generally start
the hardest part. Because once you've got
that out of the way, the rest of it is easy. So P selection,
separate them off. Now what we can do is we
can come back to this. Press control A or
transforms, set origin, two geometry, add
in the modifier, and we're going to
bring in a solidify. So if I come in now with
solidify, let's pull it out. Let's actually put an
object mode because we're really going to have a better idea of what
we're looking at. And then what I can
do is I can turn this out like so,
and there we go. And then we can
come to these ones. We're going to grab this one. In fact, we'll come
to these ones. First of all, all transform
origin of geometry. Then what we'll do is
we'll join it not join, but we'll press control L, copy modifiers, and there we go. And now we can see, Oh, we've got a little bit
of problem in that. They don't actually join up. Yeah, I know. Let's
turn it down, first of all, so let's
come back to these ones. Let's turn those down
just a little bit. So bring them back, like so. And now we want to do
is bring them out. So what I'm going to do, I've
still got my slidifi on, so I'm going to turn it
down a little bit more. Just to it's something that I'm happy with,
something like that. It's definitely
thinner than there. And then what I'm going to
do now is I can come in. And bring all of these out now, and that should
join them together. So if I press A now, come on, make sure you've got normal and then come down to
individual origins, and you should be able
to press S and y, taking proportionity
and of S and Y and you should then be able to pull them
all out together. Now, the reason
we've done it that way is it means
that you've still got control then over
bringing them back now. So, for instance, if I want to bring them out
or bring them back, you can see, I've
still got some control over that now, and there you go. That is looking
really nice already. Okay, so I'm happy
with all of this. Now, the best thing as well
is the way that we've done it means that we can actually pull these out even more now. So we'll do that next. What I'm going to
do is I'm going to grab all of these parts, and then we're going to
press Control J, join sorry, object, convert to mesh, and then press Control J and join them all
together like so. What that means is now
I can come to the top, for instance, and the bottom, and I can pull those out. So if I press the S born, I can pull them out slightly
and bring them even nicer. I can also from here as well, because I've joined
them all back up now, I could actually come in and bend them even more
if I wanted to. Now, let's think
about this top part. This top part I'm going
to have from here. If I press one, What I can do now is I can simply
just grab the top actually, press one, and then I can press
and pull this up like so. And then what I'm going
to do is I think I will grab this part here
and pull it out. In fact, this part here,
we'll pull this part out. So what I'm going to do turn normal off and put it on global, enter alterns and pull that part out a little bit
like so, and there we go. And then what we'll do now
is work on our top part. So I'm going to
pull it up to here. So I'm going to
press one, pull it up to here, and then
I'm going to press. Pull it up, and then S.
Pull it in. Like so. Then what I'm going to
do is press control I'll bring in three edge loops. Left click, right click, grab this center one.
Portion editing on. Let's put it onto sharp and let's press the
S born and very, very gradually.
Bring this part in. Like so and the
sharp. I don't think it's going to do it's
all t inverse square. Let's bring it in.
And then we go. We've got a beautiful
curve on the top of it. Now, let's create
just the top part. I'll grab this part. Easy.
Very easy to create that. Just press, bring it up. And then finally, level the top. So control B. Level the top top. There we go. Right click,
shade auto, smooth. There is that bit. Nearly done. So on the rest of
it. We've already got the chain that
we need to put in. We just need to
put this palm on. We need to make this small beam, and then we're done. Well, with the materials,
of course. All right. Let's save that
our work. And I'll see you on the next
one, everyone. Thanks a lot. Bye bye.
127. Creating 2nd light variation, uv unwrapping from atlas, using magic uv to copy uv sh: Welcome back on to
Plan four modeling and John China workshop, and
this is where we left off. Okay, so now, let's come
into this bom part. And with this bom
part, I think what we'll do is we'll
bring this in first. So if I bring this in
like so, press one then, and then what I can do is I can start bringing this in so, press the S p, bring it in. And then the bon bring
it in a little bit. Let's go underneath and
just check where we are. You can see why I
want to check it, because as I brought that in, you can see we've got a lot of crossover, which we
don't really want. And we can also fix that quite easily and join all these
together and then bring it in. By just coming up to tus mesh coming down to way
it says cleanup, and then merge by distance. Then this up, and you'll see that we've joined all
those together now, which means that we can
now bring it in much much further in if we want to. Let's press so one. Let's press, pull it down, and then
press the S born, like so. All right. I want a little
bit of a bend on here then. So let's click right click. But this time, I'm just going to grab it from this edge here. I'm going to put my
postulating on and then press the S born
and bring it in. So, there we go. What
a beautiful lamp. Okay, so that looks good. Let's actually now look
at the size of it. I think, actually,
you know, what I'm going to be
happy with the size. We could actually
make it a little bit more squat if you
want to with S and, so you can pull it in now easy as anything to get that
into the right place. And then what we'll do now is we'll just create this ship de, risa selected, simple
wooden part on it. So S, bring it up into place, like so, pull it
over to the middle. S and X, pull it out. Like, so. And then this is going to want to be going into the water. So I'm just going to press
S&X and bring it a little bit further over. Like so. And then what I'm going to
do this should be right in the center now. So
what I'm going to do? I'm just thinking, do I need to do anything
else for this? You know, well, I think it's
a little bit too thick, so I'm just going
to bring it in. And then what I'm going to
do now is create this part. So I'm going to press tab to
go into edit mode, A, 50. Bring it down without this
on, so I'll bring it down, and then R and y, rotate it round, make it
a little bit smaller. Then let's pull it back into
place, and there we go. Finally, let's press and
pull it in. And there we go. Alright, so that's that bit. Now, let's bring in our chain. So I'll grab my chain,
Shift D, bring it over. Shift S, selections cursor, put it right in the
center. Press one. And then all we're going to
do is bring this up now. Now, on this chain, we can see that this one here
is a lot thinner. Let's make this one a
little bit thicker. Now, there's a few
ways we can do that. I think what we'll
do in this case is just press the S
borne bring it up. Like so, and then I'll
just put it into place. Now, again, I want it so that this part sticks
right in the top here. So what I'm going to do is,
I'm just going to come in and delete these three, maybe. So delete vertices, like so, and now you can
see they're going the right way that I want them. So now what I can do
is I can come in, grab my lamp, pull it
over into place, like so. And there we go a thing
that looks pretty good. I'm going to bring this up,
put it into place like so. You might want to
put a steel bit in here or something
if you want to. Okay, so now, let's come in, and what we'll do is
we'll grab all of these. We'll come then to object. We'll go down to convert
and convert to mesh. And then what I'm going to
do is I'm going to come now and join them all
together with Control J. Control A or transform
set origin to geometry. Adding a modifier, we're
going to generate a bevel. We're going to put this on
aught point, uh at two, like we did with the other one, and we're definitely
going to come in and turn the clamp overlap off. And there we go. That is
what we're left with. Now, if I think
actually, you know what? I don't think I'm going to
do anything else for this. I think it looks pretty nice. Let's right click and shade
smooth. And there we go. Just looking at the
bevel on top of there. If I put it to uh point
tthree's have a look. Maybe on this one, it looks a little bit bare with that on. Yeah, I'm going to
leave that actually on. Okay, so now, let's
just put that up. Let's come to our
materials then. And at the moment, we've got just a chain material
like we had on before. What I'm going to do is
I'm going to break this down again exactly
like we did before. Let's wait for it to load
up with the materials. Let's come to this part
first, grab them both. Loss. You know what? We'll just grab all of this rather than going
through them again. Press Control L, and
we'll copy the materials. Go back to it, and now we've got all of our
materials on there. So now I can come in, grab
both of these, press. Smart UV project, click, put it on planks of wood. And then I can come in and
hide those out the way. Then what I'm going
to do is my chain. I'm going to leave my chain
for now the one that is. I'm s going to hide
those out the way. Then we're going to
do is press A, U, Smart UV project, click, and we're going to
have the iron dot. A sign. And then finally, now we want to select
every one of the so I'm going to see if I
can actually select one. And then what I'll
do is I'll select. I'll go to selection set
similar by perimeter, and we can see we've selected
all of those at the moment. Let's select each one of these, select again, similar perimeter. And now we should have
selected them all, like so. From there, then, let's
press you and wrap. Let's also then click on
glass sign, glass slit. And now, I'll show you another little chick
with UV editing. So we're going to
actually come up, and we're going to put on
one that says U V Magic, but let's come in, type in UV. And you should
have one that says UV Magic. So click that on. Once that's clicked
on, close that down. So, UV Magic is an
inbuilt add on. And then what we're
going to do is we first of all, going
to unwrap one. So I'm going to press
wrap. You know what? I need to select them all first. So I need to make sure
that I've got a way of selecting all these
before doing anything. So what I'm going to do,
I'm going to come on over. I'm going to click
on my vertex groups because these are vertexes, really, click the
plus button and click a sign and then deselect. Now, should, if I put
this onto object mode, you should be able to see now. If I collect select, you'll see it selects all of
those again for me, and that is exactly what I want, because then it's going to
make it really easy to select these rather than going around and selecting them all again. Let's click select deselect now, select one of them, and I'm
going to click and unwrap. So from there then, I'm going to grab it, press the S button. And then what I'm going to
do is put this into place. So we've got a little bit
of kind of this part here, so you can see it's just coming through on
this part here, if I put this back on material, you can see it's just
coming through there. From there, then let's
select all of these. Make sure you select
this one last. In fact, you know what? We'll select this one here. We'll press, and then
we'll go to copy, copy, and then copy default. And then what I'm going
to do is select them all. So select them all, and
then I'm going to go to. Copy. So we're going to paste, default, and there we go. Now you can see that all of
these are exactly the same. From here, then,
what you can do is you can go over to UV map, press the A bond,
select them all, and what that means is every single time now you select one, you're going to select
this, and you can just press G. So select it, press G, and you're
just going to move them over into
their own space. And you can see how
easy this is to do now, like so, so like so, and we've got like
eight to pick from, so we've got a fair amount
to pick from as well, and you can just work
your way around. And this is really,
really an easy way just to you know, have
randomized UVs. It's the quickest way
I've found actually to do this sort of thing that
we're trying to do here. So basically we want
random pieces of glass on there without going over these dark spots and
it looking silly. I J going to come round. I'm going to hide
this out of the way. Ja, so I can get two of these, and I can see perfectly
well we're around because you can see all of
these are the same ones, and then we'll just
work all the way in. All way round and just
make sure that they're all different from each other. So really, really handy tip as well if you
want to, you know, kind of pop UVs from
one object to another, you've just got to
make sure that all of the sites on the
object are the same. If they're not the same, it tends not to work.
It's not perfect. But it's good nonetheless. So on this one, I'm
going to leave that one, and then I'm going to
come on over here. You move these round. So like so, and
then this one here. Let's move this one. And we nearly background to the start. In fact, we are
background to the start. And then we go L nice
that looks guys. Alright, let's put
our render view one. Let's have a quick look at that. Double tap the A,
and then you go a really, really nice light. Okay, so let's put
it back on material. Let's go over to modeling. And now we'll
actually press F two, and we'll put it
hanging like this time. Hanging light. And then what we'll do is
we'll press the N button, and we're going to drop
it in our primitives. We're going to
save out our work. And then all I'm going to do
is just move this over here. From there, I'm going to press
O TH, bring back my light. And then what we're
going to do is bring in our final final light and our
final primitives, actually. So it's just this one here, and this is a standing light. Now we can see the work
that we've got to do. Again, we want to
break this down. This is the most complex one. So before we do anything, we want to have a good look at this and break everything down. So we can see we've got a beautiful roof on
here, a really nice top. We've got a really
interesting window on here, and we're thinking like,
how can we do that? You know? That's what
we should be thinking. So we're going to do
this though in easy way. At the moment, you can see
this goes all the way through, it's gone inside on there, and the rest of it, every
side is going to be the same. So we'll start with this part. And then we'll shape
out this part, and then the rest of it is
pretty easy. So, don't worry. It is a complex one,
but we'll be able to actually get this done and
dusted fairly quickly. All right, everyone.
Thanks a lot. Bye bye.
128. Creating small floor light source: Welcome Microphone to
blend the four modeling and jump in old workshop,
and this is where we left. All right. So if you press
one on our number pad. Let's come in now and let's
think about this part here. So what I'm going to
do? First of all, I'm just going to
shift right click, drop my cursor in
place just to get this right scale to start with. So shift. Let's bring
in a cube, not a plane. Let's delete that other
way. Let's press Shift D. Let's bring in a cube. Let's make it smaller. So we'll get it to be round
about the right size first, so you can see here, if I
pull it out round to there, that's near enough
the right size. So what I'm going to do then
is I'm going to come in. I'm going to press control
and bring in a few edge loop. So maybe I'm looking on
here before we do that, actually, let's just put it so we can actually
see through it. I don't see through
it like that. Can we see through
it the other way? Yes, we can. That makes
it a little easier. So we can see we've
only got really two of these and one here. So I'm thinking I'm thinking what I'll do is I'll
bring this in first, and then I'll create this bit. So the way that
I'm going to do it is I'm going to
press controller. I'm not going to worry
about this middle section. So this section at the moment. What I'm going to do
is bring this in. Now, it might make
it more difficult to actually line these
parts up as you can see. So I've just got to take that into account
when I do this. In other words, I'm probably going to be better
off coming in, grabbing this edge here. So shift and click, just to grab it all around and
just making sure that they line up a little bit there with these
parts here, like so. It's not really going to affect anything when I
bring it in anyway. So l shift and click
now in the center one. Make sure we've got on
proportional editing, and then what we're going
to do is S and bring it in and shape it the
way that we want it. So something like that, I think, Yeah, that looks pretty nice. All right. From here then,
I can actually now come in, put this on object mode. And what I can do is I can
bring it out to this side, right click and shade to smooth. Okay, so I want
to actually focus now on creating these parts
here then, as you can see. So these parts on here. So the way that I'm
going to do it is I think I'll put one in
the center, so control. Left click right click, and then I'll do the
same on these one. So Control, left
click, right click. From there, then
what I'll do is, I think I will level this out. At shifting click, press one, and I'm going to level
these out so Control B, and I should be able to pull these out to where
I actually want it. If I pull it out to here, you can see that we should
be able to from there, create kind of this kind of
circle part on all of these, because now level the more, you can see we look like this. All right. So now
let's get our top bit, so I can just press control. Bring in my top, so left click, right click, drop
that in the center. Then on the bottom one, Control. Left click, right click,
bring that into the center. And now I want to
do is I actually want to round these parts off. So these two parts off, I want these solid and
these rounded off. So all I'm going to do to
do that is, first of all, I'll come into the top, and I'll just test it
on these one here. I'll press Control Shift
and B and bring them out, rotate it up, like so. Left click, and then all I'm going to do is change the shape. Like so, and you can see now we've got that edging
that we actually wanted. So now we've got the right
edging that can press controls head and come round
them to each of these. Like so, just go in, grab each of these top ones. Press one on the number pad, and what we're going to do
then is just control shift and B and pull them out. Like so. Like so. All right,
happy with that. Now then I've nearly enough
got all of these parts in. But what I can do is now, I can actually split these off once I've actually
extruded them back. And from there, we can
actually create this part. So before we do that, though,
let's actually come in, and what we'll do
is we'll actually create that little
bit of an insert. I'm going to pull
it out a little bit because then I can actually
get behind it properly. I'm going to come in
nut the bottom one, just all the way down to there. So, like so. And then from there I can press. In fact, you know what?
I'll press, bring it in. So. Now, have we going
to crossovers on there, you can see we've
got a little bit of a crossover on this part. So what I'm going to do now is I should be able to
come in, clean up, and let's merge by distance, turn it up one, and there we go. Now we've merged all
of those together, making it really easy
now to bring that back. Okay, from there, then
I want to now bring those back in for
my actual windows, and then I can actually work on these parts on the inside.
So this part on here. So what I'm going
to do is I'm going to press, er, alternate, Turn off portion edit
in and bring it back, so altern bring it back like
so, something like that. Press the tab, right click, shade auto smooth, and we should be left with
something like this. Now, let's work on the outside. So I'm going to
grab the outside, so shift and click. We can see that we're not
grabbing all of those. So all I'm going to
do is just come in, shift and click, going
all the way around. L so. Like so and so. And then the last
one. And like so. Now, with these,
it's going to be easier if we just press Shift D, just to duplicate them, P to separate them off, and then we'll end up
with something like this. And the reason I
want to do that, just in case anything
goes wrong with them. So if I press control A now, all transforms, right click, set origin, to geometry, let's come in them,
add in a modifier, generate and a solidify, and let's pull
that solidify out. And this is the problem
that I was talking about. You can see here, we've got
a bed of a join in here, and that's why I
actually did what I did. So what I'm going to do to
fix that is, I'll come in, I'll press A to grab the mole, and what I'm going to do
now is make sure they join. So mesh, come down, clean up. And merge by distance. And there you go, now you can
see that's actually fixed, and now they're
looking pretty nice. Now what I should
be able to do is I should be able
to bring them out, wherever I want them right
click and we'll shade flat, so we can actually see how
far they are out, L so. And then what I'm going
to do now is the inside. So the inside pieces. So these on the inside now should be able to split
these off as well because I think it will make
it easier to actually work with Like so, and then I'm going to press
P selection, split them off. Come back to them then and now I'm going to press Shift H, hide everything else out the way just for now. You know what? Probably not the right way to actually go about this
because I need to see this. So I'll do is I'll grab this, and then I'll press Shift H, hide everything
else out the way. There we go. Now, let's
press control law. You can see here that we've
not got one going to the top. And the reason is because
this isn't joined together. So let's try something fast
first. Let's right click. And what we'll do is we'll
triangulate and then right click and what we'll
do is tries to quads. That's not going to
work because then we've still got
this mess up here. You can see if I
press control law. I can't actually do that. So what I'm going to do instead is, I'll just bring it over, and I want to kind of join
these parts in together. So what I'm going to do is I think, I will do
it the easy way. So I'm just going to
grab all of these. I'll press delete. And
what we're going to do is we're going
to delete faces. No, we're not. We're going
to delete only faces. So only faces, and we
should be left with these. And then all I'm going to do now is I should be able to
come in shift and click, shift click Shift
click Shift click, and then just minus
off the top one. So minus off the top one, so, right click then,
and then you should be able to come down
bridge edge loops. Like so. That's
not going to work because We're trying to do them all at the same time. So we're doing one at a time. So come in. Ok shift
click, minus it off. Bridge edge Loops. There we go. Ok shift click minus it
off, Bridge edge Loops. Ok shift click. Let's try
minus it off, and then shift. There we go. Ok shift
click minus it off. Shift R, and there we go. Now, finally, we should be
able to press Control law. Left click, right click
and Hale Lua, there we go. Left click, right click. On Cro, left click, right
click, Otro law. Left click, right
click. Okay, so now what we need to think
about is this inside then. So do we want them all together? I think it looks bad like that. So I'm just going to grab this, this, and this, as you can see. Same for this one then, this, this one, and this
one and this one. Otot this one and this one. Ontart this one and this
one, and there we go. Now, let's bevel them up again. So Control B, turn it up, and we can see we've
got another problem. And the other problem
might be caused by as not having they're
either not joined together, or we've got two together here, or the actual normals are
facing the wrong way. So let's look first of
all, face orientation, and there we go.
There is our problem. So let's press A, shift n, spin them all around, like so, and let's try that once more. We'll try on one of
them rather than selecting all. So control B. There we go. It's perfect. Okay, so let's turn that
off. Let's come in. Shift click Shift
click, O Shift click, and then come in to
each of these Like so. Like, so, so, so. There we go. Now, let's press Control B, pull down the bevels and let's bring them out to the
size that we want them, which will be
something like this. Now, from here, before
we do anything else, I just want to
extrude these out. Before I do that, though, I definitely definitely
want to mark my seams on just these parts because I want to split these
glass parts off. So I'm going to right
click. I'm going to come down to where
it says, mark seams. And then what I'm going to
do is hide or split all of these glass parts off because
it's going to make it much easier in the future
to actually come in. And separate this glass. I just need to remember that
I've actually separated them and not to join them together before I've
got my materials on. Then I'm going to
press P selection, and now there they are,
they're separated. Now I should be able to
grab these, press A. Control and we'll clear the seams now because
we don't need those on. And then from there
then, I should also be able to press
control A or transform origin to geometry and have some control over
how these come out. So if I go to solidify, I should then be able to pull
these out the other way, right click and not shade
smooth, shade flat. So press ol tag, bring back
everything, and there we go, that is how you make
something like this with accuracy and something
that looks really, really good, as you can see. Now, the next thing that we want on is these pieces of wood. Sou on the next lesson, we'll actually work
on these pieces of wood because you can
see at the moment. This isn't going to work out
at the moment because we actually can't put
a edge down here. So that's something that we
have to actually think about. So I want to think about that while we get to the next lesson. All right, everyone. So
I hope you enjoyed that. I'll see you on the
next one. Thanks a lot. Bye bye. M.
129. Continuing to add detail to light lantern: Welcome back everyone
to Benfor Modeling and Jomon of workshop. Alright. So, as I said,
we've got this part now. So what I'm going
to do, first of all, is I recommend you do this. If you're working on
something you're not sure how to do,
make a copy of it. So I'm going to pass ship, enter P selection and
separate that off. So now, I've got a copy of this. So first of all, I'm going to hide these parts out of the way. I'm going to hide one of
these parts then, sorry, one of these parts
out of the way, hide one of these
parts out of the way, and it should then
be left with this. Okay, so what I'm
going to do is, I'm going to show you
a little technique. So we'll go Shift click
on all of these edges. And the thing is, we can't
bring these out straight. That's the problem we have in. But what I'm going
to do instead is, I'm just going to grab
all of these going up. I'm going to press
control B, like so, and bring them in, and I want these now to be kind
of straight and out. What I'm going to do is
I'm going to press, er, tones and I should now
be able to pull these out to where we actually want them. So
something like this. And then what I
want to do is put an edge love straight
down the center. So straight down the
center of each one, like so, straight down
the center of this one. And finally, this one. Then what I want to do now is I want to come to this part, and then shift and click. And what I'm going to
do is I'm going to press right click
dissolve edges. And that then is going to give me the corner that
I actually want. Shift click, right click, dissolve edges,
and there you go. Now you've got a nice corner based on what you actually want. That is what I want, don't want this corner flattening
off basically. So now I'm going to do is, I'm going to see
do two at a time. So right click right
click and dissolve edges. And there we go. And let's do
the same thing on this one. Dissolve edges. And
then finally, this one. And dissolve. Where is it dissolve edges. There we go. All
right. So there we go. That's what we actually
wanted. Now we've got this. We can actually come
in and actually delete the other one because now we can put on
some wood on here. The one thing is the one thing is that I think what I want to do is I want to
separate these out. And I'm just thinking like, I want to make these
a little bit bigger. So what I want to do
is I want to come in, ship click and go all
the way around these, so we're grabbing them,
going all the way around like so and I'm actually
going to separate them off. Like, so, like so, right click, mark a seam. And then I should be able to come into the center of here, press the lbton and then
I should be able to delete, delete and faces. Let's delete faces out the way. And then finally, what
I want to do is I want to bring these out now
and put a top on them. So what I'm going to do now is just come into
the tops of them. I know it's a lot
of messing around, but you'll see actually
what I'm trying to do here. I'm going to come in,
grab all of the tops. Like so. And then come in, grab the bombs, like so, and then delete bases like so. And we're going to
fill those bases in perhaps or we might just
put them at the bomb. Now, if we press tab, press al tag and
bring back our part, this is what we're
actually looking at. And you can see
what I want to do is I basically want
to bring these out a little bit to make them look a little bit
more like wood. At the moment, they're
not very thick. So what I'm going to do is
I'm going to come to them, control A or transform, set origin to geometry, add in a modifier, and we
want to generate a solidify. And now we can see that
we've actually got a little bit of thickness if
we pull them the other way. So let's pull them the
other way. Like so. And there we go. That is
what we're looking for. Now you can see
we've got thickness. And now when I
straighten these up, you will see that these
look pretty nice. So if I go to offset even, that is what I'm
actually looking for. Right click, and what
we'll do is shade flat. There you go. That's perfectly what
I'm looking for. Maybe they're a
little bit thick. So let's pull it back, hold in the shift born, pull
it back a little bit. We now we've got that nice
ridge, and that's what I want. Alright, so I don't
think actually, we need to fill in these because what I think we can do is we can get a top on here and a bottom on here and
not worry about it. Now, let's put the bomb on first because the bottom will
be the easiest part. What I'm going to do is,
I'm just going to grab all of these contra
selecting them all. So shifty, and then all I'll do is I'll press the S
born to pull it out, so I'll press elite, and I'll go to limited dissolve just to make it a flat plane, something a little bit
easier to work on. Just then I'm going
to pull it up. I'm going to press E
and Z, pull it down. In place. So, there we go. Alright, so that's
that bit done. Now I want to do is
think about the top. And you can see on the
top here, these are flat. That makes life much, much easier because it means
what I can do is I can actually flatten these
off using the bevel, which makes it very, very easy. So let's come into
the top again. Or we can actually use
the bottom for this. So I'll actually
grab the bottom. I'll press your D
and I'll press one, and then all I'll do is just Bring it up into place just under there,
so it fits like so. And then what I'm going to do
is I'm going to pull it up. So if I press one now, you can see how big do
you actually want it. Again, I'm not going to worry about scale too much right now. I just want to pull this up. And get it roughly into
the place that I want it. So if I bring in now
some edge loops, so control, let's bring in some edge loops, left
click, right click. And then all I'm going
to do is I think I'll split these two off. So if I press, in fact, we'll split them
both off separately, so P selection, and
then come to this one, L L, P, selection. So. Alright, now I can
grab both of these, right click and
shades move by angle, and that flattens those out. Now, let's bring this
one up a little bit. And let's grab all
of these parts now. I'm just going to grab all of
these parts, not this one. Let's minus that one off.
And let's press one. And what we're going to do
is we'll just pull it up, and then we're just going to press son's head, and hopefully, I should be able to
stretch these out like so. Now, you can see, I didn't
grab my windows in there. So I'm gonna go back. I'm
gonna grab my windows. Then I'm going to
press one Esnsd and now I can actually
stretch that out. And for some reason, One of my windows isn't
actually stretching. Let me just see if
I've got it on. I've got it on individual
origins. That's the reason why. So let's go back, put this
on medium point, press one, S and Z, and now we
stretch it all out and now we've got how
we want it. All right. So now, finally, let's pull this into place underneath here, making sure these goes in. Let's pull this one
then into place. Let's also right click
and set origin geometry, and now we've got a better
idea of what we're doing. Okay, so I'm going to
actually now come in, grab the top of here, and I'm hoping that the shop, let's try the shop,
should do it. So what I'm going to do
now is press the S borne, and it's definitely
not going that way. So it's definitely
the other way. Let's try the sphere.
And there we go, let's pull it out a little bit. And I'm just wondering
if I actually want to do it this way, try the root. You see that it starts
to bend up at the top. But what I'm thinking is I
will bring all of this in, first of all, on smooth. So if I bring this in
now on smooth like so. So bring it in
something like that. And now I want to work on
bringing this part in, so I'm going to press
Oh, ****, click. Let's put this on too sharp. Let's press one, and
let's play around now of getting this in
the way that we want it. So you can see, not really
going to work like that. So you know what
I'm going to do. I'm just going to go back, and I'm going to come back
before doing that. So before adding all
of these edge loops, you know why, I'm just
gonna put it back. I'll come in, press
a limited dissolve. And then instead of doing
that well, do this, I won't be so clever, I'll pull it up.
Without portioning on. Then I'll bring it in. Like so. And then what I'll do now
is bring in my edge loops and do it that way
because I think that's going to be
much, much easier. So now, we'll grab this. Now we should be able to pull
it in with one of these, let's see which one
it's going to be. This one here is
looking promising. Like so. And then I think I'll take that off and just
free hand this now, so I'm going to
bring this one in. I'm going to bring this
one in a little bit. Like, this one in. There we go. That's
a nice smooth arch that we're actually looking for. Alright, I'm happy with that. Now, let's think
about our bevels on here then. So what
don't we go to do? These need splitting off. So again, I think on this one, we should grab this one. Press make sure they split off from the rest,
which is what it is. Press shift and D and then press P selection and split
it off, like so. From there, then we'll grab one of them, hide them
out of the way. Grab the other one.
And from here then, we should now be
able to level this. So press control B should now be able to bevel
it off. Like so. Now, I'm just wondering whether they're a little bit too thick. I want them to kind
of be a little bit thicker than these
end parts on here. So this is looking
quite nice like. So. And what we'll do now we'll actually work on
this on the next one because it's a fairly complex bit
to bring these out and bring them up and all of that other stuff that
we need to actually do. The other thing is we might not be able to use those parts
that we just created. So we'll see. We'll see anyway. I'll explain everything
as we go along, but it's fairly complex
to get this one done. All right, everyone. So I hope you enjoyed that, and
I'll see on the next one. Thanks a lot. Bye bye.
130. Breaking up mesh to create small wood tiles for lantern, using proportional scaling : Welcome back everyone to Blend four Modeling and
Jump china workshop, and this is where
we left the art. Alright, so what I want to do
then is come into Edge let. I want to grab these edges now. And then what I want to do
is I want to make these actually carry on a little bit longer than what
they are at the moment. What I'm going to do is
just press and enter, and then I want
to be our normal. I want to also be on
individual origins. And then what I want to
do is press G and x, and then we should be able
to pull them down, like so. And then finally, we
should be able to then lift them up into place. Just make sure that they carry
on that actual smoothness. Alright, so that's
looking pretty good. Now what we want
to do is we want to split these off now,
so I'm going to come in. Split these off. Going
all the way to the top. Like so. So I'm just going
to press P selection. I'm going to grab
them this part. I'm going to press delete. And then we're
going to press lt H and bring back the part
that we had before. And this is what we
should be left with. Now we want to do is we
actually want to press control A transforms the
origin to geometry. And then I'm just going to make these now a little
bit bigger with, of course, a solidify. I'm going to bring
my solidify in, and then I'm going to
increase the thickness, going the other way. All right. So if you're finding that you having to increase the
thickness way way too much. Now, you can see here
as well. Let's right click and shave flat. And there we go,
that's what we've got. If you having to
increase it too much, then we're going to go in
and bevel the other one. So I think that is a
little bit too thick. I think something like
this is much, much bare. What I'm going to do now
is just come to this part, and I'll come to
each of these edges. So chip click. Put
it back on global. And then what we're
going to do is just level off these parts. So just these corners, going all the way
down there they are. Press Control B, and you're just going to level them
off back into there, and there you go, we should end up with something like this. Now, from here, then,
what we want to do is we want to split off each
of these wooden parts. Before we do that, though, let's add in a few edge loop. So three edge loops on each one. So control, three. And then control. Three.
And then control three. Like so. Like so. Now we want to do is we want
to split each of these, so now we can come
up to each of these. Like so, and then
we can right click. And I'm wondering why
actually we've got that on. Let's just try that again. So, let's see if
we can go round. There we go. That's better.
That's exactly what we want. So right click, and then
we can mark a seam. Now, from here, let's just
hide these out the way. Come back to these parts then. And what I want to do
now is split these off. So I'm going to press
Alt ship click. Like so. Like so. We can actually you could
actually delete these out of the way these parts
if you really want to. Right, click, macacme.
You know what? Think I might actually, do we actually need
these parts in here? I don't actually think I
do. So, you know, well, I'm just going to delete
them out of the way and make this simple for myself. So like so, delete bases, elite bases, all of these
delete bases, like so. All right, so this is what
we should be left with. Now what we want to do is
just split these parts off, go in all the way down. Like so. So it's every other
one. Like so. Like so, and then I want to
just press y, split them off. And now you press G, you can
see, they're all split off. And then finally,
what we want to do now is we want
to first of all, solidify these and
then level them off. So I'm gonna press tab. All tag, bring back everything. Come back to these
Control A, A transform, set origin, geometry, and
then all I'm going to do now. I've still got solidify on here, which means I've got
complete control, and now I'm going to have
control over these as well. So generate difi right
click, age flat. And then what I'm going
to do is pull these out. So you can see now, this is
what it's done at the moment. Let's first of all, add
in let's pull them out, first of all. So
we'll do that first. So we'll pull them out. This way, and you
can see that there. You're going to
poke through there, but that's okay because it means I've still got control
over this part here. So I'm going to make
them that thick, I think, something like this. I think that looks good.
I can drop it down. We've done all this as well
to put them all into place. But for now, that's
looking good. And then what I'm
going to do is add another modifier and a bevel, and I'm going to turn
that down on my bevel. Let's put that one up.
Turn it down to 0.3. Try that. And there we go. And now let's apply
then this solidifies, so I'm going to click a
little down arrow. Let apply. And now on these, I
can come in and what I can do is go to mesh transform, and let's go to randomize, and let's turn this
down quite a bit. So let's turn it down to 0.1. You can see here because
we've got a lot of parts in here that it's kind
of breaking them, and sometimes that will happen. So the best thing
I'm going to do, I think, is to actually get rid. Yeah, if I get rid
of these parts, it's not going to
have the same effect. I'm just wondering the
best way to do this. Might be even two not
have all of these in or bring it down far enough. So I think what I'll do first. I'm just wondering the
best way to do this. At the moment we've
got that bevel on. That's fine. I'm just going to have a look
at these because I want to make them
a bit more rough. So if I come into one,
let's just see what happens when I go to
random and pull this out. Let's see what happens
there. You know what? That might actually
do it, so I'm just going to come
in, press the G Key. Just move these
out a little bit. Making them a little bit uneven. So let's have a look at that. And there we go, that's looking. That's looking pretty
good. Now, let's come in and do the same
thing on these. These Like, so, and there we go, that's looking much,
much better now. Like so now I can right
click shade smooth. Yeah. And I think I'm
much happy with these. I think I'm just going to move this one a little bit down. Like so. And then finally,
now, let's come to this. Let's apply solidify because I'm happy
with the thickness. Now press Control A, right
click shade auto smooth. And then what I'll do now is join both of these
together with Control J. And then it'll inherit that
bevel on there as well. And then finally, now I
can look and possibly possibly bring these down
a little bit into place. So. There we go. All right. So that's
been a lot of work. Let's also look
Shadesmooth bangle. And Jos going to turn
this up a little bit. Now, if it's not working, it's because of
the fact it might have sharp edges on
there. You know what? I'm just wondering
to move by angle. Let's turn this
down all the way. That's not going to do
it either. You see here. I've got a little
bit of a problem. Let's not keep sharp edges. Turn that off. There we go.
That's what I'm looking for. So we're not going to
keep the sharp edges. Let's try putting
that on 30 now. Yes, and that's what
we're looking for. All right. So we got
rid of that now. Now, let's think about our top. So what I'm going to do,
I've got this in the center, let's press Shift S
coaster selected. Let's press one, and what we're going to do is bring in a cube. So we'll bring in a little
cube or a big cube. In this case. Let's
put it to the top, bring it in a little bit. Press S and Z.
Let's make our top. So let's just make sure
everything is in there, let's make it a
little bit smaller. So so it goes on the top. And then what we're
going to do now is press the i bond on the top of here. So the insert, and then
we're going to pull it up. And then we're going to press S, pull it out a little bit without this proportion editing and then press E and then press S and
pull it into place, like so. All right, press Control A or transform origin to geometry. Grab this one, grab this
one, press Control J. That then we'll apply the
bevel on top of there. And now we're on to
the final stage, which is the bottom of here. So we can see at the moment, we've got just this part here, so we need to put in
this part under here, and then finally
this part in here. So what I'll do is, I think I'll press one.
I'll press shift A. I'll bring in another e.
So let's press shift A. Bring it a cube, make it
smaller, press the S born. So we're going to bring it
down to here, so, press Send. And then just pull
it up into place. So we're just going to
put it under there. So we're going to create
this part here first. So I'm going to press S bon, and then I'm going
to grab this part and you can see it
goes in slightly. So I'm just going
to grab this face, press the S born, and
pull it in. There we go. And then from there,
what I'm going to do is I'm going to
press the born. And bring this part in. So you can see we've
brought that part in. And now we just want to create this part going down to here. So, what I'm going to do is,
I'm just going to press one. I'm going to press and
pull it down, like so. And then from there, then I'll split this off, first of all, so shift and click,
grab the top of it. Sorry, the bottom of it, press P selection,
split that off. So. And now I can do is
I can press control, you'll transform set
origin to geometry. Go in and let's press control, bringing some edge
loops, five generally, just so you've got
one in the center. And then let's come
into the center one. And let's put it on too. Let's try to sphere first,
see how that comes in. Yes. And that's the one
that I actually want. So nice and smooth
going up there. Let's just make sure now
that this is in place. Like so. Right click,
Shade Auto Smooth. And now on the next lesson, let's finish it off with this beautiful bottom.
Let's save that our work. And you should be proud
if you've got this far of creating something like this because it's quite a
complex model, actually. All right, everyone.
So I hope you enjoyed that and I'll
see on the next one. Thanks a lot. Bye bye.
131. Adding final frame work to lantern: Welcome Macro on to
Blender for modeling and jump you know workshop, and
this is where we left off. Alright, so let's
grab this part now. Let's press Shift
S. Sa selected. Let's press shift A, and
we'll bring in another cube. Then what I'll do is I'll
bring this cube down, so I'll put it into
some sort of place. So I'm going to want it I
think something like this, just for now, but then I want to bring in
these blocks as well. So what I'm going to do is,
I'm just going to press S. Pull it down into the place that I want
it, so something like this. And then what I'll do
now is I basically want to bring out some cubes on here. So the way that I'm
going to do this, I'll mainly easy for
myself, actually. So what I'll do is
I'll press Control, left click, right click,
control, left click, right click Holt shifting click, and then Control B and pull these out and
there's your cube. And there's also a piece
of wood on here as well. It's going to make it easy
to do that part as well. But then what I'm going
to do is I'm going to grab these three parts now. So these three parts here. So I'm going to
press the i bond to insert them in jaws to tab
so something like this. And then what we'll do is we'll press and pull them like so. And now we'll actually finish
with these wooden parts. So if I grab these
three, like so. And then what I'm going
to do is press shift. And then we're going
to press E and Z, pull them up, like so, and then grab all of them. So grab them all like so. Now, you can see at the moment, If I press Shift H, these are actually
joined together. So let's just hide
that out the way. Come back to this one. You can see they're actually
joined together. We don't actually
want that at all. We don't actually
split these off. So shift click Shift click. Shift select Shift
select Shift select y. Now press l TH, bring them back. And now we should be
able to split these off. So first of all, I'm going
to come to these ones. I'm going to make
sure I'm on normal. Make sure I'm on
individual origins, and then I'm going to
press S and a here. Can we do it S and X? No, they're all going to go the same way, so we don't
really want that. So what we're going
to do instead is, Instead of doing
that, we can come in. Shift click Shift click
Shift click ln S. Let's bring them in. Like so. And now, can I actually
pull them out separately. So if I press S and y, you can see we're going
to pull these out. So what I'm going
to do instead is, I'll just grab these two S and y, pull them out into place, grab these two and
just do it the old fashioned way and pull
them out into place. Like so. And then finally, I just want to pull them all up. So I'm going to
press S. S and S, pull them up, drop
them into place, and there we go. Alright. Now, let's press Salt and H. Bring back our part,
and there we go. Now, let's bring this
part up a little bit, just so it's fitting
in a little bit nicer. And then finally, now, let's
do this bond bit here. So we're going to come
in. Grab this bond part. So let's just control
select all of these parts. And then what we'll
do is we'll press the S bond, just to pull it out, and then finally,
we're going to press and pull it down,
and there we go. Alright, guys. So we're
nearly done with this. So we've got a bevel
on here at the moment. We've got lots and lots of
different things on here. So what I mainly
want to do is now, I want to go through
it and actually hide the parts out the
way that are done. So you can see this
part's all done. This part is basically done, it just needs to bevel on it. This has got to solidify on. So let's just apply that. So apply solidify, hide
it out of the way. This part has got to
solidify as well. So apply it, hide
it out of the way. This part, solidify, apply
it, hide it out of the way. This is just the glass,
and this is that tag. Now what we want to
do is grab it all. Press control A or transforms
that origin to geometry. And then what we
want to do now is grab this one last
because that's got the bevel on and then press control, join it all together. Now, just make sure you're actually going to
bevel on there. You can see that a lot of
this is not actually beveled, right click shade,
smooth by angle. And then all we're going to
do now is just come down and turn off again the
clamp overlap. Turn that off, and there we go. We've got a beautiful
bevel on all of this now. Now, I'm really really
happy with how that looks. I think it looks absolutely perfect what we're looking for. I'm just thinking maybe this bot part just wants to
come out a little bit more. And also, we're going to
need a sharp on this part. So all I'm going to do, I'm going to grab
this bottom part. Like so I'm going to press
altern put out a little bit. I'm hoping that it keeps
flat as it kept flat. It looks like it's
risen up a little bit, so let's actually overlook. Altern Bring it out like so, and then bring the
bottom part out, so alter. Like so. And then what we'll
do is we'll put a sharp going along here, right click and mark a sharp. Now, we can see that
it's bent a little bit. But I actually like
that. I actually like the fact that it's
bent a little bit. And if you want.
Instead of doing that, you could have just pressed
S and pulled it out, so you're not getting this
slight bowing effect on that, but I think it looks nice. But what we're doing. And
yeah, that's all done. So now I want to do is I
want to grab one of these. So I'm going to grab
this. Press Control L, and we're going to copy
not copy modifice. Control L. We're going
to link materials. Let's go then to our materials. Let's now get all
of our materials on when this actually works. Let's this one, let it
load up. There we go. Let's come to this one then, and we can see this
is what we've got. So now let's work our way along. So this part here
can see it's met. Let's actually come
in, grab it all, Mart UV project, click Okay, and then we'll go to our
materials on dark, a sign. Hiding out of the way. This
one is all going to be wood. So let's come in grabbing
all of these pieces of wood. All the way up. And we can come in as well and kind
of box select it. Probably go away we're
doing that control plus, and then you can actually
come in and grab. Yeah, I didn't really
work too well. There are quicker ways. We could have got into
wireframe, done in many, many different ways,
but. Hey, let's press. And then what we'll do is
put planks on, click a sign. Now, we can see on these parts here that we do have a little
bit of an issue on these. You can see we've got to
join there, for instance, and I want to fix things
like that straightaway. So what I'm going to do
is, I'm just going to grab these four parts. So not that one. Let's
grab this one. This one. Shift H, hide everything
else out of the way. And then what I'm going to
do now is add in some seams. So we'll just add
in some seams here, then this will
unrote very nicely. So Jos going to come down, do the bottom of here. So you know what else? We can actually come in
control mark a seam. We can actually come in and
delete this now the way. We're not going to
need it anymore. And then we can actually
really move around here. So I'm also going
to press shift age, hide everything else
out of the way. It's going to make it
much, much easier then. And then what I'm going to do is now mark seam on the edges. Now we can there's another
way of doing this as well. So what we can do is
we can come over, select, and you'll see that you've got
select sharp edges. You can actually do
it that way as well. So right click, Mark seam. There we go. Alright, now we
can do is we can press A, wrap there you go. Now you've got a really,
really nice wrap on those. Everything looks really nice. And now we can move on. So if we come now, we can press lth, hide all of these things, and I will do it the
proper way this time, so I'm just going to press one. I'm going to go into wire frame. And then all I'm going to do is press B and just come
down to this bottom one. Control plus, hide
it out the way, put it back on material, and there we go, same plus that. Okay, the one thing is, what do I want to
make this color? I'm going to make it the
same color as the wall. So I'm going to grab this. I'm going to add in another one. I'm going to Add in another one. Like so. Click the Down. Click on Wall. Like so. Click a sign. Click U. Smart UV project, click Okay, and then just make
sure then that we're happy with that going
all the way around. And I think I am. And then
we've got these parts here. These parts will be wood.
So we're going to come in. We'll grab all of these. Like so. Like so. Then we're going to
put. Smart UV project. Click Okay. Put it onto
planks, lick a sign. There we go. That's
looking good. And now we've got the
inside bits of here. Now, we can see at the moment. These should be wood, I think. So let's come in. Now, we might have a
problem with these parts. They're not going the right way because of, we're
going to wrap them. So, Smart UV
project, click okay. And then what we'll do
is we'll put them on. Thanks. They a sign. There
we go, You know what? I'm not going to worry though about the way the woods facing because it's going to be pretty difficult to do
something about that. And then what we're
going to do is we're going to come into
these parts now. These are okay on metal. So these parts here
just need re wrapping, and then we can leave
them as the metal. So, Smart UV
project, click okay. And then what we can
do is we can hide all of these parts now
out of the way. So all of these And we should, when we do this, you'll
be left with our windows. So we hide those out of the way, and there is all our windows. And now, what we'll do is
we need to unwrap these. So if I come in and
I unwrap this one, we'll try this, press, and what we'll do is unwrap. We'll go then to UV editing. You can see this is
how it's unwrapped. We'll also In fact, won't do that, what
we'll do is we'll press S. We'll bring it down. And then what we'll
do is we'll come on over now to our materials. Click glass, click a
sign, and there we go. Now we can put them into
place, we'll want them. So I'm just going to drop
it into place like so. I'm also going to
put this on global. And then what I'm going to do
now is I'm going to press. I'm going to go down to copy, and I'm going to
copy and default. And then what I'm going
to do is grab all of these because
they're all the same, so you can see they've got
the same amount of meshing. We should be able to go to copy, paste, default, and there we go. Now, again, press A over here, and then what you should be
able to do now is come to each one individually
and move them around. So as you can see, though, we need to put these onto Like, so and onto glass
windows, click a sign. Now, we can see didn't work because sometimes
that's going to happen. You can see here,
it's just a mess. And yeah, that
sometimes happens. So what we're going to do
is we're just going to unwrap them separately
instead of doing that. Like so we're going
to click on wrap. And then what we're going
to do is press the S one. We're just going to grab them separately now,
put them in place. Like so. So I'm pressing
L. And sometimes, you need to grab them
from the edge to actually make sure that
they're separated. Don't grab them
from the other one because then you'll
end up grabbing two. And it's a little bit of work, but it should be
with the effort. So we're just going
to press L, G, and then L G. So. All right, let's hide
those out the way. And now what we'll do is
we'll grab all of these, so I'm just going to come in
and grabbing all of these. Not that one, so shift
L instead, deselect it, and then L. And then what we'll do is
pressure you and unwrap. And there we go. Alright, let's assign the glass to
each one of these. Like so let's make them a
little bit smaller. Like so. Then all I'm going to do now is hopefully be able to
grab each one of these. And you can see
that have grabbed one was very close to
grabbing another one. I'm going to drop
these into place, let's grab this one first. So I want to finish those
before the end of this lesson. I want to hide it.
I want to move it. Like so. Like so and
at least one thing by the end of this lesson. This will all be done, which means basically now
apart from the grass, a little bit of trees. We're on the home
straight, guys. We've got everything
that we needed to create actually done. All
right. So there we go. Now I'm going to
save about my work, and on the next one, I'll
get this fully finished. And yeah, that'll be looking
really, really nice. Alright, everyone, so
hope you enjoyed that. I'll see on the next
one. Thanks a lot. Bye bye.
132. Starting modeling on final wizard round tower structure: Welcome back
everyone to blend of por Modeling and Jomon workshop. Now, I put my wall on here, so you can see, I've
got my wall on here. Now, on the original we had
stone, but I'm not sure. I think it actually looks fair with the actual wall on there. So what I'm going to
do, though, first of all, is I'm going to come in. And I'm going on
wrote both of these. So Smart UV project, click. Let's drop off planks on there, then, so we're just
going to click a sign. So just make sure they're
all going the right way. And then what we're going to
do now is come to this one. So we're going to add
in our stone now. We're going to add in our stone
to each of these as well. So all of this is
going to be stone. Smart UV project, click Okay, add in stone, click a sign. And then finally, we've just got these ones left, which
we're going to come in. We grab all of these
Smart UV project, click, planks, click a
sign. And there we go. Alright, so that's
looking pretty nice. Now, the one thing I would say, is maybe with these, we might want to break
it up a little bit. So I'm just going to press
altage bring back everything. And what I'm looking
for now is if I want to change these to
this wood instead. So if I double tap the A, you can see this is
what it looks like. I'm thinking I'll change
this wood to this one here. So what I'm going
to do is I'm just going to press altage
bring back everything. And then I'm just
going to come in to each of these. In
fact, you know what? I'll hide these
out the way first. It'll make it much, much easier. So hide them out of
the way. Press one. And then what we'll do is now, we'll just go to what's this called port shade in Wireframe.
Wireframe. There we go. We'll go to wire
frame, we'll press B. And grab all of
these, all of these. Sometimes when you're
doing the courses, you actually forget
the words sometimes. It's very hard to talk for 24 hours straight about something and not
forget something. So yeah, let's go
back to material. And what we'll do is we'll
click a sign on these planks. No, we won't, we'll
click plus down arrow, and we're looking for
window a window wood. This one here, click a sign. Let's press tab and see here these aren't wrap
properly for some reason. So let's try that again, U, Smart UV project. Click Okay. And now they've all
wrapped properly. So it's a good job. We
actually check that anyway. And now, finally, We should. You can see on these, we have js looking at
the thickness of these. So we can see that's
the thickness of these. You know, well, that's
going to be okay. Let's put it on rendered view. Let it load up. And you can
see system is out of memory. So what we'll do is we'll
put it on object mode. We'll go to save file, save. We'll come back to modeling. And then what we'll
do instead is, we'll just reload our scene. So file, save once more, file open let's open it. Let it open up, exactly
the same scene. There'll be a lot of things
that need loading in now. And now we should
be able to come in and just click on render view. And there you go.
What a surprise. I actually works. So, alright. So that's what
we've actually got. That's looking pretty. Nice. Now, I think I'm
just looking on here. Yeah, you know what? I
think I'm happy with that. If you're not happy
with this part here, we can actually straighten
these up as well. So I'm thinking, shall we
straighten this part up. Let's actually have a look
before we do anything else on actually straightening
these parts up. So all I'm going to do is I'm
going to grab all of these. And then what I'm going to do
is I'm going to put it onto individual origins and
then press S and X, and it should be able to
straighten those up like so. So S and X, straighten
them up and there you go. Now, let's straighten this one
up as well because I think they looked actually not right.
I wasn't happy with them. So S and y, Let's straighten
those up, S and y. And there we go. Now, let's have a look at what
that looks like. Yeah, I think it just looks bad like that. It really does. Alright, so we've got everything now that we actually need, and it's all looking really, really nice as you can see. So now what we want to do
is we want to I think we'll actually come and start
work on this part here. So I think round the back here. And then what we'll do is I'm just wondering whether
to start on the tower first, maybe the tower. Let's
start on the tower. Let's get the last hard
part out of the way. Now, with this
tower for this one, it's pretty much exactly
the same as this. We've got a lot of parts in
here that are also the same. But what we want to do first is we want to actually
shape this tower. At the moment, I think it's
a little bit too thin. So what I'm going to do is,
I'm just going to press the S p, bring it
down a little bit. And then what I'm going to do
is look at the height now. So how high do you want it? If I bring it down, does
that actually look bare? Does it look bare up there, so it's up to you really
where you want to put it, but I think rounda there is
a really good composition. So something like this, it's a little bit lower
than what it was. Next of all, then we need to think where is it actually
going to come up to. Now, I think that it should come up to round about this part, and then drop down and
we build from there, 'cause I think we can build
everything up or there. What I'm going to do is, I'm just gonna grab
the bottom of it now. And I'm going to pull that up. To round about this
place around here. Now, the next thing is we
want to actually shape this. So next of all, we need
to ask the question. Is it actually wide enough. Is this actually wide
enough at the moment? I think it is. I just think that this part up here should
be going in a little bit. What I'm going to
do is I'm going to come in, bring in an edge loop, and I'm going to
bring it down to roundabout here just so it's
level with this point here. And from there then, I think
I can actually bow this in. So what I'm going
to do is now, I'm going to bring in
some edge loop, so left click, right click, bring in some edge loop,
I brought in seven, and then'm going to
come to this one here, so shift and click. And then what I want
to do is I want to put my proportional
editing on, and I want to bring it in now. So I'm going to
bring it in very, very gradually. Like so. You can see now that's making a huge difference on how
our tower actually looks. So yeah, a thing
that looks good. And then what I'm going
to do is now I want to bring this part
out a little bit. So I'm going to go back
and before I do that. So before I bring this bit in, I'm just going to hide this bit out of the way because I want to keep this relatively straight. Can I keep it straight if
I now bring this part in? So I'm going to press the SP,
I'm going to bring it in. And then what I'm
going to do is press tag let's have looked, and that did nothing. So what I'm going to do is
I'm going to pull this out. Turn this off, press
the S button, like so. And I think that looks
a little bit there. Maybe maybe bring this
one in a little bit, maybe bring this one
in a little bit. So, yeah, I think
that looks bad. Looks like now, we can get
kind of a flat piece on here. And yeah, we can have
some ridges around here. So now, before we
do anything else, let's actually use
this part here. So what I'm going to do is
I'm going to grab all of this bath is pretty much
the same as this one. So I'm going to
grab all of this. I'm also going to
make sure that I grab the inside of this as well
because at the moment, if I press G, we have got
the inside. Let me just see. Yeah, there is an inside, so we actually managed
to grab all of it. Let's press shift then. Let's pull it over into place. And then what we'll do now is we want to put on top of here. So we can basely at this
point, Yeah, can we? Let's just grab it all. In fact, we won't grab it all, what we'll do is we'll come
to the top of it. Sorry for me wnguys.
Let's grab the top of it. Shift S, cursor selected, and then we'll grab all of this. And then what I'm going to do is press Control A all transforms, right click, stat
origin to geometry. Shift S. And then what I'm going to do is selections, cursor. And that then
should move it all. Now, you can see that this needs to be much, much smaller. So let's make it
much much smaller. Let's bring it down into place. You also see because I
brought it in like that, which meant I'm on
individual origins. Let's bring it out medium point. Let's bring it down into place. Let's come in now to our tower. And what I'm going to do
is press control plus, control plus, delete bass. So delete those other the way. Press the tapon,
and now let's see if we can get this into
the place that I want it. So you can see
still too wide now. Some jo is going to make
it a little bit smaller. And the problem we've got is we don't want to go too small. And the reason is,
If we go too small. We're going to lose
the actual scale of this, as you can see. So you can see at the
moment, this is the scale. We're starting to lose
some of the scale, and what it might mean
is that we might need to just bring in
another actual roof. So we could keep
everything on here, but just bring in our roof. So I think that's what we'll do. Well, first of all, though, get it to the scale that
we actually want it. I'm thinking. Maybe
something like this. We've also got some
parts under here, which we can also use. So we'll get our roof
into this scale. We'll have a look at what
that looks like now. So I think we're going to press S and's head and
pull it up a bit. So I think that scale now is perfect. I really
think that is. The one thing is, yes, it's going to be
straight round there. That's going to look
good to think like this. Once we've got the wood in. So let's bring the wood in now. What I'm going to do is I'm
going to grab both of these. I'm going to press Shift
D just to duplicate them. I'm going to press Shift S then selection to cursor,
bring those in. I'm gonna press the S
b to bring them down, like so, and then I'm going to put these into
place under there. So under there,
press the S button. So S, bring them in. Like, so let's get them so
the roofs actually on there. And then what I'll do
now is grab them all, and I'm going to go to
individual origins, so individual origins. And then I'm going to
press sens head and pull them out and make
them a little bit thicker, like so, and put them
back into place. And now you can see,
hopefully that they're looking round about the same as these, a little bit smaller, of course, and I'll also rotate
them around just so they don't look the
same. There we go. All right. That's looking. Pretty good. I think
I can work with that. So now what we need if
we look from over here, we just need our roof on
now because I'm not sure. It's kind of a little bit
small, as you can see. Are they too small?
That is the question. I think they are.
I'm being too picky. Let's have a look on
our rendered view, and we'll decide from there. The e. Let's have a
look round from here. You know what? I think I'm
being a bit too picky. I think I'm going to
leave those like so. Just looking from back here. Yeah, I think I'm being a
little bit too picky on this. So what I'm going to do then
is I'm going to go with it up to you whether you
want to create a new roof. I don't think most of
you will, by the way. But anyway, let's grab this one. And then what we'll do is
we'll also grab this one. And we'll also I think,
grab these as well. So we'll grab these as well. We're going to press then shift, and we'll bring these
over into place. But what I want to do is I want to put one of these on first, and I've selected the
one that is straight on. So if I put this in press
one and C, no, it's not. It's not actually straight on. I'm wondering if we have
got one that's straight on, let's try three
or control three. And I'm just wondering, we haven't really got
one straight on. So let's not worry
about that, though. Let's actually put
it in place first, so I'm going to I think, let's even press Alt. There we go. Okay, now we
can put it straight on. So now we want to do is
shift S elections cursor. And then what I want
to do is bring it out and drop this into place. Now, of course, this is
much smaller this one here. I want to bring it
here, I want to press the S bone and bring
it down into place, like so, and then I'm
just going to pull it out and make sure it all fits. So pull it out. Like, so. And I'm just wondering if I want to make it a
little bit bigger, so S, bring it out
a little bit more. Yeah, and I think
that's looking good. And then what I'm going to do is I'm going to bring
this one here. I'm going to come into these, so you can see all of
these are selected. Just select yours, if
not, I'm just wondering. Yes, we have, so that's good. So I can just press shift. I can then bring it down, and I can actually
support this under here, by pressing the S born, pulling it out a little bit,
r and Z, spinning it round. There we go. All
right, so far so good. So now we can see this
is what we've got. We can see now, it
comes down to there. And then what we need is
another one of these. And we're going to put that one. Down around here. So I'm
going to press Shift again. I'm going to pull
it down into place, and I'm looking to put it round about in
between those lights. So and then I'm going to press Arden's d. Move it round again. There we go. Let's
press Arden's d. Move it back a little bit, and there we go, that's
in there nicely now. Everything's in there
beautifully. Double tap the A. And this is what we
should be left with. Okay, so this is coming
along really fast. So let's come in and go
to file and go to save, and I'll see you on the next and go on. Thanks
a lot. Bye bye.
133. Adding detail to tower: Welcome Microphone to Blend four Modeling and
Jumio workshop, and this is where
we left it off. Okay, so let's now sort
out this one here. So if we grab a
quick calculator, so you can grab a calculator, and what you're going to do
is then you're going to put 360 divided by
something like 45, and then you give you eight. So you can work out from here. Let's say you divided it by 50. If it's like point something. You know then that you can't actually move this
by that amount. So that's how you
can work it out when you've got a full
circle like this. What I'm going to do is I'm
going to actually do it 45, so I'm going to put this here
and then I'm going to put my little little sideways V
and put it on three D cursor, and then' going to press
shift and then R 45, and then just work my way around that we've do many times before. So Z 45, and then shifty Z 45 work my way around, like so. All the way back to the scar. And then one more, 45, and there we go. All right. So there we go. That
was as easy as that. Double tap the A and make sure that you're
happy with that. And I'm just wondering if I should bring
this in a little bit, so just this one, bring
it in a little bit. I'll put it turn my sideways v onto individual origins again, press the S board,
bring it in a tad. And then what I'll do is probably just pull it up
a little bit onto there. Maybe bring it in a little bit more Just so they're
right at the edge there, so as you can see,
right at the edge, so, and now they're all
fitting much, much better. Alright, so that's
that bit done. Now we want to do is we want to think about
our bottom part. So what I'm going to
do, first of all, I've got the main part in what I want then
is one of these. Now, if I go over the top, you can see that
they're all at pretty much a bad angle for us, but we can still come
in and work with them. So what I'm going to do is
I'm going to press L on this. I'm going to press L
on this and L on this. And then what I'm going
to do is press Shift D and then just bring it
out into place like. So and then I'm going
to go over the top. And what I'm going to do is
I'm just going to try and position it along this
line going down there. So I'm going to press
art and Z and just position it with
medium point on. So rt and Z holding
the Shift born and then just positioning it
straight so we can zoom in, and we can see that
is nearly perfect. It's a little bit
out on this end. You can see just a tiny bit. So I'll said, Let's
position it out. So. All right. Now
we've got that. We can press P selection. And then what I can do is I can press control A, all transform, set origin to geometry, and then shift in this and selection to cursor,
keep offset. And now I can do
is I can pull this out and into the place
where I want it. So I'm just going to pull
it out over to here. And then I'm going
to position this I think in something,
something like this. And I'm just wondering if
I want this part on here. So this part on here, is it
actually supporting anything? Do we actually need
it? Probably not. So what I'm going to do is just delete that off out the way. And then what I'm going to do
press delete and vertices. And then finally, we'll do is, I'll bring this then into place because it's way
too low down on there. So I'm going to
bring it into place, which will be just
round about here, I'm going to put some
stones down there. Alright, so we've got
this now into place. So what we can do now is again, position this all
the way around. Let's do it 40 this time, so it's a little bit
closer together, not the same as
these ones up here. So all I'll do then is they'll press the little
side raise again, three D cursor, and then
shift D and then RZ -40. And then shift D Z -40, and then just keep
working my way around. So shift D Z -40. All the way back round
to this part here. Z -40. And then one more, maybe
we'll get one more so shift be Z -40, and there we go. Now, let's grab them all
and join them together. Like so control J, join
them all together. And what I'm seeing
now, how far do I have to pull them over, get this in? So if I pull them, you can see here if I press
Z and pull it to there. So is that one still
going to be in place? And you can see, no, it's not. So what that means is I'm just going to put them
back to where it was. And then going to come
in to this one here, so just press shift
H, grab this one, and all I'm going to do then
is delete it out the way. So delete vertices out the way, ltH double tap the,
and there we go. And now I'm going
to do instead is, I'm just going to
grab this part here. So just this part here, press L shift D. And then what we'll do is
we'll rotate it round. So press a little
sideways again, go to individual origins, y 180 spin it round, and then just pull it over here into place just
into there, like so. And now it looks like it's actually being
supported from there. Okay. So now what
I want to do is, I want to think about
my windows in here. And basically, I
want the window. So one window to be here and
one window to be down here, and maybe you could
put another window in here if you really want to. The thing is I'm looking again to make it as
interesting as possible. So I'm looking from this angle. And if you look from this angle, it's already kind
of interesting. It's just when we look
from this angle on here. You can see, we've got a lot
of interesting things here, but if we come round
here, we really need something on
this point here. So that's why I'm doing it.
Let's first of all come in, and what we'll do is we'll
delete this out the way, and then I'll delete
these out the way. And then what I'll do is I'll
come in and grab my window. So my window is which one is it? I'm going to use this one here. So we'll use this one. We'll
press Shift D. We'll press, 180 and spin it around. And then what we'll
do is we'll bring this into place. We want it. So I'm going to put
press Control one. Should then be able to put
it near up in the center. Now, we're not going to
have it in the center, so there's no point trying to
position it in the center. All you want to do, is get the height where
you want it first. I'm thinking something around that height looks
absolutely fine. And then I'll press the
little sideways v again. So a little sideways v
again, three D cursor. And then what I'm
going to do is **** R and D and rotate this around
to where I actually want it. So I know we can see through
there the moment the window. I'm not going to
worry about that, but what I'm going to do as well. I'm going to press a
little sideways v again, individual origins now and then press the S born
I'm going to make it just a little bit smaller
because I think that looks a little bit
fair and pull it up. Now what I'll do
is I'll press D. I'll bring it down. Do here. And then I'll press
a little sideways v once more and three D cursor. And then I'm going to
press art and Z and move it round to the other
place where I want it, where I think it should
be around here, like so. And then I'll press the
little sideways v once more, individual origins,
put it on normal. And then all I'm going to do
is pull it out into place. I'm going to pull it out
so it's all sticking out. Like, so, I can see I need to pull it out further further, and you can see now it's not
actually going to fit in there properly because I'm going to actually
have to rotate it. So and x let's rotate
it a little bit. Then let's try putting
it back into place. You don't want to
go through this. And now we've got it
into the right rotation. We should be able
to press control A, all transforms,
origin to geometry. And now let's see if
we can actually come in and bring in a deform. And we want to bring in
where is it simple deform. Let's put it on
bend, and the one we want is going to be on the Z. And then what we're going
to do is pull it back. So and you can see
now that's fitting in really nicely. All right. Now, I'm wondering if I
should come in and bring in a few more edge loops in this bon part, left
click, right click. And yes, I think we should. That is looking pretty nice. And the best thing is, as well, is we can actually
copy that on this one. So all I'm going to do,
I'm going to press r and x pull it out, like so. And then what I'm going to do is press control or transform, set origin to geometry. Grab this one. So this
one here, just my window. Press Control L, and we're going to copy modifiers like so. And from there then, I
should now be able to pull this out. Like, so. And I'm just wondering if I
can actually bend that still. So you can see here, I'm not going to bend
the way I want it. It needs to actually come
out this way as well. So to do that, I'll just
apply my simple deform, and then I'll add in
another modifier, simple deform again, so simple deform on the bend, and that's the way
that I want it, but obviously not
bent that much, so I want to bring it
back, bring it back. Like, so. You know what? That's not what? What is doing? We don't want to
bend it like that, actually. No, we don't. We want to bend it on the x. And there we go. Let's see, on the Ztaminr'
the way I want it. Let's actually bring
in some major loops on here as well. So control. Left click right click. And it's because it's already
bent the fuel. So, you know what I'm gonna do? I'm going to leave that
one out of the way. I'm going to leave that
one out of the way. I'm going to bring
in another window, and I'm going to do that again. So I'm gonna press
Shift D. I'm gonna press Shift S
selection to cursor. And then what I'm
going to do is press R Z hundred eight
to spin it around, and then I'm going
to pull it down into the place
where this one is. And the first thing
I'm going to do is when I've popped it
out is I'm going to press the S one to get it round about the same
size as this one. I'm going to pull it up
then to where I want it. Then what I'm going to do is
press a little sideways V, three D cursor,
dead. Move it round. So I'll keep moving it
round to where I want it, which will will be
somewhere around here. And then from there,
then, I should be able to now bend it and still
pull it into place. So well, never got
that. So what I'm going to do I'll
first of all come in, control, bring in
some edge loops. And then what I'll do
is add modify deform, and we'll go to
simple deform, bend. And then we want it on the
y, I think, not the Z. There we go. Bend it into place. It's all bending very nicely. And now, if I click on the
little sideways V again, individual origins,
should now be able to put it back into place,
and there we go. And I'm wondering if I just want to bend it this way as
well, you know what? I'm just going to press R and Y or is it going
to be R and x? There we go. Holding
the shift born. Is that actually bending
it the right way? X. Yes, it is. And there we go. Now you can see that's fitting
in perfectly. All right. So finally, then,
let's save our work. Let's look at what
we've achieved. And I think on the next lesson
then. We are nearly ready. There we go. From there,
it looks pretty nice. And from the next lesson
then, we're nearly ready. We'll put on our
stone bits first. We'll put on the supports
and things like that, and then we can actually
bring in the wall on here, b You can see, guys, this is looking amazing, really, really happy
with how this looks. All right, everyone. So
I hope you enjoyed that, and I'll see on the
next one. Thanks a lot. Bye bye.
134. Working on base overhang for tower: Welcome back to everyone
to blend the for modeling and Jomo workshop, and that's where we left off. Okay, so what I want to do now? I'm just wondering if I want to put anything else
on here before I carry on. But I think I'm just going
to leave that for now. And what I'm going
to do is come to the bottom part of here, and I want to make
these actual stones. So I'm thinking perhaps the best way I want to create these
because I want them to go, you know, kind of
around here and be different sizes
and things like that. I think you know what?
We'll just grab this one, we'll press shift D.
We'll put it onto global. We'll just pull it
down just for now. And at the moment, you can
see if I bring this up, I can actually have
something like this. Now what I'm going to do is I should be able to
split this off, so LP selection,
come back to it, and then I'm going to press A, right click and subdivide, right click and maybe
subdivide again. Something like this, I think
should be absolutely fine. And then shift H let's hide it all the way
from everything else. So object mode, shift H, hide it out the way and then we'll just get rid of the top. And the bottom, like
so, delete and bases. Now, rather than go all the way around there, we don't
really want to do that. So I'm going to press ltH once
more just before I start. And what I'm going to
do is I'm going to put a seam in this one here. So l shift and click,
Mark seam in there, and then shift click, Mark seam in there
and mark seam. And then I'm going
to get rid of these. So l shift click, l Shift click, and then we're going to
dissolve edges like so. And this is going
to be the base now for for my actual stone work. Now I'm going to do is,
I'm just going to come in. I'm going to pres shift
H, hide everything else out of the way,
come back to it then. And now we know we can get
rid of these stones on here. We don't have to
do these because no one will ever see them. Now we can actually come in, and we're just going to
pick our stones then. So we want them all different
sizes like so, like so, like so, and they want to be
fairly chunky because it's quite a big thing
that it's holding up. It's going to be supported
by a few things, but I'm just going to come
in and split them all off. Like, so, like so. Like so, right click,
Mark. All right. So now we want to do let's split them up. In fact, you know what? Before we do that, I think
it's going to be easier actually if we press
Altag bring them back, press Control A, all transforms, right click Sargent geometry, pull them up into the
place where I want them. And then what I'm going
to do first of all, I think of better if we
actually solidify it. So if we come in,
add a modifier, we'll go to generate, and
we'll bring in a solidify. Because if we don't
solidify it first, and we actually split them up, we're going to have
a problem then. With the fact that
they're going to be stuck out in a weird
kind of angle, and we don't really want that. So we're going to
put it in like so. That looks pretty nice. They look round about
the right size to me, fairly chunky stone blocks. Let's then come in and press
Control eight on that one. And now you can see this is
what we've ended up with. Now, what I want to do
now is just come in to the ones I've already done
because I've messed up. I should have done this after,
would have been easier. But I'm not going
to worry about it, and I'm just going
to come in and grab all the ones
I've just done. Like so, right click
and Marco scene. Now, from here, what I
should be able to do now. It's come into every
other one. Like so. Like so. Like so. Like so. And so,
press the y button. And then what is now, I'll fill in all of these. But before I do that,
I might as well, let's see what they look like if I press delete and
limited dissolve. Is that going to make
them any better? And I'm just wondering, If I also should try and
get rid of these parts. I think it will,
so I'll just press delete limited dissolve and then just bring it up
something much much higher. And then you'll actually
delete all of those. Just make sure
they're all gone now, so you can see now we've
gotten none of those parts in, and I think that's gonna look much, much better
than where it was. Alright, from here,
then, we need to actually come in
and add in faces. So we're just going to
select them all with A. And then what I'm going to do is I'm going to come to mesh. Clean up and little
holes, like so. And then we're going
to press right click and shade smooth by angle. And finally, I'm going
to press control ale transforms their
origin geometry. Bring in then a material. So Smart UV project click Okay, and then bring in instead
of this, we want stone. Let's bring in our
stone like so. And finally, finally,
let's bring in our trusty bevel, like so. Let's turn up the segments, and let's now bring them back, make them into a stone like so. And that looks rey nice. Now, I'm just also having
a look at these stones. And I'm just going
to go to them, and I'm just going to increase
them up a little bit. You know what? I think
that actually looks bad. So I'm just going to put the 0.4 because I didn't do that before. 0.4. Like so, and I'm also going to
do the same with these. So 0.4 because I think it looks a little bit
better than now I had them. So yeah, that looks much, much better than how I
had them, as you can see. Now, the other thing is on
here, we have got a bevel on. This is metal actually.
So you know what? I'll leave those. This
stone now is done, except for the fact that
I need to come in and obviously move them up and down and make them a
little bit uneven. So what I'll do first of all, I'll see if I can just
do it with my randomize, but let's bring them down. Do not 0.2, something like that. And you can see, that's done a pretty good job
of what I want. And the thing is on
these stones here, we really don't want to actually have it where they're
too different, because it's the central
structure of something. You don't really want them
all over the place at all. So we don't want to come
in with a randomized. What we can do
though instead is we can again do it once more, so we can go to
transform, randomize, and turn it down all the
way down, maybe not 0.1. Let's have a sev look at that. And I think actually that's
done the job. As there. Yeah, I think that's
looking good. Okay, so now we want
to do is we want some more stones on
the bottom here. And I'm just wondering,
do I actually want now? Do I want to create the bottom here first? Let's
bring in this part. What I'm going to do is I'm
going to press it D. I'm going to bring it
down then under here, like so, and you can see now
this is the shape of it. Now, what I'm thinking is, First of all, I want
to bring it in. So I want to bring it
into something like here. Double tap the A.
And from there, I think I've got enough
room now for this one. And on my original, I'll put another
piece of stone here, then another piece of wood. But I think on this one, actually, I don't
want to do that. What I'm going to do now is
grab the bottom bit of this. So I'm gonna grab this one.
I want to press shift. And then I'm going to bring
it down. You know what? I don't actually
need that. I'm just gonna press delete faces. I'm gonna grab this one now. I'm just going to put
it there for now. And then what I'm
going to do is I'm I'm just gonna split
it off as well, because it's gonna
make my life easy. So split it off.
Controlle transforms the origin to geometry. And then what I'm going
to do now press shift H, and now I can go
over the top of it. Let's put it on object mode just so I can see
what I'm doing. And what I want
to do is I really want this to be planks instead. So planks of wood. So basically, I want to join all
of these together. Now, the easiest way to do that, is not actually to go
each one and press J. It's actually probably
just going to come in, delete only faces,
and then come in. And what we'll do is we'll
press ship and click, and then minus off one of these. Now, if we want them
to go this way, we need to minus of
this one and this one, and then right click,
and all you're going to do is
bridge edge loops, and there you go, you've got them the way
that you want them. Now, they need to be quite
thick because it's a fairly, fairly big tower this, so we need a lot of
support under here. So what we're going to do now, I'm wondering whether we want to make them a little
bit bowed underneath. No one's really
going to see them, so you know what? I'm not
going to bother with that. So right click. Market scene like so. Now we can split them off. So I'm going to come
in every other one, split them off with y. And if you really,
really want to, you should be able
to come in now and bow them off, like so. So if you come in, you can
both these off, like so. You can't I don't think you can both these off, or
you can actually. So you can bow them
off with subdivisions. What do I mean by Bow off? I mean that we can actually come and both them a little bit. Once we've actually
put them in place. So put them in place like so. Control law and
control law, like so. So basically, I changed my mind. Is what I'm saying.
Let's press A. Let's press and pull
it down, like so. And then we'll press
Control A again. I'll transform, set
origins geometry, add in a modifier,
bring in a boolean, put it onto 0.3 or pre Let's actually bring
that up to 0.4, like so. And then we're looking
underneath here and we just want to bow
these off a little bit. So I'm just going to come
in a mesh transform, randomize, turn it down. No 0.1, and there they go, they're a little
bit bowed up now. Shades smooth by angle, and that's looking pretty nice. So tag, bring back everything, and now let's fix these in
place under here. Like so. And then finally, I think we need another support going
this way and this way, and then to support it underneath here
is what I'm saying. So basically, a
cross coming under here will be enough
to support it. And from that cross,
then we can actually put in the little supports
that we actually need. So what am I going
to do to do that? I'm going to grab
my piece of wood that we've used many,
many times before, bring it over here,
and then I'm going to pre I'm going to come
actually to this press Shift. Kursta selected
my piece of wood, Shifts and selection Cursor. Finally, spin it round. So RY 90 and on the next less and then we'll
get this into place. It's already near
enough in place. It's looking pretty good there. All right, everyone. So
I hope you enjoyed that. I'll see you in the next
one. Thanks a lot. Bye bye.
135. Adding Structural Support for tower: Welcome back everyone to Blend phone Modeling and
John China Workshop. And this we left
off. Okay, so now, let's bring in these parts. What don't we do is press S
and X, and I'll bring it in. And what I also
want to do is make these a little bit
thicker thing. So definitely definitely a little bit thicker on this way. So I'm going to press S and Y
and pull them out, like so. I'm also going to bring
them down slightly like so. And this is obvious
to go Bevelon. And then what I'm going to
do is now rotate it round. So shifty z 180. Not Z hundred 80. I
won't do anything. I 90, spin it round into place, like so, and there we go. And then what I'll
do is I'll just pull this one up
just very slightly. Like so. Now we want
to actually put the support in from
here and from here. So, what I'm going
to do, first of all, I'll press Shift A.
I'll bring in a cube. I'll make the cube smaller. And then what I'll
do is I'll put it into place here, like so. And from this cube, now, I should be able to
actually make I'm going to make it a little
bit smaller even than that. Like, so yeah,
something like this, and I'll put in a major
support under here I think. So what I'll do now
is I'll press 50. I'll bring it up. And
then I'll press S and y. And I want one coming from here and one coming
from the other side. So, the first thing I'm going to do just get this into place. I'm gonna grab the top of it. Put it into place as a
support, as you can see. And then what I'll do is
I'll grab the side of it, and I'll press S and X and
pull it down, like so. And then I want the other
support to be in here. So rather than, you know, make another one of these. I don't really want to do that. What I want to do
is control layer or transforms right click
origin two, three D cursor, and then shift D. And I should
be able to then press R, Z 90 and put it to
go the other way, like so, and that
is what I want. And then I want a piece of wood coming up here
now, support this. Okay, grab this one. Shift D. Bring it
in a little bit. So S, bring it in just so it's passed
there, as you can see. And then we can put that down, make it a little bit thinner. Put it down into place,
got the top of it. Then just pull it
into place like so. Then you can see that's
looking supported very nicely. And then I'm just wondering, do I need any other I
think we should put definitely another support
in this way and in this way. And then a major
support in this part. So major support
is in a piece of. I'm just wondering if it looks like it's supported enough. That's my issue right now. I think we should have another one of
these going in here. Yeah, we'll do it
that way. So what we'll do is we'll grab this one. We'll press Shift D, and we'll
just move it to the side. Like so. And then
what I'll do is I'll press S and y and
pull it into place. And then I'll grab this one, I'll press Shift D
and move it over. And then what I'll do is I'll
pull it back into place. Like so, pull it down. Just making sure
that it's in there. So in this part, pull
it back. Like, so. And from there, then, I can grab another
one of these then, press shift and pull
that into place. Like so. And I will make I think I'll make
these parts stone. What I want to do
first though is make sure that it's
actually in the stone, and then one it's
right at the edge. We don't really want that. All we'll do then is look
through the press tab. Now I've got control of that. So once I've grabbed it now, I can actually pull this out and fit this into there, like so. And now what I want to
do is I just want to do the same thing pretty
much on the other one. So all I'm going to do I could grab both of these and rotate them around and
put it along there. That might work, so I compress Control J and then
right click and surgen, three D cursor,
and then Shift D, and then RZ 90. Is that actually going to work? It's going to work in a fashion, but I just need to pull it over now and put it into place
where it's going to go and you can see that then has made it quite
easy to do that. Alright, that then, Is enough
of the supports on there. Now I want to do is the major
supports on here again. So I can use this one I think. So shift D, bring it down. I'll bring it down in
something like that. And then what I'm going to do is I'm going to bring
in some edge loops. So control, bring in some
edge loops, like so. Grab the bomb of it then, and I want to pull this bomb out now with
portional editing on. So S, let's bring it
in. Not with that one. We'll try it with
the sharp instead. Yes, and there we go.
That is what I want. Like so. And then finally a bit of stone in the bottom of here. So I'm just going to
take that off now. I'm going to press
to pull it down. And then all I'm going to do
now is press shift and clip, enter alters, and pull
that out now into place. Just make sure that it is
coming down far enough. So just go in, make sure you grab the
center and just pull it into the ground because you don't want any
bits like this covering it up, so just pull it into
the ground like so. From there, then we can
just bring it across. So shift, bring it across
to this one, like so. And then from there we can
bring it across to this one. Like so, and just put
it in the middle. There we go. All right. So we're pretty much
done with this now. Now we want to do
is we want to split off some of the parts. So we want these as stone, but we want them
to look a little bit like these
stone blocks here, and we want these
as wood, obviously. So what I want to do
is I want to come in. I want to grab all
three of these. And then what I want to
do is split these off. So I'm just going to press P
selection, split those off. And then we're
going to join these together. So Control J. And then what I'm
going to do is I'm going to also split these off. So I'm just going to come
grab all of these bonbons. Now, to grab the bob ones, I
just need to press or come underneath will be easiest actually to grab each of these. Press control plus Control
plus control plus. Press P selection,
split them off. Turn this off for just a second. And now we're going to do is join these together.
So Control J. Press the tab button A, and we just want to
fill these in now, so mesh, clean up, fill holes, and that's those. Now, we should be
done except these. We'll do the same
things on these then. So Control J. Tab
A and just mesh. Clean up holes,
because obviously, the holes in there
won't be filled. So now we have these
blocks and these blocks, which we can join
together with Control J. And now we have the wood wood, this wood, this wood, this wood, and just
grab all of this wood. You can see we've
got some levels on some of these
already. That is good. We want to grab that one last. And then what we want to
do is press Control J, and join all these together. Press Control A all transforms the origin
then, two geometry. And let's see if I press
G and move that all away, everything moves with
it, which it should. Alright, so that's
that bit done. Now, let's work on this stone. So all they want to do with the stone base is press Control A, or transform set
origins geometry. And then grab my
stone over here, press Control and
L. And what we're don to do is copy
modifiers. And there we go. There is the stone already in. Right click Shades
move by angle. Right, click on these,
shades move by angle. And there we go. Now, finally, do we want some
warp in on these? I think there's going
to be some warp in, especially on these ones. So I'm going to come in, Control bring in some edge loop,
same on these, Control. Control. Control, like so. And then I'm just going
to grab just these ones. And I'm going to
go over to mesh, transform and come
down to randomize. And I'm just going to pop that down to something
not as ludicrous, maybe not even that, maybe not 0.1. There we go. All right. So let's look at our materials now and see
where we are with that, and let's have a look at
how this is panning out. We'll let this load up
with the materials. Double tap the e, and
we can see got a lot of problems here on the
underneath and on there. But I'm just looking at how that's all going
to come together. And yeah, I think that.
I think that's enough. So let's come in. And all we'll do is
we'll grab this part, press A, u, Smart UV Pj, click Okay, and then we'll
bring in our material, which will be our planks. Bring that in. There
we go. That's that. And what I want to do is, I want to really be able
to see under there. I've got my scene lights on. And I'm thinking, let's
press shift date and bring in a Let's just bring in I
think we'll bring in a sun. Let's bring in a sun and see if that's actually
going to brighten it up. Is that go to brighten it
up with my scene lights on? Let's have a look. Not really. Not really. That's not going
to work. So let's try. Let's try a lamp instead. So light, and we'll
try a point light. No. If we brightens to $5,000.
Not going to work either. So let's leave that all the way. So basically, I want to
let's see if I put on my Oh, it's because there we go. Seen lights. Let's
try that now again. So light point light. Is that Yeah, there we go. We're getting some
brightness there. Let's put it on $5,000. And there we go. We've got
something, but it's in there. There we go. Look at that. Now we can actually see in there as long as
it's not blindness. So let's put it on 200. And there we go. Now we
can actually see in there. All right, so that's
looking good. Let's pull it out a
little bit and we can see exactly what the issues
are with our little light. Let's put it this way a
little bit. There we go. All right, so we can see that we need to do this wood's fine. It's just this wood underneath. So let's grab all of
our wood, press U. Smart U V project, click. And let's sorry,
a sign on there. So that's looking good. And
now let's come to our rocks. Press A. Smart UV project click. And instead of the wood, let's put it onto stone. Like so, and there we
go. Double tap the A. And then we've got just this
one here, as you can see. So I'm just going
to join to these. So I'm going to
press Control and J. And then I'm going to
come to this part, and I'm going to unwrap
it, Smart UV project. Look. And there we go. Double tap the A. And
the power of lights. And that is looking pretty nice. Now, I'm just checking
these now just to making sure everything
is going into place. I'm happy without that looks. And from here, I can actually
get rid of my light now. Finally, then, what we can
do is on the next lesson is, we can bring our material
into our wall here. And then, guys, then we're on the final
bit of the building, and this one is actually really easy in comparison to what
else we've been doing. I'm just going to
have a look round. Before I go and just make
sure everything is on there. And once we've done that, we can actually bring in our actual lights and start lighting this
scene up a little bit. All right, everyone, so
I hope you enjoyed that, and I'll see you
on the next one. Thanks a lot. Bye bye.
136. Adding window and framework to wall of wizard building: Welcome back to Benifor
modeling and Jumping workshop. And this is where I left
it off because I was just standing to look round admiring how beautiful this actually was. So let's now come around
to the other side. And what I'm going
to do with my scene is I'm going to grab this
and I want to mark a scene. Now, I've got to be really, really careful on this part when I'm marking a seam because it is quite a big part going all the way
down to this part. The other thing is, I'm just wondering if I should have one more of these pieces on here to kind of
support a bit better. I'm just going to
quickly give that a try. So I'm just going to press shift and bring it up to there. And then what I'm going to do is make this a little bit smaller, like so, and drop it into place. And I'm just looking now. You know what? A thing
that actually looks bare. Now what I'm going to do is just bring this up a little bit, and all the deforms and everything like that
will go along with it. But just make sure
it's just in place. Yeah, and a thing
that looks bare. The last thing to
do then is art and Z and rotate it round. So it's just looking
a little bit more distributed than the other
one. And there we go. Now, what that means is now
that I've only really got, if you look at this, I've only really got I can put
an edge loop in here. So basically, if I go
in and put this on, I won't melt see in it
until I put object mode on. I can put an edge loop in here. So if I bring it up,
that's one edge loop. I can then come
down to this part. I've got one edge loop in there, one edge loop in there, which means I can split off now this. So if I go in, right
click and I'll mark a scene then I'll
go into this one. So ship click Shift click, right click Marko sin. And there we go. Now this
is actually split now. Now, the one thing is, have I got one in the
center of there because I really don't want.
W one in the center. Don't think I have. So what
I want to do now is hide my scene as well as hide my
seam as well as possible. So I think the best
place to put it is probably going to be
somewhere around here. So what I'm going to do
is, I'm gonna come in. I'm going to press
old shift and click. Like, so right click
and mark a seam. And the reason why I
want to mark it there, if I turn this off if we're looking from this point
of view over here. We don't want to be
able to see the wall. You can see from here, it's
still relatively hard to see. It's like the best place
where you can mark a sam. Now, you might want to think
about marking it down here, which means that most of it most of it is
hidden in the wall. That might also be something that we need to think
about. So, you know what? I'm just going to
move it over one. I'm going to right click going all the way up, macro seam. And then I'm just going to
hide this one out the way. So right click and
we'll clear our seam. Now, let's actually go
in and unwrap this. So I'm just going to
press and I should be able to unwrap
it absolutely fine. Now, let's go over
to our UV editing. And here it is, this
is how it's unwrapped. And what we're also going to do is we're going to doom in
with a little dot bum, and we're going to
change it over to be our wool so wall like so. And now, what we're going to
do is put this on material, and there we go,
we've got a big, nasty sceam down there, and that's what
I'm talking about. So what we're going to do now is we'll come to this part first. So this part here, Like so. And we can see it's because it's that way round, so
I'm going to press A, r, 90, spin it round, and then just put it into place. Now that seam should be hidden behind there,
which is great. We'll come to this part now. We'll do it a little
bit of time, guys. So we'll come to this part. We'll go L, and then A and r and 90 and
spin that one round. Like so. And then we'll
come to this one now. So L A, 90, spin it round. And then what I'm going to
do is, I'm just going to put it into that
dirty bit on there, and it's under there, so I
want it the other way round. I want it down here. So
I'm going to press R 180, spin it round, and now
it's down this bit. And now for the main bit. So let's see if I grab
this, if I press A, 90, spin it round, and I get it so that the
seam is barely visible. You can see there, it's
slightly slightly visible. Now, what I want to do is,
I want to save out my work, and I want to put it
on rendered view, and C, I how visible
it is, basically. That's what we're looking
for. And if I zoom into this, I can barely see. We can just make it out. If we're really close
to it over there, you can see it's just there. But actually, it's
very, very hard to see. If we're definitely over here, we're definitely not going to
be able to see that sceam, but that is what
we're looking for. Okay, so now we've done that. Let's go back to material. We're going to go
back to modeling, and now we've got our
last bit to actually do. So what I'm going to
do is I'm going to bring over my trustee, this one here, so we're
going to press shift, and then I'm going to
come back over here. I'll grab this point to you. You know what? I won't
grab that point there. I'll grab this point
right on there. Shift D, Kura selected. Then grab this one again and Shift D and selection to Cursor. Let's bring that into place. Okay, so let's think about
how we're going to do this. So definitely we're
going to need a point coming down here. And we're going to need
some little points, which I'm thinking I'm thinking actually
the best thing to. So where did we put
these ones here? We're going to use
some of these as well. So I'm just going to come in. And this one's been to bent, so I'm just going to
use this one over here. So I'll just grab
all three of these. I'll press Shift
D. Pull them up. I'll press P
selection, grab them, and then control
A all transforms, right click origin to geometry, R Z 90, And I'm going to
use these over this side, just to make it a little
bit more interesting. Alright, so let's
grab this part first. So where are those
parts gone 1 second? Let's pull them
out. There we go. And let's pull
this one in first. So I'm going to press Control three just to go
into the side view. And then what I'm
going to do is I'm going to put this into place. So I want it somewhere
around here, but it actually
cuts this bit up. Now, the other thing
is, We could we could. Instead of doing this,
we could bring it so far down and then
bring it across. What we could also
do is join these, so just these two, so you can see it goes all
the way around there. We can first of all, split these up and then join these together. That might make it much easier, or instead of doing that, let's come in and
actually grab this wall, so delete and faces. Now we've got this wall here. If I come in, drop this
down a little bit to there, let's say, then I can
have my wall under here. So basically, I can come in, grab both of these
parts, press and x, and I should then, not x, y, B two, pull those
back into place. So right into this
corner over here, making sure it's going
in there, like so, and now because that
is all one wall, what it means is I can bring in another edge loop if I want to, like so, which is going
to make this much, much easier to
actually deal with. So now I'm going to do. Now
I've got that into place. I'm going to pull this
one back into place. Under here, making sure it's tucked in to that part there. And then what I'm
going to do now is, I think I'll pull
it up a little bit. So can I get away with jaws
pulling it up into place. And then also can
I get away with pulling it back a
little bit like so. And yes, I think the
answer. Yes, I can. Then what I'm going to do is I'm going to come down
to the bottom in face let and just pull it
up a little bit for now. Next of all, then,
I want a window. So I'm going to
grab one of these. So I'm going to
grab this window. And you know, I'll grab
this one at the same time. So I'm gonna press 50. I'm going to bring them over.
I'm gonna spin them around. So s d -90, spin them around. And then what I'm going to do is press Control three again. And let's put this window in place first where
it's going to go. So I'm going to put a
window around here. Though not at the same level
as this one, for sure. Maybe even maybe even
a little bit lower. I'm thinking actually,
I'll put it around here. And then what we'll do
is I'll press sift. And I'll just drag it across, and I'm going to put
a window in there. And finally, then
I'm going to put this window right around here. So I'm going to press G and drop it into place
just under there. So instead of I know
where it wants to be now. But instead of doing
that, I'll just press shift selections
cursor, control three, and then just bring it
down to where I want it, which will be just under there, like so, and then going to
pull it back into place. And this then is going to make it much, much easier
to deal with. I'm also thinking, do I want to make this a
little bit bigger? I think I do. I'm going
to put it under there. And then what I'm
going to do now is drag both of these
back into place. Like, so, and there we go, all my windows now are set out. Now, the one thing
I'm thinking is, if I pull this acros, do I want this to go under? So, in other words, I'm
going to grab this? I'm going to press,
let's just see. Yeah, it's car Babylon,
so that's good. I'm going to press Control
A, transom set origin, two geometry, shift and D, and then just bring it down and I want it into
place under here. So let's press R. You can
see as well the problem is, I did cut this,
will that matter? I don't think you'll
matter on this one. So all I'll do is
press R and x and 90. And let's pull it
into place over here. So if I press S and X, no S and y, let's pull
it into place over here. Like so. And then I'm
thinking that I'll pull it back behind there. Like so. And then this is what I've
got these for as well, because these can be used to be pulled down and
make this interesting. The other thing is, you
can see my windows now, probably going to have to
be lifted up a little bit, and definitely
definitely this window should I pull it to the side. I think I should. So I think it should be something
more like that. And I think that's
looking much better. From there, then,
let's grab this one. I'll press shift,
and I'll drag it up and put that one
into place like so. So it's just in the
corner of this. That's all looking pretty nice. And I'm wondering if I should put a piece in
there. I think I should. So we're going to
press Shift D, x 90. And let's bring this into place, so send put it into
place into here, then pull it up and in. And you can see here we do have a little
bit of a problem. I'm going to have to pull it
all the way back into there. In that, we've still
got this bit kind of creeping over
there from here. And I don't really want that
part creeping over there. So what I'm going to
do with that part is, I'm going to press
Control three, and I'll quickly
just grab this part. Mesh, sect, and I'm going to
cut it just around there, so I'm just going
to cut it here, and then we're going to come
to clear it in, like so. And then we go, that's that
bit done Double tap the A. There we go, and I think that
looks much, much better. Now, let's just deal
with this part before finishing so I can pull it
out a little bit this way. And then I can pull it back
a little bit, like so. And then what I can do now is I can come to this bottom part, pull it up and into places
like so, and there we go. That is that they're done. And then on the next lesson, then we can get this, I think, near enough, finished off. Alright, everyone, so I
hope you enjoyed that. I'll see on the next one.
Thanks a lot. Bye bye.
137. Continuing with decorative wood framework: Welcome back
everyone to Lena for modeling and John
Chinad workshop, and this is where he left off. Okay, so now, let's grab. I'm thinking we'll
grab another part. You know what, we'll make
this easier on ourselves. We'll just grab this one,
we'll press shift D. And then what we'll do
is press Shift S and selections cursor and just
bring that over, like so. Now I want to do is I want
to make this much much chunkier going down
towards this part. What I'm going to do is,
I'm just going to come in. I go to grab the
sides of it, like so, AlternS let's pull
it out this way. Let's actually pull it into
place first so we can see. Now, you can see at
the moment that's probably going to be a
little bit too chunky. So AlterS Hold in the
ship born, bring it down, then put it into place, like so, and then pull it back. Like so. And then what I'll
do is I'll put this into place on here, going up. Then from there, I
want to put in one of these pieces just
to give it a test. So what I'm going to do I want another part
coming down here. So I'm going to grab
this one, Shift D, bring it down to let's
say down to here. And then what I'll do is
now, I'll grab this one. So I'm just going
to split these up, P selection, LP selection, split them up, grab them all, press Control A, A transform
set origin, two geometries. Control three. And then
G, put it into place. Over here, we might need to make all of
these bigger as well. So let's just put it into place. Like so. And I'm just wondering if that's going to fit
in there nicely like so, and then what I'll do is I'll
just pull this part up now, so pull this part all the way up just so it drops
into there and then grab this one and pull
it into the floor. So. Yes, I think Dad is
going to do it like so. I think we need one
more piece in here, which we can use this
one on or this one. I have a lot. That's the
one that's been altered. And we need another
one going underneath. So let's do the
underneath one first. Let's move these down to
where they want to be. So if I just pulled them down, they're going to be roughly
somewhere around there. So let's just put them there. Then we'll do is
I'll grab this one, I press D and drag it over. I want to go all the way into this part
here as you can see, go into there, there we go. We're also going to need
one under here as well. We can also see our roof. So our roof part
here is actually sticking through here,
which we don't want. So I should be able to just
point another edge loop. So if I press control, bring in another edge loop, so bring that up there. And then what I
should be able to do now is just grab this part here and press delete and
faces and delete that off. Now, don't worry about
this because we're going to put another piece
of wood under there. So shift, bring it up. And that's going to go
right under there like so. That's looking good. And now, kind of the final bits. I think we'll pull sideways v
here and a sideways v here, and then we'll get this part, so this part into place. So this part here, I'm just going to pull it out, so shift D. What I'm going to
do is I'm going to pull it all the way over now to
this part here. S and y. Pull it over into place. S and y make it a little bit
smaller. Into place like so. Now, the one thing is,
I need to pull these up both of them just so
they fit in there like so. And now, what I want to
do is put these in one, maybe even one, two, three, maybe a few of them. Let's just see if a
press control three, let's get them into place first, so they're going to
be the right height. That's going to be
the right height. Let's put one here. And one over here. And then another
one, so we'll press shift D or rotate this
one round. So three. Let's have three head 180, just so it looks different
from this other one. And then what I'm
going to do now is grab all three of these and I should be able to
put them back into place. Like so. And then finally, let's
bring these down now. So if I grab this
one, this one and this one of the bottom, should be able to then
pd them into the floor. Like so. And there we go. All right. That's looking good. Now, let's think Do we want anything to
be supported here? And I think the answer
is probably yes. So what I'll do is
I'll grab this one. I'm going to press Shift
D, and bring it over. And that means that if
I put this in here, then this support is going
to have to go underneath it, and then it'll be
supported correctly. So S and pull it down. Into place, and a little bit
more into place like so. There we go. And then what I'll do is
I'll move this one over. So if I move this one over now, should fit into place, which means that we're going
to move this one over. Finally move this one over and just spread them out
a little bit evenly. Like so. Now, let's
grab this one, and then what we're going
to do is press shift D. And then r and y or
R and xHd them out, like so, put them in place. And then I'm just going
to put this on normal, and then S and X or Z S'll be able to pull it out and get it into the
place where I want it. You can see here. Need to
rotate it a little bit more so x bring it down into place, and finally then S and Z
pull it out a little bit. And finally, then, let's just
put this back into place, double tap the A, there we go, and now it's up to
you whether you want one more in here as well. So if I pre shift and
put it on to global, and then r z hundred
and 80, spin it round. Let's see if it fits in. So control three. Here's that going to
fit in? No, it's not. So x Over dope. Then an x Like, so. And then finally,
then, let's pull it back into place into
place into place. At the A and there
we go. All right. So that's all done now. I'm thinking, do we want
one more around here? Maybe. Maybe. Maybe we
have too many in here. Let's move it across
to the center, and let's move this one
across to the center. I actually think that looks better than before.
Yes, it does. Alright, let's put
it on material, and let's have a look at what
we've actually achieved. We also want to make sure
that all of these have got levels on as well when
this actually loads up. So let's load it up. Again, I can't really see
too much at the moment. But what I can do is I can see
which ones have bevels on. It looks like pretty much
all of these have bevels on, and all of these have bevels on. So what I'm going to do now is just join all of these together. And then I'll be able to unwrap them quite easily. You
can see that one there. This one here looks to have a little bit
of problem in that there's too many of these on there. You know
what I'm going to do? I'm going to do my little
trick again what I did before, so we'll bring in a point
light, bring it out. Then what we'll do
is we'll put it very high and let's say 200. There we go. Now we can
actually see what we're doing. You can see here the
problems we have. So I'll come into this one. I'll press L selection,
split it off. Should still have a bevel
on it, which it has. Now, I'll just join all
of these together so, so even on this one in here, this one, here, here. Like, there we go, that should be all of those now. This one's part of the year,
so we don't need to do that. Press Control J then. Control A will transform
s origin to geometry. And now I'll do it we'll
actually add in some edge loops. So I'm going to
grab all of these. Like so. So, this one's
already got edge loops on. I'm just wondering about
the bomb up here as well. I think they're going
to need some, so we'll put some in here as well. And these on here.
This one. These. Oh, this one. This one's
already got one on. And then all I'm going to do is grab these ones now that
I've actually grated. All of these grab them all. This one here hasn't going on. That's a shame, 'cause that
means I have to go in again. Never, never mind. Okay. So like so. And then what we'll do
is just come up to mesh, transform and randomize. And then we'll just
turn that down. We'll turn it down
to Naught point u one, something like that. And then finally, what we'll do is now we'll grab all of these, press U, Smart UVP J, click. And hopefully, hopefully now, they should look really, really nice, which they do. Okay, so now, let's
get rid of this. And then what we'll do is
we'll save out our work. On the next lesson, then, what we'll do is we'll check out what we've actually done. We'll bring in the
rendered view. We'll have a look
around the scene, making sure we've
not missed anything. And then after that,
we can actually start bringing our lights in. All right, everyone. So
I hope you enjoyed that. I hope you're learning
tons and tons. I hope you're really happy with the finished result nearly. You know, there's a lot
more to go yet, actually. We're really, really bringing
this thing to light, using the composite,
using the grass. If you think it looks good now, just wait for the
next few lessons because it's going
to look even better. All right, everyone.
Thanks a lot. Bye bye.
138. Tweaking assets whilst looking at render preview: Okay Welcome microphone to end for modeling and
germy not workshop, and this is where we left off. Now, let's go round
then to the front. So supposedly, we've
finished everything on here, and this is where you should
have a little note pad out and you should be taking some notes about what
you've actually got missing so that you can
actually go and put them in. Now, one thing I might have missing is a little piece
of wood under here. I'm just going to
see if I can put a little piece of wood under there without
destroying my roof. So if you see, can I put a
little piece under there. What I'm going to do is,
I'm just going to pull it back slowly and see when as get a piece of wood just sat
under there like so. Then what we're going
to do is press in Z. I'm going to drop that
down into place like so. Press the tab on
double tap the A, and there you go, you can see it looks better than it did before. And that's the whole
point. Now, again, do we want another piece of
wood under this part as well? I think the answer is yes,
so we'll come in again. Shift D Z 90. Pull it over, and then pull
it into place under here. Pull it over this way. Obviously, we don't
want it in there, then pull it down, double
tap the A, and there we go. Now one thing about this is, as you can see, I need to
pull it back past this pit. Like so. Double tap the A. There we go. I can see that's
looking better as well. And they say at the moment, we're just going
round and making sure that we've added in
everything that we need to. So now, I bring this out. Like so 90. Let's pull it into
this part here. I think this part. I'll
actually unwrap it again. But before that, S and X, bring it in. Put it in. I. Do this part here. Let's pull it up, making sure it fits under and into place, and then I'll just rem wrap it. So Smart UV jet click,
and there we go. You can see it's a lot
more on the resolution, and that's because if
we go over to our UV, let's just make that
smaller, like so, back to modeling, and now it should be absolutely
fine as you can see. So now, I'm just
going to go round. Checking everything. Every little spot, guys. You you never want
to really, you know, you know, render something out, and then you're like, Oh,
I forgot that little bit. You know, you really
don't want to do that. What you want to do is just make sure you're happy
with everything. First of all, I'm
checking my building. So all of my building
is why I'm checking, going all the way
around it, looking for any bits that I've
actually missed. Very easy to miss parts. The d around there
looks beautiful. Even if you want
to put a piece of wood down there, you
might want to do that. I don't think I do. But what I want to make sure it's things
like this, for instance. Can we bring that up?
So let's have a look. Should we bring that
up a little bit more? The answer is yes.
That looks better. All the way round here and
round here. And there we go. Now what I'll do is I'll go
down and check my walls, go check in all my walls. You can see we've still got some white ground under there. This is why we do
it. If I press tab, you can see that what is this piece? Where
is it coming from? But let's just grab
this press shift, hide everything out of the way. And let's just double
tap the A. Oh, that is my cobblestones. That is what's going on there.
But is my cobblestones. You can see my cobblestones
are coming up here as well, which we don't really want. I don't actually know
why they're doing that. I think I moved the map
actually by mistake. But what I want to do, though, is it's because I haven't come in and drop them down far
enough. That's what it is. A. The actual train hasn't
come up far enough. So I'm just going to press
altage bring back everything, and this is where my
cobblestones are coming up, as you can see. What I want to do is I
want to go to the terrain. And what I want to
do is I want to come in to my train, select a piece. Make sure proportionality
on. Let's put it on smooth. We don't really want to do
anything else with this. Let's see if we can start
pulling it up. There we go. We can actually
start pulling it up. So let's pull it up,
but let's actually bring this out a little bit, and let's not go too
far. Pull this bit up. Because we don't want
to pull it up too far, so I'm just wondering how
far I need to pull this up, so I'm just going to grab it
over here. Stead of that. Let's see. And pull that up. The other thing is, you
might want to come in. And as you see no white on here, you might just want to come in, grab your cobblestones and put the ground material
on some dirt. Do we have any dt
cobblestone dirt? There we go. Drop that on there, and then that'll get rid of those parts. Now, we
need to check that. Dirt. But the other
thing we can do with our dirt is we can bring it down to match this
color a little bit more rather
than being so dark. So let's actually go
to my cobblestone dirt now before we do anything else. Let's press the little dot b. So we'll come to my cobblestone, and the one we want is the dirt. So if I come in, put it
on cobblestone dirt. That then will give
me access to it. And now I can
actually have a look at what that's
going to look like. So if I zoom out now, we can see it's just the
simple texture this, and all I want to do is we just want to pull
this up this way, and then we can kind
of lighten it up, like so and now I can see it
fits in much much better. Might make it a
little bit darker. There we go. You can't even distinguish it, so that's fine. All right. So that's that
bit. Back to modeling then. And again, you won't
have seen that if you're not doing what I'm
proposed to do here. You're going to look at
every part of you've seen before we move
on to the next part, which will be bringing
in the lamps. All right. That's
looking. Pretty nice. We're going to have some
bit of grass on here. I'm just wondering about
this part as well. So this part going around here. Let's look at that
actually on the UV map. So I'm just going to click it
all the way around to here. I'm going to then go
to my UV editing. And you can see it's this
way round, if I press dot. What happens if we
turn it the other way, so 90 and then bring it
into place on there. And you can see
now that's looking much better because it needed
a bit of dirt on there, because it's actually
coming down to here. I'm also wondering if
we grab the other part, so shift and click, The other part is here. Let's press L, 90 without
proportionality on. So 90. Then let's put that part
into the dirt as well. And there we go. That's look in tons tons bed because you're going to get some dirt on there. And I think now it's
time for the last look, which I always do, which will be let's now
get rid of our guy. We're not going
to need, In fact, you know what, we're not
gonna get rid of him. We'll just put him
over there for now. And what we'll do then is
just hide these out the way. So I'm just going to hide
them out the way, like so. And then what I'm
going to do is I'm just going to save out my work. I'm just going to then come in and make sure
this is turned off, and I'm also going to hide
these out the way as well. So hide those out the way, and then let's put it
on our rendered view. And now we're going
to have a look round on what it looks
like rendered view. Now, bear in mind,
guys, it may crash. So it may crash. So you mind one two. Before doing what I'm proposing, which is the sky, we're going to mess
around with the sky. You might just make sure
you've saved it out and make sure you've loaded it back up because while I want to do now, is you can see that just how beautiful this looks
at the moment. But if we come over to
the right hand side here, I've got our sky on. And what I want to do is I
want to change the rotation. So the sun rotation here is
what I want to bring round. Now as I bring that round, you'll see that I'll certainly be able to see
more of the building, which also helps me kind of evaluate if it's looking really
nice from certain angles. So like this angle
here, for instance, you'll want different windows, I may okay with them all being the same. Another question. Look from the front, and
then around the back, you're going to do
the same thing again. You're also looking as well, if it was in shadow, what
would it actually look like? And we can see the silhouette
of this is beautiful. So everything is pretty nice. So let's now bring the sun back and bring it
round to this side. And you can see now that is what it's going to look like from here with the
sunlight on there. Not quite like that because
we're going to do some work, needs grass and
things like that. We have a good idea
now and you can spot anything that's kind of, you know, not in the way,
something that's mis. So always do that at
the end of your work. And then at the end, just
put your sun rotation back into a nice in a level. And I like that because
it means that I've got some shun on here
for this front view. So this would be my front view. I've got some
darkness over here, and we've got some
shadow down here. And I want some shadow down here because I'm going to
point a light, you know, coming through there bouncing onto this part here. All right. So that's the final check done. And now I want to do
is I want to come. I'm going to put
this on object mode, and then I'm going to
bring back everything. So bring back all
of these parts, tate bring back all
of these parts. Bring back all of these parts, and then file and save it
out. All right, everyone. So I hope you enjoyed that.
On the next one then, we're going to be
bringing in our lamps, and we'll get those
all into place. And once we've done
that, we're moving on to the actual grass. So, the grass, the
main part of it. And after that, we're
moving on to compositing, and then we've finally
finished the scene. All right, everyone.
Sob you enjoyed that, and I'll see on the next one. Thanks a lot. Bye bye.
139. Placing Lightposts: Welcome back everyone Plan fall modeling and Jump
you know workshop, and this is where
we left the art. Alright. So what we
want to do now is, first of all, get these
to be the right scale. So I'm just going to
move this one over. This one looks to be around
about the right scale. However, if I come
to this one here, you can see looking at my guy. It's way, way too big. So let's make it, much smaller. Somewhere around the right size. It's going to be
something like this. And now from here, what we can do is we can jaws come out. We can grab all three of these, and I'm just going to make
a duplication of them. So shift the, bring it over. And then the first one I'm going to put in
is this one here, and this one's going to go
around this door over here. So I'll grab this door. I'll press Shift S,
cursor selected, grab my Shift S and
selections cursor. And then what I'll do is press a little do just to zoom in, and then I'm going
to put this over the top of here and I'm going
to rotate it round as well. So z let's rotate it round. Let's put this
then on to normal. And what we want to do is put this above the door like so. Now, I'm not sure if I want it above the door in this
position. Like so. So if I put it in this position, that actually might
be better if I pull it up than how I had it before. So I think, yeah, something like that that's
looking pretty nice. Let's just make sure then
it's centered like so. And that's looking pretty good. And then what we'll
do is we'll have another one of these and
we'll put it over here. So what don't we do is press 50. I'll drag it out. I'll press Alt and just to reset the rotation. And then all I'm
going to do is press, 90 or -90 on this case, -90 L so, and I'm going to put this one then underneath here. And just put it into this part going back
into this wall here, like so, and then maybe just enter it and pull it
down a little bit. Like so. Double tap the
A, and there we go. All right, so let's
have a quick look at what they're
going to look like, so put it on rendered
view, let it load up. And there we go. Now, you
can see that with the lamps, these are they're not
very bright at all, and that's something that
we're going to have to fix. We definitely want
these to be a lot brighter than the rest of the
glass and things like that. So what I'm going to
do instead of just, you know, coming
and altering these, I'm going to go back to modeling a minute. Let this load up. And then what I'll do is
I'll come down to this one. Let's put it actually.
Let's go to it first. And then what we'll do is
we'll come to the glass. And what we want to do is we
want to make a new glass, but we want to brighten
it up a little bit. So what I'm going to do
click the plus button, and I'm going to
click New glass. It. So. And then what I'm going to do
is click on the glass, click the Down arrow
and click Copy Mateial. Click on the glass,
click the Down arrow, and click Paste material. Now, before I actually What I want to do is I want to select all of the ones with
the actual glass. I put this on material,
you'll see that all the ones with the glass are going
to be glass lit windows. So I'm just going to
wait for this load up. Once it loads up
then, then we're going to select it like so. So if I come down to glass lit, I can click select and it'll
select all those and then go to glass lit and I can
click a sign like so. And from there, then
I can actually press the tab button minus
off the glass lit, and it should still
be with glass lit. So in other words, the one that we had before
wasn't very lit very well, and we want it lit
much, much bare. From here, then, because we've
got this new material on, I can come down
to where it saves emission and start
turning that up like so, and now you can see
we've got a much, much better light on there. Now what I need to do is, I'm just going to do this
then on the others, and then I'll drag
them across again. So all I'm going to
do on this one is I'm going to come in
over two material going up and change
it from glass lit to glass lit windows
to glass lit, like so, and then we'll do
the same thing on here. Like so, we'll come to this one, and then we'll go to glass lit, like so, and then just
work our way along. You know what? We'll just
delete those two off. And instead of doing that, all we'll do is just
drag these over, so shifty, drag them over, and then when I
bring in a new one, I should be able to do that now. Let's sort these out now. So if I come to this one, what I should be able to do
is just click the down, glass lit, and then
come to this one. Same thing. Like so. Double tap the A,
and there we go. Now, let's have a look
at what that looks like. First of all, Do
let's save our work, so we don't actually
lose anything. Let's put it on rendered view. And let's late for
it to load up. And from here, hopefully, now, yes, there we go. That's exactly what
we're looking for. Alright, so that's
looking much much better. You can see the
scene looks amazing. So now let's bring in, I think we'll bring
in another one. So let's put it on material view so we can actually
see what we're doing. And then what we'll
do is we'll bring in our post, first of all. So we'll bring in this post. I'm going to press D. And
then what I'm going to do, I'll put a post over here. So, if I press
seven, I should be able to press G then and
move it over to the top. I'm wondering where
I'm actually going to put this post because I've
actually got a stone there. So I'm thinking should
I put it up along here, so into the floor, like so, and then rotate it
around a little bit. What I've got to be careful
of is making sure that. First of all, you know, my guy is not going to bang his head on this or
anything like that. So I've just got to
take that into account. What I'm going to do is, I'm just going to put
in the floor there. I'm going to come
there, find my guy, and I want to measure if he's
going to bang his head on that so you can see
it's flat to the wall now, and pull him over here. Yeah, that looks
actually a nice height. I think I'm actually
happy with that looks. Yeah, I'm happy with
out that looks. From here, then, let's
bring in a another light. So what we'll do is
we'll bring in this one. We'll pressure and I want
to put this one right on top of my heel over here. Like so. So I'm going
to have it on here. And from here as well, I'm wondering whether this one is a little bit too
big. I think it is. So all I'm going to do is just make it a little bit smaller, pull it down then
and put it into place and just make sure
it's sat on the hill. So. Now I want to do is
we want to actually have some lights going down here. So I'm going
to grab this one. I'm going to press Shift. Pull it over here, Altar, just to rotate it round. And what I want
to do is as well, I want to put the orientation round to the bottom of here
because it is making it hard. So Altag bring everything
back, grab the bottom of it. Shift S, cursor selected, and then right click
and set my origin two, three D cursor like so. And now it's just
going to be much much easier to move this around. So now what I want to do
is I want to basically put this somewhere where it's going to light up
the way down here, and I also want to make sure that I'm going
to rotate it round. So I would say that's probably
somewhere around here. So if I bring this here, put it in, like so, is my guy going to bang his head again? I think
he will on there. So, you know what?
Let's pull it over, do the side a little bit, pull it up. Like so. And what I'm looking for now is, do I have enough
room or is this, do I need to do a little
bit more work and just pull this back a little bit to allow this actual
post to be on there. Be ideally, I think I'd
like my post. Around here. So can I fit it
anywhere along here, so have a look.
Actually, you know what? That I think is now fitting
in much, much better like so. And then all I'm going
to do then is rotate it. So I'm just going to
rotate it around like so, double tap the A,
and there we go, that is looking nice.
That's exactly what one. And then I think one more over here down sort of kind
of down here, I think. Or we put it over
the other side. I think actually, I'm happy? If you look at this, you can see It looks nice
going up there. I just need one more
thing down here, so I'm just going to press
shift, and then bring it over. Press Z hundred
80, spin it round. So RZ, 180 spin it round,
seven to go over the top, and then we want it is
somewhere around here, I think. Like so. Then I'm just going to
pull it down into place. Maybe up a bit. Like so. And then, pull it round. And I think you know
what? I'll pull it down a little bit more. I'm just going to
have that actual I'm going to have
it out like that. Then I'm just going
to pull it in. Like, so. And there we go. Now, we can see we've got
a nice drop off on there. The other thing is I want it
following kind of this path. So s let's rotate it. Just make sure it's level
with it, double tap the A. And there we go in that thing
that looks really good. And now what we need to think about is where else
would we need it lit? So we have you know these
three different ones. I think we would have another
light maybe around here. So let's actually bring in
another light and shift D, bring it up. Let's
spin it around. So RZ 90 or R z -90. Like, let's press G, bring it in some sort
of place. Like so. And let's put it into
the side of here, or into the top of this bit, that might also be away. So if I press so one, I can line it up now, put it into place like so, and let's just pull it back, but it's actually
stuck in the wood. And double tap the A and
make sure that it's in. I think it should come a
little bit more this way. So I pull it this way, like so, double tap the A. And then we go that looks. That's exactly what I want. Okay, so now we also
forgot about our flag, so I need to do our flag after
we've put these lights in. So we're working
our way round now. We're definitely
going to want another one somewhere around here. So one of these,
we're going to grab shift and we're just
going to bring it over. We're going to press
Altnar to spin it round, and then I'm going
to put my first one in roundabout in here, I think, and then Rs
hundred 80, spin it round. And from there, you can see that it's spinning
round from this point here. You know what? I'm going to
make this easy for myself. I'm going to grab
this one, shift D, and then, spin it round
and then RZ hundred 80. Spin it round that way, and then decide where I'm
going to want it. So I'm going to pg it into here. Into the floor around
this part, so like so. And then I'm thinking, it's a little bit low if
it comes to here. I think this one should be either a little bit higher
or put it around here, because we've got quite a lot
of light around there now. You can see going up here,
there's quite a lot of light. I think there's enough
light on this bit. So what I'll do is I'll just put it around here, press seven, pull it out, and then Z turn
it around a little bit. So. And then what I'll do is I'll put another one round here. So shift put it around here, and then R and Z. Spin it around like so, put it against the
wall a little bit. Double tap the A.
And there we go. So let's have one
more look then. What we've actually
done on this bit. I'll move this one out the way just so we have a
clear view of it. And then what we'll also do is save out our work.
So save it out. Put it on to turn these
interlocking links off. Let's then put this
on rendered view, and let's see what we're
looking at right now. Okay, let's let it load up. And hopefully, hopefully that
should look pretty good, especially when we've
got our grass on there. So you can see now we've got plenty of lights going around, plenty of lights
coming around here. And as we move around here, now, it's getting a little bit dark, but you can see just
what we're doing. Alright, so I'm really
happy with that. Let's put it back on material. And then we'll turn the
two interlocking links on. And on the next one, we'll get
these lights finished off, and then we'll get
on with our flag. And from there, then we can
actually bring in our grass. And then it should look
like an amazing scene. We've also got a light
to put down there. So we've got a light
on there, a flag, the rest of the lights in
place, and then our grass. And once we've got our grass, and we can really see
this scene come together. All right, everyone. So hope
you enjoyed that and I'll see on the next one.
Thanks a lot. Bye bye.
140. Placing smaller light sources and attaching them to the wizzard structure: Welcome back, everyone to blend the four modeling and
Jumpton workshop, and this is where we left off. Alright. So now let's focus on the lights going up the stairs. So what I'm going to
do is I'm going to grab this one. I'm going
to bring it around. I'm going to put this
on the object mode, so it's a little bit easier
to actually work with. And then what I'm
going to do is, I think we'll put one
maybe around here. So going up around here, so let's press said 90, and I can press three, and I can kind of put this in place. So I'm just looking how
we'll put this one in place and this one here.
So it goes into the. So I'm just wondering
how I want this one in. So let's put it around here.
And if I pull it back. You're just wondering
if it should be going in something like this. And I think, actually, that's probably going to be
how we're going to do it. Let's bring it down a little bit and see if that
actually fits in there. And there we go. Yeah, that
looks pretty nice like so. And then what I'll do is
wondering if I want one more around here or here
somewhere around the door. So I think I want one more
maybe maybe just around here, and then one over the door
just to light the wave. So let's have a look
at that. So shift D, we'll bring it over. We'll spin it around. So
red let's put it round. Let's make sure
that's on normal. And then what we'll do
is we'll pull this into place hidden again a
little bit by the idea. I do like that a lot. And then art and Z I wouldn't put it straight
into the walls. By the way, not
straight in the walls. I would always use
some wood, if we can. And then put this
around here. Like so. And then with the final one, I'm going to put it over here, so shifty, not the final one, but the final one
for the stairs. I can see here I've got
some shading issues, so I'm just going to grab those, and I'm going to shade smooth bingles and just sort those out. And then we going to do
is come back to this, altar, spin it back around. I'm going to press three then. And then what I'm going to
do is put it above the door. Like so. And then pull it back. Into place like so,
and there we go. I think that looks
really, really nice. And now I want probably
one this side, or at least one this side. It needs to light up this, and then one at the top of here. So let's bring
this around again. So shift D. Let's press Alt
and R if it's not spun round, and then R dead
90, spin it round. Now, I just don't like the
fat there's one this side, and then there's one
going to be, you know, kind of the other side as
well. I'm not sure about that. What I'm going to do
is, I'm just going to see if I can put it this side, put it in anywhere, this side. You can see the problem I've got is is it going to
go in the wall? I don't really want that. I
want it coming down there. But then I don't want it too far into where they're
actually going to walk. Actually, I think that's
going to look good. And you're going to pull
it over a little bit. Making sure it's not sticking
in my wall anywhere, and then shifting bring it up and then alternating it round. And then this one might
be able to go on there. Let's see where we
can put this one. I go to pull it round. I'm going to press seven,
go over the top and then match this kind of bend like so, and then G, and let's have a look where we can
actually put this in place. We can see if we put it there. Kind of going to be
hanging on the fence. I don't really want that. I'm looking where
else I can put it. Cut guess, put it there. Under there, like so. I could
always move the wood up. That's not a problem doing that. Jo wondering, You know what? That looks actually quite nice. It does look quite nice there,
so I just move it over. And maybe a little bit more. Like so. Yeah. And that's
looking pretty good. Let's pull it down a little bit. So, there we go. And then what I want
to do is I want obviously, let's have
a look at this one. So I've got this
going around here. I'm going to want
one under here. I think I'll put one under here. So I'll just grab
this one, shift. And then what I'll
do is press tar and then adds 90, spin it around, and then control
one just to go to the back and where I want it is somewhere around here
coming back under this, and what that's going to do is going to light up
the inside of here, and that's exactly what I want. Lighten up all that work that we've done on the
inside of here. Like, so and then we'll grab this one again and we'll
put it, not this one. Sorry, the little
ones that we have. So these two little
hanging ones, You know, what we go a
little having in one. So I think what I'll
do is, I'll come in, press tag, and I'm going to grab all of these. So
all of these parts. Make sure you grab
me edge select. Just to make sure
you grab everything. And also, if you're
struggling to grab something, just go into y frame, press B, and then just
grab them all like so, and grab them all here. And then just make sure
you press control part just to make sure then that you've grabbed everything
that you need. And then I'm just going
to press Shift D. I'm going to pull it over with
global, so pull it over. Like, so I'm then going
to press P selection, grab it again, Control or transform set
origin to geometry. And then what I'm
going to do with this is I'm going to
take it over here. And put it into my lights ride around these
hanging lights here. So if I pull it over. I
should be able to press. Dot, then, Zoom into it. Then we're going to put
it hanging on here. So if I press control one, I should then be able to get
it into the place that I want it, and then pull it up. And then finally if I press one, I should then one on the pad. And because I can't
see through there, so let's press
three. There we go. Let's put it straight
on. Like so. Then we go let's put it
on the other side now. So shift bring it over
to the other side. Like so. All right. That's looking pretty nice. Now what we need to think about is do we want one on the back? Do we want one round here? I think we should
have at least one around here, for sure. So let's grab this one again. Let's press Shift D, and let's bring it over. And whereabouts do we want it? I think, probably along here,
not on the top of there. We're looking at
where we actually lighten things up.
That's the thing. So I think on top of that, as well, no one would be
able to reach it as well. That's the other thing.
So where do we want it? At least here they can
probably reach out the window and reach this. So that's why I'm thinking
of putting it back here. Like so, and they just can't
open the window enough, but I don't think
they would care about that. So that's that one. And now I think we
need just one more. And I'm just wondering
where to put that one. Maybe maybe on here. I think on here, they could also light it out the
window from there. But let's have a look
at that one as well. It might not look right
there. So we'll just see. So what I'm going to do? I'm
going to press seven again. I'm going to rotate it then Z. And then what I'm
going to do is go on to normal, pull it back. And let's see if
it's going to look silly in this place here. Like, so let's double tap
the A. You know what? I don't think it
does. I think it actually adds something to it. Yeah, I think that
looks pretty nice. Now I'm going to do is I'm
going to save out my work. I'm going to go file, Dave. We've got one more
lights put in, actually. So let's actually put that in. So we're gonna grab
this one here. I'm gonna press shift D.
And this one is going to be in the center in
the center of here. I just where people
walk around here, and we're going to put
it on top of stone. So what I want to do
is I want to make it probably a little bit
smaller than this one. So I'm just going to press S. And then what I'm
going to do, I think, is I'll press S and
Z and just make it a little bit more squat,
'cause it is around here. Finally, what I want
to do is I want it to sit on some type of stone. I just don't want it in the middle of the
courtyard like that. So what I'm going to
do is, I'm just going to grab this rock that
I'll put over here. Press shifty, bring it over, and I'm hoping that I didn't actually, I didn't
actually do that, which means that now let's
bring the rock down, like so, and you can see how easy it is to
flatten that rock. And that that makes it really,
really easy to war with. So if I bring this over now, you can see we can
pick a different rock and get a really nice, beautiful rock that we want. That's really nice and flat. So I'm just going to there
we go. That one there. That one looks about right. And what I can do then is
just put this in the center. So I'm just going to
put it in the center, so I'm going to spin it around. So I Let's sq spin it
around a little bit. And I'm also going to take
this off and put it on global. Grab this one now, put it in place and then
just rotate it. So I'm just going
to rotate it on the g to plan it
up a little bit. And then from there, I can
put this on top of this rock. Like I'm just making sure it's
on there. Double tap the. And there we go, I think
that actually looks nice. Now, think also what I'll do is I'll press it D and I'll
bring in one more rock. And what I'll do is
I'll turn this back up. Like so, turn it to
a different rock. You can find another nice rock. Something that's
going to suit it, that might actually suit it. Let's press S, pull it in. Like so. And there we go. And then I think I'll
have one more rock. So I'm just going
to press D and I'm going to put one more
rock here and might be able to get away with
actually just spinning this one round without
them looking too similar. Just looking at
that. And I think actually that's That's
looking what I want. Now, now we've got
everything in there. Let's save out our work. And I will check now to see
what everything looks like. So again, let's come in, though make it a little bit
easier on our computer. Let's hide these out the way.
Hide these out of the way. And then what we'll
do is we'll come in now and put this on. We'll turn off
these two into lock in holes and then
turn on our render. And let's see what
this looks like. Alright, if it is slow
moving around, remember, you can always save it
out and then reload it. So I'm thinking that
I'm just looking now, where else would
we need a light? So you can see here this
is what it looks like. I'm just going to bring it
round. This is all down here. This is beautiful. All
of this is really nice. We've got lights leading up, and you can see it really stands out when they're actually
in the darkness. You could have a
night scene here as well, all going up there, and then a couple of
different lights here, and this is on the courtyard. Then I'm s going round. And this really, really
lights up well now. And I think, yes, I think
that's absolutely perfect. The one light I think
we're missing then, It's just a light over
this part here, I think. I think we just need
one more light. Maybe maybe come in from
there, and I think that's it. Alright, we'll do that
then on the next lesson. And then after that, we'll
actually create our flag. So we need our flag on there, and then we're onto our grass. Alright, everyone,
so hope you enjoyed that, and I'll see
on the next one. Thanks a lot. Bye bye.
141. Simulating Cloth Flags in Blender: Welcome back everyone to blend the form modeling and
jump in a workshop, and this is where
we left it off. Now what I want
to do is just put on my two interlocking links. I'm going to put my light then, so I'm going to
grab this pressure deep and I'm going
to bring it over. And I'm just wondering
then if I want to put it there and up into here. Like so can I
actually fit that in? Will it look right?
That's my question. It's sticking out of there. I don't think I
really like that. And I think, You know what? I think Because of the
angle of all of these, I think it actually
has to go, you know, roundabout here into
this wall, actually. So what I'm going to
do is press Rs head. I don't generally like sticking
them in walls like this. And I also think if I
put it in the wall, maybe, Maybe just maybe. I'm wondering if I
bring it up like that. Like so and then just
go over the top of seven and then put it at
the same angle as this. So I'll say, same angle as that. And then just pull it
back actually into place. Maybe back a little bit
further, double tap the A. And I'm just wondering if I should put a piece
of wood that's actually going to go up there or if it's going to
be fine like that. You know what? I think let's have a
look on rendered view. And you can see now.
Yeah, you know what? That's looking quite nice there. I wanted a different angle
because I didn't want it straight on this one's
kind of straight on as well. So I'm looking to actually make it more interesting,
as you can see. Now, the one thing I haven't
done yet is the one inside, and I think we
need to put one of them inside before we carry on. So I'm just going
to grab this one. You could, of course, you know, have one of these
over here as well. But I think we can go
completely crazy with lights, and we just have to
be crazy about that. We just have to think about that before doing anything else. What I'm going to do is just
hide all these out the way. And then we're
going to press one. I'm going to press
shift. And then we're going to drop this
over here near the door. So I'm actually going to go in, press the dot born
to zoom into it, and then we'll move around and actually put this near the door. All right, so I think
maybe on there, and then put it
into place like so, and then what we'll
do is pick it up. There we go. I think
that looks fine. And when we've done our flag, we're going to actually
have some light pouring out of here. So supposedly from this light. And you could, of course,
have them on here as well. You can put light for
everyone actually, but just don't go
overboard with them. Remember to make
things interesting. So I'm going to put some
light coming through here and hopefully a light
shaft onto the water here. So that's what I'm going
to do after my flight. So let's now come
to our actual flag. And what I'm going
to do, first of all, I'll create the part where
it's actually going to be on. I think that's the main
thing we should do. But let's come in,
and what we'll do is we'll grab this part here. So let's grab this space. Let's press shift
desk, sta selected. Let's press tab, and then what we're going to do
is bring in a cube. Let's press the S
button and bring it in. I just want to sit that
on top of that like so. And then what I
want to do is bring it up to where this
is going to ten. So if I pull it up to here, it's not going to be that tall, but I think it should come
up to something like that. And then from there, then
what we'll do is we'll bring out control like so, and then I'll press Control B. And then on this day,
I'll press control law. Like so. And then
what I'll do is, I'll just bring out
an edge loop for these. No edge loop, sorry. I'll just bring them
out with troot so enter alternate, bring
them out slightly. Like so. And then
on the top, then, I'll put now. So
I'll grab the top. I'll press shift desk
curse to selected. I'll bring in a cylinder,
so bring the cylinder. Let's put it on 24,
like we always do. Let's press the S board
and bring it down. And this will be then
just the start of the flagpole. Like so. I'm going to press dot just so I can get in there a
little bit easier, and then all I'm
going to do is make a simple flight poll
with I, bring it in. And then, pull it up. Like so. Now, we can see
that that is probably going to be way way too thick at the moment, so
let's make it thinner. So shift and click
alterns and bring it in. And it's up to you whether
you want to have it kind of, you know, tapering at the bottom I think you
know how to do that now. I think I'm definitely going to have it tapering
up at the top. So I'm going to do
is press control, bring in a few edge loops. I'm going to check
now thethickness of it, so double tap the A. Move your curtain
now. You know what? I think that's actually
a good thickness for it. I just think now I need to
pull it up a little bit. So I'm going to
actually I'm thinking, yeah, I'll just pull
it all up, like so. And then from there,
then I'll just add in a couple more edge loops. Left click, right, click. I'll grab the top of it then. And before I do the top, what
I want to do is just pull it out with maybe shot. We'll do it. Let's see if I can actually do it with the
shot. We'll bring it in. So. And then we go a thing
that looks pretty good. And then finally, let's
make the top of it now. So all I'm going to do is
press enter S, pull it out, and then, pull it up, and then I insert, and then, and then let's put
a little kind of top on the f. So finally, then let's grab the whole
thing and shade smooth, double tap the A,
and there we go a thing that's going to
be good for our flag. All right. So now let's actually create our flag. So I'm
going to come back to this. Control transform set
origin to geometry. Let's do the same
thing on here as well. Control transform set
origin to geometry. Adding a modifier on this
part, we'll bring in a bevel. We'll set this to
point at at three, like we've done
with everyone else. And then back to here,
Shift S Kurt selected. Now I want to do is press one. And now, I just want
to measure up my flag. So I'm going to
bring in a plane. I'm going to spin my
plane round so RX 90. I'm going to press the S
button and bring it in. L so Like, so. And then I'm going to put it where I actually want my flag. So somewhere around here
is where I want my flag. Then what I'm going to do is I'm going to measure
my flag out now. Let's put this on
global just for now. I'm going to measure
my flag out. I'm going to pull it out to the length that I
actually want it. And I think that will
be a good length. One thing I think is it's
just not quite wide enough. Like so. All right. That looks all great
at the moment. Now we need to do is we need to bring in
some subdivisions. Now, before we do
that, let's just press control A A transforms, right, click Set
origins geometry, and now press control. You know what? Instead
of doing that, I'll just press subdivide. I'll do that again. I'll click on the face, right
click, subdivide, subdivide, subdivide, subdivide
and one more subdivision, and I think that we'll do it. And then finally, what we want to do before doing
anything else? We want to grab both of
these little points here. We want to come in and we want
to bring those in like so. So even if we have to move
the whole thing across, we want to make sure that
these parts are brought in. And no only that, they're
also brought up a little bit. If they're not coming
up, just put it from medium point and an essence, and just bring them
up a little bit, and it's just going to make
that look much, much better. From there, then what we
want to do is we want to now grab this edge. So this edge here,
and we want to press Alt Shift and click
and grab the whole thing, and then we're going to come
over to the right hand side, and we want to actually have
this as a vertex group. But if we come in,
click the plus button, and we want to call this pin. And basically, this is where
we're going to pin this to the flag to stop the flight kind of floating off over here. And what we're going
to do is click a sign. Now, always check just to make sure that it's
actually working. So if I deselect it, click select, there
is my pin group. Alright, so that's
that bit done. And now what we want to do
is we want to go to layout, and this is where
we want to work in layout because this
actually has our timeline. And because this is
going to be animated, we actually need to
have our timeline there so we can move it
backwards and forwards. Now, the next thing we're going to do is we're going to come in. And this sometimes
is a bit fiddly, so don't worry if you don't
get it right the first time. And what we want to
do is we're going to generate is we're
going to generate. I'm not sure if it's
there, actually let's have a look. There we go. So it's on this one here, and the one we want is clot, and we're gonna click that on. Now if I press space bar, you'll see that it
drops straight down. Let's put it over then. Like so. And then what we're
going to do instead is we're going to come down now, and we should have one that is our pin group. So
is it under shape? There we go. So under shape, we've got one that says pin, and now I'm going
to press face bar, you can see it drops down. Now, the other thing you
can see is, first of all, if I go back, is that I don't doesn't really look
like a flag at the moment. So let's come in, and what
we'll do is we'll use our nol. So if we press one
to go straight in, we'll come to this point here, and what we'll do is we'll
just cut a little bit away. Like, so, and then I'll cut
it down, coming to here. Like so. And then
press enter. Like so. And then from there,
what we'll do is, I think I'll just move this one. So I cut it at the wrong place. So I'm just going
to move this one to here right click and I'll merge vertices at
the last like so. And then what I'm
going to do is, I'm just going to
cut all of this out. So because now I'm
not great selected. It just means after doing
and you see instead, just to make sure I grab it all, so you can see them
going right up to there. Then I'll come in and make
sure I've not missed any or gone over the parts I
shouldn't have done, like so. If you do, just
press middle mouse. There you go. There we go. There we go, and
then all of this. Then I'm just going
to right click, press delete and faces, and we should end up with
something like that. All right, that's good enough, actually for what we need. So now what we do is
if we press space bar, we can see all comes
together like so. Now, we need some wind on
here because at the moment, We don't actually have anything that's going to control it, so we're definitely gonna need
some wind kind of make it flat in the wind because at the moment, just
drop straight down. We don't really
want it like that. Also, we want to right
click and shade smooth. Now you can see it's
looking tons tons bare, and let's just pull this over here back to one and
bring in our wind. Okay, so the way we're going
to bring in some wind is, we're just going
to press Shift A, and we're going to
go down, and you've got one that says force field, and the one you one
is going to be wind. Just bring that in and
then rotate it around. So rotate it by 90 degrees, pull it back into place. And then what you want to do is pull this little arrow out. And what that's going to do is it's going to increase
the strength. Now, I press space bar, and you can see nothing
happens at the moment. What we want to do
then, And the reason nothing is happening
right now is because we just
want to set this. So the actual gravity. So if we come all the way down, we've got something that
says field weights, open that up.'s take
your gravity down to a 0.3 something like that. Then what happens is
when we press space bar, you can see this happens, come back to your win now,
reset this down. So back to your win now, and what you're going to
do is you're going to set the strength of
something like 3,000. And then what you're going
to do is press space bar. And now you can
see Nearly there. Not quite there.
You can see it's blowing around in the wind, but not quite to what we want, which means that
we can go down and now set our gravity down
a little bit lower. So let's try not 0.1. And let's try that again. Let's press the space bar. And what we want in is
that flapping motion that we're getting there is just kind of crossing
over at the moment, which means that we're going to set this down a little
bit lower, I think, so let's set it down even lower, so not 0.3, something
like that. Turn it up. And there we go, now
we're starting to get somewhere. That
is what we want. That's exactly what
we want. And now, what else we want to do is, I'm just wondering whether
we need self collisions on. Now, the good thing about this every single time that
we go through here, it's going to be pretty
much exactly the same, which means we can pause it
anywhere now, bring it back. And actually have it to
where we actually want it. So you can see here, it
actually looks as though it's, you know, flapping in the wind. We can actually bring
it down as well, all the way back to here, and then you can just pick
wherever you want it. I actually think that
looks pretty nice. Now, the other
thing you can do is you can come back to your flag, and what you want
to do is we want self let's have a look. So let's come down. I'm
just looking at collisions. There we go. Collisions and
we want self collisions on. So let's just set that
on, and now it's should. Sometimes it works,
sometimes it doesn't. I do mess around with this. We just want to
change the friction. But what happens is, let's turn this down. Let's put it back. Let's try now. You can see now, because I've turned
that down, It actually is looking a little
bit bare as you can see. Now, the other thing is, let's
turn it up a little bit. That's a tiny bit, and let's see what happens now. Yeah, sometimes it does just crumpling in on itself.
I don't like that. And you can see now, because
it's not trying to actually, you know, self
collide with itself. It does make a bit
of a mess sometimes. People just when I see people, other people use
it, click it on, and it just works, and for me, it always makes a mess of it. I actually find it be
not to have it set on. So just so you know
that, try it now. Let's see what this is
going to look like. There we go. That's
looking pretty nice. And the other thing as well as if you're not happy with it, you can also put up this. So at the moment, we
get into 250 frames, and then it's ending, and then of course, it's restarting. So just put this up to
500 and then it'll just carry on past that
250 frames like so. Sometimes you have
to restart it. And the other thing is as
well, is don't forget. I think this is also set to 250. I look at that in one moment. So let's see it gets
250 and see if it ends. If it does, we just have to
change it in here as well. And there we go. It's
actually doing that. So let's actually have a
look at our frame rate. And to change the frame rate, we're just going to have to come down and there's one under cash, and we can change this
then to 500 like so. Alright, so now I'm hoping
that that's changed that. Let's put it back to zero. And then we should be able
to now see what happens. It should be pretty much the same as what it was
in the beginning, but now it should just carry
on past that frame rate, and now you can see
there's beautiful roles, and that's what we're
actually looking for. And there you go,
it's actually going to go through the 250. Now, you can see, also, because we haven't
got self collisions on exactly what's
happening there. But for something
like this flag, You might just want to get
away with doing it like that. You can see how it came there. So I'm just going
to press pause. I'm going to bring it back
then to where I want it, which will be
something like that. And if I look from here now, that looks like it's
gusting in the wind. And that, for me, to be
honest, is fine with me. I'm going to go up then
and save out my work. And on the next one,
what we'll do is we'll actually turn
this then into mesh. And that is our flight actually done. All
right, everyone. So I hope you enjoyed that one. I'll see you on the next one. Thanks a lot. Bye bye.
142. Enhancing Scene Lighting with Additional Sources: Welcome back if you
want to Blender for modeling and
jump in a workshop. Now, one thing I have
forgot to tell you guys is the fact that if you want to file and you save this out. So we save it out normally, you can actually if
you want to put this, let's say you want to
send it to a friend, or you want to
send it to another computer or something like that. You must make sure
that you come down, and what you want to do is
put this external data on. So what this does
is it will pack everything into the actual file. So now I want to
come and save it, everything is now saved out, and that means that
all of the materials, all of the textures,
everything you've done will basically
be exactly the same. So you must make
sure you do that. The other thing is
as well, just don't forget when you do pack
everything in there, it's going to be a
much larger file than what it was originally. Because what you'll
find is if you don't pack things
and you send them through to another user or you send them through
to another computer, you're going to end up
with pink materials. And that basically means
it doesn't know where the materials are or the textures are and
things like that. So that's why we
actually do that. All right, saying that,
then, what we want to do now is to make sure you're
happy with it first. Come to object and
what you want to do. Convert to mesh. All right. We'll see now we've
actually applied that. And then what we want to do
now is we want to come in, and we really want to
grab all of our edges. So let's see if I'm come in, select and I want to
select sharp edges, and you're seeing
that's what it's doing. That's not what I want. I don't know why it's selecting
them like that. So what I'm going
to do instead is, I'm just going to come
in shift and click, l shift click old
shift click and just grab all my edges going
around there like so, right click then, and
just mark a scene. And the reason I'm
doing that is because then I want to reset
all those transforms, set origin to geometry. Delete my wind out the way. I'm not going to need
that in there anymore. And then I'm going to come over, add in a modifier, and we're
just going to add in A. Solidify bring in a
solidify, like so. And then just right click, make sure shades moves on. Sometimes sometimes
it'll end up like this. Let's try shades
move in that way. And I think what's happened
here by press tab. Yeah, it's added in these shops. So what I'm going to do is
Brits press A, right click. And instead, I'm going
to clear all the shops, and there we go, that's
nice and smooth. Now, the other thing I want
to do is probably want to add in a shop going along this edge here. So
what I'm going to do. You know what? In fact, before I do that. Let's apply this. Now, just make sure that
it's not too thick. You want it relatively
thick but not too thick. So let's actually overlook
if we bring this down. So bring it down, bring it down. Something like that, I
think is absolutely fine. It does need to be, you know, have some thickness to it, especially if you're
going to send it into a real engine or
something like that. Now I'm going to do is I'm going to put even thickness on. Apply that then, right click
and shade smooth by angle. I'm going to turn off
this and hopefully turn this down or up. There we go. And now I'm just going to see if there's any shops in there, and there is some shops in here, and you can see this has really been messed
up for some reason. So let's go back and it was
putting even thickness on. So I'm just going to
apply it now again. And then what I'm
going to do now is right click, Shade Smooth. Here we go. That is exactly
what I want, like so. And all I did as I've turned
off, keep sharp edges, turn it up a little bit, and now I've got
a beautiful flag. Now, let's see if we can
go to our asset manager, come down to our materials, and the one we want
is our purple cloth. And what I'm going to do is, I'm just going to drop
that on there, like so. And then what I'm going to do is I need to unwrap this now. So what I'm going to do
is we'll just press A, Smart view, but, click Okay. Let's then put this onto our rendered view and
have a look at that. See what it looks like
once it actually loads up. So let everything load up first, and then we'll see
what it looks like. Doesn't look promising at the moment, which I
knew it wouldn't. So what I'm going to
do now is just make sure that it's all being
unwrapped properly. So you can see if I come
into this, grab this edge. It's going to go up to here, and what I should be
able to do from there is press and wrap. And now you can see it's
looking much much better. Albeit, it's going the
wrong way at the moment. And then going to come
around to the back and do the same thing when
unwrap like so. And then what I'm
going to do, you can see these little side edges. They don't matter.
Don't worry about them. So now we're going to do
is go to our UV editing. I'm going to press
dot to doom in, and I'm going to come
round to the other side. So I'm going to do
the other side. And I'll do this side at
the same time, actually. Then what we're going to
do is just press one, and then we're going
to press A 90, spin it round, and there you go, now you can see how much bar
that's actually looking. Finally, then, we can
actually make it bigger if we need to or make it smaller,
whichever is going to fit. And I think this now fits
really nicely in there. And the other thing you
can do if you really want to is you can rotate it as well. So you can rotate them around, and then those will
kind of follow the angle of the
actual flag like soap. Okay, so now we've
done that bit. Let's go back to modeling. And now, let's come in, put it on material again. And then what I'm
going to do now is sort these parts out. So these are going to be metal. So what I'm going to do,
I'm just going to come straight in to material, bring in my planks. So let's look at planks plus plus and then we're going
to click the down arrow, and we're going
to look for iron. So the iron, not iron doc. I think is it iron do? I actually have a
look at if it is. Sign doc. So there we go. And then what I'm going to do is I'm going to come in now. I'm going to unwrap
the whole thing. So, Smart UV project, click. And then I'm just
going to now come in, assign everything
to the iron dock and then just come
into these parts, and we'll just sign
those to planks and that then is that part done. So. And then finally this part, let's press control A or transform set
origin to geometry. Ha A to grab everything. And then you Smart UV project, click down arrow, and we're
looking for iron again. It's this one here. Double
tap the A, and there we go. Now, let's just have a quick quick look at what
that looks like. Always say that I'll work again. And then we'll actually
look on our rendered view. I think it's going to
look very, very nice. I'll just let it load up. And there we go. All right. That is looking really, really nice. I'm
happy with that. And now let's think about our actual light that's going to come under here
and bounce light off here. I think that's what we
should move on to next. So I'm going to put it
on object mode for now. And once I've done
that, actually, I'm going to tidy up my scene before bringing in
the grass, I think. So I think we'll do
all of that next because we've pretty much
got everything else done. Alright, so the light
that we're going to be using on here will
be a area light. So we'll use an
area light on here. I do think it's like of the
best light to actually use. So we'll actually try and
bring one of those in. So what I'm going to do? And we'll just
come to my bridge, press shift desk,
Krista selected. And then what I'm going to do is I'm bring in an area light. So Come down to
where sees light, and the one you want is
the area light like so. And then if I just
pull this up, for now, you can see this is kind
of the angle that's at. We want it kind of
come out like this. So coming down and out. So it actually bounces light
off of our actual lake here. Then what we want to do is also, we want to make sure that it we can keep it the same size. You can make it a little
bit bigger if you want, but don't go too
much on the scale. What are we going
to do then is set the power first of
all to 7,000 do? Like, so I'm going to mess around with the color once
it's actually in there. But the one thing
I do want to do is I want to change the let's
have a look at this. So let's just make
sure I'm on cycles. Let's come back to it. I was looking on my
other reference, and actually, it's not an area
light. It's a spot light. So let's put it on spot light. I was looking for these
options down here. Couldn't see them thinking, where is this spot light? Anyway, so 7,000 watts. Let's click off the softll off. Let's put the radius up
to something like 0.58. Let's put that up.
And then let's put the Let's put the spot size. So this spot size is going to change how big or
how small it is, and then we've got the
blend in between them. So how strong is this light
going to be around here. And if you pull that down, you kind of get this
beautiful gradient on there. Alright, next of all, then,
what I'm going to do is, I'm going to pull it into place
where I actually want it. So I'm going to pull
it through here. So it's actually pointing
as you can see through here and then what
I'm going to do is press art and head and
just move it around. And then what I want
to do is I want to pull it out just to make sure it's in front
of this wall here. If I press a little dot
one you can see here, it is in front of there, and now it's just a case of
playing around with it. So playing around with it and seeing what we can actually get. So what I'm going to do is
I'm going to put this on rendered view. Let it load up. And again, if it's really,
really slow loading up, don't forget what we can
do is we can just come in and save it out
and then reload it, and that's going to make it much faster. We'll do that now. So all I'm going to do
is just file, Dave, and then file and then
just reopen it like so, let it re open, and then we'll put it on
rendered view now. So let that load up. And there we go. All right. So now I want to
do first of all, we want to make sure
it's the right color. So obviously, this color is
not going to do it justice. So what I want to
do is I want to come in and turn the color. Something else like
something warm, I would say,
something like this. The other good thing as you can see when it actually
loads up here, you can actually see
kind of in that water, and that's exactly what we want. And what we're also
going to do is just press Arns head
and move it around, so we've got some nice,
nice shadows there. Now, you can see if
I come to this edge over here that the light
is coming through here, so let's pull it
up a little bit. And we're going to get much,
much better light on there. And I'm also looking at. Can I actually pull
it over and split that light off like so
and then rotate it round. Let's have a look at what we
get if we do it that way. But let's look from here. And there you go,
you can see that's what we're actually
going to get from there, and that's looking pretty nice. Now, the thing is, you can see, We can mess around
now with the blend. So if a mess around
with the blend, you can see we can tone it down or we can really bring
it up at the edges. Let's tone it down a little bit. And the other thing is
we've got a radius, where we can actually
bring it all the way down or bring it up and light up the whole place
in there if you want to. So I'm just going to go round. You can see this is way way
too bright at the moment. And the problem is, if I bring this down to 1,000 instead, you'll see that we
lose that light there, but it actually comes on there. So I don't really
want to do that. So what I want to do
is put that back to 7,000 to light all of this. And then what I want to
do is bring where is it the radius down like so. And then what I want to
do now is and if you see the softball and
see what that does. It's actually lighting it, but not lightening it there. We don't want that on either. That's why I'm saying
that. And let's look at bringing this radius. Down something that's
usable like so, because what we don't want is big light in there
shining through like so. So I'm just going to mess
around with it a little bit. Like so. And then what I'm going to do is just pull it up. Like so and drop it into place. All right, that is
looking now it nice. I'm just looking at the light. I'm going to put it on 20,000 instead and see what
we get through there. You can see that's probably
a little bit too bright. And the thing is, it's
going to be hidden. If I zoom into it, you'll see that it's going to be hidden so you can see on here. It doesn't look right. So I'm wondering, actually, if this is the right
light to use because I do want a spot light
light coming through there. But the problem is I don't really want it
lighting like that. So I want a little bit
of light in there. So you know what we'll
do on the next lesson. I think what we'll do is
we'll bring in two lights. We'll use two lights on this. One to light it up in there, so we've actually got some
decent light in there, and then the other one to
be the actual spotlight. Alright, every
want, so I hope you enjoyed that, and I'll
see on the next one. Thanks a lot. Bye bye.
143. Fine-Tuning Point Light Sources in Blender: Welcome everyone to Blender por Modeling and Jomono workshop. So this is where we left off, and I wasn't very happy with it. But what I decided to do in the background is just do
a little bit more testing. And I think actually
what we want to do is just simply turn this
to an area light. Now, this is going to
be easier to use now. Let's put this on something like $5,000 instead and
see what we get now. Now we can see
we've got a better light contrast coming
through there. Although it's still
way way too bright. The other problem we
have is it's coming and shining all through here.
We don't really want that. So what we can do,
though, is put the spread down to let's say
something like 50, and that then's going
to bring it down and kind of shine it just where we actually want
it around there. The other thing is,
let's drop this down a little bit to 2000, so 2000 like so, and now we can see we've got a nice light shining
on this side. Now, I would say that
we're probably also need. Yeah, I'd say, bring it down even more thing that's still
a little bit overkill. I'm also going to change
the color a little bit, so I'm going to
bring the color to be a little bit more
yellow, like so. And then what I'm going to
do is just bring it down to 1,000 like so, and just pop that down and we've got a little bit of
light shining on there. And I'm also trying to
figure it if we can actually move it and pull
the light over this side. That's where the
actual lamps come from and then rotate it round. So rotate it Like, so and there we go. Now, I'm looking at the
light underneath here. I'm looking if we're going to be under here. You know what? That's looking
pretty good, guys. And you thinking whether I want to rotate it a little bit more. Like so. I think I'm
happy with that. I'm just going to now
try putting it on 500. Putting it down a little bit. And I think now we
just need to light it inside of here. You
can see what's happening. It's actually getting caught
like kind of on here, if I move around,
and actually find the light. Let's go in there. I see here, it's getting caught
kind of in this bit here. So, majority of the
light is coming here. And if I move around slowly, you can see what's happening. But we are shining
shining all of that. I think what I need to do, put one more light in here. To brighten up this
in here as well. So what I'm going to do
is, I'm just going to press shift de coast selected. Shift A, and what I'll bring in, I think I'll bring
in another light, which will be a point light. Let's bring in a point light. Then what we'll do is we want
to have it a similar color. So let's put it on
a yellow color. And then let's bring it up a little bit and just light it up a little bit more
in here because we want basal illusion that, this is lighting up in here. And then from here, all
of this light is spilling out over into this part
here as you can see. And that is looking quite nice. Like so. Now, because the
lighting is so important, we need to actually make
sure that we really, really do you get this right. So I'm looking at how that
lights spilling over there. And I think let's just
come back to the spread. Let's just turn the
spread up a little bit. Or down a little bit.
Let's have lucky if I put this all the way
down, bring it up. Slightly. Like so. And then if I come
in now and also come in and turn this down to
maybe 300, let's try that. I think that's going to be enough light spilling out there. So what I'm doing now
is looking around. And the other thing is
with the area light, what you can also
do if you click on it is you can change it
from square to disc, and you'll see that you get
a completely different kind of lighting
experience off there. I'm just making sure this
is coming through there. You know what? I think
that's absolutely fine now. I'm Check in everything
else on there. All right. Now, there's only so far you can actually push this really, without actually coming in
and kind of rendering it out. Once you render it out,
you're going to have a much, much better idea of what
we're actually looking at. The one thing I'm doing
is I'm just moving around and seeing
this light on here. I'm not sure whether I
actually want that in there. And so what I'm going to do is, I'm just going to bring down this light
now, so this sides. I'm going to bring it down
slowly, slowly, slowly. Bring it down a little bit. Maybe even a little
bit smaller than that. Just to kind of hide
it a little bit. So you can see now it's coming each side of this
and you can see now that's looking a
lot better than it was. Let's turn it down even more. And I'm thinking that that is looking about right
what I'm actually wanting. I'm actually looking
in here as well. And I think I'm going to
have to mess around with this light once we actually render it and see
what that comes out like, because we're going
to be going, you know, kind of from this view. We've got some light
spilling out there, as you can see, and we're also going to be
coming from this view. But now we can see we've got
light in there bouncing, really bouncing up of there, and I'm not so sure about that. So let's now leave that for
the time being, I think. Just wondering if there's
any other way I can actually light this in that way. Yeah, you can see that
still lit on the water. So the water is the thing that's causing it. Just wondering. If I should like use you can
see we've got it's really, really nice how that comes out. It's just the shine that I want to actually
take away from there, so I'm just going to pull
it back even further. And I know I seem to be taking a little bit
of time with this, but I really believe like
we need to get this right. So what I'm going to do is I'm going to hide this
bridge out the way. I'm going to come in, and
I'm going to grab my light, and I'm going to put on
a point light instead. And the other thing
I'm going to do is I'm then going to
bring this out. So I'm going to
bring it out, so, what I'm going to
do is I'm going to turn on the soft ball off. So turn that on, and then I'm going to make it a
little bit brighter. So let's bring out
the brightness. And I think now this
is starting to look. Much, much bere. We've
not got that, you know, such a beam of light on there and it looks
more realistic. Now, press oltge bring back. There we go. That is
what I'm looking for. So we can see now it's much more spread out double tap the A, much more realistic
coming from there. Yeah, I think that's
much much bare actually. I'm just going to bring
it out a little bit more and see what else
I can do with it. There we go. That is
what I'm looking for. Now that's the perfect light. Yes, that's looking
much much better. It looks like lights actually
spilling out of here now onto the floor down there. All right. Finally,
we got there. So we basically have got
two lights in there now. And if I go in there, I'll put it on material motor so we can
see what we're doing. Let this load up, and then we'll just go
over what we're doing. And then what we'll do on
the next one is we'll bring in our actual grass
onto this part here. So you can see now
that's what we've got. You can see it's shining through there,
which is wonderful. And now let's hide this out the way and just go
over what we've done. So if I come in and hide this and this and
maybe even this, you can see that we've
got two lights in here. One of them then is
our point light. So this is the point light which is doing the
most of the work. This is then shining a light
onto here, as you can see. And then if I hide
that out of the way, we've got one more light, which is this light here. Now, what I'm going to do with this actual other
point light is, I'm just going to for now. I think I'll find it over here. And what I'll do is
I'll just take it off, and then I'll press tag, bring back everything and
then take it off again. And I just want to
look and see what it looks like in
rendered view because I might not actually
need that point light. I'm going to let
this load up then, and then we'll just have
a quick look round, and we might be able to get away without that in there.
So let's have a look. Because there was
two lights colliding against each other and I think
that was causing issues. Yeah, and I think actually
this looks bad like this. So without this actual
second point light. Yeah, so sorry to mess
around, everyone. It's important that we
get the lights, correct? I'm going to let that out away now. Making sure is that one? There it is. Just
looking round here now. Just making sure that's lit. Yes, and that's pretty
much what we want now. And from here, we could actually put one more light just to, you know, kind of light
this up a little bit more. Well, the problem is
that then we're going to get another reflection
off of here. I'm not sure whether
I want that or not. Alright, so let's
put it on object. Molding off of
that. That's done. Let's press file and
save it out of the way. And then on the next
one, we will be starting finally
finally with our grass. All right, everyone.
So you enjoyed that. I'll see on the next one.
Thanks a lot. Bye bye.
144. Organizing Blender Projects for Efficiency: Welcome back, everyone to blend the P Modeling and John
M you know workshop, and this is where we left off. Now, I think the most
important thing should before we bring our grass in is to
tidy up our entire scene. I think that's really important because then we've
brought our grass in, everything should
be nice and tidy. So what I'm going to
do is first of all, I'm going to come in. Now, the problem you have is
that some things like these, you will see if I
press a little dot born are under Ivy leaves. Now, I'm just going to
see if I can grab all three of these and press M
and put them in their own. You can see I can't put them
in their own collection. Now, let's see if and come up. And make a new collection. I'm just wondering if there
is a collection called IV. There is a collection called
IV, which is all of these. If I can actually put all
of these leaves into my IV. So if I drop those in there, are they going to all disappear? That is the thing
that I'm looking for. And the reason I'm looking
for that is because I don't actually want these to disappear because
they're in a collection. If we click on there
and we go over to here, you can see that our
collection is these, so we've got IV three
in our collection. But what I want to do
is want to make sure that when I hide all of
these other the way. So hide in these, it's not then. Going to be hiding
anything else. Now, what I tend to do
with things like this is, I will come and I will put them underneath the ground
of here like soap, so I'll drop them all underneath the ground of there like soap. Now, the other thing is that
once they're hidden away, you can even put them inside
there if you want to, but just somewhere
underneath where no camera is going to
be able to see them, and there we go,
double tap the eight, and they're done out of the way. So now we don't need
to worry about our IV, and it means I can
hide all my IV, you know, if I want to. Now, the next thing
is, I want to actually come in and
grab all of these. Now, in my primitives, I'm certain that if
I turn these off, you can see many, many
things get hdden away. We don't actually want that.
So what we're going to do is we're going to make
one that's called working. So I'm just going to
come in. Chip select all of these primitives. And what we're going
to do is press M, and we're going to put them
in a new collection called working. So. And then what I'm going
to do now is come in, grab all of these, press M, and put them then
in my primitives. And now I know that those are all going
to be hidden away. So if I hide all of these now, you can see it's not hiding
anything in my scene. Then what I'm going
to do is obviously turn it off on the
rendered view as well, and now they are
hidden out of the way. The primitives,
I'm then going to move all the way
down right down, hopefully, to the bottom. So let's see, there we go. I moved them all the way
down, to the bottom. I've actually got a load of
other stuff in there as well. We'll move those
down the bottom when we actually come to
them. All right. So now what we got? Let's
see what we've got. So we've got ground plane. Let's see what that is.
So we've got our stairs. We've got all of our fences. So let's now start putting
these in some sort of order. So what I'm going to do
is I'm going to press M and I'll call this stairs. Like so, and we'll call
it stairs terrain. And then I know what that is. So stairs and rain, click Enter. And then all I'm going to do
is hide these out the way. We're gonna keep hiding
them out the way as I actually work on them, so stairs, terrain, hide
them out of the way. Now, let's come to our fence. So what I'm going to do is
grab all of these three, and then we're going
to put M and put them in a new collection
and click fence. And don't worry if you feel like you've got too
many collections. We are going to hide a
lot of these out the way. They're gonna get
deleted off as well. Now I'm going to do is I'm going to come up.
We've done all those. Let's now come in
to our terrain. So let's look where
our terrain is. So our terrain is in there, so you might as well keep that in there, hide it
out of the way. We've got one that
is actual water. We can hide that out of the way. And now let's come to our light. So anything that is
a light like these, like these, and like these, and all like these, we'll be able to
find any of that we've missed, so don't
worry about that. We'll bring them in and put
them in their own place. So go to grab all of these. And then what I'm going to
do is press new collection, and we'll put them in lamps, not like we'll put them in
lamps like so and click Okay. And then what we can do is now we can put that
up and we can see one that says lamps and we're going to hide
those out of the way. Now we've got one that
says bridge hopefully. So if I press a little dot one, we can see we've got
one that says bridge. Now, what is in here? Is it
just going to be bridge? So you can see all
of that is in here. And that's fair
enough. We can keep all of that in our
bridge like so. So what I'm going to do
is I'm going to come in. Put that up and hide my
bridge out of the way. Alright. Now, these IV ones, I really want them hidden
out of the way as well, so I'm just going to come in and just make sure
that they're hidden. So if I press a little
dot one, let's find it. Here you go. You
can see them here. So if I now hide each of
these out of the way, we're not going to
need to show those. As long as they're still
showing, that's absolutely fine. Alright, so now our main IV
we can hide out the way. Now, let's look at our roofs. So we should have all
of these in roofs. We've press a little
do we can see. We've got all of our
roofs here, all of these. Let's just make sure there's
nothing else selected. So if I press G now, I can see all that
is is our roofs. Now, I'm thinking that probably, probably, we should grab all
of these in here as well. So, in other words, these
little tops in here. All I'm going to do is press. I'm going to come
into this one, press. I'm going to come around
then and press. Like, so. And then what I'm going
to do as well is, I'm just going to come in to these parts that have missed, so you can see here, this one, this top here, like so, this one here, like so. And then I'm just going to make sure that they're all in roofs. So we do have one
that's called roofs. Let's put them all in there. And then from there, then, Let's hide
those out of the way. And now we can see
what we've got left. So these parts here,
this part here, this part here as
well. These tops. You can see are in wood. I think what I'll do is,
I'll split these off. So you can see all
of this is wood. I'm going to press
L P selection. Come to this one then,
and then L P selection. Then I'll grab this and
this and this and this and this one and put
those in roofs as well. And there they go all
hidden out the way. Let's make a new one for this. So all I'm going to do is grab all of these parts, press M, and I'm going to put
in a new collection, and we'll call it flag. So. And then what I'm going
to do is come down. Hide my flag out of the way. Now, the next one is going
to be wood, hopefully. So if I come over to this one, you should see that we've
got one that says wood, and I'm kind of hoping that this is all of these parts here. So if I come in, is it
going to be all my wood? This is the main thing
that we need to see. So let's see if there's anything in there
that shouldn't be. If I press G, all of that
should be the wood, basically. So let's hope it is. Okay. Well, let's Let's now come up
and see what we've missed. So let's close that up, hide
that one out of the way. Alright, so we can see now. We've got some roofs
missing to start with. We've got some doors
and things like that. So let's now put this in roof. So roof. Like, so let's
put this in its own. I don't think we have
one that says chimney, so we'll make a new
collection called chimney. So, press enter, and
then we'll go down and we'll hide our
chimney out of the way. And then we've got
these parts here. These are also our roofs. So we're going to put
those in as well. So M. And you can see, as you get start
to get down here, it starts to get easier. All right. So this one
as well is also roofs. And now we'll come to our walls. So all of these should be
in something called walls. So what I'm going to do is just grab all of my walls first. I'll come up and look for walls. Let's just grab one of them. Press the little
dot born and let's see all of these then
should be walls, like so. And if I press the G
button, There we go. We can see exactly now
what we've got missing some go to right click
and drop those in place, and I'm just going to put that
up, hide them out the way. All right. So now we've
got our staircase. Now, we do have one
that says stairs. I don't think we have one.
Do we have one that says staircases Little
Darb staircase. There we go. And then
we have the other one, which is not our staircase. So I'm looking at this
one and this one. These are the This
can all go together, basically, so let's
put it together. Like so. All right. This one can go in roof. So M, roofs. There we go. This one can
go in cobbles, so cobbles. Like so. And then what we'll do is we'll
find couples on here. All the way. Now
we want is light. So we've got this one
here. That is our light. So we'll press M, make a
new collection, lights. And don't worry
about collections getting too big at the moment. All we want to do is just make sure that everything
is in a collection. Now, I'm a human at the moment. We'll need him, so I'm
hoping, is he in his own one? Yes, he is. So human reference. Let's put that there. Let's also turn off the rendered view because we don't want to actually
render this out. Next of all, then,
we've got stones, and we are going to
need our stones because we're going to be putting
more stones around here. So, let's put it in stones. Like so, the coke. And then, again, we come down
and we hide it out the way. So pull it up, hide
it out the way. Now we've got our
doors and windows. So I'm just going to see
if this is in its own one, so let's doors is here. We can click on all of those, and you can see that's that one. So let's close it up,
hide it out the way. This one is part of a roof. So M, go for roofs, like so. And then we've got our windows. So if you click on one of them, and go over here, it
should be in windows. So grab all of your
windows. There you go. You can see all of
those are in windows. And then all I'm going to do is close that up and hide
them out the way. Now we get into the
nitty gritty of things. So we can click on
all of these parts, and these are going
to be under walls. So you can see all
of these parts. I'm even going to put this
part on the walls as well, and this part here under walls. And then all I'm going to do is just make sure that
they're in walls. So press M and just
look for walls, then this one here,
hide them out the way. This one should be
in walls as well. And then we've got
what else we got. This one should be in walls. And we'll also put
these in walls as well. And now we've got lights. So these lamps,
let's put those in. So I'm going to press M. Put
it under. Let's have a look. I've got working primitives, lamps, this one here. And then finally,
we've just got our pretty much our wood
left. Except our lights. Let's put these
in lamps as well. So lamps. There we go. And I'm just making sure everything else,
I can go in wood. So I'm just going to press
M. I'm going to come down and make sure
it's in wood, like so. Alright, nothing left in the scene. What does
that mean then? So now that means I
can come down and you should see that I've got one left. So, what
is this thing? This is called an empty. And sometimes when
you're building, you're going to end
up with a lot of empties and it basically means that there's
nothing there. It's just an empty
shell of something. So all we can do quickly is just delete it off. We
don't need it in there. Next of all, now you
can see any of these without a little tick at the
side, have nothing in them. So you know what we
can do with those. We can actually come in and just press delete and
delete them all lot. Got all of these here,
small buildings, and all of those things,
delete them off, like so, roof wood, delete, alcove, delete, working, delete, and this is what
you should be left with. Now, if we come in, and
turn all of these on now, not the primitives,
everything else. You can see now that
everything is tidd up. Everything is in
the right order, and then we're good to
go on the next lesson. Finally, on our actual grass. I'm just going to take
one more look now. So what I'm going to do is
I'm going to save it out, and then'm going to
take one more look, making sure I've not missed
anything. And there we go. I'm just going to have
a quick look round. P my lighting, got all
those lights in and just making sure that I've got no big holes or glaring holes, we have actually
missed something. And you know what? I
don't think I have. I think it's looking ready
to go now with our grass. So on the next lesson, we're
going to first of all, just make sure this is good enough to actually put grass on, in other words, Is it
low enough to apology? Can we lower it a bit further
down all that sort of good stuff 'cause
grass is pretty heavy when you
first bring it in. But I'm going to show you how to bring it in the right way. Alright, everyone, so
hope you enjoyed that. I'll see you in the next
one. Thanks a lot. Bye bye.
145. Adjusting Meadow Parameters with Geometry Nodes: Welcome back
everyone to land for Modeling and John
chino workshop, and this is where we left off. All right. So now we want to
do is work on this terrain. Now, we will see when we
go to our material mode. Let this load up.
And what we want to do is we want to bring this
down even further if we can. In other words, we want
to bring the amount of topology down on here
without destroying any of this work
that we've actually done because that
then is going to make it easier to add in our
grass and things like that. Now, the first thing we can
do is we can probably pretty much get rid of a lot of
this empty space under here. We're simply not
going to need it. We could either just cut it across or something like that. Now, before I do that, what
I'm going to do though is actually bring it down
using my scalp tool. Now, the best way to
do this really is just to hide everything
except your terrain, which is this one here, and I'm going to move this
terrain right to the top to make
it really easy to hide everything and bring
everything else in. Now, let's bring it all down now and should end up
with something like this. Alright, so now we've
done that, then. What we want to do now is come in and go to our scalp bun. So go to sculpt, like so. And then what we're going to do is we're going to press control. And read to apologize it. And then finally, what we're
going to do is going to press the R born.
And I want to now. Let me just come round this side so you can actually
see what I'm doing. So if I press now, I want to bring this down to
make these larger. I want to make them
as large as possible, like so, without losing this. So without losing this part. Now, before I do
that, if I come over, to the right hand side. And I add in a modifier
and I go to generate. Let's go to generate, and we're going to
generate a decimate. You'll see at the moment,
is 260,000 polygons. Now, if I come in
and press Control R. And Rita apologize this, you'll see we won't
lose anything, and yet we've brought it down
now to 108,000 polygons, making it much, much
easier to wit with and much easier to use things
like weight painting on. Alright, from here,
then, let's come under the underside now.
So what I'm gonna do? I'm going to press control
sevens on the underside. I'm going to come
over to object mode. And then what I'm going to do
now is just press the tab, I'm going to press the
C. And all I want to do now is just increase
the size of this. So I need to increase the size of this with my
mouse wheel like so, and then all I'm going to do is just come round to the edges. It doesn't need to be neat
or anything like that. But what we want to do
is we want to get rid of the bulk of these parts that
we're never going to see, and we're not going
to need because they're just wasted topology. So let's get rid of all of this. Once I've done that,
I'm just going to right click press delete and
Wind delete faces. And now you can see, hopefully
that should come down. So it hasn't come down yet, but when I pressed
the tab button, there you go, it's
come down now. Alright, so now you can
see that from here, it doesn't look any different, but we've now managed to bring
it down to 85,000 polygons without messing around with the topology too much.
So that's great. Next of all, then, I
recommend that you come in and you use
the C button again, and what you're going
to do this time is, you're going to come in
and just take all of this. So you're going to
come in like so, and you're going to
make sure that you can take a huge swave of this. So just make sure that
you grow it all, like so. And then what you're going to do is you're going to press shift. Take off proportional
editing, bring it over, like so, and then we're going
to press P and selection. Like so. Now we're
going to do is we're just going to hide
our train out of the way. In fact, we're not
going to do that because we need to
put this on the test. So we'll put this on
the new collection, and we'll call it test like so. And all of this basically has been done to make sure
that it's as easy as possible for you to
bring in your grass without having any problems with
crashing and things like that, because grass typically
is very heavy duty. So this is how
recommend doing it on any scene if it's any large
scene as well. All right. So what I'm going to do now
is I put that on the test, I'm going to drag
that up, put it under my terrain like so, and
then close that up. Next of all, I'm going
to hide my terrain. I'm going to bring
in my guy now, and I'm going to put him
right on top of here. I want to do this because
I want to see how high my grass and how big my leaves and things like
that are going to be. You can see I've got
some holes in here, for instance, not going
to worry about those. They're just little holes, I should still be able
to get a good view. Now, let's come
back to our train. Let's press control.
A, all transformed. Set the origin of geometry, and now let's remove
this decimate up. Now what we're going to
do is we're going to come over to our asset manager. And we're going to go
over to Geometry node and then we're going
to press the dot born. And the one we want to
bring on is going to be the where is it meadow. We want this meadow, not the curve medal. That's
something different. I will show you how that works perhaps a
little bit later on, but one we're going to bring now is the actual meadow, like so. And we're going to
drop that on there. Now, you can see straightaway
if I go back to Mdelin, that it's brought in
all of my leaves, and already, you can
feel it slowing down. And this is the thing why I
want to do the test first, because if we don't
do that, then we're going to have
some problems. Now what I want to do is
just press the tab one. And now let's work
on our flowers. So I'm going to double tap the A and we can see
what we've got here. Now, before we change this over to material view or
anything like that, I recommend going over here, And turning down where it says viewport density
and render density. So this is showing you basically
how dense is the grass in the actual viewport and how dense is it going to be
outside of the viewport. In other words, in our render. So what I'm going to do
is I'm going to turn each of these down to 500. So tab 500 like so. And now, once I've done that, you can see it's really, really smooth moving it around. From here, what I can do is I can actually put this now on material mode and now I can have a good view of what I'm
actually looking at. Now, at the moment,
you can see that our grass isn't very high. So what I'm going to
do is I'm going to turn up the scale of my grass, so let's bring it up, like so, and now you can see
it's much, much higher. You can also see
that at the moment, we've got a lot of
flowers in here. But let's first of all,
go through these options. Now, the weight painting, I'm
just going to move this up. I'm going to come
back to it, because that's the most important one. The other one is we've got
the scale as you've seen, and then we've got
the scale randomss. So let's turn this
up a little bit. And what they'll do
is just increase the randomness of
certain blades of grass. Next of all, then, we've got the viewport density
and the render density. If I turn this down
for instance to 100, you can see now we've got a lot of less grass in the viewport. This allows you then to place your grass where you
want to at very, very low setting, which means that when we
come to render though, it will still be at
500, so very thick. If I put this to 1,000, you will see just how thick
this grass can actually go. As you can see, and
this then will be rendered like this in
the actual viewport. Now, I'm going to risk
just saving this out. And then when I'm going to risk, just put it on the rendered view so you can see what this is
actually going to look like, and there you go, you can see
you've got beautiful grass. So you can see I can actually
put it on in my viewport. If I turn now this down to 500, it's going to make it much, much easier in my viewport, and this is what
the actual grass is going to look like when you
actually render it out. So that's why I'm
actually testing this out to see what it's going
to look like. All right. The next one you've got is maximum surface angle and maximum surface
angle randomized. Now, this is basically where
is the grass going to come. If I put maximum surface
angle down at zero, you will see that we don't get any grass anywhere around it, and if I put it at 100, you will see then
we've got grass growing all the way around it, and we don't really
want either of those. We want our grass not to grow all the way around
all our rocks and everything because we want a certain angle where this grass just simply doesn't grow. What I'm going to do
is, let's try 60. Put it on 60, and there you go, you can see on the big
drop offs like this, you can see our grass
is not growing. And let's put this surface
angle a little bit higher. Let's turn it up a
little bit because then it tends to go on those edges, and I think it actually looks better when it
actually does that. So, you can see we've
got some nice grass growing over just
these edges like so, and that's looking
much, much better. Alright. The next
thing is the stems. I'm going to move down
to the stems now. Now, the stems are basically how these stems that are
holding these flowers together. So if I come in
and turn these up, you will see that my flowers
are actually growing really, really high, and that's
something I really like. The only thing I don't
like is that I've got tons and tons
of flowers in here, and I don't really want
that many flowers. What I'm going to
do is, I'm just going to come and turn this down to something like two and let me just look at
what that looks like. And now you can see, I
think that looks much, much better like this. Albeit, I'm not quite happy with how high these flowers
are actually growing, but I'm much happier with
how many is in there. So what I'm going
to do now is I'm going to turn this up
to let's say, Bob. And I think actually, you know what, I'm going to go with two, which means that in
Miranda density as well, I'm going to go
with two as well. Now, let's come to
the scale randomness. Let's turn that
up, so we can have some that are growing
a little bit taller. And finally, then
let's turn down the actual scale,
something like 0.3. Like so. And now let's
have a look round. And you know what? I
think I'm going to be happy with how that looks. So we've got a few
kind of flowers in here and they're growing
this high And yeah, we've got a bit of
variation in there. I think that looks pretty nice. Alright, so now let's come down, and what we're
going to do is look at our flowers so we can actually turn up the
flower size if we want to. So you really can turn this all the way up
and have them mute. A at any stage, try
not to get away with pressing controls head to go back because on a
lot of geometrodes, that's simply not
going to work, and also it might crush your system. So what you want to do is right
click and you're going to reset to default value, like so. And all geometrnes should have a reset to default value anyway. Alright, so I'm happy
with how this looks. Maybe just maybe. I might want to bring
in a couple more, so I'm just going to put
this on three and three, like so, just to bring
in a few more flowers. Next of all then, we're
coming down to leaves now. With the leaves, we can actually
turn up the leaves that where the flowers actually come out and make them
much, much larger. Now, what I'm going to do is,
I'm just going to turn up my leaves to something
like let's try not 0.1. Maybe that's still a bit high. So let's try 0.8. Like so. Bring them down. Still too high. You're going to bring them down. Like, so, because I do want
a bit of leaves in there, a little bit of variation. As you can see, coming out
of my flowers and things. I still feel like that's
a little bit too high, so I'm going to
hold the ship born and bring them down
just a little bit. Now, finally, we're going to save out this, but
on the next one, I will go through a few more of these options and
just get it perfectly the way that we
actually want it and show you the most important
thing about this. All right, everyone,
so I hope you enjoyed that, and I'll
see on the next one. Thanks a lot. Bye bye.
146. Applying Weight-Painted Meadows: Welcome back
everyone to plan for modeling and John
Conde workshop, and this is where
we left the art. All right. So with the stems, you will notice at the moment that they kind of
come over down here. That's fine. But they don't
come over anywhere near here. So let's turn up these surface
angle just a little bit. So as you turn this up,
you'll see now to get more stems appearing in some funky places
like out up here. Now, we don't quite
want them there. Let's put it two and see if we can actually
bring them back. So we have got some
now, which are appearing in these
little parts here, which is exactly what I wanted. We've also got a mesh radius, which will increase the size. Not that one of the bottoms
of the actual stem. So if you want to
have really, really chunky stems, you
can increase that. Now, I'm just going to go back and put this on reset
to default value. I think I'm happy with those. And I think now I've
pretty much been through everything that I
want to show you about that. The other thing of
course is you can turn off your flowers
if you want to. So you'll notice at the moment, we've got these in
the collections. All you need to do
is click on this, and it will turn
off your flowers if you so want to. All right. That is everything basically
that I've got on this. The other thing of course is we can change our seed as well, which will give us a
completely different set of flowers and things like that. Now, the next thing, the most important
thing is then that we can also come down and use weight painting
to paint on here, and that's exactly
what we want to do. Because a lot of things in our actual scene,
like, for instance, where the lake is,
we don't actually want flowers where the lake is. We don't want flowers
where the cobblestone is. We don't want flowers where the actual walls are for our building and
things like that. So what we want to do
is be able to control where we actually want
all of our grass. The other thing
is on the stairs, we want to have completely
separate grass on there. Why? Because The fact is that we don't want flowers
coming out of our stairs. We want it very, very
low level grass, so it all actually
comes together. Alright, so let's now go in, and what we'll do is I'm going to show you how to use the
weight painting on here. So what I'm going to do is I'm going to come to my object. I'm just going to put it
onto object mode in it. I'm then going to come over to the right hand side with
a little triangles. I'm gonna make a new group, and what I'm going
to call it I'll call it a weight paint. For this one, I will like so. And then what I'm going to
do now is going to come back to this little spanner, and then I'm going to go
to where this weight paint and click this little born. From there, what
I'm going to do is I'm going to come down
and click on this. And what I want to click
on is the one that says weight paint because
that is the one that I set. Now, you'll see nothing
happens at the moment, but that is because
we haven't come in yet and added
any weight paint. So the more I come in and
add our weight paint, you can actually draw on your
grass wherever you want it. So if I want just grass
on these parts here, for instance, I can now
draw it on like so. The other great thing
about this is if we go back to object mode
now, double tap the A, I can actually come in and put this on the
grass again if I want to, I can still change
all these options, but it's now based on
actual weight paint rather than just putting it everywhere all over our terrain. So now you can see that it's what it's
going to look like. Now, from here, what
I'm going to do is I'm going to leave this
weight paint on so. I'm going to come in then
and bring back my terrain. So let's bring back our terrain. And then what I'm going
to do now is I'm going to put this on object
mode. Let it load up. I'm going to now
save out my work, so file and save. And then what I'm going to do is I'm going to grab this one. Grab take off the decimate.
We don't need that on. Grab this one. I'm
going to then press control l and I'm going to
copy modifiers like so. And now, if we come over, this one here is going to
have all of these settings. It's going to have weight
paint, which, of course, we've not made one with
weight paint at the moment. So now what we want to do is we want to come over to
the right hand side. Click a new one, and
the one we're going to call it is weight, paint. Grass. Like so. Now, if we come back over
to our little spanner, we're going to then
turn this and click it on and click on weight
paint, grass, like so. And now what we're
going to do is we're just going to go over, go to weight paint, and then I'm going to paint
some on, like so. Come back to object and double tap the
A, and there we go. Now what we can do is we can
actually paint all of this out all where we want our
grass and things like that. We can also minus
it off as well. So if I come in and go to object mode and go
to weight paint, I can also come in
and turn this off. So instead of going to draw, I can go down to subtract. And then what I can do is I
can come in and take those off if I actually
choose to like so. So you can see now this
is looking pretty nice. We can also hide
this out the way. And what you'll see now is this is actually
our weight paint. So you might not
want to actually draw on with your
actual weight paint. Now what I'm going to
do is I'm going to come put this back on to draw. So add or draw it doesn't
matter which one. And then what I'm
going to do now is make this a
little bit bigger, and I'm going to draw in all of my actual weight paint
where I actually want it. So first of all, I don't
mind drawing on here because I already know I've set the angle to where
it wants to be. I'm going to draw around here. Now, the one place
I'm not drawing on, if you notice, will
be the actual stairs. So I am drawing down here, for instance, but not
on the actual stairs. So I'm just going
to draw these in. And once I've drawn these in. So down here, I'm
not going to do that because I'm going to have
a separate one for that. I'm just going to
quickly draw these in now all around
where I want them. I don't want to go
obviously in my lake, so I'm just drawing
around there. And the reason I'm
drawing around this part first, is
because at the moment, if I turn this off, I
don't actually know, I can't turn that off, never
mind. I don't actually know. We're about my buildings
going to come up to. Now, the other thing is, I've
got these in here as well. Let me just go to object mode. And the reason is because these are in their
own collection. So you'll see down here, we have a collection of
grass of flowers, of leaves and things like that. Let's turn those off. But now, And let's come back to here now. And then what we do is just turn that on just to make
sure they all come on, double tap the A,
and there we go, now you can see, we've got
some beautiful grass in there. Alright, so let's keep
working our way down. So what I'm going to do then is just turn this off a minute. I'm going to come back to this. I'm going to go to weight paint. And then what I'm going to
do is just draw these in. Once we've got this in,
then we can come around, and make the final touches to our grass, whatever
we want to do. L so, I'm going to come in draw on these parts because the
angle might be set too high. And we might need to turn
that down a little bit. So all I'm going
to do is just draw in all of these like so. Then what I'm going to do is going to get up to my stream. So I'm going to
draw all of these in to my stream, and then
I'm going to come round. And actually draw and minus them in where I
actually want them. Like so. Like so. Like so. And of course, we want
the inside of there done, and' going to come to here. And finally, once
I've done this, I'm going to bring
my building in, and I'll be able to see
exactly where I want it. All right. So now
I'm going to do is just come around this stream. I'm going to make
this a little bit smaller with the bracket keys. And then what I'm going
to do is come in and draw around where I want my grass to come
out near my stream. And then I'll have a
look and any of that I want to take off,
I can take them off. Let's put some around here as well of some going around
the rocks around here. Like, so, like so. And then
let's finish this bit. And then let's come round
to where we want these. You're probably going
to be round to there. Like so. All right,
looking good so far. Now, let's actually have a
look at what that looks like. Let's go back to object mode. Let's turn it back
on, let it load up, and this is what we
shod be looking like. And then what you can
do is you can see all of that grass has
grown around there. And now, finally, what you want to do is you want to go to file, tape out your work, and then come and put it onto
material mode first. So let that load
up. There we go. That's looking pretty nice, and now put it on rendered view. And it should have no
problems loading this up now because of everything
that we've been doing. Let it load up. And there we go. That is what you're
actually going to get. And now from here, we
should be able to start now bringing in our buildings and actually painting around here. So you can see this looking
really, really nice. This bit here, as you can see, might be going too much into
the water. I'm not sure yet. I'm going to bring
back my parts now, and then I'll be able
to have a good view. So let's put this on
object mode for now. Let it load up. And then all we're going to do now
is put in our bridge, for instance, and we can see, look, this is where
it's coming up to. You can see how they have got grass in there, but that's fine. But now we can actually
draw around this part. You can see I've got
grass down here. I need some grass
coming down here. You can see once I
bring in my walls then, so let's bring in our walls. Let's we can actually
probably Yeah, we can near enough get away with working with those
walls in there. So let's now come in, and what we'll do is we want our water. So let's bring in our water, and let's see where
that comes up to. And there you go. Now
you've got a good idea of where this actually
wants to come up to. So I can draw all the
way up to here now. What I'm going to do is, I'm just going to
come into this now. I'm going to turn
this off a minute. And then what I'm going to do
is go back to weight paint, and now I can draw
all the way up. Where about my water is. Let's draw all the way up here. And you should take
your time with this, to be honest because you wanted to look as nice as possible. So we're going to draw
all the way up here all the way along here
as well, like so. And like so, and then let's look a look round. And
then this bit here. Like so. And then let's
draw on this bit here. Like so like so. Now, we can draw round this bit because we haven't got
anything apart from the wood, so let's actually bring in our wood as well. So
let's turn that on. And now we can see where
we're drawing up to here. Some jaws gonna draw all the
way up to these parts here. I'm going to fill
them in. So I'm gonna make it a
little bit bigger. Bill all these parts in
all the way down to here. I know it won't grow down there, but I'd soon have it on there. And now on the next lesson, we'll actually start working on. I'm just going to fill
these bits in here as well. We'll actually start working
on this bit going around here and making sure all of our grass is growing
in there properly. We'll bring in our cobblestones
and things like that. Alright, let's save our work, and I'll see you on the
next one, everyone. Thanks a lot. Bye bye. M.
147. Enhancing Staircases with Grass Textures: Welcome back everyone
to Blender for Model and John Conde workshop, and this is where we left off. All right. So now,
let's bring in. I don't think we'll
need our roofs. We won't need our
windows, doors. We will need maybe a door there. Let's bring in our staircase.
We're going to need that. We don't need our IV. We need the stairs to terrain. Yes, we do. We'll bring
in our fence for sure. We'll bring in our lamps. And we'll bring
in. We don't need our flag. We don't
need chimneys. We need definitely cobblestones, and I'm thinking that
is probably about it. So our stones will bring
those in, and that is it. That's what we need
to bring in for now. Alright, so now, let's come in. Make it a little bit smaller, and let's work now around
coming around these parts here. So we're going right into
that actual cobblestones, as you can see, R right
around here all the way up. We don't want to
actually go into the stairs because we don't
want to actually grow in, you know, kind of through the stairs or
anything like that. So I'm just going to go around now and bring it into the
parts that I want it, which will be all
around here. Like so. Now, let's move around
to the other side, and then I'm going
to bring it to here. So all the way up
to here into here. Like so. And then round to here. And then what I'll do is
I'll build it all the way around into here. Let's make it a little
bit bigger for this part. So let's make it a bit bigger
all the way into here. Going all the way around. We can see now exactly
where we need it to be all the way up to here. Like, so, and then
work our way around a little bit. There we go. I think we're pretty
much. Done with that. It's up to you if you want some little piece
of grass coming through here or something
like that. All right. Now we've done that. Let's
go now to object mode. So we'll come back
to object mode now. We've got everything
on there, so now it's time to first of all,
save out our work. We're then going to
delete this part off. We're not going to
need it anymore. We're going to come
back to this part, and we're going to
turn on our grass. We're going to double tap the A, and let's have a look what we've actually achieved here so we can see here some
beautiful work here. That's looking pretty nice. We can see where the grass is actually thinning
out along here. That's exactly what it wanted because you're not going
to have grass, you know, growing, or you know, it's really, really nice,
it pulls along here. And now what we're going to do is we're atually
going to have a look and see what this is going to look like in our rendered view. So if I put my view like this, like how I'm going to look at this scene, or
something like this. Zoom it in then by pressing control shift
and the middle mouse. So you can press
control shift and the middle mouse,
zoom it in slowly. And then finally, we're
just going to put it onto rendered view and have a
look what that looks like. Let it load up. Here's
going to be a bit slow. We have got a lot
of things in here. Now, the last thing
is, we can see now, this is what it's
going to look like. It's very, very slow loading up because of how many
samples we've got in here. So what I tend to do now is all come in and put this on 100. And then what it's
going to do is just take away a
lot of the grass, as you'll see in a
minute when it loads up, it's going to take a little
bit of time to compute that. And there we go, now
you can see it just loads up a little bit quicker
than what it does before, and we can also see what it's actually going
to look like. Alright. So now we've got that. What we need to deal with
now is this part here. So this part going along here
needs to be separated out. I'm really happy without
all this grass looks. I'm not happy, however, I don't think, let
me just have a look. I'm just going to put
this onto object mode. And again, if you're really, really struggling, just
turn this off a second. And then what you want to do
is you just want to file, save out your work, so save, and then file and
just open it again. So you can see here. I'm just going to
open my scene again. And there we go. Let's put
it on render view now, and it should should
be much, much faster. So you can see now,
let's turn this on. There we go. You can see
it's loading up faster now. Still, it's not going to be super fast or
anything like that. Alright, let's put it then onto object mode in it.
What I want to do. Once this loads up
on object mode now, you just go in and
check these parts. So these parts here,
as you can see, they're actually going over
this part going down here. So what I want to
do is I just want to come in the weight paint, and all I'm going to do
then is minus this off. So I'm just going to
come to subtract, and I'm going to minus this off. So all of these parts,
I'm going to minus off, leaving that entirely
empty because this I want to do
actually separate. Alright, let's go now
back to object mode. And then what I'm going
to do now is I'm going to come to this part and
actually fix this. So what I'm going to
do is, first of all, I'll turn off my grass. I'm going to turn that off, and then I'm going to
press the tab bottom. I'm going to go over the top, and I'm going to see
where my stairs are. So I'm going to come
from the top up here. So what I'm going to do is I'm going to press the s button, and I'm going to select
all of these spaces going all the way
down Wrong here, all the way down,
where my steps are. So all the way to the sides, as you can see, going
all the way down. Right click to move it along. I'm going to grab this one here, going all the way down to here, especially at the front
of here, like so. Like so, like so, going
all the way down. So and then just
minus off those. I'm not going to ave
those. And then finally, just make sure you've grabbed
everything that you want. And now all you're
going to do is press P, selection, and split that off. Alright. So now, these should still be all
joined together. You double tap the. You
shouldn't be able to see any difference
if you press it on the rendered view between this
and this, let it load up. You shouldn't be able
to see any split down there or
anything like that. That's exactly what
we're looking for. And now what we're going to
do is we're going to come in and give this another grass. So I'm going to come in,
put it on object mode. And to test this out before doing anything, let it go back. And then what I'm going
to do to test this out. I'm going to come in
minus off my meadow, and then we're going to
give it another one. So add geometry node, and we're going to bring
in the meadow again. So meadow, let it load up, and you can see already that's
what it's actually doing. Now, I five at the A, I should now have a good idea of how this is going to look. First of all, let's
put this on there 200. Let's put this on 500. Like, so, what we're going to do is we don't want
any stems in here. I just want literally grass. So, in other words, I don't have any flowers,
so minus them off. And now you'll see if I put this onto material view,
let it load up. You're only going to
have basically leaves, and you're going to
have no flowers, and you're going to have grass. So you can see there that's
what it's going to look like. Let's actually put
this onto 500. Just so we have a
better view of this. Let this load up. There we go. Like so. And then what I'm
going to do is now I want to reduce obviously these leaves at the moment I've got
so many stems here. I'm just going to put them on
something like two and two. So do I actually want that
many in? Maybe, maybe. Let's just make them smaller. So let's make them 0.8, let's make them
smaller. Like so. Let's make the grass scale
a little bit higher. Yeah, that's what
I actually want. And then let's turn the
maximum surface angle up. Or down, let's have a look. Yeah. Something
like this as well. And now what I want to do
is I want to put this on where all of my actual soil is. I just looking to make
sure that's looking right. I think actually know what.
That's looking pretty good. I just want to come up and make sure that the grass is about the right height that
I'll actually want it. Maybe it needs to
be a bit lower, but we'll have a
look at it a minute. And the thing is I want to come in and look at the leaves. So I want to turn
the leaf scale down. Like so, and that's
looking perfect. That's exactly what
I want. All right. So now what I want to do
is I want to come in with my weight paint again and
actually weight paint these in. What I'm going to
do is you can see, I've got this one here, weight paint. So all
I'm going to do. I'm just going to come to
it. So I'm gonna grab this. I'm going to go to object mode. Sorry, I'm not I'm going to come over here and I'll call it step. So I'm going to minus this
one off. Click the plus bar. I'll call it steps. Like so. And then I'll go over
two weight paint. So I'm going to come
over to weight paint. And then all I'm going to do is just paint a little
bit of this in. So I'm just going to
come down in between here. Not on subtract. I want it on add or draw. Let's paint that
in. And then what I'm going to do now
is come over to here. And we're going to go to
where it says weight paint, and the one we want is going to be this one
here called steps. Like so. Now I'm going to do is just bring that down. I'm
going to make it smaller. I'm going to come in and draw in just on these steps. Like so. And then work my way up
on each of these steps, in in Like, and
you can see that. I don't actually know
why that happened. It's because I didn't
release the mouse. Like so. And then doors
going to go over. You can see I've
got a few one here that can actually draw
in, which is perfect. Like so. And then now it's just a matter of working
your way down each step. The one thing you don't want
is going over the steps, of course, you only
want it in between. Like so. Work your way down. Like so, especially
in these bits, or a bird of grass in here. You'll see that what an amazing effect this actually gives it. And if it's gone too much over, maybe that one has,
maybe we'll have a look. See, I'm drawing on that
but nothing is happening. That's because of the angle. And now finally this
bit here. Like so. All right. Let's go now
off of the weight pin. Let's put it on object mode. And the one thing
that will tap the A. There you go, that's
what so like. So now let's put it Let's again, save that our work
before doing anything. Let's put it on rendered. Let's see what it looks like. And there you go.
You can see how nice that actually looks now. It all fits. The
grass is a little bit smaller than the
other parts of grass. And now, on the next lesson, what we'll do is we'll
actually start then bringing the rest of the meadow in just to check what
that looks like. And then what we'll
do is we'll start bringing in the leaves. Well, the pond life,
basically into here. We'll bring in the trees, and
then that's all we need to do before we actually start rendering. All right, everyone. So I hope you really
enjoyed the course so far. A little bit more to go,
and then we've finished, but you can see you're
gonna end up with an amazing resort.
Thanks, everyone. Bye bye.
148. Adding Trees and Water Foliage: Welcome back to
everyone to blend foror modeling and
John Chinod workshop. Alright. So let's now turn on this bit here. So
let's turn this on. Let's see what it
all looks like. Let's double tap the
A and there we go, Let's now bring this out. Let's get the roof and
everything else on. So we're going to
come over to test. We might as we delete that. There's nothing in there anyway. We're gonna put on our
roofs, our windows. Let's come down, and we're
going to put on our IV. We're going to come
down then and put on our, our chimney. Our lights to bring those in. And I think that is
pretty much everything. So we don't need to
put any of these on. I'm just making sure everything that I don't want
on is turned off. Alright, so this
is at the moment, what you should end up with, and you can see already that
is looking quite beautiful. If we turn this off now, That is what we've
ended up with. So you can see, we've got a
beautiful grass down here. We've got our grass
going around here only growing on certain
sections, as you can see, see our flowers
coming off there, and everything is looking
really, really nice. Now, the next thing
now we want to do is we want to populate
this with rocks. We want to populate
it with trees. We want to populate it with plants and foliage
and things like that. Basically the last part of
this to get everything right. Now, you can see over here, if I put this on, I think
if I put this on material, I've got just a plant grow through there and
something like this, you might want or
you might not want. If you don't want
it, just basically go and trim those
off with coming in and just taking those back
with the weight painting, come and delete those off. I think for me, I'm
just going to come in and should be able to
come to weight paint, and then just minus these off. I'm going to go to
instead of draw, I'll go to subtract and should be able to
do, minus those off. Like so, and just trim
them back a little bit, making sure that
they're not going to grow so much around there. Also, I'm going to press
seven to go over the top. And I've got a real good view of where I want to
trim those back. I'm also looking
at this part here. Let's go and trim
those back even more. I'll go all the way around here. On those parts, those parts. And on this part here,
and yours trim them back. And now that's
looking pretty nice. All right, let's
put it then again on object mode. There we go. Let's double tap And then we go. Now, let's come over
then to object mode. And what I want to
do now is bring in I think we'll
start with the tree. I think I'll put a
nice tree in here. And then what we'll do is we'll bring in our rocks after
we've brought in our tree. So let's do that now.
So the first thing we do is come over
to Masset Manager. I'm going to scroll down, and
the one well one is a tree, and we've got all of
these trees to pick from, so plenty of trees to pick from. And what I'm going to do is drag out this tree, and
I'm going to put it. I'm going to put it
just there for now. And the reason I'm putting
it just there is because I want to make sure that
it's actually going to be. You could see in the
brother and it was like sticking in all kind of
angles and things like that. Now, while I've got these parts, you can see here I've
got two parts here, so this is my tree,
these are my leaves. I'm just going to
put this into tree. So I'm going to put
this into tree. Like so. Click Okay. And then what I'm going to
do is come to this part, and I'm going to put
this into my primitives. So just drop this into
your primitives like so. Now, with the tree, you
can see straight away that we've got no leaves on it, but the leaves will appear
once you're actually in rendered mode, so
don't worry about that. Just make sure that you're putting the tree
in the right place, and only that, make sure
that the tree is big enough. So don't be afraid of making your tree a little bit bigger. Like, and sticking
in the ground. So you can see here. If you've got some problems
with the tree actually, you know, coming into your mesh? Just bring it over, like handerin bring it to where
you actually want it. So actually have a look and see if your tree looks nice there. And then all you want to do
is just come to your tree, put it on an object mode. And then you should
be able to see where the tree is actually going into the into the parts there. And any that you don't really
like, press the tab bottom. Press tage to bring
your leaves in. I'm just wondering if I can
actually grab my leaves here. So tag. Can I bring my
leaves in? You know what? I'm just looking at And the thing is with
trees and leaves. And these are done with an
actual particle system. So, come over here, you can see that there's a
particle system on here, and that is what is creating
trees and things like that. Now, the other thing is you
might want to delete some of these overhanging trees like
this. Branches like this. You can actually go in,
and you can see now I can actually come in and delete
them off if I want to. So I can just basically
come in and grab one, press C. So let's
press the seaborne, and just go down like so. Now, I would recommend
using making sure this is on the
X ray. Like so. And then I'm just going to press delete and vertices like so. And then if I press tab now, you can see that they're
put out the way. So I wouldn't worry too
much about pruning them. Now, the next thing is,
with a particle system, you can't just come
over and go to object and convert to mesh because you'll lose all of your leaves. So what you want to do instead is, if you want to convert, in other words, if you want
to come in and delete, some of these
particles out of here, which I don't think we
actually need to do on this, but if you do more
a little spanner, Make instance reel,
and there you go, you're going to end up
with all of these leaves. Now, I recommend
before you do that. Grab one of them, so
grab one like this. Press control J and
join them all together, like so, and you will end up
with something like this. All of these now, if
I come in and ty, you can see it still
says, make instance reel. Just delete it out the way, and then you're going to end
up with your leaves like so. Now, the other thing
is, as you can see, once I deleted that out the way, All of my branches
at the bottom, it's going to get a bit messy. So be careful what
you're doing there, so you can see here. Make instance reel
is still there, but we've also got
all of these on here. So I'm just going to go to here Make Instance
reel and there we go. Now, if I hide that out the way, I should now be able to come in and grab all of these and
delete them out the way, which is going to be painful. And that's what I'm saying
when you actually do that. So that's why I leave
those the way they are. Just going to go back
to where they are. I'm hoping that if
I move that now. No, let's keep going back. All right, so let's try it now. There we go. Alright, my
tree is back in place. So if you need to, just be aware that
you're going to have to, you know, kind of bring
combine the mall back in. Be very careful about
what you're deleting, you'll end up with two
particles on here. I don't know why it does that, but sometimes it does do that, so just be wary if
you're going to do that. Now, let's actually have a look at what this looks
like because I think I'm only going to
have one tree in here. Mine. I'm just
looking if there's anywhere else where
I could put a tree. I could potentially put a tree, you know, in the
ground over here. Let's actually have
a look. So I'm just going to press
fit on this one. And I'm just going
to bring it in to the ground around here. And then just stick it in there. I don't want it as high as
the other one. Like so. And then what I'm going
to do is just rotate it. So head rotate it round. So double tap the A. And
there we go That works. Then what I'll do is I'll bring
in one of my other trees. Let's put it on rendered view. Let's have a look
what this looks like. There you go, now
you can see what your trees are
going to look like. They're looking very, very nice. Yours going to let this
load up a little bit. And you know what? I
think that looks good. It just needs to be, I think more of a rounded tree.
Okay, so now we've got that. Let's just put it
on material mode. Let this load up and then I'll just bring in
the other tree. So let it load up. It's going to take a
little bit of time. You can see we've got a lot
of shaders in here now, mainly from our grass. Now, this point as well, what I tend to do is I tend to come into here and
just turn this off. Makes it much, much
easier to work with. Then what I'll do is I'll
delete my tree out the way. I'm going to bring one
of the other trees in, so let's bring in this tree, for instance, and this one
might look a little bit bare. Seven, go over the top, G to put it into place, and let's put it down. Like so. And let's make
it a little bit bigger. And let's just sit it
in to where we want it. So something like this I think it's going to
look quite nice. And yeah, that's
looking quite good. So we've got this tree
and this tree here. All right. So now let's
think about our pond life. So if we go over
to water plants, we can see we've got all of
these water plants here, which is going to make
it really, really easy then to put
them into place. So, for instance, if I come
over to this part here, what I tend to do is I'll bring in one and
you can see now. This is how it's
brought them in. Now, the thing is these
should already be two scales. So you can see that we've
got two different types. You can see the
water lilies here, and then we've also got some smaller water
lilies like these. Now, what I tend to do
is I'll bring these in, so I'll bring them
down to the ground, making sure that they're
just on top of the water, so they just should sit
on top of the water. They shouldn't really be popping out too much, so like so. Then what I'll do is I'll
come to my actual lilies, water lilies and bring them down into place like so,
then move these over. And this is how it
should be spawning, so it should be spawning with
ones around these like so. Like so, and put them in place. Now, the thing is about
these water lilies. Let's just make sure they really are into the actual water. So they should be
jaws on top of it, so that they shouldn't be
nearer a place like here. So they should be more or
less in a place like here. And then what I'm going to
do is I'm going to press shift and bring them around. I'll put them around this side. So rnd move them around. Into place under the bridge, like so, and then
I'll grab these ones. Seven to go over
the top and then G just move those into place. Art and move them around to where I want them,
so something like this. And now we can actually on the next lesson,
look at our reads. So we've got all of these reads. You can see here as well. We can actually get
those into place, and we're going to
dot some around here and really bring
this actually to light. All right, everyone, so
I hope you enjoyed that. I'll see on the next one.
Thanks a lot. Bye bye.
149. Placing Shrubs and Bushes: Welcome back on to
Blender for modeling and um workshop, and this
is where we left the art. Alright, so you can see
we've got our tree in here. Forgot to put this
in our primitives. So M put it into primitives. Before I do
that. You know what? I'm just going to pull it down just to make sure it's in there. And then, put it
into primitives. Come to the tree, M. Let's
put it into our tree. And then we go. All right. So now let's come to our read. So if I put my read there, you can see now we can start sticking these out into place. I'll bring in
another read there. Drop that in there.
I'll bring in the other red and
we've got another red. And what I'm going to do is just bring in a few of these reds. Like so. I'm also going
to bring in some flowers. So some wild flowers like here. So I'm going to bring these in. Like so. Like so. And then we go, now,
let's go over the top. And all I'm going
to do is just stick these reds in where
they want to do. So they generally come in clusters these around the edges. So like so. And like so. And then what you want to
do is just grab them all. Make sure you grab the reads, press shift D, and then
just bring them over. And all we're going to do now
is put a few more in place. Like ride in the corners
of this part here. Like so. And then, again, we can grab them, and
we'll just grab them all. So I'm just going to
grab my reds again. You can drag and drop them out as well if you
really need to. Now, you can see that they're
probably a little bit high. So what I'm going to do
is, I'm just going to grab all of these. Pull them down into the water
a little bit so for these. Rab them all, pull them into
the water, double tap the A. Like so. And then now
we'll do the other side. In fact, you know what,
we'll do these ones first. So just wondering,
flower yellow, yellow, purple flowers.
I've got some of these. So I'm just going to
all these into place, mixing them up with my
reads a little bit. Like so. And then I'll put
one over here. Should. Once we've done this side, show you if I double tap the A now and then
put on my rendered view. Just down nice, they're
actually going to look. I'll let this load up again. And there you go, you can
see how nice that looks. You can imagine once you've
got the grass on there. All of this is real
estate to come together. And now I want to do is
work on this other side. So it's time consuming, but it's worth actually doing. What I'm going to do now
is, I'm going to grab all of these. Like so. Just making sure
I'm gonna zoom in, grab all of these like so. And then what I'm
going to do is I'm going to press seven
to go over the top. I'm going to press Shift D. I'm going to move
them over there. And then we're going
to press Shift D. Move them there and rotate. So I d just rotate them, press the G button, to move
them into some sort of place. And then what I'm going to
do finally is press Shift D, and I'm going to bring
some over to here. Like so. And then I'm just
going to move these around. Like so. And then
we go. All right. So that is looking good. Let's just bunch these up a
little bit more together. Have the A, and I
think that's going to be absolutely fine, like so. Alright, that's looking good. Now what we want to do is we want to think about our rock. So we've got our rock here. If I bring it over, you can see at the moment
it's got seeds on. It's still got that on so all I can do is I can just press shift D. L so now I can put this into certain places where
I actually want them. So, you can see here, I
can put it into here, can change the seed
over, bring it out. And let's change the seed. So yeah, maybe like that. Let's press arm's d.
Let's pull it into place. Like, so we'll
have a rock there. Press m's d and just pull
it out a little bit. And then what I'll
do is I'll put another rock around
this tree here. So I'm just going to press sift and I'm going
to move it out then. So if I press G, I should
be able to move it over. Then change the seed again. Something a bit better, which is going to go
near my tree. Like so. And I'll also put another
rock in here as well. So Shift D, and then G, just pull it over,
change the seed round. Something that's going to
look a little bit bare. Like so. Drop that
against there. And then we've got
two rocks in here. Let's think about another
rock maybe down here. So I'm just going to
press seven again. Shift D and just drag it over. I want this just in place around here and
rotate it if you want to. So I rotate it round, like so. And then we'll have
another rock over here. So shift D, let's put this one. Over here, let's
change the seed. And a little bit
different like so. Let's rotate this one round. I'm not sure whether I
like this seed or not, so I'm just going to change
something different. Like so, and all
this looking good. Let's put another rock in
this part here, so shift. Bring it over one rock in here. Is the seed again. Bring
it up. Is the seed. Like so. And that one's
looking pretty good. Double tap the A,
and there we go. So we've got a lot of
rocks dotted around here. Now, the next thing you do
once you bring rocks in, you should really bring
in then some foliage. Now we've got a
lot of ferns here. So if I bring in a fern, you should be able
to see I can drop it in right next to the rock. The thing is it will
be on a weird angle. So that's the only
problem that we have. So what I'm going to do
is I'm going to press X and 90 and just rotate it round then and
get it into place. Like so. And then r and x. Put it in place and then maybe
bring it up a little bit, like so. All right. With these, I already know there will be
an issue with them, so we'll fix those as well. The other thing is as well is these at the moment,
they're coming in at a very, very weird angle,
as you can see, So I'm just wondering whether
I want to grab them all. Can I bring them
all out? I think I might want to update
them a little bit. So what I'm going to do is
actually delete that one. I'm going to bring this
out, bring this one out, bring this one out, and
bring this one out. And then what I'm going to
do is rotate them all round. So r, y or x -90. No, that's not going to do it, so Let's put it on
individual origins first. And then Rx 90 rotate them all. Control A transforms. Yeah, it's because we
can't reset transforms, can't apply a multi user firm. Let's try this one then.
So Control A transforms. Great new object user data and apply transformation.
All right. Let's see. If it's that one. Is that the one that we've
brought out? No, it's not. Let's see if it's actually
created a new data. I'm just bringing these out. No, it's not. So all I'm going to do is
just delete those. Then what I'm going to do
control or transform origin, do geometry, and I'm going
to do the same one here. And the same lastly on this one, the origin of geometry. And now I'm going to do is I'm going to grab all of these. And basically, I'm
going to go right click and what I'll do is
not right click, so I'll come over here. You can see I've got my four
here, and then right click, and what we'll do is
mark them as assets, and they should be
in this one here. So let's go to current file
and air the old heart. So now if I bring
one out, round here. I bring this one out,
you'll see now it comes in against where
I'm trying to put it, so you can see now it's
actually fitting in there. Not quite right, yet.
Not quite right. So what I'm going to
do? You know what? I'm going to minus these
off, so clear assets. I'm going to go back
to these parts now. I'm going to come
to this one first. I know it's a little
bit of messing around but just in case you
ever have this problem, go into the bottom part of it. So the bottom part here, bottom part, Shift
S, Kursa selected, grab this one, and
then what you're going to do, right
click the origin, three D cursor and do the same
with these others as well. So I'm just going to zoom in. I go to grab the
bom part, Shift D, Kursa selected, right
click the origin, two, three D cursor. And then, lastly, these two. And what we're
doing is we're just resetting the origin of these. The other thing while
we're here as well, I will fix something else. So ursa selected right click
origin to three D cursor. And it'll be another
little, you know, kind of tip just in case you're having problems.
So I'll come in. Shift S, cursor selected right
clicks origin 23d cursor. Alright, so that's those done. Let's delete this
one out the way now. And then what I'm
going to do now is come back to my ferns, and you will see that if I
put this on material mode. So let's let that load up that we will have
an issue with the actual with this severs
if we have got an issue. So you can see all that
actually looks nice. Let's put it on
rendered view, though, and see if it still looks
as nice because I think these ferns have a little bit of an issue. Yes, there we go. So you can see how
they look black and white and things like that. What is causing that
five press tab and press A and come in and put
this onto face orientation. This is what's causing
it. You can see we've got face orientations all over the place, and we don't
really want that. So what we're going to
do is just press shift, spin them all round,
come to the next one. You can see we've
still got a problem, and that is because
I need to press tag, bring back everything, A, shift, spin them all
around, and there we go. We should be fine now.
Same with this one then. Tag first. A to grab everything, shift and end, spin
them all around. And then we'll do the
same with this one. Tab TH A, shift end, spin them round,
same with this one. Tab Ol TH just to make
sure everything's there. A, and then shift
spin them all round. And now we shouldn't
have a problem. So now if we come in, turn
off the face orientation, now you can see they're fine. Finally, now we can
grab all of these. We can right click then, and then what we can
do is mark as asset. What I can do with
these now is I can put these underneath here,
so I can just press one. And I can bring them
all down to here, so press G, drop them
under here just for now. I'm going to put
them under, like so. Then I'm going to press M, and I'm going to put them
in my primitives, and they're now hidden
out of the way. Alright, so on the next lesson, then what we'll do is we'll
start bringing in these ferns because they should come in
now really, really nicely. As you can see, they're in
the primitives at the moment, so I need to split
those off as well. So I will yeah, I
think I'll come in. Find Let's find my primitives
'cause I messed up there. You know what I'm going
to do before doing that? I'll just tap back. All right. These now shouldn't
be in primitives. Let's have a look if they are. Yeah, they're just under
a tree at the moment. Now if I bring it
in, you will see. So let's bring in this
one. Bring it in. Drop it on there. And you can see how nicely it comes in now. That's exactly what we're
looking for. Five press one. You can see now it's actually
in against my actual rock. This is exactly what
we're looking for. Alright, so now we've got these sorts of what we
can do when we've done these then is we can put these primitives
kind of in place. These ones over
here, we can put in our primitives and these ones that we're
going to bring in. We can put under firms
or something like that. Alright, everyone, so I
hope you enjoyed that. I'm going and save out my works. We'll save out my work, and
I'll see you on the next one. Thanks a lot. Bye bye.
150. Finalizing Foliage Placement in Blender: Welcome back,
everyone to Blend for modeling and Jomino workshop, and this is where we left off. Okay, guys, let's actually come in then, and
let's put this, first of all, on
material view because we'll be able to see
things much, much better. And then what I'm going to
do is just bring this out, and then I'll just put
it into place like so, and you should be able
to see sticks near enough into the ground so can just pull them
down now like so. And what we want to
do with these is, we just want to bring
out some ferns, put them into some
sort of place like so. Make them a little bit smaller dot them
around a little bit. To bring it out a
little bit more. I think I'll put one in here. Like so. I'm going
to pull it back. You do to walk up there. I'm going to make it a
little bit smaller. Like so. I'm going to put a third
over maybe over here. Not like that. Let's
try that again. So we'll just put it over here. Make it a little bit
smaller, double tap the A. There we go. Let's
put one in here. So we'll put one in here. Like, so, put it into
place. Ble tap the A. And there we go. Let's put
a fern around about here. So in here and a fern over
maybe over here as well. Pull that one into place. Double tap the A,
and there we go. Now, let's look at other plants because we haven't looked
to all the plants yet. Let's go to course
Resource pack, and we'll go then to foliage. And we have some of
these plants as well, which you can also put in, so you can see what
these ones look like. These ones should be
fine, by the way. You shouldn't have any problems with the normals on these. They should already be done. So with these, you might
want to put these around. I'm not going to use these ones. I'm going to use my ferns. I think having the ferns
in just is enough for me, anyway, so it's up to you
whether you want to do that. Now, let's bring this back
then to the current file, unassigned, and there
we go there of burns. And now I'm going
to do is endorse going to dot a fern in here. So I'm going to put my
fern in here. Like so. I'm also dot a fern over on
this part here. Like so. I'm going to make it
a little bit smaller. And then what I'm going to
do is put a fern in here, going to make it
much, much smaller. Like so and then I have another one just
to the side of it. Like There we go. And then we'll have one just growing over here
right in there. Just making sure it's not
floating, so bring it down. And then I think I'll want
one more fern around here. So, there we go. Alright. So now what we can do is we
can grab all of these four, and we can press M, and we can drop them in our primitives. But before doing that,
actually, you know what? I will do what I did before. We I press G. Let them
to go over the top, bring them into place. Like so. And then I'll press M and put
them in primitives. Now, I've got a
lot of rocks here, which ones are they already
in, so I'm not sure. I've got one that is called. Let's have a look.
So we've got ferns. We've got stones here. You can see one that's called stones. We definitely want
them to be in there. So what I'm going to do
is, I'm just going to grab all of these stones
that I've put out. Including this one and this one. And I think was the one
there. No, there wasn't. Let's actually have a round. So all of these should
be in there as well. Like so. And a mine actually creates some
more of these stones. First of all, let's
put it in stones, so I'm going to come down
and put them in stones. And then we want our
ferns now all in the same in something like
foliage or something. So if I grab all of these ferns. So if I come in and grab burn clusters should grab
all of those. Like so. And then I can press
M and put them into a new collection
called foliage. Like so. Alright,
so that's that bit. Let's close that up.
And then we need just these plants putting
in some order as well. So I'm just going to
hide this out the way, and I should now be able to
grab all of these plants. So if I grab all
of these, press B, to grab all of these, B, to grab all of these, making
sure I've grabbed them all. And then finally, let's hold
shift and drag like so, shift and drag a
little box around. And we should now. If I press G, be able to move all of those
that way, right click. Now, if f press M and we'll
call it pond on the foliage. So, press okay, and there we go. Now, we've done all that. Let's now go back
to our Muddling. So let's go back to modeling. Let's press Altag to
bring back everything. So I'm just going to press
tag, bring back everything. If it's not coming
back, press tab tag, bring back everything, and
this is what we should have. Now, if I pull this down,
should have all of this. These are hidden because it's the grass flowers
and the leaves. So we shouldn't have
any problem with that. Let's put this one
up, put this one up and put this
one up on foliage. All of these then that
are going to be hidden. I'm going to move
down to the bottom. So I'm just going to put
these down at the bottom. The last kind of tidy
up just to make sure everything is nice and tidy
down to bottom, like so. And you can notice here now that all of these
are ticked off. All of the renders
are also ticked off. Alright, so we finally
made it, guys. We've finally made it to
actually render time. So what I'm going to do now
is I'm going to play you a short video on rendering
in both cycles and EV, and then you'll
actually get the idea of how to actually do that. Now, remember, we're going to be rendering this out in cycles, and that is mainly
because we are using the sky texture within Blender itself to get this beautiful
scene actually done. All right, everyone,
so I'm going to play that now, and I'll
see you on the next one. Thanks a lot. Bye bye.
151. Optimizing Rendering Parameters in Blender: Welcome back everyone
to Benfor Modeling and John chino workshop, and this is where
we left it off. Alright, so now we've
left it off here. Let's actually, first of all, set our camera where we
actually want it to be. So we want to get a bit
of this in if we can. We want to obviously centered. And then what we want to do
is press control shift and just pull it out a
little bit like so. From here, then
what we're going to do is we're gonna press Shift A, and we're going to
bring in a camera. So if I come down,
pick on camera, my camera is over here,
so I'm just going to press control, and zero. And then it will set my camera to where we actually want to. From that, I'm going to zoom in. I'm going to press the
end button to open this panel up over on
the right hand side. Click on the view
camera to view. And now I'm going to do is got a red box going around there. And now we should be
able to press control, shift middle mouse burn,
and then move it out. And that is the fastest way
you can actually get to, you know, set up the camera
and render this image out. So what I'm going to
do, first of all, is I'm going to set it up
to something like that. And then what I'm going
to do is I'm going to turn this camera to view off. And now I just want
to make sure that I'm happy with the actual
overall scene. So, the first thing I
want to do is I want to save out my work,
so save it out. And then what I
want to do is close up this panel with
the end button. And now, what I want
to do is come to my actual grass and
let's turn it on. So let's turn on our grass, like so, double tap the A, and now we've got the view that we're
going to be looking at, and what we want to do now is put this on our rendered view. So, the first thing I'm
looking at is making sure that I'm happy
with the grass. The next thing that I want
to do is make sure that I'm happy with the actual
rotation of my actual sun. So you can see I can still
rotate this round now, and we can still
get the light in where we actually want to
having some dog spots, wherever we want to, like so. Alright, so I'm happy
with how it's looking am. We've got some nice light
being cast down there. I'm happy with how the light is. It looks very, very natural. It looks a beautiful sunny day. We've still got this light
coming through here. What we might want to
do is just, you know, put it up a little
bit, the camera just to get a bit
of a better view. The problem we've
got is on one hand, so I I press the N button,
bring in my camera. Close that I press the N again. On one hand, we want it so that it's up here kind of thing. You know, so you've got a nice
view of it coming up here, but on the other hand, we
want to show our actual lake. So it's really, really up to you which way you
really go with this. So you can see we've got
two types of views here. So what I'm going to do
is just pull it down a little bit, put it into place. And I think that view there is probably going to be the best
view to show it all lot. Alright, so I'm
happy with how that looks. Everything is great. Now, the final thing I want
to do before moving on, is I want to come over
to my render panel. So I'm going to pop this up, coming over to my render panel. And what I'm going to do
is, I'm first of all, going to make sure
it's on cycles. You can see at the moment,
as we sort it out, we've got our GPU one. And then what I want to do is I want to scroll all the way down and I want to come to where it says
color management, and the one I want on
here is going to be this. So you see where this is. We can then make this look more stylized by saturating
all of the colors. So if I come up, click on this and put it on
medium high contrast. You'll see straightaway
what that does. And now all of those colors have come out and they're really kind of pop in out of the
scene. Alright, then. From here, then, we actually now want to create an image of this, so we want to render this out. But what we're going to do now is we're just going to go up, and we're going to make
sure that we've got all of these things on what
we want them to be. Now, once I've actually
done this and set this up, I'm going to show you
the way that I do it and the tools I use. But you can simply click the render button and once
I've actually showed you. One first of all, we're
going to do is turn the maximum samples down
something like 200. So let's put that on 200. And we do want de
noising on the viewport, and we do want it
on the render view. And now we want to do is come down to where our
light paths are, and just make sure
this is set relatively high because this then is the transparency
between the trees. If I put this on there two
or something like this, you'll see how dark
those trees go. I want to set this on relatively high so that there's enough, let's say, shadows in there, so you can see now we've got
a little bit of shadows in there without it being
too overwhelming, but making sure
that we can't quite see through the trees as
though there's nothing there. And enough though, so it's not just blocking
shadows in there, as you can see. All right. The next thing then
we're going to do is come down and
we're going to go to I think we'll
discuss film now. So if you want to transparent background, you
can click this on. We're going to talk about
that in a little bit. But now, though, we're
just going to render it out with the actual seam
background on there, so I'm just going
to close that up. And then what I'm going to
do now is on performance. Now, performance is
actually very important. The thing that we want
to make sure is on is persistent data because
we want to keep this data around to make sure that the next time we
render it is going to be as fast as the first time that we actually rendered it. And the other thing
we want to discuss is that if we're dealing
with the graphics cards, generally, not always, but generally the tile size
needs to be larger. If you're dealing with a CPU, for instance, you want this
tile size much, much smaller. So that is the way that
I always say to do it. So if I'm going to be
rendering out with my GPU, then I'm going to set this
tile size to relatively 2048, and if I'm going to be CPU, I'm going to check this to 256. So it all depends which
one you're actually using. Now, 2048. Let's put it back. Now, the thing is, if
you can use your GPU, of course, you should
be using that, so just bear that in mind. Alright, so now we
also see down on the color management tab that we've also got one
here that says filmic. This was the old version
of Blender before. So if you haven't got this
AGX, you need to use filmic. You can still from
the filmic, though, change it to medium
high contrast. Supposedly, this AGX is much, much better lighting, much
more realistic lighting, so that's what we actually want. Alright. The next thing
then, is we want to come in now and come to what we
actually want to render out. Most people when they
first start lender, they will just click
that render button. Hey, the scene looks beautiful. I'm just going to click
the render button, and there they go. The thing is though, that's
not the best way to work because It's so much more that you can actually do with just clicking
that render button. So what we want to do we want
to come over to our layers. Now, within our layers, now we've got all of these
things we can turn on and off, and these them actually
you'll be able to change each one of these, whichever one you
turn on and off. So what we're going to
do at the moment is we're going to focus
on our emission, and we're also going to
focus on ambient occlusion. These are the two
that we want to turn on because they are the two that I'm going to show
you how to use. But all of these, you
can actually work with and change them
within the composite, because that's what we're
going to do because you can take any, you know, even an am model, and you can make it look really professional with the
actual composite. So I'll show you that now. So first of all,
though, we want to come and we want to
put it on wire frame. And the reason is, before
we render anything out, we always want to put it on wire frame because that then will make sure that there's not so much going on in the viewport. If you don't have
it on wireframe, basically, you're trying to let's say
you have it on render, for instance, you're basically then trying to render something out while you're already rendering it out
in the viewport. Which is going to
make incredibly slow, and sometimes it will just say cute out of memory
and things like this. So we have to be very, very
careful of how we do that. The other thing that I
recommended as well. Let's just put it back
on object mode is actually coming in
to these parts where the grass is and
actually turning them off on the actual real time. So this is viewport rendering. We're still going to have
it on in the render, but we can turn it off
in the actual viewport. So same for this one
as well down here, we can come in, turn it off, and we'll still be
able to render it out. When I come render
now in the viewport, we won't be able
to see the grass, but when we come to render it out now, we will
be able to see it. Finally, then, let's come up. Lick it on wire frame.
Save that our works. I'm going to save out our works, so file, save that our work. I'm also going to press N.
Camera to view turn that off, so I'm not going
to move my camera by mistake because I've
got this nice view here. And then finally, finally, I'm going to hit that
render image button. And now, it's just a question of letting Blender load
all of these things up. Now, the first
time it's going to be much much slower than the second time because
of the fact that blender is going to be
persistent data is around, which means it's going to
remember some of that data. And now we need to do is
wait for it to load up. Once it's load up then, it will clear all of the fire flights. It will use de noising
on there already, and then we can see what
we're going to get. But what I tend to do now is just a really fast render,
like what I've got here. And then what I'll do
is I'll just come in, have a look at what
the scenes look like. Have a look if I'm
happy with everything. And then from there,
I can actually go in now and change the things
I'm not so happy with. So, for instance, like
these rocks here, I feel like they're a little
bit on the dark side, and I don't really like that. I feel like everything else. You can see, it's a little
bit blurry in here. And the reason it's a little
bit blurry, of course, is because we've done a very, very small render on this. What I'm going to do now is
I'm just going to come in, and this is where I come in and fix any problems
that I might have. I'm looking all the
way around my scene, make sure that I'm happy with everything else in the scene, and I'll come in and
just fix these rocks. So let's come in to my rocks. I'm going to come
to shading panel, and then I'm going
to let this load up. And then we're going to come to our rocks and we'll change the actual shade on them just to make them a
little bit lighter, a little bit too
dark, as I said. So let's load everything up. Let's come then to these rocks. So we'll make sure
run our rocks. And then what I'm going to
do is, I'm just looking, I think it's this one here,
but we'll have a look, and we'll make sure to
grab the right one. Let's come to rendered
view. Let it load up. And then from there,
we should be able to come in and actually turn these down to make them nowhere near as bright
as what they are. So you can see, very, very at the moment. Let's
come into this one. Maybe it's this one,
let's bring this down. If it doesn't do anything. Oh, guys, my blender did crash, so you see it happens
to the best of us. So what we'll do
on the next lesson now is, we'll come back. We'll come back to our rocks. I'll re try that again
and I'll show you how I'm going to go in there and change my rocks. All
right, everyone. Hope you enjoyed that.
I'll see on the next one. Thanks a lot. Bye bye.
152. Enhancing Scenes with Compositor for Vibrant Colors: Welcome back everyone to blend the four modeling and
jump chino workshop, and this is where
we left it off. Alright, so what I'm going
to do, first of all, before going over to that, I just want these rocks. So you can see if I come
down, I've got my cameron. I've got my stones.
These ones here. I'm going to pull the
stones down to the bottom, and then all I'm going to
do is hide everything else out of the way all the
way up to my terrain. I should be left
with just my rocks. Go to my shading panel
now, let them load up, and you can see
just how quick they loaded up now, click on my rock. And then what I'm going
to do is file save the way just in case
it crashes again. Then they will come
to render button. Let's click on the render, and now we can see exactly exactly what we can
do with these rocks. So now, I'm just going to pick I want to pick a rock
round here, actually. I can see how dark
it is on here. And what I'm going
to do now is just go out and look to see if I can darken it or bring
that rock down like so. So now you can see I can
bring it down like so. And what I'm looking for
now is the saturation. So you can see now I can also
bring this down slightly, get rid of a little bit
of that blue like soap. Now, everything that is still
ready now to be rendered, So what I can do now is
I can click on this. I can then come up
to file and save. Why that is happening. Basically, is because
of the fact that we are actually saturating it
with the color management. So we're actually bringing
in more color to it, and that's why the rocks are
looking a little bit darker. So now come up and
I go to render. You can see now come up and I go down to
render image. Let's see. First of all, the persistent
data one we're there. And let this load up. And there we go. Now you can see these rocks
are looking much, much nicer, fitting
in the scene. Way better than what
the other ones were. I'm just wondering
whether I want to change the material of
these rocks to this. You might want to do
that. I think they they look a lot more
natural like this. Alright, so our first render. Now we can look at what
else we want to change. Are there anything
else we want to change within any of these? Don't worry about the lights or the lighting or anything
like that right now, and let's now show
you the composite. So I'm going to close that down, and then I'm going to come
over to my composite. And at the moment, we've
got nothing in here. Now, first of all, I
recommend before doing anything with this that we lay all out in the
way that I want it. So all I'm going to do,
I'm going to come up. I'm going to hover over here. I'm going to press the end born just to hide
that out of the way. And then what I'm going to do
is I'm going to come up to the top right hand side here
and drag it over like so. Well, that's going to
do, then it's just going to get rid of that
I already had, and then I'm going to
bring it down like so. And finally, I'm going to
bring it to the left like so. And now, then this is the
actual composite window. If I use nodes now, you will see here
is my actual image. Now, at the moment,
I can't really do anything with this because I
need another box coming out. So what I'm going to do
is I'm going to go to the left hand side,
drag it over. And then on this one, what
I want to do is I want to come to where these
little dropdown hour is, and I want to put
this on image editor, and the image I want on
is going to be render. I'm going to click
down. Render result, and there is my image. Now, I find this
to be the easiest, easiest way to work on my scene and get the look that
I'm actually looking for. Now, from here, you will see on this rendered
layer first of all. We have emission, we have AO, and we have noisy image. We only need the emission
and the AO of course, the image at the moment. What I'm going to do
this is basically the composite of
what's coming out, and this is what we've
actually put into it. So what we can do here is we can let's say to our let's
do the AO first, so we'll come to our AO. Drop that in there, and you will end up with
something like this. So you can see what
blenders done here is, It's actually rendered
a layer for the AO. It's rendered out a
layer for the emission, as you can see here, and it's also rendered out a
layer for the image. Now, we can actually use those
to actually combine over the top of each other to really make this
scene look much, much better than
what it does now. What I'm first of
all going to do is I'm going to come to MAO. Now, the way that I work it is is I'll plug it in
straight into there. And then what I'm going
to do now is fix the AO. Now, you will
notice with the AO. We do have to have a little bit of noise in
there, as you can see. Now, the de noising actually uses a lot of computer power so just be aware of that. So all I'm going to
do is put in D noise. And you can see now I can drop that in there. And
you'll see all of this. We'll get cleaned
up now, so you can see all of that as
being cleaned up. Next of all, I want to be
able to control my AO. Because at the moment,
I don't really have a lot of control over it. What I'm going to do
is, I'm just going to use a color ramp to control it. So if I bring in a color ramp, like so. Drop that in there. And now, you'll notice
it's loading up. You'll notice it loads
up every single time. If I move this over, you'll see now it actually
starts to load up, and there you go, you can see
what difference that makes. Now, to stop that loading up so slowly, what
I'm going to do is, I'm just going to
bypass my Denise for now and drop that
in there like so, and you will see now that
it's much, much faster. Now, with the AO, we
can bring this down because this will be
the darkest shadows. So it can bring this
down to roundabout here. And what I tend
to do with AO is, I will bring in another
one of these pointers. So rest control
and click like so, and this pointer, I
will leave for grace. So you can see now, I've got a little bit more control
over the whole scene like so. So what I'm going to
do is I'm going to bring this one down just
a little bit like so, and then we bring out
those whites a little bit. You can see up here, especially if I pulled
this by, you can see now, I can bring those
whites and make the shine onto the roof
a little bit more. And from there, control the
really deep pots or you know, make them a little bit
lighter and things like that. So now, once you're happy
with your ambient occlusion, so just make sure
you're happy with it. It's time now to plug
it in to our image. Now, we can't just plug our image into the color
amp or anything like that. What we need to do is we
need to use a multiply. So what I'm going to do is
I'm going to come over put in RGB and the one we one is, I think it's this
one, not this one. Let's put in color instead. That might work. So color. And the one we want is
mixed color. This one here. Now, this node allows you
to change it from mix, to multiply to over to under. Basically if you
click on it. You can see all of these
that we've got here. The one we want is multiply because we're going to multiply this ambient occlusion over
the top of our actual image. What I'm going to do now
is I'm going to plug my ambient occlusion
into the bottom of here, and then we're going to
plug my image into the top. And then finally, I'm
going to plug all of these into here like so. Now, you can see
what's happened. We've actually make it much, much, much darker, like so. We can, however, mess around with this sto and start
bringing it back. Okay. Now, again, I
wouldn't worry too much about this right now because we are going to be
playing around with these, and we're also going to
drop in our D noise. And you can see
now it takes much, much longer to load up. But
this is what we've got now. You can see how we've got much, much dark patches at the moment. Now, as I said, don't worry
too much about this right now because we are going to be making this much, much lighter. So let's bring these down now. I'm going to leave that the way it is if I pull
it all the way back, the problem is that
you're not going to have any kind of ambient
occlusion on there. You'll see if I bring this
up now and let it load up, you'll see there's
nothing happening, and that's simply down
to the fact that we haven't got any ability
to control this now. So I'm going to put this
up over here. Like so. Then, what I'm going to do is I'm going to save my work out, and then I'm going to pull
this back to maybe 0.283. And from there, I can actually work with this a
little bit more. Alright, so now I
want to do is I want to basically show you
what you can actually do now. So with the node wrangler, just make sure
you've got that set. You can see then we've
got a node wrangler here. And what I can do is I
can grab both of these, like so, and come
and frame selected. From there, then
what I can do is I can go to the node now. I can actually give it a color, so I can give it a nice color. So let's give it a red color, and I can also name it. So if I come here, I can
simply call this AO, press the enter born, and
there it is AO under there. As well as that, I can
also come down and change the size of this to
be something like this. I don't actually know
what this shrink is, but anyway, there's
the name of it. And now I can come in and
actually move this around. I recommend doing
this, and then you'll have a beautiful setup
for all of your, you know, creations and
projects that you want to make. Now, I want to now come in
and deal with my emission. So let's deal with
the emision next. So what I'm going to do
is I'm going to plug the emission straight
into here, like so. And then what I'm going
to do is, first of all, I'll bring in a RGB curve. So let's press Shift A. Search RGB curves. Let's bring that one in.
Drop this in there like so. Now, from here, what I
should be able to do is, I should be able
to change what's actually glowing in
these parts like so. Now, you can see
that on the rocks, we've actually got some
glowing parts on them. And we're going to go in
and fix those in a minute. But for now, let's just focus
on these lights like so. So you can see all of these beautiful lights
that we want in here. Alright, from here, then, I'm going to turn it
down just like so. And now we're going to
bring in is a glare. So shift let's bring
in a glare, like so. Let's drop that in there, and you will see that
nothing happens. And that's because we need
to set this to fog blow. Set this to fog blow. And then what we're going
to do now is we're going to turn this up to high. So let's put that on high. Let's put the threshold
on 0.2, like so. Let's put this one then on zero. And let's then turn this
down to nine, like so. And now we can see
that we're getting a slight slight glow
around all of these. Now, the next thing I want
to do is duplicate this. So, we want to duplicate this, so shifty, duplicate it
over, drop it in place, and then you'll see that
we get a little bit more glow now off of
these and a really, really nice shine from those. Now, on the next lesson, we're going to fiddle around
with this a little bit more. I'm going to show
you how you can actually have good
control over it. And then we're
going to move on to actually adding in
a few more nodes, and I'll show you
how we can pull them all together and make
this scene really, really come to life. All right, everyone, so I
hope you enjoyed that one, and I'll see on the next one. Thanks a lot. Bye bye.
153. Applying Color Grading Techniques in Blender: Welcome everyone to
Blender por Modeling and Jin workshop, and this is where we left off. All right. So how do we control
the emission with this? So if we turn this up
all the way up here, as you can see, Once
we turn that up, everything now pops
alive and glow. So how much glow do you want? The other thing I recommend
is you put it on film like. I feel like that's always
a little bit bare. It really brings out the colors that you've
already got in there. For instance, now you can see these are the colors
that we've actually got. I also think that this is way way too bright
at the moment. So all I'm going to do
is just turn it down a little bit and just get it
to something that I want. You can see these are much brighter than these
at the moment. Now, from there,
what I'm going to do is before actually
saying these up. I'm going to move this
up here, like so. And now I want to
do is I want to join all of these together. The easiest way to join these together is to this
time, add them. So add them over the top. So let's go Shift D. And what we're going to do is we're going to In
fact, you know what. We'll just duplicate this. So Shift D, let's
bring this down. Like let's set it
something like 0.6. And then what I'm going to do is I'm going to join this one. First of all, into
the top because we're joining the AO and the actual emission now into our altogether basically
and then into the end. So let's drop this
in here, like so. Let's put this on add then. So we're going to add like so, and finally then, let's drop
them together into place. Let it load up. It's got a
lot of thinking about to do. There we go, now you can see
what that's looking like. Really, really starting
to come to life now. These are really,
really popping out and everything is
looking really nice. Now, from here, you
can control again, how much emission you're going to have popping
out of there. So you can see now once I've turned that down, it loads up. You can see now
that's what we get. I do want a little bit of
light coming from these, just not as much as these
lights that we've got here. So if I bring this
up very slightly, we'll have a little bit of
light popping out of there, let it load up. And there we go. And a thing that
looks about right. So you could turn it all the way up and have it just
blaring light out, but I don't think I want that. So if you turn it
all the way up, you'll see you get
something like that. Now, of course, we can see we have another problem
with the rocks. And as I said, we're going to
fix those in just 1 minute. I'm just going to drop
that back to there. Let it all come back
and you can see how those rocks look
absolutely fine. I'm not sure whether I'll fix those rocks, actually.
I think we will. I think we will be the
best to actually fix them. From here, then what I want to do is I want to
grab all of these, and I'm going to pull them
down to here, like so. And then what I'm going
to do is node wrangler. We're going to go
to frame selected. We're going to go back to node. And then what we're
going to do is first of all change the color. So we'll put the color as
a yellow or something. And then we'll do
is I'll name it, and we'll call it emission. Like so, not emission. I'll call it emission. So emission. So, we'll get
there. So emission. Let's minus star.
Emission. There we go. Okay, mission there we go, and let's actually change
the where's the size? Let's change the
size up, like so. And then let's just grab this and move them all
over there, like so. All right. So moving on now. Now we want to do is we want
to sharpen the image up, and then we can come back and sort out the lighting
and everything like that because we're
going to actually do that within the next few notes. So first of all, let's
bring in a box sharpen. So shift D, you want
to go down to filter. And then the filter, you'll
see at the moment is on soft. We don't actually
want it on soft. What we want it on is
to be box shopping. And we only want
to do this very, very slightly because
you'll see at the moment, once this loads up,
what's going to happen, it's going to sharpen
everything up like so, and we don't want it that much. All we want it on is
something like 0.1. Just a slight bit to
sharpen everything up. And there we go, now you can see everything's
been sharpened up, and it actually
looks much nicer. From there, then we
want an RGB curve. So let's do a search RGB curves, and we're going to
drop that in there. And the reason we're
dropping that in there again is because this is going to lighten or
darken our whole scene. At the moment, we've not actually done
anything with this. If I pull this all
the way up to there, you will see the
effect that happens. It's going to lighten
up the whole scene, and there we go. This is why it's important that we've put it right at the end up here because this is going to be kind of the major control, that's going to, you know, brighten or darken
everything up. Again, we have got one
that says filming, so you can turn that on and see the difference between them. And then what we can do
now is bring this down. So we only want to bring
it down a little bit. Let it load up. And there we go. Now, we're getting
somewhere. We've got some nice lighting in
these dark patches. I might turn it up as
a little bit, like so. Let's have a look
what that looks like. And now we can see that it's
all stars come together, and we can also see we've still got this
ambient occlusion in. I think at the moment this now is looking a little
bit too bright, so all I'm going to
do is just pull it back as a tiny bit, like so. And once that loads up, then, I'm now just going to
play with it on standard, have a look what
that looks like. Between standard and
filmic, and you know what? I can't really see
any difference, so I'll just leave it
on that one. All right. So now we want and the
saturation in here, so I might as well show you
how to do that as well. So what we're going to
do is just press shift a search and saturation, and this then can you know, kind of saturate it or desaturate it depending
on what you want. So on this one, you can see if I bring
this all this way, you'll see when it
loads up what happens. And the other you can
see it just takes away all of the color
out of the scene. So we don't want to
do that, of course, but what we might want to do is put it on something like 1.5, like so, and you'll see
when that loads up. We'll give it a little
bit more color like so. I think this is a little
bit high at the moment. So let's put the
value up to 1.2. Let's see what that looks
like when that's loaded up. And there we go. All right. Now, that is
looking pretty nice. I think this is still set
a little bit too high. So 1.3. Let that finish
loading up, and there we go. Now, the next one is
brightness and contrast. Now, you really want to be very careful when
you're using this. The RGB curves does the
majority of the job, but with the brightness
and contrast, it can add a little bit to it. So shift D, let's bring in
brightness and contrast. L so, drop that in. And then what I'm
going to do now is put this up to not 0.1. So if I let that load up, put it up to 0.1. And then what we'll do is drop the other one down to -0.1. So -0.1. Let that load up. And the reason why I don't
want to mess around with these too much is because
if I bring this up, you will see the
higher bring it up, it will make a huge difference, but it kind of puts like a gray tone on top of it.
That's not what we want. So we have to be very careful
with bringing this up. If we bring up the
contrast, you'll see. We'll let this load up now. And there we go, you can see
what the contrast is doing. So we have to be very careful what we're
doing with these. So let's put the
contrast, first of all, the 0.5. Like so. And then what we'll
do is we'll put this brightness down to 0.1. And we're just going
to play around now with the darkness and contrast. So 0.1, there we go. Let's put it up maybe one more. Let's try one more,
and we're going to get a little bit
more haze on there. Like so. Let's put it on 0.5. And here we go now, you can see, we've got a bit
of haze on there. We've got some beautiful
contrast on there. And I would say,
let's try this -0.5. Let's try that. And
think that's about it. I think that's actually
going to look nicer. Alright, so I'm happy
with all of that. Everything is looking
very, very nice now. And then what we can do
is now. We can come in. And one of the main ones that you can use is color balance. And color balance is really, really going to
give you a feel of the overall scene of
how it's going to look. Now, I recommend it before
using the color balance, what you want to do is
grab your just your image. So I'm going to grab my image, and I'm going to plug this
straight into my outputs. I'm going to plug that in.
That is what we had before. And now, if I press control, this is what we have
now when it loads up. And there's a
difference. So you can see what a difference
that makes. Control shifting d
then just to go back. And then what I'm
going to do now is bring in color balance. So search color balance. And let's go down color balance. Drop that in, and there we
go. Now, what does this do? This basically gives you the So if you've ever
played something like World War craft and you So if you've ever played something
like World War craft, and you remember
Rp of Litch king. All of that was blues. It was all cold,
and that's how they made it and that's how
they did it with you know, color balance and
messing around with the tone of scenes and of
zones and things like that. And this is used
throughout gaming. So all different zones will have a different color
gradient on them. So let me show you what I mean. So if you want this kind of a really kind of
cold atmosphere, if you set this to a blue, you can already see the difference that we're
actually getting there. So it's a nice,
much cooler look. If you're on it a
lot, warmer look, you can turn it up a little bit. Now, of course, this needs
doing very, very slightly. You've got to be very careful
when you're doing this. Do not recommend messing
around with these or here. Don't mess around with
those. Just use this here. So if I bring this
down, you can see, I can start to get a nice
green atmosphere going on. And then if I mess
around with this one, you can see as I bring it down. It starts to be a lot of warmer, for instance, like so. And then if I come and I mess
around with this final one, this is kind of the overall one. So if you want it cool, you
can have it a bit cool, or you can have it a little
bit on the red side. Now what I tend to do is I'll come over to this. I'll
just put this back. I'll mess around with this one a little bit, bring it out. Those red hues and I
want to bring this one. Play around with them
a little bit till you get in that look that you're
actually looking for. So we want a little
bit of heat on there. So it's very, very subtle, but you can see again,
how nice this is looking. Now, the best thing is now, we can come and
plug everything in. So we can come and
plug all of these in like so plug them all in, wait for it to load up, and let's see what this
final image is looking like. And there you go.
You can see what that final image
is looking like. Now, the thing is, I'm happy with you know
how bright this is. It's looking a bit too bright. So what I'm going to do, I'm just going to tone it
back a little bit now. There we go and
let that load up. And now it's looking about right for what I'm
actually looking for. We've also, well, remember, got the brightness, so we can turn up this brightness
a little bit. Let's turn it up
0.2. There we go. All right. I think I'm really
happy with how that looks. Okay, so now what
do we want to do? Well, first of all, we
want to fix the issue with the emission on
the actual rocks. All right, guys. So now we're going to save out our works. I'm going to go to file. I'm
going to save out our work. And on the next lesson, I'm going to be
showing you how you can turn up to get
a better render, what actual things I use
when I come to render, which makes things
really, really easy. And I'll also have a look just to make sure I'm happy
with everything because this tree might be blocking a lot of this going into here, as you can see, or
remind the really nice. We just might need a
better render on that. All right, everyone, so I'll speak to you on the
next one. Thanks a lot. Bye bye.
154. Final Compositor Tweaks and Background Adjustments: Welcome back, everyone
to Blender for modeling and Jumpt workshop. So let's now go
back to modeling. And at the moment, we've got all of these on, as you can see. Now, I don't really want to mess around with
anything like that. So what I want to do is just come over to the
right hand side. And to turn up your render now, what you want to
do is you want to turn up the maximum
amount of samples. So let's put this
on 1,000, like so. And then what we're
going to do is we're going to go over to our render. We're going to render image. And now we'll see that it's
going to take much longer. It's initialized much
faster as you can see, and now it'll start loading up. Just let it start load, no, it's going to take a little
bit longer because the amount of samples that we've
actually selected is much, much higher. All
right. So there we go. Now, you can see that here now, it actually needs to
get to a certain amount of samples before it'll
start speeding up. So once it gets there, it'll
then start denoising it. And it will be relatively quick. It will take much longer. So, it would have
finished before now on those 200 samples
that we have. But this now is bringing out a lot more of the detail
because what it's doing is it's basically giving your GPU time to render
out more of these points. So more of these points
are actually get rendered, which means it's adding
more details in. So that's why we're doing increasing samples because we're getting a much,
much cleaner image. Now, after this is done,
you'll see what happens. It'll basically come
then to our compositor, and the compositor will do all of the work for us that
we already set up, and then we'll have
a beautiful image. Now, the other thing is,
once I've done this, I'm going to show you
the tool that I use, which is called something
called turbo tools, and I'll be using that
then from now on. So I'll show you how it
works. It's a paid add on. It's up to you whether you want to, you know, buy it or not. We're not selling it
or anything like that. I'm just recommending
it as an actual add on. Alright, so this is
all looking nice now. You can see that's what
it's turned out like, looking really,
really beautiful, really, you know, colorful. The lighting really comes out, and I'm really, really
happy with the scene. But let's now close that down. You can see also the composite and did all that
work and everything. Let's close it down now, and let's come over to
our edit preferences. What I'm going to do is
turn on turbo tools. And then what I'm
going to do is close that down. I'm going
to enable this. And all I want to do
basically is just make sure that it's on all of these settings
that are already on. So you can see all of these
settings are already on. Now, from here, all I need
to do is go to render, and you'll see I can use turbo
tools just to render now, you'll see there's
no cash available. So I just need to set
my cash at the moment. So if I open this bond
here, you can see, please specify, and then just set wherever you
want the cash to be. So let's s come down, and what we'll do
is we'll put it in here with the
rest of our things, and we'll make a new one. I always make a new
one called cash. So cash. Like, so I
spelled that wrong. But anyway, it doesn't
matter. Let's click X seven. We don't need to
name it or anything. And then all you're
going to do is render and remember turbo tools, and you'll just see how
fast this actually is. So you can see now it's
done and now a composite. And this is why I use this, especially on, you know, very, very complex scenes. I really, really
find this useful to use to actually render
things out really fast. The other thing is now,
how do you actually turn this up to make
it a better render? So I've already showed you on the original blender render. How to make this better. And now I'm just going to show you if you want to turn this up, you can put this on high, and you can put this on
something like very high. Turn off dirty, and then just click any of these on that you're actually
looking for. So weld environment, don't
need anything like that. We're just going to
leave the rest like it. Now, let's come over, go to
render render turbo tools. You can see it loads up, and you can see how it's got a lot more samples to
actually get through, but you can see how quickly
it's going through those. And now you can see it's
basically done in a minute. Let render out, and there we go. There is our actual
scene looking beautiful. Alright. So now, what
we do at this stage is, I'm going to show you how to actually bring
in a background, and I'm also going to fix any
problems that I might have. So the first one is, I want
to just look at this water. Let's come into the water then. So all I'm going to do
is put on where is it? Let's see if I've got
one that says water. So we should have one on here. Let's pull this
down a little bit. There we are. Water.
Let's put this on let's zoom into this
press a little dar born. Let's put it onto onto our
rendered view. Let it load up. I should have
actually saved it out before doing that because
you should always always save about your work
before hitting that rendering viewport born because of the fact that we've got
so much in the scene now. So you can see here, this is looking pretty flat
at the moment, and I'm not really
so happy with that. So what I'm going to do is,
I'm just going to go over to my shading panel.
Let that load up. I'm going to save out my
work before doing anything. And then what I'm
going to do is just see and see this on material. Don't think we'll be
able to see that. Let's look at this shader then. Now, when you're looking
at any kind of shader, it's always best first. We actually have a look at
what you're looking at. So try and work out like, what is this? I'm
actually looking at. How does everything go together? And we can basically see
here that if we go in, the basics of this
is that it's made of a couple of noise textures,
as you can see here. So that tells me
that if I want to make this look a
little bit more ripply that the best way to do it is probably to turn up the
strength of the wave texture. So if I come in and
turn this up slightly, you can see now we're getting
a bit more waves on there, looking a little
bit more realistic. Then what I'll do is I'll go
over to the right hand side, and I'm just going to pull this one down
where it's a McShad. You can see now I
can really bring that out or really
bring it back. I'm just going to bring
it out a little bit, let it load up. You know what? I think that looks
much, much better now. Alright, I'm happy with that. So now what I'll do is, I'll
come back to my modeling. And the next thing I'm
going to show you is, how do you actually get
background in here? So what we're going to
do, first of all, is, we're going to come
down all the way down, and we've got one
that says film. So if you come down, should
have one that says film here. And all I'm going to do then is just click on transparent. And what that's going to do
is it's actually going to remove the actual sky
texture background, and then I'm going to bring in another texture to show you
how to set a background up. And that then leads
on to how you can actually layer different
parts onto your scene. Alright, so let's now come up, put this onto wire frame. Let's go to render, and we're
going to render it out. Let it load up, and
you can see now straightaway that this now
has a transparent background. You can see on my lake it
doesn't look so smooth anymore. You can see it's got a little
bit of ripple effects on there and let this load
up and there you go. You can see that's
what I'm talking about with the ripple on
the actual waves. It looks much much better,
much more realistic. And now what we can do
is we can close that down and we can come
over to our composite. And what we're
going to do now is we're going to bring
in a background. So first of all, I don't
want to alter any of this, so I want to keep
all of this color. So I must make
sure that whatever I bring in I'm bringing
it right to the front. Now, if you open up the file
that came with this course, you will see in there is a composite background.
Bring that in. So all you want to do is
just put this to the side, drag and drop that
into there, like so. Next of all, what
you're going to do is you're going
to click on it, and you'll see it actually
appears like this. And then what you
want to do now is you want to bring an alpha over in. So if I press shift, let's bring in a alpha
over Alpha over, like so. And then what I want to
do now is I want to drop this image into the
top of my alpha over, drop this one into the
bottom of my alpha over, and then finally drop
this one into here, and let's see what happens. So there should be
something appearing behind this now, like so. And that is how you
bring in a layer. So you're bringing in layers. You can also bring layers
to the front to the back, and you can keep on layering. So what I'm going to do now is, I'm just going to
actually come in. And first of all, I'll show
you you can bring in a gamma. So gamma like so, bring that in and
drop it into there. And now, what that enables you to do is play
around with this. So what I can do is
now 1.5, for instance, on Megama and you'll see it will make a difference to
my background when it actually loads up like
so I can also put this on something like 0.8 and
turn it down a little bit. And finally, once
that's loaded up, I can also come in and
bring in a RGB curves. Basically, I can bring
in anything along here and actually change this
background quite easily. So I can come in
now and bring that up and make it much much
prior than where it was, for instance, to let it
load up. There you go. Now, it's much much brighter, and you can see what effect
we actually get here. So that is the basis of arm. Well, there we go, everyone. That is how we created
the Wizards Tower. I really, really hope that you learned a lot from
this actual course. We've pretty much gone
through everything that Blender has to offer as far
as the modeling side goes. And if you really
like this course, then please leave as a
review. All everyone. Until next time, happy
modeling. Cheers. Bye bye.
 3D Tudor, The 3D Tutor