Transcripts
1. Intro: Why this class?: Five him murmur, welcome
to my Blender 4.0 class. For two D artists and animators. We will get familiar
with the software and use green pencil
blenders drawing and two D animation tool to create the school
animated piece of art. There are several reasons
to learn blender. It's free, it's open source, it's powerful, flexible, and has a great
helpful community. You can use blender to do two D or three D art or a mix of both. And you can even do compositing and video editing
inside Blender. I started using Blender
a few years ago for personal animated projects and found myself studying
green pencil deeply. And even came up with my own unique ways to do things to give back
to the community. I started making tutorial
and tips videos on my Youtube channel and
eventually full fledged courses. This class is for new bees
who never use blender. Or users who have some
experience with green pencil and want to learn a few tips and tricks that I spent
months figuring out. We will start by downloading
and setting up Blender, learn basic navigation, then start working
on our animation. To get comfortable with
drawing, coloring, editing, animating, and more. We finish by adding sound and render our animation as a video. The course comes with
a comprehensive list of free resources that you can download to gain
deeper knowledge about most of the points
covered in this class. All you need to attend your
computer and Internet, A graphic tablet is a bonus. So I, myself will only
be using the mouse. So let's start.
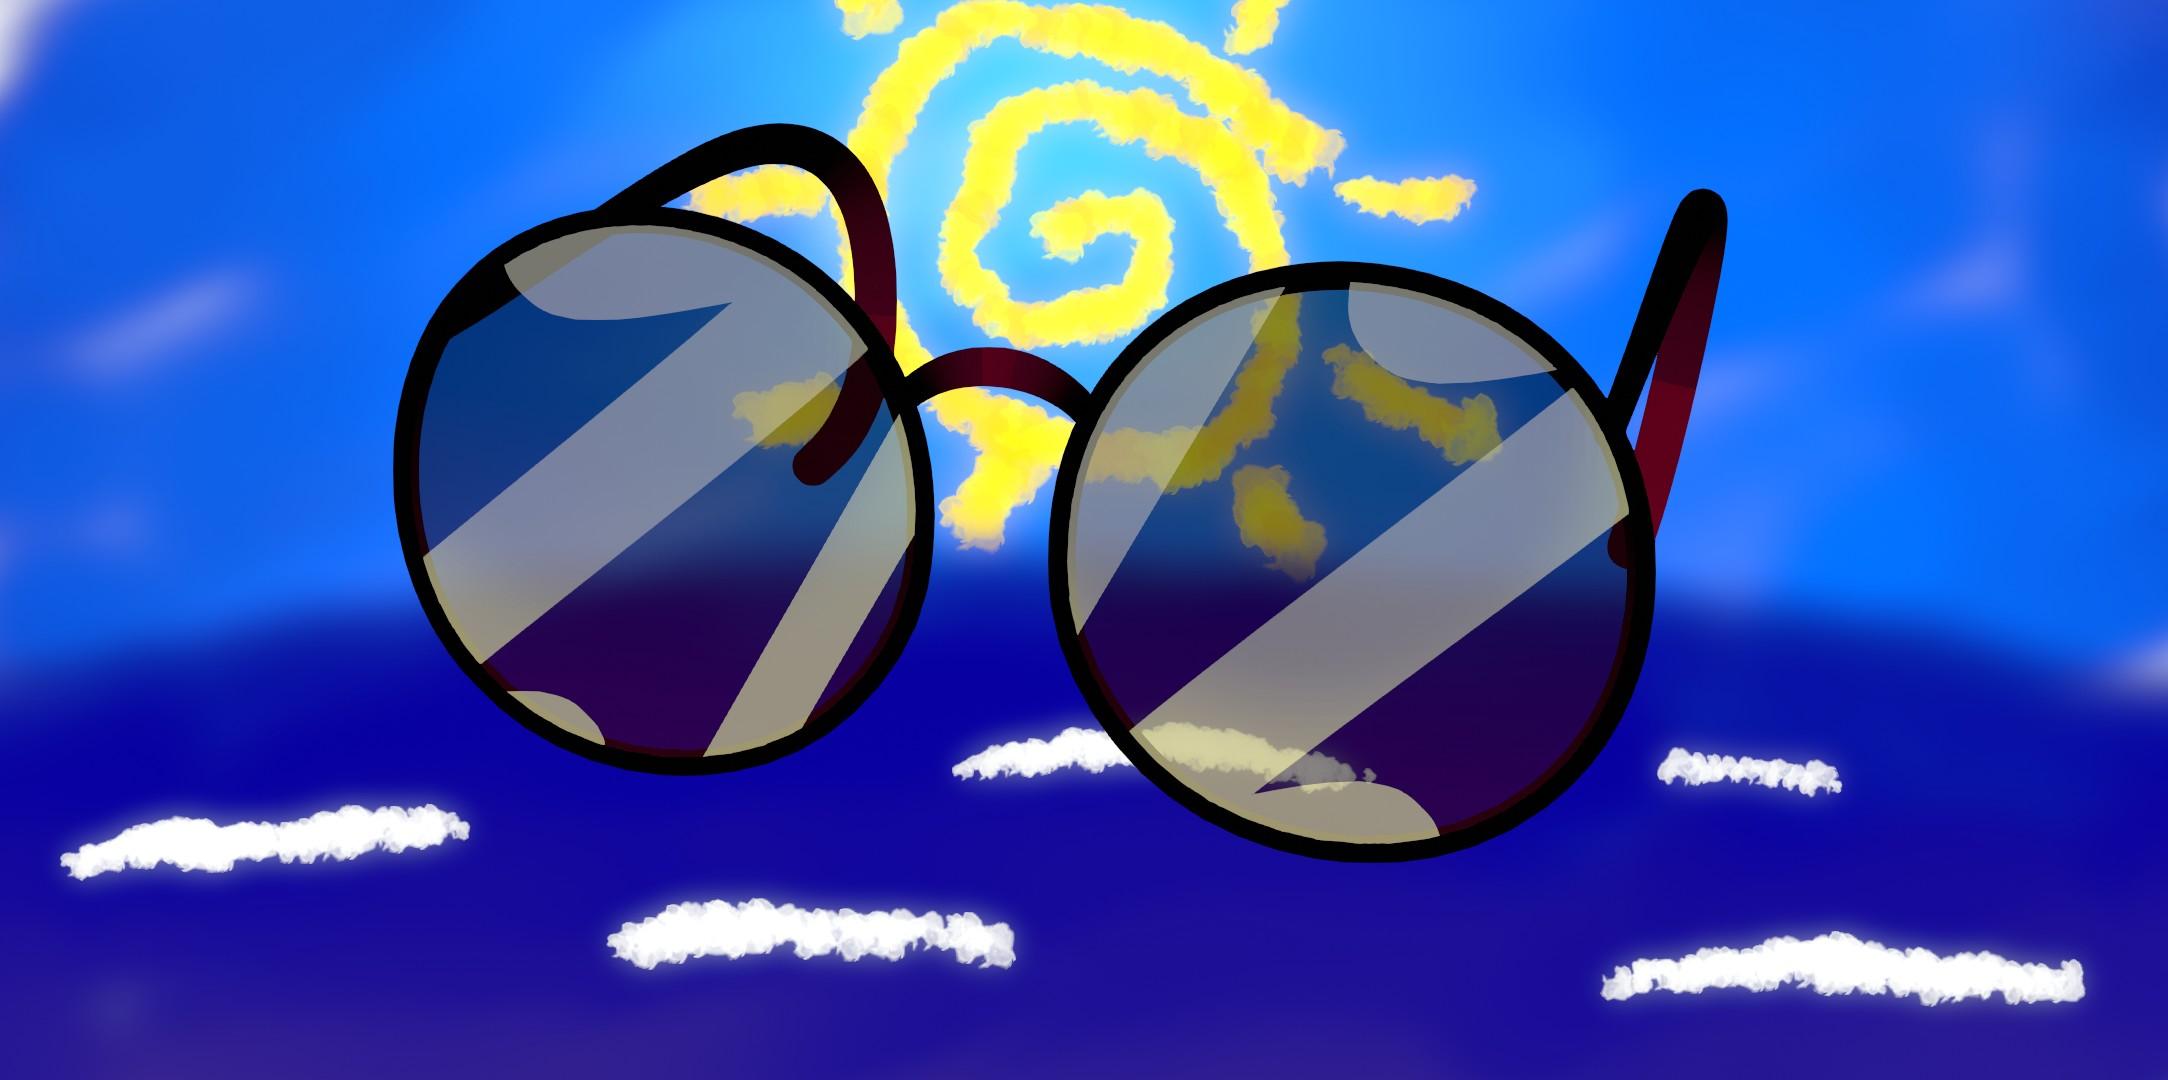
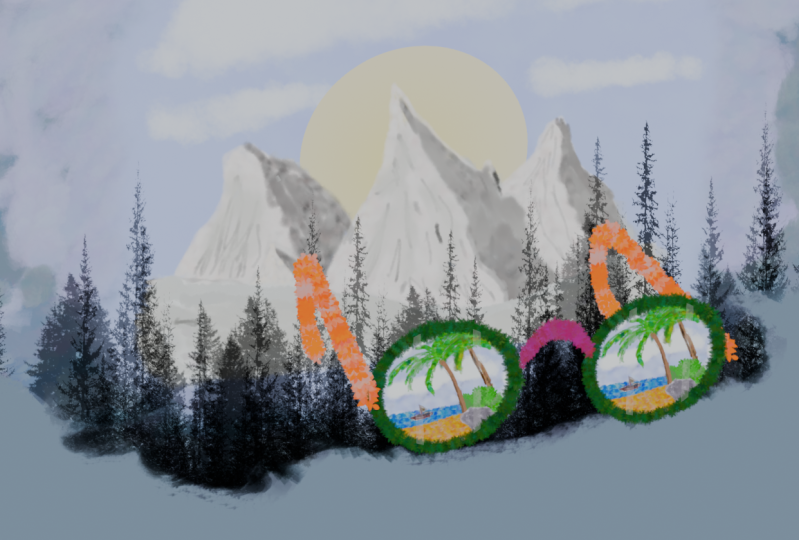
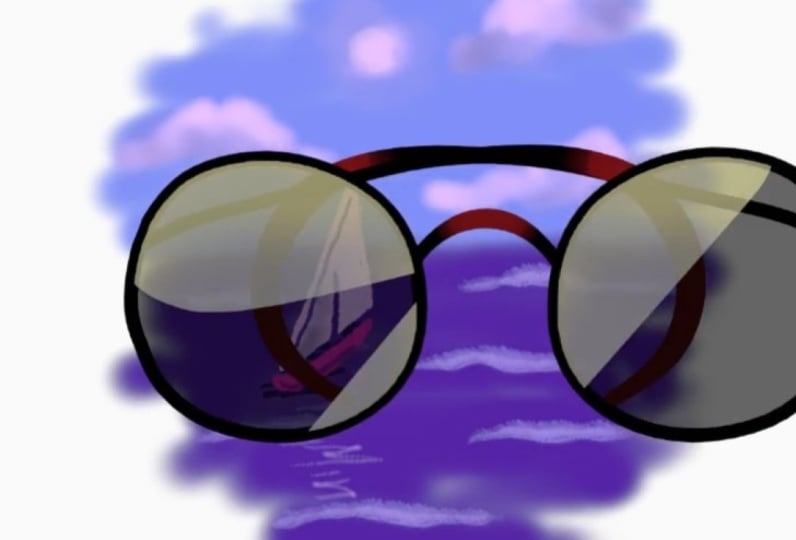
2. Project & resources: We will draw a pair
of glasses and a colorful background
using 2.5 D techniques. Meaning that we
will mix two D and three D. We will add animation, some visual effects, sounds, then render everything
as a video. Crafting this piece of
digital art will help us get comfortable with the
whole creative process inside Blunder Navigation. Drawing, coloring, a few
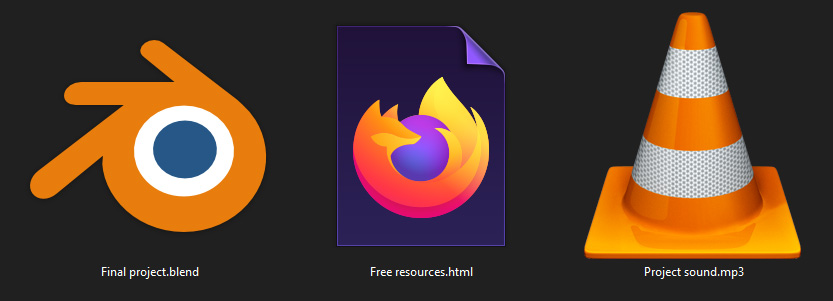
ways to do animation, adding effects and sounds, and exporting our work. Project resources are
available for download. Find them in the Projects and Resources tab as a zip file. This file contains your
final project file and the sample sound effect. This class introduces various
aspects of the software, but covering everything in depth will take a
very long time. That's why the downloadable
zip file also includes an HTML file with links to free in depth information
in various topics. If you are stuck in any part, reach out so we can solve
the problem together.
3. Download & install Blender: Download Blender.
You need to go to Blender.org Here we are. And you get this button here. Download. You click on it. We can directly download
it from this button. Since I'm using Windows, I can click on the
Windows download, or it can go here and
you get more options. We have some options
for Windows for Macos, and four Linux for Windows. We can either download
an installer, which is the most common
option for most software. We can download the
portable version, which comes as a zip file, and we can also download Blunder from the
Microsoft store. I personally prefer to download the zip file or
the portable version. Once the download is complete, you can open your
zip file on Windows, you just double click on it and then you
double click again on this folder and you can
select all these files, do control C or right
click and do copy. Then what I do is I create
a folder in my local disk, the C disc, that I name blender. And here I have
multiple versions of blender because
sometimes I want to test files on older versions
of blender and also have the newest versions,
the unstable versions. I like to test new
features and I like to find and report
bugs to developers. That is a very simple
yet effective way to be an active participant
in Blenders development. So I create a
folder like this in my blunder folder named
4.0 and if I open it, I get all the files here. Yours, of course, will be empty, and you pass here the files that we copied from our zip file. If you want to update
your installation, you will have to first
delete all these files, so we select them all. Shift Delete. Are you sure you
want to permanently delete these 20 items? Yes. And once you
delete everything, you can right click and do
past here in Windows 11, I click on this icon and I
can copy all the new files. Now we can double
click on this file here and open your Blender. And this is the
first thing that we get when we open it
for the first time. If you have an older version and you want to import your
sittings and add ons, et cetera, you can
click on this button. If not, you can
go ahead here and click Save New Settings.
Now we have this. We can open a new
file, a general file, two D animation, sculpting
V effect video editing. And we want to open the
two D animation template, so we click on it. Or we can go here to file new and open it from
here to D animation, and this is our two D canvas.
4. Customize & save settings: This is our two D drawing canvas and we are here in camera view. You see here that we have
a grease pencil object and we have a camera. We can't see the camera
frame because we are a little bit zoomed
in to zoom out. You can use your mouse
wheel like this, or you can use this button here. Now we can see the camera frame. Let's use this hand button
here to pan a little bit. Now we can change
some settings and we can save those settings
for later use. Let's go first under the
edit menu for references, under this tab here interface. And the first thing I
want to do is to change the resolution scale
from one to maybe 1.3 or 1.36 Enter Now I
have bigger text so that I can see it
comfortably and you can see it comfortably
watching my tutorials. Then I want to go under system and under
memory and limits, I have the undo steps
number set to 32. That is if you work on Blender, if you draw some stroke, if you do some operations
and want to undo them, the maximum number of undo
steps with control Z, as known in most
softwares, is 32. But this number is not enough
and we can increase it. Let's try to make it to 1,000 Enter and we see that we
have a maximum of 256. I think maybe 100
will be enough. And I'm not sure if this will have a big impact on our memory. So depending on your
machine and if you see that it's taking up
a lot of memory, you can decrease this number. These settings
that we can change here will be saved automatically
when blender closes. So if you hit these
three lines here, you see this checkbox here,
Auto Save Preferences. This will save preferences automatically when
blender closes. But if you don't want this, maybe you will do some
changes and you don't want them to
accidentally be saved. You may want to
disable this checkbox. And now you can save your
preferences manually. So I can hit this
button and I can save the new
preferences right away. Let's get out of here. Then we can also
change and customize settings in our two D
animation template. Something I like to
have always is here. And their object properties
and their visibility. I like always to disable
use lights here. Let's increase the
size of the panel. I like to disable it
because use lights, will my grespencil
drawings react to light, which make my
colors in accurate? And if I pick colors, I won't pick the right colors. So most of the time I keep
the setting disabled. During this class, we will
make a lot of changes. If you like any of those changes you can apply them
yourself to your to the animation template and
then go here file defaults, you see here to the animation. And you do save start up file, you get this confirmation
window, okay? And you click again,
save start up file.
5. Alternative input methods: The Nam pad, that is the numbers block on the right
side of the keyboard, the middle mouse button and the mouse wheel are needed heavily in blender
or navigation. But some people use laptops
with no mouse or Nam pad. Some people use
graphic tablets and in that case they are not
using their mouse. And sometimes the middle
mouth button just breaks. And before buying a replacement, you will need a workaround to still be able to use Blender. The middle most button is used. For example, if you press it to navigate the three D space. If you had shifted and press
the middle mouth button, you can pan like this. The Nam pad is used to get in and out of
camera view using zero. To get in front
view using one, you can instead use these
buttons here on the side. If you left click and move your mouse on
this magnifying glass, you can zoom in and out and you can navigate
to the side view. If you left click on the X here, you can go to the opposite
side if you click again on X. And you can also left click and drag to move like this
in three D space. Let's go back to camera view then. We have some
settings under here. Do replace also the middle
mouse button and the numpad. If you go to input here, you can enable this checkbox to emulate three button mouths. And the description says emulate middle mouth with
Alt plus left mouse. You can also emulate the
numpad main one to zero keys act as the numpad ones useful for laptops if
you emulate the numpad. Now the numbers on the
top of the keyboard can be used to
replace the Numpad. Let's go out, and if I
hold Alt left click, I will be able to
navigate the ready space. Let's press zero,
Not the Nm pad one, but the upper one to
go to camera view. And yes, it works. Now if I do shift alt
left most button, I can pan like this
without changing view. The dot key on the Nm
Pd is also important. So let's see some replacement. Let's draw a circle. Let's change the
brush to this one. Maybe draw a circle. Do Enter or middle most button. Then go to Dm tab and we can select the
circle and do the dot. We can also focus on
just some of the points. Again, dot as a replacement, you either use the tilda key on the top left of the keyboard
and we get the Spin menu. We hover over view selected
and we release the tilda key. But not all the keyboards
have the tilda key. Another way is to
go to the view menu here and select this
one, Frame selected. And yes, we can also
add frame selected to quick favorites by
right clicking on it and doing Add to
Quick favorites. We can access quick favorites
by doing on the keyboard. And we have this menu. We just click on frame selected. Now what about emulating the mouse wheel
that is used here, for example to zoom in and out? Or if we go to Edit mode tab and we try
proportional editing, let's change the select
mode here to here. We have this influence
area that is used in proportional editing and that is also controlled with
the mouse wheel. For zoom, you can use the plus and minus
buttons on the numpad, or if you have emulated numpad, you can use the plus and minus on the top of the
keyboard To for proportional editing
to you can use the page up and page
down on the keyboard.
6. Viewport navigation: The simplest way to
navigate the viewport here is by using the
middle most button, the mouse wheel, and the numpad with the alternatives
that we saw earlier. If you want to pen
in camera view, you do shift middle mouse
button and you pen like this. If you want to go
out of camera view, you do a middle most
click and drag. You can zoom in and out with the mouse wheel or
by doing control, middle mouse button
and drug like this. And you can get back to
camera view by doing zero on the Nam pad,
back again, zero. You can go to front
view by doing one and to the opposite side
by doing control one. You can go to side
view by doing three. Let's zoom out with the most
sphere to see the camera. You can go to the
opposite side by doing control three, top side seven. Zoom out more to see the
camera again as our guide. And then control seven
to the opposite side. We saw how we can use
the gizmo to navigates the view part two and to go
to any side front view y, the opposite side
by Ken on y again. And you see the minus sine here, X two side view, opposite side, z to top view, and z again to the
opposite side. If you have the tilda
key on your keyboard. You can also use the
spine menu here to go to any side to camera view or also to view selected
as we saw earlier. Let's go back to
camera view zero, and now we have these
shaden modes here. The ones I use most
with green pencil are this Material Preview mode and this one Render
Preview mode. You can also access
them by doing Z. On the keyboard, you get the
Spy menu and you can switch between solid rendered wire
frame or Material Preview. In Material Preview,
I like to go under this arrow and
disable scene world so that I see a darker color and not the white background that
will be shown in my render. If I go back to render
view Z rendered, you see that I have again,
my white background. This is an easy way to switch between two different
backgrounds if you have objects or drawings
that are hard to see in white background
and vice versa. You can also change the actual background that will be rendered by going here under world
and changing the color. Let's do escape to
undo this change. And we also have overlays. The overlays are helpers or maybe objects that will
be shown in the viewport, but that won't be rendered. If you disable this button, you won't see any of those grades or the
camera or anything. Only the strokes or drawing or animations that
will be rendered. Let's go to camera view
and draw something. I want to change to a brush
that is more visible. Let's increase the
radius, maybe 500. And just now overlays are disabled and we
can only see our word. Let's enable them again. And here you can disable or
enable individual helpers. For example, we can enable the three decursor or enable the display of
the three decursor. We will see later how
this can be useful. We can also display
the three D axis, the green one, that
is the y axis, the axis that goes from
front to back, the red one, the X axis from left to right, and the Z axis that
goes top to bottom. Let's go back to
material purview. And you see it's even
easier on the eye when there isn't all that
white on the screen. Under this button here, there are some overlays that are specific to green
spencil like onion skinning like the
canvas which will show us the plane on
which we are drawing. These overlays specific to
green spencil will also be controlled by enabling and disabling
overlays from this. When you are drawing,
you will switch a lot between en abline
and Sabin overlays. That's why it's best to have a shortcut for it to
create a short cut. Right click on this button, Go to a sine shortcut
type in your shortcut, I usually use D and follow. Now if I hit disable overlays, if I hit it again,
it is enabled. If you have a graphics tablet, you will map on your
tablet buttons. Now we have this area here
that is called the outliner, in which we see our
grease pencil object. It's named Stroke, will name it two glasses by
double clicking on it. Type in the name and enter, and you see it is
inside a collection. We have also a camera object and it's also inside
its own collection. Each grease pencil
object has also layers. If you go here under
object data properties, you see this layers
paneled here. You can arrange the layers using these arrows and you can add more layers or delete layers. And you can rename layers
also by double clicking on them and changing the
names under this arrow. We have some options
for our layers. This icon you see here, besides our grease pencil object represents the interaction
mode we are in. Here, we are in draw mode and we have all
these drawing tools. But there are more
interaction modes that we can access
from this menu or using the
shortcut control tab to display the Pi
menu to switch modes. Or you can just to switch between any mode we
are in and edit mode. Here we went inside edit mode. This is a mode that I use a lot. And tab makes it easy
to switch between this mode and any mode I
was working in previously. One of the modes also is
we do control tab again, Sculpt mode and here you
can use these tools. Here each mode has its own
tools to sculpt your strokes. Then we have object mode. Object mode will
let you interact with all the objects that
you have on your scene. You can go to object mode
using the pine menu, or you can click on the icon besides your
green pencil object. And when the icon goes, you switch automatically
to object mode. And here you see that you
can move, for example, your objects by doing G.
You can also here select the camera and move the camera
also with that means grab. And here in this
mode you can also create more green
Spencil objects. If I do shift a four ad, I can go here under green pencil and add
the new blank object. Stroke object or monkey object. They are the same, but this
one will have stroke pre, drown on it, left click. Move it with again shift a Greenpencil. Let's
add the monkey. Now let's to the
dot on the Nam pad. To focus on it, we can go to the outliner and
select a different object. Again, go to the viewport and do the dots and we focus on
the stroke object two. To delete objects, you can press the delete key on the
viewport or select that object here in the
outliner and also do delete.
7. Grease Pencil Tools add-on: You can use addons
with blenders. Some addons you will
download and install, some of them are free,
some of them are paid. And some of them come with the
package that we installed. Let's go to the Edit
Menu Preferences, go here under addons, and you see that we
have a lot of addons. And most of them are disabled so that you will only enable
the ones you need, and they don't slow the
program for nothing. Let's look for green Spencil
and we find this Adon. Every green Ppencil user should enable and use this
Adon. Let's enable it. And then save Preferences. Let's get out, let's
draw something. Now if you hit to
display the side menu, here you can see a new
tab called Green Spencil. If we click on it, we get some tools related
to Green Spencil. One of them is
camera mirror flip. This helps you flip your
canvas very quickly. And it's useful for
artists because it gives you a fresh view
on your drawings. And you can even
keep drawing while the canvas is flipped and
do any edits to your art. And this arrow icon here tells you that your canvas is flipped. We can also rotate the canvas by doing control out
middle mouse button. And this can be very useful when you are using
a graphics tablet. And if you wish to
reset the rotation, you keep the out and
control pressed. And you do a simple middle
mouse button click. Another useful feature
is time line scrubbing. If you are doing animation, you will have a lot
of key frames here. Usually you should move the playhead to
navigate the time line. But time line scrubbing
lets you do that here on the viewport just to
Alts middle most button. And you can scrub without the need of going to
the time line itself. The Adon allows us also
to navigate and manage our layers just from the
viewport by present the Y key. And now you get this
layer navigator. You can select the active layer release. And now we can
draw on this active layer. You can hide a layer
or lock a layer. You can go outside
and we are still pressing Y and change layer. And you see that
the layer that's not active is faded now. And this red color here means
that this layer is empty. And if you do while you
are still holding Y, you can disable or enable auto inactive layers. Usually to do it you need to
go under this arrow here or here in the layers panel and enable or disable auto
lock inactive layers. This feature will lock any
layer that is not active here. It's very easy to
diabulate and enable it y and then disable again, and it is enabled again. And you see that the
layer I hover on is unlocked and the others
are locked automatically. These are just the most common or the most useful
features maybe.
8. Prepare to draw: Before we start to
draw, there are a few things that you
may want to check. The first thing is
the resolution. You go here under
this output tab and you can see your
resolution here. You can change it to
whatever you want here, it's at full HD, the frame rates here, it's at 24 FPS, and this is what we want. But you can click on this
and choose any of these or do custom and change to
any frame rates you want. Here you may want to
check your drawing plane. By default it is on the word
origin and facing the front. There are some
settings for changing the drawing plane placements in this dropdown and this one. And we will see these two later. Let's go back to
camera view zero. You check also
your active layer. And they're here because
the active layer is the one that your strokes or
your drawing will be put on. You change it either
here or here, or using the Y key and choosing
the active layer here. I will also rename
this layer to Gram and change this one's
name to lenses Enter, and then make my
frame layer active. Again, you make
sure also that you are choosing the right
tool, in our case here, the drawing tool, the
right brush here, because each brush here
behaves differently. And the right material tube, because each brush needs a material to be
able to operate, we can choose the
material from this drop down or by using you
on the view ports, we can change the
active material, quickly escape or here
under the material panel. And you see that each material has a different set of settings. The solid stroke
has stroke enabled, fell disabled, We have
a line type of line. The square stroke
has a red color, has a line type of squares, and also has stroke
enabled and fill disabled. The fill material have stroke
disabled and fill enabled, and we can even draw fills with our draw tool,
which is great. Then we have the dot stroke that uses a line type of dots, a black color, and
of course, no fill. The difference between a
material that uses dots or squares and the material
that uses line can be shown. If we go to Edit mode tab, let's zoom in on these
two strokes here. Let's change here
to select Points. If the Nampad
emulation is disabled, you can use the 12.3 keys on the top of the keyboard to change between
these three modes. Let's choose point select. And if I select a point here and move it with G, grab it with. You see that every point is connected to the next
one with a line. But here on the stroke that with drew using the air brush, If I do and move this, each point is separate from the others and there
is a circle on it. We can select all these
points by hovering the mouse pointer over it and
doing L to select linked. And we can assign
a new material. If you choose square
stroke a sign, you see now that each
point has a square on it. If you choose solid
stroke A sign, now all the points are
connected, used in lines. Let's try to change
to render preview. And now you see that
we have some glitches. And this is why it is important
for some brushes to use a dot stroke type and for
others to use a solid stroke. Let's go back to camera view. Sum out a little bit. Let's delete everything here. Let's do A to select everything
and then X to delete. You can choose points
or strokes because everything is selected and
you can choose the solve. I usually do X and then D because the X is closer
to D and it's easier. So D and everything is deleted. Now tab to get
back to draw mode. And let's choose the
air brush again. Here you see that the
dot stroke is pinned, because it's a very
important material to this brush to work properly. If we disable the pen and
choose the solid stroke, now we have this is, so let's get it back to dot
stroke and pin it again. And the brush we will use
for our glasses is this one. The pen, this brush has
no pressure sensitivity. It has a strength
or opacity of one, and it should use
the solid stroke. So let's choose the solid
stroke and let's pin it here. Now we don't have to worry about the material changing
even if we change the active material here
or also if we switch to another brush that
has a different material and then gets back. Sometimes if it's not pin, the material will change to
that of the previous brush. You will also have to
decide if you want to use lights or
not to use lights. As we saw previously, we can disable use lights here under object properties
and their visibility. And you will have
to check this for every dispensile
object that you add. You can also here under object Data properties
in the layer panel, disable or enable use lights
individually for each layer. So maybe you want to use light and you want to disable
it only for some layers. The last thing you
may want to check is your pressure sensitivity if you are using a graphic
tablet, of course. And it may take some testing to adjust it depending on
your model, et cetera. Let's choose a brush that
uses pressure sensitivity. The air brush, for example, go here under Active Tool
and workspace settings. These are the settings
of our draw tool, since it is the
one selected here. If you expand this
brush settings, you get the radius or
thickness of your brush. And pressure sensitivity is enabled here with this
graph to adjust it. And the same for strength, not that sometimes opacity
is named strength, and sometimes opacity
in grease pencil and pressure sensitivity
is also enabled. This graph says that the radius of your brush will start from zero and adds 100%
dependent of the pressure. If you want to increase
this, you go to the corner, you click and move it up here, it's about 50% when the
pressure is lowest. It won't start from zero, but from 50% of the
thickness that you set here. You can also click on
this point and lower it. And you can even add points in the middle and play with
your graph as you wish. You can do the same here too, if you want to reset your graph. You go to this arrow and
click on Reset curve.
9. Draw glasses frame: Again, let's select our layer, and let's select our pen brush. Let's start drawing our frame. We can use F to increase the radius or the
thickness of the brush. And we can also use shift to change the opacity
of the brush. I want to keep it at one, it's just to escape. I could of course,
use the circle tool, but I want my circle to be
a little bit more natural. And to show you some
editing techniques too, let's draw a circle. I want the circle to be
mirrored to the other side. I go to the modifier panel. Here, I click on this icon
and I add a mirror modifier. We have a lot of modifiers
here and we won't touch at every one of them in this class here in the modifier, by default the Xs on which
to mirror the circle is x. It means left and right, and this is what I want. I keep it like
this. I will go to edit mode by doing
tab in the Viewport. Let me select my circle. And it's not a real circle
because it's open here so as to four fill to
close the circle. And now to edit the circle easily we go here and
enable curve editing. But before enabling go here, click and we change
some settings here. First I'd like to disable
adaptive resolution. I'd like to change the curve
resolution to just 16. I think it's enough.
I found that a good threshold with
not so many points and not much distortions is 0.3 So we do enter and now
we can enable curve editing. You see we've got
here four points. Two edit our shape. If you had a lower threshold, we'll get more points, and with more points
the editing is harder. You see that we can
select just one point, and that is because we have stroke select mode here enabled. Let's select point select. And now we can select a single point you
can move it with, you can also rotate it with. And we can also select the
handles and move them with. Let's do some editing
on the circle. You see that when we
enable curve editing, the other mirror disappeared, but don't worry about it. It will appear again when
we disable curve editing. Again, I think this is good. Let's disable curve editing. Let's select the whole circle by hovering over it and
doing L. Or by selecting one point and doing
control L. Then we can move it with and put it
closer to its mirror. Maybe it needs a little
bit more editing and I will do it in sculpt mode. Let's to control tab, put the cursor over Sculp mode and release control and tab. And now we have this brush
selected, the push tool, we can increase the radius of the brush or
the tool by doing, I think I will disable overlays to see my circle more clearly. And I want to just push the
sport here a little bit. Don't worry about the
mirror, it won't be edited, only the real circle
will be sculpted. I think this is good.
Let's go back to Edit mode tab again and
enable overlays again, D.
10. Drawing temples: Now let's draw a temple. First, we go here and
we add a new layer, and we name it temples. We make sure it is the
active layer of course. And I want to change the
canvas placements to be able to draw in
three D space and draw the temple
on another plane. First we select the point from which you want the
temple to get out. I will change the three
decursors place to this point. Here I do shift shift for snap and we will snap the
three decursor to that point. Cursor to selected. Here is our cursor
control tab, draw mode. And here we change the canvas sentence from
origin to three decursor. Now it is on the three decursor, and looking to the front, we can change here to the
side, for example, or the. We can also change to cursor. Now we can change
the rotation of the canvas using the rotation
of the three decursor. To change the rotation
of the three decursor, you do n to get the side menu
here and you go under view. And then three decursor, we change the
rotation from here. I think we should change
the y axis rotation. That is the axis
going from front to back to make this
canvas vertical. So let's change
the rotation here. I don't want it to
be exactly vertical, but a little bit inclined like this. I think this is good. Let's do end to height
this menu again. Let's do three on the nam Pad to see our glasses
from the side view. And we will start
drawing the temples from this point where the three
decursor is from here. And we draw something like this. Very nice. Let's check it. And these are our temples. Now let's go to Edit mode tab. Let's do three again. Let me select my temples. I can select one point and do control L. And I want to edit
this shape a little bit, but instead of using
curve editing this time, I'll go here under point smooth and we get this menu
here that has collapsed. This is called the
last operation menu, and it allows us to
change the sittence of our operations after
we've done the thing. So we can increase the
repeat value here. To increase the
smoothing like this, let's collapse it again. And now I want to make
the temples a little bit thicker from this
side than this side. To change thickness.
In added mode, a very important
shortcut is Alt. And you can change the
thickness by moving your mouse Let's to escape and to change the thickness
proportionally, we need to use a tool called Proportional Editing
that you can click on here to enable it or do
the shortcut on the viewport. To use it, we just select one
point from the temple here, and then we do alts to
change the thickness. And now we have the
circle that we can increase or lower
with the mouse wheel. I think this is good.
Let's check it. Middle most button drag. And we have this
now I want to add gradient here on the
tip of the temples, back again to Draw Mode tab. And I will choose
my Tint tool here. Then I have these colors
here to change colors here. Or choose from
this palette here. I will create a new palette
by clicking on this icon. Add new palette, then
rename it two glasses. And then I can edit
my colors here. I want something close
to pink but darker. Then I can add this color to my palette by clicking
this plus button. Let's add more colors. Let's add a white color. You can also click on
this color here and change the sentence
from these sliders. Or enter a value here. Here I want to lower
the saturation to have a white color. And I will add to my palette. Now we change the darkness
here and create a black color. I will add the black
color to, to my palette. Now I choose this color again
with the tin tool selected. Let's move a little bit here. Let's increase the size of the, I don't know the brush. And we can color this part
here and create a gradient.
11. Fill the lenses: It's time to fill the lenses. So we select our
fill tool and you see here that solid
stroke is selected. What's also great with
gris means is that you can fill using a
stroke material. But of course we will need a fill material and we will
need to pin this material so that we don't
accidentally change to a different material and get confused when some
weird things happen. I want also to edit my material, so I go to the materials panel with the solid fill selected. Let's rename it to lens fill. And let's go here under Fill, and change the style
from solid to gradient. And we can edit these colors. So I want one to be
black and the other one I want it to be the color we
used here on the temples. So here we can
have our palettes, but there are some tricks
to copy this color to here. Let's select our Tin tool just to get our color from here. So you can either go here over the color and do
E on the keyboard to summon the eye dropper and get the color from
here by left clicking. Or you can, Let's
change the color again. Go here and do control
C to copy the color. And go back here and do control
V. Another way to do it, let's change the
color again, Go here, left click, and drag the
color on the other color. Depending on what you are doing, you may find that one of these methods is the
best for your use. Now let's go to camera. You select our pill tool again
and try to fill one click. And then on the second click it works and it
seems to look fine. But if we get out
of camera view, you see that we got
a very weird result. That's because we forgot
to change our plane back to its original placement on
which we drew the frames. Let's do control Z to undo this. And then go up and
change back to origin. And here, change back to front, back again to camera view. And again we do click and
the second click to film, but why do we need
a second click? Let's do control Z again and
select our pen tool again. Let's draw this shape. And then I'll draw a different
shape like this one. Now I select my fill tool again and try to fill the shape. So the first click
will get nothing. But if I move my mouse wheel, I will get these
lines here and these are helpers to fill the gaps. Now if I left click again, I can fill this shape even though it is open
from this side. And then if I try to fill this one and use
the mouse wheel, you see that the lines are almost parallel and don't cross, so it's harder to fill this
shape with this method. So let's do escape. And there is another method
to fill gaps and advance. I think, yes, gap closure mode, I change from extent to radius. And now if I try
to fill this gap, I will increase the size of these circles with
my mouse wheel, and when I get this line, I can left click again. Let's do control Z, Control Z. So this is how we
fill your gaps. If you have gaps
in your drawings. Let's do control Z control
Z to delete these shapes. Since I don't have
gaps in my shape, I can disable gap closer
by going again here and untaken in this
check box visual escape. And now I can fill
with just one click. So we have this and
you see that we have a gap inside the fill
because of the temples. What's good is that we
drew the temples on a different layer and you
see that I made a mistake. And I was selecting
the temples layer when I filled my lenses. Let's took control Z. And let's select my lenses layer so that the fill
goes here, not here. Then I should hide
my temples layer. Let's go back to
camera view zero. Let's try to fill again. One click and the
lens is filled. But this is not the orientation
I want of my ingredient. I will do Tab and go to
Edit mode. I will do Y. And then to lock in active layers so that I
can select my fill easily. You don't need to
select the whole fill, only one point from it. And then you go to this
tool here, transform fill. And this tool has three
molds here on top, so this one is rotate. And now if I left click
and move my mouse, I can rotate the fill. We have also scale. If I move the mouse, I will scale the fill. It's not very visible
because I guess the edge of the fill is outside
of the visible area. Let's translate now to move the gradient to
a different location. Now I can rotate again. Then I do scale again and scale this gradient
to make it larger. Then translate again
and move it up. Let's go out of camera view. We can enable our temples. Now let's disable overlays D. I'll go to my lenses layer and decrease the opacity.
We have this look.
12. Draw the bridge: You may have noticed
that although the arms or the temples of the glasses are
behind the glasses, they still show in front of
the frame and the lenses. This is because of a
sitting under strokes, it's called stroke depth order. Here it's on two D layers molds, that means that the layer on top will show on top of
the other layers. If you draw a stroke, a recent stroke inside a layer, it will show also on top
of the older strokes. So if you go down again and we change to three D location, now everything
close to the camera will show in front of
anything behind it. But you see that we have
some problems here. The first thing
is this glitching between the fill and the
stroke of the frame. And that's because they are
on the same plane and they are fighting for which of
them should show in front. The second issue is that the transparency of my
fill is no longer working. That's why it is almost always better to use the
two D layers mode. When you are working
on a two D or 2.5 D drawing or animation. What we need to do is to move the temples layer behind
the other layers. I want also my lenses to be in front of the frame to
get this effect here, the edge of the lens
on top of the stroke. This is about
stroke depth order. Something that you need
to be aware of when you are making your
future creations. Now let's not forget that we
drew only half our glasses, even if we can see
the full thing. So let's go to our
modifiers panel. And we need to apply our mirror modifier so that
the other half becomes real. Let's try to disable it first. So now we see on the half, let's try to apply it. We had this arrow and do apply and we get this error. Modifiers cannot be
applied in paint, sculpt, or edit mode. This message means
that modifiers can only be applied in object mode. Let's get through object mode
control tab, object mode, let me enable overlays again, D and we have our
glasses selected. I think we don't need the canvas anymore, it is distracting. Let's disable it. And let's go again to our mirror
modifier and do apply. And now I want to draw the
bridge between the frames. Let's go to Camera View. Let's go to Draw
Mode Control tab. And let's select the
Arc tool from here. Zoom in a little bit
and you see that we have a film
material on our Arc. So let's disable the pin. And let's select
our solid stroke. Maybe pin it again. Let's try to go to the fill. It looks like a bug to me. The field tool should still have a film material pinned
here. That's really weird. So let's remove the pin anyway. And we have solid stroke here. Why? Let's select
our frame layer, release Y, and let's
draw our arc here. Just left click and drag. Release your mouse button. And now we have these points
that we can addit further, These edge points and
this blue point that we can move and change
the arc direction. If you want to change the
thickness of your arc, you can do and change the
thickness by moving your mouse. Then left click when
you are satisfied. And then middle mouse button
or enter to apply your arc. Now I want to go
to edit mode and I want to make this arc
thicker in the middle. Let's select a point
in the middle. Let's use proportional
editing. It's enabled here. With this point selected, we do alt S and use the mouse wheel to decrease the
size of the circle, and you see that it is still
affecting the frame strokes. Let's do escape, and let's
go here, under this arrow. And we choose here connected. Only now only the strokes that have points selected will be
affected by proportional. Let's do again Alt. And now we don't
have to worry about our frame being affected.
Left click again. Now I want to give it a
color just like our temples. Again, camera view. Let's go to vertex paint more this time. Control tab, hover over vertex
paint release control tab. And now we can choose
our color from here. You see that this is
the default palette to choose our new palettes. We click here and
we choose glasses. We select our color. We can increase the size
of this brush by doing, just do a quick left click here. Maybe another one, Va.
13. Draw reflections: Now I want to draw
some reflections. Let's go back to camera view. Let's add a new layer y, and you see these
plus signs here. If you click here, you'll add the layer above
the lenses layer. If you click here,
you can add a layer above the temps layer or
under the temples layer. This is our new layer. Let's make it active
and let's release Y. Let's go to draw mode. Let's select our draw to. Thankfully, our solid stroke
is still pinned here. And this time we won't
use the material color, but we will use
color attributes. What's great about
material colors is start, if I want to change
my frame color, now I just select my material, go here under stroke and
change the stroke color. Now I have a completely
different color without having to edit anything or draw anything from
scratch to escape. But if you use a lot of
colors in your drawings, you won't be able to create multitudes of materials
with different colors. This is where we can use instead color attributes
with our materials. And this is similar to what classic drawing softwares use. Let's click on this color
here and change to white. Let's increase the
size of the brush. Let's draw some strokes here. I want to draw
something like this. Let's decrease the
size of the brush and draw another line
and another one. Now I want to go
to Edit Mode tab. The transform field
tool is still selected. Let's select our selection tool. Let's disable
proportional editing and let's enable overlays. I want to select this
stroke and I want to enable curve editing to
create more zigzags here. Let's delete this point
here or dissolve it by doing x D. You see there
is a line under D here, D. I want to move
this point here, and then I can extend my line. So you can draw
inside edit mode, and that's why edit
mode is very powerful. If you do E, you will extend this point and you will
create a new line. Then again, extend
again, and again. I will do the same here, G. Let's move this
point a little bit. I can rotate it with r
little bits and then to extend again again again, The reflection will only
show inside the frames. But you will see later why we need all these
extended stroke here. Let's select this one now. It's hard to select it. Maybe with a box select. Yes, let's move this point up here and then this one here. Let's do L to select everything. And I think I will
change its thickness a little bit at now. Select this one. Let's try
to box select it again. Move this one here. I
think I will dissolve this 0.2 x D. Select this
points. Move it up. How over to select
both points and maybe increase the thickness This time alt increases just a little bit. Now let's select this coy. Again, hover over
it, and I think I will decrease thickness alt. Now we can go out of
curve editing mode. And I want to select
all these strokes and since the other layers or the
active layers are locked, I can do just a, anything in the
other layers is not selected, shift to duplicate. Maybe I can rotate them a
little bit shift again. Let's rotate it a little bit. Shift again again, rotate
just a little bit. I think this is enough. You may add another one. Now let's do the
opposite shift again. And now you see that these strukes are on
the same plane of our frame, but I want to create
a parallex effect. For that, I will need to move these strokes a
little bit forward. I do a to select everything. Let's move in three space here. I want to move them halfway between the frame
and the camera. I will do and Y to restrain the movement on
the front to back axis. And move them a little
bit here I can do three to be more precise and see where it
is in the middle. Of course, it doesn't have to
be exactly in the middle Y. And move it a little bit more. Back to camera view. I think I will resize my strokes because they
are closer to the camera. They look bigger. I do to resize them and I
think this is good. I want all three of these lines to show
inside this frame. Maybe move a little bit. Maybe I should have added
another column from here. Let's select these three. While each of these three
has some points selected, I can do controlled L to select the whole of the and
then shift the end again and be sure you are
in camera view because the camera view is looking at
the front or on front view. When you do this by doing one on the keyboard here,
you will be safe. And you will know that you are moving your strokes
in this flat plane. If you are on different plane and you move your
stroke like this, it will move out of the plane. As you can see here.
Make sure you are either in camera view if your
camera is face and front, or on the front view. Let's rotate these
strokes again, little bits and move them
with back to camera view. Now, how to hide everything
of these strokes and keep only the parts
that show on the lenses. For that, we go to
our layers panel. Let's rename our
Reflections Layer Enter. And let's hit this
dot here to add a mask or to mask
this layer here. Under masks, we will choose the layer that will
mask our reflections. That will be, of course,
our lenses layer. You hit this plus button
and you choose lenses. Now all you can see are the
parts inside our lenses. If you want the opposite effect, that is to mask the parts that are inside and show
the parts outside, you go here and
invert your mask. Now all we have to do is to decrease the opacity
of our reflections. Here we do this
disable overlays. Again, let's go out of
camera view and you see that we have the
school parallex effect. You see also why we extended the lines so that when
we rotate the glasses, we don't get to the
edge very quickly. We still could have
extended them more. But I think it can have a
cool effect if your animation is fast enough and the
reflections disappear quickly. Also, if you get closer, you see that at some point
the reflections disappear. And that also is a cool effect. That's because at some
point the strokes now, since they are in
front of the lenses, are behind the camera
or your point of view.
14. Draw the background: Before I start drawing
my background, I want to change the
resolution to a square format. I will copy this value here, control C and pasted
here control V unter. Now we have a square frame, and I want to get it a little
bit closer to the glasses. So I will select my camera, and I am in object
mode, of course. And I will move my camera, let me enable overlays
again on the y axis, going front to back again, zero and do to move
the camera Y to restrain it on the Y axis and move it a little bit closer. Then I will create
a new objects. Shift a grease
pencil blank object and name its background. Enter. Go to Draw mode, and I want to go here to
the tool settings and here to download and
import texture brush pack. So this is an extra
free brush pack made by Mattias Mendiola. It's also a great asset to have for any Grespencil
user and this option here comes with the
green pencil tools add on that we enabled earlier. So if you have it disabled, you won't get this feature. Let's left click on it. This is the easiest way. Let's go here and expand this. And now we get all
these extra brushes with a click of a button. We will start by
drawing the sky, and for that we will use a
basic brush, the air brush. We will use color attributes
and we will choose a color, a bluish color for the sky. I will add the color
to my palette. I think I will increase the size of the
brush a little bit. I will draw the sky
with the mouse. If you have a graphic tablets, this will work much better. These gaps here you
can fill either by painting like this or you
can go to sculpt mold. You can use not the strength, this controls opacity,
but the thickness. And you can increase
the size of this brush. Let's do D to hide all these lines and see
better where there are gaps. You can, for example,
click here and make the strokes a
little bit thicker. In the spots where we click, thicker means that some
gaps will be closed. Let's go back to draw mode now. Let's make a darker
blue for the C. Let's add the S color
to the paletto. Maybe we should
hide the glasses. I will add something
like this and draw the C. We can also play
with this in Sculpt mode. Again, we can use another
method to sculpt. Let's select Stroke Select Here, let's enable overlays again. Now we can do Alt and select the strokes of the
C. This, of course, needs to be enabled With that, sculpting will only affect
the selected strokes. We can also do Alt shift
to add to the selection. Now we can use the push tool. Let's disable overlays. Again, we can make this
arc here look better. Maybe pull the edges here. We can also try to fill these gaps using
the thickness tool. You see when you zoom, the brush size doesn't change. Instead of changing
the size of the brush, for example, instead of making
it smaller, you can zoom. And automatically the brush size will be smaller
relative to pure work. Now we are working with the thickness brush tool and it is only affecting
the strokes that are selected even if we can't
see them because overlays is disabled back again to draw mode and this time I
want to draw the sand. I will select a new brush, this one texture oil two. Let's change the color
to something more sandy. Let's add it to the palette. And I want to increase my
brush size a little bit. And the maximum using
F is 500 pixels, But we can increase
further here. Let's type in 800. And I don't want to paint
my sand on top of the C. So I will do control Z and I will enable
this button here. Draw strokes on back, so now I can paint my sand behind the C. Seems that I
forgot to check my layers. I just started drawing without checking or creating layers. But this is a good
chance to see how we can fix things
that we didn't do. Right. At first, I will create a new layer
and I want to have a layer for the sky and another one for the ground
or the beach and the sea. I will name one sky and
the other one beach. Let's add a capital letter here and all the drawings
are in the beach layer, so I can go here. Let's enable overlays. Let's go to edit mold. I will try to select all
the strokes of the sky. To move them to the sky layer. So I will box select. We don't need to
select everything, but we can do control L
and we do M, M for move. And move these points or these
strokes to the sky layer. If you miss some of the strokes, you can select them again and move them again
to that layer. Now the sky is in
front of the beach. Just move this layer down. Now I will add some magic to this simple drawing
using the Tin tool. Let's select it.
Let's go here over the color and do summon
the eye dropper. I won't just pick
colors from here, but I will click and drag to create an
intermediate color here. Let's decrease the
size of the brush. With this a little darker color, I will see that I
accidentally painted the C, so I'll do control Z and do Y. And to lock in active layers, keep the sky layer
active and release Y. And now I can use the Tin
tool on the edges of my sky. I can use that trick
again and click and drag. And now I create another
intermediate color. Again, try to do this. I think it's starting
to look good. We can do this multiple times
and adjust our ingredient. We are creating an
ingredient here. Let's select this initial
color of the sky and get a little bit closer
to a greenish color. And create a circle here in the place in which we
want to add the sun. Then again and D here and
a little bit of gradient, it starts to look like
a painting like this. Maybe make it a little
bit darker on the edges. Again, like this. And try to make it like this, We are only working
with the mouse. Imagine what we could do
with the graphics tablet. Now we do the same
between the sea and the sand and create a
gradient on the sea. Let's do y and select
our beach layer. Now again, move like this and created
this nice purplish color. Let's zoom in, and
let's again E again. And we blend our colors and we get this
really nice effect. Now we are almost
drawing wet sand here. Don't worry if it doesn't
look good at first. Just keep trying
and it gets better. Maybe decreased the size. Let's try to do straight lines. I think this is
good. And then let's add my sun back
to the draw tool. Let's select this brush here. Sketch one, I think. Choose a yellow
color for the sun. Maybe increase the
size of the brush. Let me do y to check if I am on the sky layer and the sun, it disappeared because draw strokes on back
is still enabled. Disable it. Do control Z to erase the sun behind
and create a new one. Let's add some rays. It seems I drew it on the
wrong layer. That's weird. Tab again to edit Spot Able
Overlays. Select my son. No, it's not selected
because I'm on the wrong layer and
the other layer is locked to the beach layer. Select my son M. Move
it to the sky layer. Why? And unhide my sky layer. Back to draw mode. Let's check again why we can go out from here and fade
the active layer. So yes, we should be good And back to the beach layer now. And we change the color. We keep the same brush white
and we draw some waves. I only wish that
these waves closer to the camera are thicker
than the ones behind. And we can do that in sculp
modes, to sculp modes. But now how can we sculpt the waves without
affecting the sea? There are several
options to filter strokes and materials
and layers, Use them. This menu here. But there is another
simple method. By going here to the
material spanel, you see that we have more
materials than before. Now graphite two is used by the material of the
waves and the sun, and Olio two is
used by the sand. If I hide graphites, I will hide the
sun and the waves. So we can edit this material without affecting
the other materials by just locking these. So we click on one of them
and drag on other rests, and now they are locked and
they can't be sculpted. I will use the thickness
tool and make this wave. Am I on the wrong layer? No, we just have
selection enabled. So let's disable it
and this is too much. You can use the
edge of the brush if you want lighter influence, we click repeatedly and
make the sky thicker, We do the same here. You can do control to invert
the effect of the brush. Either this or you change here
from plus to minus, again, make the sky a
little bit thicker and shift middle most button, move here, control and
make these ones thinner. I want to make these also a
little bit shorter so I use the push tool and push them
a little bit like this. Then again the thickness
tool and make them thinner. We can also decrease the strength that we have less
influence on the strokes. Let's make the sky even thicker, disable overlays, and I
think it looks much better. Of course, you can create any background you want
and even the glasses, you can create a
different shape of glasses in the project
you are creating. When you finish sculpting, don't forget to unlock
your materials again, because you may get
some weird issues and you have no clue
what's happening, and it's just some
materials locked here. Now we can go back
to object mode. We can unhide our glasses. Let's enable overlays. Again, I want to move
my background back in three D space so that it's not overlapping
with my glasses. G, Y, to restrain
it on the y axis. Then back to camera view since it's further
from the camera, it looks smaller from
this point of view are resize it using S. And there is a little
problem with that. Its origin point is not on the center of the
object and that's because we didn't put our three decursor back to
the origin of the world. Let's to shift S and move
the selection to the cursor. That's the place it
was on initially. Hover over this and
release shift S. This is another
example of how to fix something that
we made wrong. First we need to put
the cursor back to its original point shift
and cursor to world origin. Now with this object selected, we do a right click
and we do set origin origin to three decursor. Now since the three decursor
is on the word origin, our origin point of our object is also
on the word origin. If we rotate the object, it will rotate on this center
point or origin point. If we resize, it will also
resize on that point. Let's again move it back, G, Y, and move it here, back to Camera View S to
resize Sable Overlays.
15. Animate!: Let's go back to camera view and we'll add some animation. The first thing I will change the duration
of the animation from 250 frames to
just 60 frames. Let me enable overlays. And let's go to the
modifiers panel, and this time we will
add a noise modifier. This is a very
popular modifier and an easy way to add
animation to your scenes. If we play this, see that we get a noisy animation and the background already looks cool with the default settings, I want to decrease
the position here so that the placement of the
points doesn't change too much. Then we can play with
the strength to, it means the opacity
of the strokes here. In addition to the
change in position, there is a change in opacity. And we can play with
the thickness to here, the thickness will get
up and down randomly. I will decrease these values, maybe put the
opacity one to zero. And we can also increase
the noise scale. And the more you increase this, the more frequent
the changes will be. We get like a wave effect. And those waves seem
to get smaller when we increase this and larger
when we decrease this. You see here at zero, it seems that the whole
stroke is getting randomized instead of
individual points. Let's keep it halfway here. And here we have the
randomized check box. If you uncheck it, the noise
won't be animated anymore. If you expand this, we have two modes here. We will use steps, and
we have a step of four. And that means the noise will
change every four frames. And we can decrease this. And now we have the noise
changing every single frame. Let's put it back to four
and stop the animation. And get back to frame one
by doing shift right arrow. That's the easiest parts
animate in the background. And now we will
animate the glasses. For this, we need to have
auto key in here enabled, so that blender creates
key frames automatically. Then I like to have
in my settings under Edit preferences
animation, I like to have only insert
available checked here, so that blender only inserts
key frames if there is already a similar key frame or a key frame of that
type inserted. And this helps reduce
the clutter so that blender doesn't create
unnecessary key frames. I will save my preferences here. And then let's swim in
by using the Most Wheel. Let's do the dot on the Nam
pad to focus on our playhead. And you see here that we are in the P sheets in the
green pencil mode, and I want to change this
to the Dop sheet mode. Greenpencil mode will only show us our grepencil key frames. It means the key frames
related to our drawing. But the P sheet will show
us all kinds of keyframes, including the changing
of location or rotation, et cetera, of our
Gredpencil object. The key frames we will do in object mode with the glasses
selected here in frame one, I want to rotate my
glasses a little bit. Let me do R x to rotate
it on the x axis, and then R z to rotated on the vertical axis and
have the slick here. I want to move them a
little bit to the site. And X to restrain it
on this axis here. Now we did transform
our glasses, but we didn't insert key frames, we will do for insert. And as you saw, we only changed the location
of the glasses. We moved it on the x axis
and changed its rotation. We didn't touch the scale, so we will add key frames
for location and rotation. Here is left click, and now we have new
key frames here. Glasses, action object
transform, You can expand this. And you see that we have
three key frames here, The R for location and three
key frames for rotation. I want to hide the
sidebar here we do n. I want to go to frame 16. Here, I will transform
my glasses further. First I want a close
up to this lens here. I will move the glasses
closer to the camera. And Y to move it on the Y, Xs. Let's rotate it on
the X axis or X, and then on the z, x, R, Z like this. Maybe also on the Y axis, Y. And you can rotate it like this and move this lens
here to the center. Let's put the cursor here and
do the dots on the Namphad. You see that we new key
frames here and here. We see why insert only available is useful
because it created only the key frames
that we already had in frame one and didn't add
key frames for scale. Let's check our animation
from frame one to frame 16. I want now to copy these key frames from
frame one to the end, but not to frame 60. I will go one frame after
our animation ends. I will select the points here, besides object transforms, to select all these
keyframes under it. Shift D, duplicate these frames to the end of my animation. Now if I play again. I already have my loop. To make it look a
little bit better, I will add a shaking at the end. Let's start from Frame 52. Here I will do insert again, and insert agangee frames
for location and rotation. Now there is no change at all, but we did a blocking
in this spot. So that when we animate
in one of these frames, slender will add an interplation
from this frame to here, and not from this frame to here. Let's go to Frame 55. Let's rotate the glasses. Since we are facing front, you can just do R and it will automatically rotate the
glasses on the Y axis, we just rotate like this. And then again to frame 58 and R and rotates to the other
side. Let's check this now. Now I want to add animation to the temples to make
them close and open. But I don't want
this animation to interfere how to disable this animation
without deleting it. You may have noticed
that here we have something called
glasses action. If you click here and
open the drop down, we can switch to another
mode called Action Editor. This animation that we
created was added to an action that was
automatically called Glasses. Action. We can
rename it something like glasses, port enter. Click on this icon
to enable fake user. And that means
that Blender won't delete this action even if it's not used by any of
the objects in our scene. Now we can remove
this action from our glasses object by
hitting this X button. And here you see that our
key frames disappear. Now we go back to frame
one shift white arrow, and I still have my
glasses selected. I will reset their
transformation, so I do alt R and alt G, and now the glasses are back
to their original position, and I can go to edit mode. I will enable overlays again
and we will start to do a different kind
of animation using green pencil frames
and interpolation. Let's first change back
mode to Grepencil, and here are our
Grepencil frames back. I will choose my temple layer, and I will go to frame 27 and duplicate this ski
frame to frame 27. Or I can do control C, control V, and it will
be pasted in frame 27. Then I will go to frame 52, and again do control V
to past the ski frame. Again, somewhere in the middle I will close the temples, make sure also that
auto kin is enabled. So that Blender adds
a new keyframe here and not just alter the
previous keyframe. It's good also that we
have auto lock layers enabled so that we don't mess with the other
layers accidentally. Now I will zoom in and try to select the first
point of my temple here. Then I will do shift and
move the cursor to selected. And then here's an
advanced trick for you. You see here transform
pivot point. It means the point from
which a stroke will pivot. If select this temple, hover over it, and
do L and rotate. It rotates from the end
here of this dashed line, but we can change this
to three decursor. Now, it will use the location of the three decursor as the
origin point for rotation. Let's to escape and
to close the temples. I guess I will do seven to look at my glasses from the top. Since we are facing the
top, we can just do, or we don't need to hit Z next. And close the temple. Then let's choose the first
point of the other temple. Again, shift to snap
the cursor on selected, hover over it and then again
rotate R and we have this. Let's change the angle. I think I will lower
it a little bit. Is to one to face
it or zero R again. And rotate it like this. Now it is rotating
on the Y axis. Because we are facing the
Y axis, maybe like this. Should have done it
for the other temple before we changed the
cursor's location again, shift cursor to selected L R and rotated like this. Can use your right
and left arrow. On frame 40 we have this, and on Frame 41 we have this. Now we can go between
these two key frames, and you can either
go to grease pencil, interpolate sequence, or if you are in draw
mode control tab. Draw mode, you go to draw
interpolate sequence. Or in any of these two modes, you can do the shortcut
shift control. Back to edit mode so the
temple is later selected. We are between these two frames. We go here on the viewports, we do control shift E, we have some settings here. You can choose to affect all layers or only
the active layer. In flip mode, you can choose
to always flip the strokes. In this case, I guess no
flip is the best option. Let's collapse this menu
and check our animation. And it seems to be fine. Now we go between these two frames and
again on the viewpoint, and we do control
shift E. And now it should use the same settings
that we used before. So this is something
to be aware of, that your last seance will be applied again to
further interpolations. Let's check this animation
from a different angle. It's not perfect from this
angle because the temples seem to get shorter before they get to the original size again. But from this angle
it doesn't look bad. Now we can again switch to
the action editor here. Let's go back to camera view. And let's go here on this icon and bring our action
back glasses back forth. You see we have an F in front. It means fake user and it means
it is a protected action, and that's why it
has the shield here. Now let's try our full
animation space bar with the noise of
the background. With the animation of
the glasses back and forth and with the temples
opening and closing. A very quick and satisfying
animation, wasn't it?
16. Add visual effects: Let's go back to object mode
by hitting this icon here. Let's select our
background and we'll add some visual effects that we
can find under this tab here. And I want to add a glow
effect or the background, know that you can't see the visual effects
unless you are here. In Render preview,
the mode is luminous. The threshold means how light the colors should be to
have a glue added to them. Maybe here is good and you
see that it is pixelated. And to have less pixelation, you can increase
the samples here. I will increase this to 16. This is, I think, where a grease pencil
tools feature is useful. I can go here and
click on this button. This is the real size
that will be rendered. So if you can see pixelation
on this size here, you see we can see squares here. It means that you need to
increase the samples though. Again, 16, it seems
to look fine. I'll change the sculor. I'll just play with the hue, maybe to something yellowish. I will change the blend mode to add and let's play with
the threshold again. And also with the opacity I can disable and enable my
glow effect from here. Of course, you can play and experiment with these
settings as you want. Maybe change the blend mode, change the color here, the threshold, and see
what works better for you. Then I will select my glasses. I will add a rim effect and see that we have this yellow
color here on the edges. Go here and expand blur
and change to 300 pixels. You need to change
it in both x and y. If you don't want more blur on one axis and
less on the other, then I guess I will change the samples two to
something higher. Let's to eight and I will play with the
offset a little bit. The Y means up and down, and the X means left and right. I will get it higher and maybe
changed to X offset two. I think this looks good. And now I will add
a blur effect. I want my glasses to be blurred when they
come near the camera, and then gets back on
focus when they come here. Or maybe at this point here, I will go to frame 16, where they are closest
to the camera. And go to the size here. And do I to insert key
frames for the size. You see that we have
two new key frames, X size blur and Y size blur. Let's go somewhere here. You can click on one, keep your left mouse
button down and drag down. And then release
your mouse button. And now I can type zero enter. And it will change
for both fields here. And a key frame was
added automatically because I have autokin
still enabled. Then I can go somewhere here and copy these
two key frames. Let's try control C, control V. It worked
for only one. Okay, let's do it again. Control C, control V. Let's
test the animation again. Yes, it blurs when it's claws and then gets back on focus. Sir, is that, I guess we are
finished. Congratulations. You created your first
animation in Blender.
17. Add sound: Now I want to add some sound, and for that we should
open a new panel. We go here and we change
here to video sequencer. And here we can add video
clips or audio clips. Let's stop the animation shifts left arrow to go to frame one. And I have a sound
that I want to add. I go to Add Sound and choose this file here, Project Sound It is originally called Crews made by John Delay. It is a free sound that I cut and slowed down
for this project. It is included with
the resources files at sound strip and we have
our sound strip added. We can zoom in and out with
the mouse wheel again, if you want to increase the
size of this strip here, you can do control and click
your middle mouse button. And you can move on the Y axis to increase
the size vertically, or on the X axis to increase
the size horizontally. Now we lost our strip, so we middle click and move and we get it back. If you
want to see a wave form here, you can go either to the sidebar and under strip you choose
display waveform again, or you go here under overlays and here under
waveform display, you choose wave forms
on this way they are displayed for all the
audio strips that you add. You can move your strip also using sometimes when
you import a strip, it won't be imported in frame one or there is another
useful shortcut. It shifts S and shift S will snap any strip to the placement
of the playhead, Shift S and La. Now we can play and we did it. We have our first
animation with Sound
18. Render animation: Here we come to
the last step that is the rendering
of our animation. To do that, we
need to go here to the output panel and we
need to go under output. Here we choose a place and
name for our animated file. Let's name our file glasses. I want also to add a
file extension, p por, except you won't have to do that if you keep this
checked file extension. But I will end check it and keep the one I added manually. Then under file format, we have here PNG and this is recommended
for heavy scenes. If you have a scene with
a lot of objects and drawings and maybe three
D objects and animations, Blender or your computer may crash during the
rendering process. And if you save your
frames as PNG files, you won't have to
render the frames that were already done
before the crash. But for this scene,
it doesn't put any heavy load on your computer. So we will change from PNG to FF MPG video under encoden we
change here to MPG four, and under audio we choose
for audio codec AAC, you may keep this
sentence as they are. You may increase or
lower the bit rate here. And we can go also here under Render under
Color Management. So these are the settings
that ensured that we had accurate colors when we were drawing and picking
colors, et cetera. But now since we finished
and we want to render, you can play with these settings and change how your colors look. For example, under look, you can increase the contrast. Choose here, high
contrast for example. And you can't play with any
of these filmic or whatever. I would put them back
to the default seens. And now we can go to the
rendering panel and we can either render one
frame of our animation, one single image,
by doing two L, you see that our image
popped in a new window. You can save this image
by going to Image safe, but I don't like
these pop up windows. So I will close it and go to
Edit Preferences interface. And here under temporary
editors render, I change from new
window to image editor. I save my preferences,
close this window, and now if I choose
another frame and do 12, it will render the image
inside this image editor. To render your animation, you just do control 12. It starts rendering, you
see the playhead move in here here rendering
each frame and here the time for rendering
every frame, et cetera. It seems that it finished. Now we can check
our rendered file, here it is, with the name
we set and the extension, and we can play it in our video player and roll
off again. Congratulations.
19. Outro: What next?: Congratulations, you fit it. You touched at most
of the areas related to green spencil and
made your first artwork. Now you are comfortable
using blender. It's no longer that
intimidating Three D beast, but a valuable versatile
tool at your disposal. But this of course, is not the end of your
learning journey. Check the resources list I provided to go deeper and learn more about any aspect depending on your
needs and art style. Follow me on Skillshare, Youtube and X to be notified about upcoming
videos or classes. Of course, I'm looking
forward to see your finished
projects and assist you during the process, Pi.
 Mumu Mundo, Blender artist mixing 2D & 3D