Transcripts
1. Introduction: My name is Harry and I'm a professional 3D artists with over a decade of experience. I've been making Blender
beginner classes on Skillshare for a while now. In this class we'll be creating this procedural
hand-drawn material. Then we'll tie it
all together at the end of the
class by animating a stylish reveal animation to display our statue
in the best light. Procedural materials differ from standard image-based
textures by allowing you to design unique but totally
customizable materials without the need of
pixel-based images. This means that you can apply
this hand-drawn material to virtually any model you can think of to make it look like a classical etching
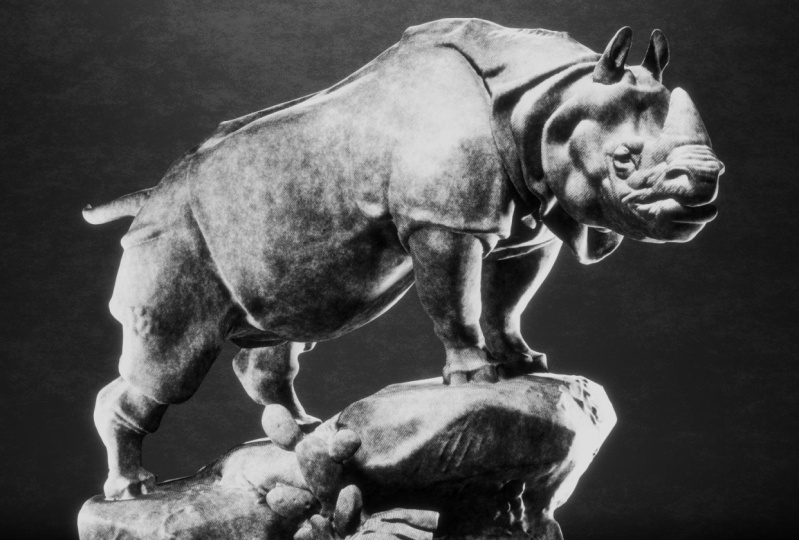
from the 16th century. Speaking of classical art work, have I mentioned that
we'll be working with this awesome rhinoceros
sculpture made by Henry Alford, Jakamart in 1878? This rhino sculpture is part of a pre-configured starter file, as well as a fully textured and animated end file so you
can check your work. You can download them from
the project resource section. Just make sure that
you have Blender 3.5 or newer installed. In this class, you'll
learn the basics of procedural texture creation. We'll explore the many
shading nodes and their effects that are key
to procedural materials, such as color ramp, shader to RGB, and math nodes. Next, Shader Node grouping. We'll work
step-by-step to create each node group to learn how they affect the final texture. After that, we'll create a
lighting reveal animation. By animating our lights
on and off in sequence, we'll create a stylish
reveal animation loop with just a few
simple keyframes. Lastly, rendering. We'll do some really
simple compositing and Blender before rendering
our final animation. We'll finish the class by
converting this animation into an animated GIF that you can share with your
friends and family. When we're done, you'll
have all the skills you need to create and render a procedural hand-drawn texture
on any model you'd like. For our class project,
you'll be tasked with making your own render
or animation with a statue of your choice from 3D scans.com using the procedural etching
texture we just made. I'll personally
review every project, upload it to the gallery, and give you feedback
on your render. This class is meant
for intermediates, but that doesn't
mean that you'll be hopelessly lost if
you're a beginner. However, I will be moving
through these lessons with the assumption that you're
familiar with Blender already. If you're just
getting into Blender, I'd highly recommend
that you look at my teacher profile for
beginner class of mine. These beginner
classes will give you the best starting experience if you're brand new to Blender. I hope you'll join me
on this journey through the awesome world at procedural
texturing in Blender. I'll see you in
the first lesson.
2. Creating the Base Material: In this lesson,
we'll be creating the base material
for our shader. This will be the
foundation for all of the other effects we apply
on top. Let's begin. The first thing you'll
need to do is open the starter file provided in the project resources
for this class. The starter file has everything
set up and ready for you, including the rhino model, the lighting, render settings,
and background material. As a reminder, you'll need
to use Blender Version 3.5 or later to open this file. If you don't have it
installed already, that's an easy fix. Simply head to blender.org, and download the completely
free version update. It should only take a few minutes and
you'll be ready to go. Now that you have the
starter file open, let's switch to our shading tab up at the top of the viewport. We can do that by just going up here and clicking
the word shading. This top view port
should already be set to your camera view. However, if it isn't
or you've accidentally exited the camera view in
this shading viewport, we can go up here to
the gizmos button, we can turn that back on, and then you'll
just need to click this little camera icon here to pop you into
the camera view. If for some reason your
view looks more like this, you can just click this
little camera button here, and that will put you
into the camera view. The last thing we need to
do for this top viewport is switch it into the
rendered viewport mode. We can do that by clicking
this little circle up here, and that'll switch this top
view into the rendered view, allowing us to see the
actual output of our render. You'll notice I have
the background material already created for you. However, our rhino is looking pretty plain, so let's fix that. We'll start by selecting
the rhino statue. Now down here in the
center, and we can click new to add a new material. Let's rename this material to rhino just so we know
what the material is for. The first thing we're
going to be doing, is deleting this principle
BSDF shader node, as we don't need all the
complexity that it adds. We're just going to select
that node and then delete it. Now we can add in a diffuse
node by hitting Shift and A, going to the search bar, and then typing in diffuse. Now we're going to plug this one into the surface socket
on the material output. Let's start adding the
nodes that will be key to the look and the function
of this base material. We're going to be making a soft smudged graphite base material that we'll be adding effects
on top of in later lessons. Now we can create a new node, Shift A, search, and we'll type in shader. Then down here at the
bottom we'll see shader to RGB. We'll select that. We're going to put that right in the middle between these two, so just drag it on
top of this wire here till it highlights
and then place it, and they are automatically
connected for you. Please note that this node will only work in the
EB render engine, which the starter file
is already set to. You won't really be able to
use the cycle render engine as it would require work rounds to achieve a similar result. After connecting this shader
to RGB node to our system, we'll notice that it really
hasn't done much on its own. But we'll be changing that
with the next couple of nodes. The shader to RGB
node will allow us to boil down all of the
lighting in this texture, to simple gradients that
we have full control over. This is how we're going to get that hand-drawn look
that we're after. Now we can add a few support
nodes to the system, that won't make a whole
lot of sense right now, but will be important
in later lessons. Down here on your
bottom viewport, we can hit Shift and A, go to Search, and
we're going to type in Math, then hit Enter. We're going to place
this node here right between these two. We can just drag it on top of that wire and it will
automatically link it up for us. Let's switch this math node
from add to multiply instead. Then for the value,
we're going to set this to 4.25, and then hit Enter. This math node will perform a specific mathematical effect
on the nodes prior to it. In this case,
multiplying it by 4.25. This basically just
makes our texture a little over four times
brighter for right now. Now let's add arguably the most important
node to the system. So we're going to
hit Shift and A, go to Search, and we're
going to type in color ramp. If you type in color
at the very top here, color ramp, we'll choose that. Now we're going to
place this between the multiply in this
material output by just dragging it
on top of the wire. Now we can begin adjusting these to affect the look of
our rhino material. This color ramp node will
allow us to manipulate the light and the shadow in our model with a large
amount of control. By using these black
and white sliders, we'll be able to
determine how much of our model is in the shadow, and where the shadows fall, and how dark they are. You can see an
example of that just by moving this slider here, we can see how it affects
our texture up at the top. It gives it almost like a
really stark comic book look. That's because we're affecting exactly how much of the white, how much of the gray
and how much of the black is in this texture. We can even flip it
by switching these and inverting the texture
on the top as well. Let's switch these back now. Let's put black on the
left, white on the right. The reason that this color
ramp is able to do this with the lighting is because of
the shader to RGB node. This is what I was
talking about earlier, where it's boiling down all of the lighting
information on our model into more
generic basic gradients. We're basically just adjusting these gradients with
this color ramp node. Let's start by adjusting
the position of these sliders now to
their final positions. Start by selecting
the black slider on the left and move it
to about the middle. We can see down here that this position value is changing. This is just showing us
where it is on this line. For our position here, we're
just going to type in 0.5, so it's directly in the center. Now select the white
slider on the far right. We're not going to
be moving this one. We are going to be adding a new slider in
between these though. With our right slider selected, we're going to click
this little plus sign, and that'll add a slider
between these two. Now, select this new slider
in the middle we're going to set this position to
0.7, and hit Enter. Now we can adjust the color
of this middle slider. We can do that by
making sure we have it selected and then selecting this color bar at the bottom, and we're going to set the value for this a good bit darker. We're going to set the value
to 0.14 and then hit Enter. Now we can see up at
the top here we have this dark black shadows and then there's a lot
of this medium gray, and then really
only the highlights have this bright white on them. There is one last
thing we need to change before we finish
this base material. Above this gradient on
the color ramp node, we'll see a drop-down
here that says linear. This drop-down changes to how
the gradient is generated. The default linear mode does a pretty good job of getting
the look that we're after. However, there is a mode that has slightly softer gradients. We can switch to that mode here by clicking
on this drop-down, we can see all the
different types of gradients that we
have access to. But we're going to be
choosing B-Spline. We'll notice once
we click B-Spline, if you look up at the rhino, you'll see that the
gradients change. Overall they are are
a lot less stark, and a lot more are
softly blended. Overall, the rhino's
a bit brighter because there's not as
much pure black on it, and then the gradients
between them are a little bit more
gradual and soft. This does a pretty good
job of matching that smudged graphite look
that we were after. With our stylized base
material created, we're ready to start
layering on new effects that make it look like a
16th century etching. In our next lesson,
we'll be adding the etching lines on top of our material. I'll
see you there.
3. Adding the Etching Lines: In this lesson, we'll add the etching lines to our
material. Let's begin. An important aspect to this hand-drawn look
that we're going for are the straight lines found in 16th century etchings. These lines mostly
fill in the shadows with contour details
about their subject. We'll be combining a
few different nodes in this lesson to achieve a simplified version
of this effect that we'll expand on
in later lessons. This is a multipart process, so let's create two
nodes to start with. First, we'll go down here
to the bottom view port. We'll hit "Shift" and
"A", go to Search, and then type in w-a-v-e
and we want wave texture. We'll create that and you can
just place that over here. You don't need to automatically connect it to the
system just yet. Now let's create a new math
node and we can just hit "Shift" and "A", "Search", type in math and then hit "Enter" and then again we can just
place it down here. First, let's connect this wave texture and
we're going to connect the color socket to the bottom
socket on this math node. Now we're going to move up
here and we're going to drag select over top of these
three nodes: the Diffuse, the Shader to RGB, and the Multiply then let's move those over here to the
left to make some room. Now we can move
this node up here. We're going to connect
the multiply node to the top slot on this new map node and then we're going to connect the math
node to the color ramp node, and then lastly we need
to switch this math node. Right now it's set to Add, so we're going to click
on this drop-down and we're going to instead
choose "Subtract". This wave node that
we created will be creating the edge lines
for our material and the subtract node is subtracting the brightness of
the etching lines from the base material. The white lines generated
by this wave texture, we'll subtract 100%
of the base material. The black lines generated
by the wave texture, we'll subtract 0% of
the base material. This will help limit
the visibility of these etch lines and the
highlights later on. Let's start by adjusting
the properties on this wave texture to make it look a little bit
more like etch lines. The first thing we'll need to change is we're going
to switch this from x-direction instead to diagonal. Now we can switch from sine to triangle which is
the wave profile. It's basically just what
do these lines look like? There's a few different types of lines and I found a
triangle to work the best. We'll switch it to triangle
and you can see here, the look of the lines
is a little bit different, they're
a bit thinner now. The only other two
things we need to change down here are the scale. The scale is going to determine
how big are these lines. We're going to set ours to 100, so it's going to make
the lines a lot smaller. We can now see up here if
we just zoom in on this, we can zoom in on
our camera view. We can see these lines
now are much tinnier, a lot closer together and then the only other thing we need
to change is the distortion. We're going to set ours
to 3.5 and then hit "Enter" and we'll
notice after changing this distortion
these lines are a lot more rough and uneven now. Right now they're kind of
cloudy and chaotic looking, but we'll be fixing
that later though. But mostly this distortion is here to make sure
that these lines aren't perfectly straight and
we want them to have a little bit of wobble to them. That way it looks
like an actual hand drew them over top
of say rough paper. After changing these settings the lines are looking
a lot better, but there's still more
improvements to be made. Let's fix the mapping and the rotation of these lines now. Let's start out by
going over here to the left of the wave texture. We're going to hit
"Shift" and "A". We're going to start by
making a mapping node, so mapp. Choose "Mapping". Let me just place
this here to the left and then again, Shift A, Search and type in texture c, and then you'll see
texture coordinates. We'll choose that, and we'll place that here to the left. Now we can choose the
object texture coordinate. We can drag that into
the top vector on the mapping node
and then connect the mapping node vector to
the wave texture vector. This texture coordinate
node here is basically just telling [inaudible]
how to display these lines on the model. In object mode, in our case, looks the best for the rhino. This mapping node here
is simply just for us to adjust the z-rotation
of our lines. Now let's change the z-rotation
and we're going to set it to 70 degrees and
then hit "Enter". We'll notice soon as we
do that these lines look significantly different
and also much better. These lines now are now a consistent diagonal
across our model. As we move around our model, we'll see a lot less of those concentric circles
that we we are seeing before we changed this mostly in the face and
then on the shoulder. If I just set mine back to zero just as an
example to show you, you can see all these
different circles and things here and that's because the rotation
didn't match the model. Now, this 70-degree
rotation here, this would change mostly based on the model
that you're using. For the rhino in this
case I know 70 works, but if you were doing
this on your own model, you would just want to
rotate the z-rotation around until you found a position that the lines
all flow with the model. In our case, 70
degrees looks good. Now let's zoom in
here on the shoulder so we can get a better
look at these lines. We'll notice that the sides
of these lines here have a soft gradient on
the edges of them. They're not perfectly hard
black and white lines. We can change that by using
a color ramp node again. Down here on the bottom,
let's hit "Shift" and "A", "Search", "ColorRamp" and then
we're going to place this between the wave texture
and the subtract node. Place it here. Now
let's zoom in here on the color ramp and
we're again going to be changing the type of
gradient that it's using. Right now the default like
I said before, is linear. We're going to switch it to
something called Constant. Let's select Constant. We'll see right away all
of our lines disappear and that's because
we haven't actually moved these sliders yet. Now let's adjust
the right slider. We're going to select the
white one on the far right. We're going to move this
roughly to the middle here. We can see as we
move this over now, we're going to move it to basically right in the center so we can set the position to 0.5. That way it's pretty much
equal black and white up here. We can now see that
these lines here have perfectly sharp edges. There's no blending between
them and that's because the constant gradient
mode essentially removes all blending
between colors. This makes it really
useful if you want to give a texture hard edges
like these lines. We can also see an
example of this down here on the
ColorRamp gradient. There is no blending
between these two. However, if we zoom out, and look at the other one we can see the
difference between this and the B-spline which has really soft
gradients between them. Let's zoom out on our camera up here so we can see more
of the full model. Right here is fine.
This is where most of the shadows
on this model are. The last thing we
need to do is make our lines a bit less prominent
in the highlights of this base material and we'll be doing this by
significantly darkening the overall output
of these lines before we subtract them
from the base material. This will result
in the line still being present across
the whole model, but they'll concentrate
them a bit more in the shadows rather
than the highlights. Right now it's
pretty much equal. You can see the lines just as much in the highlights as
you can in the shadows. Let's now go down
here to the bottom. We're going to
select all four of these nodes here just
by dragging over them. We're going to move them
over so we can make some room for a new node here. Let's make a brand new node. We can hit "Shift" and "A", go to Search, and again we're going to be
making a math node. Then we can drag this
between the color ramp and this subtract node
up here at the top. We'll just drag it on top, and then we're going
to switch this from Add to multiply Instead. Now that it's set to multiply, we can zoom in down
here and we can change the value to 0.1 and
then hit "Enter". This will make these lines 90% darker than they used to be making them subtract less from the base texture
in the highlights. The smaller we make
this multiply value, the less prominent the lines
will be in the highlights. With our etch lines added
to our base texture, we're well on our
way to completing this procedural material. In the next lesson, we'll
be adding some texture to our etching lines
so they look more realistic. I'll see you there.
4. Adding Texture to the Lines: In this lesson, we'll
finish our material by adding some texture
to our etching lines, so they look more realistic. Let's begin. This effect is actually a pretty
simple process, so let's jump right in. We're going to need
two nodes for this. We can zoom in down here. First, let's make
some room for them. I'm going to drag select
over these bottom four, and move them over to
create some space. Now, we can hit
"Shift" and "A "to add a new known, go to search. This time, we're
going to type in MUS, and we're going to
choose Musgrave Texture. We can place that around here. Then again, we need
a new math node, so shift and a, search, math and
then choose Math. We can drag this between this color ramp here
and then multiply that, we added at the end
of the last lesson. Place it right here. Now, we're going to switch
this here to subtract again. The new math node
is at the subtract. Let's move this ColorRamp, so this whole wave
texture grouping here, we're going to move this
to the bottom slot. We can just click and
drag this on the socket, and move it to the
bottom slot here, and then we're going to plug
in the Musgrave above it. Let's start adjusting
this Musgrave Texture. This texture here is
just another one of these procedural textures that
they have within blender, so just like the
wave texture here, or maybe if you use
the noise node before. This is just another
procedural noise. We're going to be turning
this Musgrave Texture into a rough paper texture. It's actually the
texture that you're seeing back here
on the background. The first thing we
need to change is actually the dimension here. We're going to set
this dimension value on the Musgrave Texture, all the way down to zero. We can just drag this all
the way down to zero. By setting this to
zero down here, it'll make these next two
adjustments actually visible. If you don't change the
dimension to zero first, you won't really notice any of these changes
up here that much. Now, let's change the scale. We're going to set that to
one, and then hit "Enter". Then the detail here, we're going to set that to 15. We're making it pretty much
as detailed as possible. This is where you'll actually notice the difference
in the texture. Now that we have our
Musgrave Texture setup, you can see the
difference that it's made in our texture overall. We can see that we have
this rough paper texture applied across most
of the shadows, as well as, some of the
highlights here as well. Although it's most prominent
here in the shadows. It does a pretty
good job here of breaking up these lines
across the model, so it doesn't look
quite so geometric. It makes it look a little
bit more hand-drawn, as if this was scratched out on a really rough
piece of paper. While this new paper
texture looks pretty good, it is a little bit
too strong right now. Now, let's lessen the overall impact of this paper texture, so it's a bit more subtle. A simple way to do
this is to overlay a brighter version of this paper texture on top
of the whole material. This will make the
shadows of this texture, more of a dark gray, rather than pure black
like they are now. Let's zoom out here on
our bottom viewport. We're going to need
two nodes to do this. The first one we'll
need is a mixed node, so we're going to hit "Shift"
and "A", go to search, and then type in mix,
and then hit "Enter". We're going to place this
over here near the end. We don't need to
hook it up just yet. Then lastly, we need
a color ramp node, so Shift, A, search, then again, color, and we're going
to choose color ramp. We can place that about here. We're going to start by dragging the height socket when on the Musgrave Texture over here into the color
ramp on the bottom. Now we need to adjust
this mix node. Let's zoom in on this. The first thing we
need to change is the float so we're going
to switch it from float, down to color instead, because we wanted to
basically look at the colors, rather than these
mathematical formats here, so we'll choose color. We're going to switch it
from mix to overlay instead, which is here in the middle. Then lastly, we're going
to set the factor from 0.5 down to 0.25 instead. Now, we can connect this
new color ramp into the B socket at the
bottom. We can zoom out. We're going to move
over the color of the material output rather, I'm going to place
this between it. We are going to need to
manually hook this up, so we can connect
the result from the overlay mix
node into surface. Then we can connect this
very first color ramp that we made into the A socket. Now, to explain a little
bit of what we just did. First, this color ramp node, we won't actually be adjusting
any parameters on this. This is simply so that
the Musgrave Texture is a nice soft gradient
between black, and white, before it gets
put into this overlay node, so you can just
leave this as it is. Now, if we zoom in here
on this overlay mix node, let's go through some of the
changes that we made here. The first thing we did
was set it to color mode. This changes the mix node, so that it's only looking at the color of the input nodes. In our case, just
shades of gray. We then changed it
to the overlay mode, instead of the default mix. If we look at this
drop-down mode here, well notice it has a whole bunch of
different options that might have looked
immediately familiar to you. These are essentially the
same thing as blend modes in other programs such as
Photoshop, or After Effects. It's possible that
another mode that isn't overlay would produce
a similar outcome, but I found overlay to work pretty well for
what we wanted to do. It overlays the lighter parts of this Musgrave Texture on top of the darker parts to
help lighten them up. Then lastly, we set our
factor from 0.5 down to 0.25. You can think of this
as the opacity slider between the A socket, and the B socket. If we set the factor all
the way down to zero, it's showing just the A socket, and if we set it all
the way up to 100%, so setting it to one, it will show just the B socket. By setting the factor to 0.25, we're blending the
B socket on top of the A socket at 25% opacity, so if we zoom out here, we can see that the A socket, so everything that's plugged
in via this wire here, is essentially the base
material which is up here, and then the lines as well as the paper texture that's
on the base material itself, so the paper texture that
we're trying to minimize. Then the B socket, so the bottom one that
we're blending on top of it at about 25% opacity, is that same paper
texture ran through this color ramp to
make sure that it's a nice gradient between
black, and white. Then it's overlaid,
which is going to brighten it up at 25%. If you're curious to
see what difference this last mix node
step that we just did here actually
made to our texture, you can simply grab
this last node, this color ramp node, and then bypass this mix node by dragging it right into
the material output, on the surface socket. We drag it here. Notice that this texture is a
lot more punchy. It's a lot more stark, and bold. It shows up more
in the highlights, and also makes the
shadows a bit darker. Now, if we run it back
through this mix node by dragging the mix socket
down to the surface here, we can see that it overall
just lightens things up. It makes it a little
bit less stark, a little less bold, and just gives it a
more subtle look. With the softening of the
paper texture accomplished, we've officially completed our procedural
hand-drawn material. In the next lesson, we'll animate our
lights to create a stylish reveal animation for a rhino. I'll see you there.
5. Animating a Stylish Reveal: In this lesson, we'll
animate our lights to create a stylish reveal
animation for our rhino. Let's begin. We're done
creating our material, so we can now switch back to the layout tab so we
can begin animating. We can do that by
going up here where it says Layout and then
just clicking that. You'll also want
to make sure that your left viewport here on the layout tab is set
to your camera view. Again, if it's not in the camera view or you've
accidentally moved out of it, you can click this
little gizmo button here to reveal the gizmos, and then click the little
camera button here. I'm going to turn the gizmos off again just so I have
a cleaner view. Now let's switch
this left viewport to our rendered viewport mode, we can do that by clicking
this button here. Then lastly, let's make
sure our lights are actually visible within
the right viewport. We can do that by going up here to our Viewport Overlays, clicking this little
drop-down arrow, and then turning
on extra objects. This will show all of the
lights that are in the scene. If you aren't able to see this
viewport overlays button, you can click and hold in on your mouse wheel while
hovering over this bar, to pan it left and right and if you slide it all the
way to the right side, you should be able
to see this button. Now we can begin animating
our lights to create a simple but stylish reveal
animation for our rhino. We'll accomplish this
with just three lights, turning them on and off
in staggered sequence. Start by going over here to the right side where your
Scene Collection is. Then twirl open this rhino
lighting collection. In here we'll see
three different lights that all have this
symbol next to them. Any light that doesn't have
this white triangle symbol next to it has been
disabled from selection. This is just to make
sure that you don't accidentally affect
those lights. Any light that has
this V-shaped line next to it that isn't a
filled-in white triangle. We won't actually be animating. Let's start by hiding
the fill light left and the fill light right. We can do that simply by
clicking this little eyeball here just to turn them
off in the viewport. Now the only light
that we're seeing, at least of the ones
that we're going to be animating is this main light. Let's select the main
light here on the list. Then we can go down here to
the object data properties and click on this little
green light bulb icon, and that'll show us the
parameters for the slight. Let's decide when we'd like our light to be at full power. This will be the time during
the animation where you get a fully lit look at
the rhino sculpture. I think frames between maybe 140 and 230 should look pretty
good for our animation. Let's start out at frame 140
by moving our playhead here. And then we're going
to keyframe the power which is currently
set to 70 watts. We can do that just by
clicking this little white dot here to place a yellow keyframe. Now move to frame 230. Then do the same exact thing. Just click this
little diamond icon to place another keyframe. Now our light warming at
full power from 140 to 230. Lastly, we need to
determine when the light will turn off and turn on. Let's start by putting a
keyframe here on frame 10. We're going to set
this to zero watts. So we'll type in zero for
the power, hit Enter, and then, again,
make sure you place your keyframe by clicking
this little diamond. We can go to frame 290, which is right before the end. Again, we're going to set
a zero watt keyframe. Hit Enter, and then
place our keyframe. We've now keyframe this light to start out with a turned off, and then it slowly
fades on up to 140, stays at full power
all the way up to 230, and then it fades out from 230
down to zero watts by 290. The way that we've
keyframe this light ensures that the animation
remains seamless. This will be important
later on when we convert it into an animated GIF. If you'd like to see what this animation looks
like in motion, we can just hit the
play button down here to get a rough preview of
what it actually looks like. We can see here,
like I said before, it turns on, stays
at full power, and now it turns off. Now we can pause our animation. Let's animate the last to
fill lights that we turned off before so we have a
complete reveal animation. Let's go up to our
collection here. We can turn on Fill Light Left, which is one that we've
turned off in the past. Now we can select this light, so that we can start
keyframing in instead. We'll be keyframing this light very similar to the main light, however, we'll have it remain at full power for a bit less time. This will make the
animation slightly more complex by having
staggered illumination. Let's move our
playhead to frame 140. We're going to place
our first keyframe, which is the full
power of 30 watts. Now instead of moving it to 230, like we did the last one, we're going to have
this one stop at 200. We'll move our playhead
to 200 and then, again, place another
full power keyframe. Now we can set our fade in and fade out points just
like the last slide. We're going to have them mimic the exact same placement
for the main light. We'll start at frame 10. Set this to zero power,
place our keyframe, and then again frame 290, zero power, and then
place our keyframe. Now lastly, let's work
on the Fill Light Right. We can select that light and then turn it on to
make sure it's visible. Again, we'll be staggering
this light from the others to maintain that slight
bit of complexity. We'll have this light be
the first one to fade on. Let's move our play
head here to frame 110, and we're going to set
our first keyframe with 40 watts at frame 110. Clicking that button there. Now let's move our play
head to frame 200. We'll set our last
full power keyframe, 40 watts at frame 200. Then lastly, just like
the other two lights, we'll go to frame 10, place a zero watt keyframe. Then frame 290 and zero watts as well and then
place our keyframe. Now let's hit Play to
preview our animation. We can see that the
offset we created between the lights causes
the lights to have an almost wave or cyclical pattern to
them as they turn on. We'll also notice that
the animation loops, which is exactly what we wanted. In the next lesson, we'll do some really simple compositing before rendering our final
animation. I'll see you there.
6. Compositing and Final Rendering: In this lesson, we'll do some
really simple compositing before rendering our
final animation. Let's begin. The first
step in this process is to render a steel
frame from our animation. Let's set our play ahead to 200. This is a frame where all of the lights are at
their full power. Now let's move to our
rendering work-space, which is up here, and
we can get to it just by clicking on the word rendering
here at the top center. Now let's actually
render this steel frame, and we can do that
two different ways. We can go up here to Render, and then choose Render Image, or you can just hit
"F12" on your keyboard. I'm just going to click this
Render Image button here. We can see that due to the Eevee render engine
that we're using, this render renders really fast, so for my case it was
less than two seconds. It would vary based on the
computer you're using, but I would be
surprised if any of these took more than
just a few seconds. Our render Is looking
pretty great at this point, but there's still one
simple compositing effect that we can add to make
it look even better. To add this effect, let's go
over to the Compositing tab, which is right
next to Rendering. So we can just click
on compositing, and we're now in our
compositing workspace. I've already set up
the compositing tab for you with the viewer node, and the render window
on the right side. I explained how I set up this window in many
of my other classes, if you're interested
in the process. If you're not seeing the render
appear on the right side, click this backdrop button on and off to get it to show up. Now let's add just a
single node here to the left side to improve
the look of our render. We're going to hit
"Shift and A," go to search and then type in glare. Will make a glare node, and we're just going to
drag it here on this line. Now let's zoom in here
on this glare node. We can also zoom
in on our image. Let's find a spot basically around the
head and the shoulders. Again, this is probably the most complicated
part of the image. This glare node will add
a subtle glow effect around the brightest
parts of our image. This effect is somewhat
unrealistic if you're trying to exclusively replicate
the look of a drawing, but I think the really subtle
amount of glare that we're going to add can look pretty
great for our final output. If you'd like to skip this
step, that's totally fine. You can just watch this to
get an idea how it's done, but then just decide not
to do it for your image. So let's begin adjusting
this glare node. We're going to switch it
from the Streaks mode to Fog Glow instead, which is the most simplified
version of Glare. Now let's set the quality
from medium to high. We're going to set
our threshold a lot lower because our images
ain't that bright, but we still want to
have some of these glow. In order to get the glow
to show up on these areas of our highlights which aren't really that close
to white anyway, we're going to have
to lower this value. We're going to set
ours down to 0.1, that way I've used these
brightest parts of our image as still really bright highlights. Then lastly, we're going to
set the size down to seven, so it's not quite as large. We can now see that it's
added a really soft, subtle glow around the
highlights of our image. If you'd like a comparison as to what it looked like before, you can just drag from the
Render Layers node here, and then bypass this glare one by dragging it
right to this dot, and you can get an idea of
what it looked like before. Again, like I said,
this isn't 100 percent realistic if you're
trying to replicate the look of an actual etching, but I think for the fact
that we're doing this in 3D, and this is all
approximated anyway, I do actually like the
look of this glare. With this final
compositing step done, let's get our animation
ready for rendering. Now let's switch back
to our Rendering tab. You can do that up
here at the top. Make sure you're set
to the Output tab, which is this little printer with a paper printing out of it. I've already set up all the
output properties for you, but feel free to look over
them if you're curious about how will be outputting
this final video. The only thing we'll need
to do is to designate a final output destination
for the video, and we can do that down here by clicking on this
little white folder. After clicking the folder, just navigate to the location that you'd like to
save your video, and then down here we
can give it our name. I'm just going to call
mine Rhino Animation_ 01, and then I'll put an
underscore at the end of it. Because blender by default, it's going to add the
numbers of the frames and the animation to
the end of the name. If you don't put that
underscore there, it's going to blend right into the version number
that I just gave it. By putting this
underscore at the end, I just make a little
bit of a buffer, and then I can choose "Accept". With the output location set, the only thing left to do
is to render the animation. We can do that by going
up here to Render, and then choosing
Render Animation or you can hit
"Control, and F12." I'm just going to
click that button now. As your animation renders, don't worry if it seems
like it's not applying the glare to each frame
of your animation. It's just skipping
the visual for that as it renders on
some of the frames. It'll look correct
in the final output. Since this render is using
the Eevee render engine, this whole 10-second
animation should only take about maybe 10, 15 minutes on most computers. That's one of the great benefits of the Eevee render engine. It's really fast. I'll see you in a moment when my entire animation has
finished rendering. Our final animation is
done, and it looks great. We can see how our
staggered lighting reveal and glare
work together with our new procedural material to produce a really unique
and stark animation. In the next lesson,
we'll convert our final animation video into a looping animated GIF.
I'll see you there.
7. Converting into a GIF: In this lesson, we'll convert our final animation video
into a looping animated GIF. Let's begin. A video is great to have a high-quality
version of your animation. However, it's not the easiest thing to share with others. By converting our video
into an animated GIF, we open up the places we
can share our animation. Skillshare doesn't
allow you to upload a video directly to
the platform yet. However, we can upload animated GIFs with
no issue at all. The first thing we
need to do is go to the free video
converter website. We'll be using ezgif.com/maker
to make our GIFs today. It's really simple and
free way to convert our video animation into
an animated GIF file. We'll start by selecting this
"Choose File" button here. Now, select the video file
that we just rendered, in my case, Rhino_Animation_01. I'll select this, and
then choose "Open". Now, click the "Upload
and make a GIF" button. This may take a few moments as it uploads your video file. Our video file has
successfully uploaded, and we can see that here. Now, we can scroll down to
see the options for our GIF. We're going to change
our size here. Right now, it's set to
original up to 600 pixels. We're going to switch it to
original up to 800 pixels. What will make our final
output for our GIF, 800 pixels wide, and then whatever
the proportional amount is for the height. Now, let's switch
our frame rate. Right now, it's defaulted to 10. We're going to switch
it all the way up to 25 because it's the closest thing to the 30 output that we
actually created. We'll choose 25 here. Then lastly, we're
going to check on this "Optimize" button here. That's mostly because a lot
of our image remains static, really the only thing
that's changing is the rhino itself. This will help just make the GIF a little bit higher quality by assigning colors to
adjust the moving parts. With these settings
done, you can now click "Convert to GIF". We'll see down here, we have
this little dancing cat which is just their load
bar on this website. We can already see our GIF
here popped up at the bottom. I'm also get a clue as
to the size of this GIF. We can see here the
width which was 800, and then it shows 450 for
the height because that was just enough to make it
proportional to what it was. Now that we see
our GIF down here, we can see that the file size
is 15.4 megabytes which is a really important
thing for us to know because Skillshare
only allows you to upload images if they
are under eight megabytes. We're going to need to optimize this GIF so that the file
size isn't quite so large. Luckily, there's a
really easy way to optimize it directly
within this site. We can do that
simply by clicking this little optimize
button here. We'll select this.
It'll bring us to a new menu where we can choose
the optimization settings. The only thing that
we should need to change is this
compression level, and we're going to set
ours a little bit higher. I'm going to set mine up to 40, and then hit "Enter", and
that will immediately start optimizing the GIF. Again, see this little
dancing cat as the load bar. Now that our GIF has
done, I can scroll down, and see that the file size
now is under eight megabytes. Now, if you were doing a
different image or you chose to change your output settings
or anything like that, this 40 optimized setting
that we changed up here, this compression level
might not be enough. If that's the case,
you might need to increase this number here. You can get an idea of
how much compression that actually equates to
over on the right side, so 30 is very light and
then 200 is pretty heavy. You might need to
increase this number in order to get your file size
down below eight megabytes. You can also try on the
previous page using a slightly smaller resolution. Maybe 600 pixels wide is what you would
need for your GIF. Once you're happy with your GIF and it's below eight megabytes, you can simply right-click
on this image above, and then choose "Save Image As", and then just choose
a location where you'd like to save your new GIF. I'll say mine in the same
location as I save the video, and I'll just call this
Rhino Animation_01_GIF, just so it's obvious what it is and then I can hit "Save". Now that we've saved
our GIF, we're done. You can now upload
this animated GIF as though or a regular
image on Skillshare. Just choose the image
upload rather than the video upload when adding
media to your class project. In the next and final lesson, we'll discuss our class
project. I'll see you there.
8. Our Class Project: You've made it to the
end of the class. Congratulations. I want to thank you all so much
for taking my class. It really means a lot to me. I hope you found this
experience valuable in learning the basics of procedural
texturing and blender. Also sparking your
imagination at all of the possibilities that
this knowledge uncovers. For our class project, I'd like you to take
all of this knowledge you gained during the class and put it towards creating
an etching reveal animation, or still render of your own. Feel free to experiment
with this texture to see if you can convert it
into a brand new look. When you're done,
post your render or animation to the
project gallery. I'll personally
review every project uploaded and give you
feedback on your render. If you want to try texturing
a different statue, you can go to threedscans.com and download a free statue
model to work with. Many of these statues are
SDL or OBJ file types. You'll need to use
the "Import" menu to add them to your
blender scene. You might need to enable
these file formats in the admin section
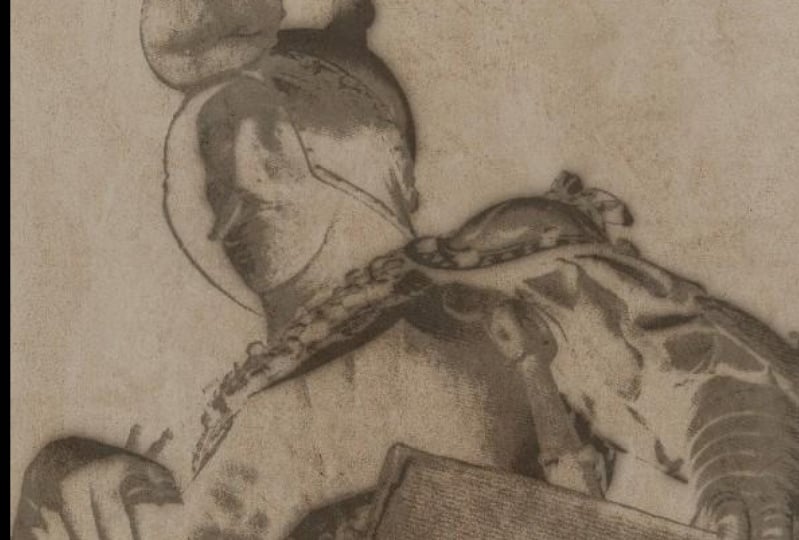
of Blender as well. For my class project, I created a parchment animation
of Theodoric The Great, by Pieter Bruegel the
Elder and Albert Kerr. I utilize many of
the same techniques we learned in this class and some simple compositing to get this ink stain parchment look. If you liked this class, let other students know
by leaving a review, your feedback really
helps me understand what you found most
valuable in the class. You can leave a review easily by going to the "Reviews" tab just below this video and clicking the "Leave
a Review" button. I really appreciate the support. After leaving a review, you might just want to follow me here on Skillshare as well. You can follow me at anytime by clicking the "Follow"
button above the video, or by going to my
teacher profile and clicking the
"Follow" button there. Following me is the best
way to get notified when I release a new class or make
important announcements. Lastly, I want to thank you
all again so much for taking my class and supporting me by participating in
the class project. I can't wait to see what
you all come up with. Farewell for now, and I hope to see you in
another class soon.
 Harry Helps, Professional 3d Artist