Transcripts
1. Introduction: Et's get festive. Have you ever wanted to create a digital greeting
card? Check this out. In this class, we
are going to create an animated Christmas
greeting card using Procreate and
Procreate drinks. Whether you want to send some holiday cheer to
your friends and family, showcase your creative
skills on social media, or simply add a touch of magic
to your digital portfolio. This class is the
perfect way to do it. Hey, I'm Alexandra
AKA the art mother. I'm an artist and educator specializing in digital
illustration and animation. And I'm here to
guide you through a delightful project perfect
for the holiday season. Here's what we'll cover. First, we will create a festive illustration
in Procreate, exploring some fun
tools and techniques. Then we will bring it to life. I will show you how to animate your illustration in
procreate dreams, creating a smooth, playful, looping animation that will
captivate your audience. I will show you three
animation techniques. First, the smoothly
looping snowfall, then the playful snowflakes
in the foreground, and lastly, a magical
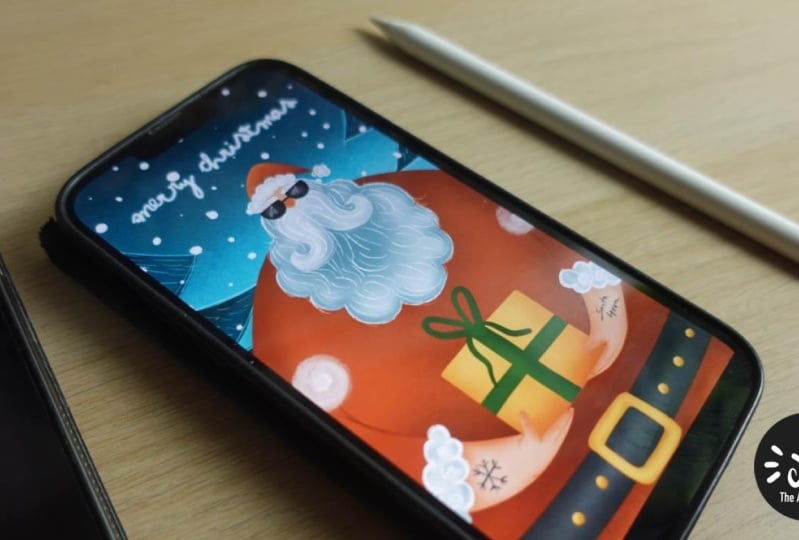
animated handwriting. You will export your artwork as a video and a high quality
sharable Jif so that you can use it as
an image attachment and actually a digital
greeting card. This class is designed for beginner to
intermediate learners. So even if you are new to
animation or procreate dreams, you'll find the steps
approachable and easy to follow. Plus you walk away with a unique holiday project
that's sure to impress. So grab your iPad,
fire up, procreate, and procreate dreams,
and let's spread some holiday magic through
art and animation. I can't wait to see what you
create. Let's get started.
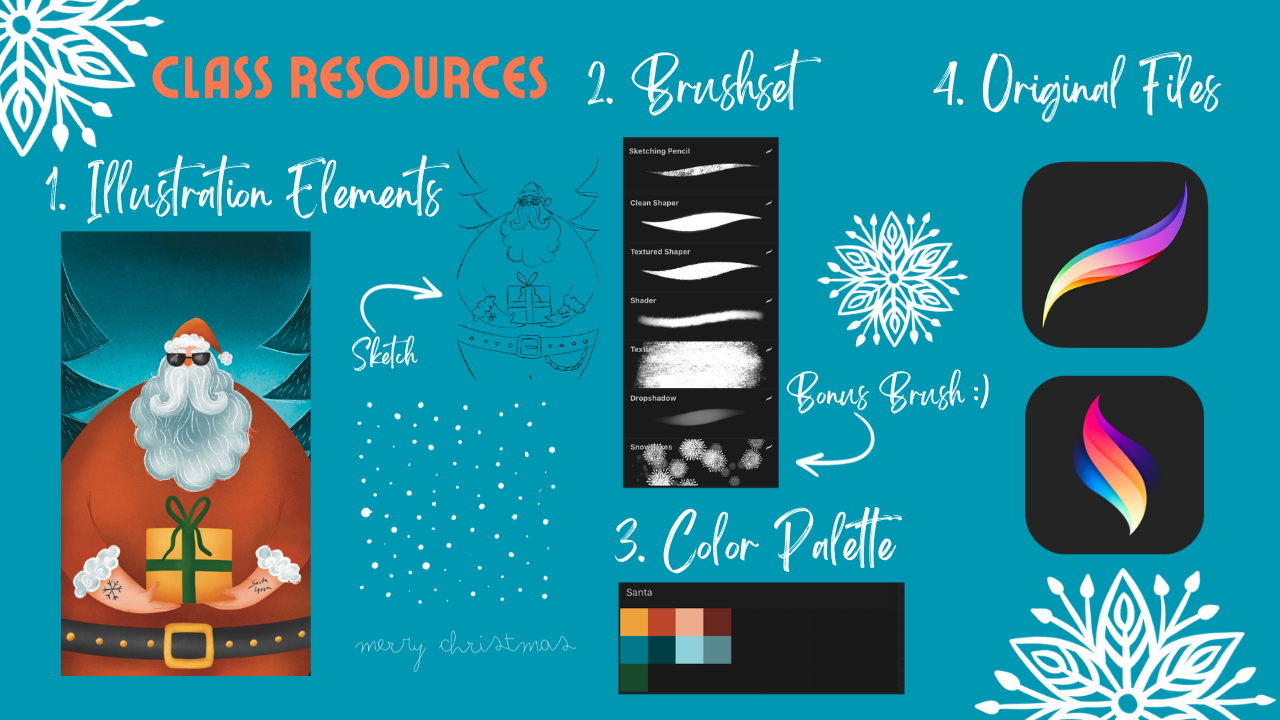
2. About The Class: It's so wonderful
that you are here. Welcome. In this video, I'm going to talk to you
about the class structure, the class resources,
and the class project. So the class is divided
into two parts. In the first one, we
are going to create the illustration
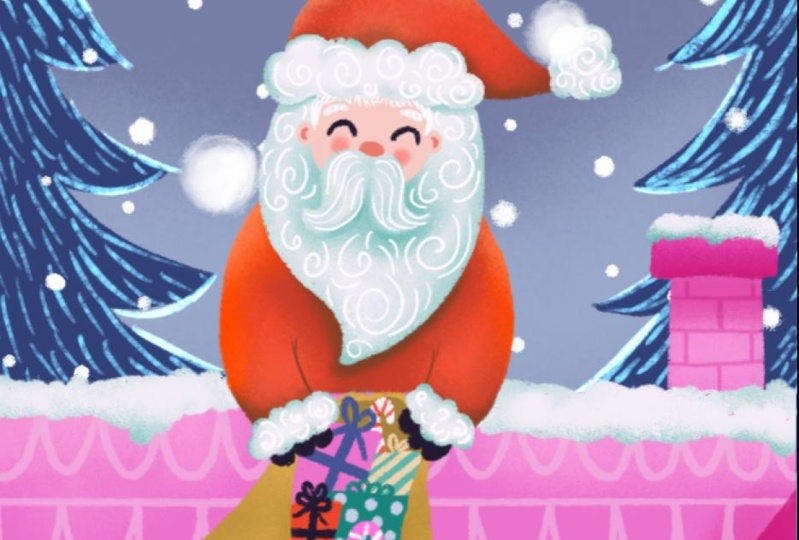
together and procreate. Now, the theme of this class is seta standing
in the snowfall. But you are free to
interpret it as you wish. But keep in mind that differently composed artwork
would need some adjustments. So create a different
composition. With the animation techniques that I'm going to
show you later, only if you are comfortable
with your skills. Okay? If not, just
feel free to change my sketch or create one from scratch following
my video guidance. Also, if you don't
want to illustrate, you can skip the
illustration part and use the elements that you can
find in the resources. In the second part of the class, we are going to animate
and procreate dreams. We will use our illustration and apply three different
animation techniques onto it. We are going to create
a looping snowfall some playful snowflakes, and I will show
you how to create this magical animated
handwriting. Lastly, we are going to export this artwork as a video
so that you can share it as a real and
also as a Jif so that you can use it as an
email attachment, for example. And also, you can upload it as a Jif
into a class project, and it will immediately
show the animation. No, I have explored
several ways to do so. Procreate Dreams doesn't
allow you to export Jifs yet, but there is another application called Adobe Express
that is free, and you can convert your
video to a JIF there, and I will show you how. And this method comes with
the least quality loss. I've tried several applications, but they came with a
lot of quality loss. Okay? So this is the best solution that I have found
yet to create chips, and I'm so happy to
share it with you. Regarding the class
resources, as usual, you will get a breast set, a color palette, my sketch. You will get the original
files for reference, and also my original
illustration as a procreate file so that
you can use that if you just only want to try out
the animation techniques. So the class project
is to create a looping animation of Santa
standing in the snow, right? As I already told you, you
have artistic freedom. So interpret this
topic as you wish, so you can have a snowman
standing in a snowfall or an angel or whatever Christmas themed or just
a simple Christmas tree. The looping part of the
animation is not obligatory. Creating a snowfall
a simple snowfall that is not looping is easier. But a looping animation is
always more eye catching, so I wanted to share this
technique with you so that you are able to create a looping animation in
procreate dreams. A looping snowfall, actually. When you are done, make sure to upload your class project to the project gallery so that
we can see what you created. Also, if you share your
artwork on social media, make sure to tag me so that
I can reshare your artwork. All right. So as a first step, download the resources,
grab your iPad, and see you in the first class.
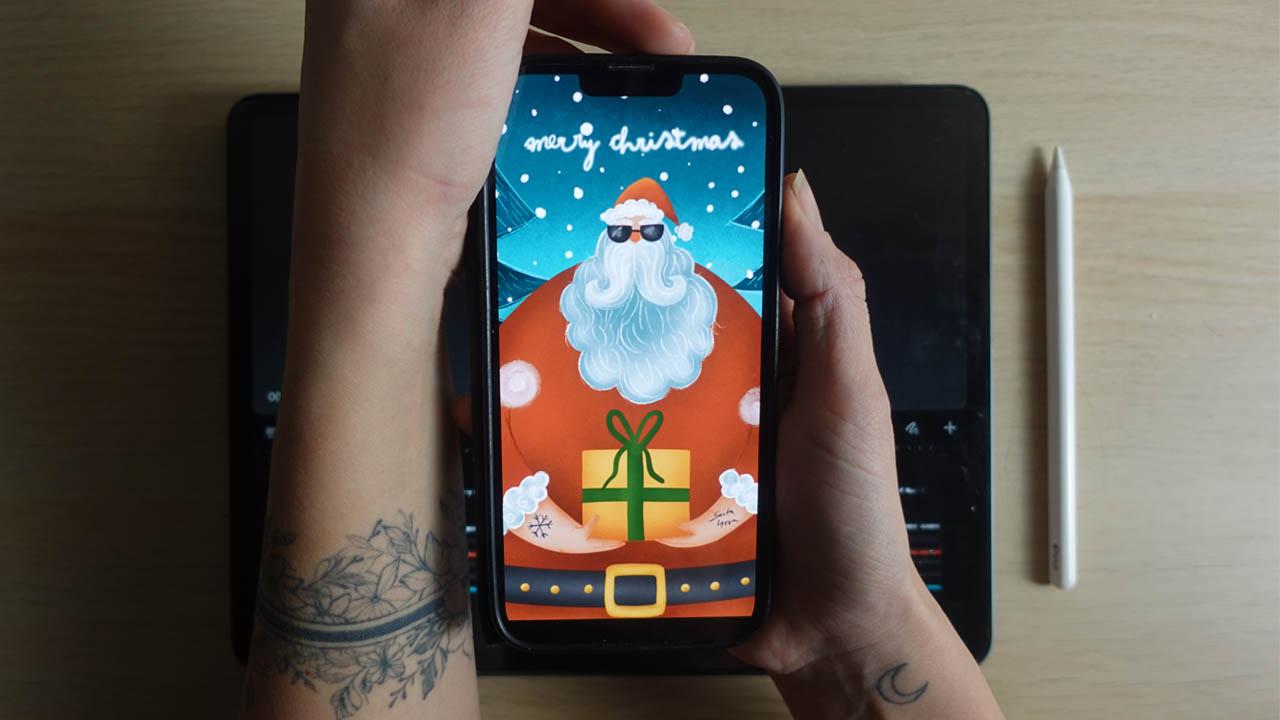
3. The Sketch: Welcome to the first lesson. In this video, we
are going to create this sketch of our
greeting card. And what I thought is
that the topic would be, basically, that we will have Santa Claus mainly on
the greeting card. There would be the
snow falling and the writing Merry
Christmas would appear in an animation technique that I will show you later. So the first thing we need
to do right now is to create this sketch of this
greeting card. You are free to do
whatever you like, so you don't necessarily
need to have a Santa Claus. You can follow along while
creating your own design, or you can just take my
sketch and redraw it, make it your own, or follow
me 100% step by step. You decide what you
feel comfortable with. I really want you to
have some fun time with this while
preparing the holidays. So it is really
important to decide on the dimensions that you
are going to illustrate in. I want this animation or Jeff
to work on social media. I want to create a reel from it, so that is a dimension
that I'm going to use. But you are totally
free to create a different dimension,
Canvas and animation. The process will be the same. No I will create a new canvas. I hit the plus
button here and hit this plus button here so that I can write in the dimensions. And the width will be 720
and the hate 12 80 pixels. So I will create it I don't know if you
notice the DPI is 300, I always illustrate in that DPI because that gives me
a nice resolution. I want to keep this
really simple. When I have a canvas, I usually create with the sketching pencil
and black color, an approximate rule of thirds. Rule of thirds is that if you divide the canvas into
three even parts, you will be able to place
elements more easily. And you don't really need
to be like 100% precise. What I'm doing is actually, I am doing the hand measurement. I could use the canvas
guide to help me with this, but I love to keep
things like Sibyl. And if you see that something
is not really even, you can just adjust it
and move it around. Alright, so I think
it is not perfect. Uh, this would look better. Alright, so now I have
this rule of thirds thing. I will lower its opacity, and I will create another layer, and this is where I'm going
to create this catch. Now, I want to
Santa Claus, right? I always start with identifying the basic body parts that my character has.
So he has a head. He has a bird. He has a
hat, and he has a body. Now if I want to
create contrast, I either create a
giant head with a small body or a giant
body with a small head. And with the Santa Claus, I think this giant body
would work very well. So in the lower third, of this canvas, I
will draw his body. And I can decide
on every element, like what basic geometric
shape it will have. I don't really want to go into character design stuff right now because this class is
not really about that, but it will help
you if you think about the basic geometric shapes and decide on them
that the head will be, I don't know, round or
triangular, whatever. Okay. So this is going to
be the base for the body. I will adjust it a bit more. Okay. And I am now just sketching in the
basic geometric shapes, okay? So he will have a
small head here and a giant beard like this. And as you can see, I am using
these lines as guidelines. So approximately this is
where these lines come from. Okay? And in the middle,
there is the head. Here is the beard. Here is going to
be the head, face. And what is it going to do? Like, he's going
to hold a present. So here is the present. And he's going to hold it. Like this. Okay. My original idea was to create
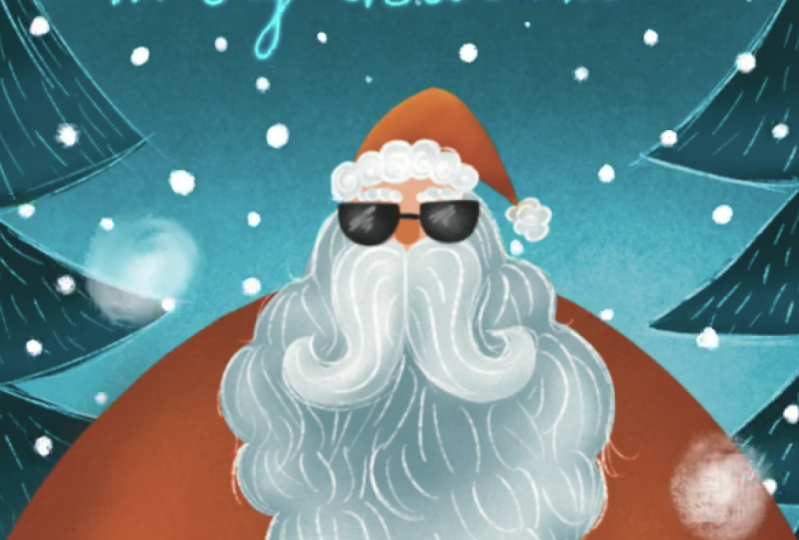
a tattooed, Santa Claus. Maybe I can create that. He will have this thing here, and his arms will be here
holding the present. And he will have like tattoos
on his hand. That's cool. Okay. This is when
I'm adding kind of character design things. Think about fun stuff
that would make this, like, really funny. And I will add some cool
sunglasses to this guy, and he will have
a big moustache. Okay, I'm already
in the flow state. So this is going to be
the random, base sketch. And I forgot the belt. Oh, my God. So he will
be kind of like this. He will have a belt. And there will be some trees in the background like this
and Merry Christmas. This is going to be
this body shape. Okay. This is cool. I love it. Alright. What I'm
going to do now, and this is what I'm going
to make quick or speed up, I'm going to create
another layer, lower the opacity of this one, and turn the guidelines off so I don't really want to
be that very strict. And what I'm going
to do is to create a clean linework over this sketch and add
some more details. So watch this sped
up and have fun. Okay, so this is so much
fun. Can you see this? I want you to have
fun with this. Okay? So the composition
is totally simple. His body shape is a big ellipse. You can even make him that
big that you don't even need to take care of the
legs. Have some fun. If you decide to
have, like, tattoos, as I did, have some
fun with the tattoos, so I like, have Santa forever. Right in here.
Yeah. And the bird, you can play with the
shape of it, as well. Okay, so let's just move
on to the next video, where we are going to
choose our colors.
4. Choosing Colors: In this video, we
are going to choose colors for our illustration. Now, with a simple
design like this, I love to create contrast with balance of warm
and cool colors. My favorite combination
is orange and teal, but I don't really want
to lose this redness of the center that is like a
signature color of him, right? So I will think
about some things. Let's go to the palettes and let's create a new
palette from scratch. And the way that I'm
choosing my colors is that I choose base colors. So my two base colors are going to be one warm and one cool. My warm color is going to
be the orange that I like. It is a very saturated color
and find the perfect one. And I'm going to choose
a teal like this. Okay? Very saturated colors. Now, I will choose a darker
version of the same color, but I will push it to
be a bit more reddish. This is going to give me
that red color so like this. And for the teal, I will
just go simply darker. I don't want that much
of a color variation within the background because that will be the background. And now let's choose
a lighter color. And I thought that a very light, but kind of neutral beach color would work great for
the skin color here. And for the teal, I will just go with this really light blue. Now, we can lighten and darken these colors
throughout the process, but I really love to give some base to my
illustrations and, like, then go with the flow and not just have colors,
you know, randomly. I will name this palette. Senta and you can find
it in the resources. Okay. So we are going to
work with these colors and then see how it goes
through the process. Okay, so I'll see you in the next video where we are
going to fill in the colors.
5. Illustration Part 1: Alright, so let's just start
illustrating this city, how I start my illustrations. The first step I usually
take is that I'm lowering the opacity
of this sketch. If you want to include
linework in your illustration, you are totally free to do so. I don't really
like to illustrate with linework,
it's not my style, but you are again, totally free to do the
Santa Claus as you wish. Alright, so I have the
sketch lowered opacity, and I create a new layer
below the sketches, and we have the colors as well, and I will just start
filling in shapes. I think we will
progress step by step. So let's just get started. I will choose this red color and I will actually
start by adding that, and then I will play a
little bit with this orange. So I will choose the clean
shaper to have a solid shape, and I will speed these
parts up so that it is not taking too
much time away from you. Feel free to watch it, and then like work on your
illustration as you go. Okay, so let's start. Okay, cool. And now at
the face and the head, like, I will create
another layer. I will choose this skin color, and I will just draw
the head shape. Okay. It will be actually
covered with the details, but you can basically see
the base composition. So there's a giant ellipse, and there's a small
little head on top of it. Then I will create
another layer, and I will continue actually by adding the bird and the moustache
on separate layers. So let me just choose white at first and the clean shaper. And let's add the moustache. Okay. And now I will create
another layer below, and I will add the bird. Now, as this background
is like white, I will just change its color to the steel so that I can see what I'm
doing and I'm actually, filling in already the
color for the background. So I'm on a new layer. I have white, and I
will just add the bird. And I can actually turn off the moustache so that I really
can see what I'm doing. And turn on the moustache. Cool. I will add eyebrows. So I will add another layer and make this brush a
little bit smaller. And I will just add this
eyebrows here. Like that. And I will add another
layer for the hat, and I will again just add
this white stuff here. Add another layer below this white stuff and
choose this red, and I will just add the hat. Now we have the
shapes of the hat. Let's move on to the next
video where we're going to add shading and
texture to this part.
6. Illustration Part 2: H All right, so now let's add
some shading to this part. We will have the head finished and then move on to the body. Okay? To shade this
massage and bird, I will use a bit darker
gray to shade it. Or we can go a bit
with this blue, but let's desaturate it and
make it a bit like grayish. I will choose to shade a branch. Alpha lock the
layers, all of them. So two fingers pe on a layer or hit the layer and
click Alpha log. Okay. Now, choose the bird. Oops, it is here. And add a little bit of shading around the shape. You can actually make it bigger and just go
through it a bit. We will add back that
white feeling in a second. I'll make it smaller
and maybe a bit darker at the edges,
even smaller. At these edges, I will add
even more of this darkness. Okay. And maybe
below the moustache. This will be the shading part. Okay. And I will go to the moustache and add
a bit there as well, but really lightly
because it's on top. Okay. Like this. And what I'm going to do is to create another layer on top, choose white and choose
the sketching pencil. I will turn off the sketch
to see what I'm doing. And with the sketching pencil, I will add these lines here. I will need to add
some shading to the mustache with this blue
that I had that white, you can see that white, okay? We'll just go through it a bit. Maybe I will darken it even more here. Like this. Okay, cool. And now I have the sketching
pencil and the white, and I will add on the top layer, I will add these little lines I will make this a bit smaller. I will go to this
pencil and add a bit of a stabilization stream line
because it is a bit wonky. Okay. And You can add some fun things
into the bird. So you can add a
bit of going out, like with these, you know, This is kind of line work. So yeah, you can have
fun with these lines. I love to use this
technique where I'm like, darkening something
and then getting back it's light with
details like this. So cool. I love it. It looks so cool. I will add a bit of this loose linework into
the moustache, as well. Okay, looks great. We will add some
more shadows a bit later to make or
add more contrast. But now let's just move on
and work on the eyebrows. And basically, what I'm going
to do is to do the same. I will choose this light green. I will actually put it here into this color palette so that
you know what to use. I will just go through
these eyebrows a bit and maybe I will do
everything like this. I will add this light
to the heat as well. Cool. And I will do another layer white in the sketching pencil, I will maybe play around with some spirals here and there. So it looks funky. Okay. Look so cool. And let's add the
shading to the head, and then we will continue
with the sunglasses. I will choose this red or
maybe this orange, yeah, and the shader brush, and I will add a bit of an
orange to the top of the heat. Like this, maybe to
the edge bit more. So it is like lightened. I will add back this
red a bit here. And I will choose a darker
version of this color. I will put it here, and I
will add shading with it. How does it look like? Yeah.
I think it looks good. It lost a bit of its
vibrans so I will add that back in the middle. Okay, looks fun. And now I will turn
on the sketch, and I will create another layer. I choose the skin color
and make it a bit darker and maybe add
the nose like that. Okay. And I will
create another layer. I will choose a dark gray, and I will add the sunglasses. Oh, my God. This is so cool. I will alpha log this, choose light gray
and the shader, and I will add some reflections
to the middle, like this. And maybe I will choose
the sketching pencil and, like, enhance it a bit. Like this. Oh, wow. I love it so much. Okay, so let's move on to the next video
where we're going to work on the body.
See you there.
7. Illustration Part 3: Alright, so let's just
move on to the body. At first, I will actually create a new layer and
fill in the hands. So I will choose the skin color, the clean shaper, and
I will add those. Okay. And I will create another
layer and draw this gift. Let it be this yellow color. So with a clean shaper, I will just fill in the shape. And I will place this
layer behind these heads. Okay. And now I will add
this part of the hand. And what I'm going to
do is to actually turn off the body and create a layer above
the hands and choose the red colour and the clean shaper and just
add these hands here. So that I can see
just what I'm doing. Okay. And on another layer, I will choose white and add the. I will alpha log them both. Also the hands,
and I will choose these green that I
shaded the bird with, and I will choose the shader. And actually, I will just
add the exact same effect to this thing so that
it fits the whole. So I will just go through the whole with this light green. I will choose the sketching
pencil and the white, and I will actually
create another layer, and now I can turn
back on the body. And I will just add these
things here. Like this. Yeah. Cool. I will go to the hands at first. Yeah, it's alpha locked. I will choose its color and choose a darker
version of it. Choose a shader branch. And I will add shading. I will make it a bit bigger. Okay, a bit smaller. And I will add shading. But I will make it even
smaller. Like this. Okay. I will choose the skin color and
now make it a bit lighter and into the middle, I will just add it
back like this. Cool. I will choose this
darker version again, make it really small
and where there is this and I will turn off the sketch to
see what I'm doing. I will just add That's a lot. Like this. Okay. Cool. I will choose the original color
and smoothen it out a bit. Really cool. And if I need to
add some details, I will choose this darker color, a sketching pencil, and I
will actually just draw here some things
that hands have. Maybe I can add two fingers, I can add nails just to make it, you know, L Real or more
real, something like that. And Oops. Like this. There are some
lines at the wrist. Really cool. And this is
the time I'm going to add the tattoos, my favorite part. So I will turn on this sketch. I will choose this dark green, but I will push it a
bit to the indigo, and I will keep this
sketching pencil, and I will just draw this little cute snowflake
as a tattoo here, and I will add Oops. Santa forever. Here. Really cool. I love it. All right. Let's shade the gift. I will alpha log the gift and
choose this yellow color, choose the darker version, make it a bit orange. You will actually get a
similar color than this one. Like this, I will
choose a shader brush. I'll make this one a bit bigger, and I will just go
through this little gift. Like this, I will go back
with the original color, maybe go a little lighter at the top to make it a bit
glowy, but still textuy. So as you can see, I have
thrown several colors into it, and it gives a great variety. Of color and some
interesting like effects. Okay, and now I will create another layer and make
it a clipping mask. So I will draw into
the shape of that. I will choose a clean shaper and choose the color
for the ribbon. I will choose maybe red. Let me see. That
would be too red. Maybe I will try the teal color. No, I will choose green color. Yeah, that would work. I will add this
green color here, and I'm using it for
the ribbon. Yeah. Cool. I will create
another layer. Or this thing at the
top. Looks cool. I will palock them both
and also add a little bit of shading maybe with
a lighter green. I will choose the shader
and just add Oops. Yeah. Add some light into it. Also here. Really cool. Okay. Now I will
create the belt. I will create another layer. Yes, I'm putting
everything on a new layer. This is my I don't
know how to call this. Obsession. This is how
I'm solving things. I chose a dark gray color. I will draw the belt here. I will make this
layer about the body. I will put it
there, where is it? I will, make it a clipping mask, so again, it clips it. I will fill in this color. Cool. Again, the
usual same thing, lighter gray, a bit of shading. So I will add a bit of
shading to the middle, maybe even darker to the edges. This is how I'm solving stuff. Cool. I will create
another layer, choose this light yellow and the clean shaper
and at the belt. Okay. And I will just
add these things here. That should be holes,
but I think it would be really decorative if I
would just add them here, and I will alpha. Look, choose a darker color, darker version of this color. Shader. Make it small. I will add a bit of
a texturing into it. So also shading like
outside, inside. Also these little dots, I will just add or throw a
bit of this shading into it, and then I will choose a
very light yellowish color, make it really small and
actually lighten it up. Really cool. So I don't like how
the belt is, like, positioned, so I
will just select the two layers and
just correct it. Yeah, looks cool. And now I need to
shade the body. And yeah, let's do that in the next video and also add some things to the background.
8. Illustration Part 4: All right, so let's continue
with the illustration. Let's shade the body. So I have it alpha logged. I choose this darker brown
to shade the whole at first, so I will take the shader brush. As you can see, this is
organically evolving. I originally chose
like six colors, and now I have nine, and
maybe I will have even more. So where I'm going
to put the shadows. I will just shade around
this shape of the hole. To give it a three
dimensional feeling. As you can see
these hands are now not fitting there,
but just wait for it. I will add a bit of a
shadow between the legs and actually below the
hands and this gift. And also here, I will add a bit of a shading
around this bird. I will make it bit smaller and around the belt or
below the belt mainly, I will add this shading. Cool. Now, I will
go to the heads. Where are the hens? Here. And I will just add
this shading to it until it blends
kind of into it. So can you see that
I can play around. Choose the slider color
to be blended a bit. Darker one here, here as well. Choose a darker color. Just blend it a bit. Go back to the body
and add a bit of a darker shading
here, below the ints. And where are the nts. Here are the hints, and I
will lighten it up here. And I will choose this red, original red, go to the body. I will add a bit back, actually. So it is not that dark. Going back and forth
with these colors, we'll just add texture. So you can find the
right amount of going back and
forth. Don't worry. Okay. And I had this orange
and I want it, actually, originally to add this orange. So let's try. I'll add this orange
at the middle, maybe at the back. Maybe. It is an interesting combination now. It is a color variety. I I'm not really
satisfied with it. I don't know. I'll go back. Maybe just a little
bit go through it with this orange to make it
a more vibrant red, but I don't think we need
that orange that much. And what I just
did with the hens, I will need to do
that to them again. So kind of blend them in. Okay. And if I want to
add some more details, I will just create
another layer on top. Choose the sketching pencil.
I'll need this brown. I will turn off the sketch
so I see what I'm doing. I will just add lines here. It will just help me to kind of land these
things together, choose a darker brown, and play with that and
I will add one here. And well, I think I'm
ready with the scena. And let's do the background. So into the background, I will create another layer. I will turn back on the sketch. I will choose a darker blue. Choose the clean shaper
and just add these trees. I will actually darken this
part down here as well. Cool. I will offer
look as usual. Choose this bright steel, choose the shader brush, and I will add some light here to the edges of the levels. Now I will choose
a very dark teal, and I will add this
darkness to the top. So between these
levels like this. And now I will create
another layer, choose this light blue and
this catching pencil and just again play a little bit. So I will add these lines to it. I love this. This is my
favorite technique now, this loose Linework as details. I can say that because
this is not like quite the original thought. Of Linework. Okay. This looks cool. It's kind of as if it was, like, a bit snowy And
the reason I love adding details on top
like this is because then I can play with
blending modes. So just a second.
Can you see that? If I go to this layer and just go through
the blending mode, I can play around and
have different effects. Sometimes it works,
sometimes it doesn't, but I wanted to show you
slider color looks great. Maybe I will keep it like that. I will create another layer. Behind these trees, and I will choose the shade
or brush, make it big. And with this light blue, I will create a
gradient to the sky. So it is lighter
behind the scena, and it will be
darker at the top. So I will just make it a
bit darker at the top. It already gives that
texture. It is super fun. At this bottom, I will
make it even darker. I'm not going, Oh, yeah, this is this shape, so let
me just this is the trees. Yeah. Let me just
darken that a bit. And if I want to,
I can add, like, a little glowing stars to the
sky, but I don't want to. That would be, I think, too
much because we will have, like, animation going
on right here, okay? I think that I don't like
this part of the center. So what I'm going to do
is to actually select the whole cena every piece of
him. I will actually group. Let me check. Yeah,
I need Uh huh. Okay. I degroup because I will
need the hands as well. So everything, I will group him. Yeah. Turn off the sketch and I will make the
Santa a bit bigger. Let me see how that looks like. So maybe, yeah, I will
place him just like here. And so that I don't
have his legs, you can always adjust your illustrations based on how you feel it
looks like, Okay? I love it like this better. I think it will
look even better. So I think we are finished here. So let's just move on to the second part of
the class where we are going to
do the animation. I'm so excited.
9. Animating A Looping Snowfall: Okay, so it is time. Let's create an animation
from this beauty. So let's open Procreate dreams. Okay, so let's
create a new file. And again, think about
the dimensions you need. So if you click that plus sign, you can choose from
several different screens. We are going to use
this four case social, and I just realized that if you click right now to
these three buttons, you can set the
frames per second. 24 is totally cool, but you can also set the
duration of this animation. And I think 10 seconds
will work best. Okay? So I will open an empty one. Oops. Yeah. And what does it do? Yeah, we have a ten
second timeline. Can you see that? We don't
have anything on it, so we cannot pinch it. And now let's import
the background. So I go back to procreate. I will actually create
another layer because we cannot put the background
color as a separate layer. So I will just
create a new layer there and select
this steel color and fill it with that color. Actually, nothing
happens, but I will have the background color
on a separate layer. And now I will select the
things in the background. So the gradient, this background
color, and the trees. And I will group them. So I will group them. And actually, if you
click to the new group, you can flatten it, but
I love to keep things. As I have a possibility
to have lots of layers. I will just duplicate this
group and flatten one, okay? Hit flatten and I will have
that on a separate layer. And this is what I'm going to import into procreate dreams. So that I have the
separate layers, always, yeah, that's
just a preference. So I will make it this big. Don't worry about the stuff
that is not finished. With drawing, we will just place the Santa Claus in a second onto it and
it will cover it up. Alright, so it is
fitting our timeline. With two fingers, you can
zoom in into the timeline. I will go back to procreate. Now, the reason I'm having
separately the background and the Santa because I want this snowfall to go behind
Santa and in front of Santa, but that will be
different snowflakes. Okay? So for the sake of it, I already grouped Santa, so I will again duplicate this layer group
and flatten one, grab it, go back to
Percreate dreams, place it about the background. Now I can make the Santa
as big as I wish it to be. I'll make it a bit
bigger like this, and I will make him
fit the timeline. Okay, cool. So now I have
Santa and the background. So let's create the snowflakes, and I'm going to create
them in Procreate because I really want a
seamless pattern, okay? Because I want a
looping animation. So I want the beginning
of the animation to be exact at the same point as the ending, if
that makes sense. So I will go to Procreate
and create a square sized canavs and now I'm going to choose a darker
background color so that I can see
what I'm doing. Create a new layer or
I'm on a new layer. I will choose white, and I will choose the textured shaper. Now, you can do this sims pattern with
real snowflake drawings. So if you want,
you can just spend time creating, like, snowflakes. You know, like, simply, you can look for
snowflake patterns. On Pinterest, for example, or you can have a
stamping brush. Like, I have a stamp
brush of snowflakes. Let me just show you. So
you can do this with this. But I would really love
to make it really simple, so use a texture chaper. So now what I'm going
to do is to fill this all little snowflakes, the whole canvas, okay? Okay, cool. Now I
want you to choose one snowflake and
make it bigger. You will be able to erase
it later if you wish. But it will be a good reference
or just remember one. I will make this one
a little bit bigger, and I don't know, make it like with this
little thing here. Now I'm going to
hit the select and the rectangle and select
the half of the canvas. It doesn't really matter
if you are precise, but make sure that you are
not really cutting any of these snowflakes or if
you can do that, as well. Free finger pipe, cut and paste. And I will This will make half of it
on a different layer. I will select the top one, make it down here, and this one up
here. So I can edit. And now I will merge these
two together, so merge down. Now I can refine
this a little bit. This will help me to create a nicer. Pattern. Okay. So once you have this
little seamless pattern, let's just bring it
to Procreate dream. So I hold down the layer, go to Procreate dreams
and bring it to the timeline between
the two layers. Okay? So between the
Santa and the background. I will make this fit
the Fit D. Mm timeline. So I hold down and make it big. Yeah. Okay. I will make
it bigger a bit. Okay. And can you see the
reference snowflake here? Cool. I will place it
somehow up here so that, you know, behind the Santa, you cannot see the snow. It will fall like this. And I want it to continue, okay? So I want this reference
thing to reappear. What I'm going to do is to duplicate this little snowfall. So I will hold down, go to Track Options and
duplicate the track, okay? Cool. Now I will go
to whichever one. Let's make the top one. I will select it
and bring it out of the frame and place it here. Cool. Okay. Can you see that? I will just zoom in. So
I have my Santa and here is one time the square and
the second time the square. And here is another
reference Snowflake and here is my
reference Snowflake. So my goal is now I
will just select it. Okay. Just it a bit. My goal is now that this reference
snowflake arrives here. In this 10 seconds. The way I'm going to do
that is I'm going to place display hat to the
beginning and hit it, move move and scale. It will add the key frame to this motion track that
applies to this one. I will go to the end
of this motion track. I put the motion track here. I placed a keyframe
here and I will just change its
position and I will make this to this
reference snowflake so that you can see
it aligns perfectly. Yeah. Let's play it. Let's play the whole.
Yeah, I 10 seconds, it will just arrive there. Super cool. Okay. And what we're going to do
with this second one? Basically, what I'm
going to do is to again, click on this layer, the move and move and scale, this keyframe, add the keyframe
to the end of this track. The end of this
track. So I'll just hit this button or
just, can you see that? Or just place it
here as a keyframe. And now let's put
it to a position. It will be somewhere here. Okay, let's play the whole. Can you see that? It
is a perfect loop. There is a jump at the end. Here. Mm hmm. Not perfectly aligned, so I can. What's the jump
about? Let me see. Mm hmm. Okay. So at this final position. I will just place
it er. Like this. Okay. Now it's played. The whole, I mean. Perfect.
This is so wonderful. I love this looping animation. Now, let's see if we can erase from this reference Snowflake. So let's go to the drawing
mode to the eraser. And actually, yes, we can. So let's see the whole. Yeah, here it is again. I will just erase this note for myself. Super cool. So let me just summarize
what we did, okay? We created a square sized canvas and put snowflakes on it. We divide it into it
into halves and like, exchange their position to have a seamless
pattern so it can continue like this
because this is the direction of the
falling on the snowfall. We created one
reference snowflake. We brought it to procreate
dreams and duplicated it. If you need more
of the snowflakes, you can do the exact same
process with another layer. So you can duplicate this
one again and just align those reference
snowflakes, okay? Then, yeah, we duplicated these two layers and placed
outside of the frame. These two squares, okay? And then added a frame to the
motion of the first one to align with the
reference Snowflake at the end of this track, and then did the same or
similar to the second one where we actually didn't
have to align because hoops, you cannot see it
because of the Santa. See you in the next video
where we are going to add some more of
these snowflakes to the front and then add the Merry Christmas
animation to it.
10. Playful Snowflakes: Okay. So what I want now is two little snowflakes
falling down here. I will record their motions and paint them in
procreate trims. My first step is to
create a new track, so hit plus New Track. It is about everything. I will enter the drawing mod
by clicking this button. I will choose white and
the turpentine brush, and I will just paint
a snowflake here. It is a bit transparent. It is textured, so this brush
will work well for this. I will go from the drawing mode, make this fit the timeline. Is one little frame. All right. I will make this tracket
to the beginning, find its position
outside of the frame. I have something here, so I will just erase it. Okay. So you have its
position outside of the frame because we want this looping animation
to look good. So if it starts without
that snowflake being there, it will still have this
looping animation feeling. Okay? So I will hit record, and I will keep my
eyes on the track. I have 10 seconds to
make it leave the image. So I will hold my breath. Oh, that's slow.
Let's start again. And this is very
quick. Start again. That's cool. Okay. Now I will create another track and do
the exact same thing. I will enter the drawing mode. I will draw a little
snowflake there. I hit done. I will make it fit the timeline. Cool. I'm at the
beginning of the track. I will find its
position outside, hit record, keep my eye on the
timeline and make it fall. Really cool. Okay. I love it. So now
we have two kinds of animations
included and let's do the Merry Christmas one
in the next video. But
11. Magical Handwriting: All right. And let's get to the last animation part
where we are going to create a nice leathering writing Merry Christmas up here. The first thing we
need for that is a base that we are going to draw over and then we are going
to actually delete it. So what I want from you
now is to go to Procreate, create a new screen
sized canvas. I will change the
background color to gray because I'm going to
work with white leathering. I will go to add text and
write Merry Christmas. Select the text. Oops. Okay, I will place it to the
middle, select the text, and I will look for a font
that I would love to recreate. Now, with this
animation technique, this handwritten font
would look the best, and you are totally free to write yourself the Merry
Christmas now with a brush here, okay to imitate
your handwriting. So you don't necessarily need
to have handwritten font. I will just go through my fonts. I use them. Yeah, I've chosen this one. But again, you can totally just get a sketching pencil
and on a layer just right. Merry Christmas. Okay? So it can be totally
like your handwriting. I will use this font. I will now go to the layer of this text and hit Rasterize. Rasterize will make actually
an image from the text, so now you cannot edit the text. I will hold down
this layer and go back to Procreate dreams
and place it to the top, and I will make this
fill the track. So I will just select it
and fill the timeline. It is filled? Yes, it is
filled. I will select it. Where is it? I will place it on top up here to
the middle, right? Now, we are going to do
the flip book method. If you have done the other
animation class that I have, you already know the
flipbook method, and it is that you are drawing actually every
frame of the animation. This can feel really exhausting
because that's a lot, but this will be a
really sweet process. It can be very meditative, and let me just
show you, actually. So the first thing is to create a new track
above everything, I will create a new track and place the play
had to the beginning. And now I will enter the
drawing mode with this sign. I will choose white, and I will choose the luminous
brush set the light pen. And what we are going
to do is that we are going to open
the flipbook mode, swipe down, and it will open
up the flip book, okay? Now, what does this mean? We have a ten second
animation with a 24 frames per
second frame rate. This means that we have 240 frames during
the whole animation. Now, we are not going to
fill the whole animation, but we are aiming to
fill at least 200, okay? With this. And what
we are going to do is that we are going to as if write out this
whole Merry Christmas, and then it will also disappear. Okay? Let me just
show you what I mean. So I'm at the flip book.
This is the first frame. I will just draw one
segment of the lettering. I will go to the next one. And as there is the onion skin, can you see this purple dot? This shows me what I
have drawn before. So this will help me
to track the motion. So now I'm going to draw
a little bit longer line and also a little bit
longer line again. And let me just show
you what this does. I'm always starting from
the beginning, okay? Let me just show you
and let's play it. I will show you here.
Did you see that? So we are going to fill
the hole like this. And it will look super cool. So let's just get
into it. We are here. We are in the drawing mode. We are the flip book, and let's spend some time with this. You can follow where you are
in the timeline down here. This means that we are
already in 1 second, so we have 24. This flipbook pages
drawn plus ten. So if I add one more frame, it will jump to 11. Can you see it will count until 24 and then
change the second. Okay, now that I'm at the end, I will write five more
little flea books, flip book pages with
the full so that there is this steady
writing for five frames. I'm at 5 seconds now. I did this very detailed. So maybe you didn't progress
in these small steps, and you might have a
shorter amount of time. That's okay. I will show you in a second
why I'm saying this, but let's just make that five
little frames right now. Can you see this wiggling? I love how it looks like. It just play the hole so that
you can see what we did. Okay, so the snow's
falling and Okay. And now it just stops, right? What I want to do till
the end of this timeline, because if you wish to just write it here and
then pm it is gone, it is cool. That's new. I want to fill this frame by, like, this writing disappearing. And I don't I will
not do this in a way that is that
detailed as this one, because that would like
but as you can see, it is like 6 seconds,
almost 6 seconds. And I have four more seconds. So four more seconds to
make this disappear. So I will make this disappear
from the beginning. So I'm going to write it, like, again, the
Merry Christmas, but always a little bit
less, if that makes sense. Okay? So I'm going to do that. And yeah, this is taking
me, like, a long time. You might see these writings, like in maybe 20 seconds. But I'm already at like 40 seconds of creating
this animation part. So, um, yeah, keep this in mind. Okay, so let's get into it. I will make the play hat
where my last frame is. Oops. Yeah. Drawing
mode, flip book. And let's do this. Okay, I think we are done. We are 9 seconds. I done, I will turn
of the visibility of this layer of the
lettering, okay? And let's play it. Oh, wow. It looks
super cool. I love it. Can you see that? This
looks incredible. I love it so much. Okay, so we are finished with the
animation. What do you say? I love it. Okay, so see you in the next video
where we are going to export it and create a Jiff
from it. So S you there.
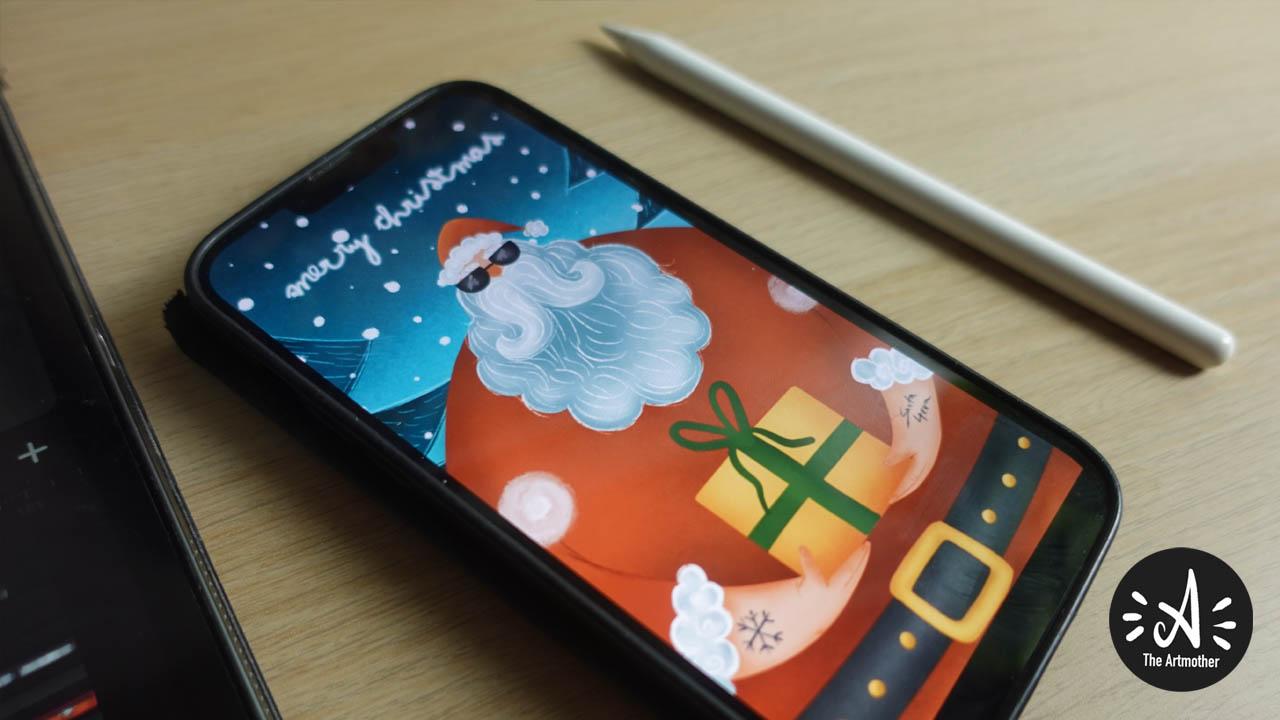
12. Export Your Animation: Alright, so now that our beautiful animation is
ready, let's export it. Now, we will need two files. The first one is going
to be an MP four. This is going to
be a video file, right, that I'm going
to share as a real. And I will need a
JIF file as well so that I can use this as a digital greeting
card in my emails. And actually, it will work as your class
project as well, okay? We will have a different
application to create the JIF because dreams doesn't
support JIFS yet. So if you want to share it, click the Dreams button here. Okay? Hit share and hit Video, and it will export
your file, right? I will pop out and
save video. Cool. And now what I'm going to
do is I'm going to switch to my phone because it is
going to be quicker for me, but you are totally free
to do this on your iPad. We are going to
use Adobe Express. That is a free application. So you can download
that onto your iPad. I'm going to do
this on my phone. So I will just at first
share this to my phone. So here is my phone, and I will just select the animation and air
drop it to my phone. So I have it here. I will
put this to the background. And what I'm going to do now
is to open Adobe Express. Again, it is a free
application. Okay. And you will need to
create an account or login with your Google account or Facebook account,
okay? All right. So when it opens up, there are several things you
can do in Adobe Express. The easiest way
to do a Jif is to click to the search
bar and write Jif. And it will open to convert
to Jif mode or possibility. So you just tap to
upload a video, choose it from the
photo library. Okay. And now that it loaded, you can set it too large because I want it
to be high quality. Like, there are other modes or applications and
websites where you can convert a video to Jif. But I found that there is a
big quality loss in those, most of those, and I found Adobe express to be less quality loss. So I will just set it to large high quality and wait
until my media is uploading. And when it is done,
hit the download. It is exporting your file, and you will be able to
save your Jif Save image. And it has saved to camera roll. So now when you go
to your camera roll, you will see your Jif. And it is a pretty good quality. When I want to write an email, I can write Merry Christmas. And at from my photos, this Jeff and it will
just play like this. How cool is that? So
you can send this as Christmas greeting
card in an email. But it will work in your
skill share project as well. So let me just show
you. In the class, in the project and resources
part, hit Submit project. You can add the project
title. So you can name it. Yeah. Hi. Christmas.
Merry Christmas. In the description, you can
add the image that will move as it as a chef. Wawa. How beautiful it is. So cool. And as a cover image, please just screenshot
your artwork. I'll just upload
your illustration itself that you have
done in Procreate. It will work like just fine. And I love how this looks like. And then hit Publish, and you will have an
incredible class project. Okay. I hope that you
enjoyed this class. See you in the last video where we're going
to wrap it all up.
13. Final Thoughts: Congratulations. You did it. You finished the class,
and I'm so proud of you. I'm sure your artwork is stunning and I can't
wait to see it, so make sure to upload it into the project gallery
and make sure to tag me if you are sharing
it on social media. Also, follow me on social media and here on Skill Share
to stay UpToDate. Don't hesitate to leave
a review for the class. It is really important to me to know what
you think about it and for others to know if
it is a great fit for them. It was such a pleasure
to have you here, and I hope to see you in
my other classes, too. I wish you all the best, happy creating and
happy holidays.
 The Artmother, Professional Art Teacher and Artist