Transcripts
1. Intro: Welcome to the class.
My name is Martin and I am a freelance 3D artist. I've been using
Blender for five years for about this time being
doing some client work, some personal work, and also have a YouTube
channel on YouTube. Tutorials and
something in-between. This class will teach you how to create the respiratory in Blender treatment 0
using geometry nose. So without further
ado, let's start.
2. What are Fields?: Before we actually start
creating anything, we should understand
what our fields, fields are basically just a
bunch of values on an object. For example, if I delete
this cube with an x and I shift a add a plane here. I have a plane which has
a tap intended node, which has four vertices. Vertex is just a
point on a mesh which allows us to create
different, different forms. For example, those vertices up, then they are moved up. The mesh is tilted. Now, these vertices have different numbers
assigned to them, so they have different data. For example, this vertex here, if you go to the top
Mode, top view here, this vertex here has a
position of one on the x-axis, one on the x, the red one here, and one on the y-axis. So this vertex here has those
numbers for each position. And also it has the height
of 0 on the z-axis. It's not moved up or down. This vertex here has the
position data of one for the x, one for the y, and
0 for the in z. If you would move
this up by one. So rubbers g, z and one, this now has the
location data of 111. This is one type of data
is point could have, this could also have
some other properties. For example, we might create a vertex group on this plane. I'm going to go into
the vertex group object data here I'm gonna add vertex group called only 1, and I'm going to assign
this vertex group. Do this vertex. Here. You do this, I'm going
to click Assign. And now we have another block of data which is a vertex group. And this has added East
part of the vertex groups. So it has the value of 11
means true, 0 means false. For all of those other vertices. This is of course 0 because
they are not part of this vertex group about kind of other data that we
have for these points. Well, we could have an
index. What is an index? An index is just the
number of a vertex. So this one here has one, this one here has two, this one here has three, and this one here has four. We can do different things
with using those numbers. So let me show an example. I'm going to open up a new site panel here
I'm going to go to Geometry node editor and
add a new node tree. Now this is for an
example purpose. I'm not gonna name this. Now we have the inputs
and the outputs, right? So if you wanted to do
something with our object, we have to do this on the way of these mesh data flowing from
this node to this node. Let's say we want to
delete the vertex that is part of our only 1
vertex group here, or that we would have to add
the delete geometry node. So let's take a
delete geometry note and plug this here. Very simple. Now everything has been deleted. And this is something
we don't want. We only want this to happen on this point here that is
part of our vertex group. Now the other inputs we
have here is a selection. This means that we can select different parts of the
mesh that can be deleted. In this case, delete it
because it's a deleting node. If you wanted to input
the vertex group here, you would be tempted to
search for a vertex group. And to be honest in my opinion, this would be a very
logical thing and blender should have this
functionality, but it doesn't. Instead, we have to plug
from here to there. Now we have a different input. How can I access this? Go to this modifier at happier, if you have the
selection here, I mean, you can make this one which means selected everything
gets deleted or 0, which means everything
will be kept. But there is also another
functionality which is this little spreadsheet
or this plus sign here, which means that we can use
a vertex group as an input. So I'm going to click here. Now we have those
drop-down menu here. And we have this selection
called point only 1, which is our vertex group. I'm going to click
this one here. Now we have deleted this point and we have kept all
of the other ones, which is logical because
our vertex group only has this point
as the input. Let's say we want to delete
the inverse of this thing. Are you going to add a new vertex group
with the universe? No, we don't have to do this and this is the power of notes. We can just inverse
this selection here. And we can do this by using
a Boolean math nodes, which is, which is, which is, which is
looking like that. Well, you're asking
what is a Boolean? Boolean is just that
either a true or false in case of this
delete geometry node, I mean these other
can be true or false. There is no second guessing
gets either didn't point has been deleted or it has
not been deleted, it's kept. It's a simpler we have different operation
here AND, OR and NOT. Now, if you plot this here, the end operation needs both
of these inputs to be true. If I tick box here, then this vertex group is true. And I mean it has been deleted, or means that both of these inputs are
taken into account. So right now we're
deleting this point and because of this tick box
or so all the other points. But there is also the
third option not, and this deletes, basically inverts everything that we have. So it is giving us
what's not input here. So in this case,
these three points, and if you enable this, we have gotten rid of all
of those tree a point here. And this is looking
pretty nice right now as the last example before we go on and moving to our Raspberry. But I'm gonna show you
is how for example, if you have more of 0, I'm gonna move this one
down by exactly one meter. And I'm going to select all of those with a and we want to right-click and subdivided, subdivided, subdivided,
subdivided. And now we have like a
massive amount of points, not very massive in
case of a tree software about a large reasonable amount. We can, for example, to do so that we
delete only all of the indices that are higher
in value than seven. For example, each of those
points has an index of 12345 and we can delete
according to the indices. So let's add the delete
geometry back here. And let's also add an index node just to have the
input of indices. Now let's plot this here. And visor see, we have
everything disappearing. Well, that's pretty logical because only the first
one has the index of 0, which means it's not
going to be deleted. Or the other ones have the
value of one or larger. So this means they are gonna be deleted because there
are one or roger. Now let's use, for
example, a compare node, which gives us a very
nice way to control this. As you see, this
outputs a Boolean, which means a true or false. We can make so that every
point that is less in value than ten is going to
have a value of true. And every point
that is larger than ten is going to have
the value of false. Now if you do that,
rarely see all of those points that have
the value of ten, less than ten are removed. We can track this value and remove even more of those and you make
something like that. The reason where
they are placed so strangely is that we have
subdivided the plane. If you do this once more, like subdivided once more, then this pattern is going
to change up like that. And yeah, this is looking
pretty cool to be honest. This is how the fields work. Basically, we have a data block for each point or for a mesh. And we can manipulate this and do different
stuff with this. We can also move, move those, move
those things up. For example, if you
have a set position, this means we can set
position of certain points. We can, for example, move
up all the points that are having an index
less than ten. So let's do this. First, you have to isolate our index less than ten, right? So I'm gonna take
a compare floats. This is called a compare
node in Blender 3.1. So don't be discouraged
if you don't find the compare floats node. Let's make sure
that all the floats less than ten are
selected or the indices, sorry, I'm going to
move this over here. Now we have to move those up. Now, moving things up is
moving them on the z axis. And the z there is the
offset X, Y, and Z. We're going to move
this up on the z-axis. But we only wanted to
move a certain amount of those are certain, less than ten indices,
less than ten. So we have to somehow input
this into the Z here. But how did you do this? Because there is only one input, whereas for that we have a node which is called the combine XYZ, because this is
an XYZ, XYZ, XYZ. And we can do that as, I mean, just notice that this note
is pretty self-explanatory. You just have X, Y, and Z here. And we can input, for
example, this here. Now this has moved
up all the notes by that are larger or smaller than ten. Let's
do something like that. And now here's the
question to you. How much do you think
they have been moved up? They are moved up by
exactly one unit, which is because
the Boolean here, which comes from here, outputs 0 or one. As I told you. This means there are also being moved up by
exactly one unit. And this is very
true as you see, if I take this ruler from here
or measure, and I measure, I get exactly one meter or so here it is exactly one
meter of distance up, right? So another thing to have gotten a good idea of how these
things work with notes. And we can start by
creating our respiratory.
3. Planning the Raspberry: Now before we actually
do any like noting stuff and this we
should actually plan what we want to create. Because things are a lot easier if you know
what we are going to do. We don't want to create
an animated transparency because this is a
bit too complex. So we just want a
shape like that, some bars on the shape, and then we need a leaf part
and then also a little tail. Also, if we look at
the respiratory, you see it has some
little hair on it. So we can add those
little things here. I know there are
spurious looking, not like something you would
like to eat right now. We have four things that we
need to create something. Hopefully, I bid more
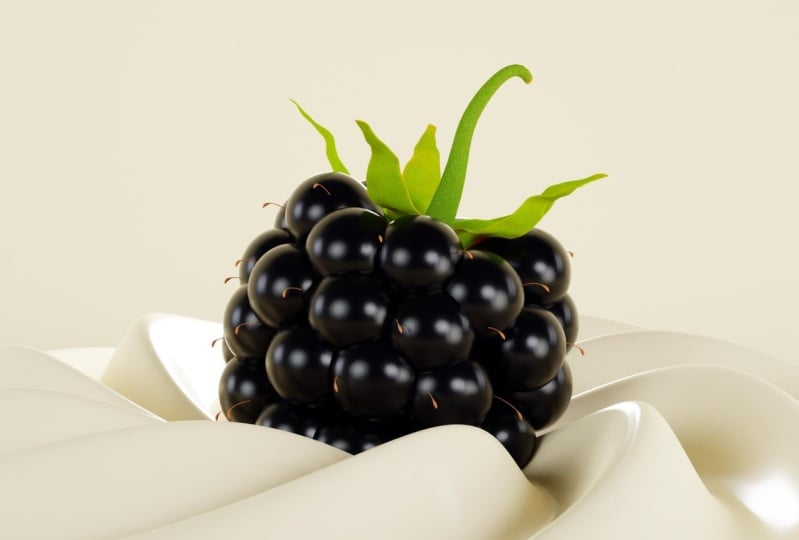
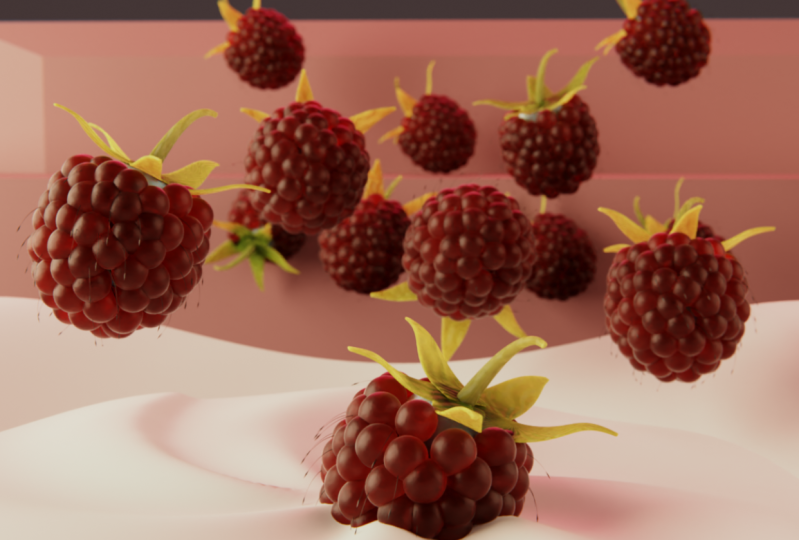
beautiful than this one here. Yes, Let's continue now.
4. Adding the Drupelets: Now we're finally
in the stage of making a respirator,
which is exciting. Do you do this? Well, you have two options to either
started working in right here or to go to this geometry nodes
of workspace. Now, I don't particularly
enjoy this geometry. Notice workspace
for two reasons. One of the reasons is that
this spreadsheet here, which in the idea should be to show you what
you're working with. Show you the different fields, different data blocks
for each point. In my opinion, this
don't just work. It almost never shows me what
I actually wanted to see. Probably just close this. So let's start As you, as I told you, we need the
object at this raspberry onto. So let's add this to this QPR. Now, to create a respiratory, we need some points
on this cube. As I remember, this was how
this respirate looked like. It has to have a
U-shaped interior. So let's first create
an U-shaped interior. I mean, we could create
this with notes, but this is just very, not very intelligent
because this is a lot faster to do manually. You should use notes
when this gives you an advantage over manual work. In manual work is faster. Use this when notes
are foster, use that. I mean, it's always a question
of what is faster for you. So let's create this
respiratory for that. Let's right-click sub-divide and subdivide this a
bit more like fat. And let's turn up
the smoothness. So we have a, like a ball. Let's maybe even subdivide
this a little bit more. So we have things like that. Now this is our raspberry and you're saying no, this
isn't the respiratory. It's more like a sphere. More like droplets of raspberry. Yeah, this is okay, but we
can later procedurally change the scale and all of those
things with this respiratory. So we can keep this right now. This is looking nice. Now let's add some droplets
on this raspberry. For that we just need a amount
of points on this surface. And on those points we
can copy a droplet. This is how this logic works in pretty much every
software Houdini, Maya B first, and also
blenders, Geometry notes. This is just how the logic is. We can take a surface, we can add, for example, two points and ontos points. We can add a cube and a cube. And this here are instances
which means they are actually the children of a same, of the same cube. They share exactly the
same functionalities, shapes, all that stuff. The only thing that can
be changed is the size and rotation until location. Let's add a bunch of
points on the surface. For that we have a
distribute points on phases node, right? If you put this here and
we have a lot of points. Now these are just
like temporary. They don't mean anything. They're just here
to show us where our future droplets
are gonna be. Now we can increase the density and we have a lot of those. And as you see,
we also have here our friend from
the introduction, which is the selection. So this means vary, want to have those points. Now, you might be thinking, this is nice because I definitely don't want to have points on the top of this thing. And you are making
the right choice because the Raspberry
doesn't have points there. So how do you vet remove this? Well, as you remember, how can we do this
with vertex groups? We can go to Edit Mode
of this mesh with tab. I'm going to disable this
note here with M key. So this is now unmuted,
unmute it muted. And what I'm gonna
do is I'm going to go to the extra remote, is select the points up here. If I select just without
the X-ray mode by dragging, I only select the
half of the mesh. But if I use the X-Ray mode
by Alt Z, clicking old C, then I can select
a larger portion or I can go through
diminish, as you see here. Now I can do so
that I go through the vertex groups
here and I enable, I click on this plus sign and
I'll have this group here. I'm going to call this no, true. Let's, alright, I'm
going to assign this. Nothing has happened,
but now we can add a, drag the selection to
the selection and go to the Modify tab and click on
this little thing there. And we can select our
no droplets and oh no, we have droplets now
on the only this area. Mean it's a it's a problem, but not a huge one
because this is notes. I mean, we can just add a
Boolean math and inward this switch system not and now we don't have
those things there. We just have this looking
like that and we have way too many points as you
might be thinking. So let's instead. To visualize this a bit better, like how much do we want
and how, what is the size? Let's add an instance
on points node. Now this node does it so that it adds an object
on those points. So for example, we
can use a cube. I'm going to search for a cube. We can track the cube
to the instance. And now we have a
really large amount of cubes which are seeing. And this creates this kind of cool effect as you see here. But we don't find as much. So let's decrease the
density for Baldwin. And notice you have, well, quite a lot of points and
quite a lot of cubes. We don't want this to happen. First, of course, we
don't find cubes. So let's delete
this and let's add an icon sphere instead. So I ecosphere is just
a sphere which has, which is like triangular,
has triangular faces. And you're saying
this is not a sphere? Well, technically, no, But if
you add some subdivisions, we have things that look
pretty much like a sphere. This also, I mean, ordered it looks like a
pretty discussing raspberry that is growing in
the backyard of your grandma and those respiratory bushes
that haven't been taken care of in
the last 15 years? I don't know even
why did say that. This is how it looks
and what we need is to decrease the density, decrease the size of those. The radius is the size of
the individual droplet, and we can do
something like that. And I think you have
noticed a problem that we can change the side but
change the density here, but some of those droplets are intersecting and this
is not very nice. So we can do steal
things in Blender. Do you combat this? The first one is adding the Poisson disk
distribution motor, which is just basically
the same thing as before, but you now have the
minimum distance between points, which
is very useful. So if I increase this, you see we have increased the
density between the points. Now we have those
respirators here looking pretty nice and small respiratory I like this but
they are still intersecting. Not as hard as before, but not very nice either. There should be more
like in this location, there should be curving, more in like, more like that. Now the proper means
that in Blender, blender is a very this feature or there is no feature in
Blender is quite a new one. For example, if you
were using like a really like an industry
professional software, I'm not saying that vendor is not the professional software. I mean, you can make some
really great work with this, but there's notes section
isn't as developed as most of the industry standard
notes softwares in Houdini would make
this so that you convert those
triplets into volume. And then you have two droplets and you're
going to make them expand. And they are going to
expand and basically create like a thing like that. They are not intersecting. Blender is not 2D. And if we cannot do
this, but we can fake this in some nice ways. And although we cannot
do this in Blender, we can make a similar thing and we just have to use
logic for this one.
5. Shaping The Drupelets: Instead of this sphere shape, which they are right now, we
need to make this droplets, you know, more like,
more like that. We need to scale those
facing outwards. How do we do this? Well, we need to scale them, like make them larger. So for that, let's use
a set position note. We have also a scaling notes, so scale instances, and now we can scale those instances
and it works pretty well. But in our case, we want to have some
more elaborate scaling. So for this one we need
a set position node. And you're asking a case, elaborate, what does this mean? This means something a
bit more complex than new venue might just get by just scaling
these things up, right? This means that we are going to start scaling these triplets. At this point. We are scaling this area here further from the
center of the raspberry. This can be done by first calculating the distance
from the center. Just creating like a basically calculating
the distance here. And then based on the distance I basically using like the
selection thing here, only select the outer
area of this triplet and moving this further from
the center of the object. This is pretty nice, should work. So
how do we do this? Well, first let's deal with the, with the scaling of
the mesh, right? So for that, what do we need? Easter scale along the normals? If you just plot
this here right now, this is doing nothing. And to make this work, what do we need to do is
to realize the instances. Now you're asking, well, this is a bit too much for me. I cannot understand
what the normals and realizing instances,
what is this? Well, first, steel width,
what is the normal? The normal is
basically, for example, if I have a, I can
actually do this that way. Let's decrease the
subdivisions of our droplets. For example, this phase here
has the normal of like that. For example, for this face here, the normal would be
pointing in this direction. This is just showing us in which direction the
face is pointing at. If you'd like to use
this information, we need to use the normal. Now if you scale those instances based
on the normals, well, this means every
phase is going to be scaled in the direction
that it's facing to, which basically means we
are making the mesh bigger. We are making the
droplet bigger. I'm going to add one
to three levels. But we only wanted to make
the droplet bigger when it is at a certain distance from the center
of the Raspberry. This sounds complex. Well, this maybe is, but I'm going to
explain how this works. We have to use a mix RGB. Note. Now, what is that? Well, this means you have
to have in some places, some scaling alongside the
normal and some places not. So this means we have a mixed, mixed node here,
which can mix between nothing and the
normal displacement. Displacement means
moving things outwards. Now, the question is, well, it's an RGB,
it's a mixed RGB. How can you use colors
to display something? Um, well, the thing is that actually colors are
just three values. I mean, it's R, G, and B. I'll revert also happens to be a
three-dimensional space. So sometimes in the 3D pipeline, colors are used to transfer
vector information. So for example, if
you have something, let's say we have a value
of just a blue value. This looks like that. Blue value of one. If you use this thing here
as the offset of our mesh, then what do you
think would happen? The mesh would move up
because the blue here, the RGB is like x, y, and z. So if I add this mixed note, these things move up like that. I'm sorry, this first
one has to be black. Like that. Nothing is black. Nothing is going to happen with this mixed node.
Now this moves up. And if you use the normal as the second thing in order
moving outwards instead, this is how these things work. This is just the chlorides
are just vectors, are vectors can be
expressed as Chlorus, actually another they
can control between nothing and some
abnormal displacement. We should be able to
use a factor here. That is based on the distance from the
center of the raspberry. Well, how do we do this? We need to calculate
the distance from the center
of the raspberry. For that, we have
a position node, which is giving us the position
of each point in a mesh. Well, if you plug
this here like that, this is very weird things happening here based
on the position. And this is happening
because this is the positive direction
on the x-axis. This is the positive
direction on the y-axis and on the z-axis, and the opposite
directions are negative. This means here, nothing
is happening but here, oh yes, we have some pretty, pretty bad displacement
happening. So if I move this
for example here, I mean you see these are getting bigger and
bigger and bigger or the factories are
actually kept at one. So it cannot go bigger than one. And this actually
looks kind of nice. I think this is
looking pretty good. But we are interested
in having the length of each point from the
center distance to each point from the center. For that, we can use vector math because we are
dealing with vectors. A purple thing means
vector. Yellow is color. Float is this crazy thing, which means just a single
floating point value like floating-point means
with decimals, so 0, this is a float. Also we have the purple thing, which Boolean, which
means just true or false. There is actually one more type, which is an integer. And an integer is this
green thing here, which means just a whole number. It is either 01237,007, and all of those
things are integers. Now we can use this
vector math here, connecting to position
into this thing and then taking this
length operation here we have a lot of
different things here. I didn't even I think use
like a third of those. For example, refract,
I have never used, but length I have used. This is a very useful runs. So as you see, this takes
a vector and calculate some stuff with this
and outputs a float. Now this float here is just a
single value at each point. It doesn't mean it
outputs only one value. It outputs one value per
each element of our mesh. A vector outputs three
values per element and float outputs one value. Now if you plot this here, well, you say, well, they're telling us this is exactly
what it was before. Let's fix this. Fixed this because we should actually create the larger contrast
because right now, if this is like, I'm
gonna delete actually all of those blue things. This can be a bit distracting. So if in the center here
we have the distance of 0, Let's say here we have,
let's measure homeostasis. Do we have here three meters? This means like the
one meter is going to be somewhere around here. I mean, it's already full size here so we cannot
see the difference. It should reach the fourth
side somewhere here. For that we have a
color ramp, right? A color ramp and put it here. Now, you still
cannot see too much. The reason is that
the color ramp. If you spend there before, you know what the colorRamp is, if haven't been doing
too much stuff with it, It's basically just
a contrast thing. Let's make sure that
the range actually, let's make sure that one is
not here, but it's here. So we have to we have to
trick the color ramp, you have to fool it to
think that the one is here. How did we get from tree? One where we have
to divide by three? So let's use
ordinary math notes. Put it here, and let's divide
by tree or with three. Now we should have like a
reasonable thing there. Let's see if those things work. Yes, they work. As you see. We can scale based on the
distance from the center. We can increase the
contrast and stuff. This is the maximum
thing and I'll just looks pretty gross and
we don't want this. Let's fix this with first, let's add some subdivisions like four maybe to make this
a bit more detailed. And let's see what
we can do here. Basically, it's
just like the play with the colorRamp right now. This one here as
the value of one. By the way, as you see
hue saturation value. This has a value of one. And if it is 0,
this means nothing. This means that the full blast. So let's do so that we like fat. Now I'm going to decrease this. I want them to be
a little bit like flattened on the edges. And also you see
this thing here. It looks a bit like jagged, like you can see
like a seam here. Let's make this a bit
more smooth by using a different algorithm
like a B-spline. Now this made is a
bit more smooth. Let's see this from the top. Yeah, I think, okay, this actually isn't as smooth
as maybe it should be. We're going to add
another colorRamp thing here and we can change its value to see to make things a bit
more, even more smooth. Now these look a lot more like your respiratory droplets
bacteria intersecting. So let's do so that we decrease, decrease their size
a bit like 0.7. Well, something like fat, maybe even like 0.66. And now let's just, yeah, These are
looking pretty okay. Maybe we can just add
some more contrast here. I can increase the
value a little bit. Okay? Okay, These are
looking pretty nice. So this is how our nodes
are looking right now. Look at those, see if you have some maybe differences that you may be like
maybe we don't like. So you can see what I used. Now let's go back to
the geometry notes tab. And if you feel like
the holes here, I mean this just something you have to play with, care for it. So, for example, decrease the
distance, minimum distance. Now this looks a bit better. Maybe you can decrease
this a bit even more. And I think now this
respirate looks rather okay. It doesn't have the perfect
appeal on those things here, but you can also change
the seed and see if we can eliminate those problems or the droplets are ready and
the next top is leaves.
6. Creating the Leaves: The model that leaf,
I'm just going to add a plane, shift a plane. And then I'm gonna
go to Edit Mode tab. And I'm going to move
this thing here. Right? Now. I'm going to with
G and I'm going to press Control R
at some luke cuts and drag like maybe that doesn't matter
how many actually, just some nice detail. And I'm going to
try to like that, tried to have Squarespace. And I'm going to select the
last row of those vertices. Press O, which enables the
proportional editing up here. Which means that for example, if I scale now with S, then I have this little
circle appearing. When I drive with
my mouse wheel, I can scale this thing up. And now I have a lot of different ways to
shape the slave. I want to scale on
the y-axis lie. That. This looks pretty
nice in my opinion, like a nice leaf, sharp in the edge. And I'm going to also
shape this in a nice way. So I'm going to rotate this. Maybe. How we're actually respire
leaves positioned. Let's see the reference,
something like that. I'm rotating with R by
the way, something. Yeah, now we have
a leaf like that. I think a bit to start
again, doesn't like this. Our respiratory is kind of
like a small cute parity, but we don't want such
a rich leaves to it. So let's delete those
things here with x, delete faces, and maybe
even your faces like that. Okay, This is nice. But I'm going to add
a solidify modifier. Solidify to make this a bit more thick, you
don't see anything. Well, let's apply the
scale with control. A apply scale. You don't still
see anything well, let's increase the thickness. Something like that. This is a bit too
thick for a leaf. I think. Let's do something like fat. And let's, let's add a
subdivision surface modifier. And now I think the
leaf is looking pretty. Maybe we don't even
need subdivision. Well, yeah, we do actually need, I'm going to also scale the
last row here down so that we can attorney off the
proportional like that. And now we have a leaf of air respirator
looking pretty okay. Let's enable those. Let's actually keep
those modifiers. And let's add some geometry notes that you make this leaf a bit better by using
a noise texture. So I'm going to add a new
set of Geometry notes. I can do this here. I can also add a
geometry notes modifier, like fat into the end. And now I can set
the position of a relief using a noise texture. Let's add a noise texture, whereas it here, and let's
plug this into the offset. Now this looks like that.
We don't want this. Let's just decrease the scale
like a little bit like fat. Now this leaf has been
randomized and I think we should also scale this on the y-axis just a little bit. Yeah, this, this looks
like an acceptable leaf. In my opinion. I want to call this a leaf. Now let's take this
raspberry and let's start adding these leaves here. These are respiratory part. Notice go forward and
let's add those leaves. We can add those by
adding a circle. And then on the
circle we are going to instance those leaves. So for example, if you have
a circular five points, we can add five
leaves if you have a circuit with 7.7
leaves and so on. So to do that, we
need of course, a circle, a meshed circle. I'm going to use
this as the input or the output right now,
it looks like that. Now we can instance
on this thing here. And you're asking photography instance on this thing here. Instance some points if you even haven't distributed
the points yet, like we did with respire here. I mean, first you
had to distribute, then we had an instance. Well, I'm just
doing this because this circle has points, right? It has those little vertices here In the edge of the edges, in the ends of the edges. So basically if I
now drag in our leaf here to denote data
instance this, well then we have
a lot of those. And if you change the vertices, then we can, for example,
only have three. For a triangle. If you make this
like a pentagon, like pentagon, then we have
five of those and so on. They are way too big, right? So let's change the
radius for a moment to see how this works.
There are way too big. So how do we fix this? Well, we can just decrease
the scale from here. So do something like that. And then let's make the
radius again one meter. This isn't very nice because they're not pointing
in the right direction. In which direction should the
point at each one of those should point in their
position direction. And this sounds crazy, right? What is the position direction? Well, this one here
is positioned here, so it has a vector
pointing here. This one has a vector
pointing here. As I told you remember,
we calculated. And we used to
positional before. We can use the position node
now as the rotation, right? Plug this here and this, well, this isn't very nice because we actually don't
want to use this directly, but rather to align
our current rotation, which comes from the leaf to the position of
those circle points. For that we have an align. Note that we can use to align an euler vector or
there is just a, was a scientist and we use his name for some
mathematical stuff. Now we can, for
example, align this to the vector pointing upwards, which is not what we want. But for example, for
kras, this might work, but we want to align the
deposition like that. Now they are all pointing in the right direction with the
factor we can change this. There are also some other
cool ways you can use this for this one here
it seems to work. The best way. You have to see
which things work for you. If you don't find
anything that works here, you just have to take
the marries or leaf, leaf and rotate 30 in the edit mode to find an
angle that works for you. Now this is working.
But there are also, we'd like This
circulates bit too big, so let's make this
smaller like that. This looks pretty
nice for Asperger. I think. Let's join those together. So now we have the
respiratory we can drag here. We have the leaves
that we can drag here, but we would like to join
those for you guys to try it. We have a joint geometry node. You take the joint
geometry and your plot, this and this here and
now they are joined, although it's a bit like two
small layer in the middle. So let's move this up first. Let's take all those
notes and put them here. And you might be
tempted to just, I mean, let's move
this leaf up here. And you might be
tempted to just take this thing here and select
this and move this up. But it actually selects
the whole object because they are in
the same node tree. Do this, we have
to add a transform node after the leaves and move this up by the among that we want.
For example, this. Now let's just use the magic of node-based stuff and let's just make it have the
scale that we want, for example,
something like that. Then the scale should be
larger but also like smaller. Do we run something like this? I think the leaves are a bit too to a uniform or there
doesn't look very nice. So actually I don't like the geometry notice
modifier here. So I'm gonna delete
this geometry on welfare and delivers
now looked like that. And I'm going to
scale the leaves on the edit mode like that. This looks like that now. And also don't like
how they are rotates. So I feel this could be a
little bit more smooth. I'm going to crap this area
here with the X-ray mode turned on from here or with old C. And with
proportional editing, I'm going to grab this
immodest smaller like that, I think now the leaves
are looking pretty cute and nice on this raspberry. And also they are a bit, a bit too cute and nice. I mean, they don't
look too natural, so we should scan them
a bit more randomly. For that we need a random value. Let's take a random value and put this here and plug
this into the scale. Now we have those
different options here. For example, float,
boolean for example, this means the scale of either 0 or one
which we don't want. Probably. Boolean isn't very useful in this case,
we have vector, which means we can use different
scales on x, y, and z. We don't want this either, or actually we can use this. So let's put this here. And this creates something
very, very weird. Like things are a bit distorted. So let's make sure
our minimum value is 0.6 or whatever works for you. This is not a number you
should definitely use. It just works in my
case, let's maximum 65. Minimum could be maybe 0.5. And other leaves are
a bit more different, and I pretty much like this. Let's also use a
different different font. Let's also make them a bit different in the
sense that if they are rotated to the sky or not, what we should do now, he
said we should rotate. They are aligned a rotation to the z-axis to the sky and then variably changed with a random value if they are
appointed there or not. Let's use another
align Euler to vector. If you just do this like fat, we have vector pointing up x, y, and z, and the factor of one, then they are pointing up right? Like that. And we
don't want this. We want just a random value that is telling us if
they're there or not. I'd say the maximum
should be around like maybe Sherman's
journal seven. The minimum properly 0 knowledge you have to see if the minimum, because the minimum is the
currently the minimum we can have if this
is enough for us, I think there should
be a rotated a little bit more down so we can change this in our leaf here. I'm gonna wrote it this
turning off the proportional. And I'm going to rotate
this a little bit like that and also move
this to the origin point. Actually this will
shift it a little bit. Now this probably looks
a bit different, yet. We have to scale down the circle like that and also make
the rotation here, right? So I'm gonna plot
this to the factor. Now this is randomly
up and down. We don't want this
to be like that. We want this to be 0.1 maximum. Now the leaves, I think, a bit better than
the variable before. Look a lot more cute. And I think they
are finished now.
7. Raspberry Interior: Now let's deal with the
respiratory interior and you're probably
thinking this respiratory doesn't look too good
because it's very, very like sphere-like. It's not like oval as
the respiration of B. That's right. We should
actually make this a bit more scaled like that, but we cannot see in this vat on the z-axis because this is
scaling the whole mesh, we should probably use notes. We can use denote as the
input here in the beginning of our tree because the notes are currently
looking like that. This is their desperate
parts and this is the or leaf part. They are joined to
the joint geometry. Now if you go here, if you go here and we
take a transform node, this means we can
scale things using a, using a node-based systems. For example, we can scale this like that and we have basically like a corn plant
think whatever. As scalar for 0.1.2
works nicely. Let's ignore the
leaves that they are like Miss fitting right now. No indexes that this
should be like me. Okay. This is probably a bit too. Yes. I think this is
like fitting and all. But as you say, these things are not looking very nice, right? They are a bit our
system that we created for making those
look a bit better, like scaling them is
not working properly. The reason is that we
have scaled diminish. If disabled the scaling, it is working properly. If we enable the
scaling with M key, I mean, it's not
working nicely anymore. It's like shifting and stuff. What do we need to do is to also scale the position that we
have here in the inverse way. If you have scaled our mesh, for example, I'm just going
to do this very easily. If you have scale this
by two, for example, then the things
down here are not obeying to our system of
normal scaling at all. What we need to do is to modify this vector that
is coming in from here. For that we have vector math and we don't have a knot vector. We have vector math. And for that we don't need
a, what is this called? We don't need a transform load or we even don't have a
transform node for a vector. We just need to scale
this, which is, which is essentially
a multiplication. So let's take a
multiplication node. Now everything gets
multiplied by 0. So this means it's
not working anymore. Let's put here one. This is now the same
thing as before. It doesn't matter if
this is enabled or not. You might be thinking,
let's scale this by two. Well, this is not a good idea. If this doesn't work,
It's actually has to be scaled with the
inverse value of 0.5. Now, with the
inverse value of 05, this is working a lot
better than you see. It's working like that. 0.58 actually seems
to work better. But the idea is this. And the idea is because
before you had a mesh, our system, our system is based on a way that you
have this mesh. And it, I mean, the colorRamp only accepts
or needs like the system works if you have a
distance of 12 here, this fixed distance now, and also down here. Now if you scale the mesh, what happens is
that we have maybe like a longer the
original one was here. So another color ramp has
some different values. It doesn't know what to do. I'll put some crap, and this is not a good idea. What we need to do is make the colorRamp think that these values actually
are the same. We have already done this here. But this was 40, like
the whole gradient, like this is like just scaling the whole vector as
it's a float value. And it's multiplying
everything with the same number or in
this case dividing. But we need to do this only on the z-axis that we are
scaling this on, right? Let's make this work
more automatically by scaling them from
the same location and adjusting them
automatically. Let the machine do
the work for us. Instead, let's use a
vector as an input, three values, I'm
going to put one here. Scaling with 111 is
essentially the same size. If you're doing this
larger like that, I think. Yeah, this looks nice. Like 0.32. And then
we input here. This doesn't work. Instead of what
you need to use is to basically get the inverse
value of this vector. This means we have to
divide one by this value. Because in case of two, this what we needed was
0.51 divided by two is 0.5. If this is, for example three, then we need one divided
by three, we need 0.33. And this works with everything. Switched us to division. And switch to the inputs
and put one here. So this is one divided
by this vector. And as I say, this is, I think currently
working pretty nicely. Maybe this should be
scaled even a bit more. So I'm going to increase this on the Colorado
non-zero point five. Let's make that 0.4. Okay, I
think this is looking, okay. Maybe, maybe, maybe let's just decrease the distance between those just
a little bit more. So 0.6 to maybe just six right? Now this is looking
a lot better. At least that's
what I think it is. The leaves are
shifted a little bit. Let's also move those leaves up by using the translation node. And now we have this one thing
here. We don't like this. So let's go to the raspberry
and let's change the seed of this play of those things until we don't
have anything like that. And now let's just move this
up a tiny, tiny bit more. The fix what we have here. Nice, this is looking okay. Now let's add the interior
of the raspberry. For that we just doesn't, doesn't matter too
much actually. Let's just take a
cylinder like fat. Whereas our cylinder
seal in there. Take the cylinder and plug this into the joint geometry that you see we have something in the inside of the respiratory. Didn't know if you can see
this we already available. So let's change this by using courageous
making this not as big, but it should be more like, and now, I mean,
it doesn't matter. It's just there to give the
impression that something is inside of the
respiratory like that. And this doesn't I mean, it does look a bit too sharp. So let's add a subdivision
surface anode. And notice up-to-date
subdivision surface node to basically make this
a bit more smooth and adjust not a philosopher's
at the site segments to have just a sysadmins? No. Okay. Let's fishes the triangles. A switch does to triangles. And now this is working better. I'm actually going to disable those other things by first
shift dragging over this. Now we have this
readout here and also actually don't
need this spot. And I'm going to just
control drag over this one. And now we don't have
anything inside here. This is the interior
of the respiratory, not looking to gray. Let's add some sites
segments like fat. And this is the inside. Let's move this up
with a transform node like that and move
this through here. Now let's reconnect the
respiratory around this. And now we have a
pretty nice interior. Maybe it is a bit too
to strange errors. So I'm adding another
subdivision surface. We're gonna hide this by
using H to make this smaller. Now we have pretty nice
photo respire here. I think. Maybe we should also move this leaves down just a little bit. Again. You see this one
here is still a bit. Doesn't want you obey. So
let's wrote it this on the z axis like that. And this is looking at the raspberry is pretty much ready. We just need a fruit on
the top of the Raspberry.
8. Raspberry Tail: And now let's add the
tip of the raspberry, which is like the root, I believe in some
respiratory hover over this is called the, let me know in the
discussion of this class. But mostly we already going
to use curves for this one. So for that we are going
to use a quadratic Bezier. Yes, this is a very beginner
friendly name for a curve, of course, well done vendor. But anyways, this looks like that if a connected
to the output, this is a bit too much share. This looks like that. Now we don't want
this shape right? So let's make sure to start
is in 000 right here, and the end is in zeros 01. So up here, the middle can be something like
that and the n, Let's move this also. This was a bit, no, no, no. What am I doing here? Shortly? Modes on
the y-axis instead or something like that. Then maybe moving
up just a tiny bit. Now this is a nice tip for the, for the respiratory rate. Let's make this a mesh because
right now this is a curve. For that we need a node
called curve to mesh. Curve to mesh, put it here. And a profile curve, we need a profile curve
because we have to have another curve to
put around this curve and turn this into a tip of the respiratory
we need. For that. Let's just use a circle. There is a cool technique
where you can the curves circle my circle and turn
down the radius like that. Now this is looking like that. I think you've got
to understand how days circular pleasure own here. For example, if I
were to use a star, I will plug this here. Then, now this is like this. A star looks like that. Maybe this is actually, maybe this actually might be a good
thing for the respiratory. I don't know. It
doesn't. Probably not. So let's use a curved
circle and put this here. This should be thinner at the
top and smarter down here. Basically, we need to
change the radius of this thing dynamically for that because we
cannot do this here. I mean, this is actually just
a circle looking like that. We cannot change the radius
of an object like that. I mean, this is just one object. How can you make
different radiuses in different positions
of the circle? Value cannot, because
it's only one position. Instead, let's do so that
they use the thing here. And we have a node
called set curve radius. Set curve radius,
it put it here. And the radius is getting
bigger or smaller. Exactly the same
thing as before, but now we have this
little diamond here, which means we can input fields. Remember, a field is something that is different depending on the position or the
element of the mesh. So we can use a thing called
the curved parameter. Now, implant or treatment 0. This is called a
spline treatment one. This is called spline parameter. So don't be afraid if
you don't find this. But the current parameter is basically giving
us a gradient from 0 down here on a curve to
one in the end of the curve, we use this as the radius, and this creates
something like that. It doesn't look too
goods because it's exactly the inverse
of what we want. And we have used the
colorRamp. As you remember. We can take the colorRamp
and put this here. Now, SEC, things have shifted around and I don't personally, personally for the
pronunciation, I didn't personally like this. Instead, Let's go to
View and turn off the auto offset
feature right here. Now this turns off
the fact that they are moving around and
around and around. What was this called? Ramp colorRamp. Notice blocks here. And we can move this
thing up like that. Now we can just, I mean, contrasts like that. It looks nice. Or we can invert this like that and we have a
thing for the respiration. Now, the tip of the respirate
isn't as thin, of course. So let's make sure
that the black thing here isn't actually black, but it has a stronger value
or something like that. It looks nice. And you see there is
an empty thing here. We can use the fill gaps to
fill this and that's it. Notice this one
is also a Boolean because it is either
filled or not. So this is another example
of where Booleans are used. Now this is filled and is
looking pretty, pretty, pretty. Let's do so that we know
group this with a Command J. Have a look at those
notes. Those notes. If you want to. Just to recap, it
looks nice, right? Let's now connect this
to the respiratory. So let's connect this
to the join geometry. And we'll just do the output. And this doesn't
look for a nice. We have to move this up
with a transform node, transform translation
and move this up on the z-axis and move this
and right now down, this is, I think a bit too
small for our raspberries. So maybe let's make
something like that. I'm going to actually make
this value bit larger. So 1.3 maybe, maybe
even treat, know, this looks pretty cartoonish
and actually like to look, but I'm gonna have two here. And this I think is pretty okay. Now the leaves are
themselves a bit, bit your regular still afield. Let's add one final
finishing touch before we touch the materials. Now, to do that, what do we need to just use a noise texture are due
September position. I'm going to use a set
position right here. Moving these things here. Use a noise texture and connect a nice
texture to the offset. Now these are offsetting. And if I change the scale,
they done anything. That's because there's instances
haven't been realized. So instead I'm going to use a realise instances
node and put it here. This creates those instances, makes, makes them
into real geometry. And now we can
displace them into all those crazy stuff here. And maybe we can do something like that with those things. That's just see if
they have shifting, they are shifting
and that's because the noise texture has
values in between 01. But this means it gets shifted because they don't
have any negative values. To compensate for that, we have to subtract something
from this noise texture. And we're going to subtract
exactly 0.5 like that. And now this is basically
in the same location. This looks pretty okay. Maybe we just have to move this up a little bit and we
have made the raspberry. There is one little detail left. And the detail is about those little hair
that are growing out from the respirate itself. So let's make those and then we can call the respirate finished.
9. Hair: That those little hair as the last part of the
respiratory itself, we must use basically the same curves setup
that we did before. Let's do so that we first modeled this
little hair which looks, which looks a little
bit like that. Okay, so let's disconnect this group outward
from the geometry. And let's use, again quadratic. Sorry, Let's use again
a quadratic Bezier. Let's use a quadratic Bezier. Let's connect this into
the output and we are using pretty much the same
techniques as before. Let's make this stand up. Let's make this a nice
and straight that Bezier. Zeros 00. Those things
in the right place. Let's maybe make this
a little bit curved like this on the
x-axis and move the, make this like fat. Maybe this is even a little
bit too curved like that. Now let's make this a mesh. Mesh, curved mesh here. And let's use a, you can use the same curve
circle as the input. Actually we don't need it. It's not the correlation
actually because this one has a lot of
resolution and we're gonna have a lot of
these little hair so we don't want to over, basically overuse
the poly count. We don't want to make this
too extreme on our computer. Let's use a curved circle. Put this here, and connect curved circle
to the profile curve. Now the same story as before. We're going to set the radius. Put it here like that, and let's use the
curve parameter as the thickness for this thing
doesn't look too good. So let's decrease this here. Let's use a colorRamp to make this have the shape
that we wanted to have. First, of course it has
to be inverted like that. First thing shouldn't
be as thick. In the end it has
a little bit of a thicker thicker think there. So let's make the
ramp look like that. But let's basically just
throw this into the curves. And this one here
should be white. So this one should be like that. This is the little thing
that we are going to add on our respiratory,
looks like that. And we don't need 32
for the resolution. This can be something even I think even three
works pretty well here. Maybe you get some close-ups, Let's make next six. And I think this is more
than enough for the spring. Okay, now we need to instance this thing on the respirator, but the problem is
that it shouldn't intersect with the
little droplets and we can avoid this 70%. Let's see. Let's connect the
output to the here. And let's now do so that
we take the same points, the same distribute
points on phases to basically have like that. And we add an instance on
points on those same points. So now we have basically, we will have hair growing out from each
of those triplets. So we get taken
instance on points. And we plug points
here into the points. Plugged the hair that we
created into the instance. And as you see,
they're all pointing off course, this
is not very nice, so we can luckily use the rotation of the
distributed points to faces. And we can connect this into the rotation
of those things. Now they're like, you know, there are way too many of those. So let's first remove
some of those by using a random value into
the selection that we are already very
familiar with. So let's use a random value, which has to be, of
course, a random value. Oh no. You can hold down Alt and
track if you want to. For example, put this here and then remove this by
holding off too, so nothing gets broken. And we're going to use the Boolean thing here and
put this to selection. Now we can select either all
of those are none of those. I think for about something
like maybe that looks okay. Now we're going
to rotate them on the z-axis to basically
shift those all into the places that are
between the triplets. Let's use a rotate instances like that and we're gonna
wrote it on the z-axis. Now this doesn't do
anything right now. Okay, this is the point, of course it doesn't do. It does something like fat. This was my point. The reason
is it's in the local space. So every instance
is going to have its own z-axis, which
is not what we want. Instead, we want
to rotate them on the global z-axis like that. This is going to get
the most of those into the edges or between
those triplets. Um, I mean, you cannot
do this perfectly. There are always gonna be
some things are not aligned, but it's going to
look better than without the fist thing. Let's turn also down the scale
by using a random value. Random value into this scale. Maybe maximum would be like
fat, minimum, let's say 0. For this, I feel
it's a bit too much. I mean, I feel they
are a bit too thick. So we should make tip
they're not as thick. And also a bit smaller. Think darryl, so it's smaller. And let's make this also. Move this a bit down on the
z-axis, something like that. This is probably also
a bit too thick, so I'm going to just
take a Math note and multiply the radius of
those things with 0.5. Now they are a bit
thinner and this looks more acceptable
in my opinion, maybe even the scale down to, and now this is, this is pretty nice
in my opinion.
10. How to add materials?: A couple of things before
we start to material, or actually just the
one thing is that they think doesn't
look very good. It looks like jagged, so we need to shade smooth and you can select this and right-click Shade Smooth, nothing happens. That's because it
only shade smooth, the base geometry that
the thing is based on. Oh sorry. The, the thing that we added in
the middle here, this is the core
of the respirate. But we need just to note for this thing to happen
and we're going to go to the end and use a shade
smooth Note, Set Shade Smooth. Now as Z it has a Boolean, true or false shaded
or not shaded, smooth. And not just looks a bit better, I think, like Shade
smooth or not yet. To be honest, I am not a huge fan of those
noises up there. I'm going to turn down the
detail during the two. And now this looks a lot better. Now the respirator is ready
to being materialized. The material, well, we have three different
materials here. We also have a node
for this purpose. We wanted to add a different
material for the droplets. Let's add a material
for a droplets. Let's add a Set, Matte set material here. And let's select the
respiratory and other material. The only ordered you have one, let's call this the
Drupal triplets. And let's select the
triplets material from here. Now, let's add the material
for the, what is this? Let's turn this off. This interior. Let's take the news slot here and let's
call this the interior. Let's add a set of material and let's sit theme
interior material. Then we have the leaves. The leaves are gonna
have its whole. Another material,
leaves like fat, and then select the
leaves from here. What else do we have here? We have the, which was
actually the little tail. Let's add the thing here and
let's add a new material. And your little material called is actually can
be a little tail. It's actually a
little, a little tape. This is not looking very nice. I think we have covered all
the materials that we want. And this is a geometric class
and not the shading class. We won't be discussing
the creation of the actual materials
in too much detail. Instead, I'm gonna
show you how you can append to materials I have created in the project
file under this course. Your respiratory is here and we have some
materialists added here. Okay, but I mean, these are just the
materials that we have here in the notes. Now if you went to replace those with ones I created while, then you are going to code
the file, then append. Then we're going to
go to Downloads. Very probably have the
file to download it right from the description
of this class. And click on this
raspberry append and then you are going to
do the various materials. Materials. And here we have like
all of those materials. So hold down control and
click on this material. You don't need this or you can deselect the
materials that didn't need. I didn't need to dot stroke,
I just need those here. And I'm going to append those. Now nothing has happened, but they are in your
blend file right now. So you can do so that for
example, this one here, select the care that
I created 0 here. Then for the droplets we have, I believe, a material
called raspberry. For the interior. We can give this as it is. For the leaves. We also have 0 leaves. 0 means no objects are
using this material. And for the little tail, we can use also the
ellipse material. So this should look
pretty nice shirt. Now let's see how this looks. Also use an HDR. So from here, disabled
to see in Word and it seems like maybe
something like that. Okay, this is a
rather okay, I think, I think actually
this HDR might be better for the respire like,
Yeah, this looks better. And also the materials
are pretty okay. I mean, you obviously have to tweak the materials were not created for this
specific respiratory. So what you have to do is
to just rotate this thing. Now this was a wrong thing. Sorry. So you have to rotate this like if you want and also maybe erase this
up a little bit. Where is our alignment? Like that? You just have to tweak
the settings and see if things work like you
want them to work. And this is how you can get materialists on your Raspberry. Now let's do the bonus part
of the cream animation.
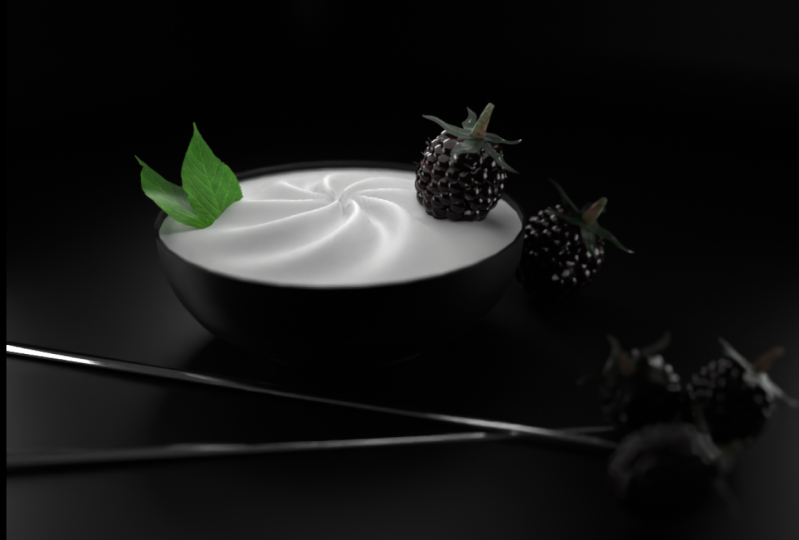
11. Bonus: Cream Animation: For the cream animation, let's just hide our respiratory
and our leaf right now. And also let's delete all
of those things here. Now this is a little bit
more advanced thing, but I think that you might like that because if you're
into learning Geometry notes, sometimes seeing some
advanced stuff is also good. For that. I just added a circle where like in the
middle of this thing, like standard 64 points. Now this has this
model of vertices. Let's go to the edge
mode with number two. Just pressing number
two and press Control F or Command F or
Mac using agreed fill. Now this is filled as a grid, which is very important
because if you want to displace this
mesh in some ways, this has to look goods
and have a square faces. Unlike an ordinary
circle which has just, where are you? Here? I want to fill in
the original circle. This one has a large face-like, which has, I don't
know how many sides. This is not working
very well for us. Let's add the geometry
nodes and let's add also a set position node
because we want to move this thing up. Now this isn't meant
to be a math lesson because it uses
quite a lot of this. But just like a general way of showing what is possible
with Geometry notes. Let's make so that we first
add some for the cream. Let's, let's not add some
twisted cream first. Let's add some, sorry. Let's add some sun rays
like that and that, and that, Let's say like five of those metaphors that
we have to use. Basically a principle
of sine waves. Well, I'm going to
show you how this works as I can discuss, explain afterwards
when it has on this, I'm going to take a position
and then we're gonna separate the position of
each point into x, y, and z. Now I have the x gradient, the white gradient,
and the z gradient. And if you want to
see those, well, what you need to do is to add a material to this thing here. Then also add a material. The notes part like
that, sit material. Select. Let's call this
visualizer bizarre. Even for the autocratic part
visualizer. The visualizer. And let's select the
visualizer material. Now, let's turn this into
the render view like that. And let's open a new shader
editor from this side here. Now let's track this x gradient
into the group outputs. And under the Modify tab, you can see output attributes X. And let's just, let's
just call this preview. This is an output
attribute called preview. We can input this into
the shader by using an attribute nodes and
just writing here. Review, I know there are
no drop-down menus here, which can be frightening, but it actually should work
if you use the right words. Now this looks like that. The y gradient looks like that, and the z gradient
looks like that. Obviously we cannot
see because this is a, probably if you move
this thing up on the z-axis to go more, right? Yeah, because it's
more up on the z-axis. Now we take those
things and views in math nodes and math, and the math operation called
arc Arkose tank engines to take the x and y and this
gives us a gradient angle. And basically you're saying, I don't see any angles there. Well, yes, maybe not, but this basically
gives us the angle from let me show you how we
have already a set position. I'm going to use a combining
extra z. I'm going to use the angle as a way to
displace the circle. This looks currently like that. As you see, this is
a negative angle. So I'm going to turn this off. So this is basically
from this area here. It's going to make a full 360. So it starts from
minus 80 degrees, minus 180 degrees, and it goes to plus 108 degrees like that. This is why it's getting
displaced like so much. And you're thinking,
okay, why isn't the displaced like 180 meters then? That's because
spender is radians, not degrees like humans like
to use mostly in radians. This is like tree plus something
exactly actually one Pi. So it should be
like one squared, two squared, three
squares, and 3.140. This is a pi here. So
we don't want this, we want to actually make
something very nice in a way that we calculate a
sign of this crazy, crazy thing here right now. So it puts this into a sine. Which means it's going to
convert this into sine wave. And before we make
this into sine wave, we multiply this to get a
larger range out of this. And now you see we have
basically, well, what is it? It's like Sandra is
sinewave outputs minus one to plus one
arranged like that. We cannot see this because
I'm going to output this. We cannot see this because, I mean, those things are
black, It's negative stellar. If you clamp this, you see it cuts away the negative part. But this is not
important for us. We can just fix this range
by using the map range. So we take the map branch
and then map from minus one. Our original smallest
value is minus one, or original largest
value is one. The new smallest value is 0, and the new biggest
value is one. Then actually wanted to
displace it by as much. I'm going to just
keep it like this. Well, as you see, we have
like some things here. I'm going to add a subdivided, subdivided subdivision
surface here just to get some more
resolution of this. And to see, I mean, we can add more of those things
and you're thinking, well, this is how
I made to cream. Yes, this is how I
made this like that. And now we also have
to make this twisted. Twisting basically
means we have to add something to this
gradient from the center. Basically, you have
to make things rotated more and more
and more and more. Let's do so that we take this input here is
position vector. We take a vector rotate nodes and the rotate this
vector like that, and then it rotates, right? But you have to rotate it more on the edges of this thing. So do that. What do we have to do is to
take a vector math nodes and plug this into the thing
here. Calculate the length. As you remember, the length
gives us a gradient. I have to visualize this. Length gives us a
gradient like that. So it's small and
large in the borders. And we can input this right into the angle here
and look at that. This looks like some twisting, which is pretty nice and all. And if you want to
twist this even more, what you can do is to add a multiplication here
and twist this like fat, or you can add something to it. This is also moving to surround. So middle Montero
did buy as much, maybe something like fat. And as you see, the edges are as high
as the borders here. Let's use the same gradient
to basically multiply the edges with the smaller value than we are multiplying
the center. So by doing the project file
is in the under the class. So I mean, if you're maybe feeling this is a bit too fast, maybe we wanted to
recap on something. You can always download this
and everything is there. So let's multiply our
reposition setting here with the same gradient. So I'm going to multiply this. If we multiply with 0, it
becomes flattened different multiplied a large
number becomes large. I'm gonna use the
same gradient from here and multiply
with this and doesn't know the inside becomes
smaller because this is how the gradient looked
like that it's dark here, it's small, but the
borders are white. So we just invert this using either a map range
or a colorRamp. Let's use a color
ramp this time. Well, actually, let's
use a map range still, but let's just call
her I'm still it seems like an easier
thing. With a color. I'm figuring control
like the thing here. This only works if the mesh has a size of one and
volume on both sides. Using the measurement
tape you can measure okay, from the center. 11 works fine. We can do something like that. Now the edges are very flat and this ugly seam here we
can get rid of disposing, could be supplying
something like that. I think works pretty well. We wanted to have
more resolution. You can have more resolution, and this is how it works. Just add the set shade
smooth in the end. Let's move this here. All right, it looks very nice. Although it doesn't look
in the center here, we have some veered things. So let's use a smooth modifier after the geometry
notice modifier to make this a
little bit better, Let's use the factor of two. Unless it was like
maybe five repetitions. Now this is something like that. Very smooth. Let's select the geometry. Notice again, and maybe, maybe just maybe make
this a bit stronger. And this is how the cream
animation was made. I mean, just by
rotating this and doing all sorts of
different stuff there. This is how this worked. And now let's get back to me.
12. Outro: Thank you for taking this class. I hope this was useful for you. This cleared up the
geometry notes. Mr. Robot, if you have any
questions, any thoughts, you can always let me know in the discussion page
under this class. Make her respiratory,
make the fine tune. It may be the best
possible and share it with others under the
projects of this class, I'm eager to see your
expertise. Maybe either fruits. This was me. See you next time.
 Bad Normals