Transcripts
1. Introduction: Procedural textures are great as they are generated mathematically without relying on traditional image-based maps. This unknown. So create potentially unlimited action is solution and fiction mapping regardless of the 3D model. But they tend to look complicated for most of the time has showed them. And I'm Columbia. We have designed this course on procedural texturing using blender that helps you to get started with the procedural texturing. We will start by looking at some of the important procedural textures, then carefully study the details and follow a layer based approach to texture the fruits realistically using procedural techniques, you will be getting Blender files for the fruits that had laid to be texture so that you can get started right away. We have also included the details and color palettes for each individually us. Learn the techniques and the right approach to procedural texturing that can be used for fruits and any other object in general. By the end of this course, you will gain confidence and understanding towards procedure and workflow so that you can create your own procedure detections. We'll see you in the class.
2. S 01 01 Setting up blender for texturing: Hey, so in this video, let's take a look at how to set up Blender so that it can be used optimally for texturing. So this includes having the optimal layout of the user interface so that it is easy for us while we texture. And then let's take a look at an add-on called Node Wrangler, which is really useful in the node layer. And then let's take a look at some of the basic preferences like Units Setup. And finally, let's go ahead and start texturing. So here I have fired a blender and it's a completely new UI with nothing loaded. So I basically deleted the default camera and the default cube and also the default light. So I'm left with nothing. And right away, what I want to do is to set up the units. Alright, so let's go ahead here and I'll select the scene properties icon right here, and I click on that. And here we can see that units and the units, yes, I'm using metric. And then under that I have set 0.001, which is millimeters. So I recommend you to set up this number so that all my calculations are corresponding to yours. Make sure you set this to 0.001. And then under the length, make sure that you choose millimeters here as well. So that all our units and measurements comes on millimeters. Alright? And the next thing that I'm going to do is set up the grid. So I'll go under here and select the viewport displays. Another we report displays. Make sure that scale is also setup to 0.001. So that's all gates Via done with the basic unit setup. And now let us go ahead and enable a main, the add-on, so that this is really, really useful in our entire process. So I'll go ahead and set up that. I'll go inside, edit and click on Preferences. I've got my preference here. I'll go and select something called as adults. And I'm going to search for an add-on called as a Node Wrangler. So I'll call enroll BE. And as soon as I type node and blended it shows me with Node Wrangler. So make sure you've got the smart check. So this add-on has a host of benefits which we will see later on, adolescence. So as of now this keep this checked. So I've checked mine already and make sure to click this hamburger icon and say Save preference so that this is being saved to your. All right, so we have set up the add-on which is neither. Now, let us go ahead and divide our interface so that all our panels are accessible for us. And this really helps us speed up the process and gives us lots of time to work with. And let's set up the optimal interface for texturing. So I'll go ahead and start splitting my Windows. If you're not aware of this feature of lender has this built-in. So whenever I had my cursor goes to the top corners of my panels, I'm greeted with a plus sign. I'll say right-click. And I have something called as vertical split and select vertical split and click somewhere about the middle. Two panels here. So I'll go ahead and set the first panel as shader editor so that we have enough space for the nodes. And I'll press N on my keyboard to get rid of properties panel here, I'll press N and that goes. And now I want to make another split here. So I'll do the same and go to the top corner, and I'll right-click and say horizontal split and split this in the middle, something like that. And yes, and I'll change this to my image editor so that I can play some images or references and refer to it whenever required. And then I have my usual 3D view here. So yeah, you have the outliner and you have the scene properties. And this is the most optimal layout that I recommend while using procedural textures and nodes in Blender. So if you're someone who uses Blender predominantly for texturing, then what you can do is save this layout as startup file because this is really useful while your texture in Blender. So what I'll do, I'll show you how to do that. I'll go inside the file and go inside defaults. Click on Save Startup File. And this is going to ask me a confirmation node. That is it okay to save this as a startup file, and you just need to click this one. So this becomes the default screen of your blender with all your units and your screen layout and also your adults. So I recommend this until you finish this course, you can go ahead and save this as a startup file so that you don't have to do this every time you launch blender.
3. S 01 2 Procedural Texture nodes: So in this lesson, Let's go ahead and talk about some of the procedural textures. I'll go and show you one by one so that you can follow along with this lecture. So to show you a procedural texture for the demonstration, what I will do, I'll first create a blink who inside the add on our 3D view port and say Mesh and Blinn. So we have got the spleen and I'll go to the top view by using this viewport gizmo, press the zip, so it goes to set to the top. And I'll just go ahead and zoom in so that I can see my blend clearly. Once I go to the top view, I'll change the shaded view to material preview. I can do this by pressing Z and clicking material preview or else I can simply click this icon here. So there we go. We have got material preview. Now our plane looks white because we don't have any material assigned to it or textures or anything like that. The first create a material for this plane. So I'll come here and go to the material properties here and say New. And we have got one material which is here assigned to this. So let's take a look at our first lecture in our lesson. So which is the noise texture. So what I will do here, I'll come to the node panel here. And I'll say add, which is on the top. And then come here to texture. And inside texture, I can see something called as a noise texture. And select that. And there we go, We have got a noise texture. And notice that this has got two outputs and various different inputs do it. So this has got a factor and the color, what this means is one is a black and white value and the other as an RGB value. And then you have a vector which basically assigns this texture to UV. It assigns to generate it or whatever. And then you have the scale, detail, roughness and distortion. Without further ado, let's go ahead and connect this texture so that we can see what this is. I'll connect the factor to the base color. And yeah, my shader, so Compile and you can see like some kind of a noise texture. This is mostly like clouds. And then you can play with the scale here to basically reduce that scale of that, of that noise. And then you have the detail which makes that noise more rough or smooth. You can see that here. And you also have got the roughness, which adds further details to your noise. And then finally you have something called as distortion, which basically creates ripple, kind of an effect which creates like a wavy texture. So you can do this here in the noise. And these are the basic parameters of this lecture. So you can go ahead and take some time and you can play with it to see what value of x, what, and how your texture behaves. All right, so let's go ahead and take a look at our next lecture, which is the Musgrave lecture. What I'll do, I'll again go inside the egg and inside of which we can see something called a stricture. And under texture, we can go and say Musgrave texture. And there we go. We've got a Musgrave and put this noise down and it will decide top. And I'll connect the height here to my base color. And yeah, see how this texture is different from our noise texture. This creates a pattern like something like camouflaged kind of things. You can see these kind of patterns in military uniforms or stuff like that. So here also I have something called a scale, retail dimension and generality. Let's go ahead and experiment those values. So as the scale suggests, it kind of, and I increase it, it keeps those values to be small so you get more texture in this square. So that's the scale. And then we have something called Lester detail. And I reduce that detail, that texture becomes smoother and smoother and finally ends up with nothing. So you need some detail to split those those Musgrave texture. So I have the detail and I have the dimension. What this does is really interesting when you actually reduce this dimension. Notice how that texture kind of splits more. So it basically has much lesser dimension, which means there are more smaller kind of patterns then bigger. So when I increase that dimension, what happens? The buttons kind of become lobby and become big. That's what this dimension suggests. So when I reduce it, do you have those really small patterns which are really organic in nature and that you can use this pattern for chipped walls or something like that. And then you also have something called Les molecularity, which also changes this texture in a lot of way. So what you can do is you can simply take some time and see what values does what, and have an understanding for yourself. So that kinda helps you in a longer run. Let's go and look at the other lecture, which is the warning. I'll go ahead and go to the texture and set off which I'll go and select the war, my texture. And I'll put this down. I'll connect the. And here you can see that there are three different outputs and three different inputs. So let's connect it distance to the base color. And you can see kind of cells type of so worn my lectures, mostly called Les cells or warranties cells, whatever you like to call. So these are, has those cells, if you notice closely, you can see different celled pattern that forms this. So one eye is extremely versatile infection to use, and it does got lots of different applications in procedural texturing. So I will go ahead and change some values. So here you can see something called as randomness and skin. So now you'll understand why I call this as cells. Because I'm going to change this randomness first. So when I put this to 0, you can see that. Notice closely that there, you can see rows and columns are a grid. So this we can call it as cell, like it's like a kind of an Excel sheet where you see cells. The similar way this has been a grid of cells which forms this Voronoi texture. So I can play with this randomness to kind of distort my cell and have different looking organic texture like that. And then I have something called a scale. Yes, as the name suggests, this only divides those cells or it just makes those cells smaller and smaller endlessly until you see like really small cells. So you can go ahead and play with this value to see how much this affects. Then you also have, you also have some settings here, something called Les F1, smooth F1 distance to edge and radius. And we're not going to go inside each and every detail of this which you can take your time and do if you want. So, but for the purpose of this tutorial, we don't need to understand this in depth, but I'll go ahead and change this value so that you know what it does. I'll just go ahead and set the distance to edge and see what happens. Yeah, as soon I said that the distance to edge, this texture is being rendered differently. Now you can see that they are more like a tile kind of a field. So you can again go ahead and see in scale or between the randomness and attacks the similar way. And I'll give this back to smooth their phone so that I can see them. All right, so we also have something called a scholar. When I put this color here, you will be seeing those color values. Yeah, so this is a color value, as I suggested before. And this textural noise, texture, and warlike also has a RGB color value. But we mostly go with the distance, which is the grayscale version of the Voronoi picture. And that's it for 19 texture. Let us go ahead and look at something called gradient picture. I'll go ahead and say add and go to texture and select gradient direction. Yes, as the name suggests, this is mostly used and it is used to create gradients in your meshes. Let's see how it's done. And here also you have color and factor. I'll disconnect the factor to my base color to see how that affects. And yeah, so nice connect my factor that you can see that there is a gradient that starts from black to white and gray scale values in between. And you also have the linear quadratic using diagonals Pericles. So you can go ahead and set something to see how that looks. Yeah, as when I change it to diagonal, you can see that the gradient starts from here and there. These are various settings so that you can change that grading according to your wish. So this creates a gradient on your mesh. So that's the understanding of the gradient texture. And then let's go ahead and see our final texture, which is called as just called as the VEI of texture. I'll go and say Add. I'm going say picture, and let's go and select the wave texture. And I connect a way of friction here. And yes, as the name suggests, year-old. So you're going to see waves, but we are seeing bands right way. So let's see that we have the, let's see the parameters of this texture. We have the scale, we have the distortion detail and some other things. So let's change the distortion. And as soon as I changed the distortion, you can see how those bands turn into waves. So that's why this is called as your picture. And yes, you can create bands do with this by simply setting the distortion to 0 and you have bars on bands or you like to call. And then we also have that distortion and detail of that distortion. So when I put that detail to 0, you can see that much smoother waves come. And when I seen the detail, you can see that the waves are becoming much more detail and they become harsher. I mean, it's not smooth anymore. So you can do this as web. And then we have the beetle roughness, which further put some details on the leaves. So there are much more smaller, intricate evenness on our, on our entire way. So that's for the wave texture. So there are much more textures to be discussed. If you go inside the ad and go and say texture, you can see that host of other pictures are there. And yes, so for the purpose of this tutorial, we're just going to use these five textures and get through the structures. So for that purpose, I'm not going to go inside all the other textures, but you can do so if you have out of your interest and you can go and explore as required. So let's go ahead and wrap this lesson up by saying that there are different textures in Blender and you don't need to bring images all every time. And you have a lot of textures built-in side and you can customize those parameters to get the texture of your choice and of your liking.
4. S 01 3 Controlling Procedural Texture: Hey, so in this video, let us see how we can control these textures. The procedural textures can be controlled in a lot of different ways. Why we are talking about control. You can observe that all these textures has a very few parameters that we cannot control, each and everything here. That's why we have more nodes to that so that we can be able to control and fine tune these textures. Let, so let's take a look at some of the controllers so that we can change these nodes and see what happens. So the first node which we are going to take a look at is called as the colorRamp, right? We can go inside the ad and go inside the converter and select the cholera. This is one method. But if you feel, if you find that this is a long way to do, what you can do is simply hover or anywhere in the empty space and just shift a and click Search and just type in color ramp. And that also adds the similar node. So I'll just keep one kilogram here. And let me disconnect this wave detection. And I'll keep it here somewhere. And let's move all these nodes somewhere else like that. Keep the color ramp here. And the first lecture, what I want to demonstrate with the cholera is the gradient texture. And see what happens when I put the gradient texture here and connecting factor inside the factor and connect this color to our base color. And yeah, and this is what we get. This is the usual thing, right? What are we get? Now I'll just move this color ramps slider. Notice that you have this slider and there is a gradient here. And when I just move this and the black dot, you can see how this is controlling on changing our gradient texture. So this gradient texture is being changed by this color ramp, and then this output is being fed, fed to the base color input. This is how this node works. So I can tweak these like that to kind of change My, to change my gradient. Again, also add color here. So I want to click here and I select the peg. I can go ahead and change the color. Notice that bottom one here. I'll select that and put two red color. And now you can see that there is a gradient between red and black. And similar way you can select this and change the color so that you can get any color that you want. And you can also add pegs in between. This is just like how we would do in a 2D image manipulation tool. Similar way, we can go ahead and select that to add a new bag. And this can be put to any color. And we can also remove that back by clicking that and clicking the minus sign here. And this would simply Delete and get rid of that big, right? So let's go ahead and delete this color ramps so we no longer need that. So that's how this colorRamp affected our gradient texture. And now let's see how this color ramp affects War II texture. I'm going to shift a and search and called cholera. I put a color on there and connect the one I lecture, the distance to the factor and the color to the base color. And let's wait for a second. Yeah, there we go. We have got the similar one license and nothing much has changed. And now let's go ahead and start moving the sliders. Yes, I can see what happens. So when I move this slider closer, you can see patterns like polka dots. And you can see that dots are coming to begin to happen. And you can do these kind of things when I put the randomness to 0, you can see how the cells, how the color ramp has affected these cells here. So you can also invert these colors by simply inverting the position of your calibre. So like that. And yeah, so covenants generally change our texture in lots of different ways and there are n number of uses for this special node color ramp. And you'll see how they are used through the lesson. So now let's go ahead and take a look at a map node, which is also a very important note so that we will be able to manipulate our procedural textures in general. So I'll go ahead and call a map node. And the way I do it is Shift a and search. And I'll just say Matt. And we have called a map node here by default, this is set to Add, and I'll tell you why they say to add and water does. So here you can see all the different textures. So I collect Connected gradient lecture to my base color. You can see that the values are black to white and even the one-eyed texture. And I connect it. And still we have a value of black and white and gray scale numbers in between. So if you see this tells you something. What it is, is you need to assume that blacks are nothing and white sell everything. So it's kind of black means 0 and white means one. And anything in between is the value status between 01, all the decimals in between, kind of slides in the grayscale. And all the whole numbers kinda falls as black or white. And now what we can do here, since we have these numerical values, then obviously we also have the math, and that's how the mat node comes into play. And all these numerical values can be added, subtracted, divided, or multiplied, and everything. Whatever you can do with math can be done with these values here. So I'll go ahead and connect this distance inside my ad. And I'll say this add to something called as Multiply. And you can see the slider and you can see the all different kinds of math that you can do with this map node, but don't get overwhelmed. All we'll be using is basically max two mikes for three to four different functions in this. And we're not going to touch all the functions at all. But it definitely looks intimidating at first. So I'll just simply select Multiply. And then I'll connect this value inside me, inside my base color. And then when I change this value to, this value becomes more than one. When it's one, it's the same. You can also connect, try and connect this and see the difference. There is no difference, right? Because any value that is multiplied by one remains the same. So that's why it is the same. And when I change this value, notice how this texture behaves. So I'll simply go ahead and change this number to 0.5 and see that the texture has dimmed ambit. Why is this happening? Because we are multiplying a value which is lesser than one. That's why this texture is being taken away. And that's why we are having that dimness in our texture. But does that make that everything to black? Yes, you can, when you multiply this by the value of 0, or anything that's less than 0 will be made as black as your regular map. So this also means that when I multiply this by a value of more than one, I'm going to brighten up my texture, and that also happens here. So my value is 1.5. And you can see that there are more bytes because things get multiplied and their number becomes one or more than one, which is being shown as white as in Blender. And render also considers one thing that any value that goes more than one will also be it as white or one or all your numbers will be put to one if the value is more than, more than one. And any value that's less than 0 will always be black. And this is what blender does here. Alright, so this is the function of the multiply and similar way you can go ahead and subtract, add, and do all sorts of things inside of math. So that's it for the math note I just wanted to demonstrate on a typical use of the mat noticed basically increase the texture or decrease the texture or increase the intensity or decrease the intensity and stuff like that. And you will understand this later on when we take an in-depth look at how things work. So don't get overwhelmed as of now. All you need to understand is just that math nor exist in Blender and you can do math functions with it. Now let's take a look at some of the vector notes away what I mean vector is it has a value and a direction, right? So it is what is called as a vector. And now let us go ahead and take a look at some of the basic vector notes, which are really, really helpful in positioning our textures, in repeating architectures, scaling our textures, etc. So let's go ahead and take a look at that. For this, what I need to do is I need to call two different types of Texas. All right, so first let's take a look at the first lecture, which is called as the texture coordinate. And I'll go ahead and say shift a and such. I'll call as texture coordinate. I'll type here the x t. And at the last you can see something called less texture coordinate and select that and their ego and see that there are blue outputs and there is no inputs for this. These are used to position your texture. So here you can see that there is something called generated. And generated is a type of texture which mostly works for procedurals because it doesn't need any UVs or coordinates. It simply sits on your 3D model and you can work with generated and then you have a host of other different types of vectors. You have UV. Whenever you have UVs on your model, you will need to connect this to the vector. And four now, let us simply connect generated inside the vector. And yet nothing has changed too much. So because this is using the generator type of texture, which is actually the default, even though you don't use this generator is a default for procedural texture. That's why we did not change anything over here. So what we can do is to manipulate this texture, we need some values. We need to say that what we want to manipulate here, what we can do, let's add another node called as mapping. What I'll do, I'll go ahead and Shift a and search and call this mapping. And here we go something called as mapping. And notice that we have the vectors and we have some of the parameters which we can change so that we can adjust our texture. So what I'll do, I'll connect it generated inside this vector. And I'll put the vector inside these vector. And yeah, nothing much has changed because all our values are 0, which are the default. So when I change this allocation and see how that picture kind of moves on the x axis. And similar way we can move this texture on the y-axis. So all this location information kind of translates or moves your texture on your plane so that you can position your texture where you want. And that can be done here. And then you also have something called this rotation. So when I rotate this on the z axis, you can see how that picture rotates on our plane. So we can have those cells going diagonally instead of vertical and horizontal. And in this way we can use this. And you also have the scale which kind of blows your texture or it shrinks your texture here. So when I put a number of two and you have the texture shrinking, and when I put the number as one, this is kind of similar to this scale, but this is not specific. It's simply blows off skills, your skills down your texture here. And that's what the mapping and texture coordinate, nor does. So. With the mapping and texture coordinate, we can position and change some of the parameters so that we can position or change the scale or rotation of protection by the means that we want. All right, so we added two textures here, right? The texture coordinate and the mapping. And I get it that each time you plug in a texture, it's difficult to add two of these, and it's a kind of a repetitive process, but you can do if you want to do so. But do you remember that we install something called Les Node Wrangler, which really helps us in a lot of ways. And it helps us here also. So when I select so a texture color as a way of texture or any texture or anything in the node. When I press Control T on my keyboard, blender automatically creates these mapping and texture coordinate and keeps it generated and as the wave direction here. So this is cool, right? Everytime you don't need to connect the texture coordinate and mapping. So similar way when I select the noise texture and press Control T blender gives us these texture coordinate and mapping. But how this is happening is because of the Node Wrangler. This only works when you have the Node Wrangler installed because that is the add-on which has the shortcut is Control P to basically connect texture, coordinate and mapping by default so that you don't have to do that extra work.
5. S 01 4 Other general nodes: All right, So we saw a lot of nodes as of now. And in this video, let's take a look at three more loans that are really helpful for us to use. And then we can go ahead and start doing art fruits. But right now, I'll go ahead and clean up the space so that it's easier for me to work. So I'll select all I mean, I'll draw a marquee and select these just by clicking my mouse and I'm just dragging, clicking and dragging and everything is selected here. And I'll just press Delete to delete my nodes like that. And I'm left with nothing. Like let's take a look at something called as mixed RGB. This is a really, really important node which will be used in our layering process for our texturing the fruit. So let's go ahead and call that. I'll again go and Shift a and search, and I'll call this mix. And there we go. We have something called as mixed RGB. And as the name suggest, this simply mixes RGB colors. And here you have got two different values. And you have got a slider, and you have got an input which is showing in these yellow color. So here also you can go ahead and mix a texture or anything that has a color value can be mixed here. And then you have output called as color. This is a single output. What it does is basically takes us input and mixes and feeds the output, which you can connect to the base color or any other mode. So let's go ahead and connect this into our base color so you know what's going on. And then let us change this to a color and it says a brighter red. And then I'll put this to blue. It's a completely contrasting color. And there you go. You have something like a pink or something like purplish pink. So what you can do is have the factor here which is 2.50. So this factor can be adjusted. So when I put this value all the way to 0, notice that we're getting that ready shoe. And when I put this value all the way to one, we are getting that blue hue. And why aren't we getting this color here is because this is a shader. So it has got roughness and all those values which kinda little bit adjusts our colors. So if you want to see this directly, you will need to connect this directly inside of you. So this can be done by using our Node Wrangler. What we can do is any note that is selected, make sure that that node is selected and simply hold Control and Shift on your keyboard and just click once. So what it does is it directly connects your, your output to the viewer, which is a temporary viewer for you to see that how your textures work. So this is a really important feature of Node Wrangler. So whatever no d'Ivoire in, all you need to do is select that node and press Control Shift and left-click at the same time so that you can see that node instantly without needing to connect this all the way here. So I'll again select this note and Control Shift and left-click. So we have got that node connect to their lyrically. And now you can see that the same color is been put over there. And when I reduce this to one, you can see that that red pops up. And what it does is basically it creates a mix between these two colors and arrives at a, at a third different color. It's basically by mixing these two. And you're getting that. And here also you can see a different set of blend modes. Over here you have the dark and multiply Color, Burn, Lighten, and all these is very similar to, if you are familiar to a 2D image manipulation tool. The similar kind of blend modes work here as well. So as of now I'll keep it to mix. And I can see in the shader 1 or 0. And notice that we have an input next to the factor. And this can be used in different ways so that we can change that color by using that factor. What I'm going to do is I'm going to call a gradient texture. And there's Shift a and say gradient texture. And I will simply connect this color inside this factor. And notice what happens. See that this gradient drives this factor value. So as I said, 0 and 1, right? So when I go to factor, you can see that there is 0 and there is one here, which is black and white. So the same values are being fed inside this factor. This factor two is a numerical value, right? So whatever is black will be set as 0 here, and whatever is white will be set as white there. So this is how this gradient texture is giving value to the factor and thereby driving our color between this red and blue. Alright, so to demonstrate this properly are much more clearly. I'll simply go ahead and put a color ramp in between. I'll call cholera and put this in between. And when I start changing the value, see that how this affects our colors or dare I say how this only the ramp looks. So I'll just press Control Shift and left-click on my node to connect this inside my view and see that this is what we get. So this is black, right? So what this is going to give will be red, the top value will be fed here. Similar way happens when I put this to black. I mean to put this as 0, we are getting the top value, which is the color one. And the similar thing happens when I connect this inside of the factors. So whatever is black, we are getting it as read, whatever is 0 we are getting as red. And whatever is white on that side, we are getting that blue and in-between values are being mixed aspart, they're different values, different grayscale values, right? So this is how this mix RGB works. So we saw the mix RGB a very similar way. There is one more shader called as mix shader. As the name suggests, this is not going to mix between RGB, but this will mix the shader itself, the entire shader itself. So I'll demonstrate it right away. Move this off to show you this I1, another principle shader, because there are two shaders required to mix between the two. And now I'll remove this base color. And now I'll call a mixed shader here, Shift a and search. I'll call mix shader. We're quite put the mix shader here. And you can see that instead of a yellow dots are yellow inputs, you are getting green and boots, which is basically indicates the shader type. So all the shader types are basically color-coded in green. That's why this is in green. So you can basically connect these two, these points and stood there. And you can connect the shader finally, inside the surface. And we are basically getting an output that is a mix between these two differentiators. So LM1 shave that. So when I change this color, this color, and similar way we are getting the similar colors. But in this way you can mix between every parameter on the shader, not just the color, hair is roughness and there is metallic values and stuffs like that. So I'll show you a quick demonstration of this. I'll set 11 shader as completely metal loop. I'll keep this to white for this valid one and increases value all the way to one and reduce the roughness to 0. So this is like a shiny metal. Yeah, I can see the reflection of the trees, which is the HDRI map here. So this is a reflective metal and this one is kind of a pain kind of a material. So what I'll do, I'll increase the roughness so that it is rough. And this is not a metallic, so this is a non-metallic object. So what I'll do, I'll connect these inside the mix and put two there. Let's take some time for the shaders to combine. And they you. And now when I put this value to 0, I can see that my metal is coming and I put this on the way to one. I can see this non-metal part coming. So the similar way we can use this ramp here, and we can simply connect this inside of this factor and see how this drives our principal, the shaders. Yeah, something like that. So I can again move this and put this together. Yeah. So there you go. You have got two different shaders working on the same object. You can see that how the blend between this happening, but generally not as in real life, but when you paint a metal, you might get something like this because the paint is a non-metal and kind of beers on whether you will get an effect similar to this. So you can assume that this is some kind of an example like that. And you can go ahead and seeing these values just like how you did in mixed RGB. And yeah, this is what the mix shader does. It simply mixes between two differentiators in Blender. So now we'll take a look at one more important node, which is the last node in our introduction series, which is called as the separate x, y, z. As the name suggests, this is going to split your object or see your object in three coordinates. Let's see what it does. So this is a very important procedural texture. What I'll do, I'll get rid of this, select and extra delete or I'll call texture called as they separate and they go, you have something called as separate XYZ. Help with that separate XYZ. So they're separate XYZ is come here and notice that we have got one vector and we have got three different outputs here. I'll go ahead and connect my texture coordinate and mapping. Note here, shifting and say texture coordinate and mapping. And connect these to generate it. And getting these two vector. And we can go ahead and put the middle two to 0. So to illustrate this better, I want a 3D object rather than a plane. What I'll do, I'll simply simply create a cube over here. So I'll go ahead and Shift a and mesh and put a cube order and select the cube and give that same material, which is the material 000 001. Yeah, there we go. We've got that material applied to this queue. And let's see what this is. When I Control and Shift and click on this separate XYZ. See that how this is giving me a gradient. Yeah, this is also a gradient. But see, you can see in the gradient based on the axis of this, I'll show you how I go to the top view. This is the x axis, right? So the x goes from, so the gradient goes from black to white on the x-axis. You can see that and it's a 3D object. This gradient covers all of it. And then we have something called Less. Why? So I'll again go ahead and Control Shift and click the separate XYZ. What this does is the nodal angle automatically connects the next output point to my V10. And now you can see that the gradient is coming from the y-axis. When I go to the top view, you can see that the gradient comes from the y-axis and blacks is here and why does it. And then we can do the same on the Xanax as well. So Control Shift and click on the separate XYZ to change the gradient on the zip. And now you can see that that gradient comes from the z-axis. And yes, this also you can simply change by using a color ramp and you can play with the values to adjust those gradients. And it works the similar way as the other gradient also. So yes, so this is extremely useful in some of the cases. So let's see how this is used in the future. But all you need to know is there's a node called something called a separate XYZ. And with this, we conclude that the basic nodes that are required to start texturing your own fruits.
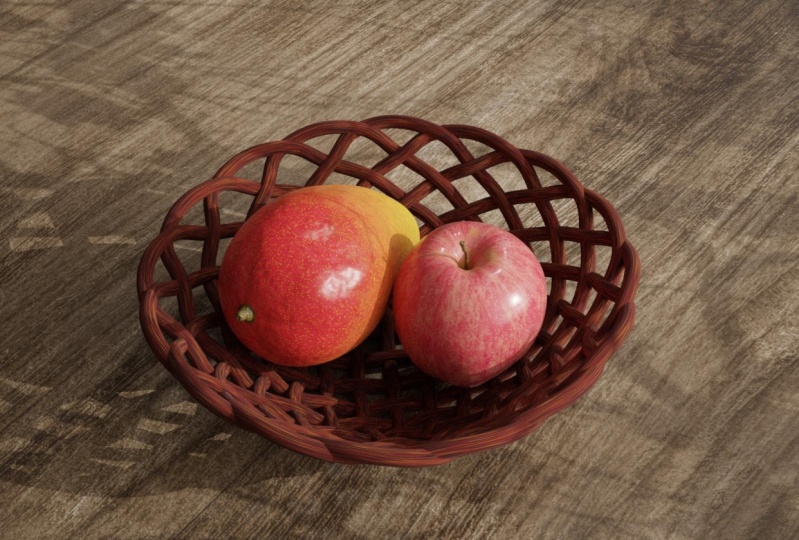
6. S 01 5 uv projections: All right, so in this video, let us talk about the Texas stretching and the type of projection on these kinds of fruits. When you observe carefully on both of these fruits, the apple and the mango, there are some textures that kind of stretch towards the poles of the apple. And also be mindful if you observe on the top and bottom of the surface of these two fruits, you will see that those textures becomes smaller and in the middle they become bigger. And again at the bottom they become small, right? So such effects are such distortions can be replicated using our UV, using a specialized projection. For this kind of effects, we'll be going with the projection called as cylindrical projection. Now speak no cylindrical projection. You can relate this kind of rejection, an atlas or a world map. What you can see there is the Earth being a geosphere is actually being cylindrically projected and made as flat rectangular projection write the similar way will be projecting the apple as a flat map using cylindrical projection. So let's see how it's done and it's simply show you what I've got here. So when I select the apple, I'll go inside tab and I have marked to seem like that. And I'll select all and simply say u and unwrap. And here you can see this is how you will usually get an unwrapped, right? But when we use this kind of an unwrap, we will not get those kind of distorted textures. What do you usually see in these kinds of fruits? What I have done here is I have simply selected all those UVs and I have made them flat, or I have replicated a kind of cylindrical projection here so that we'll be able to realistically replicate those textures on the apple. So you don't have to do this in this course because what I've supplied already has these projected in the right way. But it's important to know what's happening at the back so that it will be useful for you to do your own fruits or any other object that uses this kind of rejection.
7. S 01 6 tips and best practices: So in this video, we come to an end of Section 1. And before I wrap up, I wanted to share some of the points that I haven't mine so that it will be useful for you. It's a procedural texturing is huge. There are much more nodes present and there are lots of ways that you can control those nodes and get different types of effects and textures to work in Blender. So all you can do now is study all those different types of nodes that we saw. Like the Musgrave, the 19, the way of texture and the noise texture. Or you just need to make different planes and try connecting all these different nodes to see how they behave. And you can see those details absorbed, mostly zoom in and you can see those small details and what it does and how they look. And once you've got this, all you have to do is compare or relate these detail to a real life object. Like maybe the room you're sitting in has a lot of textures, placenta around you. The desk, you use the word, you see what the floor you've got, everything has got textures. Nature is all about textures. So all you can do now is start observing and relating those textures to what you have got in Blender. And there are high chances that you will be able to relate a lot of textures to nature. And yes, that's how procedures work. And I feel that's the beauty of procedural that they underlaid to nature. For example, the nice texture relates to clouds, or when you increase the roughness to it, it becomes so rough that you can use it to make rocks. And if you have a chipped water near home, and most likely it can be achieved by a masculine picture. Take a texture, a single texture, for example, a Musgrave, and connected to different planes and tried to adjust those parameters to see how those parameters affect your texture. You can see how it affects your details, the size of the detail, and also you'll be able to see the various number and huge variety of textures that you can generate. This changing and playing around with this four to five different parameters and you will achieve to lots of different numbers. And we also saw different controllers by which you can change and manipulate your textures. And if you're really experimental and you'd like to learn more what you can do. You can use the mics, RGB, and you can simply connect n number of Texas to do it and see how those things mixed together. And there are a lot of blend modes to your support. You can go ahead and save those blend modes to see what all textures you will be able to get.
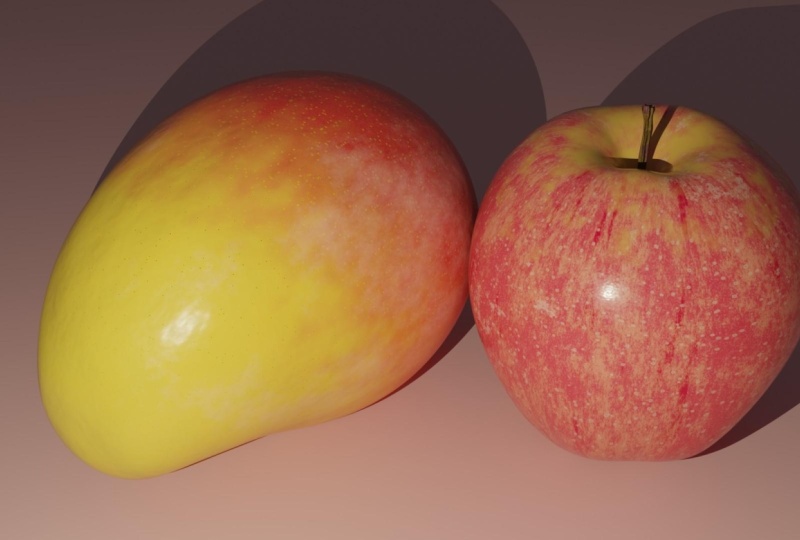
8. S 02 01 Detail study of the mango: In this lecture, we will see how to study BB days on top of the mandible. So this is the mango that we will be replicating. So let's see, the color b gets absorbed on the medical. The first one is color gradient direction. The second is greenish colored picture though is a little black dots and Ford is patchy border lake effort. And fifth is the blend between the stock and the fluid. So now let's do the backdate lectures absorbed on the mandible. So the first fact Davidic shirt absorbed is the order greenie bumps. And the second is my organic surface deformations. And the third is a blend of matte and glossy effect on demand. And for this microglia need boots on this doc. So these are some of the backward lectures observed. So in this lecture we are exceeding the mango procedurally using layer based approach. So the first layer is the color grade infection. So now you can see here, there is a blend of colors, different colors. So greenish and low to reddish orange, so that our defendant owns in between-ness with orange and deep NLU. And also the actions are blended in a very organic manner. So let's move to the second layer. So the second layer is greeny color addiction. So that little micro green color diction or lower the mango. So here, this is the procedural action of the mango and we have added colors on it. So this, the second leader is stacked on top of the firstly, that is the green gradient color action. And the third layer is a low black dots that are a little black dots all over the surface of the mandible. So this is again the procedure section of the yellow black dots. And this is the third layers stacked on top of that we're seeking. And the fourth layer. The fourth layer is actually Bowden lake effect. So you can observe you that is a pinkish white patches or lower the mango. And it does, it feels like about the dish Goldman top of it. So here we've loaded. So add though roughness D didn't do this so that we can differentiate the surface of the mandible with respect to this Bathsheba older DD. This is the leading process here. If you can see all the four layers are combined together to achieve a mango followed lake finished mango like this. So these are the details and don'ts of the color of demand. The final step is combining the Kylo details and that back leg should be details of the mango. So we get something like this. So here the image you're seeing is little exaggerated. This is completely created for the demonstration purpose so that we can observe the details and replicated as we want.
9. S 02 02 defining the color gradient: In this lecture we will see how to actually the mango. For that, I'm going to open the file, call it mango dot length from the exercise files. So File open and go and say exercise files. You can see mango, mango. And here I'd select mango dot blender and open. So this is the we are going to work with here as we already discussed, we are going to lecture the bamboo procedurally and also Leo by new. So in this lecture we are going to see how do I make sure the fall asleep at this gradient color texture on the mango? And we're already provided an image with the color palette open. It's the saints bytes, mango, color palette mangle, this, we will select Layer 1. So these are the colors that we will be using for this new category and say medieval proper disbanding. And I didn't knew me deviant new. And we can name this as mango. And enter for that we need a separate XYZ mood shift E and search separate x, y, and z. Now, select separate XYZ node and press Control D. Now we have this image section. I'm not going to use this, so I will delete this and connect it back to Victor. Change this from you. We'd do generator. Now, I need colorRamp, so I wouldn't press Shift a and search for color ramp. Now, connect the z axis to factor and colored to base color. I'm going to switch my mode to review mode. So now you can see here, there is a gradient effect is already happening from black to white along this axis. So now we will give the colors, reflect colors here. That is, we are going to separate it into, um, so for green, yellow, orange, and red. So first one is, I'm going to add the green. And then I lied one would point here. And this will be our loci though. So I select a yellow from my color palette. And this fourth one, this will be an orange shape. So I'll go and select the orange, and this is the rate. So now, if you see we have roughly created or gradient blend between the greenish, yellow to red color. To know also begin, I just heard in terms of the separation of the colored sweet bread. So I won't do it. And yellow and orange and red. So this is a separation roughly. We're glad. So now if you see your, it is Disraeli, they go, it's liquidity constant in the horizontal direction. So we would have slightly repeated in the y-direction to get some irregularity in this lane. So I'm going to increase the rotation along the y axis so it can be, I'll go with minus 15. So yes, this is good enough for us. Now we have created the gradient between the, all the colors as we regret. But it does not yet ready. Organic. It's still, it's very constant and the diagonal lines are really sharp. So we are going to add the organic garden on top of this. So for that, I'll be using Musqueam actual. Say you go and press Shift A Search Musgrave. Actual. Ok, now I add a map node to combine this Musgrave organically inside this separate XYZ that is gradient calorific that already we have created. So for bag, I'll go ahead and press Shift a search. And you connect the height value two and saved value one. In this final value will be connected in the colorRamp factor. So now we have some kind of effect over here. So now what we can do is we can change the parameters of the mosque green action. And also we will add one more node. For this two, we can control mode on the dictionary. So first I will change the scale of the Musqueam and slightly increase it. So keep the value 14. And the detail that slightly reduce it. 1.6 here. Who's good? And the dimension can be, can be 0. And also this commodity can be too. Yep. So this value we are going to combine on a doormat node with this. That is, go ahead and press Shift A Search. So this year I'm going to use this map node with operation, or it might play. So we are going to get more control on D must clear picture. So I will connect this height to this value and value to this. So if we adjust this, we can see how we can control the Musgrave texture. So some, something waiting my value would like to give. Something like this. Can be 0.50.05 or it can be when six or seven. Yeah. So now if you see that is so that is a blend between these colors, like red, orange, yellow, and green in a very organic way. So this is what we are trying to achieve from this layered one. So now what we can do is we can actually select all these and Fremont. So for that, I'll press N before. You can see here, there's an old triangular dab that, and I have selected all the nodes, which I wanted to frame it. So I didn't go and select a frame selected. So in this way, we can actually grew the nodes and make it into a frame. So this is the end of year one.
10. S 02 03 creating a grainy color texture: This video, we will start with the second layer. So for that similarity and look on the color violet for the second layer. Open layer do some exercise rates. Angle Kyla by like mango layer two. So now we have completed the gradient color texture. Now we'll go ahead with the greeny color addiction. That is the layer 2. For that, I'll be using Musgrave picture again. So I didn't go to Shift a and search Musgrave, Musgrave and press Control D. So we have the diction coordinate and the mapping connected. It is Control Shift and click. So this is the picture we already have on double for mango. So now we will change and work just with the battery does of the Musgrave diction. So scale, I wanted to very high. So I wanted some metadata on. My Gruden didn't. It does make a very grainy greenie and microglia needed. So I'll go with that owned 600. So this is the detail here until you can see there is a difference. You see something like this be mauled. And also we can change the detailed and dimension and in Lucknow entity here, we can play with it. So detailed. I would like to go with 16 order own pen. And dimension for this. For this texture, we will reduce it to 0. So that will get much more. Greenie and microglia. Any effects on X2 and lacunar D, We can adjust it, you can increase it. Yeah, This will work with this. So this is the procedure picture that we have created. Now we are going to give Gallo do this and mix it with that first layer. I like colorRamp, shift, a search color ramp. This, we can reduce it. We can play with the intensity of the picture using color ramp. So I look slightly reduce the white value to disagree, snag, my intensity will be reduced. Now, I will add mix RGB nude for combining grainy texture with the gradient effect. For that, I go Shift A Search mix RGB. So now we'll see how to combine our layer one and layer two connected car load to the color one of the mics, RGB, nude, and collect connect the colorRamp color to the fact that brand new and colored do the base color. So now we're facing. It's getting lined up. So now we see, we can see a white colored in, in color addiction all over the mango here. This scholar, we can select it from my color palette. Yeah, so this is the guy load the data we have on top of the mango. So now I feel the intensity of the actual transmitted heavy. So what I will do, I will go in, say, the kind of lamp, the right value. I'm going to make it more clear so that I will be able to see very grainy texture on top of the mango. Yeah. So this is the completion of a second layer. You can see my green diction or lower the mango from grade also do orangeish layer and also a loop. So now we come to this end of the second layer. For that before we completed even make will arrange the nodes and make a frame around it. So I select Oil node on the nodes and press N Node Wrangler tab and selected. So now we have the first layer and second layer.
11. S 02 04 adding yellow dots: In this lecture we will see how to picture the third layer that is at low black dots on top of the mandible. So for that, before starting the process, I'll go ahead and open the color palette. Fail from Exercise Files, mangle, and color palate mango in layer 3 dot PNG open image. So for creating the dots, we're going to use one line diction for that and go ahead and shift a search for water noise or nonfiction. Select the water I showed and press Control D for actual coordinate and mapping. And for this particular texture, for a particular layer, we are going to use UV. So we will connect you to the vector. So I will add a color ramp, Beslan shift a ramp. So now we will see how the diction looks on top of the Mongols. So I simply select Color Ramp and then press Shift, Control Shift, and click on that moon. So now we've seen Greece's scale value. We can see how our actual behaves on top of the ma'am Go increase the scale. So I didn't increase the scale to 400. So as you can see here, the dots are very small and this large numbers, it's spread all over the mango. Now we can play with the kilogram satellite, just the white and black men do and make this. So the white notes, whiter divisible dots can see here in a low phone. Somewhere, I don't cure, can fleeces. So now we have an actual 3D, non-weird add colors to this picture. And after adding colors, we are going to combine this with that. Previously, I will add one more color ramp node for setting the gallows shift E. And we can define the color, what we want for this dots. So we ask me reference your image. You can see our dots have dark, deep and look colored. And in the middle of the yellow dots we have a small tiny black dot. So this, we can give this as a local load, and this can be black. So we can connect the color to FEC factor of this color ramp and click this color ram Control, Shift and click. So we can see what does the details will be getting. Okay, now we have a rough detail ready? Now let's combine this with the previous layer and see how it looks. For that. We need mics, RGB, Nord, shift, a mix RGB. So we will connect the previous layer as colored. Want this color to color. And we will add the color value from the colorRamp. Basically do the aphasic factor of the mix RGB North. Now you can see that at a low dots with black, tiny dot in say, the yellow dots. So this is the overall beginning of Lake, a little black dots on top of the mango. Finally, we can connect this to the base color and see how it looks. Yeah, it looks very nice. We have the details. So now what we can do is we can change the color ramp and controlling size of the black and yellow dots and say, so I'll show you how to do that. So if I increase this, you can see the yellow dots are getting much bigger. Cell keep it somewhere here. And I wanted the white, black color dot to be much more visible. So slightly play with this white colored and increase it. Yeah, so it's competitively, it's needed. So now if you see we have completed the third layer with a little black dots. So now saved or limits and fame. And so select all nodes which we regret and frame selected from the Node Wrangler data. So we have completed layer one, layer two. Layer three is on suited.
12. S 02 05 creating patchy powder like effects: In this lecture we will see how to picture the fourth layer that is patchy Bowden lake effect. So before stopping it, I mean, go ahead and open the color palette for the fourth layer. Exercise rights. Mango. Kayla panic mango, leader for VNG. So this is a gala we're going to use in this. So we are going to use Musgrave diction for grading this effect. So go Shift eight. Search for Musgrave picture. So this is the picture. So I will select this Musgrave actual and press Control T for our mapping and texture coordinate. And select Musgrave, Xcode and press Control Shift and click. So this is the actual we have. So we will change though meters on the Musgrave diction scale. I wanted three neatness. So D1, we can increase it. So I will keep around eight. And the dimension hand, you wanted it very less. As we already discussed. It's like a Bagchi detail. So you'll keep that owned 0.3 and the molarity, we can put that on three or 3.7 million. So this is the detail we're looking for. Now. We will add kilogram to it. And I just more like we'll play with the intensity of the action. So for that, shift, a search for color ramp. And I'm going to meet though white, the green. So this is the intensity later on also after giving the color and combining with the previously as we can change the intensity three away. So now we will add the color detail and mix it with the previous layer. For that, I will add Shift a and mix RGB node. So the previous layer color to color one. And the colorRamp of this Musgrave patchy lake effect to the factor value. And we can connect this mix and see yes, so this is, this is the effect we are trying to achieve, like a backseat lake affected snake or the leg patchy effect. Now, we can change this color to beach color. Yeah, so this is the batch effect we are looking for. Now. We will select all these and frame and select all and frame selected from the node triangular cap. So if you see now we have either the fullest Leo as a gradient and this seeking as a greeny, tiny green GDP. And the third liver, the dots. And for clear asset-backed cheekbone, the lake effect.
13. S 02 06 creating the surface bumps and roughness details: In this lecture we will see how to add data roughness to the mandible. So as we already discussed, the fourth layer, this is a patchy the lake effect. We are going to use the same my screen pixel value for creating my deafness. But we are going to use a different color ramp value because the kilogram, what we have is only for the color DD. So we are going to create a new color ramp, but we will be combining the Muslim picture, the previous used to Musgrave dictionary with that new color ramp with the different intensity values for creating the roughness for that. And go ahead and shift a color ramp and connect the Moscow gribble texture height to FAC and this color value to the roughness. So now if you see this more, much more black glossier. So now what we will do, we select the black BD and make it lighter. And our white also introducing density manipulate bit. It can make the black to a very lighter gray. Make this. So now we have completed our roughness the day and we will get started with the bumpy. Did we have studied the details in terms of liters? So the first layer for the bump, we are going to create a micro greenie became bump detail all over the mango for that enemy using what's clear. So let's get started with it. Shift a, search for my screen and select Musgrave and Control D. So we have our addiction coordinate and mapping. So now we will adjust the bottom windows of the Musgrave diction. So the scale alchemic, this first for that al-Afghani must grim picture illegally. So Shift, Control, Shift and click on must be. So we will increase the scale value. So I'll keep out of 30 or 35 ish and they're detained without to increase the detail by 15. Yeah, 13.513. And their dimension, can we like that? And the last non-chemical radius it yeah, 1.4 or something. So this is a detail. Going to use it for the bump value. So for granting this detail, we want a node called bump node Shift a, and search for bump. So we will connect the height to height and bombed to normal. So this is the output we have got. So we don't need this much sprint. So we would reduce the distance value 2.07 or something. Yeah, so we want something very, very soon. We can even reduce it to 0.5 or four. Yeah, so we're expecting something like this. There is water. You bring me food all over the skin of the Man Group. So again, I'm going to use Musgrave, picture that shift a Musgrave and select must cream and Control T. So we have the dictionary coordinate and mapping. So now this detail is the overall deformation detail of the mango. So we would play with the parameters of it. So we'll keep it hot on the scale at around 4.5 or something. So I think this will work. So now we will add Matt node and combine it. So I go to shift a search for DMAT node and then combine the height value to value, hate to value. Combine the previous. Good day. Make sure, hey, do this Vandy. And value to the distance. So we have basically combined the previously with this layer. So now we have combined the layer one, MM, DD and deal do bump details. Now if you see the bumper distance value, it is 0.05. So reduce or increase it. It does actually reducing already there. They're not able to control it individually. So what we are going to do, we are going to meet this as one, distance as one. And we add individual map moods for border layers so that we can control them individually. So I will go ahead and add a, the node with the multiplayer for this shift E. I change this, I do multiply. And just pleased over he would get connected. Now it's your dinner ended. Now, if I reduce or increase the value, I can control the Musgrave. Musgrave picture the deal of the micro greening action. So I'll keep it somewhere. I don't like this. Or even less than 0? Yeah. In C does ready Mike does not completely clean, but we have a very micro grainy pictures that. So similarly, we will add another map node for the overall Musgrave deformation. The show at this, the second layer of the bump, shift a search format and done this to multiply. It's getting rendered. So if I increase this value or reducing this, concede the man whose skin, there is a oral bump detail. There is a change in overall bumped. It said keep it down. One on 1.1. Yeah. So this is the bump, didn't we have completed the bump detail right now.
14. S 02 07 separating the stalk by procedural masking: In this lecture, we will see how to mask the layer for giving the stock detail on the mango and see how to separate the stock from the members. For that, I'm going to add separate. It's lazy load. Shifting a search for separate XYZ, separate XYZ and click Control. I don't want this image texture here, so I will get deleted. So I will directly connect the vector 2, 3, separate X-rays. Now we will add the colorRamp, do it. So shift a color ramp and then connect the set value to the efficacy. Now we directly connect colorRamp and see how the texture looks. So select Color Ramp, hold, Shift Control, and click. So if I control the value here, okay, before that, this is connected with the UV. We wanted to change this UV do generated. So we will connect the generator to the vector. Yes, so now you can see that is a change in color, texture. So we are going to mask the stock separately. So if you've seen here, we are going to increase it the black q-value and separate exactly where we want. This we are doing it because to create a blend between the fruit and the stock.
15. S 02 08 creating the mango stalk details: In this lecture, we are going to see how to actually stop and then combine it with them fruit. Before starting it. I wonder to open the color palette for this talk. So I'll go ahead and open exercise fights. Mango, color, leg, mango, stock, Cp dot PNG, open. So these are the colors we are going to use it for stock. So before starting it, we are going to create a new shader node for this dog didn't buy the goods that stock looks entirely different from the fruit. So many do differentiator to create it. So finally, we will combine both the different shaders, do one using AAD, my masking detail that we created in the previous video. So let's first create a new shader for that. I even go do shift a search for principal, BSD f. So this is the shader we are going to use. So I will connect this directly by lignin Shift Control and click. So now we will detail out the stroke D1 first and then later on we'll see how to combine it with the previous one. And let's start with the Musgrave shifted a search for my script. And then also you need a kilogram, forward shift, a kilogram. And then we will be combining these two colors for this mass grave. So we will also called the mix RGB new shift, a mix RGB node. So first, we'll connect the colored FEC and kinda do B's color and height to FEC. So now also we will choose the colors we already have. So right now we will concentrate one Neon, the stock of the mandible that is really, really dying. Over here. Now, we will adjust the battle meters of the Musgrave dictionary and increase the scale value to 40, 50 towards something. And the detail can increase it to 14 or something. And I mentioned we can introduce it to 0.3 and node D, we can increase it to 10, something. We will play with the color ramp. So I increase and decrease. Okay, Now we will also add the bump eating on the stalk. For that, I will use noise texture should be noise texture. And then hold noise detection and control. And this we will connected in the normal. So for that we need a bump node, shifted a search for bump node. So we'll connect the fat factor, the height, and normal, normal. You can individually connect this and see how the section is on top of the mandible. So I select the noise texture and hold Control Shift and click. So now we can see how the noise texture works. So you can increase, yeah, we can increase the value part on DOM 35 or 40, 37 maybe. And then detailed so we can keep that on 3.5 or four. We bring food and roughness and Spain. Yeah, so this is the detail we are going to achieve, 8.80. So now we have created our texture for this dog. So now we will see how we are going to combine this shader with the previous one for that really glad mix shader. So I haven't coil shift B and mix shader. So this shader, this is a shader. And in this shader, if you see, we can combine two differentiated. So first one we will connect the fruit picture, and the second we'll go and then connect the Stop, Stop picture. And the FAC will be our master detail which we already created. Now let's connect all the things. This is our fruit shader, and the second one is our stock. And the third byte is to connect the mass, the detail to the FAC. So this is the masked, the daily color do FEC of the mix shader. So now if you see here that is a beautiful blend between the stove and the mango, be good. We can select all this hand frames anecdote. In this way we can organize all your notes so that in later stage we can edit it anytime. Now we have successfully completed dictionary in Iron Man Bu, and we saw how we used procedure shaders for actually know mango in Lear for me. And also we had a fine control over the nodes to achieve a really decide output of the mango.
16. S03 01 detail study of an apple: Hi. So I hope you learned something and enjoyed the course still here, I take the opportunity to welcome you all to this section. Take shooting an app and procedurally. So let's see how it's done. So yet I open my presentation that shows the apple details. So right here on the right, you can see that it's an apple. So this is the apple that we aim to replicate in L goes. These are the details absorbed from this apple. The first one is the green in color texture. Yes, if you observe closely, you can see that there are small red dots, right? So that those kind of grainy texture is lesson, which is what is the greening connotation. Then we have got more deep red lines. Way. I mean, this is, can you see these lines that are really bold and thick that runs across these Apple like this and they are discontinuous. And this is the bowl, deep red lines. And then we have the yellow patches. These are quite large. You can see that there are some pale yellow patches guide is going on here, which is nicely blending with that red color, right? And then we have the pale yellow dots. Dots is simply these dots that appear randomly all over the apple. And then we have a large yellow patch on the top. And finally, we have the small white patches, which is these that are also quite rough when compared with the app. And so these are the overall details absorbed in terms of color. And let's see the tactile textures that are here. And even here, the skin of the apple is so fine and smooth. It has got a blend of that matte and glossy effect which will recreate. And then you can also see some overall fine greenie bumps. Now look closely at the highlights of this apple. You will be able to distinguish those smaller, fine bombs oh, there. So that would also be created later on. So even for this Apple, we'll go for a layer based approach. And we'll begin with the layer one, which is the green in color texture. So when you see here, you have got these fine grains and you can see that there is a blend between the red and those small white, pale red or pink color, kind of a green. So this will serve as our first layer for apples texture. And then let's continue to the Layer 2. And as I said, we will then create those thick and deep lines that runs across the apple from top to bottom. And you can see the procedural texture on the left and the output on the right. So even here, we have basically layered these deep red lines on top of our greenie detail and that serves as, as the layer 2. And then let's proceed with the layer three. And here you can see those patches on those Apple, which will be the yellow patches. And that will serve as a key point in creating the apple. And this is a major detail in our apple. So this is the yellow patches that we saw on the reference. And here you can see the procedural texture of it. And on the right you can see the output over here. And then we'll go with the yellow dots. And these are the dots that mark on top of the apple. And notice closely that even these dots has a darker color on the middle. And this will also be created the same way as we did for the mango. And then let's go with the fifth layer, the yellow patch on the top. So here you can see that we have created a batch like procedural details that will serve as the top cap of Apple, which remains yellow. And the final sixth layer will be the small white patches. So here you can see that notice carefully on the procedural side, you can see that those white patches on the black will be serving as these pale colored patches over here. So this will also be rough and we'll have a rougher texture when we finally give the roughness map. And here we have the layering of all these individual layers. So when combined with these, we're going to get something like this. So this will be our final output color. And so when we mix that with our tactile textures, those small, fine bumps, we'll end up creating a realistic apple. Interesting, right? So let's go ahead and take a look at how to begin this. And let's go layer by layer until we are satisfied with the output. See you in the next lecture.
17. S03 02 creating the base grainy color texture of apple: So here I have fired up Blender, and now let's go ahead and open the apple.tar blend from our exercise files. I'll go to the fire and say Open and navigate inside my exercise files until I find the folder called Apple. And inside Apple, I have named our file called apple dot blend. I'll make sure to open this and say Open. And there we go. We've got our Apple sitting on are grounded. This has got no, our textures are, this is just a plain apple with no materials. So let's go ahead and give this a material first. So I'll go inside the material properties here, select that and give it a material. And I'll call this as Apple. We've got the material and in this lesson, what we'll do, we'll texture the stock separately. In the previous section, we saw how to separate the stock of the mango by using procedural masking techniques. But in this lecture, what we will do, we'll texture that stock separately by giving a secondary material over here. So let's go ahead and split that into two. The way I do this is I go to the tab and go into the Edit mode. And you can see the seams mark for this apple. So this stock is a separate seem, right? So there is, this is one seam. I'll go ahead and press L to select link and open up this direct link, open up this electron drop-down. And here I want to set this to seem so that when I press L, only that seem area, only that area where the covers is selected. So let me select that. And I will simply select simply plus L by holding debt and this seam is selected. Similarly, I also want to cover this because there is a scene over here also. So I go ahead and select this. So yeah, we have got the stock now selected. I'll go ahead and put a new material. I'll press the Plus and say New and call this S stock and say assign. So great, so we have assigned to different materials on our object. So I'll go to the Apple and let's go ahead and start texturing this. And because look, I'm doing to layer one, I want to open up the pallet for this layer. I'll go ahead and open. I'll click Open and navigate to my exercise files. And inside of Apple, I'll go and open color palette apple. And I'm just open layer 1 dot PNG. And there we go. This is our colors that is required for our Layer 1. And we have two colors over here. So let's go ahead and get started. So what I'll do first, I want to create this procedural texture over here. So this texture can be done with a nice texture. If you recall, this can easily be created with the noise. So let's go ahead and create a noise here. Shifting and search and go noise and put this noise somewhere here. And then we can connect this to see how it looks. If you want to preview this material, we will have to go inside the material preview. We can either click here, I'm going to press it and this material preview, we see that texture there. And I'm just pressing Control and Shift to connect my node directly into my viewer to preview my known. And let's go ahead and see in those settings a bit. So I want a more denser, kind of a green then this is like very light. So let's go ahead and turn that value up. So I'll set something like 255. And yeah, there we go. We haven't got a denser texture. And then I want to change the detail. I want to maximize the detail to somewhere around 15. And then let's keep the roughness a little bit high. Zero-point 66. And I don't want any distortion going on here, this axis direction, but I wanted to increase the contrast and I want to make the blacks more blacker. So the way I do this is by adding a color ramp over here and shift a and search and put color ramp. And put the color ramp in the middle. We've got the color ramp and I'll start turning these values up until I'm satisfied, which is somewhere there. And push the white side and put it somewhere over there and put this value up too high. All right, so again, you see that we have roughly matched the texture on Don and below. So this is fine. Now let's go ahead and put a color to it and see how it looks. So I'll put mix RGB here. And I'll feed this right of here and put the color ramp to factor. And let's start giving colors to this. There is one shaded called RGB. You can also give a color right over here, but I just like to keep an RGB separate RGB shader so that I can go out and reconnect these when required. So I'm keeping a separate RGB color here, but this value and this value remains the same. You can go ahead with whatever you like. So let's go ahead and put this color and I give it and press the picker and pick this color. And yet there we go. And I'll duplicate this by pressing Shift D and this color to this. All right, so we've got two colors now let's go ahead and start connecting them to a mixed RGB. And this I will just directly connect to column two and pink, dark pink color one. And there we go. Immediately we have got a similar effect to what we see here. And that's it for layer 1. Let's go ahead and start framing these. And then we'll go to the Layer 2 and select all press N and come into my Node Wrangler and say frames elected. We have got one layer done and a few more to go.
18. S03 03 creating the bold deep red lines on apple: So in this lecture, Let's start grading those bold deep red lines. And that will serve as I laid too. Let's see how it's done. So in my notes that Debye, this press N to close that we all there so that I have got more space to work with. Let's go ahead and start putting the layer two, right? So to create the layer 2, I'm first open this color palette for layer 2. I'll open here and go inside my exercise files and Apple. And inside of which I locally or two. And there we go necessarily do. So you can see the detail happening right over here. So by seeing these texture, what we can do, these kind of lines can easily be done by stretching the Musgrave lecture until we have got those vertical lines. So let's go ahead and put a mass grave and see how we can stretch it so that we get some kind of an effect like that. And for this purpose, we'll be using the UVs on our, on our apple instead of degenerated. Because this kind of stretching happens in a, in a cylindrical projection. You can see how it stretched on the poles. So let's go ahead and start putting those texture here. I'll call the Musgrave lecture. I'll go to my notes, shifted and search and call it Musgrave. Musgrave there. And I'll press Stat and press Control T so that I get the texture coordinate and mapping. And I'll go ahead and put the UV inside the vector so that I'll be able to take control of the ui's and do some operations here that will stretch my texture according to my need. Alright, so let's go ahead and connect these Moscow to see how this kind of looks. And it looks like that. Alright, so let's go ahead and change the scale a bit. So I, I'd like to keep this game to almost 3.3 or three, whatever works. And then we can push the detail up and put this 3.8. And I mentioned is 0. And we have got something like this, right? So as I said, we'll go ahead and start stretching. And the way you see that it's not stretched and it appears correct, right. But when I go ahead and stretch that it will start looking like the texture over here. And to stretch that, we'll have to increase the scale on just one coordinates like in 1D scale. The way we do it, it's simply stretches that picture, right? So I'll just put my scale on the x-axis to almost around eight. And immediately when I put eight, you can see that how those texture gets stretched to give me something like that. Now we have got this, but in our reference, our layer 2, we don't have this one, so we need something to compress those values and show us a little bit lesser of that, right? So if you have guessed it, Let's go ahead and put a color ramp node to this file open and Shift A Search colorRamp. And I'll go ahead and put the colorRamp there and start pushing these values. And notice that when I put that value of black and I slide that you can see that those values start diminishing and you're seeing lesser of those lines. So which is exactly what we need to create those bold lines. So I'll just push it like that and start pushing this so that I get much harsher whites and it kind of generally increases the contrast a bit. So I just push it like that until I get something like that. Now if you're not satisfied, you can always go ahead and start pushing these location values so that you can try and experiment to what kind of, what kind of patterns that you want. But I'll just put it to 0, but you can just know that feature exists like that. Alright, so right, as of now I'm pretty satisfied with this. Let's go ahead and put the color to this to see how it looks and to put the color up anywhere they're layering comes in. We need a mix RGB again. So I'll go ahead and Shift a and search for mixed RGB and put them in RGB here, and put the factor inside of that. And I'll connect this to my color 1 and color to whatever color I defined will be those lines. Here. We have got this in our palette. I'll go over and click this color and pick, and pick that. And great, we've got those deep lines on our, on our Apple. And yet this is how it looks. So we have pretty much done with texturing the second layer. Before we go and jump onto the next layer and start detailing it out. It's time to frame these nodes so that we don't get lost in the future. So I'll select all these nodes. And again, press N on my keyboard, go into my Node Wrangler and say frame selected until I've got a frame like that so that I can organize my notes properly. All right, so we have textured the second one. Let's move to the third layer in the next lecture.
19. S03 04 creating the yellow patches on the apple: So I hope you are enjoying this lecture along with me, and we'll go ahead and start giving the third layer, which is actually those yellow patches. And yes, this serves as a key detail and it kind of breaks those red colors and gives us the perfect color that is needed for an apple so that it looks much more believable and realistic light. So for this, we'll go ahead and give Musgrave texture. And by using those Musgrave, we can create those random looking patches and make our Apple much more realistic. So before doing that, I simply open my third layer palette. So I go and open and open the Layer 3, my exercise files and color palette, apple. I'll simply open that. And there we go, we've got that. And when I zoom in here, notice those random kind of details and it's really grungy and rough. It has got lot of texture. Let's go ahead and do that by using our Musgrave. And let's see how it turns out. I'll come here and press N to hide that sidebar. And I'll start putting a Musgrave here, shifting search and Musgrave. And there we go, we've got a mass grave there. And as usual, I'll click that and press Control D. And then even hear those Musgrave. We will be using our UVs to generate those muscular because this also kind of stretches at the top pole. Even at the bottom. The polars are more stretched than the middle. So let's do the same as a simply connect the UV and do my mapping. And we have the Musgrave. Let's see how that Musgrave looks like that. And this is our Musgrave as of now. And what we'll do, we'll first reduce the scale to 2.6 and we'll start increasing the detail to 15. And then let's reduce the dimension so that all these blobby minus disappears. I'll reduce the dimension. I'll make it all the way to 0. And we've got those grungy looking pattern and I'm going to leave the minority to do so. Yeah, we've got those rougher patches and now let us go ahead and control that by using a color ramp and Shift a and colorRamp. Notice that this pattern over here, you can see that the texture, it is little more gray rather than white. Why is it that so is because we do not want a complete patches of yellow, so we want to kind of blend that with that red, right? We don't want any pure whites that's hanging around in here because we are whites will create that a 100 percent full color and it might look odd. So we just simply want to blend that color along with that red at the back. So what we'll do, we'll simply click this pin on the right, and I'm going to put that white to a little bit gray. So I'll reduce that. So when I do that, you can see that this is somewhat similar to what we have in here. Alright, so what I will do, even this needs some kind of a stretching, right? Even this texture is when you rotate around, you can see that it doesn't look like, like this, but it goes in all the other directions. This is why we have connected the width right, so that we can take advantage of stretching the similar way what we did in lead 2. Let's go ahead and, and stretch this a bit till we are happy with the results. So I'll go ahead and stretch it along the x-axis. I'll put a number that is like almost three. So as soon as I put that you can see those textures nicely stretch up and it looks very similar to that of an apple. So, yeah, so this is a procedural texture. Now let's go ahead and put some color to it to see how that looks. So speaking of color, we will definitely need a mix RGB and column, it's RGB. I'll put that here and I'll change this to factor to that. And we'll put one color as our color one. And whatever color we give to color 2 will be those values over there. Right now it's white, so I want to change that. So we have got a color palette over here. I'll pick this yellow. And yes, we have got those nice looking yellow patches that brick that continuity of red and gives us a sense of an apple. So this serves as a key detail in the process of Apple texturing. So I'm happy that it has come out. Well, do know now if you have guessed it right, we have come to an end of our Layer 3 and we'll start to frame this sign, select all, and go to n and say frame selected. And you have to go to frame 0 there. And I'm just going to organize our notes a little bit so that it's easy to find out. I'll select that and push it to my left. And this is layer two and layer three. So it's like kind of a stack that is happening over there. So this kind of layout, you can easily understand that this is layer one, layer two, and layer three kind of all stacks on one of the other. And it's better that if you keep it like that. And so it's easier for you to find out later in the course of time. All right, now let's jump to our next layer and I hope you are enjoying the No.
20. S03 05 adding dots on the apple: Let's go ahead and start creating those dots which are really random on our apples. So before doing anything, I'll go ahead and open that layer palette. So I'll go ahead and open that color. Open this and go to my layer four and say Open. And yeah, there we go. We can see those dots, how they appear. Now when I zoom in, you can see those dots has an internal color at the center, just like mango did. And we'll go ahead and start this by using 19 texture. So I'll move these down. I'll call a 19 texture. Now I'm going to shift a and search and call for 109. And there we go. We have a warned I did. And yes. And press and press Control T to call my texture coordinate and mapping. I'll connect the UVs here as well because as you see these texture, they become smaller at the top and they are bigger at the middle. And again the becomes smaller at the bottom. To create this, we need those UVs, which is why we did that cylindrical projection when we start this and let's connect this one eye to see how that looks. And this is a warning as of now. Yes. Retain those Warner is two circles. We need a ramp, so I'll go ahead and Shift a and search colorant and put those kilogram there. Startling these values. And I would like to invert this and put it to somewhere there. Let's go ahead and change that scale because we don't have much of our noise going on. So I'll just put the scale to almost 130. And yeah, we've got those fine dots coming. And I've also got my randomness to one. So I can go ahead and change this to increase to size or decrease them. So I'll keep it somewhere. They're very like it. And then let's now go ahead and add the color so that it looks fine. What I'll do, I need two colors here, right? So I'll go ahead and put a color them again and call for a cholera. And put it on the top and feed this output inside the input of cholera. And then change this RAM. I'll change this color to white. And put this color too brownish. I'll pick up two brown, change this color to this color. So when I connect these two, you can see our dots. Let's go ahead and connect this with the bottom layers so that we can get a sense of our dots properly. I'll go ahead and put a mix, that mix here and put this as, as one color. And I will simply take this and put this as a factor. So here I have connected to the wrong input node of our mixed. So the general advice is like put the bottom layers as color one and put the top layers as color too. So otherwise, it might give you a not the proper leading effect and it will give you the reverse effect. So to keep this correct, I'll simply connect this to color two and connect the bottom layer, which is this layer inside our color one. I'll connect this one. Yeah, we have got those nice looking dots over there. And now if we want, we can increase our size by moving this. And you can see that those sizes increase and decrease on a moment. And I'll increase the brightness of our dots. This is looking little more yellowish, so I'll go ahead and turn that more white to that we get a sense of our dots are much more. Adults need to be prominent. I'll simply reduce that saturation and increase value. So we have those more visible dots appears on Apple. So that's it. So we have come to an end of our Layer 4. And let's go ahead and frame that. I'll select all and go inside my n to open my sidebar and say frame selected. So we have got that. And I said, I'm just organizing so that I can go to my layers anytime we want. So that's 1234 and we have done with the fourth layer. And let's go ahead and do the third layer in our next lecture.
21. S03 06 creating large yellow patch on the apple: Alright, let's move ahead and go to the Layer five. And before growing anything, I'll go ahead and open that color palette file folder and open a layer PHY and our exercise files and apple inside that, I'll open that layer file and it's open. And here we can see that we have got a big, large patch that's going on here, which color is yellow? So we have those yellow badge on the top. Now technically we can go ahead and put as separate XYZ and put the texture. But unfortunately what happens here is the nature of our Apple. If you see that the geometry of the apple, the middle is actually going down, which means that the separate XYZ might create some problems for us, so will not be taking that route, but we're creating another gradients so that we can using that, yes, we'll be using a gradient texture or here. So first, I'll go ahead and call the gradient texture. Before that, I'll put this again to material preview. See that? And let's go ahead and call the gradient texture. Really shift a search gradient texture. I'll put that gradient direction with it. I'll press Control T to connect my texture coordinate and mapping. And here I want to keep this to us, right? I'll put this to UV. So I'll change our ImageViewer to UV editor here so that I can show you what's happening. So I'll go ahead and press tab and select all. So we have kept our UVs like that, right? So what we'll do, we'll be using a gradient from the top to bottom so that we can easily separate that out. For this, we need to connect the VCR so that will be able to use this ui's and put a gradient on that accordingly. All right, I'll go ahead and talk about, and I'll change this back to the image editor. And I'll open the Layer five. Let me see that. And since we have connected the VCO and we have what the gradient texture, I'll connect this to see how are you always look. And here you can see that the texture is running from here to there rather than vertically. So how should we do that? We will simply go ahead and seen the rotation of our UVs. So that will match this texture top to bottom. I'll go ahead and do that. I'm simply put 90 degrees on my SSID. And you see that nothing actually happens in everything goes black. The way why it's happening with the type is set to point under the mapping. I'll simply chain that point to texture. So I'll be able to see that texture who they're right on, what's happening. We have getting a gradient from the top to bottom. Let's go out and control that gradient by using a color ramp. So I'll put a paradigms such and protocol a ramp or they're simply select that and put our colors there so that we are getting a gradient, circular gradient on top. So I'll simply adjust that. Something like that. And yes, we are getting a perfectly circular type of gradients. So let's go ahead and break that by putting a mass grave or there and breaking those gradient. Let's see how it is done. I'll move this up. So I have some space to work with. So I go ahead and call a Musgrave such. And we have got a muscular body. I'll press and press Control T. So we have got a texture coordinate and a mapping. And this we can keep it to Object. Object kind of things gives the scale to our object and it doesn't give a scalar going to generate it. So you have much more flexibility in terms of this scale detail. So I'll just put it to object for now. And let's see how this is happening. I'll connect the muscular picture directly, and this is our Musgrave here. And let's go ahead and put these details and join that gradient together to have the kind of those irregularities on these circular, perfectly circular gradient. So let's go ahead and distort that circle, right? So the way we do that, first, let's go ahead and add these two. I'll go ahead and put a map and say math. And put this map to somewhere in between. So one value is this, and the other value will be the value of the masculine. And we'll connect this. And there we go. We have got added value of these two. Let's go ahead and turn down the mosque, leave a little bit so that we get more flexibility. And before that, I want to change the scale of the Musgrave's that I'm much more comfortable. I'll go ahead and see in this scale to 2.5, we have these kind of blobby and patch scales. And then let's go ahead and increase the detail to almost 10. We have much more details on the edges. And then let's go ahead and decrease the dimension to 0.6. And we have got those kind of details that's happening over there. And we'll see in the iconography to 1.3. And there we go. Let's go ahead and don't download. This must be a little bit so that we'll be able to distort that, that circle. So I'll go ahead and put a mat remarkable here and seen that to multiply. And I'll reduce that value to really less. So almost like 0.07. And there we go. We have ended up with a patch that's only, only on the top. So the way I increase this value, we will get much more patchiness. So I wish to keep it to 0.07. So I'm okay with this type of gradient or hear it comes to the top of our apple, and that's it. So let's go ahead and mix these colors so that we can see how this looks. I'll call a mix RGB and asset before I'll put the bottom layer as color one and the top layer asker to. And I'll connect this in the factor. And let's see how it looks. And there we go. We've got a white patch here. Now we'll simply change the color of that white actor, HIPAA, which is being driven by this value that select that and select the color picker and C in this color. And there we go, We have got a yellow patch on top of our Apple. So yes, it looks cool right now. And you can again change this gradient if you want to. So you have more yellows or I like to keep it somewhere around there. I'll go ahead and frame all, select that. And my node triangular tab, I'll press frame selected and we have got a frame on wrong. I've just organized it a bit before we jump to the next layer. And that's it for layer five. And let's go ahead and put one last layer to our color, and then we'll conclude our color of the apple. And let's move ahead.
22. S03 07 adding the small white rough patches on the apple: All right, so in this lecture, Let's go ahead and put our last color layer on this apple. And those are those tiny white patches which are really grainy and kind of scattered all around. Before doing anything, I'll open that palette. So I will just select the folder and call the layer 6, say Open. And here we go. We have, we can see those patchy proudly kind of an effect and that also constitutes with the roughness of the apple. And let's go ahead and do that. And yes, this can also be done by using a Musgrave texture. So simply organize a bit there. And let's call Musgrave. I'll hide that sidebar and Shift A Search and Musgrave. Musgrave there, I'll press Control T to connect my mapping and texture coordinate. And here I will be using my UVs. And then we've got the Musgrave. And let's see how this looks on our apple. I'll connect that and let's change the settings of our Musgrave to have it much more grainy. And let's go ahead and change the scale to almost 3.6. And detail will be increased all the way to 16. Then we can reduce the dimension to 0.2. And then the lacunar e2, e2, 1.8. And there we go. We've got that kind of details, but notice that it's only a few, right? Not this much. So we need to somehow control this value before we could actually use this as the patches. So the way I do this is by using our Math nor called Math and change the ad to something called as greater than. And the way this works is simply increase these values so that we are going to reduce those number of spots on patches. And this way this works is by simply putting a gate by, by simply controlling the values that are lesser than this value. So any value that is lesser than 9.3 will not be coming out and they will be rendered as black, and any value above this will be shown as white. So by this way we have simply putting a limit or it's kind of a gate by which we control the other values and we have much lesser values to work with. And you can simply go ahead and change these values to see what you will be getting here. I like to keep it somewhere around there. So we've got those tiny little patches there. Let's go ahead and put a color to this. Speaking of color, I'll be using a mix RGB here. I will shift a and say mix RGB, color one of my bottom layer and color to here. So I'll just connect the value inside the factor. And let's see how that looks. And yes, we are getting batches just like how it is. So we'll be changing this color so that it is not that stock like white. So I'll just click that and pick my color picker and pick this color. And we are getting frail, kind of a pink there. And that's it. So I further want to reduce this effect of those patches. I want this to blend even further. So how do we do that? So by putting another mat that is next to this greater than regard and Shift A Search mat and change this value to multiply. And make sure that this value is lesser than one. And it's simply connect this in there. And I can simply adjust this in density by adjusting these numbers here. So when I put it too close to 0, you're not going to get anything. And close to one, you're going to get everything and anything in between will be the values in between. So I would like to keep this to almost a value of 0.6. So we have a little faint looking patches, but still they are there and they do constitute to the texture of this apple, and that's it. So we have finally concluded the color textures of our Apple. Next, what we should be doing is to create those surface bumps and green so that they look much more for the realistic. So I'll go ahead and put a frame on this and select all of these. And go to my n and go to my sidebar and say frame selected to get a frame there. And this will be our last color layer. Announced that time and chance to connect these colors directly inside our base color so that they contribute to the base color of the shader. I'll connect to be SDF to surface. So now you can see these colors with the reflection and, and you are going to get that realism with an OK. So now Let's go ahead and, and talk about detailing it further, like adding bumps and those screens in the next lecture.
23. S03 08 adding roughness and bump on the apple: All right, so in this lecture, Let's discuss grading those surface details like those smooth and rougher surface, and also those greening of bombs that are found on the upper. So first let's go ahead and put the bump. And that bump is really simple. It's just a noise texture that's been connected into the bump. So I go ahead and do that. I'll call the noise texture my Shift A Search noise stricture. And I'll press Control D to connect my texture coordinate. And I'll connect this inside a normal by putting bump node in between. I'm going to bump node there and put the factor inside the height. And let's connect the normal inside a normal to see our bumps. And let's see how that looks. Let's go ahead and play with those bumps value of those bumps. So I want really fine and release small bumps. So I'll go ahead and bump the scale up to almost full 30. And we have got those really refers office. So and then we'll increase the detail to six. And the roughness and the distortion can be put to 0. I don't want further roughness on the surface, but we have got a really rough for Apple, right? So let's go ahead and change this value is reduces value of the distance so that we get much smoother surface but with much lesser intensity of the bump. I've seen that value and put to 0.01. And there we go. We have got a really, really small bump. All right, so now let's go ahead and change this texture coordinate to UVs to see how a bump looks. I'll put the UV here and it gives the roughness a bit so that I'll be able to see that you have an I make that roughness to almost 0. You can see how those bumps affect our apple there. And yeah, let's go ahead and change the roughness value. I'll move this a bit and I'll first arrange this, and I'll organize this and press this. I'll select all of these and say n. And you frame selected and push this to the bottom. And I'll call a node, I'll call a texture here, which is going to be a mass grave, shift a, and search and Musgrave texture. There's a mass grave, and I'll connect this to my texture coordinate by pressing Control P. And I'll block the UV straight away in here. And then let's change the scale. I'll connect this to see how that looks. Looks like that. And let's seen the scale to 2.6 and increase the detail. And put the Lucknow charity to do and make the dimension two zeros so that we have much more broken kind of noise. And this Musgrave can be connected to reduce that shine by putting a color ramp. Gordon call cholera. And plug this in the middle. And now I'll just simply change the black values to closer to white so I'll start seeing refer. So you can observe here that as soon as I, oops, it's connected to the anisotropic, the wrong node and connect this two roughness. And yes, now simply, I'll change these values to see my roughness detail there. I'll keep it somewhere there. And you can see that disturbance on the surface. And that's a little bit stocks, so I want to make it a little bit less. I'll put this white value also do little bit of gray. We have lesser contrast, and we also have those disturbance on the surface of the apple. So yes, you can see the highlight on the top. The way it behaves is there is lot of disturbance on the surface. And now you can also see bumps much more clearly now. And if you increased, you can see those bumps, bumps coming up after we plugged in the roughness. So the roughness and bumps are more like they're interconnected. So when you have the perfect valleys on these two, you will have a much more believable surface. Let's go ahead and put this value back to 0.01. And yeah, so I want to put the roughness a little bit less like this and change the white to black so we have little smoother Apple and not that rough. And yeah, I find this value to somewhat perfect to my reference, so I'm going to leave it as it is right now. All right, so we have got a nice roughness detail on our Apple. Now, do you remember that on Layer 6 we talked about those patchy powdery effects which are also being rough. So we need to somehow mix those data, those details, this detail so that both of them together constitute two or bump. So how do we do that is by using a map node and putting it to add so that it adds those textures and gives us one single output which can be connected to the roughness. And then we can see how that looks. I'll go ahead and do that. I'll simply call a map node, shift a search and Matt and put that to add a. Now let's call the value from the multiply here. And I'll simply connect that value, do one of this value, and connect the, the value from the ramp to the next. And I'll simply connect the output of this add inside my roughness. And yeah, so you can see anywhere those white patches come, those patches will be little more rougher. You can control click and see how this roughness map looks. So these are the data that we got from those color layer so that we are using to drive the roughness and the roughness that we gave here using Musgrave and that texture is being added to output this color. And this we are inputting to the roughness so that we get both together. And that's it. We have made the roughness map for this, for this apple that's gone and frame that. I'll select all these and press N on my keyboard and say frame selected. And there we go. That happens to be a roughness of this apple. So with this, we come to an end to texturing the color and bump layers of the apple. And the last part that is left is texturing the stock, after which we can wrap up this course. So let's go ahead and start texturing the stock in the next lecture.
24. S03 09 creating the apple stalk details: So we have come to the final part of this section where we'll be detailing out the stock and giving it colors and bump and roughness of the stock. So let's go ahead and do that. Before I do anything, I'll call this top detail. I'll come here and open this folder and I'll select the stock color and open image. And these are the color palette for us talk. And I'll select the stock material from the material properties so that I can go out and texture that. We've got a blank, blank node here. So the way I do that is again, I'll be calling a mass grave for these dark colors fall we putting on Musgrave. Musgrave. So you've got that an alcohol, a mixed RGB. And I'll be needing to RGB notes so that I can define colors to it. And asset, this is based on my preference. You can also give the colors here if you wish. Oh, I go out and collect these scholars there. And I'll connect the factor to Musgrave. And I'll press Control T to bring up my mapping and generated coordinates. So let it be in generated and the same default settings. And I'll connect the mix to my output to see what happens. Now let's go ahead and define the colors here. The kind of a greenish yellow there, I'll put it there. And one color can be a little darker color. Put that like my picker and pick this color. And let's say in the scale and the details of this Musgrave. So I'll increase the scale to about 26. And then I'll increase the detail to seven. And I'll increase the dimension to about four, and my lack banality to 0.9. So I have these kinds of radius, two different colors on my stock like that. All right, let's go ahead and do the next color. So that will be adding those small dots on top of this color. And let's see how that's done. And speaking of dots, yes, I'll be using a warden. I help connect our texture coordinate and put this to generate it. And put my world I. And let's see how that looks. And let's increase the scale to 196. So we have much more dots like that. And I'll put a color ramp. And I want to invert that to have this kind of dots on my stuck somewhere around there. And now let's go ahead and mix this texture. So I'll put a mix RGB and this as color one and the, and the color ramp to the factor. And I'm simply change this to some color. And there we go. We have got another color on top of that. So we're getting much more organic looking stock or there. Alright, so let's collect this inside our base color to see how that comes up. And there we go. We have graded the color detail of the stock. And now let's go ahead and create those bumps on the stock so that it looks much more believable. So I'll go ahead and put this, organized it a bit like that. I'll give some space for my VM details to come. And the way I do that for the bumps, I'll be using a wave texture to kind of create a bomb so that it will, and it will be fine this talk a little bit better and kind of disturbed this round looking form and give us much more believable effect. So I'll call a way of texture shift, a search for a wave texture. And there we go. We've got a wave. And I will select that and press Control P so that my texture coordinate and mapping comes in. And let's connect a bump. Here. I call a bomb, and connect the factor inside the height and connecting normal inside the bump. Let's wait for a second. So let's go ahead and change the scale of the wave. I want to keep it to somewhere around 28. And you can see that the wave is happening somewhere like this. So I wish to change the direction of mapping. I'll go ahead and put 90 on a zed axis. So we have a wave that is happening from top to bottom like that. And we can see that this kind of disrupts that around looking stock. So we've got that wave going like that. All right, so let's go ahead and, and scenes little bit of distortions. I'll put the distortion to three. So we have much more distorted looking with over there. Then we can change the detail. I'll increase this to nine, so we have much more detail. And then I'll also increase the scale of detail to 1.5. And finally the detail roughness to 0.6. And so that looks like a much rougher looking stock. So let's go ahead and change the final distance value. I'll go ahead and reduce it a tad so that it looks a little bit smoother. So you 0.6 would be fine. And there we go. We've got these come in there now the same wave. Let's go ahead and connect that inside our roughness. So I can simply connect this factor inside of roughness so that we get some roughness value to all stock or that. And let's wait for a sec and I'll add a ramp or did colorRamp. And let's just added that and reduce that blacks to do some color that's almost white so that you don't have that much of glossier looking stock and put it to almost white. And this can be white itself, so we have some rough looking stuff over there. And now I want to reduce this color too much more brownish because this is really stuck. So I'll just simply go ahead and seen that color is put this and reduce those values a bit. So we get something like that. So yes, we are breaking up that color, but still we have got some kind of look like that. And yes, this definitely looks like a stock. And you can go ahead and texture this more if you wish. But for the purpose of this tutorial, I want to keep it short. And let's conclude this stock as of now. So I hope you've enjoyed these texturing and I hope you really learn something new. And you can simply try this and gene those values and to see how what you get. And there is no certain way that all these numbers and all these enormous needs to be exact. I've been using these numbers and parameters because I feel this is right, but it could be different for you. Also, you can experiment and come up with your own values to see what works and what doesn't. So with this, we finished texturing the apple. And I hope you learned that how layering and stacking of those layers can create a really complex Apple with, but with really simple steps. So we can arrive at any complex roots. So the same techniques can be used to create anything and any kind of loop.
25. S03 10 tips and best practices: So in this video, I thought I could share some tips and some tricks so that it'll be helpful and useful for you. And so coming to the point procedural is huge, right? So before we dive into blender and start texturing anything, if you recall, I showed you a presentation, right? So that's the way to approach a procedural texturing. So all you need to do is take the object or something which you want to replicate and study those details and look for textures like 19, Musgrave, stuff like that. And, and observe and study those textures and see what can replicate that textures inside of Blender. So that will help you reach a long way and that will save you a lot of time and stress because once knowing those textures, it's much easier to create them in procedural. Other ways that are high chances that you might get lost inside of picturing and you'll never end up getting the right texture. So the first thing to do is to study the texture, what you want to replicate. So once you've studied your texture and you know your texture well, the next thing is we'll be putting those textures and adjusting values and creating math and stuff like that, putting color ramps, etc. So there are a lot of calculations and a lot of stuff to be done. So this can result in various different results. So you need patients to arrive to the right values. Here in this tutorial, we had a lot of experiments and thus we arrive at the right values. And thereby, you might also need to create a lot of experiments before you arrive at the right values so that those textures will be applicable and useful for you. So experimentation and patients should be there before you jump inside procedural texturing. And then finally, when you're coming to nodes, Always start framing them and always keep them organized. Otherwise, you're going to end up in a huge load of MIS, which you will not even be able to recognize after some time. So keeping your notes organized will always help you so that you can take the file even after years, or you can easily pass on that file to someone else so that even that person will know that those nodes are organized. And it's simply much easier and fun to go around nodes.
26. Conclusion: We have come to an end of this class. Here, we wish to conclude with some of our dots on procedural texturing. Procedural textures are great when we use it to create organic materials, as they are really easy to make variations of our shaders. Take mango and Apple, for example. If we want to create a fruit basket out of them, you will need a lot of different types of minus, right? This can be easily done using procedural textures. All you have to do is duplicate those mangoes or apples and simply change those values. Do you get n number of iterations for both of the fruits? That's really simple, right? This offers a great flexibility to change your mood maps, nice to him in your apps emissions. This uses the dependency on the mass procedural textures saved time in generating adaptable texture. Yes, it may seem like a lot to generate a procedural texture in the first place. Once you have generated that, you can create any number of variations and you can save those texture for your future needs. This saves time in the long run, as 3D artists, we have been using procedural textures in our workflow and allowed for projects for quite some time. And they have been great in love. And at this point of time, we see it more artistic than logical. They offer great power and amazing potential. I'm salvation, experimentation and patients is all that you're glad to Cengage you want diction. Thank you for joining us. Have a great day.
 Harshavardhan Saravanan, Co-founder | CGI Artist | Author