Transcripts
1. Introduction: Hello everyone. I
am her shower than I'm a designer and a 3D artist. Today, I'm here to share my
experiences and knowledge on photogrammetry and its
methods for 3D asset creation. Photogrammetry is a robust and practical
solution to create realistic 3D representations
of objects that are time-consuming to create by traditional
modelling methods. The advancement in cameras
and digital image processing power has made photogrammetry
accessible by everyone. However, the ability
to practically use this 3D scan data is still considered
difficult due to the resulting mesh and
textures being inefficient, like high density meshes with irregular topology and bad us. In this class, we will
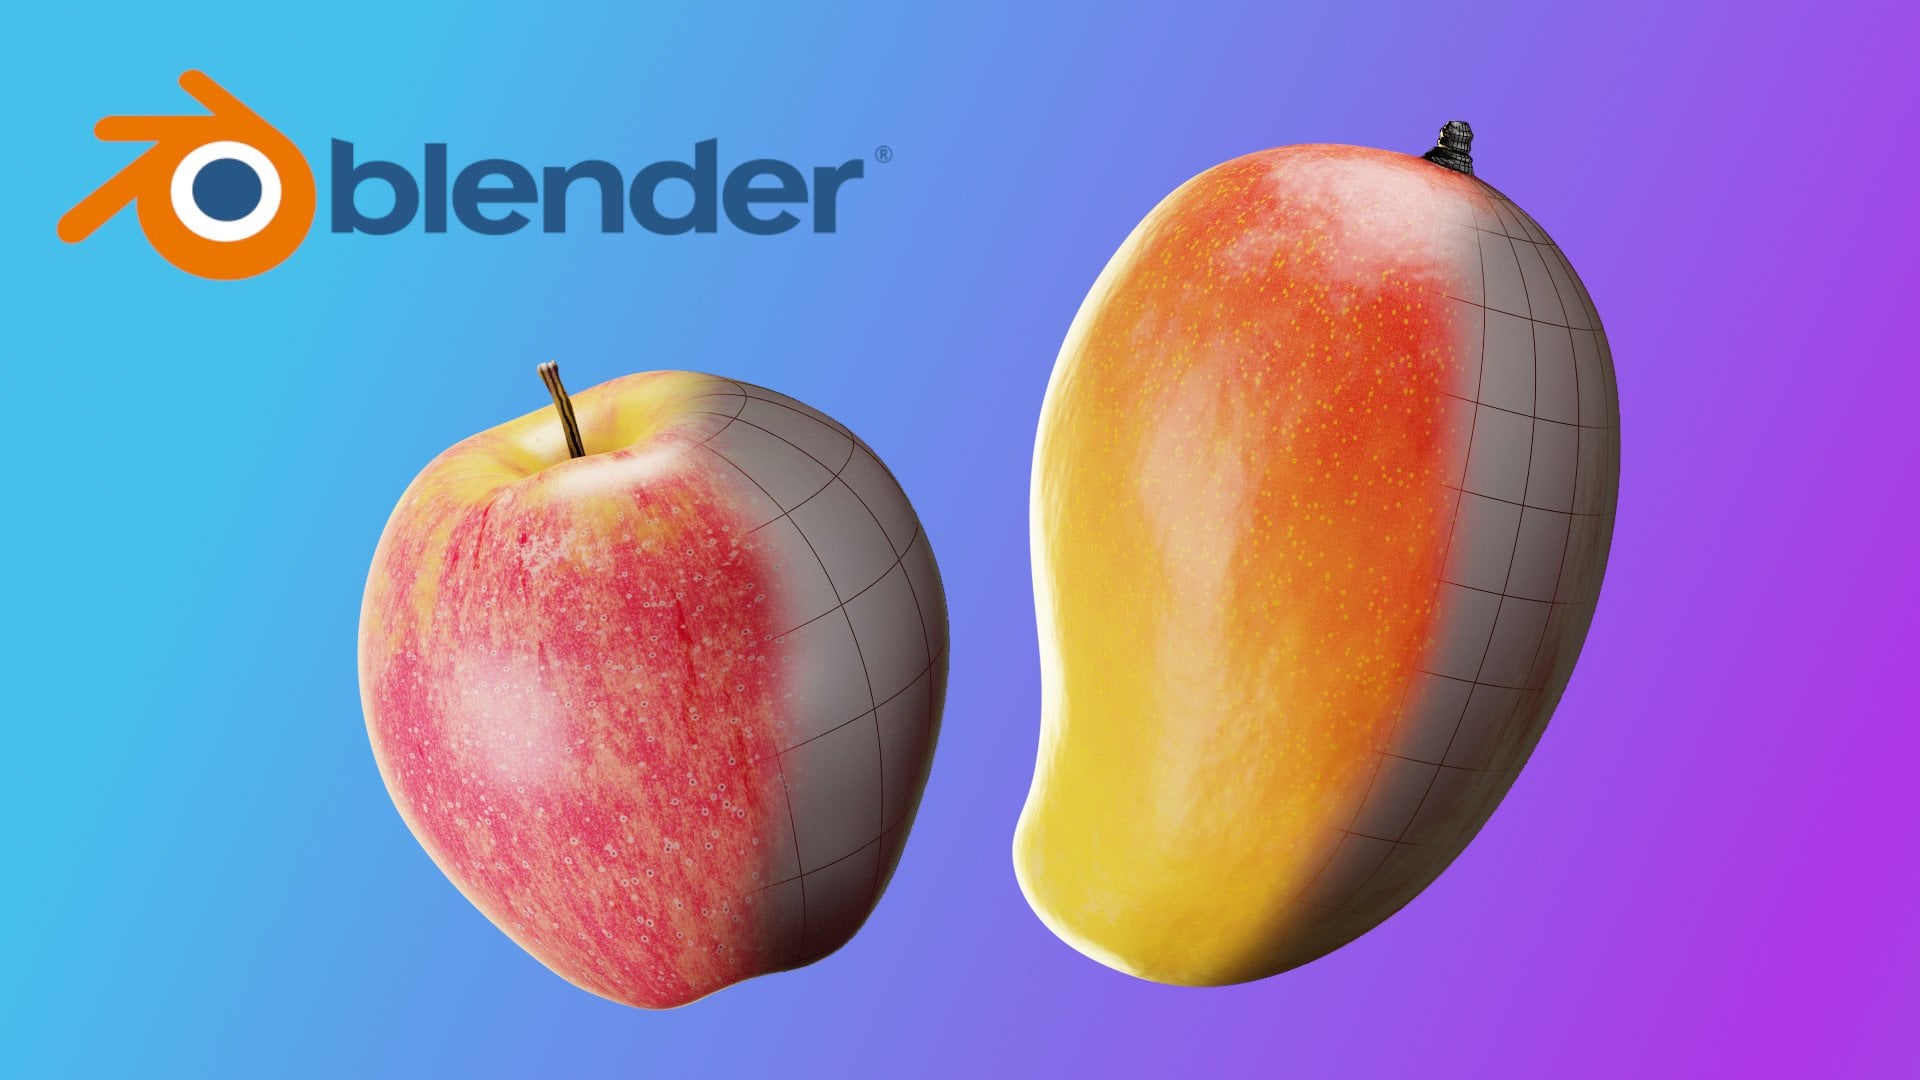
extend the power of photogrammetry to
create hyper-realistic, low poly 3D assets from
images that can be used in games and in
real-time visualization. We will start by
discussing the approach, tools and techniques
needed such as lighting and camera settings
to generate a clean scan. We will then use
blender to generate low poly 3D model with textures that can be used in
real-time applications. I have included lessons
that we'll briefly cover the core concepts such as
camera settings and angles, remeshing, ring
topology and baking, followed by some tips and best practices to make the entire process
fun and enjoyable. After completing this class, you will be able to create your own low poly 3D
assets from photographs. Join now and I hope to
see you in the class.
2. Photogrammetry Basics: In this video, let's
take a quick look at what is photogrammetry
and some of its basics. Because understanding
the core concepts will help us get good results. Alright, so first let's decode
the word photogrammetry. This word sounds complex, but we can easily divide
these into three sections, photo, Graham, and Mettrie. I'll tell you what these
three words means. Photo meaning light,
or we usually say photons photography
similarly photo. And then next we have Graham. Graham is nothing but
something that's drawn, written or recorded,
which means gram. And then Mettrie metric
means measurement. You can relate this
with trigonometry in such way we can combine these three words
into photogrammetry. Now we understand why that word seems a
little bit complex. So now that we have decoded
the word photogrammetry, now to put it into perspective, photogrammetry is just making measurements or
recording measurements out of photographs. Now let's quickly take a
look at how this works. Here you can see that
we have got a monkey. This is a scene which
you can relate to any of the objects that you're going to 3D scan or do photogrammetry, which you can see that there is a red spot
marked on the monkey, which is right beneath the nose. And this is just an idea to indicate that
there is a spot. Typically what happens in
terms of photogrammetry, there are multiple
points which to look at. But for this example
to be clear, we're just working with 1. And if you'll notice
that we have got three different cameras
in different locations. And then here you can see
on the top that we have got three different
stills of this monkey, which means three
different photograph. And you can see that the point, the red point is being displaced in each and every
photograph in here. The first photograph,
you can see that the red point is
almost in the middle. And in the next one you can see it's a little
bit displaced to the left and onto here you
can see it's more displaced, meaning that the camera is just being displaced
around the monkey. And in here you can see the
camera has a 2D sensor plane, which is the x and y. And with this, you can
see that red point has been displaced
in x and y-axis. With this basic
principles in mind, we're just going to take 1 from two different
locations and use the principles of
trigonometry to exactly match the point where
it is in 3D space. This is called as triangulation. To do this, we simply take, we simply use multiple
cameras to photograph 1, but which is a little
bit impractical. What we are doing is
we are just using one camera and we're
displacing the camera into multiple points
so that we can look at the same point
from multiple angles. What happens is 1 is looked
at two different angles. And then we're using the
principles of trigonometry. And we're just going to compute exactly where that
point lies in 3D space. This is the bare basics
of photogrammetry. But if you see this
into multiple points, so we just saw one. What if we have like thousands of different points
on this monkey? Whatever you photograph
that texture and each, and every detail
can constitute 21. Each of this point is being
shot from multiple angles. Thus what happens? We get
multiple reference points and we keep on shooting
race out of it, or we keep on
tracing those lines. And then we use trigonometry calculations to
exactly match those points, which results in a point cloud. Using this point load, we finally end up with a
mesh using these techniques, we're just going to
extract multiple points and then we trace these
points to get it. But don't worry, all these as
being automated these days and all these calculations are completely done by software. The reason why I don't do
this is because just for you to understand what
happens under the hood, now let's see some of
the applications of photogrammetry and
how it is being used. Here you can see that I have
made a chart to show how, how, and where it is used. And you can see that
photogrammetry has a multiple uses and it is
really useful in these states. It really constitutes to a
great modern-day innovation. Here we can see that
first it's being used by archaeologists and we can use it for digital preservation. And then you can see
that it can be used in medical science
where we can scan something out of a patient. For example, we are making a prosthetic device for someone. And we can easily
go ahead and take some pictures of a
patient and then we can make a prosthetic design exactly which suits
that patient. So in that way we can use it in medical and then it's
been used by geologists, cartography and
topology studies. Then we can use it for 46. This is a really key usage
today because what happens, we can exactly
document something in a crime scene and
then we can see how it's been used
by game design. We can create really
quick prompts by really quick turnarounds which were not possible earlier. And then it can be used
by art, by artists. We can simply go ahead
and documents some of artists work by
using photogrammetry. And then it's being used by architecture for
visualization, site planning. And finally, we can use it
for design and engineering. This is just some of the
fields where it's being used. But I personally believe
that it has been used a lot more
extensively than this. But this we can conclude some of the key basics and some of
the uses of photogrammetry. Now let's go ahead and
see how it's done.
3. Materials Required: In this video,
let's see what are all the materials required
for us to do photogrammetry. First, you will need an
object to photograph. Go for the objects that
will fit in a tabletop. If you're doing photogrammetry
for the first time, they are easy to control. I have used a seashell
here. For this purpose. We will need a decent camera, such as a DSLR or mirrorless
camera to get the pictures as they allow us
much more control over the exposure
than smartphone. A camera tripod for
stability and consistency of the angles allowed source of light such as a softbox
to eliminate our object. In terms of lighting, our goal is to get flat
images with low contrast. Any source of light that produces even flat
lighting will do. Even if you do not
have a softbox, you can still shoot out
those on an overcast day. We will need a black
piece of cloth. This will be our backdrop. With the help of
this, we can cut off unnecessary details
of the background. In addition to the
shone materials, I will recommend you to use a polarized filter
if you have one. The reason why we are using a polarizing filter
is because we can use it to cut off the
unwanted reflections. Thus, we can always get the base color map
without any reflections. If you have unpolarized filter, please go ahead and use one. But if you don't,
then don't worry, it's not a mandatory one. You will see some reflections
in your 3D model. Let's now get the
materials and get started.
4. Ideal Setup for Photogrammetry: In this video, Let's see the ideal setup that we
need to capture images. This illustration shows
my photogrammetry setup. I have placed my
light camera and the object in the same line
to produce a flat image. Light and camera facing
the same direction will always result in flat image
with minimal contrast. I have used a backdrop stand
to mount the black clot. I have a table to
place my object. Here you can see my live setup to capture
images for photogrammetry. Now let us see how to capture
images of the object. Photogrammetry requires
overlapping images captured from multiple
points of views. We can do this by
two different ways. Rotate the object or move the
camera around the object. In this case, we are going
to rotate the object since the object we have chosen is small and easy to handle. To get a good amount of
overlap between the images. We are going to
capture an image at every ten degrees of
the object's rotation. At least nine to 12 images
are recommended per quarter. Now, let's discuss
the camera angles. This illustration
explains my angles of camera and the
light for this object. I have chosen three
different angles. If you notice here, I have also changed to the angle of the light
according to the camera, trying to keep the object, camera and light
in the same line. After completing these angles, I will flip the shell to capture the details on the
other side as well. So we saw the ideal setup
for shooting images, and we also saw some of the angles in which
we can shoot them. Feel free to post images of your setup in the
discussion section.
5. Choosing The Right Camera Settings: In this video, let's
look at some of the optimal settings in camera. In other words, what I mean here is what is the right
shutter speed, aperture, and ISO to
get the best results. Generally in photography,
before we come to the settings, we always see the priority. Do we prioritize the
shutter speed or aperture? Iso? In here, what we want
is a crisp image with minimal noise and nobler
and no depth of field. The answer for optimal settings
lice in the statement. First, we always
need to make this clear how we want the
final image to look. In here. I'll go again. We want a crisp image
with minimal noise and we don't want any blur and there shouldn't be
any depth of field. All right, so now let's
look at the settings. In here. I have made a table. On the left you can
see the property and the property which
stands for the aperture, ISO and shutter speed. And on the right you can see the recommended
settings and the gains, which means what
is the advantages? And then we see the
losses, what we lose. We also see how we can
compensate the losses. Alright, so in here, the first one which I wanted to prioritize is the aperture. I keep aperture at the
top because I want a crisp image with
no depth of field and I wanted to
completely be shot, which is why I have
prioritized aperture. So I'll put that on
top of my chart. And the Recommended
Settings here is the highest
possible f-number. And because of this, what we get is we get
a crisp image with minimal depth of field and
there won't be any blurriness. The loss for which
we come across is it's going to result
in a darker image because high f-number always
results in a darker image because only less amount of light can go past your aperture. How we can compensate
this is by using bright lights or by lowering
the shutter speeds, or we can slightly
increase the ISO. Now let's go ahead
and do the ISO. The recommended settings is the lowest possible ISO because whenever we
increase the ISO, we always have to
handle with noise. Since we are doing
photogrammetry, we wouldn't want
noise in our image. We always have to go with the
lowest possible ISO number. This completely depends on your camera mic
and your sensors. Higher cameras will have low noise levels
even at higher ISOs. This is completely
camera dependent, but you can go ahead and keep
the lowest possible ISO, add that recommended exposure. All right, So in
here, the gains, what we get is minimum
noise and the losses. What is going to happen
is we are going to result again in a darker
image in this wave. What we can do to
compensate this is why we can go
ahead and increase the bright light
brightness of our lights or use different lighting setup, we can definitely lower
the shutter speeds. The next one, what we see
is the shutter speed. In here, the
recommended setting is the lowest possible
shutter speed. But we get, the gains are
that we get a brighter image. Why are we keeping a lowest
possible shutter speed is because we are going to
deal with static objects. It's not going to
have any moments, which is why we
recommend you to keep the lowest shutter
speed so that you can get brighter image in here. And the losses, what we can get here is
lower shutter speeds can result in shaky image
due to the camera shakes. So to compensate
this, use a tripod. To even compensate this further, I would recommend you to
use a remote. For shooting. These days. You don't have to
buy a remote because cameras these days are
equipped with Wi-Fi. You can use your smartphone or your laptop to shoot
the pitches from there. So in this way, you can even
eliminate that tiny bit of shake when you go ahead and click with your hand
in the shutter, the next main setting, which I would like to talk about is keep your contrast low because we don't want to introduce shadows on
bright highlights. We are aiming to achieve a flat look across
all the pictures, which we should. Why is this? Because flat look tends to
give us a better texture, that textures can
easily be converted into a map when we
bake detections. For this reason, always
go ahead and achieve for a flat looked and not
contrasted picture. With this, we conclude
the basics of camera setup with these
settings in my camera. Now I'm going to get my
camera and start shooting. Discussed earlier. After setting the
right settings, I'm starting to shoot. I'm rotating the
object ten degrees approximately before
clicking a photo. I have connected
my Mac and camera through Wi-Fi to use it
as a remote shutter. This way, I was able to minimize the camera shake
at lower shutter speeds. We have short about 180 plus
pictures with our camera. And now let's go ahead
and see how they look. In the table which I
have created in here. You can find the
different angles and its corresponding shots. For the purpose of
demonstration and clarity, I have shown five constitutive, overlapping short, followed by the intermediate
and the final shot. As discussed, I have shot
three different angles. Then I have flipped
the object and short angle two and angle three. Again. This will give us
the details on the bottom. In this table, you can observe the object's rotation and the
overlap between the images. Since we had used a black clot, we are able to
completely eliminate the background and our
object stands out very well. Here. We should make sure
that the entire objects details are captured
in overlapping images. Now we have come to
the end of this video. Now let's go ahead and start processing these images
in the next video.
6. Images to 3Dmodels: In this video, let's talk about the softwares which can be used to process these images to give us the final 3D model. I have made a chart with some of these Socrates,
which I know. And it is basically split into
paid commercial softwares, free and open-source, and some
of the freeware software, these, some of these
are Windows only while, some are Mac only while some are multi-platform and works
on Windows, Mac or Linux. In here we can see
the first one, which is the free and
open source softwares, which means that these softwares are free to download and try. They can also be used
on commercial projects. In here we can see that we have got two basic
softwares in here, which is the mushroom
and cold map and measure with you take a look at which is a really
powerful software. And you can go ahead and
try this by yourself. While there's another
software which is cool map, and I don't have any personal
experience with this, but you can always go
ahead and try it yourself. And then let's come
to the paint and commercial softwares in which we see those Autodesk recap. While metta shape and reality capture and 3D F and Sophia, if you have some experience in working with these softwares, are used to purchase them. They are available to purchase online and you can use them on your commercial or your
experimental projects. Then we also see one
software if you have a Mac, which I would recommend is something called as photo catch, which you can download
on the App Store. It's free to download, but it's only free
to be used for non-commercial purpose
or your personal use. If you want to use this software for your
commercial projects, then you will have to contact them to know the
terms and conditions. While in the software, I have had an absolute joy of using it because it was
really simple and it was just one-click solution for converting my images
into direct 3D models, which is why I absolutely
love about the software. And I'm using one
M1 MacBook Air, which, which doesn't even
require much processing power. Using the software, I could
generate 3D models with ease, and it didn't even
take much time. For the purpose of this video, I'll demonstrate the process
which I use on photo catch, but it's pretty much the same on any other photogrammetry
software. So in here you can see the screenshot of
my photo catch app, which I've used on the Mac. And you can see how this is. It's basically just a two
panel workflow in which we simply have to select
the folder for images where we have
kept all these images. I have short about 180 images, so I have just selected
those folders. And in here, the next one, what it shows is the settings
up here, which is the OBJ. I wish to take
this into Blender, so I would recommend you to go ahead and export this into OBJ. And then the next one is the model quality
is just the raw, full and another
preview quality, the rod is being the
highest standards and then there is full. So I have selected
for my purpose, this selecting these
will definitely impact your processing power because
the higher the quality, the more time it's going
to take to process. After you this select
the model quality. We just have to create
the create model. Your Mac will take
some time and it will calculate the model and it will give you an OBJ file out of it. While we saw the screenshot of one software of
how this is done. Well, I wish to say that photogrammetry is
not about software. Instead, it's about taking the best pictures to be
fed into your software. So it's about the process
and not just the software because all the software at
the end does the same thing. It's just going to
take your photographs. It's going to match the
identical points in there. And it's just going to use trigonometry to give
you the results. So it's not about
the software always. You can go ahead and try them, but just don't be
obsessed with softwares. And look at the ways
in which you can get the best pictures so that your software can do
a good job for you.
7. Understanding Retopology and Remeshing: Now we have used photogrammetry
software to process our images into 3D models. Now, you should also
have an output which is like an image structure
and a 3D model. No, it is a little bit unusable because the 3D model
that our software has given his completely
dense and it's not really efficient to use this in
real-time project or in a game, or wherever it is. For this reason,
we have to process this model manually
by either using topology to build the mesh or by using a rematch techniques
which uses walk cells. And it is an automatic process. But it's also a little
bit system intensive, but this saves a lot of time
by using these two methods, either re topology or Amish, we can build a new base
mesh from ground up. And then we can bake whatever the scan details on
top of this base mesh. So we can always get
a resulting mesh which is a lot more
optimized and easy to use. Now, what to choose? There are two methods. One is re topology, which you have to build the
mesh yourself manually. Or there is another method
which is the remeshing option, which you use walks in English. While this is
completely depending on where you want to use it
and how you want to use it. For example, if you're building an animated asset or you're building your model
for animation, then read topology is a
better solution because it allows you to control
the edge flows manually. And you can control the
hinges and edges exactly where you want so that it can
be optimized for animation. While if you're building something that is
static and it's not going to deform and it can still be animated
but not deformed. Then I would recommend
you to go with the remeshing feature
because remeshing saves up a lot of time
and you don't have to have the hazards of
creating a new topology. And this is all automatic. In both ways. We're just going to build
an efficient mesh so that we can bake our textures on
it before this shell model, what I have decided is I'm not
going to deform the shell. I have chosen the option
which allows me to Amish. So I'm just going
to use a remeasure to create a new mesh
on top of the ship. The remeasure, which
I'm going to use here is called as
the instant mesh. Instead, mesh is a
standalone application that runs on Windows,
macOS, and Linux. It is pretty
straightforward to use, and it's really simple. And ever since I
started using it, I've had the joy of using it
every time again and again. Right now, I'll show
you my workflow. I rematch with the
instant mesh software to make a point clear that instead mesh is a free software. You can go ahead and
download it yourself and start using it on
your own projects.
8. Remeshing the Model: Alright, so I have got my
instance mesh software open and you can see that it is a pretty basic software in here. On the left you can see some
of the options in here. Right on the top you can see something called
as the open mesh, which is a green button. I'm just going to click here. And it's going to ask for
PL1 or OBJ format in here. So let's go ahead
and click that once. And this will open
up a file browser. So I'm just going
to navigate into my desktop where I have
saved the shell model. And in here I have just saved the shell model
from my software, which is the export. And this is an OBJ file. And here you can see that
this is the model of our shell which was exported
from the photo catch app. It has got a size
of 42 megabytes, which is really large, or a model of that size. All right, so let's get, now let's just
click and say Open. And it takes a while to load. Yes, we have got it in here. So this is our model. This is a really high polygon. You can appreciate how the
scan has done its job in here. So we have got pretty much
all the details of it. The only issue is that this
is being really high poly. So now let's go ahead and
start remeshing this. In here. You can see the other
features in here, and you have got the
rematch as quartz. So I wish to keep it as quartz and I don't want
triangles in here, so make sure you have selected
this quartz four-by-four. And then you have got that another one which is the
target vertex count, which is like 13.37 K. And I was to put this significantly
down to almost 1000. You can always go ahead and
change this whenever you don't feel like you can always go ahead and
recompute this. While starting. I
want to keep this around 1000 or one k polygons. We have kept our target
polygon around 845 in here. And then we have
got the next tool, which is the orientation tool. And nothing of this works
right now because you always have to hit the Solve button
to get some idea about this. And as soon as I hit Solve, you can see that this
is how my mesh is going to look when it's done
or when it's computed, the solving process and
it's going to result in a topology similar to this. Now I can go ahead
and turn this around by just hitting away
from this model, my hitting my left
mouse button and rotating the object to see
it from all the sides. And we can see how
the resultant mesh will look like when
it's done solving it. You can see that this is the orientation or
topology which we get. Now we can go ahead
and change this by using some of the
orientation tools in here. And right off the bat you
can see the first 2D, which is the comb
like structure. So I'll click that and this
is the icon of the comb. And once I have clicked that, now I'm no longer able to
tumble around any of it. Make sure that once you click, you will not be able to
rotate around the object. To rotate around, you'll
have to de-select this again and then you'll be
free for the rotation. So I'll go ahead and
click it one more time. And now all you have
to do is just to draw the topology which you wish
your final model to have. Here I can see that my
details are going like this. I wish to keep my topology
specific to those details. So I'm just going
to just draw on, click my left mouse
button and just drag to have that
detail in here. And as soon as I do that, you can see my
topology is getting adjusted to my drawing in
here, and it takes a while. Let's just click this off and go around the object
and click it back on. Just draw some lines and make the topology going
like our model itself. Here we can see
how that's flowing across from the top and how
that's bending in here. That looks good to me as of now. In here, you can see how we're getting the
topology in here. Now here I wish to keep the
edge flow like this because we wanted to unwrap and this is where I'm
going to keep my seam. And my seam will mostly
follow like that. So I want a topology
that dissimilar to that. And here you can see
how all the topology or all the edges are
converging in here. Let's draw a line like that. Let's see how that has affected other and it does
not affected much. So the reason why I'm keeping the street is because
I want to seem to be something like that when we add going to
unwrap our model. And in here you can see how
that's detail is traveling. And I feel that's
enough for now. Now let us go ahead and
go to the next step, which is the position field. And as soon as you're
done with this, the next one unlocks the position and you
can click here as salt. This is going to give
you the resulting mesh, which is going to look
something like that. Now this will give
you a better idea of your overall topology. And still you can make
adjustments to this by using the brush icon in here. In a similar way, this
will adjust the topology and I feel whatever it has
done is looking pretty good. So let's go ahead
to the next step, which is the export mesh. I'll just click here and say
extract the mesh in here. This is the mesh
which we have got. In here you can see something
called SAP or quad mesh. When you click that and
get extract mesh again, you will see that the density
dramatically increases, which is because this mesh
is getting subdivided once. This will eliminate
all the trays and it'll make it as quartz. So I don't want to do that
in here because we'll have a separate section in Blender where we eliminate
some of the end guns. So I wish to keep this, turn this off and extract
again. And here we go. We have got the mesh
extracted like that. That's looking pretty nice. And you can see that this is a low poly version of
our object in there. And now we can go ahead
and export this mesh and import this into Blender
to see how that looks. For that, once I have
got my mesh in here, we have to say that extract mesh once and then we can
always hit save in here. And this will ask us
where to save this file. I'm going to save this as our
low poly underscore shell. You can always go
ahead and click dot OBJ because it has
some saving issues. But if you undergo any of
those pieces like that, you can always go ahead
and enter the extension, which is the dot OBJ,
which I've done in here. And now just hit Save, and this is going to save
the file to edit it. Now that we have exported, this model has a low poly file. Now let's go ahead and import this in Blender in
our next video.
9. Cleaning Up The Model: In this video,
Let's go ahead and import our low poly
file in our blender, and then we can start cleaning
up the model a little bit. In here I have
opened my blender, which is a new and
clean empty file. Let's go ahead and
get, get to importing. So I'll get inside
fight and say Import. And inside of which we have
got wafer and dot OBJ. So I'll click that and
I'm just going to select our low poly shell
and say import OBJ. We have got a low poly model
sitting here like that. All right, so now let's
go ahead and get inside our edit mode by
hitting tab in here. Or you can always select here and get inside
our edit mode. Here you can see that we have got some blue line
showing through. This is because it has been
marked as sharp blender. What we're going to
do is select all of it by pressing a on my keyboard. And we have selected
everything in here. And we can just go
ahead and get inside our edge and see clear shot. This is the first step which
will have to do in order to clear all the shops so that
we'll get the shading right. Now you can see
that there will be some n guns or
triangles in a model. You can see that we
have got an n guns now triangles are fine
because when we bake, they're not going
to cause issues. But n gun's always
do cost issues in baking normal maps or
in baby diffuse maps, we usually have
problems with n gone. So let's go ahead and solve all those n gone into triangles. So how we do this is simply we have to select
the end gods by here. And for example, I am
seeing and gone in here, which has more than four sides. I'm just going to select
this and this vertex, and I'm just going to
join them by hitting G on my keyboard or connecting
these vertices together. Now, I have made this
and gone into triangles. Now this way we have to solve
all the bonds in our mesh. But how do we find and guns
in here, which is difficult. So instead of finding and
guns with the naked eye, we can always use Blender and Target and
guns wherever it is. To do that, we have
to get inside select. Inside of select, you can
see that select by trade. In here you can see non manifold, loose
geometry interior. And at last you can see that something called by
phases by sites. This will select the phases
exactly by their sites. So we know that and guns are something which consists
more than four. So we can just select phases by sites and select vases by side. So you can see that
number equal to odd here you can see the type is
you can say to greater than. And then you can
see the number of vertices which are greater than four are being selected in here. Now we can get inside our wireframe to
see things clearly. You can see that these are all the spots which you need to tackle to clear off the end guns before you
go to the next step. This was really
simple to select. So now let's go ahead
and get one-by-one. In here we have
the first n gone. Now I am going from
the top to bottom. Now it's always a good
practice to go from top to bottom so
that you don't get, you don't miss out
any end guns in here. Don't go randomly. This, this and this
instead of which you can start from top and then
slowly solved the next one, the next one, the next one. Similarly, this is a good trip
which I have found useful. Now let's go ahead
and get into it. I'll get back
inside my solid and let me just select these
two Nancy J to join. And we have got one in here. Join. Let's get to again select by trade and
faces by sites. You can see that the number
of phases which makes sure that you have the
greater than selected. And you just have to start
doing these one-by-one. If you're someone who
is new to Blender and you don't know to
use the j feature. It's pretty simple. Just select these
two vertices in here and just get
inside our vertex. And here you can see
that connect vertex by path and which also has the shortcut G. Once
you click here, blender will automatically
connect those points together, which is what we are doing by just hitting J on your keyboard. I think I have
solved all the icons in here and I have
made them to try. So now let's go ahead
and find out if I've got everything or
I've missed something. So to do that again, we need to select and select by trade and select faces by sides. Now blender shouldn't
highlight or show any of the phases in here, which means you have
got everything right and you're now ready to
go to the next step.
10. Adding Modifiers: In the last video, we
saw how to clean up our low poly object
and we cleaned up some of the end guns by
using simple tricks. Now let us go ahead and import our high poly model so
that we can go ahead and put this model
next to each other and then we can start
baking in the future. And I'm just going to
import the high poly, which was exactly
what this can give. Let's get inside our file and
say Import and get to OBJ. And now we have to select the high poly model and
say Export dot OBJ. And I'll import this. It takes a while to import because it's really
hyperbole version. Here you can see
that how blender has imported the
high poly version and kept the location and rotation exactly on
where the loop body is. Here you can see both
of it is completely overlapping on top of each
other to avoid confusion. So let's go to the outliner
to change the names. So here I wish to say
this as high poly. This is going to be low poly, which is already there. I'm just going to name this
low poly and discussion. And we have got both the models exactly on top of each other. One more thing what we can check right away is that we need to check the normals once before
we get back, get inside it. First I'll just hide
our high poly shell. And then I'll open a
low poly shell back on. Here. I'm just going to get inside our viewport overlays and
check on face orientation. Make sure that these phase, as all shown in blue
and not in red. If they show up in
red in some cases, which wouldn't in most cases. But if that does so, then you need to flip
the normals around so that you can get the
normal map looking right? Okay, so now let's
go ahead and switch that off and get to
face orientation. And we have got ready. And let's switch
on the hypotonic. So now we need to
bake the details of the high poly mesh
into our low poly. So to do this, we need the, both the meshes to be exactly intersecting
on top of the E, on top of each other to
get the best results. But here you can see that
both the meshes are somewhat intersecting and in some places they are going up
about each other. To see this more clearly, I'm going to switch on the
random in our reward mad caps. I'm going to click this
drop-down and say random. You can see that the
high poly mesh has a different color
and the low poly has another different color. And you can clearly
see that there are some places where
the low poly is coming out and
hypotonic being inside. These things usually create
small issues in baking. So to solve this easily, we can use modifiers in Blender, and there's a trick to
easily solve these across. So I'll show you how it's done. First of all, let's
select our low poly shell and get inside our modifiers by clicking on the
wrench in here, we can add modifier. What I'm going to do in
here is that I'm going to tell blender asif
that this was sculpted. Now if you get me right, we're going to use the
multi-resolution modifier and bake the details onto the
multi-resolution modifiers such that it was
sculpted by hand. And then everything is easier, too big to get inside add modifier and get to
multi-resolution. And then let's simply get
to sub-divide somebody white almost three to four times so that it's a high poly model. Once we have subdivided in here. Now, how do we tell blender that this was like sculpted and even though we
added the multi-class, there is nothing much
changed in here. Just our mesh is being
smoothened in here. So to have that effect, we can use another modifier, which is these shrink-wrapped. So we can use the
shrink wrap modifier to wrap our low poly mesh on top of our high poly so
that we get the details. Now, if the shrink
wrap is combined with the multi-face
modifier than we get a huge benefit by adding the extra police and the extra details
get exactly wrapped. Now let's go ahead and do that. Now Let's get inside
the add modifier and say shrink-wrap here. And we have got
these shrink-wrap. And we just need
to set the target, which is our high poly. Select the target
as high polygon. As soon as I select that, you can see that our
low poly mesh has picked up all the details
of how high poly model. The best part is. We have got the best topology in here than what we had before. When I hit tab and you can
see the topology in here. And when I get back
to object mode, and this has taken all the
details from the hypothalamus. In this way, baking
becomes far more easier than beaking with your low
poly on top of hyperbolic. Now we have got this done. So blender now assumes
that you have basically sculpted the details and now
we can get inside baking. Now before we do that, we need to first of all apply this modifier shrink wrap
on the fourth level. By doing this weekend, be sure that our fourth level of subdivisions has got
this detail in here. Now to make things clear, you can go ahead and reduce
this down to see how this is affecting our
shrink-wrap in here. Let's go ahead and put
this to one and you can see that those details
are no longer there. Why? Because shrink wrap
is going to use the resolution of mesh or
the subdivisions of mesh. And then it's going
to wrap our mesh on top of our
higher poly object, which is why it's always crucial that you have
the divisions more so that you have got more resolution to
rap on your geometry. Let's go ahead and
increase this back before you can see all the
details have been picked up. Now, Blender has got the
applications of modifiers, so you can always
go ahead and apply this modifier right now
it is non-destructive. When I switch off this
shrink-wrap, everything goes off. In order to bake this properly, we need to first apply the shrink wrap so
that Blender will apply this details onto the
fourth level of subdivision. Let's go ahead and apply this. Get to apply. We have
got that applied. And it says supplied modifier, not first, but still
this works the best. And we have got the
fourth level in here. Now, if we go into
the level one, you can see that that is a smooth mesh and still
this is non-destructive. You can go back to your
normal low poly one. And when I switched it back on, you can go ahead and
increase the levels. This is like you have
sculpted from 0 to four. This is completely a
different workflow then what we used to do, We have got all the
details in here. Now we can go ahead
and get inside baking.
11. Tips & Best Practices for Optimising the mesh: In this video, let's look at
some of the tips so that we can make our workflow easier and we can unlock some
more features. So what we have done
here is we have basically a big everything inside our multi-resolution
modifiers. This means that we have enabled one more step,
which is sculpting. So it's like, if
you think about, it's like the combination
of sculpting plus scanning. After you scan your model, once you convert that into a multiverse like the
method we just saw, then we can go ahead
and we can start adding small details like EXE or
scratches, modulus, etc. But note that this shouldn't completely change the shape of our mesh because we still haven't baked our
maps such as diffuse. This might create
some issues in debt, so we can always add some
small details in this stage, this completely
enabled sculpting on top of us can't mesh. If you're new to Blender, then modifiers are
non-destructive approaches to modeling or to deform a mish, be sure that you use
the right order. So for our modifiers
to work correctly, which is the shrink wrap and then the
multi-resolution modifier. We first need to put the multi-resolution
modifier on top. Then we need to align this shrink-wrap on
the bottom because the one on the top gets to
be the first modify it, and the one on the bottom
gets to be the next modifier. In this way, we have
put the shrink wrap on the bottom and multi-class
solution on the top, meaning that first
Blender will sub-divide the mesh on multi-resolution meshes converted into a
multi-layer insulation mesh. Then it goes to the shrink-wrap. Thereby it uses all
the polygons from the multi-resolution Mish
to wrap around the object, which was our high poly model, which we had created earlier. Next one, what we can do is
to find out the end guns. We had always had to go inside the select and select bitrates
and then we need to click. This was a little
too much when we had more than two
or three and guns. The process was
completely repetitive. So we can use some quick shortcuts in
Blender to enable that. I'll show you how
you can do that. So to get something like that, we just need to get
inside our edit mode. And then let's get
again into the select. And we can see that select
by trade and select all. And you can see faces by sites. Now you can right-click in here and say that blender shows you a tool menu which says
Add to Quick favorites. And once you select that, it is going to add into
your quick February. To access your quick favorite, you have to press Q
on your keyboard, and that shows that phases
by sites anywhere you want. So when I press Q
and phases by sites, and this is going
to show up in here. And now it's pretty
much easy to select any phases like
that in this way. And using such trips, there are a lot of flexibilities in Blender where you can use photogrammetry and
your own creativity to create great assets.
12. UV Unwrapping: In this video, Let's
unwrap our model so that we can pick our normal map and diffuse map on top of this, we're going to use a simple YUI and drop approach
for this model. So let's go ahead and do
that for performance issues. And it should be
easy on my computer. So I'm just going to switch
off or multi-resolution. So we're back inside
our low poly view. And let's get inside
our edit mode, and let's start unwrapping. Now in here, I went to
unwrap this by giving a seam around in here so that everything
and drops like that. So let's go ahead
and mark some seams. I'll select my edge mode and select some of the same area. I wish to keep it inside here so that it's hidden from view. I'm just going to select this. I'm holding Control to select
multiple lines in here. So this one, and select the layer. I will start selecting
from this side as well so that I
know where to end. I'm just selecting the
edges which I think I want a scene did here. This can be arsine
for our model. I get inside our
edge and say Maxime, we have got that same month. Now let's get inside the UV Editing Workspace so that we can see the
UBI view in there. I'll select all by
pressing a and get inside, select and on, and then
get inside UV, unwrap. There we go. We have got
Model and wrapped in here. Alright, so I'm satisfied
with my UV unwrapping. Now let's go ahead and look into baking in the next video.
13. Baking Normal Map: In this video, let's
look at some of the baking settings so that we can go ahead and
bake this model. So first I'm going to bake
the normal maps of this mesh. I'll select the mesh and get
inside Properties in here. The first property which you
have to see is the scale. Makes sure that your objects is approximately the scale
in the real-world. So I have kept my scale
as in centimeters. So I'll select here and get
inside as seen properties. And instead of which you can
see the unit system being metric and my unit
scale being 0.01, which stands for centimeters. And I have also sent my
length in centimeters because having an incorrect
scale will make the light rays travel much
more and it might increase your computational power and then you won't get
the results in time. And it's just going
to keep begging. Make sure that you
have got the skills. And the next one,
what we're going to do is let's get inside our render properties and make sure you set this into cycles. And you can see that
I have kept into CPU and blender now
supports GPU begin to, but you can set to CPU if
you have a low-end GPU. So I have said this CPU in here. The next one which
we have to see is the sampling and ignore
the viewport sampling. The sampling which we are
talking about is there under samples 49 to six is quite a lot for this
speaking to work. So I'd like to keep this as like five or something
around in this, which is really low
because it just needs to put the details on the
high poly to this. So I'm not going to set
the samples very high. The next one, what we have
to look at is under the big. And you can see there
is a big tab in here. And then you have got
the big types as normal. And make sure that you
select the bake from multi-racial because
we are going to use the multi-resource to
bake our mesh in here. I have selected that. The next thing what
we have to do is we have to give a texture so that the baked information can't go and land
on that texture, which is nothing but an image. So let's go ahead and do that. To do this, I like to split my viewport or you can go inside the shading
workspace in here. We are right in the shading one. And let's get inside
our shaded view. Alright, so we have got the material for
this as default OBJ, which I would like to
create a new material. Let's select our
mesh and get inside our materials and select New. And click New and call
this as low poly. Underscore MAT
stands for material. And let's go ahead and remove this off from our
material stack. So now we have got a
material in here to check that you can always
change colors and see how that's looking
in the material later. Make sure you have got
a new material in here. Now let's get to solid. Let us now add an image so that our normal map can
land on this image. So I'm going to get inside
and see such and call image. So let's go ahead and create
a new image for our normal. So this is where our normal
map is going to land. Let's create new in here. Let's call this as normal. And I wanted to keep a resolution of 2048,
which is two keys. So I'm going to
set this to 2048. And now we can get this as blank so that we don't want
any texture in here. Then the rest of it, you can leave it
as it is and say, okay, we have got a
normal map there. And now we can go ahead and
call this normal map in here. Let's select the normals. This is an older map. So right now we can see that the normal map which
we have got is black. So make sure you select the normals in the
image editor here. Make sure you have also selected the normals image in
the shader editor. And I've selected that. And now let's get
inside baking again, get inside and select our object and get inside our
modified properties. Now you can see that
I have disabled this in the viewport and I
wanted to enable this again. And you can see how
that's details is there. Now, I wish to keep this at 0 because at which I
want to bake my details. So what this means
is I have to set this to 0 before I go to big. Blender will automatically take the details on the
highest level. In this case, we have got
the four as the highest, but your case might
be different. It will just calculate
the details from the highest to the lowest
setting point in here. So we have set this as 0. Now if we set this as one, this will become our business. So I wanted to set this as 0. So now we can go ahead and bake the fourth details
to the 0 details. So let's go ahead and get inside rental properties and
then get inside big. Make sure you select Big from multifidus and then
it's a normal. And it also says clear image, which means if there is any
image already in there, it's going to clear that off and it's going to bake
something new on top of it. So I'll make sure again, you select the normals in here, and you have got the
normals which is displayed in here in the image editor tab. Now let's go ahead and hit big. And we can just read. And now you can see
how blender has big or details in a
normal map like that. Let's see how this is looking. So I'll go ahead and
connect the normal map. And let's call a normal map. And put this in-between. And now we have connected
to the normal map. Let's see how this is looking. Let's get inside
material preview. Let's change the base
color to something else so that we can
see the details. We have got the
normals big in here, but you can see that there
are some issues here. So you can go ahead and see the base color to
see it clearly. You can see that there
are some issues, but no need to panic. This is happening because of color space
being said to sRGB. Sometimes this happens. We just need to say this
two nonpolar data again, and that will remove all
those issues in there. Now sometimes this
might be grayed out is because first you need
to save this image. Once you have saved this image, you can get to the
color space again. Let's go ahead and
save this image. Let's go to Image and Save, save As, and set on
normals and save as image. And this way we have
baked the normal maps. Now you can see how
that's looking in here. And we have baked all are high poly details into our
low poly mesh this way.
14. Baking BaseColor Map: In this video, let's
see how we can bake the high poly textures
into our low poly object. Here you can take a look
at the scan results. This is the result which
I got from Photoscan. Here you can see that we have
got nice-looking textures, so we can go ahead and
make use of this textures and we can break this
into our low poly object. For this, we need to
have two objects. One is the hyperbole
and one the low poly. We have to intersect
those two objects on one on top of each other. Then we can go ahead and
bake those together. All right, so now let's see some of these settings
which we need to enable before we get inside
the base color map baking. So I'll get inside our settings. I've selected my high
poly object in here, and I've enabled this
low poly as well. Now let's go ahead and
look at the settings. And inside of which we have got the CPU, which is the same. Then we can just set the maximum points to
fight, which is okay. Then you can come down in here and you can take
off the big from multi-dose because we no longer need the
multi-resolution baking. And then we can set the base
type, which is the combined. Now we can set this up
to diffuse and then you can see the
contributions which is direct, indirect and columns. So what this means is
direct is the direct light and indirect is the light which bounces off and hits that. These two will accommodate to the lighting in your scene and calculates the lighting as well, which we do not want
because we want the bare basic texture for which I'm going to switch
off the direct and indirect. And let's just keep the
color active right now. Sorry, I'd like to select this, selected to active
because this is what is going to give
us the big results. So I'll just click
that to open that. And here you can see
that there's cage and then there is some extrusion
and maximum distance. This works if we
keep this to 0.1 because we have a little
more resistance too big. So wherever there are some
small irregularities and mesh, we can also calculate them. So I would like to
keep this to 0.1. And then we also have output to image textures
and there is a clear image, and then we have
a marginal ridge. These are all the
default settings, which I leave it as it is. Now let us go ahead and create a new image texture from where our big diffuse
map will land on. I would like to
create a new one. Make sure that you
create that inside our low poly mat or
low poly material. Because our high poly material
is completely different and this has already come
with a texture attached, which was from scan software. Let us make a new
texture for this. I'm just going to click New in here to create a new texture. Let's call this as base color. I'd like to set this to two
k again and with the color of black and generate a
type two blank and said, okay, we have got a
base color in here. Sweet. So let's go ahead and call this base column
app inside of here. To do that, I'm just going to search and say image textures. Let's get a base
color in here and make sure you've
selected that and the color space is set to sRGB. This baking works by calculating the distance between the high poly and the
low poly objects. So for this to work optimally, what is required is that
both your high poly and low poly object needs to exactly intersect one
on top of each other. And if you remember that we have used multi-resolution
modifier, which is completely
non-destructive workflow. We actually trick this
baking techniques that we set this to four. But once we get
everything baked, we're going to set
this again back to 0. So in this way we tell blender that this is what we want to be. Why we are setting this to 0 is because when we
reduce this to one, you can see that the space
between the high poly and the low poly or the
difference between the high and low poly are
completely different. Which creates problems in
baking or this might not create optimum baking results for which I'm going to
set this to four. So this acts as if this is the model
which we have to make. So we'll set this up for. Now. Let us select
our base color. We have already selected the low poly model or
the low poly shell, which is why you are seeing
the material in here. Now we need to
shift hold shift on our keyboard and select the
high poly model as well. Now there is usually a confusion that which one to select first, whether it's the high poly
model or the low poly model. Even I have done
baking many times as still I get confused
between what to select first, the answer to this confusion lies inside our shaded editor. Let me explain. Whenever you have the
low poly material showing here, then you're right. Which means I'll show
you when I select the high poly model first and
then select the low poly, I can only see the
material of the high poly. In this way, you
will end up making the wrong information
on the wrong texture. This is not the one to go. Always make sure you see the low police material
inside of the shader editor. To reverse this, we first
need to select low poly, and then we'll select
our hyperlink. In this way. We can see that our base color, which we created
just now is active. In this way. Only you can bake the textures
into this base color map. Make sure you select
the order right. Or if you do not know the order, just make sure
that you have this material showing and
not the wrong material. In this way, you can verify if you've selected
the right order. Now let's go ahead into begins. I'll select this and now
select the Base Color. And you can see here that both the models are selected
in the outliner. Make sure you see both as blue otherwise this
is not going to work. Now let's get inside our baking, get inside random properties
and hit bake now, seen big. Alright, so now
Blender has finished baking maps and I don't think there are
issues right here. Now let's go ahead
and see how this looks by putting this
texture on our model. Let's go ahead and hide
our high poly for awhile. We can work with this now
let's select this and connect the base color
inside our base color. Let's see how that's going
to look and wow, yes, we have got all the
details which we want and I don't see any
unwanted spots aspects. And this is happening because we use the multi-face modifier. Otherwise this will be a pain. You have to adjust the
rate distance again and again to get the
baker results right, which is why we use modifiers
and use the smart way to get our diffuse map
looking at, right? Let's go ahead and reduce the multi-resolution modifier so that we can enjoy this texture
in our low poly model, getting inside our modifiers. And now we can get this
mortar 0. And there you go. Now you can see
that our model in here is completely
powered by our maps, which is on base color
and then normal. And you can see how
those results look. And to give you a
clearer picture, I'm going to switch on the wireframe in our
viewport or lis. And let's hit the
wireframe and you can see how this texture that has been mapped on our low poly model. Isn't that sweet that how we
used automatic techniques like remeshing and we could
achieve something like this. And I feel this is really
a great way to model static meshes because
the turnaround times was such objects is really huge. Without wasting this map, let's go ahead and save this before we accidentally
closed it. So I'll go ahead and get inside our image and save this again, save as, and let's save
this as base color dot PNG, and save that image. And now our base
color map is safe. We have got both the
maps of light in here. Once you have got this map, this is enabling you to a
further step of creativity, which means once you have got the base color map
baked like that, now Blender has got a
texture painting feature. You can go ahead and add your own colors
by getting inside the texture paint and adding
some other details in here and baking
that one more time. In this way, we are
adding creativity to 3D scanned model or a photogrammetric model.
Isn't that great? We can just go ahead and start scanning some simple
objects like that. And then we can add our
own details or we can add our own colors to enable our own touch to the models
which we have scanned.
15. Using the Decimate Modifier: In this video, let's take
a look at how we can further reduce the poly
count of our shell model. Now I know that this is
already a low poly model, but using some modifiers
such as the decimate, we can go ahead and reduce
this polygon even further. We usually say a term called as level of detail or L or D. The LOD here mainly
describes the relationship between the object or the
asset and the camera. When the camera is closer, we have more polygon while
the camera is further away, we can easily decimate the model and give low poly object there, thereby reducing the entire
load on your system. Alright, so let's go ahead
and see how it can be done. In here, I have just
set up my model, which we have just now
baked the textures. And now I want to duplicate this model
so that we know how this works after the designation and we can compare
both the models. Let's first duplicate this. I'm just going to get inside our object and click on
duplicate object there. And I'm just going to
move this away like that. We have got one more
object in here. Now let's just call
this as decimate. We have got two objects
in here and I have hidden or hyperbole because
I no longer need this. As of now. I have selected are
decimate object and let's get rid of the
multi-face modifier in here. So let's add another modifier
and call it as decimate. We have got the
decimate modifier here. And you can see that there
are three different settings in here which is collapsed
on subdivided and planar. All of these basically this reduces the resolution
of your mesh. So I just went with the
collapse, which is the default. So to see how much this
is going to decimate, we can enable setting, which is the statistics
which will show you what it was the
polygon before. And now, let's go
ahead and enable that, which is in the
viewport overlays. And you can see something
called as statistics in here. So I've clicked that on. And as soon as I turn that on, you can see on the
top left corner, you can see the objects
and the vertices, edges, faces and try. So basically this
is just a count of how much vertices or how much of your phases are present
in a selected object. So right off the bat, you can see when I
select an object, it says that this has got
a phase count of 1686. Now let's go ahead and
further reduce that. So I'll select this model and we can easily just turn
this ratio down. You can see that there is some distortions a little bit
happening when I do that, but as soon as I leave
it in some number, this is seeming to go away. So I'll keep this to 0.5. Now if I select that, you can see this in the
wireframe more clearly. So I'll just get
inside wireframe. Wireframe there and you can
see how this is going to decimate my object
there and this in here. So obviously you can
see that there are a lot less faces
in here than this. So to check this
more clearly, let's, if you see here that we also have a face count
which says that 620. When I compare these both, if I select this and this
has got a face count of 1463 and this has got
a face count of 620. Beware that if you
just reduce this further more than you
will lose details. So make sure that you
hit the right balance between the detail
and the polygon. And make sure if you're getting something really Les Paul II, then be sure that you put it really far away from the
camera and not closer to that, the ones we are happy with
our decimation process, we can always go ahead
and apply this modifier. So right now it shows 329 and
I feel this is really less. I'll just turn this up a
little bit to around 698. And I could just go
ahead and hit Apply here by coming here and apply. And this is just like
any regular modifier. And now you can see how much of triangles
or phases in here. So when I select that, this
is showing my face count. Yeah, so this is exactly
showing as 688 phases. So this is my current
decimated model. Now I can use this model with the same textures
anywhere I like. In this way, we can use the
decimate modifier to further cut down polys of our
photogrammetric meshes.
16. Photogrammetry Shoe Experiment: In this video, I'll
walk you through my process where
I have attempted apart of a shoe with
photogrammetry techniques and similar methods which was
shown earlier in the class. So first I had taken
pictures of the shoe in multiple points of view
using similar techniques. We can notice the
low contrast look. This will yield us a
high-quality base color map. I fed these images into photo catch up on my
Mac to get this result. As you can see, I had removed
the lace and taken out the tongue so that I can
eliminate potential blind spots. Or in other words, capture
all the details of the shoe without any
overlapping objects. I had imported this
model into Blender and I chose RE topology as my
method to generate my mesh. Hurried apologized this
model in Blender by using basic and traditional
rate topology tools such as snap two faces and the
shrink wrap modifier. After this step, I was
able to unwrap my shoe, followed by baking
high poly details into base color and normal maps. In this way, I was
able to extract a perfect base color map in
a very short amount of time. I feel that such experiments
through photogrammetry to be a viable solution for creating
realistic low poly assets.
17. Conclusion: We have come to the
end of this class. I hope you have
enjoyed learning. I can't wait to see what you can do with the skills that
you have learned today. Feel free to share your
work and I'll be really happy to go through them and
give my feedbacks on it. By NGOs.
 Harshavardhan Saravanan, Co-founder | CGI Artist | Author