Transcripts
1. Introduction: Yeah everyone, welcome back. Being able to design and
blender is a wonderful thing. Admittedly, being able to design many cities
have been some of our dreams since our
childhood. My name is Kati. I'm a graphics designer, web designer, and
a three D artist. The ideas of this course is to teach something that
is relatively simple. And for some people it might
be a little bit challenging. But I believe that challenging yourself is a good way to learn. So I've been designing
for quite some time now and I've enjoyed
it quite a lot. And I'm always expanding
on my knowledge. And so I'd like to share some of that knowledge with
people that have been following me for quite some time and even welcome new students. Hopefully, I've had
the opportunity to design quite a few
different things as well. Anything from rooms. And these are real life
objects, real places. What are we trying to
teach in this class? What value can it add to you? It has taken simple things within blender to make
something really incredible. Some of these are quite simple. Anything from creating basic
cartoon like buildings and basic cartoon like
vehicles, including plants. A little bit of environment, playing with the colors, shapes, design,
everything like that. How can you take the skills that you're going to learn
in this class and apply it outside
of this class in your own projects and
additional projects? I believe that in a way that
I've simplified this class, I think it'll be really easy to understand and in terms
of the skill set, teaching the most simplistic
way to get things done. Now that's everything
from modeling these objects in
this environment, to add in materials as well, It's going to be quite
an exciting journey. This class is geared towards beginners and intermediaries. I think it can suit
both people quite well. Now what about the
required software? The required tool.
It is a free tool. It's called Blender and this is an amazing three D
software that can be used for a multitude
of different things. There will be a link
in the description. Now let's just look at the
structure of the entire class. So that's everything
from opening the blender application to starting with the first objects, designing the first round
of the environments, and modeling some
of the buildings. And eventually, of
course, you'll get to add material to these objects and to make your
environment your own. I want you to create
something of your own. That's what's important. So just to finalize this, we're making a mini city in this class and it's going
to be quite exciting. For me it's been a mini city, but for you it could
be a mega city, it could be anything. With this course you
can create so much take the knowledge you can
get from this class and the knowledge you get from
my additional classes. Combine them together
and you can create some amazing things
including interior. I've worked on that quite a lot. The interior of office spaces, Youtube studios, stuff like
that can really be helpful. So I'm really excited to start this class
with you, of course. Let's get into it
and let's enjoy it. And please use the additional
classes to expand on this knowledge and
create something wild of your own imagination. So let's get started and I'll see you in
the first lesson.
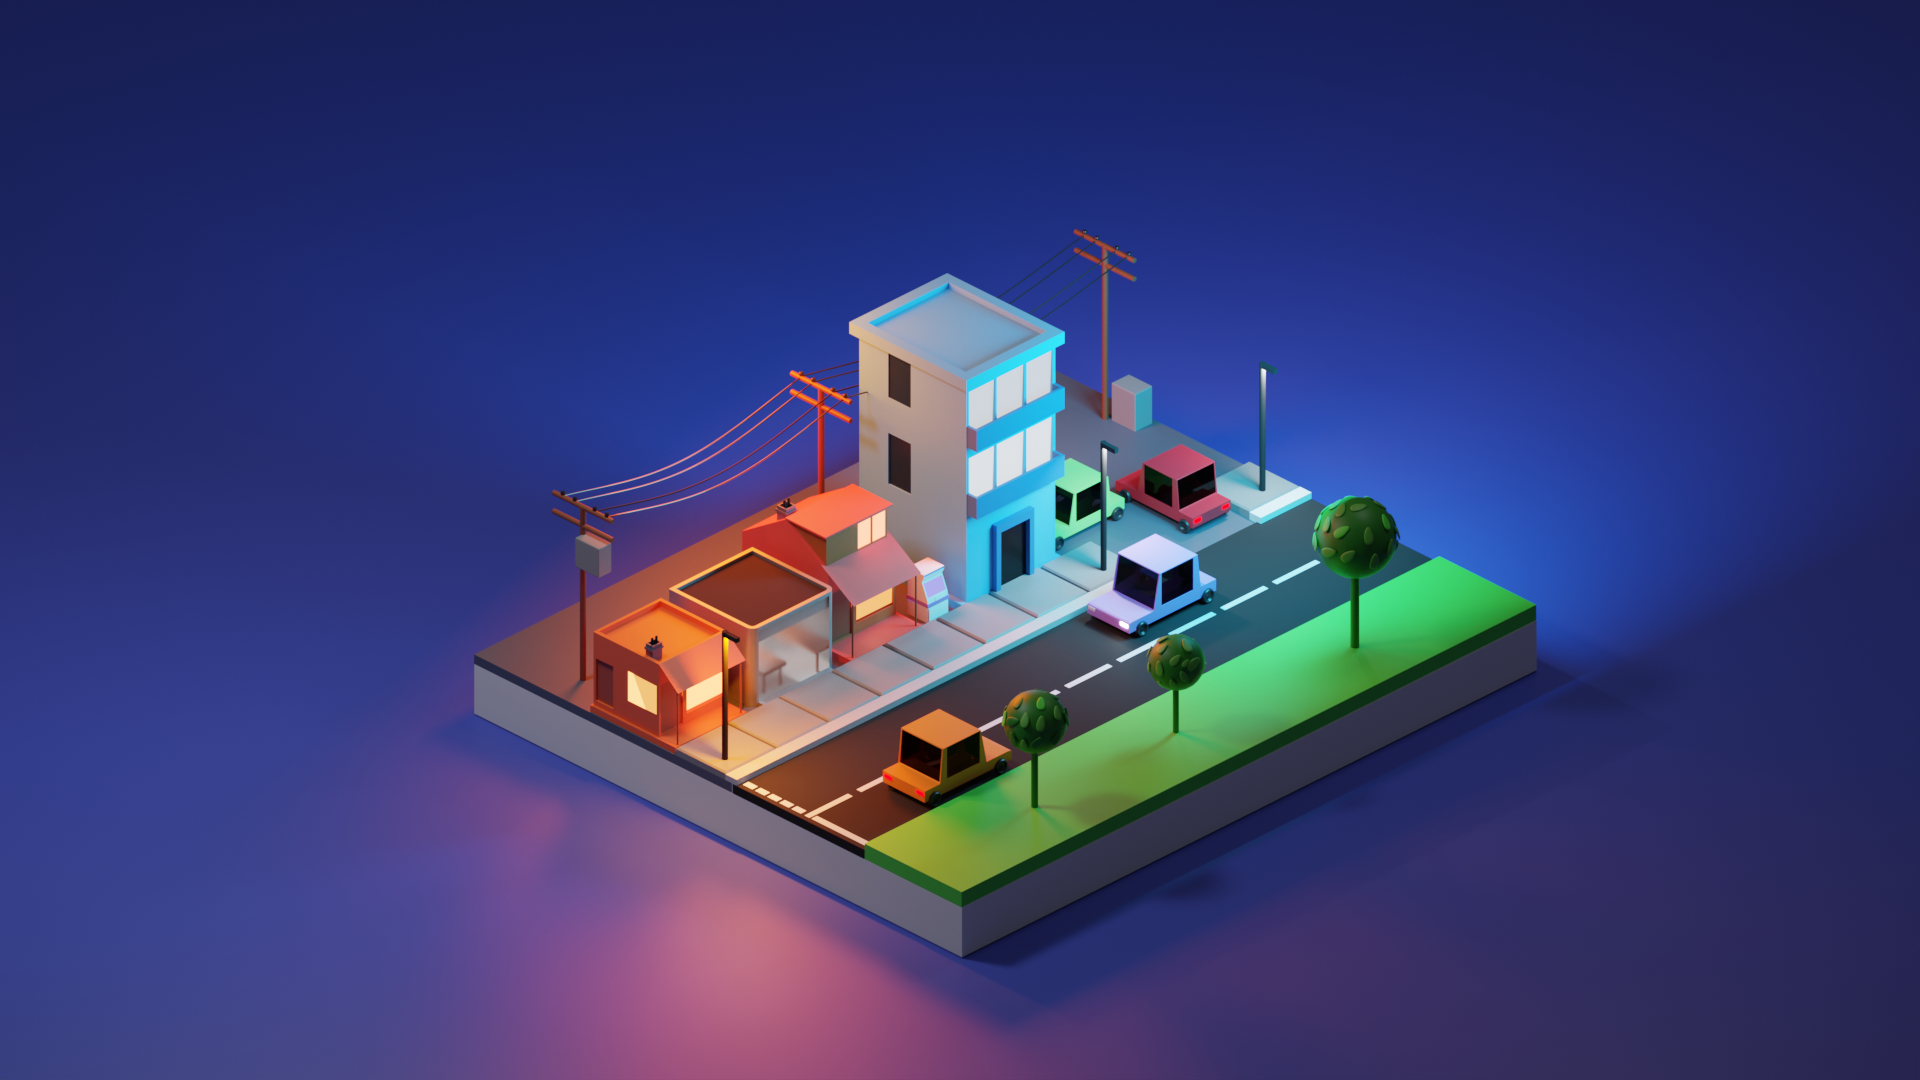
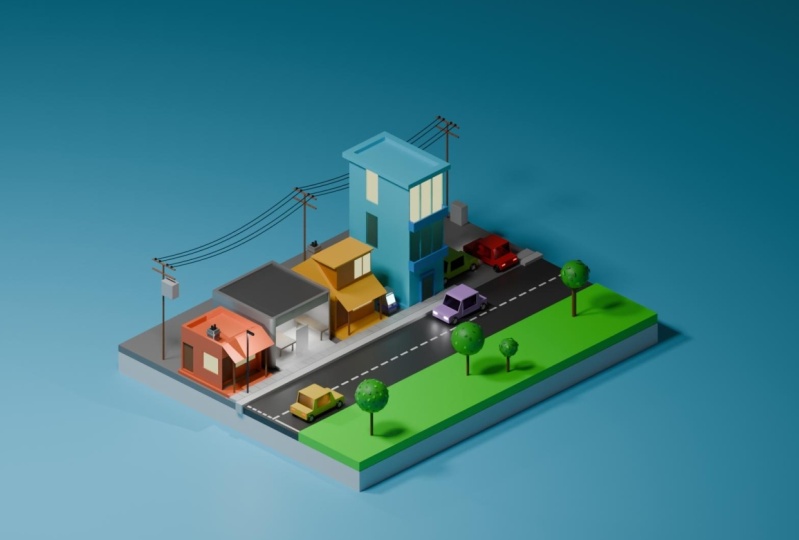
2. Modelling First Building: Everyone, welcome back. Today we are doing a blender course. Now, this course is
geared for everyone. You can be intermediary, you can be a beginner. Now, this small city will
include anything from a lot of houses, Streets, yeah. Just anything that
we can come up with. For a small little city, we've got blender open.
Actually, before anything. A very useful thing to have
in blender is the keys. Especially when you're doing a course, those are essential. On my right hand side, I do have the keys displayed so people can follow
along a lot easier. Like I was saying,
we need a platform. So let's go to shift A, and let's add a plane. We need to bring
this plane down. And Z, let's bring this plane
down just around there. And let's scale
this a little bit. Possibly not too much. You can actually
use the number pad. In this case, say one
is scaled by five, that scale in it by five, that would be a
relatively small city. That can actually work. Let's keep that scaled at five. Let's just move
this along and Y, move this along to the
center of our display. You can probably move it
along just a bit more. Yeah, that's looking
a little bit better. We probably want to narrow it. Let's scale this and
scale this on the axles. And we can scale it
down just a little bit. That is better. That's
what we want to work with. Now we do want to
extrude this, obviously. We're going to tab
in inter edit mode And now select all using A. And now scale this platform. This will be our little island. Now even better, we can
duplicate this right click and let's click on P and
separate this plane. This will be an
additional layer. Select all in edit mode. And let's scale this
a little bit more. And this can be like
our grass and not to mention our road surface. There we go. That's a
good start right there. My blended application is
looking at a little bit wonky. I don't really know why,
but we will figure it out. Additionally, let's
create a road. Once again, let's
duplicate this. Let's move this up just a little bit, and this
will be our road. We can actually scale
this along the X axles, and we just want to scale
it down just a little bit. Move it along on the X axles, and we can actually
intrude it once again, back into the ground, into
the road surface, right? So we've got some
houses to build on this thing,
Possibly ATM machines, possibly supermarkets, anything, Apartments,
absolutely anything. Let's continue. So now
that we've got our road, that'll be our road surface. We're going to have grass
trees, all sorts of stuff. Let's move this along
the X axles once more. I do believe we will
need a pavement. Here's my thoughts. So we're going to
scale this layer down. If we go to top down view, this actually makes
it really simplistic. If we want to scale
it down like that, we can also move it
along the axles and probably scale it
a little bit more and continue to move
it along the axles. Because it's the road, you obviously need a pavement. Let's bring this part down
because this is our road. We do want to have
that separation. Let's scale this
out a little bit, let's move it along inwards. And a little bit
more should do fine. But yes, we will
have a sidewalk. Actually, we do need a sidewalk
on the right hand side basically where the grass
will be parks, dogs, trees. We can duplicate this once
again and we can separate, just move it along
the axles right there and scale it
down a little bit. We can zoom in if
we'd like to get a more accurate idea
of what's going on. Let's go to Y frame, and
this makes it easier. Now we can scale it down
on the X axles even more. Just get that proper adjust. It's really nice and adjusted. We can go back to solid. And there we go, three different
surfaces are separated. Like I was saying, we
do need our sidewalk. Now, this will be really fun. So first thing that we can do, we can create our sidewalks. And obviously we want
to create bricks. We added a plane. Let's scale this plane down. And let's go to top Down view. Let's move this along the
X axles a little bit. Probably a little bit more
actually. Fantastic idea. Let's center this in
between and let's scale it down on the X
axles, this is fantastic. And then we're going to
scale along the Y axles, and move it down along the
Y axles a little bit more. Continue to scale it until it
matches the entire island, and continue to scale
a little bit more and just adjust it on D Y axles. And that this will be part of our pavement
tab in into edit mode. Let's scale this upwards
just a little bit. Now the idea of this is that it sticks out
into the ground. Let's go back into object mode and let's move
this down essentially. It looks a little bit like that. Let's move it out just to cut it off there. That's
looking better. That will be part of our
pavement and this is the road, like I said, I do want the
road to sink into the ground. We can probably scale
this up a little bit more under Z axles, actually, maybe not that much, but we do want that
lovely little separation. I think that will be fine. As for this, let's go to
number one in our keypad. From there on, we can actually
scale this up as well. But before we can do
that, let's set origin to geometry and then we can scale
this a little bit better. Essentially, we just
wanted to match the same height as our road
panel on the left hand side. I think it needs a little
bit more scaling up. So let's scale that up
on the und, Z axles. There we go. That works lovely. I'll tell you, the
fact that everyone can see the keypad really
does make this much simpler for everyone to follow along and once again just scale it
a little bit more. It really does take a
little bit of time, a little bit of fine tuning to get the right look you want. That's our road surface. That's where the
cars will be driven. This is where our park will be with trees and this is where our houses will be with ATM's
and all sorts of stuff. Let's continue. We
do want to build our first house or
first apartment. I think we can start possibly in the middle or
something right there. We can just shift right click. Put our cursor right
there. Let's shift A. And we would like to add a cube. This will be the general concept of what our house
will look like, just a cube that you'll design to look a
little bit fancy. Before we can do that though, I do need to create
some tiles on the road. Let's go to Top Down View. Let's add a plane. And let's move this plane
down along the Wyaxles. And we just want to
scale this down. We don't want this
to be too massive. Let's move it down.
Move it along the X axles into that
corner right there. We zoom in, and this is where
it gets a little bit fun. We can now tap into edit mode, Select all using A and we can actually scale this
upwards just a little bit. Let's click one on our
number pad so we can get a proper idea of how much
we'd like to scale it. Let's continue to scale it. Let's press and Z
to move it upwards. Let's select all by person
A and move it along the X axles closer to the curve. Let's move it down a little
bit, closer to the edge. And probably move it away from the curve
just a little bit. We don't want it to be
too close, I don't think. Let's go to edge select,
that's number two. Click number two for your edge. Select selecting these edges. We can click Shift to
select all of these edges. Just like that. Nice and simple. Then we can embezzle
these edges. We can give this like a bezzle, it will look a bit
more like a brick. And these are all low
poly designs as well. Let's go back to top
down view and let's go to our modified
tab on the right. And let's add a array modifier. Now on the Y,
currently it's one, but we probably want it to be 1.05 That's probably
enough distance As for the factors x
put in zero into that. And there we go, it's a bit more align,
probably can work for now. Let's leave it at 0.5 Let's click seven on our number pad. Top down view, and let's
increase the number of counts. And this is our pavement, not the edge up here
as you can see, it's a little bit protruded. So if we change the y to possibly 0.4 that probably
fix our problem slightly. It fixes our problem slightly. Not exactly the kind
of fix that I want. What we'll have to
do is to tab in a, to select all and let's
scale on the Y axles. We'll just scale it
down just a little bit. Let's go back up. Yeah,
that's scaled far too much. Let's zoom out a little bit. We just want to get a nice
idea of what's going on. Yeah, we scaled it far too much. I think that's a lot better. There we go, Now it's within bounds and that's looking
a little bit better. Back out into
object mode and now we can design our first house. We've got a cube, let's move
this cube up, that's z. And let's move this cube
upwards a little bit. And probably move it
forwards just a little bit. Obviously you can see that
it's unnecessarily big. Let's scale this
down on the Y axles. And that's just, and
y to scale down, the height is nice, but it's actually quite
large at the back. It looks like a
computer. Once again, let's scale this
down on the X axles. There we go. Let's make
it a nice cube design. We can keep it narrow, to be honest, keeping it narrow, There's
nothing wrong with that. We can scale it down
a little bit more, probably a little bit more, And scale it on the y axis a little bit more
to keep it narrow. And that's quite narrow.
And now we actually, we can probably make
it slightly bigger. We can increase the
size just by pressing, and it can increase the size
however much you'd like. We don't need to make it
too big because these are cartoon ish homes. I'd say probably around there. And let's move it out the
ground just a little bit much. Let's move it forward just a little bit
c to the pavement. Now, these tiles, I'm not too sure if they're large enough. That's what I'm
thinking now is if we need to scale this up
just a little bit, after all these are sidewalks, so let's tap in select all using A and let's scale this upwards just a little
bit. That looks better. And let's move it
along the axles. Let's move it along the axles. Now, as you can see,
there's too many counts. Let's just reduce
this a little bit, and we can continue to scale it until it matches to
the opposite end. And there we go, that
looks pretty good. If it's a little bit too big, then you can scale it back down just a little
bit and move it along the wax just a bit much. That tend to look really nice. I think at the top it
looks good as well. Yeah, that looks okay. We've been live streaming and recording for just
under 20 minutes. This is a good time to
save your documents. If you click Control
S, it allows you to save your
Blender document. Here, Save, and there you go. Now you can't lose your, your save documents
unless you delete by accident for our house. Let's move it back just
a little bit because it's covering our tiles. As you can see, this will
be like an apartment. So let's tab in and
let's go into edit mode. And let's select three
for face select and let's use to insert if we use
seven on our number pad. There we go. It
looks pretty good. Now what we can do is
just use to extrude and let's drop this down just a
little bit about that much. It does look a little
bit big, to be honest. I'm not going to lie.
This building, it's big. But perhaps what we need to do is to create some loop cuts. So let's create some loop cuts, and these will be our
floors, essentially. So that's not too bad. Let's create some additional
loop cuts along the sides. There we go. That
looks pretty good. Not to mention, let's
create some loop cuts. Well, one loop cut at
the bottom actually just just tap right And then we can move
this up and down. And let's keep it around the
same level as the tiles. As you can see this, what we can basically do is
select all of these faces. Now let's select these edges. There we go. Let's right click. And we want to extrude
faces along normal. And if I try to do that,
that doesn't look too good, does it? Not one bit. What we can do is
that we're going to have to do this manually. Let's go to top down view
After selecting those, and let's extrude it ourselves. Let's select these faces at the back as well, top down view. And we can extrude
those as well. The same thing with the faces on the right hand side,
top down view. And let's extrude that
once more. There we go. I do think that tends to
look somewhat better. So we do need a
door at the front. Actually, some more loop
cuts could be good. Right about there.
Let's go to face, select this face then. We can actually adjust this
in any given capacity, to be honest, we can
actually intrude face. And we can adjust, We can insert this as a door. We can extrude anything we want. Really, let's click on
this face right there. And let's duplicate,
Let's right click, and let's separate that face, and let's exit into object mode. And there we go, click on
that face right there. Now we can just adjust
in any way we'd like. Let's set the
origin to geometry, and let's scale this
along the X axles. And let's move it up
along the X axles. Let's duplicate
this. Let's scale it up a little bit more. That's looking better. Select that and insert. We're essentially creating
a door right there. We're essentially
creating a doorway. Let's scale this down
along the Y axles. That's looking good. Now we
can press X to delete face. Let's select all and let's exit actually within edit mode. We can now extrude, there we go. We can now ex, that's starting to look
better essentially, if you press Alt Z, that brings you into x ray
mode, very useful mode. This will be our very nice
click back on our building, and let's go into Tab in. And now we can actually
duplicate any of these panels, to be honest, when we can start creating our various flaws. If we duplicate this
panel, right click, and let's separate this, let's go back into x ray
mode. Click on that panel. X ray mode once again is Alt Z. That works really nice, really helpful most of the time. Now with this one, we can
actually scale this down. Before we scale it, let's
select Geometry for Origin, and then we can scale it down using and Z. Scale that down. Let's go to the front view, and that's during
our number pad. And let's scale that
along the axles. Let's move it along the axles. Let's scale along a little
bit more along the axles. Now, this will be our balcony. We can now move this
out just a little bit. Is looking pretty good so far. Now if we tab in,
we can actually select all with a and extrude. Like I said, this will
be little balcony. If we go to edge select, we can, yeah, just select both
edges right there. And now we can extrude
in any direction, but we are going to
extrude along the X axles. Let's select faces. If we go to top down view, now we can actually just insert these faces like that,
it's the same thing. Let's insert this face as well. This will be a Lt balcony, but obviously as you can see we're missing a
face right there. If we're go into x ray mode, that's what alt Z select two and let's select these edges right
there and let's fill, it's the same thing along
the right of the building. Let's select these
edges right there. And to fill a Z to
exit x ray mode. And there we go. That's
looking a little bit better. What we are missing, on the other hand,
is that balconies, they need to be a
little bit taller, Select all, and let's
scale this along. The Z axles, that's looking
a little bit better. Let's go back into X ray mode. And we need to fill
the bottom as well, because right now it's empty. Select those right
there as you can see, we can just fill, unfortunately, it
doesn't look the best we need to try
that once more. So once again, yeah, that doesn't work very well. Let's select all of
these bottom vertice edges that we can get our
hands on. Now let's fill. And there we go, that
works perfectly. Let's exit, and let's go
back out of x ray mode. That will be floor one. And let's duplicate
this right click, and let's Z to carry
this along words, just bring it up a
little bit to the top. Because of that, we might
need to expand this area. If we click one in
our number pad, we get all the
vertices and we can select all of these vertices right there, which
is really fun. And let's move this up
to move it upwards. There we go. That's
looking a lot better. Now, we can essentially
start creating a, a little bit more stuff
for our building, like our windows control R. One more vertice at
the top right there. This also means that
these edges right there, we can actually extrude and bring them out
just a little bit. Not too much, but
just a little bit. We can do the same with the
edges on the left side. We can bring out, let's select them once more, That's shift and right click to select those
ones on the left. And let's bring them out just
a little bit, essentially, It's just there to match the aesthetics of the
rest of the building. It's the same thing with
the ones at the back. Let's extrude that a little bit, and let's do the same with everything along the
right hand side. Let's extrude a little
bit more like that, and that tends to look good. Now we can essentially
begin creating our windows. We are already tapped
in, so that's brilliant. If we click on those
three faces we insert, that looks somewhat better, but I think we can do better. Let's insert once more, because we do want
this to look good, or perhaps we need to
insert one by one. Let's insert the left
hand side first. Let's insert the middle window, and let's insert the one
on the left as well. That looks pretty good. We can click number
two on our keypad, and we can go to select Shift
to select both of those. And we can actually just scale this down along the Y axles. Essentially, we can narrow this a little bit
more. There we go. Same thing with the panels
on the right hand side. Let's narrow them just a little
bit more with the faces. Let's go to number three.
Select all three faces, and then we can insert. But then you can obviously see there is a little bit
of a flow right there. Those bottom vertices, we
need to bring those down. Yeah, the bottom
vertices right here, we need to bring these bottom
vertices down to be safe. We'll bring all six of them
downwards. Now, there we go. That looks very much realistic. Let's go to number
three, face select, and now we can insert
this. That is way better. We can move it inwards even more if we'd like to be honest. It's a similar case
with these ones, but this might not be so easy. First, let's perhaps bring
this down a little bit. Let's tap in once more
into the building. And let's select number two. And let's bring these
upwards. There we go. And it's the same
thing with these ones. We can bring these
upwards as well. Now we can simply just
insert little by by little. If we click number three, we get a better view of
everything with these panels. Of course, we need to
do the same thing with these panels to scale them
down along the Y axis. Of course Y, to scale
them down along the X. Number three, select
all three faces and insert those faces. That looks more like a building. Remember to save your
document control. To save your document. I have a feeling would
be really nice if we created some windows along
the left hand side as well. Let's insert this face right there. Let's select number two. Let's move this one
downward just a little bit. And three for face select. And now we can insert
this one as well. And it's the same
thing with this panel, but instead it's the top that needs to be moved
up. There we go. This looks a bit like a mess, but we can always
fix these vertices after if we have any issues. Number three for face select, let's insert number two. And let's move this
vertice downwards a little bit number three and
let's insert right there. Control to save.
And there we go. That's look, that is
our first building. Some of this that we just use, we can actually re use a
lot of this obviously. We'd like to create more house. Same thing. Let's tap out. That's one building created.
3. Modelling Luxury Store: Let's tap out top down view. Let's right click right
next to that building. And let's add another
cube right there. Let's move this cube
down just a little bit. We can actually keep
some space in between. Yeah, I think some space in between would probably be nice. Let's move it upwards
a little bit, and let's scale it
down along X axles. And let's scale it down
along the Y axles as well. Let's move it outwards along
the axles. There we go. Yeah, let's move it
outwards just a little bit. That's looking much
better actually. Now we can actually just turn
this building into a house. Let's tap in and
let's select all. And let's probably scale
it down a little bit more. We don't want our house to be, to be too tall, we don't
want it to be too wide. Let's narrow it
along the Y axles a little bit. That's
about perfect. Let's move it down into
the ground once more. Actually, we can actually just keep it that just a little bit. I have a plan
because underneath, if we go into x ray mode, we can face select
the bottom face and we can then
extrude exit we go, that's looking pretty good
then this makes it easy for us to move the sides
out just a little bit. Give it that house feel and
extrude these sides out. Just had that same
principle that we used previously. Same principle. There we go. Now
select for select, let's select these two edges. Or actually we can create a
vertice in the middle first. Let's then select
these two vertices and bring them downwards. Yeah, that's looking a little bit better with
the entire house. We can actually select it all using a and bring it backwards. Face select and select
this front panel. Got a really fun idea
that we can try. Let's save our document. That's control. Let's
extrude this right there. That's looking good. Now
we can actually move this upwards and we can actually add some loop cuts
there if we'd like. But maybe not right now. We can actually leave it
like that for the time. If we insert the face
on the other hand, that allows us to do all stuff, but perhaps we need to
extrude these sides, but I'm not so sure if it
would look good that way. Anyway, what we do need
to do right now is to select that edge right there. Let's click one on
our number pad, and let's extrude
then we can extrude that edge that we can extrude
it however we'd like. But essentially
what we're creating is a little veranda right there. Let's select face select. That's starting to look good. Perhaps what we need there is perhaps a couple of windows. Let's add a loop
cut right there. If we do face select,
we can actually extrude and if we clip number
one in our number pad, we can actually select
this vertice right there. And we can then move
this down by person G, Z and move it downward. We can move it in any direction
we'd like to be honest, but we just want to get
it leveled a little bit. Face select. And now we can actually insert this
face right there, but I think perhaps a window should perhaps be a
little bit higher. Let's select number
one in our number pad, and let's move this
vertice upwards. In fact, let's move both
vertices upwards a little bit. Let's face select and let's
move this upwards as well. And that will be window, that is our window
of opportunity. And we're just moving
up the rest of these vertices so it makes it easier for us to create
windows face select. And now you can insert
this right there. That can be a little window. We can move it in
however much we'd like. On the right hand
side we actually, on the left hand side we
can insert this as well. We can scale this
along the X axles. Actually, let's move this to the left hand side
of the building, and let's insert this
a little bit more. That's like a door or a secondary window.
Let's save this. Once we out, we get the blueprint of what we're trying to create at the front. We do need a door stab in, we need a door and
possibly a window. What we need is to separate
this panel tab in. There we go. Let's add just one. Do cut actually, right there, face select on the
left hand side. This will be where
our doors and scale this up along the Z axles and move this towards the left hand side a little
bit more and insert. Yeah, I think that would
look a little bit better. Now on this side, we would
like to create a window, another window of
opportunity edge select to bring this edge along to
the left hand side Y, and we can carry it down, it matches everything else. That looks good. Same
thing for this window Y. Bring this one down, one
on the right hand side, Y. And bring it towards
the right hand side. There we have a
window right there. Another window of opportunity. There we go. That's
looking pretty good. Actually, let's exit now. Right there, we
do need to create a couple of panels, I think. Yeah, right there. What we'd
like to create is a Shift A, We'll create a circle. Let's scale this circle down. Let's move it down Z
to move it down into the ground Alt Z to
get our favor tool, one of our favor tool which
is X ray mode, tab in. Now we can fill that space
or we can just extrude. If we extrude, we can
extrude the Z axles. Now if we exit x ray mode,
that's what it looks like. Now we can move this along just to make sure it doesn't
protrude into the roof. Select all. Let's move it
down just a little bit. It looks a little bit skinnier. That looks pretty good. Now you can exit and we can
duplicate this. There we go, Right click Y to bring this along
the right hand side. That Ladies and gents is perfection on the
top of the roof. I think it'll be nice
to have a chimney, possibly a chimney
right there on the left hand side shift right click to add our cursor
shift A to add a cube. Let's scale this cube downwards. Let's tab in. There we go. We tab in face select
to select the top. Let's extrude this outwards. And let's extrude it outwards. Once again, Alt to select
the edge right there. There we go Now, right click. We can now extrude
along normals. There we go. That
looks much better. Now with the face right there, we can insert and we can extrude downwards. That
looks pretty good. Let's tap out into object
mode and we would like to add possibly a couple of pipes for the chimney,
like a cylinder. Let's scale this
cylinder downwards now. We can actually scale
it up along the Zx. Move it up along the z axis and probably just scale it
down a little bit more. Move this downwards
along the X duplicate, right click, and
move it upwards. And we don't want that, we don't want it to be cutting
into our building. We definitely don't want that. If you wanted to add
more details quickly, we can insert and
extrude downwards. It's the same thing
with the one on the right hand side face. Select Insert to
extrude downwards. Right there, we have a chimney. Don't forget to
save your document, of course. Yes, Most definite. Always remember to save your
document that is essential, cannot stress that enough. Now, with this house,
we can actually just select everything
on this house, including the pillars, the front right there,
everything right there. And we can actually just duplicate and move
this downwards. Now in between this house, we can have a store. Actually. Yeah,
like a store now, everything is mostly low poly. We create another cube, and we scale it
down a little bit and move it upwards
out of the ground. And we move it forward
just a little bit. Now if we select
everything on this house, we want it to look a
little bit different. Select the chimney, we can actually change this house to look a little bit
different if we'd like. We can actually
scale it upwards. Scale it downwards, but I think probably scale it
inwards a little bit. Move it forward just that much. And move it downwards as well. Yes, That right there, that can be like an alleyway. Now with this
building over here. I'm really fascinated with
this one because we can tab in Select
Select, right there. And we can actually move
this upwards even more. We can actually do anything we want with this
edge right there. We can actually be
it almost anything. That's actually a
really funny shape, but what I was thinking
was to extrude this, and we could extrude along the X axles, that
looks pretty good. We can possibly add another
cube. Yes, I think so. Let's add another cube, and let's move this cube right
there onto our new house. Let's scale this cube down so it fits. Let's move it along. Scale it down a little bit more. It fits, and that, that
looks pretty decent. Let's move it upwards. Let's scale it
along the X axles. There we go. Scale it
along these axles as well. And move it upwards. And then of course,
move it forward. Now if we tap into our house, we click three for face select and we can
actually extrude this. So it looks better. There we go. That looks
better in my opinion. And of course we still
have our chimney. That's, that counts a lot. Now, with this right there, we can create a couple
of additional rooms. If we tab in, we can actually create a couple of
loop cuts, I believe. Yeah, possibly one loop cut. And we can now
scale this inwards, scale it along the x.
Same thing with this one. Scale it downwards, and now scale it along the axes as well. I don't want these
to be too big, of course, that's the one thing. We can probably just
keep that as a window. This one. We can probably split this one into two windows. If we add another
loop cut right there. Actually, I believe two
loop cuts should be good. Let's scale these loop
cuts on the Y axles. Let's click on number pad three. And we can insert this face right about there. There we go. That looks pretty good. I'm thinking this window, wondering if it's too wide, if that just ruins the entire
design because there's perhaps not enough space
using edge select, let's select these
edges and let's fill. Now if that's a fill design and there is simply simply nothing, no window, I don't know, that. Perhaps looks a little bit better because it's more subtle. Now with this building there, first building, I would like
to move this downwards. I'd like to move this downwards
so it looks what we can actually do is
completely make it flat. You can give it a shot.
Certainly face select. Let's insert these
faces and then we can extrude and
bring this downwards. Now with the chimney, we can also bring the
chimney downwards. Fantastic, let's
move this chimney perhaps forward just a little bit to make it even more crazy, As a design on some
of these buildings, we can actually
put a door on top. So if we add a cube
to our apartment, we can put a cube right there. We can scale this up
along the Z axles. We can scale it up
in size as well. And move it upwards. Not too big of course, but perhaps like that. Let's go to the top.
Insert. Let's extrude this. It's the same thing. This can be a little do, but perhaps we need to extrude
just a little bit more. I think so, yes, two under number pad. And move this downwards
just a little bit. And select face
select once more. And there we go, we have a little door. Now if that design
doesn't work very well, we can always change
it and delete it. Now over here we can
actually add a car park. That's what's been on my
mind for quite some time. A car park, what we
need to do is to select our tile and
reduce these numbers, because we would like to
add a car park right there. Let's duplicate
this. Let's, let's move it upward once again
after click and right click. And let's reduce this
to a single one. In fact, we can get rid of a ray modifier right
now from top down view, we can move it upwards
just a little bit more. This will be like a car
park, like a platform. It's a similar thing, obviously, we need to scale this bat down. If we scale this down along
the axles, there we go. We can then bring it
downwards just a little bit. Scale it along the wax, little bit more, and a bit more. Now with this, once again, we can duplicate and we can just y to move this
upwards around there. And once again, scale
this down along the waxes and move it inwards. Of course, now because
this is a platform, we need to tap into
this platform. And we need to add
some loop cuts, possibly, I'm thinking two
loop cuts right there. Move this there, and then scale it down
along the Y axles. This will be our entrance Now, because we've got some
loop cuts right there, we should be able to create
a couple more loop cuts, right click and scale these loop cuts along
the Y axles as well. Now with this right there, with this edge select selected, we can move this up and down. We can do whatever we want. We can actually move this
downwards into the ground. And it looks a little
bit more like it should, but we don't want it to be
affected at the back, do we? So this gets even
more interesting because what we then need
to do is add another loop, cut right there, right click, and move it up the
X axles, that's X. To move it up the X axles, this should fix the problem. Now if we select this edge
at the front, once again, we should be able to
move it up and down without everything
being affected. Now we can save, and I'm thinking that should
look good, right. Next up we've got to design this building and make it look a little bit better, because right now
it's just a cube. We want to keep this design
minimalistic, quite simple. I think this will really
look good towards the end. The overall design will
really look towards the end. That will be a car
park along the right. I will try to model a couple
of low poly vehicles. To be honest, that's probably
not going to go so well. That should be exciting because I'll make a ton of mistakes and then we can find a way
to fix those mistakes. I think with this
building actually, this can be really simplistic with
everything selected A to select everything, we can then figure out if
we want this building to be taller or if we want this
building to be smaller. I think we're going with a smaller
building, to be honest. If we select one,
then we can get vertices up and G and
Z to bring this down. Essentially, I'm mixing up my
words today, to be honest. I'm making some poor
mistakes, unfortunately. But we'll get there. We don't want this building
to be too short, of course, but don't want it to
be too tall either. We want it to be
quite similar to the building on the
left hand side. I think that's
looking pretty good. Yeah, I think that looks pretty good in terms of height crazy, but not too crazy. I know we can experiment, we canbzzle the edges, we can turn it into an
Apple store for all I care. That's actually not a bad idea. Turn this into an Apple Store. Yeah, that's surprisingly not the worst
idea I've had today. I've worst, trust me. Let's move this up
a little bit more. Let's insert this and now
let's extrude a little bit. Yeah. Apple store,
why the hell not? What do Apple stores have? Well, they have tables, right? They've got tables
with Mac books. So this will be
very interesting. Before we design all of that, let's separate this
front panel right there. Let's separate it, and
let's hide it because this is inside of our Apple store. We just improvises that. Yeah, not bad. Let's tap in once more. We would like the floor
of this design and we would like to extrude
probably a little bit. Let's select
everything and let's move it upwards a little bit. And then we can bring this one downwards
a little bit more. Once again, let's
select everything, and let's bring it
upwards a little bit. What kind of Apple Store is
this? That's my question. Now, with this front
panel right there, we can actually, we can bring
this forward if we'd like. It's going to be a very
interesting Apple Store. Let's tap out edit mode. Shift right click
using our cursor. Let's add, I think, a plane right there. What do we have in Apple stores? Well, usually we have, we've got tables and then we've got areas on the left hand, right hand side with
additional computers. Let's design that first. Let's move this
upwards a little bit. Let's move it towards
the left hand side, and let's scale
this along the X. Let's move it along the
X axles, of course. Let's scale it along the
x axis a little bit more. Let's tap in with
everything selected. We can now extrude this. There we go. That'll be our
first table right there. We've made our first mistake. There we go. It's already Protrudin select and we
can embezzle this as well. There we go. It
doesn't look so good. But story for another day, it's probably a good idea if we find out what Apple
stores look like. Because I can remember some
parts of Apple stores, maybe not everything, but I
can remember lots of metal. Yeah, think lots of metal
for an Apple store. And a big glass, a huge glass at the front of almost any
and every Apple store. We've got this right there,
we can actually exit. And we do need some legs, right? Let's add a cube. And let's scale this cube down, because that's way too big. Then we can scale it up
along the z axes we go. Let's move it upwards
out of the ground. Let's continue to scale
this a little bit more. Let's move this along
the X on the X. Let's duplicate this and move it downwards along
along the X axles. Once again, those will be our legs. So what
do we need now? We need another plane, shift a, create another plane,
scale this down. Move it into the center
of the Apple store. There we go, Yeah, we're going to want
to move it up where it's basically along the same, same height as our current one. I think this can actually be
moved up a little bit more. Same thing with these legs. We can actually
move these legs up. Well, we can actually scale
them up a little bit more. Scale them a little bit
more. That's looking better. Let's move this upwards
just a little bit, don't want it to be too high. Let's scale this along
the z axis as well, or should we do
it the other way? Should we scale
along the Y axis, creating a T within
an Apple store? I'm not sure if that
will work very well. Scale it along the
X axles, I believe. Yeah, let's try that. Let's move this inwards into
our store. And let's tap in. And now we can actually extrude now with these legs,
this will be quite fun. We can move this around
just a little bit more. Shift y and y to move it
downwards a little bit, and X to move it inward
just a little bit more. Obviously it's protruding. We know we need to raise our desk just a little
bit. There we go. Now this gives us a good chance
to add an array modifier, or perhaps a mirror modifier. Let's select this
table right there. There we go. It's mirrored
on the opposite end. And let's shift D to
duplicate this and Y to move it along the
opposite side. Not bad. There we go. Not bad at
all for an Apple store, I think now for the
top of the building, we can actually bring this downwards in
some Apple stores. You see that there's like a protruded panel that's
very metallic right there. If we separate this,
we can actually, we can use it later,
can see how that goes, and that will be
our glass panel. Obviously, building design
has changed a little bit. We need to scale this upwards just a little bit. I
think that could work. Tabin A to select all control R to add some
loop cuts, I believe. Let's add another
loop cut right there. And let's move this upwards. We can add more loop
cuts there and there. But I don't think
it's absolutely necessary to be honest
with this selected. We can insert and
that will be our Now, because it's an apple apple, they work quite differently. Let's separate now. We've got our door,
and we can now rotate this to make it seem like
an actual Apple store. We can actually rotate this
store along the axles. That's our basic design
of an Apple store. But you can see that the roof, it's inserted too much. If we duplicate this, we can then bring an extra
layer upwards. And perhaps bring it
upwards a little bit more. And I think that looks a little
bit better. There we go. Let's save this. Always
remember to save your file.
4. Design The City Objects: Okay ladies and Ents, let's make ourselves an ATM. I think an ATM is quite essential for a city we
would like to work on. Atm. I think our ATM will be just between
this right here, so I think it will
look pretty good. Shift right click and
let's add a cube. We add a cube right
there and we just got to scale this down
just a little bit. Let's scale it
upwards, that's S Z. And we can scale it upwards, and let's move it along
upwards, That's Z. To move it along now we can
actually increase the size, make it a little bit
bigger if we'd like. And increase the height as well. Move it along the y
axis, right about there. We can actually scale it up on the y axis if we'd like,
just around there. That looks pretty good. Now we can tap in
into this design and start adding our loop cuts. Let's add a loop cut just around here,
just at the bottom. And another loop cut
just around there. And let's add another loop
cut just around there. Let's add a couple of
loop cuts at the top. We can add one right there
and another one at the top. With these loop cuts,
we can now adjust the design and make it look a little bit
more like an ATM. First, we can move this
design in and out. We can actually put this in like that with the two ones at
the top. We can do the same. I'm using X to
move this inwards. And it's the same
thing with this on X. Move it inwards just a little bit, not too much, of course. Let's click on number three. And let's select the
faces right here. Alt select. We would like to select a group of faces
right there, There we go. And right click and extrude
faces along normal. Then we can extrude out, and you can see those faces
are extruded along normals. In fact, let's separate
this, let's click on this, like that and tab in,
let's select all, use a right click. Extrude along Normals. And there we go. We can extrude all of that along normals. Let's click the
machine once more. We will use the front
face to just insert the design Z to shape it down Z to move it
upwards just a little bit. Let's protrude it
just a little bit. Now let's go back
to face select. And we would like to
insert right around there. And insert this design there, face select on this
face right here. In fact, let's select the
entire thing once again. And we would possibly like
to scale this bat down so it looks a bit more like a square
with the face selected. We can now insert this
and we can, there we go. That tends to look pretty good. What about the card reader? Am I right? Let's
create some loop cuts. Let's duplicate
this right there. And let's reduce the
size along the x. Let's move it along the wax. This will be reader. We can add a loop cut right there with the face
selected. We can scale this. Let's scale a bit more
downwards on the, along the y axes. And let's insert that
is our card reader. So let's go back
into object mode. Click on this that we've messed up and we can scale this down on the wiaxes. Just
a bit like that. That way it looks fantastic. Let's save our design. That looks excellent.
That looks pretty good. I'm quite happy
with that design. Now what I'd like to work on is our telephone pole, one
of these right here, we can actually
duplicate right click and then we can move
this along to the back. If we go to top down view, we can actually move this
to the back person G, X, moving it to the back. Then we can actually
just scale this upwards. And let's scale it upwards
a little bit more. And let's move it
into the ground. There we go. That
looks pretty good. Now let's tap into this design. And let's select Select. And let's fill this right there. Let's tap out with
this same design, we can actually duplicate
it. Right click. Move this design upwards, Z. Let's click right click. And set geometry origin to geometry. And let's rotate this along
the Y axis, 90 degrees. Now we can actually move
this design downwards. There we go. And we can scale this
down along the X axles. Move it up just a little
bit, possibly around there. Scale it down and scale it along the axles a
little bit more. Scale it down and scale it along the X Ax a
little bit more. And duplicate and move it
upwards a little bit more. Let's select all of this, and let's duplicate and move
it down along the axles. And we can actually
duplicate once more and move it upwards along the axles. There we go, just
towards the edge, this one in the middle, we can actually move it upwards
just a little bit. So it looks a little bit better. I don't think we need
to have too much. I think that, that
can look pretty good. Now with these
selected, obviously these are our telephone lines. So we need to add some wire. Let's shift A and
let's go to curve. And we can add quite a
few different wires, such as path, there we
go, we've got a path. We can now rotate this path
along the Z axles 90 degrees. And if we click through
on our number pad, we can get the side view
and we can actually move this downwards and
put it in between. There we go, that's
looking somewhat better. Let's scale this along
along the Y axles. Click through on our number pad, and now we can tab in and
we can now adjust these. There we go, Telephone wise, they do hang a little bit. We want to bring this downwards
just a bit like that. And then the one in the center, we want to select that
vertice and bring it downwards as well,
just like that. If we exit back
into object mode, it looks a bit like that. Naturally, it's a bit
protruded on the site. What we can do is scale
this down along the y axis. Scale it down a little bit. Now from the top view, we can actually duplicate this. We can shift this
towards the X and shift it once again towards the X and select both of these. Duplicate them, and
shift them along the X Axos once more. There we go, If you'd like, you can actually bring a
bit more detail to this. And we can actually add just a low poly box to
the telephone wire. We can actually add a
box just around there. Let's move it across the wax just around there and scale
it down. There we go. If we tap in, actually we
can go to select and we can embezzle these edges just to
give it that low poly look. We're selecting all of
the telephone wires. Just select them like
that. And we can now duplicate it and move
it along the Wix. Same thing really, but this because they're
a bit longer apart. We need to scale it a bit
more along the axles. There we go, and that
looks a little bit better. Save our document. Now, on each telephone wire, we would like to add
some more details. Just some low poly details. Let's add a circle. Let's
see what we can create. Let's scale this circle down. Let's scale it down
just a bit more. Let's tap in, Let's fill, let's ex, let's
move this outwards. Let's, let's move it outwards. And there we go. Let's extrude,
let's bring it inwards. Let's extrude, there we go. That looks a bit better,
very simplistic, but looks a bit better,
very low polish. Duplicate this and move it along the X axles. Right click. And now we can move it X, we can move it along,
select both of them. Duplicate, and we can
move them along as well. Nice and simplistic.
There we go. Select all four of them. Now we are going to duplicate them and
do the same things, or duplicate and why. And let's move them
upwards to the center. And right click, there we go. It's the same thing with the
end Duplicate once again, and move this towards the one at the topmost
corner. There we go. How does that look?
That looks pretty good. Let's save our document. Now what we'd like to do is just to duplicate
these once again, and move them along the
Yaxiles right there. With that, we can now
duplicate this box right here. And bring it along the axis. And now we can take this box downwards
and we can actually create almost like an
electrical box unit like that. Let's scale this
down a little bit. Now the question is, can we
create low poly vehicles? Now, before we try to
create low poly vehicles, perhaps we should try to create some trees.
Here's what we'll do. We'll take one of
these telephone poles, duplicate it, and press X. Bring it across on the right
hand side and right click. Then we can scale this
down along the Z axles, because this will be
part of our trees now, because I want my trees
to be quite simplistic, let's scale this
down a little bit. And let's right click, shift, right click, and add
our cursor right there. Let's add for our first
tree right there. What we'll add is a circle. Let's add a UV spear. There we go, fry UV spare. We can actually keep
the segments around 34. Click on it and now
we can actually just shades move so that
looks pretty good. We can now scale this downwards and move it upwards
just a little bit. Save this document now
let's go to top Down View. Let's right click just a
clear surface like that. And let's add a plane. Let's scale this plane down. That's looking pretty good. Let's scale this plane along the Y axles just around there. Let's tab in. Let's click
number one in our keypad. Let's add a loop cut in
between and with the top one. Let's move this one upwards. Based on everything that we add, we can actually
click control two. We can go to a modifiers, tap and add a subdivision
surface modifier. And let's increase it by two. There we go, with these
vertices right there. We can actually move
these downwards and we can add some loop cuts. Now from a face down, we can add some loop cuts
right around there. Loop cut in the middle. Let's click on this
vertice right there. And let's move it
along. Let's make sure it's a little bit straight. Doesn't have to be
super straight, but a little bit straight. We can actually
widen these as well. And. An X and we can actually
widen it like that. Let's add another loop cut just around there with
the vertice inside. We can actually move this
vertice down just a little bit. Click on number three
on our number pad. Select all with face select. We can select everything
if you would like. If you click number three,
we get a corner view. Click one in our keypad. Let's go into x ray mode. We can now affect the shape. We can now bring these
down along the axles. Same with these ones. We
can bring them downwards. It's the same with these. We can also bring
these downwards. Same thing with
the back vertices. We can bring this like that. Now if we select all
faces, we can extrude. If we extrude, that actually
start to look pretty good. Now with our design, we
can actually shade smooth. That looks pretty good. Let's go to our magnifier
tool at the top, and let's click faces. Align rotation to object. Let's, let's move this
up like that towards our object and now project individual
elements. There we go. And let's move it around. There we go. That's pretty nice. That will be like
one of our trees. Now we can actually duplicate this design and move it around. Keep duplicating this design. Obviously, we do want to look a little bit, a
little bit random. We can continue to duplicate our design all the way around. Let's continue to
duplicate our design. Put some on top as well. We duplicate and design all
the way around, essentially. But you can make it as random
as you'd like it to be. There we go, Continue
to duplicate. Continue to duplicate. Now that we've got
everything done, that's looking pretty lovely, if the leaves are not fully
attached to your object, what you can actually
do is you can actually scale up the tree itself so
it looks a little bit better. If it's not really
as you'd like, you can always scale it
up just a little bit. You can always shift it
around just a little bit more if you're not getting that
look that you'd really like. Now we can quickly create some
bigger trees if we'd like, click the ball itself and the pole and we
can duplicate that. Carry it down on the axis. What we've done is merged those two and then we can carry it, then we can
essentially duplicate this and we can
essentially carry it down on the wax if we can
actually increase the size, or we can always reduce the
size, whichever one we like. But then essentially,
if we take one of these and we duplicate it, we can bring it
across and we can do the same thing we did
with the first one. Once again, just start
duplicating as many as possible. Of course, you can rotate
as well and continue to duplicate as
many as possible. And continue to duplicate
as many as possible. And continue to duplicate
on the other side if you'd like until you're pleased
with your design. Now of course, we can just scale the design up to
match everything we like. If some of them
do not look nice, then you can obviously
just press X to delete the ones that you don't really want to keep that so far. Looking good so far with
the one at the back, we can create an additional one. Bring it down to the
corner. And same thing. We can duplicate and
add some shapes to it. This one can be big as well, and we can just duplicate
as many shapes as we like. Continue to duplicate
as many as possible. There we go. Nicely done. Now, obviously we
can scale this up a little bit to match what we like for the parts
that we don't really like. We can always get rid of these parts that
we don't really like. But majority looks
good so far, I'd say.
5. Design The Cars: That's majoritly done.
The next thing is that, can we create a car? Let's go down here
towards the end, and let's try to create
a really simplistic car. We are an object mode, let's shift a, and
let's add a cube. Our cube is in the wrong place. Let's move it up, G, Y, move towards the right. Move it up towards the top. And let's scale this
design downwards. Let's bring it
closer to the floor, and let's scale it
along the Y axles. This is what we hope
to turn into some car. It needs to be a
little bit wide, so let's scale it along the X axles like that,
and let's tap in. Let's add possibly a
couple of loop cuts, maybe let's save our documents control to save our document. Now let's select everything
in the middle right there, and scale it along the
X axles like that. Let's exit x ray mode. Let's go to face select, and let's scale this down, and let's move this upwards. At this phase selected. We can now extrude. That's not looking the
best, to be honest. Let's try once more. Shift right click, Add
our cursor right there. Let's add a cube.
Let's scale this down. Let's scale it along,
along the y axis. Let's move it upwards.
Very important. Don't forget to turn off
your magnifying tool. You've got to turn that off. We got our magnifying tool off. I think that was creating
some issues for us. Let's scale this
along, the X axles. Let's tap in, and let's add a couple of loop
cuts right there, and let's scale this up. And something really important, I actually forgot to
turn on my UR tool, which is basically, it will show you the shortcuts, my keys. That's quite essential actually. That is really important
that you can see my keys. So let's go to face select. Let's of our vehicle
and let's extend it. Now with this face selected, we can actually move
this downwards. But in order to
move it downwards, we need an additional loop, cut right around there. Let's select the face once more, three for face select, and let's move it
downwards. There we go. This will hopefully
be a windscreen. Let's move that forward. Let's bezzle the top,
so it looks a little bit better. Let's
bezzle the front. So the front also looks
a little bit better. Let's not embezzle anything yet. As for this panel on
the right right click. And we can actually insert, and then we can scale this along the Z axles and move it
upwards along the Z axis. Possibly carry all of this down towards the
front of the vehicle. Now we can work on the
back of the vehicle. Let's extend it
just a little bit and let's add an
additional loop. Cut right around there. With this edge at the back,
we can bring it down. And then face select once again and we can carry this outwards. Bring the back down.
Just trying the same. The front we really wanted
to look somewhat equal, I'd say that looks
just about good. Let's extend the back. Probably not that much
because we do want to keep it looking cartoony,
I would say. Now, as for the back
glass, let's extend. Let's intrude a little bit. Let's insert this one and
the one at the front. Let's insert and
extrude inwards. I guess on the side, we need
the same thing to occur. Let's scale this down. Same principles that we've
been using thus far. And let's move it
upwards with this one. We want to push this one in
as well because that will be our glass for the vehicle, I do believe select
the entire vehicle. And let's move it
upwards off the ground. And let's move it
forward, of course, so we can see it clearly. Let's move it forward a
little bit more. There we go. I believe we can add some
loop cuts around there. Now we can perhaps carry this
one upwards a little bit. Let's add a couple of loop cuts within the middle
of the vehicle. There we go, and let's
scale this along the X axles towards
the edge. There we go. Looks pretty good,
obviously We've got these loop cuts at the
front of the vehicle. Let's click number one
to get our vertices. And let's move this vertices towards the front, just
a little bit more. And the back one towards
the front as well. Now we can move this
upwards a little bit. We can scale this along
the Y axles again. Now, at the back of the vehicle, I would like to bring it forward just a little
bit, just like that. And possibly with the front
of the vehicle as well. Let's select those vertices,
and let's bring it forward. And with the top of the
vehicle, same thing. Let's select those vertices, and let's bring it upwards. We want to create
a cartoon vehicle, a friendly cartoon
shape vehicle. Let's click number three
on a number pad and we can go to Knife tool. We can cut out the edges
right around there. Let's move the back in front of the vehicle downwards
a little bit, just to keep that core. Just to keep that core cartoon friendly look the
front of the vehicle, we can select all the vertices. Carry it down just a little bit. It's the same at the
back of the vehicle. Select those vertices and carry it down just a little bit. If we select face select, we can actually separate
this face, face select, we can actually separate
this face as well, and face select separate this face as well
with this face. It needs to be adjusted a
little bit with the vertice, towards the second vertice. Let's adjust it towards the
right and the other one, let's adjust it towards
the right as well. Now we can go to three select, face select, and
separate as well. Those are all separated. Now I do believe we can adjust those parts a
little bit better. If we tab we can, we can actually add
multiple more loop cuts to this edge right there. What we can do is that
with the vertices, we can move these upwards
little by little. There we go. Move these
upwards just a bit more. Obviously, I want to
keep that cartoon vibe. Imperfection is
good in this case. Let's select the
one at the back, and it's the same thing. Imperfection is a good thing. In fact, I'd argue, let's
undo what we just did. Let's click control Z. Let's undo what we just did. Let's just keep it
just like that. Literally an old fashioned
low poly vehicle. That's what we want. Let's go into object mode. Select the one at the
back. Same thing. Let's add some loop cuts
right there with these two. With the loop cut select fourth. Those loop cuts right there. Then we can move this upwards and we can keep
that, just like that. That obviously looks about
right. Let's save this. We're going to do this with
the rest of the vehicle. Let's continue at the
rear of the vehicle. It's the same thing into edit mode and let's
get our vertices. Let's select four
of five vertices, and let's select three of
those vertices and let's move that upwards with the one at the front
is the same thing. Tab in into edit mode. Let's get some vertices with
those innermost vertices. We're going to move
that upwards as well. There we go. That is perfect. Now if we click on
the Vehclan tap in, we get these vertices
right there. If we tap in, we can actually add some additional loop cuts. If we add some additional
loop cuts at the front right there
with these vertices, we can now adjust these
vertices inwards, so it looks a little bit
better for our vehicle. There we go. Both sides should
look better. There we go. Now at the rear of the vehicle, it's essentially the same thing, just lots of vertices
right about there. Let's get this inwards first. Let's scale it along
the wYxles a bit more. Let's move them
inwards, that's x. And let's move them inwards right around there. That's
a little bit too much. Let's do it once more and
that's about perfect. Now we can actually create some basic wheels
for our vehicle. Let's start with the front
wheels, shift right click, and let's add the
possibly a Taurus. Let's rotate this
along the y axes, 90 degrees, and let's
bring this downwards. Essentially, it looks like a donut, really weird doughnut. Now we can actually scale this. There we go, That's
looking dope. I won't lie, that's awesome. If we tab in, there we go. We can take this do anything
we'd like from the edge. Once again from number
three on our number pad. Press Alt to select this circle, this innermost
circle right there. We can probably do the same
thing with the other side. We can press, to select
this circle, I'd say shift. Let's do that. That's control Z. Let's do that.
Let's try it again. Shift Alt, there we go. And the question is,
can we now fill it? Yes, we can. We can
fill that face now. We can extrude now
we can insert, or we can extrude a bit more. We can actually extrude this and then we can
possibly scale it down. That is nice, that is very nice. And extrude once more
and scale it down. There we go.
Something like that. I just improvise, but I'd
like to select the faces, I would say these
faces, these edges. And now press Shift to
select all of these edges. There we go, with
everything selected, Click and separate. Separate everything
that looks good. Now the inner vertice, this one in the
middle right there, we can also separate this, that's separated to
select everything. Basically everything
is selected. Actually, what we'd
like to do is to shade smooth this
first. There we go. Shad smooth is complete. Now we can select
everything once again, and we can duplicate this and press Y to
bring it downwards. And let's right click. And we can probably
scale this downwards. Now it does look
a little bit big, but what we can do is adjust the vehicle to suit to
look a little bit better. But obviously we need wheels
on the other side as well. Duplicate, and let's bring
this across on the X axles. And let's rotate on
Z one, 80 degrees. There we go. And let's
move it up Duplicate, and move it upwards once again. There we go. That's
looking good. Now let's save this. Let's
tap in into this right there. Edit this to look
somewhat better. Actually, before we do that, we can actually just tap into the car and we can start bezzling these
edges if we'd like. We can bezzle this like that. We can select the edges,
the loop of the edges. We can select
everything like that. Now what I'd like to do is
just to select these wheels, the rear of the vehicle.
Let's try to edit this. I do believe we'll probably
have to bring the vehicle, we've probably got to extend
the vehicle once again. Let's tab in. Let's
go to the vertices. Let's select all of the
vertices at the back. And now we can actually extend
the design of the vehicle. First, let's move it backwards a little bit on the Wyaxalsow. Let's extend it once
again on the Wyaxalsow. That's looking
better. Now let's tab out with these two selected. Let's select these
two right there. And we essentially want
to do the same thing. We want to extend this first. Let's select origin to geometry, and let's extend this along
the Y axles a little bit. And let's move it downwards. Let's try to make sure
that it does fit. Let's move it backwards
just a little bit, and I think that looks good. Let's select the rare tires.
Same thing with these ones. Let's select the rear tires. We would like to move these
rare tires backwards, and then we'd like to move
them downwards as well. Let's make sure that they're
sitting on the ground. It's the same thing with
these front tires as well. We would like these front tires to be sitting on the ground. Same thing with the
other side as well. Let's move these front
tires downwards. And actually we
don't want it to be cutting into the
tires that much. Let's tap in. Let's go to
select, and let's select all. Let's try to move these three vertices
upwards a little bit. Let's select these
vertices once again. And now I do believe that
looks somewhat better. I do believe we can do that
with the rear as well. Let's select the rear. Let's
move these vertices upwards, two vertices upwards again. And let's select these
vertices we can insert, we can move it downwards. We can just adjust these
two bottom vertices and move them upwards. Everything looks good,
everything matches. There we go, That's looking
a little bit better. With the front ones, we
should probably do the same. Let's delete these vertices
first, delete vertices. Let's click these two
vertices at the bottom. And let's extrude
inwards at a bit. Too much, I do believe. Okay, that's pretty good. Let's select them. There we go. Let's first match
these vertices along. There we go. Let's
match them all around. And I'm just filling, I'm just pressing to fill these vertices. Then we can, we can move these downwards
probably a bit too much. Let's select the bottom ones and let's adjust them as well. And the ones in
the middle, let's adjust those as well.
That looks good. Let's save that exit. That Ladies and Gents
is our low poly car. That's just a basic design, but that's the general
idea of our low poly car. Now you can see everything it
needs to sit on the ground. All right, it's going to into x ray mode,
select everything. And let's move it
along the ground. And let's move it towards the right hand side of
the road. There we go. Now for a top down view, we can also duplicate
this vehicle. We can move it into
the parking lot. We can actually rotate it
quite easily like that. Let's move our car. Let's
move this one backwards. We can actually make one
of these cars as if it's going into the parking
lot. We can do that. Put that one up into
the parking lot, then we can have another
one on the right side. Let's rotate that as well. It looks like the cars are essentially parked
along the building. We can scale this one down
if we'd like as well. With these, it's the same thing. We can adjust this a little bit, essentially looks a
little bit better. We can scale this
car down as well. With that same car,
we can now duplicate, bring this car outwards and
rotate this car like this. And essentially it'll be driving in the opposite direction. Let's scale it up
a little bit more. Let's put this car around there, so is everything on the ground. So those ones are
underground? Yes, indeed. So, how does that look
for a little city? So that's our little city, now it's time for
us to color it in.
6. Add Material: Next step is coloring our city, so this will be
quite interesting. So let's open up a secondary
window in blender. And this will be our, our render, our full render. This will be basically our
camera view for the cam. Let's see what camera works. This is the four to three. This doesn't work the
best in my favor. Let's try the ground plane
and let's try true, true. And game cam tend
to look the best. To be honest, it's
either going to be true Cam or game Cam. I think they both look good, but I probably probably
want to go with game O cam. Okay, so let's delete true. So cam just press
in X and delete. Now we've got Game O cam. Now we can actually adjust
this in any way we'd like. If we go to the camera
on the right side, we will essentially
be able to adjust this as much as we'd like in our camera
setting on the right. We can just adjust our
camera as much as we'd like. I'm just adjusting the y scaling and the x scaling as well. And basically trying
to get this to be centered as much as possible.
That's looking better. On the right hand side, we need to create a new plane, actually a new plane
for our design. Let's create a plane. Shift a, and let's create a plane. And we would like to
scale this up on 15. And we can scale it a bit more, as long as it's not within our camera view,
then that's great. That's the, this is the back
of the vehicle for one, but let's add a couple more
details that would be really fantastic for one rear
lighting for our vehicles. Let's add a cube. And let's
scale this cube down. Let's scale it
along the X axles. Let's reduce the size
along the axles. And let's duplicate
and bring it across on the axles to the opposite side. Now we can do the same
with the opposite car. Duplicate these, carry
along the X axles. And we're going to need
to bring it backwards. Right now, it just
looks like two bricks. But yeah, let's
carry it backwards down there and
forwards a little bit. So it protrudes out of our vehicle and probably
bring it down a little bit. Yeah, that's good. Let's save our document. Let's duplicate, and let's
bring this towards the back. Let's add this to
our vehicle that is entering the parking
lot. Let's rotate this. Let's bring this
down on the Axos, And let's bring it
across on the Yaxos. Let's scale it
down on the Yaxos. Let's bring it down
on the Axos as well. Now we would like to
render our application, and of course we are going
to render it in cycles. Of course, we're using
our GPU compute we would like to Noise and our
final render will probably be around
7,000 to be honest. We want this to be quite crisp. One thing that I almost forgot was to put some
markings in the road. Let's click right there. Let's add a planes. That's pretty good right
there. Let's scale it down. Let's scale this along, I think along the Y axles. Scale it down a little bit more on the X axles. There we go. Now we can just add an
array of these along. But before we do that,
let's just duplicate, duplicate, add this over there. The one in the middle is the
one that we would like to. We're going to add an
array in our modifier. Let's go to array.
Let's edit our array. Set the factor x to zero. Let's set the distance apart to 1.2 Let's increase the counts. 11 counts seems to be perfect, and I think it's a
little bit too skinny. Let's just scale this
along the x axles now. Additionally, we
want to click in into edit mode and we would like to extrude just a little bit. We don't want it to
be too extruded, we literally want it to be extruded by the smallest margin. There's like something
there that we know. Let's rotate the
one on the right. Let's rotate this by 90 degrees. Bring it down along the wax. Bring it down along the axles, and scale it on the axles. Actually, scale it fully on
the X axles, almost fully. And move it within our border. There we go. Move it
up just a little bit. Move it across on
the left hand side. Let's scale this down on
the x xs quite a bit. Let's move this along, the X X. Let's set the factor x
to zero and the y to 1.3 And let's add five different,
five different counts. Let's tap in. Typically we just want to extrude by
the smallest margins. We do that with the same
thing on the right hand side. Extrude by adding literally
the smallest margins. There we go, that tends to look pretty good. That is one thing. We can actually adjust
the vehicle right there. Let's just move it towards
the right hand side. And the other vehicle,
we can actually move this one towards the
right hand side as well, using the X axles. Of course, everything looks like it's like it's being
properly coordinated. Now, the question is,
should we add stop lights? Am I right? Probably
not at the moment. I think it's okay at the moment. Let's just start to
color our design. Everything is low poly. Of course, with the background, we'll probably use
a blue design. Let's go to our
color in section. Let's call this blue
or blue number one. Let's add a bluish, like a bright blue color. Let's see what that can get us. We also need to add lighting to our scene. That's
quite essential. If you're familiar
with how I work, you'll know how we add
light and we like to add our lights in a grid. First area light right there. Let's move this upwards and
let's expand this area light. And let's increase
it to roughly around 6,000 I'd say on our left
hand side of ice cream. We can now go to render. And we should have
something looking like that that actually
looks pretty good. We've got our trees, we got, we've got
a lot of stuff. We've got shadows. I think shadows are an important
part for our design. That is pretty good. Since we've got an area light right there, we would like to duplicate and possibly add another
area light that we go. Now we've got two
area lights and it's looking like the sun is coming coming from
the right hand side. Well, the left hand side actually with those
two area light. Move them towards
the left hand side, a little bit more G Y. And let's move them
across a little bit more. Actually, looks
really interesting. I'd say really interesting. We can probably turn
these down to around 4,000 Try not to
get it too bright, but from now on we can continue
designing our building. Now some of these designs, we also need to add glass. We need to separate
quite a few things. This, for one, we
need to duplicate. Let's bring this
outwards just a little. This will be a glass
that's also separated. We also need to separate this door right there
on the side panels. We need to duplicate
once again and separate of duplicate
this area once more, bring it out on Y. Actually, I don't
think that's necessary because that is
basically a door. Yeah, I don't think
that's necessary. So let's move on to
our house right here. And it's the same thing
with this design. Duplicate, Bring this one
forward somewhat and separate, and with the windows at the top, it's essentially the same thing. Duplicate, bringing them
forward on the X axles. And of course, separate. Duplicate, bring it
forward and separate. That's looking good. Windows are separated right there
with that ATM machine. Some things can be separated as well inside the ATM
machine right there. That needs to be separated. We can add a light
unit right there. This also needs to be separated because that's the screen, I would say that's pretty good. Those parts are separated. Now with our building, we can now tap into our building with these
ones is the same thing. Duplicate, bring
these forward along the X axles and separate
these. Yeah, that's perfect. Tap into the building
once more. Duplicate. Bring these forward. And
of course, separate. There we go. Let's
save our documents. Let's duplicate this. Let's bring it forward along
the Y axles and separate, because these will
be our glass panels. Quite a similar
thing with the cars. I think these can be separated
by material, I believe. Now let's continue
coloring our surfaces. Before we separate
these by material, let's just continue
designing our building. Now as for the plane, I think the plane can be
brought up just a little bit. That's about right. That looks
pretty good for the tiles. It can be light gray. Let's call this gray one. This is literally just white, but it's a little bit darker. The same thing
with the pavement. You can call this gray two, that's just a little bit white, but not as dark as the tiles. All the tiles, we can
just call them gray one. And for the tarmac, actually this can be black and we just need to put
this in a darker color. That's pretty good now
because it's a Tarmac, it can be a little bit glossy, but it is not metallic at all. We can probably increase
the roughness of course because it is a road
surface that's pretty good. Roughness is quite high. Just around 70, I would say. The spectacle is all the
way down to around 55. As for the pavements, this can be green because it's like grass as actually
a really nice green. Yeah, that is actually a
really, really nice green. Now, as for our tree, this can be green two, this is a little bit
darker green now, green three for our leaves. Some of these can be darker, but some of them can
also be lighter green. I'm just changing
all the colors of the leaves to green three, This is just to make
sure that everything does match and is cohesive. Now, with the second tree, we can actually do the opposite. We can make the leaves a
little bit lighter, green two. We're going to do the same
thing with all of our trees. I'm going to skip ahead and you can just color
all of your trees. Everything is
looking good so far. Let's continue. We would like to move this
along a little bit. Let's select this, and let's
move it down a little bit, because right now it's in
the path of our vehicle. I think that does look
a little bit better. Now, as for our vehicle,
our first vehicle, I'm thinking we might go with something like orange, orange. One new color. Probably a dark, reddish orange perhaps,
something like that. And obviously the
lights at the back, I do want those lights, I do want those lights to
be emission red emissions. If we're going to
the emissions tab, we'll be able to change
these lights to red. I'll be able to turn
up the emissions and doesn't look the
best, unfortunately. Or perhaps we need to make it a little bit darker,
perhaps like that. Of course, our side panels, orange one, and our
tires, of course, we can probably put black two new
materials because we want this to be a
little bit rubbery. Because for the most
part it is rubber. Turn down the
roughness naturally, I'd say keep the
roughness around there, around three, 50. That tends to look
quite interesting. And change this part to black
two as well. There we go. This, this panel should be orange one as well
on the other side. We just need to fill in
all of our colors as well, such as this panel, orange one, orange one once
again, and black two. Let's scale this
along the X axles. Now we can separate
this by material. Of course, let's add a new material and let's
assign this new material. And we will call this glass, or at least glass
one, I should think. If we're going to surface, we can then choose
glass material. I think we'd like to make
this glass a little bit dark. Yeah, like that, I think. I think that looks pretty good. It's the same for
these ones separate material. Let's go back in. And this we can separate
material as well. If we separate material, we should be able to add
glass one and let's assign. Okay, there we go. So it's the same thing with this
side, separate by material. It's the same thing,
new materials. Click on glass one and assign. There we go, we get an
interior look off the vehicle. But I do wonder if this glass is perhaps a little bit
too much information. Now, front panel, we can
extend this a little bit and obviously
separate this material. It's the same thing.
Separate material. Let's click the plus sign. And let's go, let's
create a new one. And cloud, we will
call this glass two. Let's click a sign. And let's go to surface. And let's go to glass. And this glass will
be quite see through. On the other car, this will
be a lot more apparent. But on this car, obviously,
we can't see it. That car is almost done. I'd say it's almost finished. I think the orange color needs to be adjusted. Maybe a yellow? Yeah, Perhaps a
yellow car like that. That's better, in my opinion. That's better for now.
Now, the second car, what color can we give this one? Perhaps a blue car
or perhaps gray. I'm not too sure, but let's see if we can find a
color that suits this car. Actually, this purplish color is actually really nice.
I think we can do that. Let's click on these panels and we will do the same thing, purple one, for these panels. And it's the same thing
with the tires as well. Let's fill the panels
with purple one. Obviously, you can change the colors to something
that you will like. You might not like the
colors that I'm choosing. You can always change the colors to something
that you will like. As for the tires, I do believe that was black two. And that's also
because it makes, it looks really metallic, which is really quite
nice. That's cool. And for the front lights, we want our lights to be white. Let's put white one. Let's change the surface to emission and essentially
turn up these emissions. Look at that. That looks
pretty fascinating. As for these tires as well, let's change these ties. You don't have to because if the camera is not CNA,
you don't really have to, but you can to make sure that your design is 100% accurate. Obviously, this is
a design that you can explore, save your file. It's a design that
I'd like you to explore and to experiment. To find something that
you'd like for yourself. Let's tap into our car and let's scale the front screen
on the X axles. And let's separate Bi Material, and let's click the plus button. And let's assign a new
material. New material. Actually what we could do
is use the same material we were using for,
for the other car. I do believe that was
probably glass two. It's hard to say what would look nice with glass
two, to be honest. Perhaps more of a dark, bluish in color,
that looks crazy. Let's make it a bit lighter. That still looks crazy. Let's go with dark. Perhaps
make it even darker? Yeah, Perhaps make
it even darker. What we can actually
do is just a glass one because I think glass
one was almost perfect. Yeah, I think glass one
is pretty safe for us. Let's assign glass two to the other panels at
the back as well. Let's assign glass one
there as well on the side. Let's assign glass
one. There we go. And let's save our file. Let's go into object mode and
let's go to the next cars. This one that's going
into the driveway. So for this car we can
actually go with old green, maybe green, five, I think. Like an old green, almost like an army green. Hard to find a green
that I'm thinking of. It's hard to say. It's
hard to find a color. But I'm not doing
so well with green. Unfortunately, perhaps
red, perhaps that red, That actually looks really nice. Let's change this
to red, red three. As for these panels, let's get these panels changed
as well, to red three. Let's change the tires
to black two as well. Obviously, this is all. This is all low poly stuff,
which is really nice. Working with low
poly stuff is really nice because it can
be quite simplistic because these are the
back lights We want redis for both of our light
red emissions for both. Of course, for our ties
on this side as well. We want to go with black two, it's a glossy black. Supposed to look like a, a tire. I guess that's what
we're working with. Let's see what we can do.
So let's create a new one. Let's click Plus, and
let's go with glass one. And let's assign, there we go. And it's the same thing.
Let's assign this to others, glass one once again. And assign this way it makes
everything easy actually. Under side as well. Yes,
assign that one as well. By the way, for this box, we can perhaps put that
one in gray one as well. And the one here as well. We can perhaps put
that one in gray one as well as for this
car right here. I have no idea what we're
going to set this color to, but should be quite good
new color, new material. And let's see what works. That's in. That's an
interesting green. That's a really
interesting green. I think we can work with that. Let's name this green six and let's fill in
these gaps right there. Just go around and fill
in all of your gaps so they do look nice and
of course your tires, your ties need to be black. Two, there we go. Our materials that
we already use, we're just re implementing them. And then we can tap
into our vehicle. Now we can edit these screens. We can well, we can
edit the windows. There we go. Glass one right there at the front. Same thing. Assign glass one at the rear. It's the same thing.
Glass one assigned that. On the right hand
side, it's glass one. And assign save that because
it's looking fantastic. We don't really want
to lose that, do we? There is one thing that I completely forgot
in this design, but we can add it quite simple. That is, a light pole. So let's duplicate
this pole over there. And let's take it out
onto the main road. Let's bring it
downwards a little bit. Let's scale it down somewhat
at the top right there. Shift right click.
Let's add our cursor. And let's add a little box. A little cube right there. A little cube. With this, we can actually expand our design and expand
it along. There we go. It's literally just
a simple design. Now you want to tab into this, and with the bottom plane we
can delete X to delete face, and then tab out. Now we can add shift A. Let's add a light unit in there. I think an aerial light
will be worth it. There we go, from top down view. Let's click seven on our
number pad for top down view. Let's scale this area
light along the X axles that and scale it
along the Y axles that. There we go. Now we can
increase the power, can probably increase
it to five 500. Think 500 looks pretty good. It's a little bit bright
right there. Not the best. Let's bring that down to 100. I think that looks a
little bit better. It's still a little bit bright from the
light on the left. Let's bring that
one down to 2000. Yeah, that looks a
little bit better. Now as for the
surface right here, we would like to make
that surface gray. Gray. Three is going to be an interesting
gray because we've got to make this
look interesting. That's interesting, actually, that's a
really interesting gray. As for gray one, for our tile, we can actually change
that a little bit, but yes, that looks better
as the electrical pole. Those can be brown. Let's create brown one. That would be a light brown
that I'm going forward, to be honest, that
does look pretty good. Let's make it a little bit
darker, that's near perfect. As for these ones, it's the same thing as for
the telephone wires. We can actually
increase the offset. Let's increase the depth
by one, the colors. I think we'd like to
go with black one. Or perhaps we should go with
something completely darker, like full black and
obviously no roughness. Yeah, I think that could work. Let's call this new
material black three. There we go. I think that
works. Same thing with these. Increase the depth by one. That's the bezel depth, the color, that's a black three. It's very glossy like
a telephone wire. That's the look I'd
like to go for. I think it personally
would look better. So let's delete these ones
on the right hand side. Now let's get the ones on the
left hand side duplicate. Bring them across on the wax. And extend them along
the wax. There we go. And save I think we can perhaps make the telephone
poles a little bit, a little bit darker brown. There we go, that's
better. There we go. These little things that I
designed and put on top, those can be black, three as well because
they're glossy. I think that works quite nice. Let's change all of
those, one by one. It's the same thing with
these ones within the middle. Let's change these to
black three as well. I think it's looking
good so far. And ask for these at the end. Let's change these as
well, That was a mistake. Black three. There
we go, Very nice. How is our town looking? It's looking good. Just one
more thing. Telephone poles. They need to be Brown. Let's change these to Brown. That's an easy job. There we go. And save
that. That looks good. I think what we have so far, pretty neat. Really nice indeed. As the light box,
this should be, perhaps as for the box that needs to be
black one as well. There we go. Now, next
up is this building, our first building. Let's
see what we can do. I would actually
say the chimney, the chimney color can be gray. Perhaps like gray three? Yeah, the chimney
pipes can be black. One same thing with the
secondary chimney, gray three. There we go. I think that's
looking good so far. Now, for the first color, I'm thinking of creamish color. New material, new color. Let's find a color that looks
good As for the material, as for these, these
can be brown as well. I'd like these to be brown. That looks pretty nice. Let's set the secondary
house ones to brown as well. There we go. Now
this will be glass. Let's put two
actually glass three. Let's change the surface
to a glass material. Let's bring that down as
the door at the front. I think the can
be brown as well, but perhaps a different
brown, brown two. It doesn't necessarily have
to be brown by the way. It can really be any color. We could set it to baby blue. But I do think that brown in this case does
work really lovely. Yes, I think that tends
to look really nice. As for this, I think
it's like beige. Think it's like a
light brown, maybe? Light brown. Let's separate
this inner design by color. I think for this one we can
perhaps use brown once again. Brown two, I think brown two
and a sign to be honest. It could be any color that
we choose, to be honest. But if we're going
to choose a color, I think it's important that
we do stick with that color, Like a pastoral purple. We could go with a
pastoral purple, but we really have to stick with that philosophy
to keep it consistent. And let's move our glass back
inwards just a little bit. We can actually turn down
the intensity of our glass, or rather turn it upward, depending on what suits
you for some of these. We can also add an emission
for this glass right here. We could turn it
into an emission. If we go to surface and we
choose emission and we assign, that could be quite interesting. Let's see what would happen
if we move our glass back. That's quite interesting. Now next up, we would like
to edit our Apple store. This should be silver, silver, one like a
metallic, silver. Let's make this extremely metallic or perhaps not
extremely metallic, but we want to give it
that apple metallic five. As for the top of the roof, that can actually be separated
into a different color, that can actually be black. We can actually assign that. It actually looks
relatively good. Now for the glass, this should be glass. It's the same thing
with the door. Actually, the door
should be glass as well. Now for the interior, these are all wooden. These should be brown. Let's change these to brown
because it's an Apple store, perhaps a light brown. Let's create a new color. It will be brown, but
I'll try to make it as light as possible like that. Let's call that brown three. We will be able to just select brown three from here on out. Now as for the Apple
Store surface, let's separate this into
different material. Let's create a new
material, let's assign. And I think Apple
stores are usually like white or there's
some tile or gray. But it's not metallic,
I don't think. I think the roughness
is usually up. Perhaps we can
leave it like that. Now as for our glass, let's move this backwards
into our Apple store. Let's make sure
that all the legs are properly in the right color. Then let's move this backwards. Let's move it forward
just a little bit. There we go. And save. Now in this Apple store, we will definitely need a light because we can duplicate our light
from our lamppole. Duplicate, carry this
along along the y axis. Carry, carry it backwards
along the x axles. Bring it down on the Z axis. And insert this into
our Apple store. And now we can increase
the brightness. Okay, that's probably
too bright, by the way. Let's bring it
backwards a little bit. Let's bring down this color. Now, as for the gloss, I do want to change the gloss. Let's create a new
material for the gloss. Let's call it glass four. There we go. Glass
four definitely looks better because now
things are blurred somewhat, so they look a little
bit different. Now, as for our first house, let's edit it a little bit more. This back door should be a
different material, right? Let's add new material. And I think, I think
brown three and a sign. Or perhaps brown two. Yes, because that's the
same thing as the door. So let's move on to
coloring our house. This house would
be whitish gray. So far we've gotten blue for the roof and I
think that looks okay. So far we will go
with that color. I'm not sure what that color is. It's almost like
extremely light purple, but for some reason
it does look good. This material
basically the roof, we will call this blue
three, really nice color. We can make it a little
bit more purplish, which is even nicer as this. We should put this material
into glass, actually. So I'd say glass four. For these material. Yes,
certainly glass four. The only thing with this color
is that it's not popping. Not the way I wanted to,
honestly, at this point, I feel like going with yellow
like that for the house, possibly for the entire
house possibly up here, we can possibly go with a darker yellow, almost
brownish yellow. Yeah, that surprisingly works, surprisingly works As for the glass below,
that's glass three. There we go. That's
quite fantastic. I'm still having problems
with this first color. I think the original
probably would work best. I do believe the original
was light brown, like a big brown. Now, that does look somewhat
better, I would say. Now, how about our big building? Well, let's go on
to our ATM first, of course, as for the ATM, majority of this ATM, perhaps perhaps
white or grayish, I'm not 100% sure,
but we can see. Now for the scream. I
really want this to be emission like a blush
bluish emission because it being a screen want to show a bit of blue
light bleeding out. As for this little
gap at the top right there that I do
believe we separated, There we go, this will
be purple as well, but I don't think
that purpose is showing as well as
I'd like it to. Let's tap in. Let's click
one in our number pad. Perhaps what we need
to do is to bring this part downwards
for this gap, we can actually bring
this downward as well. Let's click on Set
Origin to Geometry, and let's scale this
along the Z axles. There we go. We can scale
it along the Z axles. That's looking somewhat better. That is, looking good
now for our building, no idea what we'll
set this one to. But perhaps a blue color, which seems absurd
because this is one of the most interesting
thing is choosing colors. Let's say blue seven. And what do you know the
first color is perfect? I'm not so sure if this
is necessary at the top. We can probably get
rid of that one. Yeah, we can get rid of it. It's a bit unnecessary. These two panels are of course. Let's set the glass four. It's the same thing with
these glass at the front. Set the glass four as well. There we go. I think that
does look somewhat better. Perhaps a darker blue
for the balcony. Blue eight. Let's call
this one blue eight. Want this to be a darker blue
but not Looks pretty good. It's getting there for sure. What we need now is blue eight. Let's create a new
glass material. Call this one glass five. We will use this for
our Apple store. Let's go to Surface and let's
get our glass material. This is quite similar to
the other glass material. It's just, it's
just a lot clearer. Because I'd like to use
these glass materials a little bit separated. I'd like the ability
to essentially make these glass materials a little bit darker or
lighter if I prefer. I think that's probably
our little city, that's probably our little town. But for some reason, the first house just
doesn't fit very well. I'm thinking perhaps
we need to go a little bit different. Perhaps like that. That's
actually not that dark. For orange, that actually
looks pretty good. Now, as for light, do you need lighting
for these buildings? You could try. Let's duplicate
this, lamppost light. Let's bring these along to the
to the apartment building. Let's rotate the lighting. It's rotated by 90 degrees and take it inwards
into the buildings. And let's rotate it by, let's rotate it
upwards a little bit. Let's scale this outwards. Now we've got that.
We've got glass, but we can obviously change this emission to almost
anything we'd like. Let's duplicate these lights. This is an option if you would like to keep
it, you don't have to. But it's literally
just something that I'm trying to see if it makes the design a little bit better. Overall, I'm duplicated. And we'll bring this design a little bit
backwards like that. Duplicate, carry
this one upwards, and carry it backwards. Just a bit like
that. There we go. So changing the lighting to
make it a little bit orange, it does add an
interesting effect there. It's actually interesting. You can experiment with this
and see what you'd like. Duplicate once again,
and bring this along the left hand side to
our secondary window. This is at our first house, and of course, we will need
to bring this forward. There we go. Bring it
forward just a little bit. That really does change up
the design quite a bit. Let's duplicate once again, and let's rotate this towards the left hand side
and bring it forward. And this can be for our
additional window right there. We do have a lot of windows. We just want to make sure that
every part is considered. That's actually not too bad. Let's move this upwards Z, and move this upwards
just a little bit. What you can do is
continue to adjust this design until it fits
your particular design. Of course, perhaps scale
it down if you need to, and perhaps move it
down a little bit. Always got to make sure that
these designs, they do pop. I think that actually
looks all right. I do think that actually
looks All right. Yes, so that's our small city. I hope you enjoy this course, overall change it up. Make your own type of city and feel for you to share it in
our communities page. I'd love to see your progress. I hope you enjoy this
final thing that we've got to do is
obviously render our image. Remember to save your image
control to save your file, sorry, and you can start
rendering your image currently. I've got it rendering
right there. Just click the rendering button in the top left hand corner, render image, and I've got
it currently rendering. So that's lovely. It's going to be
interesting to see what this looks like in the end, but I do hope you've enjoyed. Thank you for watching and
I'll see you in the next one.
7. Completion Congratulations: Congratulations for
completing this class. This is a huge step in your blended journey and
your three D career. Of course, I really do
hope you've enjoyed everything that I've went through within this
class for you. I really appreciate you taking the time to complete this class. That's quite an accomplishment. I look forward to creating additional classes for everyone. Of course, if there's
any requests, please leave a comment
in the description. And before we go,
let's just recap on what we did in this lesson. In this class, it's been
quite exciting because we managed to design
an entire city. And I specifically ask you to make it something of your own. Something that you've
always wanted to create. Something that you've seen in
the normal day to day life. And you've thought, I can
perhaps do that better. Perhaps you've taken it
back to your childhood, created something that you've
always had a vision for. But I'm really curious
to see the results. So I hope you can share
these results with us. Please do so. We've got
the project gallery. This is where you can
share your project, share it with the community. I'm definitely curious to see
what you've created and I will be replying
to you if you have any questions, any concerns. And if you'd like to
see any future courses based on a similar subject,
please let me know. Because architecture
create in small cities, this is something that
I absolutely love and this is something I'd like
to see more of, of course. So with this being said, I hope you've enjoyed the class so far. It's been quite an adventure. And if there's one huge thing
that we can take away is that our vision that
we had from weeks, months, years ago, we
can somehow bring it forward in time and create it
in a beautiful environment. And share it with people
who are very like minded. So I hope you've
enjoyed this class. Thank you for
watching. Remember to leave a review for the class. Remember to follow
us, of course. And remember to check out my additional
classes, of course. I hope you enjoy those as well. Thank you for watching and
I'll see you in the next one.
 Kitai / Polygon Arcade, Creator, Designer & Animation