Transcripts
1. Introduction To Mini Scooter Class: Hi everyone, Welcome back. My name is cacti. The topic of today's
class is Blender. Learn blender with me. It's going to be quite exciting. Of course, we've got an
amazing class plan ahead. We're going to be designing a really cool cartoon
3D toy today. And it's actually an
electric scooter. Electric scooters are
so amazing right now. Everyone's, everyone's got one. So I thought it would be
really nice to design one using some basic and
some intermediary skills. And this is geared towards all different people,
all different levels. So as your teacher, I'll be teaching
you as a beginner, as an intermediary, as an
advanced student of Blender, how to navigate through
the application, how to design a simple objects whilst turning them into
something a bit more advanced. So what value does this
class hold for you, the students, and
for myself as well? What will I gain
out of this class? And what will you gain? What will you learn
along the journey? So this class has really good values,
especially for beginners. We're going to be using
simple object designs. We're going to be using
simple geometry, simple, simplistic and easy to follow explanation on how to get
these things done in Blender, how to get started in Blender, how to render, how to design
your object material, how to separate different
objects and separate things. Biomaterial, that's
really important. So if you're a beginner, advanced students
intermediary, you can gain a lot of knowledge
from this class. And as the teacher, of course, I'm also learning a lot along the way because I'm
always trying to learn something new to put
into one of my classes. And that's good
because I'm learning. While you're learning,
we're both learning. So the softwares that
you need are quite easy to obtain blender. It's a free software and
it's used by a lot of industry-leading companies
and individual freelancers. It's a free software and it's built by a
wonderful community. I also tend to use a
few different cameras, like the ISO camera, that's also free dots
are free add-on. But the most important
thing to have his blender, That's all you really
need to get started. I like I said previously, this class is geared towards every and any one all levels, which is what I usually
like to base my classes on. Not just beginners, but also intermediaries and
advanced people. There's always
something new to learn, especially from a new teacher. So if you're new to this page, then I hope you
enjoyed these videos. So like I said previously, you will be making, designing your own
electric scooter. And that's quite excited. Like I said, are extremely
popular right now. It's like a little
toy, a 3D toy. You can really animate this. You can design this using
whatever colors you'd like. Using whatever design
you can change the design concept to
suit your own needs. And that's what's
really amazing. This is great to look
forward to because I really think people are
going to enjoy this class. So I'm really looking forward to seeing your responses,
your own design. And I'm really looking
forward to seeing what you think about
the class overall. I hope you enjoy. Let's get this class started.
2. Download Blender: Everyone, the first
thing we would like to do is to download blender. We need the core software
is type it up on Google. This is the official
site for Blender. They've got plenty
of material and they also have their own
courses that they provide. Well, you'd like to do is
go to the download section, download Blender for
your specific machine. If you're on Apple silicon, you can download the
latest version of Blender if you're on
Windows or Linux, you can also download
their version of Blender. But if you've already
got Blender installed, you don't really have to worry. The next thing that
we'd like to do is to download Blender
isometric camera. That's the ISO
camera from GitHub. This piece of software code
is created by Jason Carter. Very handy, very useful
piece of software. Get this installed as an add-on
in your blender software. It is quite useful and it does make your life
easier in Blender. So it's good to take the
time just to download these. And then we're ready
to get started.
3. Design Scooter Base Model & Wheel: Hi everyone, Welcome back. Today we're working on
our little skateboard. So today we're working
with in Blender, of course, we're working
with in one screen. This is our new file. So we've just created
a general file. And we just want to start super-simple with creating
our escape board. First one we need
to add is a plane. Now let's zoom in. Of course, we've got our
plane right around. There. Should really be in the
center to be honest. So we can actually
delete that plane. Shift right-click
add to the center. And also let's remember to
turn on our short keys. So everyone that's watching
can see what we're doing. So once again, Shift
a and add a plane. So now we have a simple plane
a little bit high though. We do need it to be
closer to the ground. Of course, that's perfect. So skateboard, something really, really simple to be honest. So let's scale this
up along the y-axis, and let's scale it
down along the x-axis. We can scale it down a little
bit more on the x-axis. That's probably
just drawn right. Now what I'd like to do
is to bezel this less tab into edit mode and
control D to basil and V. And there we go. We can now bezel our object. Before we can be
hazardous object, I think we need at least
a couple of loop cuts. Let's add a couple of
loop cuts and less careless along the y-axis. That's why once it's
scaled just around there, wanted to be a little
bit even of course, once his scale a little
bit around there, then we can click number one in our keypad and select all of these corner vertices
that's using Shift to select all of them and then Control V and V once again. And now we can best lit
with a lot more control. As you can see. I'd say that's probably
looking pretty good. Now if we select all use an a, we can then press E and
extrude our object. And now what we
can do, of course, is that we can
actually insert this. Now that we've got the
first layer extruded, we can actually
extrude it once more. Now if we view this, now if we click number three
on our number pad, we will get the side view. And now if we click Alt Z, we can get X-ray. Now with this, we can actually
adjust it a little bit more by selecting the
innermost vertices. With the top vertices, we can scale once again, but not by much by
the tiniest margin. And with the middle and with the middle
vertices selected, we can now scale this
along the y-axis, kind of like that. Once again, with the
vertices at the top, we can scale those along
the y-axis as well, kind of like that. And now if we view
this from the top, Let's exit extra
mode, that's Alt Z. We view this from the top, that actually looks pretty good. That's, that's nice and simple. So that's our foundation
to our skateboard, sorry, to our, our
electric scooter. This is an electric
scooter after all. So once again, if we click number through an
odd number pad, now that we've got that, we can continue to create
the rest of our scooter. So let's continue. So at the front of the scooter, we obviously we've got
a wheel for a scooter, and we also have the handle. We've got. So the next thing we
need to add is r bar. So next let's add a cylinder. We can add a cylinder like that. Let's scale it down
just a little bit, possibly around that size. And now we can rotate
it along the x-axis. We can rotate it a little bit. Not too much of course, but just enough to
show that there, that there is that
adjustment before we rotate, Let's scale this
along the z-axis. And let's move it up
along, along the z-axis. And now we can
actually rotate it along the x-axis
just a little bit. Let's scale it up a little
bit more along the x-axis. And let's move it up
a little bit more. And now we can, we
can rotate this along the x-axis and we can bring it backwards
just a little bit. And now there's propose
a unique opportunity. We can duplicate this object. Right-click, and now we can rotate it along the
x-axis even more. But we do need to, we do
need to scale it down. Of course, Let's scale it down a little bit along the
z-axis, of course. Now we can rotate
along the x-axis. And now we can drag
this down using GZ. We can bring it
down into object, move it along, along the y-axis. And there we have it. We've got the basic
outlines of our scooter, but perhaps we can
rotate it even more. So let's rotate it a little
bit more along the y-axis. Let's rotate it a little
bit more along the x-axis. Now what the main bar? We can actually duplicate
this once again, right-click and we can scale this down along the
x-axis as well. And let's carry it down towards the bottom
along the x-axis. Now with it, duplicate it, we can now scale
it down as well. So let's tapping into edit mode. And now we can actually
add a few loop cuts. So let's add two loop
cuts just around there. And let's bring those loop
cut down towards the bottom. Let's add them there. Now with the loop
cuts at the top, Let's go into X-Ray mode with
the loop cuts at the top, we would like to delete those, those vertices with the
loop cuts at the bottom, delete those vertices as well. Now we only have the
vertices within. So let's tap out and
Exit x-ray mode. And now with this, we can actually scale this
up quite easily. So we can now scale
this up like that. But it doesn't make any sense. We need to add, but it
doesn't make full sense yet. So we need to set our
origin to geometry and then we can scale it up and it sort of look a
little bit better. But we've got a simple
fixed with this. We can actually use a modifier. So let's add a modifier and we will use solidify modifier. So if solidify modifier, we can add a certain amount
of thickness, of course. And we can obviously
offset this thickness. So let's set this to
four at the moment 0.4. That looks pretty good. We can actually scale this
down a little bit more. We don't want it to be
too thick, of course, but we want it to be enough
to make a difference. And obviously let's add
even thickness all around. There we go. So that's
the basic form of our little scooter so far. Now, once again, let's click
number three on our keypad. And let's duplicate
the bar once more. Right-click and we're
going to tap in. We're going to use the same
technique into X-Ray mode. And let's add some loop
cuts to loop cuts. And let's put those loop
cuts at the very top. Now with the middle loop cuts, we need to scale this loop cut. Now with the middle loop cuts, we need to move this
loop cut along the top. So once again, let's tap in and let's add cut right
around there. And let's move this
loop cut upwards. We want to give it
a nice distance, perhaps just around there. Now with the loop
cuts at the bottom, we can actually select
those and delete vertices with the
loop cuts at the top. We can now scale these loop cuts in whichever
direction would like. So from the top view, we can actually
scale this loop cut. So let's just make sure
that everything is deleted. So delete all the vertices from the bottom
with an x-ray mode. And now let's exit
x-ray mode once again. So we've got our loop
cuts at the top, and now we can obviously
scale this along the y-axis. We can scattered
along the x-axis. We can basically scale it within whichever
direction we'd like. So let's tap in. Now with the vertices
or the front that's going to x-ray
mode, by the way, with the vertices at the front, we can actually do this
from the side view as well. So there's, this can actually
make a really simple. Now we can actually move
these loop cuts outwards. Look a little bit like that. Now if we, if we Exit x-ray
mode, we're in normal view. This is what it looks
like, a normal view. And that's not too
bad to be honest. But I don't think it
needs to be by that much. I think we can do
this once again, we can just do it
just a little bit. So I tend to think that
looks a little bit better. Now if we tap out, that does look pretty good. And now we can actually
add a solidify modifier. Once again. Now we can actually
add a bevel modifier. With this bevel modifier, we can keep it actually, we can keep it quite
low poly as well. So we can keep it probably around three different segments. And if we shade smooth
now with our main bar, Let's tab into edit mode and let's add an
additional loop cuts. Add a loop cut around, around the middle odd say, random middle of R-bar, not a loop cuts at
the, at the top. We can now delete
those loop cuts. And there we go. It kinda fixes our issue
that we were having. And obviously you
can still see it's creating some problem,
it's still protruding. You can do is that you can
actually just scale this down just a little bit
by the tiniest margin. There we go. And that makes a little
bit of a difference. That actually looks, looks
pretty good. I'd say. Now that we've
created a basic form, we can now save this document, so Control S to save. So within your file you can
now create a new folder. Let's call this tiny scooter. And obviously remember to
name your file tiny scooter. Let's save that blender file. Remember to continue
to save your files. We wouldn't we wouldn't want to lose our
files, of course. So now a quick way to
save as just Control S and it's just save
automatically to that folder, to that particular file. That's a nice way
to have everything. Now with the bar at the bottom, we can actually reduce
this thickness. We don't want it
to be too thick, we just want it to
be a little bit just to show that
slight difference. So we can actually tap in. Now select everything
using a and let's move it up
just a little bit. Not too much of course, but just a little bit. Now right there we
can actually add a. So at the front, we can
now add our first, we'll. Let's go ahead and do that. So let's press Shift
a and let's add, and let's add a tourist. And this will be our,
we'll basically, so let's rotate this along
the y-axis, 90 degrees. That will be our first. We'll, I'd say just around
that size is pretty good. But we need to move
it down a little bit. So press G and move this
down just that much. Now if we click number
one and our number pad, we can actually
scale this as well. We can actually scale it
and make it super wide. We can actually make it
as wide as we'd like. So that's, that's pretty cool. It looks a little
bit like a speaker doesn't need to be that wide, but you can scale it in
whichever way you'd like. But yes, let's scale
it along the x-axis. Let's not make it too wide, but I'd say that's pretty neat. That is, That's pretty cool. Can probably scale it
down a little bit. Not too much, but yeah,
that's about right. So Control S and
save our document. Now directly where we are, what we can do next
is that we can add our, our connector. So this is what
connects from the, from the scooter, so the wheel. So let's add a plane. Let's go to our mesh tab. Let's add a plane. And we need to scale
this plane down, of course, along the y-axis. And let's move it up, of course. Now from number
one on our keypad, we're viewing it from the front. We can now scale this
down along the x-axis, and let's move it
along the left. We want to get it a little
bit even not too much. And I think that's I
think that's about right. We can always adjust it later. But let's tabbing
and let's scale it a little bit
more on the y-axis, of course, and let's move
it backwards a little bit. Let's scale it down
a little bit more. We just don't want
it to be too large. I think that's about right. So now we can actually
adjust this some more. So let's click number two, and we can select the edges, of course now we can
extrude these edges. We can do whatever we'd like. So from number one
and our keypad, we're viewing this
from the front. We cannot extrude
these edges and extrude it along the z-axis. And let's extrude downwards. Now select everything
using a G to move this along and move
it along the x-axis. We just want it to
look pretty good. One it to look even of course. But before we visit these edges, we need to add a couple of
loop cuts along the sides. So let's add a loop cut
right around there. Let's add another loop cut on
the other side, same place. Let's click the top
two edges once again, and let's vessel this. Now we can embezzle it a
little bit more evenly and it sort of looks way
better. Look at that. That's much more improved. Now if we click number one in our keypad with the
vertices at the bottom, I do believe we can
also bezel these. Before we bezel the
vertices at the bottom. Let's add a loop cut in
the middle of everything. Let's select the
vertices at the bottom, just the ones on the edge. And let's click Control
V and V, two beds ODEs. Let's add an additional
loop cut in the middle, right there with the
vertices at the bottom. Let's bezel these control v and v to bezel these vertices
just around there. And that looks pretty good. Now if you click three and
our number pad options Z, we can actually
bezel the vertices. We can actually add another loop cut over here along
the right as well, with the vertices at the bottom. Sirona number pad, we
can desert these and it looks so Control B and V to
bezel these one as well. Now we can actually add a
solidify modifier. There we go. We can put the thickness around
0.04 and even thickness. Of course, there we go, That tends to look a lot better. Now next we can add some additional work to
the wheel, of course. So right now the wheel
does look pretty cool. I'll have to admit that. So next up we need to do some additional
work on the wheel. So let's set its
tapping onto our wheel, and now we can do
some additional work. So we need to select
the edges, of course. So Alt, select the edges, the edge loop and do the same
thing on the other side. But you've got to click Alt and Shift and then
select the edge loop. There we go. And now
we can actually fill. So at the face selected, we cannot extrude this scale, this scale, this within. Then we can actually
bring this out words and scale
it up once again. Now we can actually insert this and extrude this
outwards that we go. And it's the same thing with the other side, to be honest. So with face selected,
we can extrude, we can scale down and we
can extrude this outwards. There we go. That tends
to look pretty good. Now of course there
is a overhangs. So to fix this problem, we can click on the connector. Of course. Let's just
call this the connector, just so everyone knows
what I'm talking about. If we click one and
our number pad, we can now scale this
along the z-axis. Not by much, but just
by a little bit. And move it down
along the z-axis and scale this a little
bit along the x-axis. Of course, not by much,
but just a little. There we have it. And of course Control S to save. Now with our connector, we can click Control to, to add a subdivision. And we can shade smooth
this subdivision, but it gives us a little bit
of a problem at the bottom. Obviously, you can see that
this doesn't look too nice. If we tap in and
click number one. The second vertices as well, the two-second vertices shift, select all of them and
dissolve those as well. With the second row. Let's dissolve those as well. And with the second
row, so those ones, we can dissolve those. And with the middle row, Let's dissolve
those ones as well. And now if we tap out, that looks a lot better. It looks a lot more
circle, of course. Now it's the same thing on
the opposite side as well. So these were all vertices. Let's merge them one-by-one. Because I think that's
creating some problems for us and that
looks a lot better. At this side done,
we can now click Control S to save our document. Our the opposite side. It's the same thing with these vertices selected
one by one at the top. Let's merge these
vertices at the center. Same thing with the
ones on the right. Let's merge those at the center
with these two vertices, the first row of vertices, we would like to dissolve these row of
vertices, of course. And from there on it's the
same thing we did before. The third row of vertices. We would like to select
those use and using Schiff and dissolve vertices, right-click and
dissolve vertices, tab out, that tends
to look a lot better. Let's save document, of course. Now we can actually scale
this down along the Z-axis, just a little bit more
and move it along the z-axis downwards
a little bit more. With the wheel, we
can actually add a subdivision control to, to add a subdivision. And we can then shade smooth. If we tap in, we can add a
loop cut to the wheels and we can move this outward so
that looks a little bit better and it's the same thing
with the right hand side. Add a loop, cut
and move this out words that looks much better. That is one of our wheel. Now of course with the connector to connect to that
we actually named, we can actually, let's set the origin to geometry for one. And let's rotate this along
the x-axis a little bit. And let's bring it
forward just that much. We'd like this to
be even somehow. And I think that
looks pretty good. Now we can do the same
thing with the bar, of course, the cylinder, the original cylinder
we can actually control to add a subdivision. And let's tab into edit mode. And of course we can add a loop cut and let's
bring this downwards. And if we tap out back
into object mode, we can now get a
proper idea of how this looks with
this original bar. We can now add a bezel modifier. We need some segments of course, and we need to, we need
to scale this down. So the amount is set at 0.03. And the segments, we can, we can increase the
segments if we'd like to, around ten perhaps. And now we can, if we tab into edit mode, selected vertices at the bottom, all the vertices at
the bottom, of course. Now we can of course, extrude this downwards and
we can scale it inwards. So it looks a bit better. So far, so good. I think overall, that does
look pretty good to be honest. Now, what's our connector? If we tap on it and
we go into edit mode, we can add a loop
cut towards the front to just sharpen
it up just that bit. And that tends to look
a little bit better. Let's add another
loop cut at the back. Can sharpen this up as well. That tends to look pretty good.
4. Design Handle Bar & Breaks: With everything so far,
what I've mostly done is just add a solidify modifier. So with the duplicated, with a duplicated cylinders, we can click Control to, to add a subdivision
tab into edit mode, add a loop cut and
scale this up. Of course we want to run it off, scale this down on our
additional loop cuts. And now we can
click shade smooth. That's just to add our
finishing touch of course. And this is same thing with
the other, other cylinders. Control to, to add a
subdivision tab and we can add our loop cuts now to
run it out at our loop cuts. And this is basically just having that finishing
touch to be honest, and scale this up
using S if you'd like. Now we can of course, add a cylinder at the top to start working on our handlebar. So Shift a to add a new cylinder as scalars cylinder
up along the z axis. And let's rotate this cylinder. And we'll rotate it on
the y axis by 90 degrees. And we can now scale it
down and move it upwards. Move it upwards, and of
course position it into handlebar seven on our keypad. And then we can
scale it out even more along the
x-axis, of course. So that tends to look
pretty good. Actually. We can scale it down
a little bit more. We don't need it to be
too big because we will, we will customize it a
little bit more skeletal, bit more out on the
x-axis. Not too much. So that right there is
looking pretty good. So let's save our file Control S. And let's duplicate
this underbar. And let's scale this down
along the, along the x-axis. And let's move it towards the left-hand side
on our screen. And now we can add a solidify
modifier. There we go. We add a solidify modifier
and now we can add thickness. So this is just add in
some additional details, of course, an even thickness, of course you've got
to remember that. And then what we
want next is to add a subdivision control
to tab into edit mode. And let's add a loop cut. Let's add this loop cuts
towards the right-hand side. And let's add an
additional loop cut towards the left hand side. Tap out and let's shade smooth. So without duplication,
we can now scale this up using S Control two. So we've got a cylinder. Let's move our cylinder
towards the left-hand side, just a little bit towards the edge. And let's
scale this up. Use an S. Not too much, of course, there we go, That will do. And now let's click Control to, to add our subdivision tab in. And now we can begin to add in our loop cut at our first loop, cut right around there, and add a secondary loop
cut within that loop. There we go and close it
off just around there. So it looks kind of low poly. Same thing towards
the left hand side. Actually, our first loop cut little bit wide
and our secondary loop cut within should be
a lot, a lot closer. So now when we tap out, this is what we get and we can now Shade Smooth from there on. We can duplicate
this and add it to the right-hand side
of our little square. And now with the actual, with the original cylinder, of course we can shade
smooth that as well, tends to look a lot better. And of course, with the protrude
Dan display right here, we're going to do some really
cool things with this. We can add a bezel right there at around 15
segments amounts to 0.5. And let's shade smooth that. And let's set
origin to geometry. And let's scale this
up just a little bit. Let's save our document. Now if we click number three on our number pad, from there on, we can add our original wheel
to the rear of our vehicle. So let's duplicate this
and let's right-click G and Y to move this
backwards that we go. And I think with the
original Foundation, with the original unit, with our original plane, we can actually extend this
along the, along the z-axis. Then we can bring this down just to add that extra
amount of thickness. So let's try once again, extruded along the z-axis and bring it down just a little
bit along the z-axis. That tends to look pretty good. Now with the rarefied vehicle, we do need to have some
wheel holders as well. Now what we could do is duplicate
our original connector. Just duplicate that. Right-click, take it
towards the back. Rotate this along the x-axis. Of course, just
run that much and let's take this down
just a little bit. We can actually expand this
just a little bit more. We have it that tends to
look, that looks alright, actually, next thing we'd like to work on is our platform. That's what we started with. Let's edit it a little bit more. First thing we've
got to do is to add a subdivision that's control to. Then you'd like
to tap into this. And now we can actually
add a few more loop cuts. So let's add a new loop cut
to the bottom right there. And let's just drop it down. And we need to add a loop
cut to the top of course, and let's drag that
up just a little bit. Then what we can do
is tap out back into object mode and shade smooth. That tends to look a lot better. Next we would like to do is
to just add a little bolt. So let's add a circle. Let's rotate the circle on
the y-axis, 90 degrees. Let's scale this
circle downwards. And let's move our
circle across to the right-hand side,
just around there. Tab on three, get our edge view. And we can actually scale
this down a little bit more. This is our little bolt, just position it
just around there. And now we can actually tap
in and press F to fill. This right here will be
our little button now. We can just extrude
it just a little bit backwards. There we go. And select the edges as well. Let's select the
edge right there. And let's puzzle this control B. There, we have it,
we can bezel this. That tends to look pretty
good to be honest. And of course we can scale it down just a little bit more. Doesn't need to be too big. Next week can actually
add a mirror modifier. So if we go to our modifies tab, we can add a mirror modifier and tap on the rear
end of our scooter. So what's happened is that it's mirrored it to the other side. There we go. And then what we can do, we can simply just duplicate this, right-click g, y to drag that
to the rear of the vehicle. And of course it's not, it's not properly aligned,
as you can see. So press G and X to move it
outwards just a little bit. That's about nice.
And there we have it. We've got a couple of bolts. Now next up at the rear, we can actually create
our brake system. So right here at the
rear, at the tail, Let's add our cursor right
there and press Shift a, and let's add a plane. Now let's scale this
down along the x-axis. Well, we can actually scale it down a little bit more along the x-axis and scale it down
along the y-axis as well. Scale it down a little bit
more along the y-axis. And now we can position this
just a little bit better. So let's rotate this along the x-axis and move it
towards the back, of course. And let's move it down
just a little bit. Let's just position
it between there. Now what we can do
is that we can tab and we can select
the edge, of course. Now with the head selected, we can now extrude kind of light that just add that
were just extruding. I would say that
looks pretty good. So that looks about
right, to be honest. That looks about right. And now we can actually
bezel it if we'd like. We can just Beslan not by a lot, but embezzler just a little. Now what this done everything. We can add a
subdivision like that. Then we can add a
solidify modifier. Now if we tap in, then we can adjust
this even more. So with R sub D, with the subdivision
modifier, we can tab in. We can select all use an a
and then we can extrude this. So if we extrude upwards, this is what we'll get it. We'll kinda look like that. And then we can add
a few loop cuts. So if we add a loop
cut in the middle, we can adjust it a
little bit more. We can add a loop cut towards
the rare, just like there. We can add a few more
loop cuts just to, just to make sure that this
suits what we're going for. We can add a loop cut
to the middle as well, and add a loop cut to the top. There we go. That
looks excellent. So that's looking pretty good. And then we can shade
smooth, That looks awesome. Then we can press G and Z, and we can bring this down into our object a little bit
more if you'd like. You can actually scale it
down to suit your design. And we can rotate it along the x-axis a little bit
more so it matches. And we can bring
this down a little bit more and bring it forward. Of course, now with all of that, we can press Control S
and save, of course.
5. Adding Final Key Details: Now we do need a stance, so let's add a standard. So let's underneath our board. Let's add our cursor, Shift a, let's add a curve and
let's add a path. And let's rotate this path along the z-axis by 90 degrees. And let's carry it towards the right-hand side
just a little bit. And let's scale this
down of course. Now with the scale down, we can then rotate this along the x-axis and we can carry
this downwards a little bit, scale it down props, and continue to scale
it down a little bit. Now we can actually tap in and we can adjust this
a little bit more. So for instance, this
vertices at the front, we can shape this vertice, see a little bit differently. We can turn it
towards the right, almost like a 90 degrees turn. And then with this, what we can do is that we can go into our, our properties, our object data properties, and we can add, within geometry, we can add a depth. We can increase
the scale of this. There we go, and then
we can fill caps. Now what we can do is
that we can just tuck it. So now we can actually move it towards the back for
once and we can just tuck it underneath
our board just around there so that can almost flip up and down
whenever we'd like. We can always move
it in and outwards. And obviously you can move it upwards just a
little bit more. Possibly scale it up
a little bit more. So now we can edit the front. So at the front of our board, Let's add our
cursor right there. And let's add another curve, which will be a path. And let's rotate that
path along the y-axis. And we'll rotate
it by 90 degrees. And we can now reduce
the size as well. Now we can actually tap in and
we can start editing this. So our first vertices, we can actually
take our vertices and move it inwards
into our board. And obviously we
want this to look, look a little bit untidy. So we can move it around to
give it a distinctive look, something that we
would appreciate. And from the front, same thing, we can actually move it around to give it a
distinctive look, like the middle cursor. We can move that
around to give it a more distinctive
look and approach. And now from there
on we can continue to extrude this right there. So we can extrude this
a little bit more. And we will of
course extruded and continued to extrude
an IT to handle. And with these two
vertices right there, we can move that around with
all the vertices that aside, we want to bring this
towards the rear, select these three vertices
right there and would like to move this
towards the rear. Of course, there we go. So that will be
where our handlers. So that will look quite
distinct, full, pretty good. And now from there we can
actually create a handle. But before we do that, let's just add some depth to that wire because that's
how braking system. Let's add a fill and let's just duplicate the handle on the right for a moment. Who duplicate that?
And let's scale it down along the x-axis, and let's carry it towards
the left-hand side. There we go. Now if we tap in, we can actually edit
this some more. Let's go to Face Select. Let's select these faces. And now we can actually extrude these faces and add loop
cuts to these given faces. There we go. That's looking pretty good. Actually, can add some more
loop cuts to sharpen this up. And of course, if this is
not making enough sense, you can always slow down
the video to continue. Again, some proper
understanding. But from here on out, we can continue to
add some loop cuts. Let's select face
again and we can actually extrude this face just around there and add another loop cut
right around there. Once again, select face and
extrude towards the rear end. Let's again add some
more loop cuts. So that's looking
better already. I would say that's
already looking better. Now obviously, we
want to make it look a little bit better so we can add some more loop cuts. Just to give it that
professional look. There we go. Just add some more loop cuts to get our professional look
that you're hoping for, that we go and gradually
it just tends to look, to look a little bit better. After you've given it
some more loop cuts. There we go. So that already is
looking pretty **** nice. And we can select all
of this and we can actually bring it
backwards if we'd like. We can actually
adjusted somewhat. We can actually move it around. And now from there on out, we can continue to
edit our objects. So that's looking pretty
good to be honest. We don't really have to
do much from here on out. Now the next thing
that we've got to do is to create our handles. So let's tap out
into object mode. Let's shift right-click,
add a cursor right there, and let's add a, I would say possibly a cube. That's a fairly big cube. So let's scale this cube down because this
will be our handle. Let's move it towards the right-hand side
just a little bit. There we go. Let's scale this cubed down. Along the y-axis,
just a little bit. Let's add a plane
right around there. And let's scale this plane down. And let's rotate this plane
along the x-axis, 90 degrees. Let's scale it down
along the z-axis, and let's move it along, along the right-hand
side, along the x-axis. And we can actually
move it out from the top view to make sure
there's nothing protrude. And this will be our
makeup of our handle. This will essentially be our acceleration
system, I should say. So from the top view, we can then edit this some more. So if we go to edge select, we select this edge and
now we can extrude. I think you already
know what I mean by editing this and I
think something like that, something like that will
probably be, be quite nice. So that's actually
where you can rest your arm and you can
just accelerate. So from here, we can
press Control two. So from object mode, if we
go back to object mode, we can press Control
to add a subdivision. And if we tap back in
with everything selected, we can now extrude this object. There we go. And if we extrude it backwards, I think that tends
to look better. Now from here on out,
it's just a matter of adding some, some loop cuts. So let's add some loop cuts
towards the left-hand side. And let's add some
loop cuts to the, the top of course. So there it is. That's, that actually looks
pretty good already. So if we tap out, we can actually just move this
forward just a little bit. And then from there on out, it's just a matter of
rotating this along the z-axis and bringing it backwards and possibly
scale it up a little bit. So it's not too, it's not too small. And carry it towards the
left-hand side, of course. And now if we tab and we can
probably select the faces. If we select those
faces loop cut wise, we can probably scale this up just a little
bit like that. But before we do that,
we should probably add an additional
loop cut right there. Then we can possibly, there's scalars move
back just a little bit. Let's add another loop
cut right around there. Let's Face Select All
to select these faces. And now we can
probably move this. There we go. We can adjust this
a little bit more. So it might look a little
bit weird at first, but once we shade smooth this, it looks a little bit better. So that makes a lot more sense. So let's save that. And from the front, I think we need to adjust
this a little bit, but that should be quite easy because we would like
to add a light unit. So with these two vertices, Let's bring those vertices down. Let's bring the top one across, along the, the right-hand side. Let's carry these ones
down a little bit more. Carry these ones done
just a little bit more. And from the side view, we can now adjust this
some more as well. Let's carry this one,
this one backwards. We can carry those ones
backwards as well. There we go, nice and lovely. And let's save our documents. So that's looking
pretty good so far. But if you'd like, you can
always adjust this even more. You can adjust this
kind of like like that. We can adjust this
some more food like without all adjusted. I think that looks
pretty good for me. You've got to adjust it to
your own liking as well. Try to make it also, it's also good to make it
look that much natural. Now, I'd actually like
to add a light units. So from here what we
can do is that we can take one of these faces
and we can duplicate. And we can separate those
face if we would like, because that will
be our light units. From the front. We can now
adjust this face unit. Let's adjust that
along the x-axis. Let's carry this to the
middle and let's set origin to geometry as carrier
towards the left. And let's adjust that some more. Now from the side view,
we can then move this forward just a little
bit from the front view. Then what we can do is
that we can then tap in, I can select these vertices
and then we can of course, Basil these, these
vertices to our liking. But before we can do
that, Let's just add a couple of cuts. Let's add a couple of
luke cuts around, right? One right there, one at the top, one at the bottom of course. And with the edge
vertices selected, Control B and V. And then we can adjust this some more so that we can add these, these bezels at the edges
right around there. So if we select all, now we can edit this, we can actually bring these backwards with an R
object just a little bit, tab out and carry it forward. Just that much. Now with all of this, we
can press Control two. We can tab into
edit mode and add some additional loop cuts so
that ladies and gentlemen, that is our light units. So let's select this
face and we can actually insert this face. We can insert it like that. There we go. Then we can tab out and we can actually move this forward
a little bit more. There we go. That ladies and gents, as I like units. So that's how a lot of Schooler, now we can start
adding some materials.
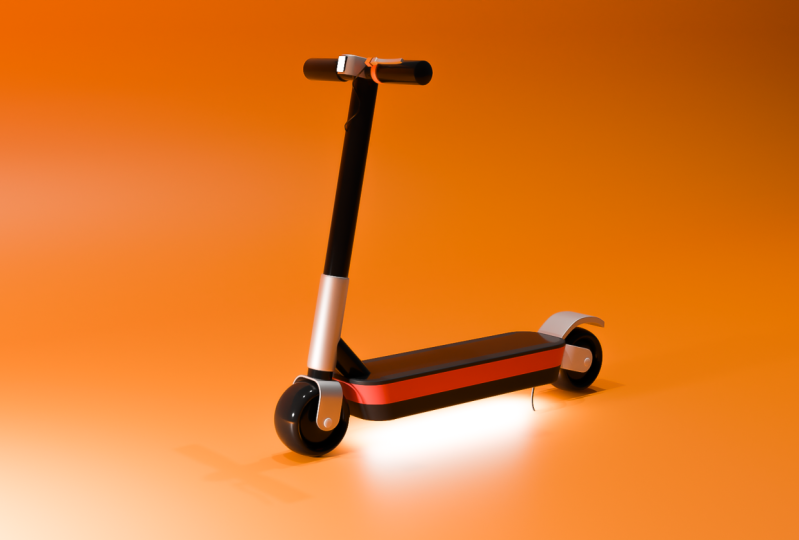
6. Add Materials & Colours: Hi everyone, Welcome back. So we will be
adding our material to our little scooter
at the moment. So first thing that we
need to do is to open up a side display. This is where we'll
view our scooter from, from the left-hand side. This is where we can
also set up our camera. So that will be quite,
quite exciting. So first thing first, we need
to go into our render tab. We would like to render
everything and cycle. Everything's being
read. And in GPU, max sample of render
will be over 6,000. And we will be using de-noise. So right now, let's switch into rendered mode
on our left display. Now on the right-hand display, we can start going ahead and start again some lighting setup. So without playing,
we can actually scale this plane up just to get a rough idea of what
we're working with. And let's start to
add some light units. So Shift a. And the first light I'd like
to add is an area light. Of course, let's bring this area light
upwards, not too high. So without light units, we would like to
turn to slight unit, but on our right-hand side we can go to Object
Data Properties. Turn this light
unit up to around 5,000 just to get a
rough idea of what we're working with and possibly move like unit up just a
little bit higher. There we go. Now we can
probably lower our, our ground as well. And from here on out we
can start editing it. So let's go ahead and click on. So let's go ahead and
click on our plane. And let's go into edit mode. And let's select number
two for edge select. And let's carry
these edges upwards. There we go. So let's extrude
these edges and we'll extrude them along the z-axis. So let's extrude only
one edge and we'll extrude this along the z-axis. So there we go. With the head selected
in the center. We can now bezel this area
if would like. There we go. That's looking pretty good. Now let's just tap out into
object mode and we can now move this forward
just a little bit. We can probably scale this
down along the x-axis. Along the y-axis. There we go. And if we tab in this
wall at the top, we can actually bring
that down along the, along the x-axis, along
the, along the z-axis. So there we go, That tends
to look a little bit better. So from here on out,
we can start editing. We can actually duplicate
this light units. So we can duplicate this
light unit, carry one. I1 will duplicate
the light unit once again and carry
this one forward. With these light units, we can actually carry these light units upwards
just a little bit. Now with this, we
can start editing. We can duplicate some more
at the back if we'd like. Just to add a TOD,
everything looks really nice and
save our document. Now it's time to start
adding some, some materials. So this is where it
gets really fun. So let's start with
our base design. And let's select Face, Select, and select these, and select
this edge loop right there. This edge loop should
be a separate material. So let's go for a new material. Let's click the plus sign. With our new material. We can do whatever we like with our new material and we
can apply this material. So with that selected,
let's click control. So with everything selected, let's click P to separate,
separate by biomaterial. And let's add a new
material and assign. Now we can, we can add
whichever color would like. So there we go. We've got two different
materials at the moment. Saw base material. This one should be, should be dark and perhaps
somewhat metallic. So we can make it a little
bit more metallic and perhaps the top layer should be
a different materials, so we can actually add
a different materials. So new material,
assign this material. It does need to be dark and this material
needs to be metallic, of course, maybe not too much. And we can just call
this black metal. And a secondary material, we can really do
anything would like with this material to be
honest, it could be read. In fact, it could indeed be a black and red
kind of color. If we duplicate one
of these lights, we can actually then carry the slight downwards.
For a moment. We will delete this bottom layer and we will just
add a new plane, because I think it definitely
perhaps works best. So now we can choose
our background color. We can simply click on
the plane and we can add a new material to select
the background color. As you can see, it's really
unlimited To be honest, I really liked this kind
of orange right there. So that's looking pretty
good to be honest. We're not sure how it would
work towards the end, but we will see now let's
lower this just for a moment. There we go. That's looking
a little bit better. Now, do we want a light
unit underneath the board? I think that would be that'd
be pretty good to be honest. So let's select the
face underneath. And let's duplicate this unit. And let's separate
this unit right there. Now if we tap out, we can actually select
that specific unit. And if we go into expert mode, that is what it looks like
underneath the board. Let's save our document so far. Now if we tap in, now, we can edit this
so we can actually add some additional loop cuts. Along the top and bottom, select everything and
then we can scale it down along the x-axis. There we go. Then we can protrude this
by the smallest margins. That will be our light unit. That unit we can now add a new material and we can add an emissions to
that new material. And this could really be
anything. So there we go. Once we've deleted, we remove
those additional materials. We can now bring those
back up just a little bit. Not too much, of course. Just enough so it is visible
and that is super bright. So we can actually turn this emissions down,
perhaps around 18. And from there,
we should be able to edit this a
little bit better. So game iso come, don't really like it
that much, to be honest. Let's delete game master cam, Let's try to ISO cam. Don't really like that either. So I'm really liking this
angle for the camera. So we can try to add a
camera right around there. Now that we've added our
light unit underneath, we can now save our document. And of course with
the with the stand, we can add that to
black metal as well. So that's looking pretty good. So additionally, we
can now add a camera. Of course we can add
a camera right there. And of course our cameras
underneath at the moment. So we do need to bring
this camera unit upwards and rotate
this camera unit. Let's rotate it
about 90 degrees. And let's rotate it along the
y-axis, another 90 degrees. And let's rotate it a little bit along the z-axis, of course. Then we can carry this
down into our viewpoint. Suck, There we go. That's our, that's our
camera view point. Thus far, we can we can always bring it backwards
and within the camera, within the cameras
set and we can then adjust the the focal length. We can then adjust the
focal length of our camera. We can obviously
rotate the camera as much as we would like. So from here on we
can continue editing. So that's our cameras setup, that's our first
camera view setup and now we can continue to edit. So let's save that as well. Now with our little
light units at the top, there needs to be a
lot unit right there. Let's tab in. Let's go into face select, let's select the face
and let's separate the slight units by material. And let's go to a
new material assign. And I would personally like this to be an emissions of course. But overall the
light units should be black metal of course. So there we go.
And if we tap in, then we can separate once
again and add a new material. And that will be
the, the lightened. So let's set that to emissions. And we can actually
turn up setup missions. And we can give that
whichever like we'd like. Now if you find that the
lighter a bit too bright, we can actually turn those down. We can actually reduce the
strength of those lights. Sometimes it can be a
little bit too bright, so we can just reduce them, set them to around 2000. And this is the difference
that it does make. So we can always adjust
the, there we go. We can always adjust
the background colors to whichever two, whatever we'd really like. And that tends to look
really nice to be honest. So we can continue to adjust this until we find something
that looks really dope. And to be honest, that
doesn't look too bad. So with how handlebar as well, that needs to be black
metal, of course. Now with the
secondary handlebar, we can perhaps make
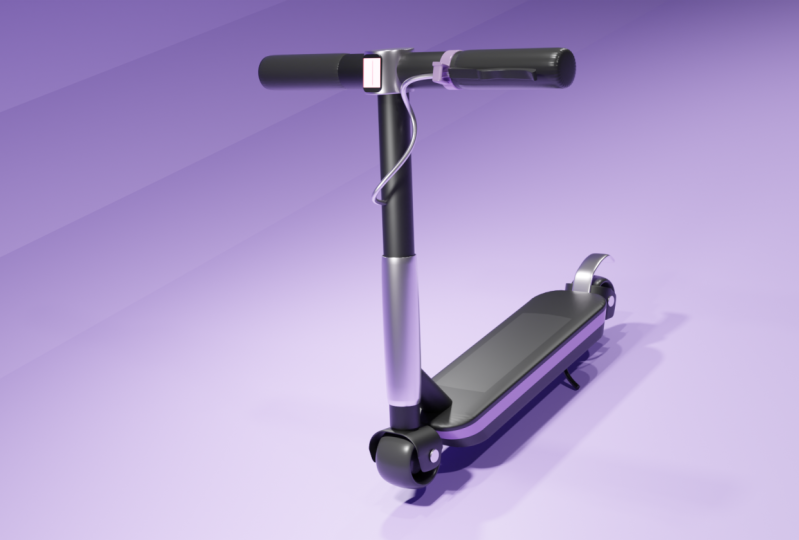
this a different color, perhaps metal silver. Let's try to create some
sort of metallic silver. So it turned the metallic
all the way up of course. And as for the roughness, we can probably turn that down
just a little bit. But it would look silver. Silver kind of like
a silver spray. But I do think I need
prompts, more light units. So let's take one of these units and let's, let's duplicate them. And let's carry that
down to the ground. And let's carry that
forward just a little bit. There we go. That tends to, tends to
add a different touch. That was a small
minute difference. Yet it's suddenly adds a new, a new look to our,
to our object. That's really awesome. And with the camera as well, we can obviously extend a
focal length if we'd like. We can always adjust
those things, but for now we can perhaps
keep it somewhat closer. And of course we can
do multiple renders. So let's continue adding out some are far harder material, so the silver at the top and of course the black metal bar. And of course these two handles, they need to be rubber,
so black rubber. And the point of this is
to turn the roughness down so we want it to look
a little bit soft. But of course,
perhaps not too soft. So as for the spectacle, we can always adjust
the spectacle. And spectacle can really change a lot of,
a lot of things. But there we go. So the roughness, we can have a little bit
less roughness. I think that perhaps look good because it doesn't
really look metallic. So that's what I
wanted to go for. So let's add that
on the other side as well as for the wire. And I think this should be
silver, silver metallic. And we can perhaps make, make this, make some
of these red as well. So we can go with the
theme of the entire, of the entire board so that we can perhaps make that red just, just like the one we
have below, of course. And perhaps this can be
black rubber as well. I didn't know that. Perhaps looks, looks good. But these are colors
that we can always adjust in the future. Actually add in a
little bit of blue, doesn't look too bad. It actually looks quite nice. Now below our third metal bar, that will be the same. So I've adjusted our metal, black metal just a little bit. I'd say we can keep the
metallic around 900. The roughness is
just around 361. And that tends to look
pretty **** good. Now as for us for below
such as the connector, this is black metal as well. I'd asked for the tires. It's like slab black
rubber as well. So there we go and ask
for our wheel nubs. These are silvers, so we've got metallic silver and it
proves to be perfect, proves to be perfect
for that occasion. And now I'm considering that this read that we've
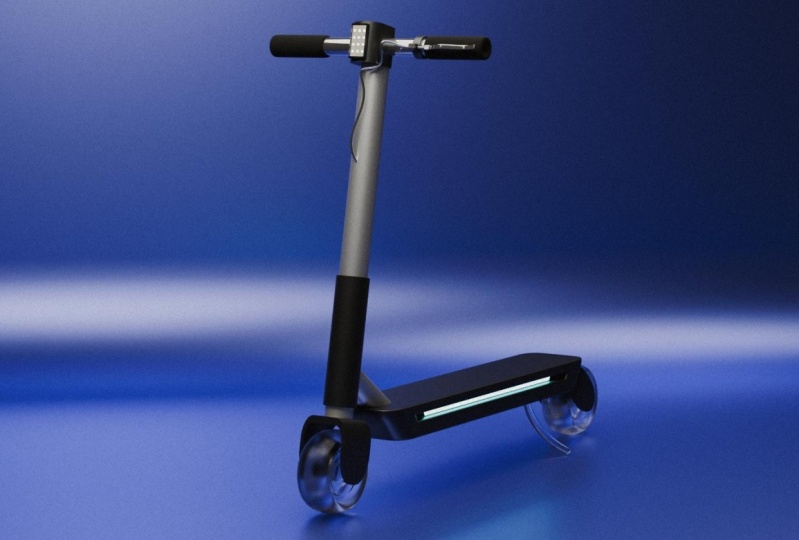
got right there. Perhaps this should be blue. Perhaps it should be blue, or perhaps the whole
thing should be blue. Now the light unit underneath, we can perhaps edit that
light unit as well. So along with the
light unit underneath, we can start
adjusting dark color. That blue actually
looks pretty nice. So let's save that document. That blue looks
pretty **** nice. So we've gone in a
different direction. So we're going with
blue ladies and gents. This is our blue scooter now
with the rear wheels is, it's really the same thing. I need is to be rubor. Of course, I need to
bolts to be silver. But of course, feel
free to change this around to your own satisfaction,
to your own liking. Some things that
make sense to me, they perhaps won't
make sense to use. So feel free to change this around until you find something
that you're happy with. But to be honest,
this can perhaps be our first render of r objects. From being completely honest, this could possibly
be our first render, first set of colors,
gray background. It's actually not a bad idea. It looks kind of, kind of different, which
is sometimes a good thing. Now we do have an
emissions right there. And what we can do, we can
create an alternative light. So let's duplicate
our main light units. And let's drag this
one downwards. Let's drag this one downwards. And if we view
this from the top, we can now edit this light
unit just a little bit more. So we can scale this unit down. There we go. And we can move this light unit forward just a little bit. And now we can do is that we can actually move this
light unit outwards. There we go. Now we can point to slight unit downwards
just a little bit. And of course it's a little
bit too bright right now, of course, so we can just
change that a little bit. Let's set that to
just around 100. And let's just see if it
does make any difference. So let's change that to 500 and doesn't really make that big of a difference
to be honest. So to be honest, we
can perhaps delete that by person X and delete. Now with this smaller light unit that we've got right there, we can start rotating
this slight unit to perhaps point our,
our, our scooter. There we go. And what we can do is that
we can duplicate this and we can start rotating this just a little bit and moving it along and continue
to rotate it. Of course. Now with this slight
unit, we can carry this one downwards
just a little, just to show off the full
board, to be honest. And as for our camera unit, we can perhaps zoom out now with our camera unit and view, and from the top we can perhaps
rotate this camera units. There we go. That's definitely look
in a little bit better, but I think we can
turn down the, the strength of the lightens
just to around 1,500. Now we can continue to test out different
backgrounds to see what works, to get a proper understanding
of what we can go with. The purple actually,
that purple, lavender doesn't look too bad. Now without light unit clicking number three
on our number pad, we can actually adjust it
downwards just a little bit. There we go. We can just add downwards
just a little bit. And that's looking, that's looking pretty
nice to be honest. We've got this baby blue
background going on. And that doesn't look
too bad to be honest. That could possibly be our
first render right now. So let's save this document. And now we can attempt
to save this document. So let's save this
document Control S, and now we can attempt
to render our document. So in the top left-hand corner, you will see your render, render options, render
image render animations. We would like to
render our image. And this will be our first render of our
little electric scooter. But there's something
that's not fully right. You can always cancel this
and go back and change. What's not fully right? Is the handle
holder right there. It's in the ground a
little bit too much so we can press G and Z to adjust this and bring it upwards just that little
bit, not too much. Save that. And let's try to render
our document once again. And now all you have to
do is just sit there and wait for your
render to be finished. But we will render a few different versions
in different colors. Try different colors
for your scooter. Try as many things as you can. In fact, add multiple
scooters if you'd like, that would be awesome. But that is it for this video. Thank you for
watching, subscribe to see more liberal or
leave a comment. And of course I'll see
you in our next one.
7. Outro: Now thank you for
finishing this class. Congratulations, huge
congratulations to you. In fact, remember to share your own work within
the community. If there's any feedback, constructive criticism,
or just normal criticism. Any reviews please share
with the community. This is a great way
to interact with other people in the
community and learn more. And this is a great way to
help other people who are struggling with a
particular area. So it's always good to share
what you found difficult, what you found easy, and how much you enjoy the
class and share your work. Create your own
different version, your own different
design and sharing. Congratulations on
finishing the course. I can't wait to see
what you've created.
 Kitai / Polygon Arcade, Creator, Designer & Animation