Transcripts
1. Introduction: Everyone, welcome back. Today we've got an exciting
course ahead of us. If you're into gaming, if you're into animation, if you're into just
anything to do with 3D design and an art,
this is perfect. My name is Kathy. Today we're designing
a Nintendo Switch. If you've ever played Nintendo Gameboy is
when you were a kid, if you have unintended switch, this is your chance
to learn how to design and Nintendo
Switch console. So I think this is
gonna be really educational and it's going
to teach you a lot of skills and I'll be your teacher throughout
this entire course. We're going to take it nice
and slow, nice and easy. I've made this course quite
simplistic to follow, quite easy to follow. I've taken a course material and simplify it so everyone
can understand. This course is mainly geared
towards intermediaries, but I also took the time to make sure that beginner students
can also use this course. Now I think this course is gonna be extremely valuable for a lot of people and teaching you
the basics of Blender, also a lot of teaching you
a few advanced tricks. The good thing about
this course is done. I will give you experience
and experiments in, I've always promoted
experimentation, try new things and
seeing how it works. So I can definitely see a
lot of value being added to you along your 3D journey. The amazing thing about this
course is that it gives me an opportunity to learn
more as a teacher, discover more on
the journey while creates an amazing
class for you. And the amazing thing
for you as a student is seeing that even people, I mean, we can make
mistakes as well. And I'll show you specific ways how to remedy those mistakes, how to undo those mistakes, how to avoid the mistakes, but also how to embrace
mistakes and just learn from mistakes without
being too upset. Now the tools you'll
need for this class is the free 3D software blender is free for Windows and
Mac books and Linux. You can also download
an additional, you can also download
an additional add-on. It's called ISO camera. And there will be a link. But both of these are free
and there'll be very helpful, it's throughout this course. So I've set up the
structure of this class to be quite simplistic
and easy to follow. I don't want to give you too much information
all at once. So we're gonna take
it step by step. It's healthy, it's good
for you to take breaks. So consistency is the key. And in this course
I've structured it to make sure that you as the students will
learn and let us something about
being consistent. And that's really important
to all students who are learning Blender,
learning 3D design. Once again, you will
be making an intent. They'll switch 3D concept
video game console. And it's going to be really fun. I'll show you how to
change the colors, how to rotate it oriented, make it your own,
use your own color, use your own designs. But I want you to share your
design with the community. Show us what you've created. If you've gotten lost in any steps, share the information, leave a comment and
I'll be sure to try to help you to resolve
these issues. So that is it, ladies and gents, let's get this course started. I'm super excited to
begin teaching you. I hope you're excited as well. We're going to
learn some amazing little skills that will help you in your future courses or your future projects
that you work on. Let's get started.
2. Blender & ISO CAM: Everyone, the first
thing we would like to do is to download blender. We need the core software
is type it up on Google. This is the official
site for Blender. They've got plenty
of material and they also have their own
courses that they provide. Well, you'd like to do is
go to the download section, download Blender for
your specific machine. If you're on Apple silicon, you can download the
latest version of Blender if you're on
Windows or Linux, you can also download
their version of Blender. But if you've already
got Blender installed, you don't really have to worry. The next thing that
we'd like to do is to download Blender
isometric camera. That's the ISO
camera from GitHub. This piece of software code
is created by Jason Carter. Very handy, very useful
piece of software. Get this installed as an add-on
in your blender software. It is quite useful and it does make your life
easier in Blender. So it's good to take the
time just to download these. And then we're ready
to get started.
3. Design Base Model & Buttons: Everyone. So what we wanna do is open
up our blend, our app. We want to go to new file. You can click on General
to get a new file. I've already started
my own file, which is Nintendo Switch. I've selected everything
by clicking a and just click Delete or x to
get rid of everything. To start with a clean slate, because first what we wanna do is add an intent to switch, an actual Nintendo Switch, just drag and drop to Blender. Once we're in
Blender, we can now center the Nintendo Switch. And of course we
can scale it up. So we can center it into the middle and scale
it up a little bit, move it up along the
z-axis. There we go. And click Control S to save. Always remember to
save your items. First thing we wanna
do is get a plane. So shift a. Now that we have a
plane, we would like to rotate this plane on the x axis by 90 degrees and
scale it up a little bit. We want to just scale it
up and make sure that it fits on top of our
template because the Nintendo Switch currently is just, is just our template. Now scale this along the x-axis. We can click Alt
Z for X-Ray mode. Now what we'd like to do is
to create some loop cuts. So click Control R to create two loop cuts them with
these loop currents. We can actually click S to
scale these along the x-axis. There we go, looking
pretty good. So far. Once we got all of these
vertices selected in the center, we can actually
click I to insert. And then we can scale these
in a much better way as well. Click on these two
edges and we can scale these along the
z-axis just like that, because we're going to want to bezel these corners as well. Once again, good,
the face selected with the interface selected, we can insert once again, because we've got the display
a little bit further down. We can scale it along in whichever form we
like to be honest, just to make sure it's a
little bit more centered. So now that we've got the
edge vertices selected, click Control B and V. And now we can obviously
scale these along the edges. And that tends to
look pretty well. That tends to look pretty
good to be honest. So once you're happy with the scaling, you can then click. So once you're happy with
that click right-click, you've got everything selected. You can actually now
extrude the edges. So double-click a solo, select a to select
all of our vertices. Now we can actually just extrude backwards and it's not
a very thick object. So if we click on, so we click on
number three on our, on our number pad,
you can clearly see we don't have to
make it too thick. And I think just about
there is quite perfect. And now that you've
got your object, well we can do is
duplicate this object and hide duplication
by clicking on h. So now we've got, so just in
case we mess something up, we can always get that object back because
we've duplicated it. So let's go back into edit
mode and let's click Alt Z. And now what we
wanna do is start modelling these buttons. So let's start with the
X button right there. Shift right-click to put
your cursor above there. And what we want in this object
is basically a cylinder. So let's shift a
and get a cylinder. Now that we've got
that cylinder, we can actually just rotate
this cylinder on the x-axis, 90 degrees all Z to go
back into X-Ray mode. And then we can scale
this object down. That looks pretty good. Now
that we've got our button, we can actually go
to our modifies tab. And what we can do
is click bezel. Let's put the amount up
to around 0.45 odd say, let's put us segment
up a little bit. So that actually
looks pretty good. Quite low poly. If you want it to look
better, you can just shade smooth and now it looks
pretty much Great. So naturally we'd like to
duplicate this object. So Shift D to duplicate
object and move it down on the z-axis and click
on both objects. And what we can do is simply
duplicate these objects and then rotate
them on the y-axis. You can rotate them
like that 90 degrees and are perfectly
rotated just like that. Obviously, it doesn't look
like it's fully centered. So what you can always do is
click on this object right there and you can move it around to fully
centered if you'd like. But me personally,
I'm not going to center it in this
video because we want to have a good idea of what it would look
like on its own. Let's click Control S
to save all of this. You can see the buttons are
a little bit protruded. So what we can do is actually
just click on all of them. Go to our side view and move these buttons down a little bit, just a little bit
because we don't want it to be too protruded. Once again, Control S to save. So as all these objects, you can select them all and you probably know
what I'm gonna do. I'm gonna duplicate them
all and just simply bring them across on
the opposite side. Just like that. That
looks pretty **** good. But if you think they are
not protrude and enough, you can always adjust
them and bring them out on the y-axis
just a little bit. It's the same thing
with these ones. You can select them all and bring them out just a
little bit on the y-axis. And until it looks, it looks perfect to your ligand. So what the rest of our objects, we just want to create the
rest of our objects such as this little knob on
the left hand corner, select Shift a, and
let's create a cube. So now that we have a cube, we can just adjust this cube, scale it down a little bit, adjusted on the z-axis as well. From the edge view,
there you have it, it looks quite nice. Scale it down a little bit. There you have it. Let's move our background image backwards a little bit so it's not affecting the
way we do things. And it's a similar thing with
this button right there. We can actually just duplicate this button and bring it down. Just use a duplication button for this object right there. And naturally we probably
want this button to be alert a bit different. So what we can do is
actually we can adjust the amount of bezel that were given this because
we naturally want this button to be a
little bit flatter. So it doesn't actually
need a lot of segments. Just around four
segments would do. And bring this button
in just a little bit. It protrudes a little bit, but not too much, and
save this object. So now it's starting to look
much better if we duplicate our background image and
move it along the x-axis. You can see that that's starting to look a little bit better. So there's a little button
on the right-hand corner. So this would be the next
button that we create. And this will actually
be quite simplistic. Shift right-click,
put your cursor right above the load button. And let's go for a plane. So now that we have a
plane, we actually want to rotate this plane on the x-axis, 90 degrees and scale
this plane down. So what this plane selected, we can tab in. We can actually start
to add some loop cuts. So to loop cuts right there. Quite perfect. And to
loop cuts right there. Now select the outer edges, not all of them, just
the edges we don't need. So select these vertices
on the edges that we don't need and we can just
delete those vertices. Now that everything is
looking pretty good, we can actually just extrude
this just a little bit, not too much, and bring
this into our object, starting to look very nice. Then we can actually just add a vessel just to make it
look a little bit better. And that, that
looks pretty good, shade smooth, and it
looks more lovely. So there's an additional
buttons that we need to create. And that's this little button on the left-hand corner at
the bottom right there. So let's put our
cursor right there. And let's get our cube, scale r cubed down. And that's r cubed so
far, looking so good. Now on top of this cube, what we can actually
create is a circle. Rotate the circle on the x-axis 90 degrees and scale
this circle down. And let's bring our
circle outwards. So now that we've
got our circle, select a circle and we
will add a new modifier. This is called a shrink wrap. And our target, we
click on the object. Now they looked almost attach. So let's click back
onto our cube. So now that we've shrink-wrap
this to an object, what we actually
want to click on for method is to project
this object. We want to project
it on the y-axis. Now that we've got our circles
selected and shrink wrap, we've got y-axis selected. Let's, let's click on negative and let's
de-select positive. So once it's on y and it's on positive, everything
is connected. We go to apply. We tap into our cube and we
would like to create art, some loop cuts for R cubed. So just scale this along the x-axis at a couple
of additional loop cuts. Scale this along the z-axis, move this along on the
z-axis, Face Select. And let's delete this
face by pressing X and then clicking face, and then that's deleted. So at these objects, we now want to join these
objects Control J to join both objects and tab in and
go to vertices selector. And now we can connect
these vertices, but we'll need some additional
loop cuts for these areas. Will need some additional loop
cuts on the opposite side. Now what we can do is to
connect these loop cuts, click face, and that's
how you connect. Your loop cuts. Pretty simple actually. Let's continue to connect. Our loop cuts. So now you just need
to connect all of these loop cuts
little by little. And you can watch me do mine. If you have any problem, you can just replay my clip to watch me figure
all of these out. Most of them are simple, but if you have any problem, it is good to just re-watch
what you've done previously, to try to, try to figure, figure it out for yourself. And we can just continue adding. Our loop cuts just like that. So there we have it. We have our little
circle created, and we will be using this
method more than once. So let's select only the
vertices in our circle. We can click F to fill
to give it a face. And then we can, we can extrude along the y-axis just
inwards a little bit. And we can actually bezel the most area of a
cube of our circle. So now that we've got that, that's looking, That's
looking pretty good. So like I said, we will be
using this more than once. Let's put this into our
object a little bit more. Let's add a bevel modifier. We want to tap in and we want to basil the edges
just like that. So now back to our objects. What we want to create as
these two little buttons on the opposite side, both opposite side to now to
get our button on the left, we want to try something
a little bit different. We're going to add a cube
right there on our left. We're going to scale this cube up just a little bit like that. And we want to scale
the cube down, put this cube within
the object or so that, and tap into the cube,
go to edge select. Now that we've got
the head selected, we can actually bears all this
cube down just like that. With everything selected,
we can then move the cube out somewhat
and bring the cube down, of course, so we can position the cube to our
likened, to be honest. And we can scale the cube
down a little bit more on the y-axis and bring it inward
into the actual object. So it looks a little bit
better, just like that. So now that we've got that done, we can actually do a
loop cut on this object. Now that we've got
this selected, we can do a loop cut on
opposite sides of the object, can bring that down
just a little bit. And what we can do
is just get rid of the bottom vertices
if we'd like. We can just click X
to delete vertices. Now of course we are
left with a top view. Top view looks pretty good. Now what would happen if we
add a solidify modifier? This gives our object some sickness, which is
exactly what we need. Let's bring this inward and that looks pretty lovely.
Look at that. So now that we have
our solidify modifier, we can actually add an
additional modifiers, subdivision modifier. Let's make sure our
subdivision modifiers below the solidity modifier. So with our
subdivision modifier, we can actually increase
the level of viewport, increase the render
to about three, so that you can see it's
not looking the best. Well, we can actually do is add some additional loop cuts. We can add a loop cut to
the edge right there. I can add an additional loop
cut to this edge over there. So now this object is not as object is
looking pretty good. We can actually
shade smooth just to get that finished and touch. We can now duplicate this
object and essentially rotate this object on dizzy
axles 180 degrees, then we can actually just
move this object down. And if we go back
into face select, we can just position
this object to make sure it looks a
little bit better. So just about there,
looks, looks pretty good. Position it on the
y-axis are a little bit more into the
center of the object. There we go. So just like that,
that's actually looking pretty good so far. So now that we've
got that done, we can actually continue with modelling the rest of our object and we haven't got much left, to be honest, we literally have two buttons left to model. So that's actually quite lovely.
4. Separate Designs: We click on our base object. We can now add a
bevel modifier to our base object just to
give it that lovely edge. And if you look at the
edge of this object, you'll notice that
it's all bezels now. And then we can
simply Shade Smooth, give it that rounded
edge finish. It's not bezel too much, but
it's not bezel too little. So from here on out,
what we'd actually like to do is to cut some additional circles in these objects for our
additional buttons. So what we'd like to get
started with is a circle. So let's tap out. Let's add our cursor above
this button right there. And let's add a circle. Let's rotate the circle
on the x-axis 90 degrees. Let's shrink it down
just a little bit, and let's move it down
a little bit more. That looks, that
looks pretty good. Let's move it out
just a little bit. So tabbing on our object and now what we can
actually do is to, is to separate these objects. So I can separate
that object and separate the additional one
on the right-hand corner. Let's separate that as well. So now if we tap out,
you'll notice that these objects are
essentially separated. Well, we can clearly
see that there's something not to correct, something wrong with our, with our object into the center, what we can do is add
an additional loop cut. And let's bring
this loop cut out. And that right there tends
to look pretty nice. Simple solutions like that. And we've automatically
fixed our object. Let's save this what
we've got so far. And let's continue to create our additional buttons
right over here. So what we're gonna do
is shrimp practice. Once again, let's go
to our modifies tab, shrink-wrap it to this
object right there. And we want this
to be on method. We want it to be projection on positive and we want to
project it on the y-axis. So once we click on
both of these and we join these objects. So now that we've
got that we can click on our left controller, we can tab and click
six to tap in. And essentially what we'd
like to do is to create some additional loop cuts. So let's come over to our Edge
and let's click Control a. Basically we want to apply
all transform and then this gives our object a really
nice smooth and effect. This really does give
it a finishing effect, and we can actually do the
same thing with the display. Now with these control edges, what we actually want to do is to tap in and let's
go to x-ray mode. With these faces, we
actually just want to press F to fill these phases. So what this object, Let's
tab N. Let's go to Select, select all three of these edges, and let's bring these. So let's select this edge. Let's bring this one backwards.
Let's select this one. Let's break this edge
down just a little bit. Let's select the top one. And let's just bezel this
top edge right there. So now that we've
got those edges, so now that we've got those
edges separated a little bit, if we tap back out, that actually looks
far, far better. It actually gives our
console a very retro look, which is exactly what we like. It's exactly what
we'd like to go for. Now at the bottom,
if you want to do the same thing, you
can, absolutely. You can tap in and
width these faces. You can essentially just move them backwards
just a little bit, move them along, and just
bezel this edge if you'd like. Once again, you can move
these back into place, gives it that lovely
finishing touch. But we're really given
it a nice arcade vibe. So Control S to save that. So on our left controller, we can tab, we can
go to Face Select. And what we can do
is actually just cut out some of these faces. So using a knife, we
can actually just, just make some really nice
cuts along these phases. We can make some additional
cuts if we would like. So now we've got a few
faces right there cut out. So that's looking pretty good. Now let's go to object mode. And of course, we can add a
shrink-wrap to this object. So naturally we would like
to create the circle. So we want to add a
cursor right about there. We want to get our
self a circle and we want to rotate
this on the x-axis 90 degrees and bring the size down just a little
bit like that. That tends to look really
nice to be honest. So now we can add a
shrink-wrap to this material. For a target, we can click
on the actual object. And once again, we'd
like to project a shrink-wrap on
the y and positive. And if we go to our object, we can now tap in and
with the face selector, we can delete this
face right there. So now this face is deleted and with both objects selected, just shift select both objects. We can control J to
join both objects. And once we tap it in, we can
now connect these objects. So we need some additional
loop cuts just around there to make sure we can
connect all of our object. We need some additional loop
cuts at the bottom as well. We need some additional
loop cuts on to cite additional loop
cuts on both sides. Actually, a technique
that we're gonna be using is typically the same
technique we've used before. We're just joining these. If I click there, I
can join those two. If I click there, I can join
those two. There we go. We can join all of them just
like that. Nice and simple. So I'm going to skip ahead. I'm going to show you
a time-lapse now. So you can just add
these objects with the same method that I'm
showing you right now. So once you've got
everything done, you can actually
just click F to join all to fill this
gap right there. Then we can insert and extrude
a little bit like that. But actually we can, we can
insert a little bit more. And perhaps then we can extrude. That tends to look a
little bit better. So we've got an object
just like that. We can just extrude
just like that. And that tends to look, look pretty good, I'd say. So we can save that. And what we want to
do is essentially do the exact same thing on
the right-hand side. So like I said previously, we will be doing the
identical thing on this side. Naturally, it's about, let's get our self
and other circle, and let's rotate a circle
on the x-axis, 90 degrees. And let's zoom this
down, put this into correct position, and
let's bring it outward. Let's move it outwards
just a little bit, not too much, of course. Once we are tapping
into our object, we're going to use the
same tool we used before, and that's our knife cutter. And it's the identical thing
that we've done before. We just want to
cut out our edges, try to get them to align. But if they don't align them, it's really not the
end of the world. We can cut out some
additional ones just along there as well. So now that we've got some
data, we've cut those out, we can actually delete this
face just as we did before. And you can probably guess
what we're gonna do. We're gonna shrink
wrap this circle. Once again, did the
same thing before. And we want the method to be on project on y and positive. So let's get our circle,
Let's shrink wrap our circle once again
to this object. We want it to be on, why we want it to be
on project as well. So now we can bring our
object down closer to, closer to our controller
on the right. There we go, tap
into our controller and we want to delete this face. We can join both objects. So Control J to
join both objects. So like I said
previously, we need some additional loop
cuts along the edges. Some additional loop cuts
right there as well. Luke cuts all around. It's identical to what we did before on the opposite side. And now we can just
join these objects. So we can simply just start
doing it just like that. Does look a little
bit rough, but it is joined and it is working
quite perfectly. And that's what really matters. So with our circle now, we can have all of this selected
and we can fill this gap and we can extrude it down
and intrude it inwards. So once we go back
out into object mode, we can have a look
at how this looks. And I'd say that
looks about good. We can select all of this and
we can actually extend it or expand it if we think
it's not large enough. And if we tap back out,
take a look once more, you see that it looks
somewhat better. Somewhat better,
I'd say for sure. So that's good
progress that we've made so far. That's really good.
5. Add Finishing Touches: Now if we select our
face and we tap in, we can actually
select the interface and separate because this, this will be our display,
this will be our screen area. Now with this coordinate
on the right, we can actually deserve
this vertices right there, clean it up a little bit,
dissolve this other one. There's all vertices
and we have it, It's looking somewhat better. So what I've done is that
I've selected this face and I've basically
duplicated everything. So we have a new face that
looks a little bit better. In my opinion. It's more like a skin, so that's just essential so we
don't get any blur. Now what we can do, we can add the additional
buttons right there. Let's start with this one. We've got our cursor above
and we want to add a circle. And let's rotate the circle
on the x-axis once again. And we can then bring this
outwards just like that. If we go to the edge, click through on your
notepad to get to the edge. We can bring this
out just like that. Now we can actually
zoom it down, perhaps just a little bit. And if we tap in,
we can fill and we can extrude just a little bit. So if we select everything, we can actually move it
outwards just a little bit. And like I said, Face Select
and let's insert this. And we can insert this
face right there at the back face and then
we can bring it down. So this would be like
our, our joystick. So once we have
everything selected, we can then move it
inwards, just about there. That's looking pretty good. So now with our face view, we can do something similar. Inserted down,
extrude it within, inserted once again, and
then we can bring this out, bring it forward just a
little bit like that. Now without edge, we can
go to edge, select Alt, select all of our edge, and we can bezel the corners. And it's the same thing with
the, with the interface. We can this as well. And that's looking pretty good. Once you've got
everything selected, it looks very low poly. And if we go to bevel modifier, so once we got all
selected Control V, and then we can bring
this down like that. And it looks pretty good. Same thing with the
innermost face. We can bring us down as well. And this will look pretty good. So from there we can
add a bezel modifier. We can increase the vessel
and then shade smooth. That's looking pretty good. Once we've got that
joystick created, we can just simply duplicate
this and bring it across. And if we go into expert mode, we can make sure it's
a bit more centered, but it was pretty
perfectly centered. That is, our little Nintendo
Switch console created. So let's add our
background view. And from here on, we
can start to color it.
6. Add Materials: So now what we can do
is add our material and this will be the fun
part, ladies and gents. So our first Nintendo
Switch will be read. So we naturally, we want our first material to
be a red material. Also want to split my
displays. So let's split this. On the left-hand side,
I will have my render. And what we can actually do
over here is that we can actually start using
our true isoquant. And this ISO Campbell
basically give us a real good perspective
of where everything is. Isoquant tends to be a
very fun objects you use. So you can position
your ISO common almost any direction
you choose to pump, just affecting the scale. So I'm just zooming out
as much as possible. So that's what we'll
be working with. So now on the left, obviously
I want that to be rendered, but I want everything
to be rendered in my favorite rendering engine
in cycles using my GPU, I want my max render
to be around 7,000. I want my noise threshold to be somewhat lower, maybe 0.005. And now because we
can't see anything, we've got to add some lighting. But so far I know what most of this is supposed
to look like. So I can actually just hide this object and we can continue
working on our object. So let's add some lightened
because we desperately need sunlight and let's
bring this light upwards. Let's go to our lightened
section on the right and possibly even make this 55000. So we will have quite
a lot of light. To be honest. What we can do is that we can
just duplicate our lighten, continue to duplicate our light. And so far we've got, we've got around
three and we can actually duplicate this
light into the back. Let's duplicate it to the
back as well. There we go. Let's duplicate a new set
of these to the front. This is good, and let's rotate this on the x-axis a
little bit just forward. So all of this will make
it look pretty bright. I won't lie, it will
look pretty bright. So now with our, with our face that we
duplicated earlier, what we can actually do is that we can bring it
forward a little bit, but not by much,
literally just a little. So I'd say that's about enough. So we want to bring it
forward just a little bit, but definitely not too much. From top-down view, it
tends to be much easier. We can bring it forward
just like that. And additionally,
what we can do is actually we can tab and we can select all and we can
extrude backwards. This will give the display
a nice little edge. This will give it a
nice little field of view, which is nice. So you can see while I'm
designing, I'm also improvising, and I always advise
everyone to improvise. And our display, we can
actually extrude artists. We can actually scale up our
display just a little bit, scale it a little bit behind, beyond the boundaries,
just a little bit and that tends to
look really good. So like I said, our handles, they will be, there'll be red. So let's start, let's
start adding some colors. So this is where,
this is where it gets fun and rewarding. And of course, our, our buttons at the
top, top buttons. These will be black.
But I must say these, these buttons are not just, are not just any black buttons. If we zoom into our render. By the way, let's
turn on de-noise in our viewport and dot will
be in our rendering engine. And if we go back
to our material, so spectacle can actually
affect this by quite a lot. So these buttons,
they tend to be a little bit soft on consoles. So you don't want a rough
to us to be too high, but you don't want to spectacle
to be too high either. And I think that looks
that looks pretty good. So with the buttons
on the left side, it's the exact same
thing, like buttons. But this is literally the fun part of the course
where you get to experiment. Most of these buttons
are black anyway. So we can use similar
materials for a majority of these buttons or most
of these buttons. The buttons on the
top right there, they're black as well, but you can literally choose
whichever colors you'd like. This is a nice thing
about blenders that you can do whatever you'd
like with the software. It's completely free. But
in a short period of time, we've managed to create
really nice Nintendo game and console just by using some simple shapes
and simple geometry. The back of the display,
There's also a black. Now this is a slightly
different black. We can actually make
this a little bit more metallic if we'd like. We can actually give it a slightly different,
different effect. And we can actually turn down
the spectacle a little bit. So if we zoom in into our
object on our viewport, we can actually affect
the roughness now. And that's, that's a, that's a pretty important part. And this object,
it's not too rough because I think most of
it is Plastic anyway, but I'm making it
look a little bit plastic while looking also
a little bit metallic. Of course, these things, we
can always change them up. Once again. With this, this
will also be black, but it's a different
type of black. So we really want this to be, to be a different,
a different shade. So that, that already looks
pretty good to be honest. But if we turned
on the spectacle, you can clearly see it affects object in some very
interesting ways. And we can probably turn
down the roughness as well. So it basically looks a bit more, a bit
more like plastic. And indeed, we don't want to have
metallic to be too high. These shades are not the
same, but we definitely, we want them to be
easy to differentiate, but we don't we don't want
them to be the exact same. So that tends to look. I tend to look pretty good. So this is where you can, you can do whatever you'd like. Actually, you don't
have to follow my instructions anymore, but it would be good if
you if you do follow my instructions and then
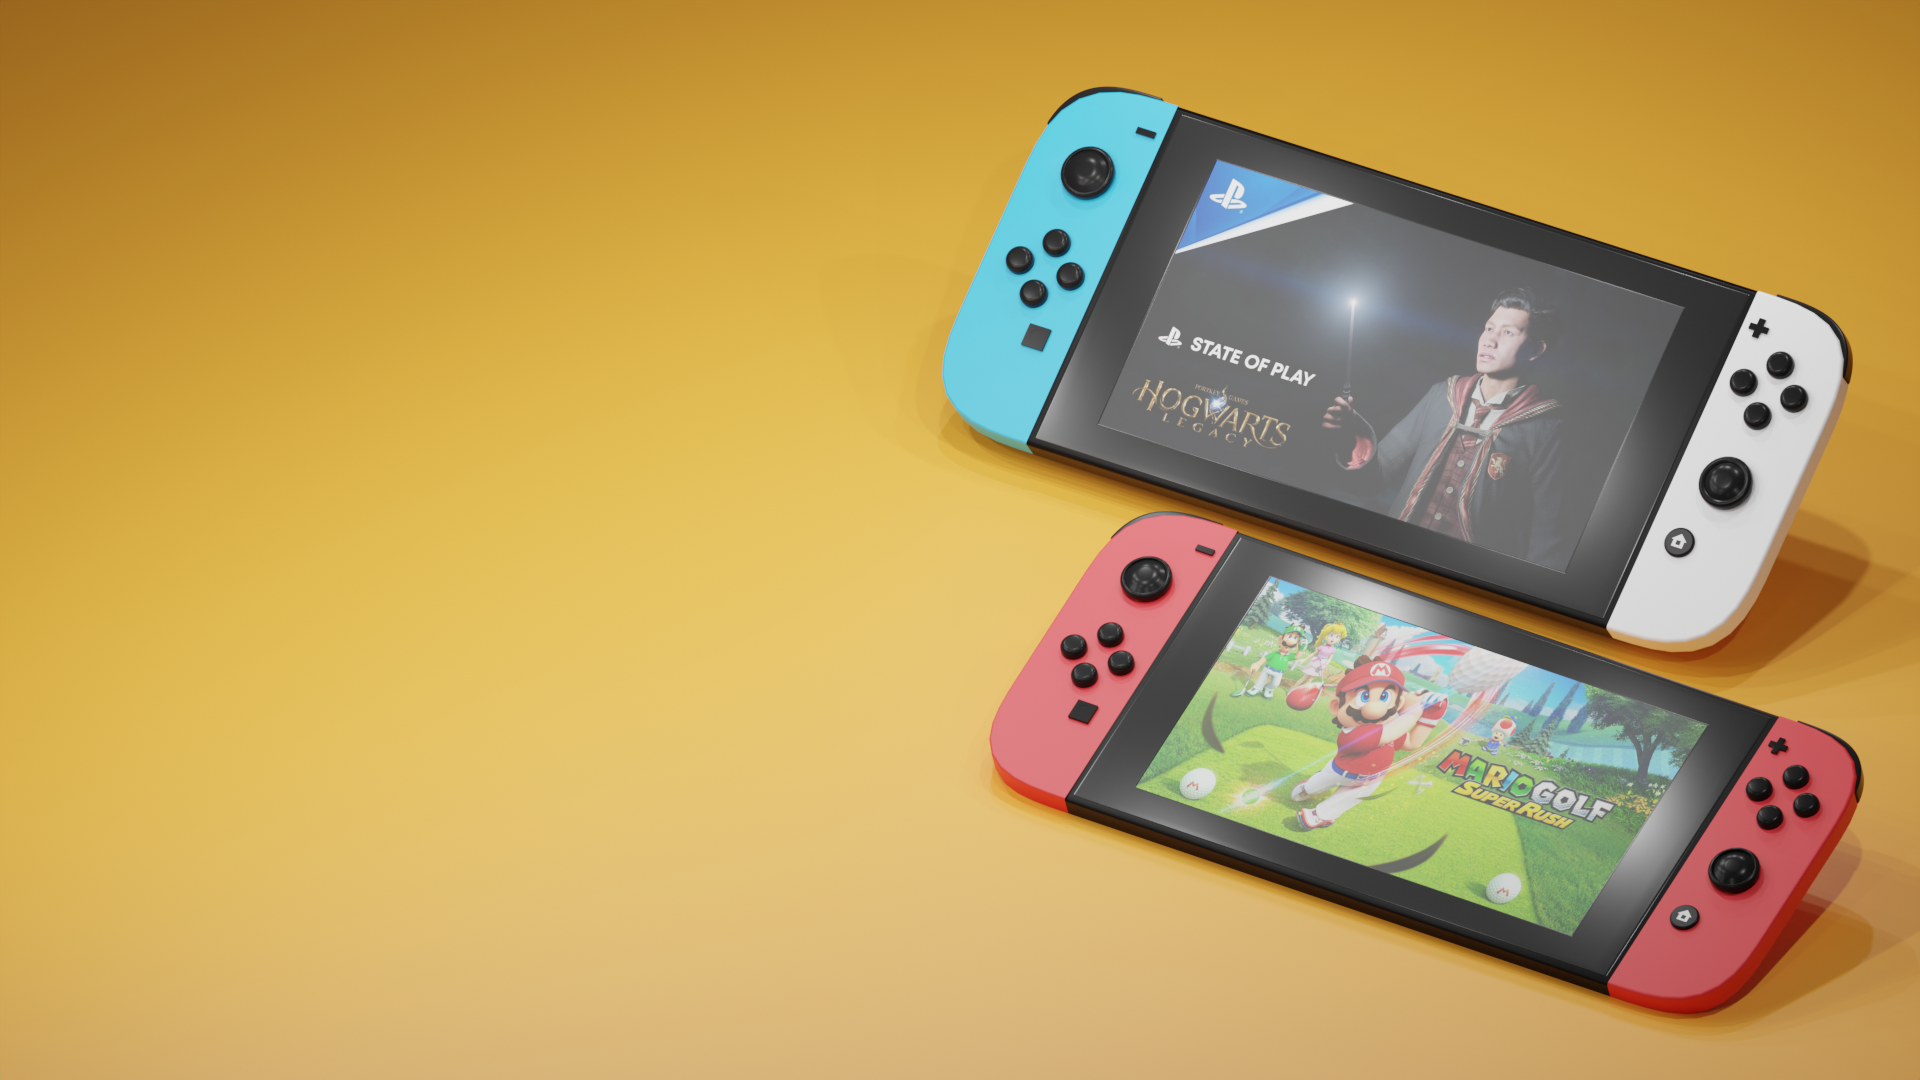
you can duplicate all of this and change it
around if you'd like. So that's our viewport. Now we, obviously we want to add a game. So if we go into shader, this is our object
that we've created. Let's save our document, Control S to save your document. We don't want it to get lost. Let's create a new material. And we'll add an inputs, we will add a texture. Let's add an image
texture right there, and connect the color to the
base color of the principal. So once you go to open, I don't know that some
some games already. So we can basically put
whatever game we'd like. A game that I'm
really excited for obviously is Hogwarts Legacy. I don't necessarily think
this will be on the, on the Nintendo Switch, but we can still try. We can still try if you'd like. So now we are in UV editor. Now what we can do is just
scale this out on the x-axis. And we can actually scale
it upwards on the y-axis. And from there on out, it
actually looks pretty good. So that's, that basically took
us a small amount of time. And so far so good, it
looks really lovely. Now our Home button
will be black as well. It looks like with our own
button, we can probably extrude it a little
bit more forward. So before we can add an
icon to this object, we need to tap and
select the face. We want to intrude the
face just a little bit. And then we can actually
just separate this face. So P for separates and
we separate this face. If we click on the face, now we can go into, into shader and we can create
new material right there. So if we go to our downloaded section
and we go to our icons, we can add a color
to the base color. And if we go into UV, if
we go into our UV editor, we can click on our face
selected right there, and there we get this. So now, so now we should be able to hover this above
the home button. And we should be able
to zoom this down. If you want to re-size
your, your circle, you can actually resize
it on the z-axis, y-axis, z-axis, x-axis,
anything really. And then we can try to, try to center it as much as
possible and reshape it a little bit more on
the, on the y-axis. So if we go back
into our layout, we see that the buttons
have changed color, objects have changed color. Sometimes you run into
problems like this and it's affected our entire object. What we need to do is to delete
their create a new color, and let's just call
this black buttons O2. Now what just happened there
is because before we end, that was my mistake right there. I should have known and
created the material. But we can easily, we can easily create
it once, once again. Now with this button right here, we can tap in and
we just want to extrude backwards a little bit. And we can go, we can actually scale it up that
much, little bit. We don't want to scale
it too much, of course. But if you go back into UV view, what we can do can click on everything and bring it
down just a little bit. And this should,
should make that more. I can do UV view.
Let's bring this down. So there are button
looks, looks pretty good. So that's our Home button. Now I've created new material for the rest of the buttons. And we can just go ahead and
select our new material. So those are some basic
material and we just created all of this in
a short period of time. So now what we can do,
we can actually just add a plane to the actual
Florida scale. This is plane up. Let's bring it down,
of course is bring it below our object. And from the top view,
we can then scale this. We can scale it out
just like that. Here we can zoom
out a little bit more and save everything. So let's create a floor color. We can use whatever
floor color we'd like. So yellow tends to
look pretty good, but we can do whatever
we like, blue, anything. But I'm digging and
digging the yellow. I'm digging the yellow
and we can make this a little bit metallic. We don't want it
to be too rough. We can bring the
spectacle down as well. Not too much of course. But that's looking,
looking pretty lovely. So that right there is
our Nintendo switch. From here on out. We can
basically do whatever we'd like. We can take all of this,
Select, select everything. So once we've got
everything selected, we can then rotate
this on the x-axis. We can affect it in that way. Then we can actually, we
can actually move it up. We can actually make it a
lot bigger if we'd like. From here, we can actually move this object around just
a little bit more. And we can duplicate this
object, duplicate this object. And because it's duplicated, we can then rotate it
a little bit more. We can we can rotate
it and lay and lay it down so we can actually
end up having two objects. We can move this object
along if we'd like. So select everything
on this side. Let's de-select the lights
because I don't need a light, but we just want to just like to rotate
this a little bit more. So I'm just bringing
this up into the edge a little bit
more just like that. But if we did make
this object bigger, this is how it would look. So we can change the size
of our objects if we like, but it's not
absolutely necessary. So there are object
is on the ground. So now we've got two consoles and there they've got different, they're in different sizes. So now what we can
do, we can change around the colors
of our consoles. So now if we go to shader, we can actually changed the
game that was on our console. So what I want is
a new material. And let's add a image shader right there
or image texture. And then I downloaded section. I will leave all of these
for you to download so you can use whichever
one you'd like. We can add fortnight
just like that. So that's, that's pretty cool. So let's go into our UV shader. Let's click on the Display and everything is
perfectly aligned. So I actually, I don't need to do anything in that regard. But with these colors now, we can actually
change the colors. Now, if I want the right controller, it'd
be a different color. I can solve. We can actually just leave
this, just leaves us in white. So it actually, that actually looks pretty good
leaving this in white. So that works perfectly. Let's bring the spectacle down. Let's bring the roughness down. And we want a new
color for this side. So mint looks a little bit nice. Also neon looks a
little bit nice. But we want something that pops. I think the lavender,
purple pops the blue apps. Absolutely looks great as well. So that actually looks good. The white and blue
does look good. So let's save that and we
can actually tap in to get some more information
just to see if there's anything left that we
need to, we need to do. What we can actually do is
just select this edge to select and we can actually
affect it like, like that. Let's see, how would
this affect our object. So from the right-hand side, Let's see how it
would affect it. So that's actually, that's
actually really interesting. So we can do simple
things like this just to, just to change it all around. And obviously I've got materials for these buttons as well, so you can actually add those
materials if you'd like. So I've decided
that it's probably best to go with the blue. I've just randomly decided that it's probably best
to go with the blue. So for now, we're
gonna go with a blue. So that looks about,
that looks about well, that's pretty well done. So now we can actually
just render out our image. And obviously this is from
the cube we leftover, so we need to
delete that object. So for any hidden objects, we can finally just
delete them all. It's a good habit
to name your files, but I haven't named anything, but it is a good
habit to name things, especially once your
project starts to become bigger or more complex. So let's try to render
our image once more and there we are
looking for better. But I think we can
perhaps do a little bit better with our,
with our camera. We can perhaps zoom out just a little bit more just to
give it that full effect. So I've decided that's
what we'll go with. I think this looks pretty good. This gives me enough room
to make a thumbnail. So I've got to think about
all of these things. But I'd say that
looks pretty good. So round of applause to you for completing this course if
you've gotten this far, seriously, brilliant
job, good job. I think we did.
Absolutely amazing. Thank you all for watching. Remember to share your own
work in the community page, in the project and community page or your own
work, share your own project. What have you created? And if there's anything
you've learned, let us know. But I hope you
enjoyed this video today and I will see
you in our next video.
7. Outro: So thank you all for
watching this course. Congratulations on
your completion of this course does a
really big achievement. I'm really proud of you
for finishing this course. Please share your work below
in the project gallery. Share it with the rest of us. I would love to see
what you've created. And obviously, I've
showed you how to create different colors
and orientations. I really want you to share
what you've created. This would be cool. And it's a reminder
that what you've learned in this course, these are basic information with some advanced
skills as well, but these are crucial for your development as a
3D artists and it'll be very helpful when
you've got a project in the future or in your
professional career. These are the sort of basic
skills around blender that makes the software amazing. But while these skills
might seem complicated, once you get used to them, you create more consistency. You realized how
helpful they are and how simplistic they
can be in your life. So if there's one thing
that I hope you've learned in this course is that no matter how
complicated we're out logs, you can still turn it around. You can still improve
and you can still finish your project and make
it look amazing. No matter the challenges you
faced in your 3D journey, we all face challenges. And there's a small
things that allow us to overcome those challenges. So I hope you have a good
takeaway in this course. Thank you for watching. Share your work in
the project gallery. I'm looking forward to
seeing what you created.
 Kitai / Polygon Arcade, Creator, Designer & Animation