Transcripts
1. About The Class: Hi guys, I'm back with a new class. It's about pending black and white landscapes. Sounds interesting night. Well, that's not the only reason why I chose to bind with a single color. I will talk today mainly about the levels of atoms. There are three, beginner, intermediate, and advanced. Have you heard those? Well, what do they mean? So my only focus today is talking and providing information about what happens in those three levels. My idea is, if you know the difference, you can easily jump up your skill level. Working on learning and perfecting those differences will discuss plenty of techniques from reading the paper gradient, large red on red and importance of paper, brushes, pains, and everything. All you need to level up your scale. So without further ado, let's get started.
2. Art Supplies: Okay. Okay.
3. Techniques For Beginner Friendly Landscapes: So I have divided the five projects in today's class in three categories. One is advanced to an intermediate and to our beginner friendly based on their complexity. So these two are beginner friendly. Now let's see how we can paint these two beginner friendly landscapes. First, we will discuss about the forest, and later we can move on to the galaxy one. It's as simple as it looks. I have first painted the background in the Python script. I have added trees, and that is it. Let's do a practice run. This is for absolute beginners. Fast. You had to read the paper with clean water. And I would suggest you guys to use brush. Spread evenly. Now, take the color of your choice. Today I'm using pines gray, so I'll just print the pain over the paper. Now, since the paper is wet, it's easier for the pain to spread. This is the exact same thing I have done in the landscape. So I'm going to let this dry. Make sure the background is completely dry. Before you add on another layer. Make sure that the paper is completely dry. It use your hands if it helps. I'm going to take a sharp synthetic brush and I will add the trees. Just to give you guys an idea about how to go on with our fast landscape. So fast. Wet the paper with clean water. And it helps if it is a good mode brush. And once the background is completely dried up, take a synthetic branch which should be very sharp and has appointed a dip, and then start adding your trees. So this is how I have been doing this vast landscape and I hope it helped. Let me share a few tips for the second beginner friendly landscape as well. So compared to the first one, this is quite different but not difficult. What you're seeing here is called a gradient wash. So a gradient wash typically starts with dark color and ends with lighter dots at the bottom. This gradient, while she is the most preferred one to paint the skies. And today, I will show you guys how to paint it. Start by writing the paper with the Ummah brush. Take the dark shades of grey and don't dilute it with daughter. Start at the dot. If it helps, you can hold your board no hands. Gradually turning down with your brushstrokes. Oh, this is it for the gradient loss. You can see the top is in dark shared, Violet is coming down. The shade gets lighter. And that's what happened in the landscape as well. And I will keep this for drying and I'll come back once it's completely dried. If it's dried out not and if it is dry, it let me show you what you can add at the bottom part of the ba. Ba. Simply add a few pine trees here. Instead of adding the Mondale's, I will show how to add the mountains while we're painting the landscape. So this is how normally and gradient gosh, under typical landscape looks like. You might have seen this kind of landscapes in social media. So this is how it's done. Painting beginner friendly landscape, like this too. You don't even need a 100% cotton paper since we're not depending on technique. Let's see in detail how to paint these two landscapes.
4. Mysterious Forest: This is the first big differently video. And I'm not even sketching. We're gonna paint directly without brushes. And to keep it simple, i'm using most basic technique. Just read your paper with clean water. And I'm using a mop brushes. This is number four. And I always use this brush for the initial washes. And now I will apply a little bit of pain in the middle of the paper with the same brush. I'm just gonna spread the pain. Don't call it the pain to the entire part of the paper just in the medulla. We are painting the simple forest. So this is a simple background. And I'm gonna keep this for drying now. But it is dry it. And I'm taking a synthetic brush to paint the trees. And I'm using a lighter shade of grey because these trees will be present in the background. I'm using synthetic brush because this way you can have control over your brush moment. Now that I'd been details are A-sharp trees or branches. I use synthetic brush, painter tree in sort of like a diagonal direction. And with the same brush, I'm going to add a few branches. And I'm adding these brushes in sort of like zigzag manner. Finding the branches in sort of gives it more natural look. Continue to add the branches of the tree. Half the stronghold brush and your movements if your using a natural brush. So I would suggest to use synthetic brush, at least to paint branches. And with the same shade of gray, I'm gonna paint on a tree at the far edge of the paper. I'm using the same synthetic brush as well. Now paint the branches just like we had done before. If you guys think you another technique, you can fast forward this part. Now, I'll paint one last tree with the same brush as well. Now with the same brush, I'm gonna use darker shade of grey. Darker shade. Because the trees we're gonna paint now are closer to us, are in the foreground rather than in the background. I will start painting a tree here. And I will follow the same steps as before. That is painting the branches. I'm going to find another tree of life diagonally as well. And when small tree at the edge of all of the trees. Now I'm gonna show you guys an interesting technique. The idea is to paint a rock covered with dried branches here. So what you should do is take a dry brush and dip it into the paint and just lightly touch the paper. Like I'm showing here. Now you can see this dry brush creating these interesting textures on the paper. Now, I will take a normal wet brush and cover the rest of the area with a dark finds crave. Now you have that rock covered with branches, tripod structure with just a simple technique. As a final step, I'm going to take a synthetic brush and I will paint a few branches here. And to give that extra natural look, take a little bit of pain over your brush and just splatter some of that on the paper. It looks quite natural and mysterious. I'd like to do this technique for all my paintings. Remote API, once your paper dries. I hope you left us with no friendly video. And see you guys in the next one.
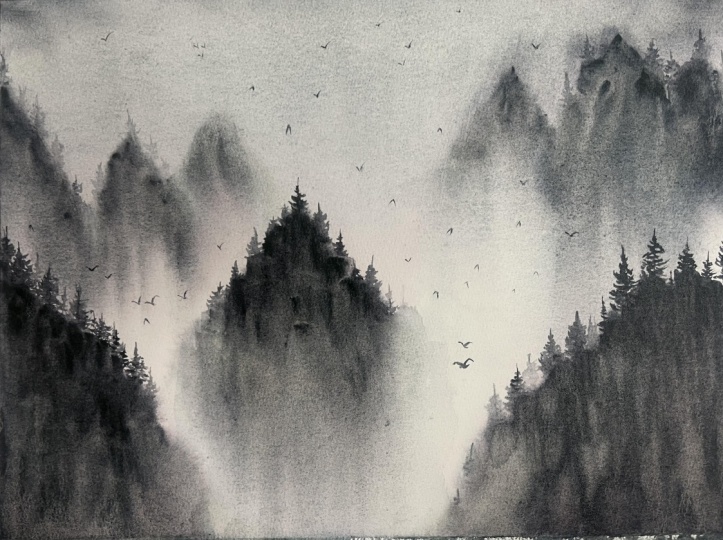
5. Galaxy Valley In The Night: Let's start with our second video, which is quite big enough, Randy as well. This is a painting about a mountain valley and a galaxy night. So I will start sketching them on dense fast. And there is a lake in between as well. So in the middle, there will be water. On both sides. There would be mountains. So to avoid the confusion, I would remark where the lake water will be. So max dewater, here, here and here. And remaining, you can paint with define scraped Dhaka screen to show the mountains. Pause this video, take a screenshot and then complete your sketching at their own pace. The first step would be vetting the paper. Of course, with clean water, I'm using my number four more pressure here. Do not get the complete paper. Just read until half. That is, you don't have to add the paper with the mountain. I'm taking a darker shade of grey and I'll gradually make it light. During the paint from top to bottom, the shape gets lighter. It's called gradient Wash. It's one of the first techniques you learned in starting your watercolor. As you can see, the top of the paper is Docker and come down. The shade gets lighter. And I'm gonna keep this drying before I start the mountains. Paper is dry and don't mine about this hard edges. We're going to paint over it with dark binds Gray. And I hope you can see the pencil sketch right underneath it. So let's start painting them on bench. Follow the pencil sketch, and leave out the whitespace. This painting was the most requested video since last year. Carefully follow the pencil sketch. We have finished. That's one to the next. It shows that there is a lake and it's reflecting that beautiful gradient sky above. Now before adding, the stars were taking right gosh, you can take flight watercolor as well. For adding the number one brush. I'm going to quickly cover the mountain. Since Tasha falling on mountains. For some extra effect, I'm going to add a few remote. I hope you liked this video and see you guys in the next one.
6. Techniques For Intermediate Landscapes: Let's see what is an intermediate level landscapes. I'm going to only talk about mountains here and not about the spine since they both have the same technique. Now, where and how exactly this differs from the beginner friendly landscapes. Well, for one thing, the paper, you definitely need a 100% cotton paper. And second, the technique involves you to walk with red on red technique. It is a bit advanced compared to what we have seen in beginner friendly. And let me give you some tips and show you how it's done. The first step is always the same. We read the paper. I would save clean, but this water is not clean, but it's okay. I'm gonna take some paint on my brush. Paint the sky area, like we have done in Galaxy painting before. The paper is, I am putting a drop of paint here. As you can see. Now I'll just blend it to paint the sky. Remember what we have done in a gradient? Gosh, just do the same. Friends between beginner, friendly and intermediate comes right here. Remember, after painting the background, that is gradients guy or a background Benz car wash. We have led to paper to completely dry. And now we are going to do the opposite. That is paint while the paper is still rat. And this is called veteran with technique. I'm just going to paint a few mountains over here to show you guys how it's done. Under that dip. Painting wet Henri technique. You also need to do the blending as well. So the brush is very important. Here, I'm using a mob brush of number four. After painting the mountains, I will start blending. Please follow the movement of the brush. To understand the blending. Since y, I have to use the a 100% cotton paper. Since you need a long time for blending all of these mountains and your paper needs to stay wet for a long time as well. If you are using the cellulose paper, it dries up quickly and you cannot blend anything over there. I'm gonna paint mountains. And like I said before, follow your intuition. Know when to stop the blending. I think I'm going to stop right now. Added a few trees and abort. And I'll just touch it with my finger. And you can see to transition from beginner to intermediate is a good paper and a good brush. Landscapes in intermediate level of same techniques. Now, I will show you guys in detail and how to paint them.
7. Mist Around Mountains: Let us start. It is somewhere between beginner friendly and advance. So let's call it intermediate. Like always, I'll start with sketching. Most of the work is done using a technique between light and dark. One part of the mountain will be, and we'll take a screenshot and then continue the sketching at their own pace and read the paper with clean water. I'm using a mop brushes. I will first paint the sky. Just give it a gradient wash. Is it now make sure that the paper is still wet so we can continue with the mountains. Now this is where it gets a little complicated. The paper is red as you can see, but not completely soaking wet. It somehow between written down. You cannot bend, missed if your paper is completely dry. So the mountains only under damp paper and blend the edges so it shows that there is a missed the lighter shade of the mountain. And then I will carry on with the Dhaka. As you see, I'm only using one brush. Brush. I always use this brush as it's such a perfect fit for me. One tip I can give you guys for your transition from beginner to intermediate and advanced is using a 100% cotton paper. As you see here. The address of the mountain are perfectly blending with the background. And this can only be achieved while using a 100% cotton paper since it stays wet for a long time with the same brush. And the final mountain peak in the first row. Do you see my Burberry step? So it's important for you to take a 100% cotton paper using a technique, especially, I will take some more pain on the palette. There is only one in the middle part of the paper painted. The next part, that is the last two mountain ranges here you can see you don't have to blend them. Just apply the darker shade of mountain ranges. There is no blending in. Like I said. One of the last steps is adding a bit of mountains. Instead of just leaving it plain. I'm going to add a few trees randomly using my synthetic brush. Remember, details, use synthetic brush and painting just regular pine trees. The technique on how to paint in my previous classes. If you haven't watched it. Here is a small dip. First, draw a straight line, and then move your brush in his exact manner. And you get the pine trees. It's quite simple and I always use this Madonna. Show you paint defines as randomly as possible and that is don't paint and all mountains paint only on a few, so it looks natural. Now, as a last step, I'm going to add a few, but and that is it. I'm going to stop it right here. I hope you liked this intermediate class. And it's somewhat in-between big, not an advanced, as you can see, we have used technique and it talked about how important it is to use a 100% vapor and a few techniques, radar brushes. And I hope you liked this class. See you in the next one.
8. Pine Forest: Let's see, one more intermediate level. Before moving on to advanced. Like previous class, this project revolves around technique as well. First, I'm going to start with light sketching. Sketching. I mean, exactly like sketching and drawing straight lines where in later stages. Let's start by reading the paper with clean water. And as always, I'm using my favorite mode, brush and paint the sky first. And just like in previous class, don't let the paper dry and start painting the background trees. I'm going to quickly change the brush. And I'm taking a small brush here that is number two. And I will lightly start painting the pains in the background. Remember, very lightly and not very detailed. Drag the pain to one side of the paper. It shows that the clouds are moving. Again. This is a technique and maybe a 100% cotton dry. After the paper dries, I'm taking darker shade of painting the second layer of files. This time a very detailed satellite pencil sketch. I'm going to paint the pine tree to create the mist, or we need to blend the edges of all these pine trees. I'm gonna be picking up a new brush that is my favorite, my brush. I'm gonna read the brush and I will just start to blend. The edges are far less pine trees. Remember if your paper is not a 100% cotton eBay bought, it would be dried by now. I'm gonna take fine screen again. And I will just move it to one side of the vapor clouds and mistrial moving. So I wanted to show the movement of clouds and missed in this painting. So while you're peppery, still wet and with your brush, Muda pained to one side. So wherever the mystery is looking at, I'm going to add a few pine trees. I'm going to add another layer of blended into the mist. Remember the peppery, still red. So I'm going to add the last layer of a synthetic brush and I will start adding the pine trees. Since it's nothing new. The final step, black paint and a few but and we're done. One sheet of paper dries up. And I hope you liked this video and see you in the next one.
9. Techniques For Advanced Landscapes: Till now, we have discussed about beginner friendly techniques and intermediate level techniques. So what's happening in advanced level? So first, it's not about how much time you spend to paint an advanced landscape. You might have seen some great artist paint rather complicated landscape in less than ten minutes, right? So what tips and techniques are needed to qualify your walk as advanced? I will not show any tutorial Since we are going to be doing that in a few minutes. But I will share a very important tips to follow when you're painting an advanced level landscape. Remember the techniques we have seen in the beginner friendly landscapes, reading the paper correctly, and then a gradient wash techniques in intermediate level. The importance of having a good paper, importance of having a grid brush, and importance of painting elements like shadows and reflections very correctly. Now, when you combine all these and paint a landscape, it's going to be an advanced level. And dividing the landscape into background, foreground and detailing helps in painting the elements perfectly. We're going to see that when we are bending the advanced landscape. Now comes the very important part. So what do you need when you're painting and advanced landscape? First, I would say a 100% cotton paper is a must because we are using so many techniques and your paper needs to be perfect. Cms, the brushes, brushes should be your personal choice. So whatever feels right in your hands, you can use them. I always use our discrete binds. Whenever I paint my landscapes. If you can only afford two things, I would say the most important, our paper and the brushes. First comes the paper. Next comes the brushes. And then if you are comfortable, you can use our discrete brains, student grade books as well. I hope you liked this tips and insight into painting and advanced level. So now let's get to the tutorial in the next video.
10. Winter Cabin - Sketching: Let's begin the Advanced Project for today's class. This is quite a long class compared to our other projects. Even if you're not an advanced level, please take a little bit of time in your day to watch what exactly is happening here. I'm starting this landscape with sketching as just follow exactly what I'm drawing here. And a few trees. Since it is advanced, the sketching is also advanced here that is a very clear picture. Take a screenshot and then painting the background.
11. Winter Cabin - Background: Start by reading the paper with clean water and I'm using my favorite Mao brush and make perfectly sure to not read the trees, mountains, and the cabins. And it's very important aspect of this landscape. Okay. And now with the same brush, right? Okay. Up and down as necessary. As it pleases. Advanced level is to let go of the need to control the outcome. So just enjoy the process. I'm adding more pain because I want to make it seem darker in the background. So I'm gonna add just a few places. Thin and synthetic brush. Keep this one for a complete trying. And we'll move on to the next foreground area.
12. Winter Cabin - Foreground: Now I'm gonna take a lighter shade of grey and I will paint trees and a few shadows as well as these cabins. In this video. You need to remember to be absolutely sure about where and which direction you need to paint shadows. Because with one wrong portrayal, landscape, he's gonna look unrealistic. Always remember, shadows and reflections are to be painted with perfection. I'm intentionally not being very careful about two years because my focus for the landscape and shadows. Talking about shadows, let's painter feel sad, light, shade of fine screens in the beginning of this video. Because shadows and reflections are always in light. I'm not following any sketch here, just painting randomly. And that's how it's supposed to be. Having the shadow below the tree. It's random, right? So that's what I'm trying to paint here as well. Adding another layer of gray. If it feels right, then I'm done with the shadow. I'm gonna take number one brush and I will fill up the cabinets to make sure that you are leaving a light wherever you think is necessary. Just follow what I am painting right here. The second cabinet. So with the same brush, I'm going to add one last bit of the shadow that is which goes up to the cabin. Keep this we're trying to the next video.
13. Winter Cabin - Detailing: This video, I'm going to add details. And I would have been this pilings and the shadows and snowfall. Gosh. Let's start. I'm using a natural brush. Darker shade of grey, and start adding details. Okay. Start adding the branches with the same brush. Make sure your brushes and a sharp one. You don't have to be very particular about the tree as well. So make sure you just paint the sharp branches and less time to paint the filings one-by-one. And I'm taking number one brush. This is a natural brush as well. And I'm taking a darker shade of grey. Lighter shade of grey because we are going to paint shadows, pilings. I'm going to finish up. Now to add snowfall. I'm using and I'm using number one brush here. Once the paper dries. And I hope you liked this advanced tutorial. And I really wish you'd give it a try, even though it seems complicated. And thank you for watching.
14. Thank You: That is all for today's class. Help you find the class. I would love to know what you guys think about the class. See you next time. Bye.
 Sukrutha Jagirdhar, Watercolor Artist I Creative Entrepreneur