Transcripts
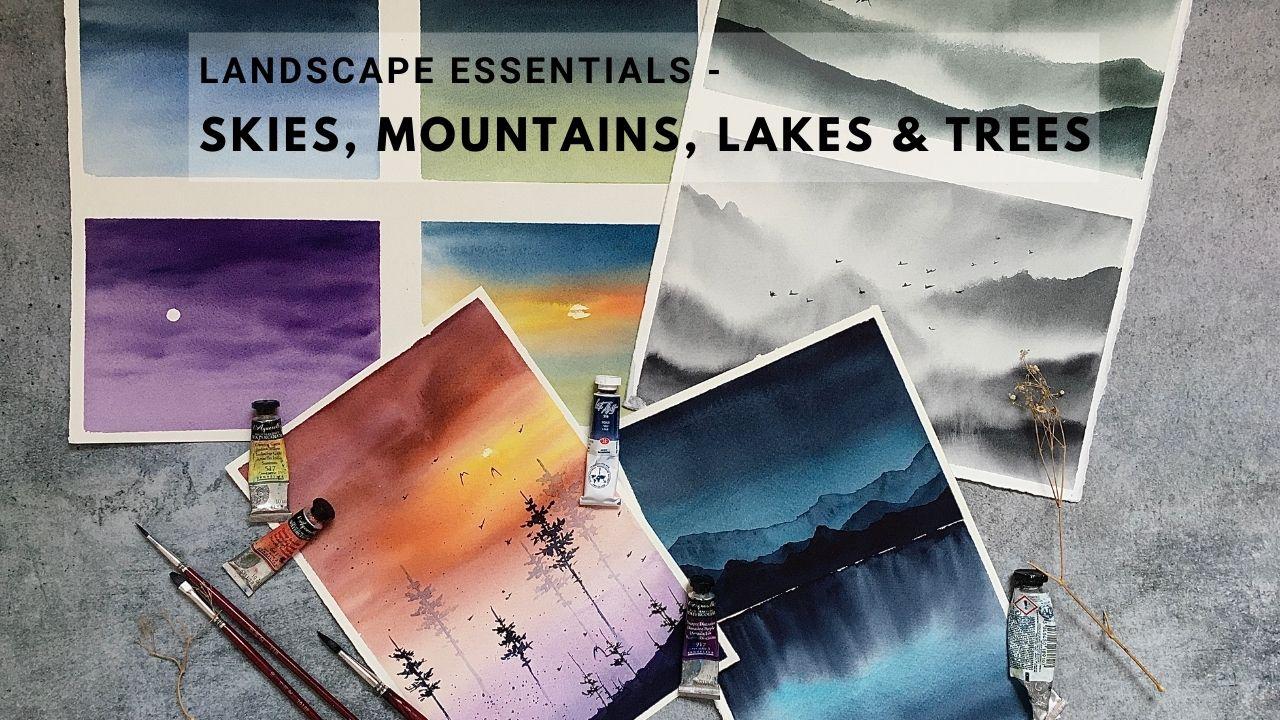
1. Introduction: Hello guys, welcome to my new class. For everyone who is thinking to start watercolour, and for everyone who wants to know where to place watercolors subjects. This class is for you. We will talk about many watercolour landscape essentials, like skies, mountains, trees, and lakes. And I will teach you how a paint them and in how many types I paint them. Since there are four types in skies that I usually go on to types in mountains, and three types in trees. So certain back, grab your supplies. And diamond to the simple informative class. And without further ado, I'm gonna get started.
2. Art Supplies: None.
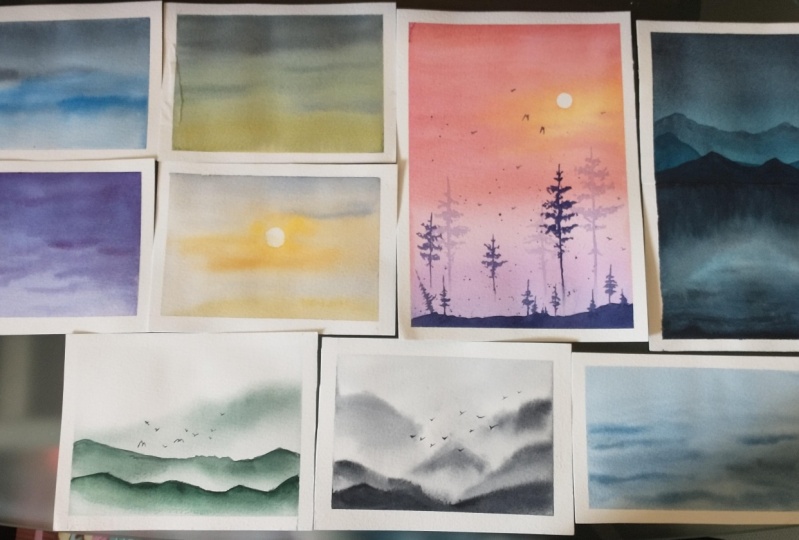
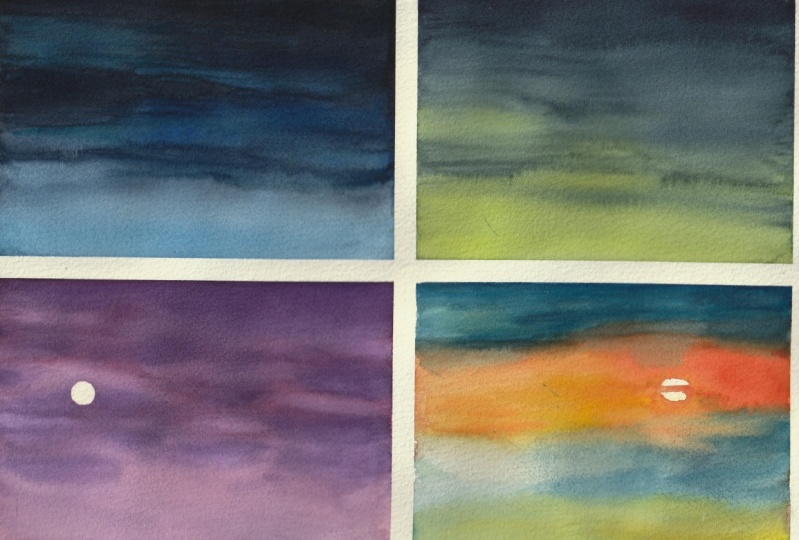
3. Sky Types 1 & 2: One of the first rules to pain skies is having light color at the bottom of the paper. And as we go up, the colored darkens, if you absorb a photograph, you will see the same thing as well. And that's how the nature is. It's always light at the horizon. Today. We're gonna paint to Skies which are quite big enough, friendly. And I'm going to use two colors, blue and indigo, and maybe a little bit of fine spray. And I have decided, I will mix it with a bit of Prussian blue here. Okay, we're going to start now by writing the paper. I'm using my number full-bridge trauma brushes. Like I said, we're going to start with light color at the bottom off the paper. And as we go up a doc and the color, we're going to add the purple now in the middle of the paper. It's like a fast layer where we have arranged all the colors we need in their respective places. Now we're gonna start adding the second layer. I will still add blue color at the bottom of the paper, which will be a quite dark that the previous layer. I will balance it out by adding even darker color of indigo mixed with pine scream. At the top of the paper. I think I'm almost done painting the first type of sky. Alright, here it is. I hope you like this style, which is quite easy. And you only need very few colors, I guess three, I think. I hope you liked this video. We're going to move on to the sky number two in the next to. The next part is also similar to the previous one. I'm just teaching you so that you're going to have more examples to practice on. But the paper with the clean water, and of course my water is not clean here. Look at my jar, it's completely blue. I'm going to start with a low. Remember the light color will always be at the bottom of the paper. We're gonna blend it with green. We have saw that bottom column. And the middle color. Now comes the tough part, which will be the dark color. So I'm choosing indigo. Hollinger brush, very lightly. Blend all three colors together. I've talked a lot about how to add these clouds in the sky, and a lot about skies also in one of my classes called soft skies and saddled flout. If you are interested, you can watch it. I hope you liked this boat psi one and psi two. These are very simple. You only need a good paper. Of course I'll tell this for everything. But it's very important. And a good brush and already good knowledge about wet on red technique. And I hope that today I did not miss anything. Yeah. So see you guys in the next video. Thank you for watching.
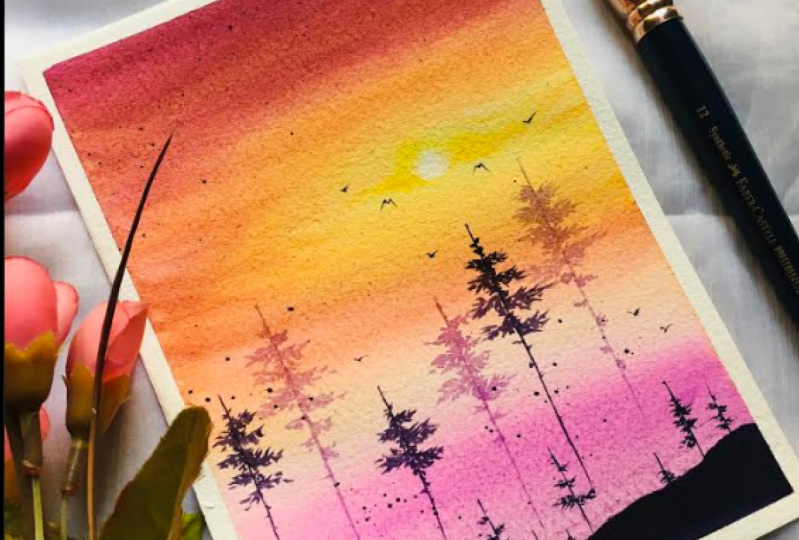
4. Sky Types 3 & 4: Ligand and now paint the third, fourth, that type of Skies. For this, you're going to need masking tape and cut it in a round shape and stick to the paper. It could act as Sun Armen depending on the type of landscape that you are going to paint. Alternatively, you can use masking Floyd, but I prefer using masking Dave. You stick that masking tape tightly to the paper, start adding the water. And I'm going to use only one color for this guy that is clean water. And obviously my water is not clean either. Generous amount of paint and go for the initial launch that we have painted in the sky e1 and e2. Psi three and psi four differs from sky i1 and i2 in having a lot of clouds and also how to paint them here. And another different from psychiatry to sky, i1 and i2 is that I am adding lots of clouds and also I'm adding them in monochrome color. That is why let my paper is still red here. So the clouds are blending in. Perfectly with the background sky. Yellow paper dries virally appending this cloud. Stop it right there. Because if you paint over their dry surface, they don't blend well and look very odd. And a little bit of adjustment with a damp brush. I'm gonna remove the excess water and paint from the brush using a tissue. And I'm gonna just Inaki while my brush to either side. I'll keep this for drying. Only when the paper is completely dried, you remove the masking tape. Otherwise, it's gonna just tear apart the paper. And I hope you like this guy, three paintings. We are going to move on to the Skyfall. It's going to be even more interesting. And the sky for is the last of our sky series. And it's going to be a bit difficult compared to sky 123. But dizygotic. It may I just my table. So you can see the colors I'm using here. And it's a lot of colors from yellow, orange, blue. And when all these colors get mixed, I'm sure we're gonna get a new color. And we're going to start like we always do writing the paper, we clean or go. Skyfall defaults from psychiatry by not using masking tape, masking flow yet for painting Sky are more. What we're gonna do instead is we leave the white space in the middle as it is, and paint around that whitespace with whatever colors that we choose. Sensor, the paper is still wet. There is a 100% chance that the color will just bleed through that whitespace. So what we have to do is take a tissue paper and dab a little, and you're good to go. Let's carry on with the rest of the paper is still read. Using the damn brush. Blend all the three colors together. It's gonna be a tough one, but nothing beats that soft sunset Look, I think. So. As many times as you can, but make sure the paper is still wet. And Skyfall. Looks like it's difficult, but it's actually not. Please try it, but make sure your paper is wet the entire time. We hope you like this. All for Sky is that we have discussed today. And if you are a beginner, make sure you try these out in the techniques that I have showed here. Thank you for watching.
5. Mountains Type 1: Mountains play a great part in watercolor landscapers in shells. Think we have all painted intuitively mountain since we were kids, right? So how can you paint mountains in watercolor with a little bit of magical mistake dodge. Well, let's find out today. And this is going to be Style Number one. We are going to paint two styles and both have missed in them. So I want to start by adding clean water with my brush. And once I'm done reading the paper, I'm going to take a small brush. It's a number toothbrush. And today for demonstration purposes, I'm using Green, amber color. It's a dark green. But if you don't have this color, you can make it by mixing Sap Green with any of the blues, preferably indigo. So as you can see, I'm not going for the detailed mountain here. It's just a shape. Since we are going for a misty leukemia, it doesn't have to be detailed. Showing you work faster because we don't want the paper to be dried. And now comes the interesting part. We're going to have to blend the edge of the mountain with the rest of the paper. So take a wet brush and just drag the pain down. Remember, the paper is damped at this point of time. I think the water just messed up the middle part of the mountain. I'm gonna adjust it with more paint. This step, if you got it right at the first, try, and blend the bottom of the mountain with the rest of the paper and the brushes red, by the way. I'll keep this for drying. Do not attempt second layer of the mountain unless your paper is completely dried. Okay. I think it's dry it so I'm just checking with my hands. The next step is I am taking the same brush and I'm taking the colour which is a bit darker than the previous layer. That is greenish amber itself, but a little bit darker. And I'm gonna paint another layer of montane. I'm gonna take my brush and I'm gonna vet it. And let's blend the edges with the rest of the paper, just like we have done it with the previous layer of mountain. This is one of the mistakes that I'm gonna usually make. Now the mountain is looking. Like a straight line, which I don't like. So I'm gonna just add some more color while the paper is still wet in a few places to make it look more ino, full of trees are full of greenish color. Now we can blend as usual. And it's not looking like a straight line anymore. Just like we have kept the previous mountain layer for drying. Keep this one as well before we attempt the third layer. Ok, the paper is dried. Now I'm gonna take the darkest color possible, our darkest written punishable for this Green amber color. And I'm gonna paint the third Mountain and which is the last one. Also. We loved the mountain completely with the darkest green unburden. With the large map brush. Just blend the edges like we have done for the previous two mountains. There you go. This is how you paint misty mountains if you are a beginner. And as a finishing batch, I'm going to add a few birds with the same green amber color. And I'm gonna use my number one synthetic brush. Many of you told me that you like my style of painting the birds. So here it is. And you can just sit back and relax with this beautiful music and learn how to paint the boat. In order to generate the bird. It's time to dock. A few tips about how to get started with misty mountains. So here I'm going to discuss only one tip, which means it's the most important tip to get you started on misty mountains. Make sure the previous layer is dried before you attempt a second layer of mountains. And if you paint while the previously is still wet. So what happens here is the both of the layers get mixed up and you don't see any distinctions between the two mountains here. And then their paper will look completely green without any details. And how do I know that child and I have failed completely while I was starting with two articles. So it's just a small tip, but it's very important. And see you guys in the next video. Thank you for watching.
6. Mountains Tupes 2: Let's start with the second style of mountains here we mostly work with radon read technique, unlike the previous style, where we worked with in layers. And only after each layer is stride that a beginner were done right, is an important technique alone. And please don't procrastinate learning this technique because it feels scary. And it definitely is. But once you grasp zone, you can make one does with watercolor. Trust me. Now, after reading the paper with clean water, I'm using by an scrape galore and only single color today. Take the light shade of grey. And I'm going to paint the sky just like we have blended the previous mountains. And let the paint sit for awhile. See the paper is not dried. It still damp. While it is still right, we're gonna start adding the mountains. And the last step is always the same one. That is blending the edges with a clean brush, like we have done previous mountain video also. I usually paint the misty mountains in this method. The previous one was just for the beginners who are just starting out. And this is quite advanced. And I wouldn't say quite advanced. It's just like a step up from the previous video. Keep in mind, the paper is still pretty damn good. A good paper and a very good hold on your brush and have caused a little bit of courage to pull this off. And I have to say I have failed quite a lot of times to paint this misty mountains and took me around two years to get a hang of it. We're going to keep on building the layers of mountains while keeping the paper still damp and not wet, you have to make sure that the paper is not soaking wet. As the layers of the mountain scape increasing. That is when you come down to the third or second layer of the mountains, the tone of the color also increases. That is, you need to paint. A Dhaka tons of colors. Yeah, I'm using only pions Cray and at different tones of the same pions gray here. If you want more color, you need to add less water. And if you need less color, you need to add more water and dilute the pain so that so that you'll get the lightest color. And now we are at the last layer of the mountains. So I'm using a lot, the Coca-Cola. That means I used less water and more pained. And we're done adding the layers of the mountains. I think it's looking weird to hell. And now I'm going to add the birds. I think not a single misty landscape will be complete without the bird. I'm using synthetic number one brush and dark shade of gray to paint the Bert. And I am going to give you guys a closer look at painting the word Desert Music Play. And, and just keep watching how the boat are painted. Please enjoy this time. I'm going to stop talking for awhile. We are done. These are the two styles of Mondale's die usually paint in most of my work developing things. First one is quite big, no friendly. Make sure the first layer is dried before you start with the second one. And the second style is completely return rate technique. And I hope you liked it. And I am going to see you guys in the next video. And thank you for watching.
7. Lakes - A Brief Talk: Lakes is another subject we usually paint with watercolor. Have three paintings here with me. The landscape here are advanced, but I did not bend much with the lakes here. They are quite beginner friendly. So I thought I'd show you guys how a beginner friendly lakes would look like. So you can see, I have used a single color in two dawn's. First I have laid down the light color and all that. I have created a slightly dark tone of the same color. And I have painted the ripples with it. And it's one of the easiest ways to paint the lakes if you're a beginner. And this second landscape is also, I have painted with the same method, but instead of just one color, I have used two colors here, yellow on greenish blue, and purple one here. Now this landscape might look advanced and it is, but delete bark is quite big, not friendly. And I have used the same method to paint all these three landscape that is fast, using a slightly light color to paint the background and over it with a slightly darker tone. I have created the ripples, and this one is red on red technique. So you're going to need a good Paypal because a while painting we don't read, the paper gets dried very fast if it's not a good quality paper or a 100% cotton paper. So you can't paint right on, right on it. Now, we're going to go for a trial run and I will show you how to, you know, recreate the first landscape, the lake part. I mean, as usual, we're gonna start out landscape by reading the paper with clean water. And I'm using my usual number for Bruce drama brush. For demonstration purposes. I'm using indigo with a little bit of green today. I'm going to turn the pilot around so you can see the colors here. So this is the one we are painting from. I'm going to paint the background that is one single color. Later, I'm going to add the repulse with a slightly darker Dawn of the same color. So this is where Don Read technique where the paper is wet and your brush is also wet with paint and water. So to avoid drying up of the paper, you need to walk faster. Link up the paper with the pain. I'm just gonna make one big wash. This is called washed by the way. So I'm going to paint one big wash. And I'm going to let it sit for a while. And I'm gonna take the smallest size brush in order to paint the ripples. Like I said before, the ripple should be at dawn and darker than the background. So just take the smallest brash and while the paper is still red, add a few lines on both sides of the paper, and that's it. You are creating variables without any effort. And remember, you need to have some control over your paper and Walter, before attempting return with technique, only then it becomes effortless. Now I'm going to take our damped brush and I'm gonna draw a few lines just around the already created ripples. It's gonna give you some sort of white shadow under the ripples. And it's going to make it look a little bit more realistic. You will see once it's done. But if you're not comfortable with this damn brush in all bending repulse, you can choose not to. It's not necessarily. The first thing you need to have control over is a red downward technique, which only will happen if you have a good Paypal and a good brush control. So I think it looks just like this vast landscape one. And this one is at the third landscape. I have used violet color here. So yeah, this is how you can paint the lakes. If you are a beginner, make sure you have a good practice of wet Andre technique before attempting this. Swap the reverse, I have some tips to share. Most important aspect of a lake painting is repulsed and to achieve a realistic ripples is with a good brush. And I'm not talking about the brand here. I'm talking about how familiar you'll get with your brushes. So the familiarity will definitely reflect on how you are holding your brush and how you're moving your hand while painting. And all those things. And adaptive is that if you're painting, we don't wet. I know it gets scary because it means more. You have to deal with a lot of water. Water can be so unpredictable. But what do you need here is a little bit of courage. And at the end of today you can just, you know, if you fail, you will just Mr. people. So that's a good bet for getting a good painting. I think that's all the tips that I have. I hope you had fun watching this video and please practice. We're done with it before you jump into lakes. And thank you for watching. I'll see you guys in the next video.
8. Trees - A Brief Talk: For a beginner, The most common tree usually paint is Pines. And for that, you're going to need a small number brush if you're painting a smaller trees of cars and a very sharp one dot. And I'm using number one brush and I'm gonna show you how to paint binds as well as misty binds here. Like I have said before in one of our previous classes of cause, one of the easiest ways to pay paint pine trees is to first draw a straight line and move your brush in a zigzag manner. Since we're painting mistake pines, I'm going to have to add a lot of fines here. Well, not a lot. We're going to just add around six to seven trees and we can get started on painting the mist. To create missed between the Pines. You need to have a brush that is wet. And I mean soaking wet. You can see the water right here and just blend the edges of the pine trees. Keep on landing. And if you want it, you can add extra pain. Blend and it feels right for you. And here we go. We have one of the simplest way is to paint the fines as well as a mystery finds here. I hope you liked this video. And let's move on to the next part. And now we're going to paint a different kind of finds. And it's not exactly a pine and many, few Change leaves and branches quite LT bit it'll turn into a different tree. But the method is same. I usually paint this one whenever I am updating far larger landscapes. These trees look. Very beautiful. So the same method that we have followed before, that is drawing a straight line and moving the r brush in a zigzag manner. But what happens here is hafta tree will be covered in branches and leaves. The remaining half will be empty with a very long stem. And painting another one. Just so we can practice. First step is to draw a straight line. Second step, he's Tomonaga brushing as exact manner. And third step would be leaving hafta stem MD without any branches or less. Hope you like this two types of pions. And let's move on to the next one. I'm using a larger brush than the previous one. Is not a pine, but dried up three, with a cost dried-up stamps and branches. Step is to paint a straight line and wash your brush and blender as two of the straight line and make the tree a bit wider. Taking a sharp synthetic brush, it's number one brush by the way, start adding the stems and branches. You can add these branches on stems wherever you think. It looks beautiful. Wherever you think it's right. Get my brush slipped, and that is a paint alone. But this is how I usually paint a trees. Pine trees are empty branches and a stems. Whenever I start with my landscapes. And these three are quite beginner, friendly and easy to paint also. So I thought you guys would give it a try and see if you like them. And thank you for watching. I'm gonna see you guys in the next video.
9. Misty Evening Part 1: Let's paint the landscape, combining all the techniques on landscape and tools that we have practiced before. So for this landscape, I'm using yellow, orange, indigo. So I don't think I'm going to use indigo dark March, but if you know me, you know that I obviously use it at some point. But the main colors are these three. And I'm gonna make some orange with purple to get the bright orangey are brick red color. I don't know what exactly is, but you're going to have to mix purple with orange. And I'm going to pull the spines on my palette and comeback to paint the fast step. Okay, now that I have added all the colors to my palette, I'm going to start the first step by writing the paper. And this time I have clean water. You know what? I'm going to take masking tape and I'm going to keep it under the board. It helps in blending the colours easily. If you are not familiar with it, you don't have to do it. I hope I already mentioned that in watercolor, you have to start from light to dark. So I forgot to mention, here, we have to, you know, leave the whitespace in the middle. Son, like we have discussed in Skyfall technique. Done adding the law, Start with the orange and then mix the orange with purple and mixing it right here and added just above the orange. Like I said, light to dark. Now comes to blending. Blender three colors is a brick, orange color that I got from mixing orange and purple with rest of the orange and yes tissue to make space for the sunny, like we have discussed in Skype painting technique. Okay. One of them missed to be there in the middle. So I'm not adding any color here. But when I reach the last part of the paper, I'm going to take Bhopal. This is light purple. So I am going to add it at the bottom of the paper. Here we go. I have added indigo. I mean, have mixed indigo with the public to get a little bit of darker shared. Now, I'm gonna give this word drying. And I forgot to mention I have to remove the masking tape before I give this war drying or else the colors will just, you know, calm down and it'll be a mess. So yeah, remote that before you give the paper for drying. And I'm gonna see you guys in the next video.
10. Misty Evening Part 2: A. Well, I can't stress this enough. Please make sure the previous layer is completely dried. And we're gonna paint the second type of files that we have discussed in trees on video. I'm taking a slightly larger bribes since the paper is larger. So I'm going to take the light shade of purple. And when I say light, it should be very, very light. So add lots of water to dilute the paint. I'm thinking to add three. Light shaded binds three or four. I think you guys know how much we have painted in Paris. Video. Dry straight line. And the first half of the line should be covered with stems and leaves. And the next half should be left alone. And let's start with the second tree. And please practice. These are all the trees that we have discussed. There are three types, including domestic violence. So practice them before you start on to this main class project. So I think I'm going to paint one more tree, quite a big one. And I will stop this video with that tree. Just stop to show paper edge of each tree. You not to blend it with the background. That took. Let's move on to the next video. And thank you for watching.
11. Misty Evening Part 3: Let's start by adding the second part of the foreground that is adding more trees. And this time, I'm going to use the darker color. For the trees that are in the background. We have used the diluted shade of wireless, which is very light because I have added more water to it. But this time I'm using indigo mixed with palpable, but this time less water and more pigment. I'm using the same method that I have used before to paint this background trees. I think I'm going to only three trees in this in darker shared. I'm going to add the second tree here in the middle. Is the number for brush. By the way, this landscape is coming together so wonderfully. I actually did not expect this to look this goal before I started it. Last dark shaded tree at the far edge of the paper. You can add more trees if you want darker and lighter shades both. But I don't want to prolong this video. I just wanted to show you the technique. So I'm going to stop with the trace right here. Now, I'm going to add the foreground. For that. I'm going to use poeple mixed with indigo. And I'm creating a dark shared here. A lot of pine trees, all of this foreground. And once we are done with that, now comes my favorite part of painting a landscape, splashing the pain, as well as painting the bird. In this first class project. Among the watercolor essentials, I have included skies, trees, and missed in the coming video. That is in the next class project. I'm gonna include lakes and mountains. So I hope you liked this class project one. And let's wanted an extra video. And thank you for watching.
12. Midnight Blue Part 1: Alright, let's start with our second class project. This is all about mountains and lakes. So for this, I'm going to use a new technique that dot here before. Take a masking tape and stick the tape in the middle of the paper tests because there'll be two parts in this landscape. The first one will be painting the mountains, that is about this masking tape. And the first part that we are going to paint. Later, I will remove the tape and I will paint the lakes below the mountains. Make sure the tape is stuck very tightly to the paper. Since I like total control over my brush moments, I will add another strip of data just below this one. Will cover the entire paper with the tape if you want. Okay, we are done. Now coming to the colors I'll be using only 21 is struck ice-cream and indigo. Just about the tape and not the entire paper. And you know what, I'm going to keep this masking tape and on my board. It lets the paint flow easily. If you're not comfortable, you don't have to do it. Watercolors, you have to always start with light to dark colors. Here. Turquoise, green is the light color. So I'm gonna start with that. And slowly, I'm going to add indigo from the top of my paper. While the paper is still wet. Blend these two colors with your brush. Think this wash is so perfect. Sometimes I surprised myself. This also is literally perfect. So that rarely ever happens to me. So I'm gonna keep this whole dying and I'll come back to paint the rest of the walk. So yeah, I'm gonna see you guys in the next video. Thank you for watching.
13. Midnight Blue Part 2: Just like we have practiced in mountains video, we're gonna do the same here with indigo paint. Showed the first layer of the paint is completely dry. That is this background wash. And then I'm taking my number 40 brush and I'm using the lightest shade of indigo fast light shared. That means adding more water. Paint. The first layer of the mountain, just like we have discussed in mountain type one video with the green colour. The mountain party still what I'm going to add just a little bit of paint at certain point. It gives depth when it dries, instead of being just a plain mon, data. I think It's looking great. I'm going to let this dry before I start with the second layer of the mountain. Now take just a little darker color than before, but not the complete indigo color. Add little water. And this time a little more paint. Follow the same method like before in the mountains by dragging the pain below using the brush. And we are done with the second layer as well. I'm going to let this dry before I start with the final lead of mountain. The second layer is also tried. Now take the complete indigo color. And I had very, very little amount. Maybe even a dropout too is enough and start bending the third layer of the mountain, which should be a lot more darker than the previous two layers of the mountain. I think the key here is to let the previous layer die like we had discussed in Mountain Pipeline. And we are done with the third layer as well. I'm going to keep this for drying before I remove the tape and proceed with the below part that is Lakes.
14. Midnight Blue Part 3: And now comes the interesting part, rewarded tape very carefully and make sure the previous layer, that is, sorry, the previous mountain part is completely dried before you start removing the tape. Now I'm going to start reading the paper with my brush. Brush. And what I'm gonna do is I'm going to leave some white gaps between the lake and montane part. You will see there should be a distinction between land and water. Are the reflections first in the lake, because there are so many mountains here. And I'm gonna paint the reflections with indigo color. They said, I'm leaving the white space between mountain and lakes here. And I'm not leaving it all throughout the lion, just start a few intervals. So like we had discussed in lakes and reflections classes, this reflection is a loose one, not a detailed one. So you have to just drag the paint down using your brush. So we are done with the reflections. You have to take ten. Taka is green color because that's what we have bantered about in the sky. So I'm gonna just read the paper just in case it's try it out. If it's already wet, you don't have to rewrite again. And at the tacos in the middle, followed by indigo. And don't forget adding the repulse. This is the landscape with mountains and lakes. One extra thing I have added here is reflections, and it's also very easy one at dark. So please try wet on wet techniques and Rick Andre techniques, all those big enough friendly watercolor techniques. Before you start with the watercolor essentials. And I hope you like the class projects that I have chosen, both of them. I always say this, but it's very important that you first practice those essentials. That is chi is mountains, lakes, and trees. Before you start with your class project, it will be easy for you. And let's move on to the next video. Thank you for watching.
15. Final Thoughts: Well, that's it for today's class. This class is about learning watercolor essentials in landscape. But this class is not about learning beginner techniques. There are a few techniques that you need to be familiar with if you are just starting out. Like a wet on wet technique, veteran dry technique, and so on. You can find them in one of my previous classes called Sunset teams. So watch the class before you start with this one. If you are not familiar with the beginner friendly techniques. Hope you enjoyed this class. See you in my next one. And thank you for watching.
 Sukrutha Jagirdhar, Watercolor Artist I Creative Entrepreneur