Transcripts
1. Introduction - The Accessory Adventure Begins!: Have you ever made a
simple sketch of a bird, an animal or an object and had the urge to turn it into
a quirky character? But then got a bit stuck. What if a single bow
tie could help us out? Let's explore how
accessories can spark ideas and bring
our characters to life. In this class, we'll
be transforming simple bird sketches
into full of life characters just by adding accessories and
seeing where they take us. We'll explore how accessories can communicate personality, how small changes in them can shift a
character's message, and how combining them
can spark creative ideas. Most importantly,
we'll be creating some quirky birds that make
us smile. Hi there, I'm Gemma. I'm an artist maker who values curiosity and creating just
for the jolly joy of it. I jump between
different materials and processes because that's
how my cozy brain likes it. And I believe that variety
is my creative superpower. My different skills
constantly help each other out and inspire me
to keep making happy. I'm hoping this
class will add to your creative fuel and give you a fresh dollop of
creative excitement. This class is for beginners
and creative fun lovers. You don't need to be an expert bird-sketcher because
I'm not either. This class is more
about practice and play than anatomical accuracy. If your birds are wonky, they are welcome here, because, hey, it only adds to
their characters. So here's the plan.
Together, we will start with loose sketches to get a simple birdie base
to build on. [laughs] Birdie base! Explore a variety of accessories and think about
what they might communicate. We'll experiment
with size, color, and placement to change a
character's expression, and bring it all
together to create unique personality
packed bird characters. I cannot wait to see the
wonderful characters you create. Grab your paper,
pick up a pencil, and let's start bringing
some birdie personalities to life. See you in class.
2. Our Project: Hi there, I'm so glad
you decided to join me. Let me tell you a little bit more about what we'll
be getting up to. Our end goal is to draw a
simple bird sketch and then add some accessories to it in order to help us
create a character. Or you could skip the
bird for now and just list or sketch out lots of accessories on a page
as you think of them, noting down your thoughts
on what each might convey. That's the project in
its simplest form, and it allows for
plenty of play. It doesn't need to
take up lots of time, and it doesn't have to
get super detailed. It's just about following your thoughts to see
where they lead. For example, you might think of a bobble hat and sketch it. Next, you might write
down the things it makes you think of maybe warmth, winter and movement as
the bobble wobbles. Then you might sketch
it onto a bird and think about how the
bird feels wearing it, and you might stop there, or you might continue further. If you add an accessory, which sparks an idea about
a character's emotion, you can experiment with adding facial expressions and movement. However far you
take your sketches, I would love to see
what you create. Remember, you can use
the Project Gallery to log your experiments or
share your finished birdies. I'll be sharing a bunch of my bird characters in
a project, too, so you can check
that out for some behind the scenes
birdie sketches. I love using coloring pencils
for sketches like these, but I also appreciate
working digitally on the iPad when I'm trying out variations
for the characters. So pick the sketching medium that suits you best
and roll with it. You could use pastols,
markers, ballpoint pens. It's totally up to you. I also want to let
you know about the free resources
that you can download. Click on the Projects
and Resources tab and scroll on down to Explore. You will find a bird sketching
help sheet which you can use as a reference for sketching out
simple bird shapes. An Accessories Ideas list, which provides a bunch of accessories organized into categories, which you can turn to if you
are wondering what to try. An accessories practice
sheet which you can sketch on top of to try out accessories and
see how they look and an expressions
practice sheet where you can test out
facial expressions and see what vibes might
add to your characters. Okay, I think we're
ready to get sketching. Let's go make a birdie base, Birdie base, Birdie
base, birdie base!
3. Sketching a Birdy Base: One of the reasons I chose
birds for this class is because their shapes can
be really simple to draw. Of course, some are more
complex than others. And that's another great
reason to explore them because they are so
varied and interesting. But, in essence, many birds can be sketched
out pretty quickly. This is great for us because we only need the
basic bird shapes down on our page before we can start adding and playing
with accessories. So here's a quick cheat
sheet about spotting shapes. Take a look at these
three core shapes. We have circles, triangles, and eggs, which are very
suitable for our birdies. Together, these shapes can create many an interesting bird. Come, take a look.
Here's a barn owl. Let's start by spotting
our first egg. Ah, there it is, creating
part of the lower body. Now, let's find a circle. Yep, there it is in that
beautiful owly head. Now we'll identify a couple
of triangles in the tail. Nice. And let's do one more egg to connect
up our head and body. Lovely. Okay, here's
another example. This one's a squawker! The body is, again,
a nice angled, eggy shape, and the head is
a circle just like before. Oh, look, there are
the tail triangles. And finally, because
this bird has a slightly thinner, longer neck, we'll throw in something
a little different, a sort of squashed square or a triangle with
the top taken off. We can make our birds as
simple as we need them to be, so let's draw a
birdie base together, which we can use to
experiment with later on. Take a look at this
Robin reference image. Let's start by drawing a circle. Don't worry, it doesn't
have to be perfect. Just relax your hand
and let it draw. If it's a bit wonky,
it doesn't matter. Okay, now draw a curved line across the middle of the circle. This is the bottom of an eggy triangle shape
that you're going to draw. The narrower top
of the egg points diagonally upwards and
creates the head and neck. Following the diagonal on the other side of the circle,
we'll draw a triangle. And now we have our bird
in its most basic form. Let's add a few features so we can get a
better sense of it. Add the eye by drawing a circle in the middle of the
upper egg section. Then draw in the beak as a triangle level with the eye and two sticks
for simple legs. Now I have the
basic Robin shapes, I'm using a different color
pencil to draw over them. We'll focus on the outline, connecting and smoothing out the shapes and add
the wing shape which hooks in at the
top of the circle and stretches along to
connect to the tail. Adding a few lines,
shooting out from the tail triangle
completes the silhouette. If you like, you can add a
bit of shading on the wing or under the belly to help visualize the form of the bird, but don't feel like you
need to go too far. You'll only need a skeleton drawing to test out
accessories on, so use this time to draw
the robin a few times. Even when you are
drawing the same thing, each sketch will come
out differently. As you can see, the first
time I drew this Robin, its head was leaning a
little further forward, whereas the second
felt more upright. In the third sketch,
I played with positioning the egg
shape sideways, which made it seem as if the
bird was pecking the ground. These subtle changes
from sketch to sketch can often spark ideas
about characters, so scribble those thoughts
down as you have them. They might lead you to drawing particular accessories later. Check out the resources
tab to find a PDF with some more bird references and breakdowns of the shapes
that you can spot in them. If one takes your
fancy, sketch it out. In the next lesson, we'll
jump into accessories. What might they
communicate about the inner life of our
characters? I'll meet you there.
4. Accessory Types + What They Communicate: So what is an accessory? Well, Collins
dictionary references them as items of
equipment that are not usually essential but are
often useful or decorative. For the purposes of this class, I'm counting any item
which can be worn, attached to or held
by a character. I will be leaving out
clothing simply because it's a massive category
in its own right. But I will allow in small
items that are seen as clothing accessories
such as hats and shoes. And simply because
we are drawing birds who have no fingers, I'll be leaning more
into items which don't require too much finger
dexterity to hold, but which can be tucked
under wings instead. That's just me, though.
If you want to get fancy with the feathers
and use them like hands, you can absolutely do so. Accessories are
practical things, but they also act like
symbols and labels. When we use them in
our everyday lives, they can show others how we see ourselves or how we
want to be seen. But often we don't even think about the messages
they might send. When we draw them, they can tell a viewer much about a
character's personality, including what their hobbies, mood, or even their
history might be. And it's important to remember that symbols can be read in various ways and can be viewed differently depending on our
own experiences of them. So as we move
through this lesson, although I'll be sharing
some common interpretations, I encourage you to
keep thinking about what the accessories
represent to you. So let's take a look at
some accessory types, and we'll see what they
might communicate. First up, let's take a look at
hobbies and interests. Accessories such as sports
gear, musical instruments, gardening tools, or art supplies can tell us what a
character loves to do. Let's take a bird with a ukulele under its
wing as an example. We might assume this
birdie is musical, spontaneous, and they
like to travel light. So how about a bird
with a tennis racket? We might get sunny competitive
vibes from this one. And an anticipation of
movement, energy, and activity. What happens, though, if we swap out the racket for
a bow and arrow? Do the vibes change to something
more still and focused? There are so many hobbies and interests to explore
accessories from. Avoid the overwhelm and
start with your own first. What do you like to do? What accessories do you use or associate with the
things that you enjoy. Now consider if you gave
those things to a character, what would they say about them? Next, let's think about
jobs and daily life. A character wearing an apron might be a baker or
maybe an artist. A character with a camera
around their neck, could be a photographer or
a private investigator. What would we assume about a bird in a construction helmet? Probably that they work as something like a builder
or an architect. How about different bag types? A bird wearing a backpack could suggest student vibes or travel, whereas a briefcase seems
more business focused. Think also about how food and drink can be
an accessory, too. A bird with a piece of
toast in its beak relays a different message to one carrying a pizza
box under its wing. Jobs and hobbies are
great starting points for feeling out the inner
life of a character, which is what this
class is focused on. But of course, you can go
a lot deeper if you wish. You can explore
culture, tradition, history, age, mood, and
intentions through accessories. Just always remember as you deep dive to keep
your mind open. Accessories will always
express more than one thing, so approach them with
thought and curiosity. Another way you can categorize
accessories is through where they'll be
placed on a character. I like to separate
them into items for the head and the neck and
items for the body and limbs. For example, on
the head and neck, we might play with hats. And, oh, my goodness, there are so many varieties
of hat out there! And, of course, our titular
bow ties pop in here, too. From scarves and headphones
to jewelry and glasses, there are plenty of accessories to play with in this category. For the body, we can explore
bags and footwear galore. In the resources, you can
find an accessories ideas list, which has a bunch of items
ready for you to pick from. So take a look and see
if any, jump out at you. Take your simple
bird sketch and try adding accessories to it
from different categories. You can use the accessories
practice sheet from the resources to try
multiple ideas quickly. Start with just one accessory. Maybe a hat or a
pair of glasses. Then add a second and see if it changes
the story a little. How does each addition shift the personality
of your bird? Also, try mixing
unexpected things. How about a bow tie plus a skateboard or a construction
helmet and a cape? Play around and see what
ideas come to life. In the next lesson,
we'll be diving into nuance and seeing
how changes in size, color, and placement of our accessories can add even
more to our characters. I'll see you there.
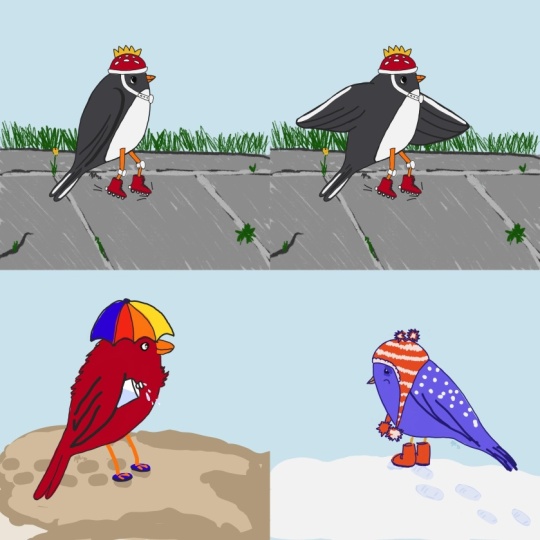
5. Size, Colour + Placement: What makes a hat feel
playful, serious, or stylish? What about a bow tie? Does it change the
personality of its wearer, if it's perfectly tied or if it's sitting
a little bit loose? Accessories aren't just
about what they are, but about how they're worn. Let's explore how
the size, color, and placement of accessories can completely change the expression and personality of a character. This is Polo the puffin. Yes, I gave my examples
names. It's not weird. So let's give Polo a bow tie. Placed centrally,
perfectly tied, Polo's character starts
to feel a bit neat and fancy or perhaps a
little stiff or uptight. But what happens if the bow
tie tilts off on an angle? Ooh. Now, suddenly, an
element of quirkiness, comedy or imbalance
is popping in. How about if the bow tie is floppy and hanging
looser from the neck? Does this feel more relaxed, eccentric, or perhaps
a bit unkempt? Okay, step back a bit, Polo. We're gonna try it
with a top hat. Placed straight on
top of the head, this hat feels
classic and formal. And oh, polo, you're
looking a bit taller. So perhaps Polo is
visiting a fancy event. But tilt it slightly to
the side and it feels more jaunty, as if Polo might be
about to do a tap dance. If the hat starts
slipping off completely, we get a sense of messiness,
movement, or humor. Okay, Polo, good work.
Go grab a tea break. Even an item as small as
glasses can make an impact through placement, as Cackle the crow is about
to demonstrate. Positioned low on Cackle’s beak, the character feels scholarly
or a bit old fashioned. Perched higher, they look
alert and attentive. So pay attention
to where you are positioning your accessories
on your sketches. It may make a big difference to how you see your character. The size of accessories is another element which
can affect a character. Please welcome Bobbin the
Robin to model the examples. So a tiny hat on Bobbin
looks instantly comedic, because it's like
they're wearing a party hat that's
a size too small. The hat's purpose becomes
less about function because it's not practically
keeping Bobbin warm or dry, but more about whimsy and fun. It feels like Bobbin
is wearing it just to make us laugh or to give
themselves a giggle. Cheeky Bobbin. However, what if Bobbin chooses an oversized hat? Oh, is that feeling
a bit more dramatic? Or intended as a
fashion statement? Maybe Bobbin is just
completely swamped in it, which might make us
feel like they've been given a hand me down
hat from a bigger bird. Perhaps also, there are
decorations attached to the hat, which are sized to make an
impact or to be subtle, like large or small flowers, which might suggest a confidence in style or a sentimentality. So when you are placing
your accessories, have a think about
how their size will affect your character. Do you want them
to feel practical and true to size for the bird or can you play with the sizes
to create more of a story? Lastly, let's talk about
color and pattern. Yay! Enter Skooby, the
blue footed booby, I do so love a Rhyme, who will be trying on
some colors for us today. Skooby One is modeling
a bright red bowtie, which might suggest confidence, fun, or even a sense of drama. Skooby Two is
enjoying soft pastels, giving off a gentler and
more whimsical feeling. And Skooby Three is going for a more serious or mysterious
vibe with a classic black. Of course, don't
forget about patterns. You can think about
the textiles and materials that your
accessories might be made of and go to town experimenting with different
patterns and textures. For example, stripes
might feel sporty. Polka dots might feel playful. Tartans or herringbones might give a classic
heritage feel, and fluffiness could create
cozy or quirky vibes. Adding small details
like a feather in a hat, a flower on a lapel, or a badge on a bag can
add even more personality. So have fun mixing
and matching and you'll be sparking
character ideas in no time. This time, take
your simple bird sketch or the accessoriess practice sheet and try playing
with just one accessory. Perhaps a hat, a bow
tie, or glasses. In each variation,
change just one element. Try a different placement, resize it, or switch
up the color. Notice how it shifts
the personality of your character and see
what speaks to you most. In the next lesson, we'll
briefly dip into expressions, which you can use in tandem
with your accessories to play with your
character's personality a bit more. I'll meet you there.
6. A quick chat about Expressions: Our focus is accessories, but once you have a few in mind to use with
your character, they may give you ideas about the feelings that
your character has. If so, you might want to explore a few
facial expressions, too, just for the fun of it. If so, here's a speedy, brief overview of expressions
to get you started. While human expression is shown all over the
face and body, for our birdies, I suggest
focusing on the eyes. You can change the feeling
in them in a few ways. Try altering the cheek lines, pushing them upwards
into the eyes, which will suggest smiling, or experiment with the lower
eyelids by covering the lower part of the eye or the upper eyelids by covering
the upper part of the eye. Eyebrows also play a big part. Try them angled outwards
for a more open expression, angled inwards for
a more angry feel, or position them higher up
for an element of surprise. Ultimately, expressions
often combine multiple elements to
convey a feeling. So mix and match a few of these basics to see
what results you get. For example, uplifted
cheeks combined with down angled eyebrows make me think this bird
is really annoyed. Whereas open eyebrows, combined with both upper
and lower eyelids, give this bird a
sense of exhaustion. Ooh. Poor birdie. And here, raised eyebrows, combined with lower eyelids
creates utter disbelief. In the resources, you can find an Expressions
practice sheet PDF, which you can draw on top of to try out lots of
different expressions. Doodle over it and take
a photo of your sheet to share with us the funny
expressions you find. Okay, so now we have plenty of accessory ideas and some solid expressions
in our pockets. Let's go muddle them all together and create
a bird character.
7. Let's Draw a Character!: It's time to pull our ideas together and sketch
a bird character. In this demo, I'll be using
five colored pencils, yellow, orange,
lilac, red and black. And I'll explain those
choices more as we go along. But remember, this
is your character. So use colors which
speak to you. If they end up clashing or
not working out, don't worry. This is all about play and nothing is stopping
you from sketching out multiple birds in different colors until
you hit on a winner. Remember our Birdie
base Robin sketch? Well, that's the framework
I'll be using here. So if you have your own
Robin sketch from earlier, feel free to draw along and add the same accessories I do
or swap in your own items. I enjoyed using the name Bobbin the Robin in an
earlier lesson, so I'm going to stick
with it here, too. But let me know which names you choose for your characters. First up, I'm using the yellow pencil to
sketch my basic shapes. I love using yellow
as an undersketch, as it's light enough that other colors can easily
be drawn over it, and it also gives a
subtle glow later on. Seeing as we already know
how to draw this part, I'll speed this bit up and we'll move along to
the next pencil. Orange is my next choice because it is close
to the yellow, but dark enough to
create deeper lines. This is the part where we
identify the main outlines of the bird and add in a few more details such
as marking out the red, feathery breast markings and sketching in blockier
tail feathers. If you like, you can add
in a little shading here, like I showed in
an earlier lesson, but I'm leaving it
quite bare for now so that I can add in my
accessories easier. Now, here's where the
accessories come in, and the lilac pencil is
going to take the lead. It's opposite yellow
on the color wheel, so it gives a
complimentary contrast for adding these extra elements. I've decided to give
Bobbin a pair of headphones for no real reason but my own curious whim, and they are always
the best to follow. These are going to be chunky,
noise canceling headphones, which makes me feel
like Bobbin is perhaps needing a bit of alone
time or distraction. As a side note, if you're
wondering where birds ears are, yes, I've already been
on that Google train… Their ear openings are just behind and slightly
below their eyes. So these headphones are near
enough in the right place. But hey, none of the
accessories used in this class are naturalistic
to actual birds. So when you're positioning them in your sketches, just have fun. You could hang them
around your birds neck or position them so the headband is
around the back of the head rather than
straight over the top. The options are endless, and all yours to explore. Okay, the second
accessory I'm adding is a cross body bag, a
bit like a satchel. I'm tucking it a little
under Bobbin's wing, and the strap travels
diagonally across their chest. Hm. What does this
type of bag say? It's medium sized, so it feels practical and like
it's for everyday use. I could see a student using this going back and
forth from college. Maybe that's popping
into my brain because it's combined
with the headphones. Together, they feel a bit
relaxed but also productive. Of course, I could
have positioned this bag slung across
Bobbin's back, which might have suggested more forward motion or hanging straight down from
the neck at the front, which could suggest
Bobbin's about to take flight and
needs their wings free. But I like this
underwing option. To me, it feels more stationary like Bobbin's
waiting for something. Okay, now I think this
bird is wanting footwear. And maybe it's all these
student vibes influencing me, but I'm leaning into
drawing some chunky boots. I could draw trainers or shoes, but somehow boots seem to
fit better with the bag. They feel practical, easy to
pull on, quick and comfy. At least that's what I'm
thinking in my head. Now I have the sketches of my accessories
coming along nicely. I'm getting a feeling
for Bobbin's mood, so I'm going to add
a bit of expression. I'm putting the pupil
of the eye up higher, so it seems Bobbin
is looking upwards, perhaps daydreaming as
they wait for the bus. Then I'm adding an
upper and lower eyelid, which takes away the dreaminess and replaces it with sleepiness. Bobbin now feels like they have rolled out of bed a
little bit too late. A slight downturn of the
mouse adds to the mood. Oh, Bobbin, I'm sorry. Suddenly, it feels like
you're having a rough day. I think it's time
for another color. Hello, red. All of the core
elements are in place now, so this color is for building up the shading and
adding more details. Essentially, this is
the commitment color. I chose this deep red because
it is bold and bright and it connects back up to the earlier warm
yellows and oranges. The marks I make with
this red are the ones which reaffirm what I
like about the drawing, boldening lines and shading, but also it adds new illustrative
elements like texture. It also fits well for
a Robin red breast. I'm using lots of quick, short, spiky lines for the
feathery breast and around the outlines, which makes Bobbin look a lot
fluffier than usual robins. But that's the great
thing about characters. They can veer off in
whichever way you like. I feel like Bobbin’s character
would be a bit rumply. Adding in darker shading
under the belly and along the wing helps give
Bobbin more dimension, and tiny dashes over
the light areas of feathers hint at a
different kind of texture. Now, most of the red
bird shading is done, so I'm adding red to the
headphones and boots, too. This helps to pull
them in closer to the overall look of Bobbin. I do, however, leave
the bag purple for now. This is because
whereas the boots and headphones are placed against
lighter shaded areas, the bag is right in the center where most of the
deepest red already is. If I were to make
the bag red, too, it may sink into the bird a bit too much and be
harder to notice. And so we move to
our final pencil. I'm using black here,
but feel free to use any dark color
that speaks to you, such as a dark navy
blue or a deep brown. Essentially, this pencil is for shading and adding
pockets of contrast. I start with the bag, adding in shading on the side to help bring out its form
and dark lines along the edge of the strap. I also add in some dots and dashes around the
bag's edges as if it were stitching and shade across the bag where the
wing is covering it. I work my way around Bobbin, adding darker lines and
shading onto the headphones, committing to the
weary expression by darkening the eye and mouth, scattering small lines through Bobbin's feathery outlines to pick out those pockets of texture and giving deeper
shading to the boots. And this is where
I'm leaving Bobbin. But of course, you can take your sketches and drawings
as far as you like. If you want to color
your character in more or add further
layers of detail, you can absolutely do so. But also, if you'd
rather simply sketch out ideas quickly,
testing out accessories, expressions, and
positions, you can fill a page with experiments
and sidestep the details. Can you believe the next
lesson is the last lesson? And it's our Wrap party. Bring your own nibbles, and let's talk about
this experience, how we can keep exploring
in our drawing. (Yes, say that fast, if you can!) And the joys of rhyming character names.
I'll see you there.
8. The Wrap Party!: My bird buddies, you made
it to the end of class! Let's debrief and chat
a bit before you go. Firstly, thank you
for dedicating a pocket of your time to
being here with me today. I really hope you enjoyed
the class and that it has given you some fresh and
feathery inspiration. If you ever feel stuck for
what to draw in the future, simply boot up that bird brain and sketch a quirky character. Remember, you can
use this as a quick, sketchy doodling practice
to fill 15 minutes of downtime or you can take your sketches further for
a longer drawing session, playing with color combos, placing characters
together so that they interact or giving them some
background elements, too. You could also use
this accessories train of thought
on other animals, objects, and, of course, people. The more you sketch and play, the more confident
you'll become in finding the inner life of a
character on the page. And you won't always need
accessories to prompt ideas. Character can be
conveyed through movement, expression,
and action. And animals don't have to be anthropomorphized to
show personality. But at the start of our
creative adventures, bringing them into our worlds a little closer can
help us to feel more confident in
our creative choices and spark future ideas. So I hope you'll embrace the exploration and
have fun with it. If you have any questions
about anything in class, the discussions tab is
ready to welcome you. Start a new thread, and I'll always try and help
as much as I can. Also I’m popping a thread in
there about bird names. If you are even a
little bit like me and enjoy coming up with
rhyming or alliterative names, do go and add your ideas to it. Extra Points if you find some really obscure
birds to name. There is also the project
gallery where you can share any photos of your process
or finished sketches. You can also check out my project if you'd like to see a
few more characters I enjoyed creating as I planned this class - from Pinch the Finch, who somehow got
lumbered with carrying the old TV from the nest and is feeling the burn,
to Tattle the Tern who has found news and cannot
wait to shout about it. Characters can be created
in so many different ways, so if you're happy to share, it would be wonderful
to see where this accessory train
has taken you. If you have enjoyed this
class or found it helpful, I'd love it if you
could leave a review. I read every one and very much appreciate you taking the time
to share your experience. They not only help me,
but they also help other students to decide if
a class is right for them. By sharing your thoughts, you might spark curiosity in a fellow student to
try something new. Of course, if this class
has been up your alley, then you might enjoy some
of my other classes, too. Check them out via
my profile page, and if you'd like to
get notified when my new classes are
published, click on Follow. Outside of Skillshare,
you can find me via my website, gemmathepen.com, where I write arty
and crafty blogs, and on YouTube
@GemmaThePen, where I make videos for
the creatively curious. Stop by anytime and say hi. You can also join my free
Pen Diaries newsletter for monthly updates on what I'm currently
making happy with or give me a
wave on Instagram. I know creative
time is precious, and so I want to thank you again for spending yours
with me today. It means a lot, and I really hope that we'll
meet up again soon. Stay curious. Say creative,
keep making happy, and I will see you
next time.
 Gemma the Pen, Making to Make Happy!