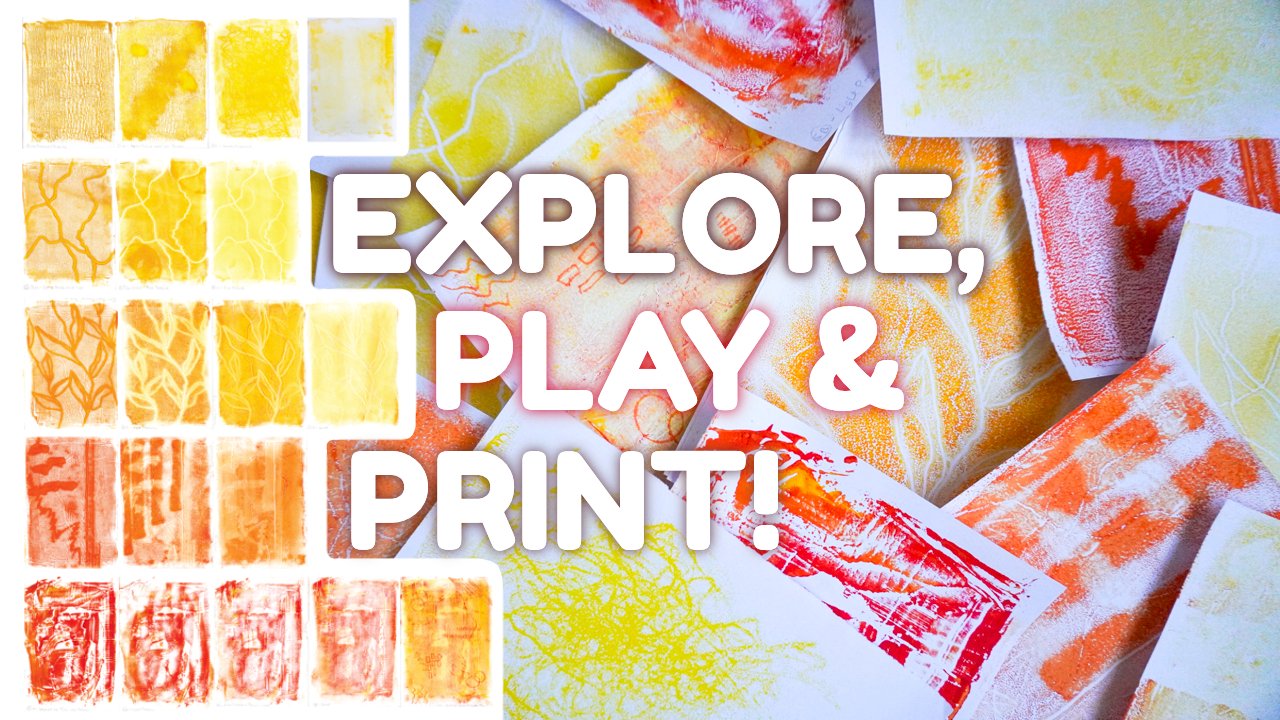
Transcripts
1. Introduction: Welcome to collagraph class where characters and collagraph collide. When I first started printmaking, I was fascinated by it but I thought that I needed to be in a printmaking studio with specific equipment in order to be able to explore it more. However, there are printmaking processes that can be enjoyed at home, in a home studio, or even in your kitchen and collagraph is a great way to start. This class is aimed at beginners to printmaking and will introduce you to the basics of collagraph, whilst encouraging you to use your new found skills to create your own character. The main question is, what is collagraph? Collage plus printing equals collagraph printmaking. In this class, you will make a collage and you will take a print from it. Along the way, you'll explore how to use textures in order to enhance the character and discover the methodical joys of the printmaking process at home. My name is Gemma, and I'm so happy to be your collagraph guide through this course. I'm an artist maker, who loves to make lots of things, in lots of ways. I believe if you combine techniques, materials, and processes, you can create auto magic. The more things you learn, the more things you can make. The printing techniques learned in this class can be adapted to helping you explore other printmaking methods in the future, such as [inaudible]. You could also scan or photograph your prints to incorporate them digitally into future art projects, such as surface design or illustration. In the next part, we'll talk about the class project in a little bit more detail, so let's get started.
2. Our Project: Our class project is to create a collagraph plate of a character, and then we're going to print from it. The reason we are including a character onto our plates in this project is so that we can have a guideline or framework to focus on while we explore this new technique, but without feeling quite so overwhelmed. Once you have created your plate, you will be able to use it again and again to experiment with different inks, different papers, and you will have a variety of different outcomes to use in the future. Step 1, find a reference image. This can be a photo or one of your own art works in another medium. Check out my Pinterest board for some royalty-free images to choose from or look at websites such as pexels.com or pixabay.com. Step 2, transfer it onto your backboard. Grab a piece of sturdy backing board and draw your character image onto it. This can be free hand if you feel confident or you can trace it like we will do in class. This will be your guide as you build your plate. Remember that a print will be a reverse of your plate image. Step 3, build a plate of your character. Using whatever materials you can find and choosing from them appropriately, build up your character plate. Take a photo of your plate before the next step as well, and share it with us because collagraph plates are so lovely to look at. Step 4, seal your plate. Using a sealant such as button polish, seal your plate to keep it protected and easily printable. Step 5, make a print from your plate and share your results. Using printing inks, ink up your plate, dampen your paper and make a print. Please do share your results with me and your classmates because we would love to see your characters. As you're working through your project, just remember, don't rush it. Print making only gets speedy at the printing stage. The rest of the time, it will urge you to do one step at a time and enjoy the process. There is no time limit on this project. Go at your own speed, and just enjoy it. In the next section, we will be having a look at where to find a good reference image to base your character ideas on. See you there.
3. Useful Resources: If you are feeling a little overwhelmed at any point, remember to check out these extra resources. There is a full list of all of the materials you'll need throughout every stage of this class, as well as character examples which can be used as templates should inspiration be hard to find. I find it best to stick with royalty-free image sites such as pexels.com or pixabay.com. I have gathered together some images from these royalty free sites and put them on a Pinterest board altogether so that you can browse. Everything will be linked down below in the resources. In the next video, we'll have a think about what's best to look for in a reference.
4. Finding a Reference: You might already have ideas pinging around your head about the character that you want to create. However, if you don't, that's totally okay and totally normal. Often we need to find some inspiration, go out there and research. The Internet is full of images which can inspire you, but just make sure you're using royalty-free ones at least. No images you find on the Internet should be copied exactly but you can use them as a jumping off point. I'll be showing you how you can trace the outline of one of these images, but then take it far beyond where the image started. As you are searching for your reference image, do not put too much pressure on yourself. Whichever one you choose, you're going to be developing it further anyway. Find something you're just drawn to. You don't have to explain why. What should you think about? Think about the size of the image that you're going to use and the plate that you intended to end up on later. As a beginner, it's easier to start with a smaller plate. There's less surface to cover and less decisions to make, therefore within the smaller frame, you don't want too much going on. Look for clearly-defined features and an interesting shape. Simplicity is really helpful. However, that doesn't mean you should limit your ideas. Your design can be as adventures as you like. Perhaps, you want to stick to the basic shapes of a silhouette, but he's textures inside it that will express a mood for a character or you could keep the basic shape, but add clothes and props to convey a personality. Maybe you just want to focus on the face, giving yourself more space to play with the features, or maybe you want your character set within a larger context and give it a background. Once you have chosen an image that you're happy with, it's great if you can print it out. If you do so, just remember to match the printing size to the size of your intended backing board. In the next section, we'll talk about the materials you'll need for plate-making. See you there.
5. Materials Needed For Your Plate: To make your collagraph plate, you will need a backing board. This can be anything sturdy, like a corrugated piece of card cut from an old box, a piece of gray board from some packaging, or even a small thin piece of wood. If you would like to trace your design onto your backing board rather than [draw] freehand, make sure you have some tracing paper on hand, or at least some thin paper that you can see through. Some useful tools to have are a couple of pencils, one hard, one soft, for when you're tracing, and some pencils and craft knife. Your best friend through this process is going to be PVA glue, make sure you've got plenty of that on hand along with a brush or a spatula in order apply it to your plate. As for the materials to put on your plate, this is where you can get creative. Here's a few ideas. As you can see, there are lots of choices and you can get super creative with the things you choose to put on your plate. However, there are a couple of things to avoid if you want to keep your plate happy. Steer clear of sharp things which can hurt you and also tear your paper. Also avoid anything with moisture which could go moldy and squish inside your plate. As you are collecting the textures to put on your plate just think about the image that you are using as your guideline and the textures that would actually suit it or enhance it. Do you need to find a texture which is fur-like to enhance your character? What fits your character's personality? For a list of all of these materials and to get a heads up on the materials you'll need for the printing stage as well, then look down below in the resources list and you'll find a materials PDF that you can download, it makes it super easy. Now we have all of our material together we need to start sketching our plate.
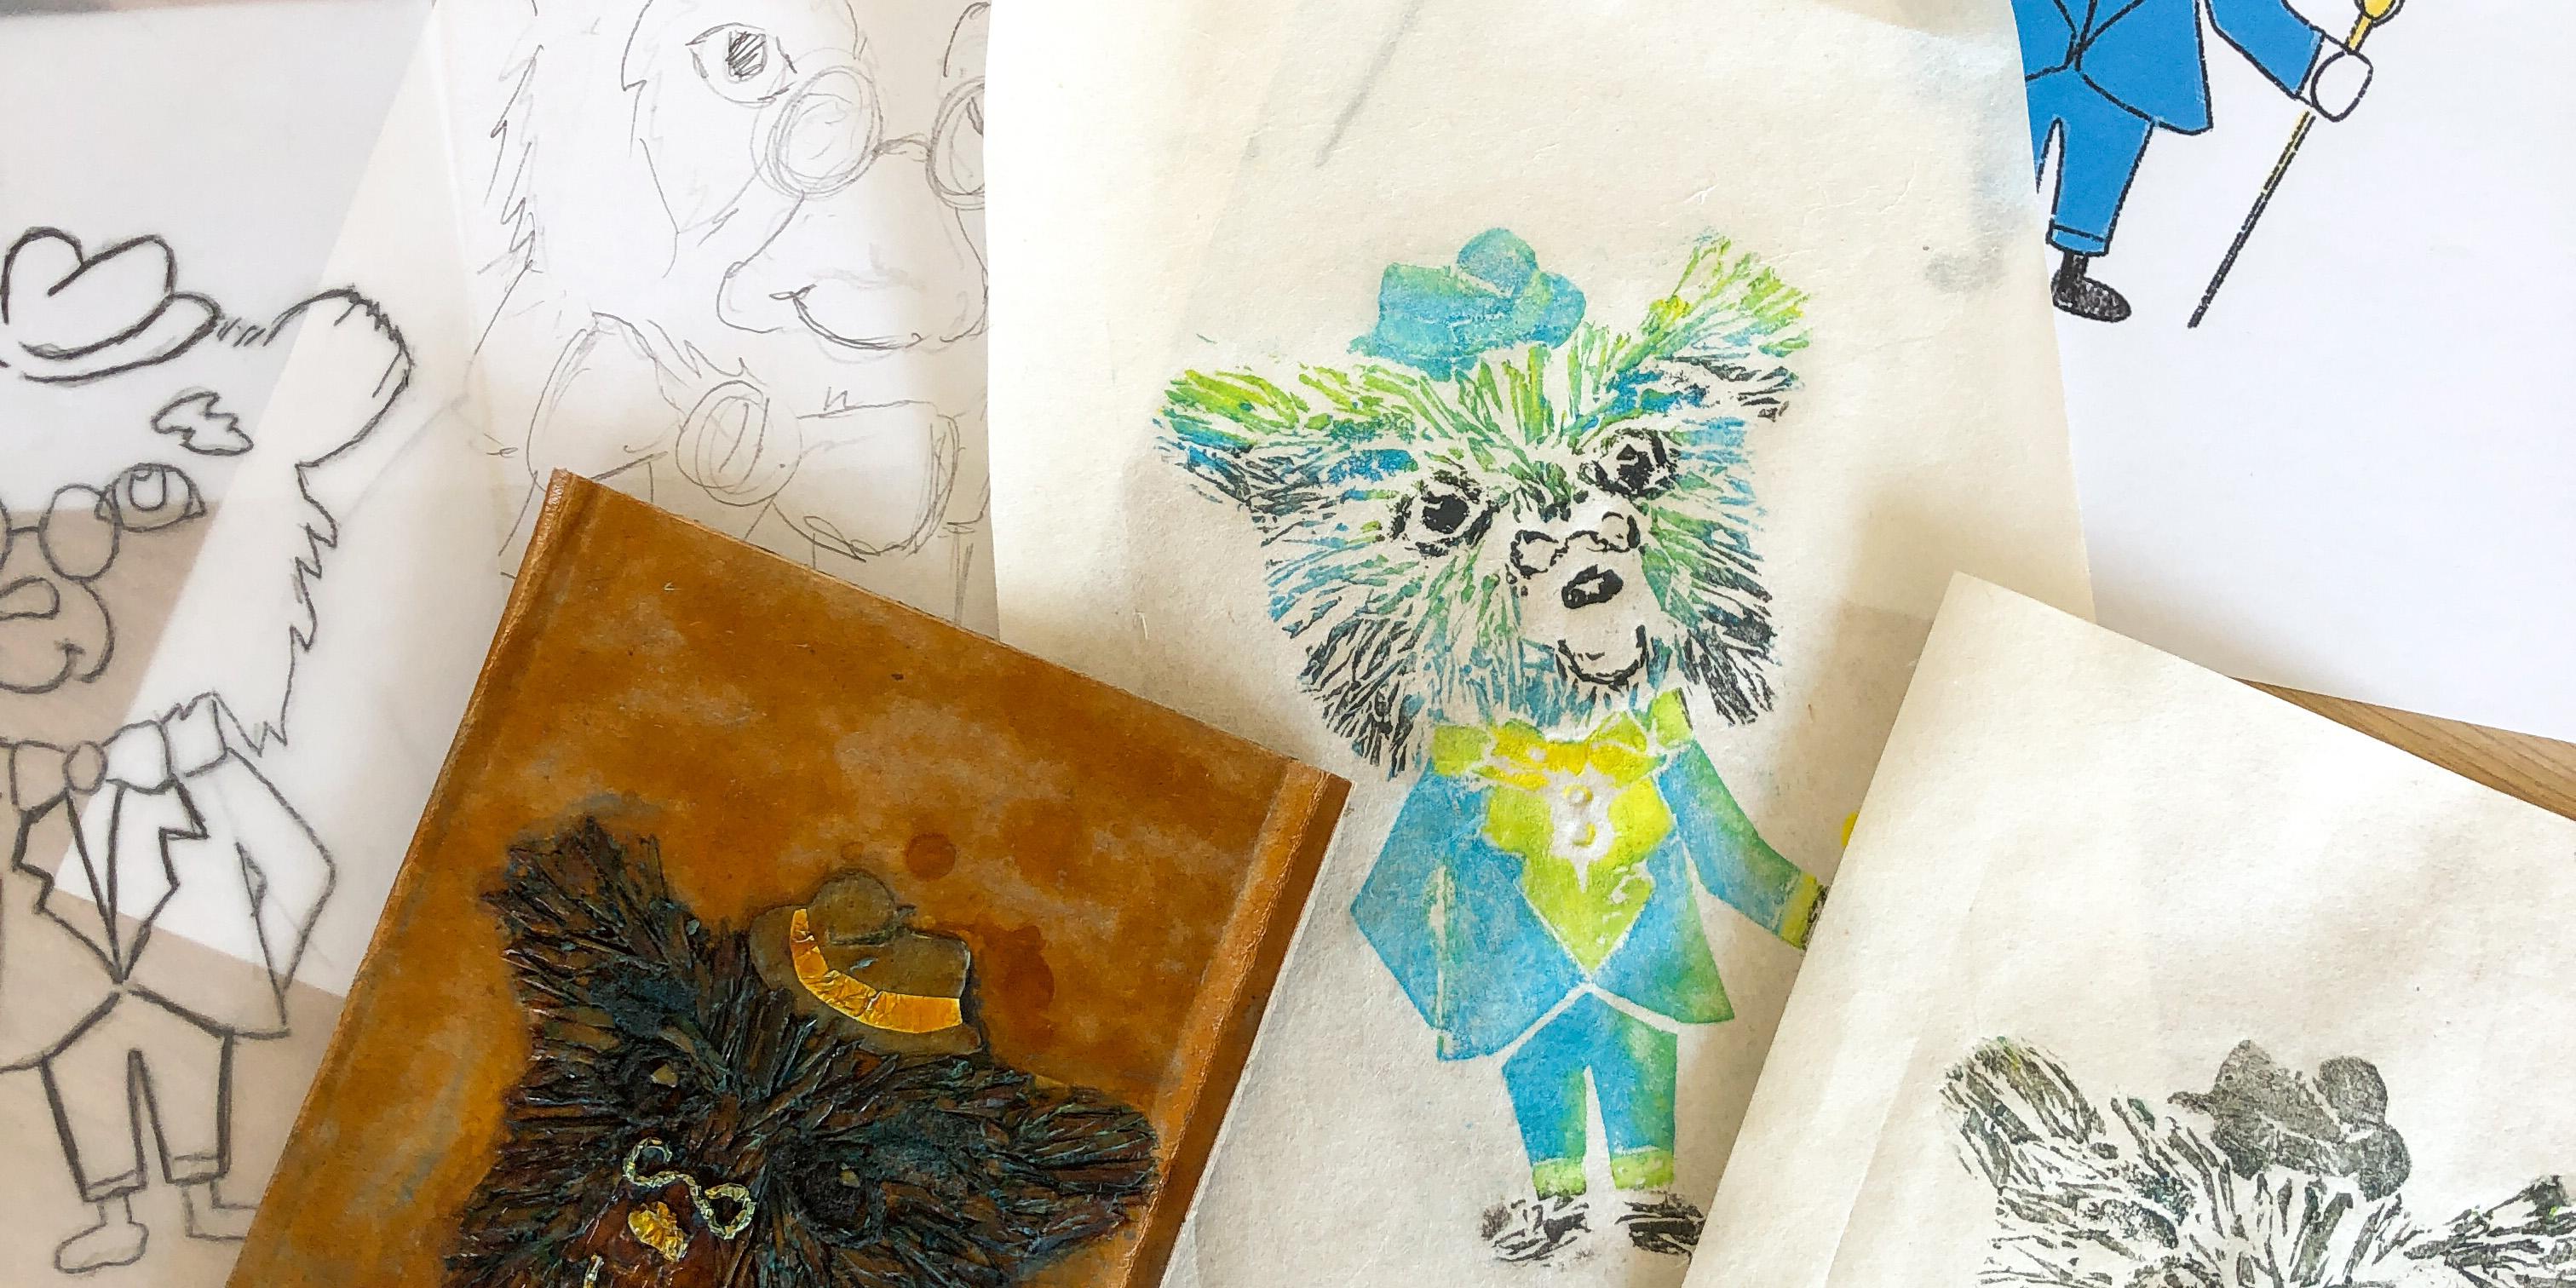
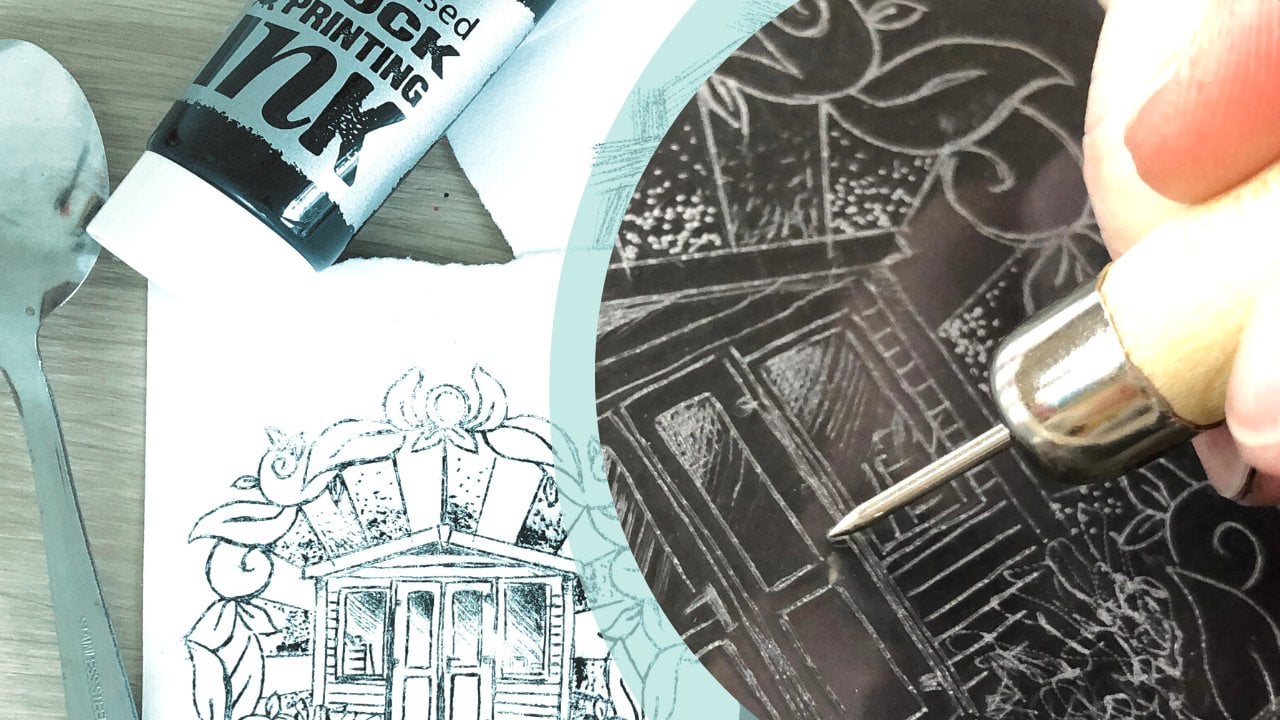
6. Sketching & Tracing Your Plate: For this class, I'm going to to focus on this picture. I really liked the bright wide eyes, very clear features, fluffy little tufty ears, and a nice clear nose. I also liked how he's mainly facing forwards rather than too much to the side, because I can still see both eyes really clearly. It also has a nicely defined head shape, which means I can separate that out and create my own body if I want to. If you want, you can start sketching straight onto this, just to get basic shape ideas about where a body might go or what eyes might do, depending on how dark your pencil is. But you can also trace the basic shape of this and work from there. That's what I'll be doing. You can do it digitally and I'll be touching on that a little bit later, but first off, I'm going to try the traditional way and use some paper. Take your printed reference image and pop it against a light source. I'm using a light pad here, but you can equally stick it to a window. Then take some paper which is the same size as your intended plate and start moving it over your reference image. This can help you to decide where to place your character in the frame. It can also give you ideas about the character itself. Is it nervously peeping around an edge or standing boldly in the center? Once you're happy, take a hard pencil and start lightly tracing around the outlines of your reference image. You don't need the details, you just need the main shapes and features. You're using a hard pencil because it creates a light line which you can easily go over later. It's a good idea to have a few different tracings just so you can try out a few different ideas before you decide on your final plan. First off, I'm going to try varying some expressions. Take a darker pencil that you'll be able to see going over the lines here and just start scribbling. On here, I'm going to try changing the eye shape on this one. Literally, if I just place an eyelid across the eye, immediately, he looks a sadder and droopier character. Whereas on this one, if I was to raise an eyebrow, he looks somewhat more surprised. Equally, you could make him an angry character. Grrr. The features are very basic ways that you can make a really big difference in where your character is going, but you can also start adding props and clothes to make some new decisions. Let's see. Perhaps we'll put a nice big collar on this one. You don't have to be specific with this. You're just feeling your way to see what happens. This one is wearing a bit of a robe, it's quite grumpy, and could have perhaps an old fashioned night cap on… going for some Scrooge vibes there! Alternatively, you might want to move parts of the body up, to cover some of the face. Like this one, looks a bit sad. By raising some hands, as it were, up to the face, I know the body doesn't look like too much here, but it's just to get an idea of how the face and the character itself changes once you start moving your body parts around. Here he is. This is really a very quick doodle. I’ll try and make his features a little bit darker. Already, he looks like he's hiding a little bit behind his fingers. Oh, poor little guy. Perhaps you want to make something a bit more fantastical and merge some other ideas in. After all, you could have just a flower shape and if you stick a face on it, it can become a character. You can incorporate those ideas onto faces. You don't have to have them just as fluffy characters. Perhaps, you want leaves coming around the side of the eyes here and it becomes a surprised woodland leaf creature. I don't know why, but it's reminded me actually of bananas. He looks like he's wearing a big face full of bananas. But anyway, you get the idea - with one tracing of one type of photo, you can get a varied amount of different outcomes just by playing around. Alternatively, you can explore your ideas digitally. Here, I'm using the Procreate app on an iPad and I've imported my reference image into a Canvas, lowered the opacity on it. Now, I'm using the pencil brush to scribble away to my heart's content, any ideas I might have. As you're sketching and playing with ideas, start to think about who your character is. [The difference] with drawing a character, as opposed to simply drawing an animal or face, is that a character is conveying some form of inner life. Consider what they might be feeling or how they might move. Are they wearing clothes? If so, what kind? Are they looking at the viewer or away from them? You might consider including a landscape too, but for your first plate, I'd recommend keeping the background simple. Keep your core design simple so you can easily see the shapes you will need to fill with texture when it's on your plate. But feel free to play with colour to give you ideas for how you might print it later. Once you have a completed design, you need to transfer it to your backing board. Grab a piece of tracing paper and a soft pencil, and trace over all of the important outlines of your character. It's important the pencil is soft so that the graphite can transfer easily to your board. You could also use carbon paper as transfer method if you have it. But if you do, remember to reverse your design before you begin tracing as a print will always be the mirror of your plate. Once finished, take your tracing and flip it over. You want the pencil side to be faced down against your backing board. Now, take a hard pencil and use this to retrace all of the lines again. Put some firm pressure on each of the lines you draw. This will help the graphite to transfer onto the backboard. Hold a finger on one corner so you can flip it up and check that the lines have transferred before you remove the tracing. Now, you can go back over each of those lines to make it slightly clearer so that you can follow it easier. You now have a backing board which is ready to start collaging on. Grab your materials and let's start playing.
7. Application Methods: You've gathered together lots of bits and bobs and you're possibly staring at them now thinking, Okay, now what? Just before we get started on our design, I'm going to quickly show you some basic ideas, techniques, for applying things to your plate. This is a tiny test plate just to get started and you can do this yourself if you want on just a little scrap of backboard, just to test out some ideas before you apply them to your main one. The first thing I'm going to say is do not be afraid of putting glue on your plate, you can dollop it on. It's probably best to dollop it on because it will have far more sticking power. You can always scrape off any excess should you wish. You especially want lots of glue down for if you're using any grains, you might want to just drop them on. Or you might want to put some blobs down in a bit of a line and place them specifically. If you're using something like a wool or a string, you can decide lots of different ways of placing this. Perhaps you might want it in straight lines and you could put each one under the other. You can cut them roughly to the size you need. But then you can always snip, snip the ends off if they're slightly longer than the piece you want. As before make sure you've got plenty of glue and then just plop them down and you can push them up against each other. Also, another fun thing to do, which I often use for eyes or anything which is circular, or perhaps clouds in the background, you can use wool in a spiral. Hold your edges in a flat and you wind it around that center point in a flat disk. As you get more, it becomes slightly easier to hold onto and then slip off any excess that you don't need. There's your little spiral and you can place it straight down onto your glue. You can build up lots of those next to each other and it makes a really nice pattern. One of my favorite things to do is so simple. It's tissue paper. So if you take a piece such as this, plop it down, but then squish onto the glue area into whatever shape you want it to be. You can just rip off any bits that you don't want. One really good tip for making fur type textures is if you've got a piece and you squash it into a tube or a line, can you see? And then start twisting it. You end up with this type of thing. Then you can cut it back to whatever length you want. When you do cut them, remember that it makes a difference whether you cut it straight or whether you cut it at an angle. I'm going to cut them at an angle because it makes it more pointy and fur-like. You can lay these down next to each other in however haphazard a way. You can really build up big areas with tiny little pieces like that, which creates a lovely flowing texture because you can make them directional. You can make them face the way that the fur would go. Now felt is easiest if you cut it. You can either grab it and do random shards or indeed, you can do big chunks. Then you can place them in any particular way you wish, or you can create specific shapes. You might want circles, in which case, cut them out from your felt. You might also want lettering and you could create those letters and then you can spell out, oh look, the start of “love”. You can do whatever you like with the felt, and it really helps to especially cover large areas. If you want to fill in a big section, then a nice chunky piece of felt that you can cut to the specific shape that you want is really handy. Foil is great, but it's best when it's scrunched. Take a piece, scrunch it up. You don't have to scrunch it much and then flatten out again, and you've got this lovely texture that comes out really well when you ink it. You can either flatten things out like that and stick them directly on. It's quite nice with foil because it's very easily tearable. If you put stuff to the edges, then you can literally just push down on the edge to separate off any extra bits. However, you can also do the same as we did with the tissue paper and scrunch, roll it. Then you have a similar option to these, where you can cut it into pieces and position it onto your plate. Another fun one is shavings from your pencils. Find ones which have a good chunk of shape. Then you can lay these, you can break them with your fingers and you could overlap them. That could make quite a lovely wing or perhaps scales on a character. There are so many different ways that you can get textures. These are just a few ideas to show you that you can rip things, you can cut things, you can position them in layering fashion on top of each other. You can have things straight, you can have things curvy. It's just a case of thinking about what you particularly want from your plate and what suits the character that you're making. With all of this in mind, let's go and have some fun and build a plate.
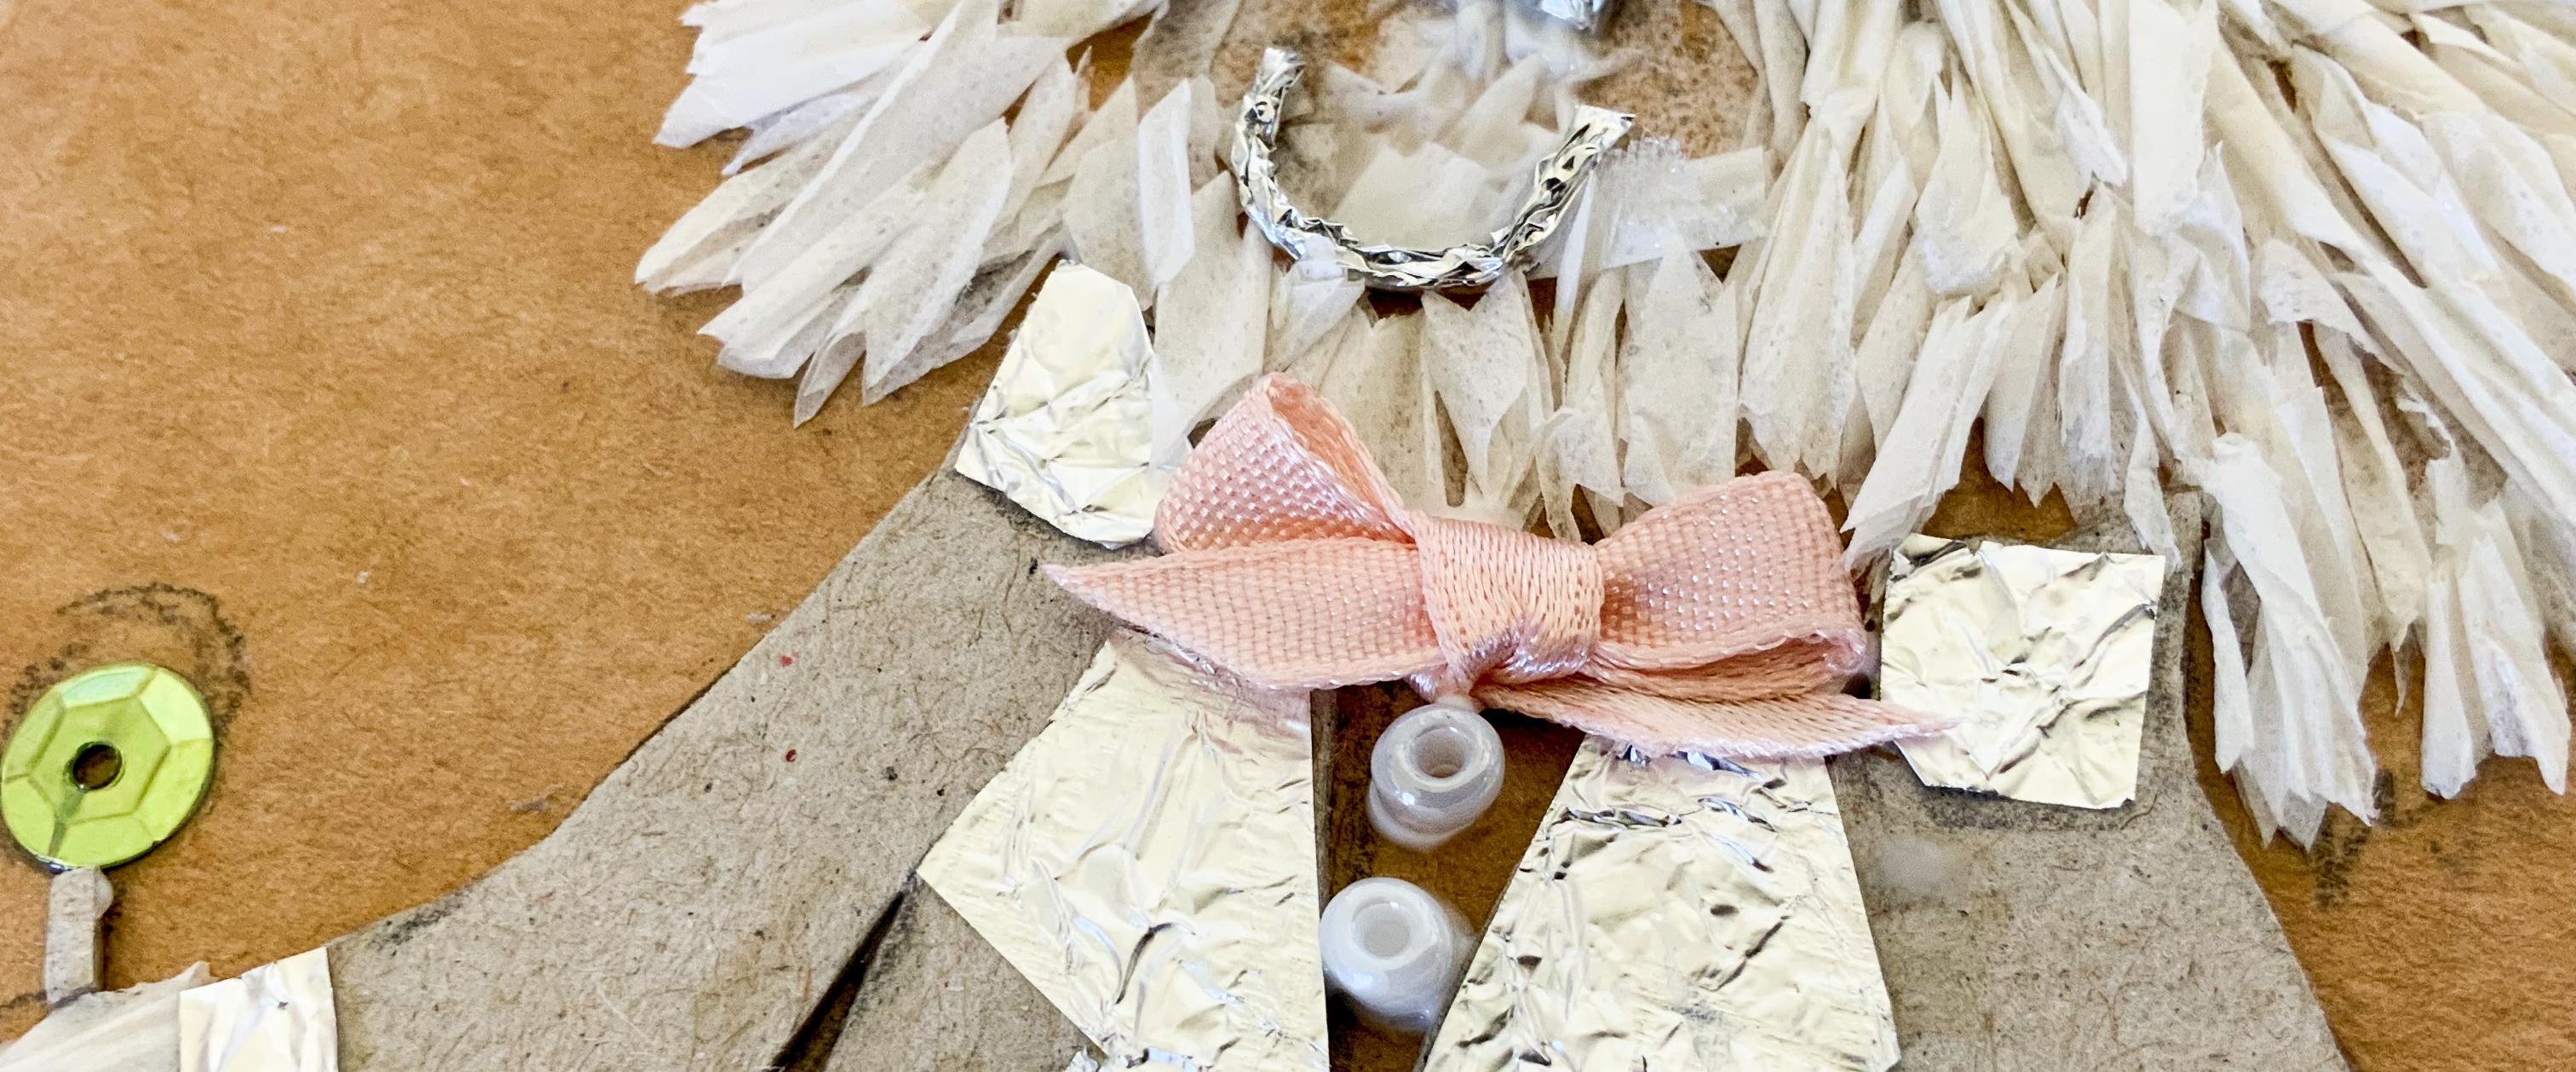
8. Building Your Plate: The first thing to consider as you start building your plates are the layers. What I mean by that is if there is an element on your design that needs to be behind something else, then that element will need to be built first. You're working from the back to the front. Here I decided to make my character's suit and hat first. I knew that later when I was doing the character's fur, I would want that fur to push over and around the clothes. If I had done the fur first, the clothes would probably have squashed the fur edges and looked less natural. I made the suit using an off cut of gray board. It was an easy material to trace the shapes onto and will also create a flatter texture. I liked the idea of having some flat areas to contrast with the busier, furrier, face area. The other most important starting points are the facial features. These are the focal point of your character. It's helpful to anchor them in early on. Then you can fill in the areas around them afterwards. As you stick materials down, don't be afraid to change your mind. For my character's eyes, I initially tried out foil, but I didn't like how protruded it made them look. Instead, I opted for a small round of felt with a notch cut out for a tiny rice grain. As the rice has a smooth surface, it means later on, ink can be wiped off easily in order to create a glint in the eye, if I want. At this point, I also created my character's glasses, but I did not stick them down. I knew these would need to be the last thing added on top of the fur, but I wanted to get an idea of how the face was working. I scrunched some tin foil into rolls and then wrapped them around a pencil to get a circular shape. Later on, I actually made these smaller as they were obscuring parts of the eyes. It's important not to put too much pressure on yourself to get a perfect plate. Often, you won't know what works for you until you try it. But you can always pull materials back off of the plate if they don't seem right and try something else. At this stage, it is hard to envision how your plate will print. It is all trial and error, so just go with your gut. If a texture seems to fit, then try it. When you are creating faces and especially furry faces, try to start from the center and work your way outwards. This will help you to feel the direction of the fur and make it look a little more natural. Another thing to consider is the height of your plate. You'll get a more consistent print later if your textures are all roughly the same depth. This means, trying to put textures together which are similar bulk wise so that the paper will be able to reach all the areas. If you look at the plate from the edge sideways, it shouldn't look too extreme. Take a look at the example on the left. The yellow lines represent the paper on top of the plates. In the upper plate, the paper will need to stretch down into a deeper recess before coming back up again, which is difficult. It's likely the texture in that recess will be missed. Whereas the bottom plate has a more even height distribution of materials, meaning the paper only needs to bend a little to catch all of the textures. Building a plate can be a slow process, but that's part of the enjoyment. If you give yourself permission to spend time with it, it can be very calming and meditative. I'm going to quieten down for the rest of this video, but if you'd like to see how this plate finished coming together, do watch to the end. However, if your fingers are itching to start building your own plate, I know, go on, get to it. I'll see you at the sealing stage.
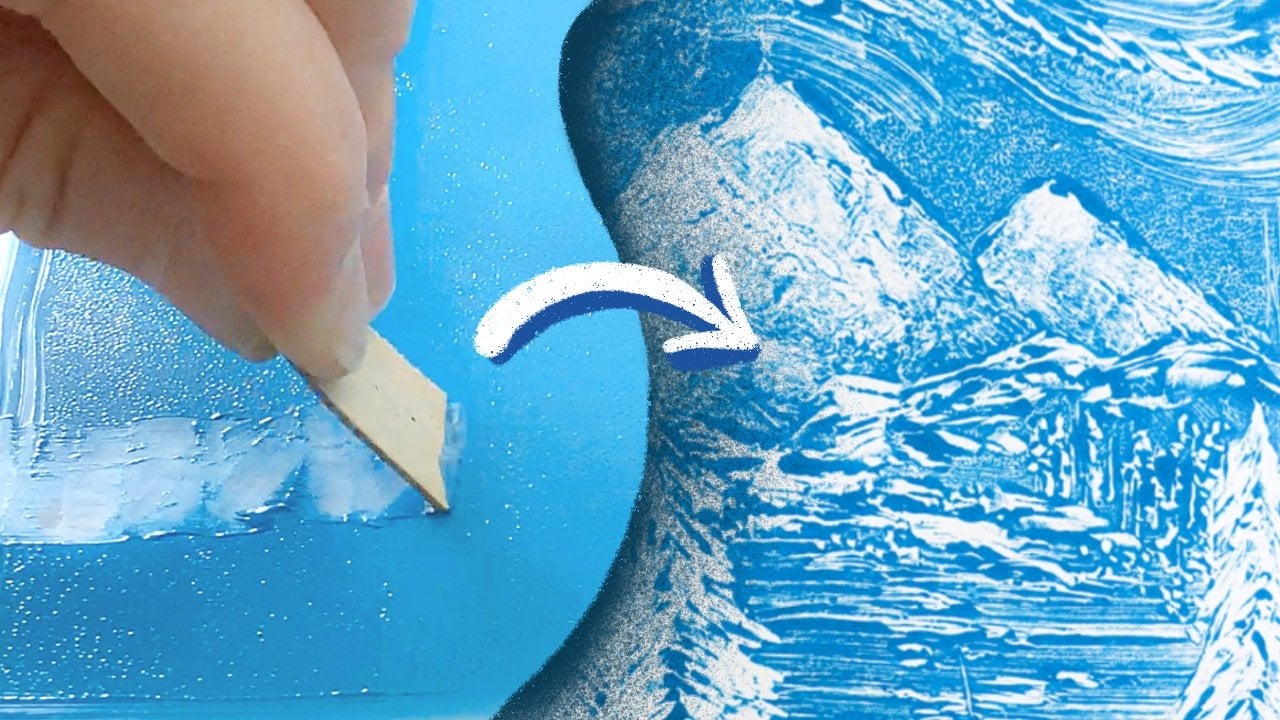
9. Sealing Your Plate: Now your plate is complete and remember to take a photo of this before you start sealing it, because it's nice to document your progress, and it's also lovely to keep a memory of how pretty they look when they are at this stage. Make sure you have some old newspaper to pop behind your plate to protect your work surface and grab yourself a sealant. I'm using button polish, but anything with shellac inside it will do a good job. Alternatively, you could use artist's gloss varnish. If you do, make sure it is the gloss variety rather than the matte, as the glossy varnish will give it the shine we need to make it ink friendly. Keep the windows open while applying as it can get smelly and use a brush or applicator you don't care too much about. This stuff will cling to the brush and you'll need spirits to fully clean them. Just blob your sealant on generously all over the plate. Take particular care over bumpy textures to be sure it seeps into all the crevices. You'll need a good few coats of this and if you want to give it even more longevity, you can seal the back of the plate too. Take your time, fit in between other jobs until it's done. Sealing the plate is important because it helps to keep it protected from the inks that you will be putting on top of it. If you were to put inks directly onto the plate, the inks would soak into all the textures and would not easily transfer off again onto paper. However, by adding a sealant, we can make the surface shinier, which will help the inks to come away easier. It also makes it easier to clean later and will protect the textures so your plate can be used again and again. Once your plate is all dry, we can start printing.
10. Materials to Print With: To print your plate, you will need some of these things. A non slip mat is really handy for keeping your plate from slipping round. Or you can use masking tape on the back of your plate. Printing inks in whatever colors you like, and pots to put them in. A metal spoon will come in handy for pressing on your print, as well as kitchen towel for cleaning. Clean water will be your best friend through this process, as well as a nice, clean soft sponge. A rolling pin is completely optional, as is a brayer. You need a thin paper such as newsprint and some brushes for your inks and some rough paper for test prints and some very thin paper for your best prints. We're ready to go, let's start printing.
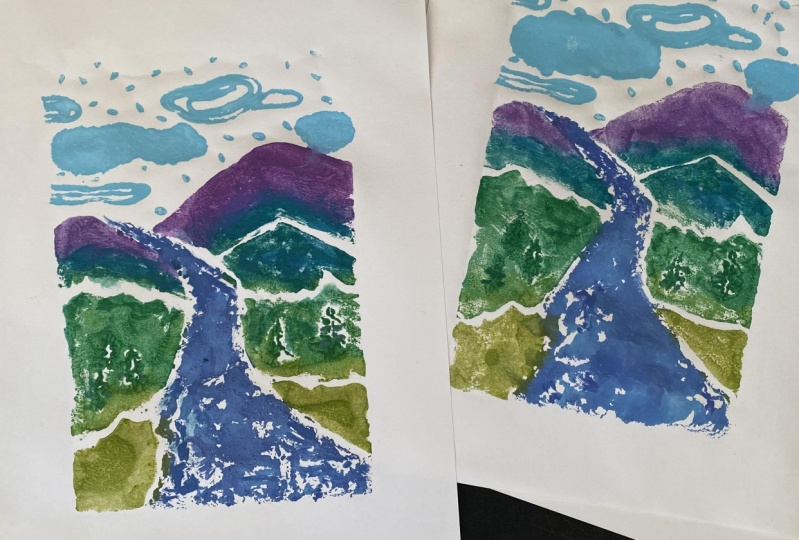
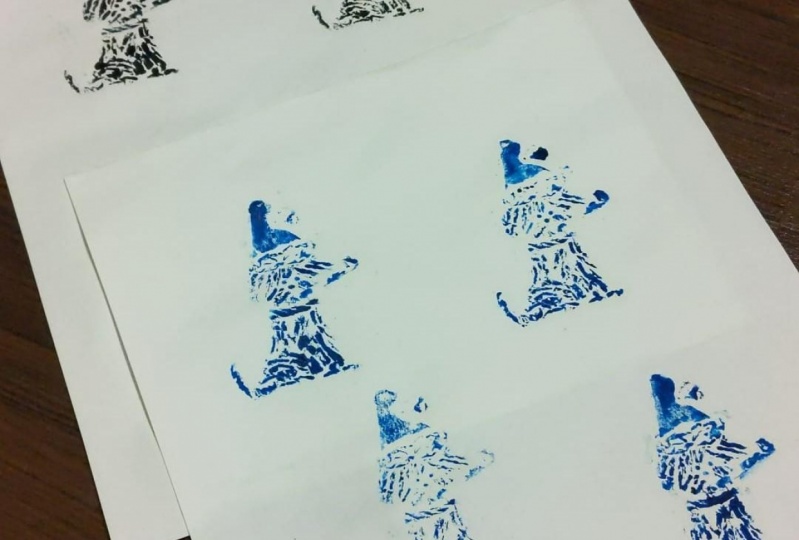
11. Printing with One Colour: It's a good idea to set up zones in your workspace for different activities before you start getting messy. Here I have a dampening zone, where I have my clean printing paper, my clean sponge water and the board. I then have a clear space where I can put any fresh prints to dry. Lastly, I have my printing zone where I have my inks and cleaning things already in easy reach of my collagraph plate. Having zones, keeps everything organized and things you can work faster once the ink is on your plate. Make sure your plate is firmly on the non slip mat too, so you want to be able to wiggle it a bit and it not move. If your plate is moving around too much on your work surface, you can always add some loops of tape and put them on the back of your plate and then firm them down. Making sure your plate doesn't move around under pressure, means that you shouldn't get too many blurring prints. Dampening your paper, helps the ink to adhere to the paper during the print, and also helps your paper to stretch into your textures. For this first test print, I'm using an old rough bit of cartridge paper. If you're anything like me, your first print will rarely be your best print, so save any expensive paper for later. Dampen that clean sponge and wipe it gently over your printing paper, then leave it to rest while you go on to the printing stage. Choose just one color for your first prints as it will give you a really clear idea, of how well your plate is working. Get a small amount of ink on your brush, and start applying it to your textures. I like to use a stiff bristle type of brush as it helps to scratch the ink into all of the crevices of the plate. Don't put the ink on too thickly, you'll be surprised how far a small amount of ink will go, and you can always add more later if needed. Take your damp paper and give it a good feel. If it still feels wet and makes your fingers wet, you may need to blot it, or leave it resting a little longer. You want it to feel damp and bendy, but not slimy and floppy. If all is well, lay it on top of your inky plate and press down lightly with your fingers. Then lay a piece of newsprint on top of that. Press down firmly onto your plate with your palms. The pressure you put onto your plate is transferring the ink from your plate into your paper. You can feel around all of the edges of your textures, you'll be able to sense them through the paper, and now you can try if you want any other forms of pressure that you may have. If you have a spoon, you can try rubbing it gently over the back of your plate, or you can try a brayer or a roller. If you do try one of those things, you'll have a little bit less control, so do make sure, you have your plate firmly secured to your nonslip mat or to your work surface, using masking tape or some other sticky force. When you feel like you have managed to touch on all of the areas of your plate, it is time for the surprise. There's a few things we can take from this print. For one, the shape is coming out really well. On this particular paper, it's not going to get into all the crevices, but I'm really happy with the amount of detail which came out on this, considering it is such a thick paper. Also, you can see that it's definitely still a bit too damp this paper, because this is water merging in to the inks. It's quite a nice texture, if that's what you're going for, but if you get that and that's not what you're going for, then you need to let your paper dry that little bit longer. Now we're going to try on one of the thinner types of paper. We do exactly the same thing as before, dampening gently with our sponge. We just take a little more care because the paper is thinner and we really don't want to tear it. Although you have already printed, your plate will still have a fair bit of ink still on it, so you don't need to ink it up fully again. Just touch up any areas that look less inky and brush lightly over everywhere else. This paper is thinner and needs a lot more care and a bit less pressure in order to print well. Place newsprint over the top of your first presses as ink might seep through the paper. Press firmly but carefully, and use your fingers to gently feel around your plate. Takeoff the newsprint and you'll immediately be able to see how your print is progressing. Gently use your fingers to lightly press on any small detailed areas that needs attention, such as the eyes. On this print you can see it has got into the crevices that little bit more, and is picking up a more defined selection of textures. We were able to get more around his eyes, and pick up his glasses. We even managed to get a little bit of his eyebrow differences there. Also his bow has picked up in a really nice way. We want to perhaps be a little more careful and not put too much pressure on his lapels because they have come out a little too thickly. That's something for me to bear in mind on the next one that I do. This is experimenting with just one color, and it really gives us the lay of the land in terms of how our plate is working. Now you can stay with just one color if you'd like. You can experiment with how much ink you put on in different areas, changing the weights of ink as you go along. But you can also experiment with different colors, and that's what we're going to do next.
12. Printing with Two or More Colours: I'm going to refer to my original idea and I'd really like to give him a yellow hat and some yellow accents. Also, we'll put some black in his features. I already have some blue on my plate, therefore, we need to take off a little bit of this blue. A little damp tissue paper can be balled up and used to dab off the majority of the color that you do not want in that particular area, or if it's a smaller area like the bowtie and the stick, which I want to make a little bit less blue, then you can use a cotton bud and you can start to take off any excess. I'm not going to worry too much about the blue on his face because the black is a darker color than the blue and will be able to override that. Start with your lighter colors first and then go in with darker ones. The ink will stay damp for a little while, but don't let it fully dry out, if it does, wipe the crusty bits off and reapply fresh ink. Remember too that not every plate will work as well as others. It's all an experimentation process. I have made so many plates that looked great as plates, but in the end, just didn't print that well, and that's okay. We're all learning as we go, so try not to judge yourself or your prints too harshly. This one shows me, that I didn't quite ink up enough because I haven't got any definition around his face. Again, this is the rough paper, but it still hasn't picked up quite as much as it did with the solo color, and that's just because I haven't given it as much ink, I need to do a little bit more for the next one. I also completely forgot to re-ink the hands and the feet which is why they are so faint as well, but what I can get from this is that I really like the placement of the colors. I'm going to do that again, but pay a bit more attention to putting a little more ink around this center point. Remember, you can also remove ink in order to create a certain effect. If you want to create a highlight in the eye, you could remove some of the ink from a certain section of that eye. Now, you're in the swing, you can start to tidy up your prints a little bit. Use kitchen roll or damp cotton bud to clean around the edges of your character. With this one, you can see that I inked up a little bit more, and it's definitely showing a bit too heavily now through on his eyes and on his feet. However, again, I'm happy with the placement of the colors, so it's just trial and error now to get the right weight. You can, of course, mix new colors if you want. Inks can be mixed just like paints. Feel free to try printing on lots of different types of paper too. In general, thicker paper works best when you're using a printing press, but at home, it's hard to get enough pressure on thick paper to print well, therefore, thinner papers work better for home printing, which is why I'm using mulberry paper here for my better prints, but mix it up, try things out and see what happens. Be a printing explorer. You can start to experiment with being a little more painterly with how you apply the inks. Try blending areas or using shading and highlights. The joy of printing is that you can try again and again as many times as you like to get a different result and every result will be different. One plate can have infinite outcomes, meaning the pressure is off. If you don't get a great print first time, who cares, it doesn't matter, you can just print again. There are surprises with every pull of a print, and who doesn't want surprises? However many prints you try, remember to photo them and share them to the project gallery to record your printing journey. I will be sharing some of my successful and not-so-successful prints there too, so come join me! And now, we clean up.
13. Cleaning Up: You've finished printing but you still need to clean up. If you're using water-based inks it's nice and easy. Just grab a cloth or some kitchen roll, dampen it and start sponging your plate. You don't have to rub too hard, you don't want to pull anything off of your plate but just try to get the majority of the ink off. You won't get every little bit so don't worry if it still looks like there is some on the plate. If you're using oil-based inks, then you can use vegetable oil or sunflower oil on a cloth to start wiping off your plate. Remember to clean your brushes and your work surfaces. Let your plates fully dry from being cleaned before you store them. Once dry, you can put the plate between a couple of leaves of paper that will help to protect it while it's stored and keep it nice and snugly.
14. Let's wrap this up!: Thank you for taking this class and for spending time with me making collagraphs. I really hope you enjoyed it, found some new ideas and have got some prints that you can be proud of. You probably have a good few prints which perhaps didn't come out quite as good as you'd hoped, but don't throw them away. You can use them for other things. Whether you use them as textured papers which you can cut up and use in collage in a completely different way, or you can scan those textures in and incorporate them into designs digitally. I really hope you have found some inspiration and have caught the printmaking bug. As you go forward in your printmaking journey just remember, printmaking is play making. It's all about trial and error, getting things wrong, learning as you go, taking your time. We live in a fast world and often we think that the pay off is the end product. With collagraph, it's all about the process and enjoying how you get to the end. If you have any questions about any part of the process, please do leave them in the discussion down below. I'll always do my best to answer and support you in your print making. Remember to share anything that you make to the project gallery. I'd love to see it, and do come and say hi over on Instagram. Keep making to make happy and I'll see you next time.
 Gemma the Pen, Making to Make Happy!