Transcripts
1. Introduction: Welcome to mindful miniatures in drawing point where we're going to get
intricate with our printmaking while celebrating the little
things that we learned. There is something
about doing things on a tiny scale that
can really focus our attention and
help us to find a new appreciation for things
that we see every day. Small things seem
precious somehow, and so we keep them close in pockets and wallets and
when we look at them, they draw us into their
unique versions of the world. Dry point is a
printmaking technique which is so well-suited to intricacy and it's achievable at home without the need
for a printing press. By scratching a design into a surface and filling
those scratches with ink, you can create
printed line drawings which have a distinctive rustic, historic feel and by
exploring miniatures, you can try out these
printmaking techniques without the worry and
commitment of a large piece. This class is aimed at
beginners and we'll give you a springboard for exploring
printmaking further at home. If you already have some
experience in print making, I hope you will enjoy focusing your creative
energies into a smaller frame and seeing how your art changes when it's seen through
a miniature lens. In this class, we're going
to create a unit design, we're going to scratch it into a plastic surface and then we're going to
take a print from it. Along the way, we will explore
how seeing our worlds in miniature can elevate
the every day and to help us to feel grounded. You are welcome to create one miniature
design or a series, but whatever you do, I hope you will share it with us in the project
gallery or with me on Instagram because I would love to see the
miniatures you create. My name is Gemma. I'm
an artist maker and I love to create all
manner of things, from printmaking to painting, from sculpture to puppetry. Everything we learned,
however varied, fits into our next idea, our next project, and
our future adventures. In the next lesson,
we'll be talking more about the class project. Let's get started.
2. Our Project: Our class project is to create our own miniature dry point
print by scratching a design into a plastic sheet inking it up and taking
a print from it. The subject to draw is
entirely up to you. But I suggest, choosing something
that you see every day and that means
something special to you. This project offers you
a way into printmaking, which has a grounding
in basic drawing, so allows you to expand on
your current artist skill-sets whilst also encouraging you to experiment with some
pointer outcomes. But why are we
making a miniature? Because it allows us to fully enjoy the intricate detailed
nature of dry point. But on a scale which has less of time commitment and
less overwhelming, by pulling our focusing smaller, we also gain the
benefit of being able to fully immerse
our minds in the task, which is calming and satisfying, and we can also make more
than one design if we want. Whether you create one
miniature or three. I hope this project
will inspire you to see your drawing
skills in a new light, and seek out new ways to
use them in the future. So now let's dive into what
miniatures actually are, and why are they so interesting? Let's go.
3. Delving Into Miniatures: Let's break down some facts about miniatures
to get us started. First things first, how
big does a miniature need to be to be
labeled as a miniature? According to the Royal Society
of Miniature Painters, Sculptors and Gravers, a miniature is something
which fits within the framed dimensions
of six by 4.5 inches, and it needs to be
of exquisite detail. This, as you can see in
relation to this as in my head, is roughly what
we're working with, but you can of course
go smaller if you wish. If you've ever been to an
historic house or museum, or watched a period drama, you may remember having seen
miniature portraits from chew to times Tiny
portraiture art became popular in Henry VIII
school and continue to be so throughout the
17th and 18th centuries. In a pre photographic era, miniature portraits became a way of conveying a
person's likeness to possible suitors or of taking memories of loved
ones on travels. There were things only
the wealthy had access to commissioning initially and therefore gained an air
of preciousness that derived not only from the
sentimentality attached, but from the money
invested in them. However, once
photography changed the world and could capture
a sentiment in moments, miniature art changed too. Nowadays it has expanded its scope to include
varied mediums and subjects using its tiny size to create new
worlds and windows. This is where it gets
really exciting for us. When you look at a tiny artwork, whether it's painted
or sculpted, think about how it
makes you feel. Often, a small artwork
can only be viewed properly by one
person at a time. Which means we develop an intimate one-on-one
singular relationship with what we're seeing. In that moment it's
just us and the art, with no other
influence and we can fully feel whatever
we want to feel. Tiny art also invites us to
concentrate and really see. There are so many
details to discover inside a tiny frame and the focus that we invest in appreciating those
details, it elevates them. Tiny things become
important things, precious things, things we
want to protect and keep safe. I'm inviting you to create a miniature of your
own in this class, but specifically of a subject which is an everyday
occurrence for you. Your inspiration for
our class project is in celebrating something that perhaps gets taken for
granted because it's so normal or because
you see it so often. Maybe you feel inspired by the miniature portraits and want to create your own of a pet, or a family member. Maybe you have a favorite
plant or flower that you tend to every day and you can
put that in the spotlight. Perhaps you have
a key ring which jungles in your
pocket every day and reminds you of home
though you don't necessarily think of it
that way all the time. Perhaps that key ring
could take center stage, have a wonder about
your space and take notice of the things you
use or the things you see. Take photos of bits and bobs, do some doodles, see what makes you look and then
look a bit longer. In the next lesson, we'll take a look at the
resources section of this class and see what
inspiration we combined.
4. Inspiration & Resources: Inspiration doesn't always
hit us straight away, sometimes we need to let our thoughts [inaudible]
for a while. While you are thinking, do make use of the links and the free materials that are in the resources section
of this class. Sadly, the Resources tab is not available via the
Skillshare app, so head to your browser
version instead. First off, check out
the Pinterest board. If you're unsure what
miniature arts look like, you'll find a bunch of
them on this board, from traditional tiny portraits to modern interpretations. Many miniatures focus on
portraits or landscapes, but I encourage you
to let your mind roam beyond this board to
find your subject. Part of the tradition
of miniatures at least with 2D ones were the frames. Portraits were often framed
in two circles or ovals, and I enjoy the idea of integrating a frame
into your design here. I have created some
ready-made frame designs which you are welcome
to use, if you want. But of course, you can create
your own however you like. I'll be using a couple of
these in the upcoming lessons, so you can see how
to incorporate them into your
design, if you wish. You'll also find PDFs on drawing techniques, resizing,
and materials. I hope they're useful to you. In picking your subject, keep this in mind, detailed does not mean
overcomplicated or busy. Drawing something
in a tiny frame means you have less
space to work with, so don't try to fit lots
of things in there. Pick one thing to focus
on, one is enough. Next up, we're going
to be chatting about some basic drawing
techniques which will be handy to
remember going forward. Let's get drawing.
5. Drawing & Design: [MUSIC] As you start
to doodle your design, bear in mind that everything you are drawing
with your pencil, you'll later be trying to scratch into a piece of plastic. It's useful to know
that straight lines are easier to scratch
than curvy ones, and the way that you build up shading in a dry point is by scratching lines in more
densely and deeper. This means that drawing
techniques such as hatching and stippling become
hugely useful here. They allow you to scratch in variations to your
initial lines, giving your plate more
movement and interest. Let's go over some of these
basic drawing methods now, then I'll show you their are equivalence in scratched form. First up is hatching. This is when you draw a
series of lines all parallel to each other and traveling
in the same direction. The closer the lines are, the denser their tone becomes. This can be developed further by moving it into crosshatching. This is when you
draw another set of lines over the top
of the first set, but going in the opposite way. Again, the closer
together the lines are, the darker the area becomes. Next is tick hatching, which takes its lead
from the others, but it uses short dashes
instead of long lines. Like its hatching cousins, the lines can all be facing
the same way or crossed over. The more sparsely you use them, the lighter the tone is. You can also create
patterns from the ticks by regulating
their directions. Stippling is the next stop. This is when you create
lots of small dots. The more you pack them
tightly together, the deeper the
shadows you'll make. Scribbling is an art form. This loose doodle
motion can create super textures and gives you a bit of freedom in the process. I have a small scrap
piece of plastic here to show you how the drawing techniques we've
just spoken about look when they've
just been scratched. This is the hatching, probably the easiest to
recreate on plastic. You can keep going
over areas to build up scratches and
create the time. Crosshatching
similarly works well. You can just swivel
your plastic around to scratch in different
directions easily. Tick hatching
allows for a bit of looseness in the
hatching on plastic. It's a little harder to control, but it makes a fun texture. Stippling is the hardest to
do with an etching needle. You need to press hard and
it's likely they'll come out more like mini
dashes rather than dots. However, if you can use an
electric engraving tool, you'll open up your
option with this one. Scribbling is straightforward. Despite the points sometimes
catching in the plastic, you can keep scribbling over
areas to build up density, and the randomness of it creates some great freeing textures. Although there are lots
of parallels between shading with a pencil and
shading with a point, bear in mind that in order
to scratch a design, you will need to
press harder and you will likely have
a bit less control. We'll talk more about
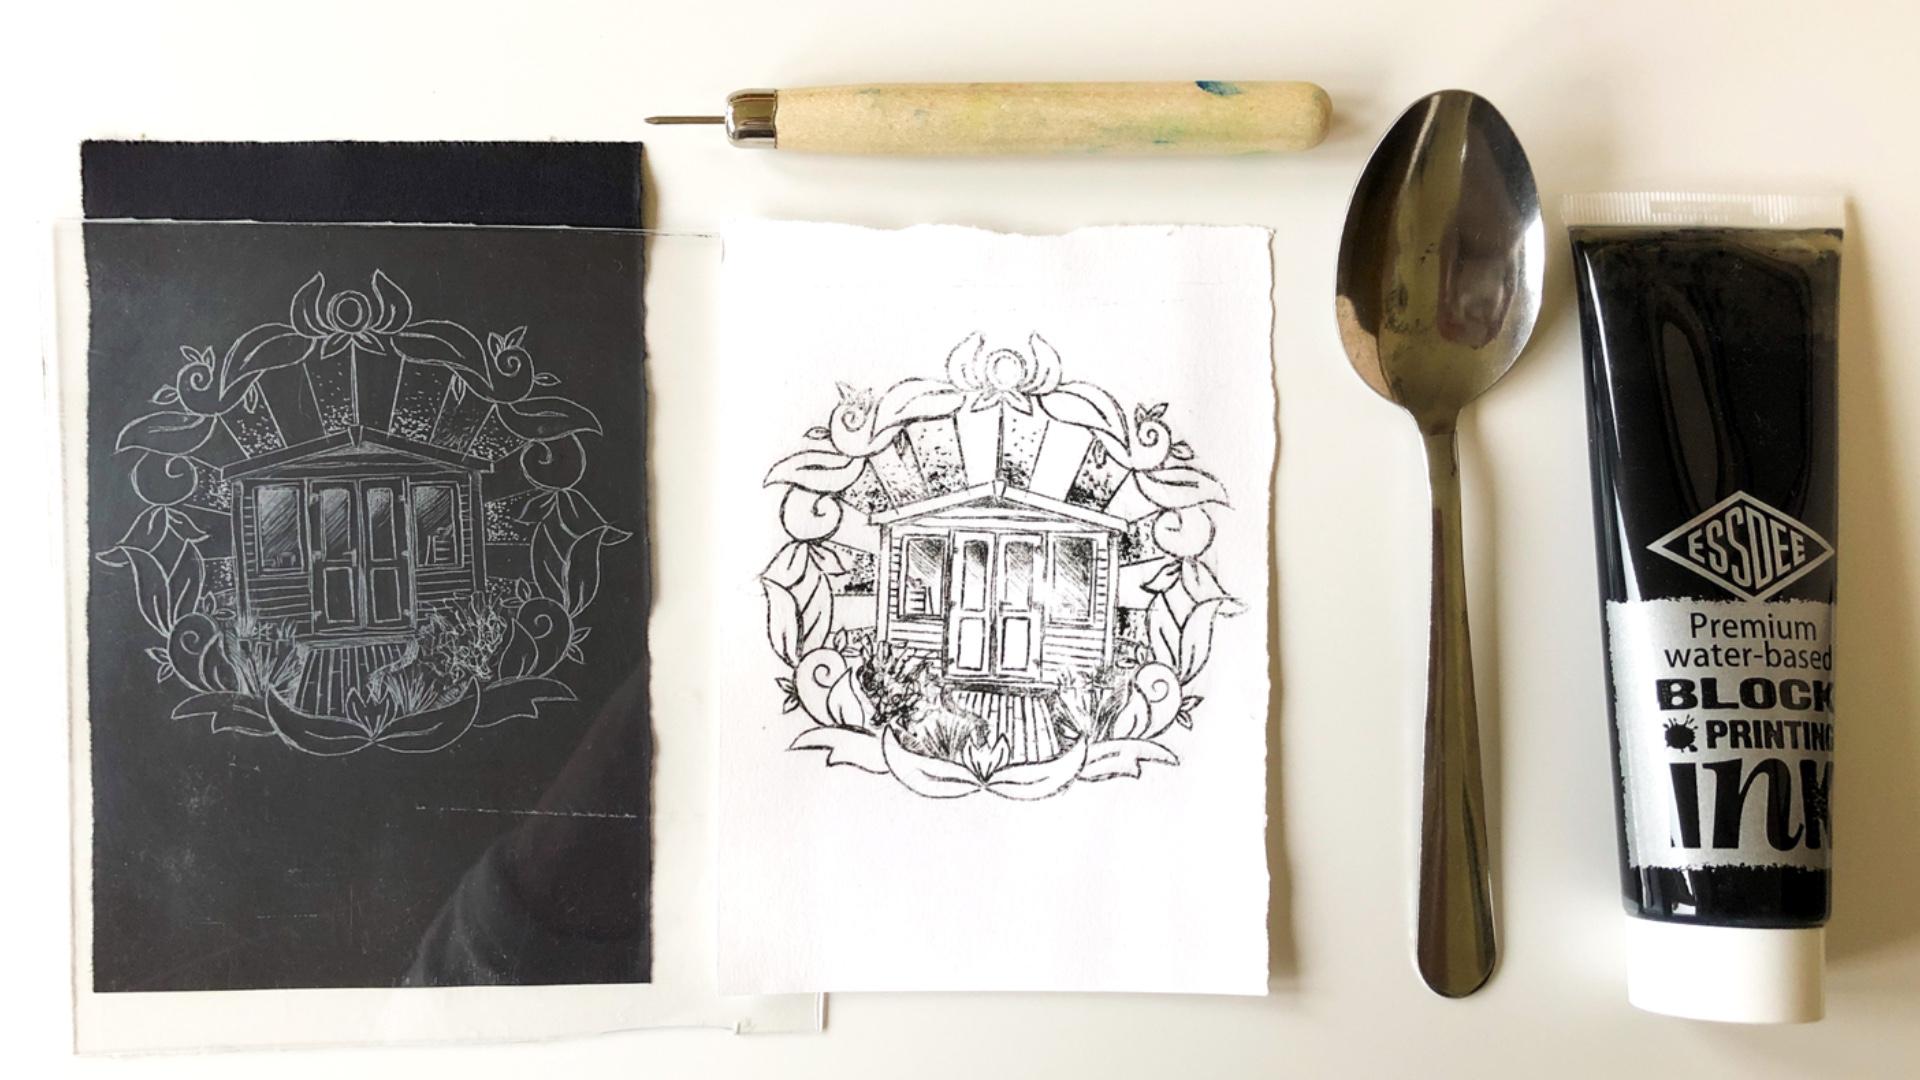
this, but for now, you can see how you can transfer your drawing techniques over to your scratching pretty easily. [MUSIC] As my main design, I decided to focus on my shed. It's the place that houses all of my creative
materials and where I began to truly feel as if I had something
worthwhile to share. It is freezing in the winter and boiling in the summer
with no electrics, but it is a creative
space which is all my own and which I feel
very grateful to have. My mindful miniature is in celebrating this
wooden structure, which represents to me
creativity and safety. I decided to place my shed
directly in the center. I took a photo to use as reference and chose
a leafy frame, which to me reflects the
garden the shed sits in. I added in some lines radiating outwards from behind
the shed and used stippling to differentiate
the segments and make it feel a bit like
a twinkle sunburst. To me, this was a nod to the magic of this
little building. In the next lesson, we'll talk about how
to resize your designs to make them miniature
and ready to scratch. Let's go. [MUSIC]
6. Resizing & Preparing Your Design: [MUSIC] You may wish to be spontaneous and scratch your design freestyle
into the plastic. Go do it. Enjoy yourself. However, if you're like me and you like to plan
something to trace, then you might need to
think about how to resize your reference photo
or drawing down, in order to get into
a miniature size. Let's go over how to prepare
your image in a tiny way. If you have access to a tablet or a computer
and a printer, you can decide to create or
resize your design digitally. Here I'm using the
Procreate app on an iPad. I have imported a photo of my
dog to use as a reference. I lower the opacity
of the photo layer so that when I later draw on top
of it on a separate layer, I can see my drawing easier. I import the PNG file of one of my frames to sit on
top of my photo. Then I resize my photo behind the frame to a
size that suits it. From here, I can create however many layers
as I want on top, to draw out my design
until I'm happy with it. When you're ready, you can
print out your finished design at whatever miniature size
you are working with. Maybe you already have a hardcopy photograph
that you want to use, but you also want to use one of the frame templates around it. Print out a copy
of the frame's PDF and cut out the frame
that you'd like. You don't need to
be too neat here. Make a slight fold in the
center to cut a slit so that you can cut the rough
area of the center away, then place the frame
on top of your photo, choosing where your
subject sits inside it, would it be central, demanding attention,
or to one side? Using masking tape,
roughly stick down a couple of
the frame edges, then you can use the
tape to also stick your image to the underside
of your piece of plastic. Lastly, if you maybe have an artwork that
you'd like to use, but it is a bit too large, an analog way of
reducing it down is by using the
classic grid method. Print out the resizing PDF or draw your own
large squared grid, then with your artwork
against a light source, pop the large grid on top of it, trace your artwork
onto the grid. When finished place your tracing beside a smaller squared grid. Use your large grid
as a reference for redrawing your artwork
onto the smaller grid, pick a point to start with. Here, I'm doing the eyes first. In the large grid, I count out which
box the eye is in, and find the corresponding
box in the small grid, then I take a note
of where the eye is positioned inside
that large box. For example, it's
in the lower half, just right at the center, and redraw it in
the smaller box, I then work my way slowly
around the image until I've redrawn all of the boxes
that the artwork covers. You can then either use the artwork directly
from the small grid, taping it to the underside
of your plastic, or you can retrace it with a frame or any extra
designs over the top. Next up, we're going to run through the main
materials that you'll need for the rest of the
project. See you there.
7. Materials for Scratching & Printing: [MUSIC] There are only a
few materials you'll need, let's check them out. First off, you will need
a sheet of clear plastic. You can buy and
critique sheets from art and craft shops that
are a little bit like this. But you can also find plastic
items that you can recycle. Here, I have a piece
of plastic from an old picture frame which I snapped down to a smaller size. As a side note, just remember, whenever you are
cutting a plastic, do lookout for any sharp
edges and be careful. You can also look out
for old food containers. This was a container for
chicken slices but cleaned off. It has a nice flat wide base. Next up, you'll need
something pointy to scratch. This is an Eci needle, which is essentially a thick, sturdy needle on the end
of the piece of work. You can get these from
arts and crafts stores, but there are other things around the home
which you can find, which can work just as well. You could try the
point of a compass, you could try a metal nail file or maybe a metal skewer
from the kitchen. It doesn't need to
be super sharp, it just needs to be
pointed and metal. Also, if you have access
to an engraving tool, you can use that to create freer lines and more
specific stapling. Those are the items which
will scratch your plate. Now let's quickly run over the bits that you will
need to print from it. Remember, all of these
things are listed on the materials PDF in
the resources section. Do look out for that and
refer back if you need to. Find some medium-weight paper, I'm using a basic cartridge
paper of 170 GSM. It needs to be thick
enough to withstand being wetted and rubbed on. Old newspaper will be handy
for protecting your services. A steel ruler can be useful for helping you to scratch
straight lines, but it is optional. Masking tape can be used to take your designs
to your plate, the plate to your table
if you need some support. Clean water, either in
a bottle or a bowl, along with a clean sponge, a large towel, or to face towels to use for
blotting your paper, your choice of ink. I'm using water-based black ink because it's easy to clean, a small sturdy scrap of
card for scraping ink with, a few cloths and at least
one with an open weave, which can be you're
screaming cloth, a metal spoon, whatever you
can spare from your kitchen. We have everything we need. It is time my friends, to start scratching [MUSIC].
8. Scratching Your Plate: [MUSIC] That I can show you the results that we
can achieve with different types of
plastics and scratches. I'm creating three different miniature plates in this lesson. I hope it will give you the confidence to
try whatever plastic you have available to you
and just see what happens. Let's start with my
main miniature design, my little sheet before
starting any scratching, if you are tracing your design, makes sure it is taped securely to the underside
of your plastic. This will help it to stay in place while still,
you are tracing. For this miniature,
I'm using the snap tough piece of plastic from
the old picture frame. It's not super thick, but it's also rigid
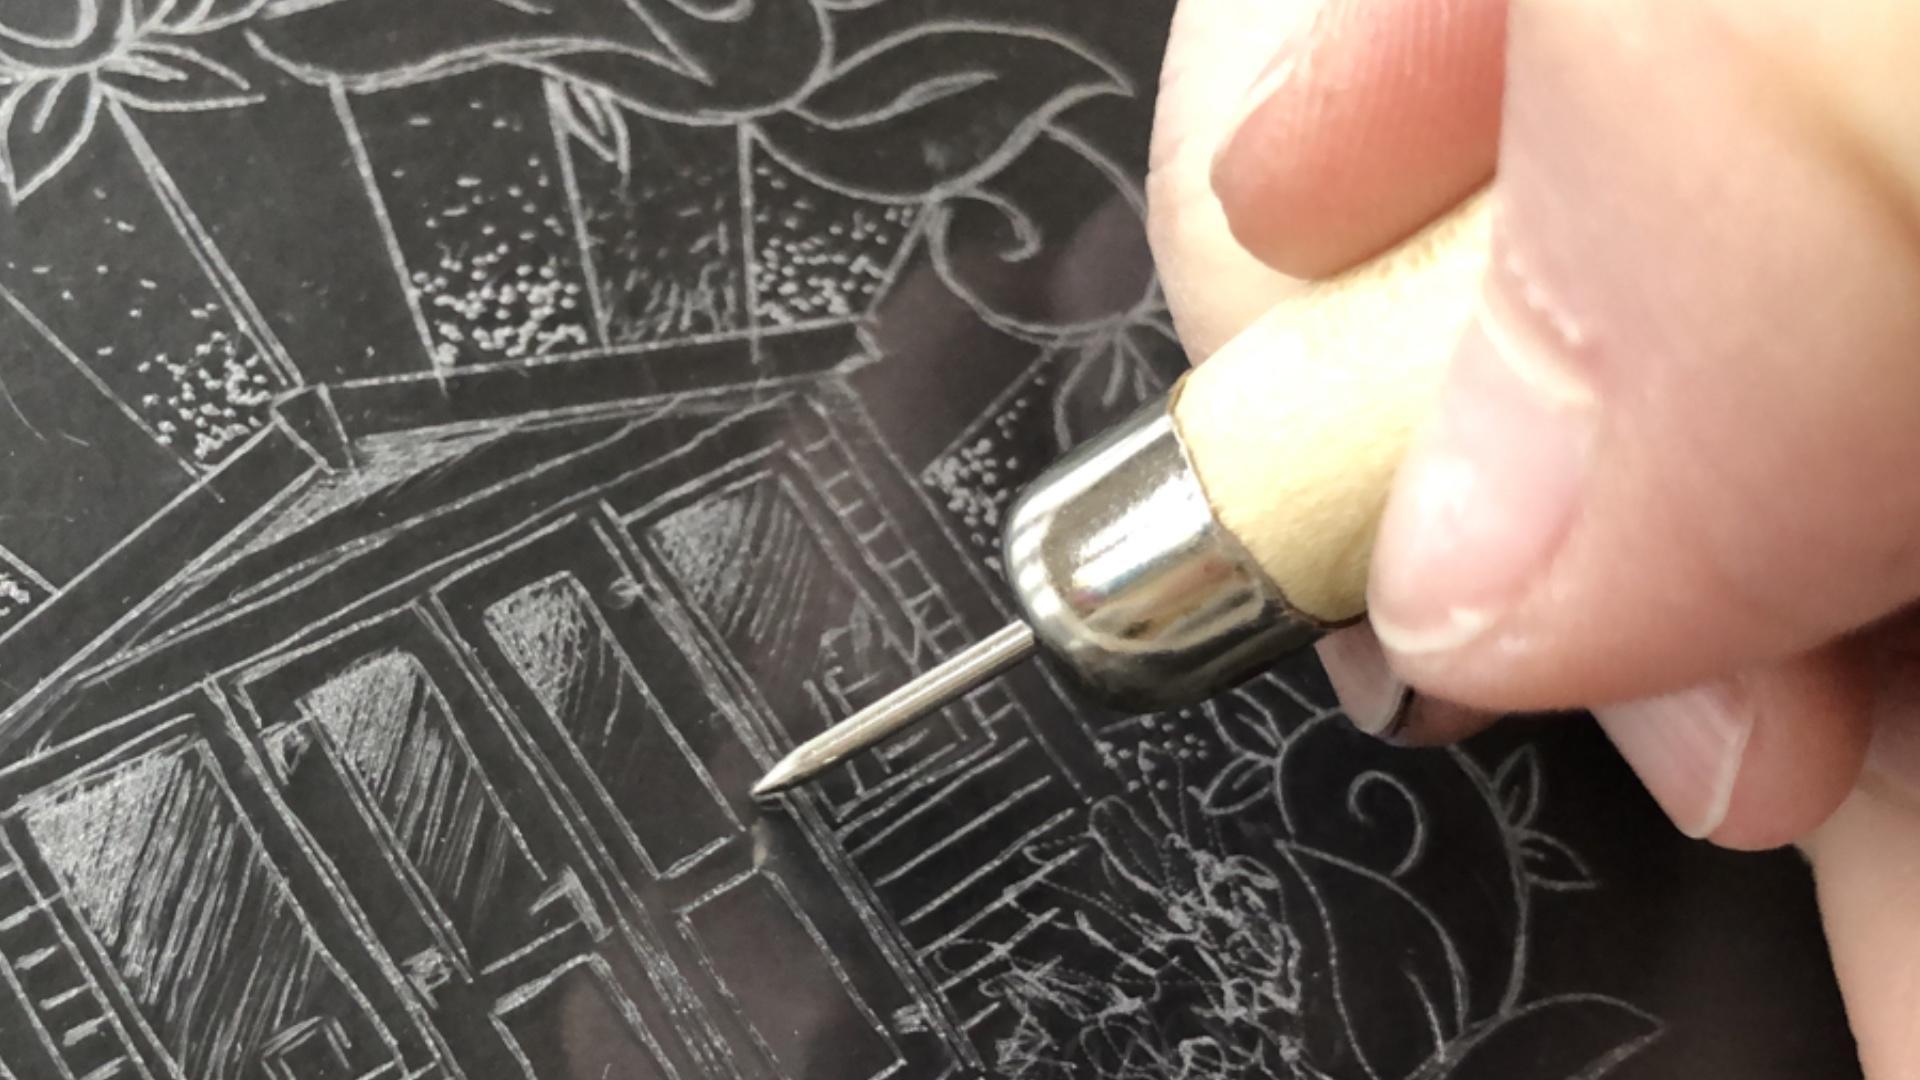
using an etching needle, I start with the straight
lines of the shared structure. Take your time on
your first marks. You can always press
lightly at first to get a feel for it and then
start pressing hard later, you'll notice you may get a little plastic flakes on the tip of your
needle after a while. This is just the plastic
you've scratched from the surface and you can
simply brush it away. Now, different plastics make different noises
when scratched. This one makes this
noise [NOISE] Yes, it might be a bit
unsettling at first. If so, put some
musical while you are scratching to
distract your ears, seeing where you've been on a see-through surface
can be a challenge. If you run a finger over
the areas you've scratched, you should be able to
feel the roughness. If you can't feel
anything you may not have scratched deep enough for the
ink to enter well inside, it's a good idea to sit in a well-lit area while you
are scratching your plate. This not only saves
your eyes straining and keeps your fingers
safer with pointy tools, but it also means you can
tilt your plate towards the light regularly to see how your scratches
are coming along. One of the benefits
at this stage of the process is that your
plate is pretty portable. If you grab something
sturdy to lean on, you can go find yourself
somewhere completeness it. Listen to some music
or an audiobook, and let some time
melt around you. Hand-drawn lines on plastic can sometimes be a little bumpy. I like the organic
nature of this but if you're aiming for
a bit more accuracy, you can use a steel
ruler to help you out. Curvy lines can be tricky. Take them slowly, do one small scratch at a time and gradually
connect to the map. Go over them a few
times until eventually, you feel you've made a smooth
groove in the surface. Due to the pressing down motion of your hands
as you scratch, you may find they
get tired quickly. If this is the case, give them regular breaks and some movement to
release the tension. Wiggle your fingers, scratch
your fists and release, rotate your wrists and
shake out any stresses. The second piece of
plastic I'm using is from an old food container. If you can remove any
labels cleanly then do so. This was quite a stubborn one so I'm going to work around it. If you do the same, just remember to scratch on the side opposite of the label. For this one, I'm using
a mini version of one of my favorite drawings that
I did a few years ago. When I see it, it
makes me smile. So I thought it would be a
nice one to miniaturize. Because of the label on the plastic blocking my
view of the drawing, I'm placing them both
onto a light pad. I'm just scratching out
the basic outlines and not pushing too hard as I don't
want to damage the light pad. Another option is to trace
the design onto the plastic with a marker pen first and
then scratch over that. Once away from the light pad, I then go back in and scratch
harder and add more detail, checking the surface in the light from the
window regularly. This plastic is the
thinnest that I've used and the scratches don't
go in quite so deep. There is no scrapings
that come away from it and it's much
quieter to scratch on. If you work with a
similar surface, be mindful of how
hard you're pressing. You don't want to pierce an
actual hole in the plastic. If you're not sure
how hard you can go, test out some scratches on one
corner of the plate first. The last miniature
I'm making is on a sheet of paper
from a craft shop. I am tracing directly from a photograph with
an overlaid frame. I couldn't resist creating
a miniature of our doggy. He is absolutely a
special subject. This plastic is the
thickest of the bunch. It again has very few flicker-ways
and makes less noise. When working from a photo, it can be extra tricky
to see where you've been so keep checking it in
the light regularly. Once you have the
main design traced, you can remove your
original from the back of the plastic and carry
on working without it. Place your plate on
top of black paper to make it easier to
see your scratches. With thicker plastics, you have the option to use an
electric engraver. This can be easier on
your hands as you don't need to push hard and
can use it like a pen, making it easier to tackle curvy lines or create
interesting effects. When working with an
electric engraver, makes sure to be in a
well-lit environment and stay alert when you have
finished all of your scratching, you can start prepping to print. Let's go set up our space.
9. Prepping To Print: Once you have finished
scratching your place, you can prepare to
print [LAUGHTER]. Prepping your area
before you start printing means you have
everything you'll need to hand, and gives you the headspace to just enjoy the printing process. First, get some paper ready, cut, or repeat to
the size you need. I want mine to just a bit
larger than my plate size. Then designate some areas of your workspace to
specific tasks. It's handy to have one
area for dampening paper, one area for printing, and one area for
drying your prints. In my dampening zone, I have a bottle of water, a sponge, my blotting
towels, and my paper. In my printing zone, I have my old newspaper tissue, my plate, inks, a spoon, my scraping card, and
my screaming clothes. If I don't have table space, I'll often make a clear space on the floor for laying my
fresh prints to dry. But you could also hang them on the line if that
works better for you. Just before you're ready
to start printing, dampen a couple of
pieces of your paper. Damp paper sinks into the inks better and we'll give
you a clearer print. However, you don't
want wet paper, you want damp paper. Either rub water
over your paper with a clean sponge or lay it
in a bowl of clean water. Once it's wet, lay it between your towels and press
on them lightly. Leave the papers in there
until you are ready to print. Enough prep, let's print.
10. Printing Your Plate: [MUSIC] I'm going to put a little blob of ink just on the edge
of my newspaper. You could use a
palette if you like. You really don't need much, and you can always add
more later as you need it. Take your small
scrap of card and scrape a little bit
of ink onto it, then start scraping the
ink across the surface of your plate across all of the areas where you
have scratched. Move your hand or
your plate so that you can scrape in
various directions; left, right, up, and down. The aim is to enable
the ink to sink into every little
scratch you have made. Take as long as you need. Once you feel you have covered all of your scratches in ink, you can move on to scrimming. A scrim cloth is recommended
to be a loose weave, course or rough cloth. However, I didn't have
one of those so I used a loose weave stretchy
cleaning cloth instead, and it works fine. Don't be afraid to try out
whatever you have available. Take your cloth and bunch
it into itself so you form a small ball that fits
into the palm of your hand. You want it to feel secure
in your grip and to have a nice firm surface
so that you can make circular motions with it
on your plate like this. Holding your plate steady
with your other hand, start to move your cloth over
the top of your inky plate. Use firm, steady,
circular motions. Gradually, you will see the
ink start to come away from the surface but leave ink
behind inside your scratches. I love this part of the process. Seeing a design emerging from
the fog, it's like magic. Feel free to move your
plate around so you can get across all the
surface areas. You don't need to
push down hard. Remember, you are only trying to remove ink from the
smooth surface. But if you push down super hard, you'll remove ink from
the scratches too, which will create a
less-defined print. For your first print,
it's a good idea to get as much ink off the
surface area as possible so that you can get a good idea of how your plate
will print going forward. After all, if you're not
happy with the first print, you can always go
back and continue scratching to develop
the design further. Once your plate
seems pretty clean, you may wish to go around
the edges of your plate with some tissue or a cleaner
cloth than your scrim, just to wipe away any sneaky bits of ink
you may have missed. Now, you are ready to take your first print.
Good luck my friends. Here we go. Take a piece
of your dampened paper. It should feel a little
moist but not slimy. Place it on top of your plate and give it a firm press down. Rub across the surface
with your fingers to get the paper feeling
like it's sticking. I find the weight of
my hands is enough to keep the paper and plate
steadily together. But if you get any
blurring on your print, try taping your plate down to the work surface to keep it from moving as you apply
the pressure. Then grab your
trusty metal spoon. Holding it at its head, rub the back of the spoon all over the areas of your design. The firmer the
pressure you can use, the darker your print
is likely to be. It's a little bit
of a memory game. You cannot feel too easily as you rub which parts
of the plate are your design or
which will have had more spoon attention
than others. Therefore, as long as you hold one edge of your
paper down firmly, you can lift the other edge
to have a sneaky peep. Check out which areas are clear, and if some sections
are too light, go back and apply a bit
more pressure to them. Once you feel as if you have
done as much as you can do, it's time for the final reveal [LAUGHTER] I am really happy
with this first print. There are areas I could have put more pressure on around the top, so next time I'll try
to remember that. I can also see that there
is a bit of variation in how dark the shading inside
my windows is for example. Seeing as they are
quite close together, I think this looks
like it is less of a pressure issue and
more of a case of my scratches being
deeper and denser in some windows and
lighter in others. I can note that down
and always go back and deepen some of those
lighter scratches. But overall, I think this
plate has printed so well. I love the hand-drawn feel of it and the texture
inside each line. That design was on the
picture frame plastic. Let's see how the other two
types of plastic printed. This is the Cheshire
cat illustration on food container plastic. It's a shinier plastic
than the others, and you can see the ink slides
around on it much more. I'm scraping the ink in
from all directions. But when it comes to scrimming, I'm being a lot gentler
with this plate. Because the scratches
are shallower, I'm cautious of pressing too hard and removing too much ink. When it comes to the rubbing, as the plastic is shinier and sleepier on
the work surface, I just take a bit
more care to hold it firmly but can also twist it around easily to apply pressure to all the
sides more evenly. In pulling this print, I am really happy with the
detail that was achieved. You can see a difference in
the texture of the lines. They have a slightly
hazier quality, a little softer, which actually works quite well for
an illustrated cat. The last plate is
my doggie portrait on store-bought plastic. I used the engraving
tool on this one, and so as there were lots of tiny speckly scratches on it, I take time to make sure ink is scratched into
all of those nukes. But as I know, those
scratches are deeper, I can scrim away the ink quite freely with less worries
about removing too much. In revealing the print, I think you can really
see how differently the lines from an engraver look. They have a looser feel and
definitely print darker. I love the speckly textures in the flowers and the blanket. I do think though, that I didn't go deep enough with the eyes. They were one point I
didn't use the engraver on, and they seem a bit lost when the ears and
the nose are darker. That's something I'll return to. If you pull a print, please do share it with us in
the project gallery. It's so exciting to
see the results. In the next lesson we'll
do a bit of exploration, diving into a couple
of extra things you can try with your
plates. See you there.
11. Be A Printing Explorer!: [MUSIC] Print making is
all about exploration. Let's go over a couple of things you can try going forwards. First, experimental scrimming. I have inked up my
shed plate again and I'm going to have a little
play with the scrimming. Part of the joy of drypoint
as a medium is that you can really explore moods
and textures with it. This time, I'm scrimmaging
from the outside of my design inwards and being much gentler
with my pressure. You have a lot of control
over what mood you create through what ink you decide to leave and what you take away. By leaving some on the surface, you can create rather
interesting effects. On this one, I'm
still removing most all of the ink from the
edges and the frame, but I'm going to try to
remove less ink from the sky. Can you see that it looks a bit more foggy above the shed. You can always lift up
your plate to the light too to see what ink
is left on the plate. With a cotton bud, I just remove some inks from the top of the frame and the top of
the shed to tidy it up. On revealing the print, you can see how the ink that
remained on the surface in the sky area has created
a texture all of its own. It has the switch from
the circular motions, which seems to move
around the shed, which is quite nice. I do enjoy the windy
mood of this one. It's like we're looking through a little window at a
shed in the storm, a little moment to catch it. Next, mix up the media. Remember, you can mix up your
medias to explore further. For this print, I
decided to grab a couple of whipped pieces
of pink tissue paper. After I had inked and
scrimmed my plate, I lay the tissue strips
onto the plate randomly, then I popped the paper on top. I folded the edges of the
tissue over the back of the paper and stuck them down just to keep
them all together. On revealing the print, it's a little faint as the ink hasn't stuck as
well to the tissue, and I may have scrimmed
a bit too hard, but it's fun to see the design
broken up with some color. It feels a bit more
ethereal, somehow, like we're gazing through
a veil like an old memory. You can also add other
mediums in after printing, such as watercolor
or colored pencils. Due to the background being
plain and this miniature, after the print had dried, I added in some
watercolor tones, and I like the fresh
feeling it gained from it. It's never too late to
go back to the plate. After the first print showed up my dog portrait as being a little sparse in
the background, I went back to the plate
to explore further. I found a tool with a rough tip, and after trying a test scratch in the corner of the plate, I went into my design. I wanted to add some
texture to the corners, and I also added in
some tiny stars. I feel like my dog
is pretty magical, so I think this would help
with conveying that mood. I decided to try white ink
on black paper for this one. Remember, you can try all sorts of colors to
see what works best. Although I missed one corner
of the frame in the print, I do love how it
came out overall. The textures from the
rough tool really helped to create
a dusky feeling, and I do think it
looks more magical. It's like a little
doggy magician. [LAUGHTER] Whatever
you decide to try, do take a photo and
share it with us. It's great to share
ideas and see the different directions
our miniatures can go.
12. Let's Clean Up!: Always remember to clean up after a printing session. Its not hard to do, and it'll keep your plates
usable for a lot longer. If you have been using
water-based inks, then just grab a wet cloth
or tissue and rub it over the surface
of your plate to remove as much ink as you can. If you've been using
oil-based inks, you can use vegetable or sunflower oil on
the cloth instead. Pop your dry plate between two leaves or paper
to keep it nice and snuggly and cozy for next time when you
want to use it again. Can you believe it? Our journey is almost
finished. Let's wrap this up.
13. Hey There Printmaker...: You did it, you made it all
the way through and I am so happy to have been your
guide through this process. I hope you've created some
miniature designs, plates, or prints that you
feel proud of, treasure them and treasure the time that you have
spent creating them. I hope it has been a
pocket of calm energy, expanding your
thoughts while letting use it inside your
own miniature world. You can of course create larger artworks
with this method. I also encourage you to explore combining it
with other mediums, such as watercolors
or colored pencils, or combining it along the side other
printmaking methods, such as silkscreen
or color graph. Remember, you can also scan or photo your prints so
that you can import them into digital programs
where you can use them in surface design or
print them onto products. Please do share with us in the project gallery any parts of the project
that you complete, whether it's the
miniature design, the scratched plate,
or the final print. If you do all of
them, even better. It is wonderful to see the
journey of an artwork and so inspiring to see the things
which impact our everyday's. If you do have any questions throughout any parts
of this process, then do reach out through
the discussions tab below, I'll always do my best to help. If you have enjoyed this class, check out my Skillshare
profile page. If you give me a follow, you'll be the first to hear
when my new classes go up, and you'll also give my
heart a little boosty boost. You'll also find my
other classes on there to keep your RT
exploration going. Do come say hi
over on Instagram, look for @gemmathepen, and check out my website, gemmathepen.com to find
links to my blog and also my free YouTube channel
where my RT videos live. Thank you so much for spending your creative
time with me. I hope you have a lovely day, keep printing and
I'll see you soon.
 Gemma the Pen, Making to Make Happy!