Transcripts
1. Introduction: [MUSIC] Creating art is about experimenting lots of
times over and over. Throughout our experiments
will make decisions not always consciously about
where our art is going. Sometimes we will create
something which is a true echo of our
initial impulse. But most of the time
we are creating something which is only
part of the puzzle. Have you ever abandoned a
painting halfway through? Have you started to sketch
something and didn't like where it was going so
you close the sketchbook. We all have artwork which
we don't think of as good. But these artworks
are not wasted. They are doorways
inviting you to think a little differently or
try something new. This class is about
digging out our past unfinished or unloved artworks and looking at them
with fresh eyes. From stitching to
coloring or collaging, we will be exploring some
easy ideas for reinvigorating your old artwork and broadening our creative
possibilities. In this class, I invite you to be brave to take this chance, to cut up an artwork, to rip it up, stitch into it,
draw all over it. So often we realized something isn't quite
working in our art, but we're not quite sure
what it is and we don't want to ruin the bits that
we think is good about it, and so we stop and
we do nothing. I want to encourage you
to break this practice, to let your hold
on your artwork, just loosen a little and realize that nothing
you create will ever truly be lost
because it came from your endless unique creativity and you can recreate
things again and again. Just remember, whatever
you do to your artwork in this moment does
not define you. It doesn't mean you
suddenly have to become a different
kind of artist. It just means that
you're allowed to experiment without judgment. Letting go of the
need to only make the right artistic
decisions usually leads us towards making
more interesting ones. My name is Jema. I'm an
artist maker who enjoys exploring creative things and
finding joy in the process. From making props and puppets
to prints and paintings. I like to keep my
outlook open and make stuff just
because it makes me happy and I love encouraging others to discover their
own creative outlets, and yes that means you. Now is the moment to
go dig out some of your old artwork and together
we are going to revisit it, reinvigorate it, and find new inspiration for our
future art adventures. See you in class. [MUSIC]
2. Our Project: [MUSIC] Our class projects
could not be simpler. Here is your mission. Go rifle through some
of your old artwork, it can be years old or one
day old, it doesn't matter. Find a piece or multiple pieces which gives you
that "meh" feeling. Maybe it's something
you've never felt happy about and abandoned
half-way through. Perhaps it's something
you liked at the time, but aren't as pleased
with it anymore. It could be an old painting, a sketch, a drawing or a print. Once you have chosen something, take a deep breath and
do something to it, stitch, draw, paint, or collage with your artwork. You can choose just
one different medium to try or combine a few. Try not to worry
about the outcome and let yourself
enjoy the process. Take a photo of the
before and after, if you like and share it
in the Project Gallery. I would love to see the
experiments that you try and how your
artworks transform. Remember that whatever you
do to your unfinished art, it doesn't need to
make it feel finished. This project is not about
correcting our artwork, but about expanding them, re-inventing them, taking them one step further along the path, and seeing what happens. We are on a journey without
end here and I'm hoping the Project Gallery can serve as a photo album for sharing
our stops along the way. We can share our adventures, give each other a wave and
boost each other's creative energy.Ready to start?Let's
get to it. [MUSIC]
3. Which Artworks Could I Revisit?: We all have different amounts
and types of artwork from individual sketchbooks
to folders of prints or drawings to
racks of canvases. You might be wondering
how to narrow down which artworks you should
choose to revisit. The good news is that you
don't have to think about this too hard. Go with your gut. If you have a sketchbook, take a flip through it. If you spot a page that
you don't like that much, put a bookmark in it and a
mallet over as a possibility. Maybe you have a
bunch of prints from printmaking session that are
faint or blurry or too dark. Any of those could
be great candidates. You might open up
an old cupboard and find a Canvas
which you gave up on. Now might be the time to bring
it back into the daylight. There are no rules
over what makes an art feel unfinished
to the artist. No matter how sparse or helpful
an artwork appears to be, it can become a candidate
for revisiting. Trust your instincts. You can also or
alternatively let the possibilities themselves
make the decisions for you. What do I mean by
this? Let's find out in the next lesson.
4. What Changes Could I Make To My Artworks?: Finding an artwork to revisit
is only part of the puzzle. The next bit is figuring
out what to do to it. I like to think about the
possibilities for changing an artwork as falling into
these three easy categories. Background. Often an
abandoned artwork will have a subject, but the background will be
blank or underdeveloped. Therefore, one way
to reinvigorate an artwork is to create
a background for it, but perhaps using a
different medium, which will automatically change the feeling or the
direction of the piece. Outline. Sometimes, abandoned artworks are
blurs of color or texture, they might be
abstract experiments or subjects where the focus
has become a little lost. For these types of artwork, a revisit might mean
creating a type of outline, creating boundaries,
defining the focus, or finessing the details. Feature. Lastly, an
abandoned artwork might have both a background and
the focused subject and yet still feel like
it is lacking something. Perhaps it is a print that got slightly blurred in places, but it's pretty close
to being great. This is where creating a feature element
could be useful, bringing in a
different medium on specific areas of the artwork to highlight or
direct the focus, and it can make a
big difference. In the following
classes where we get to try out a few different mediums, I'll be utilizing all
three of these options so you can get to see
how varied they can be. We have our artworks and we're ready to start
making some changes. Let's go exploring.
5. Materials Inspiration & Resources: [MUSIC] Here's a fun bit,
deciding on materials. There's no need to go out
and buy lots of new stuff. You can make an impact on
your old art works with all mediums and simply get inventive with the things
that you already have. Here are some examples
of the things I'll be using in the
following demos. For the purposes of this class, the term drawing is
inferring anything which explores an artwork in 2D. You can explore markers, whether paint, water-based
or alcohol-based. Acrylic paints,
watercolor paints, inks and of course, you'll need some brushes too. You could try watercolor pens, charcoal, graphite
pencils and erasers, coloring pencils,
felt tip pens, biros, ball and gel pens
and fine liners. Stitching is serving
as our way of playing with 3D
elements in this class. You'll need a thin, small-eyed needle and threads, either embroidery ones or
standard sewing thread. You can also throw
in sequence and beads and maybe even
fabrics or feathers. Collaging in this class is all about construction
and destruction. It's handy to have scissors
on hand and maybe a ruler, craft knife and
cutting mat and blue, as well as any random papers to stick on pages from magazines. While this class is more
about sparking ideas then about the nitty-gritty of
the techniques themselves. I don't want you to feel stuck. Always know you
can ask questions and share knowledge in
the discussions tab whenever you like and
you can also check out the resources attached
to this class too. There's the materials, reminder sheet at patterns prompter, a basic stitches reminder, and an arts box bingo sheet where you can tick off
the things you try. Also, because stitching can
be a little less intuitive, you'll also find a bonus
class at the very end, which goes over some of the
basic stitches that I used. We have our artwork, we have our materials. It's time to make some changes and we're going to start
with drawing. [MUSIC]
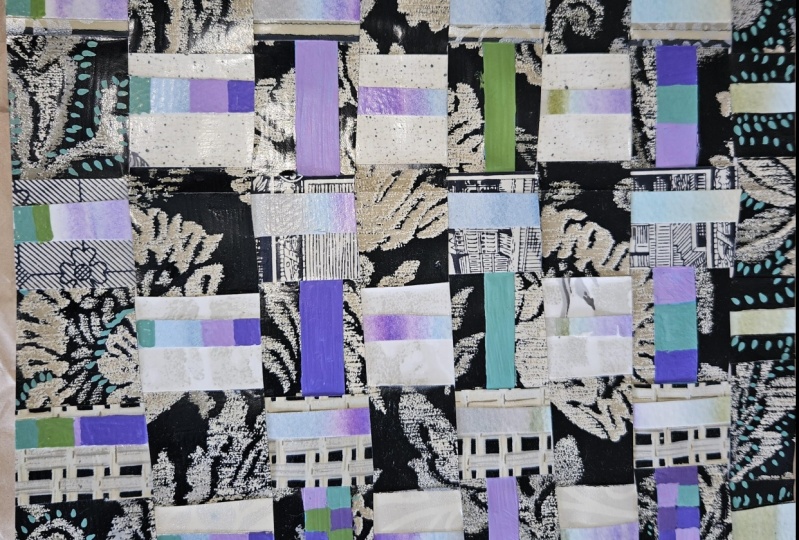
6. Examples: Drawing - Exploring the 2D Landscape: [MUSIC] This first
adventure is all about exploring the 2D landscape
of your artwork. It's also about not thinking
or worrying too much. This is one of the
most straightforward and accessible of approaches because it all narrows
down to drawing, simply using a pen, pencil, or brush to play
with your artwork. Let's try something
super simple to start. Here, I have an old
silkscreen print. It was created in
a printing session where I was trying out
colors and textures. Some of the prints
from the session we used in my
project at the time, but others like this one, well, it never quite
found a purpose. Now is where it becomes useful. It's going to become my
experimental playground. I'm going to fill in the gaps inside each patch of
white, with a fine liner, I'm drawing simple
arches and adding eyes to make lots of little faces peeping through the
silk screen textures. In this way, I'm
creating a background for my print textures. You don't need to
do faces like this, they just appeal to me. But you could instead
create patterns from straight lines,
shapes, dots, or create little mini
scenes within each gap. The contrast between the
swishy printing inks and the clean, fine liner
is very pleasing to me. The repetitive action
of finding the gaps and filling them in is
also very relaxing. It's a win-win. [MUSIC] You may recognize
this natty nate character from my very first
Skillshare class. Printmaking, being a technique
riddled with surprise, can generate a bunch
of test prints on the way to achieving
your final one, but not quite perfect prints are great for
experimenting on later. As you can see, this
original print is not bad, but it's a little faint in areas and not quite as well-defined. It doesn't have impact
and feels washed out. Let's introduce nate
to coloring pencils. By using coloring pencils
on top of the print, I can bring new vigor
to the character, making the colors more vibrant and making the edges crisper. I could also have tried
marker pens or pastels. There really are no rules. The main idea is that I'm creating more
structure in the form by emphasizing the outline
and the inner shapes. [MUSIC] Let's crack
open the paint. This old print has a
bit of a blur going on. I'm going to use a
different medium to distract away from
the print issues, and give the whole
piece a different feel. I'm going to pick a
section, in this case, the insides of the ears and
make them into a feature. These sunset type hues are
lovely to blend together, and I think they really
give the ears a lift. It's so simple just
giving one area of a monochrome artwork
a splash of color. But it can really
shift the dynamic no matter which medium you try or which artwork
you try them on, the result will be movement. A change in how you
think about your art in both past and future. Grab your pens,
pencils, and paints, and throw them into the mix. You may be surprised
with what you create. In the next lesson, we'll be diving into
stitching, so let's go.
7. Examples: Stitching - Expanding into 3D: Sometimes we need to go a little beyond the type of art we think we have made and
consider redefining our scope. What if we reframe our
thinking and allow ourselves to explore
the not so obvious. This is where the
2D framework can expand to combine with 3D ideas. This was a practice
watercolor I made of a wolf. While I quite like
it as a test piece, I do feel like I
could add to it. Therefore, why not
stitch into the paper? One of the simplest ways to
stitch into paper is to use a standard sewing thread and the smallest needle
that you have. Having a small needle
will mean the holes you leave behind will
be less noticeable. Basic line patterns can be
really effective in stitch, whether you choose
a radial burst, like I'm trying here, or simple vertical or
horizontal stripes. Bringing a raised
tactile element like thread into your artwork
can shift how you see it. To puncture holes into
something you've made, can feel unsettling at first
but the more you do it, the more you claim ownership
of your decisions. It's an act of
definite movement, something which cannot
be fully returned from, and so with each stitch, you confirm your choice
to change something. When stitching on paper, I find it easiest to push the holes in from
the front first, then move the needle to refind
the holes from the back. It makes it easier
to see where you are stitching and to
make accurate holes. For this artwork, I used a simple over-and-under
type of running stitch creating a radial burst to break up the plain
white background, but with the intention to still keep a quietness in the piece. I didn't want the
background to take over, but instead to support and push focus to the main subject. I pencil marked a border so I would have a guide
for where to place my outer stitch
holes and I created some stitches with a blue color and others with a pale lilac. Remember, the stitch
doesn't have to be the star of the show to be
useful to your artwork. It can catch notice and enhance your piece without
hugging attention. This is a ghost print I created and it has
lovely textures, but I think I'd
like to use it as a base for an experiment. Stitching can be a great
way of outlining or boldening a subject and that's
what I'll be trying here. I'm using a double
thread in my needle this time using a lighter and a darker thread together and I'm using a chain type of stitch. Both the type of stitch
and the double thread adds more weight and interest to the outline the time building. As a different medium
on the page and being bolder than the
ghost print itself, it attracts notice here and can help to bring a more solid
structure to the piece. But stitches can be used to
attach other elements too. Let's push a bit further
and attach some feathers. I'm using stitches to position some small white feathers
onto my print but remember, you could also use glue to
stick on elements like this. Now, you might look at this and think that's a bit too much, or maybe not enough. You might look at it and think it's pretty or interesting. Either way though,
it has elicited a reaction and that's
part of why we are revisiting our artwork to try different things
successfully or not, in order to spark fresh
reactions from ourselves. By playing and experimenting, we are investing in our
own creative growth. I'm going to use this old bear print
as a test ground for highlighting a
feature through stitch. I'm going to try
and bring focus to the eyes and maybe the ear. For this experiment, I'm
using embroidery thread, which is a little
thicker and shinier. I'm also bearing in mind that this print is on
a thinner type of paper so I'm trying to be more careful when pushing
through my holes. Remember if the holes tear or move and that can
happen really easily, especially with thinner
papers, then don't panic. See if you can still use them or find a way to
work around them. You don't have to hide them. They are part of
the adventure too. I decided to try using
French knots on the eye, trying different colors
clustered together. I also decided to attach a small white bead
into the eye too. Now, I don't personally feel this piece was a hugely
successful experiment. I don't think the eye
is very clear and I think the colors
are a bit unbalanced, but I loved trying it out. The French knots are so satisfying to do and I
think on a different piece, they could work really well. In trying out different
stitch shapes and colors on the ears, I even threw in the odd sequin, I felt I had a mixed
bunch of successes. Again, well, I don't think they actually suited this print that well because they still
get a bit lost in it. They did give me ideas about other pieces that they
might work better with. When trying out
different things on your old artworks try to
let go of feeling like they have to succeed or try and reframe what you
think success is. The point of going back
is not to win better, but to learn something new. Enjoy each stitch. Take your time and know that
you are always traveling. Next, we'll be dipping our
toes into the bravery pool, pulling our work
apart in order to rebuild it fresh.
See you there.
8. Examples: Collaging - Pulling Apart & Building Back Up: I was always a little
nervous of collage. I would see others making
them and I couldn't quite get my head around
how to gel with it. I think part of
my hesitation was due to collages'
destructive elements. Whilst it is all about building, combining materials
and shapes together. It is also about
pulling apart, cutting, and tearing, breaking up one
element to create another. The process can be
both terrifying and liberating, and it is okay to
feel both at the same time. There is a part of
me that really likes this marker pen doodle
illustration of mountains in my sketchbook, but there's
another part of me saying, "What else could it be?" Collaging can be as
much about what we remove as what we add so why not try cutting
areas of an artwork away to start seeing
it differently? If you use a craft knife, always make sure you
are pressing down onto a surface such
as a cutting mat, and be careful
with your fingers. Making any cut in an artwork can be nerve-wracking
because you are embracing a permanent change
but it's also a lot of fun. It encourages us to be a
bit less protective of our art and to realize that
it's okay to take a risk. With this piece, a pencil
marked out a border and drew out shapes
which could be cut away. It's super simple,
but it creates a background which also
becomes a framing device. By having pieces of the
paper missing suddenly, there's a fragility to the mountains which
wasn't there before. At least, that's how I see it. How do these cutouts
make you feel? Do let me know in
the discussions tab. Of course, once an
area is removed, there is no rule to say that you cannot feel it
right back up again and so I placed black and shiny blue card
behind my empty spaces. I'm in two minds about
the effect this has. Part of me enjoys seeing the shine of the
blue coming through, adding a new dimension. Part of me wonders whether
the black and blue are too strong because the color palette of the mountains
is so different. Regardless though, I'm glad I let myself make a bolder choice. The first cut was the
hardest, and after that, I threw caution to the wind and watched as my mountains morphed. It felt like cutting
a cord of some kind. These old silkscreen
prints have been sitting in my sketchbook for a while waiting for a revisit. It is time to cut them up and rebuild them into
something different. If you are not sure what to do and you have a similar type of artwork which has color
or texture in abundance, but no real structure or
form then you can try this, grab your scissors
and start cutting. Don't think about the
shapes you are cutting. You can simply go in
straight lines or at wonky angles and that's okay. Once you have a pile
of cutoff pieces, you can grab a piece
of contrasting paper and start arranging
your pieces on top. You don't have to have a plan or know what you are aiming for. Just pop them onto the
page and move them around until you hit
on something you like. It can be figurative
or abstract. It's entirely up to
your gut to decide. Once you are happy,
stick the pieces down and revel in the fact that today you created something brand new from something you had
previously abandoned. Cutting an artwork up
is scary and freeing, but you know what's
even more so? Ripping it up. For some reason,
tearing an artwork with your hands feels the most
worrisome of all and yet, if you can push
yourself to do it, it can feel like a release. This dry print is
one of my favorites, though it isn't
perfect and has lots of smudges and fainter patches. The thought of ripping it is actually fluttering in
my stomach a little, but I know that means
I should try it. Much like with the craft
knife and the scissors, once you have made
the first tear when there is no going back, something inside
you will let go. As more pieces fall away, you begin to understand
that the only way forward is to take action
and problem-solve. You have a bunch
of torn up pieces. So what now? Think of the ripped up pieces
as your foundations. They are the first
building blocks of a brand new structure, but they don't have to be
the only building blocks. Go grab other elements
to throw into the mix. Torn pages from magazines
or colored tissue paper. Start to move all of your new pieces around to
see how they fit together, again, fully trusting
your own gut for finding out what you like. Start sticking them down, but don't rule out
further additions. Perhaps you'll bring in
some fine liner doodles like I'm trying here or
throw in some stitches. Maybe you'll grab
some charcoal or pastels and draw over the
top of your collage or maybe you'll re-tear up your new collage to go on a
second rebuild adventure. This last stage which celebrates the deconstruction of
your art as much as the creation can be a hugely fun process
and if nothing else, it leaves you with the
knowledge that the power in your art only comes from you. You are the initiator, you are the spark, and you will always find your creative way, in the end.
9. How Did It Go? Let's chat...: [MUSIC] You've made it to
the end of class and this is the point where we get
together to debrief, decompress, and chat
about how it went. Did this class
expand your outlook? Did you try a new technique
or material that you found you really liked
or really didn't like? Did you take the plunge and
risk ruining an artwork only to find that it's never truly
ruined or irretrievable? Did you make any
art decisions that you regretted or learned from, or accidentally created
something you adore? Let me know how the
class went for you, the ups and the downs, and feel free to ask any questions you have
in the discussions tab. I would love to
chat with you about your creations and how
they are transforming. It has been my absolute pleasure to be your guide
throughout this process, and I really hope you
have enjoyed traveling back through your artwork
and moving it forward. If you have a moment
to leave a review, I would love to
hear your thoughts as they really help me to keep learning and improving, and making classes that
you want to see. If you'd like to hear about
my upcoming classes first, then do hit the follow button on my Skillshare profile page. Remember, while you
are feeling brave from all of this reinvention, do go share one or more
of your creations in the project gallery so that
we can cheer each other on. The art exploration, of course, does not stop here
or indeed anywhere. In-between classes
you can find me at gemmathepen.com
where I post art and craft blogs and freebies over on YouTube
where you can find my free art videos
to help keep you inspired and creatively curious. Over on Instagram @gemmathepen, where I share my own art
adventures and shop updates. If you are ever in my
corner of the Internet, please do pop by and say hi. Thank you for being here and
embracing your creativity. You are the shininess. Keep making to make happy, and I'll see you
next time. [MUSIC]
10. BONUS LESSON: Simple Stitches To Try: [MUSIC] [inaudible] can perhaps be a little bit more accessible straight from the
get-go as a beginner because you can just
pick up a pencil, start drawing, pick up some
scissors, start cutting, or just use your hands and
move the materials around. Stitching though can be a little less intuitive and it's nice to be able to have some basic starting
points to get you going. I like to create a
knot on the end of my thread so that when
I do my first stitch, it won't pull all the
way through the paper and it will anchor that
first stitch down. I simply fold over the
thread into a loop and then knot that loop. It really doesn't matter
if it's messy because it will be at the back of the
paper and no one will see it. Let's thread this through. I hold my thread right at the tippy tip so that I only
have a tiny bit showing, this gives me the
most control when I'm pushing it towards
the eye of the needle, especially when the eye
is so small as this one. It may take a couple of goes, but if you're super careful, you'd get a tiny bit through. You can then pull the
rest. There we go. When I'm stitching on paper, I like to create my holes from the front rather than trying to push through
from the back. So just push down and
create a small hole. Then I turn it over, re-find that hole, and push
through from the back. Now anchor knot is
holding that stitch down, you'll feel the resistance. Then we're going to do just a really basic
running stitch. I'm going to make another hole. Try and keep control of
your needle because it's really easy to slip, and push. We can just carry on all the way through and create a stitch. Now, we want to create
the next one so I'm going to come from the
front here again, just make a tiny hole. But then I'm going to go
under for this stitch. I'll re-find that
hole at the back. Turning over, push my needle through and pull
out at the front. Again, I'm going to, this time, create an overstitch. I'm going to create
another hole just there. This time I can push all the way through and create my stitch. With this kind of stitch, you can make it as long
or as short as you like. Let's make a really long one. [MUSIC] Let's make it a little teeny baby one. [MUSIC] Once you have completed your stitching
and you want to secure this last stitch so that this piece does not
come out later, all I do is place
the paper down and find whichever was the
previous stitch on the back. Put your needle
through that stitch, pull it through and create
a knot of some kind. I tend to loop under
that before it's taut. I loop underneath, pull it so it's secure and
then I'll go through again. Under that, loop around, pick up that loop
and create a knot. Then you can cut away the excess and there
is your stitching. I'm going to try a kind
of backstitch this time, which is similar to
the running stitch, but it means that there are no gaps in-between the stitches. I'm going to pop a stitch into
the front as I did before. But then I'm going to put
the next hole above it, the length of the stitch
that I want to create. So let's say it's this length. I'm going to pop that second
one in straight away. When I turn this over, I'm actually going to start
with the second stitch hole. I'm going to push through there and come out the front and then I'm going to go back on myself and go through
the first one. As you can see, it creates a really similar stitch to
the ones that we did before. This time I'm going to
pop the next stitch in and I'm going to try
and be quite regular. I'm going to estimate around here to try and make
it the same length. I'm going to push that in, create a hole but
as you can see, our thread is in the back
of the paper at the moment. Then we are going to go across that first stitch hole
up into that third one. Pull up through the front. Then we're going to
go back in through the second one that's
just beneath it. It creates a continuous line. So we'll do that one more time. We're going to go
here, create a hole. As you can see, we're in
that second hole here, but we're going to
skip up to the fourth, pull it through, and return back in through
the third hole. You can, of course, start turning if you need to. Turning is easiest
with smaller stitches, so I could place one here. Go back in and from the back, we would take this whole and then go back in
through the previous. [MUSIC] There we go. That is a backstitch. Let's move on and
try another one. We're going to try
for a chain stitch. So this one can be a little bit tricksy
just at the start, but once you have it
done, you fly along. We create a hole. We come up from the back. We find our hole, we push through and we come up from the back
anchoring with our knot. Then we go back
through the same hole. We push through, but
not all the way. Keep a little bit behind this tiny little loop
at the end here. Keep that out and create
your next hole. There we go. We have a hole to here. We're in the back, so we come up through that second hole, but don't pull too tightly
because otherwise, you'll pull this loop
down straight away. Just go until you have most
of your thread through and then go through that
tiny loop that you made. Then you're going to go
all the way through. At that point, once you have your stitch
through the loop, you can pull where that second hole is just
to tighten that down now. Then you can pull
the rest of that through and then
move it upwards, and then you're going to go back through this second hole. As you can see, it's
created a loop. Now, we're going to
create our second loop. From this point on, it's a
lot more straightforward. You just focus on whichever
hole you have next created. We're going to create one here. Our thread is at the back, so we're just going to
come up through that hole from the back like so, then you can pop your
paper down and just scoop your needle underneath
this stitch. Both pieces of that stitch
just straight underneath. Pull your thread through. Hold like we did before, and you're going to go
straight back through that one hole that you've
just come up through. That's the second chain. Lastly, I'm just going to
show you some French knots. These can be a little
bit confusing at first, and you definitely don't have to do them if
you don't want to, but I find them very fun. If you want to give them a go, this is what I do. I create a hole and then
come up from that hole. There we go. Now,
I find it easiest to pop my paper
down at this point. It's all about the fingers
and how you hold it here. It works different for
everyone, but for me, I find that if I hold my thread out to the side
here so that I can see it. Then I take my needle
and I go under that thread and I go under
and wrap that thread around. I go under a few times. Under, round, under, and why not once more for
good measure, and under. As you can see, it's spiraled around
on my needle. Now's the tricky
but also fun part. You have to hold this thread that you're still holding with your left
hand or your right hand, depending which angle
you're going from, but holding that
side thread taut. Now carefully, pull your
needle back so that you can re-find the hole that
you just came out of. But you don't want any of this thread to slip
off of your needle. You've re-found that hole and then just pick up
the edge of your paper, but then put your
thumb back onto that loose piece of thread
because you need it to remain firmly held, not super tight, but just
firm so that it doesn't sag. Once you have enough needle
to pull from the back, pull it straight down, let everything come through. When you get to the final
little bit of the loop, you can let go and pull it firm. But again, not pull it super hard because otherwise
you could tear the paper, pull everything
through in one go. That is a French knot. This is a very tiny one, as you can see, but they are super satisfying. There we have just a
few that I tend to use. We have the running stitch, the back stitch,
the chain stitch, and the French knot that you
can try if you'd like to. Keep making to make happy. I'll see you next time. [MUSIC]
 Gemma the Pen, Making to Make Happy!