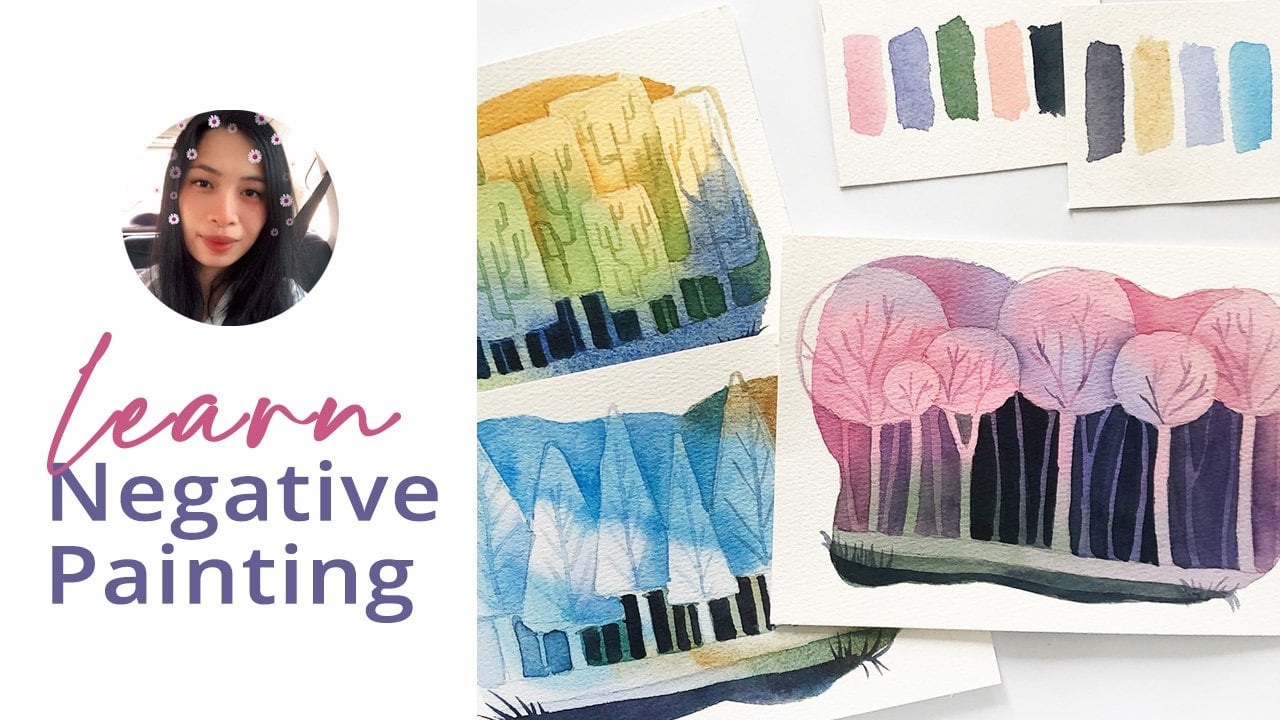
Transcripts
1. What You'll Learn: Okay. How do you paint soft and dainty flowers
with water colors. Using the wet on wet technique. Just wet the area,
drop your paint, and that should be it, isn't it? But this one is nowhere
near this PN painting. How do you really do it? With experience and
lots of testing, I have identified the
different factors that you have to consider to achieve a soft and dainty look for your
floral paintings. That's what we'll
do in this class. Hi. I'm Bian Castra an
aspiring watercolor artist from Batanga Philippines. Since 2018, I made it a
commitment to paint every day, even for just a few minutes. Some of my works have
been acknowledged in both local and
international exhibits, and have also been featured
on Mont Mart's website. In this class, I'll share
with you my secrets on how to create soft and muted
floral paintings with a limited palette. To apply what we have learned, demo how to paint
these bird reeds. Once you've completed
the video lessons, you'll have a clear
understanding how timing, consistency,
texture, brush size, lifting, and other factors affect the overall
look of your painting. And if you just want
to focus on florals, I have included a
bonus video lesson for you on how to
paint the ponies. Anyone who loves birds and
flowers, whether a beginner, a hobbyist, or an
experienced artist are welcome to join in the fun. I have also prepared a gift for those who will
complete this class. Find out how to get
yours in the next video.
2. A Gift for You: Okay. Our main goal for this
class is to paint at least one bird width
with soft and muted look. You can either
watch and paint at the same time or complete
the video lessons first. Pick one that you're most interested to paint
and work on that. But if you want to get the
most out of this class, then I suggest that
you do all of them. Honestly, it's quite addicting once you know how to
paint in this style. They say that doing something for the first time
is always hard, but the second and
third tries are easier. That's why I designed three class projects
for you to try. To help you achieve this look, I will discuss different
factors that would turn your painting from this to this. Along with those demo videos, I will show you
different flowers I did for you to further appreciate why each
factor discussed matters. All the materials
needed, colors I used, scanned copies of
class projects, and an instruction on how to get your gift are
in the class guide. Make sure to download your
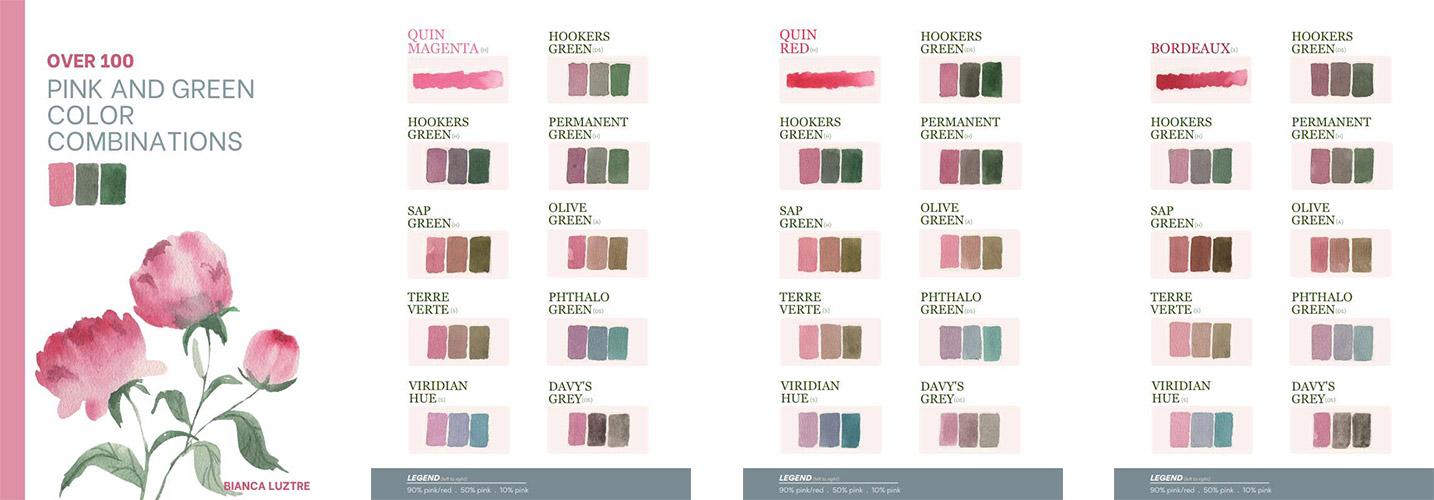
copy if you haven't already. I have prepared this gift for those who want
to learn more. A book containing over
100 color combinations of pink and green swatches. I made this for over
two months to see which colors work
together and which don't. You can get a copy
by either uploading a class project or reviewing this class and then
sending me an e mail with the subject pink and green book. I spent hours and hours experimenting and
creating this book. So I would love to
give this to anyone who loves color mixing
as much as I do. Please prepare your
watercolor materials, including paints,
brushes, and paper. Once you're ready, LC
in the next video, and let's start
mixing muted tones.
3. Muted Colors: If not for color mixing, I wouldn't have dared
painting a wreath like this with two to
three colors only. But look how harmonious
this simple pace is. Because I only used a
couple of pigments. First things first, how did I manage to pick colors for
a limited ballet painting? I discussed more of this
in my previous class. It is focused on landscapes, but all the concepts are
applicable to any subject. Please check this out
when you get a chance. Looking at the color wheel, red and green are lying
opposite each other. They are called
complementary colors. When placed together, they look vibrant and
work really well. They indeed compliment
each other. Since I'm working on a wreath, then green would be
one of the colors. As it's complement, we can
choose either red or pink. I spend some time testing
over 100 combinations. So now I know which greens
and pinks to choose. But what about muted colors? Here, we have quinacridone
red and hookers green. Without any mixing, they look
vibrant and very saturated. You can use these colors
as is, if you prefer to. Now, when we mix them
equally together, we'll get this
neutral brown color. And if you want a muted
version of each color, then you can use its
complimentary color. If you add just a tiny bit of
quin red on hooker's green, you'll immediately see
the difference between the pure green and
the muted version. The same goes for
quinacridone red. Add a bit of green, just a bit and you'll produce
this lovely shade of pink. With these colors, we'll create this bird and
rose wreath later. Now let's try another
set of complementaries. This time, it's quinacridone
red with dian hue. You'll notice how
different the palette has become just by
changing one color. Isn't that amazing? That's why I love
color mixing so much. Complimentary colors
work very well to tone down or D saturate a color. Here's your quin red
and vedian hue palette. White pigment is optional, and you can use this to mix
pastel colors like these. With these palettes,
we'll be able to create our bird
breeds projects later. Now that we know about
complimentary colors and how to use those to
mix muted down colors, I'll see you in the next
video where Is how to achieve a soft and
dainty floral paintings.
4. Technique and Timing: I always love soft
laurel paintings, and I know through experience
and research that wet on wet is the technique that I need to use to
achieve this look. The process is simple. Prepare the area by wetting
it with clean water, then drop your paint, and that should take care
of everything, right? So I thought. That's what I did on these two circles
using different colors, Quinn red and hookers green. On the third one, I
attempted to paint a simple pony with
wet on wet technique. But it didn't turn out
the way I wanted it. It was hard to predict and control where the
pigment spreads. And since I am using a
textured watercolor paper, the edges are feathery, which isn't the style
that I am looking for. It was supposed to be soft, dainty and relaxing to look at. But it looks raw and unfinished. I used the same watercolor
technique on the flower, but this one that I did is nowhere near my pony
painting. Why is that? There are so many factors
that we have to consider, including the surface, timing, consistency of
paint, brush size, and what we do once the paint has been
dropped on the paper. Perhaps the number one factor that you have to
consider to achieve soft looking paintings
is what you do once you drop your pigments
on a still wet surface. For comparison, let's leave the first circle and let the paint spread
wherever it wants. On the second one, let's
pre wet it with water. Drop or paint,
rinse our brush and then soften the edges by slightly scrubbing off the
edge of the painted area? That's one way to get a smoother transition
between the edges. But on the third circle, let's do something different. I actually got this
idea when I saw how an oil painter
blends his colors, and I, Would it work
with water colors too? Okay. Immediately, I grabbed
a stiff brush, which is actually not ideal for watercolors and
try the technique. Oh my goodness. It worked. This has been my favorite
softening brush so far, and it works best when the
stiff brush is still dry. Now, let's see the difference. The second and third ones have smooer edges compared
to the first circle, where we didn't do anything
after dropping the paint. To see how it looks on flowers, here's a gumamela or hibiscus flower
where the first one was not smoothened out, and then I use a soft watercolor
brush on the second one and a stiff brush on the
third one. What do you think? Okay. Timing also plays a crucial part on how far the pigments will
spread on a wet paper. Drop it too early, and the paper is still wet, that the paint will
go everywhere. Drop it in time,
that the paper is damp and you can expect a
slower spreading of the paint. To show how it
affects the edges, let's prepare these circles and wet them with clean water. On the first one, I'll drop my paint without
any waiting time. See how far the pigments spread. On the second one, the
paper is still wet, but not soaking wet. You can easily check
this by tilting your paper and observing
how shiny it is. Generally, the
shinier, the wetter. The paint didn't get as far as it did with
the first sample. And on the third one,
I dropped my paint when the paper has
started to dry or damp. Now, the edges have become
more defined and it didn't really give the pigments enough room to travel
across the paper. Looking closely, you can see how timing the dropping of your paint affects how
far the paint spreads. I tested it and painted pones with
varying timing and wetness of the paper. In the first flower, the paint spread everywhere and cover the whole
area with paint. While in the second one, there is a bit of control as to where the darker paint goes. Please take note
that the details are done once the paper
has been dried. And on the third one,
the shapes are more defined since the
paper was already dp. Right. We quickly demonstrated how to do wet and wet and
apply it on the flower. I showed you how retouching once the paint has been
dropped on the paper, and observing the timing will greatly affect how the
flowers will look like. In the next video, let's paint our first bird reef and apply the techniques
that we learn.
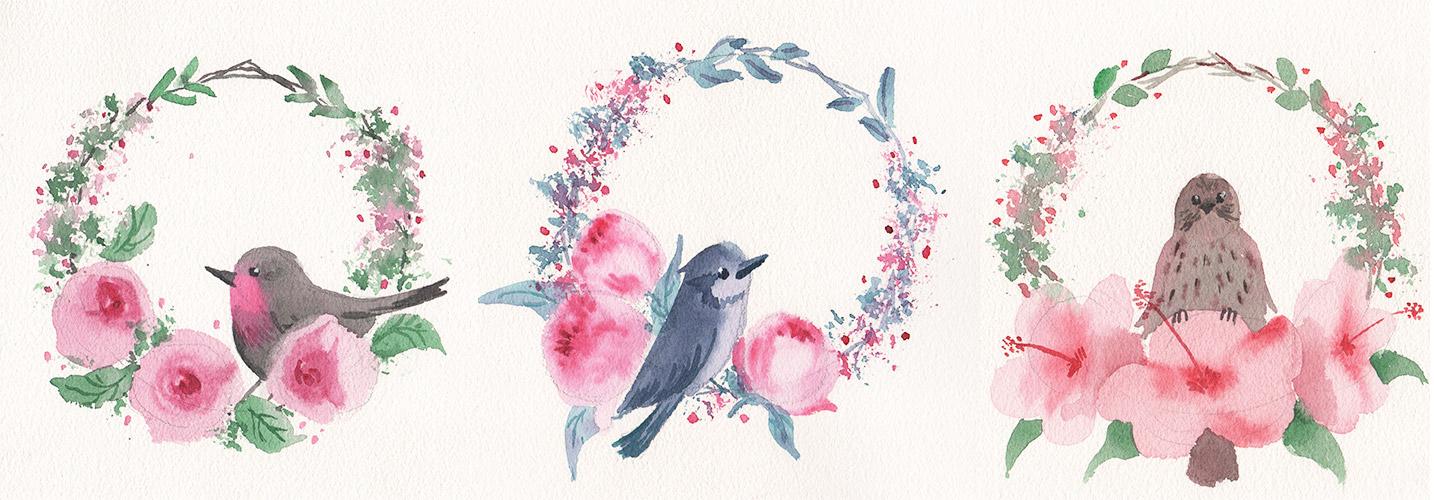
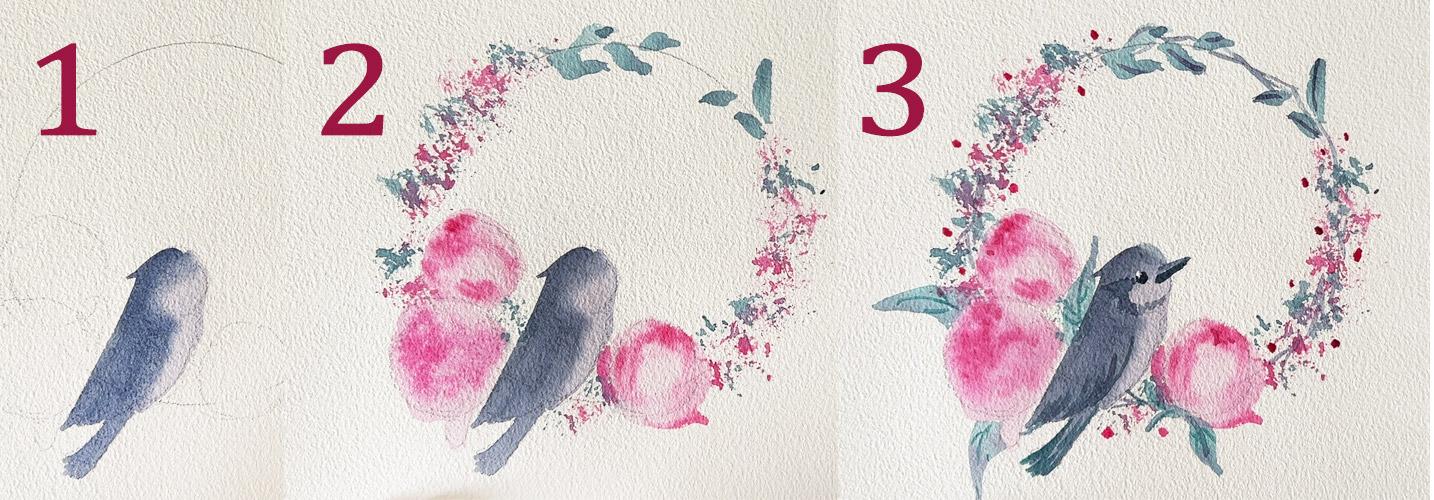
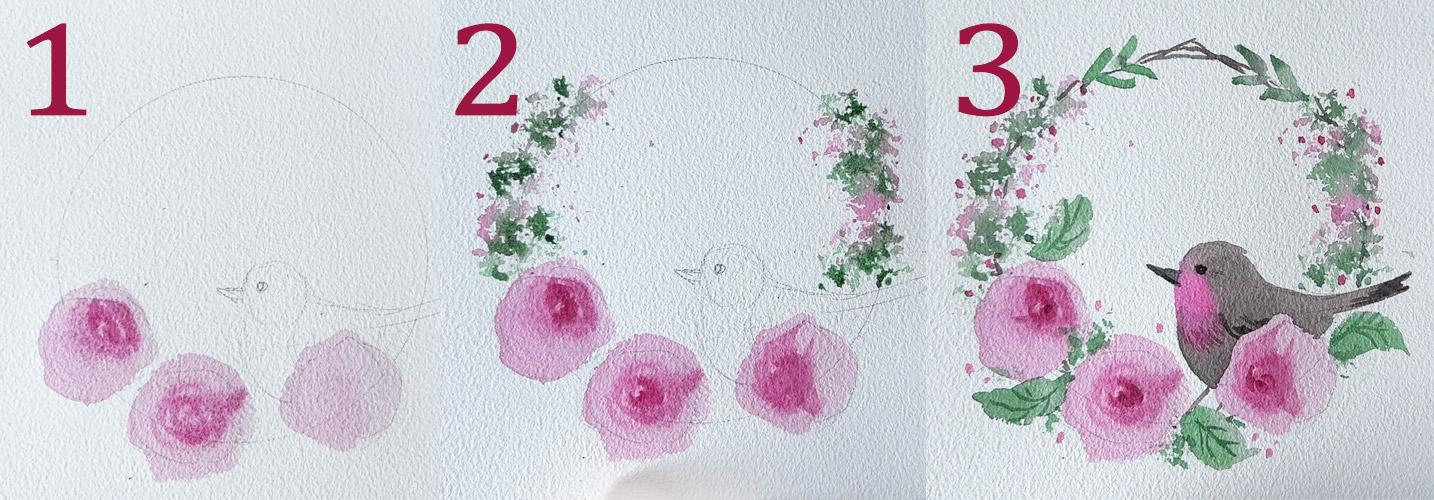
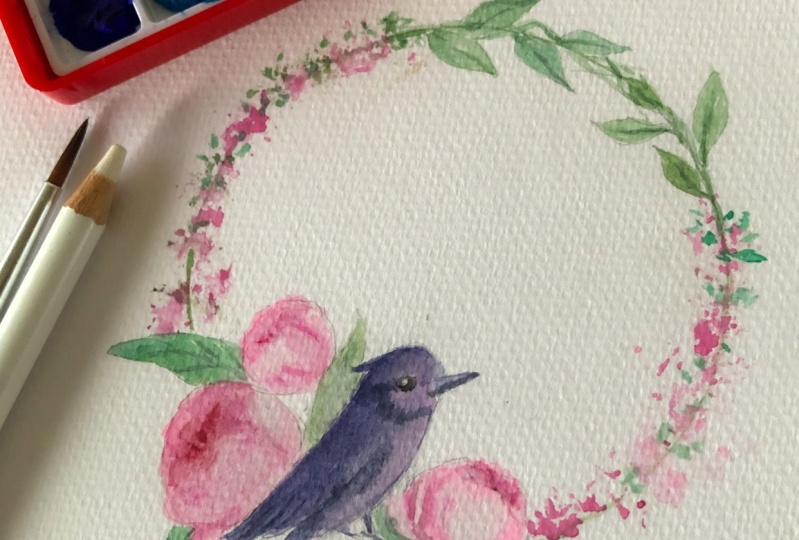
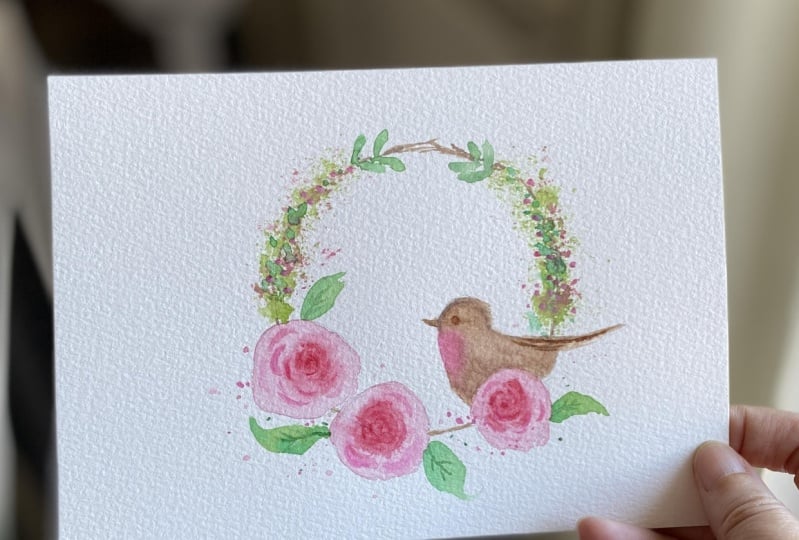
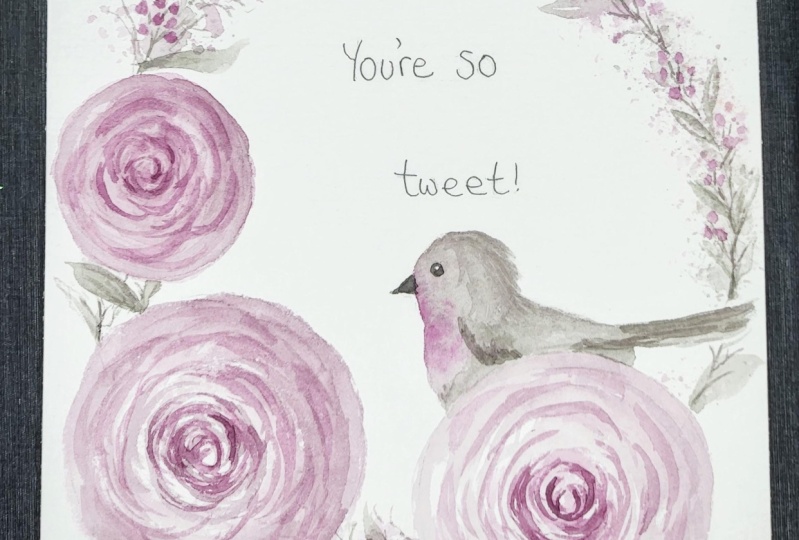
5. Bird and Rose Wreath: Let's apply what we
have learned right away and paint this
lovely bird wreath. To make a guide for
my bird wreath, I start with a big circle plan where the flowers would
be with a light sketch, and decide where
to place the bird. Once the simple
composition has been decided, I'll start painting. For this class project idea, I will use a limited palette consisting of Quinacridone red, hookers green, and
Chinese white. I'd like to prepare
the roses with a watery and muted base color. That would be Quin red
with a tiny bit of green. I'll paint the silhouette
of all the three roses. Then I'll switch to my smaller brush and using
thicker paint and less water, I'll paint some petals. Just impression and
suggestion of the petals. No need to be too
realistic here. Of course, don't
forget to use a brush, whether it is a soft or stiff
brush to soften the edges. Immediately, you'll see how dainty those flowers
have become. I'll do the same for
the third flower. Okay. Keeping in mind that I have the time
when I drop my paint. If I want the center
of the flowers to be darker and with less
paint movement, then I need to wait
for it till it dries a little bit and
it becomes d. Only then can I define
the center a bit more and gain control on
how far the paint spreads. Once done with the roses. The next part is a bit
messy but the most fun. For painting the
base of the wreath, I'm using a food plastic wrap. C a small piece like this, crumple it to a manageable size and use that as your brush. Let's dip it in a watery mixture of quin red and start painting. Don't worry. You can rinse and reuse this bit of plastic
over and over again. It's amazing how organic
the shapes it creates. Now with the same plastic wrap, you can paint the
greens on your wreath. I'd like to start with light colors first and
then the dark ones, so I wouldn't have to
rinse my plastic wrap. If you're not getting
enough paint on the paper, then you either have to put
more paint on your palette or just rotate the plastic wrap and see if another angle works. A word of caution though, this could be really addicting. Make sure not to go overboard and cover the whole wreath
with this technique. Leave some space for other
wreath elements and the twigs. Once you're satisfied
with how the wreaths, retouch some of the
areas by dropping thicker paint to make
some variations. Now, go ahead and
paint in some leaves. I love to mute them down too. Honestly, I used to hate
this color Hooker's green because it's nowhere near the color of the
leaves in real life. Only to realize that I
can take it to my liking, and one simple way
is mixing it with its complimentary
color pink or red, and it would change
dramatically. Let me know what colors you're going to try in the
discussion stab. You can then paint some
tiny elements like berries or accents with
a thicker pink color. And it's time to add those
little leaves at the top. With single strokes, work on those dainty
wreath elements. It's starting to look
decent now and I love how this limited palette
project is coming together. Now, combine the two
colors until you achieve a neutral mixture and use
that to paint the twigs, which hold this wreath together. This will also be the same color that we'll use for the bird. Speaking of it's time to paint the last but cutest
element of this painting. Our little friend. I'd like to start with a pastele paint for
its face and chest. Then while wet, I'll connect that color with our
neutral mixture. Since the flower is
covering parts of the bird, there is a bit of a challenge in painting around the flower, but paint carefully
and enjoy the process, and I'll show you a neat way later on how to
soften that edge. Paint the tail, and we we drop darker brown color
on the lower part of the bird just so it
doesn't look too flat. You can also paint the
big and connect it with the body and leave this to
dry for the final details. As we wait for our
little friend to dry, we can also add
tiny elements like additional leaves using
the plastic wrap or paint the veins of the bigger ones or add tiny berries and
anything you may want to add. I encourage you to
own this painting, so feel free to include
other elements like insects or animals or
even inanimate objects. Once you're sure
that the paper has dried paint in the eyes, some suggestions of
feathers and facial marks. Now to soften this flower, we can take a clean
wet synthetic brush, carefully sc, and use a paper towel to absorb
the reactivated paint. Finally, a touch of pure white pigment on the
eye to bring it to life. What do you think
of our bird wreath. Applying what we learned from the previous video by using a brush to soften
the edges after dropping the paint and being
mindful of when to drop those pigments really helped in achieving this dainty look. In the next video,
let's discuss how the texture brush size and consistency also contribute to the overall vibe
of our painting.
6. Texture, Size, Consistency: The texture of the paper also affects how the pigment spread. Are you using a
hot pressed paper, cold pressed or rough? In other words, is it
textured or smooth? Here, we have three
different kinds of paper. The first one is the backside of the paper I am already using. The second one is another
cold pressed paper, but from a different brand, and the third one is
a hat pressed paper, which, as you can
see, is very smooth. Let's try out the wet on wet
technique on these papers. And the first circle, even
though it is the same paper, but using the other side, you will observe that there isn't much of the
feathery texture. That's because the other side of a cold press paper
is usually smoother, and I like how that looked. Now, moving on to
the second one, this is also a
cold pressed paper bought from another
reputable brand. The pigments behave differently. And on the last one, the
smoothness of the paper shows, as you can hardly see any
feathering of the edges, and the way the pigment
interacts is different. Looking closely,
here's how they look. Most of the time, I use
brand A for florals, Brand B for a more
serious painting and hot pressed
for illustrations. What about you? Which texture do you prefer for wet
on wet technique? Of course, I also tried this in painting a simple
carnation flower. You can see how the texture affects how the painting looks. You might think that
the third one is the best to achieve soft edges. But since it is hot pressed, the paper also dries faster
than the cold pressed one, leaving us less time to use
the wet on wet technique. So I personally like using
cold pressed papers, and I recommend it
for beginners too. The size of the brush
you're using to drop those pigments
also matters. Let's find out why. These are the brushes that I will use to demo the exercise, a mop brush, a medium
sized round brush, and a small round brush. On the first circle, let's prepare the
area by wetting it with a very pale green wash. Then grab the mop brush
and drop the paint. It is a thirsty brush, so it will obviously
load more paint and water compared
to a medium brush. As you can see, the pigments in the first circle
are occupying more space and will spread farther than the
rest of the three. Now let's move to
the second circle. Pre wet the circle and with
a medium sized round brush, drop the pigments on the
left side of the shape. Compared to the first one, the paint is not spreading as far since the brush was only
loaded with less paint. What about the third circle? Let's shift to a smaller
brush and see how that looks. You'll observe that as I prepare
my puddle on my palette, the brush is only able to absorb smaller amount
of paint and water. And when dropped
on the wet circle, the paint almost didn't spread. So if you plan to
paint small flowers, it is advisable to shift
to a smaller brush like this so that you have better control on how
much the paint spreads. Here's how they look once
dried. What do you think? To further demonstrate, here's a lily of the valley
in three versions. Where I used the different
brushes I showed earlier. Obviously, if you want to
only darken the bottom part, your medium or small brush will work best for
this technique. Ever heard of the tea, coffee, milk, butter and cream
paint consistency? Yes. The amount of paint you drop on a wet
surface also matters. The paint consistency or how
much water is mixed with your paint also affects how the wet on wet
technique will behave. For example, if there's
more water than paint, say, a 90 by ten ratio, Obviously, the paint will spread faster and farther and it will be paler
since there's less paint. Just like how I did
the first circle. If you add more paint, it will then become
more vibrant and won't spread as far compared
to the first circle. You could say that this has a 50 50 ratio of
paint and water. What happens when you
add even more paint? Say a ten by 90 ratio. It is the most
vibrant of the three, and the paint won't move as much as the other two since
there is less water. You also have more control on
where the pigments will go. Looking closely, the
difference really shows. Bear this in mind the next time you work with the wet
on wet technique. Here's an orchid painted with varying paint
consistencies. A watery, medium, and thick paint were dropped on the
darker parts of the flower. In the next video,
let's paint this bird and ponf and apply
what we have learned.
7. Bird and Peony Wreath: Combining what we learned
with smooth edges, timing, and now with paper
texture, brush size, and paint consistency, let's
paint another bird wreath. This time, I will use Quinn red, radian hue, and Chinese white. You'll see later how
changing one color in a limited palette greatly affects the mixtures
that you'll produce. A mixture of my pink and green here would give us
a purplish gray. If you add in more pink, it will lean more
towards purple. I was actually surprised that the pink and green
could produce purple. That's color mixing for you. As always, start with a
big circle for the guide. Then plan where
the bird will sit. And sketch three circles
for the peonies. This time, I will
start with the bird. With a tiny bit of dan hue and queen red and adding
white to the mixture, you'll mix a cool pastle purple. That's the color I'll use
for his face and chest. Now, if you add in more green
and pink to the mixture, you'll have a darker
version of that purple, and that works well in
painting the rest of the bird. I didn't wait for the
face and chest parts to dry so that the pigments
will blend smoothly. Just like how we soften
the edges of the flowers, you can also use the same
technique with the bird. And you can apply this
on literally anything. As we wait for our
little friend to dry, we can now paint the
base of the wreath. Start by preparing a
pink and green puddle. I initially regretted purchasing a radian hue tube as it looks awkward when
used on landscapes. But that was back then when
I had no idea about mixing colors and that you can produce the hues that you need with
a limited color palette. Okay. Anyways. Yes, I am using the same
plastic wrap for this project. It is messy, but it still works. Dip it on the
lighter color first, which is pink and dab on
these parts of the wreath. As soon as you're
done with the pink, you can add in the green and let the two colors
blend on the paper. I really love doing
this part as it feels like you have absolute
control on where you paint, but you have no control on the shapes that you'll produce. It's a nice balance, and the process is
really relaxing. I hope you're feeling the same. Once the base is finished, use the same green mixture and add smaller leaves at the top. One or two strokes for a
fresh looking leaf will do. While wet, dropping darker
paints at the edge of the leaves will give it more variety and make it
more visually interesting. Next, we can work
on the peonies. I'd like to start by
painting a pastel pink base, that's quin red plus white and paint the silhouette of
the flower with that mixture. Then with a thicker
paint consistency, drop it at the center
of the flower. Don't forget to
soften it with either a soft or a stiff brush. I'll do the same on
the second flower. This is the front
side of the paper, so there will be
more feathery edges. If I don't retouch
it with a brush. Depending on the texture
of the paper you're using, you might have a
different output, and that is totally fine. It is also worth noting that I am only
painting an impression of the flower and not bothering whether I make
a realistic one or not. That being said, I
want you to focus on the darker parts of the flower only and drop the
darker paint there. This is the fun
watercolor illustration and not a photocopy. So please don't stress
too much if you are not able to produce an exact replica of
the reference photo. Okay? Now onto the third flower. If you observe, I use a bigger brush in
covering the base shape, but when dropping the
thicker paint mixture, I then switch to a smaller brush and load it with thicker paint. That way, I have greater
control on where the paint goes and avoid having it
spread all over the place. This wreath is starting
to come together now. All that's left are the details. To balance the composition, make sure to add some leaves at the bottom where
the flowers are. Use a varied mixture of pink and green to make it
more interesting. And don't forget to drop
darker paint for vargation. Leave this to dry and we can finish off with
some final touch. To paint the beak and the eyes, just use the same pink
and green mixture, but make sure that there is more paint than water this time. Add water to make it lighter and paint some facial marks
with few strokes. Do the same for the wings. No need to paint each feather. Our brains are amazing, and it auto completes
an image it sees. If you paint a couple of
feather shapes like this, we'll see that as a wing. Using the same neutral mixture, work on the twigs
that hold this wreath together and add
the bird's feet to. Some few red berries
here and there and then define the veins on the
bigger leaves and done. How do you feel about
your progress so far? Are your flowers looking
softer now that you apply the techniques I shared in the previous demonstrations? I hope so. In the next video, I will demo a few more
factors to help you achieve day florals like
using a base color, lifting and how to add details.
8. Base, Lifting, Details: The following factors that
I will discuss would have the least influence on how soft your paintings
would look like. But knowing them could
be of great use to you. Color is a personal choice. You can use different base
colors for the flowers. You have an option
to use pure water, colored water or pastel mixture. Let's try it out. You've seen me use
water multiple times in preparing the areas
before dropping the paint, and that's what I'll do
on the first circle. You're probably aware
of the process now, so I just want you to observe
what difference it makes when I use a different base
color other than water. Of course, you can always soften the feathery texture if you want a smooer edge transition. Now, if you want to see what
you are painting on easily, you can add a bit of pigment to the mixture and
start from there. That way, you won't have
to tilt your paper every now and then just to see what areas you've
already covered. Make sure that it is a pale
mixture though so that the darker pigments will still
be visible once dropped. But perhaps my personal
favorite is adding white to the mixture to make
a powdery pastel color. Adding white water
colors instead of adding just water to lighten it creates another shade
of that pigment. Compare the second
and third circle. There is a slight difference. It will be more evident when you drop the darker and
thicker pigment. White also makes a
color more opaque, in a way, it has
more volume onto it. To better see the effect, here are the circles
when dried and scanned. The paint also spreads farther when the base
color has more water, like what happened with the
first and second circles. Here are some poppy flowers
with different base colors. It might not be that different, but you'll see once
you try this exercise. Okay. Lifting watercolor
paint has many uses. You can do it to
correct mistakes, to lighten a layer, or even to soften some edges. To better compare this, let's do our usual wet
on wet technique and leave the first circle
without lifting any paint. I will try to
negatively paint on a small gap here that will
serve as the highlight. Yes, it is quite challenging to do negative painting
on a wet paper, but it also has a softer
look when done this way. On the second one, use a
pail wash for the base. And try to leave
a small gap too. But in case the paint
moved farther than expected and the negative shape became smaller than intended, like what happened here, you can grab a clean damp brush
and lift a portion there. It is not evident right now, but we can fix it later. And on the third circle, I will do the same as I did, but I will leave this dry
before doing any lifting. Okay. Checking if this is
dry and if it is, you can now grab a clean,
damp synthetic brush. My favorite is this flat brush. Gently rub over the spot
that you want to lift, and then with a paper towel, pat it dry so that the reactivated paint
won't go everywhere. You can also retouch the second circle to make the highlight even more visible. Here they are when
dried and scanned. Now you might ask,
what's the use of this lifting method aside from leaving space for
highlight shapes? Lifting is very useful
when you want to show a separation
between the petals. For example, here's a rose
where I didn't do any lifting. The second one is when
I lifted some paint while the paper is still
wet and on the third one, I let it dry first
before lifting. Now the petals are
separated from each other on the second
and third roses. Pretty useful technique, right? Details are fun to work with. Since they send us a signal that the painting
is almost done. You have different
options on how you could add details
on your painting. Let's paint a base color for
the second and third circle, since I need them dry first
before adding details. Once done, let's work
on the first circle. The technique that I'll do
here is called scratching. You might want to look
for a pointed tool like a toothpick or a used
up ballpoint pen to do this technique. You can even use a nib that
you use for calligraphy. It only works though when
the paper is still wet. Let's do the usual wet on wet procedure on
the first circle. Drop your colors
with a used up pen, scratch the paper with shapes
that will serve as details. It might not be visible
right now because I use a watch that
it's too pale, but I can always retouch
and redo the process. I love the scratching
technique so much that I created two more classes
focusing on this alone. Do check them out if you're into this type of illustration. Now on the second one, I'll
do the traditional approach, using a smaller brush
to paint the details. I find this very challenging
when I was a beginner, since it's very easy to make a mistake and paint a thick
line instead of a thin one. So make sure to practice painting with the lightest
pressure that you can on a separate sheet of paper before adding the
details with a brush. Four and the third one, L
use a watercolor pencil. A colored pencil or a colored pen can also
be great substitutes. This is the easiest of the three and the most
relaxing four beginners. If you want to go for a
mixed media approach, then try this one. Now that the circles are dry, it's easier to see the
difference between them. Which one will you give a try? Adding these types of details work well with
flowers like tulips. Pretty dainty, right? Now that I have discussed, all of the factors that
you have to consider to paint a soft and dainty
watercolor flower, we're ready to work
on our third project.
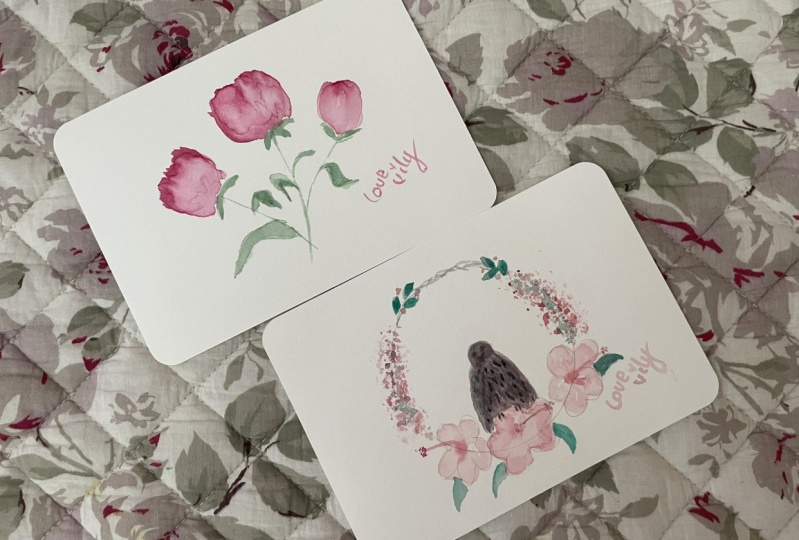
9. Bird and Hibiscus Wreath: They say that doing something new for the first
time is always hard, but the second and
third tries are easier. That is also true with
our watercolor projects. So you know the drill. Start by drawing
some guidelines, where the wreath would be, where the flowers are placed, and of the bird. I will try a
different composition here where everything is
aligned at the center. For our last project, I will use rose matter, hookers green, and
Chinese white. I will also use a pastel
version of the rose matter as the base color for my
gummela or hibiscus flowers. Paint the silhouette
of the flower. And with a thicker
pigment consistency, drop that on the shadowed areas. Soften with the brush if needed. If you'll observe closely, the paint didn't
spread that far and fast when you use a
pastel color base. Again, that's because
there's less water. There's also less
opportunity for the paint to go
anywhere it wants. Do the same steps for the
second and third flowers. Right now, we cannot see the separation
between each flower, but we can always
fix that later. Trust the process and know that almost all paintings go
through an upward phase. You know what comes next, right? The fun but messy
plastic rock technique. As always, start with a lighter color and add
the darker one next. That's rose matter with a bit of white followed by hookers green. And yes, I did use
two plastic craps, one for red or pink and
the other for green. So I won't have to keep on
rinsing when working on the different class projects
presented in this class. Now that the base of the
wreath is established, retouch some areas
with a brush and make some parts and
visually appealing. These complimentary
colors work well when placed beside each
other, don't they? Next, use a muted green and paint smaller
leaves near the center. Then mix both colors to achieve a neutral brown color
and paint the twigs. For the next few minutes, we will work on the bird. Try to achieve a
neutral brown color by mixing the two
complementaries that is neither leaning
towards red green and use that to
paint our friend. Okay. For the rest of the body, I added white to make
a pastel version. You can also vary how
the neutral mixture looks by adding either
more green or more red. Again, we're doing
some negative painting here since the flower is
sitting in front of the bird. But I trust that you can do it. It is a bit challenging, yes, but it is not impossible.
You've got this. Now, go darker by adding
more paint and use that at the top of the bird's head and to paint some
scattered feathers. Left this to dry and let's finish the other
parts of the wreath. With a thicker
rose matter paint, you can now draw the
details of the flowers. This is also the part
where you can use a colored pencil or a
pen as a substitute. But if you're in
for the challenge, then use a smaller
brush and apply the lightest pressure that
you can to paint a thin line. If you want to scratch instead, you can then re wet the flowers, drop darker paint near the center and scratch
with a pointed tool. Use the same dark red color to paint berries here and there. It is now coming together,
like how it looks. What about you? Of course, don't forget to add some leaves where the
bigger flowers are. It balances the
composition more. Isn't it amazing how much
a limited palette can do? It also teaches us patience in achieving
the shade that we want. It might take more time when you're mixing new colors
for the first time, but with practice
and experience, everything will be easier later. Now, I am painting some shadows to separate the three flowers
from each other. Don't forget to soften
the edges if needed. As a final touch, we can work on the facial
features of the bird by mixing a thicker neutral mix of the
two complimentary colors. The bea, paint the eyes. Retouch some feathers, don't forget the
highlight of the eyes. Use pure white paint for that. But you might need to
wait a little more for the darker paint to dry before adding in the
pure white pigment. If you want, though it is
not logically accurate, you can also paint
the bird's claw. I know with the bird's weight, it should not be
able to perch on this dainty flower without the flower being tore or folded. But this is a fun illustration,
have a go with it. Of course, work on the details
of the last flower too. You'll have to wait
for the bird to dry completely before you
can add this one. Here's the last
project idea for you. In the next video, let's
discuss what we can do from here and how you can claim your gift for
finishing this class. See,
10. Claim Your Free Gift: Thank you for letting
me teach you. I hope you had fun testing out the different factors discussed such as controlling the edges, considering timing,
and paint consistency, choosing the appropriate
size of the brush, deciding which paper
texture to work on, altering the base color, lifting with the pigment
spread farther than expected, experimenting how
to add details and working with the
limited palette to mix your own muted colors. If there's one key lesson that I want you to take
away from this class, that would be to give yourself lots and lots
of time to experiment, fail, and then learn. Pain is a great
teacher, as they say. Now that you know the
different techniques in painting soft
and dainty florals, go ahead and choose
another flower that you like and create
your own artwork. Don't forget to upload
your project and share it so that your
fellow classmates could appreciate it to leave a class review to help me
improve my future classes, and then you can e mail me
to claim your free gift. My pink and green
color combination book to help you choose
which colors to pick. I hope to see you in my
other classes and together, let's make this world
a little bit more colorful with our
artworks. Okay.
11. Bonus: Pink Peonies: Now, here's a bonus video where we will paint
flowers only. If in case you prefer not to include our
little furry friend. As always, I will sketch circles where I plan
to place the flowers. A light one will do. Here are the brushes
that I will use and for the colors,
my favorite trio. We acrid red, hookers
green, and Chinese white. Let's start with the
biggest flower and use a pastel pink
color for the base. Okay. If these flowers seem
too intimidating for you, just remember that
we are only painting the silhouette and
dropping darker paints on the shadowed areas. So that's what I'll do. I will paint the
overall shape of the pony then with thicker
paint consistency, drop on the darker areas. Of course, here's my hand this stiff brush to
soften the edges. Don't forget to switch
brushes if needed, so that you'll also load
it with less paint. The process is basically the same for the other two flowers, so I will speed up
this video a bit. Next, the middle flower. Same approach. Focus on the silhouette shape and cover
that with the base color. Then load your
smaller brush with thicker paint and drop
on the darker parts. Soften the edges, if you see any feathering and lift up
some paint with a clean, damp brush, if you need to
show separation of the petals. The same goes for
the little bod here. You know the process, right? Once the flowers
are taken care of, let's work on the leaves. This time, I'd like to connect them while the flowers
are still wet. Makes a slightly
mutant green color and prepare a pale version of
that by adding more water. Then start painting the
silhouette of the leaves. Drop darker paint on some
areas for visual interest. It might take some time
before you figure out which paper or brush works best for the
wet on wet technique, and maybe a bit of
experience is also needed in observing the
wetness of your paper. But it is not entirely
impossible to get the grasp on how
to make this work. You got this. Don't give
up just yet. Right. You'll notice that some of the green pigments mixed
with the still wet flour, but the paint didn't
really go too far since I made sure that this
is not soaking wet before I connected them. Okay. Perhaps that green is
spreading not so nicely, so let me lift up
some of that paint. You'll also observe
that I'm using pure hookers green on some
leaves and on the others, I'll paint with a muted version. Just to make it more interesting
and visually appealing. Don't forget also to drop darker paint on the
still wet leaf shapes. Scratching on another leaf, and the effect might be
subtle, but I like it. I can always retouch
with a brush later if that is still
not too visible. Now, leave this to dry
before adding details. The first layer has
completely dried now, so we can add more details. The flowers are looking soft and dainty and the blending
is still smooth. But we need more
defined lines like the veins of the leaves to
balance the composition. Make some parts darker too, and do the same for the flowers. You notice that I also grabbed an even smaller
brush for this. I will use the technique called negative painting and make the center of the
flowers darker. Leaving out the petal
shapes to add complexity. A few more touches
and were done. I hope to see your version of this flower and
thank you for taking this bonus video lesson. Sea.
 Bianca Luztre, Watercolor, Productivity, Color Mixing