Transcripts
1. What to Expect: Fashion illustration
always fascinates me ever since working on a small project where I was commissioned to sketch these expressive
and stylish girls. I fell in love with
this art style, combine fashion drawing with the fluidity of water colors, and these projects
look really exciting. Hello fellow creatives.
My name is Ban, a mom, a booker, and a lover of the clouds. I started painting
with watercolors in 2018, and ever since then, I am in constant research
on how to help others start their own art journey in an
enjoyable and rewarding way. In this class, we
will illustrate these beautiful ladies using the watercolor technique
called scratching. Through this technique, beginners will feel more
confident in adding tiny details in their
illustrations by combining the familiarity of using a writing pen and the
challenge of holding a brush, thus making the task a
lot easier and more fun. This has always been a struggle for me when
I was a beginner, but I tend to avoid
detailed work. By the end of this class, you will be the proud creator of these vibrant fashion
illustrations. And you will have the
knowledge on where to apply this technique with
other painting subjects. Whether you're a
beginner, hobbyist, or an experienced artist, you are welcome to join the fun. If you're ready, grab your materials and let's
explore this unique technique.
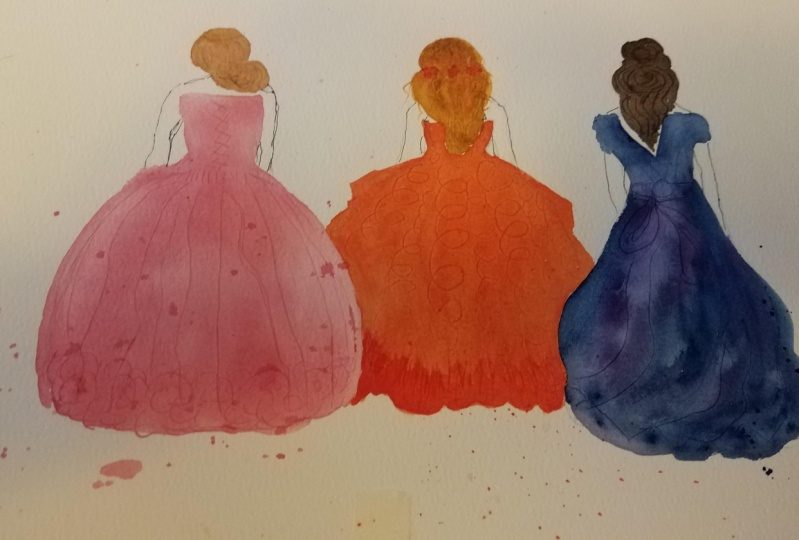
2. Class Project: Our goal for this
class is to create these stunning fashion
illustrations using wet, unwet, and scratching
techniques. To get started, please
download the class guide from the resources center and prepare the following watercolor paper. I'm using a student
grade called Canson Val, which is also a 300 GSM
called pressed paper. I'll use this scratch paper
for demo purposes later. Watercolor paints and a
palette to mix your colors. One round brush size
eight or ten will do. Please keep in mind that the
size of the brush varies per brand and is relevant to the size of the illustration
that you will paint. Water jar for rinsing the brush and paper towel or
rag to remove excess water, pencil and eraser
for the guidelines. And a marker or pen for drawing
the shoulders and arms. Lastly, please look for
a sharp pointy tool, like a used pen, toothpick or barbecue stick
for the scratching technique. Ideally, something that would be easy to use as
a writing tool. I want you to have the best
experience during this class. Please make use of
these features, such as the Projects Gallery where you can share your
work to receive feedback. Discussion Stab,
where you can start a conversation and review tab, where you can write
an honest review for other students to decide if this class is for them or not if I'm making
quality classes. In the next video, let's discuss what scratching
is all about.
3. What is Scratching: Let's begin with a quick demo on how the scratching
technique works. If you've watched my Vibrant
Fish Illustration class, you may go ahead and skip this and head over to the next video. If not, please observe carefully
for scratching to work. Once you apply a wet
wash on your paper, grab a pointy tool. My go to is this used pen and use that to scratch patterns or marks on the still wet paper. Traditionally, we use the tip of a brush to add tiny
details like this. The problem with this one is it's too challenging
for beginners, making the detailing part an
intimidating task for them. I know, because it's been
one of my struggles before. But with scratching,
adding details, marks and patterns can
be a lot more fine. Make sure that the
paper is still wet, then go ahead and draw
whatever you like. Those marks will appear
darker than the rest of the wash. Now let's try
and switch the steps. Here I am scratching hard shapes on a dry
watercolor paper. Then I will paint this over. Let's see if this will still
produce the same effect. If you compare it with
the one at the top. The shaves are not that visible. But if I scratched after
laying down the wash, then the hearts
are more obvious. This technique might
get you excited, but before you try it
on your practice paper, let's check the next video for the most common mistakes
with this technique.
4. Common Mistakes: In my previous class, I have already defined some common mistakes with
a scratching technique. But when I observed some
students trying out this trick for the first time during a face to face workshop, here are some additional tips that you have to keep in mind. First, there's not enough
water on your palette. If you are coming from
acrylics or pencils, then the concept of using water as a medium might be
a new thing for you. If you use a fairly dry mixture of paint and water, in short, not enough water
on your palette, chances are the paper will start drying as you are scratching patterns
and marks on the wash. If you tilt the paper, you can see that it's not
that shiny and it only means it's not wet enough for the
scratch marks to be obvious. Observe closely, You'll
notice that the lines are getting lighter as I reach
the right side of the wash, even though I am applying
the same pressure on my pen. This is just a small
shape for demonstration, but imagine if you're working on a dress and you've
got a dry wash, then the scratch patterns
won't be that visible. Please make sure to add
enough water on your palette as you prepare
your mixture next. On the contrary, there is
not enough paint this time, there's lots of water, but not enough paint. Making a really wet
wash like this, It's even starting to pull on the corners of the shape
when I tilt my paper. Let's try and
scratch that and see how that compares with
the one at the top. Okay, my pen accidentally
released some ink, but you can see that the
patterns aren't that visible. Either whether there's not
enough paint or water, the scratch patterns
will be hard to produce. That's why I highly
encourage you to try this out and a
practice paper to get familiar with this technique and find just the
right amount of water and paint for the scratched
patterns to be visible. Now here's a mixture with
just enough paint and water for comparison
purposes. Let's scratch it. It is easier and more fun if you get the
consistency just right. Another common mistake with
this technique is using a brush smaller than the shape that you
are trying to paint. Here's a size two brush. Since I'm so used drying
time of this paper, I know just when
it starts to dry, I'm working faster than
the usual for this was. I was still able to
paint a shape this big using a brush this small. Since I was able
to manage to keep the wash wet enough
when scratched, the marks are still visible. But see what happens when
I double the size of the shape and try to
do the same technique. The first concern about using a two small brush is that you have to repeatedly load
it with your paint. By the time we
complete the shape, the wash has already started to dry for the projects
that we're working on. If you're painting
just the same size as the girls that I
will demonstrate, then I recommend using a size
eight or ten brown brush. But keep in mind that different brands have
different sizing charts. Looking closely, the scratch
patterns are hard to see. Please keep in mind that the
size of the brush you will need depends on the size of the illustration
that you will paint. Finally, not using
a tool that is sharp or pointy enough
to demonstrate, Let me use this brush with a round edge instead
of a sharp one. Compared to the Chinese
calligraphy brush, same steps. Paint a shape and then scratch. To see the difference, I'll
just retrace this with my pointy brush to fix and to make the scratch
patterns more visible. Now that you know the
basics of this technique, let's practice how to paint
the hair in the next video.
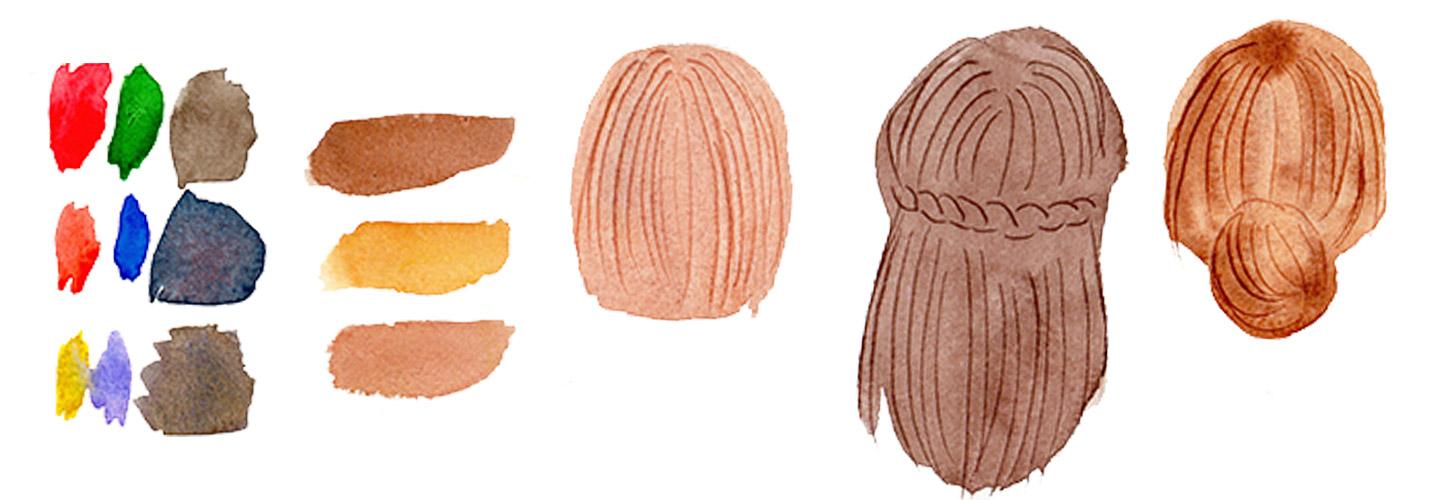
5. Hair Practice : Before painting the scratching the hair shape for our girls. Let me share with you
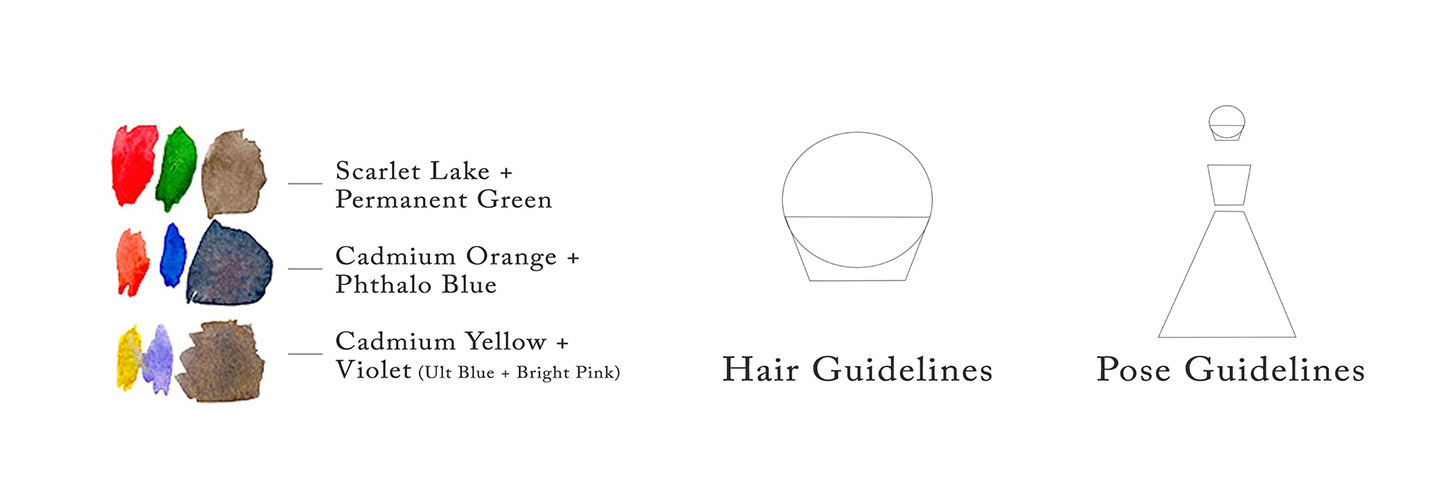
some of the colors that I suggest for your palette. The easiest would be to use
one color, a convenient mix. I love using browns
for the hair. Some common colors that
would work well are bird sienna for a
reddish brown tone, or yellow ochre for
a brighter one, burnt umber for a darker shade. These are some pigments
that you can consider. Alternatively, you can also mix complimentary
colors to produce brown ones that sit opposite from each other
in the color wheel. For example, green
and red specifically, These are scarlet, lake,
and permanent green. When mixed together,
it looks muddy, but it could still work. Let's try it out on paper. Yeah, I think it's a
reasonable color for the hair. You may also try
orange and blue. This is cadium orange
and thalo blue. It's leaning towards gray, but I like this color. I think I might use it later. Check the color wheel to see which pigments are lying
opposite with each other. They should generally
produce brown mixture. Lastly, yellow and violet. This is cadmium yellow
plus violet from a mixture of ultramarine
blue and bright pink. But you can also use
convenient violet mixes like carbazol violet and
permanent violet that looks like a pinkish brown. But again, you can control the amount of each
color to adjust how your brown mixture looks depending on what's
available to you. You could use that for the hair. I would suggest
ready mixes, though, they are the easiest to use by a combination of
complimentary colors, would give you opportunities
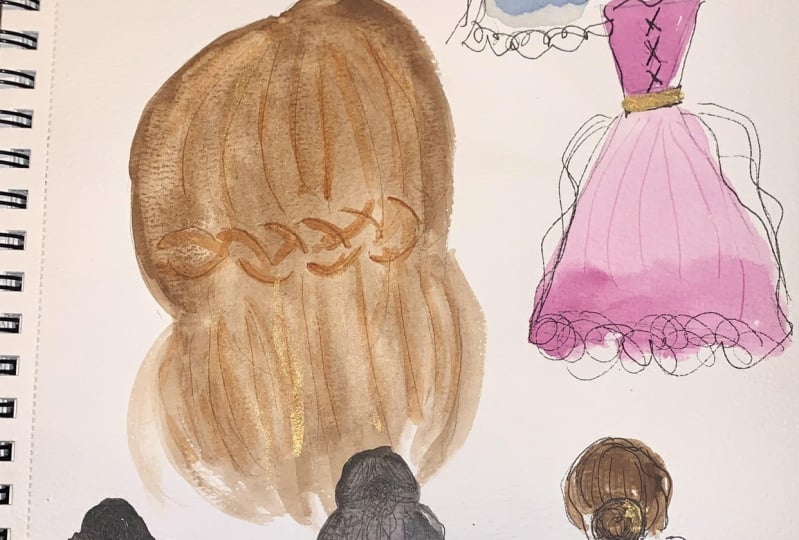
to practice color mixing. Now to draw the hair, I start with my guidelines
using my pencil. Lightly sketch a circle and connect that with a
trapezoid at the bottom. This will be my guide for
the size of the hair, if you want, you can
also sketch the shape of the hair with your pencil
before painting it in. Just focus on the
silhouette and don't get too concerned with
the hair strands yet. I'll do two more with different hairstyles and
lengths for our practice. Once your sketch is ready and you've decided which
colors to use, then erase extra marks. And let's paint
for the first one. I'll try burnt sienna, a lovely, reddish brown color. I think I might actually use
this on one of my girls. Paint the shape of the
hair and make sure to keep the shape wet
for the next step. Then using a pointy tool, follow the contour of
the shape and draw parallel curved lines to
add the hair strands. The size is only for
demonstration purposes. We won't actually
paint the head this big on your practice sheet. You can paint the
head a little bit smaller than what I have here. For the second one, I'll try the green and red combination as that one is the closest to the shade of
brown that I like. Quickly fill in the shape, Don't worry too much if you're painting outside
your guidelines. Once that is covered,
scratch and enjoy. This time I will work
on the bottom part of the hair first since
she has some braids. If you observe if there
is enough paint and water on your paper and you
scratch outside the shape, you might also produce the
dark lines which I like. What happens is the
pen or your pointed to might start grabbing
paint from the wet wash, which you can use to
draw strands like these. For the last one,
let's try two colors. The yellow ochre for
the base and some burnt umber for the
secondary color. This way the hair looks more interesting and not that flat
compared to the other two. Cover the hair shape
first with yellow ochre and while still wet
drop some burnt umber. But leave some areas for the
first color to pick through. This adds volume to the hair and makes it visually
interesting. Use this practice time
to determine which colors and what hairstyle
you'll use for your girls. You can also try a wavy hair
or different hair colors. As you get familiar
with the technique, take this time to estimate how fast you can scratch
a shape in a way that you are not in a rush that might affect how the
painting will look like. I am so used to this technique, so it's easier and
more familiar to me. It was also challenging
at first that my paint always dries before I could even finish scratching. But with enough practice, I'll assure you he'll
get the hang of it. In the next video, let's practice how
to paint the dress.
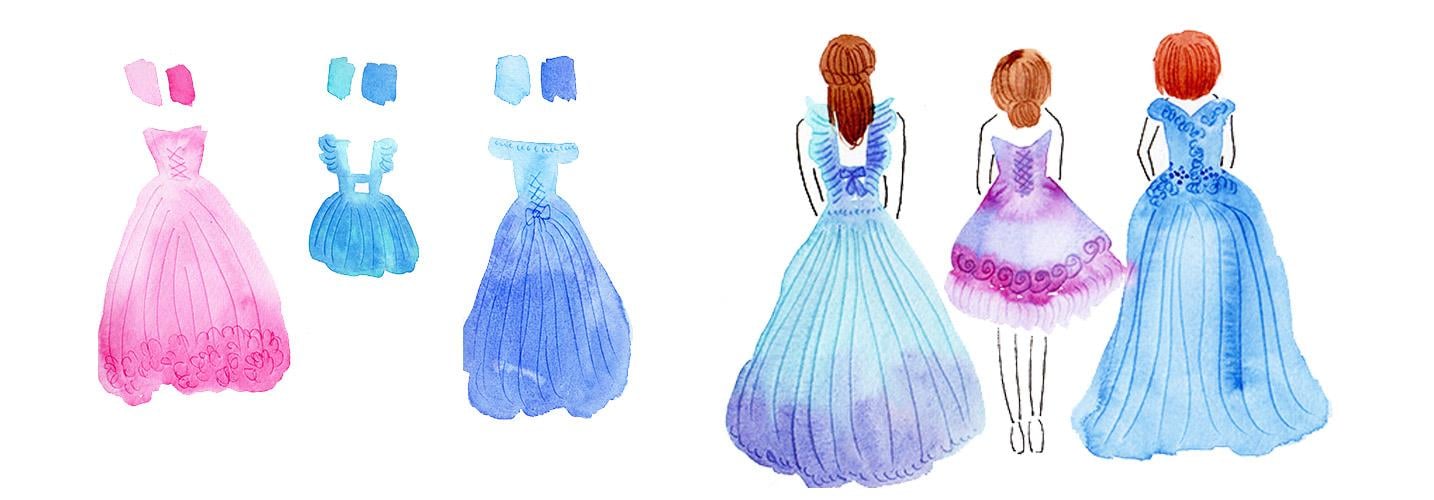
6. Dress Practice : Wear back with the
same practice sheet. Now let's fill this up
with different colors and shapes of dresses and get more
familiar with scratching. Just a reminder, you
are free to change the hairstyle or the type of the dress that
you want to paint, so have fun choosing one
that suits your taste. I usually start with
two trapezoid shapes, one facing downwards and
the other facing upwards. The bottom one will be
obviously bigger and longer since it's covering
the legs of our ladies. Now it's time to play with color combinations that
you might want to try. Since color is a
very personal thing and is developed along
with one's taste, I encourage you to
own this painting and come up with your
unique combinations. I am naturally drawn to cool
colors. Here's magenta. For the first practice piece, we're working on a bigger shape. It's better if you divide
it into two parts. First, finish off the
top trapezoid paint, and then scratch
patterns that you want. Then you can move on to the other half and
finish the skirt. You can add patterns
like ribbons, flowers, or any element that suits your taste and
the design that you are after as you work on
the rest of the dress. The real challenge here lies on how well you can estimate
how much time it will take you to both paint the base shape and scratch
some marks before it dries. That's why I emphasized
earlier that the size of the brush is relevant to the size of the illustration
that you are working on. Dropping darker, magenta means more paint than water
for visual interest. Having said that
about brush size, feel free to draw and
paint a smaller character. If you also got a smaller brush, you'll observe
that I keep on re, wetting the shape as it might dry before I could even
scratch the surface. Do the same if necessary. Now, follow the
contour of the dress, the overall shape, and
scratch the fold lines. You may also add
abstract or V shapes at the bottom of the
dress that could create an impression of flowers
and add interest to your design very quickly. Here's another
design where I used a shorter skirt and painted
it with two colors, turquoise blue and the low blue. Since this is way smaller
than the first one, I painted the whole dress and scratch the details in one go. If you've put too much paint
and water on the paper, use a clean brush
and paper towel to pick up the excess water. Keep working on this
until you are satisfied. Lastly, for this dress, I will use two colors and create a gradation
between the two. Starting with blue and
gradually changing to blue violet as I go nearer
the bottom of the dress. It's basically the
same approach as the first two sketch trapezoids. As your guide, paint
the upper part first and sketch and do the
same on the lower part, which is the skirt,
and then we're done. These exercises are designed to make you feel
more familiar and thus more comfortable and confident when working with
the actual class projects. It also gives us an opportunity to learn how fast we can recover an area and add details through scratching before
the paper dries. Please don't skip this step unless you are
really used to it. I'll see you in the next
video where we'll put everything together for
the first class project.
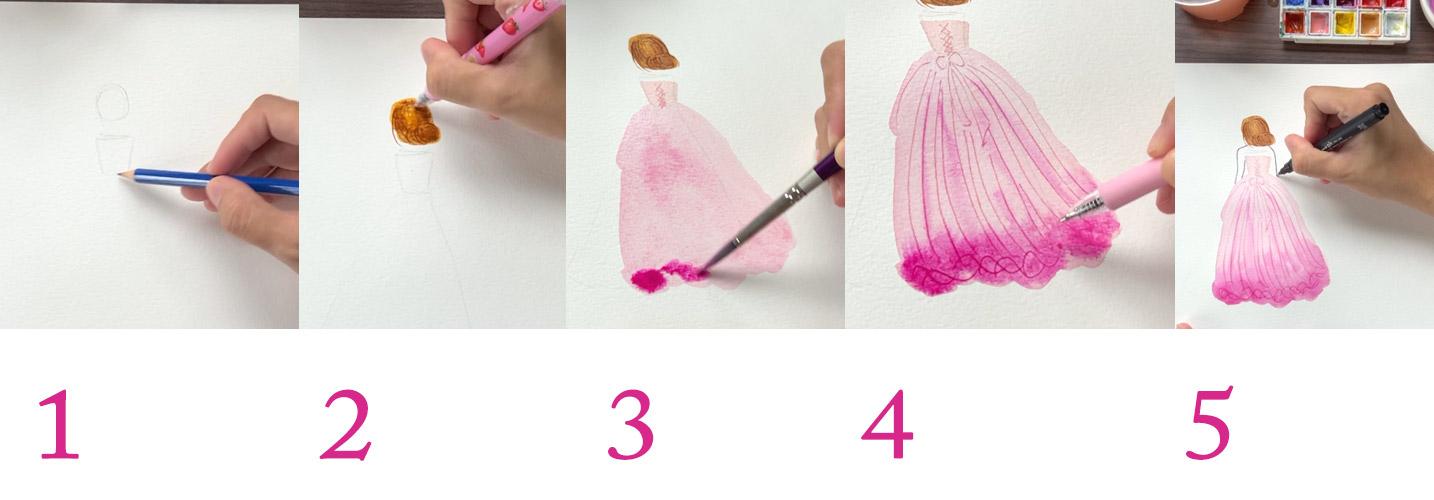
7. Lady in Pink: Right now it's time to bring together what
we've practiced so far and paint a lady in
pink about this big. As always, I'll start
with a circle for the head and two
trapizoids for the dress. I'll be painting three girls, so I'll start drawing on the left side to give
space for the other two. Take note that I will also be trimming lots
from this video, since by this time I
know that you pretty much understand how the
process of scratching works. Starting with a sketch, then working with the hair, painting the upper
part of the dress, and scratching patterns, then working on the
rest of her gown. Now here's my very light sketch and we can move on
to the fun part. Painting, then scratching
for this girl, I decided to use
a combination of yellow ochre and burnt
umber for her hair. And the style would
be a simple low bond. First, cover the whole hair
shape with yellow ochre. Then rinse your brush and
load it with burnt umber. Then drop that dark brown color. Just like how we
practiced earlier. Well, wet, scratch
some hair strands following the overall
shape of the hair. With this design, we won't need to wait
for the hair to dry before we can work on the dress since they
don't touch each other. But keep in mind to
leave some space for her shoulders and
back for the dress. I'll start with shell pink
and paint the upper part. And then scratch a corset
pattern and mix in some Quinacridone magenta and paint the rest of the dress. As I'm doing this,
I also decided to stray away from the guidelines
that I sketched earlier. And that is perfectly fine
as long as you consider the proportions and where
her legs are supposed to be, don't let your
guidelines limit you. In fact, more often than not, I usually don't paint
inside my guidelines. I just use them as guides for the size and proportions
illustration. You'll also observe
that I do the same in my other
illustration classes. Again, remember to keep
the shape nice and wet to prepare for scratching
and for variety. Add darker shades of colors or even paint
some fold blinds. Once the dress is
covered with paint, scratch, scratch, and
scratch some more. Add flowers or abstract
shapes and enjoy the process. I should also remind
you that we are doing vibrant illustrations
and not realistic ones. The final touch would be drawing her shoulders and arms and
you'll need a pen for that. This is my 0.8 uni pin
fine line which is water and fade proof to make sure that the ink will not
bleed with water colors. It is best that you draw only when the painting has
completely dried. Here we have our first
project in pink. Let's add a little more
challenge by layering the dress and the hair
in the next video.
8. Lady in Blue: I have already sketched my
guidelines for my second lady. And I will be painting her on the right side for her hair. I'll be using this cool gray by combining cadmium
orange and thalo blue. The dress, on the other hand, will be a mixture
of purple and blue. This lady has long hair covering the upper
part of the dress. Let's paint the dress first. A simple V shaped back and
some patterns to suggest the full lines of the
dress Would do the node. Your brush would purple
and paint the rest of the dress from time
to time drop blue. And let the two colors
blend with each other. Let water color do its magic. She seems to be walking towards the right and to
suggest movement, paint some lines
going to the left, make sure that the
paper is still wet. Then scratch details. I added a ribbon to make it look more interesting
and further emphasize the movement of the
dress by drawing lines from her hips and slightly curving towards the
left side of the dress. For the next step, check whether the paper has already
dried completely, then we can paint the hair. One common mistake when I
was a beginner was being impatient about the drying
time between layers. If you can't also sit around and wait for your paint
to dry naturally, then try and speed up the
process with the hair dryer. This saves up a lot of time, especially for a full
time mom like me, she has wavy hair with
a half ponytail style. Draw the outline
first with the tip of your brush and fill
it up with paint. This might be challenging, but I want you to treat
the hair as a whole shape. Don't bother about each
individual's trend. Since the hair is darker and the upper part of the
dress is already dried, then there shouldn't be any
accidental bleeds and blooms. Once you're satisfied
with the hair, go ahead and draw some
waves to suggest movement. And then grab your pen and draw her shoulders and arms
to finish this off, here's our lady in Blue. Let's add a bit more
challenge again by painting Lady in
Purple in the next video.
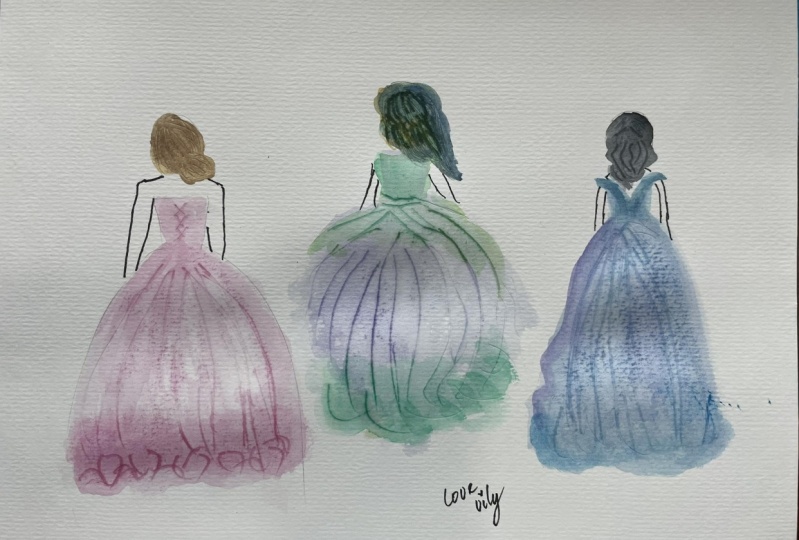
9. Lady in Purple: The last project would be the most challenging of them all since she is placed at the center and we
painted these two first. She is then covered
by their dresses. We will have to
avoid their gown to paint the dress of this
lady at the center. This girl has long hair. The approach will be the
same as the lady in blue. I will use these colors, Viridian green and
purple for the dress, and burn sienna for the hair. I'll take the
challenge and paint the dress shape in one go. Instead of doing the
upper part first, you can also do the same, but make sure to keep
the shape wet as long as you can for the scratching
technique to work. Once I have covered most of
the dress with light purple, I will load my brush with green and paint the lower
part of the dress. If you're having trouble
choosing your color palette, check the colors of
nature, flowers, insects, fruits, and you'll be amazed
how weird colors work. So well, I wouldn't even try
green and purple on my own, but I found this
brilliant tropical plant that inspired me to
try this combination. Go ahead and scratch
the details, then let this dry before
working on the hair. Her hair will be this long. It's important to check
whether the upper part of the dress has dried
already Till to check, you can see that the
bottom part is still wet. But it doesn't matter because we will only cover
the upper part. Let's paint the hair and
start with the outline first to give us an idea
on the size and the shape. I'll give her a wavy
hair style too. Once covered, make
this darker by adding a bit of blue and drop it
on some parts of the hair, give it some volume. Then proceed with scratching by following the
contour of the hair. Here are our three ladies, but something fails missing. Let's finish these projects with a couple more techniques
in the next video.
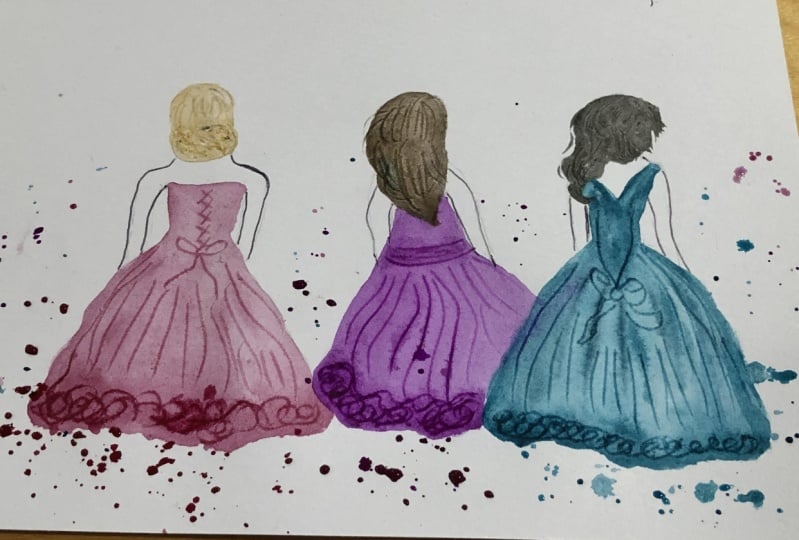
10. Final Touch: Our projects are
done and this part is optional, but
highly recommended. I want you to grab a smaller
brush for splattering. I have prepared the three
dominant colors in each dress, magenta, blue and purple, and scratch paper as well, to cover the upper part
of our illustration so they wouldn't get
splattered on any paper. Will do. Actually
load your brush with a water mixture of the colors and tap the brush to let
loose of some droplets. These adds a magical
touch on the dresses. It also creates an
impression of movement. If you're having trouble
producing any droplets of paint, then try tapping your brush
on another brush or on a pen. Or you might just need
to add more water to your mixture splatter. As much as you think you need, but not too much that
it is distracting. You may also pack
some parts dry with paper towel if you feel that those platters
are out of place. Finally, add some shadows. I should have added the shadows first before the platters. But anyways, if you decide
to do this optional step, then use the tip of the brush with light pressure to
paint some shadows. These shadow shapes
will obviously be wider and bigger than
the scratch details. Paint some here and there just to emphasize
some fold lines, but don't get overboard. Use the same colors as
before for harmony. Only more pigment and water. This time we're done. Paint to your heart's
content and take this opportunity to practice
painting thin lines. In the next video, let's
discuss what to do from here.
11. Sharing Your Work: Congrats on finishing
this class. Which one is your
favorite so far? My personal pick is
this lady in pink, since I love how the color
is blended on the dress. Now that you know how
to use scratching to add details on your
watercolor illustrations, you can try out other hair and dress tiles or even
other painting subjects. Learning by doing is always better than just
watching tutorial. I highly encourage you
to paint at least one of this beautiful ladies and share it in the
projects gallery. I will leave feedback
as soon as I can. It is also a space for us to celebrate what we have
created so far and encourage each other to keep creating to help other students decide if this class
is for them or not. Anna's review would
be helpful also, if you have any questions
related to this class, please don't hesitate to start the conversation in
the discussion stab. I'm looking forward to
your artworks and I hope to see you in my other
classes together. Let's make this world
a little bit more colorful with our artworks.
 Bianca Luztre, Watercolor, Productivity, Color Mixing