Transcripts
1. Intro: Hello and welcome to beginner would work
in class number ten, building a simple jewelry box. I've been seeing this
beautiful faux pearl inlay on mirrors and dressers lately. And I thought a
small keeps sake box would be the perfect place
to trial this effect. I'm amped to make this
easy build with you today and I hope
you'll join along as we learn step-by-step how to build and paint a
simple jewelry box. I'm so cow would girl and I'm a creator in sunny Los Angeles. I've been building
and crafting what an object's large and small
for over a decade. And I am obsessed with passing on my love of carpentry
through accessible, fun, and engaging
classes that will help you tackle whatever
project you dream of. I've been featured and
family handyman for my one woman kitchen
remodel and I've been teaching on
Skillshare since 2019. I hope you'll join me on a journey of
empowerment and skill building as we create what we've imagined project by project. In this beginner friendly class, we'll learn the
following types of jewelry boxes and
modifications we can make. Designing our box, materials
and supplies needed, making our cuts,
assembling our box, finishing our box
and final thoughts. This class is aimed
at students with a basic understanding
of woodworking. Access and experience using
power tools is recommended, but it is not required. Some basic tools are necessary. I, yr, lung protection,
sander or sandpaper, gloves, paintbrush
or sponge brush, miter, jig or hands-off. Brad Naylor or hammer and nails, drill and drill bits would
glue, clamps, paint, and stain will also be using a pearlescent mixing
medium and stencils, either homemade with
a paper cutting machine or trace by
hand or purchased. What are you waiting for? Let's dive on in
and learn how to make a simple jewelry box.
2. Types of Jewelry Boxes: Before we launch
into this project, let's take a look at common jewelry boxes to find the style we like and any modifications
we might want to make. Their jewelry boxes that
use a drawer system. Well, that's a cool concept for our purposes and simplicity, I'll be steering clear of that. But apothecaries style, all
the heart eyes. Stay cool. Britney, stay cool.
There are ones that have a bunch of dividers on the inside to
separate your items. This is certainly a
modification you could add in at anytime, even
down the line. You have ones with fancy
velvet on the inside. But for some reason, that kinda takes me back to my childhood and tacky
kitsch from gift shop. So for me, I'm going
to pass on that. You of course have ones with intricate jewelry like
dovetails and box joints, but those are all
finicky and require far too much patients
that I do not possess. I think for today, since the delicate faux pearl
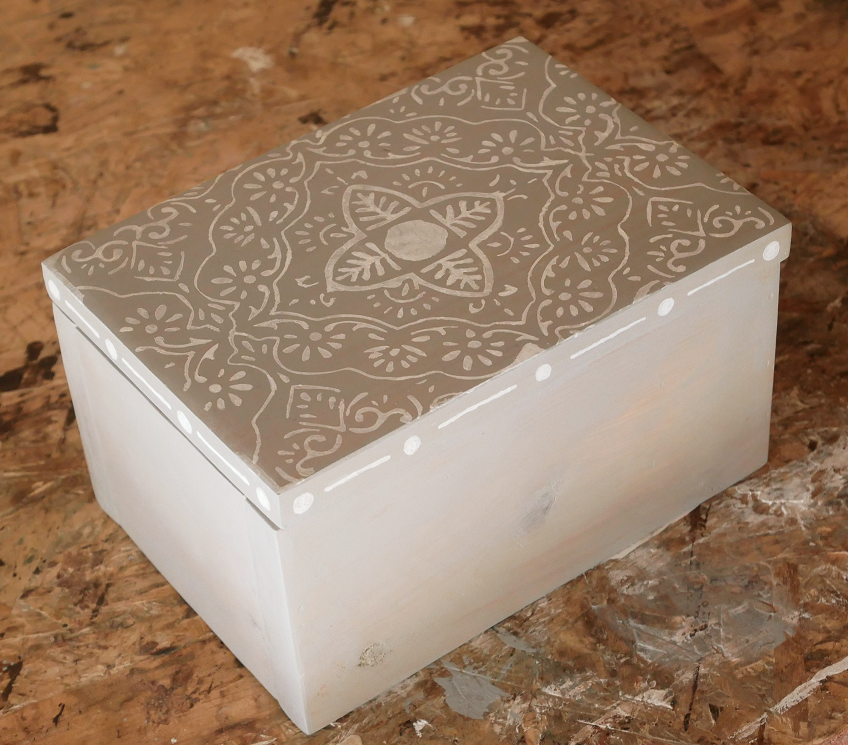
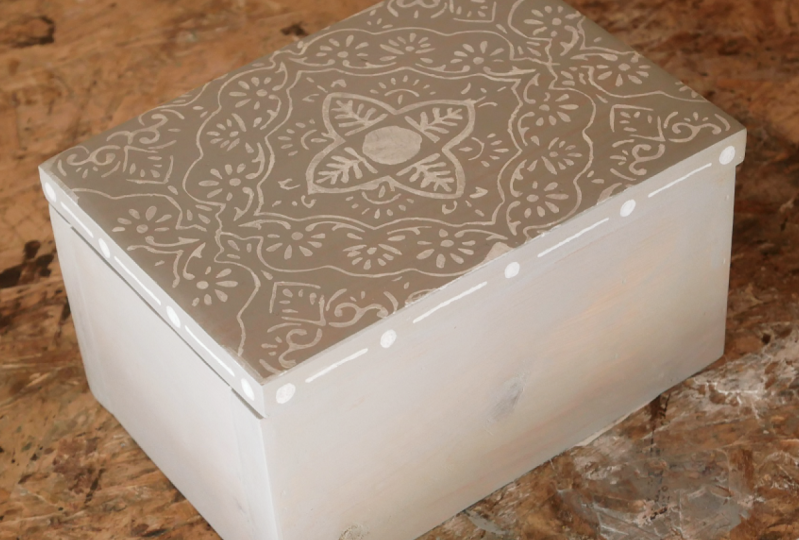
inlay is going to be the star of this project.
We'll keep it simple. Two sides, a front and
back attached by nails, a thin bottom annelid
that rest on top, attached by tiny
hinges in the back. Super simple. That way, the lid of
this baby can shine. You'll also need to consider
what you plan on storing in there that will determine the type and size
of box you'll make. Will it be jewelry? Guitar picks, a
secret stash of cash. Tell me where maybe
your dog demands the royal treatment
and wants you to store their treats inside. Whatever the case, you'll
want to design your box around your needs
and requirements. And fortunately, since you're making
it and not buying it, you can have it any
way you want it.
3. Design: Now that we have an idea of
the type of box we want, it's time to fully
design this bad boy. For me, I'll be
storing buttons and my craft room so it
doesn't need to be huge. But I also want to
make sure there's enough surface to
paint the pearl inlay, so I don't want it to be tiny. Taking a measuring tape to
some similar style boxes, I've landed on a box
that is 7 " wide, 5 " deep, and 4 " tall. This will allow me room to grow. Should I become
button obsessed at some point in time? No judgment. The bottom can be a thin
piece of one-eighth inch wood for the sides and front and
back, as well as the lid. I'm going to use just one cedar fence picket fence pickets are great for small
projects because they not only give a nice cedar sent, they're cheap and
easy to work with. A cedar Pickett is about
five eighth inch thick, so we'll need to account
for that in our design. The lid is symbol. It will cover the
whole top of the box. So it will be our
base measurement at 7 " long by 5 " deep. For the back and front,
I'd like it to be a solid front without the
end of the slides showing. So we'll let the sides be inset between the front
and back pieces. That means our front and
back piece will be 7 " long by three and
three-eighths inch tall. This is our total height of 4 " minus the five h
thickness of the lid. The front and back thickness, or five-eighths
multiplied by two, that leaves us with one
and a quarter thickness. We'll subtract that from the
depth of the box 5 " to get three and three-quarter
inches and the same height as the front and back, three and three-eighths. This is the measurement
for our sides sandwiched between
our front and back. For our bottom, we
have two options. You can make it the same size as the lid and just nail it
to the bottom of the box. Super easy. Or we can route a dado into the sides and insert the
bottom into the slot. This is a bit more advanced, so I'll be demonstrating both. If you'll be routing, then account for a
one-quarter inch route. The interior of the box, accounting for the thickness of the sides and front
and back measures five and three-quarters
wide by 3.3 quarters deep. We'll add one-half inch
to that width to account for a one-quarter inch
route on either side piece, making the bottom three
and three-quarter deep by six and
one-quarter wide. We won't be routing
the back and front because there's
simple route I'll be showing you on the table. Saw is not a plunge cut. Therefore, the route
in the front and back would show up on the sides
of your jewelry box. This keeps the route hidden. Now that we know the
dimensions of our box, we can plan our stencil. For this, you have options. You can choose from the
following freehand the design. If you have artistic abilities, print out a design and cut out the shapes, leaving a stencil. Purchase a stencil
online or from a store, or use a paper
crafting machine like a cricket to design and
cut out your stencil. I'll be going the cricket
route for this project. But if you'd like some instruction on
some of the other ways, you can always just take
a look at my making a wall plaque class where
I go over a few of these. I'll go into cricket
design space and make a rectangle shape with the
dimensions of seven by five, the length and width of my lid. Then I'm going to
pull in the design I found and size it to my lid. I'll then cut it out
with the cricket as a stencil from stencil vinyl. Once this pencil is cut out, all weed out the
pieces that I'll fill in with paint later on. Just so you know, this
took close to 25 years. So prepare yourself up next. Let's talk supplies.
4. Materials and Supplies: Aside from the tools needed
mentioned in the intro, will also need the following. One, cedar fence Pickett, the five-and-a-half inch
wide by 6 ft long kind. You'll also need
a small piece of one-eighth inch wood at
around five inch by 7 ". I'm using a piece
from my scrap pile. You'll need some wood
glue paint or stain. I actually advise paint
here as your base layer because the stencil layer
will adhere better to that. But if you're bent
on stain, It's okay. I'll be using a light
gray as my base paint because I like the way it
looks with faux pearl inlay. For the stencil design, I'll be using a basic
white paint will coat the whole thing and
either polyurethane or wax for protection. We'll also be using
pearlescent mixing medium. You can find this in
craft and hobby stores or get it online like I did. This is optional, but
I've heard that it adds a nice pearly sheen to
your paint stencils. As mentioned, you can
do this freehand, purchase stencils
online or in store, print and cut, or
use a paper crafting machine like a cricket to
design and cut your pencil. At the end, we'll use
these tiny box hinges. Optionally, you can use a
clasp to keep the lid shut.
5. Cuts: Now it's time to make our cuts. The bill today is going
to be super simple. It's the painting that will
take up the most time, but I promise you will still
have some fun building. To begin. Let's cut our lid. Will cut
the length first at 7 ", measure and make your mark,
then bring it to the miter, saw a jigsaw or hand saw, and cut just to the
right of the line. Next, let's cut our
lid width wise. It needs to be 5 ". So measure and mark,
then make your cut. If you're saw, won't cut 7 ". Just flip your piece over, match up the blade
with the line and continue your cut
from the other side. If you have a table
saw, you can just take the wood through to get
that five inch width. Now, let's cut our front
and back first measure and mark a piece at 7 "
long and make your cut. Repeat with another piece. Once again, let's cut the width, measure and mark three and three-eighths and
make your cuts. If you have a table
saw, you can just cut the width for the rest of the board at three
and three-eighths, then make your link
cuts at the miter. Solve for the
remainder of the cuts. Next, let's cut our sides, measure and mark 3.3
quarters and cut to pieces, measuring and marking
in-between cuts. Then cut them with wise at
three and three-eighths. If you're nailing
the bottom piece onto the bottom of the box, go ahead and cut
your one-eighth inch thick wood at five by 7 ". If you're going to route your
bottom in, now is the time. Take your side pieces to
the table saw the width of the blade will be about the same size as your
one-eighth inch bottom. So we'll only do one pass. Make a mark at the bottom
of your side piece, three-eighths of an inch up. Line that up with
the table saw blade. Now, you need to lower
your blade so that it's peaking just above
the table saw top slightly over one quarter of an inch will be routing the
wood without a through cut. So you'll have to remove
the blade guard assembly. Please don't do this unless you're really comfortable
on a table saw, this is more dangerous
than a usual cut. Now with the push guard, place your side length wise against the
table saw offense and push it through all the way with medium pressure on the pushcart, make sure it stays solidly
against the fence. Inspect your cut. Does a piece of one eighth inch
would fit in the slot. If so, move on to the
other side piece. If not, push the fence
over a fraction of a millimeter and make the pass
again, widening the slot. Just make sure when you
cut the second piece, you cut in the same way. Start with the original line
at three-eighths inch cut, then move the fence
in the same direction as before to widen the slot. Optionally, if you have
experienced with a router, you can do this on
a router table. Dry fit the pieces together, sides between the
front and back. Measure the interior. It should be about five
and three-quarters by 3.3 quarters. Add that quarter-inch on
either side for the route and cut your bottom piece at 3.3 quarters by
six and a quarter. Dry, fit this with
the box assembly. If everything is flush,
you're good to go. Otherwise, shave off
little bits with the salt until the bottom
fits snugly in place.
6. Assembly: Alright, we're on
to the fun part and my favorite part assembly. This is dead simple. First, we will send all
of our pieces as there'll be a little bit hard to
mess with once assembled. Makes sure your wood is nice
and smooth by starting with a rougher grit and graduating
to finer grits as you go. Clean up your area so
you have a nice place to assemble without sawdust
clogging your joints. Now bring your front and back and sides to a flat surface. We'll start with one
side of the box. Run a bead of wood glue along the end grain
of your side piece. Both ends line the side piece up flush with the
front and back, adhering together with the glue. Clamp this in place. This is super-simple
with a Brad Naylor take 1 " brad nails and nail your front and back
into the side pieces. Three to four will do. If you don't have a Brad Naylor, take your hammer and nails
and carefully pre drill a tiny hole to get your nails started in the right position. Then place your finished nail
in the hole and hammer in. Due to more. You'll want to insert the
nail head if you can. Do keep in mind if you have
routed sides not to make a nail go into that
route because it'll keep the bottom from
going in place. Once one side is in place, if you were out at
the sides carefully insert that bottom
piece into the slot, put some glue on
both end grains of the other side piece and place it in between
the front end back, allowing the other side
of the bottom piece to sit in the routed slot, clamp it in place
and nail as before. If you didn't route, don't
put the bottom piece and just place the side piece with
glutenins into place and nail. Choose the bottom end of
your box assembly and place your bottom flush with
the front back and sides. Then glue and nail
into place with either the broad Naylor
or hammer and nails. Here, I added sparkling because
my wood filler was dried out always to the holes
and edges of my box. Since we're painting, I am not worried about it messing
with the finish. After it dried, I
did a light sand. You can let the set a bit
to let the glue dry or go ahead and move forward
with the painting up to you.
7. Finishing: Wipe your box and lid clean. Next, we're going to
paint or stay in the box. Water-based paint might have a hard time adhering
to oil-based stain. So do keep that in mind. Painter, stay in your box with
the color of your choice. I've watered down a
gray colored paint. If you need more than one coat, let it dry in-between
coats with what's recommended on the
can to get the look. I wanted I tried several
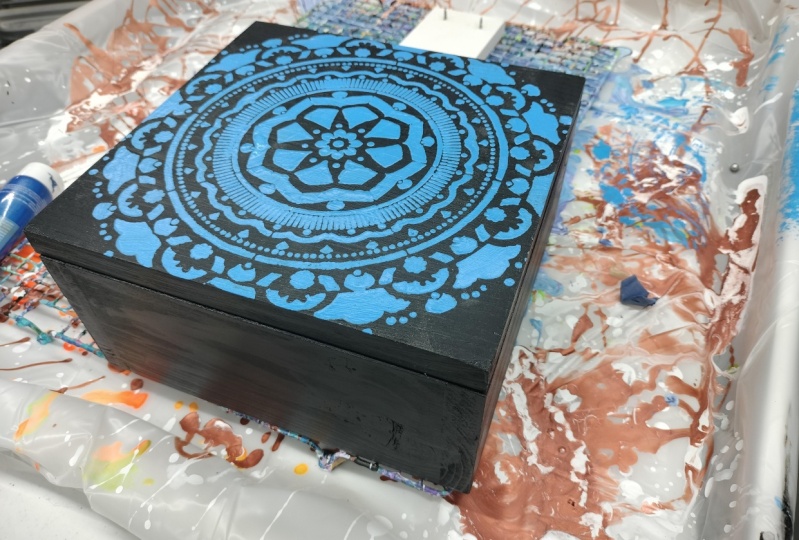
things but dipping a napkin and the paint and then wiping it on gave me the result I needed. We'll be using
water-based latex paint in white for the inlay detail. We'll mix it with some
pearlescent mixing medium so that it has
a bit of a sheen. With this, you just
need to add as you go until you get the
iridescence you're looking for, it's probably gonna be a
lot more than you think. Make sure to make a medium-size
batch for consistency. If your free handing, then you draw your design in
pencil on the lid, then carefully paint
your design with the white paint and a
small, small paintbrush. If you printed your design
and cut out the design, place it on the lid and trace
the design onto the wood, and then paint the design
with a tiny, tiny paintbrush. If you purchased a stencil
that isn't sticky, use painter's tape to tape
the ends of your stencil onto the lid and very
carefully paint your design, attempting to not bleed
under the stencil. For mine, I'm taking my
cricket stencil vinyl and placing it on the lid. It is sticky so I need to very carefully place
it where it needs to go and then ensure it adheres to the lid and there's no
bubbles in the stencil. Then I carefully paint the
pearly white onto the stencil, making sure not to bleed under. Now I tried several methods
so you don't have to the paintbrush seemed to bleed under the makeup
sponge was too spotty. A sponge brush seemed
just right for me. And I only did one coat. Carefully pull up the stencil as soon as your
last coat goes on. I then went in with a
toothpick dipped in the paint to touch up
areas that needed fixing. If you care to do more, you can stencil the sides
and front and back as well. It's up to you. After all is stencils and dried. Put a layer of polyurethane
or wax over it. I did wax. After this has dried,
you can install the tiny box hinges on
the back of the box. Place your lid on top
of your box body, put some thin cards in-between the lid and the box so
the hinges don't bind. Perhaps two or three playing
cards on either side. Mark 1.5 " over from either
side of the lid on the back. Hold up one hinge to that mark, make sure it's level and
mark the holes of the hinge. Do the same for the other hinge. Now pre drill tiny holes
where you've made your marks. Put one hinge in place and
carefully screw the hinge in. Do the same for the other hinge. Optionally, you can add
a class to the front. As I could not find
a class at my store. I'll just take you
through the steps and with the power of
your imagination, you will envision
what this looks like. Measure halfway over 3.5 " and center your clasp
marking the holes like you did with the
hinges than screw or nail it in whatever
your class became with. Now, take a look at that beauty. You just made a faux pearl inlay box and you can use it for whatever you like or give it away as a special gift
to friends or family. Whatever you do with it. I hope you're proud of
what you've just created.
8. Final Thoughts: Way to go. Now you know how to
build a jewelry box. Congratulations. I encourage you to keep
building up your shop fine. Use tools off of
Craigslist, pen, inspirational photos
to a Pinterest page with pictures that
inspire future projects. Dream up new ideas and ways to grow in your
woodworking journey. Most importantly, post a picture of your finished project here. I love to see what you made
and how you made it your own. Lastly, if you dug this class, would you consider
leaving a review? Reviews? Let me know that you're liking the classes I upload. And it also helps other
students find these classes. And thank you for watching. It really means a
lot to me that your journeying in the shop
with me, lesson by lesson. Now let's go build
something fun.
 Brittany Joyner, SoCal WoodGal