Transcripts
1. Welcome to Class!: Hey there, how are you? My name is Andy One, and I'm so happy that you've decided to join me
here for this class. I enjoy working with
alcohol markers, Pasco, Mercer, and
colored pencils. And sometimes I haven't like using all three
and even more, such as acrylic paint and watercolors and doing
something called mixed media. Over the past ten years
of my artist's career, I have learned and
gathered knowledge on how to draw and paint. And over the past three
years of teaching, I have learned what appeals to my students and how
they learn best. In this class, I want to help build your artistic abilities. Here's what we're going
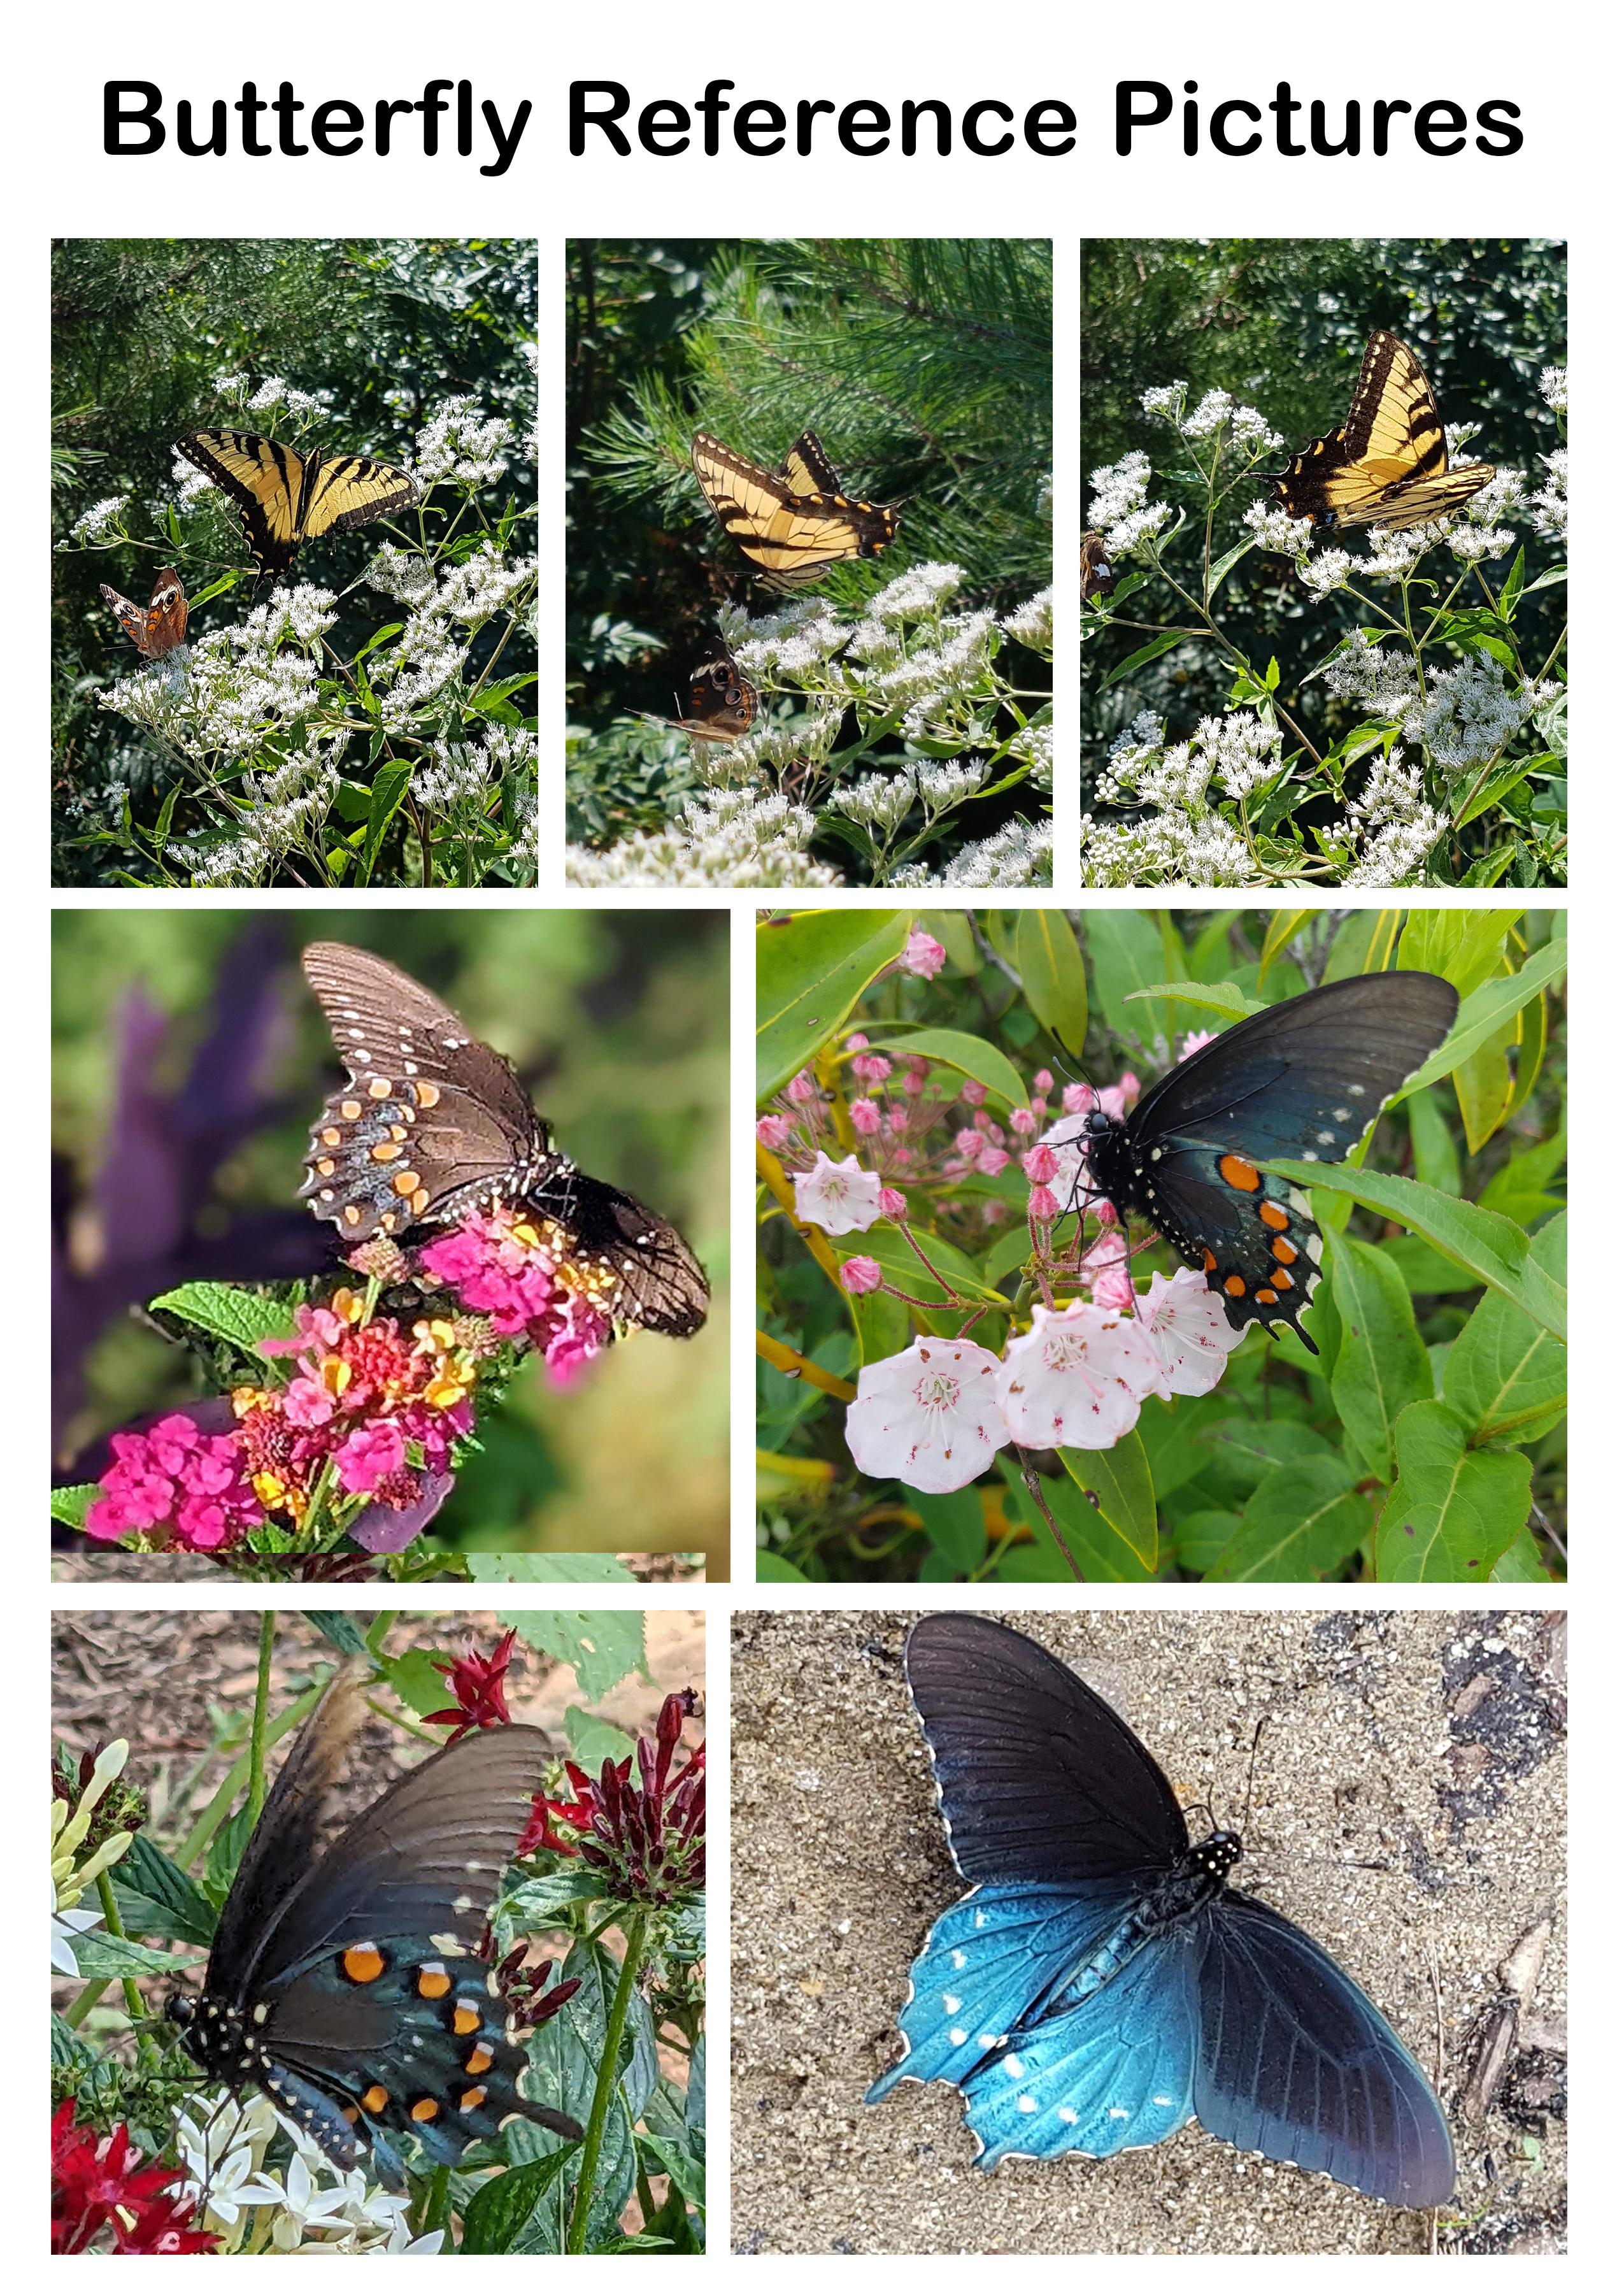
to learn in this class. I've chosen to draw a butterfly and we'll try to make it as
simple as possible. And one thing I want to focus on is getting the
butterfly symmetrical. So we want the right wing
on the right side of the butterfly to look
identical as the left. And this technique will help us to produce this a symmetry. The tools that you need for
this class are very basic. You need your paper, a two B pencil, a ruler. In my case, I'll be using a T square and a triangle ruler. But all you need is a
ruler and also an eraser. And I'll also be using a five pencil for some
more shading near the end, all you really need
is a piece of paper, a roller to measure and draw straight lines
with, and a pencil. So that's what you need.
There's a list down below this video with all the details and full description of
what you might need. I also invite you to please, when you're done
with this class, leave a review and be sure
to share your work here on skill share so that all of us can see and check out
what you have done. If you have any
questions at all, please don't hesitate
to ask me and I or someone else will
be sure to help you out. One final thing is that
I'd like you to feel free to check me
out on Instagram. My page is Andy's altitude
and you can see my work, what I do on a daily
basis to finalize. And before we start
with the class, be sure to follow me here on skill share because
we'll be taking this initial sketch of a butterfly that will only
be done in black and white. And we'll be adding
color using Posco merger and the next class in part
two and then part three, we will be adding
a background with some leaves and color to the background and it
will look really cool. So be sure to stick around. In the coming weeks,
I will be uploading those in the two
portions of this class. It is now time to
start this class. Sharpen your pencil and
let the class begin.
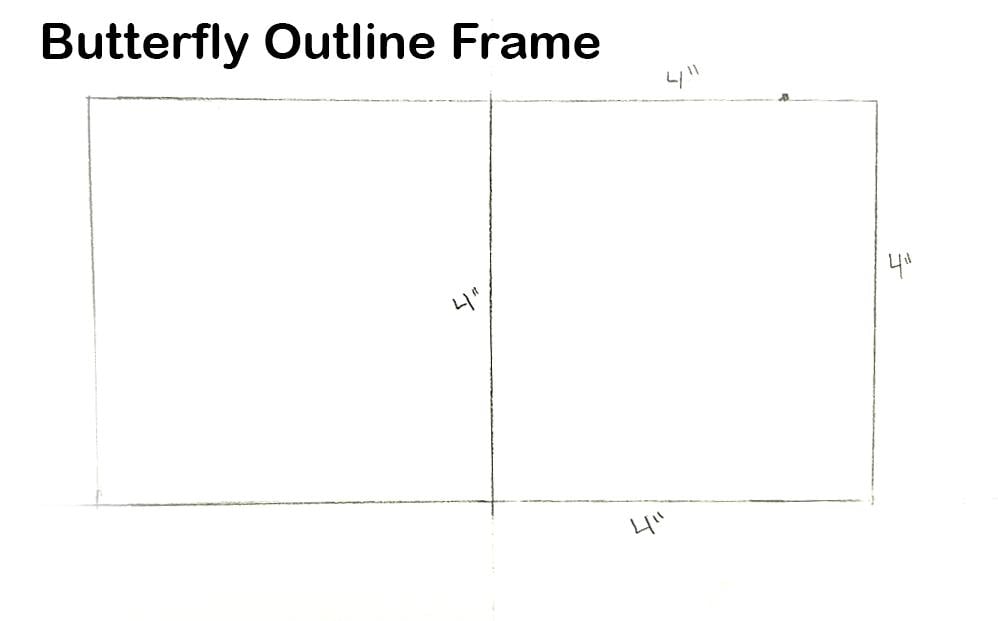
2. Drawing the Rectangle: Alright, welcome to
this first lesson of this butterfly drawing pass. So we're gonna start out
pro in our plank of phi. And to begin, what I need is
a pencil, graphite pencil. So I have this one
which is a to B pencil, and I also have my
t-square ruler. So these will be
two things I need. I also need a, I like to use a triangle. So this isn't necessary,
but it taught it. I like to have
when I am drawing. Okay. So what we'll
do is we'll start out by drawing a rectangle. And the initial thing that we have to do is go
with our roller, are going to come in here
and draw from pretty much from the top of our
scene to the bottom. So we'll have our router placed horizontally and about in
the middle of our scene. And we'll draw a vertical line. That's our first line. So now we'll switch over to our t square and we're
going to come in here and draw all the way
across from about here. We want to have an A4 distance. Just drawing an initial nine. So I just drew this time random. I didn't measure it or anything. So I may need to do is I want to have it even on either side
of this horizontal line. I want to have it even. So what I think I need to do is extend it on the
left-hand side of it. And then I'll measure
out showing what I measured out in equal distance
on the left and the right. Okay. So I measured
at 4 " from here, the middle, and from the
middle out to the side 4 ". So now I'll take my ruler
and draw a line straight up. And I measured up about 4 ". It can be more, but
for my scene here, I chose 4 " because remember, when you're drawing a
rectangle to start out with. And then I will connect
these two ions here. Okay, so that's my first sketch. I will now take my
kneadable eraser and erase some of this
excess and shorelines. Okay, so there's our rectangle. You may see that, oh, these two boxes, we don't
want to worry about that. But we knew when to
think about is how these all form a rectangle. We want it to me
longer than it is tall
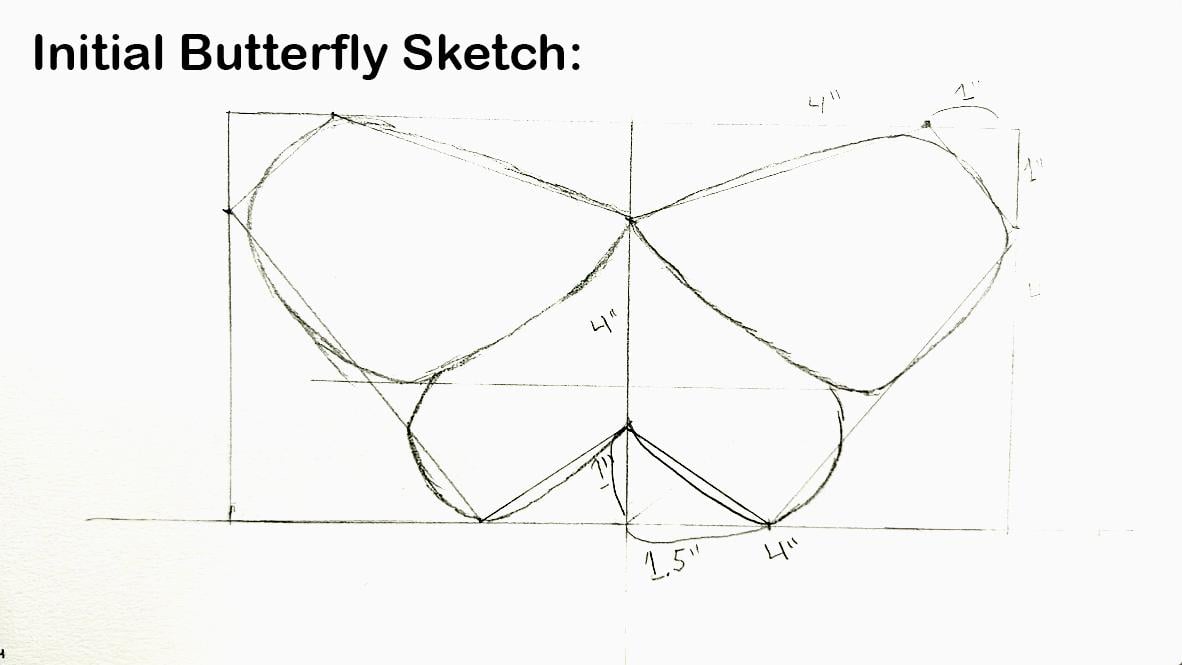
3. Initial Outline: Okay, so now we're
going to start drawing the right Wing
of our Butterfly. And what I'm going to do
is measure over about, let's say an inch
from the far side. So from up here on
measure over an inch. And I'll add a little mark at the top so that we remember all of these lines are
four by four by four. And this piece here is 1 ". Okay? So I'll will also
measure down from here, down, down 1 " from the top middle. So tau and measure down an inch. Alright, so we'll go
in with our router, straight edge and we will
draw a straight line. These two marks
that we just did, like so K and then we will also measure down from
that outer corner, will go down an inch mark there and then connect
these two points. Next, we will draw
from this point here, which is about 1 " down. Okay? So next what we'll do is we're going to measure
over from the middle, bottom over, right, an inch. Actually, let's make
that an inch and a half. So next claim or trough from here at this point to this
inch and a half mark at the bottom where it getting data because I
think that we're starting to see the formation of a lean. Next thing we'll do
is we'll measure from the bottom needle up 1 " mark because they're and we will
connect these two points. Okay. So there's our first Wing. So you some may say, well, it's very angular. V0 squared needs to be soft. I can butterfly wing.
We're getting there. In the next video, we will start rounding this off
4. Right Wing & Left Wing: Okay, so we're
going to start with our upper wing and
we'll sketch it in. So we'll kind of, what
we're gonna do is you use these shape that we just
added as a basic frame. How we may go out of it
other ways a little bit, but will basically stick to
this outline for our wing. So I'm going to start
out up here, the top. Have a Bit of a curve
out of my Wing and the ways from going
out of my frame. I come back in adding a curve out and earn a wage. Here. I'll stop about halfway down segment and I will
come back up here. And that's my upper waiting. Now I need to add in the
doorway of our butterfly. So I'll come right in here and start drawing the lower weight. So there's our first
basic Wing, LP. You see how he use
these guides that were true at the
beginning as a frame. So we did the come out of them, out of these ions. They came into the
line state in. We just use them
as a basic guide. But there's a Vout is
to be able to track wherever you went are
Wing to be the size. And it'll also allow us to added the wing on the left side, left hand wing, Ms. Same manner and have
them mirror image. So let's do that now. So what I'll do is
I'll just transfer these 123 points over to this side of our,
of our butterfly. So I'll just go and map them in. I know how much space I need. So I'll just transfer this over. One thing I want
to note is where this way this spot
indentation is. So what I'll do is Howard, I admire T-Square up and Drawing Guide on this little
indentation straight over. And they will, I
find out where this indentation typical
on the left side. Okay, so here's our initial
sketch of our butterfly. You see how we did a good job of transferring his right side, having basically an air
mirror image on the left. So now what I'll
do is clean up and Eraser many straight lines. Also the nodes
around I have around here and the route swiping,
get rid of all that
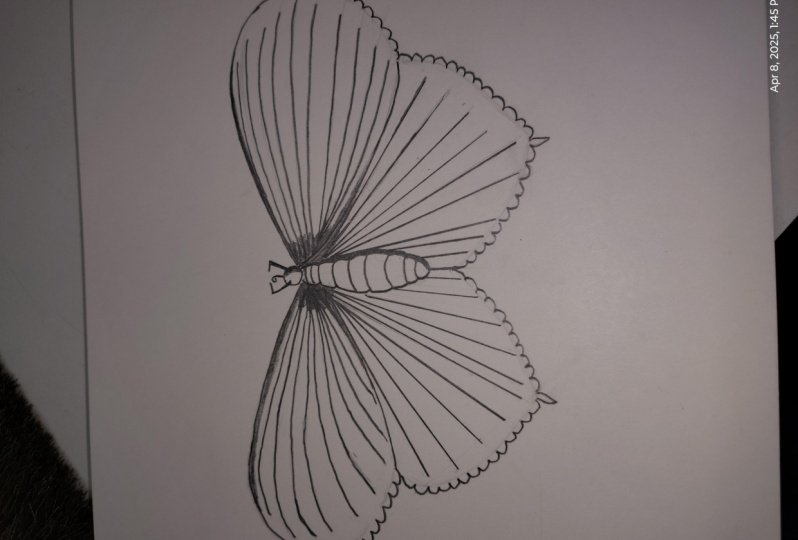
5. Adding Details to the Wings: Okay, so I've
lightened up by nine. I'm now going to go in and redraw some of the
outline with the Wings. I'm going into find them more and I will add
some more details. So for example, on
this outer edge of the upper wing and outer
edge of the lower wing, I'm going to add a bit of a bumps that may seem a reference photo
of this Butterfly. Okay, and you may have
noticed that when I erase the outer square and
other kinds and numbers, I also erased and Bit of the butterfly just to
get rid of some of that initial pencil sketch
without erasing them. Butterfly all the way. I just wanted to lighten
it so that I got to come back now and added
details that I want. So I'll come in in
the middle now, and I'll add the body. Add Villon a colored on
this middle center line. And I can see visibly adding an initial long
oval and you could say Florida and my secondary one. And then that's top will have
add one just like another. I know come on the body and add base at all arching lines. I'm going to come
back to the rest of the wing and redefine
some of the edges. Okay, so there's our Butterfly. What we'll do now is at a few more details such
as antenna and some of the lines on the
body out for the Wings. I shouldn't say they come out as if they were coming from body, come out, out like this. And it's coming from the
upper side of the wing, upper wing and the lower weight. So let me demonstrate. So for this and over
Wing was tried out here. Some lines that chain away, left off and become. So this is the basic
idea that we want to do. Now, I'll just the same
thing on the right side. And we will also
add the antenna. And for the antenna, they come out of the
head. And I got online. And then they in
other ways like that. I'll and then in
and for the tongue, which she had an
arching guide. And then
6. A Bit of Shading: Okay, In this segment, what I wanted to go in with
a mid of a softer pencil. So you use a 5B and
it's a bit darker. And I went into find
some of the edges and some of the line so they
stand out a bit more. So they will look a
bit different and give our Butterfly some more
light sort out startup, my tubing is going
wrong where the upper and lower wing divide,
playing around there. I'm going somewhere
that add some of them fatty matching of Shading here and upper side
with the wing. Some interesting texture. Thanks and I'll shade
in instead of our, and everybody are not going
to take this too far, too much Shading because
they went to my loudest. Leave this to be able to be
added color to later on.
7. Review: Alright, so that's going to wrap up our butterfly drawing. The first part of
it, at least what we've done is we've
sketched it out. We have our nice little drawing of and using our basic form and then working towards
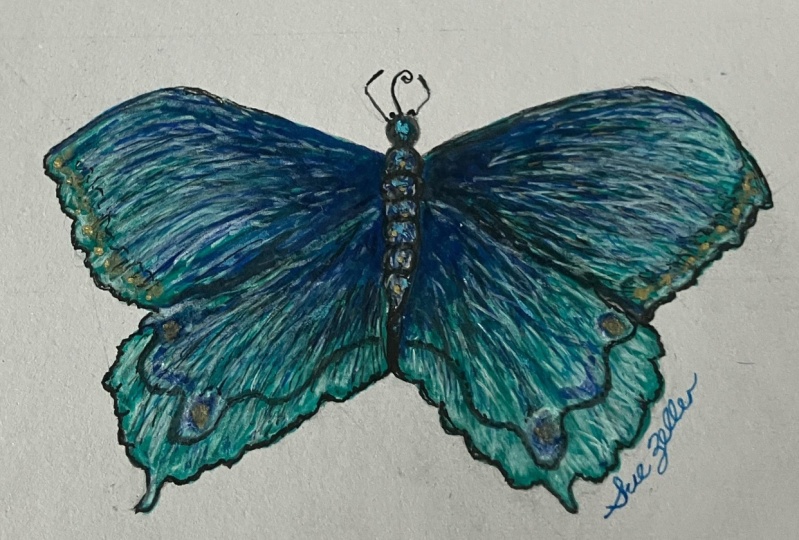
a more complex structure. So the next classes we will learn to add color
to our butterfly. And then we'll also add some
detail to the background. So I encourage you
to stay tuned. Please follow me here on SkillShare and you'll be
notified when I helped out the next classes
where we will be adding color to this butterfly and
really bringing it to life. So I hope you stay tuned. Please feel free to share this class and share
with your friends anyone who likes
butterflies when the future will be adding
some leaves around it, as well as color here
on the background. And of course, like I said, we'll be coloring
in the butterfly. So Animal been using
Posca markers. So that'll be another FUN. Alright, see you
in the next video.
8. Outro for SkillShare: Thank you so much for watching. I really hope you enjoyed this class and we're able
to learn something from it. Please feel free to post a
picture of your drawing below this class so that
all of us here on Sco chair can see what you did. If you have any questions, don't hesitate to start a discussion in the discussions
tab below this video, and I will be happy to
answer your questions. Well, if you would
like to support me, please check out my website at www.andartitude.com
And feel free to visit me on Instagram and
Facebook where you can see daily updates of my artwork
at Andy's attitude. Stick around here on
Skillshare and follow me because in the coming weeks I will be uploading
more classes. That's been it for now. I hope you have a wonderful day. See you in the next class.
 Andy Villon, Fine Artist