Transcripts
1. Welcome to another wonderful class: One, welcome to another
wonderful painting course. In today's course, you
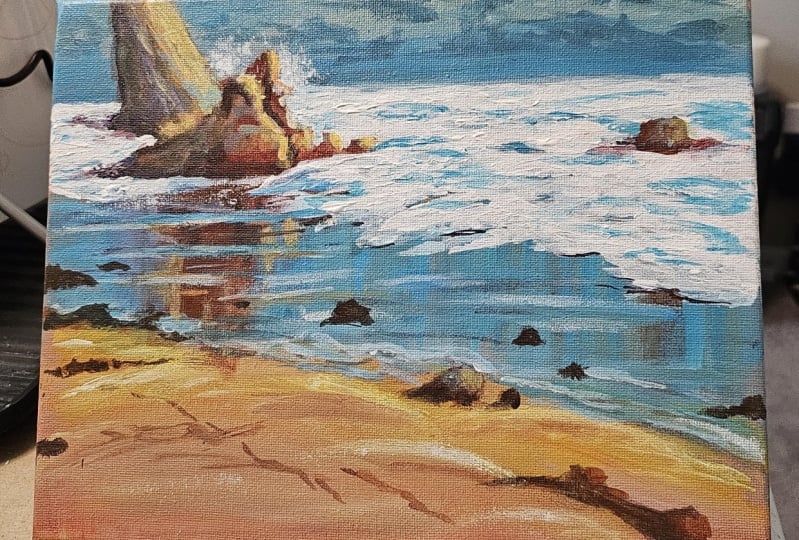
will learn how to make this seascape with
beautiful waves and rocks. This artwork might
seem complicated. However, you will have
step by step encouragement and guidance to be able to
create a successful seascape. Hi, my name is
George, and I've been a professional artist
for over 11 years. Five years ago, I
fell in love with teaching both online
and in person classes. With more than 20,000 students, both children and adults, I've developed this
interesting way of teaching that focuses
on the project and on having fun. In this class, you
will learn how to play with interesting colors, creating textures and
wonderful reflections. Don't worry, if you don't
have any experience painting, this class is specifically
designed to walk you through all the steps in order to achieve
an amazing result. And have a great time
learning about materials, mark making, perspective, and
even beautiful reflections. Focusing on the big picture, as well as the small details, you will be able to create an amazing painting by
the end of this course. If that sounds like
something you want to do, let's jump into the course.
2. Materials needed: When welcome to another
beautiful course. In today's course, we will
be painting a sea scape. It will have some
beautiful reflections on the lower side. And we will take
some shortcuts to make this easier to paint. And for that to be the case, you will need some materials. This is a canvas, 30
by 40 centimeters. You will need a big brush, and you will also need
a medium flat brush, a big flat brush. And a small flat brush. You will need some
water, and of course, a mixing plate, as
well as acrylic paint. This is Amsterdam acrylic paint, titanium white, brilliant blue. This is brilliant
blue, Carmine red, Burnt umber, also known
as brown and yellow, this is Azo yellow medium, but you can use lemon
yellow as well. This is just a yellow
that has a bit more red into it. Okay.
3. Fast brown wash: First step, we're going to do a, a brown wash everywhere. This is just so we stain the
canvas because the white of the canvas is way too strong and it makes us paint darker. So if we have some brown and the big flat brush
with a tiny bit of water, We can add more water to
lubricate this beautiful color. It's too intense. You can add water onto the canvas as well. And just take all of this beautiful paint and
spread it around quickly. You don't need to be very
careful when doing this. You can go with side to
side motion, top down. It doesn't really matter.
You can go with swirls. And I like to go
with something that doesn't make a lot
of sound and also doesn't leave a lot of these hairs onto
the actual canvas. A bit more water, water it down. It will absorb very
fast into the canvas, and plus, you don't have
to wait for it to dry. You can either dampen
it with a paper towel. I forgot to mention that you
also need some paper towels. Okay. And now let's
go from side to side, just to spread some of
that water to the side. So it drips down, so it paints the
edges as well a bit. Okay. Perfect. Once you do that, you will need to start drawing like a painter.
4. Erasing like a painter: And drawing like a painter means taking some beautiful napkins. And let's delineate a
beautiful horizon line. Well, that's curved. I'm going to need to make it
a bit lower on this side. And it is a bit crooked. So I'm just going to make
it a bit more like this. Perfect. Now you can indicate some clouds by adding
a bit of this. And in case you took
all of that brown over. You can get some from
a wet part and add it over just to indicate this
beautiful horizon line. You can do it once
again if you want. Okay. It's still crooked. You need to fix it
with the brush. It's way better to fix
it with the brush. Perfect. You can add
more clouds if you want. Don't worry about
this stain over here. You can go over it. This stage is very playful and easy to do. Let's clean up the table a
bit just so it doesn't stain. Okay. Let's add some more
brown at the bottom.
5. Drawing like a painter: And picking up the medium brush. This time with a bit more color. It still has some
water over here, but a bit more color. And let's start
making some rocks. And we're going
to basically have a rock right over
here as a line. You need more color in
case it's too transparent. This is a very good
concept in painting, which is thick over thin. The more color you
have in your brush, the easier it is to
paint over wet areas. I'm going to focus a bit
on taking off these hairs, just so they don't end up
in the finished painting. It's way easier to pick them up with the side of
the brush like this, especially a brush like that, a big flat brush that is
from the hardware store. And start with a line just
over here, and then another. We're basically drawing
the bottom of the rocks. Add another line as
if it's a step like this and another smaller
one just over here. So it's a triple step. Make this one longer. Of course, let's start
making the beautiful rock. Use the brush on its
side and start carving out very geometric shapes. Just like that.
And then going and adding some di Notice
that these are two equal. So we're going to need
to rise this up a bit more adding it a bit more angular and cutting
this one a bit. Let's make it pointy. Okay. You can also trick your brain into making
more organic things by just going and adding different lines in
different places. So that your brain
doesn't have the time to really focus on the
whole situation. So notice this one is tall, maybe a bit taller, and then you can go ahead
and combine these with some beautiful lines,
geometric lines. Notice how these ones
are way better only because I tricked my brain
into making these shapes. So these are basically
like three rocks, and you can also fill them in just to have a
bit more color. And this is a time to add
a bit more to the bottom. And also, you can refine some of the edges. Okay.
6. Understanding reflections: Going to learn a bit about reflection just now because it's a cheap and easy way to
learn about reflection. You've added this
color here if we delineate the reflection
side of the beach, we're going to actually
go on a diagonal. And we're going
to also delineate the waves just about
here as a straight line, and maybe they curve
a bit over here, just to add more
interest to that point. Now, to add reflections
is very simple, and it's easier to
understand with brown. You added some brown. This is the area where it will reflect. So you will need to
just drag some brown, add more, drag some
brown just until here, even though the
reflection ends here. You've dragged some brown, these are smaller reflections. Notice how they
end up about here. But reflections are very
long because you are looking at a plane that
is going that way. Okay. Let's add some more
rocks now to the side, just over here, and
maybe a shadow casted. Maybe it's a shadow just being casted over here
because the light, we're going to set
the light to go from the right side this time. And let's make a rock
behind this one. Just going out.
Let's make it go out of the whole situation,
the whole thing. Remember to add angular things. You can also start to
make bigger shapes. Don't touch the other rock just so you know where it ends. You can make bigger shapes
and longer lines and then add some wibble wibble or some angles afterwards,
some more angles. It's easier that way. Okay. And maybe it has a shadow just over
here on the left side. And to balance out
the composition, we will need a rock
about let's say here. A simple rock, just
a simple, easy rock. You can do it with angles, just like this, one, two, three, four, five, and six. It's like a hat, but this
one is a shadow, actually. Let's add a bit
more texture to it, a bit more working
on those shapes. I don't like this shape
over here, so let's cut it. You can also cut this one. Let's add more brown over here, and also because this one has it's tall and it has
a reflection as well. You can do that as well. Let's also indicate some
rocks in the lower part, just about here in the water
and make them as a line, just to break that
monotony monotony. And let's add another one just
about here and the shadow, and let's go with the lines with a beautiful
line that goes that way. And let's redo the
reflection line, which will be about here. Okay. One thing to notice and to really pay
attention is that usually, large objects have the
deepest shadow right where it meets ground or the contact. So this will be the shadow, and the light will
be on the left side, just a sliver of light. I will be very interesting
to draw these. And you can accentuate
that the fact that these are other rocks by making that
staircase once again. And let's make another
smaller one here. Perfect. Now, in the next
step for the next step, you're going to need to really
let this dry completely. You have the drawing now. And it's going to seem
like you're going to go over and ruin these drawings. But it's not going to happen. You're just going to paint
a sky, a beautiful sky. And try to get over it a bit just so you have enough space to make these rocks over the sky. Because when you
paint something over, it looks better,
it creates edges, and it seems like it's closer
to us because the edge is the paint just goes
over the background. So you send the signal to the eye to the viewer that
this is in the foreground, and that is in the background.
7. Stormy sky: Basically use a hair
dryer to dry it faster. Don't worry about these signs. It's just water that was going
away from the air dryer. So basically, you can use an air dryer to
dry certain parts. This is what happened over here. There was a lot of water and
it just spilled everywhere, but it doesn't really matter. We've lost the reflection line
and a few of these rocks. So let's paint them again. Just going. Maybe yours are not. Gone. But mine are. So I'm going to add them again. And the shadow side. I shouldn't have done that because I'm going
to paint there. Let's erase it. Let's take a paper napkin and take
out some of that color. For the sky color, we will need some
blue, of course. So white. Purposefully leaving some space in between them
so I can mix them together. Be careful not to mix a
lot of the color. At once. You need to gradually
add more as you go. Let's actually use the small
brush and taking some white. It has a bit of brown because of the water,
but that's good. And let's create a blue and add a tiny est
amount of yellow, and then some brown. L et's add more brown. Notice how I'm slowly
picking up some white and some blue and
then taking some brown. And I don't go into
the blue completely, and I don't go into
the white completely, so you can use it
later if you need it. I think that's almost ready. Let's add some more brown. Just needs to be
a very misty sky. So it's not so powerful. That's just about perfect. Maybe it's too dark, so
let's add some white to it. Add some more brown. Misty Misty colors more brown. You can basically test it
if you want like this. You can test it onto the
middle part of the sky. I think that's good enough. Let's take a tiny
amount of water just to make the color
glide a bit better. And start with
some line right in the middle adding this color. Go over the drawing. You can also take your finger and scrape some of that color from the
middle of the shape. Take some more color and continue to add it
right in the middle. You need to go over
the shape a bit, and then scrape
it in the middle. That's why I was
saying that you might feel like you are ruining
the drawing, but you're not. You're only creating nice
edges in between those shapes, and you can still kind of
see the whole drawing, and you have the lower
part, which is good. And let's now continue
over here, and over here. Adding a bit more color. Now let's create a different
color for the top side, which will be a bit more
yellow and a bit more light. We'll also have a bit
more brown into it. So let's add a bit of brown. Let's take some of this blue, and now white from the
side, taking some white. Test it out. It's fine
for the line over here. Let's take some water just
so it blends a bit quicker. Not a lot of water, and start doing a beautiful
line over here.
8. Reflection of the sky: This point, you might want
to just add some lines going down as a reflection. Now, be careful here
to create that edge just like the whole
rock is doing. And maybe we have a reflection
for this rock as well. Just clean up the brush
on the lower side. Don't worry too much to make
the perfect reflections yet. Just clean up the brush, just going with lines
straight up and down, and then take some more
white and a touch of yellow. And more white to make this
color more white and yellow. And let's add some swivels,
some little swivels, to create some
interesting cloud shapes at the top of the canvas. Maybe on this side, they
are a bit more calm. Okay. Be careful to paint let's
erase some of that. Can also take some water with another brush and
brush it over to have, but don't brush it to the edge. You still want
some of that edge. Let's take some of this
blue and add it over here and maybe over here to
create a bit of variety. Now, cleaning up the brush, go a bit higher than you need. Even though the line
might be around here. Let's take some water
to make it glide. Take some blue, some of the original blue if
you still have it, if not recreate it. And if you cannot
recreate it completely, you can also add, let's actually do that. Let's add some more blue into
it and a touch of brown. And it's not perfectly the same, so you need to add it
to the sky as well. Let's check if this
horizon line is straight. Kind of. It needs to be
a bit lower over here. Okay. Can also erase some
of this color if you want. It's not really needed. And then clean up the brush to just add some of
this color over. Don't blend it too much. It's very good to have
these lines going down. Leave a little bit of
a space over here for this rock to be
reflected and go a bit lower as well below
the line of reflection. This will be very
important by the end. Also go a bit inside of the
reflection of the rocks. Clean up the brush,
take a bit more color, And now a bit of
this lighter color. If you don't have it,
you can recreate it. Also, you can add it at
the top if it's different. In my case it is. You
can add it at the top. Let's add some
textures to the sky. Let's add a bit more white. That's super easy to do, adding a bit more
white just to add this color over here before you put it into the reflection. Okay? And maybe over here, making some beautiful dabs of paint and then
brushing them over, making some dabs of paint, taking some more
of this color and starting to add some
of these lines. You can also do a bit of a finer line by going
to the side like this. And I forgot to leave this. You can also trick
the viewer into thinking that things
are a bit more interesting by
having a bit more of a lighter color near the
reflection of the rocks. Let's go a bit higher here. And let's go down, add a bit of water
to blend it a bit and make it a bit more glider. And over here, let's
add a bit more. Let's take some of that blue. Just play around
with some colors. I picked up some white, but that's fine
because the water makes it blend a bit better. Be careful to have some lines. Like, notice that this is blue, this is white, this is
green. Well, the green. It's not really green, but
go a bit higher than you need because you need those edges to come over
the reflection sides. I'm just cleaning
up the brush onto the sides of the canvas and also noticing that there is a bit
of white still showing here. So let's blend that color in and in case you don't have it,
you don't have to do this. Blending it in. Perfect. Now, a deeper color, a deeper blue color with brown
and blue. Blue and brown. In case your colors
don't look like this, you can add another, ask yourself what color would bring it more to this
kind of a color? If the answer is blue or brown, which is usually the case, you can just add a bit more
blue, a bit more brown. But also, you can
add some white. Okay. And now, right here, we're going to add some shadows just to make this sky a
bit more interesting. Notice how it really pops and
some lines at the bottom. The further it goes,
the lines become a lot more fine and small. Dabbing your finger to create
some textures here as well, create some beautiful skies and lowering making some
lines on the lower side. And we're basically needing
to make this area a bit more busy because it balances
out the whole composition, because we have
these rocks here, and we need a bit
of something here, so the weight of the composition
is perfectly aligned. Think of it as a scale. If you have a lot
of things here, you need to put some things here or take some of these away. Perfect. Now, that's
all for this step. Let's fix some of this. And for the next step, you don't need to
let the paint dry. You just need to clean
the brush by swirling, taking a paper napkin and
doing not a great job. You don't have to completely
clean up the brush, and let's go into the next step.
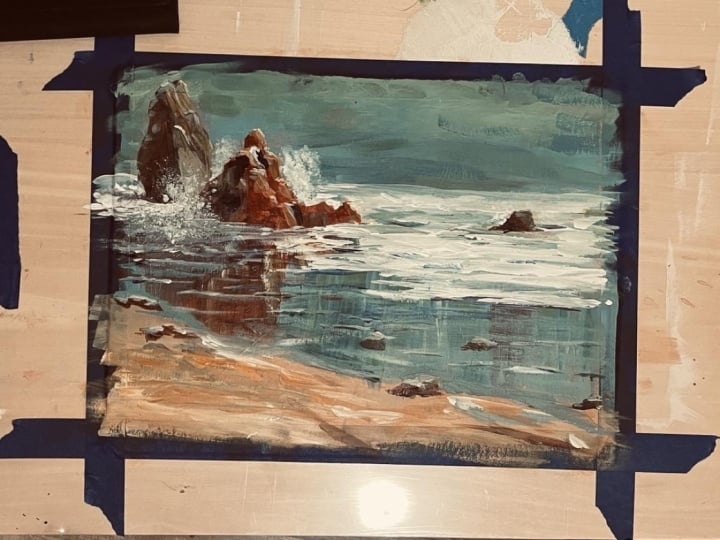
9. Central rock: For this next step,
you will play around with some red and some brown and some yellow to
make the rocks once again. It doesn't need to be dry. In fact, it's way
better if the sky and the reflections
are still visible. Okay? Taking some red and some brown I know it might seem
to red, but that's fine. Let's start in the
middle of the shape. It has a bit of water, so
it glides a bit better. And now focusing on the
shapes, the outlines, and it's good because
in case you didn't like something that was
like over there, you can do them. Make them nicer. Perfect. Just fill in the shape and focus in a bit
more on the edges. Okay? Since you added
this color over here, you might as well just
do some reflections, just going down with some lines, and over on this side. Doing some lines, and
then brushing it with your finger just to bring
it a bit into the blue. Okay? After you brushed it, you can add a bit
more color on top, and let's do some
more color over here to make this rock and this one as
well, and this one. These are not connected. There are three different rocks at three different heights. So to indicate that, add some blue to this
color to make it a bit darker and some brown
to make it even darker. And a touch more blue. The blue will really
make it a bit more dark, especially if you have a
different type of blue, it can make a really,
really deep dark. Remember that the darkest
area is right where the rock touches the
surface of the water. The object touches the
surface of the water, also on the left side a bit since the light
comes from here. Let's add some more of
this color over here. Indicating this beautiful rock, and let's touch some
of this rock as well. And this line over here just
to have it more visible. And since we have this color, we might as well just add it over on this side
of the reflection.
10. Creating distance: Now, for this color, for this rock, if it's further
away, it's more misty. It's more bluish. It picks up more
of the sky color. So you're going to need
to take this color and add some of the
sky color into it. Just that blue and mix it in. Add a touch of white just
to make it even more misty. And you can start to add it
onto the If it's too blue, don't worry, you can always
add more brown later. Let's recreate it. Like this. You can add some of this blue as a reflection on the underside
onto the shadow side of this creating more
color variety and picking up some of that brown so you can add it over here. And because this is
a different color, you can go and edit
some of those edges a bit more interesting. Notice how the whole situation with the edge is much
more interesting now, because you are
painting over the sky. Okay? And let's add
a tiny amount of white to this some
red and some yellow. Okay. Once you do that, you can go on to the
left side just a bit. It picks up a bit more of
this sky color onto the left. Don't worry if it's
too blue. It's fine. Okay. And of course, you can add this color
onto the left side of this rock as well. Perfect.
11. Sandy colors: Now, let's create
some sandy colors. We are going to do that by adding some yellow and some red, making an orange,
quite a bit of it. It's a greenish
orange. It's fine. Let's take some water
to make it glide a bit. It's a beautiful
yellowish color. And let's paint over this
area with this color. And as you go, you might want to take some water and
a touch of red, just a tiny amount of red to make it more red or a
tiny amount of yellow, if it's too yellow or too red. It changing the hue a bit
with some beautiful red. And we're going to
actually change the hue with some yellow
and some white as well as we go along and add some water to make
it glide a bit better. The bigger brush is better here. Okay. Let's take some more
of that color and add it. It creates better
textures, the big brush. It creates more sandy textures, focusing on just covering up all the wash that
you did with the brown. You can notice that
this seems so dark, even though it has a wash and
just focusing on that line. That's why you have
to go a bit lower because now it has some of that blue
underneath, which is nice. I covered this rock. So let's paint it again. But that's fine because
it gets some of that yellow back
in in this line. Okay. Let's add a touch of
yellow. Maybe that's too much. Touch adding a few dabs
and a touch more red. Red is more powerful
than the yellow, so you need to be careful a bit. Let's drag some of these
textures down over here just to make them more
interesting. Drag slice. Drag, s, drag. Well, drag, slice and it creates a bit
more interesting texture. Don't forget to
paint on the edge. It's really important if you
don't frame the painting. I picked some of that blue, so that gave me a
beautiful idea to just add some of this
blue into the color, making it a bit more muted. Just a tiny bit more
muted and greenish. Okay? And now it's
time for the white. It has a bit of blue
into it, but it's fine. Let's add some
white over here and over here and start
just blending it a bit. Don't worry if it's too white. Just try to keep some of the
color that's underneath, and then take some more yellow onto the
edge and create it. Create this beautiful color. Let's take some of that sand
color, put it over top. Some of that red, too much red. Definitely too much red. Let's clean up the brush, and L et's blend it in a bit, and then take some yellow, get over it, paint over it. And let's pick up
some of the hairs. You pick up hairs
by going like this. And if you need to not damage the area,
you just go like this. Okay. And once you do that, you can add some water just a tiny amount of
water to blend the edges. Blend the edges a
bit into the blue. With this water, it makes
it glide a bit better, and it makes it blend with
the blue right on the edge. This will make the
reflections look way better in the later stages. Okay. Let's add the
beautiful rock, once again, this time, a bit more careful, simple little rock, and
a simple little line. And there you go. That's
all for this step.
12. Light on the rocks: Til now you've
learned how to draw with a beautiful
wash with a napkin, make some horizon lines. You've learned how
to make a simple, beautiful sky and go
over the objects, just to build better edges, more clearly defined edges. And the fact that if you build the object last that
is closer to you, then of course, the edges will make it seem like
it's closer to you. So if you go back
with the sky color, it's going to seem as if
the sky is over the object. Now, in this painting, you've also learned
about reflections, how to make them very simple and easy by adding the colors that are above the
reflections on the water, but this applies to every
object that reflects things. You can add the colors around
it to make it reflect. And you've learned
how to draw with the brush on these rocks. You've learned how
to make rocks. And you cheated a bit the whole composition by making almost half of it just
this sandy color. So you don't have
to paint this area, and you basically don't have
to paint this area as well. That much is just lines, and this one is just
lines like this. And then just a few
reflections will be great. And we're basically
forcing the viewer to look in this area over here, and we're going to make some
beautiful waves around here. Okay. So for this step, you will need the brush, the medium brush, you will
need to clean it a bit. And you will need some area where you can make a
beautiful orange color. Just a beautiful intense orange, a bit more yellow. It's a bit more
towards the yellow. Okay. And these will be the
highlights on the rocks. Like, let's start with
this rock over here. And every highlight
will be on the left, except for some on the right. And let's add just
some cuts going around the shape of the rock, being very careful to edit as we go along just on the left side. Don't worry, these are not
the final reflections. Let's also add in the middle just over here as if this rock continues onto the lower
part dividing it up. Okay. If you are not
comfortable with this big one with
this big brush, you can use the smaller one. Let's add some reflections here. Well, some highlights
over on this side. Okay. Now, clean up the brush a bit. You can also add some
of this color onto the sandy beautiful things. And remember, if you put
some of this color here, you might need to put it over here as well as a reflection. Just a tiny bit, just barely touching to clean up the brush. Take a bit of water
on the corner, and let's start to make this
highlight over here as well. Slowly adding some
highlights and on the edge connecting them. Okay. Let's take
some more color and add a bit of a more
intense highlight. You are using
transparent colors, so you are using this
color in conjunction with some water to just make it blend a bit more with the rock. Notice how this is too straight. So to break that, you can go a bit
inside over here and a bit outside over there, and notice how instantly
it became very nice. And also inside of the shape, we can go a bit nicer. You can also dab
with your finger to create some textures. And of course, let's
add some highlights to bring forth this rock. So we're basically now adding
some rocks over here and building the actual outline
of this brown rock. So these are just
rocks in the distance, and they are You are basically fixing the edge of this rock. Notice how much more
beautiful it looks now. Let's add some blue and
some white to this color. This is just going
to reflect the sky. It's going to make it much
nicer and reflect the sky. So basically, some of the
faces of the rocks that are just hitting the light
from the sky from above. So over here, it's too yellow, too orange. It needs more blue. This will integrate
the rocks a bit more because it will have a
bit of the sky color. And you can go over a bit of that highlight a bit of
that interesting highlight. Maybe there is
another one here and another face just
going like that. And over here. And maybe
this one has a bit more. And let's add some of
this color over here. And on this rock, you can go a bit more intense with this turquoise highlight. It just integrates
the whole rock a bit more onto the background. Just harmonizes the
colors because it's a bridge between the sky
color and this color. And just because we
have this color, we might as well just add it as lines wherever we see
some of the exposed canvas, If it's too much
of a orange color, you can add some blue
to it and add it over And then clean up the
brush with some water, put the edge of the
brush onto the cup, and then you can blend it a bit to make it more integrated. And just because it's fun. You can also add it over here. And if you have the wasah, you can also go a bit onto the orange to cut it out a bit. Okay. And once you do that, you can also take some water Oh. Take some brown,
just a bit of brown. And like you did in the
beginning of the course. Let's make a wash over
this area just to make this beautiful rock a
bit more dark and brown. Let's add a bit more brown. And add a tiny bit more brown. It integrates it
more into the whole. It makes it more brown and
more different than the sky. Don't worry about the textures. You can go like this and add some more textures as well
with the finger. Okay.
13. Stronger highlights: It seems like we need some
stronger highlights now, cleaning up the brush,
taking some yellow, and adding some tiny
amount of red into it. Once you do that, you
can pick some white, just a tiny amount of white. Be careful not to
pick any of the blue. If you need, you can
clean up the palette. Okay? This is a very
intense highlight. So going over these colors, if it's too white and
too light, that's fine. You can always go
with a wash just like you did with the
brown to change its color. And in fact, that's actually
very purposefully good. You can do it to add
just a few touches. Notice how this is over the orange trying not to
cover all the orange. Let's add some of
this color over here. Not too much. Just a bit. And then try to blend it a bit, so it's more hazy. Okay? Now, let's do some beautiful reflections
onto the shadow sides. Let's take some red and mix it over this yellow to
create an orange. This is going to
be an orange wash. Let's clean up that
water from this. You don't need a lot of water. And let's build some
reflected light onto the beautiful rocks
right over here. Okay? It's going to dry a
bit more transparent, so it's going to look
better and better. Now, for the next step, you
don't need to let it dry. You only need some brown, a touch of water and go over
some of these reflections, just a tiny bit, and maybe over here to build that
brown once again, make it darker at the bottom. And this one as well, a bit darker on the bottom. Clean up some of that
brush onto the reflection, and also take some water onto
the brown to just go down. And build this reflection
of this rock over here. Take a bit more brown
just to be able to make this different reflection
onto this side as well nicer. Since we have this
beautiful brown, you can go over this
rock and this rock again and maybe create
this line once again, let's create some rocks over it. I know it seems like
you've painted this line like five times,
but that's fine. And let's make some
smaller things just around this area,
just over here. And this will build a lot of detail just with the
corner of the brush, first making this shadow, and then adding a
small little divot and maybe another one. Just about here that's bigger and one next to it over here. Maybe there are some sticks
or something like that. Let's add another one here, flat on the bottom
and rising up. And you can also add
some shadow to it. Just a tiny amount
of shadow. Okay. And let's go to the side and
make some more over here. A pile a little bit of a pile of rocks and sticks and
something like that, that is on a beach. And over here, let's
create some more lines. Don't make them perfect. This is a beach, needs to be a bit more organic, and I need to not
curve it this way, so let's create a line here that indicates that
this goes this way. Perfect. L et's actually
blur some of these. We can also paint over
them at some point. Okay. And that's
all for this step. You can let it try
completely. It's not needed. We're going to focus
on the beautiful waves in the next step. And then going back to the
reflections and everything else to finish up the painting in just about a few minutes.
14. Adding vibrancy: Now you've learned
about reflections, reflected light,
and we're going to build upon that concept
a bit more in this step. And for the next step, you will need not for this
one, but for the next step, you'll need either a clean
pellet or a new one. So just to save a bit of time, I'm going to use a new one and clean both of
them at the end. Okay. And let's take
the medium brush, take some blue, mix it
over here with some white. And a bit of yellow. Look at this beautiful color. And now you can use it right
around here to build some of this beautiful sea foam and create an edge
around the rock, making it a bit more nice. Add some of this
color over here, and just because you
have this color, you can also create some
beautiful reflections with it. Don't worry if it's too intense. You can also add a trick, which is to add some of this color right next
to the dark areas, just a little bit onto
the darker areas. Clean up the brush, and
slice with the brush on the water container and just soften this edge over here by adding some of
this reflection light, and be careful not
to go into the sky. If you did, you can
just add it like that. And then blend it
in to the rock. Once you've done that, you can go ahead and add more blue to this color more blue and start adding some lines with this newly found color and over here onto the reflections
and add some water. Slice it with the brush
onto the side of the cup. And you can start to add some
of the color at the bottom this wash at the bottom
of the beautiful sky. You can also take
some more water and some more color from
here and add a bit more into this to bring up more vibrancy and create
more harmony in the painting. You can also go and wash
some of these reflections. And now let's recreate
the sky color with blue, brown, yellow, too much yellow, and a bit more brown. Now, white Is that good
enough? I think so. Yeah. And let's go over some of these reflections so that
we dampen them up a bit. So they are not so
intense the white ones. And you are also creating
some interesting play. You can add some of this
color as lines over here and on the sky
color. That's to brown. Let's mix it. Let's
add a bit more white, and let's add it
to the sky color. And now let's go back to a
vibrant wash of blue, yellow. A bit more blue, and
the touch of white. Maybe a bit more blue. And let's add it
first over here. It's a bit darker. And let's add some more lines going
into the reflections. Let's add some of
this reflection color onto the actual side
of the reflection. You can go a bit lower as always and then
go back and forth. And to the shoreline, we're going to do
the shoreline a bit more intensely. Okay. So more blue and a bit of white, just to make a bit of a more interesting bluish
color, add some water, and let's go over this brownish
color to just blend it in to the whole situation,
the whole sky. Not everywhere, in a few spaces to bring some of that vibrancy. You can also take
with the corner of the brush and then brush
it onto the mixing plate and add some of this blue up again and add some of
this over the washes, so the washes are
even more intense. Let's blend a bit more
of this into the sky, just going over the
edge to blend it with this wash. And over here, there is a bit of a bit
of the canvas showing. Perfect. Now, for the next step, you will need a fresh
pellet and a clean brush. This brush. Let's just
clean it beforehand. You don't need to wait
for the paint to dry. In fact, it's way better
if it doesn't dry.
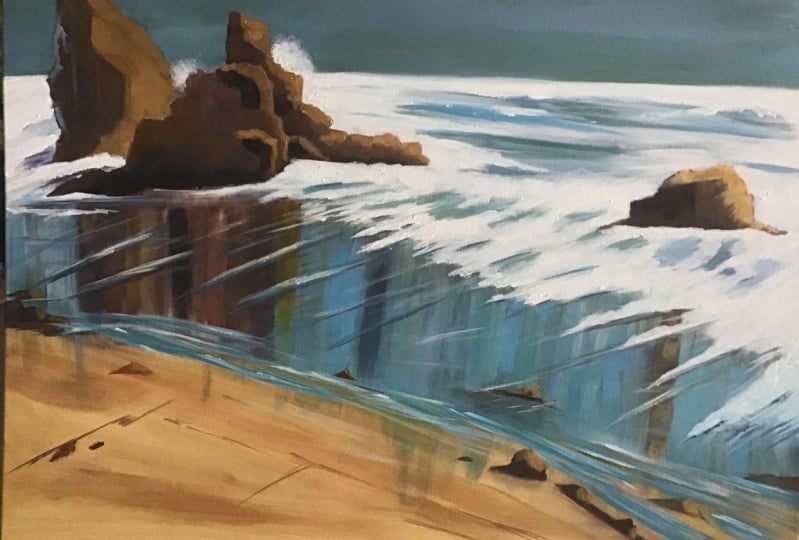
15. Sea foam: Okay. And for this next
step, you will need white, just beautiful white, and you're going to
start with this white, just building that horizon line, raising it up a bit. Don't be afraid to
put a lot of paste, not at this point, but now, for instance, you need to build a lot
of textures over here and pick some of that color that
beautiful turquoise colors. And notice how once you
pick up some of that color, you can go in other areas
and add this color as well. So that's why you don't need
other colors over here. Okay. Now, when it
comes to the edges, add a bit of water and
control the movement. Be a bit more controlled
with your marks, and then going on this side. As you go along, you will
build the confidence to just add a beautiful line, and then going a
bit like this and add more textures as you go. Build some of that textures. Use the brush almost parallel to build more
textures like this. Notice how beautiful they look. Just cleaning up that
edge of the rock, making it a bit smaller, and going and building that
horizon line once again, pushing it a bit further
into the sky just because the sky has a
bit of canvas showing. Okay. And this curve. Now, clean up the brush
a bit of this white, just a tiny amount. Can also pick up the small brush and do this with
the small brush. So basically, what
you're going to do is pick up some water and slowly inch your edge, like, slowly blend it in, making that edge a bit softer. Just go back and forth, making it a bit softer and more transparent so that it's
not such a harsh line. You can go a bit higher. Okay. And once you do that, go back to the big brush, add some textures over top. These waves need to be bigger because they
are closer to you. Don't worry if you're
making it too white, but still keep some of
those wonderful turquoises. And blue of the that
you put earlier. So go around them and also sometimes build some
more textures like this. As you pick up some
of that turquoise, you can go a bit lower
and make some nice edges. Now we're going to
control this edge and make it more interesting. Just make some lines
and some dots. You can also go with the side of the brush and
then smooth it out, make it more linear. This is too much of a line, so it needs to be
broken a bit y. And on the bottom, we can
add another beautiful line and take your finger and
make it more transparent. Okay, and over here, and these waves will
go near the rocks. This is a time to really
build that staircase. Go thicker on the paint and
just build a bit of an edge. Notice how they are
much more interesting. And going with the staircase and building some more
texture over here. As you go along, and
you can also build it and make it a bit more
of a line like this. You can go very parallel to
the waves or just indicate the lines a bit more by creating some more
lines that go this way. Let's add more texture. It's important to add texture at this stage by adding more color. Don't be afraid of adding
a lot of thickness. This will make the waves
even more interesting, and it will make you
not need to go over it again to make it
as wide as possible. As you go into the
further distance, the lines become very small
and fine and refined. And be careful not to go over
the edge, the soft edge. The textures should be
concentrated around here, so let's add more, pick up some more color
and add more texture, pick up some more color
and add more texture. You can also dab, take it
out and add some more. Now here, there is
a bit of a line. Notice how this is a bit curved, so it needs some
things over here. Okay. Now, let's soften
some of these edges, some of these waves
at the bottom here. Just a tiny amount with a
small brush and some water. Some of them, okay? You can also pick up
some of this turquoise, softening some of them up, and you can also extend some
lines just going like that. With this newly found
color that you have with some white and
some beautiful things, you can start to learn how
to make some reflections over onto the reflected side. Like, notice over here, we can go with a
line just like that, and erase it's a tiny bit. Let's imagine that it
is going from here. You erase it a bit,
and then a bit lower, maybe just a small little
line and on this side. They are much more efficient on the darker side
of the reflections. Now, let's build this area
as well with some textures. Not a lot of them. L et's build them up with some
textures to delineate that edge and also continue this horizon
line over on this side. Let's see if it's equal. Needs to be a bit higher. Even though there
is a bit of Canvas, we're going to add some
more sky color or not, depending on the situation. Let's add more of this, slowly controlling
the edge of the rock in the distance and
adding some more waves. Just adding some white and now some textures
like right over here, adding some textures
and over here. Perfect. Don't worry if it
has no blue into there.
16. Going back to the blue: And now, let's add some
of that blue back in. I have the outer plate. So I can use the
colors from this one. Let's add some of the turquoise. You can make it by
adding some blue and some yellow together,
a bit more blue. And clean up the brush a bit, just to have some
beautiful lighter color, just creating some
nice finer lines into the distance and some
over on this side. Just creating a bit of depth. You can also change it to
a bit more blue color. It also picks up some white, so it's going to be
nicer, even more blue. So it blends a bit with the colors underneath
with the white. Don't be afraid to
just go like that. And you can always add
some more white over it. Like, for instance, this area
will need a bit more white. So you're going back and forth from the
white and the blue. Now, this side does
not have any blue, so it needs some of this blue. And with the color, you can also go on the edges just over here to blend some
of them perfectly. And this is too much
of a straight line. So you can also dab a bit
to create some textures, pick up some of that white, bring it over here, to create some more
textures and over here. Don't go overboard
with the textures. And now this area is wet, but you can pick up some of
the white from over here. Make sure that the brush
doesn't flare out. I've cleaned it, so you
need a clean brush and carefully make some waves in the back over here.
Add more texture. Perfect. Let's actually go a bit lower here just
to control that edge. And then going and making
these a bit like that. You can also turn back the brush and make some
lines if you want. This will create some
beautiful ridges onto the waves and over here as well. And you can go back and
take some more white. I took some more
white off screen, and add some more dabs to just make those lines
a bit more curved, a bit more wobbly. Perfect.
17. Crashing waves: I'm going to teach you something very nice and interesting. Let's imagine that here there
is a wave just crashing. You put three dots, and then with your finger, You add some spots, and then you add
a bit more color, and you go around slowly
adding this beautiful foam. And then at the end, pick up some thick paint on the corner of the brush and
make some small little dots. That's how you make
a crashing wave. Also add a bit of
a wave behind it. That's how you make a
beautiful crashing wave. And let's say something
like that happens here, but a bit softer. Okay. So misty,
beautiful lights. This we cannot do the same here because there isn't
the sky color. We don't have the sky color. Let's make it a bit
more like that. And unfortunately, I
have went into the sky, so we're going to
have to fix that. The way you fix that is
by adding some water. And with the paper towel, just press and take it out. Just because the water
is wet, the water. The canvas is wet, it really makes it nicer. You can also add some dabs of water just to create
some of that foam. It will dry out
more transparent. Perfect. And that's
just about it. For this step. Let's create some watery textures over
here with some water. Okay, that's just about
it for this step. And the next step,
you will learn how to go over the
reflections once again to build them up a bit
more and the lower side and fix up
some of the rocks.
18. Darker tones: Now, with the clean palettes, let's add some beautiful blue. Just a small amount, small amount of red. Next to it. And a small amount of brown. This will create more contrast. You're going to
use the big brush. Well, the small brush, actually. You're going to use
the small brush. Let's clean up the medium brush. Clean it up with just water. Let's take the small brush, clean it a bit. Squeeze it out. And then let's start making a very beautiful
purple, dark color. That's just about right, has a bit too much blue,
but it's fine. This is a very important color. Let's add some more red into it and make this
beautiful purple. This is for the
underside of the rocks, and let's add it onto
the reflection as well. Let's blend it in a bit, add it at the edge of
the reflections as well. This will look very nice
because on the edge, we're going to go with a bit
of the sky color once again. And you can use it
to build some of this rock texture on
the actual rocks. And right here, it will
accentuate that line, that light on this rock, and that difference,
and here as well. You can also edit the
highlights a bit. And now let's add the
shadow of the rock
19. Reflection lines: And also, let's add a bit
more red into this color. Add a bit of water and clean the brush on a clean surface. And now the waves actually
have a darker area underneath. That's why you added some water. So underneath them, start adding beautiful lines like this. Don't be afraid to
pick up some of that white and then go back to the color
and place it over. And let's do a small line here, and then going further. Onto this to build
that difference. And over here, there is
a bit of a reflection, so we're going to need to add some more of
this darker color. And once you've
picked up some light, some white on the brush, mix it in with a bit
more add a touch of red and a touch of blue
to make it more colorful. And you can go and blend just
a bit with the white here. To create this wonderful, maybe it's too blue,
so add a bit more red. Touch more red to
make it to bring some violets into
the actual shadow. Let's bring some of
that white. Mix it in. It's still wet, the white
in case you don't have it, just build another
layer of white, and you can go and add this
shadow now because you have this lighter purple color. And it's a good color to
just add it onto this side, just cleaning up the brush. So you add the
reflection of this rock. Can also add it on
the rock itself, and on this rock as well, just adding some textures, making it more purple. And now let's take some
of this darker color to accentuate the shadow here. Make it a bit longer. Picking up some of that white. With some of that white, you can also add some lines here. Once you've picked up some of
that white and light color, you can start to add a
beautiful reflection line here. Add some water and to another reflection line,
just going like this. Take some of that darker color. And you can add some
reflection lines over on this side and over on this side, just connecting them almost, Well, in fact, let's
erase some of it. Now, add some blue just to
create some more variety. And with this blue, you can add over these purple lines to make
them a bit more interesting. And you can go further adding
these lines like this. Not too much. In case
they are too strong, you can pick up some of
the water on your finger and just brush them
just like that. Here, as well. This is good. The water will make it seem
like there is a bit of haze. Perfect. Now, add a touch
of white into this color. Not too much, just a touch
and go from this side. Onto this reflection, and maybe add a bit of this color onto the
shadow side as well. We kind of lost the shadow here, so we need to clean
up the brush, take some of this strong color, and build it back up again. And as you go along, just dab it and go into the white a bit. If it's too strong over here, take some of that water and
take some of that paint off. And once you have
some white on here, you can go ahead and add some more on the end of this and
over these lines a bit, smudge them a bit, and over here, Perfect. And over this one, just
because it's too strong, and let's add some of these
white lines just around here. Notice that it is a lot
of water in the brush. So you can go over some of the lines and
build some reflections. Don't go overboard. You don't need a lot of lines
to indicate reflection, but they can be transparent. So you can do this
and then pick up some more color from
the waves and add it over to go back
and forth with the white over the
purple, extend this line. And let's go with
a line like this. So we add more of an interesting
look and coming from here. And over here,
20. Back-and-forth: L et's add some of that
brown of the rock just going down and add some darker areas onto it and a bit of a shadow. Let's add some of that red. And then you can dab
with your finger to really make it look nicer. And let's blend this
color, this brown down. And you can do the
same over here, just to blend some of those. Even though you go
over the lines, you can always recreate
them. Let's go over here. Let's add some of
this bluish color, just to blend it over this
whole area to make it more of a I lost a
bit of the footage. The only thing I did is took
some blue and some white, mixed in some of this blue
color with a bit of brown, just a watery down, and added it to the side of
the beautiful reflections, and then added some darker
spots recreating the waves. And I was saying that
it's a back and forth between going in between
dark and light colors. And now let's add
some of this blue over the darker lines just to create some more beautiful,
interesting shapes. I've noticed this
area over here, that should be a
bit more dampened. Shouldn't have that much white. Still keeping some
of that white. You can add some of this
wash over the white and add it over the shadow
areas over here as well. And doing a reflection here. And let's add some of
this over the dark lines. This blue wash, some
of the dark lines. Don't go overboard
with the lines, the dark or the white lines. Let's add some lines
with the white. Let's create some beautiful
bluish white wash to just add a
beautiful line here, and then smudge it, and then continuing this
line over on this side. Maybe that's a bit too much. Let's smudge it over a bit and go once again
with a finer line. Over here, right where it
meets the rock, Perfect. Right here, there is a bit of a purple just showing through. And now it's time for the next
step where you will learn how to create some
depth and some of the reflections
with the sky color and the browns and the purples. You're going to play
around on the sandy shore.
21. Sand details: Step will be very, very simple. All you need is to add a bit of yellow to the palette,
not that much. And with the medium brush, let's create a
beautiful orange right over here. So yellow. Add a bit of water
just to make it glide and a little
bit more transparent. It needs to be a bit
more towards the yellow, so continue adding yellow until it feels a
bit more yellow. Add a touch of white. Just a touch a smidge of white. And you can go ahead and add some beautiful reflections,
some beautiful lines. These are not reflections. They are actually sand. If they are too intense, it is good because you
can take some water, go with the brush on the side of the cup and then
start over here, start blending them a bit. F Just a tiny amount,
go over the blue. Can add a bit more white just to accentuate just a
few areas over here. And then add some
water to the same on the cup and start blending just a bit of this color underneath to create
some more textures. Let's add some more of
that lighter color on top over here. Okay.
22. More waves: And now it's time to clean up the brush and recreate
the blue of the sky. This is a very good exercise to just be able to
replicate colors. So blue, a touch of brown, some yellow, and some blue, once again, I think
that's perfect. It's a bit lighter,
but it's fine. And now you're going to go
over the yellow and create some reflections that go
this way and go over here. That's why it's important, and it's good that
it's a bit lighter. You can go over the yellow now creating those edges like
you did with the cliffs. Now you're building them here, so the reflections stay on top. Okay. Go over some
of the darker areas, and you can also go with
some lines that go down. This is a good time
to just get rid of some darker lines in case you have too many of them
or some lighter lines. This is just almost the
same color as the sky. Now going over here. On these darker areas, these reflections
will seem perfect. Will seem just the
right amount of blue of the sky
that it reflects. Go a bit lower over
here. And over here. Now cleaning up the
brush on the side of the cup and blending some of them to make
them more transparent. Just a few of them. Maybe blend them with your fingers as well. Go over here, make
this one darker, and just over there. Perfect. Now, take some
more of that color and accentuate this
line a bit further. And make it a bit
lighter so that you can create some small little
indications of waves. These are some nicer
waves just like that onto the shoreline. They shouldn't be this thick. They should actually
be something like this and then go a bit higher and over here over there. And this one, notice how there is a space right
over here to make one and a space over
here to make one. You can also go on the shore itself and then clean up
the brush just so you can blend some of these lines a bit on top of them. Okay?
23. Going more detailed: Once you do that, you can
switch to the small brush, and take make a bit of
a darker color with red and blue and a bit of
brown to cut it a bit. You need some water,
a lot of water. Mix it in a bit over the yellow, over here the orange, or just add some yellow
and red into it. This will be just make
sure you don't have a lot. Add a touch of water,
but not too much. Clean it on the side of the cup. And then you go
underneath these waves, creating that shadow
like you did over here. Maybe a bit more dark.
It's too watery. That's too dark, very small
lines defining the waves. And usually, you have to make
them a bit more straight, and you can go over
the waves as well, smudge them a bit, Okay. Since you have this color,
this purplish color, you can also take some more
water this time and add some lines and some dots
onto the reflection. Let's recreate a bit of this color since there is
a canvas showing there. So Brown, yellow,
and a touch of red, too much red, and
a touch of red, add water to it, go over here
with a light wash and go. Don't worry. You need
to be going down a bit, and then create some waves with this lighter color
over top of them. Blend them with your finger, add a bit more white to it. Just to add the impression that these waves are really waves
and not something else. And you build a bit of color
variety in the process. Let's add another one here. And another one here. Let's blend them a bit. And maybe over here. And over on this area, Let's add a bit more blue
over here because it's too yellow and too transparent. Perfect. Now, it needs a
bit of a line over here. Le line, just a small
and going this way, blending it a bit, make it a
bit more organic, perfect. Still needs a bit
of color over here. The purple is still too visible. The purple that was going down. And once you do that, you can basically go ahead
and add some yellow. Well, let's actually do it in the next step where you will
focus on the highlights.
24. Adding highlights and textures: For this next step, you will need a small
brush, some yellow, a bit of white, a
bit more white, add a bit more white. These will be for the
highlights and a touch, just the corner of the brush, touch of red to make
it more interesting. Now, make sure that you have a nice edge on your
brush and start adding some lighter
highlights on top of these without really taking
all of these highlights off, like the ones that
you've already created. Where you have the wave, you can go a bit lighter. And you can also build a bit of a highlight like this
and then erase it a bit. And over here, we kind of
lost some of that orange. So let's create a bit of a lighter orange with
some red and some yellow. A bit more yellow. Since it has a bit of white, it will look nicer. A bit more yellow. The red is very strong, and the yellow is
a bit transparent. Yellows are usually
a bit transparent. Okay, clean up the brush a bit. Make sure you have
not a lot of paint. You don't need a lot of texture. And right in between the dark sides and the
lights you've just added, add some more textures,
maybe some dots. To create these
beautiful effects. Maybe in the middle
of the shape, we can also blend it
a bit and right here, and over here, and let's create
these highlights as well. Let's recreate them
actually going down and up and
over on this cliff, just creating some textures, being mindful of the
edge of the dark, adding some in the dark, some finer lines and
details and blending them. Then on top, notice how
soft these edges are. Let's add some of that
white yellow into this color and add a
few more highlights. Just over here and over here. And then maybe
just a few touches over on this area
and blend it a bit.
25. Complex reflections: Now, we'll need to take some
of this orange and also add it as a reflection. Don't worry if you go over the whole situation
with the waves. You can always just
go back and forth, back and forth and
recreate them. In fact, let's just
do exactly that. Taking some of that dark
color and smudging it. Plus, you have the added benefit of just smudging
some of that yellow. In fact, let's take
some of that orange, just a tiny bit of orange. Let's clean up the brush because it has some blue
and some purple. So we need some of that
orange with some water, as always, clean the
brush on the side of the think and make some lines. Maybe some of these
rocks reflect onto the waves themselves. You can also blend them a bit and maybe on
this side as well. Also add them, and
then Make a few lines. And then we can go back to a blue of the sky
if you have it. If you're not, if
you don't have it, it's simple to make maybe too intense and too light.
But that's fine. We've blended it
with the finger. Now going on this
side and this side. Okay. And for the
finishing touches, just a few more darker lines. Let's add a few more
light ones first. Because this color is
not found everywhere. All at once. Let's add
some finer lines. Perfect.
26. Finishing touches. Thank you.: And making this one lighter. Now you're going to need to
create over this dark purple, add some red, and a bit
more brown than usual, and a bit more blue. Just to create a
beautiful brown color. This will be used for some rocks that we've
lost over here, make them a bit more textured. Maybe some lines, some dots. They look very good on the blue. And also, over here, let's complicate a bit, dab with the corner of the
brush and over on this area, and some of them coming
out of this area. Let's add another
beautiful rock over here and one coming
from the side. Let's recreate some
of that shadow. And since we have the
orange color on the plate, we can add some of this
light onto this rock. Use your finger to just smudge
it a bit and over here, just a few touches. And of course, we need some of that reflection of the
sky into a bit of them. So let's add some of
this bluish color, and a bit here and a bit here. Okay. And since we
have a bit more time, let's add some orange
reflections onto the sides of the beautiful cliffs, and you might notice that
they are very, very light, so you need to take some of this newly found dark color
brown and add it over. They will blend together
because it's a watery texture. You can also add some of
this over here to recreate those beautiful shadow
parts of these cliffs, these rocks, and a bit
of a shadow to the left. Let's make it a bit more bluish
by adding a bit of blue. Okay? I don't like that.
So let's erase it and make the whole
color again with some blue and some red and now it's going to look good because it's
the right purple. And here you can dampen some of the things and with the color, you can also go onto some
waves or some areas, just smudging it a bit, maybe over here and
smudging it a bit. Perfect. And just because we have
a lot of white over here, we can clean this brush
a bit, squeeze it out, take some of that white and build a bit more
texture onto the waves, another round of textures, just around the cliffs as well. This will really make it pop. Will really make the
whole painting look much nicer, especially
around here. And you can go
with the corner of the brush to build more textures and a bit lower with a bit of a bigger wave. And over here. Don't be afraid to
put a lot of paste. Really makes the
painting look nicer. And building on the left side
some waves as well to build that texture and those
differences like right over here. Notice how this just goes in. In fact, let's just
go a bit inside. So it makes the shadow of
these rocks more apparent, and let's go in the distance
with another beautiful wave. And there you go with
this beautiful course. You've learned about texture. You've learned
about reflections, how to build waves, how to balance the composition. You've learned that you go back and forth for reflections, and you can smudge things
with your fingers. You can build things up
and do washes over colors. Most people do not
use acrylics and wash color over the colors that they have
already laid down. But that is a way to
integrate more colors and have more vibrancy and more textures
and more interest, and that's basically how you paint this beautiful seascape. Thank you for watching and
see you in the next one.
 George-Daniel Tudorache, Together we will create amazing things.