Transcripts
1. Introduction: Hello, and welcome to
Beginners Crochet. I'm Benita, and I'm
thrilled to have you here for this journey,
a little about me. I have been crocheting
since I was a girl. My nana taught me, and I
remember the excitement. Every time I came to visit, I couldn't wait to see
what was on her hook next. I want you to be able to
feel that excitement. What is going to be
on your hook next? Like I feel every time I'm
starting a new project. This class has been designed
through teaching beginners, in my in person classes, you will learn their
first skills and most important skills
in learning to crochet. And you will finish with
your first project. That is a practical item you can use being the bookmark
and pen hoolder, especially if you're a
journal nut like me. This class will give
you the skills for a soothing craft you can take anywhere that aids fine motor
skills and brain function. Remember to be kind to
yourself as you learn, we all learn at a different pace and be sure to
celebrate your win. Each skill you
learn, celebrate it. I can't wait to see you there.
2. Project: Okay, let's discuss
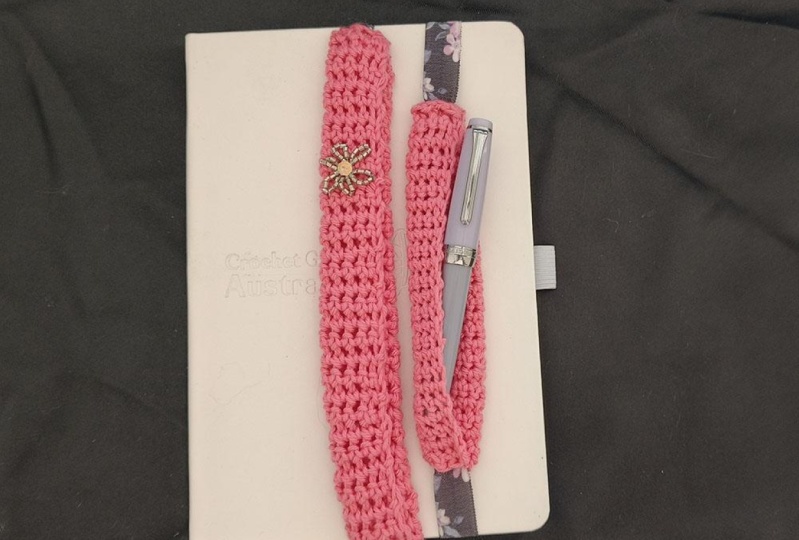
your project. First of all, it's a little bookmark holder
and also a pen holder. So this is my favorite pen, which I can keep in
my little bookmark. If you're a journal nut like me, you'll absolutely love
how this holds your page, where you're up to in your book and holds your pen for
you for safekeeping. So you will need
your crochet hook. I'm using a four millimeter. You will need some yarn. I'm using 8 ply, and a yarn needle. It has the big eye at the end, so you can sew in those loose
ends or the finished ends. You'll need some scissors and
you'll need some elastic. I'm using a foldover elastic that's used
in making underwear. And you can probably see
that it has got, like, a little section where
you fold it over. But you don't actually
see that on the book, and it does look really pretty. As you can see. The
other thing you can do is oh there's my pen. The other thing you can do is do some embroidery
or some beading. I've done some beading on
this one, just to try it out. I haven't done beading before, but I just thought
I'd give it a go. You can also put a
little ribbon on there. You can use variegated yarn if you're not a
complete beginner. It is a little more
difficult to use, but if you want to give it a go, by all
means, give it a go. But probably start with
the plain yarn first. Anyway, let's get to it. O.
3. Holding the Hook: Now I just want to show
you how to hold the hook. But before we talk about
how to hold the hook, I just wanted to quickly mention the different types
of hooks that there are. This is called a tapered hook. This is called an inline hook. So it's in line because
it's in line with the body. So the shaft of the hook is
the same as the hook size. And this one is called
a Tunisian hook. And these are used
for the Afghan rugs, making long rugs and
things like that. And obviously, you get
different lengths. First, with how
to hold the hook. So there's two
different methods. First, you can use
the pencil grip. And second, you can
use the knife hold. So I use Pentel grip
most of the time. The only reason I would use
knife grip is if I'm using really thick yarn and it's
really hard to pull through. I also use knife grip when I'm crocheting
with my left hand, and that's because I can't use pencil grip
for some reason, but I don't know why. It's just, when crocheting
with my left hand. So just have a go with both of those methods and see
which one you prefer. It's totally whatever
works for you thing. And next, we shall look
at how to hold the yarn.
4. Holding the Yarn: Okay, now we're going to look
at how to hold the yarn. Now, as I mentioned
before, we're using 8 ply which is also
worsted in US terms, it is cotton that I'm
using and one color. If you use variegated, it does make it a bit harder, but go for your life. If you want to give
it go, give it a go. But I recommend just
one color for now. We're going to use
the yarn around the little finger,
then over the top. And as the yarn goes
through your fingers, it makes it easier to
continue crocheting. You need to be able to
have that continuity. So that's why we need the yarn to flow
through the fingers. You use your little finger to
be able to open and close, and that will actually allow you to hold it when
you need to, like, to put a stop so that you
can have the tension here, and then you let your finger go so that you can keep
it going through to flow.
5. First Stitch: Okay. Now let's work
on making a slip knot. If you don't know how
to do a slip knot, I will show you and also
how to do our first stitch, which is the chain stitch. Okay, so first of all, we are going to make a pretzel. This is to make our slip knot. So we bring our yarn
around like this, we are going to bring that one under and then
pull it through. And that makes our slip knot, which we pull down
to the right length. We don't want it to be too tight because when we're
making our chain, it actually needs to allow
us to crochet back into it. First of all, we are going to put our hook under
or our yarn over, and then we are going to pull through and that will make
our first chain stitch yarn over or hook under whichever way is
helpful for you to remember. Just remembering that when
you're reading a pattern, it will specifically
say yarn over, but we are just trying
to learn at this stage, so we trying to jog our
memories that you go hook under yarn over, and
then we pull through. When you are pulling through, you're going to put a
little bit of tension on the chains you've already made or the knot as
you're holding it. You're going to put a little
bit of tension on here so your little finger can
close or it can open. When it's open, it allows
the yarn to flow through. When it's closed, it allows
the tension so that you can keep this steady and
to pull through, and it allows you to pull
through your loop easier. We don't want it to
be too tight though. Make sure your shoulders
are nice and relaxed. Do some stretching,
stretching your fingers, make sure everything's relaxed. Do some deep breathing.
Maybe that will help too. So we go yarn over
and pull through. Yarn over or hook under
and pull through. Now, I want you to practice that until you are happy to
move on to the next stage. We're practicing getting all of these little V stitches the same size as
much as possible. We are practicing making our yarn flow through
our fingers easily. We are practicing
tightening when we need to tighten and loosening when we need to loosen with
our little finger. I'm going to leave you there, have a good practice with
as many chain as you need. Once you are ready,
you can come to the next lesson and we'll start
learning what to do next.
6. Double Crochet: Now, this lesson, we're going to learn how to do
our double crochet, and we're going to
double crochet back into the chain
we've just created. First of all, we
want to start with 15 chain because we might as well start
our project already. So when you are happy with your chain and you
have 15 chain, you will see how you have all these little
Vs on the front, and that is how you
count your stitches. Each V is a stitch. When you turn it
over, you will see the little knobs on the back or the little
loops on the back. That's what we are
going to crochet into. We're going to miss this first little loop and go
into the second. Place your hook through
the little loop put the yarn over or the hook under and pull through
the first loop. Then yarn over the hook and
pull through the second. You have created your
first double crochet. Now, if you don't get this
straight away, that's fine. Just rewind the video and redo. But I will repeat this a few times for you
so that you can get the hang of it
because I know with my beginners, it
takes a little while. It's not just an instant thing. It takes time. But
don't be discouraged. You're not behind, you are learning and your
brain is working. Back to it, we're going to go back into the loop
again, yarn over, pull back through yarn
over and pull through too. Just remember to keep
your chain straight. If your chain gets twisted, your work will look twisted. Once again, back
into the loop at the back yarn over your hook, pull through the loop, yarn over and pull through the two. That is your three
double crochets on your chain and just continue that to the
last double crochet, which you can see
the last little loop and then I'll see you
in the next lesson.
7. Finishing Up: Now to finish our project. I have done 25 rows this time, so you can see the
difference between the 25 rows and the 30 rows. We have arrived at the end
and are going to finish off. We're going to pull through a slip knot and
then cut the yarn. Leave a reasonable amount of yarn so that you can
sew your ends together. The next step is we want to see how much elastic
you would like. You measure it on your
book that you will be using and give it
a little stretch. You want it to stretch a bit and then also leave
a little room for sewing it together. Next, we sandwich
our elastic between our fabric and we will sew backwards and forwards until we are
across the other side. Continue with that and I will come back when
I'm ready to finish off. I probably left my yarn
a little bit too short. To finish off, we are
simply going to go through three or four stitches
and it's just to hide the yarn basically and keep it stable so it
won't pull undone. Pull through there. Because I've left my yarn a bit short, I'm going to put my
needle in first, then put my yarn through
and then we will go two or three times across and you won't see it because it just blends
in with your fabric. Then we simply cut off the yarn. And complete that on
the other side as well. So there we have our
finished project. I hope you've had fun
and enjoyed this class. I've certainly had
fun teaching you, and this is the
difference that it turns out between the 25
and the 30 rows. With the 25, it's
only just big enough, but if you have a
small pen like I do, it fits in rather snugly and
that's totally fine with me. With the 30 rows
possibly fit two. I'm not quite sure. You might need to make it
wider to fit two. But it's up to you anywhere 25-30 rows
will absolutely work. It's a matter of trial and
error to see what you like, and that is the wrap up of how to make your
bookmark Penholder. I hope you've enjoyed
learning to crochet. You learnt to chain
and double crochet. In the future, we'll
do more stitches, so stay tuned for those. Another resource that I have for you is an e book
that I've written. It is designed to help new
beginners learning to crochet to skip those Mistakes
that new beginners make. Thank you for
attending my class. I look forward to
seeing your projects. You can find me on the Internet at YouTube and
Facebook and my email. I'll have those in
the notes below, and I look forward to
hearing from you. Bye bye.
 Benita Tatters, Designer