Transcripts
1. Introduction : Hey. Welcome back
to another class. My name is Braden Messer. I am an artist, an author, a YouTuber, and today. I'm going to be the one that
teaches you how to draw. This is part three of a three part series that I have made where I am
taking you through and I'm showing you how to draw three different references
from three different angles. I will say that if you find yourself enjoying this
class, if you like the vibe, if you like what you learn, if you like the methods used, then I know for a fact that
you would love my book. Drawing the portrait, step by step lessons for mastering classic techniques
for beginners. This book does a great job of taking that deep dive
into the ums method and that fusion with
the Asaro method on a couple of different
portraits all step by step. It is a great investment that you can make in
yourself so that when you take more of my
classes where I use the ums method and the
Asaro method in tandem, you will know exactly
what is going on. Based on the book. I will have a link in the
description of the class, if that's something
that you want to check out, by all means. Now, what to expect. This class is comprised of
eight different lessons. The first, we are starting off, and I'm going to show you how to systematically build
out the ums head. Once we have the lumus
head established, I'm then going to show
you how you can begin to draw the contour lines
of the ear and the hair. Once we have that drawn, we are then going to be looking at the eyes and
switching gears a little bit, we will be going from
the lumus method to the Asaro method. This is where we're going to
use the Asarofacial planes to help us build out not
only the eyes, but the nose. The mouth and the
facial planes as well. Once we have all of the Auro
facial planes established, I'm then going to show
you how we can use hatchmrks and start to
build out our values. We're first going to start
by doing a base layer, and then I'm going
to show you how you can go in and begin
to strategically layer by double hatching
and building values strategically throughout
the entire portrait. Once we have those values built, I'm going to show you
how you can detail out the hair and we can
wrap up this portrait. Now, I know that that
seems like a lot. So on that note, what I would recommend is go through at first and
just watch the class. Don't bother trying to
draw along with me. Just sit back. Enjoy it, maybe get some popcorn, right? Like it's a movie. Then once you've gone
through once and watched it, that is when I want you to actually go through it again
and draw along with me. Once you've completed the class, I want you to upload
your project. That way I can see
what you were able to accomplish and make sure that after you
upload your project, you also leave your
review of the class. Then one last thing before
I let you go and start trying is I am now offering
drawing consultations. For $25 a month on my Patrion, I will drop a link to my Patrion in class
description as well. That way, if you want to have a more one on one
experience and you want me to actually build out a drawing curriculum for you
to help elevate your art, I can absolutely
do that for you. That is it. That is
all and hosing class.
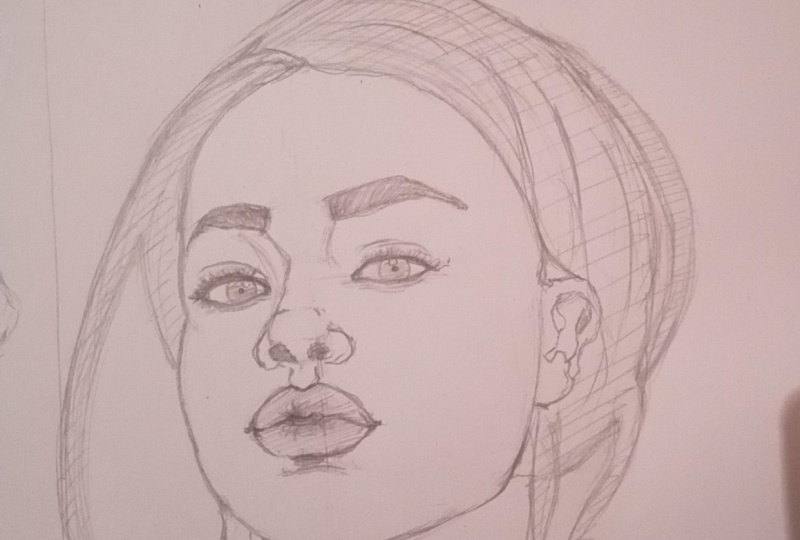
2. Drawing your Loomis Head: Okay, so step number one, when drawing a portrait is that we want to establish a circle. Now, there's a couple of different ways that
you can do this. You can use a compass tool, which is what I recommend. That way, you get a
perfect circle every time with very minimal effort. Or if you prefer, you can also draw
your circle manually. It's important to understand that your circle
does not have to be perfect so long as its height
is relative to its width. Then we want to draw our oval. Now this is to effectively
slice off the side of the circle and elongate
our circle for us. You can refer to
reference two with the looms head overlaid
on reference one, and then we want
to establish our vertical and our
horizontal axis lines. Now, these are designed to help us orientate the head in space so that we can better understand the direction that our
portrait is looking. So we're going to draw
this line here and we're going to pull it over from the top of the oval across and that's to
establish our hair line. We're going to extend
the horizontal axis line over and that is to
establish our brow line, and then we're going to
extend the bottom of the oval over at a slight angle, and this is the
bottom of our nose. Once we have all
of those placed, we're then going to
draw this line here. This is our center
line of the face. Then we're going to extend
our vertical axis line, and we're going to connect
that to our center line. Then we're going
to pull up here on the far side and
this effectively, gives us our lumus head. Now, once we have
all of this drawn, what we want to do is we want to go in with an eraser right here. See this part of
the initial circle, and we want to erase this bit because we don't need
it anymore, right? We've used it. It was important to have it
for the first step. But now that we
have our hairline, brow line, nose line, center line and jaw lines drawn, we don't need it anymore, so we're just going to
go through just like this and we're
going to erase it. Get rid of it. Then once we have this erased
all of the way, we're then going
to draw the neck and the shoulders and I'm
going to show you how to place the anchor points and the cheek plains of your
lumus head as well. Hopefully, you're able to go at a nice pace
and not stress out. The lumous head is extremely
important because it is the foundation for the
rest of the portrait to come. Okay. So now, when we're
looking at the reference, we can see that the head
is slightly tilted, right? And so because of that,
this top anchor point, which signifies the top of the upper lip is
going to be tucked a little bit closer to the nosline that we
established earlier. Then we're going to go
down and write about here. This is where we're going to place the second
anchor point, and this represents the
bottom of our lower lip. Okay. Then we're going to extend this line
over from the center of our vertical and or horizontal
axis lines over and down. We're going to do
this on both sides. What that does is that
elongates the face for us. Once we have that,
we're then going to pull down here and
I'm just going to do some quick lines for the neck and then
plugging into the shoulders. The main focus of this class
is going to be on the face. When it comes to
these lines here, you can just do nice long
poles for them if you want. If you don't like that
and you want to go and do shorter poles, you can do that as well.
That's totally up to you. Then we just have some light
breaks here between high, mid and low values
on the neck and I just want to draw
these in real lightly. Then what I want
you to do is take an eraser and erase your
lumacad not all the way, but just make it to
where it's more or less transparent on the paper.
3. Drawing your Ear & Hair: Okay, so now for this lesson, what we're going to
do is I'm going to draw the ear and then we're going to draw the
contour lines of the hair, and we're going to place both of these features on the lumsad. Right here, if you have questions on where you
need to place these lines, refer to reference
number two with the lumus head overlaid
on the reference photo. This will help you. But
what we want to do is we first want to focus on the
contour lines of the ear, so the outer lines of the ear. Now that I have these
contour lines established, I can go in and I can begin
to bring out the other lines that make up the actual
inside structure of our subject's ear. But it's important to understand that when you are
drawing your ear, start from the outside and
then work your way in. In fact, when you
look at the majority of the features in this class, that is how we
begin to draw them. You start with
your contour lines which are on the outside. Those are the defining
lines of your structure and then you work your way
in just like this. Now we effectively have the ear drawn placed on the
side of our lumus head. Notice where that
ear is sitting. It is sitting in the
bottom rear quadrant of the side oval. Of course, when I say rear, I mean rear to the what? That's right. We're to
the front to the face, just like in part
one and part two. All right, now that we
have that ear drawn, we can use the ear as a
proportional gauge for the hair. We're starting off from the top. We're going to pull this
line over just like this. We're going all the way
up to that hair line that we drew when we were
drawing our lumus head. We're using that because the lumus head is the
foundational structure, and this is why we draw it is
to help us place the hair. Then right here where the hair
folds back behind the ear and it's pulled back
into a ponytail. It's then draped
over the shoulder. I want to pull these lines here. Now, I'm doing this with multiple contour
lines as you might notice. What I'm doing is
I'm systematically drawing the segments of the hair while drawing the outside contour lines
of the hair as well. Now, I've been doing this for
a very long time, for me, I can identify these
right off the bat, but if that's not
you, that's fine. I would recommend then
is if you don't want to draw all of these lines that bring out the segments of the hair right now and if you want to
say those for later, you can absolutely do that. Just focus on the
outside contour lines. That's totally fine. I don't think you have to copy
me verbatim, you don't. Nothing right here
what I'm doing. See this on the top is I'm using that initial line that we drew from the top of the
ear up to the hair line. I'm using that as a gauge
for how far up off of the lumacd do I actually
need to pull this line. Everything is about proportion, you can use what
you've already drawn to help you gauge
exactly how far away or how close that next line needs to be in order to convey what
you're trying to convey. Whether that's hair,
the eyes, ever. It's all interconnected.
Everything is relative in a sense. This class is
teaching you how you can begin to approach your
portraits in that manner. Now that I have
this pulled over, I want to bring this hair on this side down
just a little bit more. She's got a piece of hair that goes all
the way down like this. I'm doing some really
long poles right here. Some really long poles. Yeah. I actually I like that. Then we have some
flyaways right here. Like I said, you
don't have to draw these ones right here. I'm just drawing them
because why not? The whole point is
to make sure that your drawing is free flowing.
You don't want to be rigid. You want to just
have fun because you can always go back
and you can watch this series again and
again if you need to. This is one of the
main reasons why I actually recommend
going through and watching all of these
classes as if they're a movie to really try to just
focus on what's happening, what's being said, right? I got this thicker
line right here, and that's looking pretty good. Now, here on the right side, I am establishing the contour
lines of the pony tail. Then these lines
here are segments, I actually talk about
the segment lines in hair when you're
drawing portraits in my book, drawing
the portraits. If you haven't picked that
up yet or if you're curious about learning more when
it comes to drawing hair, then I'd recommend you pick that book up. I would
definitely help you. Especially if you are
reading that book and then taking these classes in
tandem with each other. Now right here above the ear, I'm going to just go ahead because we're here
and I'm going to draw some more line segments. Now, these line segments, when you're looking at
the reference photo, these can be a couple
of different things. Some of them can be for
texture, obviously. But then depending on how the light is casting
across the subject's hair, you can also use them to define the difference between your
high mid and low values. And that's the cool
thing about drawing segment lines in hair is that you can use
them for either or.
4. Drawing your Jawline & Eyes: Okay. So now what we're
going to do is I'm going to define the contour line of the side of the subject's
face and the jaw line. And then once we've done that, I'm going to show you how you
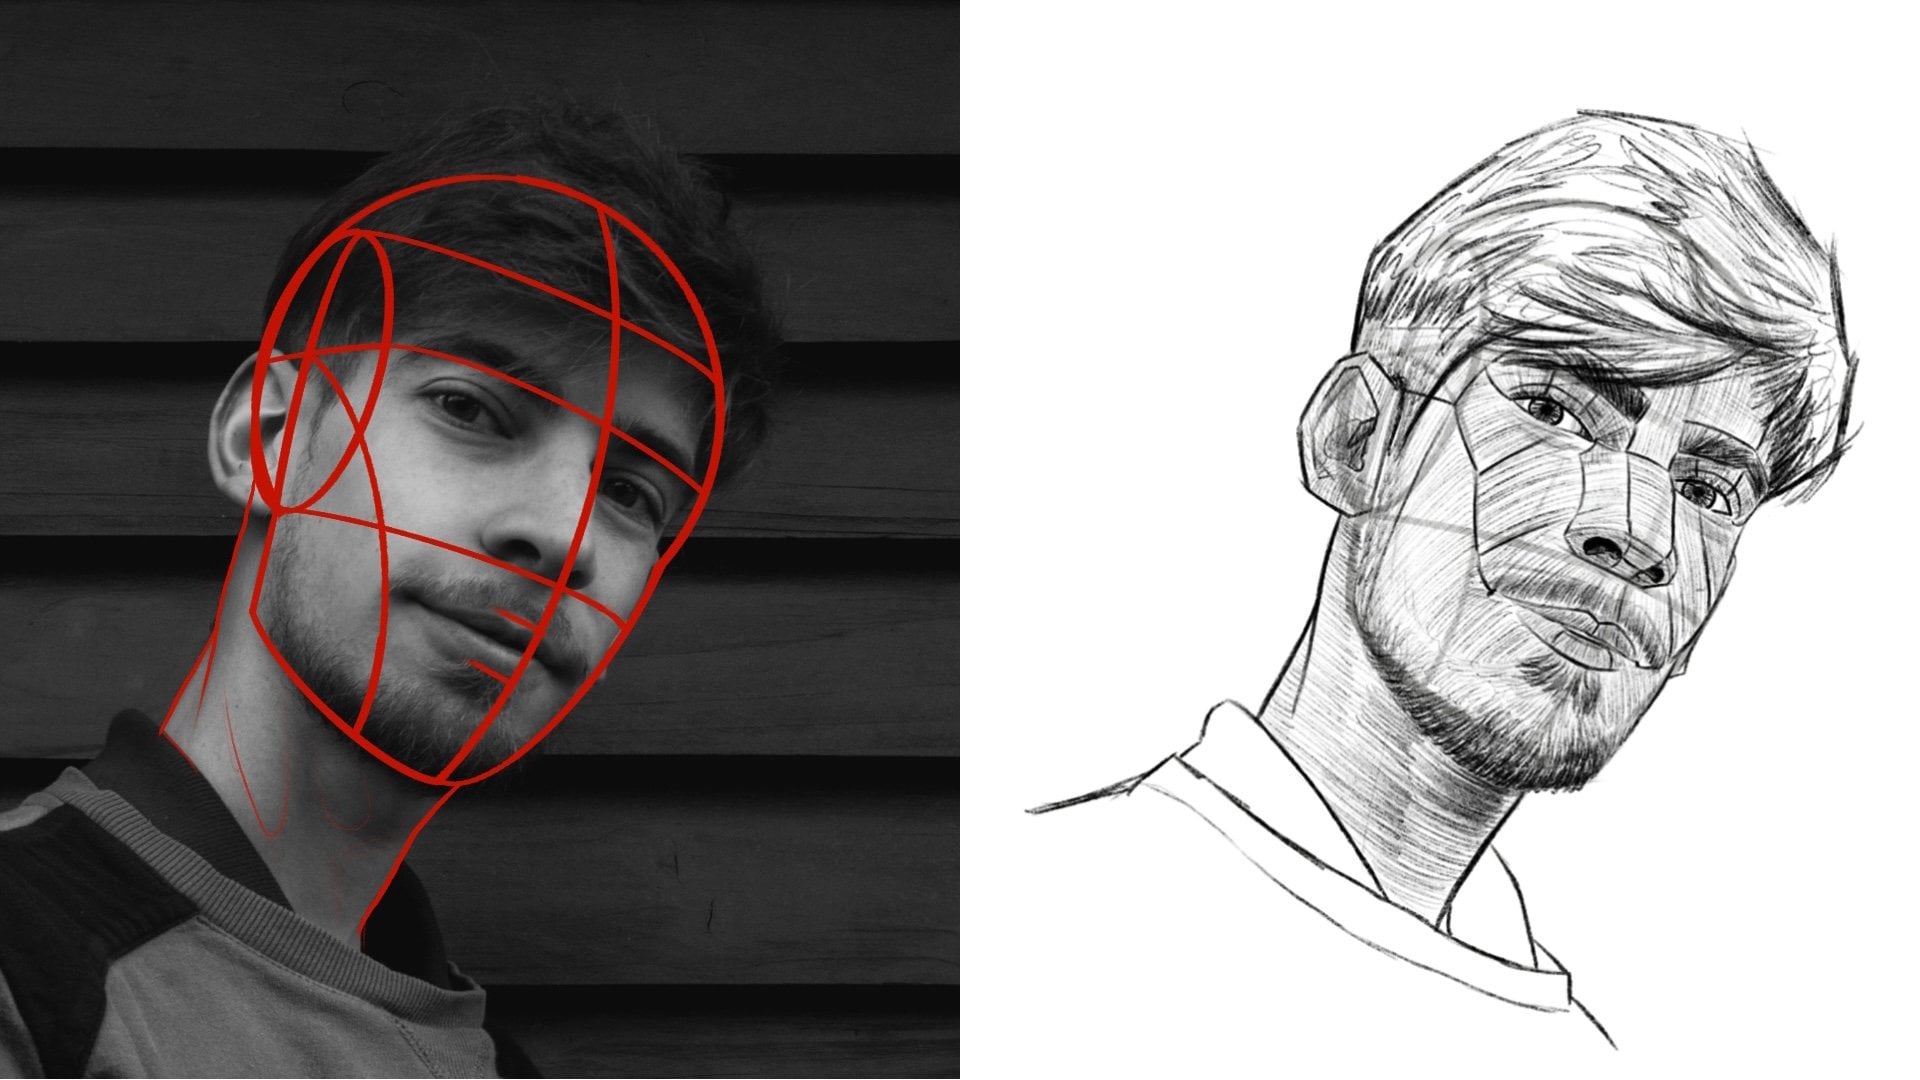
can use the Asaro method. Notice how reference
to has changed from the lumus head to
the Asaro head. And I'm going to show
you how we can identify the eyes via Asaroplanes. Okay? So just like this, notice how I'm doing a nice
light line right here. I have the basic line
of the lumus head, but that is not
completely accurate. Remember, the lumus head is
meant to be a general guide, but it is not absolute. This is the point in the
drawing process where we want to go through and we really want pay close attention
to reference number one. One of the ways that
we do that is by streamlining and
defining exactly where the edge of
the face lives. Once we know where the
edge of the face lives, we can use that as a
proportional gauge. I remember how in the last
lesson we were talking about using the ear as a
proportional gauge to the hair. We're doing the exact same
thing here with where the edge of the subject's
face actually ends. Okay? So you can take
your time with this too. I mean, you don't
have to go fast. I would actually encourage
you to take a little bit of extra time when
defining the edge of your subject's face because
that will really help you identify the proportions accurately of the
facial features. Okay? What I'm doing is I'm actually going over my lines
very lightly at first. I'm using a very light
pressure control. Once I'm satisfied that those lines are exactly
where I want them to be, then I use a heavier
pressure control and I go over the top and I really
streamline that line. I thicken up its quality. I give it a heavier weight,
a darker saturation. And we go from
there. I like that. Now right about here,
right about here, what I'm going to
do is I'm going to draw a horizontal line. Now, this is the bottom
of my nose bridge plane. Once we have the
horizontal line drawn, we're going to do
this right here. We're going to pull up two
vertical lines on either side. And then these plug into roughly where the edge of the
subject's eyebrow lives. Now we're going to be doing contour lines for the eyebrows. I am not worried about
detail right now. This is simply to get the basic shape of
the eyebrows placed. Okay. I got the
bottom line drawn, and now I'm using that as a proportional gauge
to go up to the top, and this gives me the entire
shape of the eyebrow. I'm also making sure
that I am adhering to my underlying lumacidUsing
that as a gauge as well. Okay. Now that I
have that one drawn, I'm going to do the exact
same thing on the other side. When it comes to eyebrows, I personally like to draw
the bottom line first, but you don't have to abide
by that if you don't want to. It really depends on
the reference photo and the type of eyebrows
that you're drawing. You'll find as you draw
more and more people that female portraits tend to have better
structured eyebrows. I think that's just
cosmetics in general, where men don't necessarily have that same
type of structure, and it just makes
it easier to draw. Okay, now that we have the contour lines of
our eyebrows drawn, now I'm going to pull
these lines off right here and roughly where
these two dots are. This is where the inner
edge of the eyes are. Now what I want to
do is I want to draw these temple planes. If you actually refer to
the Asaro head model, you can see the plane
that I'm trying to bring out in this reference photo. That's one of the reasons
why I wanted you to have the Asaro head model in
this series is so that you can see firsthand what
I'm trying to accomplish. Now, these are
called frame lines. I give a very detailed analysis and multiple use cases for these in my book,
drawing the portraits. B here. You'll notice how the second frame line from the top actually aligns very nicely with
the temple plane, and that's on purpose. Um, we're just going to pull
these down just like this. Because what we
want to do is we're effectively drawing the
Is from the top down. We're framing them because
lots of times if you just arbitrarily go in there without any framework and
start drawing the Is, you're really going to
struggle with proportion. I know I've done it
many, many times. When I learned about the Asaro method, I was
like, This is brilliant. This is much easier to guestimate exactly where of the subjects eyes need to live. Of course, when you
have a frame line, you can equate on the
other side of the face how long your frame
line needs to be based off of the
initial frame lines. Altogether, it makes for
a very cohesive approach. Okay Now that we have
these lines here. I'm just going to draw the iris. Now that I have these ones here, what I'm doing is I'm just
connecting the frame lines. Once I have the eye
drawn across the top, then I can use that
to figure out how far down I have to establish the line for the bottom
of my subject's eye. Yeah, something just like that. And then of course,
now that I have the contourlines of this eye, I can go in and I can put in the contour lines of
this iris on this side. But yeah, something
just like that. Now, you might notice that
most eyes have a fold, and that fold is for the
eyelid when the eye is open. Now, when the eyes are closed, that fold goes away. But when the eyes are open, the eyelid folds back into itself and so you have
this line right here. And of course, this
exists on both sides. So now that we have that
one on the left drawn, let's go ahead and
draw this one here. Yeah, that's looking
pretty good. And I think while we're here, I'm actually gonna put some quick detail
in, um, the iris. I mean, why not? You know, win in Rome. Party hard. But yes, so just like this, I think what I want to do, yeah, is I'll just establish the pupil pupil here. H.
5. Drawing your Nose: Okay, now we're going
to draw the nose. Remember how I was
mentioning that this specific reference
photo is at a tilt. Her head is tilted slightly up. So first things first when
it comes to the nose, remember how with the eyes, we were drawing them
from the top down. Well, with the nose, I
have found that it is easier and more beneficial for you to draw it
from the bottom up. So right here, we're drawing this horizontal
line across the bottom. And then we're referring to reference number
one and then we're going to pull up
here on the sides. Now, what this is, this is the width of the
bottom of the nose. Most noses, they will get
skinnier as they go to the top, not all, but most. Right here, now that we
have this edge established, I'm just doing
short little pools. We want to bring this line over. Be what we're doing
is we want to bring out the bottom
plane of the nose. Because once we have the
bottom plane of the nose, then we can identify where our nose ridge plane resides and the nose ridge goes up and it
plugs into the nose bridge, which was the first
plane that we drew when we were
doing the eyes. Okay but right here, we're just pulling this over. This line on the tip of
the nose is going to run parallel to the initial line
that you drew for your nose. Notice how the line
goes up at an angle, then it goes straight across, and then it comes
down at an angle. Make sure that you work on
your finse with this plane. Don't draw a line
just from left to right, because that
wouldn't be accurate. It goes up, then it
goes straight over, and then it goes
down at an angle. Then of course, we have
our nostrils here. You don't need to worry about getting too fancy
with the nostrils. You just have your
line over the top, and then you have your
lines on the bottom. If you need to
erase, absolutely, go ahead and erase.
That's not a big deal. Because typically when you
have the bottom plane of the nose and then you
have your nostrils, that's realistically
all you need because the rest can be
accomplished with shading. Now that we have the
bottom plane drawn, we're going to pull this
line up right here, and it plugs right in to
the nose bridge plane. And make sure that you
understand the difference. You have your bottom
plane of the nose, then you have the ridge
plane of the nose, which extends from the bottom
plane and then it plugs into the nose bridge plane. There's the ridge
and the bridge. Make sure you understand
the difference between both because they're
similar but different. Okay. So that is the
majority of the nose, but then right here, we also have what are
called slope planes. Now, slope planes are pretty
much what they sound like, but they're planes that
actually stem off of the ridge plane of the nose and they're important because
especially when you're shading, depending on how
the light is cast, you will have to
shade these planes, sometimes less, sometimes more, it really depends
on the lighting. But when you're
drawing, it's really important for you to
understand that they do exist. You don't have to
draw them all the time, but I would recommend, especially if you're
new to portraiture and you want to
make sure that you have a full understanding
of the planes of the face. These slope planes are crucial. They're very important
for you to understand. Even if you don't use
them all the time. But just like this, I'm pulling the line from the
corner and then I'm just very lightly pulling it down and you can
solidify these lines. You can give them a thicker
quality if you want. It's really up to
you. But effectively, that's it. We have
the bottom plane. We have the nose ridge plane, and then we have
the slope planes. Depending on how much detail
you would want to do, you could go in and you could do a nose tip plane as well, which if you refer
to the Asaro head, you can clearly see the
plane I'm talking about. It is the plane that exists
between the nostrils. Every nose is going
to be different. John Asaro's head model was
meant to be a general guide. It wasn't meant to
be a model that you would completely
have to adhere to. But yeah, that's
pretty much what we have because now that
we have those planes, when the time comes in the
next couple of lessons, you'll see how we
go through and how we're able to shade
and we'll be able to understand more effectively the underlying form
of our drawing.
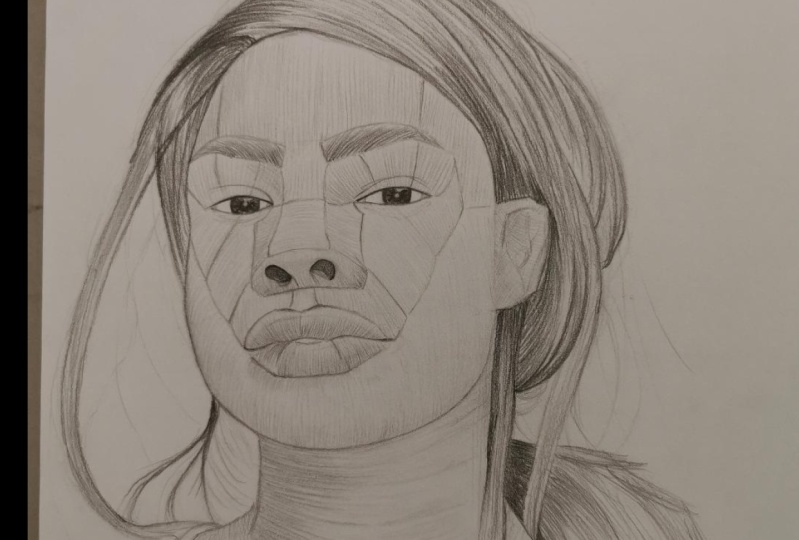
6. Drawing your Lips & Facial Planes: Alright, so now what we're
going to do is we're going to draw the contour
lines of the mouth, and then we're going to draw
the saro facial planes. Okay? So first things
first is we want to draw these two lines
down at an angle, okay? This is to identify
the filtrm plane. Now, the filtrm is that flat bit that comes off the
bottom of the nose, and then it plugs into what's called the cupid's bow, right? It's the top of your upper lip that looks like the
top of a heart. Okay? So we have these
pulled down like this. Then they come into
each other like that. Now, once we have the
Cupid's bow drawn, what I like to do is I like to draw a very, very light line. I'm using the eye as a
reference to where the edge, the outer edge of
the lips reside. I go right to about the center of my anchor points right here, and I draw a little dot. Then I'm going to do that exact same thing on the other side. I'm pulling this line
down very lightly. I'm using a very light
pressure control. Then right about the center of my top anchor point and then my lower anchor point
right about there. Now I have the cupid's bow
at the top at the upper lip, and then I know what
my boundaries are. Now what I can do is I can pull this line up from the edge. I'm going to pull it
up. I'm going to follow that contour line reflected
in my reference photo. I'm just going to bring
it up nice and light. You can use either
an overhand grip for this or you can use the three point. It's
really up to you. I personally like to
use the overhand grip. But that's just me. I'm
plugging that in. Okay, cool. Now that I have that plugged in, I am liking those proportions, but I'm going to know
more about that here in a second when I actually extend that line over to my
other point that I drew. But what we're effectively trying to do here
is I'm trying to use every anchor point that I can from the
top to the bottom. Then, of course, those
two dots on left or right to really help me frame the lips and make
sure that I get them as proportionally accurate
as I possibly can, right? Notice how we went
from the bottom up. Now we're going
from the top down. That doesn't really matter. It's just the way I'm drawing. I'm bringing this
line down right here. Looks pretty good,
for the most part. But now what I have is
I have the upper lip. I have the top of the upper lip. Now, her lips are slightly ajar, so I want to draw
this opening here. It's a little bit of an angle. It's kind of the opposite of the V shape for the top
of the cupid's bow. It's the exact opposite, so I want to make sure that
I have that accounted for. And now what I can start
to do is I can start to pull this line here and connect it and give myself the entirety
of their upper lip, okay? So just like this. Now I'm going to pull that line
over from right to left, just like I did the first
one from left to right. It's important as
well. When you guys are drawing this
line right here, just go super super light. In fact, what I would like
to see is I'd like to see a variation in
your line quality, have it be thicker from the
corner of the mouth and then have it thin out as
you go to the center. Work on some of that fnesse. Then of course, we have the top of the lower lip
right about here. Now notice we're using that
bottom anchor point as our starting point for
the bottom of her lip. Okay. Yeah, she's got
some luscious lips, so we want to make
sure that we adhere to that so that we can bring
out those perky lips. That's what we want.
But the biggest thing is making sure that you're going very, very lightly, okay? And then as we
pull this line up, just kind of let it fade, right? Again, I want to see variation
in your line quality. It's interesting because
lips are probably the most finicky
facial feature in regards to line qualities. Because if you are not
aware of that and you just draw a line and it has the same weight and quality
throughout its whole length, what inevitably happens is your subject looks like they have lipstick on and
worse than that, it doesn't look
realistic at all. Okay, so just be aware. But now what we're going
to do is if you actually refer to the Asaro head model, we want to split her upper
lip into two planes. Then the bottom lip, we want to split that bottom
lip into three planes. Notice how when it comes
to the bottom lip, those plane lines are actually in line with
the filtrm lines. So if you're unsure of where you need to put those
lines for the bottom lip, you can just align them and use your filtrm lines
as a guide. Okay, cool. It follows the filtrm line
from here and then right about here on the lower lip, that's where you would put it. Now that we have the
majority of the lips drawn, what I'm going to
do is I like to do just some nice tone lines. These lines are meant
to just help me address the shape of the lips. Because just like the
actual face of the subject, you want to start to
understand through how you'll shade and hatch
the underlying form. You don't want her lips to look flat because they're
not flat in the photo. This is a technique
that you can use to ensure that those
lips don't look flat. Okay, these lips are
looking pretty good. Because once we have these
lips completely drawn, then I'm going to
show you how we can draw the Asarofacial planes. And that is more just to give
the face more structure, which in turn will help you when it comes to
hatching. You'll see. Lots of people don't use Asaroplanes for their
face, and that's fine. But especially if you're
kind of beginning and you want to have every tool that you can think of the Asaroplanes and the method as
a whole is very, very beneficial to keep
in the back of your mind when approaching anyone's
portrait, even for cartoons. So we have all of these shadow lines, as
I like to call them. I'm actually really, really
happy with those lips. To look decent, very decent. I don't think I'm going to put any more lines on it because I think
I'll be able to go in when I'm hatching and bring out the underlying form of those lips and make them
look like they're rounded. So what we're going to
do now is right here. On the left side, I'm going
to pull this line up. If you're curious about which Asaro planes I'm
actually drawing here, you can refer to reference to the Asarohad model
right there and you can clearly see which
ones I'm bringing out. Once we get to about
here, we pull this up. This plugs into the slope plane, and then we're going to continue to Then once we get
to about right here, we're actually going to
extend this line at an angle and it's going to plug into the first frame line
of the subject's eye. When you actually
look at the shading on reference to on
the Asarohad model, you can see how when the light is cast
across the subject's face, everything above this
line is going to be of a lighter value and then
everything below it will be of a lower Now, granted, that kind of depends on the specific
lighting situation, but more often than not, right? And I think one of the things
that you'll also notice, see here, we're going to
do this on this side. One of the things
you'll also notice is that this is
very, very simple. In fact, after you go through this entire series and
you've done P one, P two, and then you wrap up this one, part three, it will become
second nature for you. I guarantee it. And
you'll be able to plug these Asurofacial planes into your drawings if you want
or if you don't want. But they're always good to
have Okay, so we got that one, we're extending that up into the first frame line of the eye, and then we're going to extend this line back and up a bit. Then once it gets to about here, we're going to
pull this up, that plugs into the third
frame line of the eye. Then once you have these ones, this last one, it just
goes straight back. Notice the Srohad model. That line rests
right at the top of the ear, just like this.
7. Hatching your Base Layer: So now what we're going to
do is we're going to hatch. Just like this from
the far temple, we're just going to
hatch nice and light. You can either do
the three point grip or you can do the
overhand grip for this. But the whole point
of this is this is designed to help you practice and begin to understand the importance of each
individual Asaroplane. This isn't necessarily
for aesthetics, this is more for muscle memory and a subconscious understanding of exactly how each one of these planes
works with the other. Okay? Just go straight
across, just like this. You don't have to
get too focused on the spacing between each
individual hatch mark. It's more I want you to just
think of the underlying form that you are conveying with each strike within
each Asaroplane. Just like this, it's
nice and light. And really try to challenge yourself a bit and
follow the form, the direction of each
individual a so plane. Now, if you want,
say, for example, if you're doing this in charcoal or if you're doing
this in graphite, you can actually go
through after you've hatched out the face
with a smudger or your finger and you can
start to smudge and blend these hatch marks
and give yourself a much smoother gradation.
You can do that as well. But the whole point of this right here is
notice how I've changed the angle from the
nose bridge plane to the eye planes here. Just like this. The cool thing about this technique as well, as you will see, is that this
is just the first layer. We want to go nice and lag. We want to start to build
out our understanding of the underlying form that is based off of these Asaro planes. But we can go back
and we will be. You can go back and we can start to hatch
over the top of these existing hatch marks to build values and convey
detail and form. But for this specific
part of the class, we just want to focus on
the planes themselves. Especially if you're new
to drawing this way, this is just another
level, right? But just like this.
Notice how I change that. We're hatching from
left to right, we're going down at an angle, and then now that we have that slope plane done,
we want to flatten out. We're pretty much
going left to right, and we are hatching across the top of the
nose ridge plane. Perfect, just like that. And
now we've switched it up. We're going more or less
vertical, right, top to bottom. And now we're hatching that
bottom plane of the nose, and we're going
from left to right. Okay. And hopefully now as you're going through and
you're drawing along with me, you can start to
understand, okay, cool. That's why these
planes are this way. It's basically
just another layer to help break down and help you digest the face and understand it on
this intimate level, where you can look at a reference photo, let's
say in the future, and you can see the planes
on the subject's face, and you can adhere
to these methods and use your own techniques
for drawing anyone. That's why these methods exist. The Auro method was actually
originally created for painters because when it comes to oil paintings
and whatnot, that's very much a
layering process. If you've ever painted, you understand that much. But these planes, because they are rooted
in visual principles, you can apply them to pretty
much any visual medium. So, in this case,
like graphite or charcoal or whatever. Okay. Now, when it comes to the lips, we want to start from the
corner just like this. And then make sure you pay attention to where
you're at in that plane. You start from the corner
and do short little hatches. But then with each hatch mark, you're slowly bringing
it up to a point, it aligns with that split down the center
of the upper lip, and then as you're
going past it, you start to bring it back down. That is what I mean by following the underlying form of
a specific Asaro plane, then of course, when it
comes to the bottom, we're doing the
exact same thing, only it's the bottom lip. I cannot stress to
you enough how good this is for your
subconscious drawing mind. Now that we have that, what we're going to
do is we're going to start bringing
these lines up, I would recommend for
the chin that you start from your contour line and
then you pull up, right? Now, if that first layer of hatching, if
you're not liking it, don't worry because
what we're going to do here in a little bit
is I'm going to show you how you can go back over certain areas
of the drawing, the chin included, and you can start to do what's
called double hatching. Like this, for example, we came all the way around
from left to right, and now we're coming back over the top from right to left. Now, depending on how low a
value you want to convey, you can be a little bit
more aggressive with the amount of hatch marks that you do and the pressure control that
you utilize as well. But as far as the subtleness
and the details of hatching, I'll show you some tricks, but for right now, let's
just focus on the ear here. Notice how I'm not
just going through and hatching the entire ear,
from top to bottom. No, I'm going through
and I'm being very, very specific and
conscious of where those individual planes
when it comes to the structure of the ear
reside, just like this. Notice there's one, two, three, there's four different
angles that I just did. Just like this. Remember, hatching like
this is designed by its very nature to help you understand the flow of each plane and how
they tie together. Now when it comes to the neck, I'm going to go from right
to left, just like this. Nice and light. I want to use a very light pressure control here. I'm just
pulling this down. I'll show you too, because if
you look at reference one, you can see how
the other side of her neck is a lot darker. It's a much lower value. I'll show you how we
can build that up.
8. Detailing & Double Hatching: Okay. Now what we're
going to do is we're going to detail
out the face and then we're going to
double hatch and I'm going to bring out some
of that underlying form. Just like this, the
eyebrow right here. I'm just going to
pull these lines real quick across it like that. Then we're going to go
through and we're going to double hatch a bit. Notice how the value actually
libers when we do that. Then right up here,
above the eye. Notice how we have
lower values with the way the light is
casting across her face. We want to double
hatch just like this. Because we already have that initial layer of
hatch marks on our paper, when we go to double hatch it, it's going to lower the value. It's going to give you actually
a really cool aesthetic. I challenge you to
try to figure out exactly where those lower values are right in here by the eye. I just went through and
lowered some of that. Then here around the
corner of the eye, subtle little detail work. But it's the detail work that really brings the
drawing together, right here on the bottom
plane of the nose, going through on this left side, right along the bottom. And notice how your hatch
marks for your second layer, for the detail layer, they don't have to
be the same length. One of the reasons
why we were doing these very broad hatchmarks for the initial layers
because it was just that. It was an initial layer where now you can go in
this nostril here. I'm going to fill both of these in and that's actually
going to help bring out a lot more
detail and it's going to help us with
accentuating the value scale, we're going from complete
black to complete white. That's really going to make
our drawing pop as it were. Then we can do some
crosshatching here on the nose. Then I'm actually
going to darken up the top line for the eyes, and then I'm going to make sure that I fill in
the eyes right here. I would encourage you to
put in that same amount of detail in your
subject's eyes as well. Notice how the line quality
for the top line of her eyes is a lot thicker and it has a
very, very heavy weight. It's got that thick saturation. That's what we want, but you don't want to do
that on the bottom, and that will help bring
out the details in the eye and make them a lot more realistic and accurate
to the reference photo. Okay, now right here
below the lower lip, we have a shadow. It's more or less a drop shadow
because of the lower lip. I just want to
double hatch that. Now we have longer
hatch marks right here because of the way
the light is casting. The right side of her face
is of a much lower value, while the left side of her
face is a much higher value. And so when it comes
to hatching like this, we don't have to hatch aggressively on the lighter side of her face because of that. But now right here
along the jaw line. I'm just doing nice
short little pools, as you can see, right here. But I'm not pulling
them all the way up. This is going to lend
itself well to bringing out the actual
roundness of her jaw. I'm going to take this all
the way up to the ear here. Okay. That's looking much
better already. I mean, we've really brought
out a lot of that detail, especially in the eyes. But then here when
it comes to the ear, we can actually cross
hatch this if we want. As far as the amount of time you spend on hatching and detailing, if you don't want to do
that, you don't have to, but I would say with
this being part three of this series, hopefully, you've already done
the first two parts, so challenge yourself a little bit and really try
to make this one. The third one the best one. Take everything that
you've learned from part one and part two and
apply it right here. Okay, now that hatching is
looking really, really good. I'm liking that a lot. Then as far as the lip here, lowering the value there. But yeah, this part
of the drawing, it's a little here a little there right here
underneath the chin. Remember how I was mentioning,
I was going to show you how to lower the
value just like this. It's important when you go
over with that second layer of hatching that you really pay close attention to exactly
where those lower values are. Now that's not to say that
you can't go over them again if you really need to get a little bit more specific. The cool thing about
hatching like this is it's very much a layering
process like charcoal. Just one layer over the next.
9. Final Details & Thoughts: Okay. Now, what we're going
to do is to wrap this all up. We're going to draw the hair. We're going to detail
the hair a lot. I think it'll be
pleasantly surprised how this brings it all together. But just like this,
what we're doing is we're using a heavier
pressure control, and we are using the initial
lines that we drew for the contour lines and then the contour lines
of the hair segments, and we're going
over those again. Notice how each time you
go over these lines, that value gets lower and lower. But don't be afraid to
do this right here. Notice how I'm going back
over the contour lines. Effectively, what I'm
doing is I'm solidifying exactly where the
boundaries of the hair are. Because once I have those, then I can go in and
I can start to detail out the hair with my hatching. Okay? Because what I'm trying to do here is I'm trying
to bring out the flow of the hair and that's one of
the things that drawing the contour lines of the hair segments helps
us to do initially. But what we want to do now is now we really want
to exaggerate it. Because by exaggerating
the hair flow, we're going to be able to
bring that out and really showcase exactly how the
hair lives on our subject. But just like this, the
biggest thing is going through one line at a time and starting
to bring out the flow. You can go fast,
you can go slow, you can go somewhere
in the middle. It's really up to you. But the one thing that
I would challenge you on this one to do is to really try and focus on
the different line qualities. Don't go through and make every single line the same weight. We want some of the
lines to be thick, we want some of the
lines to be thin, and then most all
the other lines, we want them to be
somewhere in the middle. We just like this. Notice how we're bringing in this flow. Anywhere where there is a lower value in the
light reflection, do not be afraid to go through and hatch
that again and again, like how we were lowering
the value of her face. We want to do that
exact same thing with the value in the hair. You can have shorter poles depending on where you're at in the hair like
this right here. Notice how short
these poles are. I'm not pulling them
all the way down from the top of her head to
the top of her ear. I'm barely pulling
them over the top. One of the reasons why
is because we have that light reflection there
in the center of the hair. This is a way where
you can go through shorter poles and you can start to lower the value
where it needs to be lowered. But at the same time,
you are bringing out the high to mid values
throughout the rest of the hair. What inevitably happens
as you do that more and more and you focus on
specific parts of the hair, the hair overall
becomes more dynamic. Right? That's good.
That's what we want. We want there to look very
dynamic and we want it to be of a much lower
value, you know, much lower than
any value besides maybe the eyes and
the nostrils on the face because that
will plug into the face itself and then give us a
completely dynamic portrait, you know, holistically speaking. Just like this. When it comes to everything
that we've done so far, this is the part
of the class where I really want you to slow down, pause this part of the class if you need to
and just really focus on the detail that you're
trying to bring out and the flow of her hair.
That's the big thing. Because we are
lowering the value by hatching over the top of
what we've already hatched. That's good because that
brings out detail as well. Effectively, when
you're hatching and using this type of
technique on the hair, what you're doing is you're
killing two birds with 1 stone in that you are
lowering the value, but you're also being
aware of the detail. Now, especially for
someone that's going to be looking at your
drawing critically, they'll be able to
see the technique within the value itself,
if that makes sense. And hair, of course, is
a very unique texture. Her hair is straight
in this one, and so we want to make sure that we bring that texture out. But it is important to not
go over the top as well. Notice how when it
comes to the far side, that hair is of a very low value right up to next to her face. The value across the very, very top until it hits the light reflection
is of a low value, so that's where you're going
to want to do shorter pols. Then where the hair starts
to tuck behind her ear. Right there is also
of a very low value, then of course, behind here where the hair is
underneath itself. But everything else
is going to be of a high value or a
mid to high value, so you want to make sure that you don't accidentally lower everything because
that would look realistic and that wouldn't be conducive to the reference
photo as a whole, especially if you were
drawing someone's portrait. But that's pretty
much it for this one. I hope that you had fun
going through Part one, Part two and Part three. I hope that you got
a lot of value out of this little mini series
here on Skill Share. I hope that you
leave your projects, leave your review of the class. That way, I can showcase
your projects in my monthly newsletter and
stay happy, stay healthy. Remember, never stop drawing.
 Messer Creations, Artist | Author | YouTuber