Transcripts
1. How to Draw Jack Sparrow Introduction: Hello, everyone,
and welcome back to my brand new Skillshare
class number ten. If you ever wanted to
improve your realism when it comes to drawing and
using ballpoint pens, this is a class for you. We're going to be
drawing a human face, and we're going to go
all out on detail. And what better than using
a pop culture icon like Captain Jack Sparrow from
Pirates of the Caribbean? So, yes, you heard
of that right. We will be drawing Johnny Depp. And my name is Ivan
Florentino Ramirez. I graduated from California
State University Fullerton, and I have experience
with live drawing, life painting in both
acrylic and oil paint. And I mainly use
graphite pencil. Icron ink pens and
even digital painting. So one of the reasons I love using the world of pop
culture and learning from it is to get that intimidation
out of the way that drawing realism is
only for professionals, but that is not true. And because we are drawing and technically sketching
in a small sketchbook, we don't have to commit to a large drawing and
because we are doing an ra drawing with a
drafting pencil and finalizing it with a
cheap ballpoint pen, we can cover up our mistakes
if we need to do so. And all you need is a
tiny sketchbook and a few ballpoint pens and
a pencil. That is all. And because we are drawing
Captain Jack Sparrow, we're going to be focusing on the human anatomy,
which is just the face, and we have a few
things to look at, like how to draw hair, a little bit of cloth,
some facial proportions, and detailed accessories
in the hair as well. This is all about having fun, experimenting and improving
our skills all into one. And best of all, this class will connect with my
other pen drawings, where they were around
20 to 15 minutes long and even my
realism classes, which were over an
hour in length. So this class will combine
the best of both worlds. So are you ready to start
learning through the world of pop culture and take these skills in this class
and apply it to your art? So grab all of your
materials, and let's begin.
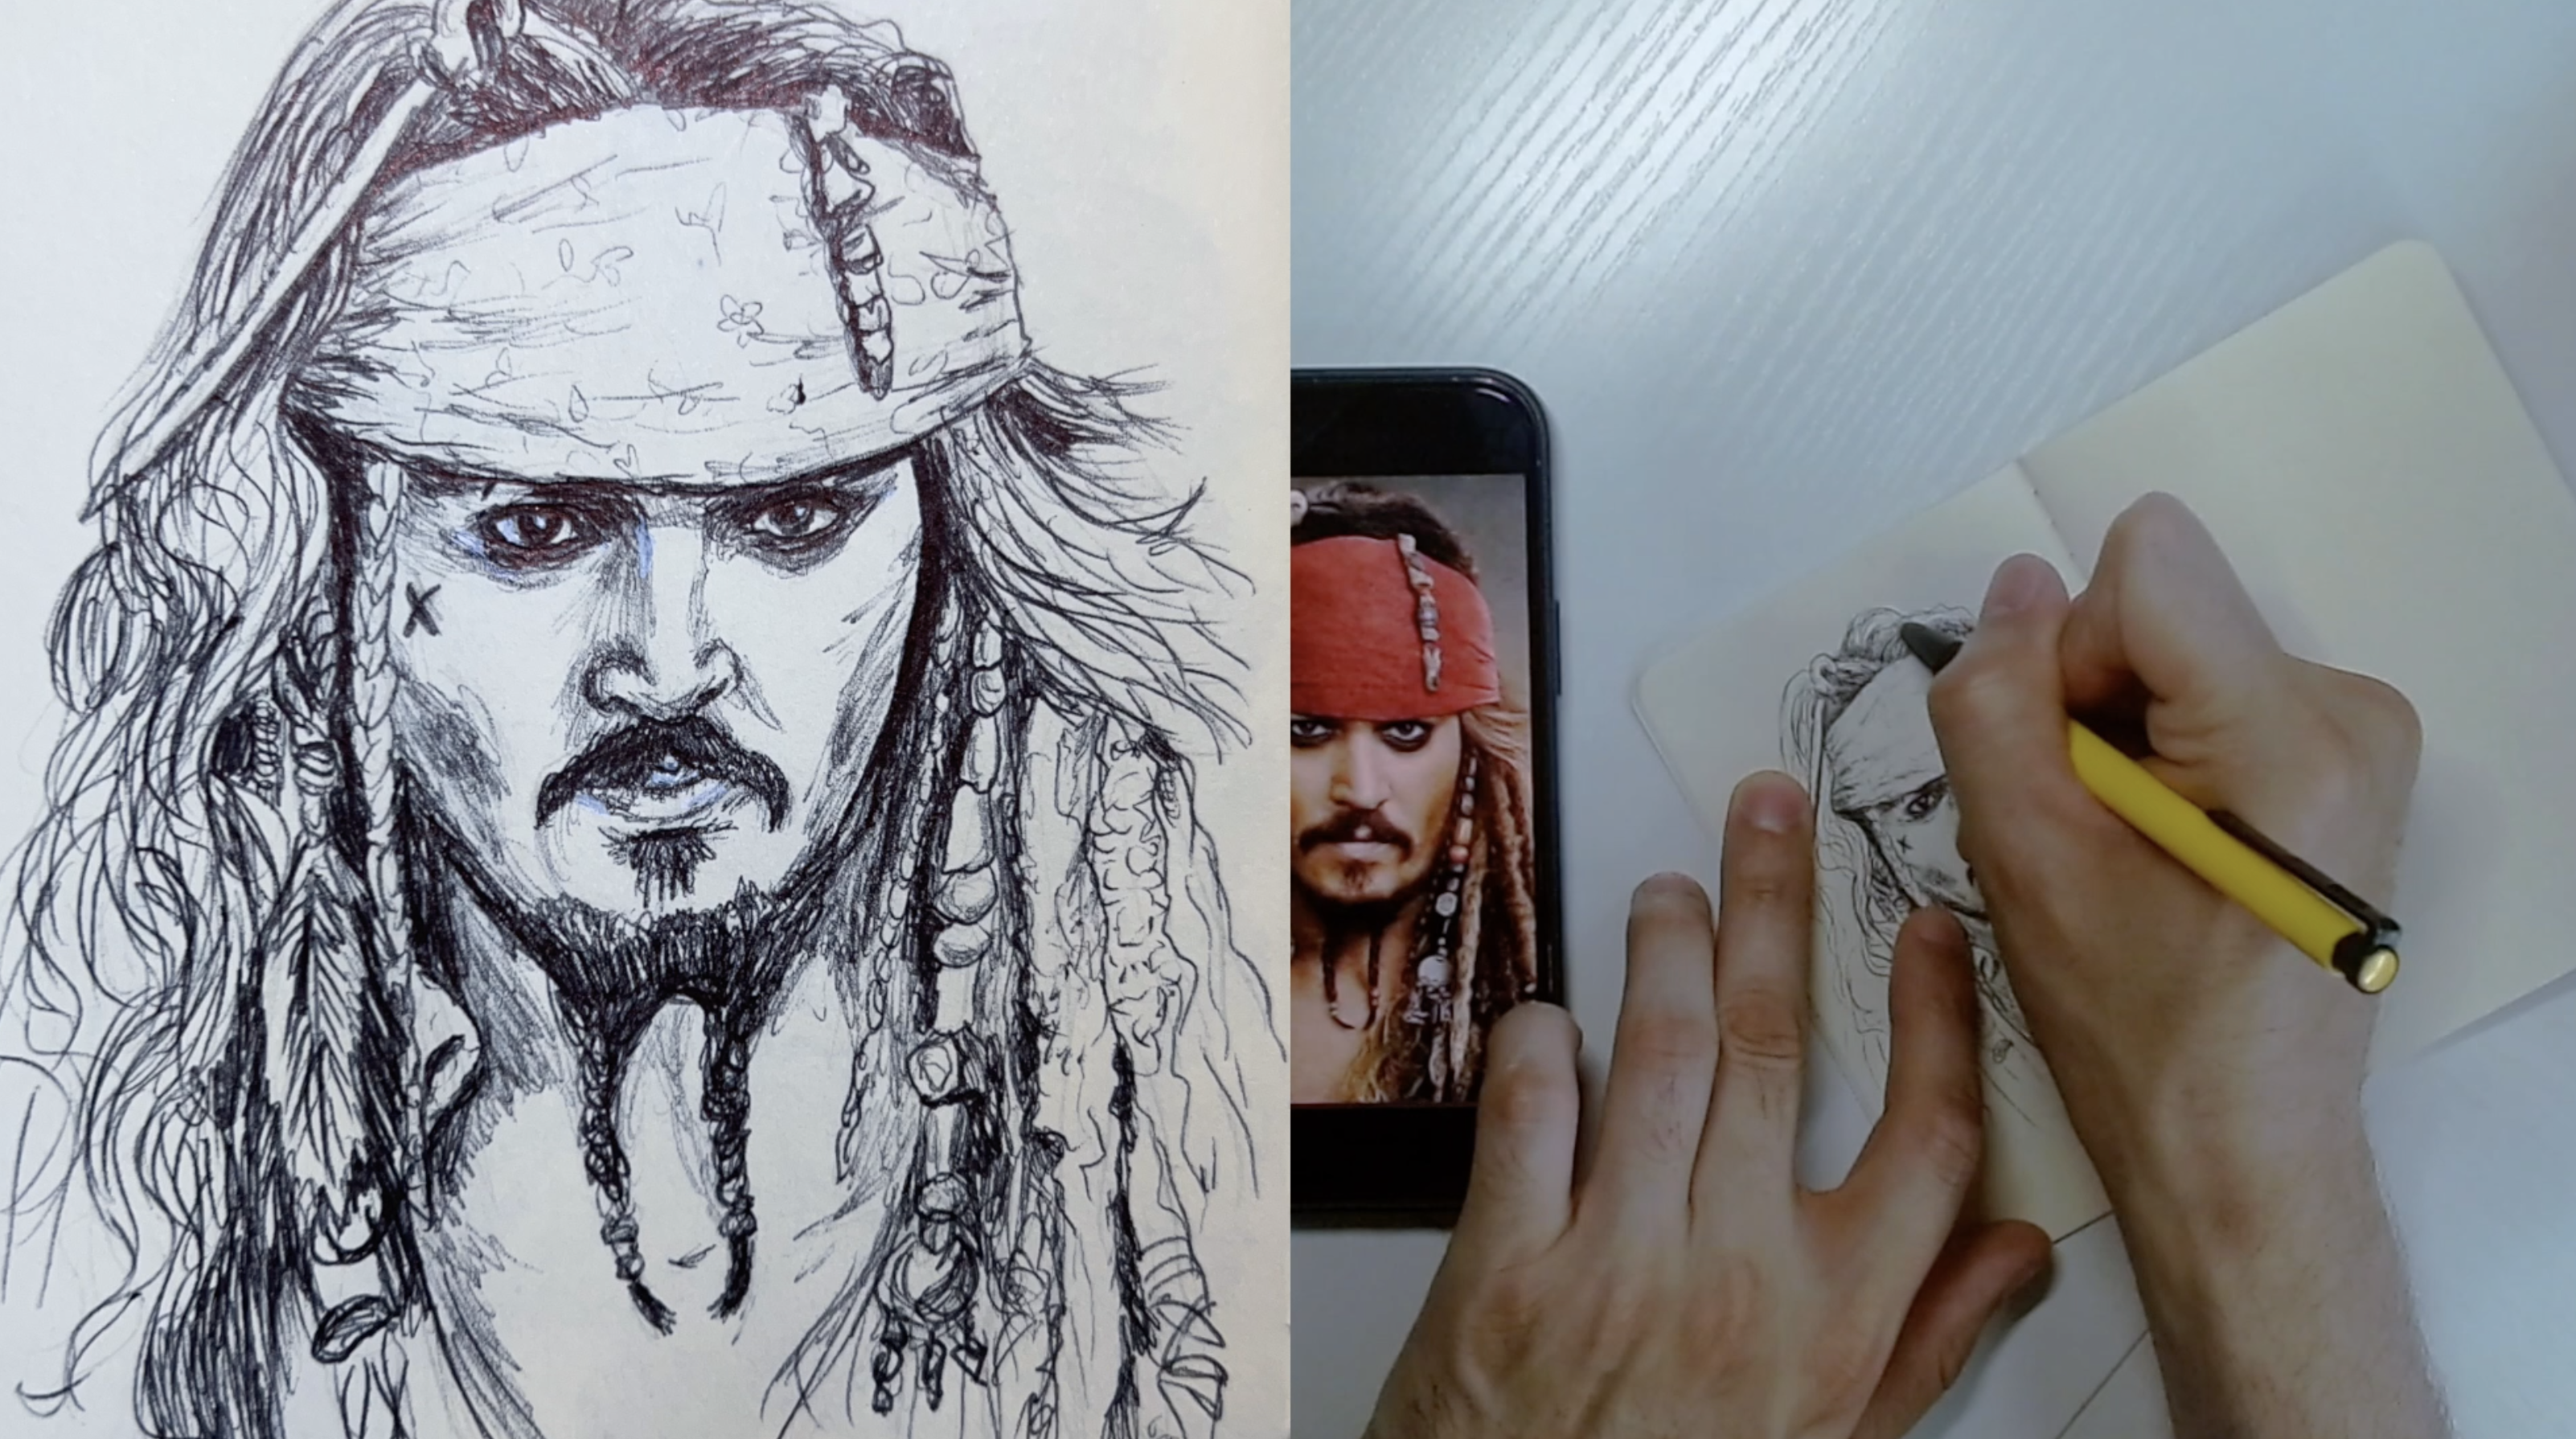
2. Jack Sparrow Pencil Drawing: Okay, so now let's begin
drawing Captain Jack Sparrow. Now, with Johnny Depp's face, this is why we are applying everything that we've
learned and that I've taught in all of
my other ballpoint pen sketches when
it came to drawing the monkey and some
of the animals is because the fact that we
are drawing so small, we have a lot of room to either make some mistakes and
also cover them up. But because we are drawing and I'm starting with
a drafting pencil, and obviously, you can use
any light pencil you have, preferably a two be pencil. We do need to at least
try to get a great overall head drawing of
his entire face, neck. Hair and all of the details
that we're going to need, but we also need to make sure the
proportions are accurate enough so that we can have a great pen drawing
at the very end. Having the best underdrawing we can is important to
step number one. And anytime I'm drawing
a head or face, I always like to draw a cross
right in the center just so that I know where the nose
and eyes will be placed at, and I just go from there. Right now, I am going to
start with his bandana because that is where most of his forehead
is being covered, and his eyes kind of go right
directly underneath that. So this is a bit of
a difference because we are dealing with
cloth and accessories. And again, all of
this comes into play with all of my other head
drawings that I have done in my longer
form classes as well when we were drawing hair, the human face,
and head drawings in different proportions. Now we are just applying this in a smaller version so we don't have to commit
to a large drawing. And again, you can
see me going over and readjusting and making
things as we see fit. When it comes to the bandana, I kind of extended it
just a little bit. I drew one eye just to
kind of test it out and see if it's looking correct
and accurate enough. So it's okay to move left and right and all
the way through the entire face structure just to see if we can get
the proportions down. And once I feel like the eyeball is decent enough,
I can move to the left, which is usually how
I tend to sometimes mess up and not get it
accurately as I can. Sometimes I have to erase and even use a ruler
just to see where the bottom or top part of the eye will be aligned
with the other eye. And this is why drawing
the nose and that middle crossline do
help with those guides. Mm. And trust me when I
say as someone who has been drawing my entire
life since the age of three, you have to trust the process. Sometimes it feels like things are just not looking
the way they should, but trust me, just
keep on going. One of the main
lessons when it comes to drawing portraits
and faces is at least make sure that both eyes look the
way you want them to and are similar in are similar enough to what
your reference photo is. I promise you, as soon as
you can get those down, you can work your way
down into the nose and into the mouth and
working your way out. As I finished both eyes, they were looking similar and
the way that I wanted to. And now I was confident
enough to start drawing some of those
details like the bandana, and I moved my way into
his long curly hair. And that's why I kind
of just wanted to make sure that he was actually looking like Captain
Jack Sparrow. And now I was making my
way into his mustache. And as soon as I
started drawing that, I was a lot more confident
that this is going to turn out into a great final drawing
with the ballpoint pen. Again, all of this takes time. You do not have to rush this. Even with a small drawing
like this in a sketchbook, I wasn't rushing anything. This is all still
a great practice, a great lesson in realism and how the human
face looks when it comes to having so
many different elements as an artist that we
can kind of tackle. Not only is this a
confidence builder, but also takes the
intimidation away from drawing realism in
your future projects. And as I was making all of
these pencil marks, and again, I was also following the form, so you can see the
way that I was drawing the cheekbones.
I was curving them. Same thing with the mustache,
when it comes to hair. I was making sure that I got these shapes down, which
is very important. I drew around the shape
and then started making some line marks to resemble
hair in the got area as well. As you can see that I was
drawing those braided parts of his beard before I even
started drawing the details. I even drew the shape
of his bandana. The shape of his hair before I started drawing
all those strands, which is not
important right now. The eyes are looking
just like I wanted to. The nose is, for the most
part, accurate enough, and now I'm slowly working my way into the hair and some of
those accessories, which can have a lot of detail. So that's why I zoomed in and kind of just get an idea
of what that pattern will look like for that hair
piece that looks like a bone and also those little
trinkets in his hair and the beads with all
of those jewels that are attached to some of those braided pieces
of hair as well. And this is where I also
started drawing some of those cloth wrinkles, at least a suggestion
of some of them, not all the way through,
because, again, we are going to
finish this off with just Black point pen because
we are also wanting to push ourselves and see how
much we can do with just one tone in those everyday cheap
ballpoint pens that most of us
already have at home. Now, to quickly summarize
simplifying the face drawings, let's focus on key
shapes and proportions. Start with basic
shapes like circles, cylinders for the head and
jaw, and then refine them. Divide the face into
thirds to establish proportions for eyes,
nose and mouth. Use squinting or selective
focus to identify and emphasize the main
light and shadow patterns. And then what we will
do with the pens is that we're going to refine
details like the eyes, nose, mouth, and focus
on their core shapes and values rather than
every minute detail. And I will have these
high resolution Jack Sparrow reference photos ready to download and
for you to access. These will come in handy,
so use them accordingly. As we're nearing the end of this first part
of the lesson, you can see that I
didn't go and push it all the way when it
came to all the details. We just want to know
what I like to call the landmarks of our subject. So, most importantly,
we got his eyes down, the nose, the mustache, the mouth, the beard, and the overall silhouette
of his head and the hair, which is most important and the most identifying thing
of Captain Jack Sparrow, which makes him so iconic. Now, we'll be finishing
off with just a little bit again of the
silhouette of some of those accessories
and some of those curly hair strands before we
go into the ink pens. Now, this is a
step where you can slow down, pause, rewind, and go back to this first
part of the lesson, and kind of just take
your time in making sure that you feel comfortable with all the proportions
in his entire face. And again, make
sure your reference photo is right next to you, just like I have it on my phone or have it next to you
on your laptop or iPad. Zoom in and out as you like. And make sure to
take some breaks, and it's going to be a lot easier for you as
soon as you know you're confident with your
under drawing and if you need to edit your pencil
drawing with an eraser. And if you're satisfied with the proportions of Jack Sparrow, let's move on with
the Black point pens, or if you have blue point pens. So let's get started.
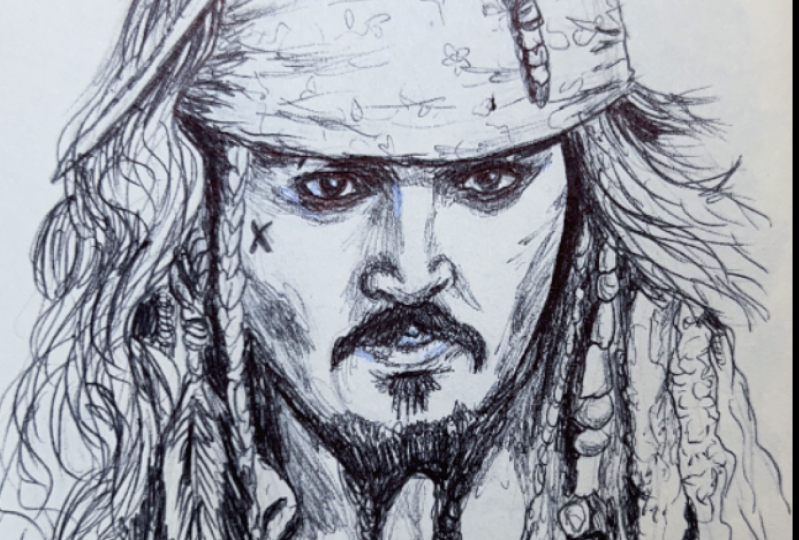
3. Jack Sparrow Pen Drawing: M. Now, let's focus on Captain Jack
Sparrow's eyes because using the Black point
pen will bring out the intense character and
expression to your sketch. His eyes are iconic. They are dark, expressive, mischievous, and
lined with coal. And this tutorial
will walk you through a detailed step by step
process focusing on structure, expression, shading
and pen technique. So this is what you will
need a black ballpoint pen of any kind that you have. Like a standard one, ideally
with consistent ink flow. You can even have a
sketching pencil, which is optional for
a light based sketch. And if you do happen to have
an eraser that erases pen, that is also fine and a small sketchbook or even
a small piece of paper, because we are drawing small
because we don't want to commit to a large
drawing for this course. I like to begin drawing with
the right side of the eye. So in this step, let's draw
the outlines with the pen. Now, use your
ballpoint pen lightly. You can build up
darker lines later on. For the upper eyelid, use a curve line that dips
slightly in the middle. Emphasize the outer corner. It's heavier and more shadowed. And now with the lower eyelid, draw a shallower curve, leaving a slight gap between it and the eyeball for
the water line. Now, as for the iris and pupil, draw a round iris, partially covered
by the upper lid, add a centered or slightly
off center dark pupil. Now, let's add some of
those detail in his eyes. Now, this is where his
personality really shows. So you're going to add
some shadows above the upper eyelid to suggest
depth and shade gently and build it up with
cross hatching or just overlap it many times in the same area
with lots of lines. Now, leave a tiny white
highlight in the pupil or the iris for a glinte of light or carefully
draw around it, because this is very important to keep that balance between a bright highlight and
some dark shadows, which usually happens with light and reflection
in the eyeballs. Now let's fill in that
pupil very dark and use circular motions for
the iris texture. Now, let's focus on
sketching the eye makeup, which is iconic to Jack Sparrow. So we're going to use
softer shading or lines to indicate his iconic
smudge black coal eyeliner. It's thicker on the
lower lid and wraps around the eye in a slightly
irregular oval shape. Add some faint smudges under his eye to show the
worn, rugged look. Alright, let's draw
Jack Sparrow's nose. Now, he has a narrow one
that is slightly hooked, but it is medium size and
with confidence strokes, make sure you draw
the nostrils and the bridge of the nose.
Very simple to do. And you can shade on one side of the nose to create
that three D effect. And again, make sure you have your reference photo
right next to you, 'cause it does have the
shadow on the left side. So just keep that in mind. We won't be focusing on shadows just yet, but
just keep that in mind. And again, we already
outlined the bandana, but it's also focused
on the hair as well. So once we outline
the top bandana wrapping around his
forehead with curved lines, we're going to add the knot and cloth details
flowing to the side. We're also going to
include the beads and trinkets hanging
from the bandana. As for his hair, Jack has
very messy dreadlocks, and it's full of texture. So we're going to use longer flowing pen strokes
for the locks. Bary the line weight for depth. Add beads or bone decorations
hanging from the hair. Now, we're also going to add some wrinkles and
expression lines. Now, he is a weathered pirate, so this makes sense to do so. So around the
corners of the eyes, draw crow's feet using thin, lightly curved lines, add some undery bags with light curve lines or
cross hatching, as well. And let's draw his
signature smirk slightly upward on one side. Now, let's understand
the mustache shape of Captain Jack Sparrow. It is split in the middle, forming two symmetrical tufts. Each side is thin and long
and curving down and outward, ending in a thin line. The texture is wiry
and slightly unkept. And make sure to have
your reference photo handy when possible. Now with your ballpoint pen, start curving the strands. As you move downward and outward at a slight
downward curl. Keep the hair strands thin, no thick or bushy lines. And here's a few tips. Where the mustache ends, use a tighter stroke to
suggest a small twist, and you can even
lift up your pen to make it even thinner. Now, in order to suggest volume, darken the base where
the mustache meets the skin and lighten
towards the end, and build up the
shadow heavier parts by using more strokes or just covering it entirely
with the ballpoint pen. Now for the mouth, use curve
lines for the lips and show his mustache blending
into the expression. Add light shading to the
corners of the mouth, as well. Mmm. Now, as for the facial hair, he has a distinct goatee with two braids and thin mustache. So we're going to use a tight, fine strokes to simulate
the beard texture to find the beard shape and darken the braids for contrast. This double beaded beard matches the same technique and
can tie in visually. Now, you may notice
that I have worked my way from the eyes and
then worked my way out. So I want to reiterate that
we are blocking out the main hair mass right
where the bandana is, as well, 'cause we block
that out as a shape. Because Jack's hair is long, wild and mostly in dreadlocks, we're going to start
just below the bandana. We're going to draw
a wide arc of hair fanning out and down
past his shoulders. Some of the dreads should curve, others should hang straight, and others should cross
over one another. You can also leave small
gaps in between the dreads. This gives dimension
and movement, as well. And this is where
we leave room to add the signature details. Again, he also has beads, trinkets, braids, and even
the beer braids, as well. For the beads, you can just draw round or oblong shapes hanging
off a few of the dreads. You can even add the feathers, small coins, bones and threads wrapping around
feel those dreads. Now, as for the braids, they are front facing on the locks. You can draw them as
interwining rope patterns. Now, we're going to
mostly leave it as it is with the paper
showing through. We're going to focus on the
remaining part of the sketch, which is the shading and all of the fine final details
that's going to bring all of this together to resemble that three D look where
we're going to be darkening in all those
solid black colors and really make it into a
realistic pen drawing.
4. Jack Sparrows Facial Details: Now, for this final
part of the course, we're going to be adding
texture and shadow to Captain Jack Sparrow's face
with the ballpoint pen. We're building
everything up from the smallest details
in the hair, the bandana, and all
of those accessories. And because we have this high resolution photo of Johnny Depp that I
provided for you, we don't have to worry about establishing
our light source. And because we have
our reference photo, you can definitely tell that the light source is coming
directly in front of him. Since this was a
promotional photo for Captain Jack Sparrow, our light source looks
like it's coming from the front because his nose, cheekbones, and lips are
illuminated right in the front. So the shadows are mainly in between his dreadlocks,
his neck area. And that is how we can determine our shadows and highlight areas. This is how we know where
the darkest shadows go, for example, under the cheekbones,
under the jaw lines, and even inside the eye sockets. And where we avoid adding too much light is in
the side of the nose, the forehead, and the cheeks. So the light side will
have little to no texture, while the shadow side will
have the heaviest inking, and that's what
we are doing now. We're filling in that mustache and where all the
hair is, as well. So let's get into his
facial hair texture. Jack Sparrow's
iconic mustache and goatee have a rough and
unkept texture look. So here's what we're going
to do. We're going to use quick directional strokes
for each hair strand, as you see that I'm doing now. We're going to build it
up with layers to show depth and heaviness in the
color, which is all black. And if we add
thinner lighter hair strands around the
edges for realism, those are the small details that will bring
everything together. And you'll even see
that right where his got is underneath his lip, where we can just draw smaller, finer strands of hair. So if we press lightly, we can get those flyaway hairs
around the lips and chin. And those are the small details that really bring together his unkept rough pirate
aesthetic that he is known for. And I'm sure you have
noticed by now that I have been using overlapping lines
without lifting up my pen, and this is where I am building some shadows and contrast
for the mid tones. So, the more lines that I put next to each
other and overlap, the darker it will be. And the less I overlap, that'll be my middle tones. And you see how I
applied that in his cheek bones to the left
and right side of his neck, even on his chest area, and also I'm using the same technique to
overlap the hair as well. And this is the technique to
use underneath the eyes and also right in between his hair for all of
those dark shadows. And as we're working
on the mustache, we're filling in all of
that part from his goatee, the braids, as
well, and the chin. All of that applies to building that darkness in his black hair. And as you can see, this is becoming a little bit more three dimensional and not so flat looking everything so far for the most
part is outlined. And because we are focusing
on the hair and now the face, let's get into the texture
and the weathering look of Captain Jack Sparrow's
rugged pirate worn skin. Now, we can use this
method called stippling. In parentheses. This
is just called dots. So if we use stippling a
little bit in some areas, this can also give
us a little bit of a stubble look or
even something to do resembling with pores and
just skin imperfections. But we can keep it light
around the nose and leave the paper as part
of his skin texture. So we're going to work around the nose, the
bridge of the nose, and the sides, around the eyes, which will have his crow's feet and that sunken look, as well. And then because the
forehead is covered with the bandana, we don't
have to worry about that. We barely have to worry
about the smile lines, but we're going to keep
the texture light in the highlight areas
to create contrast. So we can see that we added a bit of the texture
into his cheekbnes. We added that cross little
tattoo that he has. And right between the
eyes and the eyebrows, we added a little bit of that shadow that can
go on right there. And we're gonna be
moving back and forth between the hair as well, 'cause that's the most
important thing, too, is that's where the darkness
is gonna come into. Now, for the ending
of this course, let's focus on Jack
Sparrow's red bandana. Now, this head wrap that he
has has different properties, just like any clothing or most clothing do have when
it's wrapped around a subject. For example, you'll see that in the middle
of his forehead, it is, for the most part, very smooth and towards
the left and right side, it does have those wrinkles, those folds, and creases because it is being
stretched out. And right there where you
see that I zoomed in, you can see that it has these intricate
patterns of flowers, leaves, and vines, and
it's all done with a darker red line
in that stitching. Now, these repeating patterns, as you all know, there is no way to draw every
single one of them. And it's beneficial for
us not to draw every single one of those because
it doesn't make sense. As long as we draw a few of them here and there throughout
the entire bandana, it gives us suggestion
and the illusion that there are more that it's fully covered
when it's really not. And that is the
illusion and trick of drawing all
around that surface, and it still gives us
that great pattern and texture without completely drawing every
single one of them. And here's just an
example of something that I found online about clothing and the way that there's
a point of tension in clothing when it's being
pulled and stretched. Just if you need a visual
aid on how that works when it comes to clothing and
drawing it on human figures. So here is a tip about patterns. What I did was I took one of
the main elements of that, which is the flower and
the leaves and vines. I drew them sporadically
throughout every single one. I drew a few leaves
here and there, some vines, and I kind of just
scattered them throughout. Now, you can go a bit more
heavy on that if you like, but I just decided to keep them spread out and mainly focus on the heavy shadows in those wrinkles that the
cloth makes when it creases. Again, you can take your time adding more and more
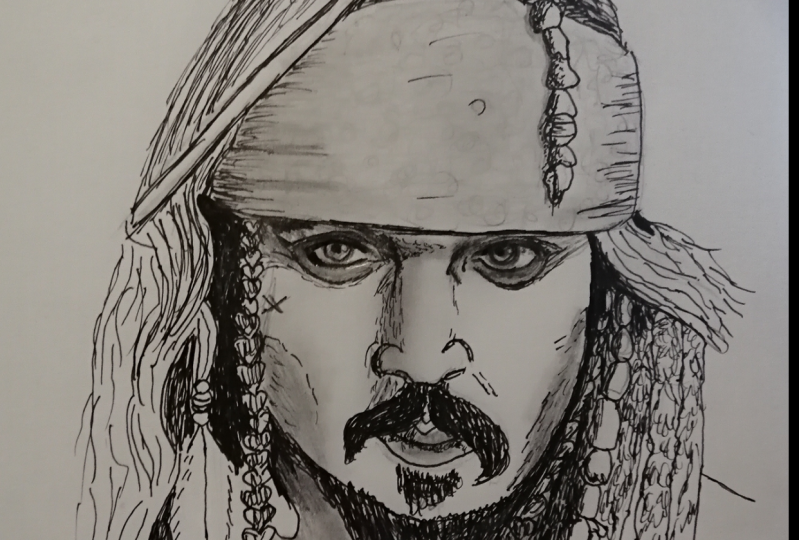
details you like. And there you have it, everyone, we finished Captain
Jack Sparrow. I know this was a long course that just focused on a small drawing, but
here's the thing. When we focused on a
smaller portrait like this, now we can apply this
to a bigger one. And the fact that we focused on a lot of elements when drawing a front facing figure and combine all the elements
of drawing not only eyes, the nose, facial
hair, a mustache, a lot of trinkets and
accessories like braids, jewelry, and finally, the cloth, this is our result. The more and more you push it, the more you'll get
the realism look while having a small sketch
that you practice with, and those skills can be
transferred into your own work. Again, I did this so that we can have fun
through the world of pop culture like Jack Sparrow from Pirts
of the Caribbean. And here's the final result with Jack Sparrow done with
Black BallpointPen. So I hope you had fun as much as I did
creating this course. And before I leave, I'm
going to leave you guys with a few final thoughts
in the next video.
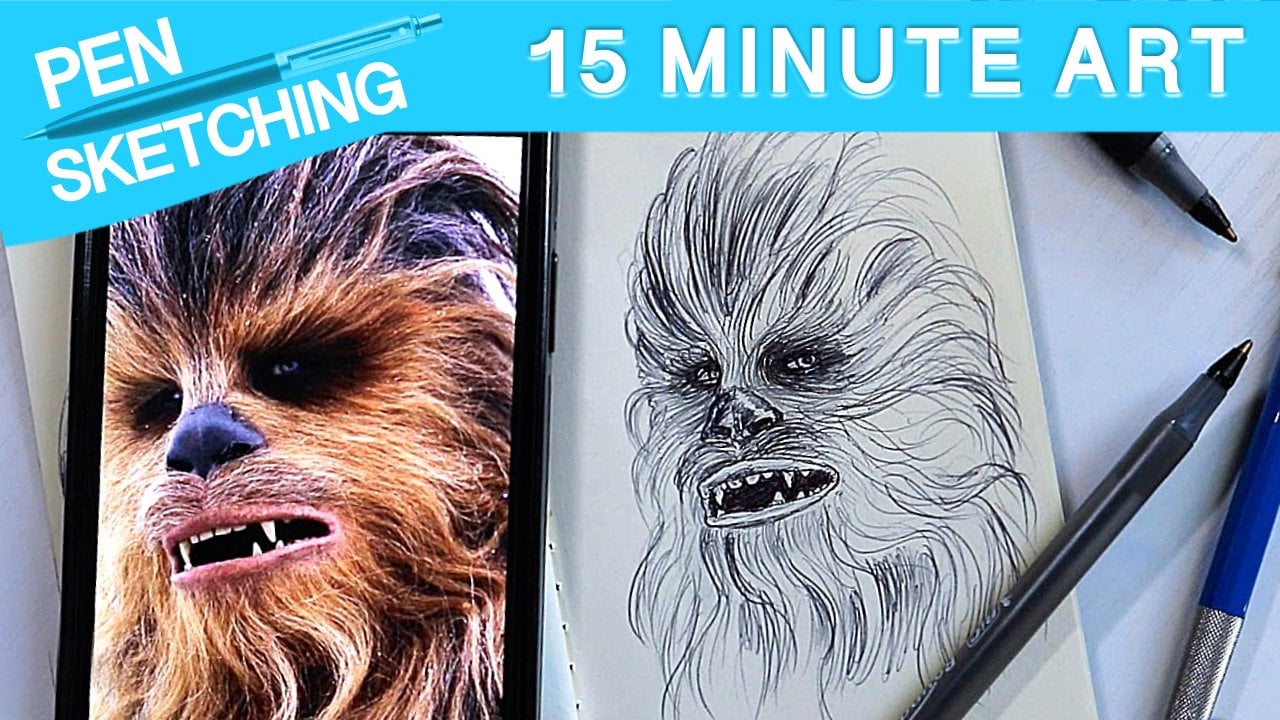
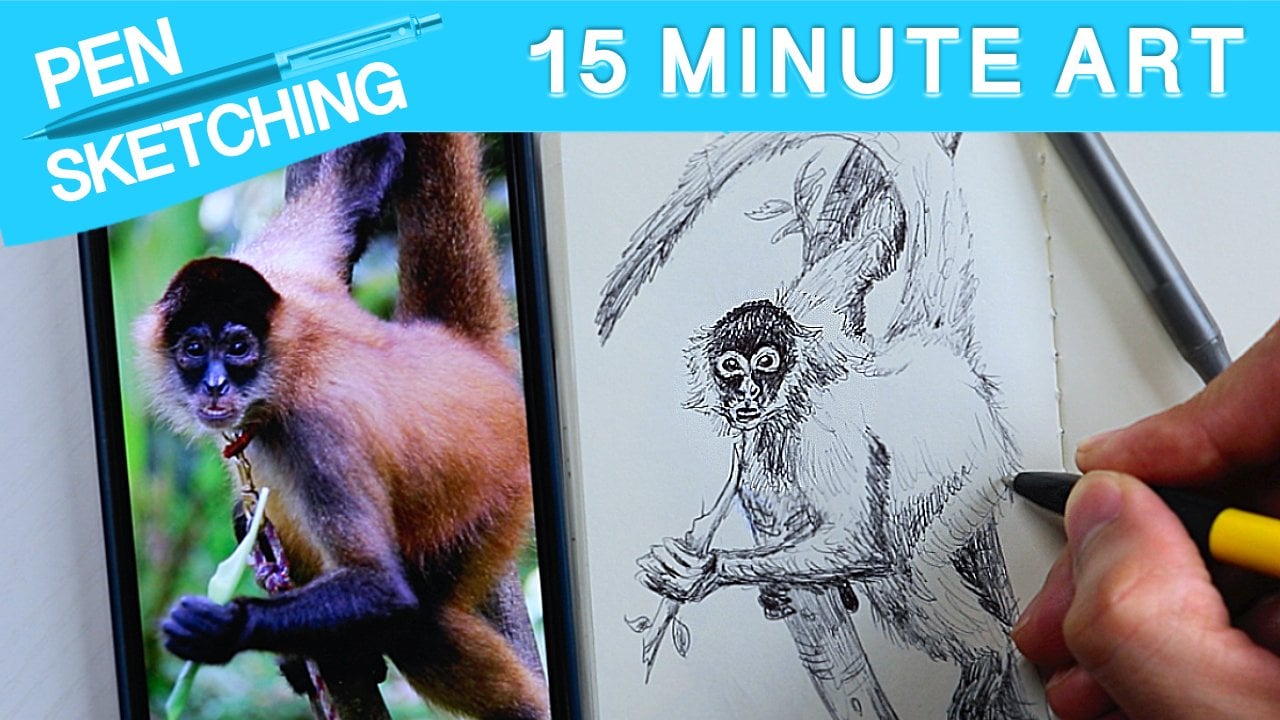
5. Jack Sparrow Conclusion: So, what did you
think of this lesson with Captain Jack Sparrow
as our main subject? And only using Black Point
pen in a small sketchbook. I had so much fun creating this. And again, this one links to my other 15 to 30 minute
videos where I had other subjects like
drawing a monkey and Jubaca and it was all done
with just Black BallpointPen. And this one's actually the
longest one that I've had. So I like the way that
it connected to those because not only did we first start off with
drawing an animal, then we went on to drawing
a fantasy character that happened to have a lot of fur and then into a human figure. And it was all done in
the same small sketchbook and just using black ink. I hope you guys incorporate
this type of method, this type of lesson of drawing hyper realistic figures, humans, and even portraits or
animals or whoever you like from real life
or just again, pop culture and the
world of phantom from your favorite movies or
favorite video games, as well. And also, don't forget to upload your drawing in the
course section. I would like to see what
you create and how you added your own style and
flare to this sketch. I can't wait to see you
guys for the next one, and I will be creating a
variety of other courses in different mediums like
graphite pencil, digital. And next, I'm going to be doing a lot of
paintings as well. So thank you so
much for watching and see you in the
next one. Bye bye.
 IVAN RAMIREZ, Artist, Painter & Youtuber