Transcripts
1. Introduction: Hi everyone, and welcome
to back to Basics, how to draw Animals. I'm Paul Richmond, and
I'm Melissa Foreman, and we are going to be
drawing animals together. We have a bunch of different
animals that we picked out. And we'll start by doing some quick gesture
drawings at the animals. What's a gesture drawing? Melissa Paul. A gesture drawing is a
quick, simple sketch. It usually just captures the overall essence of
whatever your drawing. This case we're
going to be drawing a couple of different
types of animals, like birds, and
wolves, and horses. So we're just going
to be capturing the gesture or the overall
feeling of those animals. It's a good way to warm up. Then we'll do some
longer drawings where you get to be a
little bit more detailed, starting with a pen and ink
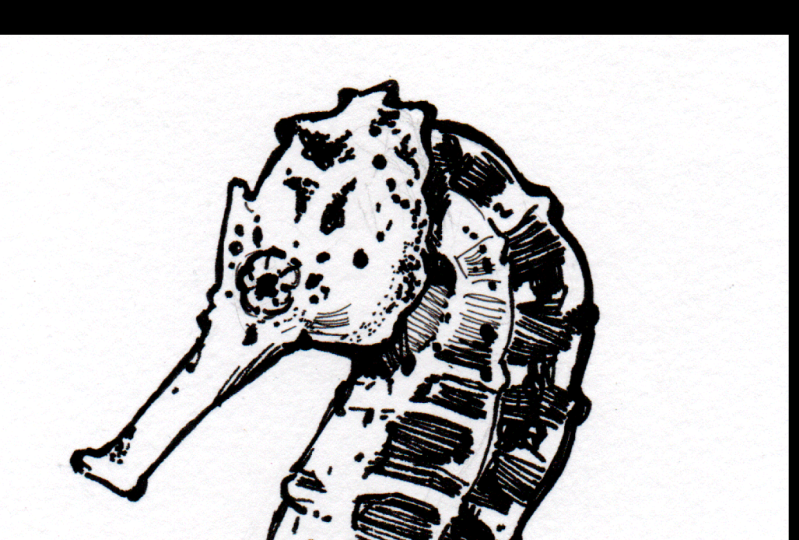
drawing of a sea horse. And then we'll be
finishing up with a graphite drawing of a
tiger, which is my favorite. It's going to be a lot of fun. Before we get
started, we wanted to introduce ourselves so you have a little bit of a
sense of who we are. My name is Melissa Farman. I am an artist, art director, and now a teacher. I have been working in the
professional arts field for, oh my goodness, 20 years now. Paul and I went to
college together. We both majored in
illustration and began collaborating on projects
of all different kinds. We love the idea of sharing
what we do with all of you. So I have been creating
art my whole life. I started on professional
portraits when I was 14 years old and have been
doing that ever since. And I now work for a large
creting card company. I am an art director
and run a department full of illustrators and
different types of artists. I am a painter, I also love painting people. I do a lot of
portraits and figures, and I do illustration
work as well. I've illustrated the covers
for over 400 novels. I've gotten to do
some commissions for some really interesting
people like Dolly Parton. That was super fun.
And like Melissa, I love sharing what
I know about art, what I love about art with all of you through
these courses. So we're very excited to be able to spend this time
drawing together. Melissa and I have
a long history, so we will be making
a lot of jokes. It will kind of just feel
like you're hanging out with some friends making art together because that's
what you're doing, pretty much, that's what we do. So we thought we share with
all of you this course. Perfect for any
artist at any stage. If you're an absolute beginner, this will be a good
introduction into how do you actually look at something
and capture it on paper. But if you're more advanced, it's still great to go back to basics and practice those
foundational skills. And you might even be able to try some more
sophisticated things, use some different mediums or different techniques
in your drawings. It's always good to
go back and practice no matter how established
you are as an artist. Yeah, that's why I love
teaching these classes because we get to go back and do
all of this ourselves too. And it really has
helped my art a lot. Yeah, it's really good practice. And practicing all the time is the only way to get
better at something. This course will also be
great for anybody who just wants to improve
their drawing skills, Whether you eventually
want to go on to continue making animal drawings or not, learning how to look
at something and find the shapes and break
it down and make it feel like it has
volume and form that applies to any subject matter
that there is a Polly? I am so ready to get
started. Let's get moving. Okay, I'm ready. Let's
go. Let's do it.
2. Projects: What's first? So the first thing we're
going to do is we're going to start with
some gesture drawings. And we will have three
different chances to practice our gesture drawings for different types of animals. The first one we're going
to focus on is birds. And we're going to draw
birds in different poses, different shapes, different
dynamic movement. And then we are going
to move on to wolves, wolves in different poses. And we're going to do this
the last time with horses, just focusing on different ways to draw different animals, different shapes,
different poses, different dynamic line work, ways to practice
drawing quickly, which will give you an idea of how to practice form and shape. We'll spend three videos drawing an adorable
little horse. And I will be using micron pen, so it'll be a pen
and ink drawing. There's my horse. See how prints out, focusing a lot on the contours. How you can use lines to create more of a sense of
the form of the animal. Our last series, we'll have three videos put together
where we will draw a tiger. So we will focus on adding a medium value to
the background and then erasing out the highlights and adding the darkest
darks with graphite. We're going to be
creating the tiger out of different shapes and highlights
and different values. And bring that out
of our tone paper. So many animals,
it's going to be a blast. Let's get going. Let's do, Polly.
3. Materials: All right everyone,
for drawing Annals, we are going to need a
couple different supplies. So the first thing you're going
to need is a sketch book. And you can use any
size sketch book. It doesn't matter how
thick the paper is. You could even use some loose paper if that's what you have. We just need a lot of
different pieces of paper to draw different
gesture drawings. These are quick sketchy
drawings that we're going to work on in the
beginning of this series. So make sure you have a
lot of paper with you. You also need some
pencils for this course. Nolis and I are using
mostly soft blood pencils. So anything in the range, I have some four B pencils, even six B would be good, a range of soft drawing pencils. But really any pencils that you have on hand will be just fine. You're also going to
need a needed eraser and a pencil sharpener to sharpen your pencils
as you go along. The needed eraser is helpful
because you can mold it into different shapes depending on how you're drawing or
how you're using it. So I would recommend a needed
eraser over another eraser. For my sea horse drawing, I am using micron pins and I
have three different sizes, 810.12 It's not necessary that you have the
same pins as me. Even the same brand, you can use any kind of
pin that you want. Even ballpoint pins will
work for drawings like this. But if you want
to go out and get some good pins for drawing, I do recommend the
microns. They work great. And then for my
drawing at the end, the drawing of the tiger, I use a piece of
watercolor paper because it has a
nice texture to it. You don't necessarily
have to have that paper, but a thicker paper
would work well for making the mid toned value. And then you're also going
to need some paper towels. The paper towels are
good for smearing the graphite or the
charcoal on the paper. And then last, charcoal
for Melissa's drawing too. What kind of charcoal
did you use? I use what's called
vine charcoal and it's charcoal without any
kind of wrapper on it. It's just a piece of thin
charcoal. It's long. You can sharpen the
end of it if you want, but you can use the side
of it and the tip of it. Depending on how you're drawing, go gather all your toys and
come back and let's play. We will meet you here.
4. Gesture Drawings of Birds: Hi everyone. Welcome back to back to Basics how
to Draw Animals. We are going to get
started today by drawing different
poses of birds. We're going to do some
gesture drawings, which are very quick,
loose, sketchy drawings. You don't have to be
perfect about these. The overall idea is just to get a quick impression of the pose or the
shape of the animal. We're just going to learn
a little bit about form, a little bit about shape, and a little bit about line. Polly, what do you think?
Ready to get started? I'm ready for these
birds to strike a pose. Oh my goodness. All
right, birds do it. Let's go. Okay,
we're going to do some gesture drawings of
birds in this lesson. Are you ready to draw
some cute birds? Melissa? I am Polly. And we should probably tell people
what gesture drawings are not a bad idea,
why don't you do that? Okay, of course, gesture
drawings are exactly that. You're just getting the gesture of whatever you're drawing. So it's just a brief sketch, it's usually timed
and it's usually fairly quick because you just want to get the
basic forms down. So it's just a way of practicing how to draw something
and getting used to things not being perfect and just looking
at the shape of the form. All right, so let's
just jump in and do it. All you need is
pencil and paper. And we're going to give you 2.5 minutes to sketch
this first bird. Ready, go. When I'm doing gesture drawings, I like to use very
loose scribbly lines. I don't try to draw
everything really perfectly. Draw a bunch of lines
and make it messy. Messy is fun. In this instance. I don't usually like messy, but I think it works well
for gesture drawings. Yes, what are the good,
Just drawing tips. Look for shapes, break things
down into simple shapes. Don't get too caught
up in details. Hm. Yeah. You're
going to look a lot at what you're drawing
and less at your paper. Yes, that's good. I might even consider that
a pro, pro tip. You know, we like our
pro tips around here. Do you have a minute and a half left when you do
just your drawings? You need to be prepared for some of them to not look great. It's it's okay. That's all part of the process. Yeah. Some will be
better than others, but just use the time you have. I would say try to
avoid using the eraser. If you draw a line,
that's not what you want, just draw another line darker. Yes. Keep moving. Definitely, just
draw right over it. I know Paul is using pencil, but I am using some
soft charcoal, which I think a softer drawing
tool usually works better for gestures because
it flows a lot nicer. You could get some of those dark values in if you have time. Mm hm. Yeah, You could even use a marker or something
like a ballpoint pen. I actually like using the
ballpoint pen because it definitely makes it so you
can't do the erasing thing, but also there's just something
nice about the lines. Hm. With that, yeah, you definitely don't need
anything special for these. Just a quick sketch,
I would say. Focus on the shapes
and the form. All right. 5 seconds
okay, and time. Perfect. Nice job. All right, Are you ready for another one? I'm ready. Let me turn
my paper here too. All right. Next up. Nice little profile view. All right, you may. Another 2.5 minutes. Let's draw. We're doing a couple
different poses of birds here just
so you can get used to the anatomy and
the structure of birds. So this is really
more to practice the different shapes that
make up different animals. Yeah. Yeah, I think
it's so interesting how we're drawing basically
the same shapes, but they're doing such
different things. Yeah. When the perspective
and pose is different, it makes you think a little
more about the movement. It's a cool thing to
capture in a still drawing. Animals are rarely
just sitting still, perfectly posing
for you very long. So that is sure to
think about movement. I think gestures
are a good way to capture that movement
because you can do quick, dramatic line work and they really capture the rhythm and the overall
feeling of drawing. Yes, I do like some drama. Really you fully, we have about 1 minute
left, of course. Now if you're
watching this video, you could always
cheat and pause. If you want a little bit
longer, that is okay. But I think there is a really good benefit to just making yourself get in the habit of doing some
really quick drawings too. It makes you loosen up, focus on the detail. Actually, even when I am
doing a longer drawing, I try to start out approaching it like it's
Adjust your drawing so I can just get it roughly placed without getting
too tight. Too quick. Yeah, I think it's a good way to practice thinking
about shapes. Yeah, just like
the overall image because it's so easy to get, get into the details
and you missed just the overall essence
of what you're drawing. 5 seconds goes fast,
time and time. All right. Are you
ready for one more? I am ready for one more. One more bird. Here we go. There My point
here and surprise. It's another bird. All right. Ready is fun with
the open wings. That's uh huh. Feel. Yes, I'm looking
up at the bird. Yeah. So as you're drawing this, don't think about each feather
that makes up the wing. Just focus on the
shape of the wing. Yes, I like drawing lots of scribble lines because chances are
if you do that, one of those lines
will be right. Yeah. You have your choice. And just ignore the wrong ones. And then if there's time, I'll go back and just darken
lines that I actually like. So I can be like, yep, that's the one I
always meant to use. You can start anywhere on the bird, it doesn't
really matter. Whatever shape you feel
stands out the most to you. Yeah, I don't know if anyone's done any of those
drawing tutorials where you draw the different
shapes usually start with a circle or you start with rectangles and you
define the shapes that way. That's a good way to start too because that really
makes you think about the different shapes that make
up an object or an animal, or whatever you're drawing. Yeah, Yeah, I think
that's really like one of the benefits of doing a lot of
gesture drawings too, is that you can try
different approaches and see what's going to
work best for you. What is your best
way into a drawing? 40 seconds left. Then once you get
those overall shapes, you can start defining some
of the smaller shapes. Yeah, yeah, you just use
the time that you have. It's kind of about prioritizing
stuff, really like Hm. What's most essential to getting across the
essence of the animal. Start there and then
whatever time you have, you can just keep going and keep building
out more details. Hm. And I think that's true
for whatever you're drawing. Yes, for sure, 5 seconds. You hear my pencil
going real fast Now, pencil, that was fun. Yeah, every one. Great job. I hope you'll enjoy getting to learn a little bit more
about gesture drawing. Getting to learn a little
bit more about birds. Paul, what do you think?
Did you have fun? I had a blast and I can't
wait for the next one. What are we drawing next time? We are drawing some wolves. So a little bit different shape, a little bit different animal. So let's get that a
shot. What do you think? I can't wait. Let's go.
5. Gesture Drawings of Horses: Hi everybody. Welcome back to back to basics how
to draw animals. We are going to do some more
gesture drawings and we're going to focus on
horses this time. Paul. I know this
is a dreaded animal for a lot of people to draw, that's why we decided
to focus on it today. What do you think?
How's this going to go? We can handle it. It's
going to be great. Okay, perfect. We
got this everybody. Let's do it and we're
back at this time, we are going to go galloping
around on some horses. So here's our first one. Let me set the timer. You know the routine.
2.5 minutes again. Oh horse, look at you. Beautiful. We have a lot
of shapes going on here. A little bit similar in
some ways to the wolf, but proportionally different? A little different, yes.
Yeah. Big old neck? Yes. Have you gone
horseback riding before? I have before, but not lately. Mm hmm. Have you? Yes. Dennis and I went horseback riding on
a beach out here. Oh my goodness, very cool. Was this Dennis idea? Of course. I don't see Paul coming
up with this idea, No, but it was very fun. Oh, okay, that sounds
very romantic. My horse was really nice. Dennis horse kept
like knocking him, so he was sort of like
riding at the diagonally, those long legs. Yes. It's interesting to try
and get some of the, I don't know, geometry
of those legs. Like instead of
drawing the whole leg, maybe break it down
into you know, section so that you're
thinking about what is, you know, this section
doing, What are the angles? I tend to draw
things a little bit more geometrically at first. Just angles, right? Yeah, thinking about the
structure a little bit, okay? 40 seconds, no pressure. No pressure, but do it in
40 seconds, no pressure. But yeah, clock's ticking. Oh my goodness, Remember
It doesn't matter. Doesn't have to be perfect. You're just getting the essence. Yes. Just start thinking about the different
shapes that make up a horse and the
different angles. Paul and I picked
horses for a reason. Horses are not the
easiest things to draw, and I know they scare a lot of people. If you Let's try this. Yeah, let's torture them. Let's torture everyone.
That's a great idea. Right? Time's up. Speaking up toward all right, and next we're going to go with a little running
horse. Look at that. Kind of similar, but the legs are at
different angles this time? Yes. All right. Ready? Said, oh my gosh,
you were on it. Uh huh. Goodness. No messing around here.
Melissa? No, goodness. Get to work. It's
interesting how it is. Like you said, it's
similar shapes but they're definitely
doing some different. But they're moving now,
which is different? Yes. It's fun to try and
capture movement in a drawing. I have to think about which
legs have the weight on them, which legs are flying, what directions is
all over the place. All the legs. There's a lot
going on with these legs. Yes, there are. The nice thing about gestures is you can capture movements and angles and different shapes easily with a few
different lines. We figured it would
be nice to start this way before we get into a
more detailed drawing. Oh, the likes,
there's so many lines a minute and 20 seconds you can certainly you
make of just your drawing where you maybe roughly
sketch out the whole thing, but then maybe you only do
detail in a certain area, create kind of like
a focal point. There are different
strategies for how do you make a drawing feel finished, even if it's not, like, rendered all the way or whatever. Hm. 40 seconds, goodness. I think it's the back legs
of horses that always trip people up because they
bend in very weird angles. Mm hmm. Yeah. It's like every leg is going
a different direction. And I think that it's
common for people to sort of accidentally humanize
things when they draw them. So we want to draw
make the knees do what our knees would
do and things like that. That won't work here? No, it's very different. Set up? Yes. All right. And time
is up. We did it. Yeah. One more left though. Oh, that's right. I thought
we were done. Oh my gosh. Now I need to go like Oh, okay. No, pal, you have the
hardest one left. Oh, Melissa, that's
why I was trying. We break up. All right. Ready? Okay. All right. I am ready for
you little horse student. Okay? And go, oh my gosh,
that's a big belly. There's a big belly here. I'm starting with
that. I think that's a I like how Melissa
cut me on track there. I thought we were
finished and she's like, Mom, we do have one
more, hey, hey, get out of it Okay. So this is definitely
one where you want to look at the shapes
and how things connect. Yeah. How does one shape
interact with the next shape? Where does it, where
do things overlap? That's a good pro
tip, I think for this lesson is like
really paying attention to intersection points
and how things align. That can help you
to get proportions. You can always draw some
guidelines for yourself too, since you're just
sketching things. I drew a straight line straight through his nose and up through the top of his back just
to sketch that spine, because I know I want to
make that straight M. That's a good idea. I think once you get
the head figured out, you can figure out
where the legs go. Yeah, look at the space
between the legs and where, how far down they come
compared to the head. It's kind of like
you get one thing on there that you feel pretty
good about and then you can just base everything
else on its relationship to that 40 seconds. It helps me too, to draw like, not just the outline, but some interior
lines where I see different shadows sometimes or just different,
you know, shifts. So it's not just about the, the outline, it's silhouette. Okay. 5 seconds. This one is tricky too
because there's a lot of overlapping lines and
shapes and things. Yeah. Okay. Time's up. If it even looks
remotely horse like, I think you should consider
that a win success. This is definitely something
you can keep practicing. Just find all kinds
of different images of animals in different poses and do a few of these to warm up before you start
on a bigger project. Mm hmm. Fabulous job everybody. You did it, You drew some
horses, You got through it. We figured out a little bit more about how horses
are put together, the forms, the shapes. And hopefully everyone
learned a little bit more about gesture drawings and
why they're important. Paul, the next chance
is yours to talk a little bit more about sea horses and how we're going
to draw them. So we just drew horses, now we're going to do sea horses and see it there everybody.
6. Gesture Drawings of Horses: Hi everyone and
welcome back to back to basics how to draw animals. In this lesson, we are going to do some more gesture drawings, but this time our model
is a beautiful wolf. Actually three wolves. You ready to draw some wolves? Melissa A. Paul. Let's give this a Okay, let's go and we're back. This time we are doing just
your drawings of wolves. You ready to do some of that? I am ready. All right. I am putting 2 minutes and 30
seconds on the clock. Ready, set, go. Okay. Different shapes here? Yeah, definitely
different than the birds. Yes. I tend to like to start with what I
see as the biggest shapes. That's just how I
prioritize stuff if I like. So I'm starting with
a big shape for the body in that way. I know that anchors it and
then I can go from there. Mm hmm. I think that's
a good way to start. It's a lot happening
here, I know. I'm like, oh my gosh, I want
to go back to the birds. Yeah. That's how
we lured them in. By making I know, right? Well, this will be no, this is not bad.
We got surprise. But again, don't get hung
up on all the details. Just get the overall essence and use whatever time you have. In fact, you know, when you
do adjust your drawing, you don't even have to
draw the whole thing. You could choose to just focus in on one part
If you wanted to do just like the wolf's face or the front part of the body or something and
draw it really big. That can be a good strategy too. Sometimes for these,
sometimes you're just going to focus on lines
or the overall silhouette. Sometimes that's a
good way to start. You don't have to draw every
single piece of the legs. It could just be a line. A simple line that
defines one side of it. Yeah, 45 seconds. Oh my goodness. Wow. It's fun though to see it when it
starts to take shape. Mm hm. When it starts to become something
other than Yeah, Goes like instantly from a bunch of scribbles
to like, oh, I kind of see there's a woman
there somewhere 10 seconds. Okay. And time's up. Okay. If there's room
for improvement, but we're starting out,
so that's all right? Yeah. We can only go up
from here. It's all good. Exactly. Let's go with that dramatic mood
that we are all. All right. Ready? 2.5 minutes again, like
Paul said the last time, focus on the larger shapes and think about the silhouette, what shape is the
wolf making overall. Yeah, that's good pro
tip for this lesson. Just really try to simplify, boil it down to the
essential stuff. Yeah, one thing I'd like to do too is when I'm
doing gesture drawings, I tend to hold my pencil farther back away from the tip and that helps me not get too tight
with the lines and marks. If you're someone
who tends to be like a really tight technical person, that's a way to trick yourself into blooding loose a little. Yes. Because you won't
have as much control. Melissa's worst nightmare. Yes, I do enjoy practicing this. The gestures have not always
been my favorite thing. If you're out there
drawing with us, maybe they're not
your favorite thing. But it is fun to
play around with different shapes and
different media. If you try a pencil and it
feels too stiff to you, try something that you don't
have as much control over, like I'm using this
piece of charcoal. And I'm actually really
enjoying it because it's flowing really
nicely over the paper. It gives me less
control over all, but it makes really nice lines. Mm hm, Yeah. Sometimes gesture drawings can be so beautiful
because the lines are a lot maybe freer than in tighter, more
technical drawing. You might even experiment
with drawing different sizes. Some people really like doing like gigantic gesture drawings. And especially if you're using
something like charcoal. And you can just like let those lines move with a lot
of energy across the ph. Okay, we have 25 seconds. That's not much. No, no, but like the birds, just start paying
attention to the anatomy. Which way does the legs turn? Which way does the head
turn based on the way the neck is turned and how
does everything fit together, what's the proportion
of everything? That's really what
we're focusing on here. Because every animal
is so different. Yeah, definitely. I think you notice
that more when you just do a bunch of
different ones like this. Okay, up but not least, we have this gorgeous
creature. I love that. Oh, that is pretty. We picked a good one, Paul. We did. I'm impressed with
us. Look what we did. I'm constantly impressed with. All right, let's do it. Are you ready? 1.5 minutes. And that's a little
bit more challenging. This is a trick on to deal
with foreshortening here. The way that shapes
look a little distorted when
they're coming toward you or moving away from you. Yes, This time I'm
focusing on the head. And then I'm going
to add the body in here because I feel like that will help me get
the proportions right, because this is going to be a tricky one getting
proportions, right? Yeah, this is a
definite case where you want to try and draw what
you see, not what you know. Because if you just
are thinking about a wolf and drawing what you
think a wolf looks like, it's probably not the shapes
that you see in this pose. Yeah, I try to just look
at it very abstractly, not even think of it as a wolf. And I'm using the shapes of
the negative spaces too. Like especially with the legs. That can be helpful. Tip. Yeah. Again, you want to look at that
silhouette or the shape that the outside of
the wolf is making. How do things fit together? How big is that body
compared to the head? All those different
relationships. You notice that in this one, the head looks pretty big. But it's also because that's
the closest thing to us. And we're getting some of
that shortening happening. Mm hm. We have 30 seconds left. I love the joy that you got out. Why is it so fun to know that? I am just stressing people out. I don't know why, but you
do get a lot of enjoyment. Yes, that's true. All right, and time is up lovely. Some fun. Great job, everyone. Okay, You now have experience
drawing birds and wolves. And in our next lesson, we're going to do some
more gesture drawings this time, horses. What do you think
about that? Melissa? I am ready to try this. Paul, can we turn
them into unicorns? You bet. All right, I'm in.
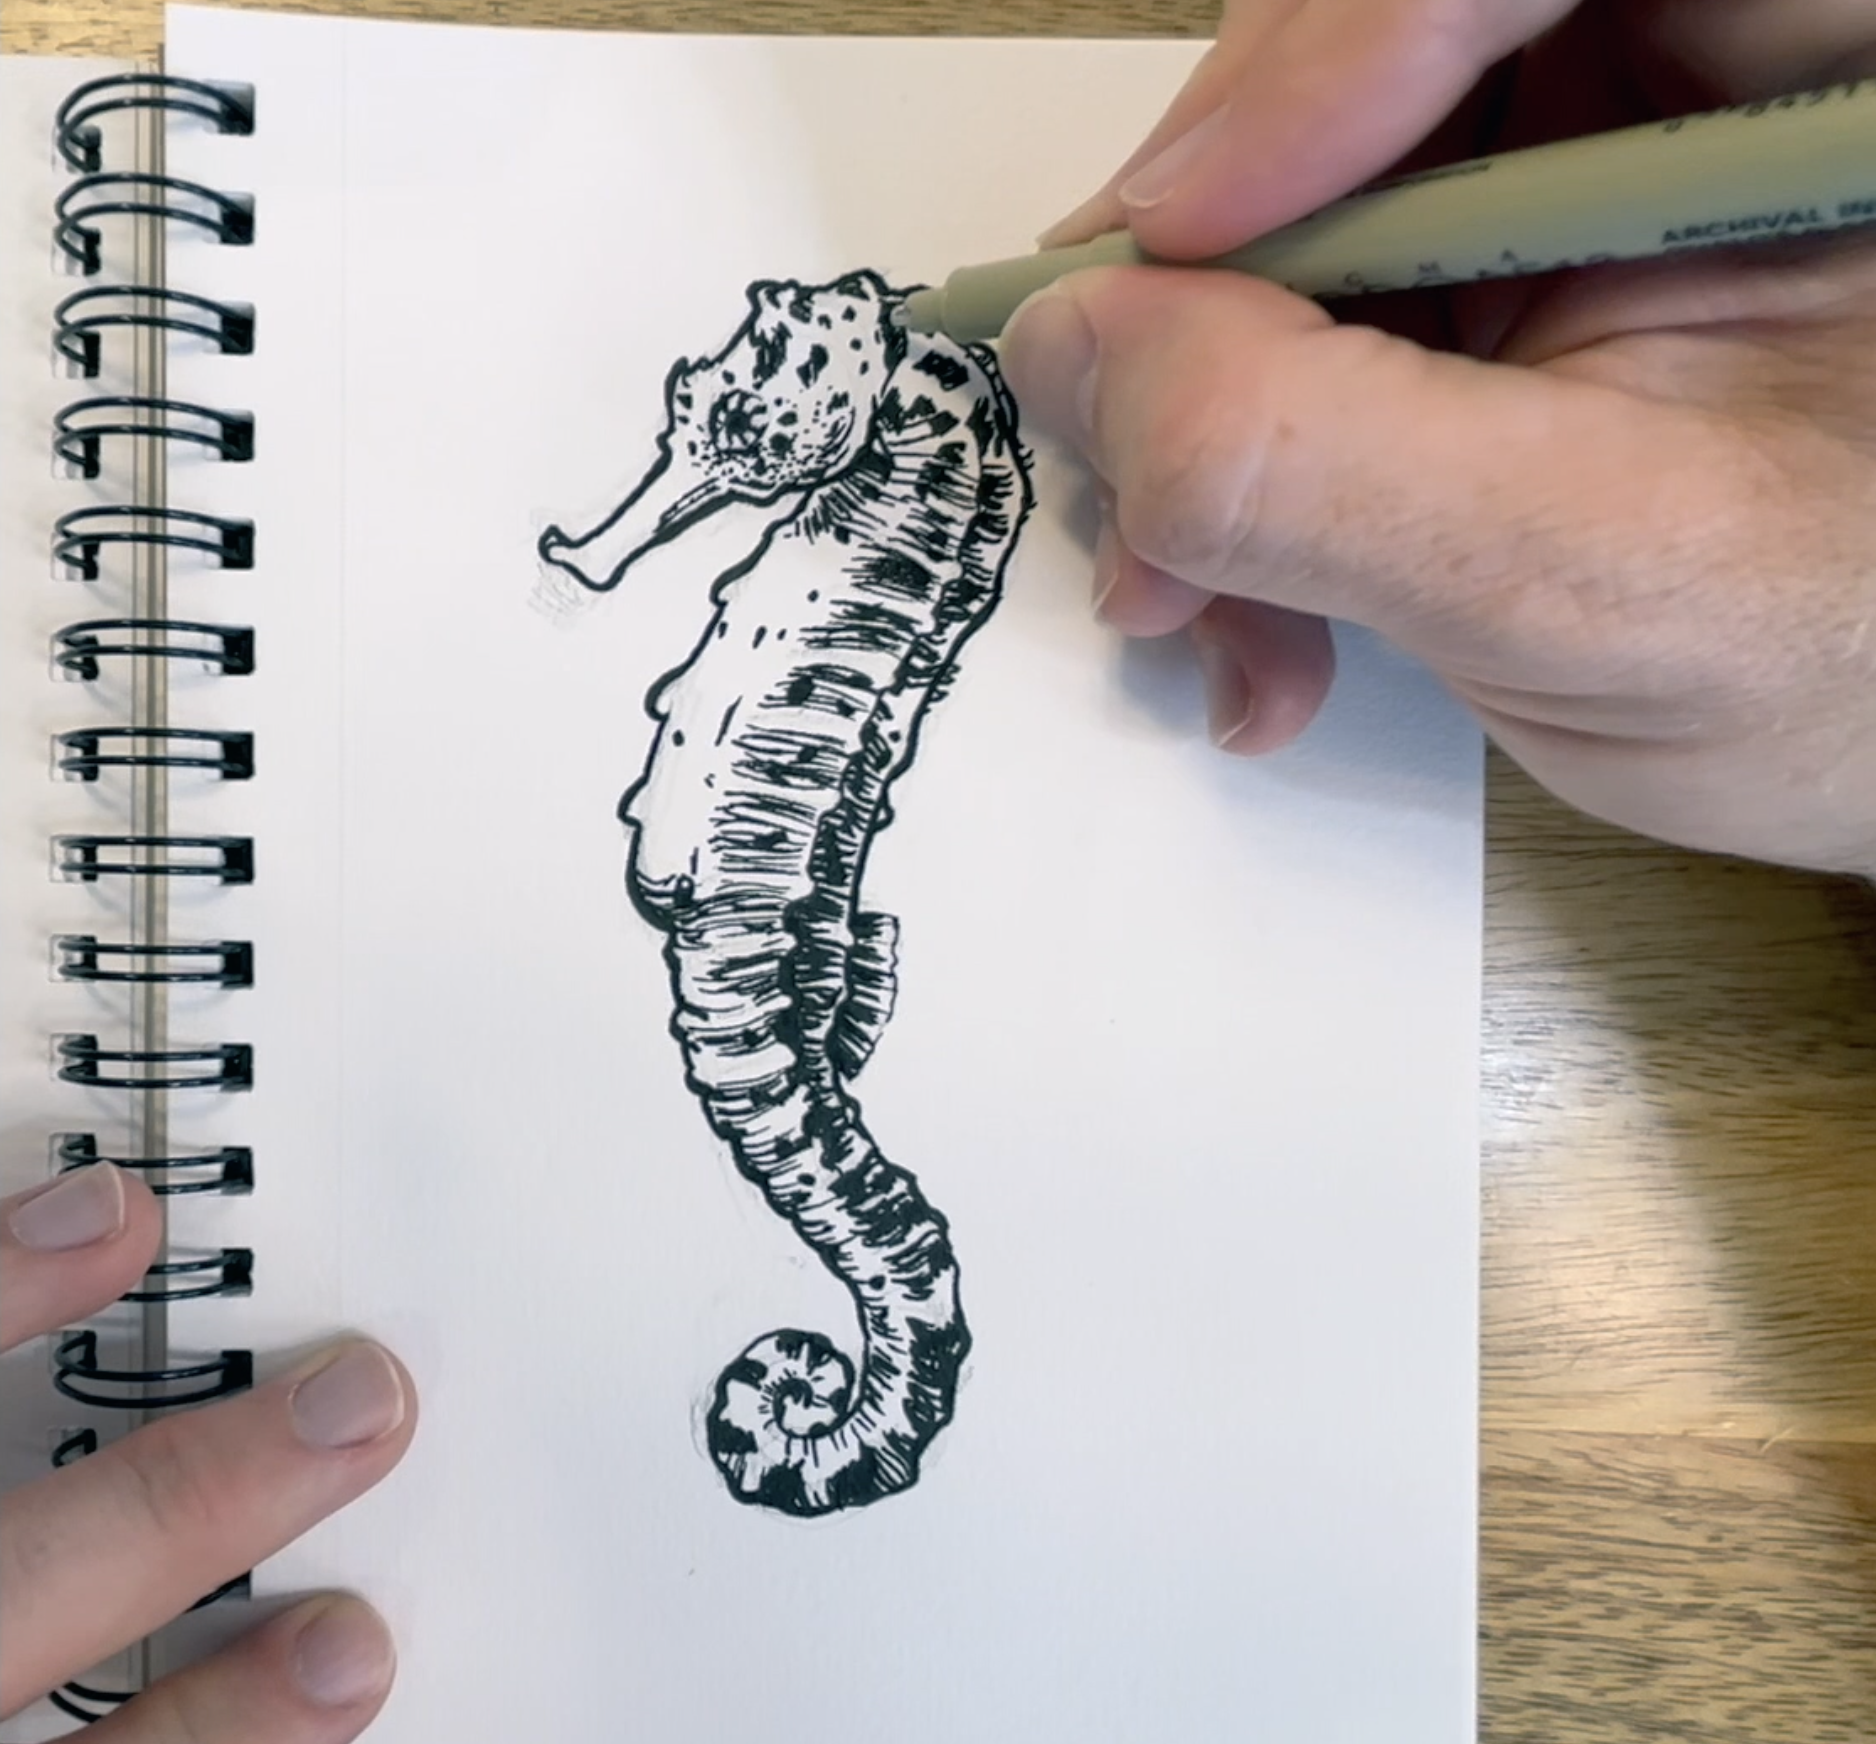
7. Project 1: Sketch: Hi everyone and
welcome back to back to basics how to draw animals. In this lesson, we
are going to start a three part drawing
of a sea horse. And I'll be using pen and ink. I'm using micron
pens for my drawing. If you have those
or some other sort of ink pen that you want
to use, go grab that. Are you ready to draw
a sea horse? Melissa? I am ready, Paul. Okay, I can't wait. Let's go. All right, we are going to
draw this adorable sea horse. Now I am using micron pins because I wanted to use a pin and ink
technique for this drawing. I have three different
sizes of pin. I have 810.12 that just refers to the
thickness of the tip, but you can use any
materials you want. If you want to use a
pin and ink technique, you could use microns. You could use a pidio
graph fancy pin, or you could use
just ballpoint pins. Whatever you have handy. What are you using, Melissa? I have a couple of
different sharpies and these come in
different weights. So some are a little bit, some
are a little bit thinner. I just have that, that's
what I had in my drawer. I do have one little
tiny micron pen, but you don't have to
buy anything fancy. Just whatever you
have will work. I think part of the
fun of this is just grabbing something that
you have easily available. And just starting, I am
actually beginning with a pencil and I'm going to do like a gesture drawing,
like what we've been doing. But I'm going to draw it very lightly because I want
to be able to erase the pencil lines afterwards and only have the
ink lines showing. Just like before, I am starting
with sketchy loose lines, getting the basic
shapes on there. And I'm starting with a pencil because I want to
make sure that I get the overall proportions down before I start
committing things to. In. Some people
go right for ink. I do that sometimes myself, but this time we are
playing it safe. Look at you not taking risks. I know I guess, you know, you get to be
the rebel this time. Are you are you starting
with a pencil too or I am. I am, yeah. Okay. Okay. So we're both we're both we're both playing
Five, terrified. It's a complicated
little creature It is. There's a lot going on. It's
an interesting shape though. Yeah, there's a lot of
texture on it that Yeah. Will be fun to draw. I picked this because
I was just on a trip to Hawaii and
one of the things that I did was went to a sea horse farm and got to hold a little
sea horse Oh up. And like wrapped a little tail around my finger and just hung out with me for a
little bit and it was the cutest thing ever. And I was like, Melissa, we have to draw this. I'm glad that you weren't
afraid to hold it because I feel like the Paul that I knew in college would
have been like, do you want me to touch
what I have to go? Yes, we have grown,
we have evolved. So one thing that
you can do to check proportions is to
hold out your pencil, line up the tip with the
end of the little snout. I'm putting my thumb, sliding my thumb up here
to the back of the head. And then I'm using
that to measure how many heads high
the sea horse is. It's 12 less than three. Let me check mine
in the drawing now. It's 12t less than three. We are good. All right, let me see if there's
anything else I want to. I might just stretch the
tail out, just a smidge. That's the advantage of doing it very lightly with pencil. And you can just use
your eraser and get rid of the stuff you want to change. Okay. Cause once you
start doing inc, it's a lot harder to change it. Yeah. Yeah. Give
yourself I'm going in and doing some
quick little lines here to just show some of those, I don't know, markings
on the side of the body. The more you can work
out loosely in a sketch, the easier it'll be
to go in and just really have fun with the ink. Hm. Look at that crazy eye.
I love their eyes. I know I was going
to say, it's got these eyelash type things. That's probably why
you appreciate them. I know it looks like
I did. Its make up. Yes. So one of the
things that we learned at the Sea Horse farm
is that you should not buy sea horses from pet stores because those are most
likely just poached. And those sea horses
are really able to live on the food that is made and sold for sea
horses and aquariums. But they have bread, you buy those sea horses and they just die
within a few weeks. Yeah. But you can go to sea horse farms like this one in Hawaii and they will
ship them to you. And they have actually been
bred to eat the proper food. And the whole idea
is that way they're protecting the ones who
are living in the ocean. They will ship you a sea horse. They will. Okay. Get a little plane
ride and everything. Yeah. All right. I think I have
them all sketched. So now I'm going to start with my number eight micron pen, which is the finest tip. I'm just going to start
by going over some of the lines and getting it a
little bit more solidified. Also learned that in
the sea horse world, it's the males who get pregnant. They have like
hundreds of babies and then a day or two later partner, because sea horses
are monogamous, their partner, she gets
them pregnant again. Really, Wow. Male sea horses spend their whole life
barefoot and pregnant. Right. The monogamy thing, I guess is another
reason why they have, the ones that have been
poached do not survive in captivity because they're
sad that they're not with. They're the ones that
they are breeding for the purpose of being
able to have as pets. They're teaching those
ones to not be monogamous. I don't know how
those lessons work, but apparently it's
been successful. Can't you just sell it with
a partner? I don't know. It seems so sad.
I'm teaching you to know that you're going to be alone for the rest of your life. Well, teaching them
to be a little bit more open to
trying new things, play the field again, not really sure what that
class looks like, My goodness. So, how do you
start with the pen? Do you do more of an outline
or do you how do you begin? Yes, that's a good question. I like to start with an outline. And I'm just going around the perimeter right now
and paying attention a little more to some of the
little bumps and shapes and trying to just get that all in. Then in our next lesson, we'll start showing some
different techniques for how you can do
shading with the pin. Gotcha. So I'm just working
my way around the outer edge really right now. Get the sea horse a little
more solid on there. The sketch was to give you something to build on
and then you're adding more detail as you
do the line the pen. And you can do that like a
little bit more confidently, knowing that things are
in the right place, the right size and stuff. All right, so that is going
to be all for this lesson and we will come back and
work some more on this little D. Great job. We have our sea
horse on the paper. We are ready to go now with
adding in some more detail and texture and shadows in the next Lawson.
You ready for that? I am ready, Paul. Okay, let's do it.
8. Project 1: Ink Lines: Hi everyone and welcome
back to back to basics how to draw animals. In this lesson, we are going to continue working on
our sea horse drawing. You ready to get back
to work, Melissa? I'm ready. Okay, let's do it. Okay, back at it. I am still going to do
a little bit more with my number eight micron pin
which is the smallest one. I just want to finish up drawing a few details and
then I'm going to jump to a thicker pin to start
going in and doing some of the textures and shadows
and fun stuff like that. Okay. But first I have to get this magnificent eye sketched in a little bit more solidly. The interesting thing about
doing pen and ink drawings is that if you're wanting
to do shading, you have to come up with ways to simulate that feeling of the
modulation of the value. Because you can't make a
pin be lighter and darker. I'll show you some different
things that you can do to use like cross
hatching or stil different ways of making
shadows. All right. That I'm just going to come
down here really quick and do this little edge and
then I think we'll be good. How's your shirt be
drilling coming? It's going All right.
So far I am using a micron right now because I figured I can use
this little one to do the outline. Mm hm. And then it won't give me
a really harsh outline, it'll give me something thinner
that I can work around. Yeah, if I'm adding
a lot of shading, I don't want something
that looks like it's outlined like
a coloring book. I want something a
little bit Yeah. That I can play with a
little bit more, I guess. All right. I am jumping
over here now to my number ten and you can see it's just a little
bit thicker on the tip. I'm going to start, I like to squint my eyes
and look where I see the darkest values so that I
can start to bring that out. It's again about
prioritizing things. I'm going to start
right over here. Along the right
side of the body. I see some really
dark values here. I'm using lines that go in the direction I imagine that particular part
of the body going. It's like you're almost tracing
the contour of the body. This is one way to think about doing shading with
a pin is using those lines to actually suggest a little
more about the form, the volume of the shape,
three dimensional shape. The closer you put the lines together, the darker it will be. Wherever you want, those
really strong shadows make it really tight. And then when you want
it a little bit lighter, you can just open it up. So I'm going through and
making it really dark. In between these little ridges, wherever I see highlights, I'm leaving it a little
more open. This is fun. Mm hmm. Yeah, I like how you just get this immediate,
you know, darkness. You don't have to build up to
it like you do with pencil. It's like that is true. Yes. Instant gratification. That is Paul's favorite Y. I do think it's a good lesson in form and shape when you are creating
lines that define the shape. Yes, define the way
it changes in space. It just makes you
really think about it differently than
if you're shading it with a pencil and doing
more of an overall tone. It's like every mark you make, you're really thinking about that section. It's
a lot of thinking. It's a lot of
planning. Yeah, I'm surprised you're doing
this and I'm not. I know, I mean I'm doing it. You're teaching it. Trying to Ten. Just plan, That's a class no
one should take. No, I'm just channeling
my inner Melissa. Oh, wow. Mm hmm. So that means I'm going to be so
perfect all the time. That means you're gonna be
here for a very long time. Yeah. You're not even going to get to teach you drawing because we're gonna spend the rest
of this drawing Sea Horse. Fine with me filing. Now you can follow along and
do the way that I'm doing, but there are many other ways
to do shading with a pin. I'll show you a few other ideas to even in the same drawing, just combine a bunch
of different things. You can use whatever you want. Another option is doing
something called stippling. I'm going to do that maybe
right here on the face. And stippling is
where you just use a bunch of little dots. And it's the same idea
as the lines really. It's like how close you
put the dots together, makes it appear darker. And then when you want
it to get lighter, just open them up a
little bit more and you can give that sense
that there are all these value shifts
happening just with. So I'm not going to do the
whole drawing that way, because we will be
here a very long time. Hm. But it is cool. There are some really
beautiful drawings that have been done like
entirely with stippling. And It's very impressive. Yes, it's amazing, but
very time consuming. You've probably done some
of those, haven't you? I don't think so. I was always
more into color drawings. Yeah, I guess that
was always my thing. Yeah, I know a lot of people
use scratch board too, which will give you
a similar look. Scratch board is something
where you start with black and you scratch
it away to white. Almost like reverse drawing. Yeah. But it will give you a
similar look to pen ink. An old engraving look, Yeah. Yeah. Another technique you could try is just
using cross hatching. I'll do that right here.
I'm just going to make this little dark shadowy area. The way that you do cross
hatching is doing all the lines one direction first and then
where you want it darker, come back and do more
lines the other way. And you just keep
building that up until you get it as
dark as you want. In that case, the lines are not so much about the contour, they're just all going
the same directions. Sea horse is just going to be a hodgepodge because I
am trying everything. That's okay. It's all
an experiment. Yes. Okay, now I'm going back
and just doing some of these ridges along the body and there's actually a
lot of lines that you can see within the texture
of the sea horses skin. Just draw those as you see them. Yeah, I think you
picked a good technique for a little sea horse ball. There are a lot of
linear elements to this, so it makes sense. It's so fun when
you really just get to take the time and study
something like this. And look at it so closely. Because it's such
a complex little, there's a lot going on in here. Yeah. You might not notice if you didn't
take the time to draw it and analyze it. Great. I mean, they're so small. Mm hmm. All right, so that is
it for this lesson. We have one more lesson to finish up our little
seahorse friends. Great work everyone. You are doing such
an awesome job. And in our next lesson, we are going to finish this up. Are you ready to finish your
seahorse drawing? Melissa? I'm ready. Paul, got my pen. Okay, let's go.
9. Project 1: Final Touches: Hi everyone and
welcome back to back to basics how to draw animals. In this lesson, we
are going to be finishing up our
sea horse drawings. You're ready to finish
your drawing up, Melissa. I'm ready to wrap this
up, Paul. Let's do it. I know it's such a cute all
right, let's get to work. Okay, time to finish
up our sea horse. I am still working with
my number ten micron pen and just following along
the side of the body, trying to get some
of those ridges in. Then I'm going to go
back and do the spots. I think it's helpful
for me to break it down into two different
techniques there. First, I'm just thinking about the overall shape and contour, and then I'll go back and
focus on the patterning. I think that makes sense. Thank you. I'm so
glad you app I app. I think that lets you focus on the overall shape rather
than the pattern itself. Yeah. You have to have a sense of what the body's doing before you put
decorations on it. Yeah. I'm just working
my way down here, squint my eyes a lot
when I'm drawing. That helps me to focus on the differences in value or the lights and darks
rather than the details. I'm still using my lines. Using very curved lines here, that's helping to show that
the body is wrapping around. That it's got some form to it. It's not just a flat
little cut out. Don't try not to get overwhelmed by all the
detail that you see in the sea horse because
it really is something where the more that
you look at it, the more you're going to see. You could spend forever working
on a drawing like this. You have to edit
and make choices about what you want to focus on. Yeah, I think the nice thing with pen and ink is
if you start small, you can always
build on top of it. Yes, just start with a little bit of shading
and work up from there. Okay. I am going to jump up
to my number 12 pen now, which is the thickest one
and I'm going to use that to make some of the spots
and patterns that I see. Very fancy little creature. Mm hmm. Yeah, there's a lot going on with
you, little sea horse. Mm hmm. So they said that more sea horse
conservation stories because now I'm a sea
horse conservationist. Sea horse trivia for everyone. Yes. They said that, you know, when they first
started trying to breed them or, you know, like domesticate them, they
didn't want to eat food. The frozen food that
they were giving them, that has been the
biggest challenge for domesticating
the sea horses. They would give them the frozen food
and they would all just look at it and be like no. But then there was one
little sea horse named Mike. Oh my gosh, this is
totally a made up story. No, this is real. And it happened at the
farm where we were at my started eating the frozen food that
they were giving them. They took little Mikey
and put him in all of the different tank
so that all of the other sea horses
could see Mikey eating. Then pretty soon, everybody
else started eating it, too, because they wanted to be
like Mike, of course. Yes. And then when Mike and his
friends started having babies, the babies automatically
that food like, they didn't even have to
be taught because it was just somehow in them. Huh? They just knew.
Isn't that amazing? Yep. Nature is
pretty incredible. God love Mikey. He really showed them the way I wish he could teach my cats how to eat
the food that I give them. Maybe you just need
like the cat version of Mikey to come and show
them how delicious it is. Yeah, yeah. I do know that struggle, though, when we, our last dog never wanted to eat anything, so I would just
like be crawling on the floor pretending
to eat her food. This is good, this is great. Don't you want to
have something? Actually, their food
does seem really good. We feed them like the most
ridiculously expensive. Of course, you. Yeah. Probably better than
what we're eating. I know I tried giving
her the, you know, the expensive quality cat food. She didn't want
anything to do with it. She wanted the cheap stuff. Wow, yeah. Like give me the stuff that
tastes like fast food. I'll take that.
Don't give me that. Don't give me the homely
stuff. That's what she got. It's trashy little thing I'm going through now and just like varying the
thickness of my lines, I think that makes it look more interesting too and
more dimensional. Less, less coloring book like. Like Melissa was saying, I'm using my thick
pen and just making it thicker in some parts
and then leaving it, the thinner line in other
parts adds a little interest. You can kind of use
that to emphasize certain things to Mm hmm. The spots are fun. Once you
start adding the spots, I think they really
add some interest. Oh yeah, definitely. This is feeling like it's getting very close.
How is yours coming? It is getting there.
It is definitely something you could spend
a lot of time working on. Oh yes, there's a lot going on with this
little sea horse. Mm hmm. Hopefully
we've just given you another idea for a different
technique you can use. Sometimes I feel like it's
always the default to just use a pencil and paper when there's
nothing wrong with that. You have that available
and that's great. But also just see what happens
when you try picking up something else that's
in that drawer and try making art with that. Sometimes that can
really free you up or just put a little variety into
your process can be good. Yeah. Yeah, it's always
good to experiment. Yeah, I think it can help
with creativity too. If you feel like
you're stuck and you're not sure what to do next and you've tried a bunch of things and nothing seems
to be working out for you. Just pick up something
totally different. Yeah. We have to be like Mikey. We can't be like Mike. Love, I love that you had
a moral to that story. The moral of the
story is like Mike. Now the final thing
that I'm going to do, but I have to wait
until my ink dries, is I'll take my needed eraser. I'll go back and erase all of the little pencil
lines that you can see. And then nobody will ever know that we drew it
out with pencil first. And they'll just think, wow,
they just did that first. You're amazing. Yes. That is the
reaction that we want. But definitely wait
till your ink is dry because it will smear all of your page and that will not be amazing That can
lead to tragedy. Yes. If you don't. Very sad. All right. Are you
ready to call this one? I think I'm ready. I mean, I could keep working
on this for a long time, but I think this is
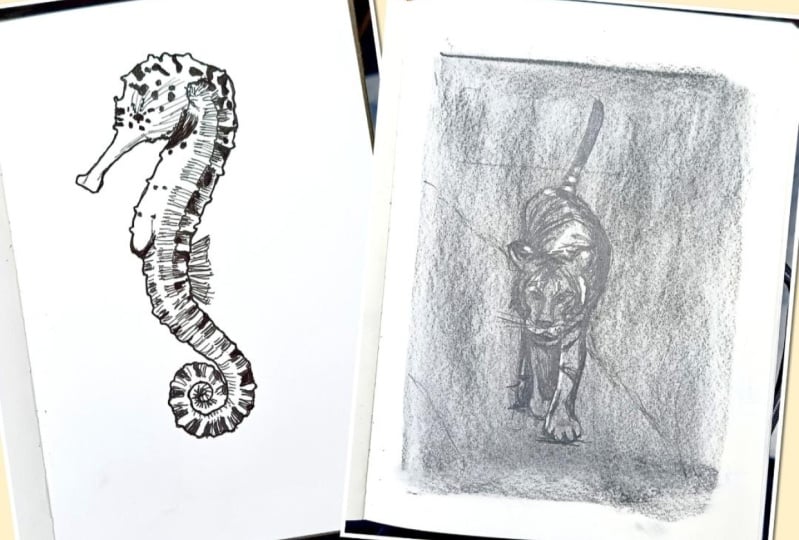
a very good start. Okay, well, we will
show you Melissa's too, so you can see what she
has been up to over there. And then we are going to
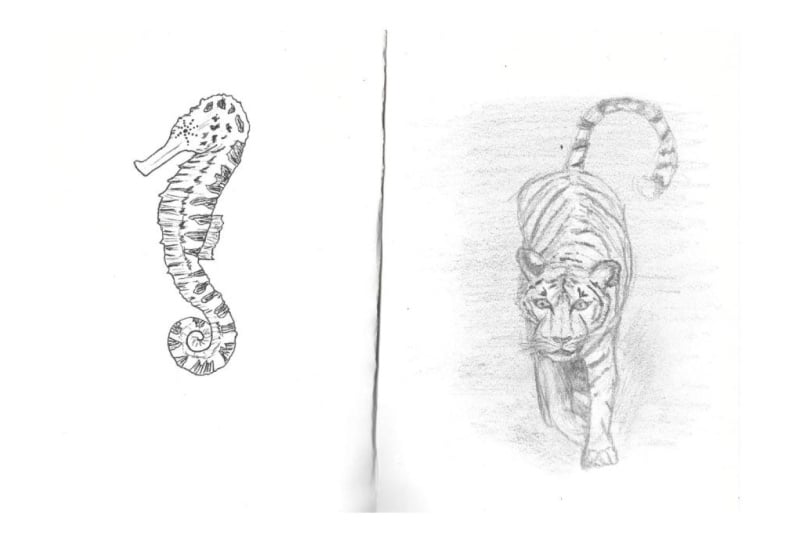
start on a new drawing in our next lesson. Great job. Oh, I love how that turned out, but we're not finished yet. Next we have a drawing that Melissa is going to be
leading us in of a tiger. You ready to take charge? I am ready to take
charge, Polly. I hope everyone else is ready. All right everybody.
It's tiger time.
10. Project 2: Coat Paper and Sketch: Hi everyone. Welcome
back to back to basics how to draw animals. We are going to get started on our three part drawing
involving a tiger. So the first thing
we're going to do is we're going to
tone our paper, and then we're going to get
this tiger sketched out. Paul, you ready to get started? I am ready. Let's do it. P. Come on everybody. Let's go. Okay, everyone. Now we are going to
start drawing a Tiger, and we are going to be using a graphite technique for this. Paul walked us through
a pen and ink technique and now we're going to
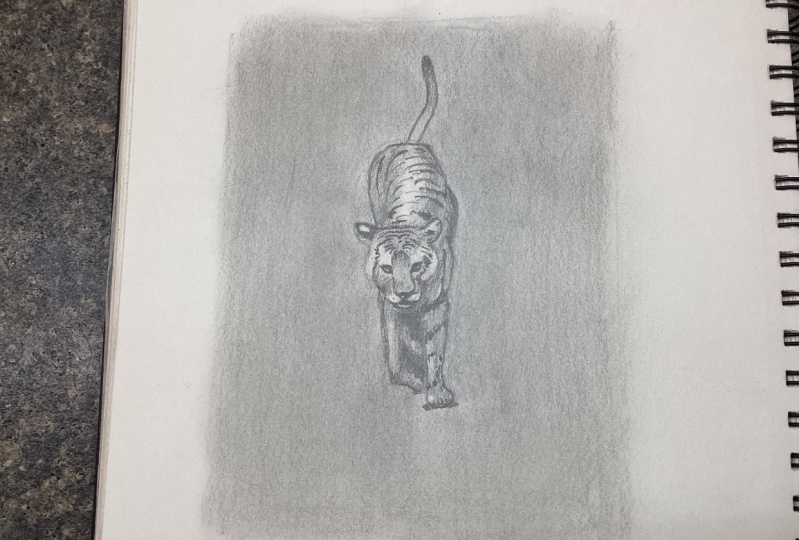
go back to the graphite. I'm actually going
to coat my paper. It gives me a medium tone to start with because this
is a very dark image. I think that will
make it easier on all of us if we have
a tone to start with. I have a piece of charcoal here. You can use whatever. You can use the side of your pencil, You can use graphite powder. I have a graphite stick here to any of those
things will work. We just need an even
coating on our paper. Just start coloring in. Take a nice gray
square to work with, and this tiger is more vertical, so we probably want a
vertical rectangle here. Once I get enough of the graphite or
charcoal on my paper, I'm going to blend it
with a paper towel. You can use a blending stump. You can use your hand,
whatever you want to use. How dark do you want it to be? I would I would say
like a medium gray. I wouldn't make it too dark
because we are going to draw the image of the
tiger within this shape. You want to light
enough that you can still see other graphite
lines on top of it, but dark enough that it
gives you enough to erase, because we are going
to go back in and erase some of the
lighter tones, okay? Not too dark. Not
too light, right? Just right. Yes, we have a
gold lock situation here. If you put some down and you feel like it's not dark enough, you can add more. I'm going to add layer here. You want it somewhat
even, but it doesn't have to be perfect
because we are going to draw on top of it because
this isn't the end all, just a place to start. Kind of like when
you're painting, if you coat your canvas in a color first before
you start painting, that just makes it easier for
you to build on top of it. This is a similar thing? Yeah. Yeah. Gets rid of that weight Y, and you don't have to cover the whole paper although you can. It's up to you. I'm just
doing a shape within my little rectangle paper here. Okay. Right. You have the edges so I don't
get all over my hand here. All right. So we have that now. I'm going to take a soft pencil. I have a three here. And I'm just going to use this to start sketching
out the Tiger. And I'm going to use a
similar technique to what we've used in all of our
other exercises so far, including our gesture drawings, where we're just
sketching in the shape. To start, okay, I'm looking at the overall
shape of the tiger. The way the back curves into
the side of the stomach. How big the head is compared
to the rest of the body. There's something helpful
about starting out a drawing or a piece of art with a little bit of a
sense of urgency. I think it makes you just
like figure things out and if you pretend that you only have like two
or 3 minutes or whatever, like it's a gesture drawing
and then go from there. I like doing that to myself. Paul likes making things
more stressful for himself and everyone
else. Everyone else. But if I feel like I have too
much time or I think like, oh, I know this will be easy. I can take my time. I
don't draw as well. I need that press. It is good to keep looking back at the reference and
then looking back at your drawing
and going back and forth constantly
checking things. Spend too much time on any
one area of the drawing, especially when you're
getting things figured out. Yeah. Hopefully you can all
see this on camera, but it is a little
bit low contrast because I am drawing into
a, a darker background. But I'm just drawing the
shapes right now and drawing the outline
of the tiger, making sure I'm getting things wind up where they should be. As I'm drawing, I'm looking at where certain
things are falling. So where's the head? Where's
the edge of the head? How big is the head
compared to the body? Where does the body
connect to the head? And then how do the legs
fit into all of that? We're just looking at
different, it's a weird shapes. It's a weird shape. We pulled this up as
we were starting to draw this and we were
both just like, oh, okay, why did we think
that we are cruel? Why did we take such a hard
shape like the body is, looks so small
compared to the head? Yes, it is a little bit tricky. I'm actually running out of
space here at the bottom, so it's going to ad a
little bit more gray, come sure, get the tail in here. And the way the shapes
overlap is interesting, especially when you
come down to the legs because it stops making sense as far as like what shape and where
does everything meet. There's a lot of shadow there, so it's hard to tell
where everything is. This is really an instance where you have to just pay
attention to the shapes and not worry too much about exactly what that is or
exactly how that leg works. Yeah. And just get that shape in there based on what
you're seeing. You draw what you see, even if you have no clue what it is. What's happening. Yeah.
It will look believable, It will look right in the end. Yeah. It's amazing
how that works. Yeah. Okay. All right. So we're
just going to get the basic shapes
established here. We have the silhouette of the tiger and how
everything fits together. Then we were going to use our next couple lessons to
add a lot of the details. Don't worry about
that right now, especially not the stripes
or any of the patterning. We're just getting
the overall structure of the tiger established so we can build on that for
our next couple of lessons. I'm just going to get
the mouth drawn here, the nose, and the
structure of the face, we will call it
quits on this one. The eyes in there, Tiger's eyes are actually really
close together and much further up the head
than you would think. It's always rising. Hm. And if you make a
mistake and you need to go back and erase something, you can't, or you can just rub it out with
your paper towel. Whatever works easier. If you need to add more gray in the background, you
could do that too. Okay. So we will see
you in the next one. All right. Beautiful
job everybody. You did such a great
job on that Tiger. I cannot wait to add some
more detail to this. Paul, do you want to add some
shading in the next one? I do. Okay, great. That's
what we're going to do. All right. See this everybody. See you soon.
11. Project 2: Shading: Hi everyone. Welcome back to back to Basics how
to Draw Animals. So we are going to get started on the second
round on this Tiger. We're going to add
some more shading, a little bit more detail, and then we're going to use our needed erasers to pull out some highlights and then
add some dark areas. So Paul, you ready
to get started? That sounds like a
lot, but it's a lot. It's a lot. Let's do it. Okay? It'll be okay.
I'll help you. Alright everybody, we are
back our little tiger here. We are going to
continue drawing and adding a little bit of value
variation within here. I had most of my tiger
sketched out last time. I'm going to add a
few more details and then I'm actually
going to start going in with the eraser and erasing out some things,
which is always fun. I always like that part of
these type of drawings. It's like working backwards. Yeah, it makes a big difference. I think it's good, especially
if you're starting out drawing because it really makes you look at things differently. Yes, one tip while you're
working on this type of drawing is to take
a paper towel or a piece of paper and lay
it over your drawings. So you're not constantly
putting your hand in it. Pro tip? Yeah, let's target
little pro tip. Let's say don't make a mess of yourself or how nice, less. So you can run your
hands all through this and use your hands to blend
everything if you want. I like being a little messy. Yeah, I actually
do that sometimes without even thinking about it. All right, let's
take our eraser. The point of the
eraser is to find your lightest lights
in whatever you're creating based on your
sketch or your drawing. You're going to go in and
you're going to find some of the whitest areas in the photo reference and you're going to start
pulling those out. You just do that
with needed eraser. What's nice about
the needed erasers? You can sculpt it into
any shape that you need. I like to make a
little point with it, almost like you're
drawing with a pencil. I just go in and start pulling
out some of those values. You don't have to be
precise with this. You can always go back
in with your pencil and add other darker
values around it if you feel like it doesn't get exactly detailed enough for you. This will just give
you an idea of where some of those lighter areas are. They're pretty minimal, really? Yeah, there's not a ton. There's a little bit on the
tiger's face, a little bit, maybe on the back of the tiger, which give it some
shape, some form. It's cool how to us tapping
it with that eraser. You all of a sudden start to see it look more dimensional. Yeah. You can use different
techniques with the eraser. You can use it almost
like a pencil. That's if you're pulling the
graphite out of the image, like Paul said, you
can just tap it. Just press it against
the paper and then pull up and it will pull
up a larger area. If you tap lightly, it'll just pull out a
little bit of the graphite. You can use it in
different ways. Just experiment with
what works for you. You can go back
and forth. You can add with the pencil,
go back and erase. You just keep
pushing and pulling those values till everything
ends up where you want it. Yeah. Now that I have some of
those lighter areas, I'm going to go in
with a darker pencil and that would be one of your
softer pencils if you're using a variety of drawing
tools or drawing pencils here. I have a six B. I'm
going to go in, I'm going to start
adding some of my darker areas in the drawing. I like going back and forth. Lead is good for
that because of the, the softer lead will give you a darker value just because it's so it will leave more
graphite on the paper. You won't have to build up as
much with the harder lead. It will just not
leave as dark a mark. It's meant to be a
little bit lighter. You'll have to build
up a lot more work to get it to be as
dark as you want. If you use a hard pencil, we don't like that, We don't want to do more
work than we need to. We are going to use the soft. Depending on how hard you
press With the softer pencils, you can get a lighter value
or you can get a darker value to experiment with how hard you press and how that
works for you. You can build up
in layers or you can press hard from the
beginning and get a darker area. I like having that based on there because it
just takes some of the extra work out of all
the middle value y, y. I think it's a lot
easier to get it to start looking
dimensional right away. And we're going to
use some of the same techniques that we used in some of the other
drawing exercises that we've already done. We're going to build up
slowly in some of the areas. We're going to think
about the mid tones, and we're going to think about the highlights and
the darker areas. We're not going to focus
on the pattern right away, we're going to focus
on the overall shapes in the form itself. And then once we get
that established, we can add all of the patterning just like our sea horse friend. Even though very
different creature. Yes. All very
different creatures, but we're using some of the
same techniques on each one. So now I have very
heartwarming stories about my visit with the sea
horses during my lesson. Melissa, do you have any
heartwarming tiger stories? I can't say that I've ever had a heartwarming
moment with a tiger. I guess I would like
to keep it that way. Do you guys I guess, and similar more prepared
for today's lesson? I guess so. Well, did his research
just for this class? Mm hmm. Flew to Hawaii just
for all of you. That is my level of dedication. He is a giver at a sacrifice. You made their
Paul for everyone. You're welcome. Okay. And as you move
throughout the drawing, you can keep going
back and forth to go to your pencils and
then go to your eraser. Keep pulling out some of those areas based on how light they are,
how dark they are. It's all relative to like
once you start getting other values in the Yes,
what's already there. You have to go back and adjust. Mm hmm. Yeah. You'll start seeing
that some areas feel a little too light or a little too dark based on whatever
you put around it. It will definitely change as you get more established
in the drawing. Yeah, if you're
working for a yo, then you look at
it and you think, oh boy, this does
not look right. That's okay. That's
not a bad thing. That, I mean, that's part
of every artist process, usually just stop and try
and figure out why is that? What do I need to adjust
to make it look better? Yeah, I would say a lot of drawing is
knowing where to go next, thinking all right, this
is what I have now, how do I get this to look the
way I want it to look up? That will come with
practice and experience. But I will give you a few little tips along the way that hopefully
will help you out. The biggest one is just don't give up. Don't get discouraged. Don't give up if it looks like there are issues
because that's normal. Yeah. Yeah, for sure, everything
goes through an awkward phase. Trust me, I don't care who you are and how
long you've been drawing. Everything will go
through a phase where it doesn't exactly look the way you
want it to look. And you start to think, do
I even know what I'm doing? What am I doing? The normal
creative process is, you start off and you
think, oh my gosh, this is awesome, I love it. And then you get to a
point where you're like, I'm not sure about this, this
doesn't look quite right. And then you just think,
oh my god, this sucks. I hate it, it's horrible. And then slowly despair. Yes. You slowly get back to
the point where you're like, all right, this is okay.
This is working now. I can get this where it needs to be to hopefully at the end, you think, all right,
this is awesome. Again, I made this work. That is true. It's just, it's normal. Please don't get
discouraged and think, oh my God, this is
never going to work. This looks terrible.
I can't make this work for me.
Everybody else can do it. Let's. Yeah, you can
do it. All right. Wonderful job everyone. Hopefully you're feeling
good about your Tiger. We got some shading
added in here so we used our racers to pull
out some of those highlights. We added some of
the darker areas. In our next round, we
are going to finish up this Tiger and be done.
Holly, what do you think? I'm excited. Let's do it. Let's do it.
12. Project 2: Final Touches: All right everyone.
Welcome back to back to basics how
to draw animals. We are ready for
our last lesson. We're going to get this
tiger finished up, so we're going to
finish up the shading, we're going to add some stripes and it's going to be beautiful. How are you ready
to get started? It will be gorgeous. Let's go be gorgeous. Come on everybody.
Okay everyone, welcome back to our
little tiger here. So we're just going to keep going with this and we're
pushing and pulling, going from darks to lights, adding those wherever
we see them. In this photo reference, I was working on the
face a lot last time. I'm going to start working
on the body here so we can get moving on that. Okay, Again, I'm using a very
soft pencil just because we are adding more graphite to this dark background
that we created. And I feel like
that's a lot easier if you are working
with the soft pencil, it's just going to show up a lot more on this dark ground. Yeah, I also think if you
use a harder pencil on this, it's going to give you
a bit of a shiny look. Mm hm. It's not going to
feel as soft and as dark, which it can get to a
point where it's actually, like, hard to even see
what you're doing. Yeah. It's too shiny. Yeah. There's a lot of shadowing on the
tiger's legs here. I'm just adding some of that, like we were talking in the
beginning, it's very vague. Down here, there's
a lot of shadows. It's hard to know what Yep, just focus on the shapes
that you're seeing. Focus on those dark shapes
and where they fall, based on some of
the lighter shapes and then how all that
connects to the tires head. It's coming together. It is getting there. Yes. I like adding those values in. That just makes
it really Mm hmm. Yeah. It will really start coming together and start having more shape and more form once you start adding
those darks in there. Yeah. Lots of drama. Just
for you, Paul. Thank you. You may not have had an
interesting tiger stories, but at least you're
giving me some dramas. Many of the drama appreciate that the stripes are actually really interesting with the
tiger because they outline the forms and the shape of the body, which
is interesting. They feel like they're
adding contour to the tiger. Yeah, almost like our cross
hatching lines on the sea. Yeah, it's very similar. You can almost use
those lines to help you define
the shape itself. Yeah, once I get a lot
of these values in here, I'm going to go back
and I'm going to start adding some
of those stripes, which I think will really
help define the shapes. Right now, my tiger is looking a little bit like a
lion just because it doesn't have to
be interesting. You don't have to get
every stripe exact. You can just get the
most important ones. You're really just saying
that for me, aren't you? Yes. Melissa can be perfection. Sometimes I can admit that it's not a bad thing
except when you're on a time, except where you're trying to actually get something done. Yes, it's a little bit more
value here on the Pal. And then I'm going to start
focusing on those stripes, which will be very
fun as you're going. If you're feeling like
certain areas are too dark or certain areas
aren't light enough, feel free to go back in with your eraser and pick up some of that dark value
a little bit lighter, make things come out at
you a little bit more. I think you'll probably start to see as you're
adding the stripes, you might need to play with
the values a little bit. I love how the stripes
on the leg and the foreground really define
the muscles of that leg. The way around the leg
is really interesting. Yeah. It starts to curve up on the left and
then it sinks in. There's a whole little
shaping thing helping there. Yeah. As you start to put those shapes on the
areas that come out at you, so those more foreground shapes, it will make those
shapes feel like they are closer to you in space. Yes, it will help with
the whole effect here. Then I want to definitely start adding some stripes on the head. I want to make sure I get that. Maybe I need to get
some tiger stripes like tattooed on my arm so
I'll look more muscular. Perfect. It sounds like a great idea. One
of your best ones. Okay, I'm on it. Okay, perfect. Can't
wait to see that. Hey, it works for this. Yeah, a little creature. It is interesting that we picked animals with a lot
of patterning. Mm hm. We like the fancy ones. Yes, adding all of these stripes on the head. And it's interesting
how the stripes change as the head
moves into the back. The stripes get a little
bit closer together and a little bit smaller and help
define those shapes as well. Like the top of the head,
the stripes get a little bit flatter and then they curve
into the back of the tiger. Yeah, they really change and if you make
them all the same, it'll flatten out your Tiger. Yeah, Yeah. You really want to pay attention to
how those shapes work within the tiger and the different forms
that you're seeing, because it really will help define your tiger and
make it look more real. Yeah, I love it. Yeah. And I'm just quickly putting some of the
stripes in here, but you could spend
a lot of time getting all of these
stripes perfect and making sure you're adding every stripe and playing
with a pattern in here. Does so if you're a detailed
person like Melissa, you don't have to stop at
the end of the course. You can always keep
working on these. Hm. Yeah. Usually these
stripes across the back, they get really interesting
the way they fold over the skin and
the way they change based on the different
movements that the tigers in or
different body shapes. It's almost like wearing a
pattern shirt and the way it would fall across someone's
shoulders or the way someone's body looks
underneath the shirt will affect the way the stripe
looks. It's the same way. Now, you're talking my language. Yes. I definitely have lots
of obnoxious pattern shapes. There we go. Perfect.
Now Paul's with us. Yes, I get. I understand. Net. Okay. One of the things
you could do with us is that a little bit more
of the background elements. But I think as far
as our tiger goes, we have a really good start on establishing the tiger
and the shape of it. Awesome job everyone. We got these tigers finished up in there looking beautiful. Hopefully you learned a little
bit more about shading, about creating a toned
background to work on, and how to use a needed eraser. So are we are done here. We wrapped it all up. Amazing. Tell everybody.
13. Closing Thoughts: Well, that was a lot of fun. I know I really
enjoyed it, Paul, and hopefully everyone
else enjoyed it too. We've experimented
with a variety of different approaches now. And hopefully you learn
something new that you can carry on with you and put to
practice in your other work. Yes, I know Paul and
I spend a lot of time focusing on
different forms and different shapes and how those forms and shapes
make up different animals. So hopefully, you learned how to carry this forward in
different drawings. No matter what you're drawing, always focus on those shapes, the forms and the
drawing will come together and look like no
matter what you're drawing. We would love to see your artwork that you
created in this course. It's always fun to
know that there are people out there all around the world who are
drawing along with us. So take a moment, post your
work. Share it with us. And also, if you
enjoyed this course, leave us a review and let
us know what you thought. We would love to
hear from you, Paul. And I love doing these courses because we love
sharing what we know with all of you and we would love to see how you're creating. With Atledge, we have a bunch more classes already available and more in the works. So be sure to subscribe
to us and also take a look around at some of the other courses
that we already have. Because we might have some that you want to
sign up for next. So keep practicing and Paul and I would love to see
you back here soon. Bye, everyone. Bye.
 Paul Richmond, Everyone is an artist.