Transcripts
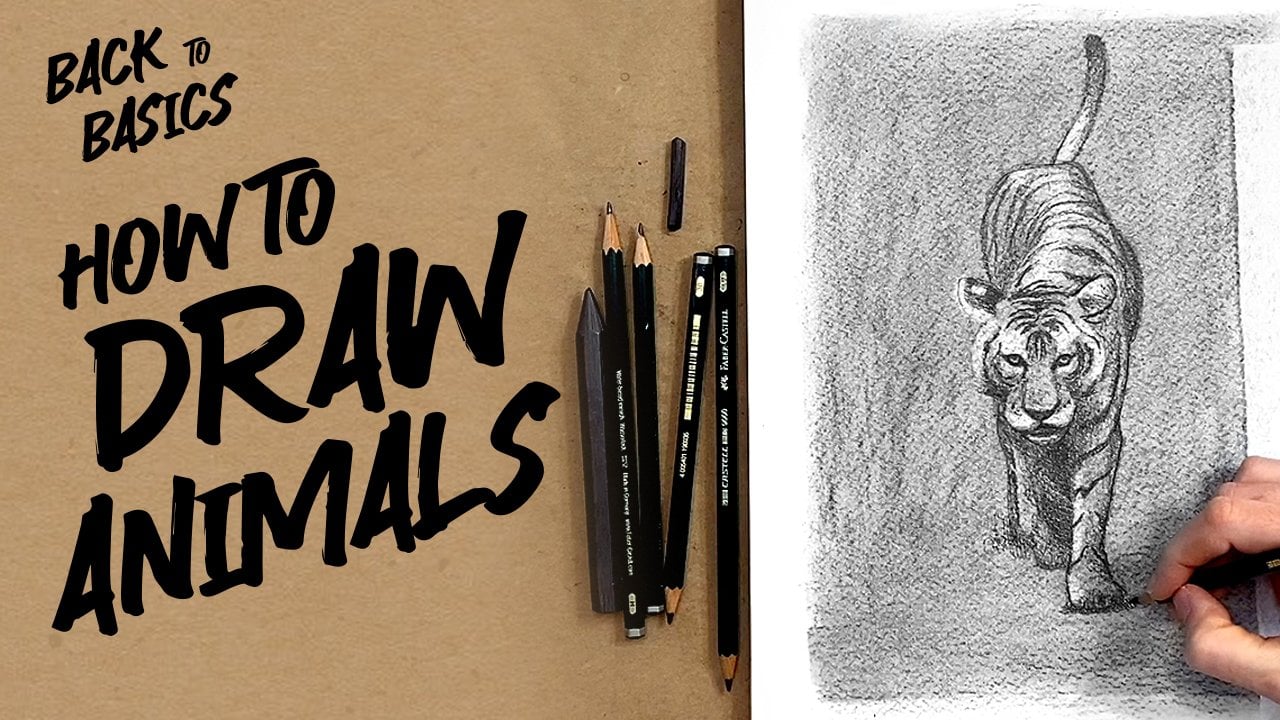
1. Introduction: You might surprise
yourself. Mm hmm. Hi everyone, and welcome
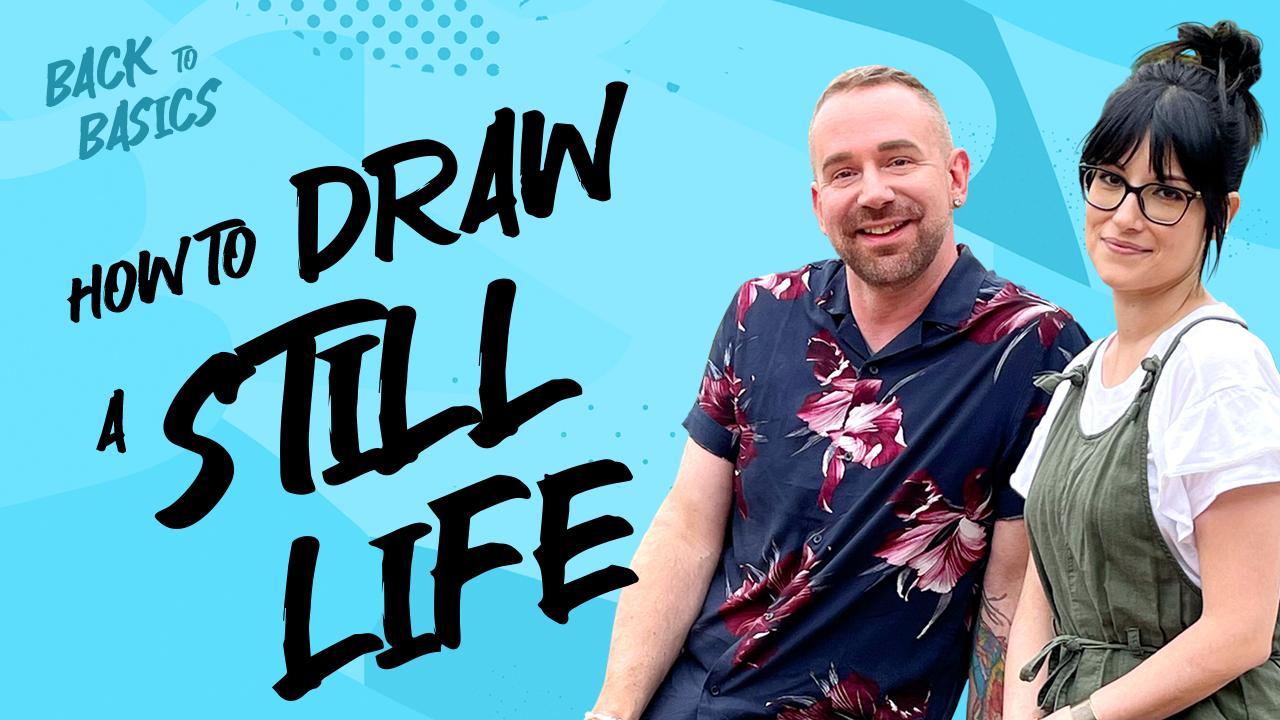
to back to basics, how to draw a still life. I'm Paul Richmond and
I'm Melissa Foreman, and we are going to be your
instructors for this course where we will actually be doing two different still
life drawings, showing you some different
techniques for them. We will be using a full
range of different types of pencils to create
different values or shades in the drawing. And we'll be talking
about things like looking for shadows and highlights. How do you make things
feel three dimensional? Then I'm handing
over the reins to Melissa and we're going to do things a little
bit differently. When it's my turn, we're
going to work with some charcoal and also
graphite drawing pencils. And we are going to start with establishing a mid
value and then working on top of that using a needed eraser to pull out
some of the highlights, and then adding some
of the shadows with some charcoal and some of those same drawing pencils
that we used in Pulse. Our goal with this course is to show you some tools
and techniques that you'll be able to take with you as you go into doing
other art pieces. We call these courses back to Basics because we
are going to talk about a lot of the
fundamental aspects of creating artwork. Which means understanding
value, how it works, how different
directional lighting affects different objects. How to establish
values through the use of charcoal and graphite and
other drawing materials. And how to put all those basics together into making something
really great. You'll see just between us, we each have very
different approaches. And that's the other fun thing about teaching
classes with Melissa, Aside from just getting
to like, you know, poke fun at her as we're
working through the lessons, It's cool for you
to get to see that two different artists can draw the same thing and have two
very different results. And hopefully, that will
make you feel like you have permission to do your own thing too and find your own style. Feel free to take tips
here and there to ignore certain things that
they don't work for you and establish your
own way of working. Don't ignore anything I say though that would
break my heart. Just ignore everything. Cosas, why don't you
introduce yourself and let these people know why you're qualified to teach this class. My name is Melissa Foreman. I have known each other
a very long time. We went to art school
together and we both established
professional careers From there on. I am
an art director. I worked for a large
reading card company. I managed a team of illustrators in hand
lettering artists, and I also do my own
painting on the side. So I worked with galleries in creating highly realistic
surrealistic portraits, and that's something I
enjoy doing on the side. So I have a lot of crafting
hobbies and other things, so I love all different ways of creating artwork and love to get to share
with other people. And I'm Paul Richmond. I also have known Melissa
for a long time and latched onto her in
art school because she was so awesome and ta***ted. And I said I am going to
make her be my friend. So we started a mural
painting business together when we graduated. So I've painted a lot of murals with her and with other artists. I also do fine art work as
well and show my work in galleries around
the world and have collectors everywhere
like Melissa, I love sharing my love for
art with other people. And what could be more fun than collaborating with my bestie to make some videos where you get to draw and make art
right along with us. So, are you ready to
get started, Melissa? I am. So read Polly.
Let's do this. All right, sharpen your
pencils. Let's go.
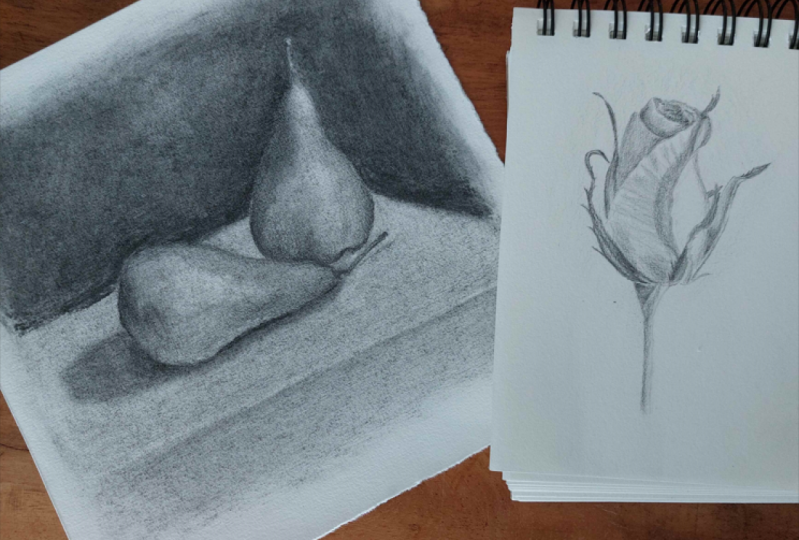
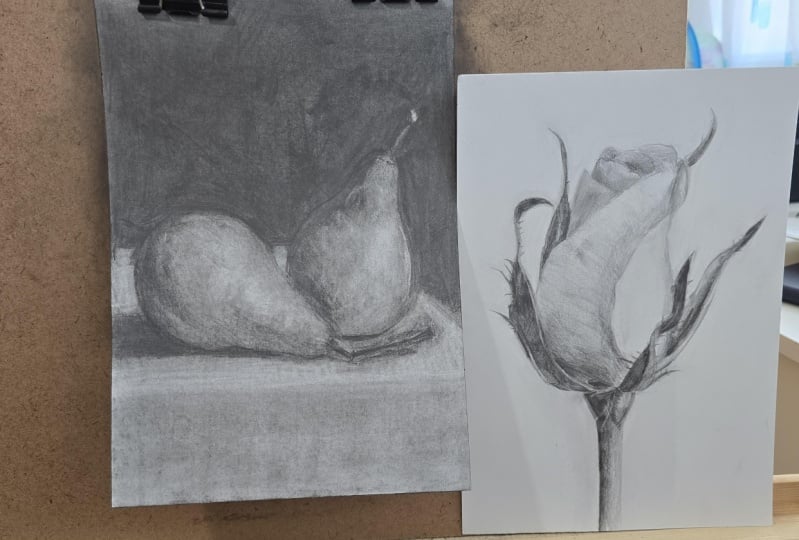
2. Projects: Okay, in this course, we are going to be
making two drawings. So, we wanted to show you what's coming so
you can prepare. The first drawing you'll
be making is with me. I mean, Melissa will
be drawing it too, but I'm the one who's
going to be on camera. We are going to draw
this beautiful together. We'll be, oh, thank you. You can see there's a
lot of subtle shading, a really fine detail in that. The way that we
achieve that is by using range of
different pencils. Because each pencil has its
own value or its own shade. Some pencils are naturally
darker and some are whiter. The main idea with
this first project is to show you how you
can take advantage of those different pencils and use them to their best
potential and have it all come together to make a realistic
drawing of this flower. Then what are you going
to have us do next? Melissa, we see your
hands with her. All right Paul. We are moving
from flowers to pairs. We get the full range
of nature here, we're moving on to a
drawing like this. And so this is done a little similar to late Paul's going to teach
you how to draw, but we're actually
starting with a midtone value on this
and we're going to use some charcoal to
establish that one overall. We're going to pull up some of the highlights within eraser, and then we're going to establish some of
the darker tones with graphite pencils
and also that charcoal. And we would love, love, love to see your versions
of these drawings too. Please share them with us
when you're all finished. Everybody's will look different, mine is different
from Melissa's. And I think it's
really cool to see how artists all over the world interpret the same
subject matters. So take a minute and share
it with those, please. Definitely.
3. Materials: We wanted to show you the different materials you'll need as we go
through this course. It is completely fine if you don't have
everything that we have. You can always make
substitutions, use whatever you have handy. But we wanted to go through and show you what
we'll be using. For the first project, I will be using three
different pencils. One is one is B. Really see that or not?
Yes. Oh, you can. Lovely. And a four pencil? The four H is a hard lead. Anything with an H
will be good for that. The higher the number,
the harder the lead, and that means it will
make a lighter mark. It's good for those
really light tones. Then the HB is right in the
middle of the road pencil. Then the four B is
a very soft lead. Anything with a B will
be a softer lead. That means it makes
a darker tone. It doesn't have to be a four. It could be whatever
number you want. The higher the number, the
softer the lead will be. Then the other materials
that I'll be using for my drawing are a needed eraser, which comes in a little
rectangular block, and then you just squish it
around and it's a lot of fun. And the stress reliever too, not that we're going to make
you stress, don't worry. And then lastly, you'll
need paper to draw on. I am using, I have this
tablet of watercolor paper, which actually works
really well for this. You can use any sketch
paper that you want. I like the cold press
watercolor paper because it has a
little texture to it. I like working with
that in my drawing. But whatever paper
you have handy, grab that and you'll be
ready for my drawing. What do we need for yours? Well, Paul's really similar. I'm going to use a
very similar paper to Pol has I have this
watercolor pad of paper. It's also cold press. You could use any
paper for this. Really, I suggest something with a little bit
of texture to it. If you have an nice
drawing paper, you could use that
if you want to draw in your sketchbook,
you could also do that. I would just suggest something
with a more texture, not something too
smooth or too thin. Also need needed eraser similar to what Paul
just talked about. Again, this comes in
a rectangle and you can meet it into any
shape that you need, which we will be doing during
my part of this lesson. Similar pencils to what
Paul talked about. We are going to start
with using a four B, the opposite of the way
Paul is going to show you, move to an HB and then
also use a two H, a range of pencils. A pencil sharpener because you want to keep
your pencil sharp, it's just easier to work
with a sharp pencil. Then I also have something that's a little
bit different than what Paul is going
to be showing. You have some pieces of
charcoal here and you can buy charcoal in all
different shapes and sizes. You want something where you can use the side
of the charcoal. This does not have
a wrapper on it, it's just plain charcoal. I can use the tip to draw with. I can use the side of it. I can use it in a lot
of different ways. And this charcoal is actually
called vine charcoal. You don't have to look for
vine charcoal specifically. Mine comes in a
little box like this. But you can buy any type of charcoal that will
work for you that has an edge and also a
tip that you can use for different purposes. Go gather everything up
and then come back and let's get started making
some art. Sounds good to me.
4. Project 1: Sketch: Hi everyone and welcome
to you back to basics, how to draw a still life. In this lesson, we are
going to jump into our first drawing by sketching out the
image on the paper. You ready to get
started, Melissa? I'm ready to be sketchy, Paul. Okay, let's go be sketchy. We are going to get started sketching out this
beautiful rose. I am working with three different pencils
for this drawing. You are welcome to do the same, or if you want to just use one pencil for everything,
that's fine too. But we thought this
would be a good way to show you what the
different pencils can do. I pick three that are all very
different from each other. Starting with the four H pencil, the H's are always
the harder leads. Those are the ones
that will make the lightest mark on the paper. Then I have an H B, which is right in the middle. Then I have a four,
that's the softer lead. The bees are the softer lead, so they make darker marks. One traditional way of doing
a drawing is to start with the harder leads and then work
your way up to the softer. I'm only using three, but some hardcore
people probably like Melissa would use every
pencil in the kit. Right? You would. Hardcore. Yeah. Yeah, we're not doing
that today. Don't worry. All right. I'm going to start
by just sketching it out. I think I'm going to
sketch it with the H B. I don't really
like sketching with the super hard lead
myself because first of all, you can't hardly see it and
also it's harder to erase. You can use whatever
pencil you want, but we'll just spend this first lesson
sketching this out, getting the proportions
to look good, and then we'll start
shaping it next time when I'd like to start by just drawing a very simple shape, Not really getting into
all of the details. I'm just using like a
jelly bean shape for the make sure I
like the placement, the proportion, and everything. Before I get to caught
up in all the details, I don't even know if you can see that I'm drawing so light. But it's a good idea to draw kind of light so that
it's easier to erase. So if you can't see
it too bad there, I promise you're
doing it right, Paul. Just trust him on this one. Just imagine a jelly bean. I think you can
see it. All right. So now I'm going to
draw the stem and it curves a little bit to
the right as it goes down. I'm just going to let mine fade. I'm not going to go all
the way to the bottom of the paper you can do. You can cover the full page if you want or you can draw it smaller and just
let it fade like I'm doing whatever you want. Okay, I'm going to just rough in some of those
little leaf shapes. There's one that
comes up over here. Typically when you are
doing a still life drawing, since that's what
this course is about, it means you're drawing
something that you've actually set up in front of you, objects that will be still
and do a drawing of those. But we are using photos since it would look the same to you either
way on screen. And probably better
through a photo than if we were filming a live still light. Yeah, it's good practice
to draw from life. I would encourage
you to take what you learn from this
course and then set up some still lives and work
on trying to draw those to. Definitely drawing from life is a little different as
far as capturing light. Because photos capture it in their own way and the way you see it in person will be
a little bit different. Okay, this is coming
together just beautifully. Those leaves look a
little Dr. Seuss. They are, there's
interesting shapes there. Just get the basic shape with the squiggle down first and then you go back
and flush it out. I can't stress enough. If you haven't done a
lot of drawing before, you're going to probably
feel tempted to want to jump right to detail. Draw every little perfect
lump and bump and shape. But it's very difficult
to do that and get the proportions and keep
the big picture in mind. Just keep it simple,
keep it light. One pro tip for today is when I'm doing the
lighter part of my sketch. I always hold my pencil farther back away from the
tip and that keeps me from getting tight
to detailed with it. That's one thing you can try if you find yourself just being too controlled,
detailed too soon. Another reason for drawing light is that you
don't want to make deep grooves in the paper with your lines because then when we go to shade it,
those get annoying. Yeah. They will show up whether
you want them to or not. Yes. Yeah, a light touch is
definitely helpful. All right. Getting this leaf in, and then I'm going to go
back and work on some of the layers of the rose. One more little Dr. Seuss leaf up here
on top. There we go. Okay, now got this petal, comes over here to the right, and then see how it actually at the top curves around so that we see the other side of it and then it comes
up and overlaps. That leaf comes down like that. You try not to think too much
about what you're drawing. Just look at the shapes that, that always helps Myelo at
how the shapes interact, how they overlap, how
the two work together, the relationship between
different shapes, the size of the scale. All that will be
helpful right then. We have this one that
comes over here, We have this little guy. There's actually a lot going on here with this flower, Melissa. I know Paul. You thought you
were picking a simple one. You knew you were like, uh huh, I'm gonna make Paul
draw this Well, you almost picked the one
with dew drops all over it. So imagine imagine what you would be drawing right now if you had picked that one. Yeah, I says gone, well, okay. Just getting all
these layers in. You don't have to get every little detail because some of it you can work out later as
we're doing the shading. But it does help to get things
mapped out at this stage. At least the main basic shape so that you know everything's
where it's supposed to be, then that will make the
shading bit easier. All right? I think if you don't start with
a good foundation, a good drawing in the beginning, your shading is not
really going to help you. Yeah. You're just going
to be shading in a mess. Yeah. You want to kind of take your time and get things
in the right place first? Or at least which I've
done that before. Like, I'm tired of drawing this. I'm just going to shade
it now. That'll help. Let me just move on. I'll just
fix it later. It doesn't. I'm sure that's hard to believe that I would do
such a thing, Paul. I could never imagine happen. Never imagine wanting
to rush things. If only they could have seen us when we had our mural
heating business together. Melissa and I, when we
graduated from college, we painted murals together. For a while, we had our own
little business foreman. Richmond Murals. Yes, my name dot, of course. Mm hmm. Well, let's just say working with Melissa on a mural is very
humbling experience. Oh my goodness. We'll have to fill you in a
little bit more on some of that in our next lesson because we are about to
wrap this one up. Now when we go to
the next lesson, we are going to start shading. If you're not quite
finished with your sketch, take all the time that you need. With this, you can just pause
the video so you'll have the reference on your
screen and keep going. But then be ready in the next lesson to
start shading it in. Great job everyone. You did it. Okay, so now we are ready
to start shading this in, in the next lesson we are going to begin with the four H pencil, which is the hardest lead, so it's going to be a
really light tone overall. So you're ready to start
with a light tone. Melissa? I am ready to start with
a light tone, Paul. Okay, I'll see you then. I'll see you soon.
5. Project 1: 4H Pencil: Hi everyone and welcome back to back to basics
how to draw a still life. And in this lesson, it is time to start adding
some shading to our drawings. So we'll be using the
four H pencil and putting a nice light even
tone over everything. You ready to start shading? Melissa, ready to
get Shady? Paul? She just can't help
herself. All right. Let's go let's do it. Okay. Let's start
shading this in. If you are following the
same process that I am, I'm going to start with
the hardest lead pencil, which is the four H. If you
have a whole set of pencils, the higher the number gets, the harder the lead will be. You could use a four H like me, or if you want it to be
even lighter, you could 68. Although by that point you
hardly even see anything. I don't know why you bother, but the idea of using the
different pencils is that you're not really
varying the amount of pressure too much
that you put on them. You're letting the natural value of the pencil do the work for you and you're building up the layers to get
to the darker value. First thing I'm going to do is put a little bit of light
value in the background, right along the edge here. First glance, I thought it
was a white background. You might have thought that too or maybe you're more perceptive
than me, I don't know. But actually, there is a little bit of value in the
background because you can see how on the right
side that petal is actually a little bit
lighter than the background is. It's very subtle, but putting
a little bit of value in the background will help to
make that petal pop out. I'm not going to shade
in the whole paper, I'm just going to do right along the edge and then let it fade. You can go as far
with it as you want, but I'm just doing it almost just like a little
glow around the flower. That's enough. You want to take your time when you're
using this technique and try to camouflage the pencil
marks as much as you can. If you want it to be smooth, I mean, it is okay to also shade it where you see
the pencil lines. That's valid too. If
you want to smooth, you just have to go slow and let each mark help cover up
the one came before. Yeah. And just use a light
touch like we did last time. Yeah. You can even let your strokes overlap the flower a little bit because we probably are going to use the same technique
within the flower. Exactly. That is actually
where we are at right now. Before I do that though, I'm going to take my
needed as this is a great eraser for drawings because you can shape it to whatever size you need it to be. I'm just going to some of my
interior lines a little bit to lighten them so that because it's harder to do
that once you start shading. And I don't want it
to look really liney, I want it to be more
realistic, All right? Yeah. Like Melissa said, basically we're going to
shade in almost all of this flower with this
shade of pencil. Because everything in the
flower except for that petal on the right and a little bit of the second petal at the top where the
light is hitting it, maybe about the shape, if you wanted to sketch
it out a little. That might stay the white
of the paper for now, but everything else you can just shade it all in. How
do you see that? Because the idea is
that we'll build up additional layers of value and keep getting
darker and darker. And being more
selective about where those darker values
go as we go along. This stage is easy because
you don't get the color in everything, colored
in everything, that there are different
ways of shading. I'm showing you this
method of using the different pencils
and building up the value and I'm just
b***ding with the pencil. Once we get to that stage, there are tools
for b***ding also, like little b***ding
stumps that are rolled up paper that you can use to b***d your shadows
and stuff with. I don't like those as much because they tend to everything. Look at, I don't know, foggy you lose at the
structure of the form. I think sometimes with those, but try everything out, see what you like the best. There's something nice
about the graphite texture too that I think you can get by using all the different
pencils and not necessarily by using
the paper stumps. Yeah, it gets a little
blurry or a little smudgy, you lose some of
that nice texture. Yeah. Yeah, it's
a pencil drawing, so why not make
it look like one? Just embrace it. Yes, embrace who you are, you little pencil
drawing. Be proud. The only parts that
I'm not coloring again are just that little section right
here at the top of this petal and then the
majority of this petal here except for maybe right along the edge on the
bottom right side, there's a little shadow there. Otherwise color way. Do you always go in the same direction
with your pencil Melissa or do you go in
all different directions? When I'm doing a
graphite drawing, I like to go in the
same direction just because I can try and
get an even texture. Yeah, I don't love seeing
all of the strokes, so I like to do everything in
the same direction because it makes even quality
throughout the drawing. Yeah, same here, but I know a lot of people
do things differently and some people really like
the cross hatching approach. And I think that can make a really interesting
texture too. I go for a more smooth
even texture overall. Yeah, you use different
ways you can do it. Like you could cross
hatch like Melissa said, you can move your pencil
like in the direction of whatever element
you're drawing. If it's wrapping
around to the right, you can move your pencil
that way and that'll give it a little bit more
of a sculpted look. So many options. I think one thing
that can help too, if you're struggling
with a color photo and drawing from a reference
instead of from life, is to make that photo
black and white. And sometimes that can help you see value a little bit easier. Sometimes it can be tricky if
you're not used to drawing. And trying to convert things from color to black and
white in your head can be a little chal***ging at
first little tip for you. Oh, look at you
with the pro tips. Melissa, teaching me, trying to get me used
to the giving a. We'll get there eventually. That was a great step in the
right direction. Thank you. Nice try. Yes. Excel***t. Just say it with a little more
confidence next time and you're there. All right. Almost finished with this
layer at the bottom. Like I said, I'm just
going to let that stem false wherever you
want it to fade. You just start lifting up a little more and
more and more with your pencil until
it's going down. Going to come back in here and just break up
that edge a little. You can always take
your eraser if you want to pull out any other
little highlights like I'm doing right here
along the edge of that. Then let me just put a little
bit more value back in. When we say value, by the way, we're talking about
the different shades, light and dark in your drawing. Those are the different values. Being able to see those
and replicate them is what will make your
drawing look realistic. Mm hm. Yeah. As simple as that. All right, so awesome work. Okay, well, we have now got
some value on the paper, but we are not finished yet. In our next lesson, we
are going to move up to the HB pencil and start
adding in some middle tones. You ready for that? I am ready, Paul. See you then.
6. Project 1: HB Pencil Part 1: Hi everyone and welcome back to back to Basics
how to Draw Still Life. In this lesson, we are
going to start adding in some middle tones to our
drawings using the HB pencil. Are you ready to
use an HB pencil? Melissa? I'm trying
to think of how I can word this so you can't
do any fun like puns. I know I'm desperately
trying to think of one over here and I got nothing too bad. You it for me. I'm ready
to get started though. Okay. Okay. Okay. Are you ready to do
some shading that doesn't just involve coloring
in the whole thing? And now we're going to be a
little bit more selective. I'm jumping to the HB pencil, which is right in the middle of all of the different shades of
pencils that we have. It will be quite
a bit darker than the value we were
working with before. The idea now is I would choose maybe a
dark spot to start in, just so you can see what
the pencil is going to do. I'm going to start over here in this leaf and I'm
just going to go right on top of the,
um, previous layer. And you can see how, because I'm not pressing any harder
with the pencil either. I'm using the exact same
amount of pressure, but it is making
quite a darker value. It's still maybe just more
in like a middle range. As far as the value scale goes, we'll still get
quite a bit darker. But basically now you're just going to go
through and shade in everything that is this value
or darker in the image. We're just slowly
building it up. This is like a very
strategic process. Melissa, I bet you
are just loving this. Are I am. Could, why am I teaching this? You're the one who loves
this kind of stuff. I'm a one pencil boy usually
when I'm drawing, honestly. Yep, keep it simple. Totally valid way to do it too. You use just one
pencil and vary how hard you press to create
the different values. Yeah, definitely. You
could totally do that. You might have a little bit
more of a chal***ge getting the right values because
it will depend more on the pressure you use and depending on what pencil
you're starting with, you might not be able
to get dark enough or you might not
get light enough. Yeah, I guess the
advantage is you have more options when you're
using all of the pencils, but it is a definitely more time consuming and strategic process
depending on how you work. Like, if you're like Paul
and you're impatient, it might not be the
process for you. Or if you're like me
and you spend forever on it and you don't want to
spend forever on a drawing, then maybe you just
use a couple pencils. When I'm doing a
one pencil drawing, I usually pick something
on the softer side, so it'll be able to go
as dark as I need it to. And then I can just press lighter with it to
get the lighter. But it is tricky to get, especially some of those
subtle light variations, It's a little tricky
doing it that way. You have to try a
little bit harder. Yeah, basically
there's no easy way. It's all hard. We're still going to do a
little bit of that method too. Once we get up to
the four pencil, we'll have to press a little harder in some areas to get
the really deep shadows, and press a little lighter
to get some of the others. Because there's way
more than three values in this image, right? Yeah, we are limiting
it from the beginning. Paul said four
pencils. That's it. Three. Melissa, 33. Oh my gosh. I have four out here. I'm already cheating ever
since we've been in college, Melissa was a freaking
overachiever. I don't even do it on purpose. It just happens, Put
one of those away. All right. So I am working
on these pedals now. The ones that are up
here I would say pretty much mostly going to get
covered with this HB pencil, but you'll see there's a few little spots along the edges where
they get lighter. This is where you
get to just really start paying attention to
more of those subtle things and try to try to leave
the lighter spots without hitting them with the second layer so that it
just creates that b***d. Okay, coming up here. Now this one gets darker as
it goes toward the edge. This is a time to really start
looking at your reference. That's your pro tip
for this lesson, is spend as much time looking at your reference as you do
looking at your drawing. It's tempting to just want to stare at your drawing
the whole time and never look at the reference, then you're going to
miss a lot of stuff. I think one thing
that can be tricky about drawing with
graphite is sometimes you'll get little
ridges where it will be dark or little areas where you feel like the graphite
isn't b***ding as well. I think when you get those dark ridges is you're probably
pressing too hard. You might want to let up
on your pencil a little bit and be a little bit more gentle with the strokes
and then see if that I would if you decide you want
to do a lot of still life drawings or
drawings of any kind, experiment with different
kinds of paper too, to see what you like the best. Because each surface will
give you a different effect. Also, I'm working on
watercolor paper actually, right now, which I really like. This is a cold press
watercolor paper. It's got a little texture. The cold pressed paper
are a little bit bumpier. I like that because you can take advantage
of that texture, it camouflages some of the lines of the pencil
a little bit more. You're using watercolor
paper, right? I am, Yes, I am also
using a cold press. The difference between cold
press watercolor paper and hot press is the texture. Cold press will
have more texture, Hot press will not
have any texture at all, it'll be very smooth. Hmm, You can use that if you want just a more smooth drawing, a result that's a little
bit more polished. But it is a little trickier to use because you will
have to be very careful about the way you're
using your pencils and the way you're making
your different lines. You see everything. You will see
everything for sure. It will take some
practice, I think, to get used to that type of paper or anything that's
a little bit more smooth. Yeah, like Paul said, the texture will actually help hide any mistakes that you
make with the graphite itself. I'm a big fan of that. You can see I'm starting
on this big petal here. I'm starting to lightly suggest some of the little
little y lines that we see in. The nice thing about
this technique really, is that it does you
just slowly build up. I think because you
are taking your time, you see more and you try
to bring out more of those subtle details versus
like my normal approach, which would be to just
be flying through this and I would notice the
big contrasty things, but I might not notice all
these little subtle details. Yes, now that we're at the HB pencil and
we're adding some of the values that are a
little bit more nuanced, I think you'll start to see
all the different details come out and heart might take
you a little bit longer. Yeah, I think we're
going to spend at least two lessons on the H B so that we
can take our time. Because this is where
we are starting to, it almost starts to
become like realistic, but just in a
lighter, higher key. Mm hm. Yeah, it does start
to take shape. You beautiful little flyer. Yes. Once you start looking at that large petal right in the center, you realize all the
detail that's in there. Who? There's a lot there's a
there's a lot of aging, there's a lot of different
ways that the light hits it. Yes. It's going to take a
little while to bring out all of that detail. Or at least some of it.
Maybe not all of it. Yeah. All right, so we will continue on this
stuff in our next lesson, you did a great job. All right. In our next lesson, we're just going to keep
doing more of the same, so keep those HB pencils handy. And I'll see you then.
7. Project 1 : HB Pencil Part 2: Hi everyone and welcome back to back to basics how
to draw still life. In this lesson, we are going
to keep right on shading the middle tones with the HB
pencil. You ready, Melissa? I am ready. Paul.
Please teach me. Okay, follow me. Let's go Just going to keep
doing more of the same. I am using my HB pencil again and I'm just going
to jump right back into, I'm working on this big pedal
here in the middle trying to bring out some of the
details that I see on that. I did sharpen my pencil
in between lessons. It's a good idea to
keep your pencil pretty sharp while
you're working. You can see I'm not holding the pencil vertically
like I'm writing. I'm holding it more on its side. It's not the actual tip, but it's a little bit of the edge of the pencil.
That's how I like it. But experiment with
different positions and see what works
the best for you. And it might be that you hold it differently depending on what effect you're
trying to get. One of the things that is really important to
think about when you're doing a still life drawing
or anything that is meant to be realistic is
the light source. The way that the light
affects the object is really what helps us
to understand its volume, its dimensionality
In this image, can you tell where the
light is coming from? Melissa, can you tell? Tells? Well, I think the
first giveaway is just finding the brightest part
of your image, right? We talked about earlier. The brightest part is that
petal just on the right there. It's very bright yellow. That makes me think that my light source is
coming from the right. Then I'll start
looking at my shadows. Where are my shadows falling? And a lot of my shadows,
especially on that stem, are on the left
side of the stem. That makes me think that
I was probably right, saying that our light source is coming from the
right hand side. Yes, Melissa is used to realizing that
she's probably right. Goodness. If you're working from an image that already exists like we are, then just identifying where the light source is
an important step. If you are setting up a
still life for yourself, then you get to have
more control over that. You can experiment
with placing a lamp or a little light source in different positions to
see what works best. It's usually better to
have it coming from one side or the other
than from the front. Kind of flatten everything out. If if the lighting is
from the front Right. You'll probably lose some
of your shadowing that way. Yeah. Yes. Have a
less in this one. In this one feels to me, like Melissa said, the lights
coming from the right. And I would say like maybe a little bit from the back to you. And you can sort of
tell that by how, like I'm looking at the stem. How much of the stem is
in shadow versus light? If the light was
more from the front, we'd see more light. In what we're seeing a
little bit more shadows. So I think that makes me think the light is just a little
bit toward the back. This is just coming
together beautifully, already is gorgeous. One thing to pay
attention to when you're thinking about light
source is the type of edge that you're
getting that's really important when you're
drawing because you either want a soft edge or
you want a hard edge. I think this reference does a really nice job
of illustrating. The difference between
the 21 example would be to look at that
leaf that overlaps that petal that is the
brightest in the image. Definitely has a hard edge. You see all the detail on it. The leaf is very dark and
the petal is very light. You obviously see a
difference between the two. Making a hard edge there
in your drawing will make that leaf pop out and look like it's on
top of that petal. But if you look at
that petal that is in the center that has
some shadowing on it, you'll notice that there's
some very subtle shifts in the shadow itself, the way the light bends across the petal and you get a
lot of very soft edges. You're going to use a
different technique when you're drawing
something like that. Melissa, I feel like that
may have been a pro tip. Okay. Paul called it
pro tip of the day. Pro tip of the day. Pay attention to the edges and how the light is
affecting the edge. That is courtesy of Melissa. Add another thing. I did not Go ahead, add another add another
mark in my pro tip to I didn't think a lot about edge control early on when I was first
starting out, But you can appreciate that, especially if you
look at the way different artists handle it. In traditional paintings,
you can see a lot of edges that I would expect to
be really sharp are painted. So if there's an area that's
just supposed to b***d into the background is a very
helpful thing to consider. It can make a big difference even on that petal itself
that we were talking about. The petal in the middle with the shadow from the
brightest petal on top of it. You can notice at the top of it, the shadow has a harder edge to it and more towards the center has a much
softer edge, it b***ds. That's the difference between
a hard edge and soft edges. One feels like a subtle shift and one feels like a
very abrupt shift. I think that's a
rookie mistake that you see in a lot of
drawings and paintings. Is the tendency to want to make everything have a
hard, hard edge? Yes. So yeah, look at
where that actually is happening and then where
it's meant to be softer. And then you just want to handle it differently with your pencil. Where one would get a, I guess just a different
application of the graphite are direct, more line based application
of the graphite rather than kind of
a subtle softer. Sh, it's a lot to think about. Huh? It's a lot to think about. Yeah, that's the hard part. Don't be overwhelmed though. If you are new to this, you just take it
one step at a time. Focus just on the area
that you're working on. You don't have to do
it all at once or know all the things at shading. And really I think a big thing that me and helps me
also when I'm working with new students is just
encouraging them to really trust your eyes and what you see and just try
to replicate that. A big part of learning how to draw is learning to see and to look closely and
to pay attention and try to bring that
out in your piece. Take the time to really
look at it, yeah. And just take it step by step. Just focus on one
area at a time. Don't think about the whole
thing in the beginning. Just think, okay, I'm going
to start here and I'm going to start shaking this and that's going to help me
with the rest of it. It's kind of calming in
a way when you do it this slower technique because
you're just inching along. Yes. Paul's favorite. Yeah. I like to run through life at the
top speed normally. So this different it can be very meditative. Right. I think I am just about
finished with the HB player. That doesn't mean
that you can only use this pencil now and
once you put it down, you can never touch it again. You can always go back and
you add in more of any of these values after you have gone through
all of the steps. But I think for starters, it's good to just work through them in order
because it gives you a process to figure out how you're building up
those different shades. Definitely. All right, one more little section right here
and we'll be good to go. Like I said before though, take all the time that you need, so if you are not
quite finished with your H B layer or whatever
you're using for your, you know, kind of middle
pencil, keep going. Pause the video, but once we
start on the next lesson, I'm going to jump up
to my four B pencil. Get ready favorite.
Great job everyone. This is looking gorgeous, but we're not finished yet. We are now going to enter the dark tone phase using
the four B pencils. Are you ready to
get dark and moody? Los Pal? You know, I'm ready for that. You made the dark side? Yes. All right. See then. See you soon.
8. Project 1: 4B Pencil Part 1: Hi everyone and
welcome back to back to basics how to
draw a still life. In this lesson, we are
going to get some of those darkest darks added into the drawing to make it
really start to pop. You're ready to make
it pop, Melissa? I'm ready to make it pop, Pop. All right, let's get popping. Hey, it's the moment
you've been waiting for. Well, at least
I've been waiting. It's time to go to
our darkest pencil. For me that is the four B, You can use whatever you want and we're just going to
jump right back into it. I'm going to go back to the same starting point that
I had for the last one, which is this super
dark leaf over here. You can see how, again, I'm not pressing
any harder than I was with the previous
two pencils, but I'm getting a much
darker value now. I just like the way too, that when you have this build up of the different layers
and the different leads, it starts the graphite just starts gliding across the paper a little differently. The strokes camouflage themselves a little
bit more because it's merging with all the graphite that's
already on there. Yeah, definitely. I like anything that
will do the work for me. Yes, you do. Including me? Yeah. That was my method when we had our mural painting
business together. Just makes do everything. It works great too. Yeah, we're decorate. This is bringing
back memories of that one day when we were
painting the mural in the bank. And I'll tell the story quickly so I can get
back to teaching. Teaching, yeah. Yeah. Story time is good to we were up on the scaffolding painting
this mural in a bank. I was just not
having a good day. Everything I was
painting was very good. Everything Melissa was painting
was looking magnificent. Flying through it. She
was she painted like three or four people,
giant people. I was just trying to
paint this one stupid. What was it like a daisy? A violet? Violet. Yes. It was just not working out and I was
getting angrier and angrier. Melissa was over there just buzzing around,
painting beautifully. Was like, Melissa,
you have to paint something that looks
bad to push you off of the So I know 'cause you certainly
couldn't bring yourself to paint something
back. I couldn't. I that was a tough decision. Yeah. She couldn't do it guys. And I'm still alive. Yeah. Somehow there were
too many witnesses. Yeah, that's probably true. Oh man. Good old
the good old days. Yes. Can you believe Melissa
still collaborates with me? I know. All right. I came back. Imagine that 20 years later, she just must like to suffer. All right. So you see how I'm just only shading in
the areas where I want this level of darkness
to create some of the roundness and the
different variations of high light and shadow. I'm b***ding it into what's already there on
the paper and you just get such a nice rich layering of different values and really start to make this come to life. You can also vary your
pressure if you want to. At this stage, I
started off using the lighter pressure like I did with all of
the other layers. But since this is
my last pencil, I am also just paying
attention to where I see like the
super dark values. And I am going ahead and
just pressing a little bit harder as I approach those
areas so that it will, I like making my drawings pop, like making everything pop. Yes, I do have to
occasionally erase off all the pencil
lead on the edge of your hand too. Yes. One thing I do and I guess
we can call this a pro tip. Melissa. No tell tell depending on whether you're
left handed or right handed. You could put this
on whatever side works for you, but
I'm right handed. Once I have some
graphite on my paper, I'm putting my
hand through it to draw on the left
side of my paper. And that's not what I want because it ends up all over
my hand, like Paul said. And all over my drawing, I will take either a piece of paper or paper towel and I'll put it under my hand
as I'm drawing, so I'm not actively spreading graphite
all over the place. That's a smart idea. Yeah, it's really helpful for me because I don't
like to make a mess. I'm sure everyone is shocked
to hear that about you. Look at the difference
it makes once you start getting those dark
values in there, just really becomes
very three D looking. Hmm, yeah. One thing you might find as you're putting
this dark value on is that some of your mid
tones don't feel dark enough. You can go back with your HB pencil and go back into some areas
that you need to. You don't feel like you have to just stick with the
one pencil now. You can feel free to go back and forth as much
as you need to? Yes, definitely. Sometimes that can
even help make the darker layer b***d in
better with the other layers. If you go back over it with the HB or whatever other pencils and just work it into the what's the This is also the time to remember Melissa's other
protip which was to really pay attention to the sharp and soft
edges of the shadows. Where do you see each type and try to bring
that out as you go to? Yes, definitely. You'll find out the softer pencil that those edges are
even more obvious. You can make them
more soft by just b***ding your strokes
into the strokes above it or next to it. Or you can limit those strokes to a certain shape in
order to make that harder edge look when you're creating a shadow somewhere like I'm doing
on this pedal right here. Really pay attention
to how far does that value go into that area. Because some shadows spread out pretty far and then
others are just right up against the edge and then
immediately transition over to the next
value that helps to convey what the shape
is actually doing to this is fun. Mm hm. I can't believe I only have one more lesson to finish this. Do you think we can do it? I think if anybody can do
it, Paul, you can do it. Well, I definitely
don't want to eat into any of Melissa's times. She's going to be teaching you
a whole different process. Yes. But I think this is a
good foundation to start with. Yeah, I'm used to adding in all of those
values very intentionally. Mm hm. I'm looking very closely at the reference
in front of you. These are all good things. Yes. Just being very mindful of every stroke
that you're putting down and why you're putting
it where you're putting it. My brain is exhausted. I know taking it step by step
but not being overwhelmed. Yeah, you can take as much
time as you need to on this. Yes. Just because we're going to be finishing it up in the next lesson doesn't
mean you have to. You can work on it
as long as you want. All right, I think that is a good stopping point
for now and then we will come back
and finish this up. Great job. These drawings
are coming along. They are looking gorgeous. And in the next lesson, we're going to finish
them up. See you then.
9. Project 1: 4B Pencil Part 2: Hi everyone and welcome
back to back to Basics how to Draw a still life. In this lesson, we
are going to finish our first project using
mostly the four B pencil, but you may use some
of the others too. So just grab everything. Let's get to work.
You ready Melissa? Yes, Paul, let's finish
this up. All right. Let's go. All right, let's finish up this
beauty. Are you ready? I'm still working with
my four B pencil. Just going to jump
right back into where I left off on these petals. We're just paying attention
to shadows, edges, all the stuff I want
to make sure and save p***ty of time for this big old petal here in the middle, Need a lot of love. Yes, the good thing is a lot of it is
already worked out with the other pencils I'm just enhancing now a lot
of it's much softer. You do just a little bit
and then just work it in rather than creating
hard edges, right? That might be one
where you're just using very gentle strokes just to get some contrast in
there, but very subtly. Yes, sometimes when
I'm at this stage, rather than doing the big
long diagonal strokes like I was doing with
the other pencils, I like to just do like little
circles or little ovals, especially if I'm just going
into a tight spot helps. I like that because it just
b***ds out a little easier. I think you can mix up your
marks that you're making. Do whatever works
for that section. We did so many still life
drawings in college. Yes, we had entire classes that were just
still life drawing. Still life drawing.
Still life paintings. Mm hm. It's a good
place to start. I think it's a little bit more approachable than painting portraits or anything like that. Mm hmm. Yes. One advantage if you do painting a flower
or something. If you get, you know, one petal a little bit off,
no one's going to know. Yeah, Right. It still
looks like a few face. It's probably more important to get things in the right spot. Yes. A little more intimidating, I think, but also it's
still life is still. Yeah. Nothing's moving. Nothing's changing over time. Yeah. Even if you're doing
like a landscape or something. If you're doing it from life, the lighting is going
to change very quickly. But with the still life, you can control all of that
a little bit easier. Mm hmm. Now, one thing I'm noticing, this is a subtle little detail, but light does this sometimes. I'm doing the shadow right
now on that big petal of where the super bright
petal is overlapping it. Do you notice how that shadow gets a little bit
darker actually? Up towards the upper part, and then it gets actually a little bit down
toward the pedal, which is the opposite
of what I would expect. But I think it's just because
there's a little bit of light creeping in down
there or something. Mm hmm. Yeah, you're getting a little bit of that reflected
light down at the bottom. I think because it's spherical. Because it's wrapping
around in the space. Do you hear my
neighbor dog barking? I just did. Yeah. I
thought maybe it was Lily, but I guess I never
heard Lily bark. So yeah, lilies
probably still asleep. She's no dummy. She's cuddled under the blanket. Oh yes. It's like
these humans are ridiculous getting up
at these early hours. What are you doing
that is so dumb. I will, I'll close my window if the dog starts to get too
obnoxious out there, but then I will just be
a sweaty, angry man. So it's kind of a trade
off that you all will have to deal with
one or the other. Yeah, Pick your
poison, everybody. I would pick the one
that does not involve an angry sweaty paw p, y. I'm with you on that one. I like going into these little tight spots
like this and just really pushing those
shadows like right underneath the
flower on the leaf. Because I feel like that
just adds a whole lot of depth and dimension
right there. Okay, let's get this
little leaf in now. How is yours coming
along, Melissa? It is getting there.
I am working on the petals right now and
just defining some of the shapes because I feel like this darker pencil can do that. Define some of those shapes where a lot of them are really just midtones and you lose
some of the definition. Yeah. Oh yeah. Yeah. It's interesting how you're drawing the
same thing and you're going over the
same surfaces each time. But it's almost like with
each pencil you notice different things and you
bring out different things. Y, definitely. I'm actually switching back
and forth between my HB and my four B fairly often in here just I feel like the harder
pencils smooth out some of the softer pencils texture a little bit and make it a
little bit more subtle. I like to do that instead of using a b***ding stump
or anything like that. I will go back over
a softer pencil with a harder pencil H. These leaves are interesting because they are super twisty. Really look at where the
shadows hit at each section. It might be different, depending on which way that particular part of
the leaf is turning, it's going to be affected
by the light differently. Hm, Just gorgeous. What's the weirdest still
life that you ever drew? Melissa, do you
remember, Oh goodness. Did you ever have to like do one for an assignment
and you're just like, I don't know what to
do and you pick like some really strange
thing, grab random stuff. I can't think of anything. I don't know. Did
you have anything? Oh gosh, so many. I'm sure. I'm sure you have much
weirder ones than I do. One time I was completely out of ideas and so I just it was a still life
painting we had to do. And I just painted the view looking down into my trash can. It's like a wadded up paper
and like a banana peel. Oh goodness, that was nice. Was this in college? Yeah. Okay. And then, let's see, one time, this might have been high school.
I don't remember. I just got like a whole bunch of my mom's high heels and
put them in a pile on the, of course, the table. And drew those which I
thought was brilliant. But then everybody else
thought that was really weird and like I had
some kind of weird foot, foot thing or something like no, I just think they're pretty, the artist is so often
misunderstood in our society. Right. I wonder why? Don't worry folks, if you're a creative genius is
not always appreciated, it means you're ahead
of your time, right? Not I will understand.
It's okay. No, but it doesn't mean that
you aren't brilliant, right? We're closing in on
the end of this one. I'm just coming down to the stem now and putting the
dark values on that. Then I want to do one more
pass over that pedal. Because here's your
approach for this lesson. One thing I like
to do frequently, probably too
frequently, or at least more frequently than
is actually necessary. But I squint my eyes and
that helps me to see the overall value structure instead of just getting
caught up in the details. And it's a good
way to just check, do like a quick check to see
if everything is feeling like all the different parts are relating in the same
way as your reference. This is a good time
to probably do that and see if you need to darken anything or
lighten anything. When I squint my eyes
and look at mine, it's starting starting to work. I'm pretty happy with it, but I want to come back over
here and just add a little bit more
value to this petal. Especially on the left side, so it wraps around more. And I'm going to
do a little bit of value on the super light one, just kind of over on the
right side to wrap it around. And then I'm actually
going to use my four H. Just put a little
bit on this part. Let's look at this beauty. I love this drawing. Yeah, I came together. Worked out, I did it. Mm hmm. Now, if you need more time, please take all
the time you want. Truly, you could spend hours and hours on a
draw if you want to. Melissa definitely could. Yes, Paul and I could. No. Yeah, I have to give her time limits or
else we're in trouble. Yeah, but you take all
the time you want. And there really is a lot of value in taking your time and just really studying
something and seeing how far you
can go with it. Like what level of
detail you can achieve. You might surprise yourself, Y, that is going to do it. Me and I'm excited
now to hand the reins over to Melissa and let her
lead us in our next project. Oh, here we go. Awesome job,
everyone. Great work. You have your first
drawing finished, and now I'm going to get out
of the way and hand things over to Melissa so she can
lead us in our second project. You ready to take over Melissa? I am ready. Palm,
that's steering wheel. Okay, Look out, everyone. Come board. Come on everybody.
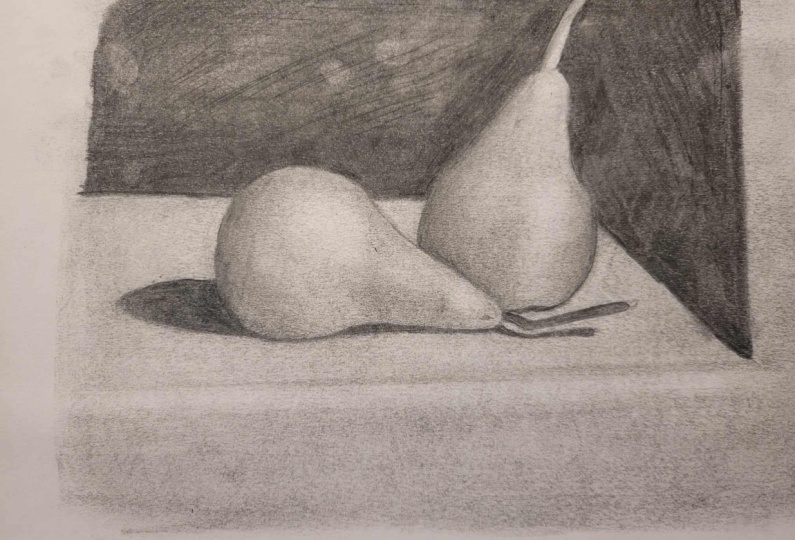
10. Project 2: Background Tone & Sketch: All right everyone, welcome
back to back to basics, how to draw still life. It's my turn to take over. So I am going to be walking
you through a drawing. So the first thing
we're going to do today is we are going to establish a nice middle ground
and work up from there. Paul, are you ready? I am ready to lead
the way. Melissa. All right, follow me everybody, let's go and the second
part of this video series, we are going to talk
about creating a midtone. And working from there, adding values that are
a little bit darker, and then also adding values that are a little bit lighter. But we're going to start,
instead of with white, we're going to start
with a middle gray. And I'm going to walk you
through how to do that. I have my paper here. I'm drawing on the same type
of paper that I drew on last time when Paul walked you all through
the drawing of the rose. This is a cold press
watercolor paper, has a little bit
of texture on it. I'm actually not going to
take up the whole paper, I'm just going to
do a little section within my paper in the middle, I also have all the pencils that Paul had us
work with last time. I needed eraser, my little
pencil sharpener here. But I also have two
pieces of charcoal here. This is what I'm
going to use to make that middle ground
so that medium gray, these are just a soft charcoal. I like the vine charcoal just because I can
use every edge of it. I can use the side of it, I can use the tip of it. I can use it however I want. It's going to be
really useful for this because I'm just going
to use the side of it and go across my paper and
create a little square in the center here that
we're going to be using as a starting point
for the drawling. That's the first thing
I'm going to do, is just going to
take my charcoal. I'm just going to fill
in a square on my paper. I'm just going to build up the charcoal to get
that medium gray. And it might take
a little while, especially with a
textured paper, to get a medium gray on here. You just feel like you can
keep going over top of it until you get the
value that you want. Again, using the side, I'm not getting any real
strokes or lines within here. I just want a tone. It's like if you've
painted before, doing an underpainting or just coating your canvas
as a way to start. And then once I have a build
up of charcoal on there, I'm just going to take
my I have a paper towel. If you want to use a tissue or another piece of paper or anything to just
kind of b***d it, feel free to use whatever
you have in front of you, even if you just want
to use your finger. If you don't mind getting messy. Melissa would never do that one. I would not. It would it would make it very
uncomfortable to be that dirty. Oh, we have to work on that. So, I'm just going to do
another layer of the charcoal. So have a nice break here. And you can just keep
doing this until you get the gray that you want and you want it
somewhere in between your darkest dark and
your lightest white. I like these lessons
where we're just coloring in a solid
color. Right. Pulled this like just color it just make great
coloring time. Yeah, just make it also gray. You don't want any
areas to be much darker than any others.
You want it to be pretty. Even if you can, if you
just have charcoal pencils, if you want to use the
side of it, you can. It is easier if you have
something a little bit bigger, like a piece of charcoal
or even like a conte cron. If you've seen those, you
can use the side of that, but you want it to
be able to erase. That's how we're going to
add some of our highlights. Don't use anything, you can't erase fairly easily. Okay? All right. I need to put we're there to mix this all together. Okay? We've got our gray. This is just going
to kind of work as our starting place or kind of
our background to build on. All right. I'm going to
get another paper towel because once you start putting
your hand on top of this, you're definitely going
to start making a mess. So I'm going to put A paper towel under my hand. As I start drawing, we all know Paul is the messy
one, like so many ways. Okay? So now that I have this, I'm going to take one of
probably a softer pencil just so I can see it once
they go on top of this. And I'm just going to make
some indications as to where my pairs are going to be and then where
my table is going to be. I think if you use a
harder pencil for this, you're not going to be
able to see your lines. So I'm going to use a similar
approach that Paul did when he started his drawing
in our last section. I'm just going to make some quick indications
as to where I think these general shapes should fall and then I'm going to
build my drawing from there. I'm not going to go into
the details at this point, I'm just going to get a general layout of where things go. You might not even be able
to see this part on camera. But just trust me, I
am doing something. I swear I think
she's lying again, like we did in the last section, we're just paying attention
to the scale of these shapes. How these shapes fit together, where the overlap is, how the two shapes are a little bit different,
how they're similar. I'm just looking at all of those relationships as we're putting these two
things together. I will go a little
bit darker with my lines just so hopefully
you can see them. This is another
one where I think it looks misleadingly simple. At first you think, oh, it's just two payers, how
hard could that be? But then you start
looking at it and, okay, there's a lot happening. Yeah. Mm hm. There's a lot of lighting effects
happening here. So there's a lot of shadowing
and high contrast lighting, which is part of why
Paul and I picked this one because we thought
it was interesting. These are some dramatic
little payers, They're very dramatic,
they're full of drama. You can see that there's definitely
a relationship between these two pairs. They're not getting
along currently. All right, that's laying
down is just over it. It is over. It is done. The other one is turned
away. It's moving on. Okay, so I'm just going to put what I'm going to call
a horizon line in here, but it's actually that table and where it meets between
the two pairs. And then I'm just going to put
an indication on the side. I'm also going to make a kind, a light indication of where I want the edge of the
table in the front, because that's going to be a
slightly lighter highlight. Then I'm going to put
my shadows in here too. One thing to pay attention
to while you're drawing is the shifts in light. And not necessarily just
the objects themselves, but where things go
from light to dark. Because that will help you
in this drawing to know where to put the highlights when you start doing that part, where you know where to
put the darker values. And it'll just be a little bit easier in the long run if
you have a map of where that light is falling. Okay? All right. Look at these
little guys. I love it. So now that we have a general indication of
where things are going, you can start building up
the value in the background. And we'll just do a really
quick pass at that. And then we will move
on to our next section, where we'll get into
adding highlights, more shadows, darker darks. We'll add some more details. This is just a
starting point for us. Sometimes we get moving
on these values, but we do know that that background is
going to be very dark, so I think we can start
laying that in now. And once we have
that established, we'll know how those other
values compare to that. That sounds like a good
pro tip for this lesson. That's our pro tip. Get your background figured out. And that's always the
part that nobody wants to do because we're always
excited about the subject. But the background does really help with the relationships
of all the lights and darks. It really does, yes. It helps you judge
values much better because values tend to
be relative light color. Mm hmm. Okay. All right, so we will move on to the next
step in our next lesson. All right, great job
everyone. That looks great. I think we have a
nice middle tone and a nice base to work on top of, the next phase in
this is just to do kind of a light drawling, add some darker shadows, get some things
established that we can work up from Paul. Are you ready for that start? I am ready. Okay, let's do it.
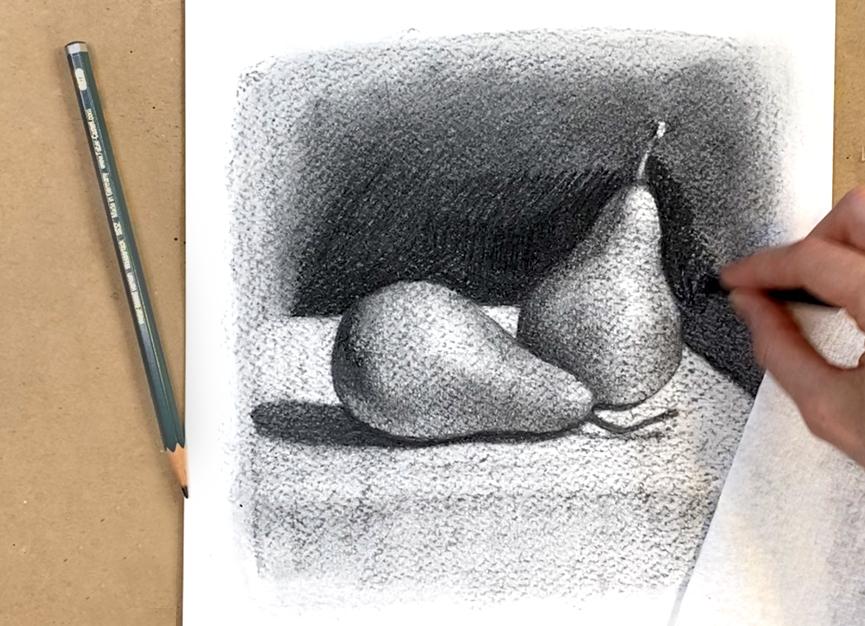
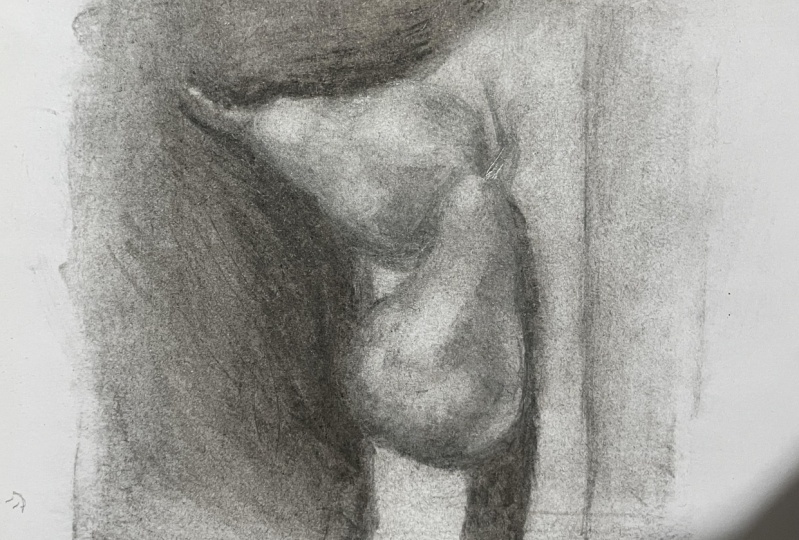
11. Project 2: Dark Shadows: Al right everyone, welcome
back to back to basics. How to draw is still life. So today we're going
to work a little bit on dark shadows and establishing that it sounds like the dark shadow soap opera from the past, but that's
not what we're doing. We're just establishing
some shadows and we're working up from there. So. Paul, you ready
to get started? I kind of like the soap
opera idea. All right. Dark shadows did,
Yeah, so dramatic. Okay, I'm ready. Let's do it. All right. We are ready to keep drawing
on these little pairs. Last time we got
everything sketched out, we got some medium gray
in the background and we started adding
some darker values to the area behind the pairs. So we're just going to
keep adding to that, establishing that
darker value before we start adding
anything else in here. Don't feel like you have
to fill the whole space. You just need enough around
the pairs to be able to make those pop out
of that background. And then also be able to judge your other values based on
your darkest area here. When I'm working on
this background, I'm using my charcoal a
little bit differently than I did in the previous section. I'm using the tip of it
rather than the side of it. And that's just going to
give me a darker value. Getting some of that in here
then if you would like to, you can also use something
to smudge this a little bit. I probably will with
the charcoal because it tends to be a little bit dusty. If you don't smudge it where
graphite isn't as dusty, I don't feel like you need to do that with graphite
unless you feel like it's part of a
technique that you really like or it helps
you in your drawing. I am going to use that
with the charcoal. So once I get some dark
areas established here, I'm just going to b***d
those out a little bit. Are you using the
b***ding stump thing? I'm just using a paper towel. Oh, nice. I usually don't use the
b***ding stumps just because I just don't
love the way they look. I just don't invest
the money in them. Usually just something
else to smudge it, like a paper towel or just my finger and
I'm filling up to it, can use so many
different things. Paper towel, tissue? Yeah. A brush, if you want to use a paint brush, you
could use that. That works really
well, actually. Yeah, That will push
the charcoal around a little bit and you have a little bit more
control over it. So that might be
something that you try and see how you like it. And I wouldn't say
that you have to be perfect about how you're getting this
background in here. If you're smudging it,
you're probably going to get it into some of the shapes of
the pairs and that's okay. I've got to write
this date down. Melissa, I okay
with imperfection. I know he would not
let that one go. He is not going to
be okay with that. That's amazing. Yeah. So now that I have my darks established
in my background, I'm really feeling like
the shadow areas under my pairs need to compare
to that background. So I am going to use my charcoal to make some of those
shadows a little bit darker. Because I don't want one darker area to get
all the attention. I want to move it
around a little bit. I want some drama under
my pairs rather than just drama on all sides. I just want to feel like my values are balanced throughout the image and
that they make sense. I don't want just a dark
backgrounds and no shadow areas. The reason that dark
background is there because it is a shadow, it really does help to work. Figure out the whole images
you go instead of just sticking to one spot and doing that all
the way to finish. But if you can start to see the relationships of different
parts, it comes together. I'm actually going to go
in the opposite direction that Paul had us used last time where we started with
the harder pencils. I'm going to start with
the softer pencil, then I'm just going
to start working in some of these areas that
are a little bit darker, just so I can establish
the difference between the lightest lights
and the darkest dark. So I'm going to add
a little bit more of a midtone around the edge of
the pair and the background. Mm hm. Just so I can start establishing some
of these shapes and how they fit together. It's almost the opposite
of how we worked before, we worked on such a light
background and we built up, this time we're working with that midtone and we're building in the
opposite direction. Somos building up to
those highlights. It's a very different way of
thinking about the values. Mm hm. And again, I'm not using a lot of pressure, I'm just using my pencil, I'm using that four B that
Paul had us used last time. Going in the opposite direction and just establishing
some of these, not the darkest areas
but your next to areas, just some of the shadow
sides of the pairs. Up on the stem, there's
some dark areas. Just making sure that
I'm capturing that, paying attention to where
those mid tones are. Because I don't
want to lose a lot of what I've already
established. I just want to
build on top of it. I like working this
way because I feel like it starts to feel like you're getting
somewhere faster. Yeah, You're taking a shortcut in a way because
you're putting all of those midtones in for you
before you even start. You don't have to build up
to that, it already exists. The fun part here is when
we do the highlights, we're actually going to take the needed eraser and just pull out some of that charcoal to make it a little bit lighter. And I really feel like it comes to life when you
get to that point. Yeah, very satisfying. Uh huh. But it does feel like it comes
together a lot quicker. For those of us who
are tad impatient, it is a great technique. Yes, if you find
that you like it, there are different ways you can achieve a similar thing too. You could buy gray
toned paper and use like charcoal pencils or white colored pencils
rather than erasing. Can also buy graphite powder.
Comes in a little jar. It's just like pencil
lead that's ground up. You can cover your paper
with that. That works too? Yeah, that works with
a paintbrush too. If you want to try
something like that, you just put a little
bit of the powder on a paintbrush and you just
spread it across the paper. It is something
where you have to build up that value slowly. But it's an interesting
way to do it. And you do have more control
over the way it's used, which you know that
I enjoy that part. Control A, Just keep working with
your four B pencil. Just paying attention
to where some of those darker tones are just
slowly building it up. Similar process to last time. We're just slowly
getting to the point where these values
start making sense. Don't feel bad if it
looks weird at first, because every piece
of art has to go through an ugly phase. Ward phase, maybe we
should say yes, right? It's teenage years, H. One day I will outgrow
my awkward stage. Noticed she didn't disagree. I have to say that I
love awkward people. They're just more endearing. There's a charm to it. It is, true. Yeah. People who have it too much together. What's
the fun of that? Yeah. And then they
just, I don't know, you can't trust people that
have it completely together. It's got to be something going on there, you got
to have something. Everyone's a little bit of
a mess one way or another. Yes, definitely. We're just teaching so
much in this course. Yes. Life lessons with pure giving. So much more than
you bargained for. And you're like, you're welcome. Right. Like that's a
class I should be taking. Not teaching, but whatever. Don't tell him that. Oh, sorry. I mean, we are totally qualified to teach
you life lessons. I'm sure we've learned
a lot along the way. Still work in progress, you know, for sure. Okay, well, I think that does it for this lesson and
the next lesson. We're going to keep
going with this drawing. Keep adding these values. All right everyone, Great job. We got some shadows
established in our drawing. So we have a range from middle tones to
the darkest tones. So we're going to start
working up from there. So our next phase is going to be erasing some of
those highlights, which is a little
different way of working. Paul, what do you think? You're
ready to give it a shot? I can't wait. Okay, let's try it. I
will see you all then.
12. Project 2: Erasing Highlights: Welcome back everyone
to back to basics, how to draw a still life. So today we're going to be working more on the highlights. We've been to the dark side. We are now moving
to the light side. Paul, are you with me? Move toward the light. Go towards the light.
Everyone come with me. I show you how it's done. Okay, here we are,
back with the pairs. This time we are
going to start with our needed eraser and we are going to establish some
of the highlights. Last time we worked on
some of the shadows. Now we're going to move in the opposite direction and
establish those highlights. I feel like this will give
us a good way of telling the difference between
the lightest lights and the drawing and
the darkest darks, and help us build up the
midtones from there. I'm excited. I know I've been very impatient to get my needed eraser in here. Paul told me I could
go ahead and do it. So we are basically I said, please can't we because this
makes such a difference. I don't know. It just really
makes a differ to life. I have my needed eraser here. What I like to do,
I think this is a good pro tip for using your needed eraser and
how it can work for you. You can actually, that's why
it's called a needed eraser, is you can need it into
any shape that you need. I like to almost make a
pencil point with it. I need it into
like a cone shape. I have a little bit of
a tip to work with. I can also use the side of it, or I can use the more
blunt end of it. I just use this as
another drawing tool. The first thing
I'm going to look for some of the highlights, especially on the
pairs I'm going to going in with my need eraser. And it might take a
little bit of work to pull out some of that charcoal, depending on how dark you
went as your need eraser starts getting a little
bit darker and picking up some of that charcoal
or that graphite, you just want to need it again. And that will get out
of that dark graphite just to keep it able to pick
up more of the background. Oh, look at that.
High light popping. Yeah, it really
makes a difference. You can use this
in different ways. You can tap it on the
paper and take up some of that value
to make it lighter. You can scrub into the
paper a little bit, which shouldn't be a problem. It's a very soft eraser, it should affect your paper unless you're using
a very thin paper, just keep working on
that and pulling out that highlight until you get
it as light as you want it. You have a little
bit of texture in your paper. At least I do. Some of that's going to stay, like some of that
graphites going to stay. But that's okay. It just adds some texture and some
interest to your drawing. Yeah. Actually the little
speckles are nice. It makes it feel more per like. Mm hm. Yeah, that's true. That was a part of the plan. At the plan, if you just
tap with your eraser, you'll pull out graphite
or less charcoal. If you scrub with your eraser,
you will pull out more. Just use it in the
way that works for you until you get the value
that you're looking for. I'm working on that
pair in the background, but once I get that to
where I feel good about it, I'm going to start working
on the other pair, just so I can see the
difference between the two. Then I'm going to
start working on that table around the pair so I can make them pop
out from the background. If you erase too much like
I just did and regret it, you can always just
like add it back in again. You're stuck. Right. If you still
have the paper towel or the paper stump or the b***der
you were using before, you can just go back in and
that you might be able to b***d into that space that
you've lightened too much, you might not even have to add any more charcoal or graphite. Okay, so I'm going
to start erasing out from around the pairs because this table
is very light. So I just want to get that
value established in here. And I do think
it's going to help with the bringing
those pairs out. Making those shapes
more defined, establishing a broader range
of value in your drawing. We're just going
to add more depth. What do you think are
the characteristics that make a good
still life set up? If people are going to, after they finish this course, maybe want to set up a
still life themselves. What would be some good
suggestions for that? That's a very good
question, Paul. I can start with one.
While you think, usually I like having more of an asymmetrical arrangement, not having everything just lined up and piled it
right in the middle, but like this one where there's interest
all throughout and the one pair is standing up,
the other is laying down. There's some variety to it. Makes it a little bit more
interesting. Compositionally. Yes. Yeah, I think that's really what the
differences between a more interesting still
life and a less interesting still life is the
arrangement of things. And thinking about
different shapes, you want objects that are all very different
from each other. Maybe one is more vertical, one's more horizontal, ones
rounded, one's more angular. Think about things that have some contrast with each other, that don't all feel the same. Because that is going to give
you some different heights. It's going to give
you some overlap, which is going to
make a big difference in how you set up your pieces. You don't want everything set up symmetrically like Paul is
saying and kind of in a line, unless you're going for
that specific look. But ordinarily, you probably
want some rhythm or some interest as far as how you put your pieces together
overlapping or, I don't know, just
some dynamic way of putting them together
that doesn't feel forced. Definitely, Yeah, Don't
ignore the background either. Don't just set some things on a table in front of you
and then think that you can just invent a background if you're looking at your
whole room behind it. Put up a piece of
cardboard or hang a piece of fabric
or something so that you can actually respond to the values that are really there instead of
having to make it up. Yeah, yep, definitely. Now that I have a lot of
my highlights in here, I am going back and defining some of my shapes
a little bit more clearly. The pairs have some dark
values on the edges of them. I am putting those in here. Now I have that broader
range of value. I feel like I need some dark
darks around the pairs. Just defining those
shapes a little bit more. It really changes
things once you get the light in the
air, it really does. Getting that light on the table, I think makes a big difference. It's a little more difficult with charcoal to think
about your edges, but you still want to
think about your edges and which edges are hard versus
which edges are soft. Just meaning that
which ones b***d softly into other values
and which ones don't. Yeah, Where I am adding some of
these darker values and want them to b***d a
little bit more softly. You want to have a
little bit more control about how they b***d. I'm going to go in
with a paint brush and move that charcoal
around on my paper. You can do this or you can use your paper stump if
you have one of those. If you want to just
use your finger, you can also do that
to me at this point. This is just a pushing pole between which
values are working, which values need to be darker, which values need to be lighter. And just playing
with all of that to get it to where I want it to be. Absolutely. This might be the
point in my drawing where I'm switching it up a lot. I'm going from one
pencil to the piece of charcoal to paintbrush
to slowly b***d it. I'm just judging different areas and then looking at everything
as a whole and how it fits together and
deciding where I need to add more things or where I need to
adjust slightly. It's just, it's a lot of looking back and forth between
your drawing and the reference and deciding
where things need to shift as you're following along. Don't feel like you
have to literally do every step that you see
Melissa doing at this point, it's more about looking at your own drawing and
looking at the reference, and just trying to do the
things that you need to do to make your drawing
match what you're seeing. Yes, this is really all
about the editing process. The editing process is really an important
part of drawing. Like probably the
most important part is knowing where things need to change and where
you need to adjust. That will just come with
time and experience. But the best way to
get there is just practicing protip practice,
practice, practice. Yes. Okay. Well, in our
next last time we are going to keep going with this and keep working on pushing and
pulling those values. Alright, awesome job everybody. Thanks for working with me
and hanging in there and understanding how to use the needed eraser
as a drawing tool. I always think it's fun.
Paul, do you enjoy that part? I love it. I know it just kind of
brings everything together. It helps add some depth
and a range of values. So we're at that point,
we're going to be working up towards
adding some detail next. So I think that's going
to be really fun. Paul, what do you think
you would like that? I'm excited to you though. It'll be fun for me as well.
13. Project 2: Adding Detail: Welcome back everyone.
To back to basics, how to draw it is still life. So today we're going to
do my favorite part. We are going to be
adding some details to these pairs and making
them just come to life, which oh, I know that's my favorite part. How
do you feel about it? Oh, I just can't wait. Somehow. I knew you
would be excited. Yes, let's do it. Let's do it. Welcome back. We are still working on
our little pairs here, making them very pretty,
as Paul would say. Thank you. I didn't even have to say, I'm here for you Paul. All right. We're doing
more of adding values. We're doing more of adding highlights through
lifting value. And we're just looking
back and forth between our drawing and our reference
constantly just to see, are we getting the
values correct? We're going to do Paul's
little squinting trick, just to start out here. You know, I've been
doing it all along. I know I can make
sure you're doing it. It's so funny. Squint at
your reference often. And I think this is a good pro tip to start
off our video here. But squinting is a
very helpful technique when you are drawing or painting or whatever you're
doing, art making wise. Because it really lets you see the overall picture rather
than focusing on the details. If you're like me,
you're going to want to see all the details and
you're going to want to see all the color shifts
and you're going to see all the value shifts. You're going to want to really
put it in your drawing. But one thing to
not forget is how all of the values overall
affect what you're doing. I'm going to start squinting and seeing if the areas
in my drawing are feeling similar
to my reference. The areas of lights
feeling light enough, are the areas of shadow
feeling dark enough? I'm going to start my drawing
there just by checking, checking in with
my reference and seeing if I'm headed in
the right direction. I think there's definitely
some areas where I see that I can get a
little bit lighter. I could also get a little bit darker and then I want more of an extreme
between the two. That is where I'm going
to start off today. Sounds good. And
everybody watching maybe in a completely
different place with yours. Let's just see what
your drawing needs. I feel like we were saying
between lessons like this process is a little bit less formulaic than
the last drawing. We had a clear step by step, Use this pencil than this
pencil than this pencil, but when you're
working this way, starting from the middle, you end up really being
all over the place. Which is fun I think, but it also is more
individualized. Hm. Yeah. It's really more
about where you're headed with your specific drawing and
everybody's going to be in a different place and getting
slightly different results. And that's the fun thing
about making art, right, is we all make things a
little bit differently. Get a different
result. In the end, where I'm at might know where
you're at, but that's okay. Yeah, that's one
of the reasons we like teaching these
classes together. So you can even just
see between the two of us how different
our results are. Hm. Of course. I know you're
all going to want to try to make yours look more
like Melissa's, but that's okay. I
can accept that. Oh, please, you know it's true. All right. So one thing
I'm doing is just making my background a little bit
darker because now that I have those dark values on my pairs, I've noticed that noticing that my background doesn't
feel quite dark enough, I'm going to add some
more value there. Don't be afraid to
change things that you've already established
in your drawing. I think as you start getting
a little bit further, you might start noticing the things that you didn't
notice in the beginning. Value wise, things
might be shifting as you're adding more of
those lighter values, or you're adding some
of the mid tones, or you're seeing
how things b***d from one area of dark into
another area of light. Yes. That doesn't mean you've messed up
or made a mistake. Like it's actually a really
good thing to notice, stuff like that because
everything is very relative and you can't necessarily evaluate all of that
from the start. You have to get more on
the paper before you can really know what
needs to happen. Yeah. True option, drawing
is a slow process, something that you
build up to over time. Yeah, it's not going
to come together immediately and I think a lot of beginning artists struggle
with that because they want it to look good from the start
and it's just not going to. Yeah, you learn the most from figuring out what needs corrected
in your drawing. Don't pass that part or think that that means that
you're no good at this. That's the opposite
of what it means. If you're seeing discrepancies between your drawing
and the reference, then that's awesome, because that means you're
really looking at it critically and noticing stuff. You might be at the face
where you're noticing it, but you're not exactly
sure how to fix it. And that's where I think
you have to go back to your reference and really
examine what you're seeing. Yeah. What area
isn't looking right. That's always a good
place to start. And then just compare, go
back and forth with your eyes between your piece
and the reference until you can figure
out needs to change. Yes. Just be really
honest with yourself and really honest with
your drawing it and really clear about why
you're examining it. You're not examining it to
make yourself feel bad, you're just examining
it to get better, to get to a place
where you are more comfortable with using reference and being able to
interpret what you're seeing and understanding
value and all of that. It's just a learning process. Yeah, You probably will
never get to a point where everything looks right on the first try
unless you're Melissa. But most of us, you artists who have
been working at it a long time still have to look and think
critically and make adjustments as they go.
That's just part of it. Yes, we will tell you a secret. No artist is ever 100% happy
with everything they do. It's just not going to happen. Yeah, Yeah. It's actually a good thing
because it means that you are able to look at your
work and be critical of it. It's also a curse though, because other people
will look at it and say, wow, that drawing is
so amazing, I love it. And you may only look
at it and be able to see what you would like
to change about it. Yes. It also means you're
growing right, and you're chal***ging
yourself to get better. Mm hmm. Yeah. If you draw consistently over a longer period of time, when you look back on the
earlier drawings in the set, you're going to really
see a lot of change. Mm hmm. Growth happens really fast
when you work consistently. Mm hm. That's true. I mean, that's true with
anything, right? It's the same with exercise. The more you do it,
the easier it gets. But the more you can push
yourself to do more. Yeah. Yeah. That's the awesome
thing about art, I think, is that no matter
how long you do it, we've both been doing
it for a while. For a long time.
Like our whole life. Yeah. There's still always
like new stuff to figure out. You never know at all.
You are always going to feel chal***ged because there's always further you can go. Mm hmm. Again, I just keep
switching pencils here. I was working with a harder pencil for a while
because I just feel like that helps me establish some
of my softer mid tones and gets them to b***d a little bit easier with some
of my darker tones. And now I'm going back
in with a softer pencil and I'm working on some of those areas that are
a little bit dark, just to get them to b***d with a little bit
lighter mid tones. You do have a lot of reflected
light in these pairs. So if you look at the
bottom of the pair, actually is a
lighter area around the rim of the pair that is a lot lighter than
some of the shadow areas. You want to make
sure that you're capturing some of that too. Yeah, reflected light is
just light that shows up in the shadow side of the object because it's
wrapping around the back. Anything spherical,
you're going to have a little bit of, like Paul said, like we call reflected light at the bottom just
because of the shape you're like we are getting
somewhere with these pairs. They are really coming together. I know they look juicy
and delicious. Beautiful. Okay, so in our next lesson we are going to keep
going with this. We are going to put some
finishing touches on this and pull it all
together. Can't wait. All right, great job everybody. Hopefully you're feeling
a little bit more like this is moving in the
direction it needs to. You've got some
values established, we've added a little
bit of detail. Next time we're going to
add those finishing touches on those pairs and get them all tightened
up and beautiful. Paul, are you ready? I can't wait to make
some tight pairs. Tight pairs. Tight
pairs. So you move.
14. Project 2: Finishing Touches: Welcome back everyone
to back to basics. How to draw is still life. Today we're working on the finishing touches on
our pair drawing. So we're going to get all beautiful and finished and done, and it's going to
be great, Paul. I'm so excited. Me too, I can't wait. All
right. Let's do it. Come on, last little
finishing touches on our oh, they're so yes,
they're gorgeous. Yes. Okay. So again,
we're just going to start by really taking
a look at this, seeing where we're at,
what needs to be added, maybe there's some details that you've been waiting to add. Maybe you feel like your values aren't fully established where
you want them to be yet. This is just the last look. Anything that we feel like still needs a little bit of work. Any little things that we feel like we've missed along the way, or we want to tighten them up, or we just want to just
make it feel even prettier. Hm. It's nice to have that
time with a drawing, to just like do those finishing touches
and really study it. And it's interesting
how I've noticed that a lot of times
the things that people comment on about
my artwork are almost always the things that I added
at that very last moment, like some little my life
somewhere or something. They're like, oh,
that's beautiful. Always I'm thinking
like, well, you know, I worked on this
thing forever and you're appreciating this dot. Okay. As long as long as you like it, I
guess that's fine. Yes, that's the
important part, right? Yes, I can be a little
bit of a diva at times. No, I know. Shocking shocker. Okay, so I'm actually starting with the
table at the bottom. And you know, me too. Oh my goodness, what happens? Whoa, We are never
on the same page. We've been doing
this far too long. I'm becoming you. Oh God,
I'm even wearing black. Oh my God, I know, and I'm not. Wow, Okay. You guys, this is history in the making. Melissa never wears color and
I really never wear black. You get Bizarro, Melissa
and Bizarro Paul today. Yes. It's a freaky
Friday. Is that the? Yes. I'll just pretend
that it's Friday. Oh my gosh. Imagine if you
had to live my life for. Oh my gosh. Imagine if
we switched bodies. I don't think I could do it. I don't have the energy. I don't know what you
would do on this body either because you would
just not know what to do. It would be right away. That would be interesting
for our husbands as well. Yeah. That's a
whole other thing, but we won't think
about that too much. That gets a little weird, Paul. Yes. Now you've made it weird. I can't help it. Okay. So I started on the table. You probably for
a similar reason that Paul did because
the table is not white. So I want to make sure that I'm establishing some of the
values in the table. And also making sure
that it looks like it's coming out of you and going down because that
tablecloth does go down. Yes, I want to make sure that
those values make sense, but I'm also someone
that likes to move around while I'm
working on a drawing, so I don't stick in one area. When I add something
somewhere else, I'm like, oh, well this part needs
a little bit more value. As I'm adding things, I'm seeing other things. M, yeah, I think that's
a good way to work. Yeah, I think it's
helpful because it does make you look
at things differently, which is always good. Would we even consider
that a pro tip? I just I was just
going to say it. This just is on the
tip of my tongue. You took it before
I could say it. Sorry. We'll credit
that one to Melissa. Yeah, so pro tip. Now, what is this pro
tip of yours now? I forgot. Now I
forgot what it was. Oh, I really forgot. Look all around your Oh, okay. Yeah, there was something else
I was going to say to you. So you say that
part first and then hopefully the rest
will come to me. Yes. You're working on one area, be looking around your
drawing to see like what else is affected or what
else needs to change next. Yes, definitely. I still don't remember
what I was going to say. But if it comes to
me, I will tell you because I'm sure it
was just pure genius. I think she's
holding out on this. She doesn't want to give
away all all my secrets. I really just lost it. It'll come back. Uh huh. Paul's not buying it. No. I like all the little
lump. It's on the pier. That's fun to just with the way you do the
shadows and highlights, you can make it feel so lumpy. Mm hmm. Yeah, there's a lot
of texture there. Yeah. Something to
pay attention to. The way the highlights are. It definitely makes you
notice that texture. Yeah, the highlights
are not like just in a straight line or in a
curve. They're All right. They're all over the
place. Yeah, they have texture and
movement to them, but you don't normally think about that when you're
thinking about a pair. But they do have a lot of
texture and interesting shape. Yeah, that's why artists
like drawing pairs. They have a very interesting
curved shape to them. I think drawing fruit can
actually feel similar to drawing or rendering skin in some ways
like human skin. Because it has a lot of textural
shifts and value shifts, I think it can be good practice
for drawing other things. Yeah, Melissa did a painting of me one time and I swear she painted every pore on my face. I did. And you know, the reason I wanted to paint such a large
painting of Paul's faces, I just really, there's something about
painting skin is just, I've always wanted to, I've always wanted to make it feel like it has life, you know. Like there's, the skin is real like you
could just touch it. And that's always
been a big chal***ge with paint is to make
it not feel like paint. Yeah, make it feel like it's living and
breathing and you could just reach out and touch
it even though we may all wish to think that our skin is perfectly
smooth like, you know, all the filters and things that we use
on our photos. I know. Not that I'm saying
I would ever, never, never. But yeah, that's that's
not very lifelike. No. That's also another
good reason for having a directional light source coming from one
side or the other. Because when the light
is coming from the side, it tends to bring out some of those characteristics more
if it was from the front, it can just flatten things out and make it look
a little smoother. Which is why a lot
of photos of models and celebrities and magazines
use frontal lighting. So those aren't always the
best references to draw. Sometimes directional lighting
isn't the most flattering, but it is more interesting. Yeah, really, in this last step, it's just looking very
closely at those values. Adding more subtleties. I would say drawing as you're working on
it more and more, you're probably
getting more into those subtleties looking at the subtle shifts rather
than the more dramatic ones. I think when you
start a drawing, it's more about establishing
those dramatic shifts. Yeah, like we did, we really started with the
darks and we put those in, and then we started with
the lights and we put those in because we wanted to make sure that we
had both extremes. As we've kept going
with this drawing, we've just added more to the mid values and helps things feel a little
bit more realistic. And I think adding some of
those subtleties really helps the realistic
quality of drawing. Mm hm. It does help to figure out
your two extremes because then you know where you're
headed in each direction. And then you can
kind of just fill in all the values in between. Mm hmm, yep. Okay, well that is our pairs and hopefully
they're gorgeous. Feeling good about that. Just working on putting a little bit more dark in my
background here. I think we're going to call these pairs Finished Beautiful. Okay, so a beautiful job, everyone. Paul. I'm really
happy with mine. How does yours turn out? I'm happy with mine too. I know we've done so
much drawing today from flowers to pears.
It's been great. Absolutely. It's been a blast. Thank you all for joining us. We hope you come and draw
with us again sometime soon. Yeah. So we'd love to
see what you've done. Please send us whatever
you have created today.
15. Closing Thoughts: Well, thank you all so much for spending this
time drawing with us. I hope that you have learned a lot of different
techniques you'll be able to take and apply in your
own way in future artwork. Have you had fun, Melissa? I've had so much fun, Paul. I hope all of you
have had fun too. And I hope you found some
helpful tips and tricks, and advice that you can use in your art making
going forward. Absolutely. And we've
said it before, but I think that it's
always worth repeating. You know, the goal
of these classes is not to encourage you to try and draw like one of
us, especially not Melissa. But it's more about finding your own voice, your own style. So it's okay, your drawings look completely
different than ours. In fact, that's
what we hope for. We would really love
it if you would take a minute and
share them with us. Because it's so fun
for us to get to see all the people out
there all around the world who are
drawing along with us. And I think it's really
cool for you to get to see each other's work too. Mm hmm. And we'd love to
hear feedback from you on how this
class went for you, what you'd like to
do in the future, and anything else you
would like to tell us. We'd love to hear
from all of you. Yeah. Let us know what
you want to learn. Because Melissa and I have so many ideas and we are going to spend a lot more
time making classes together. So you might as well
tell us what you want. I know, right? We're going
to be making stuff anyway. We might as well be
something you want. Absolutely. If you did
enjoy this course, you'll see we do have a lot of other courses already available. We'd love for you to
check those out as well. We are trying to cover all of the fundamentals
that artists need in order to really be
able to learn how to draw and paint and capture
something realistically. And then you can
branch off from there and go in whatever
direction you want. Exactly, yes. We just want to make you feel more
confident in your art, making whatever the
style you like, whatever way you
like to approach it. We just want you to
feel good about it. And that's why Paul
and I are here. We love having you as part of our little virtual
art community, and we look forward to making some more
art with you soon. Until then. Hi
everyone. Hi everybody.
 Paul Richmond, Everyone is an artist.