Transcripts
1. Introduction : Hey. Welcome back
to another class. My name is Braden Messer. I am an artist, an author, a YouTuber, a tattoo. Basically, I'm about as
artist as you can get. So awaken the artist within understanding
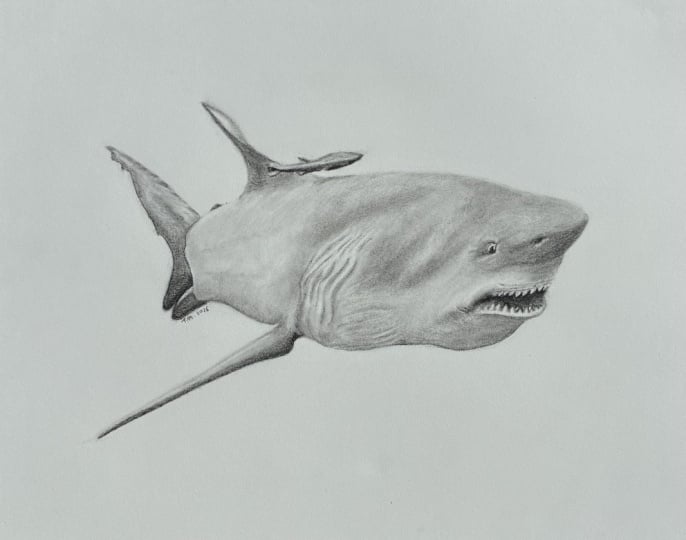
Chuckle drawing. This is part two of a three part series that I'm making where I'm
taking you through, and I'm going to show you how to draw an incredible
bull shark. I'm going to be showcasing
my three layered method. Now, I've written a book about
the three layered method. Drawing the Portrait, step by step lessons for mastering classic techniques
for beginners. Yes, I know it's about human portraits and
we're drawing a shark, but the three layered
method, the way you use it, the way you build tones, the way you use brushes
to soften your gradation, all of that is outlined
very nicely in this book. I will provide a
link to the book in the description of the class if that's something that
you're interested in. Now, what to expect?
In this class. Going to start off,
and we're going to lay down the contour
lines of the shark. I'm then going to show you a trick where we
can use what I call frame lines to essentially frame the third
dimension of the shark. Once we have the
contour lines drawn, the frame lines established, I'm then going to
show you how we can begin to layer our charcoal. We're going to
start off by using soft charcoal with our brush to give us a nice base layer. Once we have the base
layer established, I'm then going to
show you how we can use medium charcoal
for our line work. And building up our tones. We are going to be
going in sections so that you don't
get overwhelmed. Once we have the majority
of the shark drawn, I'm then going to show you
how we can use hard charcoals and begin to detail
out the shark and really focus in on those small elements and
bringing the shark full circle. I'm also going to show
you some eraser work, some high value retrievals, saving high values, all
of that good stuff. And by the end, you should have a very convincing bull shark. On your paper. So that's pretty
much what to expect. Now, make sure that once
you've concluded the class, you've made your project,
that you upload your project. That way, I can
take a look at it. I can give you my honest
feedback and critique on it. And then after you've
uploaded your project, make sure that you also leave your review of the class
by leaving your review, what that enables me to
do is actually share your drawing project in my monthly newsletter that comes out the first half of
every single month. So this is a great way for you to be able to
get not only your name, but your art out there amongst the community here
on Skillshare, as well. Now, I know that this is a lot. There's many different variables to the three layered method. And so what I would recommend, just because I've been
doing this for a while, and I know what works
and I know what students tend to
struggle with is just sit back and when you first go through the
class, just watch it. Don't bother trying to draw and taking all the information
with me at the same time. I really want you to absorb the content and really try to think about what
it is that I'm saying, what it is that I'm doing, and the effect that those things are giving
me on the paper. Once you've gone through,
watched it once, then go through and follow along with me and
create your project. Okay? That's a best practice. Now, if you find yourself
really enjoying this technique, if you're liking what
it's giving you on paper, I do offer one on ones
here on Skillshare. It's easy to sign up for those. Just go to my homepage. You can search Messer
Creations and Link to signup is right at the
tippy top of the page. So, that's it. That's all. And I hope to see you in class.
2. Contour & Form Frame Lines: Okay. So the first of the tools that we're
going to need for this one is a graphite pencil. This is just a humble HB. We're also going to be using soft medium and hard
rated charcoal pencils. Yes. We're also going to be using three
different smudger sizes, number one, two, and three. As well as a hoo hoo eraser, a Pentel click eraser, and a mono zero eraser. We're also going to be using a sandpaper strip for grinding our soft charcoal and a
extra piece of paper. I call this my tone check paper. This is for checking our tones before we lay them
down onto the drawing. Then last but not least
our trustee brushes, two different sizes, a number six, and then a diagonal cut elf brush
from a makeup kit. And here we go. All right, so when looking at
your reference image, what I do is I focus on the basic shape of
the image itself. So, in this case,
that is going to be the edge of this
bull shark here. And if we think
of shape in terms of what it is, by definition, it is the form of an object, or you could think of it as
its external boundary, right? So in this step, we're not concerned
with what is going on inside of the basic
shape of this shark. We're only concerned with
bringing out the outside edge. Now, this, of course, is going to be a two
dimensional area, right? And what will happen as we progress and as we
bring out the charcoal and we start to throw down our
values and really mess with the layering of those tones is we're going to achieve a
three dimensional appearance, but don't get confused. That comes later. Right now we're
only concerned with the two dimensional
shape of this shark. And think of it like this. What we're doing
is we are more or less framing the drawing
for the charcoal to come. So see here I can use this point to this
point as a reference. And that's the thing with
this specific drawing is that you can use
certain points as you are drawing it out to help you kind of nail
your proportion sizes. That's kind of the trick when you free hand drawings, right? Is we're not using the grid
method or anything like that, so use a reference point,
say from here to here. And right about there
is where the end of those gills are going to be. I see. I'm a big fan of free
handing my drawings. For those of you that have
been following me for a while, you know, I just
like the freedom. I like the freedom of being
able to not only the freedom, but it's also kind of a
challenge, and I like that. I like to be challenged
when I'm drawing. I like to not get things, you know, picture perfect. So here we are. So I'm all
about making mistakes, and that's why I have three different types
of erasers here. I'm just going to
clean up these lines. Just embrace mistakes, okay? Don't think that you need
to nail every single line. That's not what drawings
about, in my opinion. It's about having fun.
And more importantly, it's about learning
from those mistakes. So here with the mouth, what we're gonna do is
we're going to draw out the top line of the
mouth everywhere. And then the bottom lip here, just kind of streamline that. These are main lines
within the mouth. And these are almost like
the gums, if you will. So put the gums in there. And then, now that we have that right about
here as a reference point, we're going to go up
to right about there. And that is where the eye
of this bull shark is. So now that we have the basic area of where
that eye needs to be, go ahead and we can
start to more or less bring out the eye
in our outline. And then from the eye and middle of the mouth
to right about there, that's where our nostrils are
going to be on the bridge of this snout here.
There we are. That's coming together. Now here what I'm gonna do is I'm
gonna count the teeth. It looks like we got
one, two, three, four, five, six, seven, eight,
910, something like that. Ours gonna put in
these teeth here. But you see why I put that
line for the gum of the teeth. I wouldn't want to just put
the line and then not draw the second line for the gum
and then put the teeth in because that wouldn't look accurate to the reference image. Then here it looks like we
have these little indents these little gaps between
the bottom teeth, so we want to make sure that
we outline those indents. And then here we're
going to start to put in where these where
these bottom teeth go, where they plug into the
bottom jaw of this shark. And then sharks teeth
are row, right? So we want to put
teeth in front of other teeth as they belong in the reference image. That's
looking pretty good. I'm just gonna
clean this up here. There we are. A nice
light hand, okay? When it comes to
outlining the graphite, outline a nice light hand. Nice, light pressure
control is what we want. Then here, it looks like we
have fishy in the background, so we're just more or less putting putting in this outline so that we can get a good idea, a good feel for where these fish are in relation to
the shark itself. And in regards to optics, the overall look
of this drawing, I want to speak to
these fish because we can use these fish
to really bring out the depth of the drawing. But I'll speak to that a little later as we
progress through this one. Okay. So now, I'm going to put in this little
fin, and now here we are. So this is what I call
framing in drawing, and I'm going to tell
you why it's important. So as I spoke to
before, you know, shape is defined by the outer
contour and object, right? Which is how your viewer
will first perceive it and begin to
make sense of it. But it's only going to
be two dimensional. So now, Form is three
dimensional versus shape, which is two dimensional. Form frame lines, which
is what these are, in order to achieve a three
dimensional appearance, we must use form lines. This is to help
frame the invisible contours of our object. This will help us go from a
two dimensional framework to a three dimensional
framework.
3. Tail & Rear Mid Section : Okay, so now here's
my tone check paper. I've taken some
soft charcoal and I've graded it onto my
sandpaper strip here. I'm going to take
number three smudger, and I'm going to get
a nice lower value, a darker tone, right? And I'm going to more or less just start very
lightly applying, very lightly applying
the charcoal here. And keep in mind with this step to use a very
light pressure control. You don't want to press too
hard because, of course, this is the three
layered method, and the three layered method
is all about layers, right? Layer on top of layer
on top of layer. And what you'll find
is not only with smudger work with brush
work and pencil work, if you push too hard
onto the paper, if you use too much
pressure in your hand, what'll end up
happening is you'll end up overworking the paper, right? I see here, I didn't
like this line, so I'm actually gonna bring
this tail in a little bit. Got to clean that
up. There we go. That looks a little bit more accurate to the reference image. And and when you're
looking at this, just focus on where those
lower values are first. Don't worry so much about
where the higher values are. And because you'll be using a lighter pressure control in your application
of the charcoal, if you do need to
go back through and retrieve higher values
with your Monozero eraser, you can most definitely do that. Okay. But see, just like that, it doesn't take
very much at all. It doesn't take very much time. And we are off to the
races, as they say. But here, if you need to bring
out a lower value, right? Convey a darker tone, just continue to work
that spot on the paper, and your value will
progressively get lower and lower with the more time you spend on a specific area. And then here,
there's almost like some ripples some low value ripples on the
top of this fin. So this is how we're
going to convey those. We're just going to
smudge them here. And here, I'm just gonna
take my number six brush. I'm just gonna very lightly
blend all this together. This is, uh, giving us a
nice smooth look and giving us a form of gradation across
all of our values here. And this is what I was
talking about with retrieving those higher values with
our monos or eraser. See how easy that is? Boom. Okay, so now our
diagonal cut elf brush. Now, this elf brush, I've only been using
for a little bit, but I absolutely swear by it, especially when it
comes to sharks because they do tend to have a smoother texture compared to most animals
that you'll draw. But as you can see, we're
not so much stroking the paper as much as we're using the brush
and we're dabbing. So you see that?
See how that's how you'll know when your
brush is fully loaded, is when you hit the tone
check paper and trucal bits fall off onto the paper, right? But here, what I'm doing
is I'm more or less I'm pushing or dabbing the
paper as I like to call it. What that does is that basically conveys a smooth texture, while at the same time also doing what the number
six brush does, it's speaking to that gradation
and bringing that out. Now here what I'm going
to do is I'm going to do a nice light line with
the hard charcoal. I'd want to use a
hard charcoal for my line work here just because there's more binder in the hard charcoal than there is in the medium or
the soft charcoal. So the lines tend to have a
better overall integrity. So you can get a
nice, nice thin line, and it's not going
to look gritty because of the amount
of binder that's in it. But then here, I'm going
to bring this line out. I wouldn't want to use a
medium charcoal for this. I want to use a hard charcoal, so my line keeps its integrity,
even though it's thinner. And then you see what
that line, effectively what we've done is we've pushed that tail fin back, and we've brought the body
of the shark forward, right? And so what we've effectively done with the use
of a single line is that we have
elongated the image. And that's just a simple
trick of optics there. Okay. So now that I've re solidified that line
with my graphite, now I have a little bit
better idea of what I want. I'm going to go ahead
and we're going to continue with our
smudger work here. And then this little fin, looks like there's the
bottom side here, so we're going to want to just slowly pack in this lower value. Remember, we don't
want to press hard. We we like it when our
tools work for us, right? The smudger wants to smudge the charcoal, so just
let it do its thing. Now here I'm going to
take we're going to apply a line here with
the hard charcoal. Kind of more or less bring out that fin. And
then here's another trick. If you want to take a
medium charcoal pencil because you want to
have more control in tight spaces like this, you can go ahead and you
can just very lightly, more or less caress the paper, let the charcoal fall off of
the pencil onto the paper, and you see what it conveys, it conveys a lower value, right? A darker tone. And then you can go
in with your smudger and you can blend it together, because when you do that
with just the pencil, what happens is the charcoal
when it lays onto the paper, it looks gritty, right? But when you hit it with
your smudger like this, all of a sudden it blends it and smooths out those
transitions from, you know, high value to
mid value to low value. And then here, you can
do the exact same thing for the tail. Thing. And depending on the texture
that you're going for, you might hit it like that and you might like
that gritty look. That might be the kind of
texture that your shark has, so you won't have to hit it with a smudger like
I'm doing here. I'm just hitting it with a
smudger more or less for blending purposes and I want to smooth out that
transition between values. Okay. And then you can go in with your makeup brush and you can just go ahead and
smudge it and dab it, and this will just
blend it more and more. Then here we're going
to take our number six, load up real light. This is where we're going
to start having some fun. Start having some fun. If you look at the
reference image, you see how there is that
point of a little lower value. We want to run our
brush left to right, and now we want to run our
brush vertical, up and down. But we want to make sure that
our strokes are contingent upon those form frame lines that we laid down during our
outline phase with our graph. I but real light, real light pressure
control here, guys. Don't push the charcoal into the paper because if
you do that, again, we're gonna be going
back through with our mono zero eraser and we're gonna be retrieving
higher values, and we're going to
be bringing out that underlying form to give our shark that three
dimensional form, right? So we want to be nice and
light onto the paper. Nice and light onto the paper
with our number six brush. Now, I'm just cleaning
this up a little bit. Charcoal will get away from
me if you let it, so Okay, so now I'm taking a medium charcoal and I'm making sure that my
pencil is sharp here, and I'm going to bring out
this line on the underbelly. Now, when it comes to sharks, you can get away with using medium charcoal for
your line work, okay? But I caution you not to use medium charcoal for
your shark lines on the top of a shark's body. And one of the reasons why is just like this
reference image, the shark is fairly close to the surface of the water, right? And because of that,
there's much higher values, much higher values on the top of the shark than there
are on the bottom. So keep that in mind, okay? Okay, so now I'm going
to take my smudger, and I'm springing out and
smudging some lower values. Now here's a trick. Make
sure your elf brush is dry. Make sure there's not
too much charcoal on it. And then start from the
line and then pull up. Start from the line
and then pull up. This might not seem like it's doing a lot, but
trust me, it is. What this is doing, if you
look at the reference image, you can make out what I'm
trying to accomplish here. I'm trying to bring out that low value directly
from the line. And what this will do
is this will trick the viewer's eye
into thinking that that belly of the shark
is rounded, right? I really speak to that
three dimensional form, which is the biggest trick when it comes to
any drawing, right? That's one of the gateways to realism is being able to bring
out form in your drawings. But one of the things
you'll find with this elf brush is that and any smaller brush,
kind of like smudgers, right? Me control. You can really pinpoint where
those lower values are in relation to your mid and your high values when it
comes to your brush work. But again, just like what we were doing with
the number six brush, when it comes to the elf brush, nice, light pressure control. Okay, now, this is the fun part. So now what we're
doing is we're taking our monozur eraser. And we're just very
lightly hitting the paper, and what we're doing
is we're retrieving those higher values. And at the same time, this is actually a trick
where we're bringing out the form with our eraser work because if you actually look
at the reference image, there is a lot of
higher value like linework like
texture almost from the light that's striking
the top of this shark. And so this is the
technique that we use to achieve that same type
of look onto the paper. But the biggest part of this is just making sure
that you stay aware to the direction and
how you are pulling that monozo eraser across your paper because the eraser is gonna do what you
tell it to do, right? It's not going to
do anything that your hand doesn't dictate. And so just make sure that you understand what you're trying to accomplish and how you're
trying to do it, right? But it's absolutely
amazing some subtle lines. And you could think of
these as implied lines. But also notice how when you leave gaps
between your poles, that actually brings out more
texture than if you were to just run that Monozoe eraser and run your high value lines immediately
next to each other. There we go. This is coming
together pretty nicely.
4. Mid Section Continued & Fins: Okay. Number six, make
sure it's nice and dry. And then it's very lightly. We go back over everything that you just did with
your monozur eraser, right, all of your high values
that you just retrieved. And this is just for
blending effect, okay. Alright. So now our number two smudger. I'm
just going to go in. I'm going to bring out this fin. We have our low value there. Now I'm just gonna kind of
clean this up a little bit. Now, I'm gonna take my
hard charcoal, remember, when it comes to line
work on the top of your sharks, use
a hard charcoal. It'll have a better
aesthetic for you, than a medium charcoal will. There we are. It's looking good. Just clean this up a little bit. Looks like there
was a little bit of residual from that
graphite line. There we are. Okay,
so now I'm gonna be checking my tone here with
my number two smudger. And let's bring out this let's
bring out this fin here. So again, I'm looking
at the reference image, and I'm starting where the
low values are first. Okay. Remember what I always say,
start on the low values, and then your high values will inevitably take
care of themselves. And worst case scenario, if you really need to bring out and solidify exactly where
those higher values are, because you're using a nice
light pressure control with this step
with your smudger, you'll be able to
go back through and lift that charcoal
off with the paper and really bring out
those higher values with your monozur eraser. Okay. Remember, we can always go
back in and add more charcoal. You can always add
more charcoal. The trick is, if you
add too much charcoal, being able to bring back a lighter value in that space without
overworking the paper, okay? The analogy that I like
to use a lot of the times in regards to that is it's
like cutting hair, right? You always want to
cut a little bit of hair off because you can
always take off more. Well, in direct
relation to charcoal, you can always add
more charcoal. You don't want to add
too much because it's hard to it's hard to
retrieve sometimes, like it's hard to bring that hair back after
you've cut it off, right? Okay. So more line work.
Hard charcoal, of course, because we're
on the top of the shark. We're just gonna go up and pull it. This is real time here. Boom, just like that.
All of a sudden, we've solidified the end
of the, the fin there. We're just gonna bring this
line here 'cause it's folded. There we are. Then here's
gonna bring this line up. Just like that. We're not gonna connect them
up top. No need. No need. Okay, so now
we're switching it up. Bringing out our makeup brush. And one of the reasons why I absolutely love this
makeup brush is because you can see
the kind of spaces, the kind of tight spaces
that you can get into, and you can start blending
those lower values, where I wouldn't
be able to do that with the number
six brush, right? It's just too big of a brush. We with this little elf brush, it's very versatile in that
regard. Very versatile. So if you don't have one yet, definitely get one, okay? But here we're just more or less dabbing, dabbing the paper. But we're not pushing
hard. There's no need to. You know, I always
say, let your tools do what your tools want to do, what they were designed to do. And they'll do it. Okay, here we are. I'm
just cleaning this up. Kind of want to kind
of redraw this, uh this little fish. I don't know what
kind of fish this is, but, he's in the drawing,
so we're gonna draw him. And the big thing with these little fish here
is just make sure that you outline those
big differences that you see between
high and low values. Okay. And now, because these values in this
reference image are very, very low, very low values. I'm going to use my
medium charcoal here. And again, just like with
any part of the drawing, I'm focusing on the
lower values first. And then what I want
to do is I want to run this line right along the belly right along
the belly of this fish. Here we go. See that
just like that. And I also don't want to pack in that low value because I'm
going to be going back in with my smudger and I'm going to be
blending all of this. So when you leave breaks in the belly of that
fish, like I did, I didn't pack it all
in, all of a sudden you have value relationships in
a very, very tight space. Of course, value
relationships are just that. Those are by definition, low values, mid values, high values immediately next to each other and how
they correlate to each other within a greater composition,
like a drawing, right? There we go. We're starting to really bring out this fish. And then here, I'm
just going to go ahead and add the e of this fish. These are very small details, but we're also working
in a very small space, so But again, don't give
these fish too much time. Don't worry about giving
them too much detail, right? We want these fish to be soft. We want them to be,
for the most part, fairly implied because they're not the focal point
of the drawing. The focal point is
the shark itself. Now here what I'm
doing is I'm taking my huhu battery operated eraser. I'm just going back
through and just solidifying this line, which is the main differentiator between the low value
on the belly of the fish and then the high value that we see on the
top of the fish. On. It's looking good. Okay. Now it's time
for his little friend. Every fish in the sea
should have a friend, so we're going to give him his. But here what we're
doing is we're just using our smudger work, and I'll be using a
hard charcoal just to bring out some of the lower values that we
see on the fish's belly, but smudger work and then
monozeroeraser work here. This is just more or less really bring out
those boundaries between the fish
and the background. Oh and then here's
my heart charcoal, 'cause if you look at the
reference image here, the lowest value that we see on this fish is on his chin
and his underbelly. So but if you notice, I don't want to put any
defined lines on this fish. Like I said, I want this fish to kind of
be in the background. I want you to know what's
there, but I don't want the viewer's eye to be
drawn to it in any way. I want the viewer's eye to focus mainly on the shark. Okay. All right. We are
cruising right along. You. Okay. So now, just like we did with
the back fin, the top fin, I'm using my smudger and I'm just laying down a nice
base layer of charcoal. I'm spending a little
bit more time on places in the drawing that
need to have a lower value. But the trick is a lot of people think that
when they need to convey those lower values, they need to use a harsher
pressure control, right? They need to use more pressure. Well, you don't need to do that. You just need to spend more time on that specific area, okay? So just keep that in mind. Okay. So then here.
Just real light. You'll find you can play around
with your hand pressure. More pressure means lower value. Lighter pressure
means higher value. Okay? It's literally
that simple. And just like riding a bike
or just like doing anything, just practice, more practice, and you'll really
get comfortable with exactly what
your hand needs to do in order to
convey a certain aesthetic, right?
Takes practice. That's all. So I'm just going to clean
this up a little bit. I know it's hard to see
in the reference image, but that fin actually curls. So what we have here, this medium pencils remember we're on the bottom
of the fish now. So now we can use a medium
charcoal for our line work. So I'm going to take
this medium charcoal and this fin actually does this. I'm going to solidify
the bottom here. This is the very, very bottom. It's actually the backside,
believe it or not, away from away from us. But then there's the
top line. See that? That's actually what the fin
does in the reference image, but because of the nature
of the shadows and the nature of how the
light strikes that fin, it's not that black and
white, if you will. And I'm going to
make this look a lot more like the
reference image. But a lot of times it's knowing how to
look at something, right? It's kind of the art of
looking, if you will, when you're drawing because basically what you're
doing is you are constructing the image
that you're looking at, and you are very much building
a relationship with it. So it's in situations
like this where it's knowing what to see and how
to decipher it in an image. Okay. So now, again, we took our medium pencil to
bring out that lower value. Now we're just blending
it with our smudge. And you're probably
thinking to yourself, Wow, that is a very,
very harsh line. We need to soften
that up, right? Well, I agree with you. So now what we're gonna do is I'm going to take my smudger, and we're just going to
run this smudger right along that line that we laid down with our medium charcoal. Kind of blending this, you know, not too harsh on the
hand, pressure, okay? We're just just having fun spending more
and more time on it. And see this as we blend it, all of a sudden,
boom There we are. That's what we want. That looks a lot more like the
reference image. Wonderful. Okay, I'm just taking my models eraser and just kind of cleaning up this
line a little bit. Charcoal will run away
from you if you let it, so I just want to make
sure we take care of that. Then here as well.
It's cleaning this up.
5. Gills & Top of Head: Okay. And then here's another trick. If you want to go in and
you want more control, but you still want to lower the value on your fins, do this. Just take a medium charcoal,
flip it on its side, and then just very lightly
lay down more charcoal. Of course, it'll
be gritty, right? So you can either take a smudger or you can take your
elf brush like this. You can use either or it's
up to you and just hit it, soften it up, blend it out. There you are. And also
notice on this fin, I'm not going to run a defined line on
the top of the fin. I only ran that defined line with my medium charcoal
on the bottom, same principle as the rest of the body of the shark, right? You could have a
heavy defined line on the belly and the bottom
of the shark's body, but because of the nature
of the photograph, because of the nature of sharks being close to the
surface, that sun, that light is illuminating
the top of everything, the top of the fins,
the top of the body, the top of the whole
body of the shark, so just keep that in mind. Then here, if we want
to change this line, we can do that. We can make it more abrupt. We can soften it up. It's really up to you.
The main point of these tutorials is to show you guys just
different techniques, different tricks, different
things that you can do, different tools that
you can use to achieve, you know, certain aesthetics. You know, that's really what
this tutorials is about. Now, if I was drawing
this shark for a client, I wouldn't be able
to draw this in an hour or an hour
and 20 minutes. I'd probably spend a good
ten plus hours drawing it to really bring out as much detail and as much accuracy to
the drawing as I could. But in this one, we're
just having fun. I'm just teaching you guys my approach, how
I would approach it. We're kind of moving it,
you know, light speed here, but you know, we're having fun. That's the point. If you can
absorb tricks of the trade, different techniques, you know, that is wonderful
because then you can take these tricks that I teach you and you can apply them to your own methods and your
own ways of drawing. So Okay. So now what we're doing is
I just took a hard charcoal there and kind of
punched in those gills. Then here, I'm going
to take my smudger. When it comes to drawing sharks, in my opinion, what
I'm doing here, this is the hardest part is when you look at
the reference image, you see that underlying form, which is conveyed visually. By lower values in relation to their mid and high
value counterparts. So you can go in
with a brush and you can start to bring
out the lower values, or if you're uncomfortable
with a brush or maybe you've just started drawing with a brush and you're a little
unsure on your brush work, you can use a smudger
instead, okay? The smudger is your
alternative for more control. A lot of times when we're uncomfortable with
anything that we do, especially when it
comes to creating something or crafting something, we're uncomfortable because we don't feel like
we're in control. Okay? So you can do that. You can convey those
lower values with your smudger instead
of your brush. But now here what I'm doing because I'm taking
my number six, and I'm just more or less going
through and I'm blending, I'm getting a nice soft look, I'm adding to my gradation. Now, bear in mind, I've been drawing with brushes for years. So for me, I'm very
comfortable with them. And if you're not yet you
will just takes time. What I'm doing is I'm
going through it and I'm basically accomplishing a
couple of things with a step. I'm laying down a
nice base layer, all the while being
cautious to use a very light pressure control,
extremely light handed. I want my charcoal
in this base layer to rest on top of
the paper, okay? I don't want it to
get pressed into the paper because I'm
still very much going to be going through with
my monozura eraser and bringing out and retrieving higher values where
they need to be. But here, here's a technique I want to show you guys that is basically what I'm doing is
just I'm smudging the paper. When you smudge the
paper with your brush, you have more control
versus if you swipe, right? So I'm basically just
kind of not to mention, it gives you kind
of like a shadowy, almost like a blotchy type look. Okay. Okay. So now, as promised, busting out the
model zero eraser. And this is where we
really get a chance to bring out kind
of the form that we see in the top of the gills
and just kind of we're able to kind of bring out that waviness of
the shark's skin. But again, with this
step, it's imperative, especially if you're
unsure to just go slow, take your time and be just conscious of the direction
that you're pulling. In regards to pressure control, I am not pressing hard at all. If anything, with this step
with the monoza eraser, I'm just skipping
across the paper, more or less caressing
the paper with my eraser, if you want to think
of it that way. Because if you press too hard, all of a sudden you're
going to have a really, really definite implied line. Versus if you barely hit it, the viewer's eye will look at it and they won't even realize
what they're looking at. They'll think, Wow, I see
the form in that shark, but they won't
understand that it's due to your eraser work. So keep that in mind. But here what I'm doing
is I'm going in with my number one smudger. And I'm doing this
because I want more control than number two or my number three
smudger offers. And I'm just this is
where you really get a chance to bring out
those lower values and actually start
to convey a sense of a sense of texture, right? So now I'm going in with my
heart charcoal, and I'm just, uh more or less solidifying exactly
where those breaks between these gills are. If you look at the
reference image, you can see that it's more value relationships
than it is actual line work. So when you go in with
your heart charcoal, you can actually just
more or less highlight those lower values and you'll get that same type of
aesthetic that you see with the gills in the
reference image. It's a dance between
your smudger work and your heart
charcoal work, okay? Then here, just taking
my number six brush. Blending for some gradation
and now I'm switching it up, taking my ELF brush. I'm just going in
and I want to bring out the lower values
a little bit more, and I'm using my elf brush for this because I
want more control. The elf brush
offers more control than my number six brush does. And when it comes to
really pinpointing where a shadow needs to be, right, where a low value
needs to be conveyed, I actually prefer this brush over my number six
brush any day, especially when it comes
to drawing sharks, right? And you see how quickly
we're able to move, granted, I do have this
visual sped up a little bit, but you'll be amazed when you start to work with your brush, especially if you're new to it, just how quickly you can bring out different aesthetics
onto your paper. There we go. Just like that. Being about a boom.
Wonderful. Okay. So now I am switching it up. We are going back
to our smudger. And I want to start bringing out the nose of this bull shark. So of course, form is important. So what we're gonna do
is we're going to focus on kind of the
bridge of this nose. We're gonna kind
of solidify that. And then right here, see
where we're going to pole. Just like that. See that? Direction. It's the
direction that you pull with your smudger work that'll
give you that form. See how it kind
of looks like it. There's almost like a little little bridge to that nose now. And we did all of that with
our value relationships. Now, herms gonna pull up it. Away, up and away. Up and away. There we are just like that.
And that was real time. That was real time.
That's literally how fast you're able
to convey form if you just if you just know what you're doing with this
specific technique, okay? All right. And remember, if it looks harsh,
if it looks greedy, don't worry. Brush work. Just like this with a number
six, blend this together. Nice, light pressure control. We're blending, bringing
out lower values. That's all we're doing here. Okay. That's all we're doing.
6. Bottom of Head & Mouth : Alright, so now take
a medium charcoal, and it's time to give
this shark an eye. So I'm just referring
to the reference image, and I'm just looking at how the line work
around the eye is. And then there's a little bit of little lower value shadow right here coming off
the side of the eye. And then what I want to
do is I want to actually, I think I'm gonna
clear this out. I want to bring this, uh,
people down a little bit. Let's bring it
down a little bit. Just got to re solidify
it. Pack this in. There we go. Oh, yeah. There's an eye. Okay. So now we want to make
that eye look like it's sunk in to the head
just a little bit. So this is how we're
gonna convey that. I'm gonna take our smudger, and I'm just going to refer
to the reference image, and I'm gonna start to add all of the lower values
around that eyeball. Then, of course, the brows
it connects, you know, the snout of the
shark or it connects. Layer upon layer. That's all we're that's all we're
trying to do here. Then just take our number six, just kind of blend
it and just see how that immediately gives us a smoother look, a
smoother texture. Just kind of bring out the
edge of the nose here. We'll take a medium charcoal. What I want to do
is I want to bring out the nostril of this shark. Again, like that fin. It doesn't necessarily look like that in the
reference image, but that's just because we
have these lower values, all the shadow work that's immediately around
it, so it's there, but because of that shadow work, you can't really see
it in that regard. So again, it's just knowing what to look for when you are looking at
your reference image. Then here, there is some low value around the
top lip of the sharks. We want to start
bringing that out. For me, drawing sharks, I think my favorite part of drawing
sharks is the mouth. So that's where we get to
bring out those teeth. Then here we have an
interesting texture here. Um, it's like, kind
of kind of skin or it's where the
shark's mouth contracts, right, when it opens up
its mouth to eat its prey. And so we're just going in with our heard charcoal
and bringing that out. Then we put it in a
fine line right here. Hard charcoal. Right out there. I want to make sure that I want to make sure
that these lines have a nice mid mid road
line quality to them. The one here. Same thing. Kinda bring it up and over. I just kind of want
to let that fade. Just kind of fade. There we are. Okay. And then
taking my smudger. I'm just kind of pulling up
immediately from that line. And this will make this will make the mouth look like it's
like it's kind of round. If you look at the
reference image, you see how it's round, right? Right, right in through there.
Well, that's how we do it. We take our smudger,
go from the line, then pull up away from the line. And that gives us
a nice round look. Then here we're just running
our sputters left or right. It's kind of given
us that kind of a blotchy look that
we see on the chin, kind of the gullet, if you
will, of this bull shark. But, guys, when it comes
to running, you know, low values, you can
either do it with your smudger or
you can do it with your brush or you
can do it with both. I tend when it comes to sharks, I actually prefer smudgers
because just like this, I I'm able to kind of
convey that quick, little low value line that we see in the center
of the cheek of this shark. Smudgers are amazing when it comes to shark texture in
regards to their skin. So Brush works more for just
very big areas of low value. And then, of course, gradation and smoothing and blending
all of your values together. Okay, then here what I'm doing. I'm just really trying
to solidify the bottom of this shark's gullet here,
the bottom of his mouth. Start run that line, and I'm pulling up from the
line. See that? Run that line, and then I'm
pulling up from the line. And if this looks great, don't worry. We're gonna
hit with a smudger. We're going to hit it with
brush work, and we're really gonna we're really gonna
bled it all together, and it's going to look
it's gonna look good. It's gonna look pretty for us. So that's what we want.
Blending it all together. And notice how, if you take your smudge and you do a
line or something like that, if you notice kind of along
the cheek of this bull shark, there is a lot of, like,
scarring and stuff like that. So that's a way that you can convey scarring on your sharks
with your smudger work. Am is taking my number six, and I'm just kind of more or less blending this all together. This is softening it up, giving us a nice smooth texture. And then, of course, if you want to load up your number six, you can go in and notice
I'm only doing this because the value of this reference
image is so low, right here. But but I actually like to run the base layer
with smudgers and then I like to hit it with the brush because I can really
kind of pinpoint my value relationships and
exactly where my high values are in relation to my
mid and my low values. And then here what I'm
doing is I'm building up the bottom lip of this
shark with my elf brush. And you can do this with a brush or you can do this
with a smudger. I just wanted to show you this so that you
can understand that this part of the drawing can be accomplished with brush work. Remember what I was
saying earlier. You know, a lot of what I'm trying to
accomplish with you in these tutorials is more or
less what your tools are capable of and what
they can do for you. And then what you do with
them that's up to you. Okay. This is starting to look
somewhat like a shark. It's a toothless shark. You don't have no teeth yet. But he's going to. We're
gonna give him some teeth. Very soon here. I got some runaway charcoal.
Just gonna clean this up. Okay. Alright, so now
actually what I'm gonna us I'm gonna take
my medium charcoal, and I am going to
bring out a fine line. I'm gonna run this line all the way back to the
gills, all the way back. Boom. There we are. And now what I'm doing is I'm
going to take my smudger. And again, I'm going to run that smudger right
along that line, okay? Right along the line. But I want to be
careful that I don't go on the line, I
go on the line, what will happen is the
charcoal will get pushed off into the white space,
and that's not what I want. That'll compromise the
integrity of my line. And I do not want to do that. But now I'm just basically going back through
with my smudger, and I'm just building up those lower values and exactly where they
need to be, okay? Now here, I'm actually going
to take a hard charcoal. I'm gonna run another
defined line. Okay. And here, I'm just gonna change the angle of this
mouth a little bit. Then solidify where those
gaps are going to be. There we are. Okay. This is
starting to come together. Then here what I'm
doing is I'm just going through and you can just
run back and forth, or you can do, you know,
nice tight little circles with your mono Zero eraser. But I mean, you have
all the power, really. That's what it boils down to
with this technique is you can go in and you can retrieve high values all day
long if you want to. And remember, with
these tutorials, there's only so much I can do
in the time that I'm given. So I'm trying to show you
what's going to benefit you. And then move on
to the next thing. But then reclo looks like this shark got, like,
a hook or something. So we want to put in
some low values there. And then here, this is texture. This is a trick for texture. So you see this,
see what I'm doing? Just nice little light poles. A lot of times when you look
at photographs of sharks, um, you know, the ocean is
a big wild place, right? So a lot of times
sharks will, you know, they'll get caught caught in
nets or they'll, you know, get in fights with other
sharks or, you know, another sea creature of
sorts and they'll have scars on their skin and stuff,
blemishes, if you will. So with your monozura eraser, especially on top
of lower values, you can really kind of
bring out those scars and, uh and solidify that aesthetic. And then here, think of this
technique as a form of, uh cross hatching, how you'll
cross hatch with a pencil. You can do the exact same thing with your monozero eraser here. This is very subtle, though, very light pressure control. But what this is basically
doing is this is really bringing out
that underlying form. A lot of times when you think about when you think
about your viewers, you're trying to basically trick their eye into thinking
that what they're looking at is three
dimensional when in fact, it's only ever going to be a two dimensional
reality, right? That's the trick. Okay. So now, medium charcoal,
medium charcoal. I want to start off by first outlining the basic
shape of these teeth. I really want to solidify
where those teeth are. Okay? That's the first step. Front, back, front, back,
boom, there's that. Okay, so now now that I have those teeth solidified,
now I'm going to go in, and I'm not going to press hard, but because I have my pencil, I have pinpoint control, and I'm able to go
in and I'm able to start laying
down that charcoal. Exactly where that
charcoals at, okay? And also notice with
this shark's mouth, we want to have more charcoal compact underneath
the top teeth, and then less charcoal
compact closer to the bottom. You see that difference? And then what we'll do is
we'll go in with our number one smudger and just very lightly go ahead
and blend everything. There we go. This
is looking good. Yeah, I just blending
this together. Okay, now here, what we're doing for these
little indents is you just push it and pull it.
Push it and pull it in. And you can just use the
residual charcoal on your smudger from when you were blending inside the mouth. And then we're just
kind of want to throw a lower value onto
the gums of this shark. All of a sudden all of a sudden, this is really
starting to come out. That is what we want. It's
starting to look like a shark. And then if you want to,
you can go back through, and you can redefine
where those teeth are at. But that's totally up to you. You don't have to do that
if you don't want to.
7. Final Details : But just blend and
blend until you're satisfied with the way it looks. But I think, you know, one or two hits
with the smudger, and you'll be fine. Okay. So now I want to kind of lighten
this up a little bit. And what I want to do is I
want to run a nice mid tone, nice mid value on these teeth, kind of give them some texture. There we go. That looks nice.
That looks nice. Okay. So now, swapping
it out for my elf brush. I'm going in, and you
notice how when you look at the reference image
on this shark, the nose and more and actually the bottom of the nose is really where we
have a lot of low value. Then here we also
have some slight, you know, um, changes in value. And so basically what we're doing is I'm just
going through and I'm targeting and looking at the
reference image in anywhere that needs to have a blend or anywhere that needs to have, you know, that lower
value brought out. I want to use my brush for
this step because we're getting close to the
end of this drawing. So rather than having
a gritty look, I want to have a
nice smooth look. And here with the
mode zero eraser, I'm just going through, and this is pretty much for texture. We've reached the point in
the drawing where we have our base layer of our charcoal laid down
pretty much everywhere. And this is where we're able to go in and really bring out exactly what that texture
looks like and exactly where it falls within the
greater drawing, right? Okay. So sloading up. Is the thing. You know, anywhere that has texture or has fluctuations
in your value, you know, this is
a way where you can bring out that smoothness. Whenever you're drawing sharks, you definitely want
to be using brushes. I mean, you can clearly see why. They give you so much control. They give you so
much versatility within the greater
drawing itself as far as being
able to switch from pencils to brushes to
smudgers to erasers, you know, being able to use all of those tools
in tandem with one another really does
give you a nice solid, aesthetic, one that a lot
of people seem to like, and, and, of course, you learn in the process. You know, anyone who's been
following me for a while knows that I'm a big
fan of just learning, I'm just making mistakes
and learning from those and taking what you learn and applying it to your
next drawing, right? Drawing's a lot
like life that way. You know, it's not about getting something
picture perfect. It's about learning and having fun, man. That's the big thing. I like to I like
to have fun when I draw, and I'm sure you do, too. And that's all
we're trying to do. Min about a boom, ya. Okay. This is starting to
starting to come out. Okay. But in regards to
the brush work, one of the things you'll
find that you'll like a lot with a diagonal
brush of this size, whether it's an elf brush or, you know, a brush from
an actual makeup kit, is that you have a
lot more control with this brush than you would say
with your number six brush. The thing that I like
about the diagonal cut on this brush is if you're
blending something like this, but then, let's say
you need to go in, where the eyes at and you
need to blend just a very, very thin section of paper, you flip the brush up
on its its sharp edge, and then you can go in
and you can actually get a nice gradation blend with just that one
side of the brush. So that's a little trick. I mean, I like how versatile that style of brush is because with
the number six brush, you don't have that
same versatility. The number six brush does about one thing and
one thing really well, and that's blending, right? Because it has a
round head on it, it can't be flip
flopped like that. It takes up just as
much surface area on one side as it does when
you flip it on the other. So Okay. So now what I'm doing is I'm
taking my monozur eraser, and this is more we're basically accomplishing
two things here. I'm focusing on the shadow work, the way that the light is hitting the front
half of the shark. But then I'm also adding
texture to the shark's skin. So Then here, check this out
if you pull up up and away, right from the edge
of the shark's nose. This will speak to your viewer, and this will give the nose
just that much more form. And this is we've
kind of reached kind of the final
stage of this drawing, where now that all of the base layers and shadow
work is pretty much laid down, now you get to have a
lot more fun, right? Now you get to go in
and you get to bring out those subtleties
that you see. You know, one of my
favorite artists, Leonardo DaVinci, in his drawings and
especially his paintings, he would talk about how when you spend so much time
looking at something, you need to take a break and you need to walk away from it. Then when you come back to it, you're going to notice a lot of things about your drawing that maybe you didn't notice
before and that rings true, especially in detail work. Detail work is what I
call subtle work, right? It's work that a lot of
drawers tend to overlook, but a lot of times it's
what you don't see that really makes a drawing
pop in regards to others. Bigger what we're doing is we're just darkening these values. And then here, I know I didn't
specify the needed eraser, but I just wanted to
show you how if you make a mistake and you go a
little bit too low in value, how you can take your eraser,
and you just roll it, roll it on top and see how that actually gave us a little bit of texture, too. And then just blend
it real quick. Boom. There we are. I just wanted to
show you guys that. Okay. So we're cruising. And what I'm doing, I'm
taking my Monozero eraser and I'm just more or less, this is for underlying form. Okay. So now, texture. If you actually look at
the reference image, you see how there's all
those little dots kind of all over the
skin of the shark. Well, this is how we're going to accomplish that aesthetic, okay? This is a hard charcoal. It's going to hold
its integrity when we go to hit this
with a brush, okay? And blend this. But you see
how all of a sudden we have that same type of texture that we see in the reference
image for our shark. Real light, real light
pressure control here. Just doing, you know, big, you know,
swooshing circles. And now, a dry number six, dry number six, very
lightly hit it, and this will blend the
charcoal in that texture, but it won't completely compromise the integrity
of that look, right? But that's a little
trick that you can use for bringing out texture. Texture is the big
thing in any drawing. Texture is what will
make or break you. It doesn't matter if
you're drawing a bird, a shark, a horse, a person. It doesn't matter.
Texture is the variable. That's what changes from
drawing to drawing. If you know subtle
tricks where you can convey certain types of textures like
what we just did, that's a trick that not a lot of people know of a lot of
people who would try to go in with the tip of
their charcoal pencil and it.it over and over again versus just
flipping it on its side. Seemingly using a light pressure control and
caressing the paper, and you're able to move
super quick, right? Time is money, especially
when it comes to art. So the faster you can move, the more product you
can bring to market, the more money you'll make,
right, enough jibber jabber. I got another fishy I
got to make. So here. Same principle as the
other two fish here. This one's in the back
of the viewers mind, so I'm just going to
hit it with a smudge. I'm gonna spend more time on the areas that need to
have a lower value. I'm do a little bit of high value retrieval here
just to give it a little bit, a little bit of sass, a little bit of
character. There we go. And then I'm going to take a dry elf brush. I'm
just gonna hit it. A little bit of
gradation. Oh, that's it. I'm not gonna put a
define line on that fish. I'm not I don't want the viewer's eye to
look at the fish. I want the viewer's eye
to look at the shark. Okay, so now remember how
I said there was, like, a little must have been a hook or something in the
shark's mouth here. This is just This is detail
work. That's what this is. This is a hard charcoal, and this is just detail work. You can literally spend hours on detail work, literally, hours. But, you know, because this is, uh, you know, only an hour and, you know, 15, 20 minutes tutorial, there's only
so much I can do. But what I would do if I were you is I would spend
probably a good hour, literally just on detail work. And that'll really elevate
your drawing above the rest. So now what I'm doing is I'm just taking a heart charcoal. I'm just kind of running
a nice nice soft line. And I know it looks gritty, but I'm going to take my
symmetry here, my number one. I'm just going to
run it right along the shadow here of this fish, and then right along that
line, just like this. Just nice light poles. Going to blend this
line into existence. This is going to solidify the form of the top
of the shark for us. There we go. That's looking
good. That is looking good. I'm gonna take my
little elf brush here and just kind of blend this
lip a little bit more. I want this lip to be a little darker so
it looks like it's actually above the kind of
the goal to the shark here. And then I'm just
gonna clean this up. Charcoal everywhere. Even with
the three layered method. Charcoal everywhere. Just go to kind of clean
all this up here. That's looking pretty
good, pretty good. But guys, the cool thing
about this method, especially if you're new
to drawing or if you're just learning about the
three layered method for the first time, is that it offers a lot
of autonomy for you. Like, you can go back
through and you can add and add and add and
nine times out of ten, because of the nature
of the method, you won't be
overworking the paper. So it allows for you
to make mistakes, and it allows for you to um, to learn from those mistakes and fix a lot of those mistakes. A lot of methods,
especially in drawing, don't allow for you to learn from a mistake
once it's made, especially with a
specific drawing. But this method does. So I hope you learned
one or two things in this video and good luck
in your future drawings.
 Messer Creations, Artist | Author | YouTuber