Transcripts
1. Introduction: Hi, I'm Nadine. I'm
a watercolor artist from Melbourne,
Australia, today, what I want to do with you is to keep exploring this
idea that Less is Me. The most enjoyable thing
about watercolor is letting the pigment
do the work for you and leaving the light. It's always about
leaving the light. But funnily enough, it's
actually really hard to leave the light and particularly
leave white bits of paper. Everyone always wants
to fill everything in. So what we're going
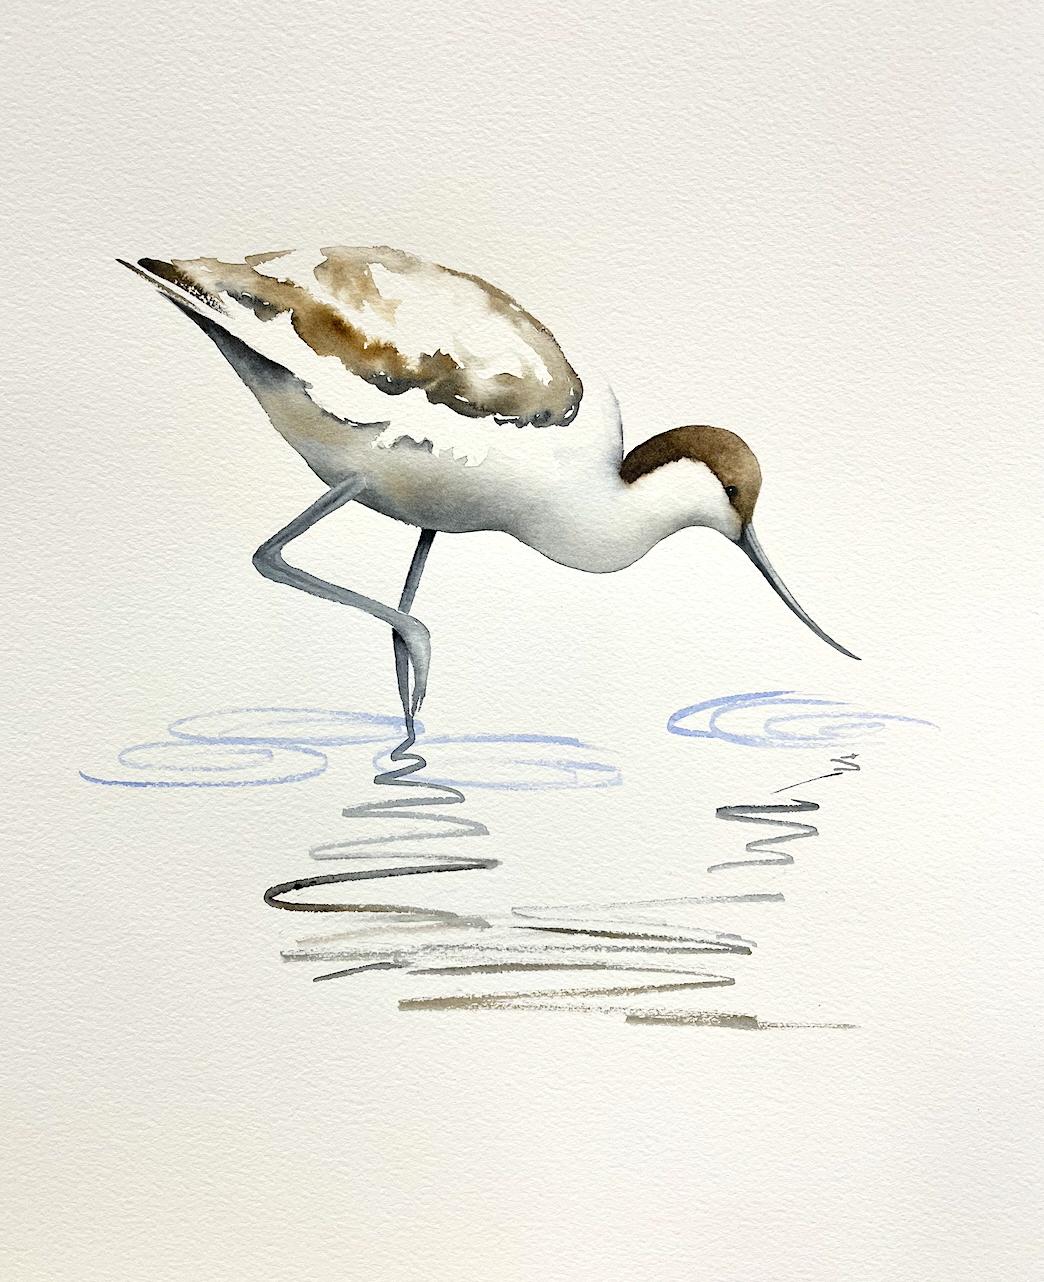
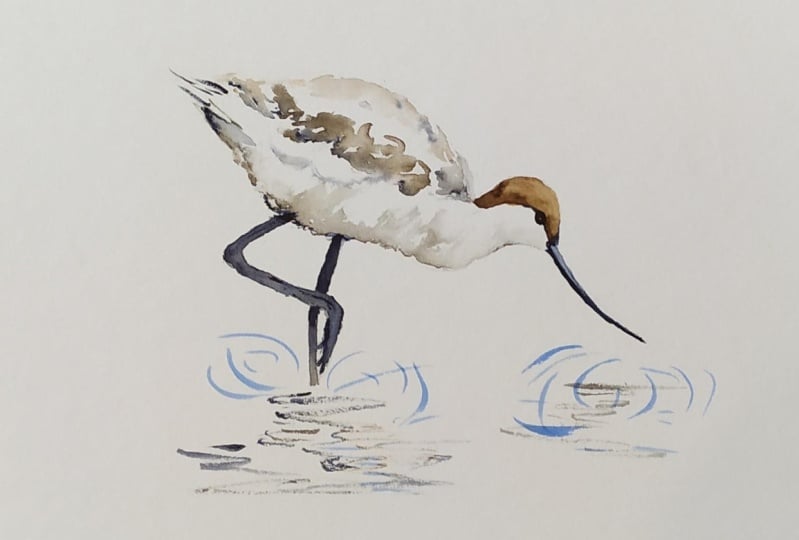
to do today is an aset that's
standing in water. We're not painting
the water, we're giving a little
suggestion of it. And the most important
thing about this painting is living white, living
light on the back. So I'm hoping that you'll
be able to see by the end, but minimal is fine, and really you can portray the
subject really quickly and easily without getting
hung up in all the detail. So we'll go through
the reference photo. We'll go through
the sketch, step by step through the painting. And what I'm hoping
is by the end, you haven't painted
everything in. So really try and sit on your hands and leave
some white paper for me. That's the aim of today.
So let's get started.
2. Materials: Okay, materials for
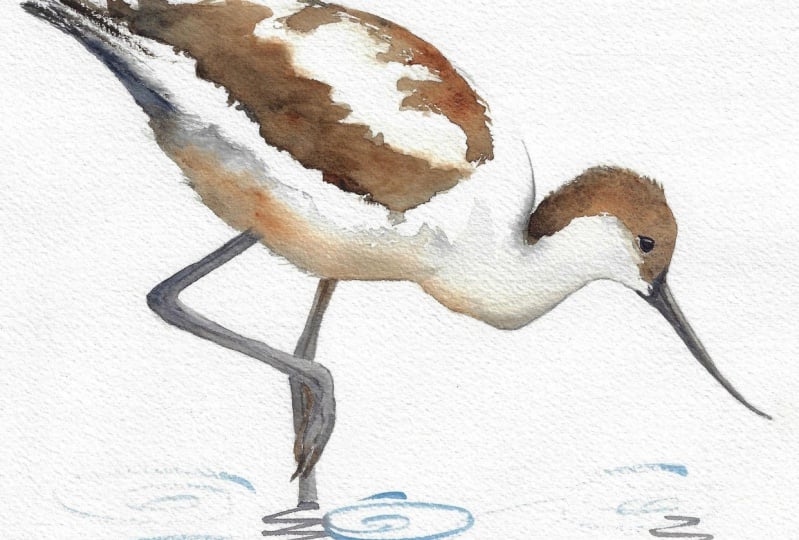
the class today. First up the reference photo. This one is from Pixel Bay, and I've got a link to that
on the material section. I'm painting on 300 gram
arches called pressed paper. I'm painting flat on a board, but I'm not taping it down. You'll need a regular HB
pencil and an eraser. In terms of paints, I'm using the three
main ones I've got. I've got some Daniel
Smith Indigo, some Daniel Smith Vandyke brown, and I've got some Windsor
and Newton burnt umber. Now, the Daniel Smith indigo is quite a different
color to say, for example, the Windsor
and Newton indigo, which is almost like
a Prussian blue. Check the color of your paint. If you don't have
that, you could mix up some burnt umber and French ultra to
get a similar dark probably with a bit
of vandyke in there. Just have a play
before you go ahead. I'm using I think
out my palette. I've got some cobalt blue. Could be French
ultra. I think it's probably cobalt.
Doesn't really matter. So whatever blue you've
got hanging around is fine for this because
you just need a touch. And I put a tiny highlight
of white glass in the eye. If you don't have this,
don't rush out and buy it. You can either leave
the paper white. You know, just leave the highlight when
you go to paint it or you could use some China
white or titanium white. In terms of brushes, I'm
using well, I'm using two. I've got two little
synthetics here and the details of those are in
the material section and I'm also using this
stiff synthetic to fix a mistake that I made. You probably won't
need that if you don't make any mistakes. Other than that, you'll need
your palette, jar of water, some tissues or toilet paper, and I think we're good to
start the sketch. Okay.
3. Sketching Up: So starting off with the sketch as always keep it
nice and simple. So get the shape of the beak in a little bit of an indication of where the darks
under the wing are, but I don't want to put
in all this patterning, keep it nice and
straightforward. Now for the legs,
this foot is actually quite complicated when you look at the reference.
It's hard to tell. I think this back bit probably
belongs to the front foot, but because I can't see that,
I'm not stressing about it. I'm just giving myself
a little bit of an indication of the shape. Now, I am putting
a few ripples in, but I'm not drawing all of this. I'm just giving myself, again, a bit of an indication of where some of those
lines might go. So here for the beak, and just the start
of these ones for the leg here. And that's
all I'm going to do. I have gone slightly larger on my sketch
than the image that I've printed out here
just because I don't have any very good paint brushes at the moment that I've
got a really nice tip, so to make it easier for myself, I've just got a touch
a touch bigger. Now, if you don't want to
paint sketch it up yourself, I have included a template that you can download from
the Skillshare site, and this is actually
a little bit larger than the printout that I've got
there at the reference. So this is the same size as
the one that I've got here. I think we're ready to paint.
4. Eye and beak: All right. So we're going
to start off in the beak. Now, I actually did find
this brush isn't too bad. I found one under my mess. I want to get this shape in, but I'm going to turn the
page around because my hand, I can't do that easily
make it a bit simpler. I'm going to come this
way to pop the beak in. I'm going to go with some
indigo. I've got squeezed out. I'm I haven't really drawn
just looking at the reference. It's a bit hard to tell what's going on in
the front here, but I'll make it up as I go. So get some milky probably
indigo to start with. I'm going to straight
onto dry paper. Start in the tip. I've got to be careful but
this paint brush, it's got water on the
heel of the brush there, so I want to get rid of
that because if that dribbles onto the page,
I'll be in trouble. Tip down. Coming on the underside of the be there and then I'm going to pick up
a bit more paint, come into that wet area and come into the
front of the face. Now I've just not quite come
to my pencil edge there. I'm just going to tidy that up. I don't really mind that that's coming to the
front of the head. I'm not fussed about that. I do need to close up now
that light I was light to begin with because I
didn't want to come on too hard and mess it up. Now while the page is still wet, I'm just going to drop in.
A little bit more paint. I still think now, before I finish
this, I think I want a little bit of
light on the top. I've just wet my brush. Before this dries,
I'm just going to pop a little bit of water on there and maybe come
the other direction. I just want a little bit
of a highlight on the top. Now, I could do that
once this is all dried, but it's easier while
it's still wet. I will need to go
darker on the bottom, but I'm not going to worry
about that until this is dry. I just keep wetting my brush, dragging it I'm
wetting the brush, taking off the excess, and
just dragging it through. But I think that's where
I'll leave that now. I'm also going before
I stop for a second, I'm just going to pop in I know we've only just
started and we're stopping, but I want this eye and the beak to dry before
I start the rest. That's just straight
indigo onto dry paper, just popping in that
little dark for the eye. Because I'm painting flat, I'm just going to pull
that up and just make sure that that is the
right shape before I move on. Now, this isn't dark
enough unneath here, but I want to come
out of that for now. Give that a couple of
minutes dry won't take long.
5. Starting the Head: Okay, so I'm drawing there now. So we're going to put the
head and the body in. Right. I'm going to use, I think maybe it's a
bit tatty this brush, but I reckon I'm going
to go with that. I got a tissue. I've
got some water. Now, in my well, I have
some van **** brown, some burnt umber, and
I've got some indigo. I want to use a mixture of
wet on dry wet and wet. Now, I might just
do the head first. I want a little bit of light
at the front, I think. I'm going to just throw on a bit of water
come around that eye. Bush isn't very clean. It's going to throw
a bit of water on. I might bring that to the
back of the neck there. I'm going to keep that dry. We'll see what happens.
Now I'm going to pick up. I've got a bit of
my burnt umber, counts bit of my burnt umber
and a bit of my van ****, a bit of both with milky
consistency initially. I'm going to come onto the
dry page here and pull that across to come
into the wet area. I'm just teasing it into the front there so
it stays nice and light. But I want a bit more in that. I'm now going to grab
a bit more paint, probably more van **** now
darker along this edge, I'm going to throw a bit
more paint while it's still wet and let it bleed. Around the eye. Wash my brush, and then I'm just going to help tease that out to the edge. Now, what I want to
be careful of if I've got too much water pooling and it pushes all
out to this edge, I'll end up with a
really hard line. So I'm trying to make sure I want to border on there
to get some movement, but I don't want so
much water that I end up having all the pigment push to this front edge where
I want it to keep light. Testing back, I think I
need maybe a bit more. I'm just checking a bit more of that van **** in
bringing over top. I'm just eyeballing how
much light I want to keep. Okay. Now also, I just want
to rough up a little bit. We'll take a little
bit of water. My brush is pretty dry still. I'm just painting
underneath that brown. Then I'm going to come up and just ever so gently
touch the edge, so I get a little
bit of bleeding. But what I don't want
to do is introduce a whole lot of water there because it will shoot
all over the place. I just want to mustard up a bit. Really softly painting
underneath and then coming up to meet that painted edge. I'm going to do the same here, just coming back
into the shoulder. After that soft I feel like I'm going to put
a bit of indigo as well. I'm picking up now
some andyke and my indigo and now
coming in again last time onto that wet edge because I've still got
water in the page. My eyes lightened off too much, but I'll worry about that later. I've been in there a while now. The idea being that I wanted to get nice strength
of color in here. I do want to e, although
it's not in the reference, I do want to keep a little
bit of light on the front, by doing it slowly like that, I've let myself keep that line without getting
a really super hard edge. You have a little bit of an edge up there,
but not too much. Now, the eyes are dark enough. I need more darks around the beak. There's
more to go in here. But I don't want to
make decisions on that until I've got
everything else in. I think sometimes
you go too much in one area and then realize it doesn't balance out
with the rest of it. I need to come out of
that and let that dry, give it 10 minutes,
and then we'll come in and we'll do the main body.
6. Getting in the Body: Okay, it's been
about 10 minutes, and I wasn't worried
so much about this bleeding as me
putting my hand in it, that's why I wanted it to dry. So we're going to come on and do the wing and the body here. And I want a mixture of wet
and wet and wet on dry. So I'm going to grab
my medium brush, and I'm going to throw a
bit of water down just on the on the wing where the brown feathers are on
the top of the wing here. So I'm just not we. Not absolutely saturated, but a reasonable
amount of water. Just patchy. I want
you to try and leave I'm going to put
a little bit in here, but I want you to try and leave some white paper in there. Then I'm going to pick
up. I'm going to put my brush in my brown, my blue, my warm
brown, a bit of a mix. I come on and I'm not
going to think about it. I'm coming onto I've got the
dry edge here coming into the wet page and just throwing
a little bit of paint on. Clean my brush. I'm going to just drag my
brush at the bottom of this one just to get a bit more bleeding and I want
a little bit of something. The same three colors, just milky into that that's maybe a bit browner, a
bit warmer than I want. I'm going to get a bit of my
indigo and chuck that in. And come out and dribble. Now, what I don't want
you to do is now go on and keep going and filling all of that in. You want
to stay out of that. I'm going to pick a bit of
indigo up and just chuck a little bit more
paint on a little bit darker on the edge here, tidy up I don't like this shape, so I'm going to chuck a little
bit more indigo in there. Then I want a couple
of little flicks for the tail onto dry paper. I'm going to touch my brush
into the van **** and indigo, and I'm going to just
pop a maybe another one. A couple of lines in just
a couple of strokes. That's all. Then I'm going to come in to
the rest of the body. I'm going to clean my
brush. I wasn't clean. I'm going to pop some water on. I'm going to stay out
of that tail coming around I guess me not
having a clean brush, you can see where I'm
actually painting the water, would have rather a clean brush. Throwing the water on coming
under the neck there. Little bit up into the shoulder. Now I want to keep
light through here. I want to keep light through
the cheek initially. Just painting along
my pencil edge. Then I'm going to
pick up a bit of my andyke but more indigo. The dark blue and the dark
brown keep them really milky. Then I'm just going
to come in and actually just throw that didn't get much brown
there into that wet page. And let the water wicket around. I'm going to come up and drag a few little marks
into that dry paper. I want that mixture of bleeding, and then the hard edges. Hiding up my shape
coming in here. You know, coming over into
the front of the face there, touching into the beak, which I have to tidy up later. Okay. And then I want
a bit more indigo at the bottom edge here. I've picked up a bit more of my blue dragging that through, letting it all bleed. I think up here I'm going to
pop a bit more solid blue. So my indigo. I
still nice and wet. Because there's that
little shadow underneath this tail tail feather
there that I'm going for. Then I'm just going to soften. I'm sweating my brush. I want some of these hard edges. I don't really want the
hard edge on the face. So I'm just cleaning my brush, taking off the excess, and just worrying my brush
along that edge. I get a combination of I guess, that thing where they talk
about lost and found edges. That's what I'm after. I've
got some really hard lines, but then I've got these
soft edges as well. Okay. Now, because I'm not painting
the background as such, when I put out that pencil line, I'm not going to have
anything to show me what's happening there. I'm going to just pop a
bit of water in there. I'm going to tuck a
little bit of my blue, a little bit of browns
probably a bit much, so I'm going to just flood
that with a bit of water. I want a little
bit of something, but I don't need
quite that much. Again, when you do
something like that, I decided that was too hard, don't panic, work
it back off again. I want you to let yours dry. But do what I'm doing.
Just sit and make sure you haven't got any
edges that you don't like. Come out of that. Watch it
dry for five or 10 minutes, and then we'll probably put
in the legs before we go and then fix up the
balance of the darks. Coming out and letting that dry.
7. Legs: Okay. I'm dry now. It's been about 10 minutes. I'm going to pop in these legs and maybe go into the water. I haven't quite decided.
We'll decide as we go. So to help me with the leg, I'm actually going to put a
little bit of water in first. So I'm just going to paint
just a touch into each. No soaking, just a bit of water to help my pigments
move. I think I'm going to go. It looks like actually when
you look at the reference, it's bit of cerulean
even in there, but I'm going to keep
it simple and I'm going to go with my indigo. Start on that knee
joint straight on. You can see that the
pigments moving a bit. I'm just going to drag in a
few maybe isn't sick enough. A few brush strikes, then I'm going to push
out to my pencil edge. It's really easy with these
to go fatter than you intend. That's why I started in
the center and then I can push out so I can rescue
it if I mess it up. Now I'm going to just soften
off where it joins in there. I just wash my brush and
just soften that back a bit. Then do the other leg while
everything's still a bit wet. Well, I got no water
there. That's a bit dark. I'm just going to get a bit bit of water into
there to make it move a bit. Okay. Then I'm going to
suggest that the leg behind. No, I think I want my
claw to be a bit sharper, so I'm just going
to drag my brush to get a bit more of a tip. Then I'm going to
keep coming straight into these reflections.
So I'm going to pick up. I think I'm going to do
a bit of a mix of my blue and my brown,
see what happens, not thinking, coming in and
just dragging some stuff. So I actually I meant
to go that way. I didn't do it. I don't care. I'm not going to overthink it. But what I'm after is a bit of a mix of the blue and the brown. Then I'm going to keep going with the same stuff
on my brush onto the dry paper and just put in a little bit further
one that's on the beak. Maybe I need a bit
more under here. So I want a mixture. Of the blue and the brown. While that's drying, I'm going to come back
into the face. Now here I'm going to
switch to my small brush. I want to come back
up to the face now. I need my eye to be darker. I want this light here, but I need a little bit more
strength of color. I want to tidy up what's
happening in the beak. I'm going to grab. I'm going to go straight indigo. I'm turning my
page a little bit, going to go straight
on to the beak. I think I think there's
sort of a little bit of a line up here, I should probably put
my other glasses on, but it's too late and
just drag that down, wash my brush, run
it along that join. So I made the effort
to put that light in. Initially, I don't want
to close it all up, but I just want to get a
bit of a transition there. Come out. Might need to go darker again, but I'll let that dry, and then I need to
darken off this eye. And you might find
that you want to leave a little flash of light. I'm not sure that
I do, actually. Some of you will do all
sorts of lovely things. In that eye, that's totally
fine. Go ahead and do that. I'm not going to
bother. What I'm going to do is I'm going to let that dark kind of come
down a bit into the front. So I want to strengthen up. I'm going to pick up a bit
of my brown now as well. Just in this. Yeah, I know I spent all that
time leaving the light, but I don't want it
all wash my brush. Because it's always
easier to put the light in first and then go
darker if you need to. Trying to get the light
back is really hard. Now, I don't like the
shape of that eye. I think I want more
brown than blue in here. I'm just picked up a
bit more van ****. I'm just throwing that in. I think what I don't
like, I think what it is. Let me see if I can
do anything about it. I don't really like how far
that brown lives come down. What I'm going to do,
I'm going to take my hard oil brush. Let's see if we can fix
it. Well, clean tissue. And I'm just going to
I feel like this line. I feel like this line
is too far that way. I don't like the shape
that it's giving me. So I'm just going to see to keep watching my
brush to do this. So I'm just dragging
this clean, damp brush, hard brush to try and bring
that pigment back a bit. Give me a well, it makes it a bit more interesting and I can correct the shape. I'm also not quite right
down the bottom there, but I just bugging
me too straight. I'm nearly there. Nearly there. I'm just going to tidy up. You know, you lift
pigment like that, and then you've got
to kind of chase the join to make sure that it doesn't that you can't
see the correction. So yours mightn't have needed
that. Mine was just wrong. And I need this is
now not quite right. I think I want to
tidy that up now, so I'm going to grab a bit more indigo and just
that little spot in there. Still not quite. Everyone will tell you that watercolor is very unforgiving
and to some extent it is, but you do have some
scope for correcting, particularly if you've
got a brand of paper that will let you lift
and push and pull. That's why I use arches
because it's pretty forgiving. I put that dark on there and now I'm going to switch glasses. I am going to just tidy
up the shape here. Now that I can see that down. You think that's
starting to look better? You know what? I don't
know that it's in the reference. I can't. There is a nostril
if you zoom in. I am but I'm just going to paint because I've got
this nice bit of white. I'm just going to paint a
little line on that highlight. Because I put that light in it, let's put that little
bit of detail in. Okay. Now I'm officially fiddling. What I want to do is come
out and let that dry. We're nearly done, but
I want to let that dry. I'm going to rub out
my pencil lines. We need to strengthen
up a few of the darks and we need to put
a few little ripples in. Come out and give that
10 minutes to dry.
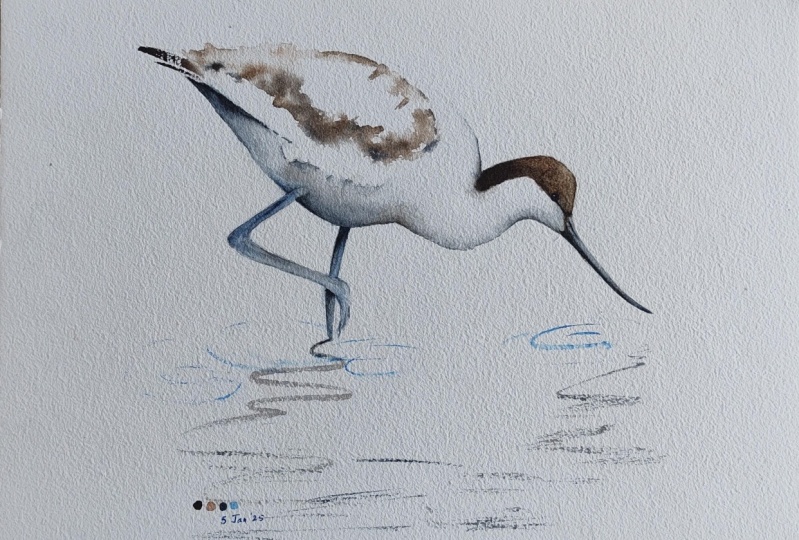
8. Finishing Off: Okay. So on the
home straight now, I'm going to put in just a
couple of little ripples. I'm going to use.
I think this might be I think this is either
more French ultra or cobalt. Maybe it's cobalt.
Doesn't really matter. Just grab some blue, and you want a really milky
mix of paint. And then all I want to do, I want to think about there are some kind of
circles around here. So I'm just going to pop in and maybe around
the foot here. I don't have to be
particularly accurate. I just want to get in. A few of those little. Some of you will do this with absolute accuracy and
beautiful delicacy. Again, that's fantastic. Do
that. I don't want to do it. I just want a little bit of
the blue and a little bit of an indication that this
is the top of my water. Well, that's drying, and
I forgot to mention I have dried gotten rid
of the pencil marks. Couple of little
things I want to do. I've got a little
gap here that I want to close in between
this far legs. I'm going to put a little
bit of a shadow in here. Maybe tidy up. I don't know. I'll see how I feel about that. I'm going to do this one first. Be careful not to
put your arm in the water in the ripple
that we just did there. I'm going to go on to
dry paper, actually. I'm going to take some indigo. You can wait for these to dry. Obviously, you don't have
to go straight on with it. It would be simpler, but
I'm eager to push on. So I'm just closing up that
little gap that I had. Now I'm dry cleaning my
brush again and just teasing that down because I'm after the transition
to dark to light. Now that I've popped
that in now that page, I've effectively wetted it down, wet it down, we down. I'm going to pop in
more solid plant. I really mean that now. But because I've already
got water on there, it's going to move a bit for me. Goodness me, I have a coffee and now I
can't find my words. So in there, and I think this probably hurts me this
little light there, maybe. Because I want to see
I think I'm dry there. I can put my hand in that now. Where that touches. I'm just painting
with water first, seeing if I can move that
around a little bit. Then I'm going to grab my
indigo, just tidying up. Just a little bit. Don't
have to go over the top. There's a little bit too much
white paper there for me. Then I'm going to pop to
bring this leg forward, I'm going to pop a
little bit of a dark. I'm going to go onto dry paper just so I can chisel out
and see what I'm doing. And then I'm going
to get some water and come up to that join. Then I might pop. I'm now thinking about I talk about this a
lot about the balance. I've got a nice dark
here in the beak, I've got a dark here in the leg and then I'm
completely light here. What I'm going to do just to get a little bit more of
that dark in there, I'm going to take some water, run a line into that leg and down to that one got the shakes
from the coffee. Then I'm going to grab
a little bit of indigo. Actually get some paint and
just drag a line up in there. I've just got a bit of interest. Now that little blip of
light is going to hurt me, so I'm just going
to close that in. And just to get a bit of something
in there without having to overthink it. Maybe that's what I want, maybe I want a little bit
of that on this too, just to break up that
shape of just a flat wash. All right. Now, I have
to have a look in here. I've been a bit messy. I'm going to just
grab a bit of water. I've got that little
chink there that I want to back off and I want to
come right up to the leg. I'm just worrying
some water over that and just tidying it up. Then this shape, probably it needs to come
around and join to this one. I'm just going to tidy that up. Then I'm going to pop a
little bit of indigo. Just to help me make
that make sense. Not really what's
in the reference, but I'm working with what's working for the
painting in front of me, and then I've got to
soften that back in. Washing my brush, and I think I actually want to make that I'm going to actually put a
bit more pigment in here. I'm going to make that darker
in there soften the edge. Always softening the edge. And then I think
I need a bit more at that back there just
to kind of match them. Okay. Now, I like all these
mixing of colors here. I want to go a bit harder with the shadow underneath
the tail there. So I think what I'm going to do, I'm going to take
my medium brush and I'm going to paint
just some water. Not soaking, I'm
just dampening that. Here because I want to
add then a little bit of indigo and let it do what it wants. Maybe I'll
take a bit brown. I'm taking a bit of vanike
and a bit of indigo, and then just chucking
it into where I was wet there and letting
that wick down. Then again, because
I'm thinking, again, I've got that thing
of balance in my head, I might get a little bit
of that in a couple of places along here
without closing in everything without overdoing it. Just a touch of my indigo under
these ones as well. You don't need much and I don't want to paint
all the way down. I just want a little bit more. I think I'm probably going to strengthen up the shadow
underneath this chin, put a highlight in the eye
and then I'm gonna stop. So softly, softly. I'm just going to grab
some clean water. Paint down in here,
damp, not saturated, further than I want the pigment
to go because I want it to dilute out as it
moves on the page. Then a little bit of my blue and a little bit of my brown. I didn't get any blue
then. Mine to go. Get my brush. So there's
quite a bit of pigment there, so I can now just
flood that with water and just push
that around a bit. Closing a bit of that light. So I'm just kind of get a
bit of form, bit more form. And you can see that
it's already diluted out a heap because I've
been pushing it around. So now that that's all wet and I can see where
I want to go, I can just pick up
a bit more pigment, throw that in and I want to close off the light just
a little bit there. I think I probably need a
touch of the same thing here. So again, dry, sorry. Again, I'm coming on
with clean water. Clean was the word I was
looking for, not dry. My blue and my brown
and just throwing just a touch in
washing my brush. So I'm sort of looking at that shape where
the shoulder is. And then just
softening that back. And then I think I'm just
going to put a tiny highlight of gouache in the eye. So, you know, you may have
left the light initially, and I think I'm
just going to put just a tiny spot of
gouache in the eye there. Alright. That's actually
where I'm going to leave it. And really, what I want
you to get from this, it's this learning to
leave the whites that it's okay to leave
the white paper and for some strange reason,
it's really hard to do. But it's important in this one. This is what it's about this
lovely light on the back. So try not to overpaint. We're going, I'd
rather you underpaint and then you can in a couple
of days when you think, that's not quite
enough, add more to it, the fill all this in and
lose all that light. When you're finished, if you're happy with
what you've done, take a photo for
me and pop it up on the project section on the Skill Share page
have a look at. Always happy to give feedback. I'll also be
interested because I know some of you will
paint all the water. I'll also interested to
see how you go with that. Thanks for joining me.
 Nadine Dudek, Professional Watercolour Artist