Transcripts
1. Introduction: Hi, I'm Elisabeth and welcome to this artist inspired
series class about Tamara de Lempicka. I'm a professionally
trained artist and art educator and
I've been teaching here on Skillshare for
many years since 2021, sharing different
art approaches, different art techniques I'm exploring and in the artist
inspired Series class, I am taking you on a journey
to get inspired by and intrigued with artists
from the past and the present to help inform
your own artistic journey. In this class, we are looking at the beautiful
art deco work of Tamara de Lempicka and her work is a
gorgeous combination. All there is to love about
art deco and the way that you can do stylized portrayals
of the human figure, also leaning into
cubism based on some education that she had
during her time in Paris. It's this really beautiful
merge of stuff and her goal was to be an artist
whose artwork stood out. You saw a sea of 100 paintings, you would be able to
spot hers in an instant. She has a very distinct style. Because her work is so
locked in stylistically, we can pull a lot of
different elements from that and really shake
things up in our own art so I hope you'll join me in this fantastic class as we learn about the
life and art of Tamara de Lempicka and get inspired to lean
a little bit into art deco and lean
a little bit into Cubism and lean into some
gorgeous color palettes. Let's turn it over to our
next lesson and we'll talk some more about
our class project. I'll see you there.
2. Class Project: For a close project, as we get inspired by
Tamara de Lempicka, we can really lean into any
art media that you want to. This would be a
really fantastic one to approach with acrylic paint. I think that might be the
way that I'm going to go. I always love to play with
how I can merge media. Maybe I'm going to start
with acrylic paint, and then I'm going to go
back into it with brush pens or paint pens or
colored pencils. Quite figured out how
I want to do that. I know that I want to lean into the very stylized approach of merging the geometric
angle lines of cubism that Tamara included in many
of her backgrounds with these gorgeous lush curves that she used to represent not only the figures in her portraits, but also the curvature
of the fabric. She did that same thing
with florals too. She has these really lush, gorgeous florals and
you can see a lot of parallels between her
later flower paintings and the figures that she
portrayed both to build up her reputation as an artist and the commissions that she was asked to paint
throughout her life. And the way that
she's playing with different aspects from post
impressionism and cubism with the multiple perspectives and the values that
she's creating. Her treatment of gradient and value
shifts is just stunning. There's a lot of
different ways we can lean into Tamara
as an inspiration. But you could lean into
the color choices. You could lean into the value. You could lean into the
way she did her sketches. We have some beautiful
examples of those. I have a whole Google Slides
presentation that you can check out on the Projects and Resources
section of class that tells you a lot
about Tamara's life and her drive and shows you so
many beautiful pieces that she painted to help get you inspired and get you excited
to weave some of these things into
your own I'm going to do sort of multiple studies of Tamara's inspiration and influence as I figure out
my own way through this. This is one that's a little
bit more open ended. Some of our other
artists inspired series classes were a
little bit more dialed in to very specific aspects of the artist and what inspiration
we're drawing from. But Tamara has so
much that we can pull from that I really want you to pick and choose which aspects of those you want to play with for
your class project. Lessen it over to
our next lesson, and I'll talk about
the materials that I'm going to
have on hand as I get started getting inspired by Tamara de Lempicka work.
I'll see you soon.
3. Materials: For Tamara Tian Pia
inspired artwork, you can choose any supplies that you would
like to work with. Tamara was a painter, so you could go down
the road of painting. You could also go
down the road of dry. You could also go down
the road of digital. And any of those would be great. I think I want to play with
a combination of drawing and painting and
do a little bit of mixed media because
that's what I love. But I also think I
want to try this just leading into the drawing
aspect using paint. I have some mixed media paper, I've got a graphi pencil so
I can sketch out my imagery. Then I've got several
different colors of jewel tone paint
pens because I know that I want to lean
into color schemes. I really love the
color palette that she worked with and the way
that she stripped it down, but then all those
great values within the colors to create the dynamic contrast
and the dimension that she created in dent volumes of shapes and forms
that she was I've also grabbed some colored pencils too because I think that
I might want to use those to help push
some of the shading. So I'm going to use my paint
pens for my flat color, and then I'm going to use colored pencils
to push my values brighter and darker
to give me the contrasting shading
that she created. Once you gather up your art supplies that you
want to play with, we can head on over to our
next lesson to learn more about the life and art of Tamara de Lempicka.
I'll see you there.
4. About Tamara de Lempicka: A Tamara is a really
interesting person. She has a very glamorous life that you can take
a look at and some of the resources that I
share for this class. She was constantly having to
reinvent herself and became an artist to help her family survive after
having to start over. Then she really was incredibly motivated to make sure that she was successful and to continue that success
and make connections, set some really lofty goals for herself and achieved
every single one of them. There's also a musical
inspired by her life, as well as a really
amazing documentary. So there's lots of great
resources out there that I share on the projects
and resources section of class to really help you
fully understand the world that Tamara de
Lempicka created for herself and her art
thrived during. She is really neat because
she is an art decal artist. She's female at a time
when women weren't often successful artists or
even publicly creating art. She played with that a
little bit to build up a reputation before she
began signing her pieces, identifying herself
as a female artist. She lived a very bold
life and a lot of glamour after she survived several different political
upheavals in Europe. Is an art deco artist. Art Deco was one of the major art
movements happening in Paris during the
time she was there, but she was also leaning into different inspirations
and aspects of cubism. There's this lovely play of her really soft gorgeous
curves to both how she depicted figures and the
way that she manipulated color and value to define
space and create form, the nuanced nature
of how she was so good at going between all of these different settled
values to do that, as well as these harsh
geometric background. There was often a dynamic
contrast happening between some geometric
Cubist elements in the background and the figure that she was portraying
in the foreground. She would also use her
daughter as a model. She is a daughter from
the first husband and they have a
rocky relationship, but Casett would model, and pose and sit for her mother for many
years of her life. There's all these different
really amazing portraits documenting Cosette's journey as a young girl and a woman. If you have some time
to take a look at Tamara de Lempicka
work in more detail, let's send it over
to the next lesson and I will show you
what I'm starting to play with sketching
in her style. I always love
leaning into cubism, but I also love art deco. We can take a look at the
shapes of art deco and the angular lines of cubism and especially her color schemes and
her value shifts. I really want to
play into that too. I explore her in a lot of
different ways, I think, in some different
studies to better inform those aspects
in my own art making. Let's send it over to our next
lesson and start creating art inspired by Tamara de
Lempicka. I'll see you there.
5. Sketching Compositions: So, Tamara was working primarily with
figurative drawings. She was doing a lot of
commissioned portraits. That was how she
made her living as a successful artist throughout various stages of her career, regardless of whether
she was living in Paris or when she
moved to Los Angeles, the different times
in her life that she had to kind of start over or build new her reputation as a successful
artist in the world. She also was very determined that when you looked
at a body of work, if you walked into a room that
was filled with paintings, that would be very obvious which one of those
pieces for her. She took all of the
understanding of the art world that she
was exposing herself to, and she was leaning into different aspects of art
deco that she really loved, but she was also exploring
aspects of cubism. And it says play of hard angles and soft
curves and volume. As well as the range of values, the jewel toned brilliant colors that she was working
with that really make Tamara's portrait stand
out unique from anything else that was
happening at the time or since then in history. So we can play with those
a lot in our artwork, too. But she was also
doing still lives. She was constantly working her craft to get better
and better and better. Painted a tremendous
amount and body of work to really kind of hone her style and figure out all of the
amazing things that she had. She also had some
really fun play between the geometry
of structures, architectural structures
in the background, and then the curves of the
figure in the foreground. And her figures almost always fill the
entire frame, like, from the very top to the bottom and often from side to side, unless it's on a little
bit of a curve there. So we can play with her
composition as well, too. So if I take a look at
the lady and piece, we just kind of think about
the composition of it. The fact that it's a figure. It's almost always a very
tall rectangle for Tamara, and then there's a curve line where the left side
of the figure comes. This is following the curve
of the dress coming down. And then there's a cut
off like a triangle, a sharper edge where
the shoulder sits, and then there's
another curve like a ripple curve that's happening over here that goes
all the way off the page. I think that I want to do an abstract interpretation
of some of the things that Tamara was focused
on and play with the compositions that she created and that
hard and that soft, as well as the
colors and the value and lean into that abstraction. There's the head and
then the background, she had, there's some
sharp lines back there, where the shadows and the different sides
of the buildings are, which is really
fabulous, I think, to play with and creates a nice rake up of
that negative space. Then there's the other side of the city the great thing is because she's looking at cubism and influenced by that, as well as art deco, we can manipulate things and have them be a
little less perfect. I'm simplifying the
building structures that I'm seeing in the
background of this artwork. Then this line comes
all the way down. It's not perfectly laid out, but I love this
as a composition. There's another triangle here where the crook of the arm is, so we could put that in as another way to break up
the space if we want to. This is a pretty big
form to have going on. We can continue to look
at the negative space. There's a curve of the arm
and then a window that's created the side of
her torso down to her hip and we can have that be something
we're looking at. This over here, this is
a wrap or something. We could play with those lines. It's just more curves happening. You know, simplify what we're
seeing there if we want to. Maybe I will just to have a
balance of negative space. There's enough line
happening here to the openness of the figure.
I could keep going. I could keep drawing
in the dress curves. I know I don't really want to do a figurative piece for this. This is going to be my
sketching planning sheet. So in this one, I'm looking at the
lady in the lace. That's my inspiration for
that geometric take on it. When I move this over to do my more formalized study of it and add in the
colors and stuff, I could make this
even more geometric. I know this is a figure and I liked that I didn't
know that before. Maybe in the end, I
would take out some of the windows peek
through spots there. Let's look at another
piece and its composition. I want to pick one that has the geometry in the background. I really like that play of
the angles and the contrast. We can look at the
portrait of her husband. This one was done in 1928. This piece is
interesting because it's that same rectangle. He's a little blockier
because she's doing a male figure. Versus a female. Just fun backstory
to this piece. This was the same
year that she and her husband divorced,
her first husband. You'll notice when
you look at the piece that his left hand where his ring finger
would be is unfinished. She was in the
process of painting this when they ended
up getting divorced, so that aspect of him
never got finished. He is more angular, so we're going to have less
curves going on. But I think we can
play with that. I'm going to start by
putting in the triangle. Where his coat and
his scarf come. Then I'm going to
ignore his hand, his right hand that's resting
on his leg and I'm going to put in an angle for that
to define that leg. I do really like
the angle that's created the peekaboo
that's happening between the edge
of his sleeve and the front of his coat. I'm
going to include that. Then I really like the
angle of his shoulder. I'm going to go ahead
and put that in. I'm going to ignore where there's a wrinkle happening
kind of from the fabric. I'm going to ignore
that for right now. This one, I'm noticing
that in the painting, this shoulder is much
higher than the other one. So I think I want to make
sure that I take this down. So I'm just going
to kind of get rid of that because I really want more contrast
between those two. And then this
shoulder has a nice. There's an angle to
his elbow that I like. It's kind of subtle,
but it's there. And then this has his knee
underneath the trench coat. I'm going to go ahead
and put that angle in. Then where his coat separates, there is a nice geometric
situation happening there. I'm going to go ahead and create a more exaggerated
angle for that. I do like the curve of the hat. I think his hat, I'm going to go ahead and
put in as a full curve. And then including both
aspects of the hat, and then I'm just going to
let that go off, I think. I do wish there was
more curve happening. Maybe I will exaggerate
the curve of his head and have that
just ignore the scarf. That's there and
have that curve get dissected by let this line
go out and exaggerate it. Then there's some great linework for the city in the background. So some of those
building structures. This one's pretty simple as far as what's happening
in the background. I might decide when I do
a bigger one to add more there because I wish there
was more line work happening. There's a whole lot happening on this side that I
don't want to put in. I just don't feel like it's
adding it would add to the piece in a way
that makes me excited. The cool thing about just sketching simplified
compositions is that you really start to pay attention to artworks in a way that
we don't often do. We don't often look for
a long time at a piece. It's nice to do a stronger visual study
of a piece like this. It helps you notice things that you might not have
noticed otherwise. That one comes over. It's
another section here. Again, this is just
a quick sketch, kind of deciding what to
keep and what to get rid of. I do want to simplify up here, so I'm going to have this come up and just touch it
and then go down. And then I'm going
to have this kind of come down and go down, and then that. I
think that's good. All right. This is I'm just
going to put husband 1928, just so I know which painting of her husband
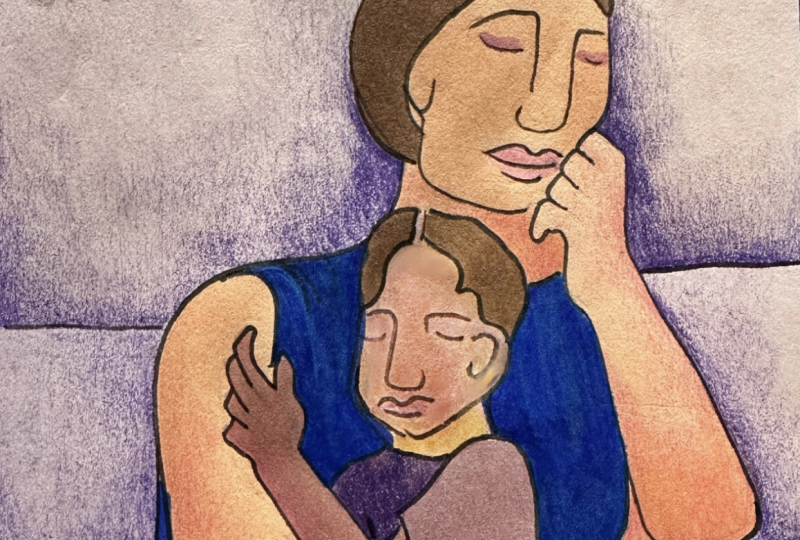
and this one is. All right. Let's do one more. Let's do the Polish girl, 1933. This is one that I
just really love. I think it's one of my
favorite paintings. It's one where we get to see her daughter Kazat as
the model for the girl. This one's a little bit wider, but we can always exaggerate the canvas shape if we want to. So this one's nice because there's a lot of
details that we can leave out, which I think is really fun. I'm going to definitely
probably ignore her hands. Let's see. I I very much
like the sweeping angle, of the shawl over her head. I'm going to start
with those lines. I like where we get to see bits of the shawl
in the background. I might exaggerate
those a little bit that angle with the sweeping curve goes
down into the book. It doesn't actually, but you can follow the line from the
shawl into the book page. I'm going to exaggerate that and then I'm going to lean into those curved angle shapes
and really play those up. Because I really like
those. Then this can cut off that line, I'm
going to ignore the hand. I'm going to have this
go all the way down, I think, and just
keep that simple. Then this part of
the book goes off the page and I'm going to go ahead and put in both lines
of that. You would know. You would never
know that this is a portrait of a young
girl holding a book, which I think is fabulous. Then I'm going to put in the angle or
something similar to the angle of the left edge of the shawl that's
over her head. That goes off the page
and I lean into that. Then I definitely want
this curve in there and then maybe simplify the
curve of her jaw line. Want to make sure that this
doesn't look like a portrait. I really don't want that. I'm going to follow
the neckline of her top just put in that
straight line coming down. I think that's all I want. I
mean, there's darkness here. It could put in an angle line
there. I guess I like that. I could also add more of
those, break it up more. I don't want to get
too carried away. Although I do like
that because that mirrors what's happening
with those lines. Okay, this one is
the Polish girl. This is a fantastic way to start understanding a painting,
like we talked about. This can also be where you start if you decide that you
want to do a painting, if you want to follow more in line with
her subject matter. If you want to do something more in line with Tamara's work, this would be a great
beginning stage. I want to lean
into the abstract, so I'm going to have this be my stopping point
for drawing these out. And I kind of want to do maybe a couple of studies.
I'm not sure. I love this
composition the most. When I look at these, I can
see the figures in here. I've achieved what
I was going for to try to mask the
figure in the lines. So what I'm going to
do is I'm going to redraw this on another
sheet of paper, and then I'm going
to start looking at the play of light
and dark in color. And I think what I want
to do is I'm going to separate the color
from the piece. I could lean into the color
scheme of the Polish girl, but I think I'm
actually going to use one of the other
color schemes that I like from her pieces and kind of do a merge of those things. So I'm going to get this all sketched out on another
sheet of paper. And then I'll meet you in
the next lesson where I'll begin adding color and
value to my piece. I'm going to start very
flat and then I'm going to build up the values on
top of that drawing. I will see you soon
in the next lesson.
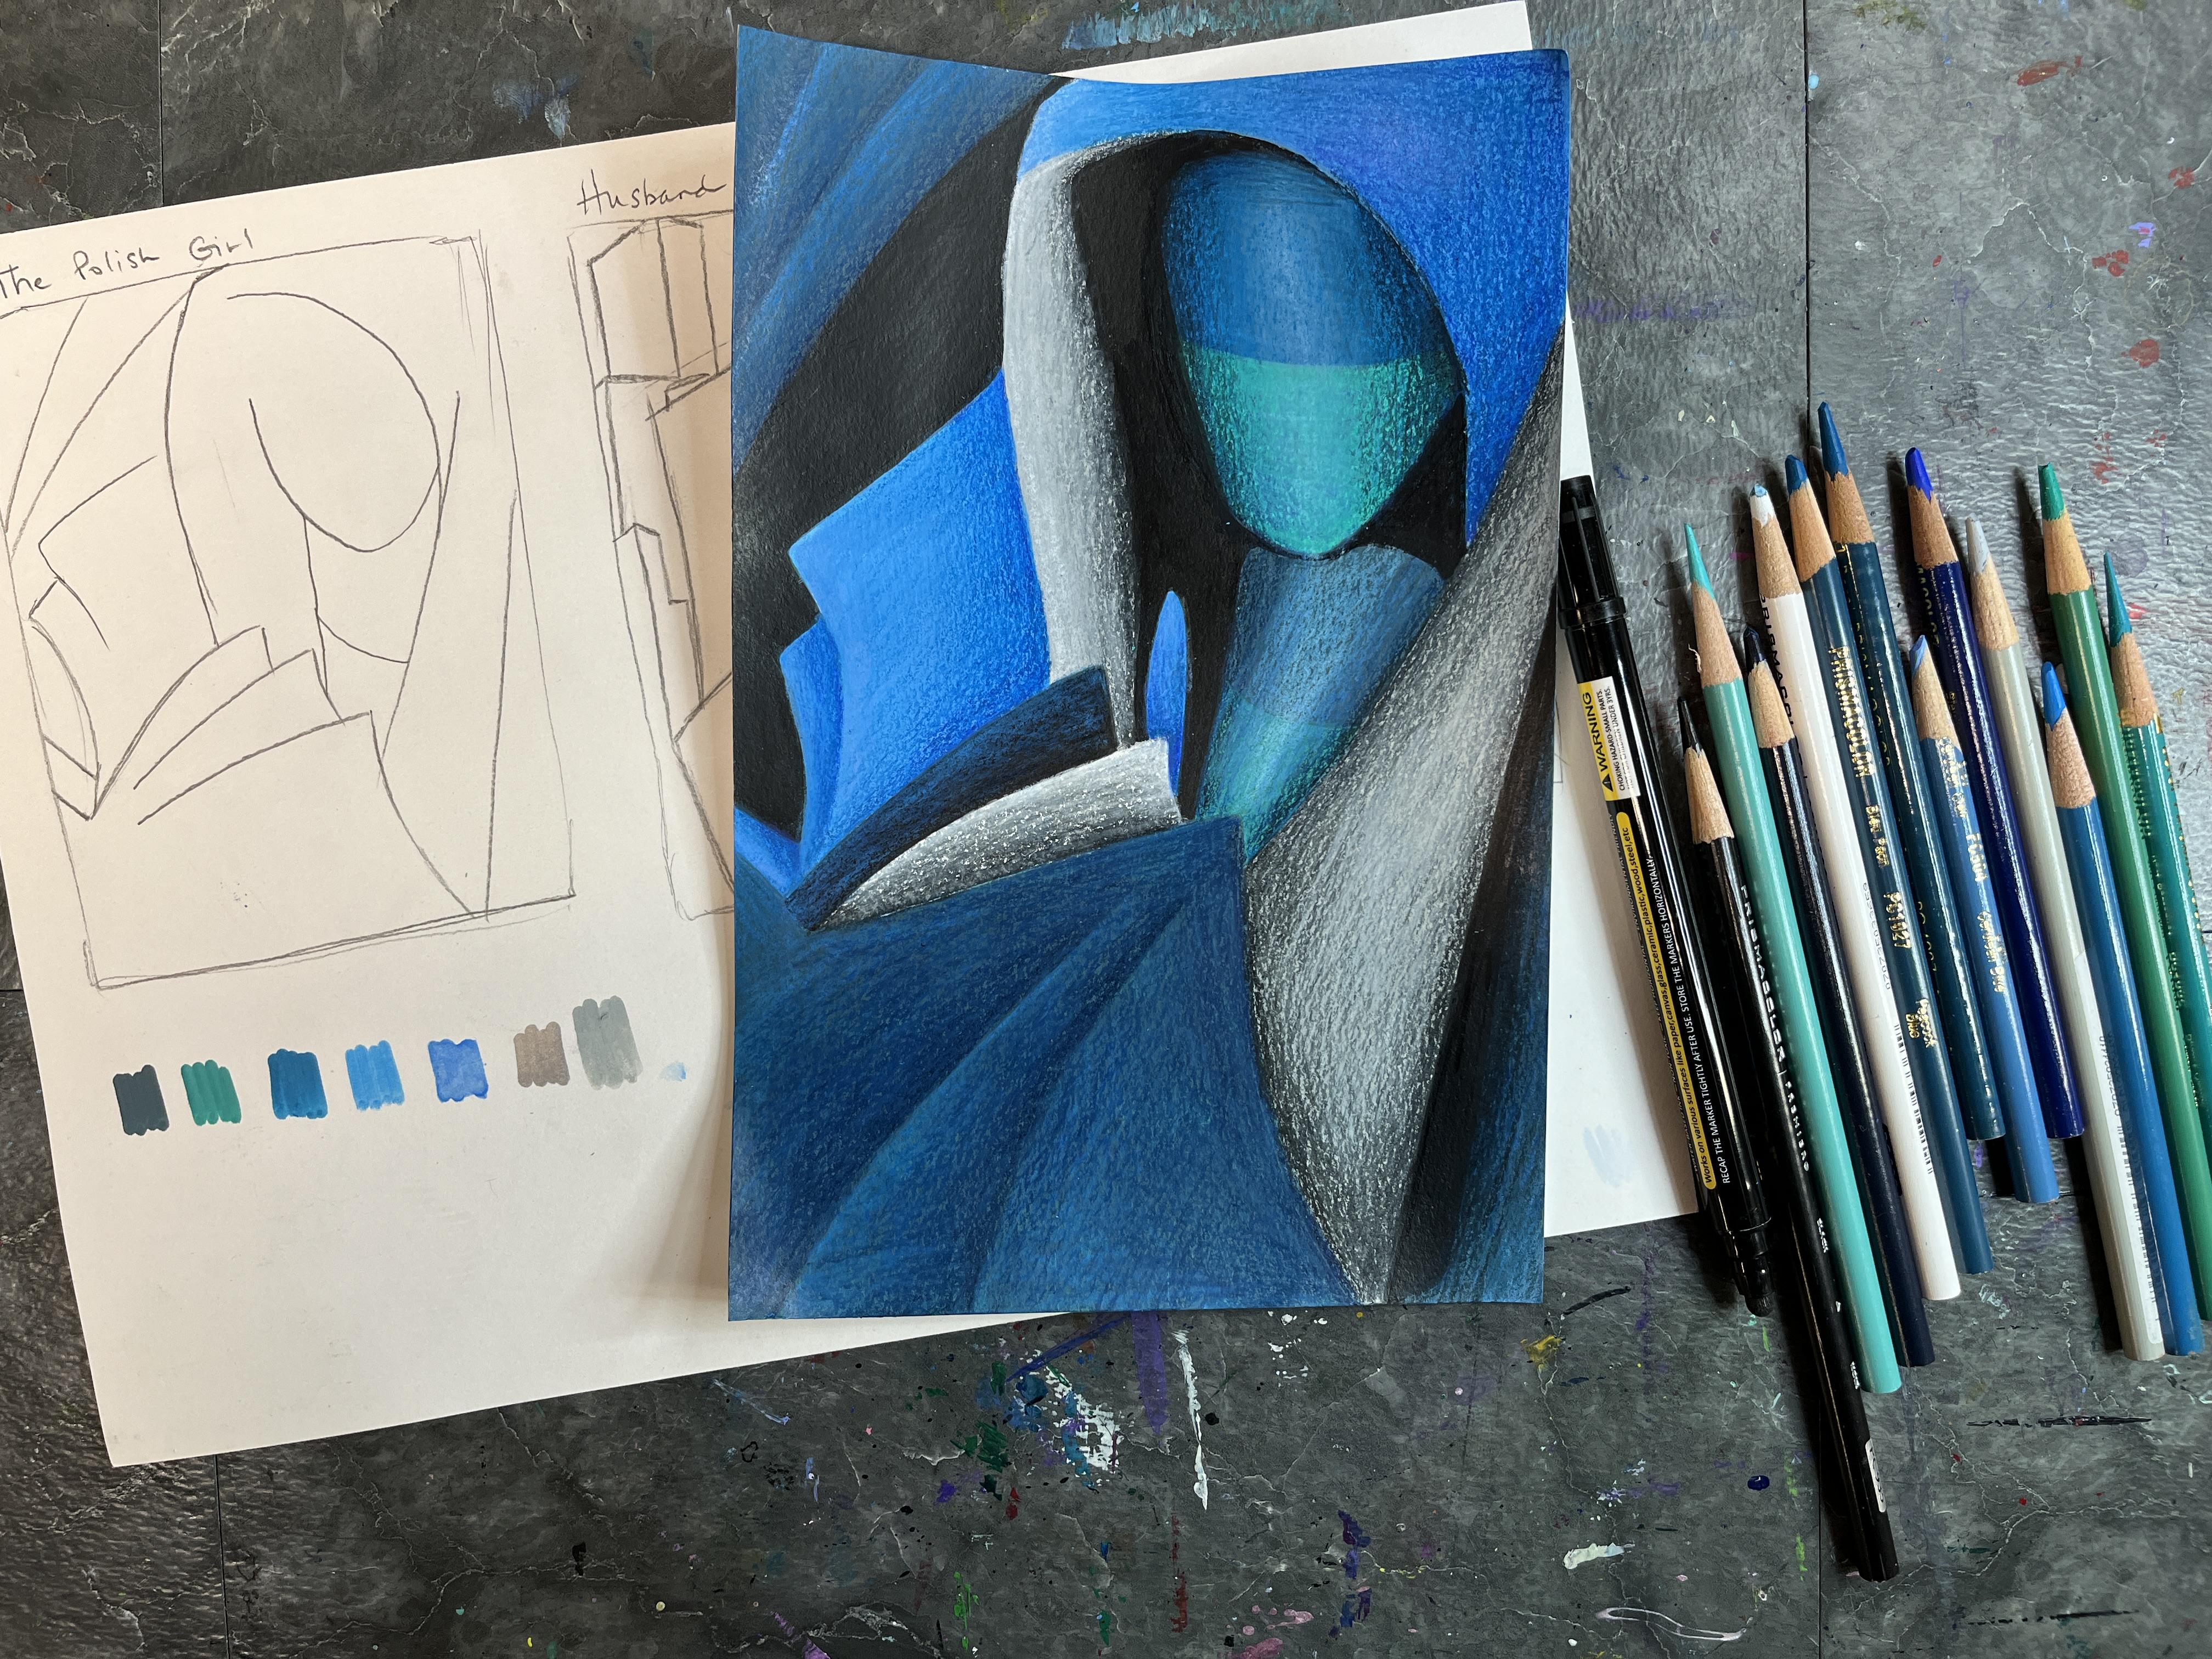
6. Acrylic Color Blocking: Okay. So in our previous lesson, we broke down the composition
into simple lines and shapes using three
different artworks that Tamara painted. Then I chose one, the Polish girl to then transfer to a fresh
sheet of paper. So I'm working with
mixed media paper, and I just kind of
sketched it out. I'm going to go really intense
with the shading because I want to lean into that
aspect of Tamara's work. So I went and sketched
it out nice and dark. The other bonus.
It's easier for you. And I also color swatch the
paint markers that I've got. The original Polish
girl painting is predominantly neutrals. I was writing green flowers on her saw and then
we've got skin tones. I'm going to bring up that
image so I can look at that. It's also got a really
big contrast between darkness in the background and then the brightness of her too. I did add some lines that
aren't already there to mirror some of the other things that I've got going on
with my line words. We'll see if I let those fade away or if I let
those become pops. This is a really fun part of
the process because we are getting inspired by the
artists that we're looking at. I can decide for
me personally how much I want this to pull
from Tomorrow's work and how much I want this to be a springboard and lean more into my own aesthetics and then
how much of it I want to weave together to continue
to grow as an artist. I'm going to use the pens, the paint markers because then it'll go a little bit faster. Then I've got colored
pencils off to the side, I might grab some
other drawing tools, fine liners,
sharpies, who knows, just to decide what
else I want to pop in. So right now I think I'm
just going to lay down blocks of color and
kind of map that in. The great thing about
using either acrylic paint or acrylic markers is that I can go back over it and the opacity of it can take anything out
that I don't like. Tamara is an art deco artist. That was the art
period that she was working within and associated
with and characterized by, but she was also
leaning into cubism. So I can kind of
play with some of those graphic elements too and lean more into
cubism if I want to. Now, I just want to
map in some values. I might not have all
of the colors that I need within my paint pens. I might actually need to get out some acrylic paint and
do some color mixing. I'm just going to do nice big
blocks of colors and make some quick decisions
right off the bat about what I want to
have going on here. Now, if you're using
a paint marker, Costcos I find this
happens with more often, but it's true for
all paint markers. If you're dragging
across your wet paint, it's going to pick
up the wet paint as you're trying
to put more down. So to get a nice solid coverage, I'm going to just
go shorter strokes. And fill in the space
little by little. These paint pens are bottoms. They're my favorite paint pen because they have a variety
of colors and they're jewel tipped and I
don't have to do the whole shaking
and prepping work that happens with pascas.
I love pascas too. But when I have a chance to art, I want to get to it, and
these allow me to do that. Then when I need
to, I can switch to the Jualtip section and
get the smaller edge. To really get into tight
spaces on my drawings. I also want to play with
some nice balance too. I Tamara's painting, she's got a dark section on the
top left and then she's got the darkness
of the book and then there's some
darkness around here too. I think what I want to do maybe is make this whole section dark, so I have a nice little
balance happening. The other thing to get more of an opaque flat section
application for paint pens, often you have to
get that base coat in by really letting
it dry in between, and then you can go back and do a second layer to really get
that opacity that you want. Because they do have
different viscosities. There's some texturing
that's happening here. Some of it's because
some of it's still wet, some of it's just like it was
the end of the stroke too. A lot of times I like
texture in my pieces, but in this instance, I don't want it. I want
it nice and flat. I'm going to go back over now that it's dried it
dries pretty quickly. I go back over and get some of these streaky sections
and clean those up a bit. The great thing too, just
like with regular paint, if it's shiny, it's still wet and if it's
matt, it's dried. I'm going to do another
dark section here. Because like I talked
about in the last video, I don't really want it to be recognizable at all that I pulled from a
figurative artwork. You'll know because
I talked about it and you know what
painting I went from. I really want to lean into the abstract elements of this
painting to make it my own. That's another aspect that the flat application for my initial colors
is going to do. It's just another way
to simplify it down. Then when I do add the shading, it's going to lean more
into the abstract side. I don't have any more teals, but I know I can also
change the colors when I go in with colored pencils. I do want to play with some
more aspects of the blue. That's going to pop
a nice brightness. I know I want to
balance everything out. So the fact that I've got
that bright blue there, I want to put that
in somewhere else. So maybe that can go up here. I also want to make
sure that I leave some white areas that balance between that light and
dark is also what I really love in Tamara work. Of free hand a little bit here. Figure out some of the darker
shapes I want to put in. I'm actually going to take out
that darker teal I put in. And then bump it over. Might will give me a
little bit more separation between a little more
distance created. All right. More pana yeah, the Marmo
paper is going to curl, even though it's a
mixed media paper. Just kind of the nature
of adding moisture to it. So at any point in time, you
could kind of carefully kind of bend it so it
starts flattening out again or take a break, kind of let the paint dry
and then put weight on it. I'm going to go ahead and let those lines that I
drew in go away. I've got my reference sketch, so I can always put them
back in when the time comes. So don't be afraid to
cover over things if it helps the color
blocking stage of this. The reason will take a little
bit more time to cover because it is drying out. But those lighter colors do tend to be ones
you have to layer up a bit more to get the same opacity that a
darker color will give you. W make the shape darker. Okay. I like that better. I also like some more of the darker details. Submit it out a
little bit more free and shaping in there.
That's looking really good. I'm gonna extend the light blue. You can kind of always go
back and forth and clean up. I think I gonna leave
these two sections white, and then I can put in the value with the colored
pencils for those. So let's hand it over
to the next Listen, and we can start adding
in some value and take our color blocking
to a gradient state. See you there. Oh
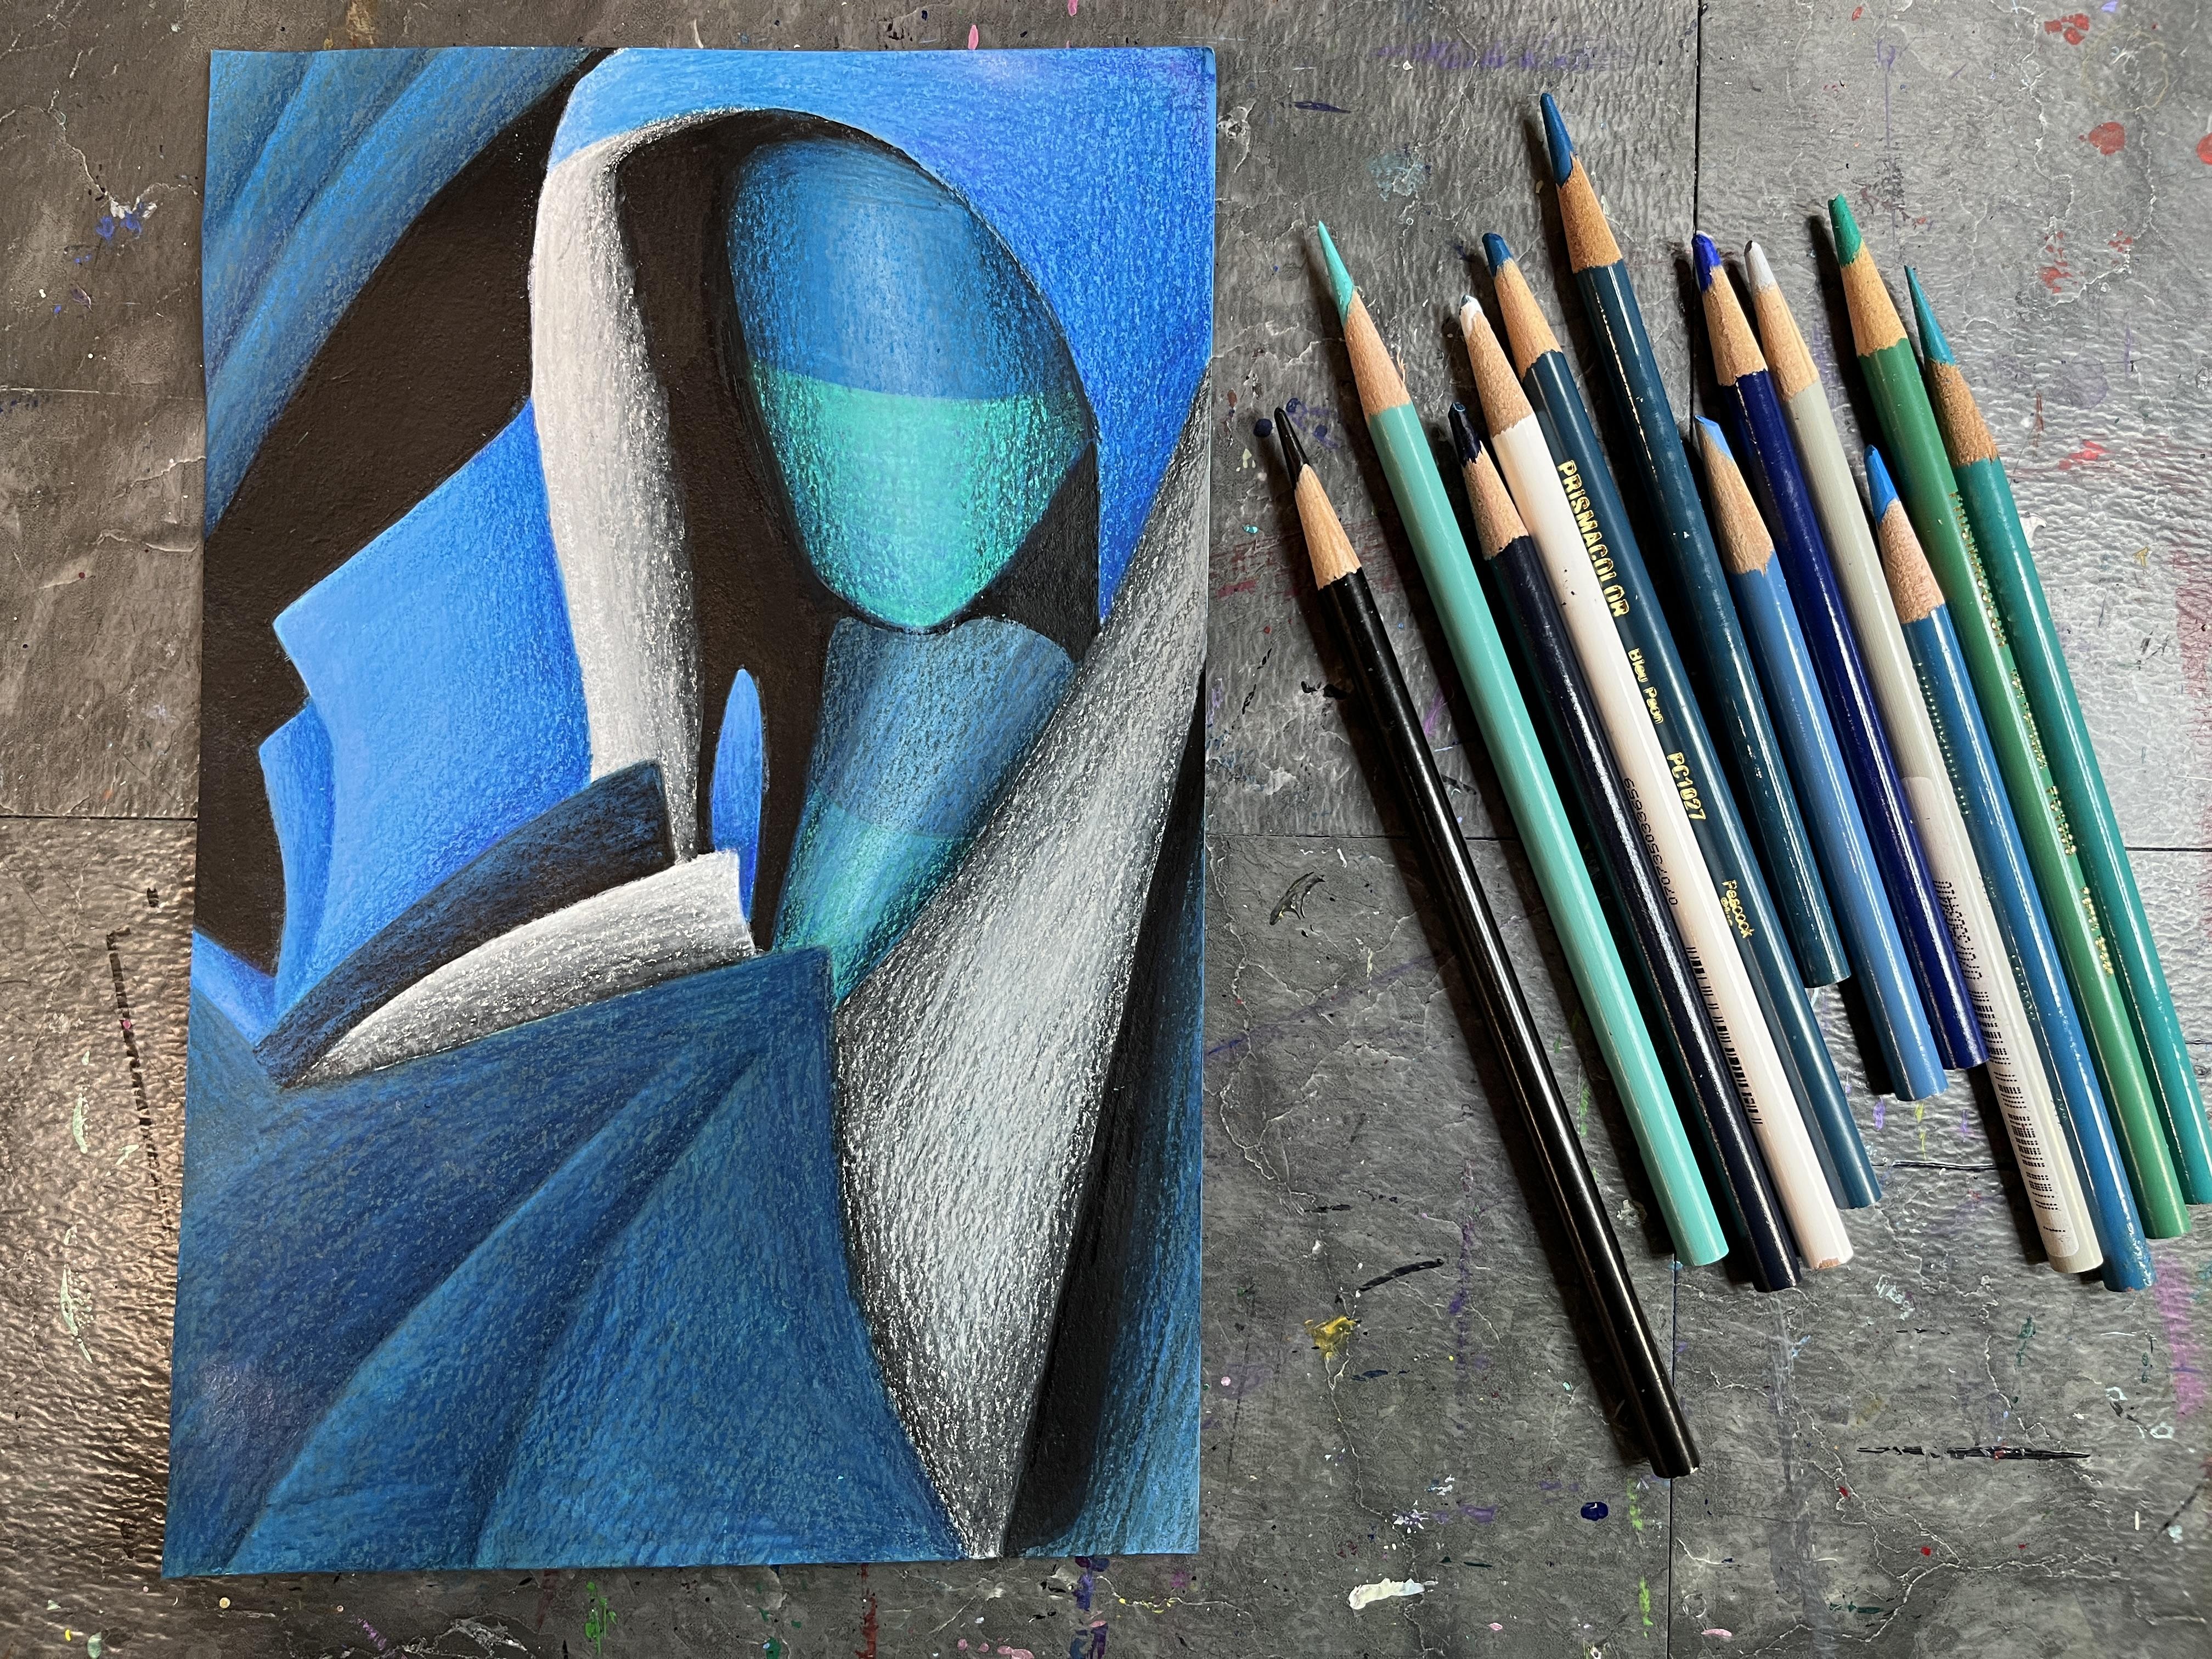
7. Colored Pencil Shading: Alright. Now that I have
my color blocking in, I really want to start laying in my values and
really start to make these very flat shapes and start to have form and
definition to them. So I think I'm going to
kind of start with some of the obvious shading elements
that are going on in Tamara's painting that
we're looking at for this example and then I'll
kind of build up from there. Just like I would normally
do when I'm working with colored pencil into
any colored pencil piece, I'm going to work light to dark and kind of
jump around a bit, but I know I'm going for drama, and I don't want to max
out my wax on my paper, and I'm already going
on top of paint. So it's going to be
a little different than doing colored
pencil on top of paper that hasn't been treated with any
other art medium yet. So I'm going to start building
up some quick gradients. I want to make sure that because I'm going for an abstract look, I want to make sure that I
don't lean too heavily into exactly the shading
that Tamara has in this painting because I really want this to feel abstract. I really want to
maintain the focus on composition and color and value. And not have it
start to look like a simplified figurative artwork. I'm going to go ahead and use relatively dark color
to put in some of the lines that I lost over here. I want sections
where I've got value and sections where I'm blending that shading into
what's already happening. I'm just going to start popping
in a bunch of gradients. I'm going to add in
my lights and my darks and go back and forth between those and Billy
see what happens, play around with colors. I might lose some of the
block color that I put in, but that was really a foundation.
I'm already loving it. I'm going to play with
lighter colors and darker versions of those colors to pop the values even more. I'm fading out lights into darks and fading out
darks into lights. Just going around
the whole piece, adding it wherever
I think it needs it to give the
effect that I want. I don't know that I want to go straight in with
black at this point. At some point I do, I think. I really do want
to push my values, but I can do that with color, which will give me a
more genuine effect, I think, with the
colored pencils. Although Tamara was using black very much so in her
shading for her darkness. So it would be right on trend with getting inspired
by her to do that. Now, colored pencil can
be something that takes a long time to really build up. That's not really something
I'm interested in. I don't want this piece
to take a long time. I'm going to let the colored
pencil be pretty loose. We'll still getting the
gradients that I want. Then I can push anything as
dark as I want it to go. I think I'm going to save adding the black fade out for last. I just let the color
sing for right now. I've got a little bit of color pencil dusting
up into there. I'm totally fine
because I hadn't really figured out what I was going to do
with that section. It gives me a chance to start
laying in sort of gray. Now, there's no paint here. So it's going to
have more texture. But if that bothers me, I can always use a
clear colored pencil. This is a colorless blender. Esme color makes them. I think a couple other brands make them. They're really great for
just adding the binder. So it's just the wax. There's no pigment to it. I can also go in with white
paint pen, too. But paint pens pick up the paint that they
were used with before. So you want to make sure
that the paint pen is clean. It's not going to lay down whatever previous
color you had. I was wondering if I
was going to have to do the white with the
paint, I think I am. But I'm surprised happily
to find out that it's blending so nicely over the color pota wax that
I already put down. I wasn't sure how
that was going to go. And again, it's a lighter color, so it's not going
to cover as opaque. Maybe the same thing with
this section down here. Now, everything's
got paint on it, so it's going be
easier to work with. The more wax I lay down, the smoother it's going to get. I'm going to be able to get
rid of some of that texture. Like the texture, then don't worry about laying
down a bunch of wax. I'm not trying to
smooth everything out. That's a texture that
doesn't bother me at all. I'm using a textured
mixed media paper. I know there's texture hiding under the layers of the paint. What I do like pretty
smooth gradients. By the nature of those, I'm
going to end up smoothing it out and getting a decent
amount of wax build up, which is going to take care of any texturing that might have originally happened
with a thinner layer of colored pencil. Let's see. I want
that to go darker. I think I'm going to get a black since this is a gray section, I just dust it in. It doesn't need to
get crazy intense. But I do love the drama
of Tamara's shading. So that is something I'm trying
to replicate in my piece. I can get that intensity, and then I can have it
fade out really fast. So you get the effect
without it getting too dark. Then it brings back some
of the texture again, just by the nature of being a much darker colored
pencil color. So you can do a lot
of back and forth. Want to to smooth it out. I'm loving how this is looking. This is super exciting. I want to put the definition
back in these sections, so I can do that with similar but slightly darker
colored pencil colors. Pushing the darks or
pushing the lights. Every time I add a dark
section that's fading out, I'm creating more
and more depth by creating the feeling of
overlap and stacking in space. It doesn't take that much.
Just a little dusting of faded out value and you get that gorgeous depth that is similar to what
Tamara has in her pieces. On the flip side, I can
pop in some lights to push the depth even more to pull this one more
into the blues. I'm going to try to
pull back the darkness. A little bit. Yeah,
that's great. This shape is the last one that I'm just not super sure about. I can make it light blue.
I can make it black. I can make it go like
this. I love this. And this is that same darkness. I just have to figure out
how to break it up more, I think, to kind of put
in those other shapes. Maybe I just need to kind
of some lines like that. I think this is going to
work out great because now it really doesn't
feel like a book. It was having a
hard time getting past what I knew it
was inspired by. So now I have to make a decision because this got so much darker. So it's more matching those.
This really stands out. I've decided if I'm okay
with that or if I want that to go to some other color. But I do also want to intensify my shading on this gray section, bring all that dark down. A little bit of black,
some of these other parts. The other great thing is because I'm going for abstraction, just because I
started this way and my inspiration is
oriented this way, it doesn't mean that
that's how the piece has to be in the end, too. So it kind of helps to spin
it and kind of turn and see it from other angles. I kind of want this
to, like, continue. So actually, I'm
going to get back out the two colors I used, and I'm going to make
this white space go away. I'm gonna let those dry. And then I'm going to
treat them the same way that I did down
here. Do like this. It's going to kind
of feel like it's a continuation of that shape. I like that a lot
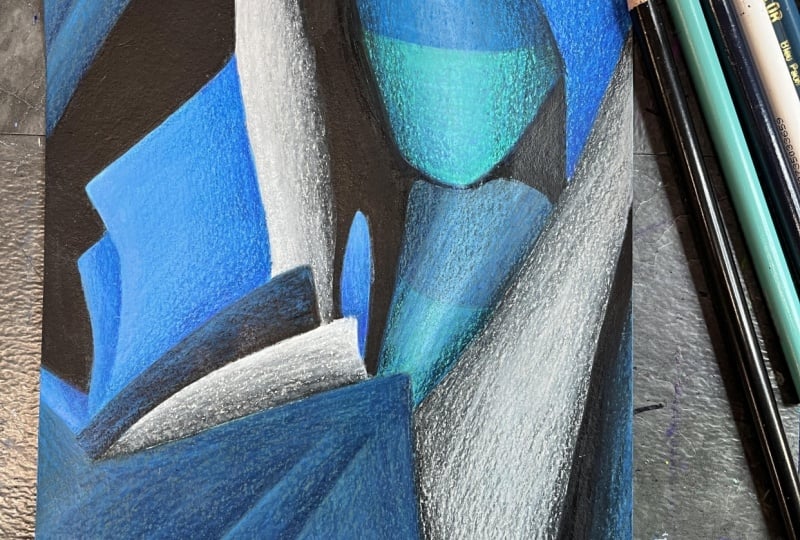
better. I'm really glad that I made that decision. I'm truly surprised with where this project took me is
going into a class project, going into creating this class. I knew that I loved Tamara's
work for many reasons. I wasn't quite sure how I wanted to share that with you
in my class project. I wasn't sure what was
going to come out of this. I love this piece. I love this so much
and I'm excited to do more of this work to get inspired to do
more of this work. I feel like this is
very much taking away the subject matter that
Tamara was working with that I also really love the way
she interpreted the figure, the elements of art that
are present in this, the abstraction, the shape
and line, color, value, saturation, contrast,
and volume, those are all things
that when I break down Tamara's work and what I love, those are what I love. The fact that I was able to look at a piece of hers
that I really enjoy, simplify the composition
to an abstraction, and then layer in the color and the value and create depth and volume in these three
dimensional forms out of it. I'm so ecstatic that I
went on this journey. I know that this
is going to have a really positive
impact on my art moving forward and is going to be a jumping off point for
more things like this, looking at other artists use of the canvas and the page and
different elements of art. I hope you are having a lot of fun creating
your class project. I can't wait to see them. So let's send it over
to the last lesson, and we'll wrap up the
class. See you soon.
8. Final Thoughts: Thank you so much
for joining me in another artist
inspired series class. This one, looking at the
gorgeous art deco paintings of Tamara de Lempicka. I hope that you had so much fun exploring her use of
value, her gradient range, her color seams and palettes, the different ways that she
was playing with art deco and cubism and putting all of that together for
her gorgeous portraits. And you get a chance,
be sure to pop on over to the projects and
resources section of class to upload your project to
the student gallery to share how you're getting inspired by Tamara
in your own work. Be sure to stick around and
see what work others are creating as we continue to get inspired and
support each other. Then I'd really
appreciate it if you head over and left a review. Your feedback is
really important to students who are interested
in checking out the class, as well as to me as a teacher. It's a really great way to share inspired you, what you
took away from it, and of course, any feedback you have for improving
future classes. I would love to stay connected, be sure to click
the Follow button. If we're not already
connected here on Skillshare. That will ensure you get
notified about future classes. I have a lot of classes, both the art making and technique approach
side of things as well as in the artist
inspired series class. If you are new to my classes, I really hope you'll take
some time to go over to my profile and see all of the class offerings that
are there currently. A lot of class ideas
that I'm currently working on and plan to
work on in the future. I would love for you to get a notification as those
come up so you can keep connecting with
art and art history and artists to continue to inform and inspire
your art journey. We can also connect
on Instagram and YouTube where I share art
adventures I'm going on, art classes I'm
teaching in person, what I'm working on
in the art studio. All things art are
over on Instagram. I have some really great
videos about technique and process and art adventures
over on my YouTube channel. Thanks again so much for taking the time to take this artist inspired series class and I hope to see you in
another class real soon. Mm.
 Elisabeth Wellfare, Artist, Art Educator