Transcripts
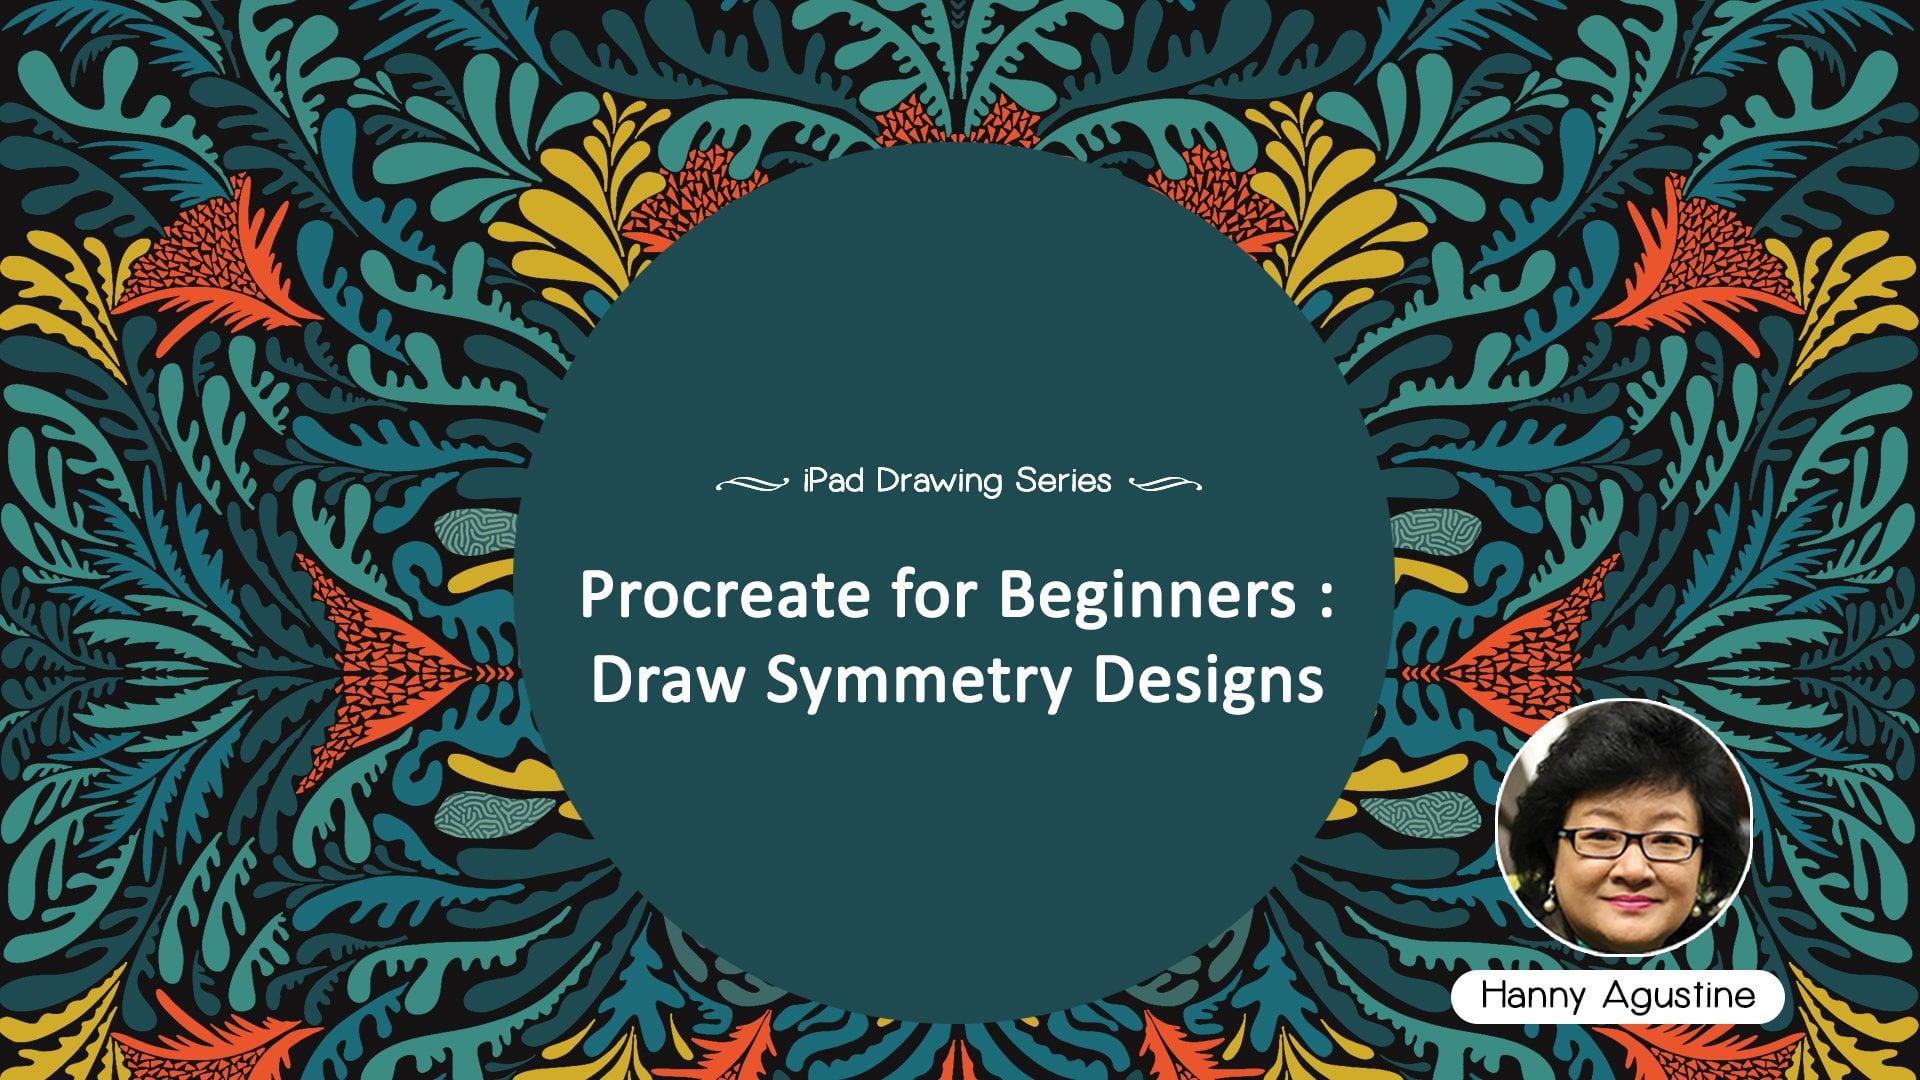
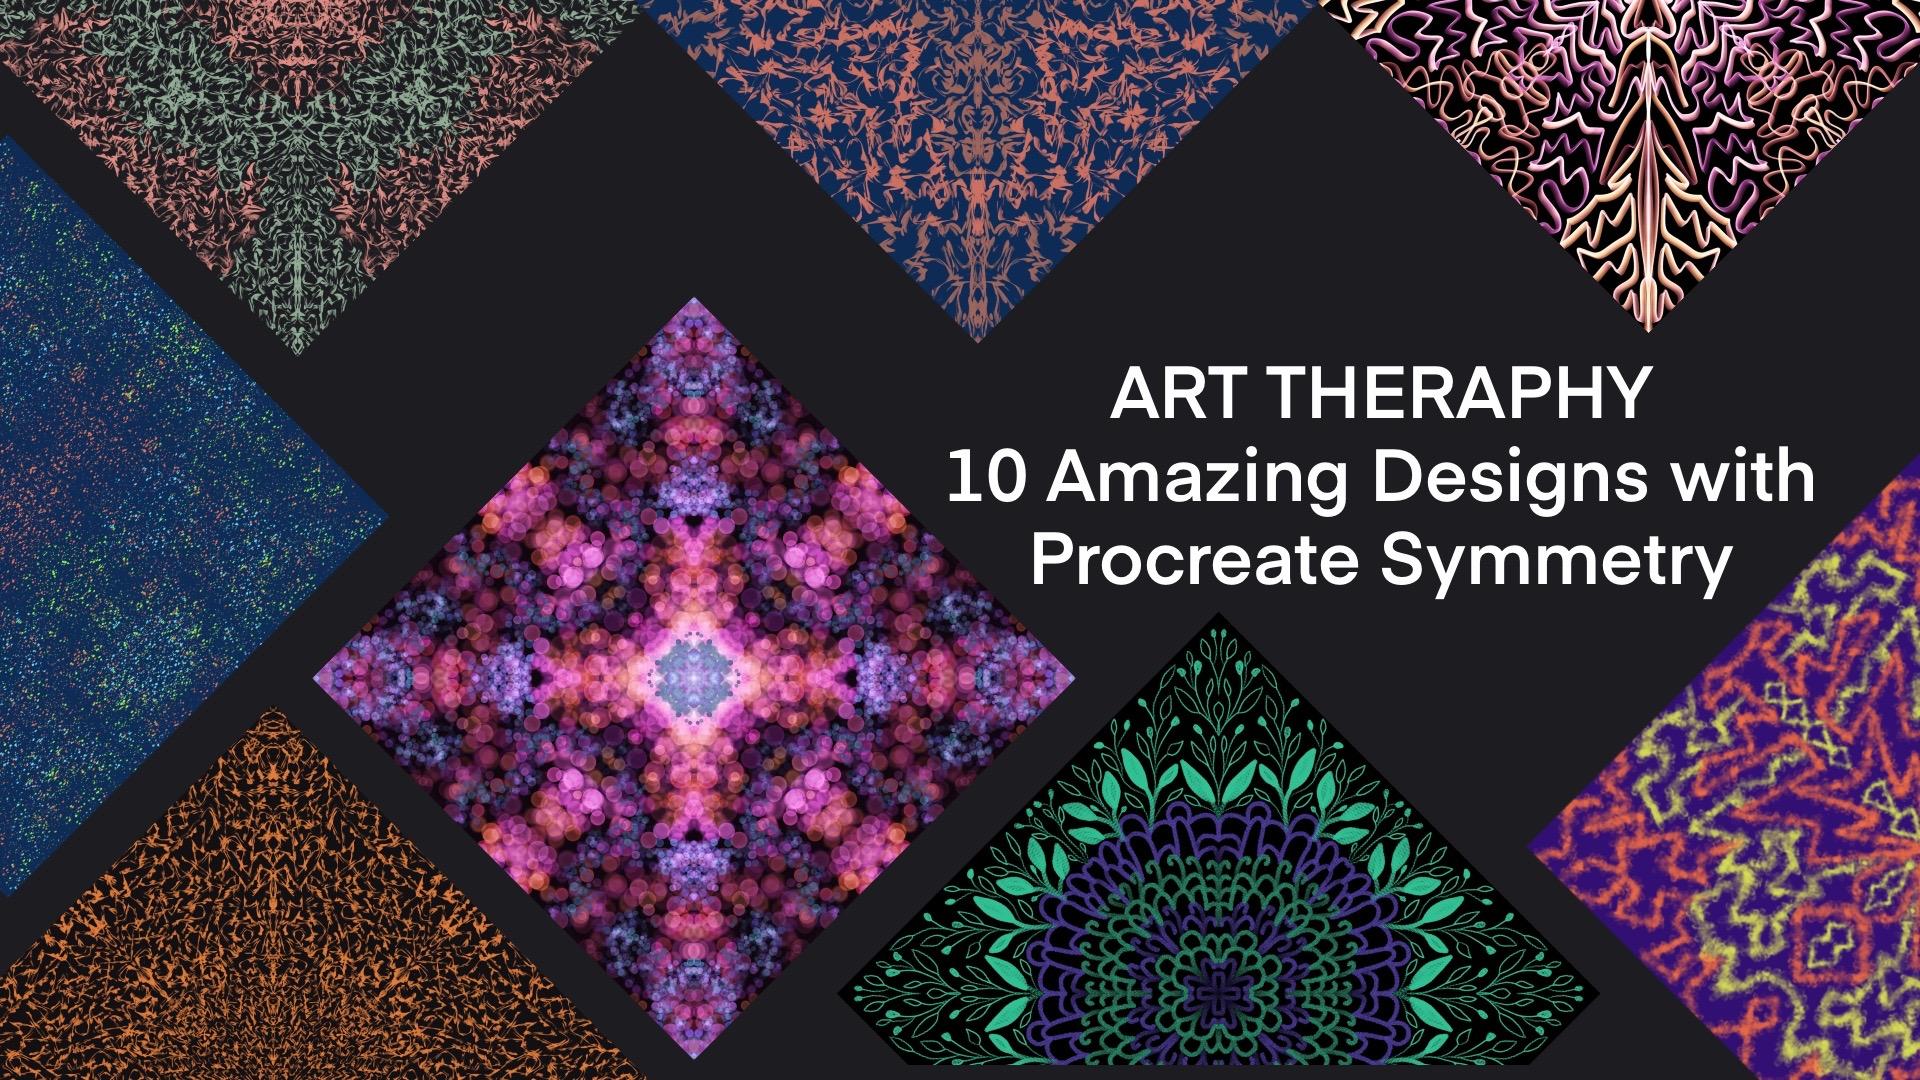
1. 1 - Trailer: Hello, this is my new class, Ar Trappy, Amazing designs
with Procreate Symmetry. In this class, I
will teach you how to use a very useful tool, it's called Symmetry Tools. In procreate, what you need is only your
ipad you install, procreate, and use a popencil or any stylus or even your hand. I only use original
procreate brass. I will teach you to create
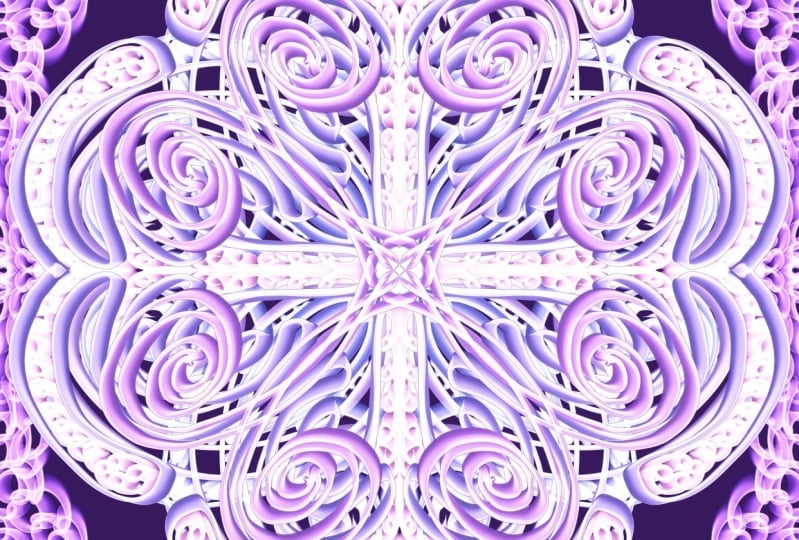
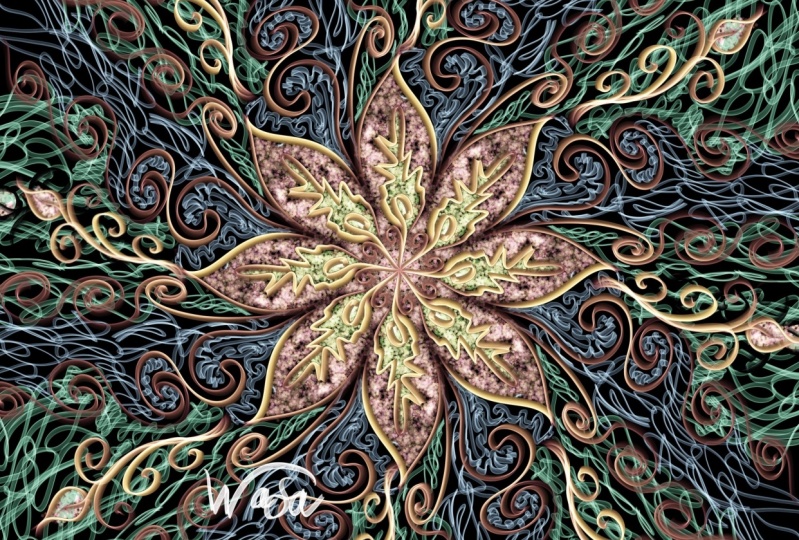
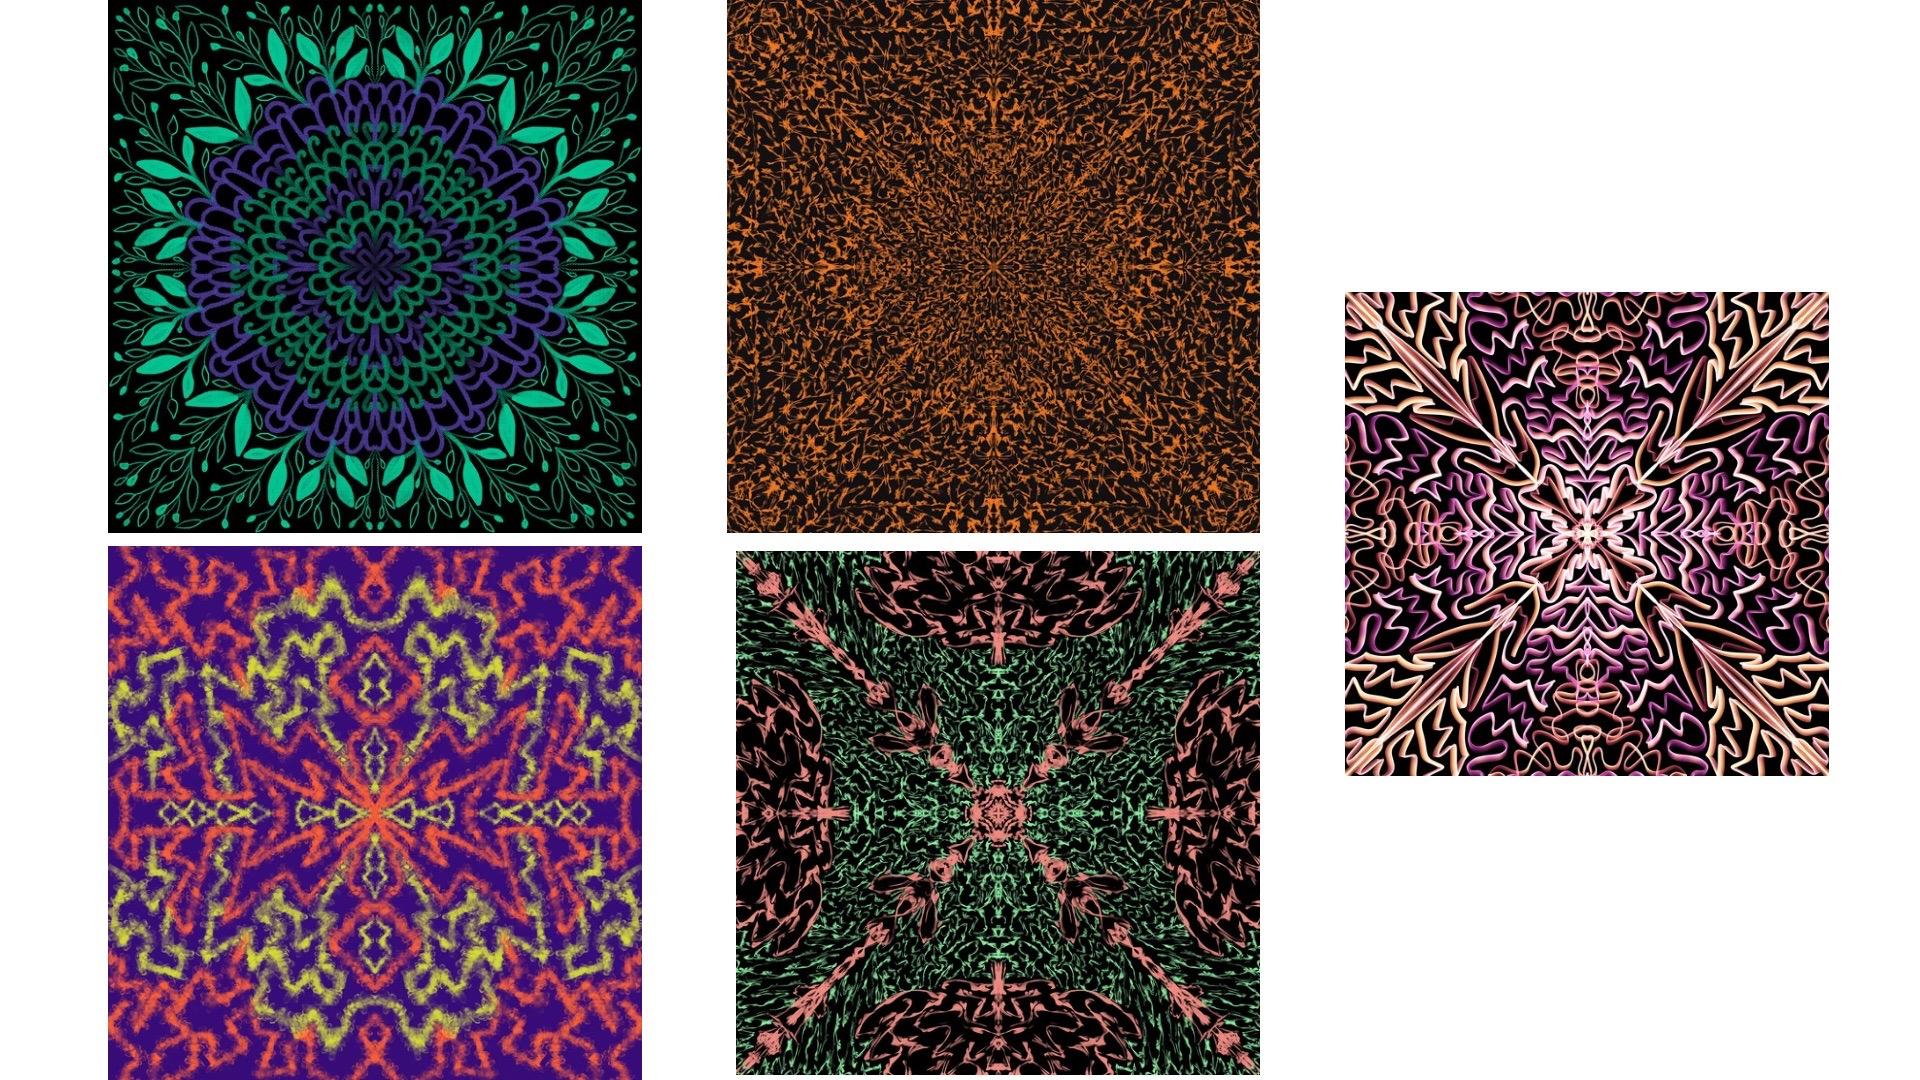
not only one or not three, but ten amazing
designs like this. You can see how beautiful
this one and this one. And also you will be amazed when you use it as a
handphone casing, a, that bag or a notebook, or even a up for your coffee
and a mask like this. And you can also imagine it
as a pillow on your sofa, or even the design of your club. This looks nice also
as a mouse path. And s, this is again as a to pack a drawstring bag
or handphone casing. So I will teach
you step by step, it's very easy, it's very fun. And it's also a good therapy for your mind, for your soul. I know you will love it, so let's do it.
2. 2 - My Art Journey: Hi, I'm Honey Agustin. Actually, I'm an engineer, but I love art so much. I put my drawing tools in 2014, but only in 2016. I start to draw every
day, everywhere I can. Mostly of my drawings are because when you draw
colorful flora like this, you can feel happy, you can release your stress, and you can soothing your
mind and meditate like me. So I draw a lot on papers
but also on my ipad. This is another freedom
for me because no water, no messy table, and
I love it so much. And then finally
I realized that I have so many drawing
on my table. One day I counted about 800, but another day I
found more than 1,000 because each of
my drawing has a story. Then I start to create the story card of
each of my drawing. I can remember what
is my feeling, what is in my mind when
I draw each of it. And then I digitalize it and
I transform it into fabrics and papers and leather to be what we call it,
a wearable art. It's like scar or
tile for your pack. Also a pouch wrapping
paper and also tea towel. And of course the
packaging pops that also originally S my
watercolor have drawing.
3. 3 - Example of Amazing Abstract Designs: I will tell you why these
two jobs sticks are here to accompany me while I record
my video for this class. Last month in November 2023, I went to Japan to meet
my friend, Matsu Tomoko. I call her and this
is the picture in 1986 when we met in a student
exchange program in Kyoto. And the second one, when we met last month, we have not met in 37 years. She gave me this jobstick. I love it so much. I keep it. I love Japan so much. I love the culture, the people, the clean air, and
also the blue sky. That's why I chose the two
chopstick to accompany me, record this class for you. Now I will show you some amazing designs created with symmetric tools
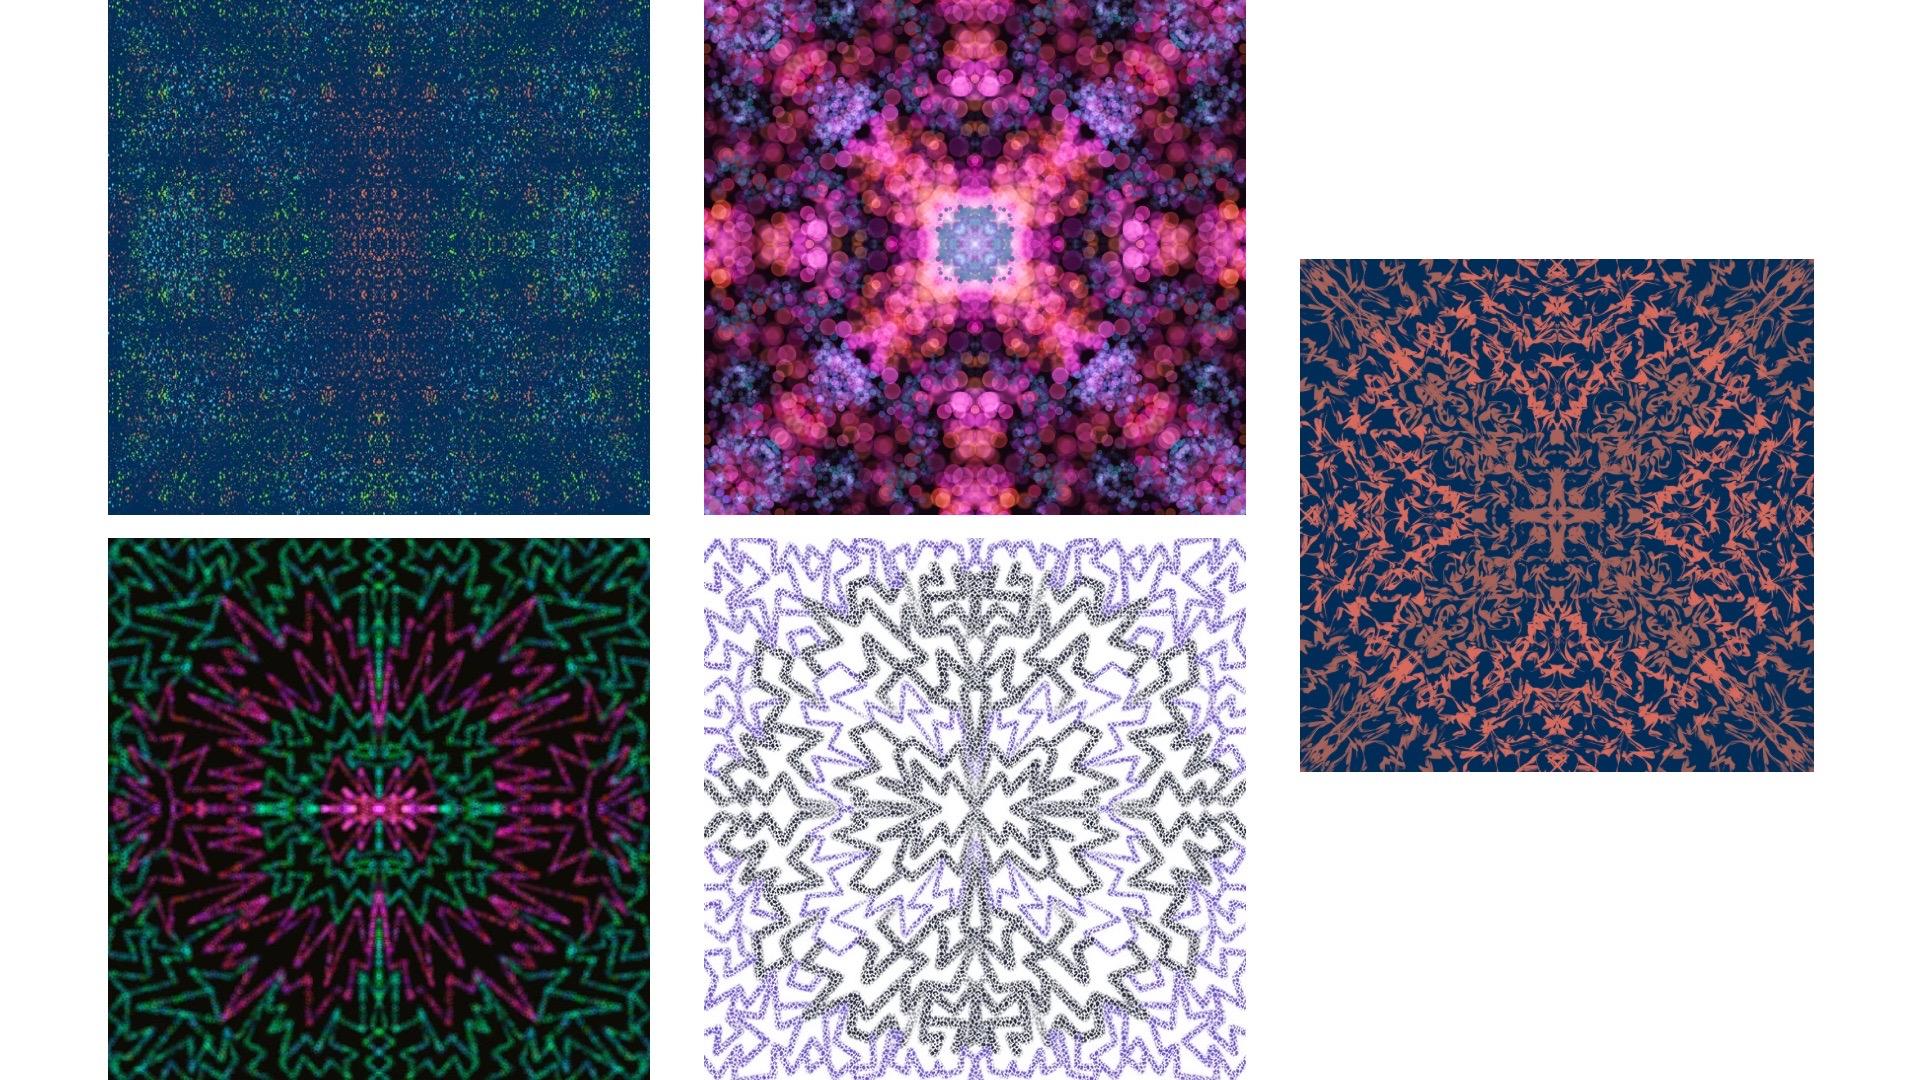
and procreate. The first one I'll show
you here is made with texture press category
and the type is Optican. I like optican because
once we choose the color, it creates a gradation of color. If I choose purple, then you may have a purple, light purple, pink,
light yellow, and you can combine it. This is another
example of Optican. Next you can find
the floral textures. Its name is Victorian in
breast category. Next is Rose. If you draw, it looks
like just a line, but if you sum in, you can see the detail dots in every line. And that's beautiful
for this blue design I use from abstract category and the breast is called for. This is very nice.
You can made it. Later on in our class, I use elements drive and snow. I put a rectangle in the middle and then a circle
side. It's very nice. The last one I made it with abstract spaklsd bright in
the middle. It's very nice. I like it next. This design looks like
a metal or a sword. In each line we can
see a rich textures. This is made with
abstract marble. I'll show you again
the collection of my Rawls I love this
vintage grew fy. It creates a small and
medium and big textures by itself when we draw. So it will create a very
rich design at the end. This is also grope. I use two colors, the green one and
the orange one. When you combine it,
it will look amazing. I create a diagonal lines rectangle in the
middle and so on. The last one, I don, I love Odeon because
it gives you a kind of lighting on
the lines that we draw. I draw in the middle, zigzag, and then also at the G. Then for the other layer, I draw on the plan space. And when we combine it, it become a very
beautiful design.
4. 4 - Original Texture Brush: Now we will see
the texture press from procreate one by
one just for example, for you, we create the cavas
of 5,000 times 5,000 pixel. Then we will see the
brass library textures. We have many brasses
here, desolated dark, gura sine, then we see here decimal Victorian
wood, also rosette. This is a very simple
but I like rosette. Let's try one by one. Now I chose blue and desolated. Make sure your opacity is 100% Now you can
arrange the size. I try this one. When you zoom in, you
can see the textures. Also, you can push
your pencil harder to your ipad and the
color will be darker. I don't lift up my hands, the texture is the same. But see I live again again. Then the result will
be different because the second one will be
darker from the first one. This is the first one. This is up, draw again. Draw again. Draw again, up. And it will look different. It's up to you later on. When you need a lighter color, then you draw without
lift up your hands. But if you want to change, lift up your hand. Now we use two fingers
or double tap to undo, then now I will use purple. Let's see how tarkin looks like. I make it a bigger size
and then medium size. When I push harder, the color will be darker. This is one time, this is two times, Three times will
be also different. Double tap again to undo. Let's see, Tim. I change to be P, now I make a bigger size. This is when you repeat it many times without lift
up your hands. The dots will be
on the same place, but when you lift up
your hands many times, the position of the
Ts will slightly move and will not be the
same as the first one. This is 1234 and you can see the dot is moving slightly to
the left or right. That's now we try Victorian, now we try different color pink. Let's try the small size first, the medium size and
the bigger size. This is repeated
without lift up. This is repeated by
lift up your head. What I show you here, this is only a sample of
texture press inprocreate. But later on when we
create the project, I will not use textures only. We can try another bus
category too, this is wood. When you zoom in, you can
see how the darker wood, when you repeat it, the dots and the textures of the
wood still the same. Again, we'll see
another brass set. Now we try with orange. Yeah, when you try it
looks like only a line. But when you zoom in, you can see a little
dots there for Rost. Now we try me Lucca,
the small size. This is a medium one,
make it smaller. When I repeat it,
it looks darker. If I just softly draw it, it looks like paper textures. I like it again. This is only, for example, for you to see how in
your press library, in one category, you can
have many good press.
5. 5 - Let's Try First Design (1): Now let's try our first design. We will use a very simple
press and only one layer, and I'll lose your step by step. Create the canvas 5,000
times 5,000 cell. Then go to Canvas and
turn on Drawing Guide. You click at the Drawing Guide, you choose Symmetry and Options. There are four types. This is vertical,
this is horizontal. Because we want both
vertical and horizontal, we choose quadra, and
the other one is radial. Now our canvas is
divided into four parts. And C, we use vertical
and horizontal. We will draw only
14 of our drawing. I just escalated and I need something
dark like this blue. Let's try. Okay, I like it
use two fingers to undo. I start in the middle with
the small drawing, you see. Because we squad run. Now our drawing is already drawn in all four
parts of our canvas. I will continue to this part and then you can zoo
in to see how it looks like out again. Now I make a smaller
size of press. Yes, I create another
drawing there. I need to tell you, if you throw slightly like this
softly to your ipad, it will be lighter color. It will give you a darker color. Now, I will push my hand a little bit and you can
see the difference. Now the lines become darker. There is no rules. There is no right or wrong. Just keep it throwing and
fill in the white space, a small curve or the big one. And I can just continue
without thinking. I feel in here again, you see you only draw 14 part, but because we chose symmetry, then your drawing will be in
four part of your canvas. I continue again, See how
big picture looks like. Sometimes I stop here, but no, there is a white space
from the big press. I will make it
small press first, and then I will fill in this white space inside the
first drawing that I already made Here you can see on
the top and the bottom, because we choose quadrn, now your throwing is
on the left and right. Because we have vertical throwing guide top and bottom, left and easy right. You can also ask your
kids to draw like this. They will love it
so much the lines, and there is no rule
your kids will like it, because it depends
on their creativity. And give them freedom
to draw and to move their hands just as
long as they like it. Okay, I already fill in all the white
space in the middle. Now we still have to continue again with the white space here. I try to find the perfect size. Okay, I like this medium. Now I get medium size here. And I pushed my
pencil a little bit so you can see the color
is darker than before. Oops, I don't like it. Just double to undo again. Okay. Don't worry that
you will make a mistake. Sometimes I also repeat to draw so many times
if I don't like it. Okay, we still have a little
bit white space here. I make it smaller size. Okay, I just, this one, now I draw again. And we will continue
in the next session.
6. 6 - Let's Try First Design (2): We continue again. Sometimes you need to fix
your drawing like this. I find that symmetry
tools in procre can be therapy for us because
when we are so tired, when we have an
overthinking talk, a meditative action like
this drawing could be a good solution for your
mind and your mental health. Also for your kids. You can use this freestyle and free drawing to soothe
their mind and to release their stress from their
daily activities with school and friends and
families and so on. Here we still have
a blank space, now we fell in again. I remember when I throw
this kind of design, very abstract and
very loose style, I never thought in the beginning how it will
look like at the end. Now we finish with the top side, and then now we continue
on the right side. Again, this could be your artrapy for yourself
and also for your children. We zoom in now and we'll see there is still
a blank space here. We continue to draw with the
smaller size of brass here. We have to fix again
these little things. Either draw again and it's good. Now we fill in all the white space
from the bigger sizes. It will be full and
it takes time of. But I'm sure that after finish, you can feel much better. Your mind is very peaceful, your feelings become positive. And trust me, you will love it. And you only need to do
as a daily activities, you don't need to finish
one design one time, sometimes before going to bed. I took only 10 minutes probably, or 15 minutes to draw. And then I can continue the
other day until it finishes. It's completed now. And if you think you still
have to draw some more, you can give it with a smaller size and then you fill in again the white space. As far as you like,
there is no rules. Follow your heart, follow
your feelings and your hands. We'll know when
you have to stop.
7. 7 - Tenun Thread With Crystal: Now we will try another
brass, it's called Crystal. This session, I
name it there, Ton. It means waving because in Indonesia the non
is very popular. We can see many women
in Bali or Sumatra or Jaffa Islands are waving this threat when the
design for dress, it looks so beautiful
on this woman. Like those pictures now we create a cavas 5,000
times 5,000 pixel. Then make sure you already
turn on the drawing guides. Choose at the drawing
guide, you choose symmetry. For radial option, we will have eight part of this canvas. Again, just make sure
that you already choose elements and crystals. Now let's start first how
this crystal looks like. Two fingers to undo. Okay, I'm ready now. I will choose the color. I click palate, and
then I choose orange. And this is two fingers to undo. Adjust your precise and
make sure your opacity is 100% I start to draw from in the middle and then I create a crystal lines. Now I add layer two and make sure you
turn on drawing Assist. Layer two is assisted now
and then I will choose blue. I continue to make a se, crystal like drawing because I live in Indonesia, there are so many ethnic
textile like Pati or Non or A. When I draw this
and then I remember it looks like the
noon or the waving. Then when you row at
the same position, you can see that the
blue now is dark. Now I continue again, I go back to layer one for or I continue to throw
some more lines. You can zoom in, zoom out to
see how it will look like. If you hold your pen, it will be straight line. If you don't like it,
two fingers to undo. You can enjoy throwing this
with listening to the music. Feel calm and meditated. When you repeated the lines, it will look darker
than the others. Now I go back to the blue one. I continue drawing
this tenon thread with blue colors
until it finished. You can check if
you don't like it, use two fingers to undo. Enjoy your moment
listening to the music. No two things just
follow your head. Now let's continue. Go back to layer one
and choose orange. Go on and on and on, and then when you see it, it will create a very
different design. It's so fun, it's so relaxing. And it's good for
our mental therapy. When we feel so stress, you are so tense. Just grab your ipad and your pencil and in
free style like this, at the end, you will feel
so relaxed, so peaceful. Trust me, I've done this so
many times and I like it. When you zoom in, you really
can see the details of this crystal which looks
like, okay, it finish. Now I see for overall like
it now we have two layers. Again, if you want
to change the color, for example this Fia, then I track it to layer one
which is orange, blue fuss. If we change layer
two, for example, I just light green, then I track it to the
blue one, light green. And pia, again, I want
to change to purple. Now it's purple. With black colors, it will look like this. Beautiful, I like it.
8. 8 - Abstract Opticon: Next we will use another press. It's called Opticon, then create gun fast 5,000 times
5,000 pixel as usual. And then go to the press library
on an abstract category. And we choose Opticon with a mini circle and
pluri like this. After you finish this drawing, don't be surprised because
the image will look blur. But it is not because
of my videos blur but because of Oticon
I already jose. Now we try a bit here. Then for the background, this time I will
choose a light gray. And then make sure again
click Drawing Guide is on at the drawing guide and
symmetry option and quadrant. Now your cavas will be
divided into four parts. Now we are ready to layer
one is already assisted, It will be drawn on the
four parts of your cava. I try a little bit
here, smaller size. When I go to the center, it will create a darker color. This is a combination of
light and dark color. This is another example. If I repeat it, draw a circle
and then a circle again. In the middle, it will be Y. When you hold your hand, it will look different. Okay, Now we start to draw. I hold my hand. The shape will be
formed by procreate. Then I create again
a six sac lines. And then when I hold, it will become a very
sharp edge shape. I add layer two. Now make sure drawings
layer two is assisted. Now I choose screen. I draw again a six lines and hold my hand for a while until the jacket
lines is created. Again, I hold my lines and
now it's become bigger. I go back to color
history and choose thing. Then I, and you can zoom in and zoom out
to see how it looks like. Draw again and hold. If you don't like it, just
double tap to undo row again and this space hold again. Okay, I like it. I will go back to layer
two and then in history, choose your green color throw and hold and fill
in the white space. Hold again. This is still another wide space. We draw again until
it's full now. Okay, for the below part. I will also add some more lines in row and hold again, and little bit more. Okay, I feel this
is still playing, so I will add a little
bit, row and hold. Okay. Now it's full. It's very simple actually, but if you want to add
some more, you can do it. Okay. It's finished now. And then we see the
background color. We already use optical,
it's blury lines. But when you put black
as your background, it will look like this. I love it. I love it. I love this so much.
9. 8 - Groovy Dance: Now let's try another one. This is Dance. As usual you create a canvass of 5,000 times 5,000
Now we go to Find, and I choose groovy. I love groovy so much. Because a simple drawing, the result will be very amazing and will surprise you again. In symmetry option,
I choose radio. It's done now. Now I will try
a soft color. I like this. We take the size first, and then two wingers to undo. I make it smaller. And look at this, I draw continuously without
lift up my pencil at all. I draw without thinking. Sometimes it's truly
fun because I just move my hand and then add
again continuously one time. Then I will add layer two. Don't forget to take
your drawing assist. It is assisted now and I will
choose the second color. I will dry the lighter one. Then for the precise
I make it smaller, little bit 38% Then again, in one time, just draw
without thinking it is so meditative it is
reliving your stress. I like to do this every day. Just continue to fill
in your play space. Move around your hands. Now we still have a
little bit white space. I go back to my layer
one and then I use this, you can find history. That's the dark brown
color I used before. I move up to 43% and then now
I draw again for the rest. Okay, this is very nice, very simple, one time drawing. This is layer two, and this is layer
one for two colors. Then if you change
the background with dark blue or okay,
I choose this one. This is a indico blue, it becomes so beautiful.
I like it so much. By fines and groofy textures, you can throw out this
simple but amazing design.
10. 10 - Driven Snow: Now we try the design. It's called Driven Snow, and let's play like a kid. I already created my canvas. 5,000 times 5,000 pixel. Then I choose blue
for the background. And now we will play like a kids with the brass from
elements and driven snow. I choose oranges because
orange and blue is contrast. Make sure you turn
on drawing guide, then you also choose quadrant. I like the size. Now we start to play around. I make a circle and then going around as much as I like. Remember when you were a kid, you also like to play. Now I create a layer two. Make sure you turn on drawing
assist. It's assisted. Now, then I a different
color, light green. In the layer two, I draw with light green again. Let's play a kid, it is enough. Then once more, I
create layer three. Drawing assist is on, and now I choose light blue. Okay, I add some more
with light blue. Let's no restriction, just
play around like this. Now you have three layers. For example, you want to
change the color with red. Make sure you
choose layer three, which is light blue. You want to choose with red, but oops, this is what
happens if you track, not precisely do it again and track the red color
precisely to the light blue, and then your drawing
becomes red like this. It's up to you. Now
when you want to change the color can
also change all, or you leave it
like this as I did.
11. 11 - Jagged Lines: This time we will see
that procreate gives you capability to draw
a checkout line like this design
and it's very easy. Let's do it now. As usual, you create canvas 5,000
times 5,000 pixel. We will use sal, crappy brass and you choose
mono line for the color. I choose black. Now for example, you
want to draw a circle. When you hold it, it becomes
very precise circle. And it's done automatically
by brocriate. This is ellipse also, if you draw a triangle, hold it, then it will be
precise triangle by bcriate. I draw again the square or
the rectangle says hold it. Now I draw a diamond. I hold it a little bit and it
will be a very nice ships. This is about ship, but also you can
draw like a star. And then hold it will
create a check out line. Again, when I draw
a curve like this, like a flower, but when I hold it gives you straight
lines like this. Now double tap to
undo this first. That's the way we draw after this to create a jacket line, make sure you use material and grass and we will see
how it will look like. Make sure your drawing guide
is on at the drawing guide, and then you choose symmetric
option and Squadra. Your cavas now divided
into four parts. There is a vertical
and horizontal line. Make sure your press in
the materials and for no, I try to adjust the precise first to find the
size that I want. Then now I start to draw. And then I hold my pencil again. I draw a curve, but I hold it and it becomes
very sharp edge like this. Again, you'll see this is
what I call check out Line. Now we try a smaller size, but the press is still the same. I use purple now. Again, I hold it. Just hold a while. And then it creates
a different lines. You can zoom in to see
how it looks like. And then I go back to black. This is in the same layer, I still only have one layer. And then I go back to draw
again with black color. If you don't like it,
just double to undo. I don't think before
to throw like this. I just follow my mind
and my hands and we can fill in the white
space until it's full. I continue to then after black, now I go back to purple. I adjust again to
be a smaller brass, again, finishing all
the white space here. If you don't like
it, just double tap to undo and redraw again. Don't forget to hold
your pencil a bit. So it will be the same
checkout line everywhere. And then still the
plank space here. I will finish it. Okay, We'll see
it's complete now. It's finished. That's
the way you draw with holding your pencil and
create a check out line.
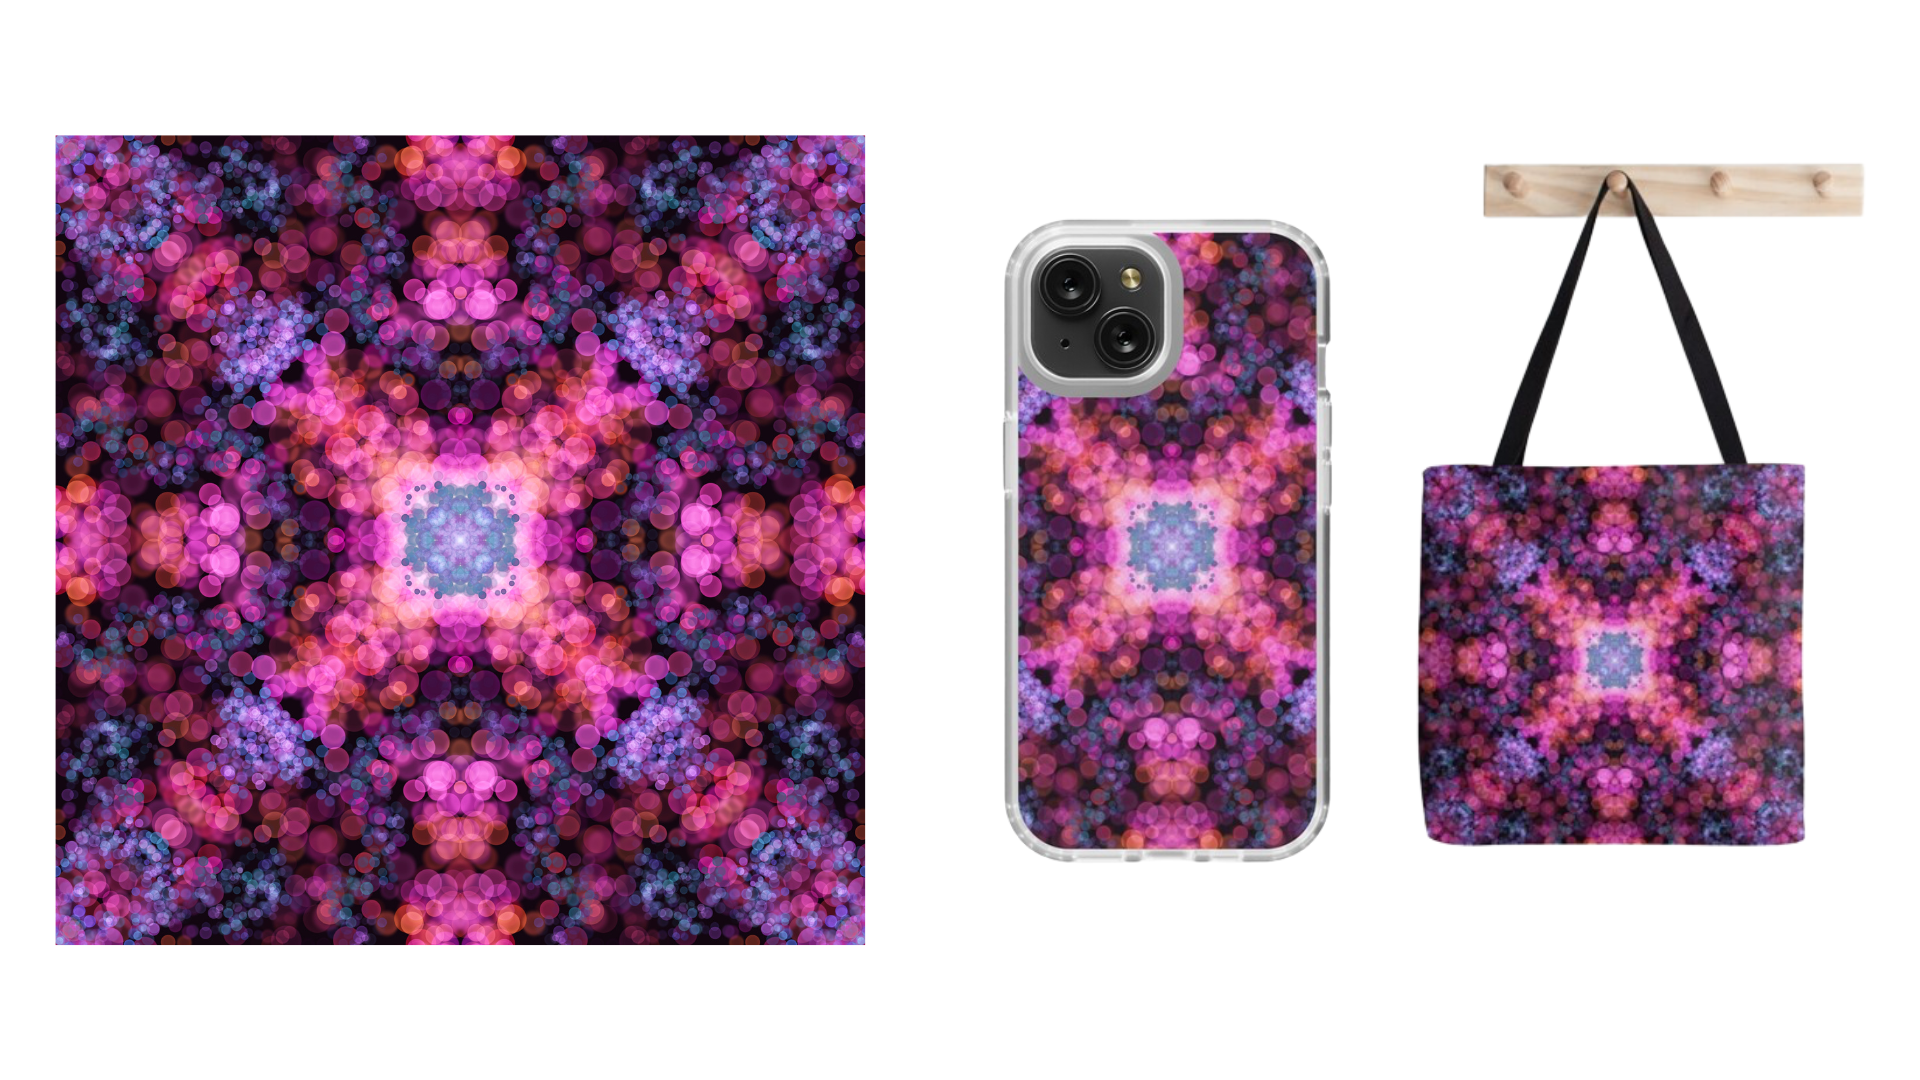
12. 12 - Pinky Bokeh Abstract: This design pink abstract
will make you surprise. Let's see how to make it. Now we start to make
another design. For example, I create a gain 5,000 times 5,000 pixel canvas. Now we will dry luminance
and poker lights. I use pink color. This is a medium size. If we make it a bigger size, it will look like this
and we get smaller one. This is a very beautiful
texture brass, I like it. Then make sure drawing
guide on and then at the drawing guide
again, we use symmetry. And an option I chose radial. We have eight parts separated and now we
are ready to draw. If you repeat it in the middle, it will create a lighter light. And then now I
move to this part, then I add layer two. Do will get to take
drawing assist, I will use a dark blue. I will add some more in the wide blank
space, for example, in the middle in this part, if you don't like it, just
tap with two fingers to undo. I will create again here. Okay, I'm happy. Now I will add layer three. Take drawing, assist,
and then assist it. Now I chose purple. Then I will add
some more again in the white blank space here. Another one here.
It's up to you. It's freestyle. There
is no Rom or right, And we have three layers
with three different colors. And then when we chase the
background to be black, you see the Luminance
Lite give you a very colorful design. You can also change
to dark gray, but I like black. Okay, This is a very nice
with aluminum spoke a light.
13. 13 - Calligraphy Odeon: Now this is my favorite
press, calligraphy, Don. As I told you before
that when we use Odeon, the press gives us
a shining effect. Your lines will be
looks like this design. As example that I show you here. This design is created
with two layers. Let's try it now. Create a new gun F 5,000
times 5,000 pixel. Then let's change
the background color from white to be black. You can use double tap on this, this and it will be
automatically going to be black. Then make sure again your drawing guide is
on the drawing guide. And then symmetry
option and radial. Now we cannot see the
guidelines because it's black. I need to change to be white. Double click the white
line and then click. Then make sure your opacity is 100% And then this is
to adjust your breast. We try first. I think
it is too thin. I make it bigger. Okay. I like it double
tap to undo now. I just fusia. I love it because it's a mix of Gia and yellow and orange. Look at this. When you draw, and you repeat it at
the same position, such as in the middle, it gives you a brighter
or shining color. This is the interesting
thing about press. I'll show you what I mean. If I make a line and
then I repeat it, you see there is a shining
and brighter color. Again, if I three times, it's shining more,
the only two times. Now we continue. I throw on the diagonal line. I hold it but I don't like it so I want to have
an original line. It will not be check out line. Then on this part I throw again with the curve
six second lines. You see you may have Fay, or you may have light
yellow and so on. To make easier, you can rename
your layer with Odion one. Then I make layer two, make sure your
drawing assist is on. Layer two is assisted. Now I, I start to draw
in the plan space. I adjust again the
precise to be 25% Okay. This ping gives the
design a different color. When I draw slowly, you can see that the white or the light color is blooming. Now I draw with more six lines and fill in so you can combine
it between two colors. Now we still have
many plank space. I will draw a, sometimes I like to draw inside
the drawing like this. I like the bright color. It's like a sparkling
on this design. Okay, this pink is also
combined with orange. I like it now. I go back to Don one, the first layer, and
I go back to Pia. I draw some more lines again. Here I continue into
inside the first line. Now with two colors, two layers and
diaconal line create a very beautiful
design for layer two. You can also rename it with two now this is
Odeon one, Don Two. When you combine it, it looks much better
as overall I like it. But later on you can draw
not only with two colors, but maybe three colors. I'm sure that will be
very amazing design.
14. 14 - Vintage Groovy With 2 Colors: This is an example of
different texture bras. We will use find screw here. I draw in a very different way. I just draw in the middle and in the four sides we
use rata symmetry. Then the second
layer, the green one, I draw like this to fill in
the plan space of layer one. Now if we combine two colors, it will look like this. Make sure you are on the
feints and we choose crew. Now we create a new fast, again 5,000 times 5,000 pixel. I try to use a dog
background. I choose black. Make sure your
drawing guide is on, you choose option, make sure the line is very
clear enough for you. I choose white on black. And now done again. Finta Scroofy. Now we try the size. I start to draw in the middle. There is no rules to use. Grope. I like this
press very much because you can see how rich
our drawing can be created. I just move my hand wherever I sometimes straight and
sometimes I make a curve. Now I feel in this part. Okay, now we have a cross
line and four parts. Now create another
layer, layer two. Make sure drawing assist is on. Layer two is assisted. Now I choose green color. Now let's continue on layer two. Two fingers to do, I put smaller size. Okay. I like it again. You can see that
when I draw this, I never think about how it
will look like at the ends. I just move my hands. Sometimes I repeat
it the same part, but sometimes I
create a new one. Now I continue, I do six there. Then I continuously,
until I want to stop. I throw akin here to
fill in the blank space. And then now I continue again
until this space is full. Sometimes you can zoom in and zoom out to see
how it looks like. As I also drag the long line
like this, this is enough. This is still a blank space. I keep it okay. I like it so much. We have layer 1.2
with different color. When we combine layer
one and layer two, it will be looked like this. We only use two
colors at this time, but later on you can
choose more than two. You can try three
or four colors.
15. 15 - Floral Style: Floral style would
be our last design. It looks like flower
in the middle. And then we draw some
leaves surround it. And it will be very
amazing design too. As usual, we create new canvas. Then again, we turn
on the drawing guide. At the drawing guide, we choose symmetry and option. Before we use Squadron. Now we use Radial. Our canvass will be
divided into eight parts. Then we just textures
and desolated. Now I straw in the middle. Just a free style of flower. Now we create layer two. Again, take the drawing assist. Layer two is assisted Now
to find the second color, I click this and then you
can drag your pencil to find the right cream that you like with the same isolated. And now I continue to draw this flower back
again to layer one, the purple one in history. You can find your purple
from the previous choice. In the layer one, I draw again some more. Now I go back to layer
two with the green color. I add again. Here I add some more sometimes I sped up the video so you
don't waste your time. I go back to purple. In layer one, I make a bigger curve line, The flower looks
like it's pluming. Now this flower is enough. Now I go back to green again. For the leaves, I choose
rose and smaller size. Now I throw leaves here, I fell in the leaves. I try to zoom in and zoom out to see the size is proportional
with the flowers. And then I draw again a
big leaves, a small leave. Just fill in the white space. I like it now I try to again
fill in the wide space. I create a smaller
size brush and then I throw the little leaves
without fill in, it will be variation
of the leaves again, just double if you don't like
it and you can repeat it. After you do drawing leaves like this
is also meditative. I like it so much, I zoom in, take a look, and now I work some more. Now I draw a branch
with little Eps. This is a part of the
leaves or the flower again. I continue until all the
white space is full. Now I move on, on this side, this is still a lot
of white space. I draw again the leaves, and if you see the
line is too thin, you can re draw again
to make it nice. Okay, let's see Now we still have a little white
space in the middle, at the top and bottom. Okay, let's finish it then. If you think that you
need to fill in again, this little white space, it's up to you. You can draw again the leaves or the pads
wherever you like. Finally, if you see As overall
it will be look like this. When you change the
background color to be black, your design looks so beautiful. You can draw again with different styles of
flower or leaves, but I'm sure you will like it.
 Hanny Agustine, Artist | Technologist | Educator


![Art Therapy [Abstract Designs with Symmetry]](https://static.skillshare.com/uploads/project/698246/cover_800_2dc19fcc16676d0d37eb086f13b9fe51.jpg)