Transcripts
1. Ugly Bunny Oil Pastel Introduction: Hey, friends, how are you? I hope you're having a great day today. Today we will be creating an ugly bunny. He's so ugly, He's cute. And I just wanted Teoh. Introduce him and show you exactly what we will be making today. So let's get started.
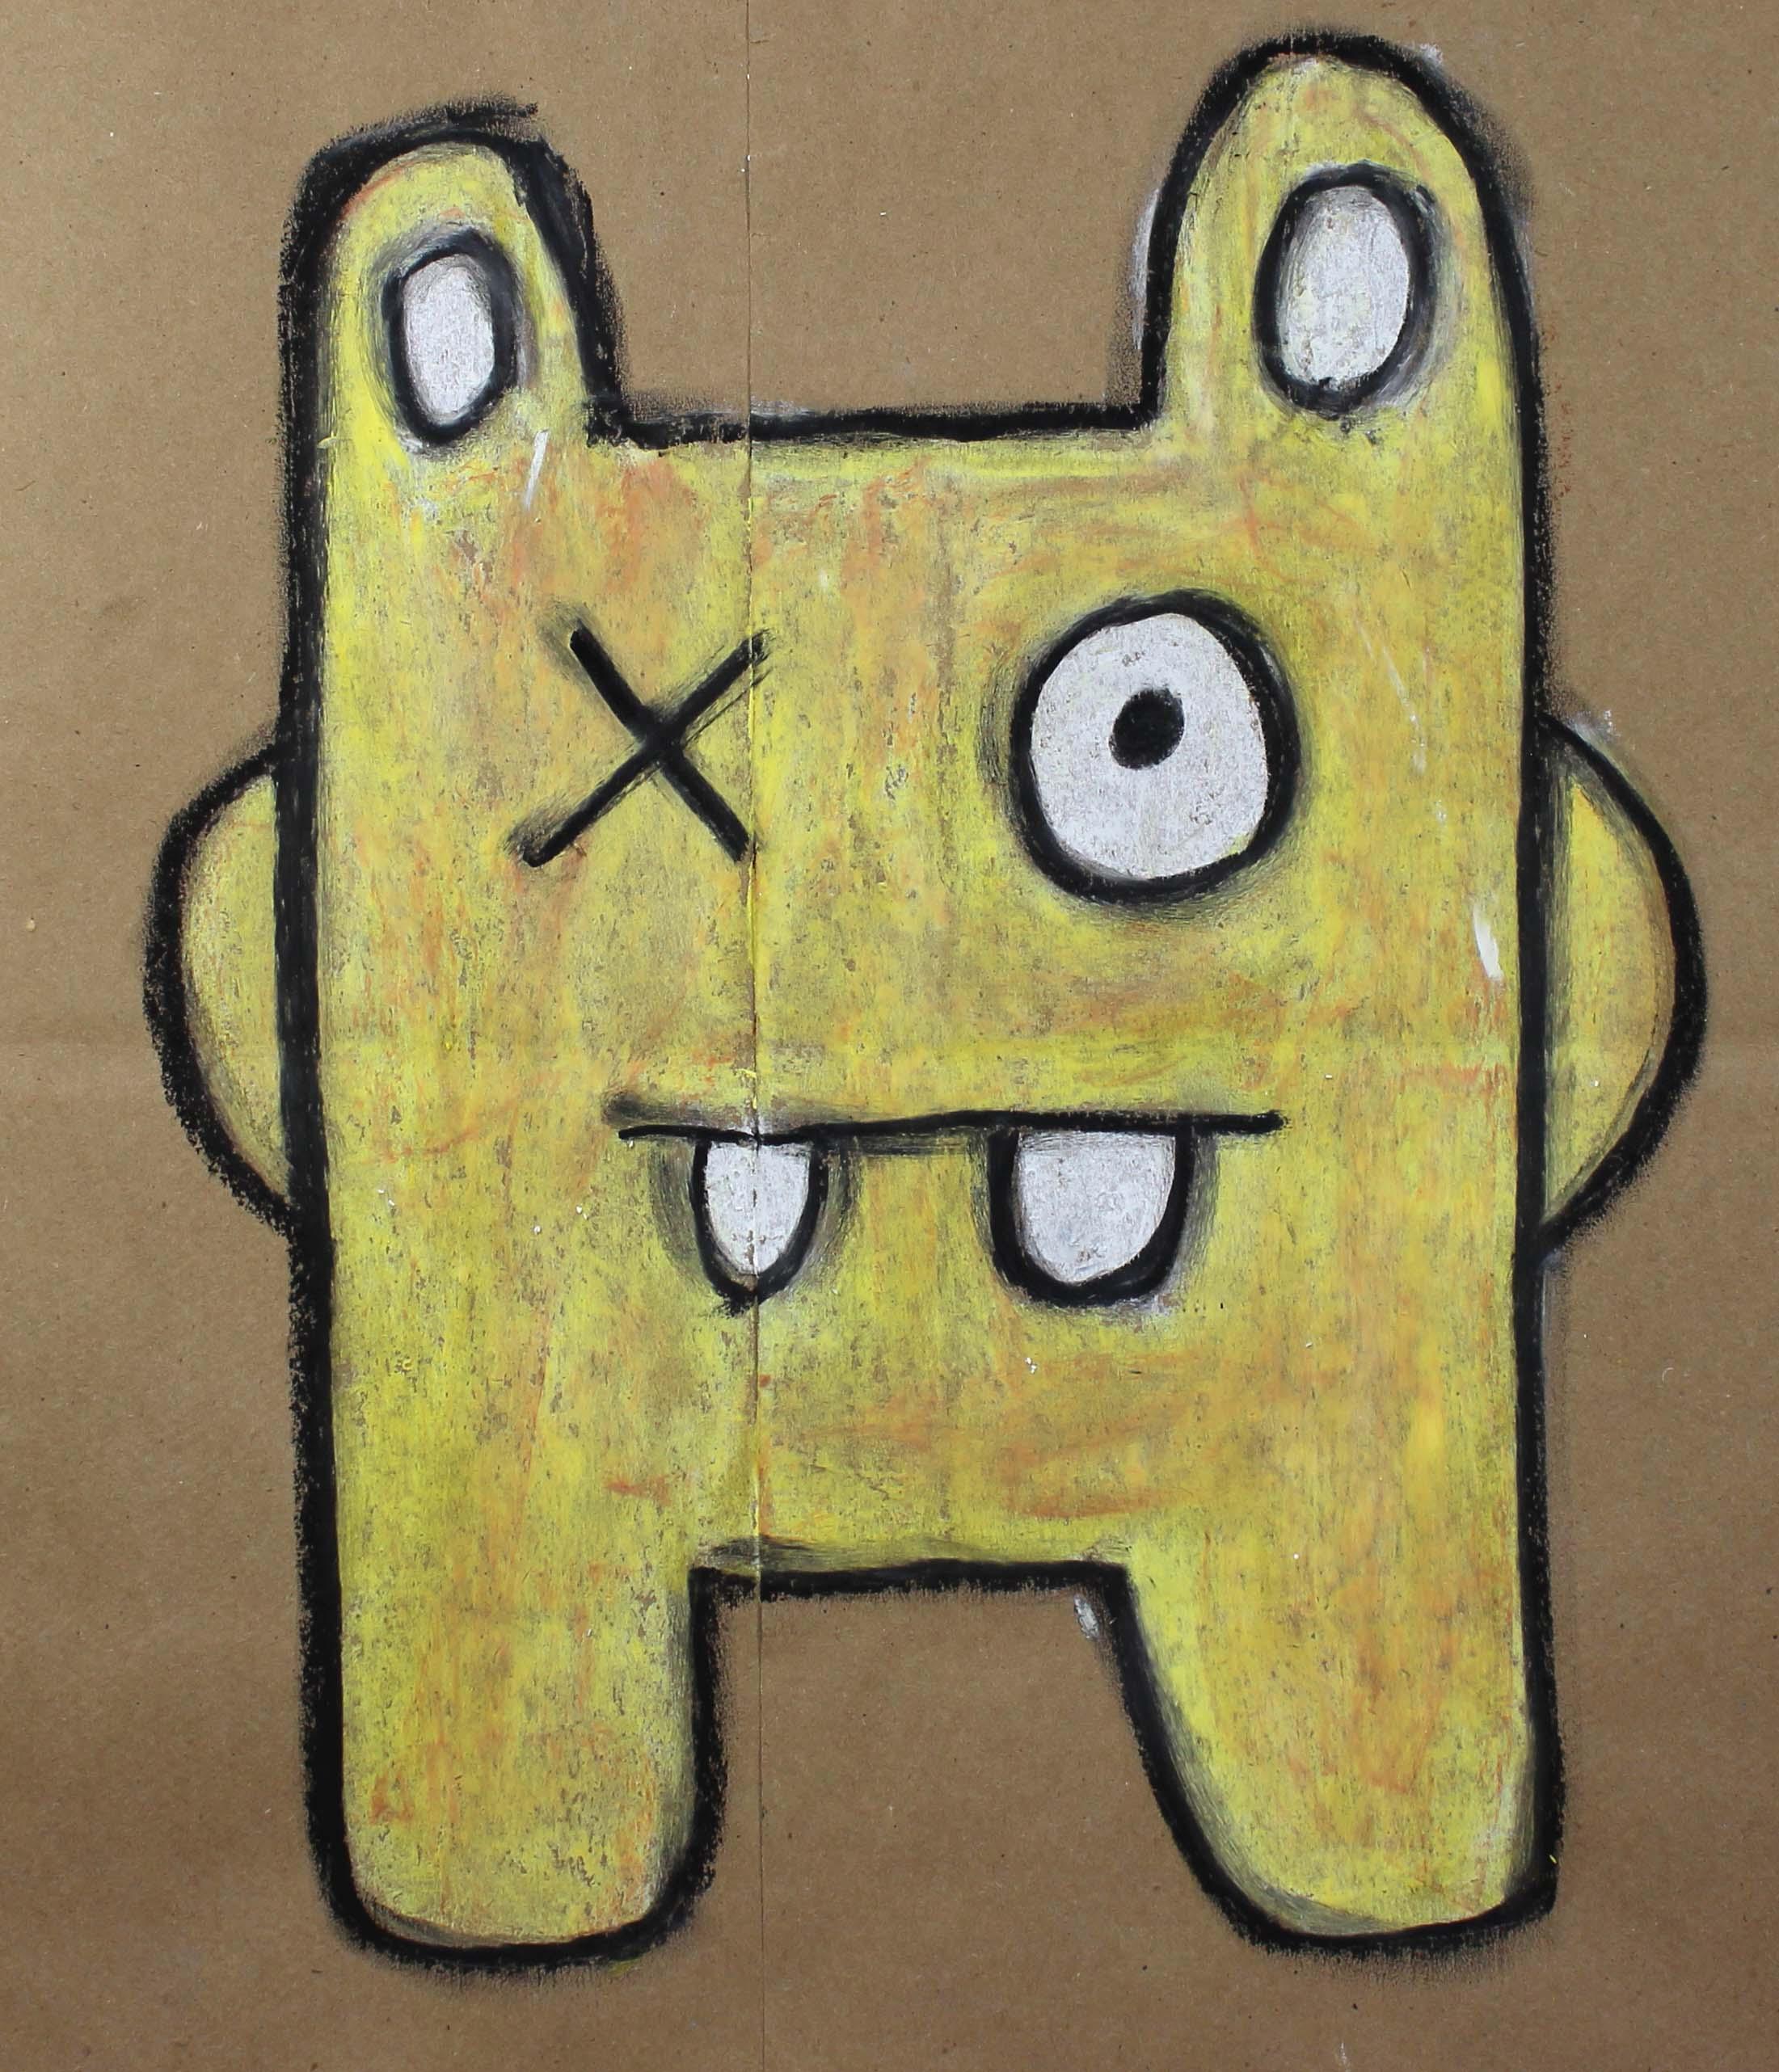
2. Step 1: Draw Ugly Bunny: all right. A friends. So we are going to be creating are Ugly Bunny are cute, ugly bunny And we will need a few things for this project. The first thing that will need is a paper bag. I got this paper back from the grocery store. A lot of people are using plastic bags, but we need a paper back for this one. We need some scissors, some kid scissors, safe scissors, and we need a pencil. And in the oil pastel colors that you will need for this project, you will need a yellow, a black I've around and a white. So those are the four colors that you will need. And I'm going to just peel this a little to get it ready to go. There we go. Okay. So what we're going to do first put those aside is we're going to cut our bag. And so I'm just going to show you how to cut a bag. So what will want to do first is cut a little bit off the side like this. It does not have to be perfect at all. It does not have to be perfect at all. So cut the other side of your bag at the edge. Hopefully, your bag that you find will be constructed the same way as mine. But basically what we do need is we need Teoh have a surface to create our artwork. One, some throw this away. Okay, so now you should have subsections of your bag. See, we have this section right here. We might be able to use that for another project. So we'll set that aside and then on this side, the same thing. Have a section. And if it doesn't go through if you're cut, doesn't go through all the way like minded. It see right here. And I just cut it a little bit more. Like I said, it does not have to be perfect. And it actually looks a little bit better if it's not perfect. Okay, so then I opened up my bags. Numerous increases here. So this is actually the bottom of the bag right here. So we're going to want to cut that off, cut off the bottom of the bag before we go. Now, this part of the bag we will be using for another project, So we're just going to put that aside. Thanks. Right. So we're just going to be using one side of the bag today. And if you want to straighten out, see how straight this is right here. And this is a little bit crooked. If you want to straighten that out, just go ahead and make a little trim until you're happy with good. Alrighty. So that looks great. Now what we're going to do is we're going to take our pencil and we are going to make an outline of our ugly bunny. So let me show you how we're going to do that. So make a decision on how large or how small you'd like your bunny to be. I'd like mine to be really pretty large, and that's what I usually suggest, because if you make a little tiny one, um, you won't be able to see him very well. So what we're going to do is we're going to make a couple of lines, so make a straight line coming down and it's probably about two or so inches from your side and then do the same thing on the other side. It doesn't have to be perfectly straight. Make sure they're relatively got the same length. Okay, Now what we're going to do is we're going to make a fat letter. You that comes up in a fat letter, you that comes up like this was there going to be his legs and his feet, and then we're going to do the same thing up here and then go across. Same thing over here. Those are going to be his ears. Alrighty. What's close this up down here? All right, so that's the general shape of our bunny. Now we're out of this side. We're going to make his little arms or his hands, and those are just going to be wide letter used to the side. And then we're going to go up to his ears and make some circles or some ovals. It's up to you and again. This isn't Ugly Bunny. So we don't He doesn't necessarily have to be perfect. And then he is missing one of hiss button eyes that we're going to make an X, and then we're going to make a nice round circle with the people inside for his teeth in his mouth. We're going to just make a straight line with some use coming out. You could even make one big and one small. So I have my big one here in my small one here. All right, basically, that's it for Ugly Bunny. And so what we're going to do now is we're going to start filling him in or cry with are oil pastel. So the first color that you'll want to use is white. So the reason why we're using white is because it will help the other color stand out more and were granted for this project. We're going to just leave the outside of your bunny. Um, just a plain brown, unless you want to cover it with some color. And that would be a great idea. So I have the side of my, um, well, past all my white one, and I'm just going to go along. You're going to color all of this in if I go out a little bit. No problem. Okay. And the nice thing about this is you can go over the pencil, but you'll still be able to see it. See how I'm going over the pencil a little bit. But I can still see it. So when I outlined, I can still see you don't like that. I did. So I'm basically going to just fill in the hole. Ugly funny shape with my white well past. Still just like this. Uh, excellent. OK, now these could get pretty messy. You have to be up for that. You have to be aware of that. And that's one of the really cool things about him, in my opinion. Okay, so we filled in our ugly bunny completely.
3. Step 2: Apply Oil Pastel to Ugly Bunny: what we're going to do next is we're going to put some color on him, and we're going to put some some yellow and we're going to put a little bit of round. Okay, so the areas that you do not want to put your yellow are the teeth, the eyeball in the ears. So what we're going to Dio is we're going to go around and we're going to fill in all the other areas. Now for this part, you can either is the side like I'm using. Or if you want a stronger color, then you can use your oil pastel more like a Cory on like this. Okay, because I'm trying to show you this incredible short amount of time. I'm going to use the side mostly, Um, but it's up to you. And remember, if I ever get going too fast, which sometimes I dio police feel free to pause your video until you could touch up. Okay? I'm just gonna take a minute to go through this, Bonnie, and make sure that I have his coloring. Nice is solid. Remember, you are avoiding. You don't want to go over the teeth eyeball or the ear area. That little insert in that in the middle of the year right here. We're gonna keep that white unless you can think of another color that you like to use. Or if you really want to use the yellow through there, that would be fine too. This is your artwork. Okay. See how small that God, when you're using oil pastels, they go very, very quickly. Used them up very, very quickly. Much more quickly, then Crayons. Okay, just putting a little bit more color. It's okay if you see a little bit of the white showing through. That's the beauty of oil, Pastel. Now what you can also do What's it need about this particular type of art? Supply is you can smear it. So let me show you. So if you see an area that you like to look a little bit smeary, you just rub your finger around. Is your finger going to get pretty? Um, messy? Yes, it iss. But that's the fun of oil test stills. We smear him around a little bit, see how simmering my hands are getting, but I really like the feel of it. It's cool if they're kind of um, really, I kind of feel oily. Okay, So what we're going to do next is I I really like it if we put a little bit of brown, makes him look just a little bit dirty. So if you want to put a little bit of brown just, like very lightly, that's a good idea. If you don't want to, you can skip this step. Okay? I just like to do this. It look gives it a little bit more detail, and then I like to smear it in. See that? See how I'm Samir ing it in. So all the colors kind of blend together. Hey, excellent. All right, So the next thing that we're going todo is we're going to add our white going to add or what? See how I have on my handy dandy paper tell I love paper tells because we can get a little bit of the excess off. So let's take our, uh, white right over here, and I'm going to press pretty hard and I'm going to press this way. You're going to hold it this way, not on its side. And I'm going to fill in that tooth that big tooth and then I'm going to fill in the smaller too. I'm going to fill in the eyeball. Then I'm going to fail in the ear and then the other ear. Here we go. Now, the last thing that we're going to do to complete our ugly bunny is we're going to put some black outline all along the pencil lines. So what I'm going to do is I'm going to start in the middle of our ugly bunny and I'm going to go out. So my hand doesn't smear anything. One thing about oil pastels that I just shared with you as they smear a lot. So if if you don't want to smear them, then you you want to keep your hand from from rubbing on them. So if you do want them smeared, which a lot of people dio, then it doesn't matter. But what I like to do is start in the middle. There's one eye and then just go out that on our ears I knows in our teeth and mouth I see . Like I said, they break very easily. Okay, I'm going to go on the top. Do you see how I'm just following along my pencil line just like that all the way around. Okay, Now I want to show you one more thing. I was talking about oil. Castells being really smeary. One of the really neat things that I like about oil pastels. If you're outlining something and he wanted to look a little bit messy, you can smear on purpose so you can kind of go over with your finger along the line like this because this is an ugly bunny. We can create a little bit of Samir eeriness on our bunny Onley if you want to. Some people Do you like to skip this part? See how it gets on your hands? It just kinda blends the lines a little bit. I actually like this look, so that's why I'm doing it. But if you'd rather not do this part, that's okay. I know the kids that I teach. Sometimes I would rather not do this part, and that's OK. So going along with my finger and then I'm going to do here, in here, just like that, it makes it blend in a little bit more. Okay. I am excited about this little guy. I think he looks really cool. And I hope you enjoyed this lesson. Please let me know what you think. Or if you have any questions or comments about this project, you think it's really fun. All right, I'll see you later. See? Next time. Bye.
 Em Winn, Teacher, Art Instructor, Artist