Transcripts
1. Introduction and Supplies You Will Need: Hi, friends. How are you? I hope you're having
a great day today. I'm excited about sharing
this project with you. This is a project
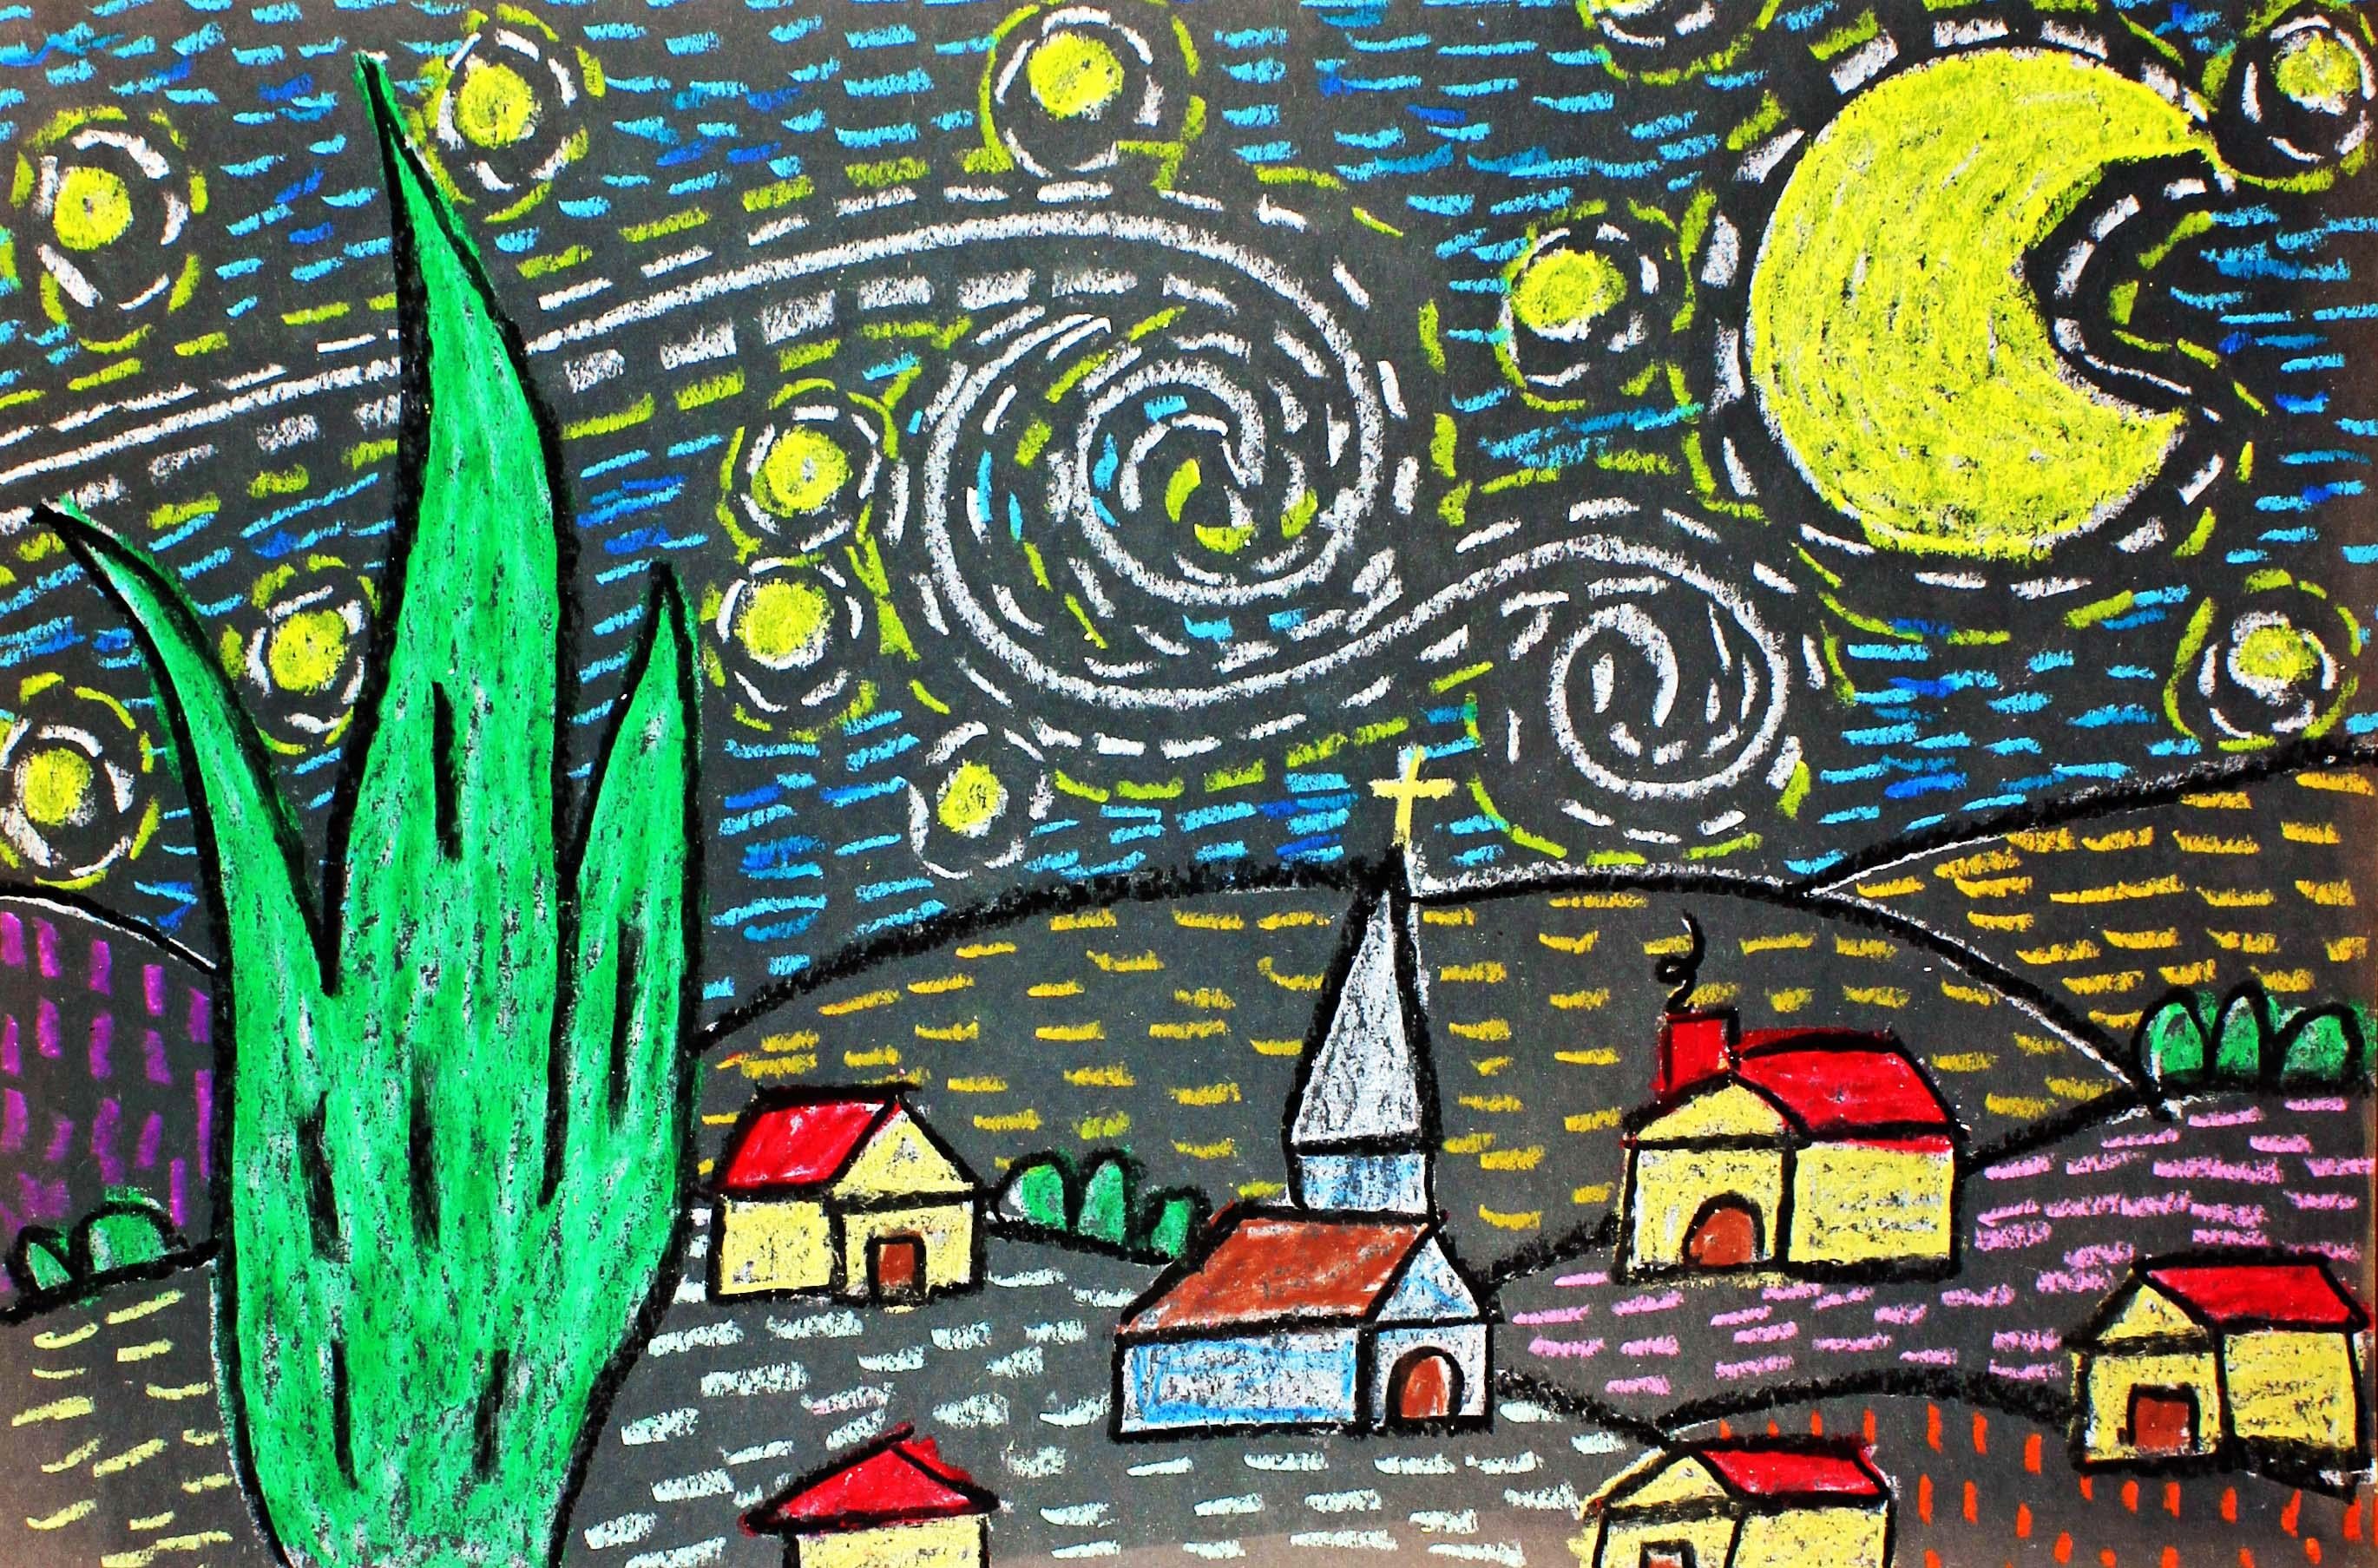
that was inspired by the artist Vincent Van Gogh, and he painted a painting
called The Starry Night. So I think it'll be a lot of
fun to create this project. Let's get started. Et's talk about the supplies and the materials that you will
need for this project. The first thing
that you'll need is a sheet of thick black paper. I'm using a construction
paper here, but just use what you
have available to you. You will need a paper towel. You will also need a set of oil pastels that includes
the colors black and white. So go ahead and gather those
supplies and materials, and I'll see you back
here in the next video.
2. Step 1: Draw The Starry Night Design: All right, friends,
let's get started on the first step of our project. We are going to be using
our white oil pastel. Remember, oil pastels
are really soft. So if your oil pastel happens to break while
you are using it, make sure you just
put that broken piece aside and then just
keep moving on. We're going to
make a curve line, and remember your curve line might look different than mine, and that's okay because we want your artwork to look different
than everyone else's. That's just the best
thing about art, how everybody's will
look different. All right, so I have
kind of a curvy line. Then I come down. I come back up with another curvy line almost to the top of my piece of paper, and then I come
down all the way. Then I'm going to add a
little bit more right here, little curve line, and then
I'm going to come down. So that's my cypress tree. Now, right here in
the middle and over to the right at the bottom
of our piece of paper, we're going to create a
village, a small village. In the center of a lot of
villages, there is a church. So we're going to make a church and it's not going
to be a tiny church, but it's not going to
take up the whole space. We need to remember
that a big part of this project is going to be
the beautiful starry sky. So we're just going to use the bottom half of our piece of paper to create
our small village. So to make our church, we're going to make a large
long and tall steeple and that's just going
to be a triangle. And if you want to put
a cross at the top, go ahead and do that,
but you don't have to. Underneath that,
what we're going to do is we are going
to make a rectangle. And then what we're
going to do at this corner of our rectangle, we're going to make
an upside down V, and then we are going
to close it up. Make sure it is attached. So the triangle is attached to the corner of the rectangle. Now what we're going to do is we are going to extend
this line out, so it's a little bit longer. We're going to come
down at a slant, and then we're going
to close these up. So this church is going
to be more three D, and this is the roof
line right here. Now we're going to make a
box underneath the triangle. And we're going to make
another rectangle underneath. As you can see, that
is a three D church. If you want to make a door
here, if you have room, you might even make some
windows, okay? It's up to you. All right, so
there's our church. Now, around our church, we are going to make some
structures, some houses. And let me show you how
to make a three D house. So you start out with a
triangle for your roof, and then you come down with two lines and you
close up at the bottom. You make three lines
coming out the side. One, two, three. Notice that the second line and the third line are a little bit longer than the first one. We're going to connect
these two lines right here with a slanted line, and then we're going to connect these two lines with
a straight line. There you go. There's
your three D house. If you'd like to add some detail to this house, go
ahead and do that. I'll add, like, a little
chimney, maybe a door. If I have room, maybe I
can even add some windows. Now, at this point,
it's going to look like our church and
our structures, our houses are kind of
floating in the air, but we will anchor
them to the ground in just a few minutes after all
of our houses are finished. So at this point, I'm going to make a couple of
more houses here. And remember, I'm not
going up onto the top part of my paper because that's where our starry sky is going to be. You're just going to
be working down here. So go ahead while
I'm working on mine. You work on yours, and you put as many houses as you'd
like in this area. Okay? Make sure they're not tiny and make sure they're not huge. Like, you can't really have the same starry sky inspired artwork if you make
a giant house right here. Okay? So let's get started. Alright, friends. So as you can see, this is the foreground. That means this is the area this tree is the area
that's closest to us, and I have some structures that are going off the
bottom of the page. That's the way that Vincent
Van Gogh's painting looks. So I wanted to get a couple
that are off of the bottom. And it does still look like my houses and my
church are floating. So what we're going to do
now is we are going to anchor our structures
to the ground. The way that we're going to do that is we're going to create lines to show ground, the ground and a few hills. Alright? So I'm going
to start over here on the left part of
my piece of paper, on the left side of
my cypress tree. And I'm just going
to make a line, and I'm going to jump over
my cypress tree, come out. And then I made a
little tiny line here, and I don't want to
go through my house, but I want to come down like
this and then come down. Like that. All right. Now I think I'll make another
one maybe right here. So I'll come up, like this. Make sure that you
don't make these super straight because they're
little hills, right? So maybe I'll even
come around like this. And I think to create a
little bit more interest, maybe I'll make one down here, and maybe I'll even
come up like this. So do you see how that is anchoring the church and the
structures to the ground? I'm going to make that
line a little bit darker. Make sure you push
pretty hard with this so you can see
your own lines. Alright, at this point, if you see anything down
here at the bottom, any areas that
you'd like to fill up with something, you
can go ahead and do that. I'm going to put some bushes in some spots that I feel need
a little bit of detail. And remember this
is the foreground. This is the middle ground, and this is going to be
the background in the sky. All right. Once you're happy with the way that
your drawing looks, we're going to move
up to the sky. Now, in the right top
of your sky area, you're going to make a moon, and Vincent Van Gogh is really
good about making moons, and he makes a really cool and beautiful moon,
and it's big. It's huge. So let's
make the letter C. And then inside our letter C, let's make another C,
but it's not quite as deep or big, that's
going to be our moon. Now, if you look
at the painting, the Starry Night, you
will see swirls of stars. And so we're going to
work on that right here. We'll put one swirl here
and one swirl here. Let me show you how
we're going to do that. You're going to start at the
edge of your piece of paper, come out, jump over your
cypress tree. And make a swirl. All right. So it's
like a swirling sky. Now for this swirl right here, we're going to start here
next to this initial swirl, come down and make
another swirl like this. Okay. So we have our
one, two swirls. Then what we're going to do is we're going to find some space, and we're going to make
some small circles, not tiny circles, but small. These are actually
going to be stars. You can make them some of
them close to each other, some further away, and we're
making those in the sky. Maybe I'll make one
more right here. Maybe I'll make one up here off the page, going
off the page. All right after you finish making your
squirrels, your moon, and circles for your
stars in the sky, take a look at your
whole entire drawing and then decide if you
want to add anything else. If you want to add
something else, go ahead and add it as long as it has to do with
what we're doing. For example, we're not
going to add maybe like a jet or maybe like a llama
or something like that. We're going to stick
with the theme. So if you'd like to add
another house or some bushes or a small tree or some more
stars, go ahead and do that. Next time when we meet, what we're going to do is we
are going to add some color in the style of Vincent Vanco.
3. Step 2: Apply White Oil Pastel: Alright, friends. So
the first thing that we're going to do is
we are going to put some white blocks of color on certain areas of our drawing. We're going to fill in
the moon, the stars, the cypress tree, the bushes, the church, and the houses. So I'm going to go ahead and do that with my white oil pastel. I'm going to try to stay inside the lines, the best that I can. If I go a little bit
out, that's okay. I'm just filling it in
in an organized manner. Alrighty. So I've blocked in all my white that I'm going
to do for the moment, and when we come back, we will
start working on our Sky.
4. Step 3: Add Details to the Sky: Alright, friends. So
what we're going to do now is we're going to
be working on our sky, and we're going to start
again with our white. We've been using it so
far, so far so good. And what we're going to do is
we are just going to create small lines impressionistic
style right along this swirl. And so we're not
touching the swirl. We're just going
around just like this. And then we're going to
go on the other side, and we're being pretty careful. We're doing our best work. Okay, so what this does is it shows an
impressionistic style, and that's what
Vango was all about. So what I'm going to
do is I'm going to go ahead and go around
this other swirl. I'm going to go
around this star, this star, all of the stars, and also the moon. So I'm going to do that with
my white oil pastel out, and I'll see you back
here in just a minute. Alright, so I'm
finished with making my little impressionistic marks on my swirly part of my drawing. What I'm going to do
next is I'm going to get my yellow oil pastel, and I'm going to be using this. I'm going to be using
this yellow oil pastel to fill in my moon and my stars. And then I'm also
going to be using it to make some
more small lines. But let me start with
the moon and the stars, and I'm going to fill
them in pretty solid. Alright, now that I've filled
in my moon and my stars, what I'm going to do next is I'm going to follow these white, small lines with
yellow small lines. I'm going to go right along the same line without touching. And I'm going to put
some yellow detail there along my white
little detail lines. So I'm going to go ahead and
do that on these swirls, and I'm going to do
this also on the stars, around the stars and then
also around the moon. Alright, friends, it
looks like I have all of my little yellow lines, my impressionistic
lines around my moon, my stars, and my swirls. I'm going to put that away, and then I'm going to
get my light blue out. If you don't have a light
blue, use your dark blue. We're going to be
filling in the sky, and we're going to make
sure that our lines are going just one way. So they're just going
to go horizontally. That means back and
forth this way. So go ahead and do that. All righty, friends.
So I have my blue sky. I think I'm going to add a little bit more of a
different shade of blue. If you'd like to go
ahead and do that, you can do that, but
you don't have to. I'm just going to
put a few marks just to give the sky a
little bit more interest, but that's completely optional. All righty, friends.
So when we come back, we will be working on the lower half of our artwork
plus our cypress tree. So I'll see you back
here in just a minute.
5. Step 4: Apply Color to the Design: Alrighty friends.
So in this step, what we're going to do is
we are going to go over these white blocks
with other colors. So, for example, I'm
going to use a dark green on my cypress tree, which is what Vincent Van Gogh
did with his cypress tree. And then I'm going
to just come up with my own colors
for the church, which I think will keep white with maybe a little bit of blue. And then with the houses,
I'm not sure yet. I'm going to see how I feel about that when
I get to that point. So think about the
colors that you'd like to use on the cypress tree and the structures and the bushes and go
ahead and do that. And you can watch me fill
in my colors as well. So I think for my cypress tree, I'll use this green right here. Alrighty friends. So what we're going to do
after we fill in some color on our greenery and
our structures is we are going to put some
more lines down here, Vincent Van Gogh style. So the lines that
you see up here for this style of artwork are
also going to go down here. You can choose any
colors that you like. If you want to choose pink, go ahead and choose pink. It's completely up to you, but remember all of
your lines are going to go one way within each space. Alrighty friends. So
it looks like all of my artwork is filled in
with my little lines. And the last step, what we're going to do is we are going to outline some of our
features with black. So I'll see you back
here in just a minute.
6. Step 5: Outline the Design with Black Oil Pastel: I Alrighty friends.
In the last step, what we're going to do
is we're going to take our black oil pastel and use
the tip part if you can. If it's not if it doesn't
have a big tip on it, use the side, and that way, you'll get a sharper edge. And what you're going to
do is you're just going to outline very carefully
your greenery, meaning your cypress
and your bushes. You're going to outline your
structures and your hills. We're not going to go into the sky and outline
anything there. All right? So I'm going
to go ahead and do that. It might look like I'm
working really fast on the video because I speed it up, but really, I'm not
working that fast. I'm taking my time, so
I do a really good job, add some detail there. So see you back here
in just a minute. Alright, friends, so that's it. I hope that you
enjoyed this lesson. I sure had fun teaching you, and I will see you next time.
 Em Winn, Teacher, Art Instructor, Artist