Transcripts
1. Introduction and Supplies You Will Need: Hi, friends. How are you? I hope you're having
a great day today. I'm excited about sharing
this project with you. This is a drawing and
watercolor painting project that I designed,
especially for kids. Students do not need to have any drawing or
painting experience at all to be successful
with this project. I will guide students step by step through all the steps
that they need to take. Today, we are going to be
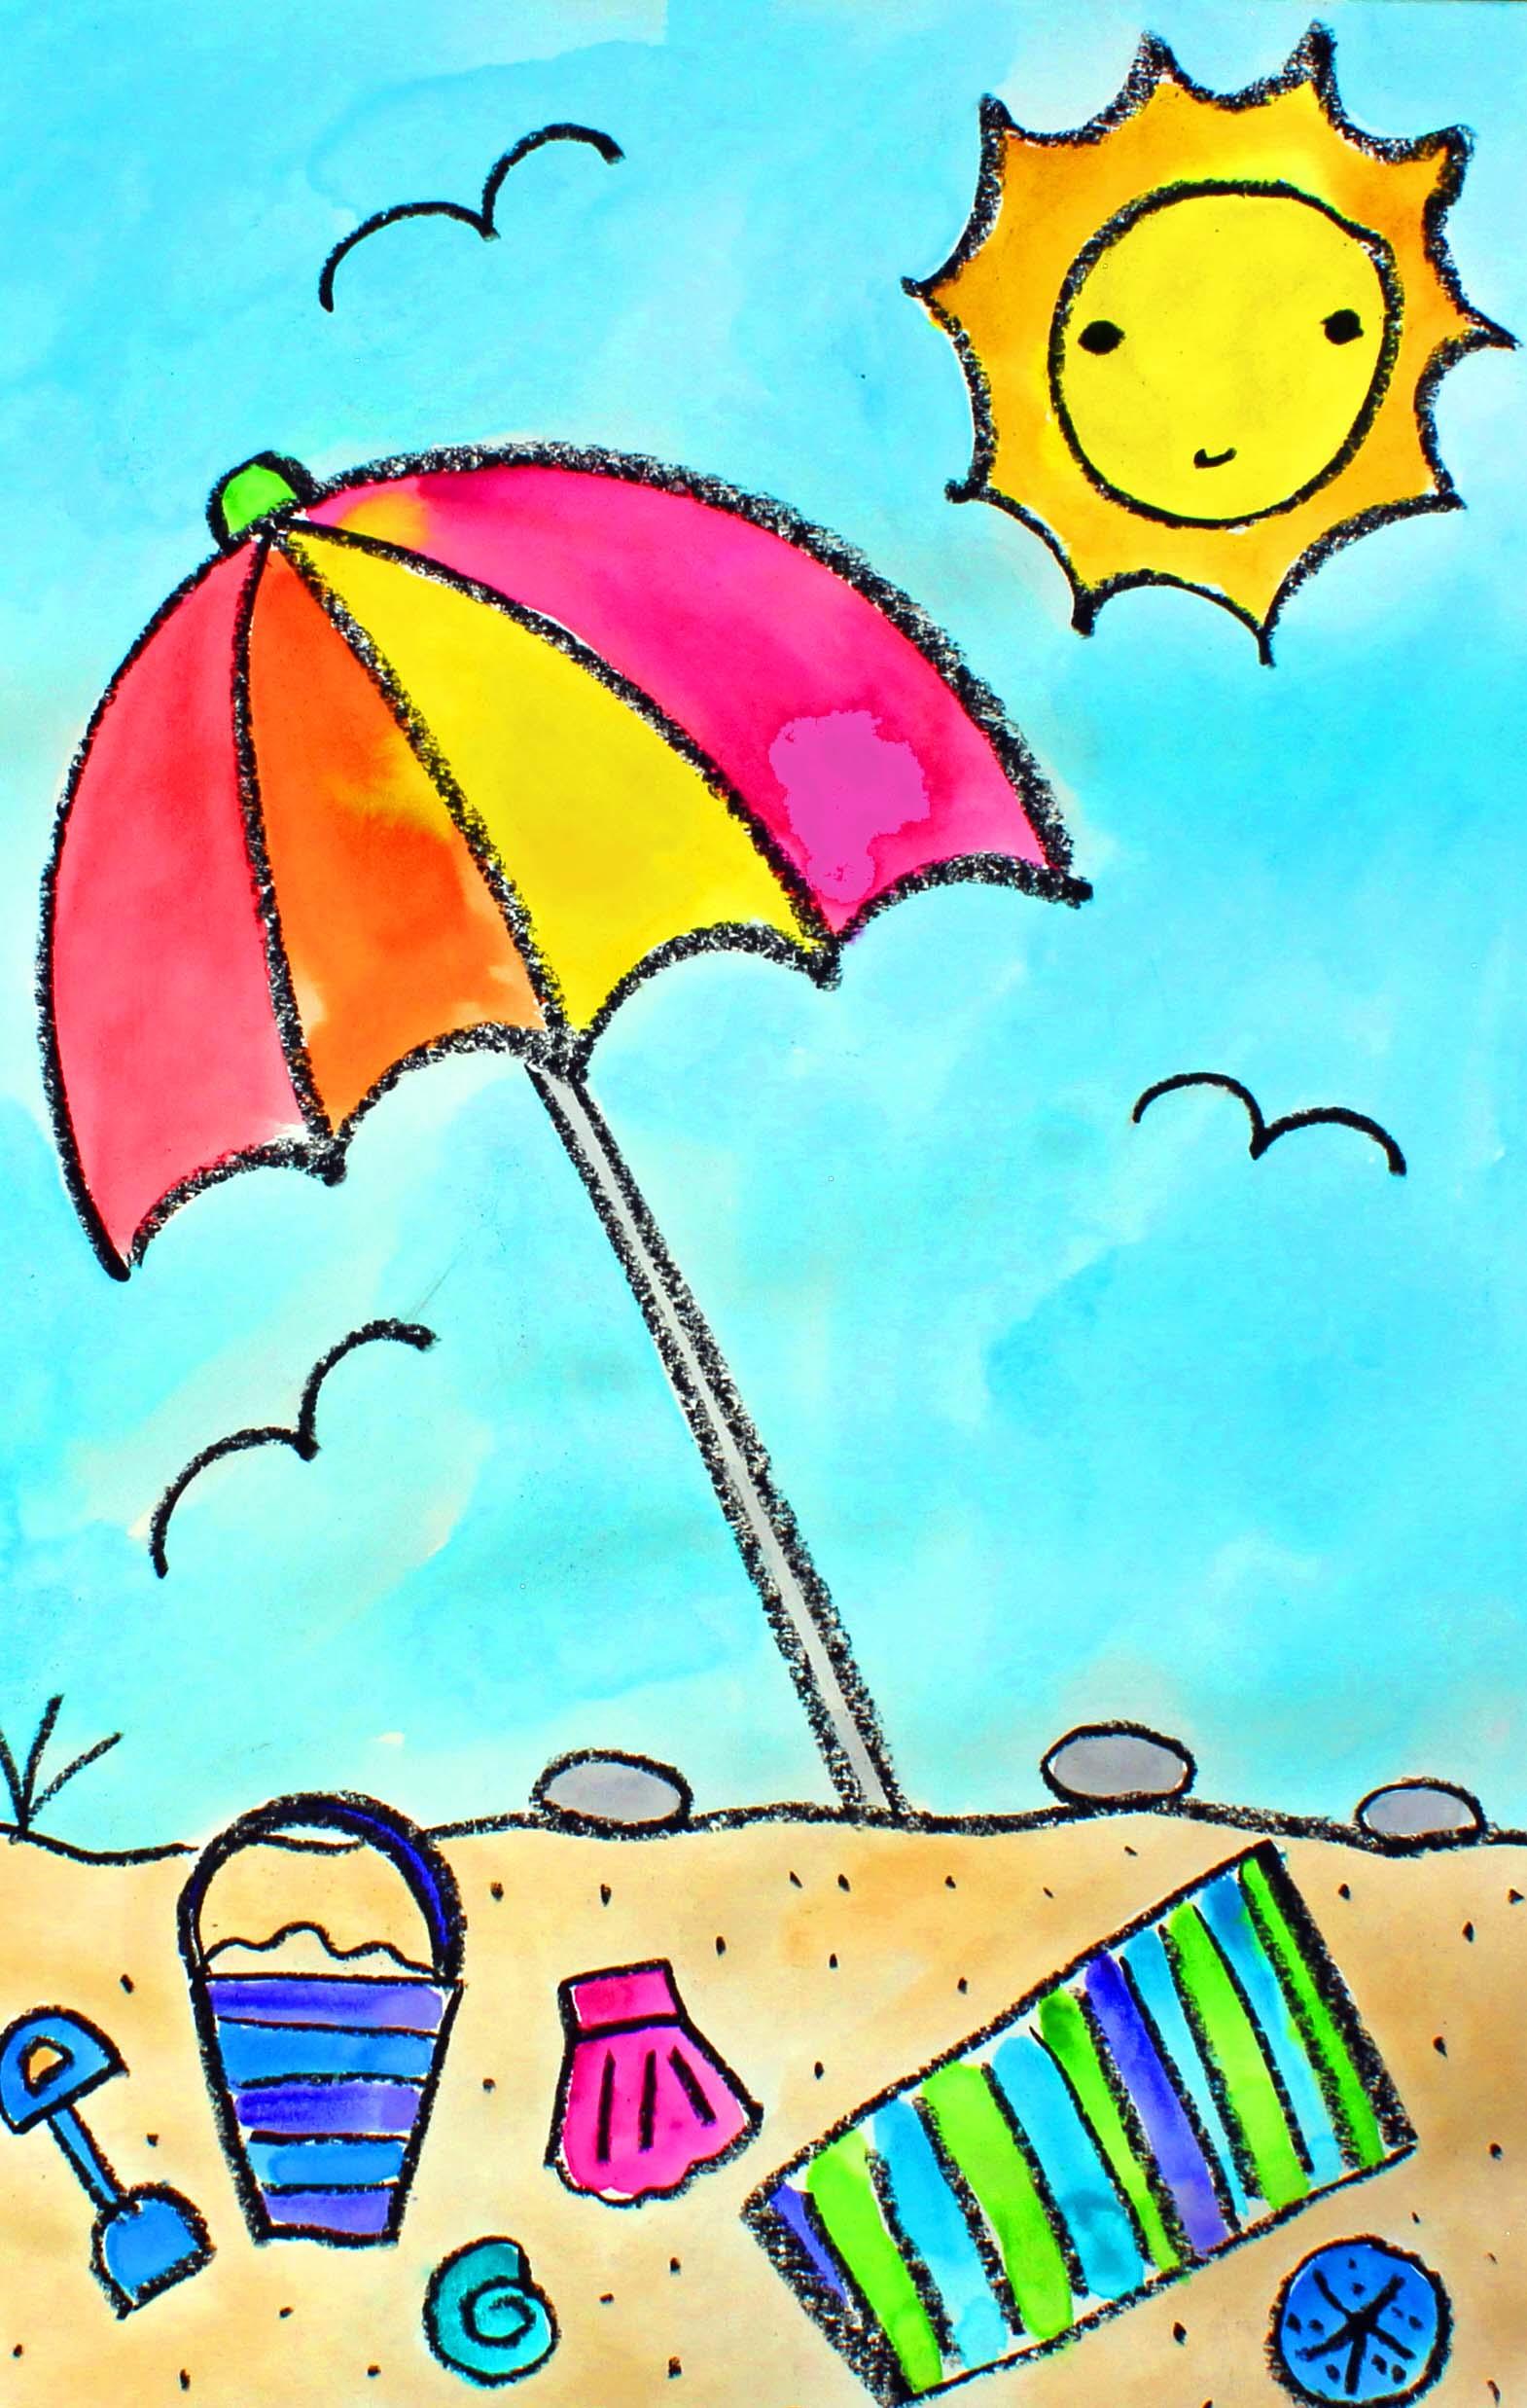
creating this beachy scene. I hope that you have
a lot of fun with this project. Let's get started. Let's talk about
the supplies and the materials that you will
need for this project. The first thing
that you'll need is a sheet of watercolor paper. You will need a set of watercolor paints
and a paintbrush. You will also need a cup
orbl with clean water and a paper towel and a black
oil pastel or crayon. So go ahead and gather all of those supplies and materials, and I'll see you back
here in the next video.
2. Step 1: Draw a Beach Scene: I In this step, we're going to draw our design. So let's get started. The first thing that we're
going to do is pick up our oil pastel or crayon. I'm going to choose
an oil pastel. We're going to go about to the middle of our
sheet of paper. The middle of my sheet of
paper is about right here. And we're going to
make a large umbrella, beach umbrella about right here. Alright? So let me show you
how we're going to do that. We're going to start with an upside down letter And then underneath the
we're going to make some smaller curve
lines like this. And this is going to be the
main part of our umbrella. Now what we're going
to do is we are going to come down
from this umbrella, and I know that it's not
finished yet, but that's okay. We're going to finish
it in a moment. We're going to come
down here and we're going to add some things
down at the bottom of our sheet of paper
now that we know where our umbrella is, okay? So when you go to the beach, think about what you
need at the beach. You need a towel, right?
So let's put a towel. Anywhere here at the bottom, I'm going to make a towel
that goes this way. It's going to be a little
bit slanted like this. Doesn't have to be perfect. And then I think I'm going
to add something over here, maybe a pail with
sand in it, a bucket. So I'll make a straight line, a slanted line coming down and another slanted
line coming down, and then close up at the
bottom with a straight line. And then I'm going to put a handle on the top
of that like this. Maybe I'll even double that up. I'll put a little bit of sand inside of my
bucket or pail. And then I think over here, I'm going to add
a little shovel. So let me see how I'm
going to make my shovel. This is going to be the
top part of the handle, so a curve line and
then close that up. And inside that shape, I'm going to make a smaller
shape that looks the same. And then two lines
coming down for the handle and then a shovel
down here at the bottom. Alright, so I have my shovel. I have my pail with
some sand in it, and I have my towel, and I have the top
part of my umbrella. Now, I think what
I'm going to do is make some sand down
here at the bottom. So I'm going to decide
where I want my sand to be. I think I want my sand
to be about right here. So I'm going to come
along. Like this. And remember, sand when
you're looking at it, it's not completely
flat or straight. So you need to make it
a little bit bumpy. And then if there's anything
else that you'd like to put onto your sand, you can do that right now. So if you have a
little bit of space, you can put some beach rocks or you can put some seashells. I think I'll put
a few seashells. So I think I'll start with a seashell that looks like this. It's a rectangle, and
then coming out from the rectangle to slanted lines, and then a squiggly
line like this and some little bit
of detail there. That's kind of a
funny shell, right? Maybe I'll put
something over here. Maybe I'll put Ooh, I know. How about a sand dollar? A sand dollar,
this is how I make sand dollars. So let
me explain that. I make a circle, and then
I put some lines inside, and then I put some little dots. Mm, I wonder if I can put
something right here. Let me think. I think
I'll put another shell. This will be more of like
a snail shell like this. I like that. And then I think
what I'm going to do for the rest of this space is I'm going to put
some small dots, and these dots are going
to represent sand. So that's what I'm
going to do for the rest of the space
just to fill it up. There we go. Now what I'm going
to do is I'm going to add a little bit of detail for
the pale or the bucket. I'm going to make
some lines here. You don't have to be
perfectly straight. And then I'm going to put
a design onto my towel. I think I'm just going to add some more stripes
here for my towel. You'll add a couple more
here in the center. And then what I
think I'm going to do next is I'm going to come up here to right underneath
in the middle on my umbrella, and I'm going to make a pole
for my umbrella like this, and that's going to
go into the sand. Now I'm going to
decorate my umbrella. So I'm going to put a curve
line here at the top. And then from this curve line, I'm going to make some stripes coming down to these
points right here. So it's going to be a
little bit curve like this. So curve line, curve
line. And curve line. Now, you can make any type of a design that you like on
the inside of your umbrella. This is just what
I'm choosing to do. Now that we have our umbrella and some things down
here in the sand, what I'm going to
do is I'm going to come up here
because I want to make a sun, going
to make a circle. If you'd like to make something different, you can go
ahead and do that. And then I'm going to
make some curve lines going all the way around that are connected
to each other. I like to make this type
of a sun sometimes. And then I'm going to make a
small face inside of my son. Make sure those eyes
are evenly sized, and then a very
small little mouth. And then off in the distance, I'm going to make some seagulls. So I know a really easy way to make a seagull,
and this is how. So you make a curve line, and then attached to one of
the ends of the curve line, you make another curve line. So it looks like a bird
flying off in the distance. I'll put one here, and then
I'll put one right here. If there's something
else that you'd like to put into the sky or
something different, you can go ahead and do that. Or if you'd like to put more seagulls or a different
type of a sequel or a bird, you can do that, as well. Now, go ahead and take a
look at your art project. If there's anything else
that you'd like to add, go ahead and do that right now. For example, if you see
some space here or here, you can add more
things on to the sand. For example, let me see. Let me add a few
little rocks here. That will add a little
bit more interest. And then if you want to
add some little seagrass, you can go ahead and
do that if you'd like. It's completely up to you. Alright? So go ahead and add any other
features that you like. And when we come back
in the next step, what we will do is we will
start painting our design.
3. Step 2: Paint the Design: In this step, we are going to
start painting our design. So let's get started. The first thing
that we're going to do is we are going to add one or two drops of water into
each of our pans of paint. And what this will do
is it will soften up our paints a little bit so that they are easier for us to use. So I'm going to
take a moment to do that because it really does
help once you start painting. Now that our paints
are softening up, let's turn our attention
to our beach design. So here we have our umbrella,
our beach umbrella. We have a sun in the sky, some seagulls, and some designs
down here at the bottom. Your designs might look completely different from
mine, and that's okay. I just put a few beachy ideas down here at the
bottom so you can have some ideas on things
that you might like to add to your
artwork, right? So what we're going
to do first is we're going to focus on painting actual designs
and not the background. This is what I mean
by that. We are going to be painting
in this step. We are going to paint the sun. We are going to
paint the umbrella. We are going to paint any
items that you have down here, any beachy items, for example, the towel, the shells, the rocks, the bucket, if you have a little shovel, those are the things that we're going to focus on painting. What we're not going
to be painting in this step is the background, which is the sky, and we're not going to be painting this
down here at the bottom, which is the sand. Okay. So think about the
colors that you'd like to use, and that's what I
will do, as well. You do not need to use the
same colors that I use. You get to choose the colors
that you would like to use. This is your artwork, so you
get to choose those colors. I'm going to start up
here with the sun, and I want my sun to be
a nice, bright yellow. So I'm going to add
some yellow there. Remember, if you would like your paint to be really bright, then you add more
paint and less water. And if you'd like
a softer color, then you would add more
water and less paint. Okay? So I have my
son in for the rays. I'm choosing a
light light orange. It almost looks like a yellow. Just wanted a little bit of a different color
for those rays. Alrighty. Now I'm
going to move down to the umbrella and all of these
things down at the bottom, these BT items. Okay? So I'm going to paint my
umbrella, some different colors. I think I'll start with a red. And then I will move
to some other colors. I think I'm going to stick
with the warm colors, which are the red,
orange and yellow. I think that's what
I am going to do. So red, orange and
yellow, maybe even pink. Here we go. So if you see
right here and right here, you can see that my
yellow is starting to spread into the other
colors, and that's okay. That's just what watercolor
paints like to do. They like to spread around. So if you'd like to stop
the spread of your paint, what you can do is
you can hover over that area with your paper
towel and gently tap it, and that will stop the spread. But I like that, so I'm
going to keep it there. Now I'm going to go ahead and I'm going to
finish painting. I'm going to paint this area at the top of my umbrella
and the pole, the rocks, and everything
else at the bottom. So I'm going to
speed up the video, and you can watch me. Alright. Now I'm going to paint this area right here in the
pole, and then these rocks. For the rocks and the pole, I'm going to use a little bit of black paint with quite
a bit of water because I want it to look almost
silver or a light gray. So I'm going to paint the rocks a light gray or a silver shade. There we go. And then I think I'm just going
to paint the top of this green because I think
that that will look great. Alright, friends, I'm finished painting all of the
beachy details. When we come back, we will
start painting the background.
4. Step 3: Paint the Background: In this step, we are going
to paint the background. So let's get started. We're going to start by painting the sand down here
at the bottom, so we have the sand on the
ground and also in our pail. So what we're going to do is add a little bit of water
into one of our wells, and then we're going to add
a tiny bit of brown paint. We want just a tiny
bit because we don't want our sand to be too
dark. That's about right. So what I'm going to
do is I'm going to go ahead and paint my sand after I paint my
sand, this tan color. Then what I'm going to do is I'm going to start painting my sky. I am going to paint my sky blue. But if there's a
different color that you would like to use
to paint your sky, go ahead and use that color. So I'm going to
speed up the video. You are going to see me
finish painting this sand, and then you will see me
start painting the sky. Alrighty friends, I'm
finished painting the sand. Now I'm going to
move on to the sky, and I'm going to use this shade
of blue to paint the sky. And what I'm going to do is add a few drops of water into one of my wells and then add some blue paint to that and
get started on my painting. I'm going to try not to go into the other
colors with my paint, but if I do and they start
spreading around, that's okay. That's just what happens
with watercolor paints. It loves to spread around. Alright. So I'm going
to speed up this video, and you can watch me. Alright, friends, I'm
finished painting my design. I'm really happy with it. I hope that you had a lot
of fun with this project. I will see you next time.
 Em Winn, Teacher, Art Instructor, Artist