Transcripts
1. Introduction and Supplies You Will Need: Hi, friends. How are you? I hope you're having
a great day today. I'm excited about sharing
this project with you. This is a drawing and
watercolor painting project that I designed,
especially for kids. Students do not need to have any drawing or
painting experience at all to be successful
with this project. I will guide students step by step through all the steps
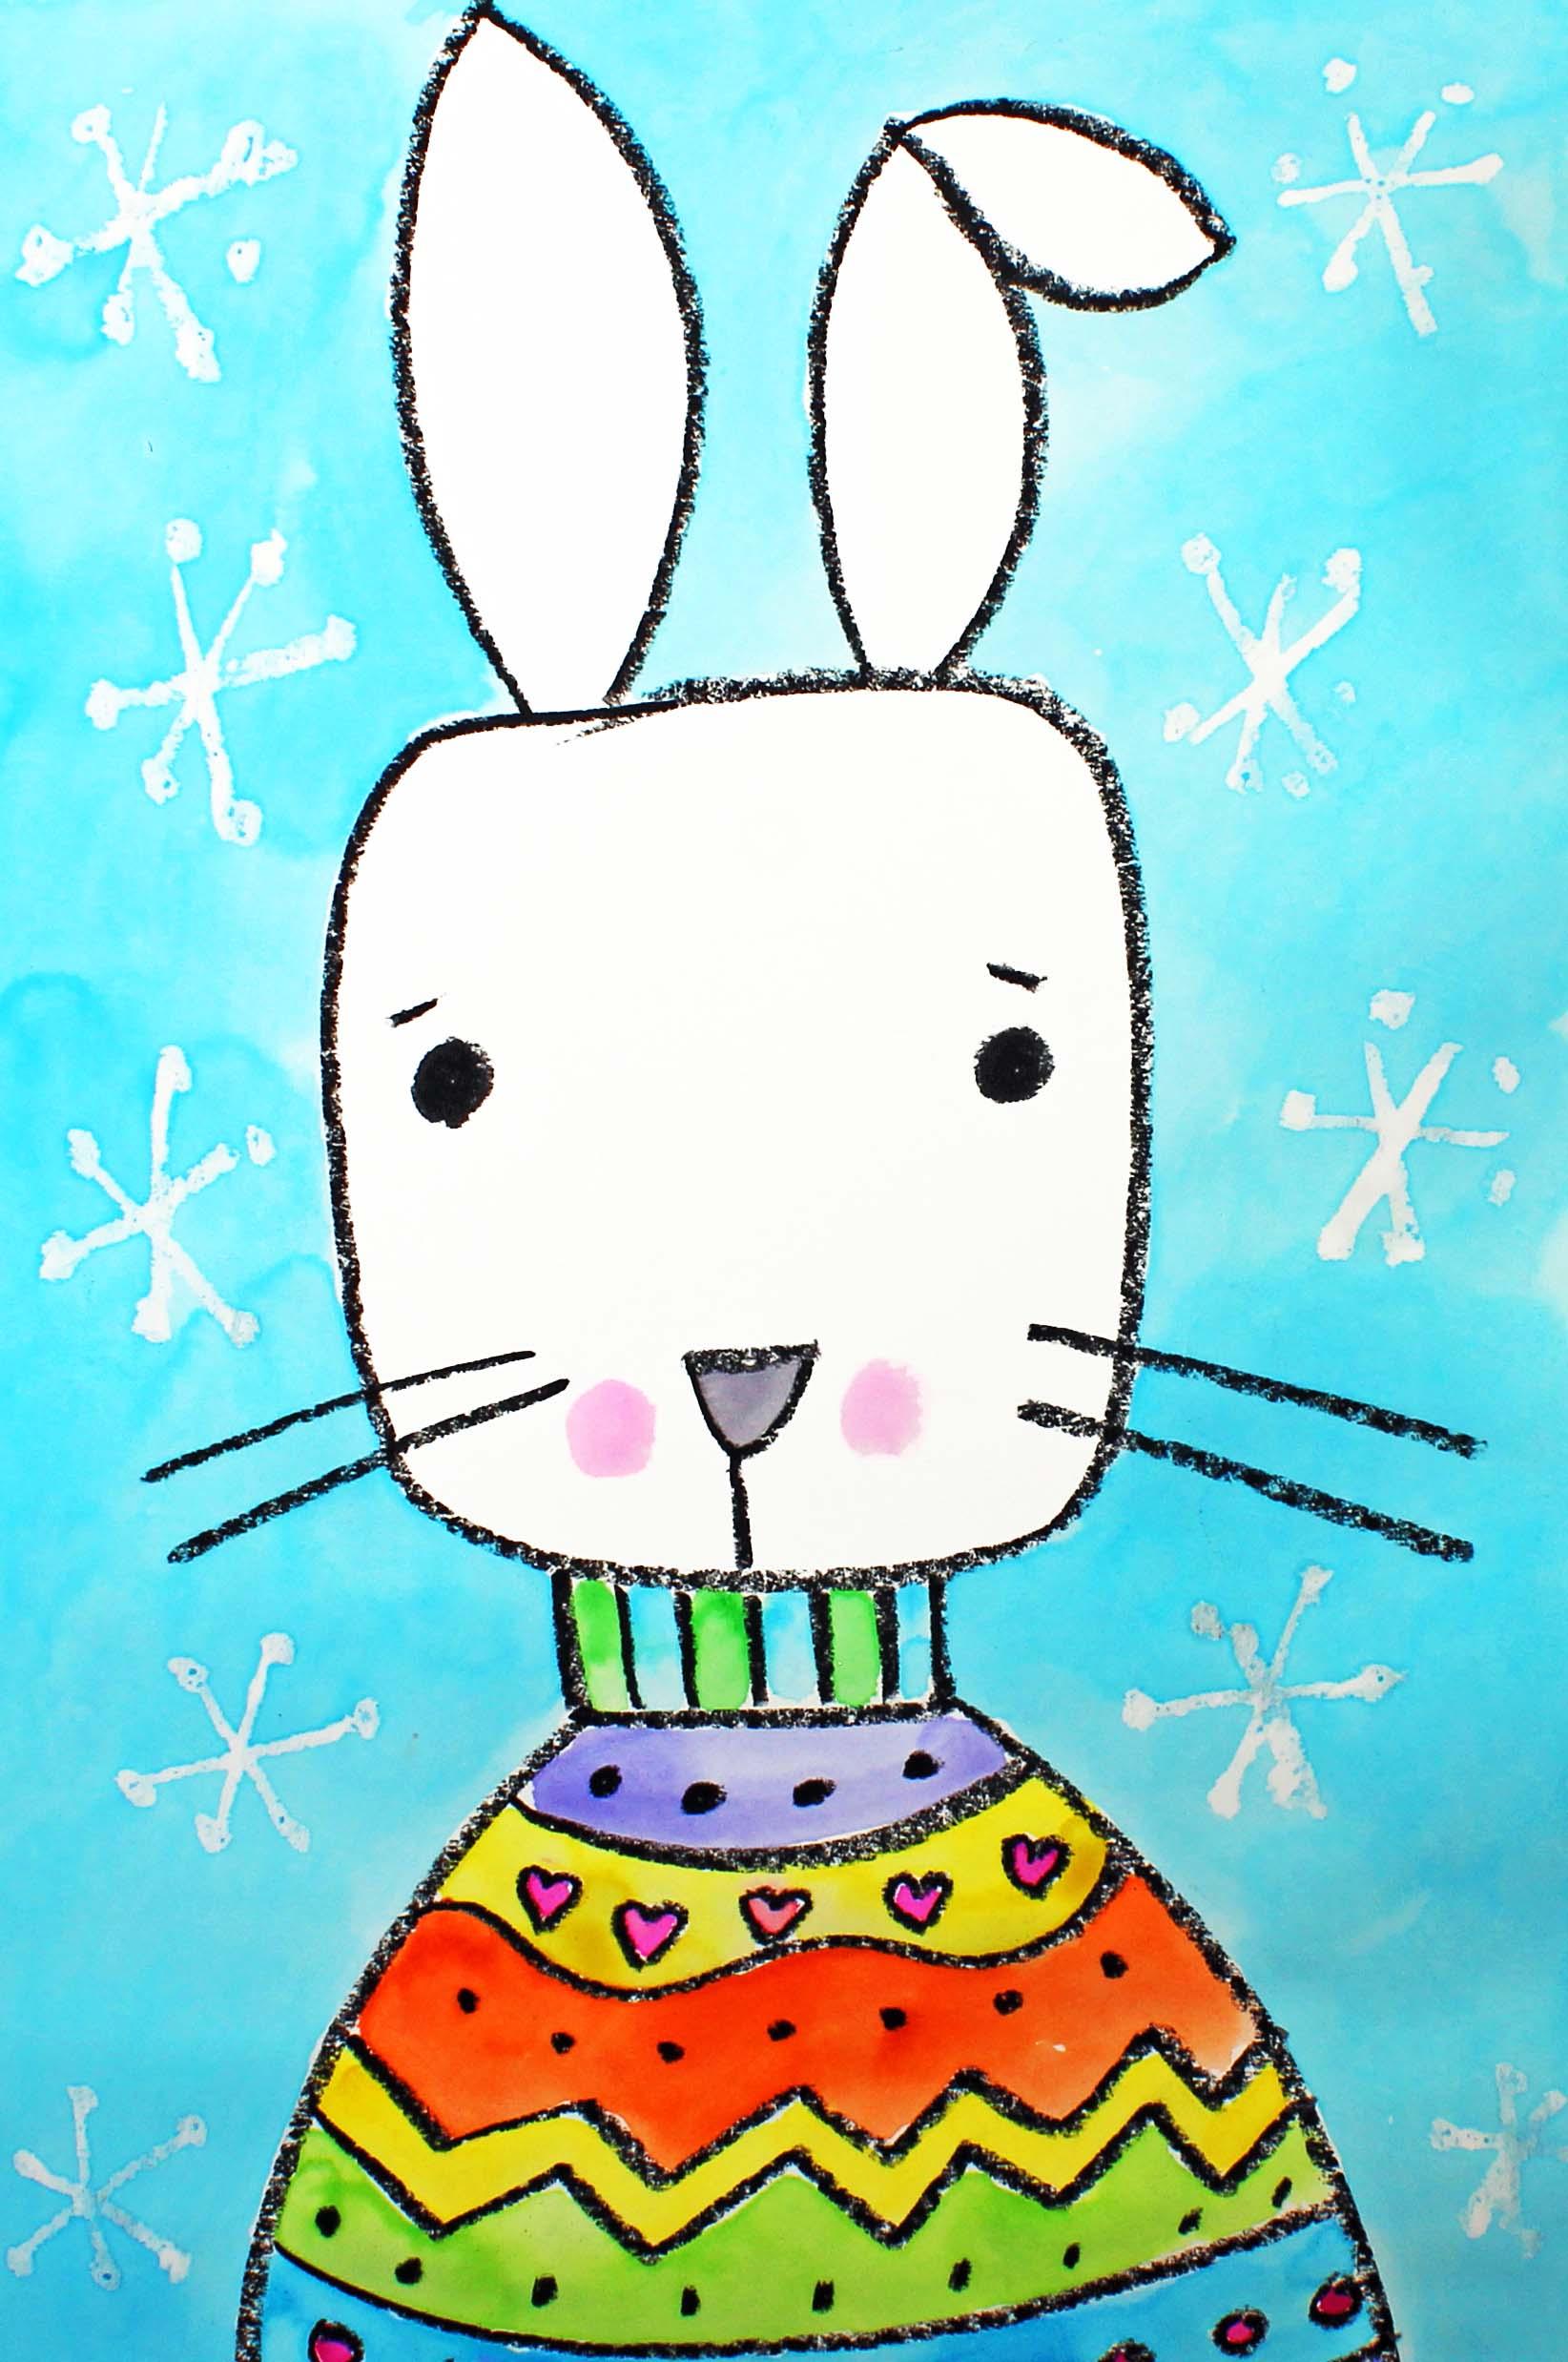
that they need to take. Today, we will create this
cozy little snow Bunny. Let's talk about
the supplies and the materials that you will
need for this project. The first thing
that you'll need is a sheet of watercolor paper. You will need a set of watercolor paints
and a paintbrush. I like to use this
size paintbrush, but just use what you
have available to you. You will need a cup or a
bowl with clean water. You will need a black
oil pastel or crayon and a white oil pastel or
crayon and a paper towel. So go ahead and gather all of those supplies
and materials, and I'll see you back
here in the next video.
2. Step 1: Draw a Bunny in a Cozy Sweater: In this step, we are going to
draw our cozy bunny design. So let's get started. Let's pick up our black oil
pastel or black crayon. And what we're going
to do first is we're going to go fairly
close to the top, but not all the way to the top. The reason why
we're not going all the way to the top
is because we need to leave some space
for our bunnies ears. And as you know, they
have pretty long ears. So we're going to start
about right here, and we're going to make a
shape that looks like this. It's kind of like a square, but it's also like a circle. So it's basically a square
with rounded corners. This is going to be the
face for our cozy bunny. The next thing that
we're going to do is add some ears here on the
top of this shape. So they're going to
be two curve lines going almost to the top
of our piece of paper. And then, so that's
one of my ears, and then the other ear is
going to look like this. It's going to be a little bit shorter because it's
going to be bent. So we have a curve
line, a curve line, a curve line coming out this way and a curve
line going in this way. So do you see how the ear
is bent a little bit? So we have a straight
ear and a bent ear. If you would like to
make two straight ears, that would be fine, as well. Let's move down to the
face of our bunny. What we're going to do is
we're going to make some eyes. I like to just make some
circles filled in for the eyes. But if there's a different type of an eye that
you'd like to make, go ahead and do that. I'd like to make my eyes pretty similar in size and shape. Might not be perfect,
but that's okay. I gave my bunny some
little eyebrows. If you'd like to
give them eyebrows or eyelashes, it's up to you. Or you can keep them without
eyelashes or eyebrows. Now I'm going to come down here and I'm going to
make a triangle. This is going to be
the nose for my bunny. And then I'm just going to make a straight line coming
down for the mouth. If you'd like to make some
curve lines coming up, so you have a little smile on your bunny, you
can do that, as well. I'm going to make
some small whiskers. I like to just make
two or three whiskers. In this case, I'm going
to make two whiskers. And then what we're
going to do is we are going to take a look
at the face of our bunny. If there's anything
else that you'd like to add to your face, go
ahead and do that. Now we're going
to move down here to the sweater for our bunny. We're going to make two
lines coming right out of the head area and then
close those two lines up. And then I'm going
to make some lines inside of that shape. This is going to be the
neck of my sweater. And then down here, I'm
going to make the sweater. So I'm going to just follow a curve line all the way down to the bottom of my piece of paper and do the same
thing on the other side. Now what we're going
to do is we're going to make some patterns inside this area of our sweater. So think of some patterns, something that repeats
some shapes or some lines that
repeat themselves, and you can just create some patterns all the
way down your sweater. So I think I'm going to start
maybe with a curve line, and you can either
follow my directions or you can come up with
your own shapes and lines. I'm going to add some dots. I think that I'm going to
make a curvy line like this. And then I think I'm going
to make some hearts. And then maybe I'll
make some dots here. I like to use dots a
lot for this project. All right. Now I'm going
to make zigzag line. And then I think I'll
make another zigzag line that follows that
first zigzag line. So I feel like I've
filled in pretty much all of my space on my cozy sweater. Now I'm finished with
my black oil pastel. I'm going to put
that down and pick up my white oil pastel. All around my bunny, I am going to create
some snowflakes. And these snowflakes are going to be let
me just show you. Let me show you what kind of snowflakes I'm going to make. Sometimes I just like to make dots for snowflakes like this. And then other times I like to make a snowflake that's a line, another line, and another line. They intersect right
here in the center. And then I like to
make a little dot at the end of each
of those lines. So those are my two favorite
types of snowflakes to make. If you can think of
a different type of a snowflake that
you like to make, go ahead and do
that if you'd like, or you can use a combination. You can make some of this
type of a snowflake, this type of a snowflake, and anything else that
you'd like to make. So I'm going to make
this one right here. So I'm going to go ahead and
pick up my white oil pastel, and I'm going to start
making some snowflakes. You will not be able to
see my snowflakes that I'm making because I'm using
this white oil pastel. And to be honest, I can barely see the snowflakes
that I'm making. I'm trying my best. But when you're using a white oil pastel or crayon
on a white piece of paper, it's really challenging to see those lines and dots
that you're making. So I'm just going to do my best. Alrighty friends, I'm finished making those snowflakes
on my background. I can't see where they are, and I'm sure you can't. But when I start applying
paint onto my piece of paper, then those will
magically appear. So in our next step, when we come back
in the next video, we will start applying
watercolor paints to our design.
3. Step 2: Paint the Design: In this step, we
are going to apply some watercolor
paints to our design. So let's get started. The first thing that
we're going to do is we are going to add a drop or two of water into each
of our pans of paint. And what this will
do is it will soften our paints a little so they
are easier for us to use. So I really do encourage my
students take that step, to take that time to add a drop or two of
water in each pan. Now that our paints
are softening up, let's turn our attention
to our design. So here we have our
cozy little snow bunny. And what we're going to do
is we're going to leave our snow bunny white
because it's a snow bunny. And we will be
painting the nose. And if you'd like to apply
some pink onto the cheek area, you can certainly do that. We will be painting the
sweater also in this step. For the background,
we're going to leave that for the next step. Okay? So we're just going
to be focusing on the nose, the cheeks, and the sweater. Alright? I'm going to start out by preparing a little
bit of paint for my cheeks, some pink paint,
I put some water into one of my wells and
added a little bit of pink. I want this to be pretty light. I hope that you can
see that, okay. Just want that to be
very, very light. Now I'm going to move
on to my sweater. I'm going to paint this nose last because that's
going to be black. And usually I try to
paint with the black last because the black is a very
dark and strong color, so I want to use that last. So I'm going to just focus
on painting my sweater. I'm going to try to
stay inside the lines. But if I go outside of
the lines a little bit, that's okay. That's no problem. That happens with
watercolor paints. Watercolor paints love. They love to spread around. So that will happen sometime. So I'm going to go ahead
and speed up this video, apply my paint, and I'll see you back here in just a minute. Now I'm going to go ahead and
paint the nose on my bunny, and I'm adding just a
small amount of water and a small amount of black
paint into one of my wells. And I want this nose to be
fairly light, not too dark. There we go. Perfect.
When we come back, we will start painting
the background.
4. Step 3: Paint the Background: In this step, we are going
to paint the background. So let's get started. I've decided to paint
my background blue, the shade of blue right here. So I'm going to add
some blue paint to one of my wells and
then add some water. And then I'm just going
to start painting. And as you know, I added some snowflakes with
my white oil pastel, so I am expecting them to
show up on my piece of paper. And there they are right there. So I'm going to go ahead
and speed up the video, and you can watch me, and I'll see you back
here in just a minute. Alrighty friends, I'm
finished painting my design. I'm really happy with it. I think it looks awesome. I hope that you had a lot
of fun with this project. I will see you next time.
 Em Winn, Teacher, Art Instructor, Artist