Transcripts
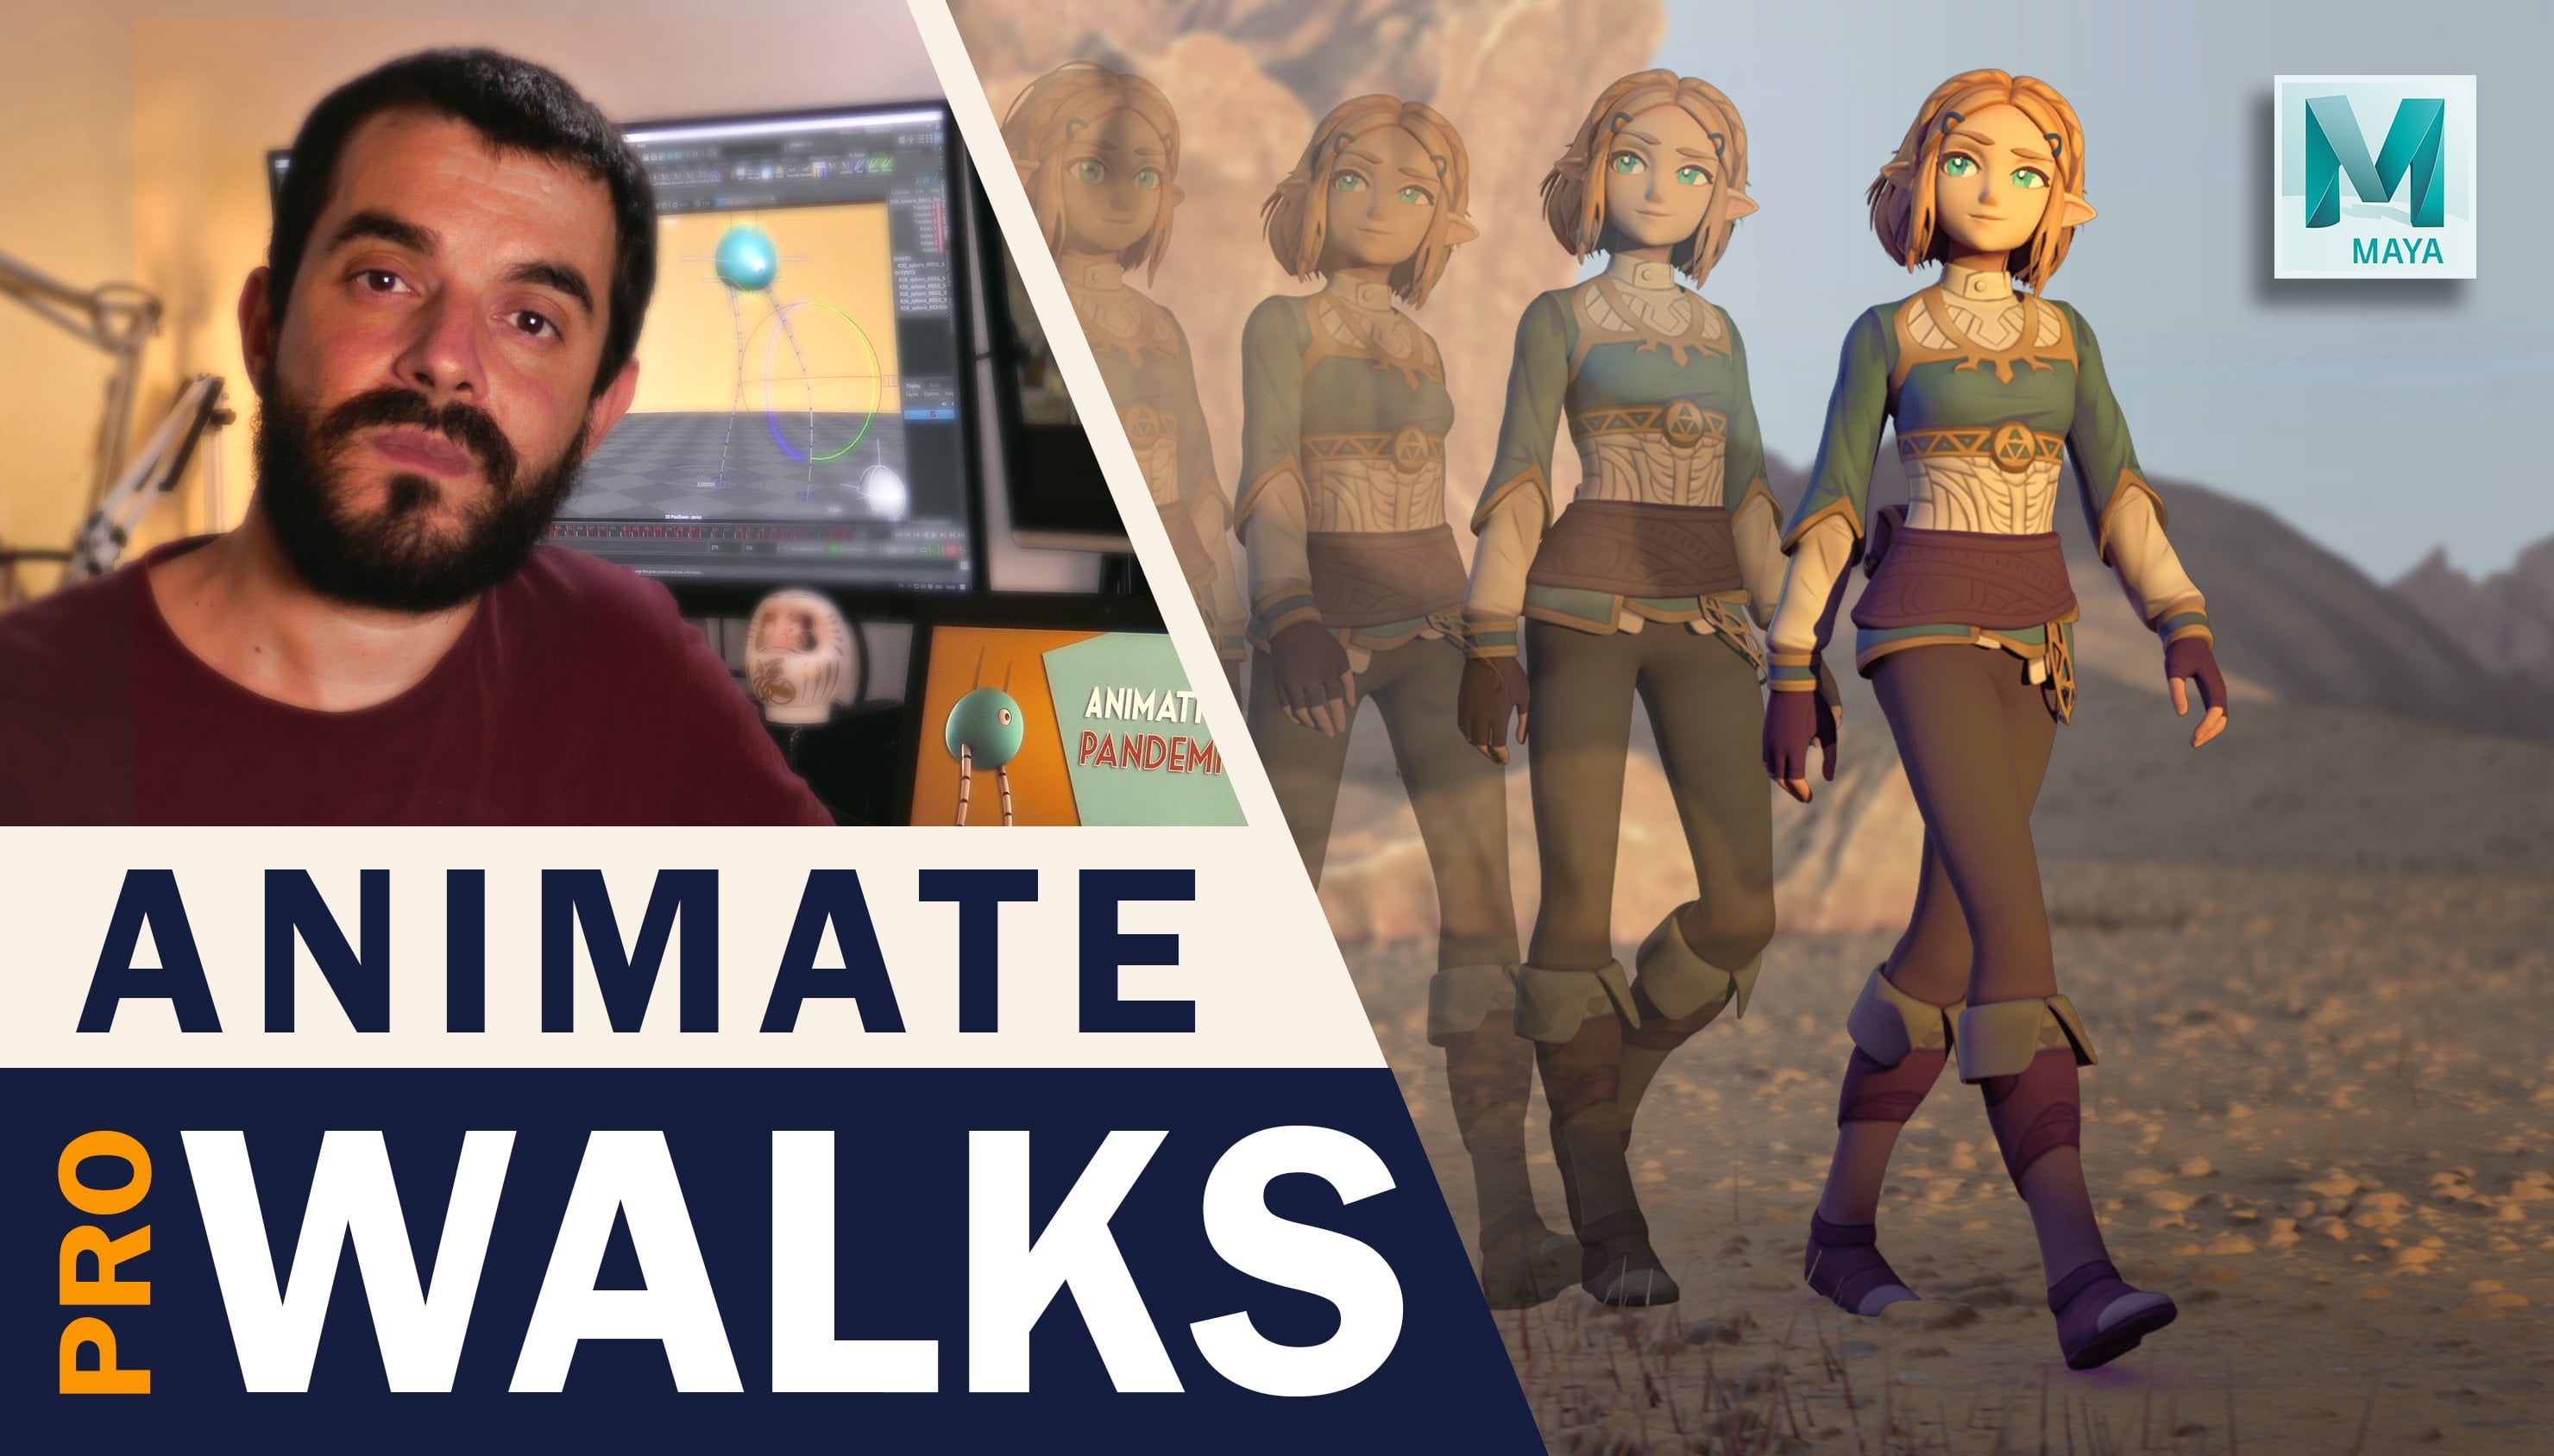
1. Intro & Preview: Animate an anime inspired, stylized female run animation in Autodesk Maya.: Hi, and welcome to this animal inspired animation tutorial. In this tutorial, you will learn how to animate a stylized run in Maya. My name is Amedeo Beretta and I am a 3D character animator with a generalist background. I started working in 3D CGI in the year 2003. And alongside production, I kept training the students and professionals ever since. By the end of this course, you will be able to animate with confidence as stylized looking run in a short amount of time and supported by a solid workflow. We will start by understanding the story behind the run, and then we will learn how to evaluate, import, and manage references coming from existing animation. At that stage, we will be able to design the key poses, mirror them, and I iterate until satisfied. After that, we will make the character run first space and polish the animation. The course runs in Maya, but the principles are applicable to any software. I designed this course for animators who are familiar with the very basics of the workflow but struggled to deliver a good posing polishing and locomotion. If you are interested, just hop aboard and follow along with the cat.
2. Finding References: Since there are many different types of runs, you have to decide which type of run you want to animate before even opening the free the software. So you need to start collecting references. The more references you will find and the more informed you will be about the dynamics of a run. In this tutorial, we're going to animate one that has a bit more of an animal that comes across as a bit more stylized wild. In another course I am recording, I will demonstrate how to animate another one, which will come across as a bit more realistic. In fact, we will base it on live action references. By the way, on YouTube, there are similar collections of animal rounds. And if you really look through a lot of feature films, anemias, and even TV series, you will find a very good variety of examples of runs, and you can best use them as a base for you to learn for this stylized type around. We're going to have a look at Tashi Yuki noise, millennium actresses run, which I think looks really nice. And I think it poses some unique challenges. One of which being that the original animation is done on twos. That is one drawing every two frames, which is something that comes across as very nice looking into dy that needs to be studied in 3D. You can, they'll load video clips from YouTube using our YouTube Downloader and you can convert them to image sequences. Make sure you convert them to image sequences that run the frame per seconds unique to have in Maya. By default, Maya ran at 24 frames per second, but in practice, it depends on the project. On TV projects, you often animate on 25 frames per second, while on games, you often animate on 30 frames per second. For the purpose of this tutorial, we're going to animate at 24 frames per second. Anyhow, you can use the links in the resources to download the frame sequences of these references.
3. The Story of a Run: While you're searching for references, it is a very good idea to start considering the story overrun. So let's see together the story of around. The story of around is the story of a locomotion cycle that is designed to propel the body forward at a speed which is superior to that of a normal walk. One thing that happens in around that does not happen in a walk is that in a run, there is always one pose in which both feet are off the floor and practice your character will be flying, although for a very short time, without wings, it's kinda difficult to fly. So let's start checking the poses. So in around like in a walk you have a contact pose which is opposing which the food first touches the floor. The spose can be with the food planted on the floor already or with the food touching with the heel and the tip up. It depends on what you're trying to achieve. The contact leg tends to be almost straight, if not entirely straight, and the arms are opposing the legs. So if the right leg is forward, it will be the left arm which is forward. After the contact pose, you will slide naturally into a down when the body will lower. If you track the belt of this footage, lowers and then you will go pass the passing pose and again you will kick-off and then be in the up pose again.
4. Identifying the Essential Poses of a Run: Now the issue with these kinds of locomotion is that it happens at a very high speed. So if you think of it, we have a contact pose and just few frames later we have something that looks like passing pose. And then again one frame later we have something that looks like a kickoff pose, after which we go into frames, into the up and then again into the contact. And the speed of the round depends on what the character is doing. The character might be jogging, in which case the round may be a lot slower than these run we're looking at right now. So if we have a look at these round from the movie millennium actress, you will spot that the traditional approach to Iran is fairly methodic. It starts with a contact pose with the food on the floor and the other food still being behind the arms and swinging opposite the food. So if the left arm is forward, it will be the right food that is forward. And then from the contact pose we go down into a downs lash passing pose. The leg which just contacted is going to bend and the weight is going to lower and the back leg is going to start moving forward. You see while the arms are at counters winging from these kind of down slash passing pose, we move straight into the kickoff post. The kickoff poses deposed in which the foot which just contacted is leaving the ground. It's the last frame in which these foot is on the ground. While the opposite food as gone past this food and he's preparing for an AP pose and then a contact pose. In the meantime, the bodies being propelled forward and upwards, the arms are still swinging to help, we can call these the kickoff pose. The pose we need in order to propel your body forward and a bit higher up, you can't possibly run if you don't keep cough first from the kickoff, we go into the app you see there in the up above feet are off the floor so there's no contact with the ground whatsoever. Arms stills winging to oppose the motion of the legs. And the main body action is forward and a tiny bit high. So this kind of vector, I suppose. And then after that, we start all over again with a contact. So we go back to the contact pose this time with the other leg. So we have the left leg in the air and the right leg is about to recover and go forward while the arms are still opposing, the weight will go down between the up pose and the down pose. Not so much as you would expect because the main motion of the round being forward, you do not want to waste a lot of energy by going up and down with the body. There will be certainly up and down. But the quickest Iran, the less up and down you have also, depending on what you're trying to do, the body will be more or less leaning forward in a very quick round. The body will tend to be leaning forward quite a lot if you think of it and in around that needs to decelerate, the body will start to lean backwards instead. So for instance, in this shot, the girl is supposed to change direction. So while she's coming from this direction, she will decelerate and change direction. And you will notice that as she does so, the wave starts to move against the motion of the running starts to lean backwards because she's trying to control the change of direction. In fact, of course boil and on there she will fall in this. It's very interesting again to notice how these animation was done on twos. That is, there is only one drawing every two frames. You see I'm moving the timeline. But again, the drawing changes only every two frames in free. The, by default we animate every single frame. And you will see that this would create a difference between the animation we see in these reference, for instance, and the one who will animate, which we'll look at lots mover, but also a bit more diluted. In fact, the poses want feel as strong as those you have into the animation. And their opinion is that happens because they don't stay on screen as long as they do in the 2D traditional animation. So as far as traditional poses are concerned, we identify the contact pose at down slash, passing pose, kickoff. You can't run without a kickoff. You can't push, you can't jump without a kickoff and an AP pose. And then we start again. So again, contact down kickoff. There is another approach that does round by doing first the contact, then the down, and the kickoff is indeed the passing pose. In our case, we are going to consider the kickoff, just the kickoff. Because from a storytelling perspective, the kickoff is the one frame we need to be able to push the character forward. We can't push it forward, as I said without the kickoff. So we're going to merge the down and the passing pose into a single pose. A good video that explains the difference between the two different approaches of posing is this one by Alan Becker and the mating run cycle in which it goes through the traditional approach we've contact down passing and oppose. And another one which instead is based on contact, passing, kickoff end up pose. For the purpose of this tutorial, we are going to use a contact down slash passing kickoff end up approach.
5. Setting Up the Project and Finding a Rig: The first thing we want to do once into Maya is to create a project. So we're going to File project window. We need to specify a new name. I will call this round underscore. T stands for tutorial in my case. And you want to specify the path you want to store these project into. The names are unimportant, but they need to be clear and something that you can easily remember. I will click on Accept and a new project is created and set. If you want to double-check, you can go to your folder. You can find the tutorials folder that I've just created run underscore t. You see that I can click and in there you will find all the sub folders that are typical to a Maya project. The indication that this is really a folder of a Maya project comes from the workspace Hotmail file. You see this file, you know, you're looking at the Maya project. Then we need the rig, find the REG file that counts with the resources of this project. The version of the rig is not so important to be honest in general, the tutorial we work with whichever version of the same character and just going to copy this REG file. So into the scenes folder, I created a folder named rake. That's where it will store my Rick and I will paste the rig in there. So now if you think of it in my project folder, I have a Scenes folder that will contain the animation file. And into that, I will also have a folder named rate that will contain the rig itself that I keep things nice and organized. Now let's reference that rigging to the scene. I will go into file create reference. And the beauty of it is that they create reference window opens up already in the Scenes folder, which are radian itself is a good advantage because it's Bears you some cliques. I will go into rig and I will grab Rocket Girls break the version is not so important. Rocket girl, we'll load and please notice that we know it's a referenced item because of the little blue diamond in the outliner. If you want to know more about why setting the project is important and why referencing your rig is important as well. Please check the link to the respective videos on my YouTube channel. There, everything is explained and now we're ready to save our first animated scene, regardless to the fact that there is no animation in it. So I will hit Control S to save my file, and I will call the file capital animus. It's a token that stands for animation. Of course, I will call this thing stylized run, and then I will add a splitter underscore 000 001, that's the version of the run, and then begin, That's the comment. So this way, phi's would be organized first by the token or the type of file animation, then the token of the type of animation stylized run a vendor version. And finally the comment, which is relatively important, it's better to save the file as a Maya ascii because it's easier to recover data from my OS keys, then it is from Maya binary. The tutorial will work even if you save as a Maya Binary, I will click on Save As and now I'm ready to animate.
6. Working With Video References: With the Reagan the scene, It's time for us to start thinking about references, the video references we will use to inform our animation. And remember, we were looking at this clip from The Onion actress as a way for us to start animating something that looked a bit more animal-like. So indeed, we are going to employ these very clip. It's worth reminding people that you can download YouTube clips. We've got YouTube Downloader plugin that you can install in a browser. Also, if you need to edit your Eclipse or export them as frame sequences, you can use a software like shortcut, which is free and open source. Amongst the assets included in this tutorial, you will find that file named Anime around dot zip archive contains an image sequence with the frames we would like to employ as a reference for our animation. You will see that we won't be able to do exactly like they do in the anemic or a number of reasons. But nevertheless it will provide us with good support. Once extracted, the anemia around folder will appear and we will need to move this folder into this source images of our project. So we'll just cut this folder here. And once we are into the Maya project we have just created, you will find a folder named source images. That folder contains all the textures that Maya needs to operate within the context of your project. So we'll double-click on it and we paste in there the anemia around folder in there, in the animation folder, you will find all the frames in Maya. We make sure we are looking at the scene for the perspective view. And from the perspective view, Viewport, we go under view the menu on the top left side of the UI and go Image Blaine, import image Maya. We'll ask for the path. And incidentally, but not so much, my is already looking into the source images folder so we can go into anime around, grab whichever frame. It doesn't matter which frame you grabbed. Just double-click on it or click on Open. There you have it. You have your frame sequence except it doesn't play that yellow mark around the image plane means the image plane is currently selected, which means that if you hit control a like alpha on your keyboard, you will open up the attribute editor for that image Blaine. And in there you'll see that the image plane is a setting that says use image sequence. If I tick that box, then the image plane will start to play. And as I scrub the timeline with the left mouse button, you'll see that I see the animation playing and we'll make it a lot easier for us to work with. However, one thing you will notice is that the animation doesn't really start with this scene we need, so I will need to make the timeline long, like for instance, 500 frames. And I will scroll until I find the sequence that you go. You see that the first pose that we identified earlier on, which was the contact, happens on frame to 51. So we would really like these frame to fall on frame one of our timeline in the attribute editor, the image plane, you will find frame offset. If you input a negative number like minus one, you see that we see the previous frame. That means that the timeline or the image plane is moving to the right of the timeline of Maya. If we type in positive number like I don't know, five for instance, you see that we see a frame which was supposed to happen in the future. That means that the timeline is shifting left. That means that if I input to 51 in here, I'm going to move the whole image plane sequence 251 frames to the left, meaning it should end up at frame one, the contact pose, and there you have it. In fact, if you go back to frame one now, you will see that we have the contact pose. If you accidentally lose selection on the image plane F, for whichever reason you can't select it anymore. You can go and watch the view port from the same camera you attached to the image plane to in this case the perspective. Then go under View, Image Blaine, image plane attributes and use select the image plane you want to work with. And there you have it. If they attribute editor does not show up, you hit control Alpha, control a again. And the attribute editor we show up. There you go. Once they image plane is happily in the scene, it is time for us to start the actual animation. One of the problems you have when you unmake is that you may accidentally select the image plane is you work or other items which are in the scene and which you do not need. Now you see as I move the perspective of way, the character disappears behind the image plane that socks. So maybe we can go under View, image plane, image plane attributes, and find the image plane we need, which I can maybe rename as anemia run image plane. And once the image plane is selected, you click on the channel box on the top right side of the screen you see there's a tab named channel box. And there you want to grab the depth attribute with the left mouse button. Once you middle mouse drag in the viewport, you're increasing the number, the value of the depth, you don't see it, but you're moving the image plane away. And now you see, even if I move the camera away, nothing happens there and the character is always visible. If I set the depth to one, for instance, you see the character becomes invisible. And as I increase the value, then suddenly the character starts to become invisible because the image plane is traveling far away from the character. Maya is also counter scaling the image plane so that you don't feel like it's moving away and you will still see it. Speaking of which was the image plane is far, far away. We have a very big number on screen. You can maybe grabs size x and y and middle mouse drag them so that you see the character we need to look at a bit better. And you can also use offset y to have the character a bit more centered or maybe a bit more offsets so that we can keep the 3D character in the scene. That's going to make it a lot easier for us to operate.
7. Setting Up Maya for Animation: So usually we set these lecture mosque in Maya to be able to select on the animation controls. The selection mask you see in here has all the boxes highlighted in blue, meaning that Maya will let you select whichever thing you want to select, the viewport regardless of the type of item, if you do not see the selection mask, this is the way that bar should appear to you. Do not worry too much. You will see that this bar starts. We've had drop-down menu on the top left corner. And as you scroll to the right, there are several icons. And then there are free icons with a cursor and different symbols next to them there's a vertical line, we have a triangle click on it that will expand this lecture mask. In this lecture mask, remember, we only want to be able to select curves, the controls that we operate to animate the rig. So we click on the little triangle next to this lecture mask. We set all objects to off. And now you see all the squares are not highlighted anymore. And when we drag a selection in Maya, we can't select anything from the viewport which is useful to a certain degree. However, we want to select the curves. So if you click on the curves icon in this lecture, mask these zigzagging line there with the two vertices at both ends. You click on it, and now you will be able to select only the animation curves. I know that it seems like I'm selecting geometry, but that's something that has to do with avoiding Maya highlights hierarchies.
8. Setting Up the Rig: Once we have set up my operate in a way that is friendly to an animator, it's time for us to set up the rig to behave in such a way as to make it easier to animate and spline is animation. The first thing I want to check is the legs, of course. And remember, the legs are by default operating in inverse kinematics. That means that you grab the end of a hierarchy and by translating it around the hierarchy, self's itself adjusts. However, you notice how when I rotate the food, the pole vector, these little control in front of the knee is also moving regardless of which regular operating. My suggestion for the purpose of this exercise is to make sure that the pole vector is independent from the food orientation. Otherwise, as you rotate the food, you will also rotate the knee one-to-one, which is not really the way it works in real life. To do that, you go back into the channel box on the top right corner, the UI, you will see that tab there. You click on the channel box. And usually regardless of the rig, you should find in the pole vector control that there is a channel called local parents, parents space. And if we go and check, there is parents space. And by default it's set to food, but we really want to set it to world so that now you will see that the right food will not influence anymore the position of the pole vector. We can move the pole vector bit more forward. While on the left-hand side, if we rotate the food, the collector is still moving with it. So we want to grab that pole vector as well, the left-hand side 0 vector and set it to world so that it's not affected by the rotations of the food. And other thing that you want to check is in this animation that you can tell it from the pose, there would be a lot of twisting of the chest left and right. But you see as I rotate the chest left and right, the hands are staying there, which is a bit cumbersome in my opinion because it forces us to counter animate the hand every time there is a movement with the chest. This is because their hands by default are set to work in IK, just like the feet IK or inverse kinematics, Y allele. If we could keep them in FK forward kinematics, maybe they would follow the chest, but we will see that we were still need to do a few steps to make them work the way we like in here I will animate using FK forward kinematics, but it's not your preference. The advantage of FK is that it's much easier to track the arcs and we will see why locomotion cycle disadvantage is that you don't have precise positioning of the hand. We have a single control. But for the stuff we're doing here, FK, in my opinion, is a bit more suitable than when you become more expert. You can use IKEA's do locomotion as well. Usually a lot of risks. They have a cross marker or a gear marker near the wrists or near the root of the rig. In this case, there is a little key. And here you see these control with a line and a circle. These two controllers are your IK to FK switcher. And in fact, if you go into the channel box in the top right corner of the screen, you'll find IK to FK. You select with the left mouse button the name of the channel, and then you drug with the middle mouse button, the timeline you see you can switch the value from 0 to one, where one is FK and 0 is IK. So we want them to be buffed set to FK. Again, the attributes may be named differently in another rig, but the function will stay the same or so. In summary, eggs, the IK through FK goes between 0 to ten and maybe 10 means FK and 0 means AKA, their philosophy is the same. The values aren't changing. Non worry too much. Now as we rotate the chest, you will find that the arms are following one to one, which is a bit better if we are going to bend the chest this way, you see that the arms are going to behave like the wings of an airplane. That's not really handy. I would really like the arms to stay globally oriented. And that's usually called global orientation or parents space set to world. It will have a different name based on whichever regular opening, but usually is called local global parents space, parents switch, switch space, space, which it depends on the rake. In summary, eggs, you can find that in the shoulder control up there you see here, but right now in here we only have a rotation and translation. In some other rigs, you can find it on the IK to FK controller. And if I grab above the IK to FK controllers, you see that there is something called FK rotation space and it's set to shoulder if we click on it and we set it to world. Now, as I rotate the chest, the arms should stay global. You see they do. That seems rather handy if you ask me now, another thing that happens when you round or locomote is that the head stays globally so that it can aim at the direction of the motion and avoid obstacles. And also says the obstacles that may arise as you locomote forward. By default, a lot of rigs, they are set to local rotations. So the head is moving one-to-one with the chest, which is rather inconvenient for the kind of animation we do. Because as we twist the chest, you see that we will have to count there and they made the head stays straight, usually on the neck and on the head or on both. You will find a locker to global converter of sorts. In this case, it's on their head it seems, and there are additional space of the head is set to neck, we set it to world. And now you will find out that as we rotate the chest, the head stays global, which makes it a lot more flexible in terms of workflow. We can even set it to torso and see how that works. I don't know if that works. Let's see how it works. I think dorsal will be a good setting so that we can rotate the character around. Yes, yes, I was at torso in this case.
9. Designing the Run Contact Pose: Now we have set the rig to operate in such a way that it will be easier to animate what we need to animate. And usually this is one step you have to do before you start the animation. Ask yourself which way it will be the easiest to operate these machine, which is the rig, in order for you to finish this animation better and earlier, let's do the contact pose. So I'll grab the food that they lifted their, their own for the demo, I will 0 out the values and I will, it's the right food and I will move it forward like the right foot, that girl. And then I will move the left foot backward like the foot of the girl and I wouldn't raise it to rotate scale and translate. You hit to rotate. W to translate are to scale. So W E R, that will you translate E rotates our scales. Now you see that my axes are not aligned to the food. To change the axis orientation, you just press down the relevant Charcot. So W and left mouse button and a marking menu shows up is the equivalent of the pie menus in Blender. And in there you can decide which axis you want to liberate you see? So I can go world and that, and that axis is oriented like the world. And I can go object and an axis is oriented like the objects. There are advantages and disadvantages to all systems, of course, for rotation the same ie and, and left mouse button, you can pick different axes for now we'll just stay on object. I'm going to rotate left foot backward and I am going to maybe lower the root a little bit so that the leg doesn't get stretched. You see, you will notice that the next day is stretched. And then at a certain point, if it's not, and then at a certain point it's snaps in place and it bends a lethal. We want to just have it snapped in place and not totally stretched. That's because as we transition between stretched and in place, that will be as NEP, which is usually called an IK pop. And that is usually considered the mark of a Junior Animator because junior animators may pay less attention towards fixing these kinds of issues. So in general, you don't want to have those issues in your CH4O because the presence of these issues reduce the perceived quality of your work. So I'm going to lower the root ever so slightly rotated forward. If I check the character I'm looking at, it's slightly rotated forward and I'm not really going to animate the rotation of the root in this animation. I'm just going to use it as a general orientation, but I'm not going to rotate it because remember every time I rotate it will also rotate the head, which I don't want to do Venice there, right leg went forward. It means that their right arm will go backwards. Now it's really interesting to notice that some reefs have two controllers for the shoulder and this is one such risks. So for the sake of this tutorial, we are only ever going to use Molar controller unless otherwise specified. So try to make a mental note of it and we're never going to operate this guy, just the smaller one. So the thing in here is I could just you see, move back, but it starts to look a bit like a different kind of run. I mean, if you move the arm back, what happens in real life is that the chest, we swing back a little bit, you see to help the arm. And if you check the angle of the arm from the top you see how much more natural it is when you swing the chest back. That's a lot more natural, speaking of which, if they chests wings in one direction than the pelvis will swing in the opposite direction to help the contact with the floor of the leg. Going to make the leg work a lot better and also it's going to allow us to lift the root quite a lot more if you think of it. So there you go. That's now I really need to rotate the arm forward. And now if you want to bend the elbow for the sake of this tutorial, it, my suggestion is always to use only the anatomical axis of the elbow because you know, most rigs let you do this, but that's not the way elbows work. So the suggestion I have for you as beginners is first bend the elbow following the anatomically correct axis. And then if you want to change the position of the hand, rotate from the shoulder control, that's the way anatomy works really. So I'm going to move up the arm in there and more or less that's it. But you see that we need to raise the head in there and maybe moved the neck and maybe rotate the neck a little bit more forward. There you go. So that's my post and they're still not looking exactly like the post we had in there, but it's pretty similar if you think of it, you have to keep in mind that when you animate for a shot in the movie, you may start from a locomotion cycling Friday, but then you need to adapt it to the scene. So in here, the image sequence we're using a reference has a lot of variations. It's not just the local motion cycle, so we're going to use it as a source of information, but we're not really going to be able to do X subtly, that kind of animation because we're not animating a shot per se, maybe in another tutorial. Now for the fingers, you will see that some rigs have some controls that rotate the whole finger around. And then inside the channel box you will find that curl attribute, that curl the fingers. I don't often use this kind of stuff for close ups because this controls. They tend to curl the fingers uniformly, which doesn't really happen in real life if you want to have more control, my suggestion is to enable they tweak controls which you may usually find already visible or in the channel box and the main controller, you will find something called finger tweak maybe or finance control. Depending on the rig, I can set that to On and you see a lot more controls will appear, and we can use those controls instead. I will just liberally select all the controllers and control this leg. The stuff that I don't need, including the main controllers of the fingers which I don't plan to use. And this way I should only operate the finger controllers, which I can just bend down. You see that I accidentally selected the coupling control in there. I don't want to select a thumb for now, so we'll deselect the thumb again Control left mouse button to de-select. And now I'm going to just create a fist posing there. Now one thing that happens with the feast pose is that, well, I don't think the last phalanx is rotating nearly as much. So I am going to, to rotate those little bit. And then in a fist, you don't see the gap between the fingers, but in some rigs you will get the GOP anyway. In here there's a bit of a proportion issue that pink is actually longer than the ring finger, which is a bit strange. So one thing you can do easily ease, you can just move the fingers closer to one another, even if there is a bit of intersection, don't worry, this is not a close up of the hand and it's always going to be motion so that it's more important for it not to have gaps then for it not to have intersections. So you see you have to go also the context in which you're operating to understand whether an intersection is a problem or not. I'm going to stick out the index a little bit more because in general, in a feast of the index tends to stick out a little bit more. And there you go. I have my opposed other thing that happens in feasts is that the tip of their fingers tend to point at the base of the reason they're so I'm going to maybe rotate these guys ever so slightly so that they point at the center of the wrist in there. And other control that is very useful to have an incentive. You have it is the capping control which you usually find where the pinky connects to the wrist. And you can use these to rotate you see and change the shape of that bomb to a more a static pose. These pinky is a bit problematic, so we'll rotate it even more, although that's anatomically incorrect. Another thing that happens in a twist is that the thumb dance to rest on the second phalanx of the ring and middle finger. So I want to grab the thumb. And with the main first controller, I'm going to rotate the controller so that the thumb is generally speaking oriented the way I needed. And then with the second, third controller, I'm going to operate on a single axis. Remember that the thumb second, third phalanx operate on a single axis. It's only the first phalanx that operates a number of oxygens. So I'm going to grab these guys and rotate them on a single axis. And you see, now we have our feast. Suppose not too bad. Now let's save this file and that's talk about mirroring.
10. Mirroring Poses With Red9 Studio: If you're following this tutorial, we've Rocket Girls rig, I highly suggest you install red lines to the IUPAC, which is free of charge. And you can find the link in the description of the video, of course, and if you want to know how to install it, because you don't know how to do so. You can find my YouTube tutorial that explains you how to do so. It's very easy and it's very quick. If you're using a different regions that if you want to use red nine for mirroring poses, my suggestion is to head over to my tutorial in which I explain how to set up a rig to mirror poses. But I also suggest you try Studio Library, which is an excellent tool for mirroring poses. Unfortunately, it doesn't work very well. We've rocket girl rig, but it works well with Maslow rigs around. And it's actually a bit faster in terms of setup if compared to red. So you're nine. Again, you will find all the links in the material of this tutorial. Once you have installed read nine Studio, you will find the Nikon. We have a rocket sound where your shells, you just click on it. It seems like nothing has happened. But if you look at the top right corner of the menu, rights to the left of the help menu, you will find the red nine menu. You want to click on it and scroll down until you find a tool named mirror setup, I will click on it and these window opens up. So this is how we formed a rig about the way we want it to be mirrored. I already did the job for you so that you don't have to do it manually for rocket girl. But if you're using a different rate, you will have to go through the process. The process doesn't take long, maybe about ten minutes, but it's very rewarding once it works. Alternatively, you can use through the library, which does it with one click, but doesn't work. We have all the rakes but works we must have them among the assets I provided with this tutorial, you will find a file named rocket girl retina and mirror table dot mirror map. These file is the file we need to inform read nine on how to mirror our poses. Let's copy this file into the folder of our project. I'm going to store it into the data folder. The position doesn't really matter, but I like to store it into the data folder. It's down to your preference is once you have a vacuum Mya, first of all, we want to make sure that the followings controllers of the right hand are visible in the scene. So I will select all the controllers for the fingers and enabled finger tweaks on them. And then we want to left mouse, select all of the controls of our rake. If you want to be extra sure, you hold down control and shift and you see that the cursor becomes a cursor. We've A-plus, That's additive selection. And we dropped another selection just for double safety. In once we have that selection, we are going to go into the mirror setup window, click on Load mirror configs. And in there we're going to browse to the data folder where we have our mirror map file. There you have it. Double-click on it, red 39, we'll think about it. You see it's loading the data. Once the data is loaded, we should be able to mirror poses. Let's see if this works for the fingers. Will select all the fingers controls. I don't need to select Anything else apart from the fingers. So I don't need the wreath, for instance. And then I will go to the side which doesn't have the pose yet. I will select the controls in there. You do not need to be very precise. In this election, the important thing you select, at least the controls you need. And then we want to make the post symmetrical. To do so, we go on the red nine animation toolkit. And in there you will find that the bottom there's mirror controls symmetry pose left to right. Let's click on it and that you have it. Now you have depose mirrored on the opposite side. Not bad for free, just one clique, not bad.
11. Mirroring the Contact Pose: Now let's have a look at the feet. If I grab the right footing there. My rule of thumb for animating locomotion is that if our food is on a contact even partial, I want to keep the foot controller flat on the floor at least at the beginning, and use the foot role attribute instead. That makes it super easy you see to animate the food rolling down. So I'm just going to do it that way. And maybe if they feel fancy, I will use the toe wiggle control to flip the tip up a little bit. You see that as I used the foot roll the leg bands, which means they can maybe lift the route a little bit more you see and still get a nice extended pose and they're not too bad. That's looking quite alright. Now I want to store deposed by selecting all controllers. And on frame 1 hit S, like star on your keyboard that jots down a keyframe. You see there's a vertical red line in there. So now we want to find the opposite contact. And you see that the opposite contact pose is pretty much the opposite of the first contact pose. There is a variation in these higher this green for the arms and we will look into it then depends on the context of the shot. Of course, we won't be able to do many variations in this tutorial, really, back into Maya, then I need to mirror that pose. So first of all, let's find that Bose. So scrub the timeline. I don't need a timeline these long anymore. I think they're round. We'll use the maximum of about 20 frames, 22 frames, but nothing more than that. So in here you see here that the character moves outside the screen. So I was a bit too ambitious when moving the image plane around. So I'm going to go and grab the offset and maybe scaled back the character and move it back a little bit. So again, let's select all controllers and let's find the frame. On frame 8, we have our contact pose in there. It's the opposite contact pose. In terms of 3D animation, this will be a mirrored version of the previous contact pose. So I imagine that by opening up bread nine animation toolkit and scroll down until I find mirror pose. I imagined that I should be able to mirror these bows, which it seems like I am able to do nice and free of charge, not bad. You will now notice that the character we're using as a reference doesn't have exactly the same poses on one contact and on the other. That's because of course, of the variations that are introduced in the shot. Right now we're focused on producing a locomotion loop. So we will just trying to find a compromise.
12. Improving the Contact Pose: One thing I really like about this pose is how close to the body the elbows are in. Looks very, very defensive, very, very feminine in a way that's stereotypical way I would say almost. So I want to go closer to the rocket go Reagan, just move the elbow a bit closer. You see this curve between the forearm and the wrist. I want to create the same by grabbing that light and moving it out. And especially from the top view at the back, you see that as I keep the wrist this way, curved in, it looks a bit more masculine and heroic. As I rotate the wrist out, it starts to look a lot more stereotypically feminine if you see what I mean. And that looks a lot more feminine in itself. It's a lot more defensive as a position. Similarly, with the back, I want to do a similar pose. Maybe bend the elbow little bit and then twist the shoulder until you see the elbow feels a lot more green if you think of it, we're not actually even moving the elbow in the fact that we're twisting the shoulder this way makes the elbow feel a lot more inwards. And this way you see we have our post and if we grab the briefs, we can lift it up. You see that starts to become a lot more feminine than it used to be just a few moments ago. That's kind of neat and maybe we can twist the wrist a little bit just to show a bit more of the under palm. And then you go in here, you see that now automatically we have a much more feminine pose. Another thing that tends to happen in rounds, if you think of it, is that the feet tend to lend much closer to the center line then in a walk, in my opinion, you see how the foot goes inwards towards the center line. Also the needs of a female around. They tend to be very, very close to one another. So vacuum, I want to maybe Center the contact foot a little bit better and do the same for the food which is up in the air, maybe lower the tip a little bit this way. Maybe I can even move the pole vectors of the knees a little bit closer to one another. That's nicer and lower the root just enough for the leg to settle in a known IK pop-up pulls. This Bose becomes a lot more feminine as opposed. Again, let's save and set a key on everything. I really suggest that you keep Auto Key on in Maya. If while we work on this tutorial, these logo next to the man running away from the gear. If it's red, it means Auto key is on. If it's grade means it's off. If you set it to on, Maya will automatically record the variations of value. The most attentive will have realized that by changing these contact, we need to go back to frame one and copy the contact we have on frame 8 over these and mirror it. So as a rule of thumb, as we do a locomotion loop, we want the things to loop perfectly and then we add variations if need be. So we want to have framed one just the same A-frame 8. To do so, you select all controllers, you go to frame it with the middle mouse button. You draw eight to one, then you release and you press S-like star on your keyboard that duplicates the key, you see exactly the same key. Then once on frame one, we have all the controllers selected. You hit mirror pose and the pose will be mirrored just like that. Nice. So now we have made the two contact poses not bad, and it was rather quick.
13. Giving the Face a Bit of Emotion: Let's have a look at the face. You see that they face of our character in the reference is a bit sad. So we want to make a concerned around ourselves. So I will just grab the center control of the eyebrows you see, and just lifted up ever so slightly and rotated up ever so slightly. And maybe I can have the line a little bit straighter and upbeat, asymmetric. And then we're going to close the eyelids a little bit of off the top and the bottom one. And then with the mouth, we're going to open the mouth and versus lightly by grabbing the Jew. And then we are going to lower the corners of the mouth ever-so-slightly that you go to give us a sad expression of sorts. So this alone is enough to make the expression a lot more enticing if you think of it. Now if I undo and go back to the default pose and you undo by pressing zed, you see how default the default pose was. While if we add a little bit of emotion, shift zed to redo, remember, then everything looks a lot more interesting. In my opinion. These controllers we do not need to mirror if you think of it, we just need to set a key on one middle mouse drag one over 28, release and press S likes dark, duplicate the keys.
14. Setting the Viewport Evaluation Mode to DG: In order to jump between keys comma and period on your keyboard will jump between keys. Do not worry about these eyes being left behind. First of all, just make sure that the playback cash is set to off just in case it was set to on. And then you go under Settings, Preferences, preferences. And in there under animation, you can set the evolution mode to either dg or pallor layers to see if that works any better. And it seems to me that now this is working, it won't affect your animation, although it will affect what you see in there. So it's better to have it work to begin with. So now we have made our two contact poses that was quick.
15. Blocking With Stepped Tangents? Not Exactly.: At this stage, we could just go in between the two extremes and design all the poses which are missing. But in my opinion, we should stop for a second and devise a strategy to do so. If you think of it, we could right-click on the timeline and enabled us that preview from the menu. We could also go into Windows settings, preferences, preferences, and into the animation box. Go find the animation tangents that we have by default and set them so that by default when we set a key, we create stepped tangents. Because of course the common knowledge is that Pros use stepped tangents to perform they're blocking or due date. Now for instance, let's say that we want to do the kickoff pose. So the pose that right now falls on frame for I have to do these posts from scratch and start moving every single control and counter rotate the whole body around to create the new pose. Well, it's going to take me a while before I get to oppose that works. And even if I succeeded in a short amount of time, how would they have no guarantee that the pose I am building does work in the context of the other two poses, f built. If you see what I mean. If I am they experienced as an animator, the chances of getting these posts to work correctly would be higher, of course, but not everybody's unexperienced animators. I could also employ a tween machine tool to give me samples. That is after way through the two extreme poses and that's what professionals do as well. However, I found out in my experience that if I kept the tangents to say spline Linaro auto, depending on the situation. Now as I go to frame 4, you see that part of this pose is already built for me by the software and you can't really beat the speed of that. Once I have that pose partly built for me, it would be time to actually go in there and build on top of what the software gives me. And things become a bit faster if I use the sink graph editor and sync timeline display, then maybe I'm happy with the z translation I get from these food from the interpolation for instance, but, uh, maybe don't want to have the same position on x and y that I get from the interpolation. And I can maybe just duplicate that position in x and y. And similarly, I could do the same for rotation. And this way, you see making the pose becomes a lot easier because they pose sort of works by default. I don't mean to say these poses finished. I still have to do a lot of work on it, but it kind of works. It's a similar principle to the one you have, for instance, when you use the tween machine on just individual axes and not on all the axes together. Now this way you get the best of both worlds, in my opinion, you get the interpolation that the software gives you for free, paired up with the ability to control your own posts with a certain amount of granularity. Of course, the risk is that if you don't pay attention, you will just be happy with whichever pose the software gives you. So you have to keep your eyes open, but you will still need to keep your eyes open step. And in my opinion, if you are inexperienced, building a breakdown pose from scratch in step is way more difficult than building it starting from the interpolation.
16. Blocking Strategy The Tangents: So I am going to keep my default tangents in Maya to auto and then I will only use theft to evaluate the blocking as a work. So this way I will get the nice preview in step that will allow me to troubleshoot the poses. While at the same time I will get the benefits of using an interpolation, of devising oppose starting from something that was already interpolating. You should not take these workflow as a religion. This is just a personal workflow and you should work with any workflow you think it's most efficient. So if you find a better way to proceed, then these one, Just feel free and go for the better way. Don't use my way.
17. Tracking the References: So if I scrub the timeline, I can have a look at the image plane. Now the problem with this image blend is that the camera moves a lot. So maybe we can do something about it. Very often nanometres, they do counter truck there footage so that the character stays stable in the viewport. You can do that in post-production with Premiere After Effects. So you can also do it here. So I can maybe go into the camera view image plane, image plane attributes, select the image plane that I'm working on. And then to the channel box you see that have the offset y and x. I can maybe set a key on one on both. And then maybe I can go to frame 5, set another key on both. And maybe I only need to move the image plane a little bit, essentially tracking the body of the girls. So you want the body to stay still in your viewport day it goes through that you can better evaluate the changes in the post. I will maybe move the keyframe to four because that's when the key changes in the reference. You can actually go in there and every time there is a change in the reference because it's unlimited onto, you could move your image plane so that the body stays centered in the view port. It doesn't move that much. If you need the reference point, you can maybe put the Rocket Girls nearby so that you can tell if the Cotton moves around the big too much. Remember, I'm tracking the body of the reference if you want to, if you want to be at bit gentler and more precise, it is just nine around the image plane. Now I'm controlling your viewport. You select the offset x-axis, or the image plane in the channel box, you hold down control in your viewport and your middle mouse drag. That gives you a bit more precision. The movement will be smaller than a go. It's just a few frames, so I can do that by hand and they go to Frame 6. I'm using comma and period on my keyboard to just jump between keyframes and then I have frame 8. So now the character in the reference video is staying still in the relative space of the viewport. Nice. You can go on you can even go on to frame 10 and adjust frame 10 as well. Can you see that, for instance, between 810, you can see how the body lowers and the head remain stable there or rather moves up if compared to the body in this view. So by tracking the reference footage, you can actually understand better what are the changes in the internal economy of the body of a character which provides you with great insights as you animate. So now that I have those keys, I can just double-click on the timeline for the image plane, right-click and go. Tangents stepped because at the end of the day, the image plane only changes every two frames. I do not need to interpolate the motion of the image, Blaine. I just needed to move whenever there is a change in the framing and that these every two frames, so that's sorted. So now hopefully would be a bit easier to work with the references.
18. Devising the Kickoff Pose: I'm going to start with the kickoff Bose because the kickoff pose contains the last pose in which the fruit which was contacting on frame one, is in contact with the floor. So for me that's a massive change. I would call it almost an extreme pose, probably these and extreme pose. So I am going to check the references there and it seems to me that on frame seeks the right food is ready afloat. So probably the, the kickoff pose as far as these animator is concerned, would be happening at frame for it seems to me that's the pose. So you see that the ankles or rocket girl are a bit broken. So maybe with the right IK food control selected, we can open up the Green Machine, move this slider all the way to the left. And that will give us a pose which is exactly the pose we had under contact. If you think of it when we swapped, It's the same thing. Now maybe I can move the food back in World axes by holding down W left mouse button and pick the world axes coordinate system. And then I move the food all the way to the back, 0 out the foot roll and I have my kickoff pose. Remember that we will animate the character on the spot and then we will move the master linearly forward. That means if the master moves linearly forward, is that the feet must move linearly backward. So I will make sure that this food translates channels are set to linear for now so that it won't be sliding as I move the master forward. But we will see more about these later. If you don't get the forward, backward linear motion vein, don't worry too much about it. We will stumble into it a bit later. If you're eager to know more, I really suggest you watch my walk cycle tutorial because in there I explained the thing extensively in fact, and just as it was anticipating earlier on, you can see that the pose we are having thanks to the interpolations, is already quite similar to the wine. Our reference, it kinda works by default. It's not exactly the same, but I think that if we increase the foot roll and maybe the Tories a little bit, that would let us raise the root and get a normal straight line with the right leg which is kicking off them. Maybe we can adjust the rotation at the left food and the position and the left fruit you see in the reference looks like it's a bit more forward. So I'm going to try and put it forward. If you end up in gimbal lock like I am, don't worry too much about it for now. You can hold down the left mouse button and go object and rotate it in object mode. This is going to be interesting anyway, later on we are probably going to have issues with that. As far as the arms are concerned. Remember, the elbow of the lady, the right elbow is quite high up, which makes sense if you consider that the left leg is quite high up in the legs and arms are opposing by default in locomotion. Remember that as you bend the elbow, you can only bend it on one axis, at least for now. Then as you become more expert, you will understand when it's possible to cheat and bend it in different axis. Also, if you're doing very stylized animation, very cartoony animation, you can easily break the elbow and it's not a big deal. But for this kind of animation, we really need to keep the elbow straight. Then at a certain point, maybe it was blinding, we may break it a little bit. Then the hand, I really want to have this kind of broken elbow line like I have in the reference. It's a bit small in the reference, you can barely see it, but you see it's almost vertical. And then finally, I guess I want to move the elbow a bit closer in. They go for the left arm. I can move the arm to the back, twist it open a little bit, and maybe raised a little bit and make sure it's not broken in 3D. So always make sure that there is some sort of connection between the forearm and it reached. Otherwise the rest will look very broken. It may not look broken from a position like this one. You may even think this kind of makes sense, but when you move to the, another point of view, you will find the difference. And if you're working for a video game, you can't necessarily predict the angle at which the character will be seen. So you really need to be careful with anatomy, at least at the beginning. Then as you get to know your project a little bit better, you will know when you can cheat and when you can't really cheat. So I guess the elbow in the reference is not that bent, bent forward, so just keep a little bit of abandoned. There they go. And that should be it. I guess. As far as the hips are concerned, I can't tell that the left hip is moving forward to support the motion forward or the left leg and to support the motion backward or the right one. So in fact I can move the right one, see the momenta, start taking care of the hip. The legs can be adjusted again, so don't spend too much time on their feet at the beginning, just put them in the right position and then adjust the body, because you might have to end up adjusting them again, once or just the body. So I am going to counter twist maybe with the upper controls of the spine. So the right arm will push the chest forward or the other way around rather. And maybe I could push the arm forward a little bit more and the left one backward little bit more using the clavicles. And that's going to be my hippos. It's a good idea to have a look at the posts from any possible NGO to make sure that it kinda works. Sometimes I don't really like the viewport lens, so I select the camera, go into the focal length in the attribute editor. By the way, to select the camera was a bit quick on debt. It's the top-left button on the viewport, this guy with a camera icon. And then here in the channel box on the right-hand side, you can just increase the focal length so you will get less deformation. The problem I had their neurons that the camera was something like this. So when you get those four character, it looks very deformed. If you look at a character we've 60 or 50, it looks a lot less the form. And you can go around the character and see things a little bit clearer, in my opinion anyway, I kind of don't like to see the rocket right now. So maybe I can go into the rig itself, find the Geometry Group in the outliner and see there's a rocket pack GO which I can press H ONE and hide for the time being. You'll know it's hidden because it's grayed out in the outliner. If you select it again and press H, it will come back. So don't worry too much. You're not deleting the thing. Maybe I can imagine that as I lift the left foot, maybe the hip is also lifting on the left-hand side. And as I do it, you see that the right leg becomes bent a little bit, which might give us a little bit more leeway to move forward or upward with the body. And that's more or less typos in there. Let's have a look at the previous pose. I think this could work. I kinda feel like between 14 in the reference, the character is leaning backwards a little bit, but we have to look at it in the context as well. The animation goes forward and the character is going into a turn here. So the real lean backwards to prevent the body from falling forward. So I'm not going to act on it too much. Maybe I could just grab all the spine controllers except the pelvis and rotate them backwards ever so slightly. And the beauty of it is that if you think of it, we only touched some controls, not all of them.
19. Why It Is Important To Set a Key on All Controls for a Pose During Blocking: However, it is a good idea at this stage once you have that post to just grab all of the controls and set a key on your post so that whichever thing happen, you won't be changing your posing by mistake. Let's imagine for a second that I haven't set a key on some controllers. And then I enabled us that preview. You see that the pose is changing. Well, there are two reasons in this case for which the poses changing. One is that this character is not fully compatible with the step to review. The other thing is that any control which does not have a key on this particular frame is going to be showing the previous key. So let's have a look at the pole vectors, for instance, to explain this phenomenon a bit better, Let's have a look at Translate Z, these pole vector control. You see it's here. This is the one I move it and it moves forward and backward. Please stay with me right now there's a pre resolve, so this is just interpellate. You see just moves slowly back and forward. That's fine. Now when you enable the stamp preview my eyes just covertly converting your emission to step. It doesn't really change the curves, but that's what it's trying to do anyway. So let's disable, start preview for a second. What happens when I'm on frame for grab my curve and converted the step. And you see thus change position because instead the control stays there, sees days these days, days until it goes to the next key. So if you have not set a key on that pose on frame for when you check the animations that preview, you get false feedback. You don't get really oppose. You get afterward between your pose and the stepped preview. So you don't want that to happen to your animation, which is why I suggest that after you figure out oppose, you select all controls And that balls and you set a key for all controls on that bores, at least while you learn, then as you become a bit more expert, you decide what's the best workflow for you.
20. Designing the Up Pose: I probably should offset the image blamed by one frame less. You should think of it because on frame 0 you see that we have the same pose that we're on, frame 1 and then frame once they use their unlimited on two. So that makes sense. Then we have the next pose that stays for two frame in the reference image plane, and then so forth and so forth. So in fact, the image plane has been offset by one frame too many. So I'm going to go into the image plane attributes and I'm going to change the frame offset to to 500. That means that now the image plane is translating at the wrong offset, right? So we click on Select in the attribute editor for the image plane going through the channel box. And these two channels are those that we have to move by one frame to the right. There you go. And now it should be stabilized. That means that our poses also need to be moved one frame to the right apart from the first one. There you go. So now we are again lined up. I don't know how I didn't notice this mistake earlier on. And if you look really closely, you see how we have a space for one drawing frame free. And once a space for a drawing at Frame 7, which is exactly where the 2D animator was doing. So I think we are onto something in here. So now remember we are not in stamped preview. We want to maybe decide wasn't exposed. We want to work on. And at this stage I don't think it makes much of a difference really. I will work on Frame 7, which is the hypos, the up pose we are up in the air. Please notice that these animator is following our same workflow. By the way, rather we are following he is because he's probably older than I am and it's been around for longer. So I'm going to select that FTK food with a twin machine. I'm going to move this line there all the way to the right so that I get a contact person there. But I'm going to raise it a little bit and I guess it would set a key on the route as well just to see what happens, It's got to be very difficult for us to evaluate whether the character in the reference image is going up or down. We can sort of assume that if this is the top position, the root will also lift up a little bit if compared to the pose at five. So there will be a bit of motion in there. And remember, we don't want to stretch the legs. That's not needed for this animation. And please notice how the biggest motion that you see on screen in the reference picture is the one between the left foot previous position and the left foot next position, followed maybe by the right arm. You see that the right hand is moving quite a lot. And please notice that in our animation, just thanks to the interpolation, this is happening just for free. Not bad. That means that we're using the computer to do with the computers are good at. We're not doing the job of a computer, which is great. So now these fruit poor guy is rotating all over the place. One thing you can do to see if this is something coming from a gimbal lock is to open the graph editor, grab all the curves, and go on their curves. You are fields there. And my wife tried to recompute the curves and you see that it gives you a much better pose. So in fact, we were onto something here. The problem being that sometimes the controls are in gimbal lock, we do axes on top of one another. And that really makes it difficult to animate. So every now and then you have to run an Euler filter. And even with that, you might have to do some tricks to clean that animation at a later stage. And the most advanced Briggs are able to somehow bypass this issue. Anyway, I want to check the difference between the two poses. I will set a key on the right food anyway. And you see that the ripe fruit is lifting off the floor but really not doing much, essentially translating to the back a little bit and lifting up, I guess I could just 0 out the foot roll in there, rotate the food a little bit more to the bag, translated forward, they go, you see, it's not doing much the biggest relative motion counts from the left foot moving forward in fact, and their right hand a little bit. So let's have a look at their right hand as well. The right hand, you see it's moving quite closer to the center of the body. It could also be an effect due to the camera point of view. And we have to keep in mind that the animator there is adjusting their animations base to the camera angle. We don't have that luxury. We have to make it work from all points of view, right? And you see that the main difference of their right arm between the contact pose and the kickoff pose was that the elbow was bending quite a lot. And in our poses you see that's also the same difference. And then between the kickoff pose and the up pose, you see that the main motion is not really a change of angle between the elbow and the arm, but is rather a change of position. And we are replicating that. Let's have a look at the left arm. So the left arm is naturally working. I would say that's kind of cool. In fact, I think it will have to adjust deposited left arm for the opposite contact. But I would say that this is kind of working in 3D. That's quite cool. Now let's have a look at the hip motion. I would imagine that if we wanted to contact with the left foot, we would rotate the hip down on the left fruit just to favor that pose and forward on the left foot, just a favorite that pose. They would let us extend the food quite a lot more. If you think of a day you go, That looks about fine. Now, let's have a look and see if we can understand what the chest is doing between 57 and the chest is quite stable, I would say and sois the hip really in the motion. So I'm making my hip and maybe I even really need to solve for now or we just let the chest go. I won't really do anything in there. Let's have a look at the head and the neck. Set a key on seven and using comma and period, again, I have the feeling that there is a certain delay in the head feels almost like it stays a bit more behind. So I'm going to just rotate the neck behind a little bit and the head forward a little bit to create a little bit of a delay in there. Maybe I could again roll the spine back a little bit just to create a little bit of delay in the upper part and favor the contact on the way down they go. I don't know what happened to my facial expression there. I worked so hard to get it. Maybe you want to save just before something odd happens. So I'm going to call this thing Version 2. And this will be hoses. That's where I store my poses. And I think I'm looking at the viewport issue. You see that if I move one control the eyes, they pop in place, so we are experiencing a view port issue. I really recommend that as you work with Rocket Girls, which is a pretty old rig, you set your viewport to dg so you go into Windows, settings preferences, preferences, and in there on their settings animation, you make sure you're working with the G. And another way to wake up a rig that fell asleep, so to speak, is to grab the master, moving around and undo. That usually also works. I have the feeling that they had in my calculator is traveling forward as they move. Now let's have a look at it from the front view. You see that as we move between the contact and the kickoff, the neck is moving quite a lot. And I tend to think that the neck was in the wrong position in the contact of the beam width. It's sometimes it's easier to just go back to the previous bosons, see the difference. So I can maybe strengthen the neck in the context of that, he stays straight in the key cough as well. That means that if we change, remember if we change one contact, we had to go to the opposite contact of the control. We changed and then mirror the post there. And now the neck looks a lot better so you always have to keep your eyes open. I mean, from the point of view of the perspective, it felt almost as if the neck was translating forward. But when we went and checked the front view, you see how the problem is that really it was moving sideways. Remember this is called 3D animation for a reason, you really have to check it in 3D. So we have done our AP pose. We can select all controls as before, set a key.
21. Designing the Down Pose: And now we go and we do what would be called the down pose or passing pose in our workflow. And you see that almost automatically the down pose is made for us. Very similar, not perfect, but very similar. So let's get down to it and see what we can do to improve it. So first of all, let's set a key on the foods that we have it there and we may be rolled back to 0 and tow raise back to 02. We go to 0 as well. So remember we are flat on the floor in there they go. And maybe that means that in the kickoff we can set that we got two zeros. Well, I forgot it on. I'm so clumsy today. So there you go. I am going to reset that. We go all the way through practically the food self-funding made it itself. The one part that won't fix itself usually is their hips. In fact, if you lower your weight a little bit, what happens in real life is that the leg supporting the weight, the right one in this case is going to stay relatively straight, right? Which means he's going to push up that hip on the side. So that means that you will have the feeling that the hip is going down on the side which doesn't leave, then you wait. So now you see that as I touch the floor and leg, pushes through support the weight, the hip is pushed up. You don't really want to do too much of this thing because we don't want too much motion in Iran. Remember the phaco Z is forward movement and run. We don't want to waste excessive energy in unnecessary hip swinging. So I'm going to check that the hip is pushed up on the right side and maybe I'm going to reduce this wing on the kickoff photos. There you go. Now let's have a look at the arms. The arms are going to be tricky on this one. See how in the reference the right arm is bent quite a lot more already. So I think I can grab the elbow and just lifted up a little bit on its correct anatomical axis. Then I can grab the arm itself and just move it forward a little bit. But you see how the elbows is on the inside, on the inside. So that means that the arm needs to be twisted a little bit this way and we need to move it forward so that the elbow is leading the motion. You see that one of the most notable differences between frame one and free is that the elbow was behind on frame one and it's leading. So we have an inversion, if you think of it, of the arm rotation and then inversion needs to start from the shoulder control. I mean, you could go as far as doing something like this, but that would be crazy. So there you go. Now we have that inversion. That's maybe a bit too much. Softening days will work, I guess. Now let's have a look at what happens to the left arm. In animation, we are using as a reference, they elbow and the left arm stays relatively outside while ours goes a lot today inside. So I'm going to move this guy relative to the outside also the abandoned the elbow doesn't seem to be sold marked. So I'm going to reduce that band. And remember the wreath moves up a little bit, so I'm going to move that up a little bit ago. That means that probably the shoulder will go down a little, I guess, on that side. And just guessing here, in general, when the hips go up in one direction, the chest goes down in a direction that we want to have something very little. We don't want it to look too awkward. Maybe we can do it with both controls for the spine a little bit this way. There you go. You could even go and overlay your character on top of the girl character you're using as a reference and enable the X-ray geometry just to see whether you're getting the main changes right in. We are not really tracing stuff in here, but I think it's a good idea, especially as you learn, to learn from the best animators and just see what's the time in because it's not trivial. I remember the first time I had made the character breathing, I thought, well, how hard can it be, right? I mean, he just needs the briefing and sales, right. The problem was that I didn't know the first thing about breathing, exhaling, inhaling. I didn't know anything about that. We didn't even know how long it took. But when I had that first shot that I had to animate, I realized how little I knew about breathing. So I think it's a good idea to just have a look at your references and see how your animation lines up to the references. If it does, and whether there is something that you could improve on and you can think of it. We are quite spot on in there, except there is one thing that I don't quite like in my animation, and that is between the up pose and the contact pose. You see that in here, the leg goes down quite a lot. That's the main motion, right? Everything goes down. While our character feels a bit stiff, it doesn't quite feel like the leg is going down. So I think we need to do something about that. And that something could be to grab buffer defeat and the route control and just move everything up a little bit. And then for the food which is leading the left one, I'm going to lift the foot a little bit more and moving forward a little bit more so that the motion on the way down you see would be a bit more pronounced. So sometimes you need a stronger movement towards one direction, but you can't change the landing pose because that sets, right? I mean, you can't go under the ground, can you? That means that if you want to see that transition to that pose from the previous one, you change the previous one so that the transition becomes better so that you can create more contrast. Then I can also, I guess, relax their hip a little bit. In terms of the animation on the right arm, I can maybe lower it a little bit and then grab the elbow and raise it and raise it even more so that the elbows stays there. You see in practice the race of the character in the reference is moving down as well. So maybe I could move the elbow again, move it down slightly so that the wrist moves down as well and maybe just lifted, raised up a little bit more in there. There you go. The left arm in this contact is in quite some rotation on the wrist if you think of it. So maybe I could introduce a little bit more of that rotation and lift up the elbow little bit, remember our needs correct anatomical axis, only a go, so that gives me a similar motion. Now of course I changed the contact pose, remember? And whenever you change the contact pose, you have to select all the controls involved. I will select them all and then mirror the pose on the opposite side. Now if you use it to like unembellished, there is a way for you to tell the software to automatically mirror the poses of a loop. But as I said earlier on, this is a paid for plugin. So I'm, so I can't assume that everybody watching this tutorial, we'll have it. So I'm going to do this with the basic tools that I find around for free. So let's duplicate that Bose and mirror it. So middle mouse drag nine over 21, hit S to set a key. Now, 19 should be exactly the same pose. And on frame 1, I'm going to go into red light on animation and mirror the post DAG. Now I'm going to check the animation there. If you enable the step previewing here, you will not. There's something funky. That's something funky is that the rotation of the food changes. This is due to the way the recomputes. I could not find the solution to this problem. This seems to be an incompatibility issue between Mayas that preview and these Reagan particular. But we're not so concerned about it. So we rolled the controller selected. We are going to set a key on every single post so that we don't accidentally change these poses. And now it's time for us to mirror that poses. So I'm going to shift left mouse, drag over the timeline to select my keys, right-click and copy, and then go over the next keyframe and we'll have to insert which is two frames after the last one on frame 11 and right-click and paste. That's going to paste the pose that we have earlier on. That means we have to mirror them, but that's easy. We mirror the, mirror, the mirror, the pose, and that's done. And at the end, if you want this to loop, we go to frame one, duplicate it over to 17. The animation will loop just fine. Now if we want to check this animation in stepped without the step preview, because remember the step breathe is going to change the position and the look of my feet see that we are going to need to select all keys by double-clicking with left mouse button on the timeline, right-click on it. And then we're going to go tangents and stepped at the end of the day, if you think of it, the only tangents we really used was some linears on the feet so we can't restore them. Don't worry too much about that. If we now playback between 16 and one, we don't want to play 17 because that would be repeating one keyframe, right? So as I press Play, There you go. We have our worried run. Not too bad. Not too bad indeed. And it didn't take long at all if you think of it starting from here, we have two routes. One is to go and keep the animation on twos. So just the way it was animated originally, we keep opposed for two frames. That's going to look probably better than refining this animation. I think the other one is to refine it. So I will first have a POS at fixing the poses that a little bit and see if there's anything that I have to fix in there, then I will show you how to keep it on twos like there was, you know, animation. And after we're happy with that result, we're going to see how these can be converted into smooth 3D animation. So every single frame is different and you're going to see that the moment we move to the traditional CG look, it's not going to look as cool as it looked when it was on twos. I think there's some magic in an emission and happens on twos. And it is probably due to the fact that the frames get impressed in your brain a bit longer. So they make for stronger posing an emotion.
22. Writing Animation Notes to Yourself: We have been rather quick as we should have been to begin with. This way we can already well wait which parts of the nation needs love and which parts are already working. At this stage, you are primarily looking for Southern accelerations or arcs that break for Eastern. So, so if I have a look at the right arm, the right arm is quite nice and smooth and the legs also they look quite okay. I wish I had a little bit more delay between the head and the body. It seems a bit like the head is going down one-to-one with the body. If you think of it, you can tell that body and head fall down pretty much the same way as we approach the contact, it almost feels like the head is anticipating the body, which is a bit too much probably. So that's something that is worth looking at. And then after we hit the contact pose, you see that there is almost no down. So maybe we can increase the down a little bit as we progress. It's a good idea to write down this stuff. This is a pretty quick character, but sometimes in visual effects, you might end up working in Greek that works very slowly. And by the time you do a little bit of a fix, you don't even remember what you were doing because it took so long. So let's write it down. So the head delay when going, when body goes down and it's a good idea to include when. So I think between 89 she is between 8, between 79 if you think we'd because those are the two poses. So you have to be very specific as you write down the notes so that you are going to descend a will fix specifically the problematic areas. Everything else was already working so you don't need to stay there and clean it up too much. For now. Your main interest is to show something to the client or the supervisor or whoever or yourself quickly so that they get whether you're going in the right direction or not. So that's something to fix, we were saying and then between nine the contact and the down, there is almost no down motion. So between 13, I guess One and free increase down motion, I would say not so much so but just enough then what else? The arc of the left arm needs some love, I think particularly between 8 and 11, I'm not sure what happens there. So check left arm arc between 8 and 11. Everything goes, seems about fine. So we can close these blablabla and we have our list of things to do. So had delay, increased our motion check left arm arc.
23. Addressing Our Own Notes: So let's do it. The DOM motion should be relatively straightforward. If we go to frame free, we can just lower the body a little bit. And you see that that's enough to give us down motion. Remember, we were left to mirror the pose is unless we have uninvolved, that mirror deposes four hours, of course that is. So we lower it a little bit, just ever so slightly. And then one thing that we can do maybe is we cheat a little bit with the head. And as the head goes up, we delay the head a little bit, we keep it low. And then at seven we delay the way up. And at nine as we go down, you see that as we go down, they had almost goes down together with the body. So maybe we can just delay the neck you see, just keep it higher up and maybe even cheat a little bit with the translation as you're learning. It's not a good idea to cheat with the tradition of a head unless you know what you're doing, it's very easy to break it and you inform me really. Now you go. So now the head is delayed on the way up and then on the way down, it's delayed ever-so-slightly. Please notice that I'm also really knows a little bit higher up so that you have a little bit of upward rotation and the head doesn't feel too stiff as the character falls down. The nose stays behind a little bit. That's quite a nice thing to have, I think. Then I think that's looking quite okay. Now, I'm a bit unsure about what to free and free to 504 the chest so the chest is moving slightly backward there and then stops moving backward and goes forward. So maybe it will keep the chest a little bit more forward on F3 79, you see that the chest rose up. You can tell it by the head as well. Then between 79, the chest is almost blocked, glued some libya can delay the movement up for the chest. And seven, so that I will exaggerate it so that you will see, so I delay it quite a lot so that you see that now as we go towards nine, the chest moves up and it doesn't feel quite as stiff. But I think I, I've exaggerated it. So there you go, something like this and maybe I'll nine, I can just rotate the chest a little bit just not to stop the motion of you can delay this a little bit as well. You could even cheat and just translate it up a little bit. You see now I'm compressing after the down. Remember that if we change nine as we did, we're going to change, we're going to need to mirror one again. So then what else do we need to do in there? So we delayed the head, increase the down motion. Check the left arm arc between 811, I guess I meant 9 and 11 there. Who? 9, 11. So let's see what happens between nine and 11. So the arm stays still pretty so the left arm stays pretty steel between 79. But then between nine and 11 kind of pushes forward with a lot of speed. So maybe that's a bit too much. So that means I have to go if the action happens between 911, I have to go between 13 because that's the because it makes sense to fix 1.5 of the cycle and then just duplicate and mirror it. So I will go between 13 and just the lay egg versus likely to movement, but not so much. So just ever so slightly. There you go. Just to remove a little bit of the Southern acceleration. I'm not sure I did a good job in there, but it could potentially work. I'm a bit worried about the rotation of the wrist forward in front of the chest. There's a lot of motion forward in year, but very little to the center and then there's lot to the center, then a little bit less and then almost nothing. So maybe it can start rotating a little bit earlier. The pose at seven, I'll rotate a little bit less than between 789. There is little bit of continuous motion, continuous rotation towards the center of the chest. At this stage, you might have different problems that I do. So you just have to evaluate arcs. The basic principles of animation is in practice, arcs. There is overlapping motion with the head and the chest and so forth. But if you did the basic poses that you run will look okay, you're ready. Remember now and economy are the poses. I changed the post 9. So that means I have to set a key on everything. Go to frame one, drug, pose nine over to frame one with the middle mouse button and hit S and then make sure that one is mirrored. There you go. And then I changed all the pauses between 37 so I can just copy them. It's a good idea to delete the old poses. Sometimes when you paste the pose over pose, you get a mix of the two poses depending on the situation. So you really want to be careful. So I will just grab these poses between 37, base them on 11, and then go 11 mirror, 13 mirror 15 mirror. And then I will copy frame 1 over 2, 17 and make sure all the tangents are set to step and we're back to checking the arcs. Still not convinced about the left arm. In fact, I'm less convinced that I was earlier on, but the head is a lot cooler, is lot gentler if you think of it. So that's quite cool. It's not too bad. And they really need to play between one and 16 relay go. That looks a bit more rushed Arizona runs. So let's have one last look at the arc. One thing that maybe strange is the arc of the elbow there. The elbow moves a lot. It moves forward quite a lot then to the center than to the center again and then stays there between 799 comes back. I guess the problem might be that between 57, the elbow is moving to the center, and then between 79, it's already in vertical direction. So maybe you can use world coordinate system and just rotate the elbow little bit more to the back. So we want invert the root just between 79. I think that might work. And I want to check these arc from this angle as well, from a free quarter. And you see that there's something weird going on the elbow moves forward quite a lot, then a little bit and then it locks there. So maybe I can lift it up so that he keeps moving forward a little bit, doesn't lock no ego, and then there's something else we choose a finger rotational decrease the risk comes in, and then between 57, it's essentially locked. You see doesn't change rotation or nothing, and between 79, it moves again. So I think that may be the culprit there. So I'm going to select all controls, set all tangents to auto again. And I want to see what happens if I grab the reason than the elbow and at 7, just delete the key and see what happens to the interpolation. And I think from the side view, the interpolation is quite cool. Let's see it from the free quarters. I think from the free quarters is kind of okay As well and good to maybe keep the brief little bit more in line. Yeah, I think it works, so let's grab them all again. And remember I changed free to seven, so I'm going to again copy them. And this is when uninvolved really comes in handy, my opinion, because it's a tool that would do this process of mirroring and duplicating for us, which makes an animation lot faster. Of course, I duplicate my poses, mirror, mirror and the mirror. Now I'm going to check and make sure that loop starts and stops with the same except posed, set everything to stepped one last time and play back the animation step. Remember I convert an emission to step just because the rigor does not support stamp preview. I would otherwise have used this, that preview. There. There you go. Now the animation looks nice. Everything seems to be tracked thoroughly.
24. Evaluating the Run Animation So Far: Let's make a play blast. So these noticed how whenever I make a play blast and make sure there's a frame count there on screen so that I know which frames are in need of attention. And one thing you have to check when you use a software like for instance, the JV is that the JV view dance to play back the animation at the last used animation frame rate, which was 30 phrase because just before recording this tutorial, I was animating on a game. So it was running it at 30 frames per second. So I'm really animating at 24 in here. So we've got a photo that looks a bit too quick. And this will be the animation on twos as if it was hand-drawn, so to speak.
25. Troubleshooting From the Front View: While the problems these animations often have is the front view. So you wanna make sure that from the front view, the neck and head are not moving too much side to side. Remember that you need to keep a stable head in order to aim at things as you run. So please notice how between 13 we are going down towards the center, but between 35 we are going back to where we come from. And between 57 we are inverting the motion and go and again to the left, so that can't be good. So I'm going to use the neck control and a global axes to make sure that if on free we go down towards the center, like we are, then on five, we keep moving in the same direction so we don't invert the motion and understand when we will be fine. Remember to always duplicate and mirror poses where you do a change, but it's a good idea to do your change. And after you did several changes to duplicate and mirror unless you have an automatic tool to do that. One problem that they had tends to have one is in globally is that people forget that there is a little bit of rotation at the head anyway, so it's not perfectly stable. So one thing I suggest is that you rotate it and versus likely one way and the other just ever so slightly, just to make sure that it doesn't stay perfectly aligned vertically, otherwise it will look computerized. Now since we edited the head motion, we're going to go and copy the keys, paste the keys, and then we're going to mirror, Mirror, mirror. And then we're going to make sure that the beginning and the end are exactly the same.
26. Reducing the Head Ups and Downs: Now as they press Play, you go the head is a lot more rational debt, but maybe still a bit too much up and down there. If you check the image plane, you will find that there is a bit of up and down in there, in the head. But they had this. And that's because in general, as an audience, we tend to track the face of a person. So if the camera's panning, the character is running and there's no falling down and the head moves up and down too much, that's going to be pretty difficult to track the head motion. So in general, we tend to stabilize the head a lot more when running in animation that I know of anyway, that's my experience anyway. So I'm going to go and grab maybe the chest and I'm going to cheat with the chest. So, so as we go to the down pose, I'm going to counter stretch on the way up the head and chest just ever so slightly to reduce the downward motion and then down on the up. And these should have the effect of having steal the hips go up and down while keeping the head a lot more stabilized. And then remember, again, we change the posing so we go, we're going to copy and paste and just Mirror, Mirror, mirror. You see that now they had these a lot more stable on the way up and down. But you still have the feeling that the character is going up and down, but the head is a lot more stable. And the few have been careful not to overdo it. You will find out that now you will have the same amount of ups and downs in the body. The head will have considerably less. It's easy to spot it if you watch it from the side view. So if I go and check the side, you see that the hip moves up and down quite a lot in there, but the head doesn't really cover that much ground up and down, not as much as the hip anyway, quite a handy tool to still keep the feeling or the illusion of an up and down motion with the body, but the not have the head inherit all of that happened down. The risk of this technique, especially at the beginning, is that the character will act like a pigeon and the head will be super stabilized. So we'll take a few tests before you get it right. If you don't feel comfortable doing it, Just don't do it. Keep the ups and downs for now and we will be a little bit more experience. You can try this. The animation you're looking at in here is instead, you wouldn't believe it, but it is actually stepped. Look at that. Every key stays up for two frames. And yet when you press Play, it works rather beautiful. You're ready and it does so from practically every point of view.
27. Introducing Back and Forth Body Motion: One thing you can do in runs is fake little bit of forward motion. So let's convert everything back to auto tangent. So we'll select all the keys, set them all to all the tangents. And then I will grab the root and on the kickoff pose I will push the body and the food a little bit more forward. That means I will have to probably roll a little bit more the right foods so that the leg is not entirely straight. It doesn't go into a pop disease to fake the idea of a push. So if you now check the head, you see that the head moves in the kickoff. If you track the nose, you see that the nose trucks forward. Otherwise, you would have had a little bit of a problem because it wouldn't look as if it was a bit. And again, for the up pose, you can maybe cheat a little bit and move the same left food and the route a little bit more forward. And for the contact, you can maybe move the root only a little bit more forward. So that between the up and the contact, we come back a little bit. And between the contact and the down, the body counts back to its natural position. Remember, we changed the contact on nine, so we have to go back to one and mirror. In fact, the biggest problems you will have in following these tutorial will be to remember to duplicate and mirror that poses that you have changed. But if you keep default cuz you should be able to pull it off anyway. So now we change the root motion and we changed the left foot motion for practically all the frames, I think. So I'm going to copy all the keys between 35, paste them from 11, and just Mirror, Mirror, mirror. There you go.
28. Troubleshooting the Face Animation: Now the face is probably having some weird animation. There is a character changes expression every now and then. So you just need one single boson there. I think the one I have a frame 9 is good enough for me so I can just copy it to one and deeply and leet every other key in there. Now I press Play and between one and 16, That's the animation. Works pretty neatly. It's pretty smooth as it is if you think of it.
29. Watching the Animation on Twos: So as I promised earlier on, I want to make a playlist with animation on twos as if you were traditional animation. So we'll set it to step again. And I will make a play blast, which I will call 2s because that's my animation on twos. Now as the press Play, That's my animation I go and this is the animation as it is onto, the result is quite appealing. It's quite cool.
30. Make the Character Run Through Space: Now let's move on and move this girl through space. Let's make this person run through the space instead of running on the spot to make their character around through space, you need to first understand how fast the feet are moving on the floor and then counter animate the master forward by that same amount. Let's have a look at how this is done. On frame 1, I will grab the contact food control. I will duplicate it and I will, um, parented Control D to duplicate and shift between parent it. And that's the fruit in there. Duplicate in an object in Maya by default does not duplicate the keys or even break the rig. These has just become a NURBS curve without any importance whatsoever or rather with some importance. Because now I can go to the kickoff pose, which was on frame 5, moved the master forward until the controller of the right food is lining up to the duplicated controller. And you should think of it. This will give me the exact speed at which the food is moving backward and exhaust speed at which the master is moving forward. I do not really need any other key on the master apart from 15, you think of it. So all these keys that are leftover will be deleted. Now you can't really keep the master in step two, you think of it, you will have to convert it to linear. Now, the character will move forward, you see, but you see that the feet are sort of the sliding because they're still in steps. So we have seen an efficient workflow to get the blocking through the door. We have seen the look that with animation on twos we should, could have rendered and it wouldn't look more or less like traditional animation in terms of timing. And now we want to push this forward into the rail of free, these blind animation. So we need everything to go back to auto tangent to begin with. They go and except for the feet when they are on the floor. Please notice that right now the feet iron sliding already. This is a great success. It almost like if they are as lighting, you might have forgotten to set them to linear as they traveled back in Dynasty it is guys and our set, linear, not bad, not bad, I would say that ensures that there is no sliding. So in that case, you just need to set them on linear and make sure that on each one of these free poses, the fruit is where it should be without sliding. The important thing is to have two keys on the, on your master. And if you want your master to move forward forever and ever, which you probably want to, you want to go into the graph editor view infinity to show the infinite line there. And then you go under curves post infinity cycle we've all sent. And now that kinda they will go forward forever and ever, and ever, never, never without adverse lighting, not bad. It was cheap, it was easy to do. Now I no longer need this guy, but I might need it later on for this blinding. So we'll keep it there and we'll just hide it for now. Otherwise I will get confused. Let's save the file as version free, linear muster. So that's where the master was. Linear.
31. Splining the Body Animation: And I think we can now transition into splicing. So we'll go File Save As again, because I want to store a file without any edit and set the version to four and the common to spline in there you are this way even if I break something in here, I can always go back to the blocking version free in which everything was working just fine. It's a good time to start splicing. However, before getting into the temptation of splicing feet and legs and arms and whatever, we really should focus on, SPL lining the body instead. So I will hide the parts of the body that I don't need right now. And to do so, I just need to go into the main group of rocket girl group. If you open it up, you will find the controller. If you find a transform controller and you open it up, you will find the geometry group. And if you go into the attribute editor by pressing Control a and U on your keyboard, you can scroll down until you find the drawing overwrites these guys. The drawing overrides are by default enabled in rocket girl, but in other rigs they won't be or they may not be. Rather, we just want to disable them for now. And now you see that we can click on the geometry earlier on. We couldn't quite click on it. Now I'm just going to grab legs and arms and even the head. Why not? And if you click on to the channel box tab and go down to the display layer section. You can make a new layer and store these elements in there. And we'll just call this thing jail, Kingdon jail. Why not? They go and now we'll just hide it. Maybe this guy is, well, let's add it. And then finally there is the structure or group which we also want to add. So right-click and select. Now as I press Play, There you go. I have a skirt on running. Maybe you want the teeth and the mouth and the tongue to just be hidden as well. But we certainly want to see the hips aria that's useful to ask. So the problem is that the hips aria is a single part with the legs, so we have to do some magic there. And if we right-click on geometry and go face, and if we right-click and hold onto the geometry and go on to face, we can now select faces, and I will select one phase at the very bottom of the legs and then double-click on the next one that we'll select an edge. We'll do the same on the opposite side. And now if I hit Shift N greater than keys, you see that I can increase the selection until I get to the waist area. It's a good idea to save this selection. So let's go create set, Quick Selection Set. I'm going to call this thing legs, and I'm going to add it to the shelf this way or we'll have a selection set down here, which I can right-click on it and click on select members or on the shelf I have a button that says exit the legs and I can hide that stuff. That means that the juncture, the hips does not need to be on the hidden GO anymore, so we'll just remove the selected object. So there you go. So now with these on, I can check the movement of the body alone and I can finally spline it. So let's grab the up and downs first. Let's start from the very beginning and you see they're set linear right now. So I'm going to set them to auto ML. You can just keep the motion a bit smoother in general, because you see that these curves are a little bit wonky there, there'll be wobbly. So maybe we'll just grab both keys and just change them a little bit just to give me a tiny bit of motion there. As you see, I have no animated rotation on the main control, on the body control. I don't really need that. Now as I press Play you up and down, which seems about fine. If you're unsure on what you're doing in here, maybe one thing that you can do is create the usual sphere which we learned to love. We're just going to match the transmission of the sphere to the one of the body controls. So select the sphere first, the body control last, modify much transforms all. And then we just scale the sphere up. There you go, and make it red as we are used to by now. If you want to see the motion of this fear, you just select the current body controls first, the sphere. Next, you go constraint parent. Now as you press Play, you can check if the sphere is bouncing in any meaningful way that you like. Then we're going to check the hip instead. And we're going to, again, you see it's in linear, so all the tangents to begin with. Now let's try and make sense of those. So these curving here is an interesting one. It's the sides decides translation of the hip. So it kinda makes sense that the hip translates from one side to another to be honest, but this is a bit strange. It goes one way and then it comes back immediately and then he stays flat. If I zoom it out, you see the motion is minimal. So really, it's not really contributing much to the motion. But one thing that I can do, maybe as I go from contacted down in here, I move this onto the leg which is holding the weight, which makes sense. This is what is going on. And instead of coming back immediately afterwards, maybe I can stay there a little bit more. So there's one I don't need. And that means that on the opposite side, this key will be up here somewhere. In fact, I can grab the value that I have on the pose I am right now and then paste it there just before the other contact with the inverted value. There you go. And remember, I did not need this value. So I will have now the Hip translating to the left versus likely staying there. And as we approach the next contact, the hips, wings to the opposite leg, which and that makes sense. Now if you're going to see the POS cycle and precise and infinity, you see that the curve is looking a bit funky there you see it goes down, stops and accelerating. Again. You really have to make sure that for whichever curve you're working with, you make sure that the tangents create a nice and smooth transition to the next curve. And that's true for any control we have in this loop. If we grab, for instance, the rotation channels of these hip and we'd go post infinity cycle and pray infinity cycle. You see for instance that in here, the curve stops and starts again at the beginning of the loop. That's going to create a bit of a jitter. So we're going to just rotate the tangents to begin with so that they work nicely together. Then let's have a look at the other curves. So, so the XX curve is moving very little, virtually nothing. So this seems to have a negligible effect. However, one of the most important rotation curves of the hips is the Y1 in these particular rig. So these kind of swaying is really important because it lets you remember, extend the legs forward and backward without creating possibly excessive stretch in the leg. So we want to see what happens. So after the contact, the hip is winging backward. That's exactly what they should be doing. So we are finding there, maybe we don't, maybe you can swing backward faster so I can just delete that key and you see that the curve becomes a little bit more continuous there. And then as we approach the down, we start inverting the swing because the leg which was behind this one, the right one in this case, starts to swing forward. So it kinda makes sense. We could maybe delayed a little bit, but it's a quick grants, so maybe we could keep it that way. You go. And then finally, this one is a bit interesting, but there is a reason for it. So in practice, as we land on the right food, the right leg will stand straight and it will push up the hip on the right-hand side of the screen at these current viewport. That is, that means that this curve does make sense. Then of course, as we move the right foot to the back, the hip will swing back down a little bit. And then and then as the left leg goes down towards the contact, hip will rotate down towards the contact to enable that contact. So these all make sense, although it looks a bit funky, so I'm not going to touch it. A sphere makes it harder in fact to evaluate everything we need on this. So maybe it will just elongate it as much as they can. And that should give me a better idea of the rotations. But you see it doesn't rotate at all. The reason why it doesn't rotate at all is because remember we constrain it to the body control, not the hips. So now we can maybe change this constraint and we can in fact go under the sphere, delete the constraint, then go grab the sphere, the hips, and just go modify, match translation and again match rotation. And then the hip is going to be the master. So we're going to select it first, then the sphere, and we're going to go constraint parent. And now as we press Play, you see that we can evaluate the motion and the motion makes sense. It's nice and clean. We can have a look at the chest in there. Let's have a look at the curves. It seems about fine, but let's have a look at the curves anyway because they are not spline that the other day. So we're going to auto tangent them. The most important curve is definitely in this case the Y1, this kind of swing parallel to the floor. That's the most important curve in my opinion, Nina, locomotion like the run. So we will expect to have a curve that is very similar to the one of the hip but opposing its motion. In fact, you see when they hit goes in one direction, then the chess moves in the opposite direction, which does make sense considering that the legs are opposing this winging of the arms, just like I simplified the curves on the hips earlier on it and maybe delete these key and just keep the curve simple and smooth. And do the same. Remember I'm on the opposite side. And then maybe you want to check if the ligand is key makes any difference and it does make quite some differences, I will just smooth and that curve, maya 2022, if you're using it, you will find out that the auto tangents will align themselves a lot better with the existing curve. So you will have to do much less than this hand tweaking or the tangents, which frankly speaking doesn't make much sense. So there you go. And in here we have the forward and backward which we introduced earlier on. We have a bit of forward and backward motion there, but it doesn't bother me and it's highly visible. And then we have the zed action, which we are good to see because it's a bit interesting in here it goes, it goes down, then the sort of plateaus, and then it moves down again. So I want to see, first of all was the range of motion. That is, if I 0 out these key by inputting 0 in here, how much does this change the animation? And it changes a little but enough to be noticeable, I want to delete this key and just see what happens. I think I kinda prefer is the curve is cleaner there. So we'll just have the solo, just have the pelvis rotate a bit more naturally and cleanly. Now you go. If I wanted. In fact, I could have pushed the chest down quite a lot more on the contact, then I should have had two counter animate content translated. And in fact, if I was doing visual effects are creature animation, I would probably investigate that. But in this case, we are going for a fairly simplified runs, so I'm not going to touch it. Hey go, it looks quite clean and now that we have it, we can progress with this blinding of dysphagia, can delete the sphere and bring back the visibility for the legs and all the other parts of that I had hidden and go on splicing and the rest of the body. So I guess I can go into the graph editor and see if my best friend, ruler filter is doing magic. So curves, you Euler filter and you see it is indeed doing magic. You still have to check if that's what you want really, because maybe from the front view tip is a bit, it's a bit too much on the insights and maybe I can straighten it a little bit and maybe keep the leg open just until the contact and same thing for the opposite leg. There you go. So that the contact won't only be down, but it will also be down and center if you think of it. Now, I want to check the general motion and the character is running quite okay. Let's see what happens if we make it run forever and ever even with the rest of the limbs. So we'll select all of the controls except for the Master, going into graphic, into the graph editor and select all curves, go curves post infinity cycle. I want this to loop forever, never lets see under View and feet it's there. So now if I grab any given control, you see that the loops work just fine. Now these tangents are only, are only linear. I don't really need them to be linear anymore. I don't even remember when I set them to linear. I fought. I only did the food in linear. So we'll select all controls except for the feet, because the feet, at least when they translate that as being linear and convert all these tangents to auto. That should give me a nice move action, which indeed happens. Now if I make the timeline a lot longer, you see that the character runs forever and ever and ever and ever forward.
32. 032 Restoring Some of the Heads Ups and Down: In fact, I would say that while they had looked okay, when their character was running on the spot, the head now looks a bit too stable. And this is why you shouldn't really be spending too long on running on the spot. Because you also have to check how does it look like when we see this animation from outside. Again, if this is a video game in which the camera is always attached to the character, that maybe you could have kept that version in which the character around on the spot and it looked okay. But if your character needs to be seen from the distance, then this head looks a bit too stable if you think of it actually quite a lot. So I think we want to go back and fix that. A cheap way to prevent the character from running forward is to go to frame 1, select the master, right-click on any given channel of the master and go mute old. Now the control 1D plane animation, that will still be an animation or not deleting it, but it won't be played. And in here you can see that the head, now that we look at it again when we're up close is quite okay. And in fact, if this was a close up shop or the character running, I would like to have the head stable because this way I could read the expressions. But in practice, the further I go and the excessive there's the realization is, so you see that bending on the shot you're catering for one animation may work or may work a little bit less effectively. So I will maybe reduce the counter animation on the translation, the head. So I'm going to go into the graph editor first of all and identify which axis is going to cause that. And that looks like the y-axis. If you want to quickly filter the graph editor to only show the curves you need to play with. Go on their channels. And in there you will find sink graph editor display there you've got this guy. And I will enable it. And the beauty of it is that now as a click on Translate Y, I will only see translate y in the graph editor. Be careful guys, because it may lead to some confusion sometimes, so you want to be careful with that. Similarly with sync timeline display in the channel box, I can enable it. And now whenever I click on this box, I'm only seeing the key that is belonging to that channel in the timeline. Again, be careful, it's very easy to forget you have that on. So again, translate Y is our curve. Let's see what's the effect of the curve. So as the body goes down, you see that the head goes up. And as the body goes up, you see that the head goes down. If I wanted to reduce this effect in a smart way. And maybe you could find the middle pose where the neck looks more or less of the correct length like this one. This value, 0 dot 1, 0, 4 seems to be an OK value. And then I can grab all the keys of Translate Y. And they make a scale them right around this value. If I hit R and I hold down shift and middle mouse button, there you go. You see I can scale them down. Again though it would be nice to have a previous. So maybe I can go to a place where I have a peak of the motion. And then in the graph editor I can go under Edit Scale Options, and I want to scale proportionally. So scaling works this way. Let me reset it. The value scale indicates how much you want to scale these values. So let's say we want to reduce the counter animation by say 20%. I'm going to input their aid and my go to scale animation by 80 percent, thus taking, thus taking away 20%. But from which P, What are we going to scale? Because the problem here is that I could scale it from this point where I can scale it from the bottom, for instance. So wash the skeleton from, I said I want to scale it from that value that identified earlier on. So in the value pivot box, so the first one is the scale, the second is the pivot. I'm going to paste the value that I liked. I'm going to position my cursor on the peak of the translation there. And then I'm going to reduce by 20 percent by hitting applying. You see that now I can press Play and see the result from the distance. That's better. And I can hit Apply again. And the more I hit apply and the more the head will go up and down, That's it. And this way you can cue the counter animation anyway, you like, It's quite cool. And in fact, very often in production, you will be told, Hey, can you reduce that by 20 percent? And that's a good way to do it in my opinion. So now I can look at the character again running for the screen and see if that's still too little in terms of up and down. And I think that now the head looks a lot more believable. It's still stable, you see, but it's a lot more believable and I can go forever and ever. And just as a press Play, they can make the timeline a little bit longer to evaluate a bit better, different distances. So now I would need probably need another monitoring year to demonstrate that. But now I can grab these guys and maybe I can scale everything from nearly 0 there now. And if I grab these keys, as the character runs, runs for a screen, I can apply a he say I, I'm, I'm picking the wrong channel. Now. She's running and rotating the head over and over. Remember, I only need one channel that they got. So I can reduce that and introduce a bit more up and down. There may be something to say about the chest as well. So I can maybe ground. Remember, the chest was also counter animating quite a lot. So let's see which channel of the chest was causing the issue. That seems to be Translate Y again. So maybe I can grab again the chest this time around it was scaled around, at, around the value of 0, I think because 0 is the default pose that I don't need to change, or was it reduces by a bigger amounts that you can tell the difference. So if I reduce it by 80 percent, so I type in dot t2 in the scale, see how much it changes stuff. And now a trust, the head will go up and down a little bit more. So these are ways you could do and you see now you actually see the head going up and down. So these are ways in which you can control the animation by scaling numerically and progressively see the effect. It's quite useful, useful. In fact, of course, it tends to work better if you devise your animation. We have a logic. So for instance, if your account they're animating the opposite of ups and downs in some fashion, then you should always use the same control and same axes to do that so that you only need to scale those controls and those axes. So that's our animation in there.
33. Splining the Feet: Think it already works, but we can maybe go in there and splenic a little bit. So I will mute the master again. The army is working quite okay. The legs are not so cool. Let's have a look at what they do. So we'll grab the food. Remember, we only need to clean the loop itself so the food goes down. So for instance, after contacting the floor on the second frame, I think I could draw nearly flat actually, I can roll entirely flat. And then we just keep up the toll a JO and these will give me a bit more time on the floor and I will try to have frame for roll down as well just to give the impression that I spent more time on the floor. And then I have a little bit of a problem because between 45 there is plenty of Raul going on. You see the heel lifts up quite a lot and then there is almost nothing going on. So maybe I can cheat a little bit and lift up frame seeks. See I don't have a keen there because I've selected the foot role and I was thinking timeline and graph editor. If you go and check that translation as you see it, you will see the key. So this is the risk of having sink, graph editor and timeline on. It's very easy when you forget to think you have put a key and not have it visible on screen and you're thinking, why not? I just made a keen there. So I go in there, lift the foot a little bit better and then you see that and we don't leave nearly as quickly as we should, so maybe we can lift a little bit quicker there. And then if you track the arc of the healing there, I'm going to show you the Iraqi will find there's a very hard corner somewhere. Up here you see it feels almost like the heel is hitting an invisible ceiling and then moves forward, bounces forward. So maybe in here I can have a look at the curves. I don't want to really set a key reframe, although for the feet, It's not uncommon for the liftoff to set a bunch of keys. So the feet right now are still in linear. I want them to become 02 tangents the moment they lift off the floor, they just need to be linear for as long as they are on the floor. So when I get down to the contact there, I will go back to linear. But until then we want the curves to be nice. Or two tangents. There you go. That's going to be already working a little bit better. Now let's have a look at that infamous wall. Let's see what the zed is doing. You see the zed is moving forward. So maybe you could just delete the movement forward and then he's already proving you see the arc. And then maybe at 11, I can lift up a little bit and then the lay the tip. I mean, I could even cheat y-naught and just use the toe wiggle there to increase the delay. And that would give me, you see, a much nicer arc. There is a little bit of indecision there because it feels like between nine and 10, the cheapest Translating is rotating forward and then rotate back again. So I wonder what is going on in there. It might be, again, a gift of the gimbal lock. So let's select rotation values and just run a new layer filter. Again, you see was indeed a gift of the gimbal lock. Now you see we have a much nicer arc down there and there is a very strong variation of motion between 15 and 16. You see that we go there very quickly and embalm, we change direction very quickly as well. So maybe we want to do something about that as well. I take it that's translates that again, that's the AD's solider could reduce the amount of translation that we have forward in their ego. And that starts to look okay, I guess maybe I could lift up even quicker and indulge a little bit longer up in the air. And remember, we are sinking the timeline. There you go. If you want to check the motion a bit better, just like in my other tutorials, you can create the proverbial, almost proverbial, I would say red sphere, and then you snap it to your food using the Modify much transformations, translation and rotation, not that it matters really. And then the control, the food becomes the master is fear, which will have to select, becomes the slave. And we do a parent constraint. And this means that now we can go visualizing gospel sphere. You see that now you can see the motion a little bit better. In fact, probably ghosting doesn't work too well for me right now, so I will check and that makes it a lot easier to assess any inconsistency in the arc. That's good. This works. So now the food goes down, lift up, and then changes the motion and then goes down again. Maybe ONE frame 16 can delay the way down a little bit so that the strongest motion on the way down would be between 16 and the beginning of the motion. Not that. Now, once you're done with this, you can hide or delete the sphere. And you would want to do the same thing on the opposite side, right? But now you have way more poses to mirror. Not to mention that you would have to tweak the curves. So maybe one thing that we can do is, first of all tweak the curves for that food in there. And you see that translate X, for instance, is a bit linear the moment we are again in the air. So I want to make sure that it goes back to round there and maybe I want these to be flat there so that it's a bit nicer. We did connection with the next part of the loop. Similarly, the rotation, you want to connect nice and smooth with the loop. So you want to make sure that you don't connect with the loop in a way which is a bit too harsh and it goes something like this will work.
34. Copying the Foot Animation to the Opposite Side: Once you have your curves clean is tied to flop the innovation on the opposite side. So I'm going to do it for this food, but the same thing is applicable to any control. So I'm going to go between 117 and then going to copy the keys in there. And then I'm going to grab the left foot, delete everything. I know it's sad, but we have to do it and we paste the animation. Now the two feet will move together, see that it's no longer around, it's a jump with both feet. We probably want to set to infinity before enough there. So pre and post infinity for all the curves. Now that we've jumped together, That's our innovation there. She's sad, I mean, no wonder, I would be sad if I had to run that way. So now we have the animation, but you see that we kind of need to mirror it. So we need to understand which values needs mirroring. In practice, you would want it to do it. And as I said, multiple times, uninvolved deposit. But let's say that we are left to our own devices. So if I move these food on local to the left of the Greet as we are looking at it now. And the values go to positive. And to get the symmetric pose on the other foods, the value go the opposite way to negative, like they do in here, then it means that you have to mirror those babies. Similarity. If I go up with zed and the value is going to positive, like it is up here in the channel box. And I do the same with this guy. Well, if the values are moving in the right direction, you don't need to mirror if I go instead on wine less. Why negative? Because the value is decreasing. Let's see what happens if I go four values. The crazy, it seems to me that we only need to mirror translate X on the translations. And then let's check the rotation. You need to be in gimbal axes. So hold down the left mouse button gimbal to evaluate which rotation axes need mirroring is better to do it when you are flat on the floor. So let's see if I rotate in Jimbo, say parallel to the axis and above go in the same direction that oxygen need mirroring because it means that I need to rotate it the opposite direction to get a symmetric pose. So one will go plus 1 would go minus. So y rotation needs mirroring. This does not need mirroring. Write, it works just the same and zed definitely needs mirroring. So translate x, rotate y and z. So let's go grab all the curves for the left foot. And remember we're thinking the graph editor. So we said that translate x, hold down control or command if you're on a Mac to select the Rotate Y and Z that we said we needed mirroring for. Then we grabbed his values and we will need to invert them right, from plus to minus or the other way around. The easy ways to select them all go scale options, reset settings, and the venue scale is minus 1. If we multiply any number by minus one, we're going to get the opposite and the p, what is going to be 0. That's the default position. We hit Scale. And now you see that they are perfectly mirrored. It fill around, but now they are perfectly symmetrical. Nice. Now the problem is that they will be offset, right? We know that frame nine really ease the opposite of frame one. So if we manage to put Frame 1 over 29, we should be done. I will make sure I don't feel they're the selection. So I get a grab all the keys on the timeline. So I click out and you see there's no chocolate selected. Then I grab the whole timeline. And with the middle mouse button, I'm going to grab the middle two yellow markers there and hold and drag until frame one goes over to nine. I made these control pre, cycle infinite, right? So it's going to run even after that. And now you see that the round works pretty well. The feet are super clean and we successfully cleaned the animation. They're not too bad, not too bad indeed. Similarly, you could go around and check the rotation. Why, for instance, of the chest and maybe you don't want these bumping there. You can delete it on both sides of the loop. There you go. Just to, just to keep the animation a little bit cleaner, this blind, literally cleaner whenever you want to delete a key, it's a good idea to make sure to position yourself on that key as you delete it so that you will see what's the actual change in animation. You don't want to blindly the keys.
35. Splining the Arms: So now let's have a look at the rotation of these arm. I will either phi3 just for safety. And we'll check what happens there. To be honest, that rotation looks pretty clean already. Let me check the opposite. I think in here that the elbow I think that the elbow in here is being a bit mis Civ use. Let's have a look. Yeah, maybe it's not too bad. But maybe as it moves forward right now is locking, I could keep it moving forward a little bit. So you see this is the curve I'm using, the y-axis. So maybe I can grab these key. And by moving it down, I keep the elbow sliding forward. There you go. Something like days ago and in fact, it's a bit softer now I like it more. Now I could just do the same in here and duplicate it, but really I kind of know what to do, so I will go to, this doesn't look mirrored, it doesn't look like the same curve. Let's have a look. It's not. So now that I know it's not, I can do the same game and that's a good way for us to practice again. So I'm going to duplicate the keys of the arm. So copy, I'm going to grab the other arm, left one, delete the keys and go paste. And then I'm going to move one over 29. Then I'm going to select the whole animation middle mouse drag it so that frame 1 becomes nine and then Curves post infinity cycle. The cycle. You want to check which curves you need to mirror. And let's have a look. So x seems to work just fine. Why is moving the arm forward and z is giving you a symmetric pose. So if when you operate gimbal, every wishing you make gives you a symmetric pose in this UNF to mirror anything, that's our lucky day. So now a go even left arm is a bit nicer. That's cool. That is actually quite nice. There you go. So now we have a we don't need the motion trail handle anymore and I can hit Save. This is going to be lining, right? So I'm going to hit Save.
36. Tweaking the Splining: And maybe I cannot little bit of reaction to the up and down in there. Let's see if I can do it. Grab the head, create a layer. I don't want to touch my animation just now. Set a key on frame one. And as the character goes down, I'm going to delay the nose on the way up a little bit. Now, on frame free, the cocktail touches the ground, the body stops going down. So I expect that the head will receive a little bit of a hit there. So we'll create that sense of hitting that. Maybe at frame nine will 0 out again, and then I will start over and again. Delay between nine and 11. Five, create a little bit of a sense of a hit. If you want it to be ultra precise, you could just duplicate deposes, remember, but right now, I think we will be fine. Remember at 17, you want to go back to 0? Now let's press play on these animation. Let's see if it looks a little bit more realistic. And I kinda like it. I could make it more exaggerated just to maybe demonstrated a bit better. Let's see if I manage to. So I will delay quite a lot more. There you go. That's visible, delayed and I will go down quite a lot more. And the same thing, you want to track the position of the nose. The nose can be the nose cannot be higher unleavened and he wasn't afraid. Nine, of course. Now, as I press Play, you see that I have the reaction of the girl. It's too strong. You can just go grab the weight of the layer and we'd use the weight so that you will still have the reaction. It will be considerably less. That's one of the beauties of animation layers. If you want to learn more about animation layer, you can watch my YouTube tutorial. You will find the link in description of the video. So this is a good way to quickly add a bit of overlapping motion. In general, at this stage, you will have different issues than mine. You will have to fix different parts, but the logic stays the same. Let's say we just fix the right elbow, we double-click on the timeline, copy the keys, go on the opposite side, grab the other elbow, delete the keys on the opposite elbow, paste the keys. We know that these rotations don't need to be mirrored because we tested there, they're on the shoulder and then grab all the keys and offset them until the frame we used to have one becomes nine. Make sure that your animation is looping is cycling before and after in infinity. Now as a press play, the elbow works. It's a bit hard on the way down so that they can delay their addition, the embraced. And if I wanted to delay the rotation at framing free now with this forearm in particular, how would they have to find a place where there is a key? Otherwise you're going to edit infinite. You don't want to do that. So I will delete here and maybe in here again, I want to keep the wrist the late. And now I should get you see a bit of a softer motion on the way back. So there's this magical overlap, I guess I'm still not very happy about the rotation of the wrist in there. And there you go. We have our animation. It works. Okay. It's blind. Spent too much time explaining the controls. They were okay.
37. Cleaning IK Pops: One thing you definitely want to check is IK pops. You don't want the legs to stretch. So I'm going to go frame by frame. You see, just make sure we don't have sudden stretch the legs and there's a bit of a pop in here in the left knee. So if I go and grab if I go and grab the left foot control, you can see how many moves a little bit forward, then accelerates, accelerates quite a lot, accelerates, then accelerate even more, and then a lot more. And then the next frame is changing direction. That's a bit strange. So I think in here, one trick that you can play is to go to frame 22 and trying to keep the same pose or the food more or less, that lower it a little bit so that the NEA want lift that much and the inversion in the next frame will be gentler. Similarly, of course, on the opposite side, this mega movement forward, we're going to lower the leg quite a lot so that the transition will be a lot softer. You see now the knees are working a lot nicer. Still feel like I could hit the ground with the feet flat. They're a bit earlier because they feel we don't spend enough time on the floor, so we'll animate the toe. We go to keep the fluid a bit flatter. They go, that looks a bit better and that's it. That's our Japan inspired female run inaction.
38. Conclusion and Outro: Thank you very much for following the course. I hope you enjoyed it as much as I did. If that's the case, please consider leaving a review and even suggesting improvement that will really help me develop more and better content. Where should we go from here? As someone learning animation, my suggestion would be to animate a different run based on different references. If you haven't animated a walk, I suggest you do so as well. And once you master both runs and walk cycles, it will be timed to learn to animate transitions between the two that you increase your understanding of body mechanics if you're interested in more animation tutorials, please check my other courses on this platform as well as my YouTube channel. And remember, luck helps those who prepare.
 Amedeo Beretta, Animation Director/ Tutor