Transcripts
1. Introduction: Walks are the base of human locomotion and the foundation for advanced animation mustering walks gives you the confidence and skills you need to control human characters in more of the related scenes. Hi, my name is Amedeo Brenda, and I am a 3D character animator with a generalist background. I started working in 3D CGI in the year 2003. And alongside production, I kept training the students and professionals ever since. Many of the problems we encounters animators can usually be easily solved by understanding the basics of locomotion and employing the right workflow. By the end of this course, you will be able to animate human walks with confidence, interpret reference footage for animation, and adopt the same techniques that industry professionals employ to deliver their animations. While during this course, you will learn to specific on the animate a female Walk in the process, you will also learn to work with video references, identify and design key poses of a walk troubleshoot Bose's understand weight shifts, control strike width and length. Lighting feed set-up priorities first, blinding controls pipelining and polishing workflows at details through animation layers and fix the pops and intersections. The course will run in Maya, but those principles will be applicable to any software. I designed this course for animators who are familiar with the very basics of the workflow, but struggled to deliver that quality of posing, splicing, and polishing typical of high-end production. Thank you very much for watching this video. And if you want to learn more, please have a look at the course preview and I hope to see you soon.
2. Workflow Breakdown: Hi, my name is Amedeo bread. And in this course we are going to learn 1D made production level human walking by animating a female walk using the Zelda Regan, which is freely available online. And you will find the link in the description of the video. First, we will look into finding video references for animation, and we will start to planning ahead. We will set up the rig to make it easier to animate the animation we have in mind and we will reverse engineer older poses of the uomo walk. And after that, we will try to understand which pose we should concentrate on first. And we will work our way through the other poses. And we will realize we need a way quickly mirror poses because after all, human locomotion tends to repeat the same pose is except mirrored. We will make a short diversion to see how to mirror poses manually and automatically smarter way using freely available tools. And then we will proceed to block out the missing poses of the walk. One sold opposes will be there. We will learn how to assess weight positioning and especially hip animation. After that, we will learn how to control the stride of the walk without having to go in every single pose and fix them manually. But we will still have to understand how to prevent the feed from sliding before deep splicing, we'll figure out a hierarchy of controllers that needs blinding before other controls, which is a good thing to learn now so that when you have to tackle more complicated shots, you already have this workflow in your toolbelt. Once the main body motion is polished, We will start cleaning arms and legs and feet. As a last touch, we will fix n0 pops and intersections and add some details using animation layers. You will see that these approaches a mixed approach between post to pose and layered animation. And it's a good compromise I found to benefit from control over the single policies and the flexibility of a layered approach. Make the best of this course you should be familiar with the basic viewport navigation in Maya. You should know how to set keys on the timeline, and you should know that animation layers exist in my old or you're not expected to be an expert on them. It would be good if you knew how to install scripts in Maya. But in practice, I will give you a link to a tutorial that explain how to install the scripts that we are going to employ in this course. All the material we use is freely available on the web.
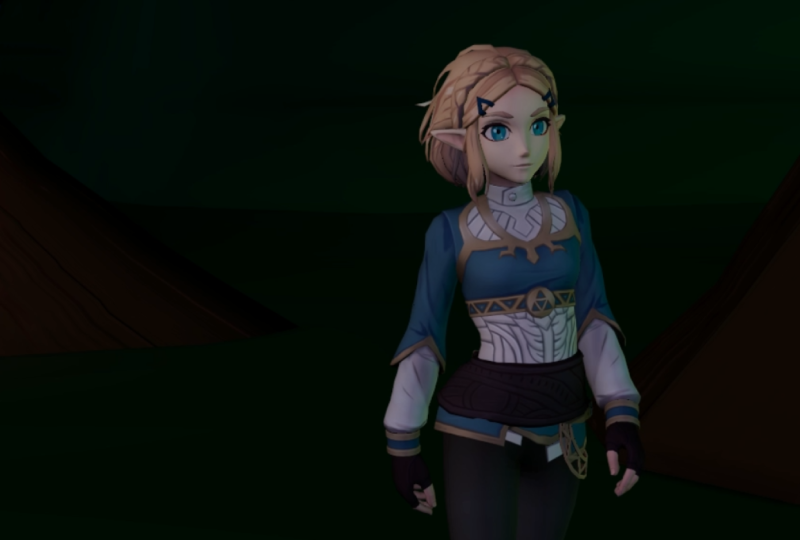
3. The Story Behind a Walk: We're going to play with today is Zelda from Christophe squash. I don't know how that's pronounced. This is the name of the artist. He made a lot of rigs. If you Google Zelda, rig, gum road, Maya, you will surely find this. I will also put the link in the description of the video so you can easily find it and you can follow along as well very easily. Then going to go on to file create reference. And I'm going to find my Reagan there. You see I have scenes folder. The project is ready set in my case, I am going to Rick and that's my rig. The V1 008, I click on reference and the first thing I'm greeted by Is an error message, not bad, but it's 3D. There's always some problem somewhere and these are doesn't tell you much. So just click OK and how do we know what is an error in a file in Maya? Once you pressed okay, you go to the bottom right corner of the viewport and you find this button with the curly brackets and the semicolon there, and you click on it, and that opens up the Script Editor. And the script editor does the ICO of whatever happens in the scene. And in you see that we have some warnings about an unrecognized node type. Those of you who are a bit older will remember Monterey, it's an old render engine. Now the seas. Don't worry about that at all. Gates, we don't even need to render this out, so it's not a problem. Hit six, and we should be able to see the character, its splendor. These hair is black, but I'm pretty sure that on the website I could see that the hair wasn't black, like geometry, no apparent solution. Try lighting two-sided enlightened and see if it works. We can animate. You can really start animation without doing a bit of research first. Well, perhaps if you worked on a couple of projects where you animated the same character over and over. Then perhaps you can start some animation without even doing much research. So let's try and see which kind of research goes into actually animating the Before we start fighting against the software. So a walk, usually a locomotion cycle in which the two feeds are opposing each other and the arms are opposing what feet are doing. There are people who animate this thing before us, and one of them, richer Williams. And if you Google richer Williams, the animators survival Kate walk, you will find a bunch of blueprints that you can use. By the way, if you happen to come buy this book, it just comes with a bunch of very nice blueprints for animation. And as you begin to learn, you can just look at them. And that will give you a lot of information that you can learn on your own, of course, but it will take you a lot more trial and error. So I think it's a good starting point and then you will develop your own workflow. Of course, as you learn more and more, richer, Williams says, okay, we have five poses to a which actually repeating. So it's four pauses plus one specular. One of the ways you can get to dispose is to think of a walk, the way you would think of a story and the story of a walk. You have no walk if the feet are off the floor, there's always one foot on the floor. And if one foot is in the air automatically means there must be a point where this one foot touches the ground. There's one foot touching the ground is called a contact bows. And usually that's a good point to start the walk from. So there's a contact pose and after the food touches the floor, the foot goes down flat on the floor, right. You can't walk about that. You can stay on the hill and then just walk on your heel that that doesn't quite work. So there's a down. So the stone down the weight is on the food that is just flatten the floor. And then we have a passive pose in which the language was behind us. Now moving forward is passing in front of the leg who just touched the floor. And the arms are doing similar thing. And then you have an app which is the posing with your buddies at its top height. And then you will go down again towards the fluorine. You repeat this for every never. So what we're going to do today is exactly that. So this is good for us to understand what is the minimum requirement there in terms of poses for this story to be told? I guess we could call these poses possibly key poses. Everybody I guess will have their own jargon. They're a key pose. It's opposed that is needed to tell the story without which the story doesn't work.
4. Planning Ahead: References and Rig Set Up: Our character is a girl. We will need a feminine walking there. These is general walk in there. It tells us about the poses, but it doesn't quite tell us how would that work for, for girls, for instance. So we need to find it out. And where do we find it out? Well, you film yourself, you feel friends, or you find stock footage online. So if you Google Woman Walking stock footage, there you go, you end up on Shutterstock. Usually you can browse through a number of people who walk in. Some of them is low motion, some of them with a different character than others. Do you would download the preview with some Chrome download their plug-in usually, and then you can use it in my hour. In other view, where to check the reference that you now have. This is a tutorial. I've already prepared some references. As you can see, we have reached a WMS breakdown opposes there. And then we have a bunch of references that we can use to evaluate a feminine walk. Now we have enough information to reverse engineer the walk. Break down opposes, front and side view close ups on the back of the legs and the feet from the side. A clear idea of what is going on in here. So you wanna make sure that your video is exported as a frame sequence and you place it into the source images folder of your project. That's really, really important, of course, in Maya, we go into the perspective view port, go view, image Blaine, import image. You see that we go automatically into the source image is section and then you can just grab any frame. It doesn't matter which one. And they, you ladies here, except you move the timeline, you see nothing happens. And that's because in the image plane you have to pick the box, use image sequence. And now the lady is walk must be Poll, take a couple of steps every 24-25 frame. So every second or couple of steps in a regular walk, we're going to use the rest of the references as a way to inform a workflow and start from the contact pose. So the contact poses the one with the food which just contacted the floor. We could have this image plane set up so that on frame one, we have the contact posed. Check whether we have the contact pose with the right food. There's one could be a contact post 32. If I now frame offset the image plane by 32 frames, let's see 3131, I prefer 31. Now, the only problem is that the image plane is covering my poor character there. If I reduce the gain on the image plane, you see that it becomes half transparent. And if you scroll down into the attribute editor, you will find the attribute depth, which you can increase and the image plane will stay behind your character. I don't like to keep white image planes on the viewport because they're very bright, but you're already staring at this thing for the whole day. We'll want to make things even more difficult. And I will save this thing as capital score Zed for Zelda, walk in underscore 001. As I move a control, I'm already thinking and that comes with experience, of course, will have troubles ahead with this kind of setup. That makes me think of something. Look at that I moved the hip down and I'm thinking, do I really want that? Every time I move the center of gravity, I have to fix the position of the arms. I started moving a control and I think wait a second, there's nothing that doesn't adapt. And here, every time I move the center of gravity, I have to fix the hands. So I need to set up this rig so that it's easier to animate. I would really like to be able to move the body around, so at least translated and have the hands translate with it. Or rather, I would like to be able to control the body without changing the angle between the forum and the shoulder. That would be great. The simplest way in my opinion, is use FK for this kind of motion because the arms aren't really touching anything. And usually next to any IK limb, you will find out there is a little controller. Usually the shape of a gear across debt has an FK to a case which, which I can set two, whichever number gives me the FK controls, which are controls, I can only rotate. Usually they let you pose the limber by rotating them, OK, rather than by grabbing them, rather than having to grab the end of the hierarchy and translated or around. So that's a bit better. Now as I move the center gravity up and down, you see that the arms are staying there, which is fantastic. So that's good. I have another question. What if I decide to say swing with the chest? Every time the chest is rotating a tiny bit wave want the arms to be swinging with it that I can I will be forced to counter animate them. No, I don't think so. So usually you will find that in more advanced rigs, the JFK route controls have something called global or local or space, which are parent, depending on the name. In this case it's called space local world. So you switch it on and now you will find out that as you swing the chest, the arms, they in global. So that means you don't have to count their animate them. That means that if you do like this, they stay in position. Imagine if we had to swing the chess from the front view. And now whenever I swing it, I have to count their animate the position of the arm. There'll be cilia would be spending my time counter animating or Liaodong. So now let's wish it on. If I check the motion of the girl, you see that the head is fairly stable, it doesn't rotate that much, it's always kind of pointing forward. You will also notice that there is a lot of motion in the back there. The back is compressing and it's turning. So that means that I can expect to have to turn my chest as well. But you see, as it turned the chess they had or the girl is rotating as well. That means I will have to counter animated. I certainly don't want that. So usually you will find that in the neck and all in the head, there is a local two worlds based control that lets you rotate the spine without having to diego rotate the head. Now, the rig is by default behaving like our reference. So that means I will have less work to do planning ahead buffing terms or references and in terms of risk management is really important because it can really reduce the amount of hours you spend on this work in lets you concentrate on doing good animation rather than fighting the rig or fighting the software. We want to enjoy the process and possibly make a living off it, that would be great, right? We do what we like. I can't see anything better than that. In fact, now, I can rotate the neck and you see that the head is global. I could even decide that even the head could be Globus. Now I rotate the neck and that translates the head which stays in global. You have to imagine this as operating some sort of piece of machinery. You want to make sure that machinery helps you. It's not something that you have to fight against. And in the next video, we're going to get down to the practicalities of animation now that we're ready.
5. The Contact Pose: In the description below, you can find a link to the rig we are using for this tutorial. In my opinion, it's a good idea to start making the walk on the treadmill, so on the spot and then move the master later on. This is especially true if you're working for a video game up here in the Maya view port, we wanna make sure that we can only select curves. So if you take all these boxes and you only need leave nerves curves on ten, as you drag a selection, you will only be able to select the curves, the control curves, which are nerves, we have the right food moving forward and you see if we move the control away and the leg is extended, you really want to pay attention to that kind of stuff. We call it IK pop in their knee going from band to straight in just a frame. It can make it look a bit strange, so we'll keep an eye on that. If we move the feet further apart than the character isn't touching the floor anymore. So what you need to do in there is a couple of things. A, you need to understand that this part of the pelvis is moving forward to help the leg extent. If you look at a close up of someone walking from the back, you see that as we approach the contact posts with the right leg, for instance, the right hip is moving forward so its wings in that direction, so that helps the extinction. So in here these round control is called the pelvis. I can just rotate it. It's a bit easier for the legs to reach their destination. The other thing is that as we approach the contact, the left-hand side of the hip is sort of moving towards the contact down there. It's lowering a tiny bit. So I'm going to lower this thing a tiny bit. Okay, just a tiny bit. And then we want to have the tape on the floor for the back food and the Hill on the floor. As a rule, which I find works for me. I never really rotate the ankle controls when the feet are supposed to be in contact with the floor. So I'm going to reach these pose by using raul control of this rig, this guy editorial control. They go and you see that the leg of the ladies fairly straight there. However, you can even help by lowering the center of gravity, this cross at the back. You can lower it a tiny bit. I want to make sure I have the heel on the floor and I will use these little controlling here. Sometimes you will find the channels in the main channels of the ankle controls. So here you will find the food role or a healed role. Sometimes it's in this control, sometimes there's little more at the back of the food. They go and you see that the moment I rolled the food and they're taken also moved this thing a lot more forward. If you're animating a lady we've administered there, then the stride would be short there, of course, the only problem is that you see that these leg is really a lot more to the bag for my reference arms. Well, the arms really are opposing the legs, so I'm going to move the shoulder a bit forward. It has this a shape really the reference is almost vertical whenever you want stuff to be fully vertical in 3D because it looks ugly. So in here, I will just rotate it at a tiny bit down and please notice how we are showing the cocktail reference is sort of showing that the back of the hand, the top of the hand there. So what do grab the controller and I want to mimic that. But also notice that the character the reference is showing us. The top of the palm bat, the elbow is kind of in both sides and that's typical feminine walk. On feminism walks the knees and the elbows. They tend to be a bit more inside that all masculine walks. The forum is not forward, so we'll probably rotate this finger lot forward. That means that I need my four views in there and it's certainly need a side view. I can see now that the forum is a bit more forward, we see a lot more of the forum in the reference. Then in here, you will also be swinging the chest back and forth, right? So if I help extend these wave, for instance, you will find out, look at that. A little rotation on the chest goes a long way in improving the silhouette of the arm. Then I said that almost always in body mechanics, when the chest goes along way, usually the hips winks the opposite way. Now, the other arm, it's pretty close to the body and pretty much straight if you think of it. I don't want it to be fully straight for now. I just want to give the impression that it's straight. As far as the hand is concerned. You see that the head is again showing us the back. These two references are not real line up super well, because I think in this case the right hand is showing us that the top of the hand and in here is a bit sideways, kind of prefer now that she shows us a bit of the top of the hand there, originally said that the hip goes down towards the contact. But look at my reference in here. It's already up there. I would probably put this thing a bit straighter. The heap of straighter. Of course, the head will be pointing forward for most of the time. So they go stare, you see pointing forward, you see it's tilting a bit towards the left. So perhaps I could add a bit of tilt ever-so-slightly. Don't really want to overdo it because we don't want our head to Bob, left and right all the time as she walks. And you've gotta look at it from more than just the camera point of view. You see how close to one another the legs are as she walks. And please notice out the weight is still on this leg because you see that the chest is still biased the worse the lag which is at the back and want to make sure the legs are a bit closer to one another. You see how the count of fruit is not straight compared to the camera, but it's actually rotated so we can use the heel control. She's not very convenient. Day go to rotate the food. You see that at the back the heel is a bit more inside that the tip. So we again, we can do it with this control and we can just rotate things, a tiny bit of rotation. Really Betty's something which look a bit more alive than it did earlier on. I really don't want to do the cape right now because this is not the place where the Cape animation. I can rotate the bomb a bit more outside just to give her a bit more line of action there. If you want the image plane to be moving with the camera, you can go into the attribute data for the image plane, go on the display looking for a camera, you see that you move the camera and stays there and it's not visible in the other views anymore. You can grab a top spine control. You can just move the spine this way. Usually the heat doesn't move in this kind of setup. I don't know why it is. One is a bit particular. I guess you can grab the chest and they go, You can do this kind of stuff. And you can also grab the hip. You can do this kind of stuff, which in my opinion, especially for quadrupedal animation, makes things a lot easier. The alternative would be FK spine, meaning you are left to rotate each single controller disguise. It's a matter of habit. I mean, I use both depending on the short Rayleigh, but for this kind of stuff that kind of prefer IK spine. Now what I can do in here is I can grab the chest and I can move it a bit towards the language was behind. One thing that you will notice is that the shoulder looks as if it's a bit lower than the shoulder which is forward nose, I could even write this thing out of it that way on the left side of my camera. And then perhaps I could use the clavicle to lower the clavicle there. And this guy could be a bit higher so that you see I'm introducing the same slanted section there. If you go back, you see earlier on it was perfectly flat compared to the horizon. And now it looks a bit more dynamic. I guess I have my first boson there. I'm going to select all of my controls and I'm going to hit as to set a key on the whole REG one to store the whole pose. It's also a good idea in my opinion, to pose the fingers anyway, even if you don't want to, they always look like forks in 3D. So we'll grab them all and then using Give mode rotation and we'll just close down a tiny baby. Please notice however, that in our reference, the second fallen, so the finger is having a sharper corner than the corner you would have between the palm. So this line and the first filings, you really want to replicate that bending the second phalanx a lot more than the others, gives us a nicer poets, usually at the middle of the ring and the pinky, they tend to be a bit more rotated. You need to twist them or even in, have them intersect a little bit. Do not worry. I mean, in real life, there are gaps between fingers, but there are also areas in which the fingers are pretty close together. And the important thing is that you don't make these fingers look like a for money. Also you can use usually they handcuffed control to just bend this thing a little bit. So making a pose which is a bit more natural, will make fingers look a lot nicer, more believable. And you don't really have to animate them for a walk. You just need to make the post look natural.
6. Understanding Pose Mirroring in 3D Space: I mean, depose needs to be the same on the opposite side, right? The first question I'm going to ask, of course, is, are we really going to mirror every single control for these wreak individually? For every single poles. You could do it manually, but it could also be smart about that. And that I know off there are a couple of tools online available for free that lets you mirror poses. A bit of a simpler way than just manually going through it. One is through your library, which comes very handy, bows manager. And if they do mirror poses also the ability to land poses. You still have to train the tool. Of course, you have to tell it to how your works. And then the other one is read through your nine, which is also for free. There's a paid version, but the free version works just fine, which comes with a bunch of tools and I'll wait to mirror poses as well on my YouTube channel and emission pandemic, there is a tutorial named mirror poses and then Iraq we write nine as three jetpack, which goes through explaining how to set up a 30K for mirroring. It doesn't take long, it takes something like nine minutes. They're minutes, the duet for the basic controls and also my channel. You will find that tutorial on how to install Read threonine to mirror the position of an object in space, you need to identify the axis across which you need mirroring. So in this case, we would need the left foot to be forward and the right foot to be wet backward, meaning the axis we are going to use is this one, right? It's minus 90. This is the y and z axis. You can see it out here. You see that? Now let's delete this. I don't need it. And let's start with something simple. The very base level of mirroring happens manually. So you learn that you understand how it works and then you can pass onto automatic tools. Let's see how the mirror opposing year for our control, I will take the two knees pole vector for a second. See what happens if I translate them to the left-hand side of the camera in here, I move both of them by a similar amount. I select one. The value on translate X is minus 5573, and I select the other one and the value is exactly the same. So the first lesson in here is that the value you see there in the channel is not an absolute value, but it's relative to whichever parent that control has. So if I go into the outliner, you will find out that these guys have parents and any value you see in the channel box is always relative to the parent. And the parent, again, its values are relative to their parents and so forth until we reach the green. So that's the first thing you have to keep in mind. That means that equal values do not necessarily mean equal poses. However, usually the controls, twin controls are in a similar space, which may be mirrored automatically already, which may not be merely told. So in this case, if I think that, for instance, this guy is going to minus x by 55 units, if I give it its twin control of the same value but inverted. So instead of minus 55 is going to be plus 55, I am going to get you see the opposite pose. So to invert these kinds of control, for instance, the procedure with a bean to copy and paste the key and then invert the value. I do not need to mirror. Why? Because the pose is already mirrored. Whatever I do to y. Same thing goes for z, for a control like this one. This will be the procedure. Let's see if the feet have a similar behavior. Every control is made different. There are conventions, but not all rigors follow the same convert nations and not all controls behave the same way, of course, just to make things easier, there are practical reasons behind these. It makes it easier to animate sometimes to change the convention. If I select this guy and I want to have the same pose of the, of the right feet on left food. I will right-click Copy and then select the let food, right-click and Paste. And then you go and you see that the position that two controllers is now Murat for these particular controls, it seems like copy and paste works nicely. However, you have to check also rotation. So I would rotate this guy just to see clearly. So now I want to copy the spose. I want the left would have exactly the same pose. And as a paste it, you see that wild translation worked. In this case, you see that the rotation, they didn't work. First of all, how do we know which axes are we rotating on? So by default, Maya uses object axis you see which are always in line with your controls. But the values you see down here are not objects values, they are gimballed values. To see gimble axes in Maya, you have to hold down e or your keyboard and then left mouse button held down, and then you move the mouse cursor over to gimble. That's the actual asked axis. You see it's very different from the object taxes. There are two different things. These is the true rotation axes. And when you move one of these axis here, you will only have one rotation channel changing up there. If I used object in this case, and I use these rotation, you see that unchanging all the three axis, that's because I'm actually operating a bunch of gimble axes all together. It's very important to understand that Maya's rotations are calculated using gimble axis and not using object axes. Object axes are there for you, for your convenience because it's easier to operate them. But in terms of mouth, the mouth happens on gimble axes to understand a bit more how free the software calculates rotation, I suggest you have a look at this video. You will find the link in the description beneath that shows you a bit of the logic behind rotations in 3D software. You do not need to understand the math behind it just before you get scared. You just need to understand there is a difference between Gimbel in object axes of How do we mirror the xB axis. So let's 0 them out to begin with, just to show how your rotation, let's say that one axis is rotated when you need to do is exactly the same thing we did for the two pole vectors, except applied to rotations using gimble axis. Remember if I rotate on the y in this direction, if I select one control, direct control the rotation Ys minus 40. Tradition. Why on the other control is again minus 40. So if we invert this number, we get a specular hosing. They're one of the feed is pointing up the one on the right, and that's because this control is rotated. So you've gotta do the same thing. You need to copy the key, then right-click and paste the key. And you see that they're not mirrored because there's something off in there. So if I rotate x using Gimbal, the position you see is exactly the same. So that's good. It means that I don't need to mirror x if I use, however zed, you see that that is different. So I will need to mirror zed because they move the same way. They don't live in a mirrored way. When I use the x_1 axis, I will need to mirror the zed value on the left food controls, so minus the last oxidant didn't check is why you see why? When I rotate, I don't get a miracle pose. That means after mainly mirror inverted value there, the controls are perfectly specular. The post does not work yet because of the root up here being not spake ruler, he sees a 0 it out. They have exactly the same position there. And also this guy needs to be 0 dot. This is how you get to a mirrored pose. So essentially you have got to copy and paste keys and invert the axes that we have seen how to find out who they are.
7. Automatic Pose Mirroring: And Eric would have perhaps hundreds of controls and you would have to do it for all of them. It would be a waste of time to spend our precious life and time dealing with something that should be automated to begin wave up. So we are going to use another method instead, and the other method that usually is called mirror tables. So first of all, I'm going to select all of my keys. And then with the middle mouse button, I'm going to drag key one over two, key 25, and then Angular depress S on my keyboard that has the effect of duplicating the key. We've comment period, I can jump between poses skipped between keys. I need to mirror this thing. For mirroring, I tend to use red nine, but it doesn't matter which one you use for as long as you use a tool to mirror poses, don't do it manually. Okay, just learn the basics of doing it manually, but then just use a tool to make your life easier. There is a paid for version of right nine, but the stuff I uses all three in this case, so you don't have to worry about that at all. And I have my mirror mapping here and a selection script in here. You will find a link to the mirror tables into the description of the video. So all I need to do once I have downloaded the archive is to select any given control from the rig, going to the script editor in there and make a new Python tab or use the existing one if it's empty, I just drive the selection script over to my Python tab, execute and my script, we'll select all the controls that need selection opened up the mirror setup tool from written nine, And the only thing you need to do is click on Load mirror conflicts. Go to the path where the mirror map is stored. Load it, give it a bit of time, they go. Now I can close this, close this. You will need mirror nine installed first of course. And then it can go read nine and emission toolkit. And just to make a test, I can select everything in there. I can click on mirror oppose and I get my post mirrored wave one clique, which is great. So now I want to fix something. Remember that we did the fingers on one side but we didn't do with m on the other side. I am going to select only the fingers controls in there on both sides, so left and right. And then I want the post to be symmetrical, right? So in red nine, you will find a tool that does exactly that under mirror post you have symmetry pose and I can symmetrized from left to right. And now I have the post Don, right? Then if you work in production, you will have a production pause manager. You will have a tool to mirror poses or symmetrized poses. So when you do the animation for your CH4O, you usually start at a disadvantage because you're competing with people who are into accompany. They already have these tools built-in. They don't have to do anything. They just well, they have to work a lot of horse, but in disrespect, that tool takes care of mirroring poses. So it takes them one click them Erebos. And if you don't have the same tools outside your do your CH4O takes you and our camera pose. So of course you animation in the end is going to suffer because of that.
8. Working With Video Reference: The Up Pose: We have the ability to near the poses. So what it can do in here, I would probably need to duplicate the finger pose on both 125. So I have exactly the same post. So I head over to 25, select all controls and click on mirror pose. And renowned will calculate that. And there you go. And now I'm mirrored. I have one contact and the other content which is great, which is exactly what we wanted to have. And it took us a couple of clicks, thanks to the mirror tables, of course, build your own. Remember you can just head over to the tutorials I mentioned there they're on or you can use the one that comes with the assets of discourse that came tonight. Oh, we have one contact and the opposite, no one of the features of 3D software is that it gives us interpolations. That's also great if we could use these transitions as a base to build our other poses. So there are different methods I kind of preferred to start from extreme poses. So the down is the most extreme downpours we have and the opposite, the tallest pose we have, if I do the up, the reasoning behind it is that the down in the past will naturally interpellate towards the up. And then I will have to go to the down and just lower it. So that will be my approach. Also, while doing that, I will have to find these respective poses, all my references. So for instance, let's say this is the contact with the right fruit. Now will go to frame 1234 or three, and this will be the down, I guess if you track the pelvis, desire here starts to push up towards the past impose n, then this will be the up more or less. You see that the difference between Russia Williams up and realistic up is that in ritual Williams up, the heel is up in the air already. You don't necessarily need to do that much depends on what you're trying to do there. And then we have the contact again, we will start blocking out this poses. In my richer Williams suggests that the opposite contact pose is actually on frame 13. Now we'd made the opposite on frame 25. So we'll select all of my controls. Hold down shift, press left mouse button on the keyboard, and the key from that I want to slide and then millimoles drunk to frame 13. Then I will go to Frame, then I will set a key and every control there will make sure that withdrawal is set to 0. In my reference, the girl is still with foot on the floor, so we'll just set the food role to 0. You see that food is not flat on the floor there and that's because these he'll control is interpolating. So I need to 0 that out. They go and now I have the food flat on the floor. You have to imagine that we're making distractive walk on the Fred meal on the spot. And then we're moving the master forward linearly. If the master moves forward linearly, we can grab both feet. Controls go under Windows, animation, graph editor, graph editor. And in there I'm going to grab the translate zed curves, which control the back-and-forth of defeat. You just click on one and then Control click on the next one. This curves we're gonna make linear because we are going to move the master forward linearly and then the feet back linearly. I will show this better later on. For now I'll just do it. I will also delete these keys only translate said. So in a few minutes, I will also show why this is really, really important. For now. Just do it and then it will be clear the food is on the floor there. That's great. The left foot is off the floor, right. It's up in the year so I can lift it up and you see it's rotated. However, the food control there isn't rotated ease it. We are up in the air. I preferred to have the rotation on the control of the fruit, not on the heel control like this one, it doesn't make any sense to rotate from this pivot while you're up in the air. So it will 0 out the heel control in there and I will use the ankle control. So as a rule, when I animate ie, if the food is off the floor, I rotate the food using the food control, the ankle control. Whenever the fruit is in contact with the floor, I rotate the food using the additional controls that we have, foot rolls and so forth. You don't have to taking this rule as a religion, of course, it's up to you, whatever you prefer. I just found it made it easier to control the animation. If I look at the way the food is there, you see it's almost parallel to the floors. I want make it perfectly parallel with tilted it a tiny bit because Greeks don't really look nice when they are perfectly parallel to the floor. The food of the lady here is a bit behind the knee and in my rig is not, so I would want to bring it a bit behind the heel. The arm is pretty much okay. But for the lady, you see that the arm is still covered by the silhouette in our k's in here, the Army's extending out of the silhouette. If I go to a side view, this will be a lot clearer. I could rotate back the forum at tiny bit more, which is going to work nicely as well because that means that later on we will get some nice overlap on the way up. The other thing which is really, really important is the rotation. See how the right buttock is much the, the bank in this pose. And so I'm going to do the same with my Rick and I'm going to move it back and also see how from the top view, the right hip is a bit higher than the left one, so we'll lift it up at tiny bit. Similarly, see how the right shoulder is a bit more forward than left shoulder. Shoulder, we can actually see a bit of the left shoulder there from the side view, meaning that these needs to be rotated a bit more that way. Just a tiny bit. If I go between the two poses, you see how the armed at f time, which is behind, barely moves, mind moves a bit more. So I maybe wanted to have a pose which is more similar to the postal, the lady there that can use a tool which is called the tween machine, which you can find online if you Google, it will also put the link in the description and let's see what the twin machine does for us. So let's say that I have the right forearm and I wanted to look more like it used to be on frame one, then it doesn't frame 13. Select the arm. I have the twin machine open. I can just you see, move the slider to the left and that lines the position of the arm back to frame one. And I move it to the right and it tries to match the position of the arm or the rotation of the arm that I will have on the next frame. So this is a very useful tool and it's used a lot in animation. Now I would like to have a look at the head translation. And if you check the head of the girl in here, it moves a tiny bit left and right between the two contacts while ours rotates more or less like our reference, but doesn't translate as much, cannot autonomy that translation by using the center of gravity. So you could push the center gravity a bit more on the left on 13. You can copy it by using Middlemarch, drag onto frame one, release and press S. And then of course, whatever you copy between frame 113, you will have to mirror later on. So you see how useful this mirror setup is. This in fact read we useful, hopefully we will have a bit more of side-to-side motion. You see there with the head still feels like is not moving as much as the lady in the reference. And I think these depends on the fact that the neck is not taking part in it. So there is a control behind this girl, another cross which is called a neck. Not surprisingly, and what I can do in there is I can help these movement dynasty with the neck. You see if you track this point that the neck, as they move between two frames, you see how he translates as well. So there is some translation there in the neck, which is actually rotation. Probably they can rotate the neck a tiny bit more this way, minimize drag and drop disposal every 13 press S on my keyboard, and that's it. Now I have the key. However, since it's a key I duplicated from the first contact, they need to mirror it, they go and now it's mirrored. That's so easy. I will also lead frame ten for the neck because now the interpolation will be different. You see there is a lot more motion left or right with the head, probably even a bit too much. So perhaps I can reduce this a tiny bit and again duplicate and again mirror and leaked interpolation. Thanks to the fact that it's so easy to your opposes, we can easily change poses without really getting too worried about anything. Well, you can help a bit, the arm moving forward and the left arm moving backward. If you need some select all control for post n and r will just HIT.
9. Weight and Hip Swing: The Down Pose: The next books I'm going to try and do it probably is the other extreme, the downpours, right? I want to see what happens in the decompose. So the contact pose, if this one for the right food, I want to track a spatially the hips. And you see how, as we go to the down pose, you see how this hip stays there. The right side of the hip stays there. Why the left side seems like it's going down and that's because of course, these leg starts to absorb the weight of the body and it starts behaving like a stick that doesn't bend. So you see it's pushing up the heap quite a lot in hearing effect. And I want to have that kind of motion in my animation to, and this is also visible if you go to a close up of the back of a person walking. This is about the contact pose. You see how as we move towards the down, this side of the hip is going up. Let's see what happens to defeat. The feet are pretty straightforward. The contact has the heel on the floor and then the fruit just flatten down in about two frames. Reframes are, so let's take care of that down pose, which are Williams suggests we could put the down at four. So I'm going to try that there. So 1234, I will set a key on the master only for now. I just want to use comment period to see if that's really a down. And you see that in the case of these reference, the hip is actually going out there. Head is not going up as much. If you track this line between the shirt and they paint, you see that that line moves up a lot more than the head does. The head is almost right there at the same spot. In fact, when people walk, they don't really move up and down that much like a cartoon. So they tend to keep the head fairly stable unless they have a visible movement. Of course, up there, some types of walk have that down is really happening a bit earlier for this reference, I think I want to follow the reference in here. So normally if I weren't emitting a cartoony loop, i will lower the master quite a bit here they want lowered the muster a bit earlier at around three or so. And in here, I will keep the master more or less where it is. If anything, I will raise it a tiny bit and you see how the chest and the hip moves forward quite a lot in there. So we'll move the master bit forward and there the chest is rotating from a pivot which is around the base of the neck is rotating forward that way. So I want to really replicate that. Then I want to see again if I can push forward with the hip more ECA can I guess I could rotate the HIPAA tiny bit AC now, however, it feels like the base of the neck is moving backwards. That's not really the motion we want, so we'll just move it a bit more forward. Yes. So that's about it. So this is one of those moments when you have to take a decision. Do you follow a regular blueprint which is telling you that down needs the body to be a lot lower? Or do you follow your reference and then fix the down a bit later? If you check the front view there, you can clearly see that in the first three frames, if we track the top of the head there, you can clearly see that the head. Is moving down in the first two frames and then on frame for it's moving up while the blueprint or whichever WMS may work this down is happening a bit faster than his blueprint. So for now I'm still going to stick to the reference because I decided I want the feminine walk. So I do not want to compromise too much. I will keep in mind however, that one of the characteristics of the down is that the weight is lower. Later on, on frame free, I will want to lower this down position. I will make a mental note to myself, of course, to that effect. Here I will say just remember down bows on free. These will be my main will. Normally I have paper. Now I want to check what happens to the food which is on the floor and that food needs to be fully flat. So we'll just check out which rotation. That's extra notation. I will just 0 out the extra rotation and also I will 0 out the zed rotation. I want to check what happens to the total. You see that that toy is moving a bit in sight as it lands. So maybe I can use the rotate y also to move them to a bit more insight. The problem is that now since I'm moving this control there, as I walk forward, the fruit is going to slide four there. So perhaps I want to keep this value next pose. So I just moved the time machine at the twin, twin machine to the left time machine. Time machine. I wish I had the time machine, yes. So will keep the same value of rotate y throughout the walk of the right food. So it will always have the same value there. This way the tip is not going to slide, so it's going to be in the same position on the down, the forward food is on the floor. See what happens here. However, what's happening is that in the reference, the girl is a pretty straight leg, right. So I'm going to move it a bit up there as well. Yeah, that shouldn't help giving us a bit of straight leg. But the one thing that is certainly going to help us is if we track these line between the shirt and the pants, you see how high it goes up and you check in here as well from the front view, same thing and we have seen in our references as well, same behavior after the contact, you see that the button is pushed up on the negative contacts. So what it can do in here is I can just raise this thing Y a lot until I get to a straight leg. You can now tell that the same push that we have here in the hips or the reference we also have in here in the hips of our animation. See like it feels like the thigh is moving a bit to camera left in here as we go down. So I'm going to move the hip debate can perhaps move also a whole route at tiny bit, thinker can rotate the hit even more. We can't really track this top line here because you see as we rotate, that line doesn't move quite as much. I think we have to track this guy here. You see that moves considerably, that's good, that's good. Again, we wanna make sure you're not stretching the leg there. You see that it might be stretched in this to be on the florist. So I'm going to move this thing down until the food touches the floor, but I still want to keep the leg straight. Okay. I think it's very important for me to keep that leg straight because that's the characteristic Oh, my walk. Maybe I could bend the leg ever-so-slightly there. I can't do this job also on the graph editor, I can just grab the Translate Y, select a key with the left mouse button, hold down shift and the middle mouse button drag. You see I have a lot more controlling.
10. Controlling the Stride: Now what happens to the leg behind? So the lag behind is an interesting behavior. They fruit is lifting and is rotating more or less around the toe there. Again, I want to set a key on the food. There is some rotation on the control. And if you check is the extra rotation because the controller is about to go interpolating that direction. Remember it was going towards the opt, so I need to keep the x 0 dot so the control is flat on the floor also will find there will be probably some rotation on the Hill or there isn't. That's good. So I want to check what the heel is doing there and you will have the same issue of sliding that I was highlighting your neuron for which if we have this particular pose, the mirrored posing here, they rotate y. This one in here is going to change progressively. You see it goes from 0 to the full value there. So perhaps, well actually in here doesn't really matter because it's up in the air. It does matter, however, in here when the food is on the floor. So I want to give it the same y rotation daddy has on the contact. Otherwise it will start sliding around. In here I can the graphite or I can just grab the value and just paste the value there and on down so that doesn't change. And then as the food goes up, it will start zeroing out, which makes sense, of course, let's see what happens from the side view to this food. See it's rolling around its toe and also it should be moving backward in our case, right, because we are moving forward, so it doesn't make sense for this foot to move forward there. So we need to move it back more or less by the same speed that these guide there. Right now we are going to eyeball it, but an easier way to find that out is to rub off controls, translate Z, both of them. And you want to have in here, this one is the back food. You want it to be still linear. Remember we set it to linear, but you see that it doesn't quite work because it should be linear, but it should going in the same direction of the forward food, right? Because they're both on the floor and for as long as they are on the floor there, moving backward in here, I will make this curve linear by clicking on the linear tangents on the graph editor there. And we'll move this key down, shift middle mouse button until they're going more or less at the same speed. So I will know, you see that the controllers are going more or less the same speed. However, you will find out, of course, that the leg is way too sharp for this kind of motion. That's not a big deal because a, we need to 0 out the food role there to see what's going on. So probably we can do a lot more afoot role, but you see that again, not enough. The thing that we can do is we can rotate. They hit up on the right-hand side a lot more and lower a bit. You see that gives us a nice line of action. I think the problem here is that the feet are moving a bit too quickly. So reduce the stride debate. And the fastest way to reduce the stride in here is to go again in the graph that we are going to love this thing. And we're going to grab both translates that channels to see what I can do. If I could grab these keys and just scale them this way, then I'm going to reduce not only destroyed, but the whole animation of the feet translating back and forth, right, that wouldn't be bad. I think I could do it however, to scale visually, you press aria keyboard and then shift the middle mouse button vertically. And that's scaling the curves vertically. But very often as you animating a production, what happens is that the supervisor or the client tells you, and you do this right, 15% shorter. So how can we do it if you're eyeballing thing? And this is when we'll learn how to scale curves. So I need to have both translates, that axis selected, all the keys selected there. And then I'm going to go under edit and options of scale. This is the box where the magic happens. I will go on edit and reset settings just in case some settings were off and then I want to change it to scale the values. So the factor, let's say want to have 10% less. If I want to have 10% less, I can input a value, a scale value by a venue scale by 90, that means 90%. And the pivot is the pivot we are going to use in here on the timeline. Typically this could be 0, say here, we will scale from this point of view, but I can scale from this point of view, for instance, it really depends what you're trying to do there. I will keep 0. And now as I hit apply, see what happens there. That's already solving it. But there's one thing I would really want to check in there. They want to perform this operation on frame for so that as a scale, you see, I can see the effect it does there and indeed it does help. Please notice I press it to undo my operation. However, I think I want to try and roll the food around the toll as well just to see what's going on there. And you see that if I roll around the toe, I can easily replicate the position of my food without really having to change the strike. This scaling technique was useful for us to understand what to do in case the problem happens. But you see how in here I can actually do it without changing the stride. I don't want the food to be fully vertical in there, so we'll keep it a bit mirrored. And you see that now, I quite nicely replicated the position very easily without having to do any particular magic.
11. Tweaking the Blocking: The Passing Pose: So let's see what happens to the head since the head is depending on the main spine action, the ups and downs and the site decide, I tend to do the head later. I don't really want to do it early. You see that if you track the connection between the Jew and the neck, the neck does not translate forward nearly as much as the chest. So that's quite good for us because we already have that chest motion in place. We can delay the head a bit more. So on frame for I can rub the neck and just rotated a bit more forward if I track the notion here is moving quite forward and quiet and with very little rotation. So I think I can afford to raise the weight tiny bit. Normally, you wouldn't want to translate the head up, but if it's a tiny bit and it doesn't hurt, I will do it nevertheless. So now I have replicated the motion. Nice. We'll select all of my controls and I will press S to store the key, of course, in general for feminist walks, the knees, they tend to be a lot more inwards then for masculine walks. In this scenario, you see how the ne of my references a lot closer to the center line, while that of my animation is a bit more further out, I would really like to have the NEA a bit more insight. However, the problem here is mainly that the leg is so straight that even if I rotate the knee and not going to change anything. So that means that probably I will need to move the feet a bit more towards the center line, right? Again, I want to see this from the front view just to make sure I'm not doing anything stupid. And you see this is the distance between the colleagues. And then if I look at the references, See the distance between the caliphs, I think I can keep the feet a bit closer to one another, which tends to give a more feminine look to the walk. The elbow is a bit more insight on both arms. I could try and achieve that effect as well if possible. Let's start by defeat. There you go. I will grab both controls. I want the whole motion to be closer to the center line. So again, animation graph editor for this kinda stuff, I tend to use the graffiti. There are a lot for other stuff like free form animation, maybe not as much in this phase. You can do excellent animation both ways, in my opinion, but understanding geography, that there is a good help. So you see the channel, I'm moving stuff on in here as a move towards the center away from it is mainly translate X. That's the biggest variation. So we'll grab translate X for both controls. I'll hold down control as I select one and another. And then I will just grab these two guys. And with the scale options this time I can scale again by nine. The middle line is zeros, so the pivot is still going to be 0. I hit apply. That's not quite what I want. I want them to scale the other way around. So I will scale up to 10% more. And as I hit Apply, I see that the whole motion gets locked closer. And now I'm actually really directing the whole animation if you think of it, and now it looks a bit more feminine. So earlier on he was, the guy was going balanced rate like a raw, but a lot of the walks that my students send me for feedback, they have this problem that if you look at them from the front view, they are super straight by just moving everything a bit closer together, you'll get a better, more organic pose usually also. You will notice that as someone walks forward, See what they let food does. You see how it moves outside to avoid hitting the right food? It's quite normal that feet are very close together on a feminine walk. And then as the res, they sort of go outside to pass over the other leg and if anything, that is going to tell me that I didn't check from the front view what was the post of the left food, especially if you track the heel, you see how much to the left that he'll go so much into the center it goes. So I really need to do that myself. And I could add some overlap and have the tip of the food arrived later just to mimic that kind of rotation that is happening between the up and the contact there. I guess I could even use the heel controlling here and just rotate a lot more to the center so that you see now I have a lot more motion going on in there. That means I changed this pose, right? So that means unfortunately that I have now to grab both controls. Middle most drug 13 over one. And what do I do it one, I mirror that pose, of course, mirror that pose. So they go see how often we need that. Yes, so it's getting there, I think. Let's check the knees again. For now. I will just move both of them a bit closer to the center. You probably just copy this value on the left knee and just inverted on the opposite one. And then since you see I didn't know motion, I can just delete this keys for now. I just don't really care for as long as 131 are the same, I should be fine. And then I want to see what happens to the pole vectors as I go to the down pose, you see that the nice stays pretty much inside throughout the whole duration of the animation. There's a bit of moving out, perhaps at the ground frame seven or so here there's a bit of moving out. So perhaps on the downer can move the knee out. You always have to check it from the front view because otherwise it's very difficult to know what's going on. So I will move this out of a tiny bit, and also we'll move this guy out a tiny bit on the down. But I want them to be pretty much aiming inside for most of the time. Now was saying it would be great if we could replicate that elbow going in at tiny bait. You see if I twist it very often on rigs, you can also rotate the elbow this way, but you can't. It's a good idea, at least when you begin not to touch that axes on the elbow anyway, because people tend to break the elbows and then the arcs become very difficult to track. I want to check from the front view. So at 13, the left armies pretty much hidden behind the body. So I can just increment that. And then I can rotate the arm a bit this way to have the elbow even more in. I don't really want to hide the arm behind the body because they would disrupt the silhouette. You see I still want to see both arms. Then I will go and check the frame one. And at frame one, the arm is pretty much outside the body. There is a big gap in there. So perhaps I could rotate it out a bit and then Twisted a tiny bit just to up the elbow a bit a bit more in there. I think I'm twisting it too much. Maybe I need to. That much and I want to check the rotation of the handling there and we'll just straight and the risk that tiny bit there, ensure a bit less of the top of the hand there. I always go back to the perspective view and I check what happens to the wrist and was the rotation I wanted it to have. So I will lower a bit. Then I want to check what's going on with the Posen frame for I can't even delete the key and see what was the original key. I know that's actually quite ok, I think already. Now let's have a look at the other arm and the right arm in there. It doesn't do much apart from hiding even more during the down, it comes out during the, which is exactly what we wanted. And then there's a lot of rotation forward, I think within the app and the contact you see, this is probably a bit too much. So I want to have a look at the image plane and I want to position it again. Figure could have created a couple of more image planes there. They would have been easier. I would need really another image plane for the front view. Something that is only visible in the front view, that would make life a lot easier perhaps later on overdo it because this is becoming a bit complicated to manage. So I want to check where's the maximum rotation in the arm system there, you see that the shoulder is rotating abate. The forearm isn't rotating that much. I want to rotate the shoulder a tiny bit and the arm a bit less. Yes, I think this will do, but remember I did change the position of the contact post there. And every time I do that, I have to select all controls that I changed and mirror them on the other contact pose. So you see that very often it happens that I have to select the same set of controls and that's kind of annoying. So there are a bunch of tools that you can use to store your selection sets. The most primitive of the mole is called the poster shelf. It's a very old tool that you can find out and I will, and I will put the link in the description. A more reliable and flexible alternative to the poster Shelf is the studio library to which I mentioned earlier on through which you can save selection sets and poses an animation called them when you need them, will I use both depending on the situation, I have to say that the advantage of the postal shelf, in my opinion is that it's a no-nonsense tool. I can click one, select the icon, Save the selection, and from now on this is going to be stored on my shelf. Sometimes I just, I'm just too lazy to go and open up an animation library for just a control that I needed selected. So It's up to you. It doesn't make much difference. However, the bottom line here is that we need these posts to be mirrored. So I'm going to Middle mouse drag 13 over one, press S, And then I'm going to go to one end mirror depose there so that I know for a fact that this is mirrored. The need to take care of the missing poses or rather they miss impose. Because if you think of it, we have done the up, the contact and the other contact ended down. So we're only missing the passing position. The passing position as big complicated in my opinion, because that's when you tend to get the interpolation from Mayas or the pose suddenly dies on you and everything tends to look static, really even. We want to make this thing a bit more alive. The food which used to be on the floor earlier on between 47 would have lifted off. They just 0 out. The rotations there begin wave, then I 0 out, whatever role I had in the foot roll controls there, 0 everything out. And it's also 0 the heel and then I will use the ankle control. Remember I said whenever the food is not contacting the floor, I really prefer to have the ankle control to decide where the food is. So I'm going to rotate the food more or less like my reference. I'm going to put it more or less in the same position there. Maybe rotate it even a bit more to the bank. This is going to be my transition. The left knee is passing over the right one. The food is lifting ever-so-slightly between 47. There is quite a lot of up if you think of it, this is when the leg is right under the weight. We are at, at the tallest of these reference, almost. There's, the output is a bit taller, but this is about it. I mean, this is almost as high as we can get. So in here what I can do is I can grab the center gravity control, grab the Translate Y, and you see that my Translate, why isn't really what I wanted to be? I need this guy to be higher, so I will just lift up these two keys because I need them to be the highest Bose's ever in this animation. So the girl will go marginally higher between the contact and what is our down. But we know that we will have our actual down a bit earlier. So that will be lower a bit earlier. And then we have on the passing pose you see now we can actually appreciate our character lifting up. I think we can lift up even a bit more. So using shift the middle mouse button, that's quite a lot of up and down. So we'll reuse a tiny bit, something like this. And then it moves a tiny bit up later on, marginally, not so much so, so i could even reduce this tiny bit. Now let's see what happens to the legs. We wanna make sure that the feet are not being yanked away from the floor? I certainly want to make sure that the hips are helping as well. If you track the thigh, the front of the right thigh, you will notice how much to the backend moves. So and this is also true for our animation. So we're sort of find their, I guess we could even rotate the hip even more to the back because probably as the left leg is moving forward, the heaps are the hips as winging now why? Right? I'm going to help with that. This is probably the moment where the right hip of the reference girl will be at its highest. And we'd just make sure that's the case. From contacted down, they auction, we see the mosses rotation around the naval more or less. And then from down to pass, most of the motion is translation on the way up. There isn't much repetition going on anymore, not as much as earlier on. And then from, from passing to up, the biggest change is the rotation of the hip from the front. You see that you can clearly see that going on there. And then we go down again. Nice. I think I want the passing to be even. To be bit higher, just not happy with what I have right now. But you see I'm dragging the food along in there. So if you find yourself in this situation where you end up dragging the fluid along, you have usually a couple of solutions. On advanced rig. This rig is quite good but not a feature level REG. So one solution would be to reduce a tiny bit the rotation of the hip without us noticing too much that you're doing that. Hopefully, that's one solution. Some rigs have an additional control on the hip that lets you move just this side of the hip independently a bit lower. The other solution is cheat a bit with the food roll and just use a tiny bit of football. You see that as a use a tiny bit of football, I regained control over the Neither, but I'm not quite happy about these just yet. And the other solution again would be to grab the whole AN emission curve for the up and down at the body. Just move everything a tiny bit lower. C that if I translate the HIPAA tiny bit to the left, to the left of the character. Again, a few important milimeters there. And then I'm going to cheat a bit with the foot role, just, just tiny bits, so something like this. So now my food is happily on the floor. Okay. The leg is straight like my reference. I want to check from the side view and you see that finger moves the mouse from the side view, is actually the chest moving up, just as moving up quite a lot in there. Not quite as much as the hip there. I'm not sure I will be able to replicate this thing. I think I will be able to move the chest a bit more forward and that will give me probably what they want. Usually, you can also stretch this spine on some rigs and not sure I can on this rig. Let's see what this guy does. You see that the spine doesn't really scale there. So that's a bit of a shame. But what can we do? Now we have our animation there. You really need to take care of intersections. Bit of intersection is not an issue that you don't want that to become too visible. So I'm going to open up the arm a tiny bit in there. And I can also delay a bit that will create some nice overlap. Yes, I think this could work. Please notice at no time during this cycle, I press play to check the animation because I really needed to have the poses done properly before a really can press play and plus ideas blind it. So I'm not sure what I would get if I press Play in there. I think it would just struck me from my mission. Let's check the left arm and there we go to the back, that's cool. We go to the back, that's cool. We haven't been ever probably the bag in here. So we'll just cheat with the bag and it will be a bit more to the back that it doesn't get in the way. And then I will select all channels and break connections so that it won't be animated. It will stay there finding my Did they hit a bit too much? Probably. So for now I'm going to keep it there and then I'm going to find a solution after a mirror the loop. I have all my poses in there. I want to set a key on every single one of them, on all the controls just to make sure I didn't change anything. I could just duplicate all the poses and then just press play and see how it works. So let's see. First of all, if this rig supports stepped playback, place yourself on a key, you right-click and you enable step. If the post stays the same. It means that the rig more or less could be compatible with step preview if they post changes when you enable stepped playback on a key, it may mean two things. A, the rig is not compatible. B, you didn't set a key and every control on that frame. So now as you transition to step tangents, the position has changed. How do I evaluate this rig without having to mirror the animation first, which I don't want to do yet. Well, it's super easy. Well, first of all, you go to a side view and then you press seven. And you see that as you press seven, you can always see the silhouette, which is great. That means that if I make the animation loop between frame 112 and I mean step preview and I disable the curves. Now you go. That's my animation there. I will probably disabled the image plane now I just don't want that to show up. They go. And you see that the loop is already working, not bad. You can already do some tweaks in here and decide what needs love before you go to mirror. So you spare yourself the trouble of mirroring the animation, please not as I'm not really tracing the animation. I am identifying the main key poses and the main variations that I have between one pose or another and trying to find where we have the biggest change and then trying to replicate that change. Ok, for instance, I'm noticing that in the oppose, it would be good if I could have the left-hand already popping out of the silhouette that you and I have the silhouette come out a bit more from the back. You still want to make sure that your contact pose works. After that, you see that now the hand goes back. It goes back quite a lot. It between the passing and the up. And then it sort of stops there, which is not great for us. I think they go and now you see its coming out from the silhouette there. Of course, now that you know, I've changed the contact pose, what do I have to do? I have to mirror this contact pose again, they go. So we'll drag, we've asked a middle mouse button 13 over one. You see that the poses changed there. It doesn't quite updating the view port. So usually a press common period to go back and forth and see the update. And then I click on mirror hippos Baum and a mirror. It, I really want to check that this still works moving forward, which it seems to do, break the elbow a beat as we move forward just to give this nice feeling of overlap, I could even go this way. I look at that. I mean, this is probably too much, so we'll reduce it. I think before mirroring the animation, I need to decide how fastest scarf is moving through space and I need to fix any sliding into feet before moving forward. Otherwise, if I don't fix this lighting feet right now, once a mirror will have to fix the defeat twice on the first step and on the opposite one. As well as remember, I have to do the pose on frame free. There's still something to fix, so I don't want to forget this guy here. That's why I took out the nose to check if there was anything that I was missing there between up and contact. You see we are going down with the head. I usually trapped the head to understand what goes on in between contact and down. We're actually going a bit up, but between 12, well, we're staying more or less stationary there. What it can do is I can lower the contact at tiny bit more. So will reduce this guy a tiny bit as well. And then of course I have to mirror the contact. I need to grab both twin controls, dropped them on frame 13 and mirror deposed and other thing that happens between up and contact. I think I need to move the up to the front and it moved up a bit further forward there so that we push between contact and down on the passing, we push more vertical than anything else, so we don't move as much forward. And then between passing and up, you see we move slightly backwards, so I will make it very subtle there. And then the biggest back motion is between up and contact. That's there's a lot of back motion, a lot of moving back there. So you see that now you're actually doing something interesting there. Now we have also been a forward and backward with the roots. So you see how people looking at things from different points of view. And as I examine something, I discover something else that will disables that preview. I will save my scene, of course, and I will make sure that the center of gravity is not moving up that much, but rather keeps them moving down a bit. And we'll check the Translate Y there. On frame three, we start moving up. Before we move up, quite a lot of things.
12. Fixing Sliding Feet in 3D Animation: Before we address the problem of the sliding feed in the scene, I would like to show you why there is a problem like that and how we solve it from a theoretical standpoint. So that once this thing is understood, you won't really have a problem anymore with sliding objects on the floor because you will know where it originates from. Weave any red you will have a master. And when you move or master around, you will move the feet around by default is red brick here represents one food. So when they move the master around, you'll see it if it goes around. If I press Play, this break is going back and lifting up in down-going back forever and ever. This is exactly what our food is doing in any walk cycle seem so you will always have this situation when you want the walks I could do move forward. You will grab the master and then you will animate it forward. I will temporarily hide the masters that you see what happens as you press play, you will see your food slides a little bit, then moves forward and slides a little bit, the moves forward and so forth. Our problem is that these motion is more or less what we want. Really. It would be great if the food didn't slight when it was on the floor. Let's see. The fruits lies back, lifts off, slides back and so forth. If I managed to move the master forward between one end 18, the two keys are the food. By the same amount, the food slides backward, then the effect I would have is that there would be minimal or little slide between the two keys. You see that now does not change anymore position between 180 by moving the master forward by a certain amount and counter I animating the food backward by a certain amount. Now this is the food, my left hand is the food. Now you will see that the resulting motion is that at least as far as the audience is concerned, is that the food does not slide anymore between the two keys. There is no sliding. There is a little bit of a change of the position, but it's not a big deal really. However, between the two keys, you see that the foods field moves back and forth between two keys we have who poses that work perfectly well. And now all of a sudden, when we go in the interpolation between the two keys, the animation doesn't work anymore. Now there is sliding again, because we learned at the beginning of this tutorial that animation depends in 3D at least or in a software primarily on two things, the keys and interpolation between the two keys. Now, we also know that the two keys are just fine with us. The interpolation between them have, must have something that doesn't work. So let's have a look at interpolation. I will grab the master and going to the graph editor. You see that this is the curve. The master in the graph editor, the Master starts fast, the Master starts fast. Remember this is also our representations of acceleration and then slows down towards the end. So that means this must there isn't moving forward continuously. And if we look at the animation as it progresses forward, you will see that it stops, starts, stops, starts and so forth. But I walk cycle is linear motion forward really. So rather forward linear motion really. So in here we would need the master to move linearly full word. And the way to do it would be to select the two keys. Heat linear tangents on the graph editor. And now the master will go forward forever and ever. And you see that the food doesn't live anymore. So now I can go back into the animation seen, one thing I could do is I could grab this would control down here, and I could duplicate it. And then I will hit shift, be like pappa al my keyboard. I did that on the contact post. So now what I can do is I can grab the inside a master. I do not need really any key on it sold break the connection. And because I don't need all the keys have put, I need some other keys. And at one, I will set a key and then I will go to frame 13, where these food is still on the floor you see? And I will move the master forward until the two controls that I've created are more or less in the same position. Now as I press forward, you see that between 113, The food is exactly in the same position, which is great. They probably is that in the middle, there's all sort of stuff happening. Things are changing and so forth. So if your keys are fine, then there is some interpolation going on. So let's have a look at the interpolation. And if I go graph editor, you see that the Master starts slowly, accelerates and then slows down. And easy way to read the graph editor ease the steeper the curve, the faster the motion, the more horizontal the curve, the less variation in value does lowered the motion relative, of course, to whichever other motion we have in there. So in here we have a master that slows down, accelerates, slows down, accelerate and so forth. But remember at the very beginning I asked you very kindly to keep this curve straight, right, as linear. But if the food is moving back at the constant speed and the master is not moving forward because at a constant speed, then of course they are going to be moving at different pace. So if I grab the master now and I grab these translate zed curve and I just make it linear. And now our food is not sliding anymore. Let's see from the front view because maybe from the front view it is sliding. And indeed it sliding from the front view, sliding a bait, I think it's a problem of pivot more than anything between 410 because it's sliding distributed sliding around the bowl of the food and instead is rotating around some other pivot. And then there's a massive change due to possibly they healed rotation. So I'm going to check you see rotate, why is set to minus nine dot something there and then it changes. So that was the reason why he was lighting a lot. And you see now it's not doing that anymore. However, I did change the contact posts, so I need to go back to one and I need to make sure that on one, the opposite heal as the same rotation on y but with a different sign. There you go. I want to check if this food is lying between 14. So I'm going to go and emission graph editor and I'm going to make sure that's linear. You see that's linear indeed. There's a Beatles lighting there. That's because we eyeballed the positioning earlier on so I can just duplicate this control, control DO my keyword shift, B, shift papa to parent it. So now I have a duplicate controlling their and I can just on four, I can just line up my control to the old control. And now you see the control stays there, which is not bad. I want to check and you see it's not even sliding anymore. And then we take off. That's cool. So let's say these two guys, I just needed them for the purpose of these sliding feed problem and it's time for me to mirror the poses grab although my controls, I don't need really to copy 13 because if you think of it, I can just copy one because the loop is going to end up onto its own pose, onto the same pose. So I don't need to mirror that. So I need to copy it between 210 and then I go to 14 and I go paste, paste. I have to remember that on 14 I only have one key for the central gravity, so I don't need to mirror everything in here. I just need to mirror the center of gravity. And then for the rest of the controls, except for the master, the master in here, I read and not need to select that so I can deselect that stuff. So I need to 16 mirror depose 19 mirror the pose, 20 to mirror the pose, and 25 would work just fine. So now one limitation of red nine is that it kinda messes up with your curves. You see that it breaks tangents there as you mirror the poses, I want to select all the curves and give them an auto tangent. And then I have to remember of course, that these two food controls for the Translate Zed, they were supposed to be linear for as long as they traveled backward, Right? So these keys set them to linear. So now as I press play, this character is moving forward and backward. Because remember I accidentally duplicated the master key there. So I need to go to 25 and I need to delete that key for the master. Also, I want to check the motion on the spot now so I can select the master and I can right-click on the channels. I can mute all. And as a mute all I press Play. And that's my cycle. And I didn't even I didn't even clean it. Of course I'm in right now. This is the cycle we get without any spliting, without any clean up, just with the poses. So it's a bit clunky now. But I think it starts to work. They took us a while because I needed to explain the thought process behind my choices. Of course.
13. Splining the Core Body Motion: Let's proceed to spline and published his animation now as a rule of thumb, in my opinion, it's just my experience anyway, it is a good idea to start polishing from the core of your character. And there's a simple reason for that. If you grab the center of gravity of your character and you move it around, you see that whatever these core does, it's going to affect the rest of the character, any other part of the current including the feet. So that means that any mistake that you're going to get into the core is going to be cascaded onto the other controls. However tempting it is to start cleaning, say the arcs of the feet or the hands. It's probably not that much of a good idea because you might get excellent feat and hand motion. And then you realize there was a problem with the core. You fix the core. And that's going to ask you to change every single arc of hands and feed potentially, of course. So in my opinion, it's a much better idea to start from the core. Polishing is an area where I, myself find it difficult to take decisions every now and then because sometimes I just go with my gut feelings. But usually it is a good idea to, as I said, to start with a core and a good way to track what the core is doing when you can't see it very well. Could be two. Create an object that moves like your core and it makes it a lot easier to understand what goes on with your course. So for instance, in this case I'm going to make a box, I'm going to make it read y naught. They go and then I'm going to snap the box up there. And I'm going to parent it to the core itself, not the control which is rotating, but to the actual core. This means that if I now select the box, hit Control one on my keyboard, I will go isolate mode. I can check what the motion is doing in space. And if I realize that the core is a bit harsh and some of the motion or the arcs are a bit off for whatever reason, I can take an action there. And it's a lot easier to evaluate an emission from this simplified point of view than it is to evaluate it with all the controls on screen and everything moving at the same time. So I will go to this side view here. It's going to be very difficult, in my opinion, this particular reference to understand if the core is moving the right way or not, sort of reverse engineer what goes on with the references? So between 14, the core of the lady here is moving mainly forward. You can see this line here, the great, that's where the core is starting to be. And then as I move the timeline for 24, you see the core covers nearly one square of the Greek there. And then as you see, it isn't quite move forward anymore. If I check what my core is doing there. Between 14, it is moving forward. I think I could even hide Zelda mesh layer and not the controls. I will need those. So between 14, you see that it is moving forward and these moving diagonally up pretty much like the reference. I kind of feel like my core is moving more OPT and it's moving forward there. So maybe that's something to look into. And then let's see what happens in the next transition between 74, you see that the core nearly stays there. It moves up allele. That's what it does. And you see the My Core moves up a little as well. Between 710, it's coming back almost horizontally, which is what my core is doing there. And then it comes back down diagonally to the left, and then it starts all over again. So I would say overall, this is kind of good. One thing that I could do perhaps, is instead of having that core move just to the back horizontally in here, I could maybe do an arc, which the court does a bit more of a circle there by their need to have a complete perfect circle. Of course, I just need that to be a bit more arched as emotion. If you select the control of the core and you go on their visualize and create editable motion trail. You should be able to see the motion trail of your chord there. And you see that on SDS up the motion is perfectly horizontal. And now that's usually not what happens in real life, right? It's very difficult to get periphery horizontal motion. That's something that gums we've computed or any machine user usually. So let's fix that up. And if you check the translate y, you see that we indeed have that kind of an issue there. It's a bit difficult to take this decision in the blind. So the juncture backing here. So perhaps I could grab these top Posen here and I can just lift it a tiny bit, just making sure that the food is not yanked away from the Florida C. So we'll just do something like this. So that now by moving up the curve in there, I should get a bit more of a curve except that I don't see it there and I didn't see that change because the motion trail was not updating. It was just enough to grab the two tangents and move them a little bit. And that made the motion trail update. Now please notice that and grabbing both the key I have at frame six and the one I have at frame 19, because it's the up and down motion. And if I change it a 1.5 of the loop, I need to change it on the other, or I could change it to one. Then just mirror deposed the other way around and just duplicate the pose and on the other way around. But I don't think I need that, that you see is already changing considerably our motion, so the loop will go up and then it will start moving up. I guess, I guess I can try and see what happens if I overshoot the tangents little bit. I don't think I will see a difference in there, but I can tell it's a bit subtler Now, I want to check if I didn't introduce perhaps a snappy problem on the legs. The next Arabic clunky, you see they go back straight and then all of a sudden they pop imposition and they go, I'm tracking the knee here. It's going back and then it has this juggling motion. I will do it at the end. I really need to fix these core first and then I will do. And wherever else I need to do. That's a bit better. I guess I can go to the translate Zed and see what the translator said does so at the beginning of the animation, we start slowly and then we accelerate forward towards the down. We slow down a little bit between 47 and then we invert the motion between 79. So this is, this has to be what this loop is about. However, I want to check, since the reference, of course is not symmetric, is not really looping for perfectly. I think it makes sense to check what happens between 47 as far as forward motion is concerned. And you see that if you track this point at the core of the lady. It almost looks like it's moving back between 47, I would say it is. And while my core in there is moving forward, so that could be a problematic area. I want to check if that's the same on the other half of the motion for the reference because maybe there was just a variation in their loop. So we'll check between 1416 and it's moving forward. And then between 1618 and you see it's definitely moving backward. So what I can do in here is I can grab the two keys that are moving the core forward on 19 and on six. And I press W to translate stuff. And then I hold down shift middle mouse button. And what it can do in there, you see I can start moving down the core ever so slightly. I will probably fix something at certain point, But let's see if that works a bit better. And I think that is now a bit more subtler than it was in terms of forward motion. At this stage, I generally go by intuition and I might be wrong and might be right, that it's still going to be a decision I take you have to take a decision that's pretty much about it and then leave with it. So now I have replicated a bit more of that motion for which I'm Dom move forward that much anymore. Between 47, I could even, I guess, move backward more in there and in the next bows just to see what happens there, if he works a bit better, I kind of like the motion of this cube now, it's a bit strong on the way up, I think between 23, it could lift a little bit less. So I can go on the Translate Y, and I can try Latin the beginning a bit more and see if there is a change. You see there isn't much of a change really. So perhaps one thing that I could do is I could lower the keel for ever so slightly and then change its tangent with the middle mouse button so that the frame on three will be a lot lower, a lot relatively, it will be a bit lower, so that now you see it's a bit softer, the acceleration towards the top, and even the way we come back, it's a bit softer and it's little things. Of course, at the beginning when you learn animation, you won't even notice the difference between the previous version of this and the one I have now. And probably if you came back to me and asked me to describe the difference, I'm not even sure I would be able to notice. Okay. I might feel there's something strange in one version or another. I wouldn't necessarily be sure of what the difference is there. So now that's sort of clean. I will check now the emotion from the front view. And if you go from the front view, you will find out there is some pattern there for which before a food can leave the floor, the weight has to be a bit more on the album. The opposite fruit, because of course, if you're, if you're weight is holding onto this hand here to my right hand, I cannot movie if I have weight pressing down. So we'll need to move the weight away and then it will be able to lift the hand. And the same thing goes with the feet were my reference of screen. I want to track the outside line of the thigh. You see that as the weight is being pushed up by the leg on the floor, the weight of the thigh tends to go towards camera. Left was the left food as lifted off? The, we'll see that the thigh will start moving towards the left hand side of the character so that by the time the left food has contracted, the floor there, right food can lift as well. This is particularly evident in here. You see that before lifting the right fruit of the character, the hipped is moving to the right hand side of the camera quite a lot. So I can possibly trying to replicate their motion if I didn't do that already. Usually if you have been careful with the references when you were doing your blocking, you would have this motion already in. But you know, it's very difficult anyway to get everything right. So it's possible we can do a bit more work. So in here, what it can do in here is I can probably push that wait, a bit further away from the left foot which is lifting off. So that means they're probably, I do not need these key, but you have to be careful. If I move these key, which is the 104 right after the contact, I will need to change this one right. Which is the one right after the contact. So 13 is the contact and 16 is the poses right after the contact. I do not need this guy already deleted it, and I can certainly grab this value here in the graph editor copied and then grabbed his key, which is the opposite of the downpours we had at the beginning and just paste the value, but you see it goes to the opposite side. So I will just need to invert it. And if I invert it, I will just show you what happens if I don't invert it. So if I don mirrored the values, what would happened is the moment I based this value here, the weight will go to the opposite place where it's supposed to be. So I need to grab that, translates that value and just invert devalued there. So if there was a minus, there will be a plaza or nothing really that you'll see that now you can see a lot better that the weight is going to shift over the leg which just touched the floor, and then it's going to progressively shifted to the opposite side. And now I have a lot more side-to-side motion there you see it's a lot clearer there. It might be a bit too much. I might want to hold these weight on the right foot for a bit longer. So perhaps in here in the passing pose, you see that the hip of the lady there is moved to the right just a tiny bit. Perhaps I can play a game in here and just delay these a tiny bit and leave it there so that the transition will be a big later. That means that if a changed both seven and it dropped the value and goes and go to the tween pose, which is on 90 and invert the value there. And you can just change the first half of the loop and then mirror the poses and their competence or worked at where you have a tool in which you just do a half of the loop and the tool does the other half so you don't even have to duplicate any pause. The tool does everything for you, which is amazing, the weightless not shifting to the right hand side. And I think I don't need this key anymore. It fuels, it seems to me is sort of breaking the curve. I want to see what happens if I delete it and you see not much is changing there. So I could perhaps just tweak the curve in there. And if I, you see that by changing this poses Now I am I am affecting the Posey won 13, which is a contact posts. So normally I would just delete this thing and change the tangents that you see just works very nicely there as a curve. But in this case, what I will end up doing probably is just move up the key a bit more. And it's because I need this value here, and I need the other contexts to be having the same value, that negative, yes, otherwise, it won't loop correctly. So you see that if you checked a box, there is a nice motion from the side view. It has a nice motion from the front view. So it's kind of working. I think I need this one to be visible. There you go.
14. Continuity in Looping Curves: So now that the core is nice and clean, I can take any control that is extending from the core core and progressively cleaned them too, which is exactly what I will do. And normally I prefer to go up the hierarchy of the spine. Why? Because the chest, for instance, will be affecting the arms and it will be affecting the head position. So it would make sense to Qc to clean this bind first and once that screen proceeded to the extended limbs, so to speak. So please notice how I have very little, if no rotation at all on the center of gravity there. I just don't need that. And you could guess a tiny bit of rotation, but I didn't quite need that. And the problem is that if you weren't, they'd sit there gravity. Now you're rotating to hold Fieger very easily. So now you have, you will have to count their animate all the limbs if you do anything wrong in there. So I tend not to rotate that in this kind of scenario. But again, it's up to do personal taste and workflow. So now that Cory's clean, I do not need these guy anymore than not need this box anymore there. So I can, I could delete it right now. So I will save a new version because this is when I'm doing this blinding. So we'll call this thing on TMZ walk 00 freeze blinding. Please notice that it has a stack version off the version. You see that the order in my file manager is nice and clean. I can put the version I needed it, and then I can put whatever comment I need there. And there would still be a nice clean order. Two things, there you go. But now before moving onto the next control, I want to consider something descend through gravity will be looping forever and ever. I'll do these curve work as I looked them. And I can tell you that this curve is going to give you a problem because the curve is going to push the character to one side, then slow down as the flat tangent approaches, and then accelerate again. But this motion is suppose to be continuous. And if we go under View infinity, we show they feed the curves. You will see that the curve is nice and clean and polished. And then all of a sudden slows down and then accelerates again. But what this key down here is telling me is that this should be continuous motion. So ideally I would like to curve to be going down these weight, right? The tangent to be done this way. However, you see that as I, as I change the tangent here, I'm only affecting the left hand side of the curve. And that's because the right hand side depends on this tangent here, which as you see it is getting repeated on the right hand side. So this is something to keep in mind as you do loops. And one way to fix it, these alleles to grab both keys and then buff tangents. So I'm holding down shift as I do it. I grew up and I move with the middle mouse button buffed tangents at the same time. And that gives me a very nice and clean curve on both hands. Then you go and make sure this is true for every curving. These guys do not really need any work because if I make them cycle, you see that? Already makes sense. This was, this was only these curvy my keys that needed these kind of attention. We will find out that we will have this problem for every single link. So it's a good idea to keep an eye open for that, for the looping of the curves. So I'm already thinking ahead.
15. Animating the Hip Swing: I don't need the motion trail handled anymore, so I came deleted and I am going to grab the pelvis and and good to see what happens there instead. So let's have a look at the curves for the pelvis. They're a bit confusing at times that Belle-V is translates a tiny bit and then translate the opposite, translates the opposite way, but then start to have grinds to a halt and then accelerates again. So usually in this case, I want to see if this was a problem of me not following the references correctly. It's possible at dyes that you will need to move the rig in a way which is not very clean, just to accommodate for deformations or some other noisy emotionally or trying to replicate. In this case, I want to see what happens if I delete this key and you see that the change is really minimal, perhaps I could afford to just delete that key, but I can't because this scheme is mirroring. So what I will do, just like I did there in their own, I will just make a nice curve. There's something that is a bit more continuous. Us something. After all, if I check the years reference, we have motion to camera, right. But we also have that motion there. So I don't need I think to accelerate that even more. And then in here, these pose between 1319, I guess I can even delete. There doesn't really seem it doesn't really make any difference to me and actually prevents me from having a nice curve in there. And you see now I get a lot of a nicer curve and I didn't shut that didn't change the poor, that didn't change the poses too much. So you see as I delete keys, I just checked the fame affecting the emission too much. You don't want to just go around and delete keys until the curves are clean. Okay, because what dictates the look of your animation eventually is what you see on screen. So it doesn't matter if your curves are super clean. If what you see on screen doesn't make any sense or perhaps is too polished. Doing creature animation. You do not need that kind of super polished cartoony animation. Unique to introduce noise, unique to introduce a lot more variation into the animation. So in here, I'm deleted, for instance, 16, which is the one which comes right after the contact. And this is the equivalent of friends 16, right after the contact. There you go. And also, I changed the position of these key, which is the one that counts right before the contact, which is this guy, right? So I will need to grab these value here and just paste it on the opposite side. And again, I could use red nine to do this job. I don't need to do it manually, okay, but it's just another way to do things that you can learn. You see that I have a similar problem that I had before. I feel like this curve is meant to go down in a smooth way, but actually it's stopping and then starting again, which tells me that I will need to do the continuity check on the curves for every single control probably. So let's do it in a smarter way. I will select all of my controls and except for the masters. And I will select a key for each curve, and then I will go curves past infinity cycle. That will make cold the curve cycle and the Cochrane will go on forever. That means that as I now go back into any control, I can already have a preview of what goes on in there. So I don't have to enable infinity for every single controlling their I can just grab all the keys that I need. Tweak their tangents until I get some motion that I like, which makes me think that maybe I don't even need these key there. I will just go and see what happens if I delete this thing. And you see I don't really, the movement, they're changing movement is quite margin on. So I don't think I even need that. So this will be my curve for the y curve. This is the y curve in there. I have a curve that starts to make sense already. One thing that I could do is perhaps move this thing a bit better, just C, just to make a curve that looks nicer there. And then from the zed curve, it sort of makes sense. It's great. But I also remember that I was trying to match the forward motion of the pelvis there, so I do not want to change too much. Let's see. So I have a lot of emotion for what would that Bailey's That makes sense. And then a lot less movement forward. So perhaps in here I could just already see move the Belle-V is backward and I think there is a lot of rotation on the pelvis. Let's use gimble axes on x, which perhaps I don't need to have that see that's the case. And so you see that the bellies roles probably forward? Yes. A bit. Let me undo that. And then it starts rolling backward More and more than any sort of stops out of the blue. You don't really want to do that. So what I can do is I can delete those two keys and there'll also be a bit smoother there. So that hopefully should give me a nicer softer motion there. Checking always wanted the Leakey's as you see, I'm checking. What is it that I'm doing exactly. I just don't delete keys randomly. Now let's check the Europe nationwide on the pelvis, which looks very interesting. I think I made another box to show you. There were additional dispel these. So we'll create another box down there and make it a bit bigger so that you can tell what's going on there. You can tell a couple of things. A, there's a big of a problem there. They should not the berries. And it was really difficult to not is that problem just by the geometry, the control, because the controller's round, you don't even see what it does. You don't see what the rotates. And the other problem that I see is that despite me thinking that I cycled all the curves, I've just realised, I probably did not, because now I grab this guy and you see there is no looping there. So just because I don't know what happened there, I will select all controls. And then except for the two masters, they don't have to cycle the same way. The controls dues like a key, press a and the graffito to frame everything so that a key for, for every single curve that you don't need to select the whole curve and then curves past infinity cycle and you see that something changed in there. So it means that for whatever reason I didn't really match the selector controls earlier on, which is great. Now I know at least, and now when I press play, you can see I can able to see the motion there. And the motion is sort of okay. Well, you said there's these double motion at a certain point with the twist on y. So we'll grab why just to show the issue there. So this is the y rotation. You will see that we move forward and then we move back very quickly. And then we move forward and then we stop, we go down and then we move forward again. So I want to see if this is something that happens in my references as well, because perhaps that happens in the reference. I'm not sure we'll be able to check that. So it seems to me that there isn't much swing on the y on the hip in here between one and Four and I don't have much swing either on my animation. I have a tiny bit more probably, but not so much. And then between 47 I have a lot of swing or my animation there, but, Well, actually I have some swing in the reference as well, but I don't think they can really compare. So I think it was winging the match because I was trying not to snap the leg straight. So what I can try and doing here is I can try and swing a little bit less there to see if that has that effect. If that has a bad effect on the leg, but I don't think it does. So I think are willing the swing a lot less than there. So this Bose happens to pauses before the contact. So we'll need to go to posts before the opposite contact and I will have to swing opposite way. There they go. Then as I swing between 710, I have a lot more springing there. And now I can definitely see there's lot more swing even in mind emission there. And then in there, I think there is little to no swing forward really in the reference and in my animation there is some swing forward. So I guess it could perhaps, oh, I see why I had the the position here for this wing because I was trying to cater for the contact post which I don't want to be super stretch there. So one thing that I could do perhaps is just delete these key leading to the contact post. So again, this key as well leading to the contact post and see what happens in terms of animation. If I clean this up a tiny bit, maybe I could even move the contact pose a tiny bit forward, get a nicer curve in there, and make sure that the opposite contact poses are coherent. And they also need to have a nice continuous curve there. And now I check the motion there and you see that the motion is a lot nicer now. I think I could perhaps give a stronger hit forward with their hips there between 16, I guess, and 22. I'm looking at the animation here. And I feel like I would like to have a bit of a stronger movement forward with the hip as it swings forward. That means that probably in here at 22, I need the key back. And I think I can just lifted up a tiny bit that way and that will make me change the next curve I expect the next curve will go down and start going down. So in here, that means that I need to recreate the pose at ten. But now I'm getting a bit lazy, so we'll just hold down shift and Middlemarch dropped 22 over 210. And I will hit S there, that will give me the pose. But you see that that pose needs mirroring. So i will call in and I will mirror the post. And if I get, if I can get perhaps a nicer overall on nicer curve on the way down. And this is a bit harsh, is a third. There's some, maybe I will just soften these tiny debate. But you see now we have these sort of stepping the, in the, But you see now we have to start to step into curve. And I feel like now it's a bit too harsh the movement forward, it feels like it's even worse than he was before. So I will just make it a bit softer again, they go, uh, so that they should be a bit nicer on the way forward. Except now I have to mirror the poses. So I have to mirror 192216 So we'll grab 16, copied over 419, copied over 722, copied over ten. And then I will go and as you know by now, Mirror, mirror, a mirror. And that gives me, that should give me a nicer curve of the overall. You see that now the curve is kind of nice there. I think that this wing moving on the zed could be loved a tiny bit more. And you see that indeed, it feels to me that it's moving up in here, which is the same thing they references doing more or less. I feel like I need to check my references once again to understand if what I'm doing in terms of rotation zed on the pelvis makes any sense? So this is the contact pose with the right food from the references. And you see that as we touch the floor and the weight start pushing on the right food, you see that the right side of the hip is moving up quite quickly and the left side is going down. So I want to see if that's what happens in here. And you see that that's exactly what I'm doing as well in here. And then I want to see what happens as we go towards the apples there, which is probably something like this one I suppose. And it's very difficult. I think it's very subtle, but you'll see that it goes down and then lifts up at tiny bit. He goes, I'm talking about the left-hand side of the hip, goes down a bit and then left up, lifts up a tiny bit. That's not disability. If you track this Seidel that pocket there, you see that before touching the floor, it's actually lifting up a tiny bit and then it goes down again. So it's not very, a very continuous motion. I mean, it's continuous of course, but there are some variations in here. So what I can do in there is I can do the same thing. So it goes down towards the, so I can make this wing stay more or less down into BIS imposed by keeping this wind down a bit. And then as I move towards the up, I lift a tiny bit and then I go towards the contact again when it will start going down. And I think again can just flop them this curve and see what happens there. I've changed the disposes here, so we'll need to duplicate them, mirror them. So we'll go and grab four to ten and then paste the keys there. That means now will have to mirror them. So Mirror, mirror and mirror, please not is that the solid at tangents are broken by this procedure. So you want to keep that in mind. And certainly I want to make sure that the first bows and this last are the same. I will alter tangent. These guys. They go and then I will see what happens if it can play this animation a lot, foster. And I think now it's working more or less. Now. I will probably have introduced problems with the knees. Okay. But I'd not care about those yet because remember, I need the CT to work a lot better before I can fix the knees. So that sort of works for me. Or another way to track these problems is usually by tracking a prop which is attached to the bath like this one. So you don't necessarily need the red box for as long as that promise. There, there you go. So that's working nicely. Now, these can go and you see that we go back and check the old references, even though we did check them already few times over in fact, and now the heap is relatively clean. I think.
16. Splining & Clean Up for Spine and Head: The hip is relatively clean, I think now I can delete that box there. You don't need to delete it. You can just hide it and maybe you will need it later. And then I'm going to check what happens. I think a mirrored the poses on the hip. So I want to check that the curves on the other controls, we will look at this one. I want to check that they're working just as well as they did earlier on. Because remember that the mirror pose in red nine does this crazy thing of breaking the dangerous at times. So I just need to check that that wall whoa, whoa. Was about to say they go, just need to check that there isn't anything crazy going on. There they go. So now probably need to check the other curses. Well, this looks OK. And now I'm going to check the chest and the chest as something potentially problematic because we have motion, inversion of motion, inversion motion stop, motion, inversion, inversion stop. So the emotion wheel will ensue, may potentially be problematic. So again, why did the delete remind me why are deleted the bulks and they said you don't need to delete that, right? So I guess I will create another box. Now I press Play. And I have to say it's not nearly as problematic as a fault. I just want to check what happens if I make this curve a bit more continuous. So what happens if I delete this guy? Whoo, okay, that's, that's the change there. So I'm conscious of the fact deleting this key has on the animation because it's changing the position of the head considerably. So I want to see if this is something that I wanted to begin with. You see the head, it was kind of clean there. And the neck as well is kinda clean. So I'm not sure that they want to do that. They wanted leak that key, but hey, let's check what happens if I delete this key per ups. I think you know what, I think it will clean this motion. I would I would just delete the key. I have a thin, which means I will have to delete the key. This is just before the contact that 13. So we just need to delete these key as well. And then I will go and grab these two tangents as usual and just make sure it's a nice continuous motion there, which should be the same as this one to it, to be honest, there you go. So it's not too bad actually, I think I've learned something there. So if you look at Big Sur level animation, you will find out that the motion is really, really clean underneath. And very often one of the ways to achieve that clean motions by cleaning curves just by making sure that your core is gleaned there. I wanna make sure that the other curves are just as fine. They're fine, they're not doing anything particular there. This guy, the chest now. So you see that the chest motion is actually quite cleaner ready, except for the which kind of swing is that? The forward and backwards. When you see that again, I'm locking the motion there. It's almost never a good idea to lock the motion of a part of the spine. So what the I think what this spine was doing here where there's just was doing his was rotating clockwise from this point of view. So let's see what happens if I move this thing. Big moore, Yeah, I think I can do that. I think I can make this go up in more clockwise, which means that I need to do that also for the other contexts. There you go. Actually, that's not bad at all. Yes. So that's it. That's clean. That's clean and it's clean. There's sort of okay, I guess wanted to see what that does. So and will need to evaluate this from a front view. What happens if I delete this? Okay, yeah, well, I get a tiny bit of motion there that I wouldn't otherwise get. Yeah, I don't think of with Dutch. So there you go. That's sorted. Once the main part of the core is sorted, one can think about sorting out the head, for instance. So let's see what they had been doing it since the position of the head depends on the position of the core and the core. It's a good idea to do the core first. It's not really, it's a no brainer, I would say. But before doing the head, it would make sense to do the neck because remember the neck, the size, the position of the head. So I just want to check what's going on there and you see the Ford rotation as something funky to it. It locks. And that's because perhaps at times we said, remember at the beginning I said that you never control for every pose. And then I go to the next poll is, and maybe I'd give him move that control or I, well, that's explanation. So it's very often they, you do something like that. And perhaps my workflow is in perfect. So I think that's an area where I, again, still definitely improved a lot. And one thing that I can do in here is I can maybe see what was happening to the head in there between 710, you see that the body is moving, the chest is moving backward quite a lot in the reference. And they had instead is startled, delayed. So that means that the necking here should probably move forward, which is already doing. Then I want to check what's going to happen between 1013 and we didn't Jennifer thin, it feels to me that the neck would have reasons to move forward still because the body is moving backwards, so the neck will be left behind. So I can definitely do that year and see how that works. Yeah, I think that could work. Something like these, I guess. And it will probably fix this curve at any of it because I just don't like it. You go negative now I press play, sort of okay. I think. And then they go and grab the head. And there you go. Again. I want to check what's going on there. You see there's a locking motion there. So want to see what this thing was doing. There's a tiny bit of rotation there. So let's see what happened there. So as we go up the nose or the latest, quite perfectly aligned. So sorry, maybe they'll need to counter Animate up that much there so that the nose stays aligned. And then I push up and push up. I might perhaps delayed and knows appending bit down. So imagine I'm down and as it push up, the north stays down and then comes up again. So I will try and add. And then in the reference in near the nose is kind of going down between 710. So let's see, sowing here, there is some lucky motion again in their addition x, it's not much, it's less than one degree if you think of eight. So i, i Nobody will ever really noticed that. But even for the sake of checking it, what we can do in here is we can see what happens there in the reference. And you should know this sort of leveling staying down. So perhaps, and here we do not need to move the nose that way, but actually we can just see if we move it rotated down a tiny bit. We keep the nose a lot more label there. And then in the next frame, we are pushing up quite a lot with the body. And we could add the nose, probably be delayed a bit on the way up so that it stays down a tiny bit as they neck is pushing the head up. And then between 710, the nose of the lady there is actually moving quite down in the reference. So I want to see what happens if I do it myself as well. And then as we go back down the nose with probably translate a bit that yes. So now you'll see that the curve we've, it's meaningful change anyway, because it's one dot five degrees, so it's minimal. But that helps, every little thing helps creating a nicer motion there. Okay. I need subtle things, but if you add all of those legal things on top of one another, you may imagine we had that problem at core levo. That would mean that every control on the way up would inherit that problem. And that means that by the time you are at the head, the head moves all over the place. And maybe it's one little problem that like, I don't know, 1.4c degrees of rotation for every control, which by the time you add 34 controls becomes maybe six degrees to ten degrees problem. And then degrees starts to become unnoticeable issue, which is why you need to clean the core as much as you can. In my opinion, there you go. So now that motion of the head is clean, I want to check the front view there. The front view seems to be OK. To be honest, one thing that the reference is doing a lot more as you see it's rotating the head this way, a lot more from the front view. So perhaps I could grab the rotate xanthan, The Lady of my animation there. And using this scale to think I can do it for, I can have the neck as well selected so I can grab both curves in there. And using my scale tool, I can use a pivot of 0, which is this middle line. And then I can increase that rotation by 10% and see what happens to you. That could work, I guess. Now I want to check if there is a particular acceleration in the head of the lady there. So there is a big straightening in here. Let's see. Yeah, I think there is probably less rotation between 1013 than in other parts of the animation here. And I kind of feel that between 14, my hand is really irritating to the right-hand side of the camera clockwise, while her hers is mainly translating the neck. See what I mean. It feels to me that my hand is doing something like these numbers. I'm going to exaggerate it. Weiler had these rotating on a stick almost. So we tried to see if I can delay their additional ahead a bit more. Between 14. I am looking at the references and animal almost thinking that I would probably want the head that want to be rotated further more to the left if you see what I mean to camera left, because there is such noticeable variation in rotation between 14 and de reference lady. But I'm a bit worried that that would result in way too much motion into head. She's already quite noticeable there. So but perhaps I could try. I could give it a shot and see rotate the head a bit more of the beginning and on frame for the lay there with addition of the head? Yes. The thought of it. And then I will have to remember that. I will have to mirror one over 13 and then four over 16. And then I will need 25 to be exactly the same as one. It's sort of okay. So no. I really want to control the motion of the head from the front view. I think that's really Bolton. So I will make the usual box in there and see what's the motion of the head of my character there. If that's acceptable, you see that there's a little bit of indecision, I think, in terms of swinging left and right clockwise and counterclockwise from the point of view, the front view. So let's try and see if we can smooth that out. And I'm, my current curves are not really looking that promising, I think. So I will just track the earth station zed and you see, it's all over the place. When a mirror, they didn't fix the curves there. And then I have lock, move up, move up, move. To be honest, I'm I'm leading some of this stuff just so that we can see how this blind puppies, but I certainly AM messing up big diming here. So let's see out to fix that. So at the beginning is sort them. Okay, I think to be locked there, think This is when I really need the second monitor to record on. So there you go. I think it's smart to locate to be locked there. And then in here, the hand of the reference is actually rotating quite noticeably clockwise. So I think it will do the same, maybe a tiny bit less, and then between 710, more clockwise rotation. So I think this will be a lot more, a lot more. And then we go back down. So this whole set of keys I can copy based over. And then we written on animation. I can mirror, mirror, mirror, mirror. And again, I guess 25 mirror debt. Now wanted to C, you see that now the motion is a lot cleaner if I check the box. So, so big do linear if you, if you ask me, it's just like whoo. Like at the end of the loop is quite visible. That's the end of a loop really. So one thing I could do perhaps is to make the head keep rotating even if the end of the loop is there. That means that these key here needs to be mirrored on frame four and the contact tangents need to be. So now I press play. You see it's a bit less linear there. It's not amazing, but I guess it will work for known omega. So that say, I want to check the side view front decidedly, she's quite okay.
17. Cleaning Up the Arm Swings: And now I can finally clean the arms and legs. So now that the Corps works more or less, the spine works more or less, the head works more or less. I think we can actually afford to check on the arms and the artist. They already, already working for the most part, but I guess we could go further and go into the graphite or for a second just to double check what's going on there. You see the curves are not amazing, but they're good enough. And I certainly think we shouldn't make sure these motion carries forward into the loop. You see that in here, it stops. And I think there's something interesting to be lurked in here. One of the issues that a lot of loops may have, he's dead. You will notice how at the end of the loop the animation slowed down to a halt to then just start again from frame one. So it is really important that some of your limbs, we'll have continuous motion going on after the loop is not just an inversion of movement like you would have to say and desire the curve. But it's rather a movement going forward there so that it will be hard there for us to notice that that is actually looping animation. This is naturally happening already here in the arm, if you think of it, because the forearm is going towards the back and then we just don't want it to stop, but we wanted to keep on going forward, say this way so that you will not be able to see when the loop ends. Or rather, you will think by looking at the arm to the loops and somewhere around frame free while actually the loop and it frame one. So you're sort of hiding the moment where loops, the loop is repeating itself. You could make this even stronger. If for instance you would, you would be delaying the forearm here quite a lot more and here as well. Now I'm just going to show that to you just so that you see the difference. There they go. So now you would have a lot more speed as the loop unfolds. You see that now it's a lot more, it's a lot harder to understand where the beginning of the loop 0s for the arm. So you want to have this kind of motion that carries, carries forward from the end of the loop. That doesn't just invert the motion. And this is a cheap way to get that motion there and make it more difficult to understand where the loop is looping thing. This is already started working. I will look at the shoulder there. And the shoulder is a bit more interesting because clearly twisted it at certain point at the beginning. But then I forgot. I forgot that I did and now I'm paying for it. So just because I'm a bit lazy right now and I don't want this tutorial for drug tools looked for too long and we just diffuse the twisting along the whole duration of the loops so that it's a bit less visible that I did that. I will also check these other guy here and see see similar issue. I twisted it and then I forgot I did that. And you go I want to check the other curves. And you see since the, since the arms were in global, there is much less clean work to do. Now I will show you what happens if you animate a norm in local. So let's say, let's pretend I animated this fingering in local. So this is the arm. You see how the arm now is a lot more G3. And that happens because it's now inheriting whatever the body is doing. So now, if I rotate the upper body, you see that that's going to affect the arm quite a lot. So you don't have to animate the arms in global of course, although I think it makes it easier for now, I'm kind of happy off what I getting there, although the curves are not the cleanest I've ever seen, I want to see this scene from the front view because I see something a bit suspicious in terms of zed rotation. And here I could afford to go a bit more deeper behind the back of the character. Okay, go. And in here, I think the reason why I opened up the arm does much on the way forward. It wasn't because probably because of the bag and the hip in there. Remember, I just didn't want to intersect with the hip too much and there's a lot of intersection with the bag in there. So that's why I needed to open up by the look of it. They probably will need to open up even more, even more, I won't care about the belt going in. And I think I will need to keep this open for a bit longer. Something like these. I guess this is to prevent intersection. I guess I could even start opening up a bit earlier, for instance, just to have a little bit less of change of motion there, something like that could work. Now will go to the other site. And again, you see I was going in the back and then opening up to go past the back and they could keep it open for a bit longer. There's one in here. I think it's going to work anyway as it is. I think it's a good time for me to do a playlist and please notice how very rarely I do a play of us until I I need to really evaluate this blind motion. I also picked a low weight rig to avoid having to do a lot of play lists here. So now I will just do my playlist. I think I don't want to see the image plane and the longer I'm just now and just focusing on the animation itself. So this will be version's free and it will be the blinding version. And I'm only evaluating the upper part of the body. You see that the motion of the arms is pretty softens move. The body is doing its job and the head is fairly stable there. So the upper body is sort of okay. I think, I think it's working more or less for the time with devoted to it. And now let's see how to clean the legs.
18. Clean Up of Feet From Side and 3D View: If I look at the legs motion, you see that one of the problems is, is the knees, they're, the knees are popping all over the place. If I could parent a sphere to the nice, just to let you see what the problem is read there, you will see that the motion of the NEA is a bit erotic and G3, it moves forward very quickly, between 12, dense, goes back fairly quickly but smoothly. Then it's sort of stops at around frame ten, then moves again, rotates a lot, and then accelerate back and then accelerate forward. You see that it's a bit strange at times. So let's have a look at it. We move quickly forward and a bit between 12, but then we go back again. So there's an inversion of motion in just one frame, which might be a bit too fast if you think of it. And then we move backward fairly smoothly until frame 1011, there's a bit of rotation there. And then the more we go down and then we accelerate back. So the brain of the audience is going to think, okay, we're good to go back, except the next frame, we accelerate forward very quickly. So that's the big issue there I think. And then we accelerate very quickly forward. And the next thing we know is we all move anymore and then we accelerate again. The problem with the needs that you will get a lot of change of pace of the knee. And that's going to contribute to this idea. N0 is moving in a bit of a G3 way, not very clean effect. You might be tempted to use the pole vector to fix this, but you need to know you can't do this kind of stuff with the pole vectors. Usually the best thing to do is to first of all decide what's the arc of the feet. And once you have decided that you see what you can do to fix knees. So before fixing these, make sure Tucker works, which we did, and then make sure the feet work, which we are going to do. So I will go to the side view in here and I'm going to check what the feet are doing. So I will start with the right food. They contact one. The right food you see. First problem I see is that it wasn't about the content, the floor, and the next thing we know on the frame pool, it's still pretty much up in the air. I really want to see the image plane in there and see the difference in the reference. The food is high up only the heel is on the floor on one and on the second frame the fluid is almost entirely flat on the floor. That problem we have is that this guy needs lamp down a lot quicker and it's not doing that. So I'm going to grab the heel rotation control and I'm going to just increase this rotation on the way down a lot more than the food falls down a lot faster. Please notice how this falling down a lot faster is going to affect the position of the knee. So here's why you need to make sure that you first fix the core and the food and then and only then you fix the knee because the knee is a byproduct really of those two elements. So it will go back to this side view and the non-unique to see the joints in here. So we're saying on frame to the food is almost entirely on the floor and on three, it will be from the front view. I want to see what happens there between 12, so between 12 x0, that's going down quite a right already without me having to do anything. I'm looking for the controller of the toe and if I grab the controller of the ankle, I don't know why, but there is a subtotal controlled visibility here. So on frame two now I can just enable that thing. Actually, I want to break the connections there so that it's always enabled. And that will allow me to animate this guy here, which is something that I really will need to have. I think first of all, I want to decide what's the overlook of these. And I think I wanted to be a bit higher to begin with by default. And that will be true throughout the whole loop. And then as we fall down with the food, I wanted delayed IT TO even more. And then I wanted to go back to standard and flatten there they go. As we approach frame, then I would like you to notice how we have we have left the floor and that could be because the leg is overstretched. So if you move the root and you, if you move the core at down and you'll see the food moving down, it means that the leg is over extended. A lot of rigs have an additional control for stretching. You seen here in the ankle, you have the same, the regular self stretch to reach the target. So we'll keep the stretch on by default. And I think in here it means that I can pick perhaps a Ford, have no food role on, on this bows and still have the food flat on the floor, which is going to look a lot nicer if you asked me, and I think I will need a floor at this stage, I think I can afford to make a cubed down there. Cubes are for free, right? Food is sort of lifting up. I don't know why goes under there. So I want to see what's going on. Usually in animation, we sink down the character into the floor anyway, a tiny bit. So I will try that as a first trick. So I will grab the secondary master, the one we moved forward and on the Translate Y, Y will just lower this thing earlier on I mutated. So now I will just unmute this January just to see what goes on in their day go. And I want to make sure this is flatten the Florida ego that start the works for us. I think I also want to check if there's anything going on with the Translate Y of the food controller, and I wouldn't want the controller to go up and down in there. And it seems that the food controller why is actually flat. So I just don't understand how come this guy is sort of lifting up at a certain point. Oh, there's a foot roll in there so I know what's going on. So I am going to 0 out the food role there. I yes, that's, that's a lot, lot better really. Now it doesn't lift anymore as the food starch starts rolling back, I could play a bit with the tip and just put it down on the floor lot better. They will give me a lot more of a sense of rotation, which is what I wanted to have in the first place, and then they will lift up. Please notice how they contact the right food works a lot better than the left would now. And in general, the right food works a lot better. One area that you really need to track in your walk animations is they heal as the foot lifts off. And that's because you see here, this is the heel there. And then we move up quite a lot up there. Next thing we know, we are just frozen there. So it's a bit strange that the food can lift up that quickly with the heel and next week we know is not moving, it's not moving at all. So this is the result of the withdrawal starting to work with the ankle control. So let's try and track that thing a bit better. And you will see that the pivot of the ankle one being the same place it's supposed to be because there's also withdrawal going on there. Ok. So this is a notoriously troublesome area. One thing I also would like to do probably is to lower this guy at tiny bit just because I feel it has not left the floor yet. I think it would be a bit unfair to just to just float away. You see that makes it work a lot better as it bends? Yes, he works a lot better. And then as we lift off, I can 0 out the tip. Or rather given the value I want it to have. And now these tracking will start to happen manually. One thing you can do certainly is to go on the moment where the food is no longer on the floor and break the tangents from the break Tangent button on the graph editor so that you can control this right-hand side of the curve so that the foot will start accelerating too quickly towards the forward position. That's going to help a lot already. And then the other thing you want to do is you want to track the movement of the wheel as they set. So it goes up diagonally and then it goes up diagonally. I think what I can do in here is I can probably keep it on the floor. So the heel goes up, goes up quite a lot. In fact, in here, I think I should be rotating this a bit less with the food role in this pose. I don't know why. I think by looking at the reference on the left, I feel like there is a certain amount of motion with the role, yes, but not as much as in my animation. And there's a lot more in the next frame, which makes a lot more sense. And then you see that now the heel works a lot better already. The problem that the healing has now is that it starts moving up between 1516, but then it moves just sideways. And if you check the reference is actually moving up quite a lot. So one thing I can do in here is I can't just lift up this bows so they heal, will keep moving up. And other thing is that please not inside the tip of the fruit gets left behind is actually moving behind still. So one thing you can do in here is a rotate the food a bit more to the back. Probably I will use world axis here. That means I will have to rotate this guy. Yeah, I know it's a lot more similar. And another thing that you will notice that there was a Benton here, you see this bunch of pixels. And as I go to the next frame, the band is almost gone. So I want to keep that Benton there and then I want to rotate the tips that I also remove that that will give us a better idea that the weight is no longer on that tip. So for the heal, we just need to track this bit of the geometry. They actually heal there. And I'm going to probably I will need to go in frame by frame for the portion between frame 15 and about 19. Just because in that area of the screen you see that the people that the ankle is off because I am interpolating between the Food Drug Control and the actual Inca control. That's what is going to force me to track the heel manually there one thing to note is that between 1819 to heal, there's actually moving down are ready. So I will make sure that that goes down a tiny bit as well. Then at 20 would be pretty lower ready. And that's because we usually don't raise their food that much as we know, the food will go forward. And if you check the orientation of the food in the reference and see that the tip is not quite as ISDs AND here, so I will probably need to check this from the 3D view. And I think I will need to lower that fruit ever-so-slightly. I guess it could even try and just mimic their position, raise their heel eta1 a beat, and then lower the tip a tiny bit and see what happens there. And now press play. And you see that the way the food lifts off is lot better. It's a lot more stable now they heal. Tracking forward is really quite cool and we've odd, even wanted to do that. Track the sphere, the knee. Now it's working a lot better. It's still not perfect, of course, but hey, it's better than it was before. And we didn't even tried to fix it. We were just trying to fix what was affecting the knee. So remember we always go for the limbs and the controls which are affecting other controls first. And once they are clean, we think about other problems. There are the secondary issues. By these meter. You wouldn't start animating, say, deals or hair until you don't have the Finnish animation, which is really, really clean.
19. Tracking Feet From the Front View & Mirroring Legs Animation: The next problem we have to solve at this stage is the front view. I think there is a tiny bit of a slide in there from the front view. If you see, if you check translate X curve or the foods, you will see that that doesn't move at all. So that's sliding mass must depend on either these controlling here or these controlling here. But you see how these controlling here does not really rotate between frame 413. So it cannot be that guy. It must be this guy here causes this light. So let's have a look at this. The front view. At the beginning between 47, there's a bit of motion, but I don't mind it too much to be honest. I think it's actually quite cool to have them motion in there because it keeps the food a bit more alive. Plus if you check the reference there, you SMS lining inside as far as the ankle is concerned. So I don't mind that as much. However, later on it becomes a bit too much probably. And then you see that the fluid moves out as well. So that's a bit of a problem. I don't mind the rotation, but I do mind the translation I get from the front view. And the solution for this thing between 710, we can move the food a bit more towards the center there so that it stays a bit more centered. And between 1013, try and keep the tip there so that it doesn't translate left and right from the front view. And at 15, again, I'm going to keep the tip there. They go. 16 again, I'm going to keep the tip there. And then as it lifts off, there is something else to notice. Please notice as we lift off, the tip of the fruit of the reference goes down initially, but after frame 18, it starts rotating again outwards. And it does so because it's about to pass over the left leg so you don't want the tool to stumble into your left leg. I think we can do the same in there between 1820, we can check these rotations, the zed rotation, and I think we can just replicate the motion there and just help move out a tiny bit. And I think even at 19, we can afford to start the rotation are ready. In fact, even more than this. They go And one thing you can do as you move forward the food, you can also cheat a tiny bit and just open up a tiny bit the food so that you are opening up to avoid heating the left leg. And that will give you more solid contact and transition on the way forward. And now there's light is mostly gone and the food looks a lot more natural. How do we set the same animation, but on the opposite side, how do we mirror it? And let's see how we can do that. It seems a fixed animation only on one food for the whole loop. Now I cannot any longer mirror the poses we've read nine, and this is done so that I can show you another method of mirroring animation if you need that. And if I want to have the same animation that I haven't the right food except on the left food, but mirrored. All I need to do in there, which is some work anyway, is to select the controls there are making that animation so the toe tip, the heel and the role, and I have to remember the order m selecting them with. In fact, I can just click on the poster shelf tool and I can save these selection here. Just so that they remember the order. So our food there, and I'm going to save the selection to the shelf. And then I want to have the same selection on the opposite side, which I could do manually. But I think I have about the choice. That could mean saving the selection set in studio library. Or for instance, I could go into the common that both the shelf has written for me, grabbed his guys, grabbed a coat, pasted in a node eight are now i'm using Notepad Plus, Plus, but you can use Sublime or any other two really does search and replace. And in here, I'm going to find, underscore our quote, and I'm going to hit Control F and say fine underscore our port, replaced that. Well in a, replace them all. Now, if I paste this code here in the mail box and drag it with the middle mouse button on the shelf. Now as they click on it, I select with the same exact order, the opposite side. And that makes me remember that I forgot to select. The fruit can draw. Well, I will have to add it later. So now I've selected all the controls and the right food. I have all keys between 125251 look exactly the same, which is great. And now I double-click on the timeline to select the whole timeline, and then right-click copy. So now these keys are stored. Now I am going to deselect stuff and then select the left food after this election. Remember controller they forgot earlier on, I will save before doing that. And I'm going to double-click, delete everything, right-click and paste on frame one. This should, both feet should work in a very fancy way. You see exactly the same. I didn't touch the pole vectors because that's unneeded now. Now the problem is a, I need to mirror these guys and be that's not the right timing. So first of all, mirroring, Well, I know, or I should remember at any rate, debt for the food control, the mirroring axis is translate X. Let's see if we have any other axes on the rotation. We have learned how to assess that. So translate x, rotate y, and rotate Zed. I am going to go up the food. So as I said, translate x, rotate y, and rotate zed, these free curves. So if I select all of them and they go on their scale options, I can say scale value is minus one and P one is 0. So should scale around the Xerox's. There, they go. Now, don't worry about that and doesn't look too cool, but it's going to work for the food role. Certainly have to mirror, rotate y and zed and for this little control, same thing, y and z. So I'm going to select this legal controls in here and the fruit roll. And let's see what the DOE does. So that till again is y and z. I'm going to grab all the Wien's that curves in here. But you see there are many and anomic lazy. So what can I do? I can go channels, sink graph either display, and if I now grab rotate x and y that aren't selected for me, couldn't have been easier, I guess. And now I'm going to grab all these keys and mirror. And now the pose is supposed to be perfectly mirrored. So you see, he didn't take too long. We just need to know what to do, of course. Now the problem is that the timing is off, but hey, I'm a pro now I think I can handle the let's see. So I'm going to select the left-hand side of the controls and go into the select the foods down there, the blue direct control for the food. And the issue here is that the tiny should be opposing, Right? So it means that when I have a contact we one leg, I should have the opposite contact with another leg. But if you think of it, we know that the contact on the left foot is on 13 because we'd be working so long and this shot than now we know it's ins and outs, and also we take notes. And now I can select all the keys, grab this guy and move it 13 frames to the left until that ends up on frame one. And then I'm going to copy the animation. And then in a second it will be clear why. If I go back to frame one, you see that that opposes the contact very well, it's working already. However, the mission stops there, which is not a big deal because remember, it copied my animation. If I go to frame 13, I can now go paste or right-click paste, paste. Now the post shouldn't be changing. And, and now you see I have done a mission mirrored and it took how long? Five minutes, maybe maybe it would have taken shorter if I didn't have to explain it. So there you go. Our feet are moving just fine apart from the tip of that food. We can handle this kind of stuff, the old pros. So I can go in here. Zed needs to go back to what he was. So I need to scale again, x needs to be mirrored the other way around. I will select the axis and I will press scale. There. There you go. Another dip should work. And he does, he's an amazing, and it's all for free. And the goal is walking and not only that, but the knees, for the most part are already working. And the only thing we did really is we truck the feed. Amazing, right? When things just work.
20. Knee Polishing, IK Knee Pops, Intersections: And now the only thing that's left to do in here is to fix the knee popping at the back. I shouldn't fix it before mirroring. I've been stupid. I will have to admit this, but it's going to be fairly easy. So if I check the knee in here in the reference, you will find out the 10kg goes back, deal about 13 onward when it starts inverting the route and comes forward in our animation, you see it pops forward, then goes back, then pops forward. I think this is due to the fact that we are rolling the food a bit earlier. So if I go to frame 12, for instance, in a rolled-up food a bit less now the knee will keep on going backward and then he was moving forward later on. And if you think of it, that's about it. It's fixed, it's easy. So usually if you don't have any other tool to fix the knee, you just want to go in there with the withdrawal of the ball the ball roll and see how you can tweak the need. So we'll go to the opposite side. That said, I will do it manually in here. So just before the contact that will just input this value, the same value I have on the left hand side. And now the knee should be working just fine. It works. So that's the quick and easy way to fix the the knee popping. Another solution could be if you're rig allows for it, would be to grab additional controllers. So for instance, let's grab this gear controls and, and now we'll enable the band. And the band control gives you the ability to bend limbs. See you like that. You don't need that. I trust here that along that usually there is a nice control for the need that lets you position the knee without affecting the food. So that's another way you can use. We don't need now, but it's good to know that exists and other control that usually is very useful. And I don't think it's in this week is the additional hip control which lets you move the hip up and down if you need, we tie you move the thigh down. The knee will bend so you have to use that. We've pinch of salt so that the finger is fixed neck and press play. There's a bit of a problem there because of course the boots are intersecting there. You see, at the back there's a little bit of a skinning issue. You see here, the scanning is a bit harsh between the two signs of the hip. That information is not great. Well, why did they see this? Wasn't too bad there I think. Let's see what else we need to do in here. Well, I think we can see if there is a quick way to fix the boot intersecting with a calf there. So to fix that intersection, I will use additional controls. So let's see how that could work for us. So we'll grab the knee control at 130 will set a key that 15 sorry, I don't know why I wanted to make that 13. I think 15 will work. I will move that out a tiny bit at 19, then I will grab the opposite one in the reference. The left is actually moving out of the way. So between 1519, so I will do the same and here we'll just move it slightly out of the way. It's a bit known anatomically correct. But look at how little intersection needs now. And in fact, there is no single integer frame. We wish this intersection is really that big, but I guess I could push it even more out in here and even more out in here and see from frame 18. So they're just brushing now they're not it's not really a very clear cut intersection, but I guess I could grab the second bendy controlling their and just translated a bit more to the side there. And these guys, well, I suppose they go. So now it's a lot better set of qian frame 191 at 0 on frame 15. So now as it moves forward, there's a bit of deformation that is not going to be noticeable, but it's going to be enough for us to get rid of that nasty intersection there. I will have to do the same in here. So I guess I will select all these guys and then I will set a cookie on free. Seven. I will move out, move out this guy, and then I will grab this guy is the left knee and I will just move it out. And I will also move out the under the control, which is right under the Neither or rather this guy, let's see. Just move it out a little bit. Set a key and I want to see what's the intersection there? Well, the intersection there is quite noticeable. And the point in which I think I may even consider using the pole vector a bit more. Okay, so now let's check again. So now i'm working a bit of a free-form way. I'm just fixing. And you see there is a bit of a snap their 25 and want oh, yes, there is. It's not indeed. And it's because of these controls after remember that all of that, all of these additional controls that I'm tweaking, they wouldn't need mirroring. So if I have a value at one m1 at 25, they shouldn't it be exactly the same? So I will use Middle mouse drag to make sure that two poses are exactly the same. So that won't be that kind of snap. It sorted the word they write while moving forward works already. The left one moving forward, I think I can play a bit with this food control there on the x_hat and I guess I could move it out on the Zagat and a bit more. And now you see there sort of brushing but not such a hard intersection there. Well, it's still somewhat there but it's only for one frame and it's not really not visible from any point of view. So I'm going to keep it. And there you go. And that's my mission there. I think I could possibly reduce a bit of the swinging of the pelvis up and down. I want to do that in a controlled fashion though using the scale in the graph editor. So I'm going to grab the zed axis there, and I'm going to, I'm going to grab all the keys. And I go to scale, say down by, say 10% the swing and see what happens. There you go. That's my walk based loosely on the reference I was using and on a bunch of references we were able to eating earlier on. In the next section, we're going to see what more can we do to improve, to make it a bit more high fidelity.
21. Polishing, Mood, and Details through Animation Layers: So let's add the last touches to this piece of animation. And one thing that we can do perhaps is to make the shoulders a bit more flexible to add some variety to disinformation, I could use an emission layers. So let's see how they work and we'll save this file. It, this is this blinding version, and now I will save a new version. This one will be version four, and I will call this fitting financing. Let's say that the director sees these innovation and they say, amazing work. I would like her to be a bit more hunched and see what we can do in here. The problem is that you remember I cleaned everything in here. Now if I have to change one pose after change all the poses there, who I don't think that's for me. No, no, no. What can I do to make this girl I've been more hunched like the director wants imagined that I could grab the whole animation, just bend it forward, for instance, could there be a possibility? And it certainly could. So in hearing the channel box of Maya at the bottom, you will find this player layer and animation layer on emotional layers is what you need for this tutorial. And I think what we can do in here, just to show you how it works, we can grab all controls that contribute to the hunched pose, which is the spine controls in the head. Actually there will be more, but what I will get this one as well. And then you see the bottom, top right button of the animation layer there. It's called the create layer from selected, I click on it. These controls are now on the layer. You see that the timeline is empty. The beauty of this tool is that what you do on this layer stays on this layer for as long as the selection has been put on the layer. And if you want to know if a control is being put on a layer you just selected. And if you don't have any dot there on the layer, it means they control is not on the layer. That controlling effect is on the base animation layer. And we'll probably do a more in-depth tutorial about layers for now. Just take it as it comes. How do I know which controls are on an a given layer? I right-click on the layer, select objects, and that gives me the controls. So now I can grab this controls, set a cookie on the layer. We'll maybe bent forward the spine and probably will bend backwards the head a go. The beauty of it is that the, and then I will select all objects and press S. The beauty of it is that since the arms are not oriented like the body can do it. If they had been lotto, they would rotate as well. There'll be sad, right? So now I press Play and she's walking like before, and now she's a bit less happy. And the beauty of layers is that I can grab it layer weight and I can reduce it. So this is the walk as she was, as it was before. It is more of a catwalk really. And this is the walk as it is now. And now she's a big more pissed off, I think. So you see that very little work for as long as the emissions Clean underneath, you can indeed do a lot of stuff in there, including changing the mood of the animation fairly easily. Mood depends on posing, but also on Dining. So, and then we walk will have a bit of a different timing that food was dumped down a bit faster. But that's just to understand how animation layers work. This is the very basic one, animation layering. You can put controls on a given layer. You can set a key to offset the whole animation, and then you can fade out the opacity of that layer so you can make it less intense or more intense. But now what I want to do is I want to go further and I can delete layer there. So I want to add some more mobility on the shoulders. They move but they don't kind of react to the up and down of the girl. So I would like to I would like them to react a bit and same goes for the head. I would like to have to bump up a tiny bit there. And maybe I would like to animate this little guy there. So let's get started. What I will do is I will need the two clavicle controls, select it, and then I create a new layer. So the top right button, which says create layer from selected. Now they are the two Chronicles. And on a layer, I will go to the front view. And what I want to do in there is a want as the body drops, I want the shoulders to drop a bit later. Okay. So we'll go to say frame one. We'll raise the shoulder offshore. There's a tiny bit there and as the body drops, I will just move them back up so they didn't drop nearly as much they go. You see that they are dropping. The important thing in this frame is that they don't go above the line they had earlier on. Okay. They can stay there but they can't go above that line. So as the body goes down, see that they go down a bit later and maybe I can make them go down a bit further below the original pose. But how do I see the original post? Well, you can disable, you can mute the layer and that's how the shoulder blades were. But what if I want to have the original posts on frame five? Well, that's easy. You can click on this button top-left corners GOP layer. And that's going to set a key on your layer which is perfectly aligned to the layer beneath. In fact, if you were successful in this endeavor, you would be able to mute the layer and see that nothing changes. Where hey, as if I went to say frame one, you see there there is a difference. The body goes down, the head goes down, and then the shoulders go down. And I, I said I want them to be even lower, so I will just lower them even more knowing good, exaggerate this a lot, just to show you what I'm after in here. But they are probably going to stay down for a couple of frame as the rebound and the way down. And then I'm going to go back to 0, or rather I need to go to frame one, but rather I need to select both the M Buffy radicals there and go to frame one and copy frame one over 13, okay, because they are both contexts and I also, I will need them to mirror the animation later on. Probably love to copy it or mirror the bending. You see that the, the shoulders are falling down very quickly and then they recall and then come back up. Now I can perhaps give these shoulders more and motion as well as the body comes with accomplish while they're coming back up by, you see that between 111, this, their body falls down quite a lot. In fact, I can go to 11 and I can move up the shoulders there so that they want fall down with the body, with the same speed of the body. That will need to mirror this second part. But really I just use zed, right? And zed doesn't need mirroring. So I can grab the right clavicle. They're open up the graph editor and rotate z. And I can copy this keys, so edit, copy. And then they go to 13 and I can paste them over the left clavicle. And then I do the same for the left clavicle. I just grab one to 12, copied it, go over to the right clavicle and paste that on 13. So this way, I am mirroring the animation. Now, I'm going to press play and you see, that's the motion. Really a lot of motion. Ok. But I did say that I wanted to exaggerate it so that you can see so.
22. Tweaking fingers motion and making the character walk through space: Another trick that you can play IS fingers normally walk that doesn't need to be seen from up close. You would not need to animate the fingers or you just need a pose. And in fact, nobody was missing an emission on the fingers. And here, the one trick that you can play at times as the hand goes down, you can close the fingers a tiny bit and then as it moves up, you can open them up again just to give them a tiny bit of motion. And then as you reach the extreme there and the hand starts moving backward, you can open up the fingers and even irritate them, that doesn't work. They locked the axis, so I will just open them up a tiny bit and then you can go down to 0, whatever name it hasn't there. And that's going to add a feeling of softness. Usually it's a good idea to have one finger move more than the rest. For instance, usually the index is a good candidate for this kind of motion. So you can even make it a bit closer there. As the hand moves forward, that finger gets closer to the other fingers. You reach the opening, UHD, extreme position of the hand there. And as you come back and play with the index autonomy, then open it a bit more. Keep it open for a bit longer. And now let's have a look at it. You see that? Now you have a very nice and soft movement of the fingers, fingering their ok. And even just that little bit of a finger is enough to give an idea that the rest is a bit more alive. I will do it down because don't like it that much to be honest. I mean, I think it's nice but not great. And then I can go and you do the same with the thump really easily. I can put it on the same layer there and set S at the beginning to just have zeros in there. As the hand travels forward, I can rotate the index a bit closer to the palm. And then as we reach the extreme there, I can just move the thumb a bit more towards the front and open it up a little bit. And then eventually it will go back to where it's supposed to be. And now I look at it and you see that even the finger in there is worth so not too bad. I think you have an idea of what you could add to the animation. It really depends on the kind of project and the time you have to do anything in there anyway, it's not as if you have to do this thing for every single one-dimensional we do, in fact, you probably want to have the time to do so. We manage to do the walk of a person there, which looks reasonably feminine, reasonably under control. We have seen how to plan for it, to block it, to spline it, to polish it, and to refine it and add more detail if need be. I just don't like when walks don't have official expression there. So I think I really need to give her at least a bit of an expression there, just so that she's not entirely static as a face. And I think I will need the eyes there were moved a tiny bit closer. I don't know. I think this in this case, it could actually work if they weren't closer, there should be a blink attributes somewhere. There you go. So I can close them. Even, even if you close the eyes of, of freedom model a tiny bit, you will get u, it will give you a lot more life. And usually there are additional controls. I think it's here where you can switch on the face controls, I think, or the brow controls all these guys. There they go. And I can give this girl expression which is a bit more and looks a lot cooler than it did just before you see. It just takes very little to give some life to a character, just take some love. And that's Zelda. Woo, we made it. She walks. Let's say now we have a bunch of layers like we do, and we want to get rid of those. I will say the Sienna is a version five this time round. And this is going to be by merged layer version. When you sit, when you want to merge all the layers down, you select the first one at the top, you hold down shift and you click on the base animation layer. And all of them will be selected. You'll see that. And then you right-click and you go into the AP shown merge layer. Because, why do you go into the options and measured layer? Because if you just merge the layers the way they are, this is what happens. Gave you the second, hey, go. So now I press Play next. Okay. It seems like it's what do we want, right? Yeah, but let's say we have to edit it. I select one control which wasn't a layer, say the hand. And we'll get that one keeper phrases like mock-up. To be honest, it's not a big deal. Once you have a bit of experience that's sort of a K, you can increase your animation, has to look like that by the end of the show I think, but that's not good for us if you can avoid it, we should probably avoid it. So let's see how we can avoid it. In fact, do and select all layers again. And to avoid this scenario and have the keys back down to something more manageable, you have to right-click and go into the options of merge layer. And in there you want to enable smart bake. Now you hit merge, you let Maya do its magic, and now is you press play. You always have to check the animation, okay? And now as you press blade and emission, since the work, you grab one control, you have to think either before. You might have a couple of keys more, but more often than not, my eyes capable of leaving you with more or less the same keys and the new animation, which is fantastic. Wow, so there you go. And this is going to save it as a merged layer version, as they said. So to make this character walk through space now we need to select all of the controls, all of them except for the two masters underneath. Then at 25, make sure we have a key. At one, make sure we have a key, and we want to delete any key which falls outside 251. Okay, so we'll grab these guys. These are the keys for the left leg, which we mirrored manually. And then go to one. And I make sure I delete any key which is before one day go. And then I select a key for each curve in there and then go curves, positive infinity cycle. And now if we did everything correctly when a press play, the characters shoot cycle forever, It's worth noticing that if our control wasn't an emission layers, when you merge it down, you won't be cycling anymore. Okay, so that's very important to know. So now we need the girl to walk through space. So we'll grab the insight Master and I will right-click and unmute all. And for the first step, the girl will probably move forward, you see? But that is a seizure stops. So we can grab the translate Zed, we can go curves past infinity cycle with offset. And what cycle we also does, it takes the curve and it starts of glues it on top of the existing curve. So it takes this curve and it glues it up there and it goes on forever like that. So your girl now would be working forever and ever. And behold, the feet are not sliding. Think I could give her being more up and down To be honest, I feel like she's MC2 straight and the way she walks there. But yeah, that's it. And this is going to be our animation for today.
 Amedeo Beretta, Animation Director/ Tutor