Transcripts
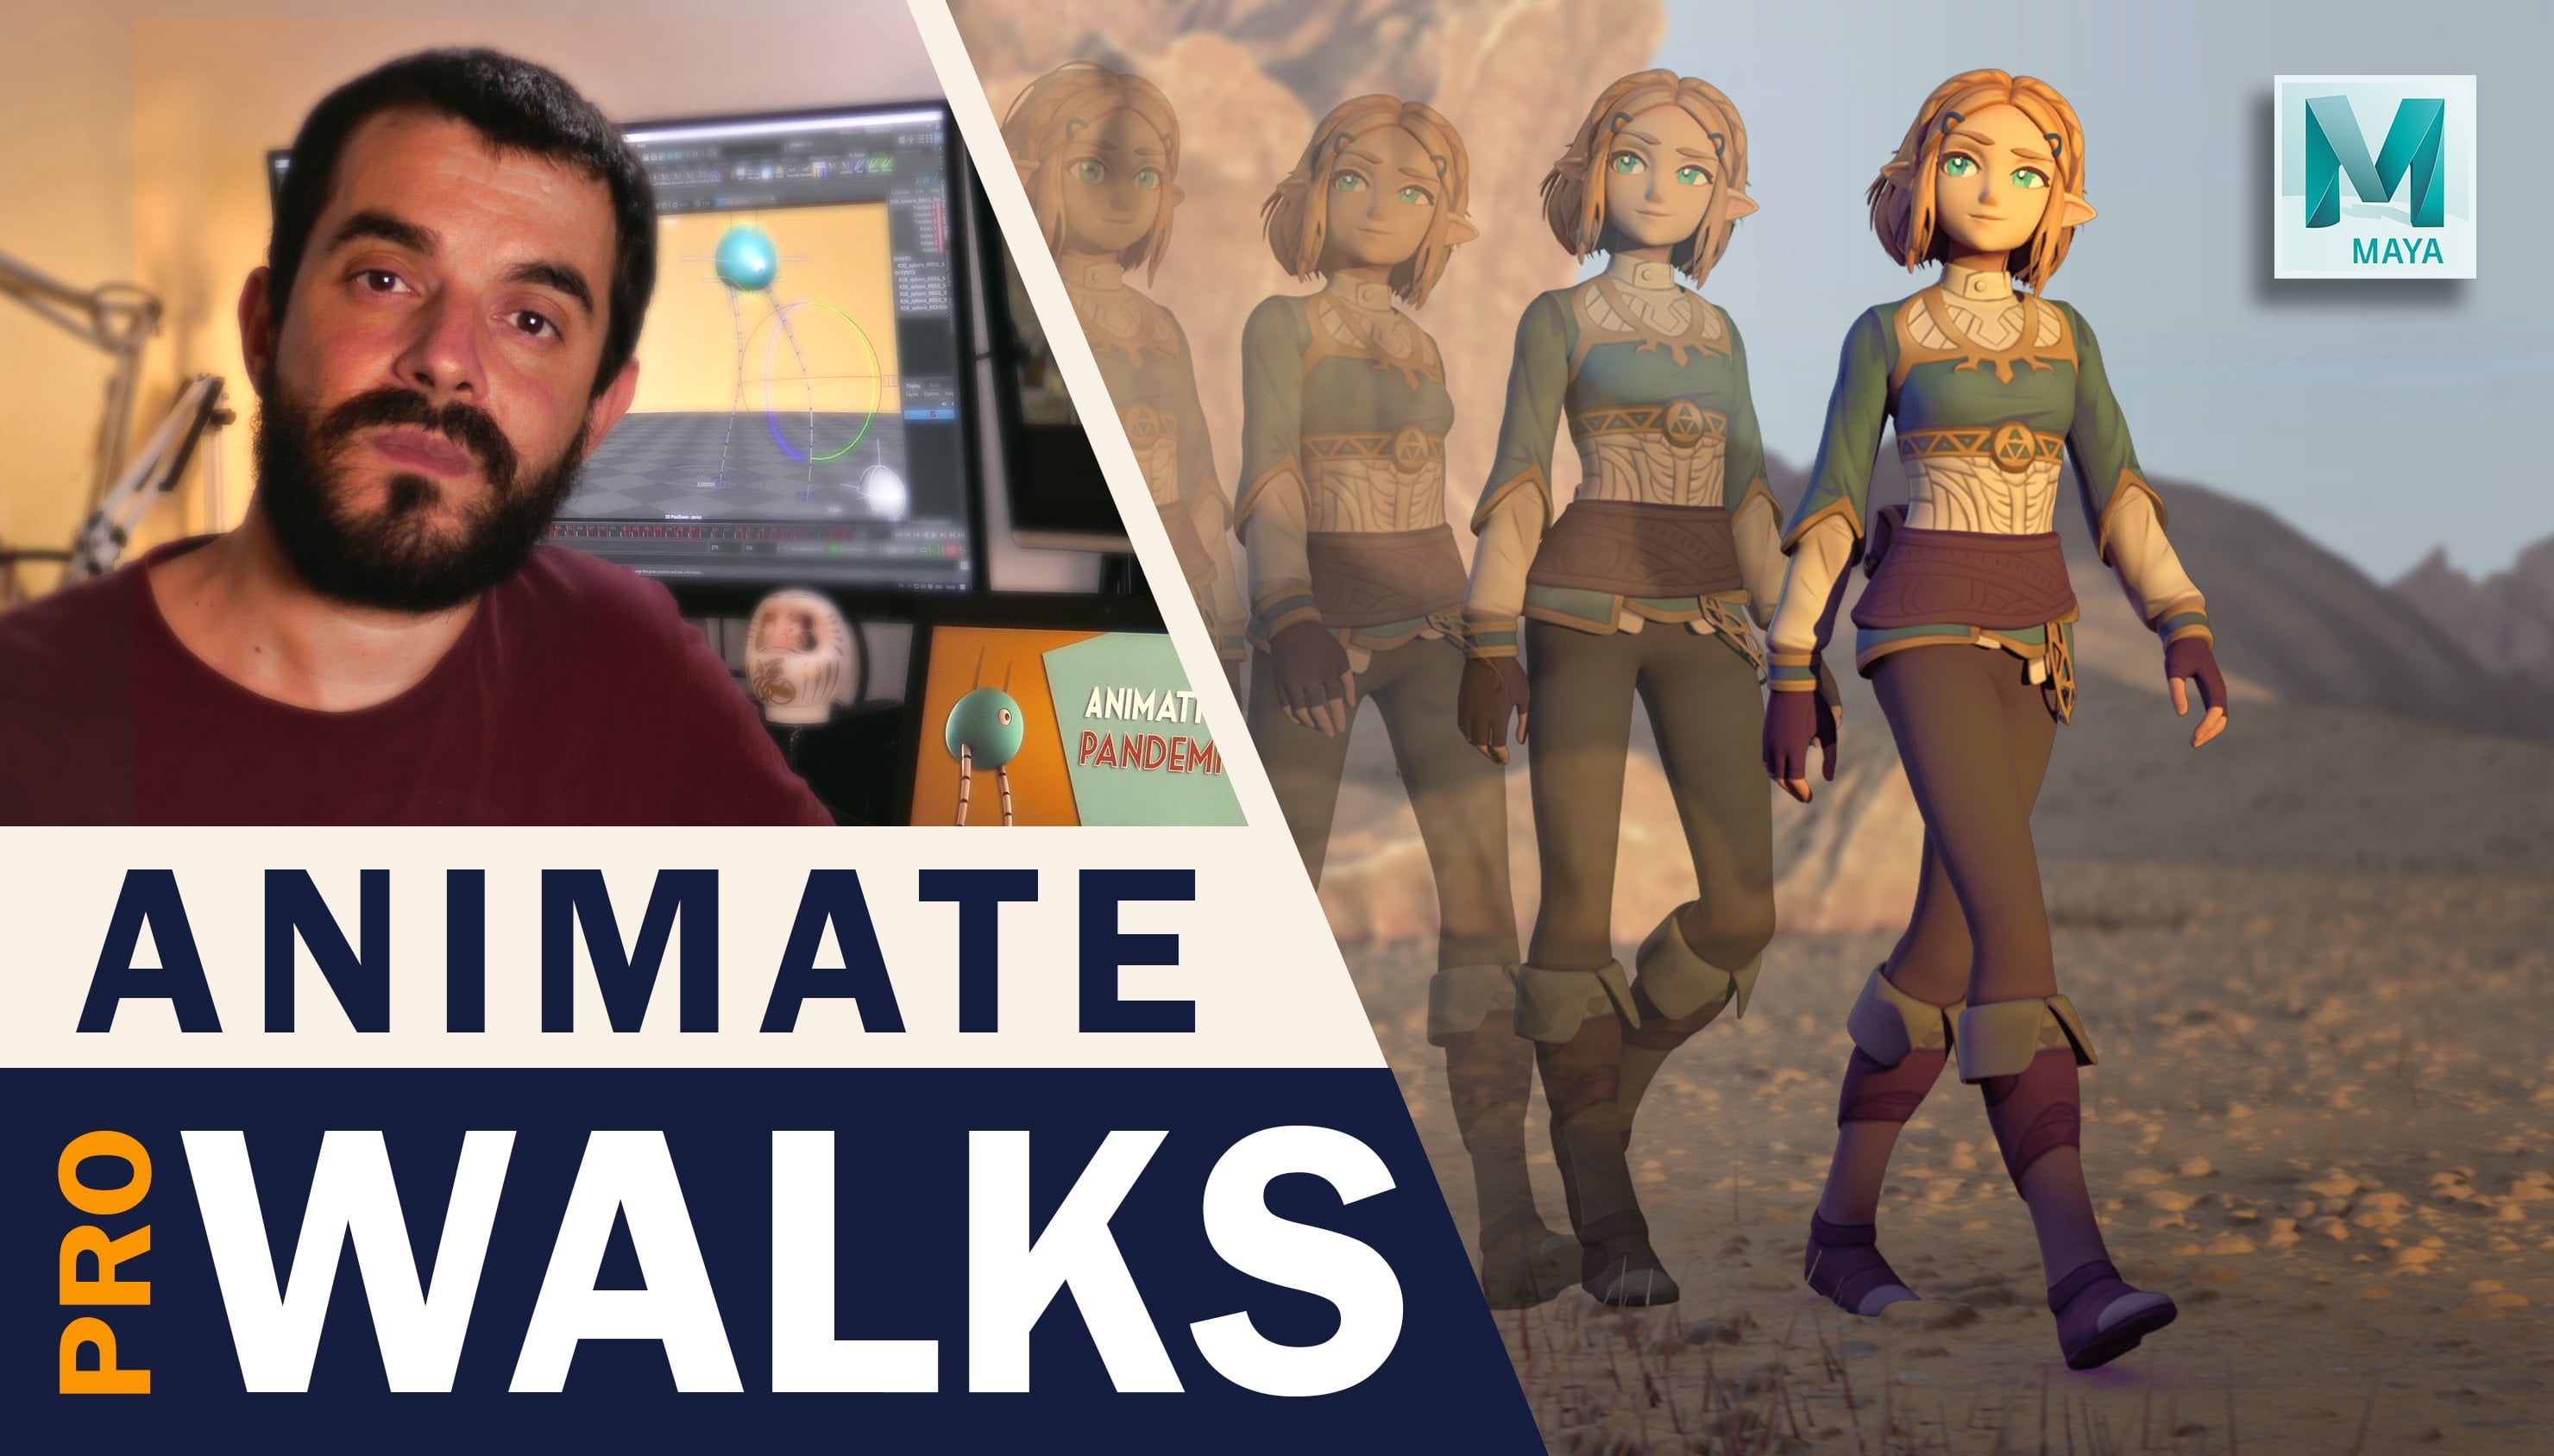
1. Introduction: Hi, my name is Emilio Beretta, and ever since the year 2002, I animated on feature films, TV series, Rio games and
visual effects movies. In this tutorial,
we are going to see a number of
quick techniques to speed up your animation workflow while animating a panther walk, the walk itself is applicable to any big cat locomotion while the workflow is applicable
to any software, although the tutorial
is recorded in Maya, we will start by finding
suitable video references and identifying the key poses after which we will find
an install custom, freely available tools
to make the animation easier and faster in
terms of animation, we will start by animating the core aria and only one leg, after which we will
reuse the same keys to animate the front part
of the creature to then generate head and
tail animation in a half automated wait until we will eventually
mirror the animation. The idea is to follow a workflow that confers
the animation a clean, polished and realistic
look in a short amount of time and the while
avoiding repetitive tasks, we will use a freely
available rig that you can download by following the link coming with this video, if this is of interest to you, just join me and I will
see you in the next video.
2. Working with references: The first thing we
want to do before even starting
animating as usual, is to look for references and
we can find them on YouTube or on websites that sell stock footage like for
instance, pond five. In fact, in here
there's quite a lot of stuff regarding animals. You can't just use the
preview as reference. You're not going to use
it commercially anyway, different videos will give you different pieces of information. For instance, have you
doing wish the character is Phase Steel relative
to the edge of the camera gives you a pretty
good information regarding the variation of poses internally in the internal
economy of the body. Whereas VDS in which the camera is still or it doesn't
follow the character one-to-one can give you a
better idea of how things are perceived outside the
fixed frame of a camera. For instance, they make
you appreciate more easily the absence that stick out
from the general footage. Like for example, the shoulder
blades which are popping out quite large even if the character is
moving through space. Finally, another
piece of information you can get from the
videos is timing. One of the issues I have
found we've stock footage is that sometimes that
happens in slow motion, it is fairly difficult, in my opinion to get
to the right timing, especially on
YouTube, you can get some information about the
actual speed of the video. So for instance, down here, it tells us that this is a high-speed video motion
capture at a 120 hertz, that is 120 frames per second. And it's now being
played at 25 hertz. And this is going to give
you a pretty good idea on how to speed up or slow down this clip as you need after evaluating
all the clips, it is a good idea to pick one in particular that gives
you the mood you want. I am looking for a
fairly generic walk in here and I will
go for this clip. Now, these clips have
been uploaded on a platform which is called
the sink sketch.com, which I really suggest
you use if you need to work in animation
or do animation, because it lets you
easily evaulate stuff and you can draw on
screen at the first glance, animating quadrupeds
may look a bit more complicated than
animating humans. The true fees at these
more work mainly because you have
twice the amount of contact with the floor. But if you break it down
to smaller chunks of work, you can manage it just fine. So for instance, there are a few approaches you can
employ for quadrupeds. One consisting in finding
the up and down or pale Reese and shoulders
and use them as a base. You could do the body first and then animate the
legs afterwards. Another approach would
consist of treating their hind legs in a different fashion if
compared to the front legs. So you may be solved
first the hind legs and then the front legs as if they were two different
human beings walking. In this case, I'm going to have some sort of mixed approach. I am going to first find
out the key poses for the hind parts of the body
off four legs and pelvis. And then I'm going to do the
same for the front part. I usually start my local motion
animation by identifying the contact and the contact being the first contact
with the floor. So this one looks about
fine with the leg. One thing that I
notice immediately is that the leg is not fully extended like for
a man, for instance. And that's something I
will have to keep in mind. I will draw a line here just to identify where the bomb
is supposed to be. And after finding
this first contact, I went to find the same contact
at the end of the loop, probably this one at
frame 37 or my reference. And again, the pelvis is there. I can't really use the
height of the pelvis as some reliable information
because you see first of all, did the two poses are different, so the stride or the
second contact being a lot wider than that
of the first one, you see it is different
and the wider the stride, the lowest the pelvis. I already know I will
have to come up with a compromise between
the two Post-Its. The important thing for now
is really to find out where these two contact
poses are happening so that I will know the
general timing of this. For instance, it seems to
happen over a 30 frames, which is a good indication for us because we already know on the timeline where to
put the first year and the last key for the loop, after every contact that
must be a downward, the body has to go
down and the legs have to stop the body from
folding in here you can tell that the body
goes down and there are 123 frames of going down, and then the height doesn't
change much and you see that the pelvis tends to
rotate counterclockwise. So this is something
to keep in mind. There is more than just
simple up and down in there. The pelvis is actually twisting
in several directions. And it's something I would
love to keep in mind. The fact that the two contexts
present different stride. It already tells me that this
may be a situation in which the character is
actually changing the speed at which walks. So we tried to scout the
reference footage in order to define two contexts and look
more similar to one another. So for D7 will be the
one and then I will find maybe 68 as another
contact as well. They look pretty similar. 67 looks more like the thing, will use 3767 as
the two key poses. There is 30 frames
between the two. And I expect the
opposite contact of these hind legs to be
roughly in the middle. So 37 plus 15 is equal to 52. So if I go to 52, I should
find something like this one, for instance, that
should look pretty much you see like
the opposite pause. Not incidentally, it's right in the middle between the
two contact poses. Now after the food of creature touches the floor of
the body will go down. The leg will impose
resistance so that the body doesn't fall to the ground and this creature
is no exception. In fact, you'll see that the
body goes down in there. So I can maybe
track this point on the pelvis to see how long
it goes down for you. And you see that after
going down for free frames, it kind of stops going down
and then changes the motion. So tentatively I'm going
to consider posts 40 as my down that's free
frames after the contract. It means that on
the opposite side, I imagined that if I go to 55, some sort of downpours
there and you see, I'm not very disappointed by this because it
seems to line up. Then after the down we have usually a passing pose
and then an up force. Let's try and find the up pose. So I will move forward until I find the higher
point of the pelvis. You see that the pelvis reaches the highest
point at their own 47, and then it kind of stays
there as it twists clockwise, which is something I would
have to consider there moving down and then it
starts moving down again. Actually, I think 46 is
more OPT as an oppose. One thing to consider
in here is that after reaching the up pose, you see that the body stays up and then it
starts going down. And I think I want
to consider that 46749 will be my held up pose. In general, the loop will run between 3752 and then
it will mirror itself. I do not need really to find
all these poses after 52, although at the
beginning it helps to identify them between
the down and the app, there will be a passing
pose somewhere, but it is rather
difficult to find a defining moment of the passing pose as far as
the pelvis is concerned. Instead, that will find the kickoff pause for
the leg which is behind in the motion and
the kickoff pose since to happen
here on Frame 43, by kickoff pose, I
mean the last pose in which one food East
contacting the floor. It doesn't matter
by how much it is contacting for as long as
there is some sort of contact. So now I have 37 as
a contact for D, as a down, 43 as a kickoff, 46 as a nap one, the first step, and 49 as an app
to the second up, because we see
these up is hailed. And it is very
important I think, to understand that
the app movement can be held even when there
is gravity involved. Much the same way it
happens on a swing. When you reach the
top of the elevation, you see we stay there
for quite a long time before the swing
comes back at us. In my opinion,
understanding this is a good chunk of understanding
body mechanics. Similarly, on the way down, I find it a bit
difficult to find a very clear reference for the downward movement
of the pelvis. But since we have found
the contact pose, I don't have to think
about it too much. Now we have the contact
pose, the down pose, the kickoff pose, the
upper one, and the up-to. Now let's have a look at the
legs a little bit better. So on 40 on the down, the right pole is
flat on the floor. That's not bad. And the left one you see still fully in
contact with the floor. So this is kind of
straightforward. And then on 43, please notice how the main
motion is actually the hind leg
extending in order to conclude the push
and prepare to lift. So if I make a line of
action for the leg, you'll see that really the
main changes around here, and this would be a very
interesting feature to have then the app one, what happens in here is that the leg bands quite a lot and there is a sizable amount of spacing forward
for the left leg, while the right one is still flat on the floor
on the app too, as far as the legs
are concerned, the up-to pause is
essentially a passing pose. The left leg nearly has the
same pose silhouette wise, but it's crossing
over the right leg, which is still flat on
the floor, poor guy. And then as we go
down to the contact, the left leg extends again and we're going to
the down again. These thing, having
these few pauses on the timeline makes me
confident we can mirror them after a frame 52 and get
the other side of the walk. Now let's have a look
at the front legs. Generally speaking, there
is some sort of offset between the front and hind
legs of a quadrupeds. So at frame 37, you
want to have a contact, of course not for this
type of gate any way. In fact, you see that
you will find there right front leg contact
at around frame 42. Now for the sake of simplicity
during the blocking, I will treat 43 years of contact
for now also because you see that's the moment
that leg extends and stays there for two
frames extended. I would love to keep that
in mind as I spline, but for the first
pass of blocking, I will treat the contact as 43. So we'll call this
thing contact plus one. For now the shoulders
don't tell me much because I haven't compared them to any previous you're following frame. But you see that right
after the contact, true to the nature
of locomotion, the shoulders go
down quite a lot, the ribcage goes down
quite a lot and there is the most fascinating twist
on the shoulder blades. See that? Fantastic. However we are here to
find the down pose. And it seems to me that tracking the line between
the two shoulders, these lining here between
the two shoulders, the downward motion really
stops at around frame 46 when the chest
twists visibly, but it's faced the same height. Then it starts moving up again. This will be my down
pose for the chest. And now let's go back and
check the front legs. So at the beginning of the loop, the front right leg is
essentially in a passing pose. It's crossing over the left one. The left one is
flat on the floor. The chest seems
to be essentially the same height it
will have on frame 14, the reason noticeable
amount of twisting counterclockwise on
the shoulder area. I would love to keep that
in mind as I animate. But overall, it seems like the chest is more or less there. Maybe it goes even a bit higher, but it's more or less
there between 374040, the front right leg is significantly changing the
line of action if compared to the previous pose entities
at 40 free that leg fully extend and there
is a little bit of a bend in the down pose, not so much so, and then the right foot
stays flat while the leg doesn't really change its
internal economy that much, it just slides to
the back and it stays relatively
straight as it does transition to frame 52
pretty much the same way the left leg was if you think of it at the
beginning of the loop, as far as the left
leg is concerned, we have an almost
unchanged internal economy between 3740 and the
same thing goes for 43. It is indeed on the down at 46, we start seeing the variation of this angle between the elbow and the shoulder a little bit. And at 49 we have the last moment of
contact with the floor, which is probably something
we could call a kickoff. Then we have the most
beautiful inversion of silhouette in here, which already started in the previous posts,
if you think of it. In fact, at 46, we went from a narc that was pointing to the right
to then see 49, we start seeing an inversion of the curve in a fully
inversion at 52, you'll see that it's quite a beautiful inversion of curve. If you think of it, it's
really important to notice the impact of the down. It goes down quite a lot. In fact, one thing
which is fairly typical of big cats is that
the shoulder blades move up quite a lot after
the down in order to allow the fraud legs sustaining the weight to stay straight. Otherwise, the leg would have to bend or the body
would have to go up, which is a bit unlikely, and these are going to be
the key poses of our walk. Now what we do is called 3D animation because it
happens in 3D space while it is all fun and
games to look at things from a profile like
we are doing in here, for instance, we should remember that we have to look at
other points of view, just understand what's
going on in there. In fact, in here, I have a different
point of view of a similar walk in which allele part walks
towards the camera. This is pretty useful
because as you notice, it gives us a pretty
clear idea of how much the shoulder blades
are moving in a big cat. And also it shows the head moving up
and down quite a lot. Now these guys looks
a little bit bigger than the one we see in
the previous reference, but I'm not an expert
in little parts, so I can't say for
sure either way I find it useful to
edit them together. We can do that. We were free software
and named shortcut, which you can download
from shortcut.org. Or you can use Adobe Premiere,
whichever you prefer. If you think of it having the two references side-by-side, it makes it a lot easier to
understand what goes on. And it also gives you a
lot of information about the line of action as it
is from the front side. So for instance, if you look
at the front right leg, the banded leg hairs
from the front view is something you can't tell
from the side view. A good idea is always to have two different
points of view. At least if you do quadrupeds, if you have a top view,
that would be amazing. In fact, I find that top
user often very useful, although they are not
aesthetically very pleasing. Also the good thing
I've seen sketches that you can download
the video with the sketches or you can download this sketches
altogether and use them as grease pencil
for your Maya session. You can certainly have a look at the line of action
and notice how when the pelvis goes down is also when the chest
tends to go up. And this gives you this sort of undulating motion of the body. Now the more the creature
is cat-like and the more flexible these eye
of the body will be. Now that we have a less
foggy idea of how the story works is time for us
to start the blocking.
3. Gearing up. Having the tools at hand: Before we start the
actual animation, Let's prepare
myosin that we have all the tools we need
to make it easy. First of all of
these tutorial was recorded for Maya version 20, $20 for, although at the time
of recording this tutorial, Maya 2022 is already available. However, I think Maya 2022, as of January 2022, not particularly stable and also poses an additional
issue for which some older scripts that you
can find online for free may not be working with the default settings you
will find in Maya 2022, because my add 22 uses a
Python interpreter with a different version
if compared to the previous version of
Maya, if you hadn't gone. And daily end of this video, I will point to a couple of
approaches you can follow. Make the older scripts
work with my at 2022. In our particular case, oldest scripts
should be working in Maya 2022 except for
one called overlapping. By the end of this video,
I will also show you how to make that
work in Maya 2022. The other thing to know
is that we will use some specific tools which
are freely available, but you do not have to use exactly the same scripts
I use for as long as you understand the result that we tried to achieve
by using the scripts, you can use any script
that does the same thing. And let's get started
with studio libraries. Through the library
is a very handy tool that lets you save and mirror poses as well as
mirror animation under Maya, redo it useful and for free, it counts with
installation instructions. So you can download it
from Studio library.com, which we are going to do. Once that's downloaded, you can extract the zip archive
and you will find that it contains
a folder names to the library dash the
name of the version. In order to store
through your library, you need to head over
to the folder named documents maya on your
computer if you're on Windows, while if you are on Linux, you will find it under
home slash Maya. And if you are on Mac OS, you will find it on their
home library preferences. Autodesk Maya, which I believe is a hidden folder by
default and a mic. In this case, we are
on their windows, on their documents maya, you will find a folder
named scripts and hours through your library
folder and goes in there. So we're going to
open it and just drag their studio library. In my case, it was see
plenty of sub-folders, but that's not going to
be your case necessarily. It depends on how many things you haven't installed
before this. Once you have copied your studio library folder into the scripts folder in Maya, you can open the
folder and you will find that there is a
bunch of files in there, one of which is called
Install dot mail. This is the file we need. Once we are in Maya,
we need to make sure we are looking at
a customer shelf. In this case, I'm using the
regular custom shelf in Maya. During the tutorial,
you will find that they normally cold my
scripts from other shows. In this case, however,
let's put them into custom. You can put them
wherever you want. So we take installed up mail, we dragged it over
to the view port on Maya and new icon is created. It's two squares,
one white, one blue. And as you click on it through
your library will open up. And in my case, it's already set up because they're
already used it. But in your case,
it will ask you, where do you want to store
the folders of 3D library? And we question, it actually
means where is it that you want to save all the data that you're going to store
with studio library. Any folder will do for as long as you know
where you put it under the script that
I wanted to install is the title bar dot mail. Let's open it in the
script editor of Maya, we go to the bottom-right
corner where the logo descriptive or resides. We click on it and we
go File Open Script. And we go to the path for
these groups was downloaded. You will find the script along with the material
of this class. I opened the title
bar adult male. This is the code. I'm just going to select it with the left mouse button and then drag it with the middle
mouse button over my custom shelf descript
toggle the visibility of the bar above the Maya
interface so that as you work, you can earn some
precious pixels, especially if you work
on small monitors. Let's give it a name. Let's right-click on it and go Edit and under shelves and under the renames section of the shaft content In type, in title bar. And the same goes
for the tooltip. Finally, let's give the
icon labeled the same name. Now on the custom shelf in there I have a button
that says title bar. And when I click on it,
it switches between title bar O1 and off next up in line we have
Insert key dot mail. Now the script you can
find with the material of this course and other
way to open it up in the script editor is
to just drag it over the script editor or
a male tap possibly. And this is, the script
is pretty basic, but it is very useful indeed. So let's say you have a cube
moving from left to right, and you want to
watch the drafted into a curve. This is the curve. Now imagine that you want to
create a breakdown in these are the curve you would
normally press S in Maya. But you see that as you press S, the curve changes shape, which can be a bit of a
problem sometimes when you don't want to touch
the curve at all. And here comes the
alternative by running this set keyframe, insert Maya. We'll set a key on any channel
that has been previously animated without
changing the curve. Look at this, I
execute the script, I get my breakdown and
the curves stay the same. Let's select it with the left mouse button and
let's middle mouse, drag it over our shelf. This is going to be our
Eastern Turkey buttons. So I go on edit shelves and
I'm going to call the insert. And same thing for the two teeth and the
icon labeled Save. And now. Whenever I hit that button, I get my Insert
key for as long as the channels were
previously on inmate, you can even assign the
script to a hotkey. Next in line is the
AB stalker come tool. Let's drag it over to the scripts folder in our
documents Maya folder, the same place where we just
stored this 3D library tool. Very often you find
the instructions to run a script in
the script itself. So if you right-click on the
script and you open it up, we've got the text editor. That means that in this
case we can open it with Notepad in
Windows for instance. And we can just
drag it over to it. And you'll notice that in
the script itself we have a brief description
of what it does followed by the line
used to run the script. So I'm going to select the two lines used to
execute the script in my Angular to create an extra Mail tab in
the script editor, I'm going to paste that script
and I'm going to select the command middle mouse
dragging over to the shelf. And let's see what the
script does very quickly. So let's say I have
a character running through space and I want to follow it with a camera so that I can check the
official expressions. For instance, I can position
my perspective camera, select the character
I want to stalk, or the controller
I wanted to stalk. In this case, I'm going
to execute the script. And the script lets me decide which channels I want to
follow the character on. In this case, I can click on all the channels and I
can stalk the chunk. Now I have a new camera. You see that he's following the character or the
control one-to-one. So I still retain the
perspective camera in there, but you see that the
camera is following it. And the next tool
we want to install these Morgan Lucas's
world baked tool, which is super useful. And you will see why it's useful during the
course of the tutorial. So let's see how to install it. We had over to Morgan Lewis.com
and we don't load MIL, we'll bake thought BY
you will find a gain to the link in the material
counting with the video. We saved the link
as and we don't load the file raw
thing to notice with this tool is that it requires a library which is specified
here on the requirements. You're requires these M
and utilities dot p-y. Unfortunately, these
link does not work, so we'll have to download
it from somewhere else. If you go on their tools
in the same website, then you scroll down. At the very bottom, you will find the
MLU utilities here, which you can just
right click and save. As with the two Python
scripts downloaded, it is time for us to
stole them once more. We had over two documents, Maya folder and in there you will find
the scripts folder. And we want to copy
those two scripts into the documents
Maya script folder. In my case, you see I
already have it installed, but I'm going to
replace them anyway. And if we head back to Morgan
lunacy is page we have the installation
extraction and we also have the lines to execute. When running the script. Such code needs to be
executed from a Python tab, which I'm going to create in
the script editor in Maya, just going to paste
the lines in there and middle mouse drag
them over the shelf. And now I have a Python
code to see if it works. And you'll see it opens
up, it works nice. The next tool we're going
to stall is called half cm high there from Francisco
Saqqara Montero. I hope I'm pronouncing
this right. The beautiful thing
about this tool is that it lets you hide parts of the character even if they
belong to the same mesh. This is very useful for creature animation
and any type of high-end animation in which
you want to be able to evaluate the motion of
individual parts of the body. You'll find SEM hi there on gum tree and in
the donation box, adjust, just input the
amount you want to donate. You will be prompted
for an email address. After inputting that, you will be able to download your files, which will come in the
form of an archive, which we are going to
extract, extract the gain. And there you will find a
how to install text file. The instructions are asking
us to copy the icons and to drag and drop an
installer. Sounds easy. Let's see if it works. I'm going to find icons either, and this is the icon folder. I'm going to copy it. Then I'm going to
go into Maya 2020. My gaze preferences that I'm
going to go into documents, maya diversion I'm
using right now, 2020. And then there, there you will find preferences and icons. I'm going to paste the
icons there as you see, I already have them
installed, of course. And then back to Maya,
I'm going to grab the installer mail file, drop it over the viewport. And here I have the
tool which as I open, opens up, which means it works. Next in line, we have
the twin machine which you can
download from GitHub. Between machine being a
pretty handy tool that you can use to create
breakdowns easily. To download the tween machine, we just click on code on GitHub and we then
click on Download zip. This will start the
download, the archive. And the only thing
we really need from these archives is defined contained in the Python folder and it's called twin
machine dot p-y. We are going to drag
this file over to the script folder in our
documents Maya folder. And once that's done,
we're going to try and see how to run it in
the instructions. If you scroll down, there are these
two lines that say import twin machine
to machine dot star. Let's see if this will work. I think IT want. And as I paste them into a Python tab in
Maya and run them, you see that my
complaints that there is no such module
named twin machine. Which is a complain
reasonable enough. In fact, if you go and check the actual name of the twin
machine in the script, you'll see there's an underscore
between the two words. We're going to copy the name. And in the line of code that
was supposed to execute the Turing machine going to just paste the new name
in both instances. The underscore that ease. Now as they run it
through a machine works, these was a bit confusing,
I have to admit, but it's now sorted out and now it's time to
install overlapping. Overlapping is a really
useful tool to automate tail animation and any appendix
that needs overlapping. You just need to
download it either from GMB road or
high-end Friday. Again, you will find the link in the material coming
with this video. Once downloaded, you go into the folder with the
latest version. And in there you will
find at PY script, all you need to do with
the script really is to open it up in
Python tab in Maya. Once in the script editor
you go File Open Script, you paste the path and
you open the script, you select the whole code by clicking with the left mouse
button and then hitting Control a on your keyboard and middle mouse
dragging over a shelf. Now as you click on it, overlap issued
run, there you go. As I mentioned earlier, overlap be unfortunately it does not work by default
in Maya 2022, you have two ways
to make it work. You could convert the
script or you could force Maya to ram with a
Python interpreter. I will show you a possible
solution on how to convert the script for the running different
Python interpreter in Maya, I will point you to some
resources from art station. Here we are seeing overlapping. If I select the whole code and paste it into a Python
tab of Maya 2022. The code, if I run it, you will find an
invalid syntax error. And these happens
because this code follows a different convention
rather than Python three, which is the one Maya users. So we're a bit stuck, but we can think of one thing. Maybe somebody wrote a tool to convert Python two
into Python three. And maybe these
works for most of the cases. Let's have a look. If you head over to
Python two, free.com, you will find a
website that lets you paste Python two code, and it will hopefully convert
it into Python free code. I'm going to paste
the code in here. I'm going to click Submit. Wait a little bit, grab the converted
code, just copy it. Then into my younger into
paste it into Python tab, and then going to drag it
over my shelf and execute it. And you see it works. This could be a way, of course there is no guaranteed these will work with any script, but it's better than nothing. If you find those script
that doesn't work with the automatic conversion
I've just shown you. You are a bit out of luck, but you could still
force Maya to use a Python to interpreter. This way the old
scripts would work, in which case a recommend
you follow the advice, you find the desired
station page, which you will find the link to in the material
out this video. An alternative to overlapping, although not free, is
called overlap Pr. And it's a tool that does pretty much the same
thing in a bit more of a solid way when we some more features, I
actually have it. And it's pretty quick
and it works very well. We're not going to use it
in this tutorial though, but I suggest you
have a look and see if it's of interest
because it saves a lot of hours of work among the features that
overlaps her hands that overlap it doesn't have there is the ability to
add a little bit of wind. There is some noise in the
animation that can be very, very useful in a
lot of instances, which is for me a reason enough
to consider this product. However, as I said,
we're not going to use it for this tutorial, but you will find the link in the material coming
with the video, which means that if
you buy for that link, I'm going to get a
little bit of money, but let's not tell anybody. And last but not least, if you are under Windows and
you want to do a play blast, but can't see the QT format
under the format window, the play blast, That's because you do not have
QuickTime installed. And from Apple.com you can download QuickTime
seven for Windows. Now be careful because officially time for Windows
is no longer supported. You do a security
issue in the code. However, it's the only way
I've found in Maya for Windows to have a
quick time play blast if you are in a Mac computer, instead of having a
cutie format in there, you will find something
called AV foundation, which will do exactly
the same thing if you're on Linux island, no, you have to
do some research. Sorry. This is pretty much it
for the scripts we are going to employ for
these tutorial.
4. Setting up the project: And now that we
have our references edited together and we
can start to work in 3D. Of course, you can
download the references by following the links
provided with this video. Becky, my other first thing I wanted to do is to
create a project. So hold down spacebar go file and the window is specify
a name for this project. And I hit Accept, as you know, whenever you create a project, a bunch of folders created and everything that we work with
should be included in there, in fact, into source images, I am going to paste the
video references off the video and image
sequence to be honest, frames sequences play a bit
faster and Maya's viewport, provided that you keep them
under the full HD resolution. In this case, the
resolution of my frame sees 960 by 540 after the references, of course, we need the rig
which you can download by following the links
provided with this video. We are going to copy it into the scenes folder of
our Maya project. Here it goes. By the time this
tutorial is live, you may have a different
version of the rig because of course I will keep updating it in the meantime, back into Maya, you
have noticed that I am missing the top bar in there. I'm using Maya 2020, but in practice you can
follow this tutorial on any Maya past Maya 2018. I get to show the top bar you can hold down spacebar
on your keyboard, go Windows, settings,
preferences, preferences. And in there under the
section interface, you will find something called short title bar in main window, and that's how you
show the title bar. I don't really want to show
it now because I don't need it and it takes
away precious pixels. Also, if you hold down
on your keyboard, the keys Control and M like mic, you can show and hide the
menu at the top you'll see. And similarly, if you hold
down Shift and M like Mike, you can show the Menus
inside the viewport. This is really handy if
you have a small monitor. Not my case, but since I'm recording this tutorial
on a single monitor, I do have a small monitor. In fact, you want to animate
with a capital of monitors, at least now that we
have all we need, we need to insert the
Reagan to the scene. If you have watched
any of my tutorials, you know that you need
to reference this rig. If you haven't, you should
watch some of my tutorials. Let's reference the rig and
their file create reference. We're going to grab the
rake and hit reference. And here's the rig. By hitting Alt B like Bravo, we can change the
background color, this character being very dark, it makes it difficult to discern its silhouette against
a black background. So I'm going to change
it to something a bit more palatable
after the rig. Of course, we need
the references. So I'm going to first create
a new camera under View. Create camera from view,
I mean perspective. So I made a copy of perspective. I know there's a new one because down here
you see there's the new perspective in
town in the outliner. The same thing happens. I want to place the image plane in new camera because
maybe it will need the perspective to be free of image planes and I need to
use it for something else. I don't know. Maybe I have a backup
camera if I need that. And then I go view image
plane, import the image. Myosin simply opens up
the source images folder. And in there I can
find my frame. You can pick any frame. The problem you will
have is that it doesn't play because
you have to hit Control a like alpha into the
attribute editor in there, click on Use image sequence, and now the animation
will play fruit. Now of course, this
video does not have the sketches I've
made as soon sketch, so I paste those as well into
my source images folder. And again, you will
find the frames with sketches by
following the links coming with his video in Maya
again in the same camera, I'm going to go under View
Image blending import image and I'm going to
find Panther phrase. We've sketches and Leo
part sketches of course Panther and layer bars
belonging to the same family. And make sure that
I use an image, an image sequence in there. You'll see that now the
playback is a bit nuts. One of the problems we've freely software is that if you put two planes and double one another for the software
does not know which one to play in the channel box
of one of the planes, I can maybe change the size, make it smaller,
change the depth, and make it closer. And now I can press Play and see buf two sketches and the
version without sketches, I can also operate
the offset said than y to position this sketch. Now I shall have my sketches
ever so pressures as well as the clean version as well as the front camera,
That's pretty good. The problem, however,
is that you see that as I move the
camera around, the rig is sometimes behind the image planes and
sometimes in front of them. So I'm going to add a 100 units to the depth of the plains. And you'll see that these way
it's a bit easier to work, but still not quite as good. So I'm going to add 1000 units
to both the image planes in the depth
attribute and change the depth in this smaller
one just a little bit, just so that it
becomes visible again. So now I have all I need
to start the extra job. I will save the
file as capital are named panther walk 001. I use my ascii is a format, is simply speaking
more practical. And in the following video, we're going to see
how to sit down the key poses for
this animation.
5. Setting up the rig: Now we know for a fact that we highlighted only off
of the poses we need. In fact, if you check the
backside of the character, you will see that we only have the left leg moving forward. We do not have poses for the right one doing
the same thing. But also if you think of it, is being free the animation, we can do half of the loop and just mirror in deposits
at a later stage. So it would be good if we could
already set up our rig to mirror the poses before diving
straight into animation. I think it's a good
idea to devise a technical approach to make the best of what the
rig has to offer. In order to do that,
we have to first analyze the
references once more, then decide the strategy for the break as a check
the references. One thing that I notice
is that the area of the spine here is
pretty flexible. There's a lot of up and down. There is a little bit
of stretch and squash. So it would be great if
there Rick do the same. So for instance, in
this particular rig, and you can follow along
with any rig you want. The important thing in fact, is to understand the philosophy
by which we operate. I was saying in these
particular rig by default, you see we have this
controllers for the spine, which seemed to be
FK controllers. In fact, if you check the
name of the controller, it even says so K stands
for forward kinematics, meaning they're
primarily achieved by rotating and usually
work based on a higher, which means that you
grab the first one of the hierarchy and the
others are following. This method is
historically fairly useful to achieve
good our axis Z, you're rotating objects
around the pivot. So in practice that makes it very easy to draw
arcs on screen. However, one of
the limitations of this approach is
that if you check the pelvis is now a reference. The pelvis goes down while the chest actually stays
at the same height. Meaning that in here, it would be difficult to achieve that effect because we
would have to counter animate the rest of the spine up every time the
pelvis goes down, which is a lot of work
for what we have to do. Be nicer if we could control the height of the pelvis
and chest individually. In order to do so, we will need to have what's
called a Nike spine. And in this particular rig, there is a cross
next to the spine. That's the IK to FK converter. We can set the FK, I
can blend value to ten. Now, most rigs will give
you the ability to convert the spines from AKA to f k
and the other way round. But it's not a given
that the value will range between 010, a lot of rigs operate
between 01, for instance. Anyhow, now that we
have an IK spine, you see we can
control the height of the pelvis independently from
the height of the chest. So it seems to me
that will make it easier for us to animate
this kind of motion. I think it will go for Nike
approach for the spine, the neck and head area, or another big chunk
of this animation, we want to see what happens
when we rotate the chest. You see when we rotate
the chest in here, the neck and head
follow one-to-one. However, if you check
the references, you see there's
plenty of twist in the shoulder area particularly
so from the front view. But you see that the head
doesn't twist nearly as much. That is a negation for us. It's telling us that
having the chest rotate while the head stays stable would make
our animation life easier because we wouldn't have to counter animate controls. So usually you want
to check whether your head and our neck can be kept to global rotation
as you move the chest. And usually in the FK
controllers like this one, you have an attribute
which is called parent's local space are global, in this case, it's
called Global. Once you set it on,
the head will be kept. You see on global whichever
thing the body does. However, when you
rotate the neck, you have the same
issue with the head. So maybe we can grab the head and set it to global as well. So now when we rotate the neck, the head stays global. When we rotate the chest, the neck stays global. However, there is the
case in here for which we could use IK head as well. Let's try out and
see what it does. Most rigs will let you convert
between IK and FK head. Of course, in this case
I have a cross next to their head and I can switch the S-Gateway like
a blend to ten. And I will have to
square controllers, one on the head and
one on the neck. The problem you see is that they still follow the
chest one-to-one, thus defeating the
purpose of an IK setup. But let's see if there's any additional channel in the neck. For instance, there's
something called fixed orient. Let's set it up to ten, and let's see what happens now. Unfortunately, these
fixed orient attribute, which seemed to promise a global orientation on the IK controller does
not seem to work, which is a bit of a bummer considering this is an IK chain. However, this is a great
opportunity for us to learn to work about the
limitations of a Rick. I will keep it in inverse
kinematics just to be able to show workarounds
to this problem. And the neck to head chain will be moving in a bit
of an awkward way at the beginning for
which it will follow the rotation and
translation of the chest. But when you rotate the neck, that won't move the head because of course
it's an IK chain. Will learn to work around
this problem just in case in the future you will
have to deal with a similar issue for the legs. It goes without saying that IK is actually a
very good solution. So I don't have to think much
about that for the tail. One of the issues
we are going to encounter is that whenever
we rotate the pelvis, the tail will rotate, a behavior that if you check this footage is
not entirely true. In fact, the tail does react
to the motion of the pelvis. Stays for the most part stable
even from the front view, you see that while the pelvis, wings left and right in here, the tail down there
is relatively stable. It certainly reacts,
but it doesn't rotate one-to-one
with the pelvis. So we would in fact
be fantastic if the tail global controller here that global attributes,
which it does. So now we can set the global
attribute ten you see, and have the tail
cell stabilizer, which is going to be very
useful as part of setting up the rig and devising a technical strategy
before animating, I would argue that having
the possibility to mirror the pose is quickly in this animation will be
an essential feature. In fact, if we go
check the references, it is clear that we
highlighted only one step. In fact, we can
see how we did not highlight poses for
the right hind leg. Of course, the idea was
that we would animate one leg and then mirror it
onto the opposite side. Of course, we can
do it manually, but why do it manually when
we can do it automatically? So we need to find a solution
to mirror this pose is quickly a tool I would really recommend unimportant
for this process, which however, isn't free. And I can tell you that in most companies you will work in this particular time you will find on him but
anyway installed. But for the sake
of this tutorial, we will use to do
a library instead, which is a free tool. You can easily download it. It's free. It comes with
installation instructions and you will find the link, of course, along
with this video. So we'll open up Studio library and we'll create a new folder. I will call this thing Panther. And I want to create what's
called the mirror table. That is the definition
that the tool will use the mirror poses. To do so, I will have to select all the controls they plan
to use for my animation. Now on the upper side of
the view port of Maya, you have this magnet icons
and you can collapse them by clicking on
this vertical line next to them on the left. And you see that when
the icons are collapsed, the line becomes a line with a triangle pointing
to the right. If you click on it,
it will expand again. Next to this line, there's another one on the left, and this one is actually
showing this selection masks. These buttons are
telling Maya what can be selected
within a viewport. For now they're alone so you can select a bunch of things
into the viewport. But if I click on the triangle
next to them and set, all objects do off. Now when I drag a
selection in the viewport, I am no longer
selecting anything. Which means of
course that I have to activate a couple of things, at least when we animate, we usually operate NURBS curves. So I want to click
on this curve icon here in the selection mask. And now when I drag a
selection, the viewport, I can only select NURBS curves
if you don't believe it, you can create a cube
in there and then drag a selection and you see that
the cube won't be selected. This is pretty useful
for animators. In fact, I don't think you
can work without it in Maya, at least with this
selection mask on. So only curves I can select all the curves
I want to animate. So we stood your library open and with the Panther
folder in front of us, we can click on the plus icon
on the top left corner of your library and go for
something called mirror table. And you see that Indian
suing window on the right, we are asked for in
mirroring plane and for some left and
right side token, we're going to need to
see what that means. If I grabbed a random
controlling the rig, you'll see that the
naming convention is name of the rubric, colon, name of the control underscore, capital letter
indicating the site. So this is the side token
which is underscore capital L. If we grab an opposite control on the right-hand side
of the character, and these tokens are always relative to the
character itself. You see that we
have capital R on the left and right side tokens. We have two input
star underscore, capital L and capital R star means whichever named
the control has, which is followed by
the token underscore L, That's going to be
the left side token. And the same goes for
the right hand side. For the mirror, we want the
mirror to go from left to right or right to left to understand on which axis
the mirror we'll operate, we only have to go to the bottom left corner
or the viewport in Maya, you see this is the axis box and with the character
being frontal two, as you can see that the x-axis is the one pointing to the
left of the character. You can see that an
invisible mirror axis cutting through the half of the tiger would necessarily line up with the y and z axis. The y and z in fact, is the correct mirroring plane. And as you remember from school, a plan is the geometrical
entity defined by two axis, in this case, y and z. As I said, I'm going to give the mirror table and
name called say Panther. Then I'm going to select all of the controls and then
going to click on save. Maya will ask whether I want to store a thumbnail, which I can. And at the end of a short wait, I will have my mirror table. Now let's see if that works. I will move one pole
to the side, say here, than in the mirror
table settings I will select as an option
left to right, and I will hit apply. And you see that the left pole has been correctly mirrored. That's not bad
considering it's for free and it took us
only a few minutes. I will try that with the chest
to see if that's a thing. You see that the chest
mirrors as well. So it seems to me that we on to something and then the
mirroring seems to work. Of course the sailing is
not always that smooth, but now I know this
works and this is going to stay with me for the
duration of the project. In fact, in production, you'd normally receive
mirror or tables or you can create your own and share
them with other animators. I have saved this file as anime panther walk to rig set up so that they will remember
this is the scene in which I have done the setup. And another thing that
it would be worth considering is whether we
will need selection sets. If you think of it, the character
has plenty of controls, so it would be great
if as we animate, we will create selection sets to select entire chunks
of the character. This is something we
will do as we animate. But just to let you
know, in uninvolved, there is the possibility
as well to make a selection set and select
the opposite control, which of course makes
animating a lot faster. Now if you think of
it, this means that we have references
that we understand, including from different
points of view. We have devise a strategy
on how to operate this rig so that it already
behaves the way we need it. And we have a solution
for mirroring poses, which is essential for an
animation of this kind. Which means we can move
forward to the next step in which we will actually
create the key poses.
6. Animating the hips and hind leg: Image plane, image plane
attributes grab the image blame. And in there, in the frame
offset, we input 34, that should move the whole
plate 34 frames to the left. Now let's do the same with
the other image plane. And now you'll see
on frame one we have the first pose that
we marked earlier on. Then we want to click on
the settings for animation. The little men running away from the gear in the bottom
right corner of the screen. And on their playback speed
will make sure that we have the playback speed set to
24 frames per second, x1. That should ensure that we
get real-time playback. Well ladies, that
ease as much as Maya and your computer.
Let you do that. Let's make the
timeline shorter to say about 73 frames for now. And let's start posing
these character as far as the pelvis is concerned
in the contact pose, it is not at its maximum height. In fact, you see we
have an upwards in there and that's where
the height is four. So in here, I will just
lower the pelvis ever so slightly and then it will move to the bank, the left leg. And I'm not going to fully extend the leg
because what happens after the contact is that
the leg extends even more. So we'll give it a
little bit of slack. Also sees the left leg is going to the back,
probably the pelvis. We'll rotate a little bit
to favor that motion. As far as the right
leg is concerned, the right leg as
they move forward. And that looks indeed like the maximum extension
forward for these legs. I can't exaggerate
as much as I want. One thing I can
certainly do is to roll the pelvis down to favor the
contact of the right leg. When you see that
your control no longer lines up with the
geometry of the leg. That's when you know that
your overstretching the IKE and limp a lot of breaks also
have stretched mobility. You can grab the IK
control and increase the stretchy ability there so that now you see you
can stretch the leg. I can also do that. I think in fact, I will set
both legs to be stretchable. I am not planning to
abuse this feature, but I'm certainly blending
to take advantage of it. We want to be able
to orient the knees right now it's very difficult
to know what happens. But for instance, if I check
the front references there, if you see that the muscle
of these sides of the pelvis since to point out after the contact and
before the next one. So maybe I can keep the knee in here a little bit and have it out instead on the right leg. Let's also create a plane on the floor just
so that we know whether we are placing the feet on the floor or
somewhere else in 3D. In my opinion, it
is a good idea to sync your character a bit
deeper into the floor. And I can do so by grabbing the master and just
lowering everything. These will give me,
if you think of it, a better sense of contact with the floor if you compare
the before and after. The after, certainly
looks a lot heavier. How much you can sync a geometry into the floor Depends on the camera you're employing on the project your own and
are a number of features. Of course, if the camera
were these clothes, I wouldn't be able to
sync the pole that much, but we have a distance more similar to this one you
are seeing right now. It looks okay. I
think it would make sense to save
selection sets now. So I will grab all of the
controls of the left leg, including the pole vector. And in Studio library I will right-click go a
new selection set, and this will be B
underscore left leg. I'll save this, capture
a thump y-naught. And now every time
I click on this, I can select the selection set. If I was working with running, but I will be able to select the opposite set of
controls much faster. Of course, in here I'm going
to manually select it. So let me right-click
on studio libraries, save the selection set. This is the back right leg. And now every time I double-click
on one or the other, you'll see I get my
selection to work. So I will set a key on both, and I will set a
key on the pelvis. Then I will find the
opposite contact, which happens at frame 15. I will select all controls for the hind legs and the
pelvis, set a key, and then using those
to your library, I will grab the mirror
table and as an option, I will just swap the pose. And once I hit Apply, I will get the precisely
mirrored pose. I will hit S to store the key. But in fact it makes
sense to enable auto key. In the bottom right corner
of the screen you see this icon with the two
arrows changing one another. That's the auto key. Let's set it up so that
every time we move a controlled for as long as the
controller idea had a key, it will get another one. I did the two extreme
poses because this way I get
interpolation for free. In the middle, you see the character is half
doing what I wanted to do, which is not bad at all. Since once the character
will move for space, it will move linearly for space, I want to make sure that
the forward curve of the food is set to
linear as well. This way the food wants
slide in the graph editor, I will just set the
curves through linear. If you're unclear as to
why we set it to linear, recommend you watch my
walk tutorial at any rate, we will check this
lighting feet later. So now we have our first motion. Remember the story
after the contact, the pelvis went down. So we want to create down as well on frame for for instance, I will just lower
the pelvis down. Please notice I'm using
world axis in this case. And since in the
down the left leg is meant to be
extending even more, I am going to move it to the bank by how
much you will ask. My suggestion is for the
time being to just cross compare the speed of
the left and right leg. Make sure the forward
motion is linear and make sure that the speed
at which the left leg goes back is similar
to the one on the right leg so that they both move to the bank
at the same speed. This way, when we will
move the master forward, they should not slide. Or at any rate, it will
be easier to fix them. There you go, and
you see they move to the back together
at the same speed. I guess it will make sense for the pelvis to rotate a
little bit towards the leg, which is extending
in order to favor the extension from the front
view of the reference, it seems like the pull vector of the left leg could
even be pushed inside. We'll try that out. Now animating our character, which is so dark, is a bit difficult
because you do not get to see very
well the geometry. So you can go into
shading and uses the default material
and then maybe enable wireframe
from the time being. This way, you will see
the geometry a lot better after finding the down
we have the kickoff pose, which has massive extension
of the leg even further, which makes me think
that I'm already pushing my leg to
match to the back, but I don't think it
makes sense to do the kickoff yet because
if you check the pelvis, it goes down towards
the down and then towards the key
coffee cans backup, but it keeps moving
up until the up one. Which means that if
I do the app first, it will be able to
zoom the speed on the way up from
the interpolation. So I will take care of the app first and I will raise also, I can't ignore these
beautiful line of action that I have on the
top side of the spine. So we'll try to get
to that by maybe rotating the pelvis
clockwise from this view and lowering the
middle control of the spine. And I can lower and rotate
the middle of control until I get to oppose that looks more or less like that
in the reference, I will hit S to set a
key in there to try and re-create the same
beautiful line we can try and
rotate the pelvis. There's a controller up here which is called pelvis fixed, which also can give
us a little bit of leeway to control the curve. And we can also operate these round control
in the middle to create a curve that is a bit more in line
with what we need. We can also rotate it. Of course, it would be a bit too early at this stage, however, to stay here and refine
these controllers, since we did, since
we don't even have the main poses and we
didn't even pose the chest. For now, I will just focus on the hind parts
of the character. And if I go and
check the left leg, there's a moment in which the left leg is
supposed to kickoff. You see there for the pelvis, I have done the down pose, the app one and I have
of course the contact. Now there was an app to
pause if you think of it, the one we now have
it framed for teen. And you see that between
up one and up two, there is very little difference in the height of the pelvis. So I definitely
want to have that. And to get to that pose, I will use the three machines, but I want simply reusing the twin machine on
all axis instead, what I'm interested in is
the height of the pelvis. So I will grab which axis is
responsible for the height, which is the y-axis
for this control. And I will use the twin machine to give me a pose which is a lot more similar to
the previous pose. This way you see I will retain the rotation
of the pelvis, the interpolation
I had earlier on, but I will keep the
app that I need. Also if they track
the base of the tail, it seems to me that the
pelvis is rotating almost clockwise if from the point
of view of the cameras. So I will add a little
bit of that rotation, which if you think of
it, we will facilitate the forward reach
of the hind leg. In fact, that will go as far as checking the contact pose. And you'll see that
as I spin the pelvis, I removed the IK stretch
that was in there. Whenever you fix a contact pose, it makes sense to fix the
opposite one as well. So if I am twisting
the pelvis downwards, I also want to make sure that at the beginning I have
the same twist. And you see that the
moment I do that, I get a much more dynamic down transition with the pelvis. That is simply speaking, a lot stronger than the one I would get with a
simple translation. It's a bit too exaggerated if compared to what we
have in the reference, but we can always
reduce its intensity. Now for the pelvis, we
have contact pose down, pose, one up to n, the other contact pose. That's it for the pelvis. We don't really need to
do much else for now. I would say now that
the pelvis is sorted, let's move on with our
strategy and we want to find key poses for
the hind legs. I will start with left one. Of course. The left one starts with a contact and then
goes into a downpours, which we already made. And then the next one we know
about is the kickoff balls. Now you'll see that in this case when we have a kickoff bows, they don't really have
a pause on the pelvis, but that doesn't matter
too much for now. Let's move the leg to the back. It would be great if the leg we're moving at the
same speed to the back, they will feel
otherwise the food was lie a lot more easily with turn these tangents to linear
and you'll see that I do get the leg fully extended, but it's also fairly stretched. If I remove the stretch, these will be the actual
length of the leg. This is a red flag to
check the reference, it is hard to notice, but while on the down the food is actually
fed on the floor and then it bends as we
rolling to the kickoff, the food is actually straight
now and it's only with the tip of the toes that we are making contact
with the floor. It is clear from these angles, from the front, this
is what's happening. While we did get the right
timing for the kickoff, the toes are not really in
the position they should be. And we can try solve this
by rolling the food. And you see that just
by rolling the food, we can control
these a lot better. In fact, my suggestion
would be to grab all the controls of the
food, including the toes. Set a key at four, go to seven, set a key, go-to 15, set a key so that we have a key for
everything in there. Then let's play with the other controls we have
available to see what they do. This one could be handy. Then we have another one here. This one not so much. So there's one should be
the pivot around the tip of the toe and this one
is the heel pivot. That means that for
this particular rig, you could use the
roll if you wanted, but you could also use
the individuals who were all controllers
that we have in here. This one in particular
looks pretty useful and you see we can still roll from the tip If we need for now we'll use
the embed role. And then I will create
a little bit more of a dynamic pose with the toes. And it would roll down
the first phalanx or the toes and then
grab the second, third and roll them back. It's Ziff, the toe was still contact in the floor and it
was flattened the floor. This should give
me a little bit of a better idea of
contact with the floor. I can do the same with
all the other toes. Toes in place. We can check if there's anything
that needs to be doing. We can maybe use
the tweeter here on the pelvis to adjust the line a little bit
if we feel we needed, maybe I could push it a
little bit to the back. And even though we're Who knows, you see that there is a
moment where the legs snaps. That's a Nikesh nap. You don't want to
have that kind of stuff unless you can control it. And with this particular rig, we have a device
called anti pop, which I want to see if it works with the anti
pop set to ten. You see that the way
we go from stretch to not stretched is
actually quite okay. So this is something I will
probably keep in mind. I will set a kiosk
on the tweeter here. And at frame one, I will
0 the tweak air out. And the same thing I
will do on Frank 15 when I have the
opposite contact. Now for the left pole, we
have the contact down and they kick off pose to be
fair in our reference, the kickoff pose does not
have the toes on the floor. It's just the tip of
the toy in there. So in here we could have
already lifted the fruit. Now moving on to the next pose, we're going to look
at AP one and up two. And I want to start
from up to we truly something passed
the passing pose. And I start with these
because the idea is that hopefully I will get
enough interpolation to make the pose work. And I'm starting from this pose because hopefully the
interpolation that, that will regenerate
in the middle will be useful as a base
for the next pose. I will just lift the
leg 0 out the role, 0 out the pelvis tweak. This is a bit tricky
because we don't have enough resolution here to understand which pose
we have in here. We can only assume this
is kind of straight. And if I look at these new sets of reference I found on YouTube, you see that the lower
part of the leg is rather straight and it actually does
some sort of banana shape. So you'll see the quality
of the reference really does make the difference
between emission, which is the fruit to the original material and one that maybe is
a bit too free. The like, I will probably try to straighten this leg a
little bit and I will use also the additional
controls possibly to try and get it a
little bit straighter. And then I will grab the fingers controllers and I will just 0 them out to begin with and roll them down,
something like this. I guess I will set a key on old controllers taking
part in this pose. And I will also
make sure to bring the knee out a little bit. One thing that is very important for the up pose of
both humans and quadrupeds is the distance
of the PO from the floor. We normally do not
leave the feed that much because that would
consume a lot of energy. So I'm going to lower
down Depot a little bit. Now that I have the second pose, I can go back in the middle
and find the up pose, which of course is
fairly different from what we have in the
interpolation unfortunately. So we can't really use it. If we check the line of action, it looks a bit like this. This looks like what
we have in there. And these picture
from the front view seems to suggest
the same curvature. Indeed. Let's get to that. I will first of all
zeros out the row, then lift the food, rotated, wrap the toes and rotate
them to the back. Another thing that happens
as you lift that toe off the floor is that there
is no more weight on it. And if you compare to's which
are supporting the weight, say those are the front leg. You see that they are much
wider than those at the back. Of course, in this case, some of these differences
due to perspective, but we can use these yellow controlling in front
of the toes and use the spread attributes to get them closer and closer together. Between 710, the leg moves
forward quite a lot. You see it goes from fully extended to fully bent in there. I want to make sure
that in my animation I do have the same amount
of bending there. By enlarge, we seem
successful at it. And just by scrolling
with the period and common keys on my
keyboard. Do you see? I can find the key
poses of my walk, at least for the
left-hand side leg, which is not bad at all. Considering we spend
only a few meters to make this thing work, we need to do the
opposite leg, of course, but we have to devise
some sort of strategy. I want to try animating the full loop of the left
leg and maybe mirror it on the opposite side and offset that
animation in time. I want to see if
that's a fast method. I will start by
mirroring the pelvis. So I will shift left mouse drag, select all keys between 413. I will right-click on
them and hit Copy. And then I will go to
a free empty spaces after 15 because 15
is the contact pose. So 115 would be the
same but opposite. So we'll go 123 spaces
after frame 18, I will hit right-click
and Paste. Now of course, these
is paste in the pose exactly as it was
on frame for it, but she's not exactly
what we need. But remember we have the
mirror table is through the library so we can
grab Panther mirror, set the option to swap, select the range and hit Apply. We are greeted with an error and this error complaints about
namespace being wrong, these happens and I made this on purpose to show
you that you have to keep your eyes open
because depending on certain situations your
namespace may change. We want to operate
these mirror tables from the current selection, not from the namespace. I will try again, select
all keys between 1827, swap them, and that
seems to have worked. And then two frames after 27 on 29 IN going to paste frame one. The fastest way I know to
copy a keys to middle mouse, drag it to the
destination and then hit S on your
keyboard like star. So we know that a loop goes between 129 and the deposits
need to be exactly the same. This is not the case
now for the left leg, but we're going to fix
it for the time being. I can set the time
slider to 29 anyway. And if I hit play, I shouldn't have them
loop on the pelvis. And you see already there's
a bit too much up and down, but we're going to
sort that out as well. The first thing I notice
is that between 1315, The pelvis is going
down a bit too fast, so I can maybe grab the y curve and grab all the
keys that represent that pose along the timeline and just lift them up using shift
and middle mouse button. If you incur in a
stretch of the limb, you can just grab the
tweeter and move it down. However, we probably want
to have the anti pop on throughout the whole
duration of the animation. And at 15, I will just
lowered the tweak or ever so slightly to get to a
known pop situation, I will also duplicate the posts between
115 for the weaker. Another thing that happens in
the references that between 14 dependence disease
indeed going down. But then you see that between
45 and a little bit of six, the pelvis is I'm staying down. It doesn't really
move up that much. It starts moving up a
little bit on frames six, but otherwise it stays
down for longer. And this is something
I can fix by keeping the pelvis down on frame six and maybe
you're rolling it a little bit
counterclockwise. This way the Federalists,
we go down between 14, stay there at five and then it will start rolling
back up at six, just like in the
reference when it will move up quite a lot indeed. And probably I can go and
grab the top point of this app motion
and just lower it ever so slightly in
the graph editor, if what I'm doing in
the graffiti story is a little bit
too fast for you. I recommend you watch
my walk tutorial. Now of course, since I've
added a new key, frame six, I have to copy this key, go to frame 20, paste the key and swap the key. Anything I do on the first
half of the animation, which is between 115, needs to be mirrored in
the second half or no. And you'll see that
right now we have the up and down
motion of the pelvis. The apps are a bit exaggerated if compared to the reference. So we'll go into the
graph editor and just lower them even more. Now I want to animate the
left leg moving backward. The first step I
probably want to do is to make sure
that the leg loops. So I will middle mouse drag
frame one over 229 and hit S. This way I will make exactly the same pose on 129
for the left leg. And in fact, I should
be doing the same thing for all the controls
of the left leg. Here my contact is a bit off because the contact
of the reference really has the heel on the floor almost and they
told us in the air. And so maybe I could
use the role and just roll the food back a
little bit on the heel. And maybe I will
create a little bit of variation in the toes
just so that they won't be perfectly aligned
to one another and I will keep the
spread tight for now. Also, if I wanted to be a
little bit more refined, I could rotate the fruit a little bit to the
outside and maybe I could draw it a little bit so that it doesn't land
perfectly flat. Of course, these means that
I left the fixed frame one. I can also add a
little bit of rotation parallel to the floor
just not to keep the food perfectly straight and I can rocket a little bit to the side just so that it doesn't lend fully flat two frames
after the contact, the foot is flat on the floor. So I'm going to grab
the graph editor, make sure the movement of the foods to the Becky's linear. Remember this will
come in handy later on when I will want
to fix this lining of the feet and I can't reset the position of the toes just by duplicating
the first key. In fact, I can roll them even further into the
ground, maybe not. The last following
sees the clouds. I will keep them out and I
will make sure that the food. It all goes back to 0
and the rock goes to 0, which makes me understand
that I didn't really need to rotate the toes. This is a great lesson that
reminds us that first of all, you want to fix
the route control, in this case the pole
and then the limbs, in this case the toes. Otherwise, you risk
fixing the toes and then having to fix
them again another time. Maybe I'll twist
the toes ever so slightly just so that they're
not perfectly straight. And then they will look a
little bit more natural. And then the fruit
will, simply speaking, slides to the back and repeat
the loop. There you go. There is a problem
with the knee. Of course, you can tell that the leg is snapping
at the certain point, but that's the
last thing we will probably take care of for now. What we want to focus on UC is the same kind of motion
overall in terms of timing. And I can tell that
the up and down, it's still way too much. So I am going to take the Bailey's upper pose and that would reduce
it a little bit. And then I'm going
to take buff up one and up two and lowered them. And that may be working
a little bit better. There's also the problem for which these middle
of controlling here is animated and it goes
from one post to another. So maybe I will
delete frame one for this control and just
keep for standard form. Now, this thing will certainly
look back there in steps. But if you want to have
a look at it in step, you will have to key
every single axis that you have in
here in the pelvis, otherwise they won't
show up in steps. I will hit S and
comma and period to go for the keys and release
a key for every channel. And now I can right-click
on the timeline. Go enabled other steps, preview, and I can press Play. There you go. That's
my animation. But you see the problem is, since there are
no breakdowns for the food on the way back, it becomes fairly difficult to evaluate these kind
of stuff in steps. One thing that you could
do to mitigate the problem could be to select both
the pelvis and the food. And every time there is
a key on the pelvis, you add a key on
the fruit as well. These will create keys that
you don't need these guys, but at the same time it
will let you appreciate you're blocking and step
preview a little bit better. Which solution is
better is hard to say. It depends on your situation. I have to say that for
these kinds of cycles, sometimes it doesn't really make sense to add keys just
to see them in stepped, in my opinion, will go
back from step preview. And I would want to have a
look at this from the top. As I said earlier ONE, having a reference from
the top would really, really help you a lot
because it makes you understand how
things are working. But in this case
we don't have it. So I have to kind of make do. One thing that I don't like is that the pelvis seems to stay relatively straight apart
from sliding side to side. Whereas if you think of it, the control lets you do quite
a lot of rotation there. So I'm wondering if
I'm not missing out on an opportunity
here at any rate, you see that from the top view, my apparently doesn't
really stay straight. It actually rotates
left and right. And a way to make it
look a little bit more realistic is to
add some left and right motion so that as you
go down into the down pose, you can push the weight a little bit more onto their right leg because after all it
has to move on to the right so that the
left can lift off. And in fact, we can delete
these keys in the meantime. So the pelvis will slide onto the right as the white
is on the right food. And it will stay there
for a little bit longer as the left
leg lifts off. As the left leg lifts off, then the weight can
center again itself. But in this case, I want to delay that a little bit and then it will start to re-center
and start over again. In fact, maybe I could control, see these keys from the graph editor go to
frame a dean and Control V. Then the problem is that in the second part
of the motion, the penalty is actually needs
to be on the opposite side. The easiest solution
to this problem is to select the keys going into the value box or the
growth rate or the one next to the time and type in, Multiply equal minus one. In practice, we are multiplying
the values two minus one, which means we are
inverting them. One thing to keep in mind is
that when you invert values, you're actually breaking
the tangency here, which is a bit silly, but
that is the way it is now. We also have some left and
right motion of the pelvis. It doesn't look amazing yet, but we'll improve it by
the end of the animation. And if you think of it
now we have taken care of the blocking of the pelvis
and the left hind leg. We won't be even looking
at the right leg for now because I
think it would make sense to take care of
the chest beforehand and sort out also one
of the legs in front. A thing that we will
do in the next video.
7. Animating the chest: If they're doing the
poses for the pelvis, we can ever look at the
poses for the chest RAM. And there's a little
trick you can try to play and see if it works. If we look at the
video reference, we can almost see the rotation
up and down of the body with the chest and the pelvis alternating in the
ups and downs. And I made a few lines through underlying the difference
to see what goes on. You see for the pelvis, this is more or less what happens in terms of up and down. And if we check the chest, you see that the
movement of the chest is alternating that on the hip. This is a general observation. You shouldn't take this as a mathematical
alternation of poses, but it's very close to that. Maybe we can try play a
trick in here just to see how you can reuse
animation in 3D. If you observe the
references up close, we could maybe grab the pelvis, paste It's an animation
onto the chest and offset its animation just
to see how it looks like. And if this stuff is usable, I'm going to select the pelvis, double-click on the
timeline, right-click, copy the whole animation, then select the chest. Find a moment in which
the chest is down, say frame six, for instance, paste the animation
on frame one. And now if you look at
it, you have the chest and the pelvis moving
at the same time? They move one-to-one. However, I could grab
the whole chest, move it either no, six
frames to the right. And now you'll see
that the chest and the pelvis are
alternating one another. Of course, these relies
on the fact that your pelvis animation
is quite clean. I'm just showing
these to open up the mind to new possibilities. Sometimes it makes
sense to just do the blocking and do this
blinding on top of the blocking. Call it a day. Maybe sometimes for a character that is far away
from the camera, it's just faster to duplicate
keys and offset them. In these case, we're missing the first key, but
it's very easy. I mean, we have a key at 29 now, we just need to middle mouse, drag it to one and press S. And now we should
have a full loop. And you'll see that we
have a full loop in which the chest and
the pelvis alternate. So we are reusing
animation quite actively. The movement of the
neck and the head for now are a bit distracting. So I'm going to right-click
on the geometries, select the faces of the neck. And we've FCF either the tool I've introduced in
the previous video, I can actually
right-click and add the selection to the headset. It this way I can hide and
show selection as I need. In fact, I cannot the gums, the teeth, and the
eyes, and the mole. So this way I can evaluate the animation without being
distracted by the head. Similarly, I could do
the same with the tail. In fact, when I
animate them a shot and I know would be
spending several hours, if not days on it. I usually save selection sets. So this is going to be the tail, which I would be able to toggle the visibility off at real. Now I can check whether
the motion does line up. And you see that,
and you see that of course it doesn't
line up perfectly. So if we track the upper
body line between one and for the bottom
line stays started there and then it
starts going down. While in our case, it kind of moves up
and then it goes down. So maybe we can set a
key on the chest that frame for open up
the graph editor. And I can just grab all the keys which represent these
upper portion of the motion and just lower them so that the body won't
lift up anymore. And then at six, when the body is supposed
to go down a bit faster, I'm going to grab the
respective keys and just lower them down at 11. I can maybe keep the
body even lower, then it will come back
and it will start again. Now please notice
that the keys that we have mirrored have
broken tangents. That tends to happen
with mirroring tools. So I will just set
them to auto for now. And now that looks maybe
a little bit better. Let's have a look at it
in the perspective one. And while the up and
down is a bit too much, I think as far as the work. In fact, I can maybe grab all the poses and hitting
R on my keyboard, I can middle mouse shift scale. Then from the bottom you'll see, and I will scale the
curves proportionally. Of course, this is
just one method. And to be fair, if you only
have to do free for poses, sometimes it's just
faster and more precise to do deposits yourself. But I wanted to show this technique because
it's fairly useful. Please notice these
corner between the upper arm and the lower arm, and we don't really
have that corner there. We have to do
something about it. I think in general, we could
grab the chest and just move the whole curve down lower. And you'll see that now that
we did that we are matching the curvature of the
spine a lot better. Also, we can translate
the clavicle to the back and we can maybe
even rotate it a little bit. There is an intersection
there between the elbow and the chest. So we can grab the pole vector
and move it out a little bit unless you're working we were fairly sophisticated rig. You won't be able to avoid all the intersections between the front legs and the chest. Also think that possibly I could rotate the chest a
little bit forward. And you see by doing that, I have two effects. One, I get a better angle between the top of the
arm and the bottom of the arm to I removed this bulge that he is at the bottom of the chest and everything
looks a lot better. So I will hold down E
like ACO on my keyboard, left mouse button, and I'll make sure I look at gimbal axis, the only true axis
you have to look for when you work
with animation, because these axis is the true representation of what you see in the graph editor. So once I know it's the chest axis that can
pitch the chest forward, I will just grab the x curve
and shift middle mouse, drag it up until I get to a pose I like a
little bit better. Now let's have a
look at the legs. One thing that you
have to consider and then you often forget
when you start animating is that in real life we tend to
keep the feet pretty close to one another
when we walk and so do the animals in a
lot of instances, you'll see that
in year that pose are actually pretty
close to one another. So one thing that I
can do is already moved the pose closer to
one another in the front. But before proceeding,
I would just ask you to listen to my reasoning
for a capital of minutes. I would of course have
to move the leg back, generate all the poses that
I see in my reference. And of course take care of clavicles and not
the relative angles between the various bits of
the arm that is granted. Also, they have to
keep in mind that the hind PPO tends to land on the last known
position of the front one or in a nearby RAA anyway. Finally, there is a
technical consideration. After animating the full
character walking on the spot, I will have to move
the master forward, which means that the master
will move forward linearly. And for as long as the
feet are on the ground, that will have to move backward linearly by the same speed so that there will be no
apparent sliding occurring. However, if I were to
manually post the front pole, there is a high amount
of probabilities that I will make a
mistake and I will introduce some sliding
before proceeding in this new and they were I
would probably have to think about it for
a couple of minutes, which means I will see
you in the next video.
8. Posing the front legs: Let's have a look at
the front leg instead. One thing to keep in mind is that we will animate the legs on the spot and
then we will grab the master and move
the master forward. The feed will have
to slide back by the same amount of
master slides forward. It is important of course, that buffer feed
front and back will move backward by the same speed. It's going to be
difficult to match the speed unless we
play another trick. That trick might well be the same we've played
with the chest. We select the whole
animation for the hind food. We copied. We grabbed the front foo
where you go to frame one and we paste the animation. Now if you think of it, both feet are moving
at the same pace. These is handy and we
right-click on the timeline, go paste, paste, connect. And now we have exactly
the same motion on the front and hind legs. Now we don't need
now we will not need the same exact motion
as the leg lifts off, but we certainly
needs the same speed as the leg moves
through the back. And we have accepted that. Now of course, the problem
in years that they are not meant to be moving
at the same speed. So maybe I can't identify
the moment where the food goes from being flat
to rolling forward, which is between 47. And I wanted to check in the
reference when that happens, then it happens between 1013. So if you could frame
for fall over a frame, 106 frames the right, then we should be able to get more or less the same motion. So I'm going to open
the graph editor, grab all the curves
in the stats for the time I'm going to
type in plus equals six. And now frame four
became frame thin. And between 1013 we
have the famous role. And then we move forward. So that gives us, you see the same offset we have in the
reference for which it almost feels like the
hind leg expulsion forward the front one. Of course, at the
beginning of the motion, there's nothing
going on in there, but nothing is hidden to the person who knows
where to look. So we're going to grab
all these curves, make sure that in
the graph editor we have infinity set to on and then we're
going to go under curves, pray infinity cycle. We will have the
animation loop anyway. And now you see that we have the same motion forward and
you see it was very quick. We didn't really have
to do much guesswork and the gain is not
really that perfect. But did you think of it in
here we are trying to explore modern workflows using a
walk cycle as a pretext, could be animating
anything else indeed, but we're trying to understand the philosophy of working here. Of course, one thing
is the workflow and the other thing is the creative
value of the animation. The problem is that in order to unlock the creative
value of the animation, you need a strong workflow
to support your work. As far as the creative
aspect of it is concerned, you either need on his
feedback to grow or you need yourself to be very honest and they're attentive
to what happens. Now I can go to frame
one, set a key. Be careful because you
see when I said a key, I am actually
creating a tangent, which is not the same way
was when I was looping. So I have to remember to
linearize this thing. And now we are in
a perfect loop. We move to the back and the same exact speed we had
on the back leg, that should make things
a lot easier for us. Now that we've got the technical
problem out of the way, we can focus on the poses. On frames seven, we have this
kind of contact plus 11. Thing to notice is
the shoulder blades, the pattern on them
is actually quite useful because if you check what happens between frame 17, you can clearly tell how the shoulder blade
moves to the back. In fact, if you
check the y curve of the chest in here
and move it up, you see it was already
moving in that direction. And remember this
curve was something we copied straight
from the pelvis. By the way, we want to grab the clavicle
controlling here and maybe we are going to
lift it up on frame one because I see there's
a big bumping there. And I will also move it a
little bit more forward. And then I'm going to go to
the next pose of the food, which is on frame seven. Actually, I'm going
to find out first what's the most extreme
posted the back of the shoulder has and
it seems like at around ten we are the
third, there's the back. We also oppose all the
food on frame ten, so we'll go to the
clavicle and just move it to the bank
and low quite a lot until I get to a curvature which is similar to what I have
in the reference. And I'm going to go to
frame ten, set a key, and see if the
difference between the reference and
mine is similar. I think I should lift
up this thing a little bit and maybe Turing machine it a little
bit more to the back. You see that now it helps
the leg slide bake. That's really handy. Then let's see what happens
to the leg between 1013. Between 1013, we have a
beautiful reversal of the curve. You see that it is
really quite beautiful. So I am going to achieve the
same effect using the row and this row controller
here, the independent one. There you go. That should give me, you
see the same curvature, but you see there is no key on my raw controller, so we'll. Make sure that there
is a key before at ten and then at 13 I will
roll it with this method. You have to be very careful. You want to remember
that we didn't really set key on every pose yet, and we're not even
sure what was do that. So it's very easy
to forget that you didn't use some objects on 13. You see that as we
roll we could actually dig in deep into the ground. So I'm going to lift
this up and there is a double inversion
or curve in there. You'll see that there
is an inversion of curve in this sort
of ankle connection. But then between the
East and the toes, there is another
inversion there. So I could maybe achieve
the same in here. So I could grab all the
controls for the toes, set a key at 1013, and then just first roll them in a little bit to remove this
bulge that looks a bit like a boot and then de-select the root controller
for the toes and move them forward to create
that inversion of curve. Now the thing that is
happening in years that they are very
parallel to one another. So I can grab the master
control for the doors, set a key attend and one at 13. I said a key at ten
because I don't want the modification
I will apply to frame 13 to be affecting also everything that happens as the food is on the
floor in there. We'll need a different
posts for sure. And at 13, I will just use the spread to pull
the toes together. Now since we are looking
at it from the front view, you'll notice how
there is some sort of curve in here from
the front view. So the food is not perfectly straight legged
using my 3D model. And I want to achieve that. Of course, I could rotate
the foot controller in here, but now it would have
to deal not only with the translation but with
the rotation there, which could make things a bit complicated when we
spline, instead, you will usually
find some sort of twist or a rock
controlling your food. In this case, there's
the ROC control then I can use to
achieve the same effect. But you'll see that
the line here on the front leg goes almost straight while mine
sort of breaks, I can use these additional
rod controller and rotate to achieve
the same effect. And this way you see we get a lot more organic posts and I can push it even
further. Why not? I will grab the pole vector for the elbow and maybe move
it a little bit closer. Now the pole vector
for the elbow is moving with the
food control. You see? I don't really like
that too much. So we'll set the
follow through 0 so that it will be
independent from now on. After all, this is a loop. I don't really need it to follow the link and then
I will move it in. You will notice that unless the rig is very sophisticated, you won't be able to get rid of all intersections we will have between the legs
and the chest area, for instance, we're just
going to leave with this. This is just a workflow with the administration
in practice. So again, key on 1013 for the pole vector and we
have our inversion. Now we will move forward
until the contact, the contact happening at 21 is select all
controls for the toes. The select the food
controller there. And I will just
paste then over 21. So we'll go back
to a default pose with the toes on the floor. They're not entirely
on the floor. And that's because
probably the sum rule. And in fact, if I
0 out the role, you see that we are there also, please notice that I think
that we have the toes and year and then we go up
relatively straight. While in here we go First
flat and then our substrate. In here, I want to also 0 out the roles for the
ankle and you see that pose becomes
immediately lot better. I mean, a shape like this one should already make
some bells ring. It's a red flag. And in fact, I recommend we 0 out the rock value as well and just adapt the pose and even
lift it up ever so slightly. There you go. Now
you will notice how there is a little
bit of a problem in that clavicle liver. But again, if we
look at what happens between 1321 to
the clavicle area, you will notice how the clavicle translate forward quite a lot. And I sure way to
double-check that is to check the
perceived distance of the neck at 13 if compared to the perceived these
things of the neck at 21, you see that the neck becomes
considerably shorter. Not that it is
shortening in real life, but it's perceived that shorter. And that's because at frame 21, the clavicles are indeed
a lot closer to the head. In fact, I can grab the
climate cool and just move it closer and maybe rotate it a little bit to preserve the line
of action I want, you see now the clavicle
would translate forward languid extent and
we're all happy there. Now I will copy the
clavicle key from one over 229 so that the clavicle will
start sliding back again. One thing that is typical of big cats is the shoulder action. You will notice that as the animal touches the
floor, we have a leg. It tries to keep the
legs straight and that causes the shoulder
blade to pop up. Look at that. We touch
the floor and then the shoulder blade is
pushed up in here. We want to do the
same thing in here. So we want to find
a full extension of the clavicle and the way up, which seems to be
happening at frame 27. And in there I'm going
to lift the clavicle up quite a lot to give me
that bump, that angle. You see that typical of the
kappa unimportant thing to check as the front leg
translates to the back. Is the kind of raced angle
that we have in year. Do we want it to be up? Do we want it to
be midway through? Do we want it to be
flat on the floor? We need to decide
what we want and they're taking our decision is the best thing you can do to push your animation forward. It may be go forward in the
wrong direction of course, but at least it will
be your decision. In here. Once again, my references
are not so good, but I can't think
that they can't assume that they've reached is going to be relatively straight. So I'm just going to
straighten it a little bit. And I think that looks okay. And then I will go to frame 29. I feel like at 29, I should probably move this
shoulder blade a little bit more to the bank and
a little bit lower, just because they're free, just because they're freely leg looks relatively vertical and the one in the reference doesn't
really look like that. Then remember you will
have to copy 29 over 21 every time you fix
one end of the loop, you have to copy it back to the beginning or
the opposite end. Now I press Play and
you'll see that we start to have something
that looks like a walk. If you think of it, it didn't take as long
to animate per se. The longest part was indeed the setup and explanation
of the workflow. Let's take greater care
of the kickoff bows. First of all, between 1013, you see that the shoulder
blade is going down noticeably in the reference
in desire of the screen. I want to do the same and
lower the clavicle even more. And then I want to go
to the front view. And after the kickoff, I want to see what
happens to the leg. And you see that
the front leg gets straight immediately and you see that front the front view, our front leg straightens
up immediately. But from the front view or
references a beautiful line of action there any wouldn't be
amazing if we could use it. I am going to first rotate the poll so that we get to
the same line of action, then grab the role,
rotate that as well so that we get the same
line of action as well. Then I'm going to grab
all the controllers for the toes and roll them to
the back there you're, now if we go to the front view, you see that he starts
to look very organic. In fact, I could probably
push it even more to the center and have
the elbow as well, a little bit more to the center. You see how important it is to check the references from
different points of view. Otherwise, the risk is
that your 3D animation will look like it's going
on a straight rail. Here. I could maybe rotate the
clavicle little bit to favor the orientation
of the arm. And I will go around
and check if I can do the same for
other poses as well. That is rotate the
clavicle to get to oppose, which is more similar to
the one in the reference. Then you please notice
how the clavicle works. The reason weird rotation
between 2629 with the clavicle, which I want investigating
the graph editor. And you'll see that in year
the curves are crossing. Now, this is not
necessarily an issue, but when you have two
poses that look very similar and you have
crossing curves very often. Or you see something happening in the viewport,
which is strange. You might benefit from
selecting the curves and running a non-linear filter
on them and see what happens. You'll notice there is
some weird rotation between 2627 in my case. And this is because
this is a very basic rig at the end of the day. And the clavicle rotation
is sort of automated, which is not really
helping here. How, however, I can grab the
food controller and there is an attribute in the channel
box called Leg aim. I could play with that
and see what it does. And you see that
it seems to sort out the rotation
issue a little bit. It is in fact the activating the self rotation
of the clavicle. So maybe able to just remove
a bit of that value there. And similarly at
29, keep it low. You see that reduces the
problem quite a lot. And possibly later on I will
show you a technique to get rid of it completely
as you spline, it's still a bit wobbly, but we're going to do
something about that. We need not to worry. If we put the 3D
character on top of the reference and we enabled the X-ray geometry
in the viewport. When we press Play, you can
see that we just a few poses. We nailed the general
motion of the character, although it would
be nicer to see a little bit more
flexibility in the spine, just like we did
with the pelvis. Let's have a look at the
left and right motion of the chest as the weight
is onto one leg, we would like to chest the
translate onto that leg. And if we check the curves, you see this is already
happening because not so coincidentally copied the
curves from the pelvis. Maybe a could increase
that emotion by say, 10%. So we'll just go into
the graph editor and into the value box
I can type in star, that means multiplying by equal, which means a venue equal to. And then let's say one dot one, which is 10% more. You see that it's a very little change and willing to do to show you
It's a very little change, but it's definitely a change. And I can go on like this, typing star equal one dot one
and increase that interval. You'll see that
even from the top, the character starts
to look organic. It is not anymore
a solid piece of geometry that just
rotates up and down. At this stage, I
could indeed height the right-hand legs because I
don't really need them yet. Remember that plan was to refine the left-hand side and
just duplicate an offset. So in SEM Hi there I can assign these phases
through the right arm, would just disappear
and then again, select the hind legs, hit greater than which in an English keyboard
is Shift period. To expand my selection. And this will be the right leg. So that now I can
look at this and not be distracted
by the other legs. And in the next section
I'm going to devise a general pose for
the head and tail.
9. Designing a pose for head and tail: As anticipated in this video, we're going to set up the
general pose for head and tail. So I will assure
them back through SEM Heider go to frame one. The head and neck
system, of course, presents a unique challenge
as in its supports IK, but it follows the
rotation of the chest. We were left to play a little
bit of a trick in there, which is a good trick to
learn and it involves, of course, space switching. For now, what we're
interested in is achieving a nice decent pose. I think it would be amazing if we could have produced
these line of the shoulders with
a straight line going down to the neck, something seeming there to this one That would be
amazing within notch, Let's try and do that. Rotating the base of the
neck does not quite help, but there is some
sort of star-shaped controlling inside
the base of the neck, which I can't rotate to
achieve that effect. This is good enough
as a starting point. It's still not
exactly what we need, but you see it's getting
us quite close to the line of action we
want from the reference. Then it would grab the
head controller and just straighten that a little bit. You'll see that now we get a very similar line of
action to that reference. If we want, we can maybe grab the middle control of the IK of the neck and see what happens if we translate it
down a little bit. We can also grab the
base of the neck and rotate it a little bit
to change the shape. There you see something
like this could work. And then there is the
beautiful curve leading from the chin through the neck
and down to the chest. This one will be nice to
have in our model that line is not so graceful as
I would want it to be. There is a controlling front of the chest which I
can't rotate you see, to achieve that effect and then gives me a much nicer curve, much more similar to the
one we have in here. To top that up, there are controls on top of
the climate goals, which I can pull up to give me a sharper corner on
top of that clavicle. Now, we have achieved more
or less the same line of action in the neck
that we had in the reference for the tail. The cheapest way to
achieve these Bose is to just grab all of the
controls of the tail, rotate them down together
until we get to oppose that at the root of the tail is similar to the one we
have in the reference. Then I will deselect the controls their route
to the tail and just rotate the others back and
maybe adjust a little bit. I can even rotate the end controller is a little bit more. And you see that we'd
get to a similar pose. And all of these were
just a few clicks. Of course, maybe I will unroll it a little
bit. There you go. So now we have achieved
the general pose, but we have no motion yet. We could already
create the motion, but my plan is to generate
the motion of head and tail based on the
pelvis and chest. Hopefully without
having to sweat too much through the poses
and it would be a bit premature for me to do so now when I didn't even clean
up the chest and pelvis, the risk would be that if I animate the head and tail now, without cleaning up the
chest and Bailey's, I would end up to spend time to generate the motion of
the head and tail and then having to clean up
again had entailed from the problems that they he narrated from the
chest and pelvis, which at the time
weren't displaying yet. So instead of focusing on neck and tail in the next video, I'm going to splice in the body.
10. Splining the spine: As promised in this video, we're going to clean up
the body while cleaning up the body right now and not very interested in
seeing the leg. So I'm going to hide both
of them by using SCM. Hi there also I don't need
to see their head and tail. I keep the wireframe visible
because it gives me an idea of how things are
moving and I will start by cleaning the pelvis. One thing that I noticed
in the reference there is that the beginning of the
pelvis as this kind of bump, which as we glide into frame four levels down a little bit, Let's open up the graph editor and let's have a
look at the curves. The first thing to notice
is that in the areas where the poses were mirrored, you'll see that the tangents
are all over the place. So I'm going to run an auto
tangent on all of them. The first thing, now let's have a look at the down motion. One thing to notice is that
at the end of each cycle, the cycle needs to continue. So we want to see what happens
to the infinity curves. There we go under View infinity. We make sure that
that's set to one. And then we go under curves, pretty infinity cycle,
curves post infinity cycle. And then we select all
channels, all curves, go curves, post infinity cycle, curves, pretty infinity cycle. We go check the
translate y curve again and select a few keys
towards the end of the loop. And we press F, like
Folks on the keyboard. And you see that by
the end of the loop, the curve grinds, stands still and then
starts over again. And that's because while the curve is supposed
to be continuous, well, the tangent doesn't
quite account for repeated animation that
is not driven by keys. And thus you won't
be able to give you a nice continuous curve. By default, you can sort this problem out in
a couple of ways. One solution is
to grab both keys and beginning and
end of the loop. And then grab both tangents on the same side of the key and
just move them together. And you'll see that
that sorts out the continuity of the curves. The problem being that if
you just grab one curve, you're not necessarily
going to sort out continuity on
the opposite side, solution works, but there is another solution
that you can employ. You could make the timeline
a little bit longer before and after the beginning
and end of the loop. Then you can grab maybe the
first three keys of the loop, copy them, and paste
them over to 29. If you check the graph
editor as you paste, you will see that
this will recreate the same curve that the
cycle created procedurally. Of course this will
break the loop, but we're not really interested
in what happens after 29. And then we go grab
the two keys before frame 29 and paste, and paste them before frame one. That the key that happens right
before frame 29, that is, we were to frame
interval is going to happen by the same
interval before frame one. That means that frame 129
will still be the same, then emission after 29 will
be the same as if we use the cycled curves and the one before one will be
exactly the same. But now you will
notice that even if you mess up the tangent for the first key and the
last 129 of the loop. The moment you
apply auto tangent, you will see that the curves
are smoothing down properly. And this is an
alternative solution to manually tweaking
all the tangents. At the end of the day, it's
down to your preference, but I have a bunch
of curves in here. There really are a lot, so I can just auto
tangent them and I'm pretty sure this will
give me a decent curve. Not perfect, but nothing
is perfect, right? I'm merely finding a
compromise to spend less time on
manipulating tangent. So we have the pelvis go down. We want to make sure of course, that it goes down
at a pace that is consistent with that
of the reference. And I have to say that
it goes down a bit too quickly if compared
to the reference. So I'm going to
pick Translate Y, grab all the upper keys
of the loop and hit R and shift middle mouse button at the bottom of the curve. And you see this way, I can reduce the whole animation on the upside of the curve. Now we'll get a little bit
less motion on the way down. Then after frame for
the pelvis stays down and starts rolling up
a little bit between 46. So we'll need to
roll it up at 6. First of all, you need to hold down E and
left mouse button. First of all, we want
to make sure that we operate on axis which are consistent to what we see in the graph editor in which
we see these three curves. But if we were, say, in world coordinate
system and we were rotating the pelvis
on the y-axis. You see that that changes all
the free curves in there in the graph editor then happens because the axis
you see in the viewport, as I said in a previous video, are not really reflecting what we see in the graph
editor to know, to find a better
connection between what you see in the viewport
and the graph editor. You need to make sure you're
operating gimbal axis. That means holding
down E, like acorn, your keyword and
left mouse button, and then drag your mouse to the right over to
gimbal and release. These are the true
axis and in fact, you'll see that
as I rotate them, I only affect a single curve. That's good. So if I wanted to pitch the
pelvis more on forensics, I know it's the x curve
and I could go into the graph editor and grab
all peaks for that curve. And you see, I can
pitch it up there way. Similarly, I could just
grab the top keys and just scale them from the bottom
and pitch the pelvis more, whichever is easier
between 46 we are pitching and we're also lifting
up the bump little bit. In fact, you see the
curve is doing that. So maybe I can push even
more there than between 610. We're still moving up. We stay up within 1013 and
we come back down since we operate the keys on both halves of the loop between 1151529. Now, we don't really need to fix this second half as far as the ups and downs and forward and backward
pitches are concerned. However, we want to have
a look at the site, decide swing and translation. It seems to me that between 14, the main motion swings
towards the left leg, which is left behind. So I want to check
the rotation y to see if that's what we do and
that's indeed what we do. And then if you track the
reference between 46, you will notice that
the pelvis will start swinging forward on the
left-hand side again. So I do expect an inversion of motion
in the curve in here, and that's exactly what I get. I could make it stronger, but for now, happy
with what I have. If I wanted to make this
inversion stronger, I would have to
move down the key. The problem is that I
would have to go to the opposite poles on frame 20, and I would need to move up these key the same way
because anything that happens after frame 15 in this loop represents
the same motion, except inverted, that
the pelvis will do as it swings to accommodate
the right leg motion. However, it seems to me we
have made a little bit of a mistake in here because
while on frame 115, we do have the same value but
inverted for this wing on rotation y and on 184 we have exactly
the same value again, if we go and check frame 24, and then you see that the
values are different. So in here, there is a little
bit of a problem which we identify that the curve
is not perfectly mirrored. And that's going to be
a bit of a problem. Because if you
remember, we did grab this curve to create the chest, which means that they rotate
Ys wing on the chest will be necessarily having the same
mistake because of course, we did copy the keys and
indeed, there you have it. The simple solution
here is to just delete both keys so that you will
have exactly the same curve. But you see that every workflow requires you to do some sanity check every now and then and understand the
implication of a choice. If we had not kept in
mind that the narrower on the motion of the pelvis was being inherited
by the chest. We would have assumed
that the chest was perfectly
moving and we might have become complacent if you want to access better visual
feedback on our motion, we just create a cube using modify, match
transformations, match translation,
and again match rotation with snap it
to the pelvis you see? And then we've parented
to the pelvis control. Once we have that in place, we can make it narrower. And why not? Let's give it a nice
bright red color. Play the animation between 128
and this alone should give us a very good idea of whether something is
moving a bit too fast, are a bit slow or
in a weird way. It seems indeed that by
the end of the loop, the pelvis is twisting down the left-hand
side fairly quickly. We want to investigate
them motion because it doesn't
look very appealing. So we're going to check
the rotate Z axis and you see there is a peak moving it up and then it suddenly moves down
and then slows down. And the curve again,
he's not even symmetric. So another mistake on our part. Also, if we do check the
z rotation at frame 15, which right now is
recorded as minus 8.368, and then go check the
same value at frame one, you see that they're
not the same, they should be the
same but inverted. Now of course, in real life nothing is perfectly symmetric. But at least as a
base for our work, it's easier if we
make the first pass of spline is symmetric and
then we can add variations. Of course. You see that by doing that, the curves that look
the same but specular, that means that also on 29, we need the same value
of course, but inverted. Now you see that the motion
is a lot more moderate. So you see that adding
visual aids makes it easier for you to assess whether there are any issues for now, I am happy with what I
have achieved and I don't want to go into
very fine tuning, which would be a bit outside
the scope of this tutorial. We want to do the
chest aria again. So I'm going to duplicate the cube that I've
created for the pelvis. Select the chest after
having selecting the cube and then go modify much transformations and
match translation and rotation so that now I have a similar visual
aid for the chest, which I'm going to of course
parent to the chest control. Remember that we
will have to invert some curves after frame 15, while some other like
the Translate Y, we'll just need to
be exactly the same. So I'm going to quickly
check the rotate y, which seems to be
inverting or write the z, which seems to have a
little bit of a problem. Remember, we had a problem
with the zed earlier on. So let's, let's make
the Z inverted. I will just delete all
keys on the past frame 15, grab all keys between 115, Control C, Control V. And then of course, I will
scale them to minus one. And that should give us a
perfectly symmetric curve. Of course, I want to play the same trick that I
played with the pelvis. That is to copy keys to
before and after the loop. So we'll grab the first
two keys that I have after a frame one and
paste them after frame 29. So make sure that the
emotion will go on the same way it went
on after frame one. Then I will drop the
two keys preceding frame 29, copy them, and paste them over frame
one so that they happen at the same interval that
they had before frame 29. This would, let me
select all the curves in the graph editor ran an
indiscriminate auto tangent. And this will make
sure that between 291 we have exactly
the same tangents. And now we can talk, of course business to translate. X seems to be okay. Ty seems to be repeating
equal to itself. There isn't much going
on in zed at all, which is something
worth considering, in my opinion, rotate, rotate x seems to be functional. Rotate y, since
the beam mirrored, rotate Z, we made it mirrored, so we're fine with it. And there's nothing on scale. If we now play between 128, we should get the loop working. In fact, one could argue that since we did
clean the pelvis already and we usually it's blocking to create
the chest animation. We could have, simply
speaking, cleaned the pelvis, copied animation, paste
animation over to the chest and
adjusted the chest. But for the sake
of this tutorial, I'm just going to clean this up. One thing that I want to do is one thing they want to
consider is maybe between 69, it is true that the
chest goes down, but it is not, strictly
speaking true that it rotates that much down
on the left-hand side, you see it rotates
down quite a lot. I don't think that's
really what we're seeing. So I'm going to grab frame nine, find its twin frame on the second half of the
motion and just scale them by increments
of ten per cent until reduce the downward
motion on the Z. You see that now, if we check
the reference between 911, You see that as the
reference twist down towards the left leg, my animation does the same, whereas earlier on that
wasn't that strong. In fact, probably that's
a bit too much now. So I can reduce it a little bit. And now we have our
animation in there. I think the rest
seems to be okay. I have the same debate about the rotate y that I had
for the pelvis. We'll decide to keep
the noisy motion there anyway, and that's sorted. Now that the body is sorted, maybe I can play a
little bit with the up and down or the
middle of control the body just to
see if I can get any fidelity out of it
without sweating too much. I will call this file
version five, bodies spline. And I want to examine the
central control of the body. You see that the central
control of the body stays in the middle position between
the pelvis and the chest. So maybe we could achieve
something by storing its animation in
world space and then delaying it by a couple of frame that maybe will
give us something to make for a stronger
visual aid in my effort to introduce
some fidelity, we'll of course use a sphere as a visual aid in an
effort to make it easier to troubleshoot
what the problems are with please this fear there, where the central control is, assign it a nice red shader and parent it to the
central control. Now that we have our visual aid, we want to make sure
that our timeline shows the frames
between frame 129, that is the full loop of the animation and
using world bake. After selecting the
center control, we want to bake on ones and
maintain the constraints. The result will be a
locator that moves exactly like the central control in exactly the way the
central control date. Now nothing will have changed. It's all the same animation. But now I can consider
oscillating up and down motion, say by four frames to the right. And you see that gives
me a nice up and down offset if compared to the
chest and pelvis motion. Of course, the first frames
of the loop won't be covered by that because
these curved wasn't looping. But we can always make it loop by setting the pre
infinity to cycle. And these in turn should make the animation loop seamlessly. Let's say evaluate this animation
without the visual aid. When we evaluate the
animation we brought the visual aid is very hard
to see anything in here. In fact, maybe I can
grab the translate y and scale the
whole curve down. Maybe even lower it down. And you see that now the
effect is a lot more visible and it's
definitely too much, which seems to suggest they can scale this motion a lot lower. It is of course, difficult to appreciate the
difference between this version and the
previous version unless we make a comparison. So what we're seeing
here is the version with the offset central
controller animation. While if I right-click on the channel box and I
mute all while having, of course the locator selected. I will see the difference
with the previous version. And you see that in the
previous version it feels like the central
part of the body. It doesn't quite move at all. If I unmute all, you will see that there
is a lot more motion in the center part. I mean, which way is
better depends on whether your reference
support that decision or not. In this case, I have to say that the reference doesn't seem to move up and down that much
in the up and down motion. But having said that, it seems to me that
the new motion we achieved is a bit more organic, so I will definitely keep that. That means I have to bake the locator back
to the controls. So I select the locator, make sure I'm displaying
one to 29 on the timeline. That's the full
length of our cycle. Baked from locators. I am banking on once, of course, and I bake the selected
locators back to Object. And I have my animation there. And I don't have my animation
for the center part of the body without having
to do it myself manually. Maybe you could stretch
the body a little bit as attached to
this animation. You see that as the
pelvis goes down, it moves back a
little bit and then it seems to move
forward a little bit. So maybe I will do it
myself in here between 14, I'll move it back
ever so slightly. And then at 13, I will
squash it ever so slightly. And then I will want
to repeat the motion. That means I have
to make sure that 151 have the same
value except inverted. So we'll just paste the
inverted value over to one. And then it will gamble
the translate that keys in the graph editor and
over to frame 15. At frame 15, I want to set a key and bring the
value back to 0. Then it will grab all the
keys between 150 controls, see them, Control V them. I don't really need
keys before and after. Of course, I want
to make sure that the curve is continuous indeed. And that will give
me a little bit of stretch and squash
just a tiny bit, which I can of course
increase if I need, if I scale this
curve quite a lot, you will see it a lot better. You see in here, you have quite a lot of squash
and stretch now, which is a bit too much. So I'm just reduce
it a little bit. We could of course do the same with the chess and we could simply duplicate the
curve on the pelvis, go over to the chest, grab the translate Z, delete anything that is
happening there, delete any key on Translate Z, and just paste the animation
over to translate Z. The problem is that
they would both move at the same speed. But really, you see they
move back together. But really if I offset them
by a couple of frames, that will increase the amount
of stretch and squash. And you see that now there is a tiny little bit of stretch
and squash in there. And again, the only
way to perform a reliable check is
to mute Translate Z. And now you have the
motion from before. And if I unmuted, you will see the new motion, which is a little
bit more elastic in the way it stretches
and squashes. And at this stage we have a body motion that
is relatively clean. It does loop and
is by-and-large, very similar in nature to the one we have
in the reference, except maybe the spine in our
case is a bit too flexible. In the next video, we're going
to take care of the legs.
11. Splining the legs: Having spline the body, we find ourselves in the ideal position
to animate the legs. We will start from the
back leg in this case, when dealing with the legs, my first concern is to
get the aurochs and the general speed of the
pole right after that. And only after that, I will take care of
any IK popping that the leg might have as
they check the reference. One thing that I notice
is that between 1517, there is definitely a change of orientation of this
part of the leg, which was a little bit
steeper in the previous pose. I would love to
recreate that effect in my animation because
the blocking didn't quite described that. And in fact, if you check the rolling of the
research itself, you see that that thing
is in there at all. So we'll go to frame 17 and I will draw the
ankle down quite a lot. And you see by doing so, I achieve a line of action
for the leg that is a lot more similar to the
one in the reference. If you want this transition
to be even more evident, you could go to
the previous pose and make it a
little bit steeper. This way, the difference
in orientation will be stronger and more visible because there will
be more contrast. And then let's see what happens. And then you'll see
that the steepness sort of stays the same. And then eventually
you'll see that the ankle rolls backup. Now if you check the 3D model, you can clearly feel the moment when we touch the
floor and then you can see that the ankle goes down to handle the
weight of the pelvis. In a walk cycle, you often
have to go frame by frame and check off the contact
motion and the kickoff one. For instance, between 47, you see that our 3D
model looks a bit odd. It's first list the toes, then it leaves the
doors and the pole, and then the poor goes
down again onto the floor. This is really bizarre. So let's have a look at this thing and try to
see what's going on. So the control of the fruit is flattened the floor and doesn't have any vertical variation. So that can be the guy
who would leave us. The problem there is
the rolling here. There were all curve starts
softly and then speeds up. Maybe we can see what happens if we make it started a
little bit quicker. And you'll see that if we
make the roles start quicker, it doesn't really affect
their addition of the fruit. So I think in here
it's a method of going there and just keeping
the fruit on the floor. I will set a key at five for flood control and just
lower it at frame six so that it will feel like the George she's actually
rolling onto the floor. You will always have
to keep in mind that once you go to the cinema, you won't be able to
see the controls, so you have to make sure that the geometry actually works. So that's why we're looking at the geometry and not really
what the controls are doing. The action of the
controls is however, useful for technical
troubleshooting. In here we have a
bit of a role and then a lot more of the role. And then on frame eight, we are off the ground. And if you check the front view, you will see that the fruit is basically rotated backwards. So on frame eight, we actually need to rotate the whole thing backward
quite a lot more. I will grab all of the controls
that make up the poll, except maybe for the main pole control
and between machine, I will try and make a
pose when she is more similar to what I have
in the next pose. And this should give
me a pose that is significantly more similar to what we have in the reference. There's also the method of the backside of the ankle here, which is rolling down
quite a lot between 46 and then rolling back
up and then doing nothing. So we want to fix that maybe
for framing running 29, I will roll the ankle
to the back quite a lot to get to these
angles that I see in the reference this way as
we approached the kickoff, the ankle roll forward exactly the way it does
in the reference. Then there is a
moment in here in which we have omega
rho going on. If you want to see if
the Mega Roll is due to stretch and it's not. So for now we'll go to frame
five and just count there, animate that role to the
back so that it will be a little bit more continuous
with the previous action. In general, it seems
to me that the leg is now overstretched
so I can grab the tweak control in here for the hip and just move
its y curve down. And just move its old
zed curve so that it wants stretch the
leg in here between 57, what we have is probably
a double game of rolling on these control
of the food and the ankle. In hindsight, it would have
probably been easier to roll the individual controls rather than rolled
from the poor control. But now we are invested, so we are going to
stick through it. In here there is
Omega rotation again with the ankle which
we want to prevent. And then finally
there's the kickoff. What I'm tracking here is
this point behind the ankle. I don't want it to pop all of a sudden or to do
anything strange. Then after we have the kickoff, we're just moving forward. And between 1315 we roll
the toes up and then we flopped down between 1517 and
then we just rolled back. That part is taken care of. I just want to hide the upper side of the leg
now because I just wanted to check if the motion of the leg makes sense in
here, the lower leg. And it seems through
indeed make. A lot of sense, there is a bit of sense of push between 57
before the contact. And the same sense of
Bush is not there in the, in the 3D animation. Maybe I can achieve
that sense of Bush using the individual
controls of the tools, which at this stage I can save a selection set
back left tours. And I will keep the
selection set on the other screen that you
can't see, but it's there. And I will put all controls
on an animation layer, set a key at 401 at six. And at six I want
to create a pose which is which has a
lot more attention. Roll down the toes as much as I can and then
grab their second, third phalanx and
enroll them up. And if I have to cheat
and translate them, I will also do that this way. It will feel a
little bit more like there's some sort of
pressure on the toes. And then at frame seven maybe able to 0
them out and tried to achieve a post
doesn't intersect too much with the floor and
then I will 0 them out. Another thing that tends to
happen after the contact is that as the wave
goes onto the toes, they thought may well
spread to simulate the fact that there is
more weight on them. And then as the
poll lift up again, the doors will get
closer to one another. So now you can feel that as the poll travelers under
the weight of the body, the tours are compressed
than they spread apart. And in general, now
you'll see that the motion is nice and clean. If you want it to
be very refined, you could even delay
one of the toes falling down or
even two of them. And then we'll make sure
that it won't feel like all the doors are moving
at the same time. What actually happens
in the references that especially the front doors, they hit the floor and then jump back up and then
settle a little bit. But this goes beyond the
scope of this tutorial. Now that we have the motion
of the leg figured out, it's time for us to figure out the pelvis and see if there's anything in there
like a stretch or anything that looks
a bit bizarre. I have to say the image blame now it's a bit bothering us, so I will hit out for on
my keyboard to disable it, I will check that the
first and the end frame of the loop are the
same and they are. Now I will check for
IK pops in here. If you check the thigh, you'll see that it's
fairly straight and then between 23 sort of pops paint and then it doesn't bend
anymore between 34, but it just travels to the back. I am looking at this section. You'll see there's a pump or the geometry and then
there is no pump anymore. It just travels to the
BEQ that usually is ascribed to what's
called an IK pop, which is the IK
chain just popping, bent or straight to depending on the situation and we certainly
have to take care of it. There are many solutions. One of them being the Anti Pope, which is already on in our rig. The other one often consisting in additional
controls that you can drag and affect the
link for the hip wave. And in our case, we have this controller in here
which could come in handy. We're going to use that instead. I want to check what happens in the reference just for safety, maybe we could already
start with a bit of a band on frame one after all, that seems to be the case. Also maybe on frame
one I want to pull vector to be a
little bit outside. So on frame one, I
will just lower the, it's a bit of a cheat Of course, but you'll see between 23, we still have a major bands. So I will set a key on to go to F3 and move this
up to counteract. Maybe you want to move it down. I really dislike
operating frame-by-frame, but in this case I
don't see a way to avoid that IK bump
unless I go in there frame-by-frame and operate
either the control or the pelvis controlling here, you have to be careful,
you don't want to move it too much
in single frames, otherwise it will start trembling and it
will become visible. I really wonder now if it is the anti pop that
makes this problem. We'll just set it to 0, muted and see if I still
have the problem. And sure enough the problem is there so that it
wasn't the anti pop. Now let's see if it's
the stretchy attribute that is creating the problem. So we'll set it to 0 muted, and I still have the problem. So he's not the stretchy. It is something going
on within the rig, so I will have to
intervene manually there. Between 36, the reference is actually stretching
quite a lot in the pelvis, Zara in the hip area, and then add seven, it
bends forward again. It's not a massive deal. I think you'll see that if I check after tweaking
it a little bit, frame-by-frame, it's
holding up quite a right. It seems to me we have achieved decently clean result in here. If anything, from
the front view, I'm not quite happy
about the fact that at around frame ten or 13, Here's this kind of line
breaking with the wrist. Here. I would like
the race to be a bit more in line with
the rest of the fruit. But now the problem
is that when I rotate the rest of the food, the pole vector rotates as well. So I will call him world bake, will need to change the follow
attribute or the pollex. So you see that as I
do so I lose the post, so I have to bake
these onto a locator. So I grabbed the
pole vector calling the world bake and bake
the selection to locators. Then I will grab
the locator itself, set the follow to 0, break the connections and
the follow so that it doesn't go back to be ten, grabbed the locator and baked
animation from the locator. This should give me
exactly the same pose except in world space we bought
following so that it can go to frame for t and u c
and add a little bit of subtlety to the food so that it doesn't go down perfectly flat, it doesn't move that Flint. A trick that is often
played in visual effects animation is whenever
you have a contact, that contact if there's
a lot of weight, it causes some vibration
here and there. The cheap way to do
it could be very to wiggle the pole vector
ever so slightly. Maybe at 15, I could wiggle the pole vector
in a little bit. And then as we go down, leave it there for
one frame longer. And then as we go
down to frame a teen, I can wiggle it
out and in again. And then maybe, then maybe bring it a little bit earlier
to the final pose. In doing so, you'll see
we create a little bit of disturbance in the movement
of the pole vector, which might be rare. There's some start the
reaction to the walk. It's not very evident, but it's something you cannot. Now let's maybe merge the
layer with the toes on it. So we'll go select both layers, right-click Merge
Layers options, make sure that smart bake
is set to on and hit Merge. Now let's have a look
at the front leg. As usual, I will start with
the movement of the pole. Then you see as usual, I will have to check
the contact and kick-off in here you
see that the kickoff, there's something weird
going on in this case, there's a massive amount
of role between 1011, which is not really
there in the reference. So I'm going to reduce quite
a lot that amount of raw between 1012 and you might well end up doing this
frame by frame again, what we want to achieve is
the feeling that the rest is helping with the roll
forward or the kickoff. And between 1112, you see that what rotates is the
brief from these people. Not really, it doesn't
really translate forward. So in here we, I think we are rolling a little
bit too early. So we'll set a key on
the pole control at 11, Want to 13, and then I would
go in the middle at 12. Now we'll roll it back so that the W3C want role
that much forward, except it's still does. So we'll have to
fix the position. In this case, I'm fixing the
position or the controller. And now that Bruce rotates
forward a lot less. There you go, that's a
bit more reasonable. And then of course we had
the massive translation and rotation forward, which are due to the
reverse of the curve. Let's have a look at
the animation and other kickoff works a lot
better when you started operating the
translation backward of a controller which
is on the floor like the poll for instance. It is a good idea to
make sure that you're not introducing sliding feet. So we want to move the
master forward and check how much these Panther
translates for space. We'll call this file
legs pipelining, and I will translate
the master forward. So given the master
key frame one, to know how forward these
master needs to be translated, you would need a motion that
is the same as the one of the feet moving back linearly like you see in
the graph editor, but in the opposite direction. Of course, there are
many ways you can do it. But the cheapest I
can think of is to grab the food controller
on frame one, Control D as delta duplicated and parent by
hitting Shift P like parent, these would give you on frame one copy of the controller
that does not move, you see stays there, that you'll find the last moment in which your controller simply translates to the back before it even does
the kickoff thing. And you move the master forward
by the same amount until the two controllers
are lining up the duplicated one and
the original one. In the graph editor. These master must
have a linear curve. Because if you don't
have a linear curve, what will happen is that the
difference in acceleration you see will cause the food
to slide and you see does. But the moment, but
the moment I said the translate Z curved
linear for the master, you will see there
will not be any sliding on the food whatsoever. As the master goes forward, which is really handy. Once you have found the general speed of
the master forward, you want to set its curve to post infinity cycle with asset. And that has the general
effect of duplicating the curve over itself and an
offsetting it through space. So now we have just found the general movement
of the master forward, which is very handy for us. Which also means
that we can truly ensure that the food
works at the bank. And you'll see that in
here due to the role, their role is introducing
some translation and we don't want it put the pole
control and a layer, set a key on five where
everything was working just fine. In six, I will move
the controller back because now I'm checking the movement
of the geometry. I don't want the geometry,
just lie it forward. See that on seven, there's a bit of
sliding forward, so I will move the foot to the back a little
bit. There you go. Then on eight, I wouldn't
move it back a little. And then on 15 for the contact, I will 0 out the motion. This way we fix a little bit
of the problems we had with the sliding there there's a
limited amount of lighting, But Feed dues and lied in real life as well to a
certain degree, of course. And also depends on how close to the food
you're going to be, the amount of sliding you
can tolerate in a scene depends greatly on how close to the character
you're going to be. After we have attached
down on frame 1720, here's a bit of
sliding going on. See that I think
that's something to do with the wire rotation. Rotation is 11
something at 17 and then at 20 becomes
free dot something. So I'm going to 17 and just paste the free
dot something at 17. And then another is much less
sliding due to rotation. However, there is a bit of a problem with the translation. I think translation
is not very precise, so I will delete every key in the linear
movement forward between 152929 is the pose that works because it's the one-way fixed
his lighting for. It's my reference pose. I will duplicate the controller again and I'm parent it again. And that will leave me, you see, we went other
controller there. And then on the layer
at 15 for the contact, I will just move the fruit forward to match the
landing pose I want. And at 17, I will just match translation and
rotation on the layer. So that will guarantee that I will be in the right position. And at 29, I'll match it again. For as long as the curve
between 1729 is linear, I should get in those
lightning food whatsoever. See that? Now, the fruit is his
lighting anymore. And this is just
one of the ways you can fix sliding feet with. And I have another
tutorial on YouTube called fixed sliding
feed in Maya. The easy way that goes
through that method. That's not you want
to check out because it's also a fast way to proceed. Coming back to us, we don't really need those two additional controllers that we duplicated
it on your own. So we can just delete them. I will save the file and I will move on onto the front leg, which is what I was doing
to begin with, remember, I'm interested in not having
the food slides all of a sudden during the contact or
lift off before the contact. Maybe the forward motion of the wrist between prevalent
13 is a bit too strong, so I'm going to reduce
it ever so slightly. And for the pose
before the contact, you see how in the front view of the reference the fruit
isn't straight at all if compared to the floor while
mine is computer straight, I want to achieve
a similar pose. And here with food
and ankle and egg gives a much more dynamic
pose if you think of it, I want to of course, get rid of these lighting feed in here. And then you'll see
that between 110 we have some sliding
feed going on in here. So I'm going to use
the right line method. From the red line menu, I will call the
animation toolkit. I will position
myself at frame ten. It will select the time
range between frame 110 by holding down Shift
and left mouse button. And then it will tell written
nine to please truck or stimulus the time range and
process backward written, I would go through
the whole timeline and you see its time realizing my food there and
now I no longer have sliding feet,
which is handy. The drawback, of course
there is multiple keys. I want the same key on frame
one and then Frank 29. So I'm going to
copy one over 29. Now the problem,
no doubt will be that after touching down at 21, I will start sliding again. One thing I can do is at 21. So of course I can
play the same trick. Select 21 to 29 and
then process back. And there you go. I have no sliding
feed whatsoever. That was quick, Was it not? In fact, you could even touch down with detours a lot higher, have them land down quite quick, bounce back up and
settled down again, and never give them a stronger
impression of weight. Of course, once the
food is taken care of, it's time for us to
evaluate the shoulder. Remember the shoulder head, a little bit of a problem in
general in life that were weird rotations going
on Every now and then due to the fact that the
shoulder was aiming at stuff. So we maybe want to first nail the key poses of the
shoulder and after that, clean it up in here I
have additional control the shoulder that I can use to create a curve that I
much prefer in general with the shoulder at the top
of the shoulder, of course. And then between 15, there is some motion to
the back in the reference, but really not as
much as the one I can see my animation where each starts to read a
kickoff from four on. So maybe I can use
the twin machine and just delay the emotion of the shoulder so that
at the beginning won't be that much
movement to the back. I also want to see what happens. You see that the
shoulder start to stays there and doesn't
really go down, then it starts
moving down because the chest is moving it
down and to the back, maybe it will delay
a little bit of motion to the back and
keep the shoulder up. And then between 1013
I see the shoulder going down quite a lot in
the reference in here. See that? So I wanted to
maybe have that effect myself and I will
have to do something about the crazy
rotation I see up here. Then we move forward quite
a lot indeed, contact, think I can keep the pose until 22 and then there's the big
push up with the shoulder. You see it moves up quite
a lot and I'm going to do the same and going to
push up quite a lot there. And we start the game. Let's maybe play the
animation between 128 so that we avoid playing the same frame twice at the beginning
and the end of the loop. And overall the
translation is okay, but you see that the way
the clavicle balances. In terms of rotation, is not really in line with what we've seen
in the animation. The rotation in decision is actually happening
quite a lot here in desire between 1718 and
then again between 2629. So that's a bit of a problem. The best way to solve
this would actually be to again convert the
animation to world space. Because in world space
you won't be subject to the rotation of the
leg aim attribute, which in hindsight we
should have disabled. So that's an option. The other option is to check
whether by increasing or decreasing the auto rotation
in the name attribute, we get a better result
for the clavicle. That seems to work. But you'll see there are
still a moment between 1718 where this would require some sort of love which I can maybe give it. Let's see, I can go in there. Actually it does work to use the lagging to sort of
counter animate that. And if I check the result, that kind of works. Although the rotation
is still a bit dodgy. So I will try to convert this
rotation to world space. So we'll select the
scapula controller Bacon once mundane constraints in the world bake tool of course, and bake this election to
locate or it's important, we bake one to 29. Now in theory, since
these animations depends entirely on the locator, locator being free in this
locator rotate Z curve, we can clearly see all
the irregularities of the rotation that we
had in the shoulder blade, which we can now clean
up a little bit. And now we have a little
bit of a softer rotation of the clavicle there. That's another method. The important thing
really is to know which method could work
in which situation. One of the issues of
converting animation into worlds spaces that you might get into a gimbal lock
like this one, for instance, if you want to learn more about gimbal lock, I suggest you watch my video on YouTube about this
problem in here. The bottom line is
we can no longer control the lateral
rotation of the clavicle, which is a bit of a problem. And for this reason we are
going to select the locator, fire up the convert rotation or their script
from Morgan Loomis. Gentlemen, we all
owe a monument to. We ask it to evaluate the
situation and these objects is indeed a gimballed
controller right now we have no way to
control some axis. We can maybe convert the rotation order is way
the animation will be converted to a
different rotation or their animation
world stayed the same. And hopefully we will
benefit from better axis. And now you can see
that there are spikes here and there on
certain rotations. This is an extremely powerful
tool because it sorts out a lot of the
issues you normally have when working
in world space. And it makes it,
generally speaking, a lot easier to spline
unruly animation. And you see that by
removing the spikes in the curves provided we are
using sensible axis studies, we get a much better rotation on the clavicle and
things are indeed looking up for us from all points of view we
should think of it. That's quite good. Nice trick to have
converged rotation order. Great tool to have any convert rotation order tool is a good addition
to your tool set. Again, antibodies
does it as well, once happy with animation
and indeed we are, it can't convert it back. So we select the locator, we open up the world bake tool and we make sure
we're previewing one to 29 on the timeline and we bake from locators,
we bake on one. So remember otherwise
the auto aim will do its trick again with
baked animation. And now we should get
the same animation we had earlier on
except on the rig, which is wonderful news indeed. And now we find ourself in the inviolable
situation of having both the legs and the body splint next on
the list of things to do. And we'll see that in
the next video will be the animation of
the head and tail.
12. Splining the head: It has anticipated it is now
time to animate the head. So I will show it ahead. As you see, the head is
moving left to right, which is a good sign if you think of it
to a certain degree. Of course, this is what we are seeing happening
in the reference. That's pretty good news. It means we are on
the right track. But you see that the problem
is that although the timing is more or less correct in
the movement left to right, There's actually a lot
of motion going on in the 3D model that we don't
really have in the reference. Also for every transition we would have to
count their animate, maybe these star-shaped
controller, they translator of the head itself and maybe
even these dude. That seems to be a lot of work and I don't know
what you think of it, but I certainly think
we should reduce the amount of work.
Let's do that. First of all, we
want to get rid of the problem of having
to counter animate. Right now the problem is that
we are following the chest, so we would have to counter animate a bunch of controllers, but it's usually a solved by externalizing the
animation towards space. So we are going
to grab the base. So we're going to select
the Base control, the middle control, and the head control
for the IK chain of the head, Coleen world bake, make sure we are seeing
one to 29 frames on the timeline and bacon ones maintaining the
constraints, two locators. And now we have the exactly
the same animation. We've a little bit of an
advantage if you think of it. Because now whatever
we decided to do with the locators we have
selected is not going to be affected by
the rest of the body. So we are no longer counter
animating, which is amazing. Let's say that the first
thing I want to check, maybe it's the up and down. If we track our
references in here, you will notice that as
the chest goes down, the head tries to stay there. While in our 3D model
has the chest goes down, the head goes down one-to-one. So in here we want
to, of course, to delay the movement
down on the head. The head controller
is this locator here. There's one. And since we're going
some offsetting in here, we want to first of all, precise cycle and post
cycle all the curves. Then I will grab the
head controller there, find which curve is defining
the up and down motion. And you'll see that
as the curved points down the head goes down, we want to delay that
motion on the way down. So I'm going to shift
middle mouse drag to the right so that as
they chest goes down, you'll see that
the head comes up. That's a little bit too much. So I'm going to
reduce the offset. Now has the chest goes down
and the head stays there. And then it goes down again. Now is I press Play so that
now that's a bit too much, but it looks already ten times better than
it did earlier on. Indeed. In fact, this was how the head motion looked
before and this is later. So you'll see that
just by converting the animation to world space and also thing
you'd a little bit, you can achieve amazing
effects at virtually no cost. In fact, of course, if the problem is that these
head is moving too much, and if compared to
the references, it is moving a bit too
much on the vertical axis. One thing that we can do is find the posts that we don't want
to change like this one, for instance, which
is the top pose. Then by hitting R
on the keyboard and middle mouse click and drag
at the top of the curve, we can scale down the downward motion so that
it will live the same delay, but you see a lot less
up and down motion. That's quite cool. Now let's reduce the
side-to-side motion, which is way too much. The side-to-side curve in
this case is the XX curve. You see that there's
another thing to consider, which is the rotation
wide curves. So I think we want to
scale both of them down. We'll choline from the graph
editor, the scale tool. And as a venue scale pivot, I will input dot 90. That will mean that
we'll scale it down by 10% every time we iterate. And 0 is the standard
line in the center lines. So if I go to an extreme
point and I hit Apply, you'll see that I reduce the motion quite a lot
and now I am reducing. You see the left
side motion there. However, I still think
it rotates way too much. So I am going to grab the wire rotation and I'm going
to reduce it quite a lot. I'm thinking of even delaying
it by a couple of frames. And also maybe I wanted
to reduce the z rotation. Similar way, I can just
see you scale down by 10%. And you see that all
of these columns visually at no cost for us. I think we can raise the head overall motion a little bit. And I think we can still reduce the up and
down motion here. Now as the head
moves up and down, the head is locked, of course, to the neck. In this position, there will be a little bit of a
delay up and down. I wonder if by delaying
the x rotation by the same amount of
the translation in y and even a little bit more, we can get maybe
an interesting set of motion going on in there. You'll see where
the head rotating a little bit in reaction
to the up and down. That's pretty cool. We can even grab the
z may be delayed at as well by a couple of frames
or even more. Let's see. You see if we delayed even more, we get uneven software motion there and maybe we can scale it down a little bit
so that it doesn't feel too soft as emotion. I still think it's
probably moving too much to the left and right. You'll see I'm
reducing that as well. And we're just a few clicks, you see we get very cool martian out of the box without
sweating too much. Of course the
drawback is that you get one key every frame. But I didn't know. Is that really so important
if the animation works similarly to what we did with the central control
of the spine, we could play the same game with the control of the neck and delay even further to give the neck a little
bit more flexibility. This is not exactly what
we see in the reference. You see the reference
doesn't move as much, but I'm happy with it. Of course, once you
get the gist of it, you can do the same with
practically any control. And now you'll see we have
very clean motion on the head. Now let's do the tail.
13. Animating the tail: Now let's have a look
at the tail itself. We're going to employ a similar technique this time around, we're going to use a
tool named overlapping. These tutorials, really a
mass of tools that you can employ to make your animation
faster, not only better. First of all, I want
to make sure that the loop only happens between 129 and there won't
be any other keys outside. To do this, I'm going
to select all of the controls are
my REG except for the master because
remember the master does not loop between 129. We'll de-select the master
from this selection. And then on frame one, I wouldn't run the set
keyframe minus insert command. This command will
insert a key on every animated curve without
changing the tangent type. And I will do the
same on frame 29. It is way I'm sure I
have a key at 129, which automatically
means that if I position the cursor
on the timeline on frame 29 and delete any
key that happens after 29. You'll see there's nothing
changed in here in 29 because there
was a key on them. Similarly, if I go
to frame one and I delete any key that
happens before frame one, there will be no change
whatsoever in the pose, and these two poses will
be exactly the same apart, of course, from
the other side of the legs which we
haven't touched yet. Once this is sorted, I will grab all keys, go curves, pray infinity cycle,
post infinity cycle, so that the animation
will cycle seamlessly. You see before and after 129, then it would set the
timeline back to 129, since I have changed it now, this way I am creating an animation that is
looping for sure. And these loop will inform the overlapping tool before
you can run overlap. However, there are a couple of things that you have to do. First of all, overlap ease
seems to work better. You can create a locator
at the end of the chain. I guess that these way it helps orient the last control
that you want to overlap. So I will grab the
last control of my chain and using world bake, I will just bake selection
to locate those here. This will give me a locator that is perfectly aligned
to the last control. In fact, now that I have it, I can delete the animation
that locator parents that located or under the
controller and move it out. This will be helpful
for overlapping, means that when I rotate
the last control, you see the locators
following along. Then I'm going to
select from the base of the tail down all the controls. And last but not least, I will add the locator
to the selection. We'll go to frame one. I would maybe check
from the top view that I have a nice Bose. You see not a straight butt, a little bit of poles with
a line of action there, set a key on everything, delete any key that is happening in the middle
and set a key on 29 so that they have
exactly the same key. These seems to be a requirement
for overlapping to work. Then we were overlapping. We'll maybe increase
the smoothness of the animation a little bit, increase the scale a
little bit so that the objects will be a little
bit slower and again, increase the weight
a little bit so that it won't bounce
around that much. I want an emission to loop
because this is a loop. So we'll click on
looping animation and then I will run
the rotation baking. And I will cross my fingers, of course, as I wait, if you encounter a
problem at this stage, something like object not found. My suggestion is to close the window of
overlapping reopen it, reselect the
controllers, rerun it. As his move failure
for this exercise, I found that 1.70 something
is okay as a scale, Zero Dark Thirty
something is fine. 3836, There's a weight. 016 seems to be a good value. The truly is far
from very quick. Once overlap is done, you press Play, which
is pretty cool, but it's waiting
around way too much. So maybe we can scale the
animation down, for instance, so I can grab all of the controllers using
the gimbal axes. I can see that the way we
just depends on the y-axis. Maybe one thing that
we can do is go under the channels in the
channel box and sink selection and timeline display in the graph editor and
on the time range here. So that whenever we select the rotation channels
in the channel box, you see that the graph editor
automatically updates, which is quite useful. So I can select the Y
rotation in the graph editor, open up the scale tool, maybe scale the y
rotation by F5, 50% starting from zeros of p. But now you'll see I
have the same motion, but a lot less white,
and that's quite good. Now, the last bit seems
to be a bit too active. So maybe this time around, I can grab the bait only and
use the Z rotation instead, reduce it by 50%. And similarly, I
can do the same way if it's immediate neighbor, see how useful it is to sync channel box
and graph editor. Maybe this guy, I'm just
going to reduce it by 20%. And maybe I wanted not to
become perfectly straight, so I will change the
curves so that even in the lowest bows represent
servers a curve. Now you go and now I
have my animation there, which is nice and smooth, very elegant, and also loops
which is not bad at all. Of course, this is
not a one-to-one representation of the reference. In order to do that,
you would need to sit down and create poses. But if you think of it, it took as how long, five minutes. And the advantage of
it is that it's also an a layer called
overlapping animation layer. So at anytime I can go in there, reduce the weight of the layer and these way
reduce the overlap. In fact, not that I think of it. Maybe I didn't even have
to scale the curves down. While overlap ease for free, There's also tool named
overlap or which are not covering in this tutorial
because it's not a free tool, you have to pay for it. And I'm going to lop
reaction that gives you quite a lot of control
over the animation. It's also faster in the calculation and
you can also add wind. It adds overlap based
also on disturbance, so to speak, turbulence. Of course, there's
a link to this tool in the material coming
with this video.
14. Mirror the animation and wrap up: And now that we
have the animation, then it's the big time we need to mirror it on
the opposite side, it's a good thing that we
have a mirror of tabled prepared so that we can
use it, or at least try. And let's see how this works. First of all, I want to select all the controls for the
left-hand side of the body. This is going to take
a little bit of time. I also want to grab the
Bailey's and scapula is because they contributed to the general pose of the legs. So we can't really
work without them. And see me literally this
little guy here that I use to shape the
scalpel that top. If you want, you can also grab the additional
controllers for the arm, which we didn't really use, but we could have had, maybe. We're going to save a selection
set with studio library. There's going to
be the left side. There you go, that sorted. Before doing the mirroring, we want to consider why are
we even mirroring this stuff? Let's look at the case
of the hind legs. On frame 15, the left hind
leg is about to conduct, we could call it a
Contact indeed, in fact, we have it here in the
animation as well. If instead we go to frame one, it is the right leg, which is about the contact. We can indeed make
the case for which the right leg animation is nothing but the left
one shifted in time. Whereas we had a contact
on the left leg, frame 15, the same way that happened for the
right leg at frame one. Meaning of course, that we
can reuse the same animation only shifted by 14 frames
to the left. I say 14. That is 15 minus one. So let's try that. Having gold, the controls
selected on the left-hand side, I'm going to select
all keys between 129. Grab the mirror table that I prepared at the
beginning of the videos. And in here as an option, instead of swapping it, we want to copy the
animation left to right. Whereas the left
and right terms are always relative to the character
we use as a namespace, the one from selection
that works for us. And we cross our
fingers and hit Apply. And this isn't working. You see, let's investigate
why this isn't working. First of all, it would
be a good idea to remove any key that exists on
the right-hand side. That's a bit of a bummer indeed, because you would expect the
script to do it for you. But at the same time, there are many options
in the script. It's for free and then super happy that I
have it for free. I mean, if I were
using uninvolved, I would be paying for the tool. So of course I could ask
a couple of features, but in here, I don't
have the same luxury. I'm going to select
all the controls that control the right-hand
side of the legs. You want to be careful
not to add anything that belongs to the left-hand side. I'm going to save this as a
selection set right side. We've unembellished. You can just simply speaking, select the opposite
control and their work. So usually I'm going to delete all keys on
those controls. Now, there shouldn't be any
key whatsoever in there. Then I'm going to select the controls on the
left-hand side, going into the mirror table, select the range one to 29
and copy left to right. And you see these works
for the most part. I say for the most part
because I feel like the clavicles aren't really doing what they were
supposed to be doing. So we'll look at them
from the side view. There is this
rotation here that we have a 26 that doesn't seem to really match what happens
on the left-hand side. In order to understand
this problem, we have to consider what moves these controller
of the scapula. If you remember, well, the controller is animated
by translate and rotate. By the way, this is
an excellent exercise to start troubleshooting
rig issues. As you animate the
scapula controllers, they said these controlled
by keys of course, but there is a
factor down there, which is the leg aim
attribute in the pore control in practice is you operate
the leg aim attribute. You see you're effectively
rotating the scapula. I suspect the on the
opposite side of the leg aim attribute
is causing some issue. That's a bit of a
bummer off course. But what can we do? Are we really going
to fix the rate? We're maybe the
deliveries tomorrow? I don't think so. I think we can do maybe is
to disable the leg game altogether and then transfer the animation over
to the other side. Now the problem is
that the moment I disabled the leg aim
that's going to change. You'll see there in
addition to the clavicle, we already animated
this clavicle. We don't want to do it again, but there is of
course a way to store the emission of the
scapula control, which I keep calling clavicle. And that way is of course
through the world bake tool. In fact, we can bake on once, we can maintain constraints and we make sure that
we are making 129, which is the full
duration of the loop. We select the left scapula
and we bake two locators. Now the animation will
stay exactly the same, except we have a locator in their USE and it does
maintain the animation. So that means that I can
go into the pole control, select the game, switch it off, and you'll see that
now it doesn't matter which value I give to
it because of course, the scapula is held in
place by the locator. So you might as well break the connections on the leg game. Set it to 0. So now I have the animation of the scapula exactly like before. Nothing else has changed. And I can grab these
capita located or M bake from locators. So now we'll have the scapula free moving exactly like before, but no longer dependent
on the AIM attribute, which means that hopefully
it will be able to mirror it without
further problems. But let's see. I will delete all
keys on the pole and on the scapula and
the opposite side. And then grab pull
and scapula control on the left-hand side, select the time range between 129 and
mirror, left to right. And I would argue that
most probably the problem because now when I check
the scapula motion, you see it's the same, both left and right. Of course there are variations, but that's due to the
fact that the chest is indeed controlling
the scapula as well. So it is going to influence
what we see on screen. But you see we don't have the wonky motion of their neuron. This was excellent. It is always a good
thing for an animator to understand which issues
may come from a rig. Having said that,
let's call in SEM. Hi there and let's show
the right and left legs. You see now they should move exactly the same way
as the opposite side. It looks a bit like around in slow motion if you think of it. But our mission won't be over until we offset the animation. So I'm going to select
the right hand side through the selection
set I made earlier on, select all the curves
in the graph editor. If you want to have visual representation of
what's going on, you can go to 15, right-click and convert the
key to break down. Now this gives you
a colored key, which means that you will see if these key goes to frame one. Then you know you're
doing the right thing. If you go somewhere
else, then you're not. We've all the keys selected in the graph editor in the box
at the stats of the time, I'm going to type
minus a equal 14, that he is 15 minus one. That moves the whole animation. Of course you want it to be pre and post cycle if
we haven't already. And now everything
should work just fine and you see it does. So there you go. You have now your
beautiful walk in there. And it didn't take
too long to make. You see that animation is
really clean without us going too crazy
with explaining it, which is of course a great plus if you want to see this
thing going for his space, so you need to do is
select the master and unmute all the
channels in the master. Then you will see there's
a little bit of a problem there because you see that
the head stays there. I wonder why it stays there. Well, if you remember, we still have the free locators we use to create the head. There's still controlling
the head and these locators aren't really following the
master if you think of it. So it means we have
to bake them back. So we go back to frame
one when the master, it's at 0 mute or
channels on the master, grabbed the free locators and
with the World Bank tool, bake on one's from locators. You always have to make
sure that you are showing the timeline between
129, of course. And now if you've got the
master and you unmute all, you should get your nice
walk going on forever and ever and ever or DOS it because at the
round frame 48, you see that the front left leg is doing something a bit weird. Start to wobbles and
then keeps wobbling and the arm breaks here
it over stretches. There's something
going on in there and I wonder what that could be. Well, if you think of it, we did convert the
animation of the clavicle. But converting the animation
doesn't mean looping it. You see it's not looping. So you have to pre and post
cycle all curves again, and these will
solve the problem. There are usually two
reasons for a loop not to go on forever and ever
in a seamless way. One being you didn't
loop all the curves. The other one usually being some courage
or looping between 129 and some others aren't
looping in the same interval. So now let's make our
good play blast of this. And in order to play blast, I would like to have a camera that follows the
character around. So I will go out
there and master, position my camera accordingly. And then I will open
up this Volcker com, install all the channels
that will create. You'll see a new camera here, which is following
the character. Not bad. Now the reason little bit
of a problem intersection you see between the
chest and the arm. So I can go into
the perspective and see if there's anything
that can be done. There isn't either controller
in here that maybe I can animate to mitigate the
impact of these intersection. I will bring the
timeline back to 129. And on frame one, I want
the controller to be at 0. And as the arm
travels to the back, I want the controller to go into the chest a
little bit more. And this way you see I mitigate the intersection quite a lot. And then there's
the leg opens up. I want to reset the controller and then it
can copy frame one over 29, and that seems to improve. You see the intersection
quite a lot. Now of course I've added
these new animation. That means that I
have of course, the pre and post infinity
this time around, I'm going to use a button
on the Graph Editor. This guy here is setting
the curve to pre cycle while the other guy on the right is setting it to pass cycle, That's a bit faster
than clicking multiple times into the menu. There you go. And you see that now the
intersection is a lot milder. Now that we have done it, I think it would be only fair
if we mirror the animation. So I will grab the control
which I already have selected. I will select one to 29 and it will mirror
it left to right. Of course, this needs to
be cycled and offset, but we have the two
button to cycle and we know we can type
in minus equal 14. And this way we
successfully mitigated intersections on both the left and right
sides of the chest. So let's do a
playlist under Show, we select platelets display. We tear off the window by clicking on the
double dashed line. We override it,
set everything to non-exempt for polygons
and heads-up display. And then then their
display, heads up display. We want to show
the current frame that will give us a
reference frame, of course. And then we're going to
play blast the animation this way we should not be seeing the curves as we play blast. And then in the render
settings of Maya, the copying board with
the gear next to it. We opened it up and at the
bottom under Image Size, we want to have a
full HD 1080 screen. That's useful because
once we right-click on the timeline now and go into
the options of play blast, we can set the display size
two from render settings, and that gives us a
full HD play blessed. We can set the scale to one. So that gives us again full HD. And as a format we
use q t If you don't have q t is because you
are either on a Mac, in which case you will
have AV foundation, or you're on a Windows PC and you haven't
installed QuickTime, do some Google about
it. As equality. I said it through a 100 y-naught and I click on Play
blast. Last that's done. I have my animation there. Isn't that lovely.
15. To render or not to render: Thank you for having followed
the tutorial so far. If you have found
this course useful, please consider leaving
a review that would help me a lot to understand whether
people found this useful. And it could also be useful for other people wishing
to join the course. Maybe they are in doubt
and they don't know if it's worth it or not. Also, it would help me immensely if you share your achievement
with your friends. In order to leave a review
or share an achievement, you will have to mark
all classes as complete. At that stage, you
will be able to both share and
review the course. Now I am recording these
tutorials in my spare time, but, but thanks to your support, I can record better and
more frequent tutorials. Back to the course. Now
the question becomes, where do we go from here? We have a decent piece of animation and we would
like to render it. While this is an
animation course and does not cover rendering, I find it that people
respond better to rendered animation if compared to gray pixelated play blasts. For this reason, I have
recorded a series of free tutorials that
show you how to render your animation
in Unreal Engine, which is also free. You can find those on
my YouTube channel. You will find a link to
it along with this video, and that's it for this course. I would really like to take this opportunity
to thank you very much for trusting my work and
for choosing this course. I hope you found it useful and I certainly hope that I will see you sometimes in the future. Who knows, maybe we will work together on something amazing. Keep practicing and
remember that luck helps those who
prepare, Have fun.
 Amedeo Beretta, Animation Director/ Tutor