Transcripts
1. Welcome: Gifting Emi groomi means gifting something
unmade and thoughtful, and that's what
makes it special. It doesn't have to be
perfect to be cherished. Its value comes from the time, care, and love stitching
to every part of it. Hi, I'm Anna. I'm a crochet and Emi groomi designer with
16 years of experience. I'm the crochet designer
behind Buddy Rumi. You can find my fun and whimsical
patterns at Buddy Romy, Etsy, and now Eron Skill
Shares Digital shop, as well. Welcome to my new class AmigurumiF Beginners
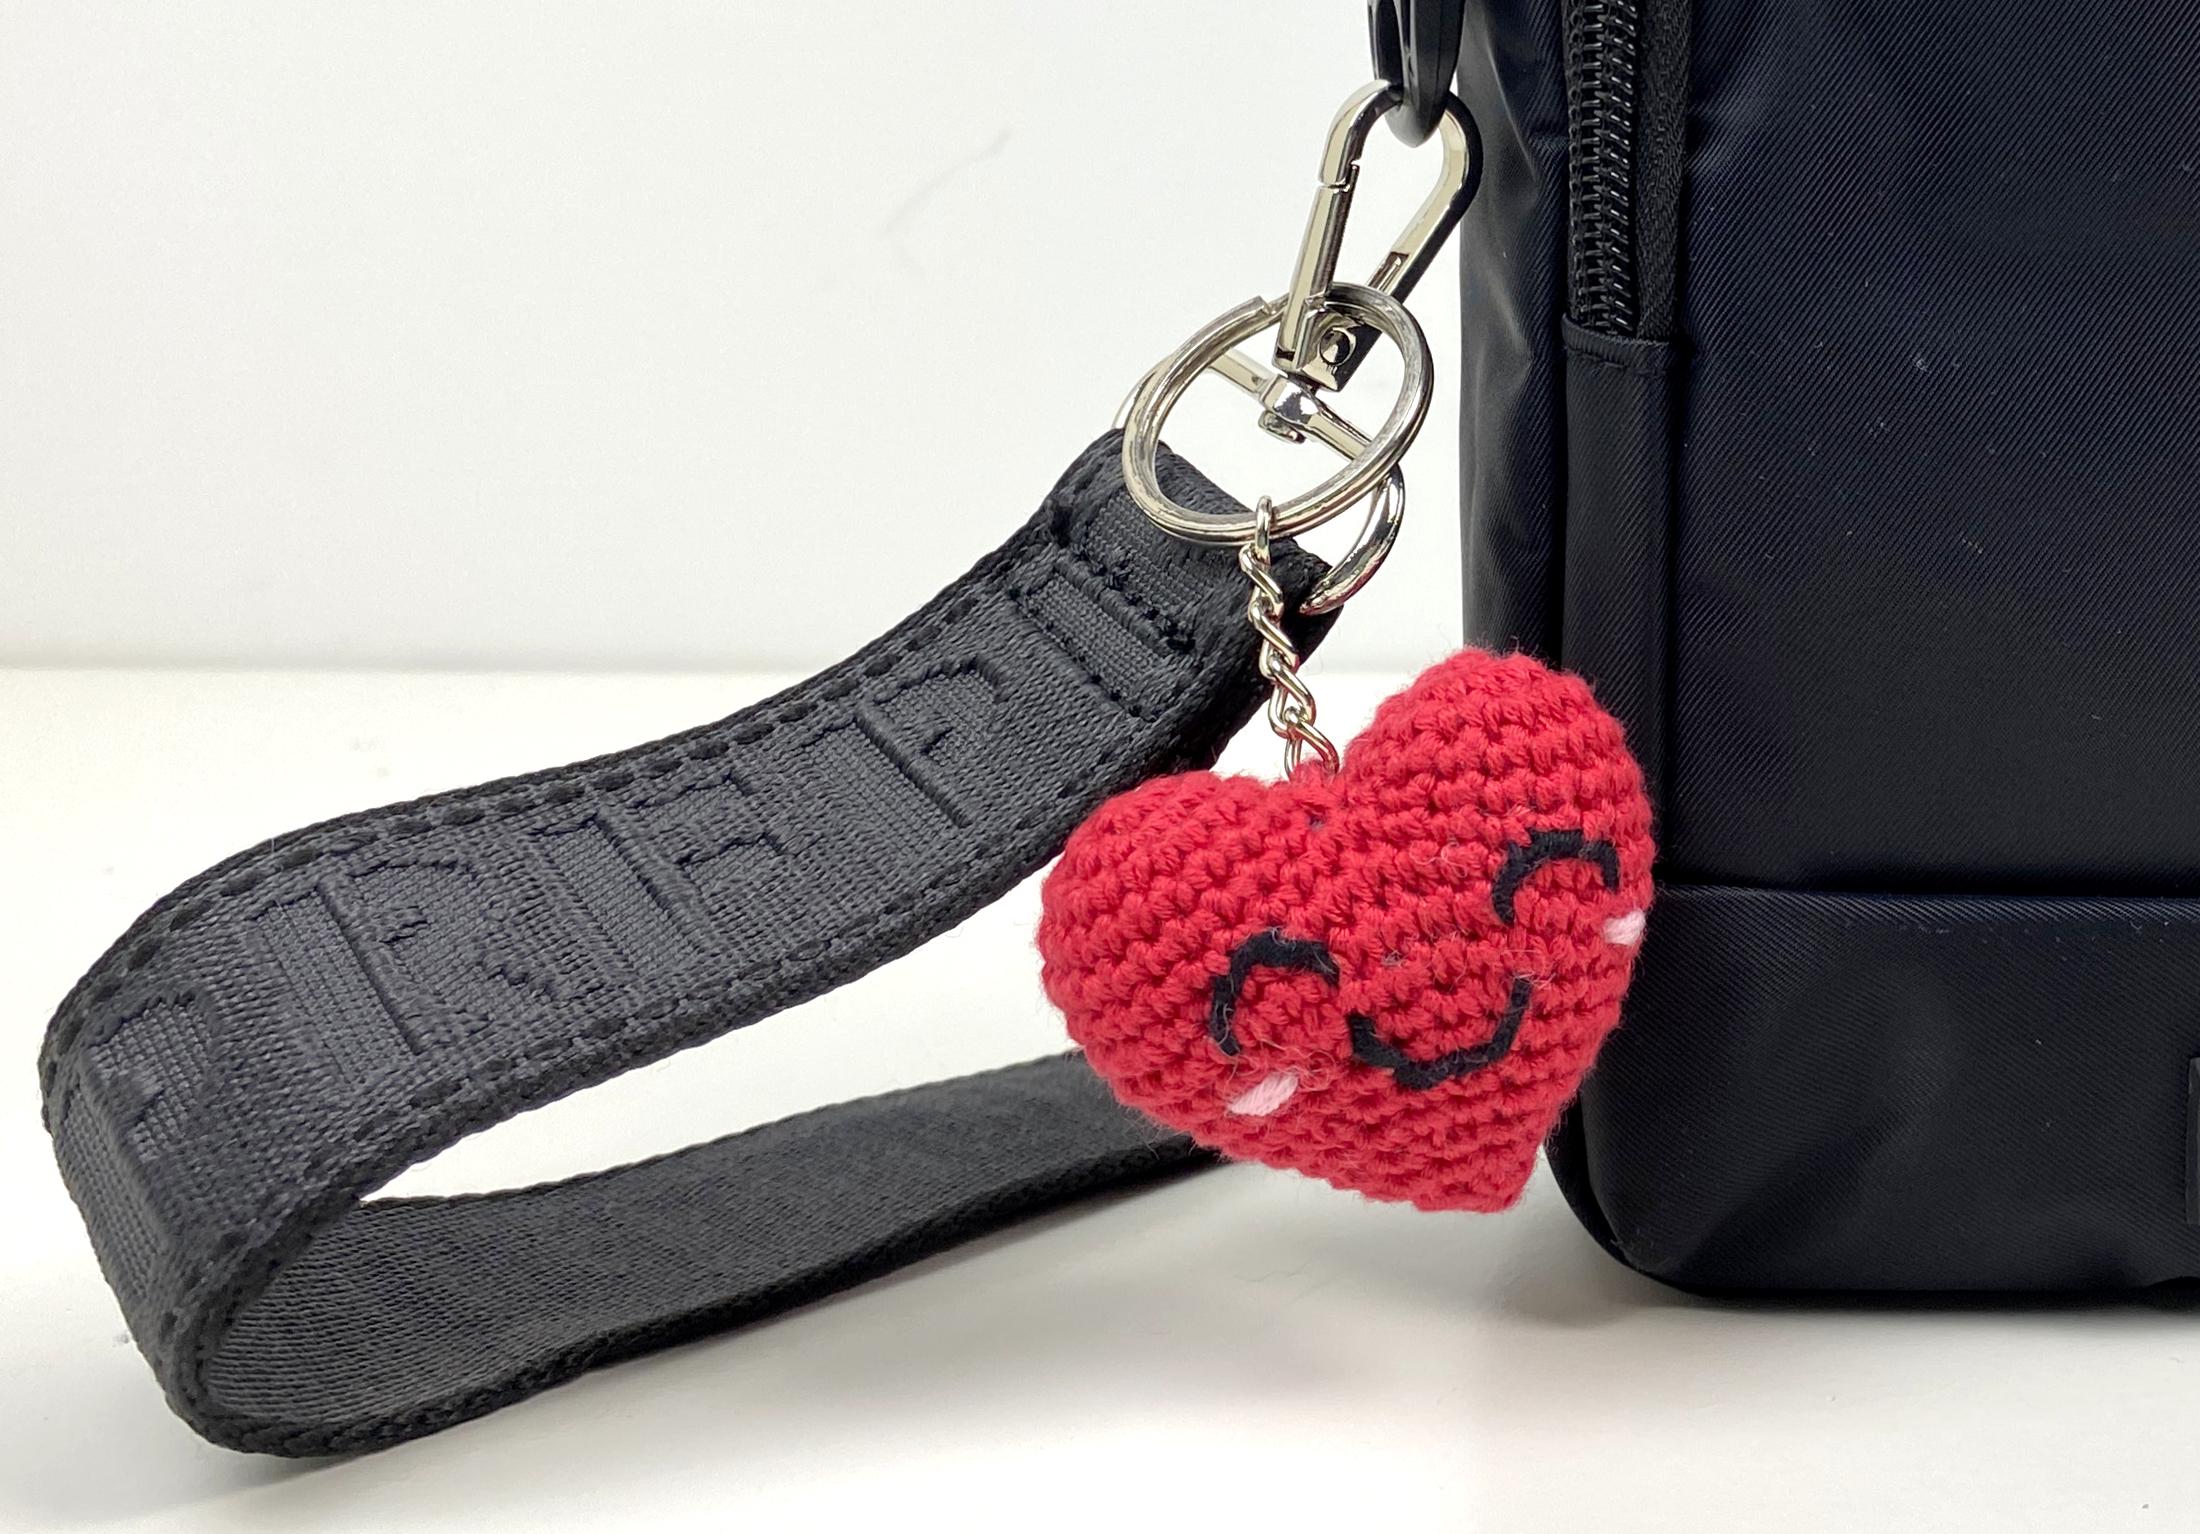
Crochet Hart Kitchen. You'll learn how to crochet this super cute
amguromi heart kitchen. This quick project is
perfect for beginners or for anyone looking for a quick make for themselves or to gift. You can use the Emi
groomi hearts as charms, kitchens or little
decor around the house. I'm so excited to share
this class with you. Let's get started on
our Amigromi heart.
2. Project: Welcome. I'm so excited
to see you here. Today we are going to crochet this amgurumi heart and
turn it into a kitchen. First, we'll go
over the tools and materials you'll need to
complete the project. While making this
cut omgurumihart, we will refresh our skills
on how to make a magic ring, how to single crochet, how to increase and decrease, how to close a Mgurumi
and finish off. We will learn how to
join two pieces in the round and turn them
into a single bigger piece, and we will turn our
heart into a key chain. As a bonus, we will
learn how to embroider a cute little face and
a message on our heart. Before we begin, make
sure to download the pattern in the project
and resources tab. And if you need
help or get stuck, use the discussion page. I'm here to answer
your questions. Be sure to share
your finish arts. In the project and
resources section, you'll find an area at the
right called My Project. Upload your photos and click the submit Project button to
share your hearts with us. I can't wait to see all the
variations you come up with. Next, we are going to
talk about the materials we'll need to make our
little my groomi heart.
3. Materials: To make our Omega
Rumi heart we'll need fine weight yarn in red, black, light gray, and pink. You'll need a 2.5 millimeter hook size in the US
and 12 in the UK. You'll need stuffing, scissors, a stitch marker, an
embroidery needle, sewing pins, and
kitchen hardware. We'll also need two small scrap threads of
different colors. Try to make it one blue
and the other white. If you don't have
it in those colors, use what you have, but make sure that they are different colors. Now that we gather all
the materials we need, let's get started
on Am gourmhart. And
4. The Cups: Grab your hook and
yarn, and let's start. We'll start by crocheting six single crochets
into a magic ring. Wrap the yarn on your
index finger two times and bring the
working yarn to the front. Go under all the
loops with your hook, grab the last one and pull
it under the other two. Yarn over, pull up a loop and take the magic
ring from your finger. Work six single crochets
into the magic ring. To single crochet,
go into the ring, yarn over and pull up a loop, yarn over and pull through
the two loops on the hook. Take the hook from the loop
and close the magic ring. Pull the tail of the magic ring. See which of the loops moved. Grab that one close to
the tail and pull it. Grab the tail and pull closing
the magic ring completely. At the end of the first round, you left six stitches. For round two, increase on all stitches of
the previous round. At the end, you
left 12 stitches. Don't forget to place
your stitch marker. To increase simply work another single crochet
into the same stitch. On round tree work one single crochet
plus one increase, repeat six times to the end of the round at the end of 11, 18 stitches. Men. Repeat five more times. For Round four were
18 single crochets. Oh. Take the hook from the loop, cut the yarn leaving a
long tail, and it'll join. Undo the loop and take
off the stitch marker. To needle join, thread the
end on the embroidery needle. Go under the two top loops of the second
stitch to the left. Pull the yarn. Insert a needle between the top loops of the last
stitch of round four. I like to go under
the third loop of the same stitch as well. Pull the yarn until
the needle join is the same size as the top
loops of the other stitches. To finish off, catch a loop
on the inside of the cup. Pull the yarn. Go under the same loop again. Pull the yarn until
you have a loop. Go into the loop and pull creating a
knot and securing the R. The first cup is finished. Make another cup repeating
from the beginning. But this time, do not
needle join or finish off. In the next lesson, we'll join the two cups to make the top
of the heart. See you there.
5. Joining the Cups: It's time to join the cups, and to make it easier, we are going to knead are
two scraps of thread. Place the blue
thread on your hook. Insert your hook into
the next stitch. Take off the stitch marker. Yarn over and pull up a loop going under the scrap
thread as well. Place the white scrap thread on your hook and grab
the second cup, the one we finished off. Insert your hook under
the needle join and under the top loops of the stitch
directly below it, as well. Yarn over, pull up a loop, and as before, go under the
scrap thread on the hook. Yarn over and pull the yarn through the three
loops on the hook. Remember the order in which
you use the scrap threads, especially if you're not
using the same colors. I use the blue first
and white second. The first side of the
join is completed. The scraps of yarn
mark the two halves of the stitch we used
to join the two cups, which is essentially a
single crochet two together. They will be useful when joining the cups on the other
side of the heart. Place the stitch marker on
the stitch we just made. This is now the first
stitch of round five. To continue Round five work, 17 single crochets on
top of the second cup, bringing you to the
back of the heart. It's time to finish
chining the cups, and for that, we are going to look for our scrap
thread helpers. We are going to use the
same spaces as before, but in reverse order. First, we are going to insert our hook at the base of the set, we marked with a white thread. The second one we marked
with the scrap threads. Yarn over and pull up polo. We can take the
white thread off. We don't need it anymore. Then insert a hook at the base of the stitch marked
with a blue thread. The first one we mark with
the scrap threads, yarn over, pull up a yarn over and pull the yarn to
the three loops on the hook. The cups are joined. We don't need the blue thread anymore. You can take it off. To finish, round five, work
17 single crochets on top of the last
round of the first cup. At the end of round five,
we'll have 36 stitches. This technique of joining two amigo roomy pieces
is very useful. Imagine that instead of cups, you have two long tubes. Those could be legs, and if they are on
top of the head, they could be ears or antennae. Join me in the next lesson to continue to
work on the heart.
6. Rounds 6 to 12: We are now at the
end of Round five. Let's continue to
work on the heart. From round six to eight, we 36 single crochets. After round eight,
we can start to see the main part of the
heart starting to grow. Now we need to start to decrease to make the pointing
hand of the heart. On Round nine work, four single crochets plus one
invisible decrease. Repeat from the
beginning six times, at the end of your
left, 30 stitches. To decrease, go under the front loop of the
next sitch again, under the front loop
of the next sitch, yarn over and pull up a loop. Yarn over, pull through
the two loops on the hook. Repeat from the beginning
five more times. For round ten we three single crochets plus
one invisible decrease. Repeat six times to
the end of the round. At the end of round ten, you left 24 stitches. Oh. Repeat three single crochets plus one decrease to
the end of the round. Work 24 single
crochets for round 11. At this point, I like
to start the stuff, but before that,
we need to bring the long tail of the
cup to the outside. Thread the tail on
an embroidery needle and make it come out
between the cups. Pull the yarn. Stuff the heart. For round 12 work two single
crochet plus one decrease, repeat to the end of the round. At the end, you
left, 18 stitches. Push the stuffing down
with your fingers and keep your index finger behind
the stitch you are working into to avoid
catching the stuffing. Join me in the next lesson
to finish the heart.
7. Finishing the Heart: Let's finish the heart. Work 18 single
crches for round 13. Too loose. Let's try that again. Better. At this point, I like
to stuff a bit more concentrating the stuffing
down the sides of the heart. On round 14, work one single
crochet plus one decrease, repeat six times to
the end of the round. At the end you left 12 stitches. W 12 single crouches around 15. Before closing
completely, I like to reinforce the stuffing
a little bit more. Use the flat hand of a thicker hook to push the stuffing through
the small hole. Stuff the heart filling
all the corners, but don't overstuff or the stuffing may show
through the stitches. For the 16th and final round, decrease six times, leaving you with six stitches at
the end of the round. Take the hook from the loop and cut the yarn leaving
a long tail. Close the end of the
heart and finish off. Undo the loop and thread your embroidery needle
with a long tail. To close the heart, go
under the front loops of all stitches of the last round
and pull the yarn gently. Once you've cut all the loops, pull the yarn firmly,
closing your omega Rumi. To finish off the heart, go under one of the loops that go into the center
like this one. Ideally, use the one
closest to where you ended, insert the needle under
the loop, pull the yarn. Go under the same loop again and pull gently until
you have a loop. Insert the needle into the
loop and pull creating a knot. Insert your needle into the
center of the last round and make it come out anywhere between two stitches
on the heart. Pull the yarn tightly until the knot slides into the heart. The pointy end of the heart will be pulled inside,
but don't worry. Just pull it back out
with your needle. Old the pointy end of the heart and pull the
yarn again firmly, ensuring that the knot slides
further into the heart. Hold the yarn tot, and cut the yarn with the scissors
flush with the heart. The urn will disappear
into the heart. Be careful not to cut any
stitches of the heart. We have completed
our Omegoumy heart. Now it's time to
attach the kit chain. Seeing the next lesson,
we will do just that.
8. Attaching the Keychain: In this lesson, we are going
to attach the keychain. Let's start. To
attach your keychain, thread a long tail
that's at the top of the heart on your
embroidery needle. Grab the keychain hardware and go through the left
link of the chain. Insert your needle
into the heart, one round over where the
tail is coming out of. Make the needle. Come
out where your tail is. Pull the yarn firmly, pulling the kitchen
into the heart. Go into the last link of
the chain, pull the yarn. Go back into the
heart and come out the other side of the round using the same spaces as before. Pull the yarn firmly. Repeat a few more times going into the last
link of the chain. And then into and back
out of the heart. Once you're satisfied that the key chain is
firmly attached, go again into the left link of the key chain into the heart and come
out anywhere on the body of the heart
between two single crochets. Pull the yar. To finish off, turn the heart right side up. Go under the closest loop
of the stitch on the left. Over you came out
of, pull the yar. Go under the same loop again, forming a loop with a yarn. Go through the loop and
pull creating a knot. Insert the needle into the
bottom of the loop knot is on and make it come out
on the opposite side. Pull the yarn firmly, pulling the knot
inside the heart. To make the nut, go even further into the heart, place your needle under the loops of the
stitch on the right, and the stitch where
you created the nut. Pull the arm firmly while you pull the needle in the
opposite direction. Hold the arm firmly and cut
it flush against the heart. Be careful not to cut the
stitches of the heart. And there you have it a
super cute aigramy heart. The heart we just
made is about 4.5 centimeters or 1.77 " wide, and about 5 centimeters
or 2 " tall. If you want a slightly
bigger heart, you can use the same exact
pattern and instructions, but substitute the
fine weight yarn with medium weight yarn and the 2.5 millimeter hook
with a 3.5 millimeter hook, size E in the US, and nine in the UK. The bigger heart is more
or less 8 centimeters, 3.15 " wide, and 6
centimeters, 2.36 " tall. In the next lesson, we'll
make cute little faces, and our cute little
hearts. See you there.
9. Make the Face: In this lesson, we are
going to add the face to our amg roomy heart and
make it even cuter. To make the face, we'll
need 40 centimeters, about 16 " of the black and
pink fine weight yarns, and a few sewing pins. We'll start with the eyes. Before making any stitches, I like to try out the placement
and shape of the eyes. Place the end of the black
yarn in the shape of an arch on top of the heart where you would like
to make the left eye. Play around with the placement, height and width of the eye. Once you're pleased
with the shape and placement of the eye, mark it with your sewing pins. Make sure to mark the
start and beginning of the arch and
its highest point. Thread the black yard on
your embroidery needle. Insert a needle through the back of the heart
and make it come out at the front where you mark the outside
corner of the eye. Pull gently leaving a tail of more or less 10 centimeters, 4 " at the back of the heart. Go in and out of the
fabric of the heart, creating little dashed stitches, following the shape of the eye. Take the sewing pins
off as you go along. Try to make at least three
stitches and always end with a blank space between the last stitch and
the working yarn. Insert your needle
from the outside of the arch to the inside, under the last stitch you made. Pull the yarn gently.
The last dash can become loose when
you work under it. To fix this gently pull the
stitch, made to tighten it. Repeat for the
remaining stitches. Go into the outside corner
of the left eye and come out four to five stitches to the left of its
inside corner. Pull the yarn gently, completing the left eye. Repeat from the beginning
for the right eye. Make the shape of the eye with the yarn to check its
placement and shape. Mark the shape with
the sewing pins. Make the little dash stitches following the shape of the eye. If at any point you don't
like the shape you created, just take the needle
from the urn, pull the stitches
out and try again. If your stitch
comes out twisted, pull it out a bit, laid
it on top of your work. Place your thumb on the yarn
and pull the yarn carefully. Your stitch will
come out perfectly. Insert the needle from the outside to the
inside of the curve of the arch under the
black stitches without catching the
stitches on the arch. Insert your needle into
the inside corner of the right eye and make it
come out one round below. Pull the yarn gently,
completing the right eye. The mouth is essentially the same as the eyes,
but upside down. Make the shape for
the mouth with the yarn and mark it
with the sewing pins. I made the corners of the mouth aligned with the inside
corners of the eyes. Make the stitches in
the shape of the mouth. Insert your needle under
the dashes, one at a time, from the outside of the curve of the mouth to the
inside, pull gently. Insert a needle at
the right corner of the mouth and make it
come out at the back. Leave it for now.
To make the cheeks, grab the cut pink yarn and thread it on your
embroidery needle. Insert a needle at the back of the heart and make it
come out at the front, a little bit inside the left
corner of the left eye. Pull gently leaving
a ten centimeter, 4 " tail at the back. Insert your needle 1.5 stitches to the right
of where it came out previously and make
it come out at the inside corner of
the cheek. Pull gently. Insert your needle into the outside corner of
the cheek and make it come out at the inside
corner. Pull the arm gently. Insert your needle
once more into the outside corner of the
cheek and make it come out a little bit inside the
outside corner of the right eye. Pull
the iron gently. Insert the needle
1.5 stitches to the outside and make it come out at the inside
corner of the cheek. Pull gently. Insert the needle on the outside corner
of the cheek and make it come out at
the inside corner. Pull the iron gently.
Insert the needle into the outside corner of
the cheek and make it come out at the back of the
heart. Pull the iron gently. Finish off and we in all the ends at the
back of the heart. To finish off, go under the
closest loop of the stitch on the left of where you
came out of. Pull the yarn. Go under the same loop again, forming a loop with the yarn. Go through the loop and
pull creating a knot. Insert your needle into
the bottom of the loop your knot is on and make it come out on
the opposite side. Pull the arm firmly, pulling
the knot inside the heart. Place your needle
under the top loops of the stitch on the right and the stitch where you
created the knot. Pull the arm firmly
and at the same time, pull the needle in the
opposite direction. Hold the yarn firmly and cut
it flush against the heart. Be careful not to cut the
stitches of the heart. Repeat for the remaining tails. You've just created a
super cute emiromy heart with a super cute face. You can use this
technique to add faces to your other
Emiromi as well. It's fun adding faces
to our little hearts. But if you want to know
how to add a message, jog in the next lesson.
10. Write the Message: Okay. If you prefer, you can write a message on
a heart. Let's do that. To make the message, you'll
need 61 centimeters, 24 " of the fine
light gray yarn. Thread it on your
embroidery needle. Insert the needle at the back
of the heart and make it come out at the front where you want to start your message. Since my first word
is one letter long, I'm going to come out a little bit to the right of the
center of the heart. Pull the yarn gently, leaving a ten centimeter or 4
" tail at the back. Insert your needle, two stitches to the right and
make it come out. Two runs below align with the center of the vertical
line we're about to stitch. Pull the arm gently. Insert your needle under the
first line we just made, and at its center, make the needle come out
two rounds below, under the left end of
the line at the top. Pull the arm gently. Insert the needle, two
stitches to the right. Make it come out one round below and four to five
stitches to the left. Pull the iron gently completing the first word. Insert your needle,
two rounds below and make it come out 1.5
stitches to the right. Pull the iron gently, creating a vertical line. Insert the needle at the bottom of the vertical
line we just made. Make it come out at the
same height as the top of the vertical line and 3.5
stitches to the right. Pull the yarn, creating an horizontal line and
completing the letter L. Insert the needle at the
same height of the bottom of the directly below of where
it came out of before. Make it come out one stitch to the left and one round above. Pull gently leaving a bit
of slack on the yarn. Catch the yarn with
the needle and go back into the same spot
it came out before. Make the needle come out
at the top of this letter. Pull the yarn holding the long line on the
left in a curved shape. Insert the needle at the
bottom of the curved line and make it come out one round above and one
stitch to the right. Pull the arn gently, leaving
a bit of slack on the yarn. Catch the yarn with
the needle and go back into the same spot it
came out of before. Make the needle come
out one round above. Pull the yarn, holding the long line at the
right in a curved shape, and completing the lateral. Lay down the urn on
top of the heart to check where you're going
to make your next stitch. Insert the needle,
two rounds below, and one stitch to the right. Make it come out,
two rounds above, and one stitch to the right. Pull the Rn gently completing
the first half of a V. Go back to the bottom vertex of
the V and come out one sched to the right of the top of the second
half of the V. Pull the RN gently
completing the V. Insert your needle,
two rounds below. Make it come out two rounds above and two stitches
to the right. Pull the yarn gently.
Insert the needle on top of the vertical
line we just made and make it come out one round below
and one stitch to the right. Pull the yarn. Insert the needle, one stitch to the left under the vertical bar. Make it come out at the
bottom of the vertical bar. Pull the yarn. Insert the needle, two
stitches to the right, and make it come out
one round below, and six stitches to the left. Pull the iron gently,
completing the letter E. Insert the needle, one round below and one
stitch to the right, and make it come out one round above and 1.5 stitches
to the right. Pull the iron gently. Insert a needle, two rounds below, align with the outer end of the
diagonal line we just made. Make it come out
two rounds above, and one stitch to the right where the yarn is coming out of. Pull the yarn
completing the letter Y. Insert the needle, two rounds below, and
make it come out, one round above and one
stitch to the left. Pull gently, leaving a
bit of slack on the yarn. Catch the yarn with the needle, go back into the same
spot it came out of and make it come out at
the top of this letter. Pull the yarn,
holding the long line at the left in a curved shape. Insert the needle
at the bottom of the curved line and
make it come out, one round above and one
stitch to the right. Pull the yarn leaving
a bit of slack. Catch the yarn with the needle, go back into the same
spot and make it come out one round above and
1.5 stitches to the right. Pull the yarn gently,
completing the oh. Mm, I came out a bit far.
I'm going to go back. I have a stitch to the left. There, better.
Insert the needle, two rounds below, and make it come out, one
stitch to the right. Pull the yarn gently.
Insert the needle at the bottom of the vertical
line we just made and make it come out two rounds above and one stitch
to the right. Pull the yarn. Insert your needle at the end of the horizontal
line at the bottom and make it come
out at the back of the heart between
two single crochets. Finish off and within both
ends at the back of the heart. To finish off, go under the closest loop of the
stitch on the left, pull the yarn, go under
the same loop again, forming a loop with the yarn. Go through the loop and
pull creating a knot. Insert your needle into the bottom of the
loop your nut is on and make it come out on the opposite
side of the heart. Pull the arn firmly, pulling
the nut inside the heart. Place your needle under
the loops of the stitch on the right and the stitch
where you created the nut. Pull the iron firmly while you pull the needle in the
opposite direction. The nut will slide even
further inside the heart. All the yarn that and cut
it flush against the heart. Be careful not to cut the heart. Repeat for the other tail. You can write different messages using this simple
type of stitching. Here is another one I made. And you can use
the same technique on your other Eigomi as well. There you have it. They are
ready to gift and enjoy.
11. Thank You: And that's it. Thank you so much for spending this
time with me today. I hope it was helpful and you enjoyed creating this
cute amgramy heart. Have fun making lots of amgrimy hearts with different colors, different size looks and
yarns, and different messages. Spread the joy by gifting them to your friends and family. If at any time I
want to be too fast, please remember that you can
use the discussion step to ask any questions and
that you can download the pattern in the project and resources step where
you'll find step by step tutorials of
all the techniques used to make our little heart. Sure to post pictures of your finish arts in the
project and resources tab. I'm super excited to see your Amgurumi and now
you're going to use them. Leave a review on this class
so I know if you liked it. I have many more coming, and I really appreciate
your feedback. Click the follow button below, so you'll be notified
when a new class is live. I'm really glad you decided
to take this class, and I'm really excited
to see what you create. Thank you so much for
watching. See you next time.
 Ana Rosa, Amigurumi and crochet designer