Transcripts
1. Welcome: Hello, everyone, and welcome to amigurumi Basics, flat shapes. I'm Ana. I'm the Migomi
designer behind Buddy Rumi. In this class, we'll build our flat shape sampler
while learning how to crochet simple geometric
shapes like a circle, a square, a triangle
and many more. This is the first class in a mini series where
we start with simple flat shapes
that then will be used in the last class to create an adorable amigurumi project. Now, you might be thinking. Wait, isn't amigurumi about
crushing three D plushes? Why are we learning
about flat shapes? Well, let's ask our
little robot friend. I, I may be T D, but I made from lots
of flat pieces, my face nines are
rectangle into circles, my control panel, my rectangles,
squares and triangles. Even my head and body are built from flat
shapes sewn together. Thanks, little robot. And there's another important reason to learn flat shapes. Almost every pretty crochet
shape starts as a flat shape. So by learning the basics, you'll build skills that
will help you create any kinds of amigurumi
project, play the ron. This class is perfect
for beginners who want to explore the many
possibilities of crochet. Grab whichever hook and
yarn you have on hand, and let's get started.
2. Project: Welcome. I'm so happy
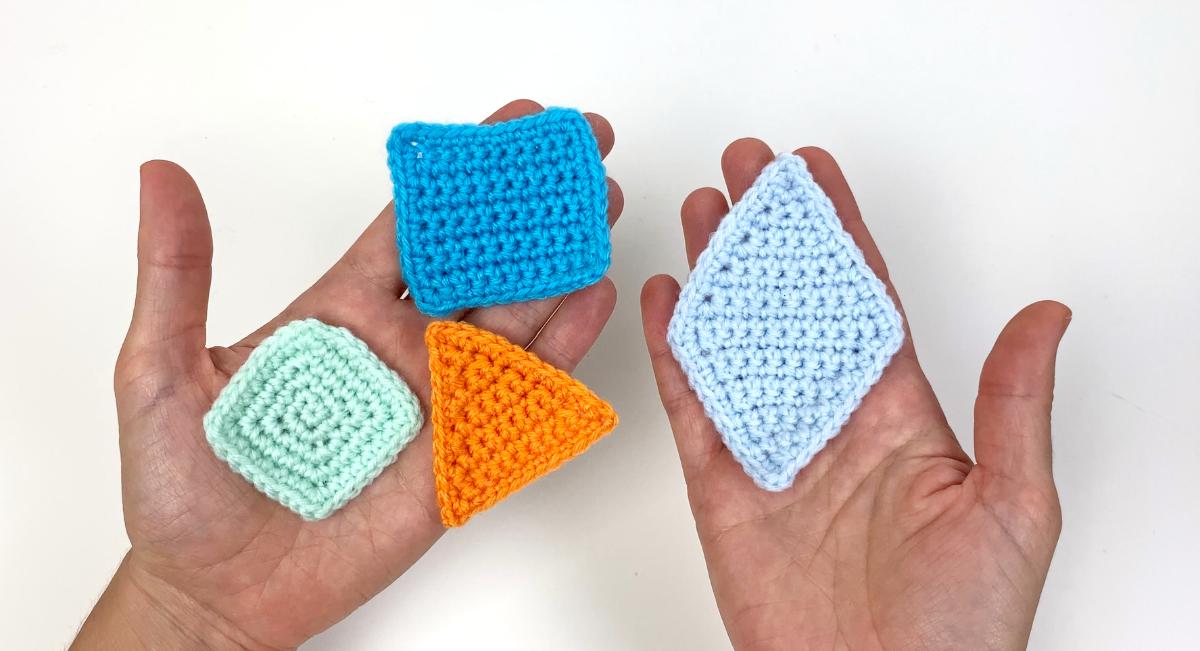
to see you here. In this class, we'll
start building our shape sampler by learning
how to make flat shapes. We'll begin with
circles and novels, then move on to squares,
triangles, and diamonds. After that, we'll learn how to crochet pentagons,
hexagons, and octagons. In the final lesson, I'll also show you a
special technique to crochet rows so all your
stitches face the same side. Don't forget to download the written patterns from the
project and resources step. You'll find all the patterns for the shapes we make
in this classy. And remember to share
your progress in the project and
resources step as you complete your shapes.
I'd love to see them. Share your project with
the rest of the class, go to the project and
start the step under this class and click the Submit Project
button on the right. Add a picture and a brief
description and click Publish. If you have any
questions along the way, feel free to leave them in
the discussion section. I'm always happy to out. Met me in the next lesson to find out what we'll need
to start our sampler.
3. Materials: For this class, you'll
need whatever yarn you have on end and a suitable
hook for your yarn. Check the label of your yarn to see the recommended hook size. I'm using a medium weight yarn
and a 3.5 millimeter hook. That's an E four for the US
and size nine for the UK. You'll also need scissors, embroidery needle
and stitch markers. Now that we have all we need, let's learn how to
crochet a circle.
4. Circle: The starters off on
our shape sampler, we are going to learn how
to crochet a flat circle. The circle is the best
for many amigurumi, and because of that, it's really important to master
this simple shape. To crochet a flat circle, you need to start with the
right number of stitches. If you start with too many, your work will become wavy. And if you start with too few, your stitches will
bunch up into a cop. Taller the stitches
you're using, the more stitches you
need to start with. If you're working
with single crochets, start with six to
eight stitches. If you're working we
have double crochets, start with eight
to ten stitches. If you're working
with double crochets, start with 12 to 14 stitches. No matter the stitches
you're using, you always start the same way. Where the recommend the number of stitches for
the stitch you're using into a magic ring or into a chain
turned into a circle. I'm working with single crochet, so I started with six
stitches into a magic ring, which is my preferred way
to start working in a run. To make a magic ring, wrap the yarn around your
index finger two times. Bring the working
yarn to the front. Make your hook, go under all
the loops on your finger, grab the last one and pull
it under the other two. Yarn over and pull
through the loop on the hook to secure
the magic ring. Take the magic ring off your finger and single
crochet into it. Going to the magic ring, yarn over and pull up a loop, yarn over and pull through
the tulips on the hook. One single crochet.
Into the loop, yarn over and pull up a loop, yarn over and pull
through the tips on the hook, two single crochets. Three, four, five and six. To close the magic ring, take the hook from the loop and turn your magic
ring upside down. Pull the tail just a
little bit and see which of the loops of the
magic ring start to close. Grab it close to the tail
and pull it towards you, closing the other loop. Grab the tail and pull firmly, closing the magic
ring completely. To get a flat circle, we need to increase
by the same number of stitches we started
with in every round. Since we started
with six stitches, we add six more stitches
in every round. That means that the total
count will grow like this, six, 12, 18, 24, 30, and so on. Keeping this pattern helps
the circle to stay flat. If you had too many
or too few stitches, the shape will start to
curl or change form. For the second round, increase
on all available stitches. At the end, you
left 12 stitches. I the tail from the magic ring under the next stitches
by working over it. Don't forget to use
a stitch marker to mark the beginning
of your runs. To increase, work
another single crochet into the same stitch as before. Continue to increase all the way around to the
end of the run. On round three, work one single crochet
plus one increase. Repeat this pattern until
the end of the round. I'll need to repeat
it six times, which is the number of
stitches I started with. At the end you
left, 18 stitches. For round four work two single crochets
plus one increase, repeat to the end of the round. At the end of this round, you left 24 stitches. On Round five were three single crochets
plus one increase. Repeat to the end of the round. At the end of Round five, you'll left 30 stitches. To keep growing the circle, simply add one more
single crochet before each increase
in every new round. For example, on round two, increase in every
stitch on round three, one single crochet,
one increase. On round four, two single
crochets, one increase. On round five, three single
crochets, one increase. The next round would be
four single crochets, one increase, repeat
six times all around. To finish the circle, work a slip stitch into the next stitch and cut the
yarn leaving a bit of a tail. Thread the tail on an embroidery or ar needle
and needle join. Here's a neat trick to
always spread your needle. Add the end of the yarn between your index finger and thumb
on your non dominant hand. Place the eye of the
needle between the tips of your fingers on top of
where you feel the yarn. Push the needle down, and at the same time
wiggle it side to side. Your needle is threaded. To needle join, insert
your needle into the second stitch to the
left and pull the yarn. Insert the needle back into the stitch from where
the tail is coming out of and into the top loops of the
stitch directly below it. Pull the yarn gently
until the stitch is the same size as the top
of the single crochets. I like to go into the third loop of the same stitch as well. I think it makes the
needle joint kniter. The third loop is this
loop at the back of a single crochet right
below the back loop. This is the back loop, and right below it, we
have the third loop. Finish off on the back of the circle and
weave in the ends. To finish off, go under a loop at the back
with your needle. Pull the yarn. Go under
the same loop again. Pull the yarn gently
until you have a loop. Go into the loop and pull creating a knot and
securing the yarn. Weave in the ends, under a few stitches at the
back and cut the tails. And there you have it
a flat crochet circle. A flat circle can be
the starting point for many important shapes or a way to complete or embellish
your amigurumi. You can use it to create yes, buttons, spots, and
many other details. A fun variation of the
circle is the half circle. So if we started with
six single crochets, for the circle, for
the half circle, we are going to
start with three. 41 work, three single
crochet into a magic ring. Close the magic ring. Because we want to half
circle and not a full circle, we need to chain one
and turn our work. On row two, increase on all the stitches of
the previous row. At the end, we
left six stitches. Chain one and turn. On row three work one single crochet plus one
increase three times. At the end, we left
nine stitches, chain one and turn. Four row four work
two single crochets, plus one increase, repeat from
the beginning three times. At the end we left 12 stitches. Chain one and turn. Four oh five work
three single crochets, plus one increase,
repeat three times. At the end, we'll
have 15 stitches. You probably notice that a half circle follows the
same pattern as the circle. Just cut in half. And
just like the circle. If you want to make it bigger, simply add one more
single crochet before each increase
on every row. If you'd like, you can crochet
along the straight edge at the end to give the half circle a cleaner
and tidier finish. For that, turn the F
circle upside down. Chain one. Work a slip stitch into the same space as the
last increase of the last row. Slip citrecross up to the same space as the first single crochet of the last row. Cut the yarn, and it'll joint to the first single crochet
of the last row. Go under the top loops of the first single crochet
of the last row. And then between
the top loops of the less slip
stitch of the edge. Finish off at the back the same way we did for the circle. And that's how we
crochet one half circle. My favorite way to use the
F circle is to make years, but I also use it to make
this cute reindeer tail. Next, we are going to learn
how to crochet a novel.
5. Oval I: Next our no shaped
sampler is the oval. We are going to use two
different techniques to create our ovals, the first starting with a magic ring and the second
working around the chain. In the first
technique, the oval is worked in a similar
way as the circle, but with a mix of taller and shorter stitches in the same roungT start,
make a magic ring. Into your magic ring work. Two single crochets and
one half double crochet. To make a half double
crochet, yarn over, insert your hook into the
next stitch, or in this case, into the magic ring, yarn over and pull up a loop, yarn over and pull the yarn through the
three loops on the hook. Repeat one more time
from the beginning. One single crochet,
two single crochets. One half double crochet.
Close the magic ring. To keep the shape of the oval always work. Single crochets on top
of single crochets and half double crochets on top
of half double crochets. At the end of the first round, we'll still have six stitches
like we did for the circle, but because we are working with shorter and
taller stitches, the end result is an
oval and not a circle. For the second
round, increase on all stitches of the
previous round. The first two increases with single crochets because we are working on top
of single crochets. Don't forget your stitch marker. One increase with
single crochet. Two increases with
single crochet. Next, we have a half double crochet on the previous round, which means we need to increase with half
double crochets. Repeat from the beginning, always working single
crochets on top of single crochets and
half double crochet on top of half double crochets. At the end, we left of stitches. If you want to keep
increasing the oval, keep adding one
more single crochet before each increase
on each round, just like we did for the circle. This way, for the third
round, we'd need to work. One single crochet. Place the stitch marker. One increase with
single crochets. One single crochet. One increase with
single crochets. One half double crochet. And one increase with
half double crochets. Repeat from the
beginning one more time. At the end, we'll
have 18 stitches. To finish the oval,
single crochet to bring the height of the stitches down from the half
double crochet, slip stitch, needle join,
and moving the ends. Cut the tail and thread it on an embroidery needle
and needle join. To needle join, insert
your needle into the next stitch to the
left and pull the yarn. Insert the needle
between the top loops of the slip stitch and into the top loops of the
stitch directly below it. I like to go under the third
loop of this stitch as well. Pull the yarn gently
until the stitch is the same size as the top
loops of the single crochets. Turn your oval around, go under a loop at the back, pull the yarn, go under
the same loop again, pull the yarn gently
until you have a loop. Go into the loop and
pull creating a knot. We've in the ends, under a few stitches at the
back and cut the tail. And that's one way
to crochet ovel. The only difference
between the circle and this type of oval is
that to make the oval, we mix shorter and taller
stitches in the same round, and that is what gives
us the oval shape. In the next lesson,
we'll crochet an oval using a completely different
technique. S there.
6. Oval II: For this technical
silkro chain runs. But instead of starting
with a magic ring, we'll work around
the foundational chain to create our oval. For today's oval, we'll
start with 11 chains. To start the chain
first, we need to create a slip
note on our hook. Place the yarn on top of your index finger with
it still to the front. Slide your hook under the
yarn from left to right, then rotate it clockwise
back to its usual position. Yarn over and pull the
yarn through the loop on the hook. One slipknot. Remember that this
doesn't count as a chain. To chain, yarn over, pull through the
loop on the hook. One chain. Yarn over, pull through two chains. Yarn over, pull
through three chains. Four, five, six, seven, eight, nine, ten, and 11. To avoid gaps in the oval, work the first half
of the first round in the back bumps of the chain. Turn the chain and
insert your hook into the second bump from the hook and work one single crochet. Single crochet, eight
more stitches across. One. Two. Three. Four, Five. Six, seven and eight. On the last bump, we are going to create our first round end. And for that, we need to work three single crochets
into the same bump. Notice how your piece naturally turns upside down
as you crochet. Start working on the
other side of the chain. This time grabbing
the two top loops. Work the next stitch
on the second chain. The first chain is where you work the three single crochets. Work eight single crochets across up to the
penultimate stitch. On the last chain,
which is the same where we work the first
single crochet of the round, we two more single crochets, this creates the
second round and end. At the end of the
left, 22 stitches. Now we have a group of
three single crochets at each end of our work. You can think of these
groups as two halves of a circle of six
single crochets. When making the second
round of our circle, we increase on all six stitches. We'll do the same year,
but our circle is split in two ends with eight
stitches between them. To work the next
round, you'll need to increase on all three
stitches on each side. Increase on the first stitch
of the previous round. Mark the first stitch
with your stitch marker. Work single crochets across. The number of stitches between the two round and ends
is always the same. In our case, eight. Increase on the next
three stitches. Single crochet, eight stitches
across to the other side, and increase on the
last two stitches. At the end of Round two,
we have 28 stitches. For round three, work,
one single crochet, followed by one increase. Work eight single crochets
across the straight side of your work up to the first syncrease on
the previous round. Work one single crochet plus one increase three times
around the first curved end. Single crochet cross
with eight stitches, and finally, work on single crochet plus one
increase two times. At the end, we have 34
stitches on one forward, two single crochets plus one increase. I know. Eight single crochet across. Two single crochets plus
one increase three times. Eight single crochet across. And two single crochets plus
one increase two times. Leaving us with 40 stitches
at the end of the run. If you'd like to work more runs, keep increasing on the
halfs of the circle and heading one single
crochet before each increase. For example, the
next round would be three single
crochetsman increase, eight single crochets across, three single crochetm
increase three times, eight single crochet across, three single crochetma
increase two times. Once you're happy with
the size of the oval, it's time to finish off. But before doing
that, I like to work a few extra stitches to smooth out the edge
and prevent a kink. Work one single crochet. On lifted. And now you can
needle join and finish off. To needle join, go
under the top loops of the next stitch to the
left, pull the yarn gently. Go between the top loops of
the slip stitch and between the top loops and under the third loop of the
stitch directly below it. Pull the yarn gently
until the needle join is the same size as
the top stitches on the edge and finish
off at the back. To finish off, go under a loop
at the back of your work. Pull the yarn. Be careful not to pull the needle
joint too tight. Go under the same loop, pull gently forming a
loop with the yarn. Go into that loop and
pull forming a knot. Weave in the ends under a few stitches at the
back and cut the ends. With this type of oval, you can change the
length between the two circular ends simply by starting with a
shorter or longer chain. For this shorter piece, I started by chaining seven. And for this longer piece, I started with the chain 12. I like both styles of oval, but I use them for very
different situations. The oval where we start
with the magic ring has the tendency to get misshapen,
the more rounds you work. And that's why I
like to use it for smaller details
like eyes or spots. The one we start
with the chain can we worked up as many
rounds as we like, just as long as we keep increasing evenly on
the rounded ends. I like to use this type of
oval for the soles of shoes or feet or for straps where I want the
ends to be rounded. I can even imagine it as a
smiling mouse for a robot. Did you know that we can crochet squares in rounds? Oh, es. Join in the next lesson to
find out just that. And
7. Squares in Rounds: This is a fun one. We are
going to learn now to crochet square in
runs. Is it possible? It is grab your Hook. To make a square worked
in continuous runs. Start by working four single
crochets into a magic ring. On the second round, work three single crochets into each of the stitches
of the previous round. This will be the base for
the corners on your square. At the end, you'll
left 12 stitches. Remember to use a stitch marker to mark the first
stitch of the round. For the third round, work
on single crochet plus one increase with three single crochets in the next stitch. Notice how your work rotates naturally while you
make this increase. Work two single crochets and increase by three
in the next stitch. Repeat three times. Make one more single crochet
to finish the round. At the end, we left 20 stitches. By now, our work is clearly
looking like a square, and now it's just a matter of deciding how big
it is going to be. There are two simple rules for making squares in
continuous rounds. One, always make the corners in the middle stitch of the
corner in the previous round. And two, the stitches
between the corners, always increase by
two in each round. For example, if you were to single crochet between the
corners on round three, on round four, you'll work for single crochet
between the corners. Remember that the side where we start and finish the
round is split in two. That is why we
always start and end the rounds with half of
the single crochets. If you follow these two rules, you know that your square is
still a square and you don't need to count your stitches
at the end of every round. Just continue to work
to the desired size. On round forward, two single crochets,
increased by three, then work four single crochets, followed by an
increase by 33 times. And to finish work
two single crochets. At the end, we left 28 stitches. For round five, work three single crochets,
increase by three, W six single crochets plus
one increase by three, three times W three single
crochets to finish the round. At the end, we'll
have 36 stitches. A. Continue to increase to the desired size. To finish a square
work in rounds, I like to work the
same number of single crochet that I
finished the last round with. We finished round five
with three single crochet. So now we are going to
work three single crochet before working a slip
stitch and a needle join. The extra stitches, keep
this last edge straight. Take the hook from
the loop and cut the tail long enough to
needle join and finish off. Thread the tail on an
embroidery needle, go under the top loops of
the next stitch to the left. Pull the yarn. Go between the top loops of the slip stitch and of the stitch
directly below it. Go under the third loop of
the same stitch as well. Pull the yarn and
finish off on the back. Turn the square around, go under a loop at the
back. Pull the yarn. Go under the same loop again. Pull the arm gently
until you have a loop, go into the loop and
pull creating a knot. If you need your tails to be
a little bit more secure, there are two ways you
can make that happen. Go under a few loops
at the back as usual. Then go up or down a row or round and moving the tail
in the opposite direction, under a few stitches. Cut the tail. In the second way, go under
a few loops as usual. Go under the last two
or three loops again. And under a few of
the next loops. Cut the tail. My preferred way of making a megurom
is in the rounds. I prefer the uniform texture of having stitches always
turned to the same side. But the thing I love the
most when working in rounds is that your work
as in ven angs all around, and you don't need
to do anything additional to work up from them. In a piecework in rows
to have the same effect, you would have to make an additional round all
around your work. In the next lesson, we are
going to work one more square, but this time worked in rows.
8. Squares in Rows: In this lesson, we
are going to learn how to crochet square
in rows and how to finish its sides
so that they are all neat and ready to
use on your project. To make a square we
start by chaining the desired amount of stitches for the size of square we want. Let's work 11 chains. First, work a slip knot. Wrap the yarn on top
of the index finger of your non dominant hand
with the end to the front. Go under the yarn with your
hook from left to right. Turn the hook to get to the
position you usually work in. Yarn over and pull the
yarn through the loop, completing a slip knot. Two chain, an, pull through
the loop. One chain. Ano. Pull through the
loop, two chains. Three, four, five, six, seven, eight, nine,
ten, 11 chains. For one, work one single
crochet into the second change from the hook and then nine single crochets
across the chain. I like to work on the
back bumps of the chain. You can also work
in the back loop of the chain if you prefer. I like to work in the back
bumps because it leaves a cleaner finish and doesn't leave gaps between the
stitches and the chain. At the end, we
left ten stitches. Chain one, and turn your work. Because we are working in rows
and with single crochets, we need to chain one and turn before starting
the next row. When using taller stitches, you'll need a longer
turning chain. For example, for half
double crochets, chain two, for double
crochet, chain three. As a general rule, the taller the stitch,
the longer the chain. For rows two to nine, work ten single crochets across. Chain one and turn your work
at the end of each row. Here I am at the
end of Row nine. Before we continue,
I want to show you a really quick and easy trick
to check if you already have a square because
sometimes it's a bit hard to tell
just by looking at it. Take the hook from your work and fold the square in
half corner to corner. If the edge is match,
you have a square. Work enough rows to make the square as tall
as it is white. I worked up for nine rows, but it's my vary because
of the yarn you're using or your personal
tension while working. Now that we have a square, it's time to tidy up
the unfinished sedges. On row ten, work
nine single crochets plus an increased tree
into the last stitch, which means you need to work three single crochets
into the last stitch. Continue to single crochet down the side between every row. To avoid gas, if the next row begins
with a single crochet, instead of inserting your
hook below the stitch, go between the V in front of the stitch and go under the first loop
at the back as well. On rows that start with a chain, just go between the two rows under the stitch you
went into previously. Work three single crochets on the first stitch of
the initial chain. Tingle crochet cross and work tree single crochets
on the last chain. Single crochet up the
other side and were two single crochets on the same space as the first
stitch of the last row. So far, we've been leaving a
sharp tail to finish work. But if you want to sew your crochet piece
onto another later, you'll need to leave
a longer tail. I'll show you how to
leave a tail long enough to sew crochet
pieces together. Remove the hook
from the loop and place the square
on a flat surface. Loosely lay the working yarn all around the edges
of your shape. And double the
length of your yarn. Cut a bit further down the yarn, and that way, you
will always have a tail long enough for sewing. Undo the loop,
thread the tail on an embroidery needle or yarn
needle and needle join. To needle join, go
under the top loops of the next stitch to
the left and pull the yarn Insert your needle between the top loops
of the last stitch of the finishing and under
the third loop as well. Pull the end gently to avoid pulling on the needle
joint too much. This time, we don't
need to finish off at the back because we left a long tail at the end to attach this piece to another. You can easily
modify the square to create rectangles by
working less rows, like for this shorter one, where I only worked
up to five rows or by working many more rows
like I did for this one, where I worked up for 15 rows. Squares and rectangles can be used for little details like the snout on this cute
little cow or the buttons on this cute little robot or for bigger objects
like this backpack, where the top, bottom, and pockets are made of squares and rectangles
worked in rows. Next thing, our shape
sampler is the triangle. Join me in the next lesson
to learn how to crochet one.
9. Triangles: In this lesson, we are
going to crochet triangle. To make a triangle, we are going to work in rows. Tarpi crochet a chain
that is the size of the width of the base of the
triangle we wish to crochet. I changed 11 stitches for mine. For row one, work,
one single crochet into the second
change from the hook, and then nine single
crochets across the chain. I like to work into the
back bumps of the chain, but you can work into the
back loop if you prefer. Chain one and turn. Unlike a rectangle, a triangle needs to get
narrower as we work. So we'll use decreases to bring the sides of the triangle
towards the center. I like to work the first
row without decreases because it keeps the base of the triangle
nesting straight. For flat pieces, I like to use the single crochet to
together decrease. It doesn't leave unused loops at the back and makes the piece
feel stronger and neater. On row two work, a
single crochet together, six single crochets, and another single crochet
together at the end. At the end, we have
eight stitches. To single crochet, two together, insert your hook into the
next stitch under both loops. Yarn over, pull up a loop, insert your hook into
the following stitch, yarn over and pull up a loop. Yarn over and pull through
all the loops on the hook. Now we need six single crochets. One two, three, four, five, and six. And one more single crochet
together at the end. To keep both sides symmetrical, we need to work the same amount of decreases on both sides. You can already see that
the edges are starting to slant to the center,
Chain one and turn. I don't want the
sides of the triangle to narrow too quickly, so I'll alternate between rows with decreases and rows
without decreases. Keep repeating this pattern until the end of the triangle. For the third row, work
a single crochet across. Chain one and turn. On the fourth row work, a single crochet two together, four single crochets, and
single crochet two together. At the end of left,
six stitches. Chain one and turn. On the fifth row work
six single crochets. Chain one and turn. For the sixth row work, a single crochet two together, two single crochets, and a single crochet two together at the end we left for stitches. Uh, excuse the cutair. Chen onein and turn. On Row seven work four
single crochets across. Chen onein and turn. For row eight work two single
crochets two together, leaving us with two
stitches at the end. Chain one and turn. On Row nine work to
single crochets. Chain one and turn. Finally, four row ten, W one single crochet
two together, making the upper corner of our triangle with just
one stitch at the top. At this point, we
have a triangle, but we still need to
finish its edges. To do that, start a
single crochet down the left side of the triangle between the first
and second row. Place a stitch marker on
the single crochet you just made to make it
easier to finish the edge. As before, to avoid gaps when you have a
stitch on the edge, insert your hook between it. On the next row, we have a single crochet
together at the edge. Notice how it resembles the capital letter
from the front. In this case, I like to
insert the hook after the first leg of the N. Be sure to catch the loop
at the back as well. Before working into the
initial chain, chain two, and work a single crochet into the second
bump from the hook. At the corners, we
really need to work into the back pump so that the
edge of the triangle is even. Work ten single crochets
across the initial chain. Working into the initial
chain might be a bit harder because we already have stitches worked into it on
the other side. Oh. Chain two, work a single crochet into the second
chain from the hook. Start single crochet up the
right side of the triangle. We can cover the tail from
the chain as we work. That way we don't need to
weave it in at the end. Place the tail close to the edge of the triangle and
work around it. Work the last single crochet
of the edge on top of the single crochet together of the last row of the triangle. Chain two. Take the hook from the
loop and leave a tail long enough to needle join and
finish off undo the loop. Nle join to the first
single crochet of the edge, the one with the stitch marker. To needle join, go under the top loops of the
first stitch of the edge. Between the top loops of the last chain and between the top loops of the single crochet
together on the last row. Pull the yarn. Don't
pull too tight. Go under a loop at the
back of the triangle. Go under the same loop again. Going to the loop you just created with the yarn
and pull forming a knot. Weaving the ends under a
few stitches at the back. In pieces where I single
crochet it around, I like to go under the
stitches on the edge. Cut the remaining tails. One triangle worked in rows. We can control the rate at which the triangle
comes to a point. The triangle on the left is
the one we just made where we alternated between rows without decreases and rows
with decreases. For the one on the right, I decrease on all rows
except the first one. For this staller triangle, I wear three rows without decreases between the
ones with decreases. If we want a bigger base, we can, of course, start
with a longer chain. Triangles are fun to use as little details
on our Ming roomy, like the buttons on our
little robot friend or the nose on the sku utter. In the next lesson, we are going to make a
diamond. Join me there.
10. Diamond I: To make the diamond
using the first method, we need to crochet
a triangle just like the one we did in
the previous lesson, but without the finished edges. Work the triangle to the top, yarn over and pull up a loop. Take the hook from the loop and cut the yarn leaving
a bit of tail. Undo the loop, and now
you work quantum gravel. To make the diamond,
we are going to work a slip knot on our hook, grab the triangle with the unfinished sides and
flip it upside down. We are going to
work on the base of the triangle. Think
of a diamond. If we divide it at the middle, we get two triangles
joined at the base, one pointing up and
the other down. We just need the
second triangle. Insert your hook under the top loops of the first
stitch on the right. Yarn over, pull up a loop, yarn over and pull the yarn through the two
loops on the hook, completing a join with
a single crochet. This is one of the things
I love most about crochet. No matter where you
are, on your work, you can go wherever you want. Want to grow wider, narrower, grow to the outside, and back to the center again.
We can do that. Want to go back
without finishing this row around?
Yes, we can do it. Want to start working at
random point on your work? Sure. I just love the endles possibilities and
what you can make with them. Continue to single crochet across the base of
the first triangle. At the end of the 11th throw, we'll have ten stitches. I call this the 11th
throw because we already have ten rows
of the first triangle. Now it's just a
matter of continuing our second triangle the same
way we made the first one. Chain one and turn. For the 12th row, work one single crochet, two together, six
single crochets, and one single
crochet two together. At the end, we elevate stitches. Chain one and turn. On row 13, work eight
single crochets across. Chain one and turn. On the 14th row, work one single
crochet two together, four single crochets, and one single
crochet two together. At the end, we'll
have six stitches. Chain one and Turn. On the 15th row, work six single crochets. Chain one and turn.
Or the 16th row, work a single crochet,
two together, two single crochets, and one more single
crochet two together. At the envell four stitches. Chain one and turn. On the 17th row, work four single
crochets across. Chain one and turn. F 018, work to single
crochets two together. We'll have two
stitches at the end. Chain one and turn
on the 19th throw, work to single crochets. Chain one and turn. And for row 20, work one
single crochet two together to make the tip of the
second triangle with just one stitch at the top. To finish single crochet on the first side and
mark the first stitch. This way is easier to know where to needle join
into at the end. At the first corner,
work one single crochet, chain one, and work another single crochet into
the same space. Single crochet on the next
side, covering the tails. No At the bottom corner, work one single
crochet, chain two, and another single crochet
into the same space. Single crochet up the next side. At the second shallow corner, work one single crochet, chain one plus one single
crochet into the same space. Make sure to make this corner at the same height as the
corner on the other side. Continue to single crochet
on the next edge to the top. At the top, work one single
crochet and chain two. Take the hook from the loop and cut the yarn leaving
a bit of a tail. Needle joint to the first
single crochet of the edge. To needle join, go under the top loops of the first
single crochet of the edge, the one marked with
a stitch marker. Pull the yarn carefully
and make sure that the top loops of
the chain are facing up. They tend to roll over
when we pull the yard. Go between the top loops
of the last chain and of the last single crochet of
the finishing, pull gently. At the back, go under
a loop, pull the yarn. Go under the same loop again, pull slowly forming a
loop with the yarn, go into the loop and pull creating a knot and
securing the yarn. Weave in the ends.
I like to weave in the ends under the
stitches on the edge. Cut all the tails close to
the back of the diamond. Be careful not to
cut your stitches. And that's one way
to make a diamond. In the next lesson,
we are going to learn a different technique for
how to crochet a diamond. Join me there to know how.
11. Diamond II: For the second method, we'll work the
diamond in one piece, starting at the point on the bottom and ending at
the point on the top. To start this diamond work
a slip t and chain two. Work three single crochets into the second
change from the hook. Chain one and turn. On the second row, work three single crochets
across Chain one and turn. Let's do that again. For rotary, increase on the first stitch, work on single crochet, and increase again
on the last stitch. Turn one and turn. We'll have
five stitches at the end. Work five single crochets
across for the fourth row. Chain one and turn. On row five work, one increase, plus three single crochets,
plus one increase. At the end, we'll
have seven stitches. Chain one and turn. Work seven single
crochets for row six. For row seven, increase
on the first stitch, W five single crochets, and increase on the
last stitch of the row. At the end, we left
nine stitches, chain one, and turn. On row eight, work nine
single crochets across. Chain one, and turn. For row nine, work one increase, plus seven single crochets
plus one increase. At the end we have 11 stitches. Chain one and turn. H. Work 11 single crochets for row ten, chain one and turn. One half of the diamond is made. Now we need to start to decrease
to make the other half. So for row 11, work one single crochet, two together, seven
single crochets, and one single
crochet two together. At the end, we'll have nine
stitches, chain one and turn. For Row 12, work nine
single crochets. Chain one and turn. For the 13th throw, work one single crochet, two together, five
single crochets, and one single
crochet two together. At the end, we have seven
stitches. Chain one and turn. On Row 13, work seven
single crochets across. Chain one and turn. On the 15th row, work one single crochet, two together, plus
three single crochets, plus one single
crochet, two together. At the end we have five
stitches, chain one and turn. Oh for row 16, work five single crochets
chain one and turn. On row 17, work a single
crochet, two together, one single crochet, and one more single
crochet, two together. At the end, we left
three stitches. Chain one and turn. On the 18th throw, work three
single crochets across. Chain one and turn. For ow 19, work one single crochet, three together, leaving us
with one stitch at the end. Two single crochet,
Tree together, go into the next stitch, yarn over and pull up a loop. Go into the following stitch, yarn over and pull up a loop. Into the next stitch, yarn over and pull up a loop. Now you have four
loops on your hook. Yarn over and pull the yarn through all
the loops on the hook. And that's one single
crochet tree together. Finish the diamond the
same way as the first one. Single crochet on the first
side, Mark the first stitch. On the first corner, work one single crochet, chain one, and one single
crochet into the same space. Single crochet down
the next edge. Work one single crochet, two chains, and another single
crochet into the corner. Single crochet up the next edge. Make a shallow corner
with one single crochet plus a chain and another single crochet
into the same space. Single crochet up the left side. On the top work,
one single crochet, chain two, and needle joint to the first ditch
of the finishing. To needle join, go under the top loops of the first
stitch of the finishing. Pull the yarn and make sure that the chain is facing
to the outside. Go between the loops
of the last chain and into the last single
crochet of the finishing. Pull the yarn. At the
back, go under a loop. Go under the same loop again. Go into the loop we just
created with our yarn, pull forming a knot with
in the ends and cut. Be careful not to
cut your stitches. Here are the two
diamonds we made in this lesson and in
the previous one. They are basically the same. The only difference is that
in the one on the right, from the middle, downwards, the stitches are upside down. Just like the triangles, we can control their
size by working more or less rows without
decreases or increases, between the ones with
decreases or increases. In this long one, I worked
three rows without decreases, between the ones with decreases. For this little guy, I increased and then
decreased on all rows. How you make your
diamond, it's up to you. Choose a technique that
works best for your project. Join me in the next
lesson to find out how to crochet a pentagon, hexagon, and an octagon.
12. Pentagon: Next for a ship sampler, we are going to
crochet pentagon. To make a pentagon,
start by working a slip note on your hook
and chaining 11 stitches. Work one increase plus
eight single crochets, plus one increase on
the chain for row one. At the end, we left 12
stitches, chain one and turn. For the second row, work 12 single crochets
across Chen and turn. On rotary, increase
on the first stage. Work ten single crochets and increase again
on the last staige. At the end well
life 14 stitches, Chen one and turn. Work 14 single crochets
across for row four, chain one and turn. Four row five,
work one increase, plus 12 single crochets,
plus one increase. At the end we left, 16
stitches, chain one and turn. Work 16 single crochets, four row six, chain
one and turn. No. On row seven, work on increase, 14 single
crochets, and increase. At the end we left, 18
stitches, Chain one and turn. On row eight, work,
18 single crochets. Chain one and turn. Four row nine,
work, one increase, 16 single crochets,
and one increase. At the end we left 20 stitches, chain one and turn. For roten work, 20
single crochets, chain one and turn. Now we are going to
start to decrease to make the top part
of the Pentagon. Work one single
crochet, two together, 16 single crochets, and
one single crochet, two together for the 11th row. At the end we live, 18 stitches, chain one and turn. Because I want the
top to decrease at a faster rate than
what we increased for, I'm going to add two more
rows with decreases. And so for row 12, work one single
crochet two together, 14 single crochets plus one
single crochet two together. At the end, we have 16
siches chain one and turn. Four row 13, work one single
crochet two together, 12 single crochets, and one
single crochet two together. At the end, we left 14 stitches, chain one and turn. Work 14 single crochets, four row 14, chain one and turn. On w 15, work one single
crochet two together, plus ten single crochets plus one single
crochet two together. At the end, we
left, 12 stitches, chain one and turn. For row 16, work one single
crochet two together, eight single crochets, and one single
crochet two together. At the end we left ten stitches, chain one and turn. Four row 17, work one single
crochet two together, six single crochets, and one
single crochet two together. At the end well left
eight stitches, chain one and turn. Work eight single
crochets for row 18. Chain one and turn. On row 19, work one single
crochet two together, four single crochets, and one single
crochet two together. At the end of left,
six stitches, chain one and turn. Work two single crochet, three together for row 20. At the end of left,
two stitches, chain one and turn. And finally, to make our
pentagon really pointy, W one single crochet
two together. To finish the pentagon, single crochet on
the first edge. Don't forget to mark the first
stitch of the finishing. On the first corner work
one single crochet, chain one, and one more single crochet into
the same space. Single crochet down
the second edge. On the initial chain, first move the tail out of the
way into the back. Then work one single crochet, chain one plus one single
crochet only in the same space. Work eight single crochet
across ding the tail. No On the last ditch, work one single crochet, plus a chain one plus one single crochet
in the same space. Single crochet up the next edge. Make sure that the corners on the side of the Pentagon are between the same rows on both
sides for this corner work, one single crochet, chain one, and one single crochet
into the same space. Single crochet up to the top. Work one single
crochet on top of the 21st row of the pentagon, chain two, and needle joint to the first single
crochet of the finishing. Take the hook from the loop and cut the yarn leaving a tail. To needle join, go under the top loops of the first
ditch of the finishing. Pull the yarn gently. Make sure that the
chain is facing out. Go between the top loops
of the last stitch, pull the yarn carefully
until the join is the same size as the
top stitches of the edge. Finish off at the back
and cut all the tails. Go under a loop at the back, go under the same loop again, forming a loop with the yarn. Go into the loop and pull creating a knot and
securing the yarn. Weave in the ends at the
back and cut all the tails. And here's our pentagon. With a few small changes
to the pentagon, we can also create a
hexagon and an octagon. To make a hexagon, start the same way as the
pentagon, up to row ten. At this point, you
should have 20 stitches. From here, you'll begin
shaping the other side. Work one row with
20 single crochet. No changes, then start
decreasing on both sides, every other row until
you're back to 12 stitches. For example, on row 11, work 20 single crochet. On row 12, single
crochet, two together, 16 single crochets, single
crochet, two together. At the end of left, 18 stitches. For row 13, work 18
single crochets across. On row 13, work one single
crochet, two together, 14 single crochets, and one
single crochet two together. At the end of left, 16 stitches. Keep repeating this
pattern, one decrease row, one regular row until you
reach 12 stitches again. The octagon is
made the same way, but with a few extra
rows in the middle. Start like the pentagon
up to row ten, where we have 20 stitches. Then work several rows
with 20 stitches. Now increases or decreases. I work ten rows. After that, shape it the same way as
the oxagon by alternating. One row decreases, one
row without decreases. Continue until you reach
12 stitches again. You can find the
full patterns for both shapes in a project
and resources page, along with all the other
shapes from this class. Pentagons, hexagons, and octagons are great for
decorating your amigurumi. You can use them as buttons like we did with the
squares and triangles for our little robot friend
as spots or other details. For example, they would look
at able as giraffe spots. We could make these
shapes in the run, but that would involve
chains for the corners, which can leave small holes. For amigurumi, we usually want a tight fabric
with no gaps. That's why working in rows
is a better option here, even if it takes a
little more effort. If we want our stitches to face the same side when
working in rows, we can use inverted
crochet technique. That's what I want to show
you in the next lesson.
13. Inverted Crochet Technique: When we crochet in rows, the stitches on each row
face opposite directions. This can create visible
lines in the fabric. For amigurumi I usually prefer
to work in rounds because all stitches face the same side and the fabric looks smoother. But sometimes working in rounds isn't the best option for
the shape we want to make. A helpful way to work around. This is a technique I like to call the inverted
crochet technique. To use this technique, start by chaining the number of stitches you need
for your shape. Work your first single crochet to the second change
from the hook, single crochet
across, chain one, and turn just like
you normally would. Here is where it's different. On even number rows, you bring the yarn to
the front of your work. With the help of your thumb, keep the working yarn always to the right side of your hook. Usually, we would insert our hook from the
front to the back, but to work the inverted
crochet technique, we are going to invert our
stitches on even number rows. For that, we need to insert our hook from the
back to the front. Yarn over, make
the hook go under the working yarn and grab
it. Bring up a loop. After grabbing the yarn, pull it through the stitch
and to the back of your work. Yarn over once more and pull the yarn through the
tu loops on the hook. You just completed
a single crochet worked with inverted
crochet technique. Let's do that again.
Go under the top loops of the next stitch from
the back to the front. Always keep the yarn to the
right of the hook. Yarn over. Pull up a loop, yarn over and pull the yarn through
the tu loops on the hook. Into the next stitch. N over, pull up a loop, yarn over and pull through
the two loops on the hook. It may feel a little
awkward at first, especially in the
first rows where we don't have too much
fabric to hold on to. But with some patience and
practice, we get there. The fronts of the stitches on both rows are facing
the same side. Remember to chain one before turning and
starting the next row. On the out number rows,
we work as usual. The result is a fabric worked in rows where all stitches
face the same side. We can use this technique when creating all
types of shapes, not just squares, and we can use it with most
crochet stitches. On pieces worked with
inverted crochet technique, we finish the sides the
same way we did before. Just make sure that the
front of the stitches, the little vis face the same side as the
ones on the edge. Parachute little robot friend, I use flat shapes
to build the head, body, the face, the panel, and its little buttons. As you can see, I use the inverted crochet
technique in all of them. I think it gives a cleaner, smoother finish, with
an even texture. Now that we have our
great sampler or flat shapes to spark
our imagination, I invite you to join
my next class in this series where we are going
to crochet three d shapes.
14. Thank You: Congrats One more
class finished. Thank you so much for
watching my class today. I hope it was helpful and that you learn new
exciting things. Continue to practice making
the shapes we crochet it in this class and experiment
with their variations. Remember that the patterns for all the shapes we crochet in this class are available in the project and resources staff. If you have any questions
or need any help, please ask in the
discussion section. I'm here to help and clear
any doubts you might have. Be sure to post pictures of your shape sampler in the
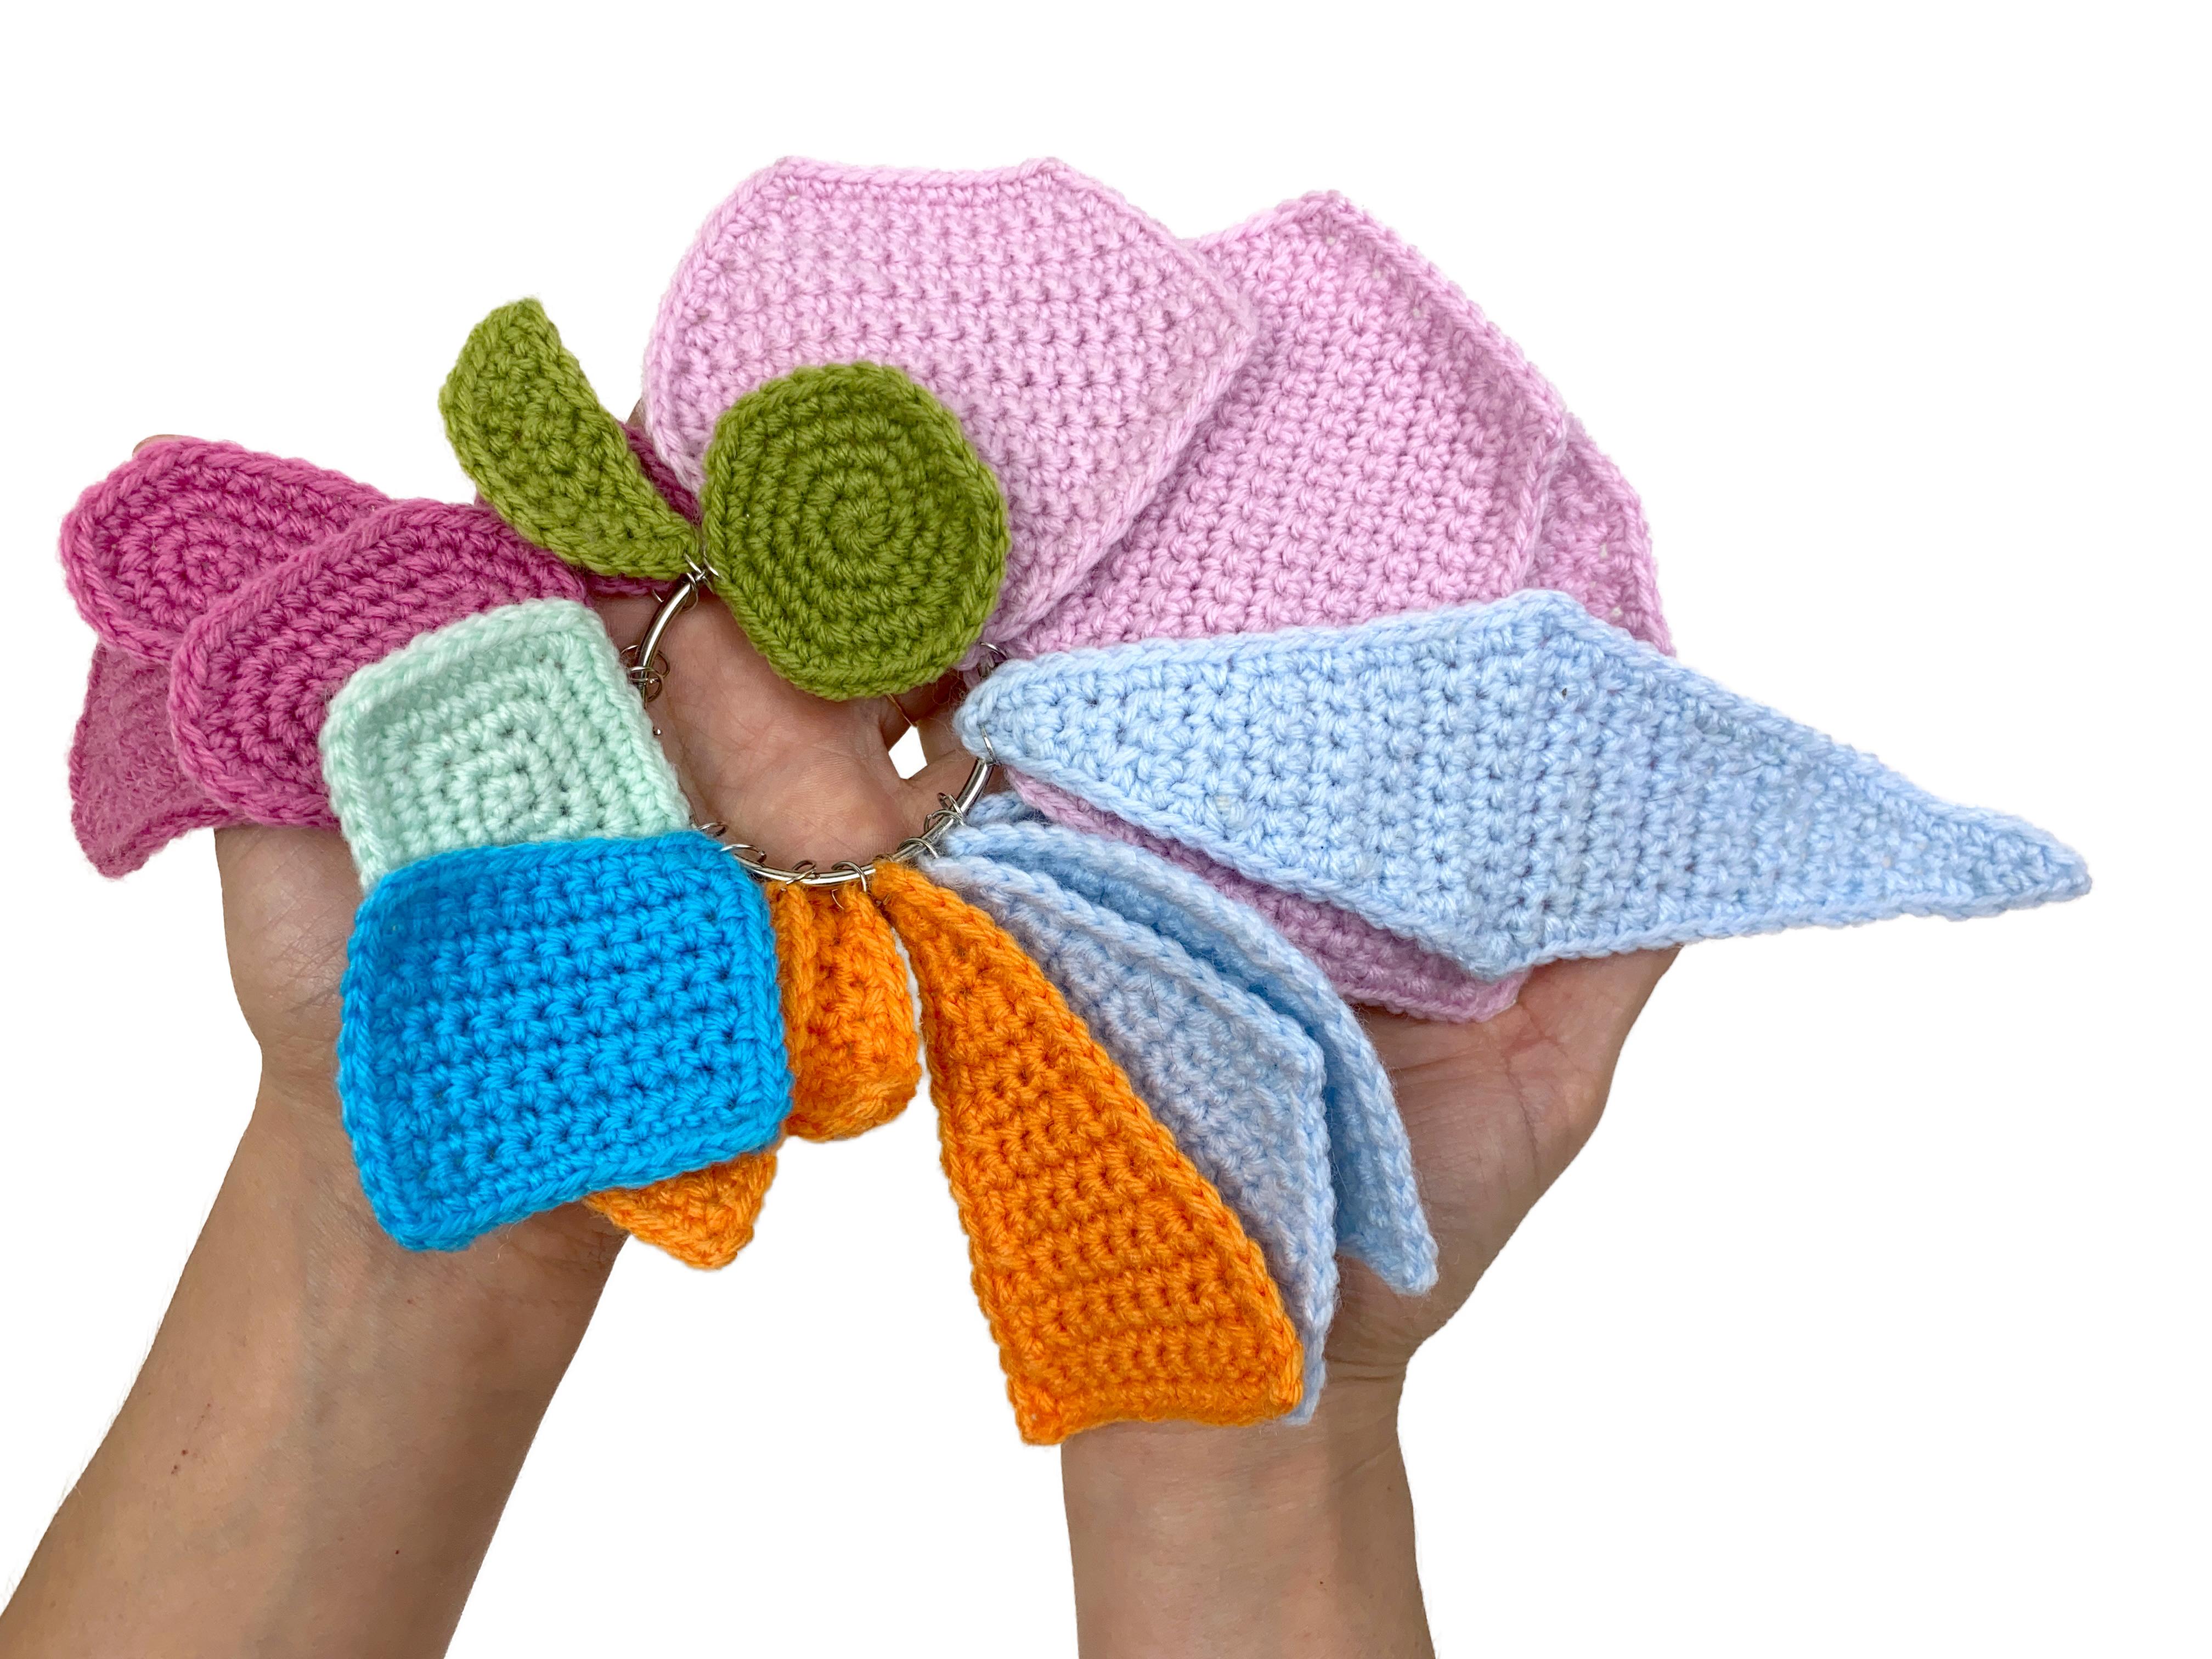
project and resources page. You can post pictures of
your shapes as you finish. Can group the shapes in a
ring like I did with mine, keep them in a
special fancy box, attach them to a felt or crochet book or do
whatever you prefer. The important thing is to have them all at hand in a way that it's easy for you to grab and use as reference
whenever you need. In the next less of this series, we are going to tackle
pretty crochet shapes. Make sure to follow me to be
notified when that happens. Thank you so much for watching, and I hope to see you soon.
 Ana Rosa, Amigurumi and crochet designer