Transcripts
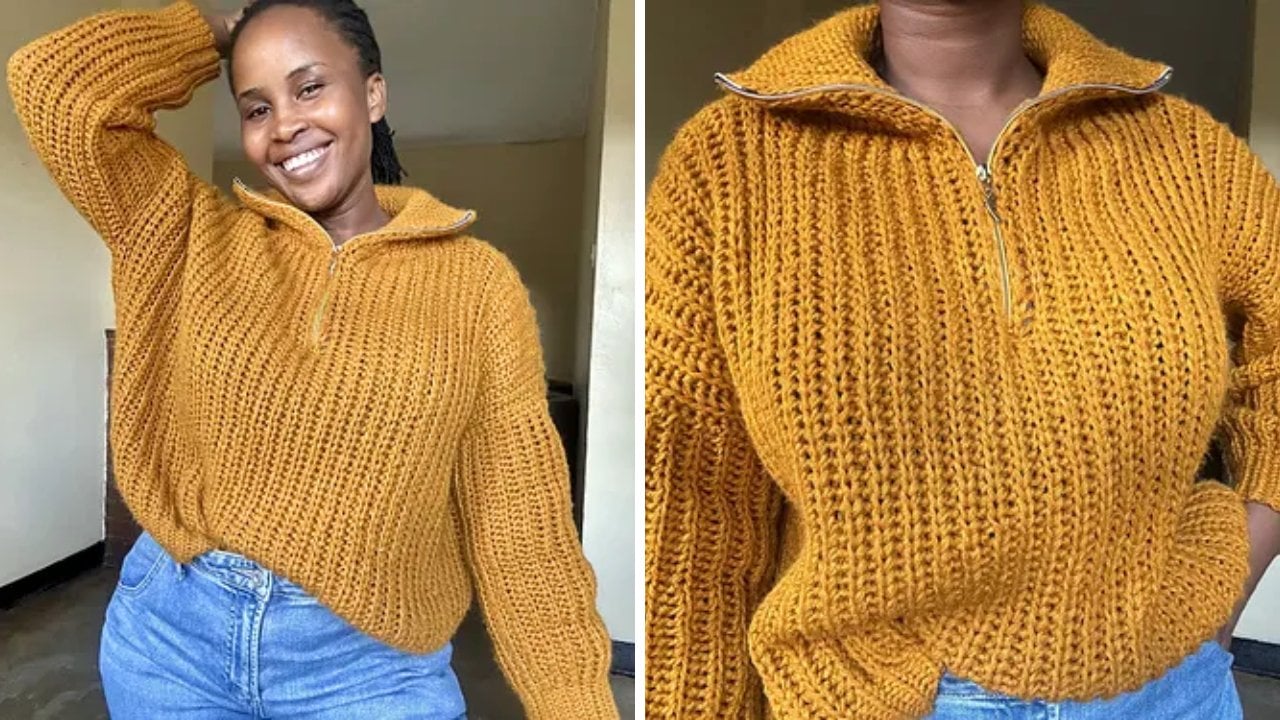
1. introduction: The best part about making your own tier
wearables is that you customize each piece to fit your body and your
style. Hi, there. I'm Charity from Sutent crochet and I'm a passionate
crochet designer. I love creating everything from stylish crochet clothes
to adorable baby items, and of course, some lovely,
fluffy, playful toys. What I find most exciting about
crohing your own garments is the freedom to choose the fit and look
that best suits you. And of course,
this year joy that comes from making something
that's truly old. So in today's class, you're going to learn
how to transform basic crochet stitches into your own unique
custom modro piece. We'll cave associate techniques, including the slip stitch, which adds a ribbed knit
look to your sweater. And I'll show you have
to bring everything together with minimal sewing
for your seamless look. This class is perfect for
anybody who's always wanted to crochet their own
clothes and had a bit of personalization they w. At the end of our time together, I hope you walk
away with your new, cozy handmade
Taylor made perfect to fit you sweater for
your winter collection. I'm so excited to start
this journey with you. So why don't you grab
your crochet hook and joy let's make this
crochet sweater together.
2. Materials : Before we get deep
into the course, let's talk about
everything that we need. We are going to be
using three pairs of crochet hooks for this sweater. The biggest will be
the 5.5 followed by the four millimeter and the
3.5 millimeter crochet hook. The 5.5 will come in very handy when
we're working the body. The 3.5 will mainly be
used to make the sleeves. So this part of a sweater and the bottom band
of the sweater. The four millimeter, we're just going to use this
to make the collar. So we're going to use a three
millimeter because we need the sweater to have
more of a hold on the wrists and on the waist. But if you have a larger waist, then you can always go for
the four millimeter hook. And we're going to use a
four millimeter because we need the neck o pending to be a bit larger so that our head
can easily get in and out. Of course, we're going to be
needing four stitch markers, especially when
we're done making the color because the
construction of elsewhere, we're going to start
with the color, and then we're going to
start working the body attaching the body to the color. It's very easy. Trust me. We're going to need the
colors so that they can tell us where to begin
the front panel, where to end the front panel, where to begin the back
and where to end the back. Plus we might be needing it for when we're working the body. Make sure you have the
stitch markers very close. The measuring tape may ads for the end or when you're trying
to measure your gauge. But I don't really
need it as much, but then I always measure
my work so that you know what measurements
I have considering, assuming that we're
making the same size. A needle, this is for
weaving in the end. So For example, I'm wearing a cardigan
right now and I have not done
weaving in the ends. This little thing right here, it does not look nice. We use the yarn needle in order to hide the
weight this yarn. The scissors to
chuck off the yarn, the fining bits, and
of course, the yarn. I don't have the yarn on me
right now because I will be frogging a crochet project
to make this weather. I do not have the bulk of yarn, but we'll be using
a wasted weit yarn. Make sure you have any
worsted weight yarn with you, any of your choice, it could be any color, but make sure it's cotton or acrylic, and that's about it,
on the materials.
3. Construction : All right, then, now, let's
talk about construction. I figured it's going
to be so much easier for you to know what we're doing each and every step of the way. So I'm going to
start by giving you a little blueprint of how we're going to work
our crochet sweater. So let me start by saying, I hate having to connect
pieces together. I am not the type to crochet the arm separately,
the body, the front, the back separately,
and then sit down and start sewing everything
I'm not about that. And I hope you hit it too, if you do, then this is going to be so much
quicker for you. So, we are going to start
by making the color. Excuse my drawing. So we're going to make
the color separately. After we're done with the color, we're going to slip off the and leave our little
collar on the side, and then we're going to
start working our body. So we're going to make a chain. So this chain is going to
start from the shoulder. Ache mets here up to where
you want your sweater to be. So I'm going to
tell you to either make this longer or shorter. If you want a cropped sweater, if you want a longer sweater, if you want a sweater dress,
then this will be the part, the beginning chain of the body will determine
on the length. After we make the chain, we're going to work a
few rows of our pattern. And after we've
worked a few rows, these rows are going
to make the shoulder, the part that hangs off the
shoulder, that portion. And then when we are
ready now to start working the rest of the
body, from the chest, the whole rest of the chest, from the hanging off part of
the shoulder to the middle. That's going to make
sense when we get there. You are going to connect
what a row to the color. And then we're going
to work a few rows to decrease in order to make
the front the front. We're going to
work, I'm assuming, so ast from here to there, we have decreased a few rows. And then we're going to
work a few normal rows to make the front
portion of the sweater. And then to make the
to mirror this side, we're going to
increase a few rows. After we're done doing that, we're going to now work
another portion to make the other end of the sweater. We're not going to
cut off the yarn, we're going to continue. I'm assuming now this is flat
and we're working the back. We're going to continue by chaining a few chains to create
the arm hole right here, and then we're going to mirror what we did here for the back. And then we're just going to
close the side of the arm. Making sure that we leave
space for another arm hole, and then we're going to close the shoulder so the
back and the front, we are just the shoulder parts because the rest of the body will be
connected to the collar. We're going to sew them closed. So that's the only minimal
sewing that we'll do. Then we're going to
connect because this will be the under
arm section, right? We're going to connect your yarn to the under arm section, and we're going to make a chain. This chain will be enough
to make for the sleeve. So depending on where you
shorter drops or ends, you are going to
make a chain long enough to that reaches
just around here, or if you have longer sleeves,
you're going to do so. And I forgot to say this. We are going to be
working the bottom band. Of our sweater as we go. We're going to be using
a five millimeter. So this is the bottom
band of our sweater. For the body, we'll be using
our five millimeter hook. And then when we reach
the bottom band, we're going to be switching
to a 3.5 millimeter. What this is going to do is
going to make the stitches at the bottom so much smaller
than those on the top, and it's going to
give us this feel. Because that's exactly
what I did with this, I was switching between 5.5
to 3.5 to the bottom band. And it's like the same stitch, as you can see, I did not
have to connect anything. It just transitions from a larger stage to a very
much smaller stage, and it looks so much beautiful, and it looks very neat, and we're going to
do the very same thing for the sleeves. All right. So after we're done, we're just going to
close because of, we're going to start from this, work our way around
to the other end. So the only sewing
we're going to be doing is closing the shoulders, closing one side of the
sweater and the sleeves. And then we'll
weave in our ends, and what we did to the side, we will repeat the very same
thing to the other side. If this confused you, do not worry because I am
going to walk you through every single process
gnu my ugly urring. I just wanted to
give you an idea of how we're going to A.
4. Starting the collar: All right. To get
started on our collar, we are going to use our formalmo
crochet hook and our yn. We are going to begin
by making a slip knot. To make a slip
knot, I'm going to show you how I make
the slip knot. I like to crop the yarn between my pinky and ring
finger like so. Then I will take
the longer tail, wrap it around my fingers. Bring it through my pinky and my ring finger again and make a criss cross leg I take my hook in so it
underneath this yarn. O, the longer tail, and then tighten it on
the hook, just like so. To make the color, if
you want a longer color. Assuming you want
your poll neck, you are going to make the
chain so much longer. You can make a chain of 11, which is what the written PDF I have attached to the course
is going to tell you to do, but I am thinking
of a slim color. I am going to make six. One, two, three, or five, six. What we just did, we
have made chains, and I'm going to do
that again with you. Trick. Something you want to do or not do is make your
chains too tight. When you make your
chains too tight, it's going to make it so hard for you to work
into those chains. To make a chain, you
want to yarn over, pull. That's one chain. Pull
through the loop. That's your second chain.
Pull through the loop. That's your third chain,
pull through the loop. Fourth, f sixth. I said, I'm just going to
have five because I'm looking for a final color. If you want to go according to the written pattern that I
have attached to the course, you're going to
make a total of 11. After you've made 11, it
means when we start working, the collar is going to
comprise of ten stitches, like I have made
six, but at the end, the comprise of five stitches. To start working on the color, you want to turn your
chain upside down. When you look at it
like this, you're going to see that
it's an actual chain, which is why it's
called a chain. But when you turn
it, you're going to see the weird parts, the bumps. It's into this bug bumps
that I like to work into because it makes
that work so much neater. This is your chain,
that's your first stitch. We're going to be
skipping that stitch and we're going to be
going into the next one. The second stitch from the hook, you're going to go behind
into that bug bump. Then into that little bump, that's the stitch that's
bumping out, which is this one. You want to insert your hook, and we're going to
place a slip stitch to make a slip stitch. You va. This is yearning over like so. Pull the arm through. Now we've got two loops on our hook. Now you're going to continue and pull the arm through again. So that's how first slip stitch. Then into that second bump. Insert your hook,
yarn over, like so. Pull that year through.
You've got two lops now, and pull it through. All you're doing is you
slipping the stitch through, which is why the stitch
is a slip stitch. You find the next one,
insert your yard hook, yarn over, pull it through, and you pull it through again. That's how third. So you
hook in to the back. Yeah, I know pull through
and you pull through. That's our fourth. And
this is my last one. If you still go a
bit more to go, just pause the video and you meet me when you're
making the last one. This is the last one for me, p through and p th. And this is my work.
So this is row one. I want you to keep count
because it's very hard to keep count of slip stitches. This is e one to
start a second row. But before you go in further, I want you to just double count to make sure that you've got the five or ten or whatever number is
like you're going for. So it's one, two, three, four, and five. They're still going to look like chains when we look
at them from the top. So I've got five chains, and that's what I wanted. To start the second row,
we are going to chain one. Just like so and turn. This is the chain that we just made and we never
work into that, but into that next stitch. From row to going onwards and to however many rows
that you need to work to work your color, you are going from here on you're going to
work into the back loops of the stitches. I am going to place a number somewhere in the
screen to tell you whichever size you're making because I didn't
memorize the pattern, but I will place a
number or just a said, let me just refer to the riddle pedum that I
have right here right next to me so that
I can tell you how many rows you need
to work for your sites.
5. Working the collar: So I'll be working a total of 80 rows for of slip stitches. If you're working
an extra small, you're going to be
working a total of 60. So you're going to work
60 rows of slip stitches. We have just made one remember. So if you're doing
an extra small, you're going to be working
a total of 60 rows. I'm making a small, so I will be making a total
of 80 rows of slip stitches. If you're working, medium, you're going to work 100 rows. If you're working a large, you're going to be
working 120 rows. If you're following
the written pattern, which is a touch, the PDF at touched, all of this is written in that pattern. So I have made my first, now we're going to get
started on row two of 80. To work row two, like I said, you'll be working
into the back loops, so You're going to
insert your stitch into that loop right there into these loops at the back furest from your
hook or furest from you. You're going to
insert your hook into there and over pull
through and pull through. Remember, you want to make your stitches as loose
as can be not too loose, but loose enough that it's going to be easier for
you to work your next round. Because when you
make them too tight, it tends to be a
bit hard for you to your hook and you don't want that plus your collar might be a bit too tight. I have just finished row two. I'll chain one and ten, and I'll repeat row two into
the buck loops. Slip stitch. That's one. And that's two. That's 34 and five. Chain one, and ten. I will repeating this. I've just done a total
of three rows so far. I will continue to do this
for a total of 80 rows. And once I'm done with my AD, I will come back and I me.
6. Placing single crochet around the collar: All right, so now I am
done with my eight rows. So it's time to close
the ends, right? So I like to close by slip
stitch in both sides together. But just grub your
two stitch markers. And place one at the place one at the first row that you
made. So at the top. Right here. I'm going to place
one stitch marker at the first row you made
and the last you made. So that's one. And
excuse me. Another one. I'll place at the top. There we go. So these two stitch markers represent the first
and the last. So the first and
the 18th stitch. Now, what we're going
to do is we're going to slip stitch both sides together. Okay. So I've already done my chain one if you
haven't already do so. Make a chain of one and
make sure your color is straight as, like so. So what we're going to do is act as if you're about
to place a slip stitch. And do the same for the
other side of the color, and then we're going to
slip stitch those sides together just like that.
That's the first one. And then into the second one, act as if you're about to place a slip stitch and going to slip stitch
those sides together. Into the third and the
third of the other side. And you slip stitch
both sides together. So you're going to do that for the whole row and to your time. If you have more rows than I do, then pose the video
and finish off. As for me, I am at the end. There we go. So after I
have closed my collar, this is what it's looking like. We have now that perfect circle. So we're not about to be done
with the collar just yet. You're going to make
a chain of one. All right. Just like I did. Now, this is where your
stitch marker is because this is where you're going
to have your first stitch. So before we begin, let me just explain what
we're about to do now. We're about to go on the
side of each and every row. So 80 rows for me. It could be 120 for you, 100 for you or 60. So you're going to
go on the side of every row that you did and we're going to place
a single crochet. We're doing this so that
when we work the body, when we're connecting
the body to the color, it's going to be so
much easier for us. It's going to be easier
to see the stitches. Plus to work into the stitches so we will be using
a bigger hook. So that's another thing,
you want to make sure that your stitches
are not too tight. So the stitch marker is going to show you where
your first row is. I'm just going to
remove that for now. And where that
stitch marker was, I'm going to go in that stitch and place a single crochet. And then I'll take that stitch marker and I will replace it in there so that I don't forget that's where my
first single crochet was. So as you know, the slips to trues are
kind of hard to see. So first one was right there. The second one is going to
be this one right here. Now, you're going to work in between the ridges
and then on top of the chain in between the chain and then
on top of the chain. Because in between
right here is a row. On top of that chain,
that's another row. So how is that going to work? The next one is
right here on top. Actually, it's not. Next one is going to be right
here in between the chains. Right there, I'll place
my single crochet. Next one on top of those chains. I'll place my next
single crochet. Next one is in
between the chains. And then on top of the chains. So remember, you can keep count as you go so that you know
you're not losing count. If you had 60 rows
of slip stitches, you're to have 60 single
crushes at the end. And the last one obviously
is going to be where you left the other slip
stitch marker. I mean. So I'm going to continue doing
this all the way around. I'll make sure I
count my stitches, so that when I meet you, we can now finish off together and then get staged on to the
next part of our sweater.
7. Finishing the collar: So I have reached to the end. I've got one more stitch to
place my single crochet in, so I'm just going to
remove that stitch marker. And into that Astwar, is where my 80th single
crochet is going to go. So I'm going to take that stitch marker
and put it back in there. Now to connect the rows, you're just going to slip
stitch into that first. You're going to remove
that first one again. Slip stitch. This time, you're not going to go
into the back loop, you're going to go
into both loops. You insert your hook into both loops legs so
and slip stitch. Chain one to close the row. Let me do that again. I want you to keep
note of your stitch because we're going to have
to maintain that same stitch. Slip stitch. This is
your stitch right here. Chain one, this, and you
want to snip of f on. T up. Rub your stitch
marker and place it back into that stitch because that's still going
to be your first stitch. And so far, we are
done with our color. These little bits,
don't worry about them. We're going to weave
them in at the end, and they won't
have to bother us. So this was the color so far. We're done with the
first part of the work, and you can see
it stretches out, so there's so much space for your head to go in
and on this side, right here, this
is where the body of our sweater is going to go. All right, then. Now, let's get started
on the croche body.
8. Crocheting body: How many stitches you need: Now that we are all
done with the color, it's time to get
started on the body. I'm going to go
back to the graph to just show you what
we've just done. We have finished this part, now we're about to start
this part of our sweater. I have already done that,
which is the swatch for me. But I'm about to do it
with you on camera, so I will use a
different color on, and I'll make a smaller
version, but why not? I'll tell you how many
you need to change. Remember, I'm making
a size small. If you're making a
size small with me, you're going to follow the
number of chains, my stitches. But if you if you're
doing an extra small, then that's going to be
61 for you. Small is 71. Medium is 81, and the
large is 91 chains. Remember, if you're making a larger one like a sweat address, you can always chain more. This is the part. So Slip
slip by stitch, slip not. Sorry. I'm just going to
start with the chain of 20, but you're going to
assume my 20 is 71. So that's two, three, four, five, six, seven,
eight, nine, ten, 11, 12, 13, 14, 15, 16 17, 18, 19, and 20. So pause the video
and make your chain, the number that
you actually need, and then meet me right back. T. To begin, you're going to
take out the 5.5 millimeter hook and go to the
four millimeter hook. Okay. And now, remember how we were working in the back
bumps of our chain. When we start in the collar, we're going to do the
exact same thing. You're going to turn your
chain the other way around, and we are going to slip
stitch into the first ten. So into that second
stitch from the hook, go in the first slip stitch, so that's one. That's two. 34, and you're going to do this until you
have a total of ten. So I have done one,
two, three, four, five. Six, seven, eight, nine and ten. So now you grab your stitch
marker, you just get mine. You place it into
that tenth stitch. Because now, this ten slip
stitches will count as the bottom band
of your sweater. All right. Now you remove
that four millimeter hook. You go back to your
5.5 millimeter hook. Still working into
the bug bumps, we're now going to switch
to a half double crochet. So you Nova Into
that next stitch, still in the bu bumps,
insert your hook. Yarn over and pull through. You have three
loops on your hook. You're going to yarn over and you will pull through
all three loops. Let's go for the next one. You n over in set your
hook into the back bump, pull that loop through. You have three
loops on your hook. You will an over and you
will pull through all three, and you will do that
for all the stitches. Half double crochet. Half double crochet. Half the caffe, all the way
up to the end of the row. So pose the video and let's
meet at the end of the row.
9. Starting the shoulder : So at the end of the row, this is what your work
would be looking like. This would be the body, and
this will be the bottom band. Obviously, your work is
much bigger than this. You chain one and turn. So each time we're
going down our work, we're going to do slip stitches. Each time we're going up, we'll start with the slip stitch
into the first ten, and then we'll switch
to a half double croche that will be repetition
of the horse udder. So into that first stitch, into the back loop, slip stitch. In your slip stitch all the way down until you reach
the stitch marker. All right. So when I'm slip stitching, I like to hold my hook like
the knife and fork method. So post the video and slip stitch all the way down
to the stitch marker. I'm already there. And
when you get there, you can just play
the video again. When you get to
the stitch marker, you will switch back to the
four millimeter crochet hook, remove your stitch marker, and finish off slip stitching into that last ten with
your four millimeter hook. A just like I am doing. Remember, what this does is it makes sure that the bottom
band is nice and snug. At the end, ham one, and turn, already you can see that our pattern
is starting to form. But after we work our third row, that's when you're
going to see the ribbed pattern actually come to life. Still using that four
millimeter hook, you are going to
slip stitch into the first ten stitches again. That's one, two, three, five, six, seven, eight, nine, and that's my tenth. Grab my stitch marker, and I will place
it back in there. O. Remove my four
millimeter hook. Go back to my 5.5, and we're back to the
half double crochet. And we're half double
crochet in the bag loop. We ara, find our first
stitch into the bag loop. Place your half double
c. Y into the loop, half double cro, and you
do this all the way up. Just like so. Okay. And once you get the hang of it, especially when you're
working the body, you can just put on a
movie and crush away. I have reached the
end, but you want to pause because obviously
you're not there yet. Pause and let's meet at
the top of the work, and I can just show
you one more time what we do the next row. At the end of the
work at the top, you chain one and you turn and it's our slip stitch
again into the bug loop, go do slip stitch. So. And you slip stitch all the way down until you get to
the stitch marker. When you get to
the stitch marker, you're going to switch to
the four millimeter hook and slip stitch down
the last ten stitches. And then slip stitch back up, ten stitches with
the four millimeter, switch to the five qu 5.5 double crochet up. That's
what we're going to do it. We're going to repeat this going until you have the number
of stitches that you need. So you can side the
pattern starting to form. For my size, I am
going to do a total of 19 rows. That's for size more. If you're doing extra
small, you're going to do a total of 15 rows. For a medium, you're going
to do a total of 23 rows, and for a large, you're going
to do a total of 27 rows. After you're done
with those rows, then you're going to
meet back so that we can learn how to connect
to our color.
10. Separating the collar : So now it's time to mark
our collar before we start connecting the sweater, the body of the
sweater to the collar. So like I said, you're going to use
stitch markers. When you follow the
written pattern, I was going to show you but
then from my laptop and each time I try to get
the lotop on c mark, you'll just see the
big green light. I'm just going to
explain to you. So if you're going to follow the cruci pattern that I have
provided to this course, you're going to see a section
that says mark the collar. So you place your
first stitch marker in the tenth stitch. This is for my size, for extra small and
for size small. So you're going to start counting from
one of the stitches, and I'm going to leave
the stitches here because it's going to tell you will
show you where to begin. I'm just going to remove this
stitch right here and I'll count the stitch that had the stitch marker
as my first stitch. For size small, you are
going to count ten stitches. For extra small, you're also
going to count ten stitches. For size medium, you're
going to count 15, and for size large,
you're going to count 20. So one, two, three, four, five, six, seven,
eight, nine, ten. Into that tenth stitch is where I'm going to place
the first stitch marker. So that's ten
starting from here. I want you to remember that. Next, it says, place the next stitch marker
in the 20th stitch, that's for size small. For Extra small, you're going to go into the tenth stitch again, for small 20 for medium
into the tie stitch, and for large into the
20th stitch as well. We're all doing 20
except for extra small. What that means is,
you're going to start counting from one again. After the stitch marker,
start counting from one until you reach 20 or ten if
you're doing extra small. One, two, three, four, five, six, seven,
eight, nine, ten, 11, 12, 13, 14, 15, 16, 17, 18, 19, and 20. Into that 20th stitch, grab your second stitch
marker and place it in there. Now for the last stitch marker, for extra small, you're going
to count ten, for small, we're going to count
ten again, as well, for medium 15 and
for extra large 20. So one, two, three, four, five, six, seven, eight, nine, and ten. And then into that tenth stitch, again, place your stitch marker. So you can double check to make sure
everything is correct. But so This was the
first stitch marker, and this is the last
stitch marker we placed, ignoring this one
because this one was here to indicate where
they were began and ended. From this stitch after the last stitch marker to where that last or first stitch
marker was of the row, we should have a
total of 40 stitches. We have 80, if you're
doing working size. From the 80 we have
pretty much half that. From here to here, there's 40 stitches second. There is 40 stitches
and 40 stitches. What we have done here is just marked where we're going to decrease and work
the normal rows. So that when we fold the sweater in half like this, you
can tell where the front. Have you noticed how some
sweaters will lean down like this so that you know this is the front and that's the back. That's what we're trying to do. That's what we're going
to be decreasing. We normal rows and
increasing for the back, we're just going
to do normal rows. Instead of having your Instead of having
reversible sweater, we're going to have a front and back portion of our sweater. It's going to make
sense when we go. I hope you understand though. Like I said, between the last
stitch marker we placed, we should have a total of 40, so I'm just going
to count with you. One, two, three, four, five, six, 789, ten, 11, 12, 13 14, 15, 16, 17 18, 1920, 21 22, 23, 24, 25 26 and 728 to 930, 32, three, 34th 536-73-8309, and 40 into that last stitch
stitch marker right there. So that is how you section your stitch marker.
I mean your collar. So now we're going
to start connecting the body of our sweater or
shoulder to the collar. Make sure you do
not remove any of the stitch markers until we're
done for the front part.
11. Crochet sweater body: decreasing : Now, we are onto
my favorite part. I'm about to be done
with my 19 rows. To count the rows, the ribbed
area is the second row. This is row one, this is
R two, three and four. I just like to count in two, so I will go two,
four, six, eight, ten, 12, 14, 16, 18 and 19. Size more, remember we're doing 19 rows for the shorter portion. When you're about to
finish the 19th row, you're going to leave two
stitches unworked because we are going to
decrease in there. Let me just remind you
back to our color. Remember, we sectioned the color into one, two, three bits. Right? So the first ten stitches
for size small that is, we will be decreasing, then we'll work normal rows, and then we will increase. The purpose is so that
the collar can come down like so so that we can differentiate the
back and the front, instead of having the collars, you know, boring and
round like that. To work the decreasing, it means we'll be decreasing
on our main work. We're going to start
decreasing on the 19th row. To decrease, you're
going into your nova, insert your hook into
that next stitch. Pull that loop through. You have three
loops on your hook. You will not finish, you will
go into the next stitch. Pull up the loop so you
have four stitches. The idea is to turn these
two stitches into one. Let me just do that
again with you. You va as if to do a
half double crochet, insert your hook into
that next stitch. Pull up the loop, you have
three loops on your hook. You go into that next or the last stitch now,
pull up a loop. You have pot four, now v, and put three everything. Now those two stitches
have turned into one. From here on instead
of changing one, we will be connecting
to our color. I want you to pay attention. Remember, this was the
first stitch that we had, we counted ten to get to here. Into that first stitch. Ignore the stitch marker. This stitch marker
is just to tell me where the last stitch is. Because since we
slip stitch to join, sometimes it can be
hard to see a stitch. This stitch marker
here is just here as a reminder so that
we know this is where we're going to place
our very last stitch when we've made our way
all the way around. This one here is our first one. Into that first single
crochet right here, you will bring your home work, insert your hook
into that stitch. Like so. Grab your on
and you slip stitch, so you earn over
and put both loops. The idea is to just
connect the work. Let me do that with you one
more time to make it clear. All right. You work is still on the You
have just decreased. You will take your hook and then into that first
single crochet of the row, Insert you hook into that
first single crochet. Okay. I'm just going to
pull this out of the way. Then you're just
going to on v and slip stitch through both loops. It might be a bit tricky, I'm just going to pull
down my hook like so and pull that
through both loops. That's going to count
as our single crochet or chain, sorry. We have connected that row. That's row 19 to the collar. Now, to start the next row, you're going to slip stitch. Into that next single crochet. Let me do that with you again. The next single crochet would
be this one right here. The second one on
the Color rover, we've got a total of ten will be decreasing
for the next ten. The next stitch on
the slip stitch. Just like that, that's going
to count as your chain as well to start a new row, and
then you're going to turn. So we have just slip
stitched twice, one to join the previous row, another to start a new row. I want you to know
that this first two Vs at the four s stitches, we do not work into those. The actual stitch is
this one right here. If you want, after you
work your last stitch, at the very top, you
can always leave a stitch marker so that
it doesn't confuse you. But right now, just take
what I've told you. The first two Vs are the slip stitches that
we put onto the collar. If it's going to confuse you, you can just undo it and
then place a stitch marker. Into that last stitch
that we made before we start to slip state so that
you don't get confused. As usual, our work going
down is a slip stitch, and we are also going to
decrease that slip stitch. Ignoring our 24 stitches, we are going to
start as if we're going to do a slip
stitch, insert your hook, pull through, we finish, you insert your hook into
that next stitch as well, pull through, and then you just pull through both
loops, like that. That's how we have decreased. A slip stitch row, and then we slip stitch all the way down.
And you know this part. You slip stitch all the way
down and you get to the end, you switch to a four millimeter, finished at that bottom, chain one, steal the
four millimeter, slip stitch in to ten, switch the 5.5, half
double crochet up, leaving the last two. So when I come back up, I will meet you again so
that I can show you how we decrease one more time before I'll let you guys finish
of decreasing by yourself. So here I am at the
top of my work. I've got two more stitches left, and we are going to
decrease together. So n over. Insert your hook into that blop, pull through, and then insert your hook into the back
loop of the next stitch. Put through, one, two, three, four loops on your hook,
pull through everything. We have just finished that row. Now, you will find that next single croche that's
where we're going to slip stitch to join the
row to complete the row. To start a new row, slip stitch into
that next stitch. Remember, these two stitches
are the slip stitches, they're not our actual stitch. Our actual stitches,
this one right here. So L et me turn my work
and show you again. These two stitches are force. Our first one is
this one right here. Into that first one,
let's go in without the decrease slip stitch. In pull through, into
that next stitch. Put through and
finish off like that, and then you'll proceed to
slip stitch all the way down. All you're going to do is
repeat what I'm doing. As we go, you will see
that you are connecting your sweater to your
color neatly and so easy. I enjoy this part it's so fun and you can just
see we to come to life. So you're going to continue
until the stitch marker. When we're working
into that last one, I will meet you so that I can explain how we work
this next part. So proceed and I'll
finish off here. With you when I'm
finishing this one, I will come back
and I'll meet you.
12. Crochet sweater body: normal rows: So I got a bit
carried away and I worked the middle portion that we were supposed to
work the normal rows. So however, I'm going
to give you a rundown. So we worked rows of decrease according
to everybody's size. After those rows of decrease, you were supposed to end
where the stage marker was, which was around here
for mine here or here. Following that, we
will suppose we are you are going to
work normal rows, so we're not going
to decrease anymore. And by that, I mean, I'm just going to
demonstrate with one, but I have worked all
of my normal rows. I'm just going to demonstrate
with this next one. Assuming this is you at
the top of your work. Because remember before we were decreasing the two
last stitches up here, but now we are
just going to work normal half double cloche and then a last half
double croche in there. That's just like that, you
will connect your row. To finish and then to start in, you can slipstitch into that
next, and you will turn. We're also decreasing in
the slip stitch stitches. But now we're going to work
normal slip stitch rows. What that means is,
remember these two are the ones we used to
connect to the color, we're just going to go
into that first one and place one slip stitch and we're going to
place one slipstitch into each and every row. We're not going to be
decreasing anymore. That was just me
demonstrating that. So for the remember, you've got your
stitch markers here, so you have decreased up
until that stage marker. From that stage marker,
you're going to work the normal rows we
just demonstrated here. You're going to work until
the next stage marker. My next stage marker
was right here, and I have removed it. So I want you to post the video and work your normal
rows and then meet me so that we can now
start to increase for the last portion
of the color together.
13. Crochet sweater body: increasing : So after you're done
with your normal rows, it's now time to get back to the last portion of
our front collar portion, which is now the increase rows. So if you've ended at
the bottom of your work, I want you to just pause the
video and work your way up and just leave one stitch
left before the collar. But if you're already
there, then let's proceed. It's now time to
start increasing, and we're increasing
because we're trying to match or we're trying
to mirror this side. We decrease this side, so we have to increase the other side. So we're going to
be increasing up until going to be increasing up until the stitch marker
portion or section. All right. So to increase, we're
going to have to place two half double crochets
into that last stitch. So go in there with your first half double
crochet, anova, into that very same stitch, go in there with another
half double crochet. Slip stitch. Collar
join the row. Slip stitch the color
to start the next row. Turn your work. Just like so. Now we're also going to have to increase for the
slip stitch row. The first 24 stitches are where we slip
stitch to the color. Into that first stitch, we're going to place
two slip stitches. That's one in there again. With another. That's two, and we have done our increase. Then we're going to go
down just as normal. Switch to the four millimeter
hook and slip stitch, chain one, slip
stitch back to ten, half double crochet
all the way up. Then we'll work into the
last one right here. We're going to place
two half do crochets. We're going to repeat
doing what we just did here up until the stitch marker, where I will meet you so
we can finish together. Then let just explain after
we're done increasing. This area. We're going
to go back to making the other shorter
portion, just like that. So let's finish increasing just like I have showed
you right here and after when I reach that last stitch where
the stitch marker is, I'll get back on camera so
we can finish off together. Then I'll guide you on
how we can finish off the front panel by mirroring
this shorter portion. So good luck, and I'll see
you at the stitch marker.
14. Finishing front of sweater : I have just arrived where
the stitch marker was, which marked where I
finish increasing. Now it's time to replicate
this shorter portion. As you can see, this
portion was not connected to the
color whatsoever. What this means, Let's just
finish the row together. Stitches. So I'm just
going to finish. One and two. So I'm going to
assume you're also done with the shot,
the increased portion. So from here on, first of all, you want to take
that stitch marker. And please. So the last row of the color
was this lip stitch row, which was going downwards. So that was the
last row of the co. This new row is now
the shoulder portion. So this is now my
row of the shoulder. I'm just going to place my
stitch marker somewhere here. Mark this as my first row, Let's come back to this and count how many rows we
had for size small. That's one, two, three,
four, five, six, seven, eight, nine, ten, 11, 12, 13, 14, 15, 16. Let's t again two, four, six, 81012, 141618, 19 rows. We did 19 rows for size small. That means we're
also going to do 19 rows for the other side. This row right here is row one. To go onto row two of
the shorter portion, we're not going to
connect to the color, but we're just
going to chain one. We're going back to what
we were doing this side, just chaining one and turning and continuing with the row. Chain one, and we're going to slip stitches all the way down. Switch to a four
millimeter hook. When we reach the bottom
bend of the ribbed area, C chain one go up ten stitches with the
four millimeter hook. Switch to the 5.5 into the half double
crocs coming back up. When you get back up here, you're going to chain one and turn and you're going
to continue to do that until you've got
a total of 19 ropes. That's if you're making size for the other sizes.
Remember, we've got that. Um printed pattern, follow that. This site is going to
replicate the site. This is going to
take you a while, so you're going to
put on your favorite movie or your podcast, listen, or chill and cruce away. But I'm going to do
the rest of camera. Again, all we're going to
do is chain one at the top, we're no longer
connecting to the color. Once you're done
with your number of rows that you need the site, our comeba camera so we
can snip off together. We can fasten off together, and then I'll show you
how we now get stared on the back. Part of our color. So you chain one, Care done, the N, and you will start
to slip stitch. Just like so. Slip stitch all the way down at the bottom with your forma hook, do the bottom band,
chain one come back up. Half double croce chain one
at the top, turn slip stitch, and so on and so forth, and you've got your desired
number. This is row one. Remember, do not forget
that stitch marker, place it so that you can keep count of how many
rows you've done. I'm now on to my second row. I'm going to finish off 19 rows and I'll come back
so we can fasten off together and we'll get started on the back
portion together.
15. Fastening off and ending the front of sweater : So here I am finalizing the row, and that's my last half
double crochet of the row. I'm just going to grab
my pair of scissors. So to fasten off, you chain one, and then you cut off the
yarn, mine's ready cut. And after you chain
on, you just pull and fasten off you tighten. Let me just take that
apart and show you one more time how we fasten off. Okay. Let me just redo that last half double crochet
of the row because it done. To fast of, you want to
make a chain of one. Like so. Assuming your arn is to connected to the
rest of the yarn, you're going to snip it off, leave a bit of a tail
because we can use this to connect the
shoulders together, and then you just want to pull that and tuck onto that yarn, and you want to
fast just like so. With that, we are done
with our front panel. L that. Halfway with the body. Now we're going to get
started on the back, and how we do the back is exactly how we have
done the front. It's so much easier, however, because we were decreasing
and increasing on the sides. But for the back, it's just
going to be the 19 roles, assume you're doing a
size more like I am, and then we're just
going to connect the way we did the middle part, so we're not decreasing,
we're increasing anything. We're just going to connect
and then do the rest of the 19 roles to finish off
the other shorter portion. With that the part A of the
body of the sped is all done, let's get to the second part.
16. Starting the back of the sweater : So start in the back, we're going to start exactly the exact same way that
we start in the front. So if you remember, we worked that showed up panel. And for size small, we did 19 rows. So if you did the size smaller or you're doing a slight larger, then obviously the
number of rows you did was much larger. So I want you to go
back and repeat that. So make sure that
foundation, if you change 71, change 71, or if you added more
rows or less rows, make sure to do that as well and work that the number
of rows that you need. So I have already done
that as you can see, so I want you to post the
video and meet me right back after you're done.
So when you had done. Let's just finish
the row together. Obviously, you're going
to be a wrong stitch. I was just doing a cardigan and I was doing the
comfortable slip statag. But remember that
you're working your row at the top or near the color. Yes, so at the top of your work. Let me just untangle my yarn. Okay. Let me just
finish that row. So I've got two more stitches. One, and finally, two. So like I say, this is the fun part because there's
no more having a decrease or increase or the s.
So you want to bring back your body the front
panel that you did. So I made the mistake of
removing my stitch markers, but then I'm going to assume your stitch markers
are still in. So this next part, I want you
to be very, very careful. I've made the mistake. So let me there's a wrong
side and the right side. This right here
is the wrong side or the side that's
going to be inside, and the side with the pretty
penn that's the right side. So when you're connecting
the back to the collar, you want to make sure
that the wrong sides, so the flat sides are
facing each other. You don't want to
make the mistakes of putting the other side on the inside because
that means you have to undo your whole work
a start all over again, and you don't want to
do that. Trust me. So you want to make sure that the wrong sides are
facing each other. Again, the wrong sides
are the smooth sides. The right sides, are the
sides with the ribs, with the bumpy sides,
the pretty sides. So I've got the wrong side
facing me right here. As you can see, this
is the right side, and this is the wrong side. The wrong side facing me, I'm going to take the wrong side of the new shoulder panel, the back panel and lay
it on top of this one. If I count, there's
also 19 rows here, even though it looks bigger
than the one I've just done. So that's two, four, six, 18, 12, 14, 16 18 and 19. It's the exact same thing.
On this side right here. Okay. So wrong sides
facing each other. Check. Now, you want to find, I'm assuming you still
have your stitch markers connected to your color. So you're going to find the
next stitch marker available. For me, I don't need
a stitch marker because, I'm used to this. I know that my next available stitch is this one right here. So I will connect, making sure that the wrong sides are still
facing each other. I will bring my hook that's sill connected to the
previous row and insert into that next
available stitch, and then I will slip
stitch to join. A we go. Now we have joined
the rows together, just like I know it
looks like this side, this is smaller than this, but it's absolutely fine. You can always double count. If I'm going to double
count, make sure I have 19, two, four, six, eight, ten, 12, 14, 16, 18, and 19. Trust me. This is the same. You just need to
stretch it out a bit so that it catches up to
the previous work. But anyway, so we have connected
that row to the color. I'm now going to turn my collar so that I can work
with it smoothly. That connection, the slip stitch we did was to join that row. Now, remember to
start a new row with slip stitch to the next
available stitch marker, stitch, I mean, and then
you turn. All right. We're working on
this smaller panel. Now it's a slip stitch row, so you're going to
go down ignoring the two first four stitches. You're going to go down and
slip stitch all the way down. When you get to
your stitch marker, you switch to the
four millimeter hook, slip stitch down, and
then you come back up, switch to a five millimeter
after the ten slip stitches. When you reach the top, going to slip stitch to join the row, slip stitch, the next
one to start a new row, and then we repeat just
as we've been doing. And you're going to do
this all the way until the last stitch on the color. After you're done right there, that's when I'm
going to meet you, then we're going to finalize
the last shorter panel. All right. I hope
that made sense. Let me just explain
one more time. You are going to do as you've been doing for
the rest of the color. We're not increasing
or decreasing. We're just connecting and
going back and forth, connecting to the color, going back and forth until
the last stitch. Where the last stitch
marker is on your color. Once we have finished there, that's when I am
going to meet you. Good luck, take your time, and I will meet you when we
are done with the color.
17. Finishing the back: I have just finished
the back of the collar. So in other words, I have
finished the whole collar. Now, left with the
back shoulder panel, so 19 rows for my size. So I'm going to
do that with you. So I ended my row at
the top of my work. I'm not sure if it's the same
for the rest of the sizes, but chances are it probably
is. You'll be ending. Actually, yes, you'll probably be ending at the
top of the collar. But if you ended at the
bottom of the collar, that's absolutely fine as well. Start in the next row. I want you to grab a stitch
marker, so have it closed. And as you know to
start a new row, we were connecting to the
stitch to the collar. In this case, we're going
to go back to chaining one. So chain one and we turned. So obviously, the next
draw is a slip stitch row. Be coming up, it's always
a half table crochet. So I've chained
one, turn my work, and I'm just going
to slip stitch. So it's into that second chain
from the hook right there. That's where I'm going to go in the back loop with
a slip stitch. And I was lip stitch
all the way down, and you know the draw from here. However, what I wanted
to show you is, remember to always replace
your stitch marker. Or to put a stitch mark
into that first row. So when you're counting
for the 19 rows, you know where to stop. So I'm just going to this is
the slip stitch ro we did, so I'm just going to put my marker into there,
just like that, and I will go down with my
slip stitch with slip stitch, come back up with my
half double croche row, and at the top right here, I will chain one and turn. And so on and so forth. F here on we're not
connecting to the color because we've worked
around the whole color. We're just chaining one
and turning just like we did these portions. You're going to
continue to do that for the number of roles that
your size calls for. And after you're
done, after I'm done, I'm going to come back
and I will show you. The next appointment after this, the next class will be now
to lay the sweater down and close the colors and close
the sides of our sweater. So go ahead, work your
last shoulder portion, and I'll met you to connect the shoulder to
close the sweater.
18. Connecting the shoulders : You would have ended
at the bottom of your of your row with the formulma hook
because you'd have just finished the lip stitches
at the bottom band. You're going to leave your
stitch your croce hook there. You're not going to fast enough. But in a separate
strand of yarn, You will add your yarn to
your 5.5 millimeter hook. Because right now
what we're about to do is close the collar. Personally, I love to
use the crochet hook, not much for the yarn
needle and stuff. With your work, with the right side still
facing each other, the wrong side, the flat
side is the one facing you. We're going to start by closing the shoulder before we
close off the sides. You're going to take
the two ends together. I'm just going to
cut off the yarn from one of the ends since
I lift a bit of a tail. This is my ar to my hook, and these are the two corners. Remember. The right sides, the bed sides are
facing each other. You're going to insert your
hook to those corners. Let's do that again,
you're going to your hook into the
first stitches. The first stitch would be the side half double croche
rows into the very top. It might be a bit tricky, but you're going
to force your hook and it's going to get in there. Then you're going to pull
your with a sp stitch. Let's do that again.
This is one side. This is your first side
of the half double c row. Then you're going to
do the same thing for the other side just like, so grab your an. Slip stitch. There we go. It's going to look quite messy
at the beginning, but as we go, you're going
to get the hang of it. The next row is the slip stitch, you're just going to your hook. And the top on the other
side, stitch to connect. Most of the part, you're
just going to have to eyeball it and guess where
you're going to insert, but you're going
to have to try and make sure it's nice in meat. All you're doing
is going through the stitch to look like rows to connect
both sides together. If this is too hard for you, then just saw the pieces,
saw the sides together. Put your on the
needle and just saw the sides together as you
would do regular sewing. But personally, I prefer
this because it lasts longer and it's
looks nice to me. Like that, I am going to be
connecting the shorter panel. What we do on this
side, you will also repeat for the other side. You want to pay very
close attention. On the top. Sometimes it may not be
even, but it's fine. The stitch that we're
doing is very forgiving. Like so. And into the like so. I'm almost at the end. You don't want to
leave to big gaps between the lip stitch stitches. I know that they're
not actual stitches. We're just trying to find
visible ones to connect. Because if you leave a big gap, you're going to see your finger, there'll be a big hole
where your finger can go. We're trying to avoid
that as a possible. This is how I have to connect. Then sometime, you're going
to just try and see if there's a space like
this right here. My fingers to going in
and you can go a bit into the color to close that little
hole and just like that. It's gone. Once you're done, once you reach the end, you're going to just do a chain of one. C. And fast enough.
Nice and tight. This is what it looks
like on the other side. You have closed
off that shoulder. What we've done here, do the very same thing
for the other side. A
19. Connecting the sides : Once both sides are connected,
both sides of your color, as I've just done right now, it's time to connect the sides. I'm going to do one side
with you, the other side, you guys are going to
do by yourself. Okay. So I want us to first of all count or to estimate how much you want of an arm
opening to be left. So for size extra
small and small, I would suggest you
leave 20 stitches. For the size is large, I would suggest you leave 25. If you want a bigger arm, then you can go ahead and
leave 25 stitches at the top. That's absolutely up to you. But for the extra
small and small, I'm going to say you
leave 20 stitches. So how do we count
the 20 stitches? You're going to go from
the very top of your work. From the shoulder where
we just connected. You're going to see
that you can still see those stitches. You're
going to count 20. I'm doing a small remember, so I'm going to be
counting 20 from here going down for
both sides there is. Make sure you have your
stitch marker closed. Here is mine. So I'm going to count
20 stitches, one, two, three, four, five, six, seven, eight, nine, ten, 11, 12, 13 for 15, 16, 17, 18, 1920. This is 20 stitches for me. I want a bigger arm, so I might just do 23. So 23. F s the
option is up to you. So I'm going to do
23 for me and I'm SI sm and I'll leave my stitch
marker into the 23rd. Now what I'm going to do is
also count 23 from this side. So one, two, three, four, five, six, seven,
eight, nine, ten, 11 12, 13 14, 15 16, 17 18, 19221, 22, 23. So I'm going to connect
both sides together. Now my stitch marker
has connected on the 23rd stitch for both
the front and back piece. Now what we have to connect
is everything else done here. Remember I told you not
to pull out your yarn. Turns out it's the other
side, but it's fine. The yarn is connected to the other side that
I haven't started. I'm going to show you how you connect from this side anyway. But if you happen to be in
the same scenario like I am, all you have to do is
connect to your yard, to your working or to your hook, the four millimeter is. So I'm just going to
connect to the slip stitch. There we go now. This is your work,
you want to find the first stitch for both sides. So for the back panel. This is my first one,
and I'll go into the back loop because we're doing a slip stitch
remember to connect. Then for the front side, this is the first
one right here. I also go into the back loop. I've put my hook into the
back loop of each stitch. Just like that, I will over and I will slip
stitch through both. If you've noticed the first
stitch is always the most challenging to do,
but you get through. When I was recording, I had no idea that it stopped
recording by itself, so I lost a bit of footage, but good thing I didn't go far. You will connect using
the four millimeter hook, the first ten stitches of
both the front and the back. After you're done with
the first ten stitches, we're going to switch to
the 5.5 millimeter hook. What we're doing is, remember, we're just going into the into the back loop stitch
of the front panel, and then the back loop stitch. Of the back panel. We slip stitching both
sides, just like so. Into the back loop
into the back loop, pull together into the back
loop of the front panel, into the back loop
of the back panel, and you slip together,
and you're going to continue doing this with your five millimeter
and up until you reach the last stitches
before the stitch marker. What you've done
this side, you're going to repeat for that side. But when you reach the top or just before the
stitch marker, I'll meet you there and
when we meet will be done. We will be done with
connecting the sides and we'll be getting
started on the sleeve. So What we did do this side is exactly what you're going to repeat
on the other side. This side is still
open. We're going to finish the
sleeve on the side, and then once we're
done with this sleeve, I'll let you guys fly
because you'll be good to finish the other
side by yourself. So Just a recap. We're connecting the back and the front panel
through slip stitches, and we're just slip stitching
into the back loop. We're just connecting,
inserting a hook into the back loop of the front panel and then
going to the other panel, doing the same thing
and you will connect. You want to do that
all the way up until the stitches before
the stitch markers. These stitches right here. Once you get there, I'll
meet you and when we meet, we'll be getting
started on the sleeve. I hope that made sense.
20. Crocheting the arms: Getting started on the sleeves. So your yarn is just
under the stitch marker, just like so, we're just going to start by
making that chain. That's going to get
started on our sleeve. To make the sleeve,
remember that we're using a four
millimeter hook to make the bottom
band of the sweater. Now we're going to
switch to a 3.5. Since it's smaller and we want the band to really
have a whole wrists. We're going to switch to
a 3.5 millimeter hook. Now, for the size extra small, The pattern is going to
turn chain 46 for small 56, for medium 66, and for large
76, I'm doing a small, so I'm going to be chaining 56, but I'm going to be
adding just a bit more since I want a bit
of a longer sleeve. Remember, like I said, this is your sweater, you
can play around. Make them shorter or
longer if you want. Instead of 56, I'm
going to change 65. So you just going to
start one, two, three, four, five, six,
seven, eight, nine, ten, 11, 12, 13, 14, 15, 16, 17, 18, 1920, 292 23, 24, five, six, 2017 30, 32, t three, 34, 35, 36, 37, 38, 39, 40, 41, 42, 43, 44, 45, 46, 47, 47 48, 49, 50, 51, 52, 53 G 53 54, 55 56, 57, 58, 59. 60, 61, 62, 63, 64, and 65. As always, I encourage to
double check to double count, just to make sure you've got the desired number of
stitches that you need. So one, two, three, four, five, six, seven, eight,
nine, ten, 11, 12, 13, 14, 15, 16, 17 18, 19, 22 20, two f 167-20-8302
th f67, for two. 4056 7405 9505 0502, 503-50-4505,
567-50-9606 to 666 65. Perfect. 65. I'm going to go straight to my 3.5
millimeter hook, and into the first ten stitches, we're going to be
placing our slip stitch. Remember, we start
into the buck bump. So one, two, doing 4567, eight, nine and ten. There we go. Ten stitches. Now, we switch back to the 5.5. And you know, the stitches, it's half double
c all the way up until the stitch markers. I'm just going to remove the
stitch marker from one of the stitches, and I'll
leave it in the other. So I know this will be the
last stitch of the round. If you need to
place a stitch mark into the tenth, please do so. I don't have to. I
can tell that this is my first and
last slip stitch. From here, I'm going to switch
to the half doable crochet and I'll go up and all
the way up to here. I'm just going to
show you how we connect just for the sake of
reminding, but otherwise, you're so good at this because
that's what we've been doing for the color and
going all the way around. I'm going to have double crochet all the way up onto
the stitch and we'll connect together and turn and
then I'll let you guys fly. As always, I got
carried away again and I did my ten slip stitches, I switched to the 5.5 millimeter I did my
half double crochet. Now, this is the arm opening
and you want to be careful. Remember that you've got
the right side facing you. This is what we're
trying to achieve. We also have the right side of the ctigun on the right
side of the work. If you make the mistake of
doing it the other way around, You're going to have I
mean by that I mean, if the wrong side is facing
you, and you're doing this, you're going to have
the right side of your arm on the wrong side of the sweater, if
that makes sense. After you've worked
your first round row of the sweater of the alter, you've gone down and
you're coming back up. You do not want to
connect to this side. If you see your sleeve open. You don't connect
to the far side of the arm opening because that's also going to
make the rib side be on the inside
of your sweater. You need this to be on the
outside of your sweater. You want to go clockwise. You going clockwise rather
than going anticlockwise. You're going to connect
on obviously where I'm connecting the side that
I'm connecting so that you go this way around
joining to the sleeve. I believe that makes sense. I have got two more half
double crochs to make. And then I will
connect to my sweater. Just like that to join the row. And then to the next stitch
to start in your row. Now, to see the stitches, you're just going to
hold your work like so. Remember that we
were working into the back bumps over our
stitches for the first round. This gives us perfect
stitches for both sides. On this side as so you
can see the stitches. That's where we're
going to be putting our slip stitching in too. After you slip stitch twice, you're going to turn your work. And you're going to go
into that slip stitch row. Remember the first two stitches
are the four stitches. Into that third one is where
that's your first stitch, your slip stitch, going
all the way down. Like so. Just like that. From
here, like I said, I'm going to let you fly and
let you do everything by yourself going around
because we're repeating. Joining and the how slip
stitch and have to bo crochet is just a repetition of what we've been doing
for the horse sweater. When you reach this
part right here, you're going to be
careful because as you can see this little gap. Where the two rows were. After you've joined
to this side to connect and then you're joining to the next side to
start a new row, you might find yourself
with a little hole in between, don't
worry about that. We can always sew it closed
at the end of the row. Or if you can, and
when you're joining, make sure the stitches
are as tight as you can be because the
tighter the stitches, the more is going to
pull them together. But if you still
find that there's a little hole in the middle, do not worry or
stress about that, we can always sew it closed with our needle at the
end of everything. So, proceed going
all the way around and I'll meet you when
we're closing the stitch. You're going to continue
slip stitching to join at the arm opening
and you're going to go all the way all the way around up until the last stitch, which is where the
stitch marker is. Then we're going
to turn the work inside out to join so that the
seam is on the wrong side, and you're going to repeat everything for the other
side. Don't worry. I'll meet you when we have to
join our sleeves to close. Proceed, put on your movie
or audio book whatever is you love to do
and croche around.
21. Closing the sleeve and weaving in the ends: So I've just finished working all of my rows around my sleeve, and now it's time to close. So like I said, I aim to have the seam on the inside or the
wrong side of the work. So I'm going to have you guys turn your sweater inside out. Make sure you grab
your ball of an. Assuming, I'm just left
with this pile of viion. I'll grab it carefully, not to frog my work and
turn it inside out. So you've got the wrong side, the flat side facing
you, just like that. If you remember how
we closed the sides, that's exactly how
we're going to be closing the sleeves as well. We want to have
your squa nice and flat or the sleeve nice
and flat like this. And since we just finished
with the 3.5 millimeter hook, we're going to also
start with a 3.5. Millimeter hook. The idea is the same. You're going to slip
stitch both sides together in order to close. Remember that there's
ten stitches, you're going to go into
the first on this side, and you're going to find the
first one on the other side, and you want to slip
stitch both of them close. Like that. You're going
to go for the second one, same as the other side. Slip stitch them and
the third like so. The fourth here. Fifth, and so on and so
forth. Now it's number six. This is number seven, eight, nine, and
finally, number ten. Now, this is a part where we switch to the 5.5
millimeter hook. I'm just going to
and grab my 5.5, and I'm going to
repeat the same thing. Go all the way up to here
and once I reach this part, I'm just going to
chain one and cut off that yarn. And
then that's it. You're going to
weave it in. Or not, this is going to be on the
inside of your sweater. But you can just cut them short. So I'm going to
continue with the 5.5. Slip stitching all the way at
pit, and after we're done, we're going to cut
off together and weave on the ends together. And that will be it. We'll
be done at our sweater. So continue with your 5.5,
doing what we've been doing, slip stitching both
sides together, all the way up
until the arm pit. So I just reached
the last stitch. Now I am going to chain one. Rub my scissors. Cut that. Pull it through
and tighten that. This is what I'm left
with. This is on the inside of my sider honestly, I can just leave it like that. But if you are very neat and you love your work to be as
flowless as possible, you want to grab
your yarn needle. Let me just get e. You're going to grab
your yarn needle so that we can get to leaving our ends. You're going to put your yarn
through the yarn needle. Sir. I just like to go
through the seam of that because obviously
when you hold your work, you're going to see that row of slip stitch that
you just worked. I just I like to weave it
there in and out of that. In this case, I'll go in
through here like I'm sewing the other side. I'm not sure what the stitch is because I don't
really sew as. But I'll just do that. Until I feel that I've covered enough. Be obviously you're
going to reach a point where the iron is not
staying with the yard, so you can just pull
it through cut. And when you do that, you
cannot see where that arn is. You're going to go
around all the places where you've got
your sticking out, especially around the shoulder. As for the parts, I just like to like the ones
next to each other here, I'll just tie them in case
there's any holes around. I'll tie them like
so grab my scissors. I tend to take my my
course projects apart, but this is what I
plan on keeping. So I'll just cut the young close to the knots since I've
secured them nice and tight. So just like so. Throw the bits away,
and I'll go around. There's another piece
of on this side, and it's nice and secured. So I'll just grab my scissors and cut it close to
where the knot is. So that piece is
not even enough to go to protrude on
the other side. And I'll do the same right here. There's two strands of yon
right next to each other, so I like to just tie a knot. If there was a hole, sometimes
this helps to close. I'll tie it once tight and
I'll tie a second time. Nice and tight.
Crumb my scissors, and I'll cut it very
close to the knots. Same for that. Throw them away. And there you go. Same as here.
22. Blocking and measuring the sweater : Now that I'm more
done with my sweater. I just want to give you
guys a measurement. I think you can see camera
that it's so dirty. I've been working. This is what happens
when you're working with where it gets so dirty. I'll be cleaning it and as I clean I'm going to
use that as blocking. Let me just explain
what blocking is. After you're done, working with your croce your project,
it's a bit stiff, you want to have its actual
actual natural drape, so you wore hand wash it. Or some will just
sprinkle water or or press it with an iron or
steam or something like that, but I prefer to just wash it because it's going to
be cleaning as well. By the time the intro that you're going to see the intro that
you've already seen, that's the intra after
it's been blocked. You're going to see that there's a difference in drape as well. But anyway, I'm just going to give you a
few measurements, especially around the neck. From one corner to the other, I've got exactly 9 "
for my size smoke, and from one shoulder, right here to the color, of course, exactly 7 ". And then to the other shoulder, I have got 23.5 ". That's because I already
wanted it to fall down to be more like
an oversized sweater. From the color to the bottom
band, I have got exactly. I've got 16 mime straight in it. I'm just going to say 16.8 ". So chest from one
side to the other, I have got 22.5 " and the
length of my sleeves, I have got 15.5 " as well. That's it. This will
size small, remember. You can you don't
have to measure. I just like to know how
many inches I have, and you can keep it on record because next time you're
making something similar, that could help you, especially
when you're just doing the chilling and you want to know how long your
arm needs to be. That's it, guys. I hope this was so easy for you to follow. If you liked it,
if you enjoyed it, be sure to recommend the
class to someone that you can also love or
will enjoy making this. Since winter is
coming up very soon, this is a great
project because it's very nice and very very warm. D.
23. Outro : So this is the end
of our course, and we are done. In this course, you have learned how to do the slip stitch, the stitch around the
collar, in this rib stitch. You have learned to do
the half double crochet, which is the thicker
stitch right here. You have learned to
join to your work, joining around to the collar, as well as to the arms. You have learned to alternate between stitches because we were work we would work
the slip stitch or the half double crochet, and then would alternate
Within our work to the slip stitch while
switching our crochet hooks. You have learned to weave in ends and connect
pieces together. I hope everything was smooth and the whole course
was easy to follow. Remember that if something
didn't make sense somewhere, you can always reach out to me in the discussion
section, and I, together with other students
will be more than happy to help you work through
whatever you struggled with. Along the way, you have learned a new few new stitches and
this stitch combination. I'm sure you did
not know combining a half double crochet and the slip stitch will give
you this beautiful robe. It's nice and stretchy
and nice and warm and it works up rather rather fast
compared to other stitches. If you have any challenges, remember, I'm here to help you. You can always reach
out to me yet again in the disc in the comment
section or discussion section. Otherwise, I am so happy, I was with you
during this course. Until next time, bye bye.
 Charity Limbithu, Modern Crochet Designer