Transcripts
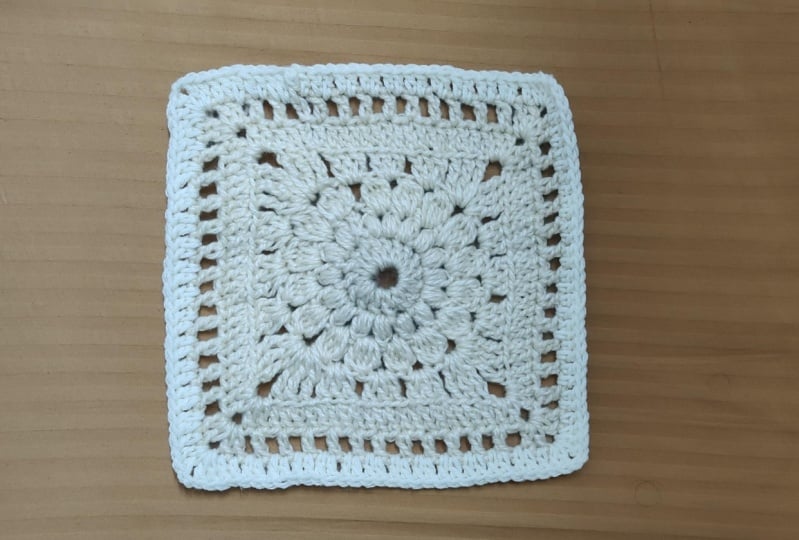
1. Granny square crochet intro: I made my very first
crochet project, I truly believed
it was impossible. Especially the crochet Graney squares, because I wondered, like, how do people get
so many colors in a wall? Like, in those perfect
how do you do it? And this made sense
because I was a beginner, I get the constructions. I didn't know how it was done. Now, eight years later, I sit down and I
can tell you that the crochet granite squares are the perfect crochet
projects for the beginners. Because as a beginner,
you're looking forward to making big
projects like bags, sweaters, dresses, and the s. And as a beginner,
you cannot just sit down and whip out a dress
or whip out a cardigan. But with crochet granny square, it is possible. Hi there. My name's Elena Charity, and I am the owner of
sting crochet.com. I am a self taught crochet. That means I struggled
hard before I knew even how to adjust align the right
crochet to the right line. So this class is made perfectly for the beginner and not
just for the beginner, even if you're more experienced, but rather just learn from
the clam stuff along the way. This class is perfect for
you guys, because in here, I'll show you how this
beautiful crochet penispe with so much
texture and style to it. And it's rather larger push penisa than
what your ears do. And that's the beauty of it. I will take you
every single step of the way from
the magic ring or the chain if you struggle And if you do straggle magically, at the end of this class, I promise you, you
would not anymore. And as we go along the way, you will walk away with your
beautiful crushing ginispare and I'll give you ideas on what you can make the ginisqaes. So if this sounds like something you'd like to do or
get involved in, why don't you enroll and
let me see you in class?
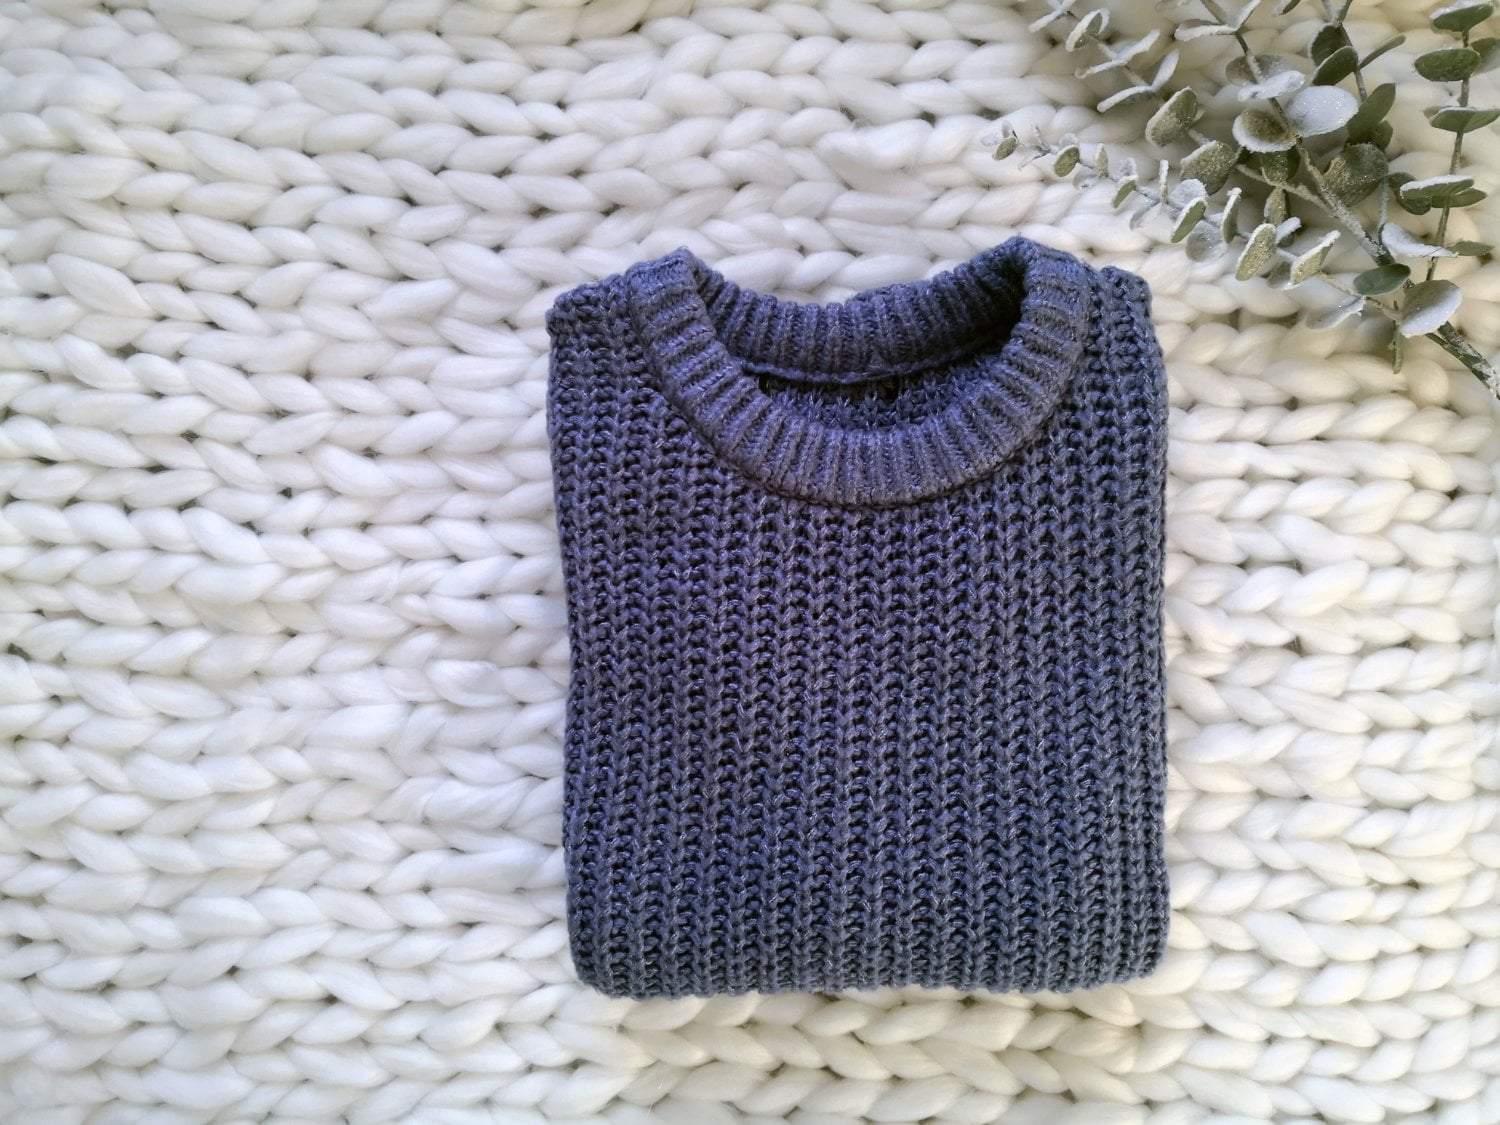
2. Materials: To achieve this
crochet granny square, the materials that I used
were a decay weight yarn, and this is a drifted yet. As you can see, I have
just bought apri. I thrifted some sweaters
from my charity shop, and I decided to repurpose it by making
a farne square bag. However, if you do not
have a decay weight yarn, but you have another
weight yarn, then I have a
tunkyon in my hand. I want you to know that this
is always another option. You can always use a chunky yarn or a western weight yarn. However, one thing I need
you to keep in mind is I got this length from
a decay weight urn. So obviously, if I'm
using a medium weight, which is bigger than
the decay weight yarn, it means my croniqut
will be bigger. It is already quite
a big granny square. I'm going to hold it next to a smaller granny
square that I made, and as you can see,
it can fit right in the middle and there's about two or three
more rows outside. So I want you to
keep that in mind. If you're going up
a size of this, then expect that your granny
square will be bigger. If you want that,
that's absolutely fine. And if you're going to
go using a chunky yarn, then expect that the
granny square will be even bigger than it would be with a medium weight yarn. I wouldn't recommend
using a fine yarn. This is a fingering where
you'll go a three plied yarn, as you can see,
it's a three plied. If I also use this,
I'll use two balls of these two strands of these using two balls at the same time, two
strands together, it would give you a DT yes, if I was to use a phone plan, that would give
me about a media, but just something slightly bigger than a
western weight yam. So keep that in mind. You are not grounded to using
a decay weight like I did, but if you're trying
to get the same measurements as I did, then I would recommend
you use a decay weight.
3. Making the magic ring: We'll begin by
making a magic ring. Now, I'll show you two methods
of making a magic ring. I know making a magic ring is
not everybody's cup of tea. So I've just cut
the young puzzles a little bit off and not on this. So I know making a magic ring is not easy for every person, so I will try and
explain this in a very simple way.
Now, step one. If you want to learn how
to make a magic ring then, I like to take the short
end of the urn and just twist it over my fingers
to form an X, like so. So this is the longer tail, and this is the shorter tail. Then I get my crochet hook
and I insert and loop onto the end on the strand of that longer tail right
there, just like so. And then I'll like to secure
it by chaining 21 and two. Just like so. So let
me do that again. So this is my working yarn. So this is the short tail. Now, when I say working,
I meant to say this is that longer tail of yarn. Now, the short tail
is to my left, and I will wrap that
yarn around my finger, making an X, just like so. And then I will get my
hook, go underneath, and loop onto that longer
tail of yarn and chain two. Just like so. Now, if this is hard for you, then there's an easier way
of making a magic ring. And that is to just make
a slick not just like so, and you can change
three or four, depending on the size
of you're doing. I'll change three, just like so, and then you will connect Slipstitch to that first
chain that you made. Now, so you know what,
let's chain four. Since this is a fine ion, you chain four and you slip stitch into that first
chain that you made. So in the center now
of these four chains, that is where you're
going to be working into. So if I tell you to make
15 or 20 double crochets, all of those will come
from the scepter. So the good thing about
this is it's very easy, but the good thing about
a magic ring is you can shut the middle so that it
looks something like this. Whereas the chain four, you might still be
left with a hole. But then if you make it nice and small and squoze
your way through it, it might work just fine. So make the magic ring
in the best way or the easiest way you
know how and chain two. Just like so. And if you prefer
making your magic ring by chaining four and slip
stitching after you're done, then also chain that too.
4. Round 1 : solid Double crochet: Round one, we're just
going to be placing double crochets
into a magic ring, and that chain two does not
come as a double crochet. So we're going to
place a total of 16 double crochets
into that ring. So to place a double crochet, you're just going to y over. So take your hook and over. Insert your hook
into the magic ring. Pull through. Yo,
pull through two, Y over, and four through two. So it may look like two
because we started with a chain two and then we
made a double crochet, but you're going to view
this as one double crochet. So that's one. We have 15 left. Hat and Maga. So we have two. Three. Four. Five and six. So six done, ten to go. So continue making
your double crochet and I'll meet you at the end. I've got two more to make.
So that's 15 and 16. So working in granny square, the math needs to be perfect. That means your stitch
count has to be perfect. So I would advise that
at the end of every row, you need to double check, so count and make sure that your stitch count
is actually accurate. So we're supposed to have
16 double crochets around. So I'm just going to
take out my social hook, making sure I won't
lose that stitch, and I'm going to go and count. So that's one, two, three, four, five, six, seven, eight, nine, ten, 11, 12, 13, 14, 15, and that first 116. That's good. I have my 16. If you are not counting with me, then pause the video and count. Otherwise, if you made a magic ring like I have,
then this is the fun part. It's so satisfying. You're just going to
pull onto that tail and watch that circle close. So you don't pull onto it too tight because you might
end up breaking on, and that may have
been a bit too tight. But there go. So here's that
thing I was talking about. Do you see how that
center has closed, and it's looking nice. So at the end of the row, you are just going
to find that top of that chain you
made, that chain to, so the top of that chain, and you will slip stitch
to join the round. And just like that, we
have finished round one.
5. Round 2: Puff stitch: Now, time to start round two. And Round two, we're
making puff stitches. So there's little cute puffs. And I feel like this row is what adds character to
the granny square. Personally, that's
my favorite part. My favorite part is this and the little chain,
the windows around. So the puff stitches, we will be starting our row. Mm. There we go. We'll start our row by starting
with a chain of two. One and two. And the chain of two does
not count as a stitch. Now, I want you to
pay attention to where that stitch
is coming out of. Because in there, we're going to start placing our puff stitches. And to place a puff stitch, we'll act as if we're
making a double crochet, but we're not going to
complete the double crochet. So we're going to yarn
over, just like I have. Insert your hook
into that stitch where we slip stitch to join. Look that yarn and pull through. Now, that's one. We're
not going to complete the double crochet.
Yarn over again. Insert your hook
through that same hole. Look that yarn. Pull it through. And that's two. One more time, and you yarn over, insert your hook
through that same hole. Look that yarn, pull
it through, and three. So if you count, you should
have one, two, three, four, five, six, seven,
loops on your hook. We're going to yarn over
and pull through six. So you're pulling through
six, you're going to be leaving that
very last one there. That first one we had from the chain to, but you're
not going to touch that. So you're going to yarn over and pull through all of them. And I've got two
loops on your hook, and you're going to over
and pull through the two. To finish, you chain one. So we're going to do this into all the 16 stitches
going around, and at the end, we're
going to have 16 parts. Now, let's do that
next one together. You over, insert your
hook into that stitch. Look that yarn and pull it through. We'll finish the roll. You will over again. Insert your hook
through that same spot. Look that yarn and
pull it through, and we'll do it one more time. Y over, insert your
hook through that spot. Look that yarn, and
pull it through. And I want you to count after every puff stitch you make just to make sure you didn't
get carried away. So that's one, two, three, four, five, six,
and seven. Good. We're going to yarn over
and pull through 36, sorry, we'll be left with two
stitches on our hook, Y over, and pull through
those two and chain one. So let's do that again together. You're yarning over.
Insert your hook into that next stitch. Pull up, yarn over again. Insert in your hook
through the same stitch, pull it up, and you're
yarning over one more time. Inserting your hook through that same stitch.
Pulling through. And then you're going to over, pull through six stitches, over and pull through two
and shade one to couplete. And as you can see, our
puffs are starting to show. So you're just going to repeat doing this all the way around, and I will do it with
you one more time, and then I will meet
you guys at the end. So over insert your hook, look that yarn, and
pull it through. Y over again, insert your hook. Look that yarn, pull it
through one more time. Count. And seven, Yova 36, anova, p three, two, and chain. So continue doing this
all the way around, and I'll meet you at the end. I've completed 15, and I have
one more puff stitch to go. So I will do that
with you guys on Cam. So that was one, two, and three. Put through six, P through
two and chain one. Now, you're going to
find the very top of that first stitch
that we made. And you will slip
stitch right in there. So let me just show you again where we're
slip stitching into. So that first puff
stitch we made, that first the stitch, you can see right
there at the top. That's where we're going
to be slip stitching into to complete the round. Just like so. And
just like that, we have completed round two. So far, our granny square
is starting to take shape, and I can tell already, it's going to look so beautiful.
6. Crochet round 3: cluster double crochet: Now to start round three. Round three, as you can see, from the granny
square completed, it's a round of clusters
of double crochets. So in each cluster,
we're going to have four double crochets going
all around in every stitch. So at the end, we will have 16 clusters of double
crochets going around. And how we do this,
before we go further, we will slip stitch into that chain one space.
To start the round. And then it's going to be
followed by a chain of two. It's one and two. And in this round, the chain of two will
count as a stitch. So we're going to yarn over and place three extra
double crochets. So the double crochets
will be half completed. We're not going to finish all of them together, and
I'll show you how. So you over, insert your hood, loop that yarn and
pull it through, yarn over and pull through two. Instead of finishing,
we're going to place another double crochet. And set your hook, pull that yard hand over
and pull through. So we've done, like, a total
of three double crochets. Now there's one more to make. Hand over and set your hook. Yo and put two. So we have a total
of one, two, three, four, one from the first chain two that we made and three
that we've just completed. And now you're gonna yarn over and pull
through all of them, and that's how
cluster completed. And then you chain two
to begin on the second. So we'll be working
these clusters in the chain one
spaces that we made. So into that next
chain one space, yo and replace four
clusters of double crochet, insert your hook,
pull it through, yo and put 32. Anova, insert your hook, pull through, anova,
and pull through two. So that's two. And that's three, one more, and that's four. And now you're going to over. So you over and put through
all stitches on your hook. So now you've got five,
one, two, three, four, five, and you put
through and two. So that's two
clusters completed. And let's get going. Y Is your hook. Put through, Y and put
through two, but one. That's two, Yov. Set your hook. Look that, pull it through
Yov and pull through two. That's three and one more, and that's four and Yaro and pull through all
five stitches, Shain two. Now onto the next one. And this is what we're going
to do going all the way around until we have
a total of five, 16 clusters of double crochet. One, two, three,
four, five, Yan nova, pull through everything,
and hang two. Let's do one more together. Yva in set your
hook P through two. Va, set your hook, pull through, and
put through two. That's two, and that is three. And that is four, so I'm using twisted yarn. One, two, three, four,
five, yarn over, and you will pull through
everything and chain two. So so far, this is what
we're looking like. Continue placing your
clusters going around, and I'll meet you at the end. Now, the last round
on the last plaster. So I keep losing my urn here. Okay, so that's one. Use two, three. And finally, that is four. Yeah, no voce three or
five and chain two. And now we're going to be
slip stitching to that first stitch up there that you can see at the top to
complete the row and then slip stitch into that chain
space to start a new round. And so far, this is our granny square taking
shape, so far so good. And then the next round,
we're now going to turn the granny square into
an actual square. So we will start
working our corners.
7. Rounds 4: forming the corners: In round four. Now we're about to begin
forming the corners. So to begin, we are
going to we'll be working treble crochets
for the corners and three double crochets in spaces and Trouble
crochet is at the corner, so the total of corners
we're gonna have this four. So we're going to begin
with the corner right here. And for the first trouble, we are going to chain four. So that chain four is gonna
count as our first trouble. For the second trouble, we'll yarn over twice,
just like I did. And then into that chain space, we go in pull up
your yarn, p three, two, 43, two, and p three, two, just like that. And then we'll make another one. So yarn over twice. 43, two, 43, two, and 422. Chain three. And so this chain
three is what's going to actually
form the corner, and then we place three more
trouble crochets in there. So over a choice. Go in there, p32, 232, and pot two, and we'll make two more
trouble crochets in there. And so just like that, we have made our first corner, and then to make the
rest, you chain one. So that chain one will separate the cluster that we've just
made going to the first. So in those previous
chain spaces, that's where we'll be placing
our three double crochets. So that was one. This is
two, and that is three. And then we will chain one. And into that next chain, please. Three double crochets. And after you're
done, chain one. So that's two double
crochets we've made. And then into that next
base, three double crochets. And three. And chain one. So I'd like to just bring that the
grandes that I've made. So we are working
this pro. Right here. So working this way right here. And we've just completed. We have just completed
this right here. So a triple and three
clusters of double crochet, just like here, triple,
one, two, three. So after the three clusters, we're going for another corner. We'll have three
clusters, another corner, three clusters, another corner, and then three clusters through. So after we finish our three
clusters of double crochets, and we've chained one in
there that chain space, we do three triples. And three more troubles. And then we do chain one and
we do three double crochets, chain one, three
double crochets, chain one and three
double crochets, then we make him have a drop my boy in and then we'll
make another plaster. Yo and right in there,
three double crochet. That's one, two, three, chain one, one, two, three, and chain one Chain one, we've
done three plasters, and it's time for
another corner. You y over twice.
You place a treble, chain three, and
another trouble. That's one. That's
two, and three. You chain three. And over twice, and there again, three
more troubles. That's one. Two, three, and then
chain one to separate. And we've done three
corners so far, so you've got to
do three clusters, a corner and three clusters. And at the end of the
third end of that round. After you've done your last
class of double crochet, I'll meet you so
that we can join together to complete round four. So now we're at the end of
the row after round four. And remember that chain
four that we did? You're going to slip stitch at the very top of that chain four. So that's one, two, three, and four and into
that fourth stitch, Me a canoe Slipstich
to join round. So far, this is the little
square that we have. It started to look so good. We have got about three
more rounds to make, so now we have just completed
that first round of square. So we have one, two, three
more rounds to work, and the three rounds are
really quick and easy. They'll go by so fast. So let's continue.
8. Round 5: Solid double crochet back loop only: Start round five.
It's just a round of back loop double crochets, and we're going to start
by chaining three, and that chain
three will count as a double crochet
for that stitch, it's coming out of that leg. So, into the next
two back loops, just go into the back loop
and place a double crochet. So the back loop
is that furthest. Usually would go into here. But because now we're trying
to make a ribbed effect, we're going to go into that
leg that's furthest from you. So you n over insert your hook through there and
place a double crochet. And now in the
corners, we're just going to replace two
double crochets, chain two and two
double crochets, which is a regular
double crochet corner. So Yanova two double crochets, chain two and two
double crochets. And then from here on, we are just still placing
double crochet. So we're going to start
placing double crochets into that previous
three troubles. And in each side,
there'll be 19 stitches. 19 that's all the three, including the chain ones. All of these are going
to give you 19 stitches before the next corner. So you do 19 back loop
double crochets, a corner, 19 back loop double
crochets, a corner, 19 a corner, and you
finish off from the side. So B loop, double crochet. Back loop, double
crochet, and Oops. So continue buckle
of double crochet. At the end, you'll double
count to make sure you have got 19 double crochets, and then I'll meet you
at the next corner. So I'm at that corner, and we're doing two
double crochets, chain two and two
double crochets. Chain two and two
double crochets. I double counted, and I made sure I had 19 double crochets. And then this side, we're
doing the exact same thing. 19 double crochets
into the back loop, a core 919 double crochets
into the back group, a corner, and the
same on this side. So you guys continue doing that. Just do exactly what
I've told you guys to do here and repeat
that for these sides, and I'll meet you at the end. So I'll meet you guys
at the end here. So now I have finished. So the last row meant
we were supposed to do 16 because we had already done
three at the beginning. So with that, you're going to come to the top of your chain, the first chain three, and
slip stitch to connect. And that is your row complete. I like to just stretch
them up like this. Just to help it get its shape. And if you want, actually,
you can stop here if this one here is too
big for your light. So if I lay like this, you can see the difference. And if personally
you prefer the size, then you can always
just stop here. But if you want to go,
we've got now one, two. So there's window row and the solid granny
square row to finish, then let's keep going.
9. round 6: chain stitches: So start in the next round. We're now working this round
of what I'm pulling windows. So this is so far one of my
favorite rounds as well. And to begin, you're
going to chain four. So one, two, three,
and and four. So this chain four
is counting as a double crochet
and a chain one. So that means that double crochet is coming from
that stitch right below. And that chain one means you're skipping the stitch right here, and we're going to go
into that next one and place a double crochet. And after you've done
that, you would chain one. You chain one. Skip
the next stitch. This one right here, and then
into that one right there, place a double crochet. Then chain one, skipping
this stitch right here, the next one, and then going
straight into the corner. And into that corner, you
make a corner stitch. So that's two double crochets, chain two and two double
crochets into that same corner. So one, two double crochets. Chain two into that same corner. You make two double crochets. This one just so now chain one. Skipping the next
stitch into that one. Double crochet. Chain one, skipping the next stitch, into that next one.
Double crochet. Chain one, skipping that
stitch into that next room. Double crochet. And
that's what we're doing. Chain one, skip the stitch
and double crochet. Chain one, skip the
stitch, double crochet. So continue doing this all the
way to the end of the row. And I'll meet you
there so that we can make that last coordinate
together again. And then I'll let you guys
continue crochet until the end where I'll meet you
to finalize the row together. Now, I've arrived at the corner. I've already done my chain
one, and into there, we're placing two
double crochets, chain two, and two
double crochets. So that's one, two, chain two, and place two more
double crochets in there. Just like that. So we
made our second corner. This was our first
corner right here, and this one right here
is our second corner. So what we're doing what
we did this on this side, we're going to
continue doing that on this side. So
continue doing that. Make your corner
when you get here, continue making your windows, make another corner
when you get here, and then work this way
and no you get it then. So now, at the end, all you're doing now is you're
going to slip stitch into the third chain from the first
chain for the image one, two, three, and
slipstitch join my round. And just like that, you
have finished around six. So now we have one more round
to go until we're finished.
10. Rounds 7: Final solid double crochet row: To start round 12. So round 12, it's just a fine round of solid double crochets
grandmother round. So you're going to start
with a chain of three. And this chain of three
countles a double crochet. So into the chain spaces, you will place a double crochet. And then on top of
those double crochets, you will place a double crochet. And then into the
chain on spaces, a double crochet, and then
on top, a double crochet. And you're doing that, and we're still working the corners. The way we've been
working the corners, so that's two double crochets, chain chain two, two
double crochets. So I have reached the corner, and we're just going to
do two double crochets, chain two and two
double crochets, just like we've been doing. So chain two and in there
again to double crochet. The other side, a double
crochet on top of that stitch, a double crochet on
top of that stitch, a double crochet into
that chain stitches, a double crochet on the
previous double crochet stitch, double crochet into
the chain one, and this is what we're doing
going all the way around. So continue doing that, and I'll meet you at the
very end of our room. So now, at the end
of the round seven, you're just gonna slip stitch at the very top of
the chain three, so one, two, and three. Yeah, connect chain one, leave a little bit of a
tail and cut that off. And then we'll be weaving
that in with yarn needle. So just grab your yarn
needle and connect it. Just like smooth so that
we can weave in the ends.
11. Weaving in ends: Weaving in ends, I
just like to go on top of the stitches. So you go in from that
side and back in front, back in front of the previous row stitches,
just like I'm doing. And then when you've covered when you've covered
quite a bit of a th, then you can always
cut the iron off. But I'm just gonna keep
going up until the corner. Okay, up until here. So we've gone from
here, up until here. So I like to just pull onto
that so it cries like soap, crab a scissors and cut
it somewhere there, so that when you
straighten things out, that yarn is just going
to disappear inside. And when something is still
showing up a bit like this, you can always grab the scissors and cut
it off just like that. It's never too deep. When just like that,
you have weaved in your granny square and you have finished
the whole granny square. So go ahead and
make another band until you have enough
to make a project. It could be a big project like a blanket or something smaller, like a bag or I don't
know, pillowcase, a top. Honestly, the choices are yours.
12. Outro : Now we are all done with
one granny square at least. And if you actually
want your granny square wound to something, you want to make a few more, 'cause if you make
about 20 of thee, or let's just say 60, so you can have ten in a row. And three rows, that would me. Oh, no, no, six rows that would give
you an action plaque. I think maybe my math
is Because these are quite big and you can make
yourself a little throw. And in another class, I'll be showing you how
we can connect these and make a crochet
consider that. Lois by the end of
this festival that you have learned how to
make a magic ring. If you don't like
making magic ring, if that is still kind
of hard for you, then there's always
an alternative. I know it's not for
everybody, but I had made sure to explain very detailed how you can
make yourself a magic ring without all that
stress and struggle. But if you don't like it,
then this is a chain. And now you have also learned
how to work in the round as you go and how to do
clusters of double crochet. The double crochet corners
and increases as you go, those window rolls and the
final solid cranes belay role. And honestly, this finis
square is gorgeous. I love it. It's not the
first time I'm making it. I love it so much, and I really wanted my back to have the texture just like this. So if you like this, then I hope that I can
see you in another class. And if you have any questions, remember always posts
in the discussion area, and I'll be more than
happy to assist you. Otherwise, bye bye and
I'll see you in the class.
 Charity Limbithu, Modern Crochet Designer