Transcripts
1. Class Introduction: Since you are here, the
story Alice's Adventures in Wonderland is probably just as special for you
as a test form. Let me welcome you
to part three of the story Character Exploration, the third class of my
Alice's Adventures in Wonderland series. Hello. My name is Irina. I'm an illustrator from the UK and also the owner
of Busy May Studio, my tiny creative business, where I make brushes
for Procrit, and also teach procret and traditional art classes where I try to inspire
people into relaxed, creative approach to
fairy tale and folk art. In the first two
parts of the series, we've learned how to
approach character creation, build a composition
around it to make the character related to
the story and paint funny, fluffy animals and procrem. In this class, we'll draw
the Queen of Hearts. Another minor but very memorable and full of
personality character. We'll cover a number of topics including drawing a female
face, the proportions, facial features,
and expressions, and the ways to apply this knowledge to our
character's personality. We'll use some handy
tools in procreate, including the Symmetry
tool, and of course, we'll continue mastering
the composition, working with limited
colour palette, and coloring a female
face and procreate. You don't need to do
the first two parts of the series prior to
taking this class. However, painting the
Queen of Hearts is a natural progression from all the things we've learned
in parts one and two. If you are a beginner
in character building, I'd recommend having a look. This class is taught
and procreate and recommended for
confident procreate users. But if you're an
ambitious beginner, I'd also give it a go. If you are ready to embark on another journey to
Wonderland with me, I grab your tools,
and let's begin.
2. Tools & Materials: For this class, you
will need an iPad, you will need a pencil. The brushes we're
going to use are the same brushes we used
for the previous two parts. AAW it's our main set. You will also need the
Victorian elements brushes that we used for the
rabbit in part two. You will also need Rosa stamp. The colour palette,
we're going to use the Dormouse main colour palette that we used for the
previous two parts, and we're going to use
skin tone colour palette. I'm also going to use the paper overlay
and the gold foil. They are both optional. All the resources I will attach in the resources
section to this class.
3. Class Project: For your class project, I would like you to illustrate the female character from a story of your choice
or your own character, as long as it's a human
and a woman or a girl. You can draw her in any style from realistic to a
cartoon character. Whichever style
your heart desires, feel free to follow along this class step by step and
create the Queen of Hearts. From this class with me, that will be a great practice, especially if you've never drawn female characters before. If you share your creation with us here or on social media, I'll be super grateful, as we'll all be able not only to admire
your illustration, but also draw some
inspiration from it.
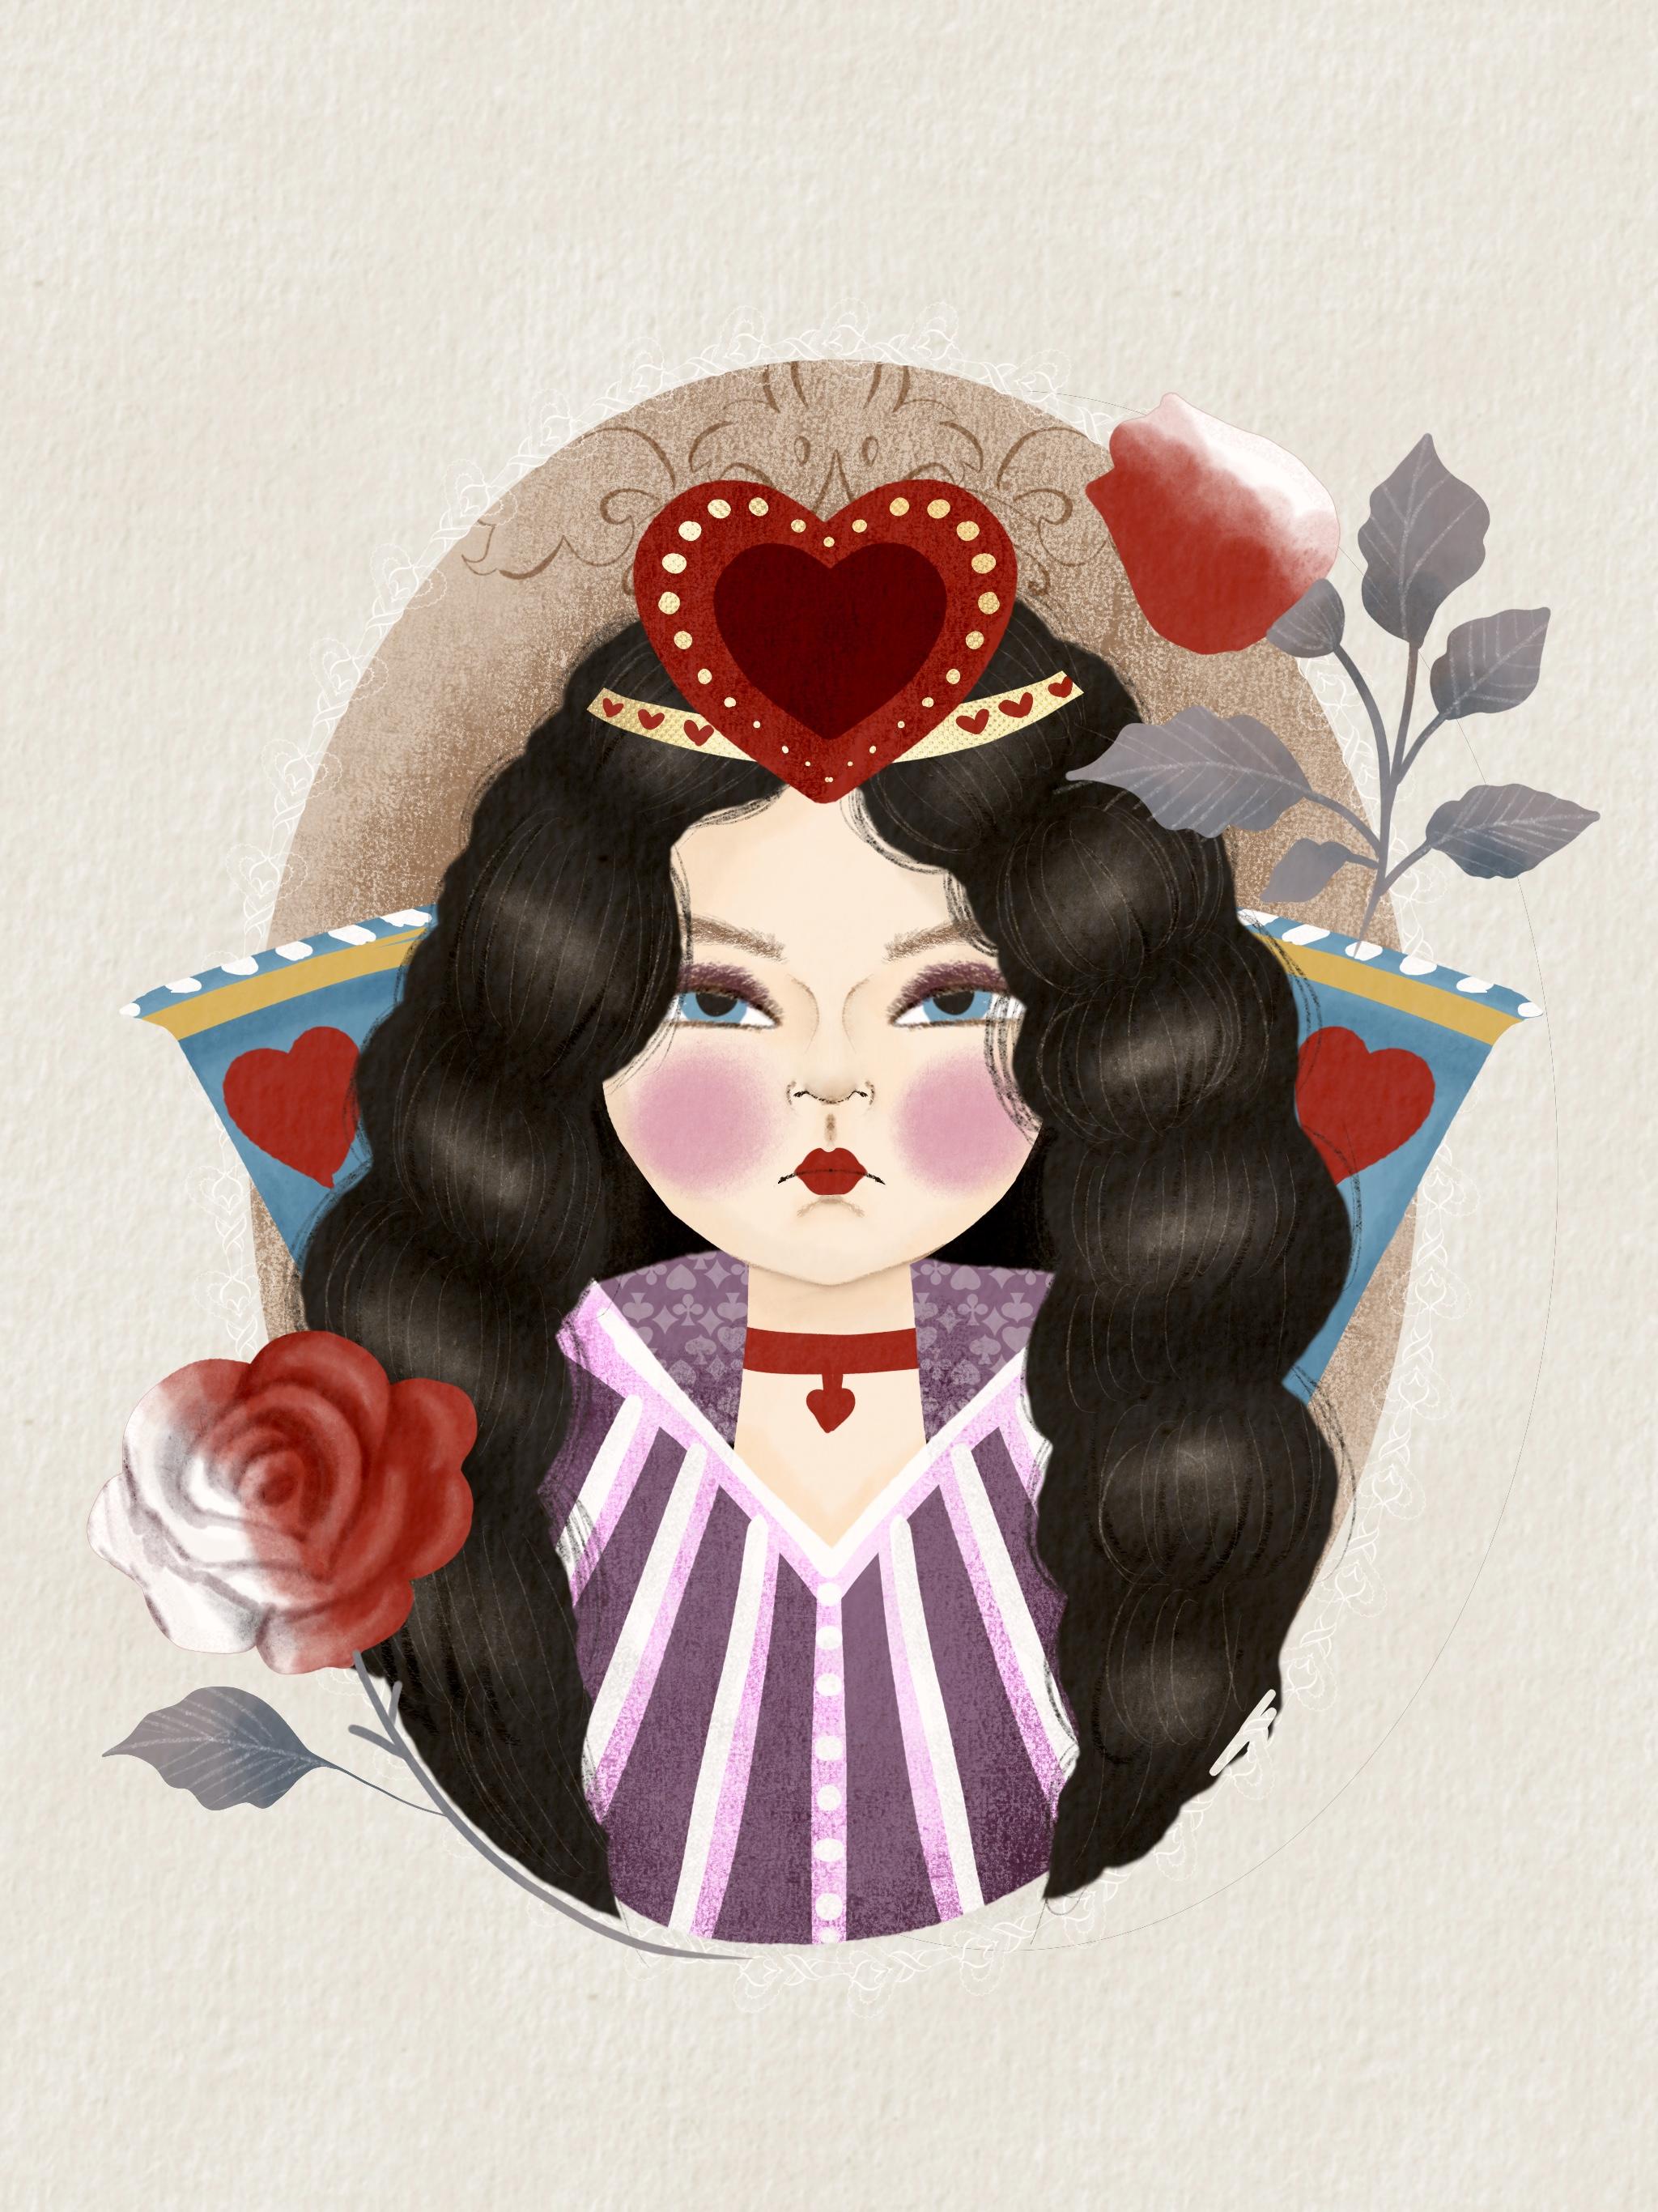
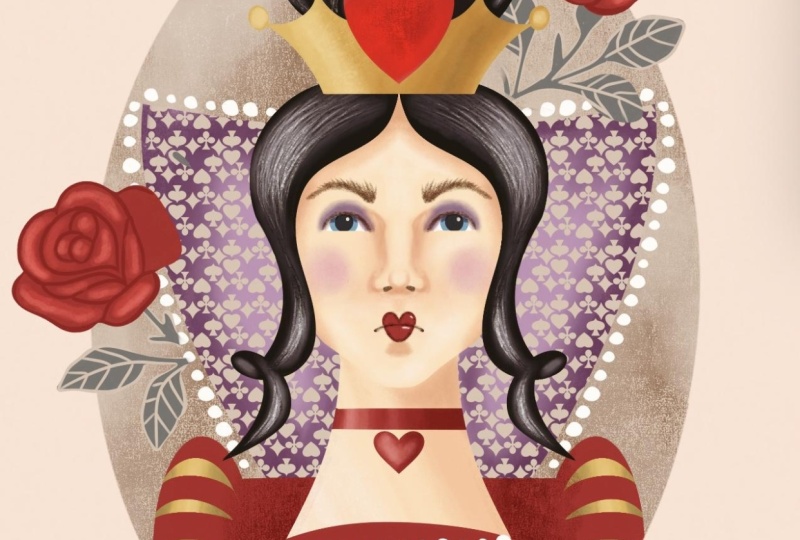
4. Character Overview: The Queen of Hearts is the hot headed ruler
of Wonderland. Everyone's scared of her, and for good reason, she's loud, dramatic, and always yelling her famous line off
with their heads. She acts like she's
totally in charge, but most people follow her
out of fear, not respect. Dressed in fancy red and gold, she loves attention and control, even though the world around
her is pure nonsense. To me, the Queen's rage
indicates that she's mature and generally
not too intelligent, like a spoiled child who's convinced that the world
should revolve around her and who throws a tantrum every time things don't
go the way she wishes. The fact that the king, right away, pardons all
the people she sentenced, and she doesn't really seem
to care that much is to me the evidence that she's more
hot tempered and impulsive, rather than evil and cruel. Those are the features I would like to reflect in my character. So, the Queen is
obviously a female, a young one based on her lack of proper judgment and wisdom. She's got dark hair to make her different from Alice
whose hair will be fair. She'll be dressed
like a royal in red with a bit of
purple and gold. And, of course, she'll wear some form of a crown 'cause
she's a queen, after all. I'm going to add some hearts to show her suit and back and some surrounding elements to bind her with a
store, some roses. And the facial
expression, of course, based on her overall
lack of maturity and intelligence and
plenty of childish rage, she'll have a stubborn and
contemptuous look on her face, furrowed brow, narrowed
gaze, and pursed lips. Now, before we move on
to sketching the Queen, let's look into some female
face drawing basics.
5. Female Face: Drawing Basics: Painting a female face has been an important
part of art history, showing beauty, emotion, and identity in many
different ways. During the renaissance, artists focus on balance and proportion, while impressionists
painted quick, colorful impressions of feeling. Later, modern artists
experimented with bold shapes and ideas to show
new views of femininity. A human face can be a
complex subject for drawing, and if your aim is to paint
a realistic portrait, you do need to know
all the details of a human face anatomy. But don't worry. In our class, we won't need to learn all
these muscles and bones. In fact, for a human, it's enough to see
a circular object with two more or less equal dots for eyes and possibly a line for a mouth to immediately
perceive it as a face. Even a young child easily copes with
this kind of drawing. You don't need to
observe all the rules of anatomy to be able to
draw a female face. For example, my favorite
artist Mark Shagal's paintings of People can't be
further from realist, but look how much magic
and emotion goes on in In this class, I'm going to show you
some simple rules I follow to create a female
face in my illustrations. There is no perfect symmetry
in a realistic human face, but for our illustration, I think we can use Symmetry tool and Procreate because
it's going to be much, much easier to draw
facial features. Procreate, I've already
tapped on the range I C selected Canvas and
switch drawing guide. If you go to Edit drawing
guide instead of the grid, you just choose the
vertical symmetry, which will allow you to draw
same thing on both sides. You can see that I've
created an empty layer because initially I don't
really need drawing assets. So I've selected the
pencil from our set, and the very first thing I'm going to do on a new layer
without a drawing a set. I'm creating a perfect circle. I've drawn an ellipse, and I moved it to the very
center of the canvas, and that's the base I'm
going to work with. Next thing I'm going to do, I'm going to select the arrow tool making sure that the free
form option is selected. And I'm kind of
squish the circle, making it more human facele. And that's it. So that's a very base. I usually star while
drawing a face. And next thing I'm going to do, I'm going to create
this middle guidelines, central one vertically
and one horizontally. It's just to divide my oval my ellips into halves
vertically and horizontally. If it helps, just
switch on the grid, going back to drawing
assist if you want to make sure that your guidelines are
straight enough. So That's all I need on a layer which is
not assisted drawing. Now I've created a new layer. I've made sure that drawing
a cistonal as you can see, I draw on both sides
at the same time. Next thing I'm going to do, I'm going to create this
kind of vertical lines to cut the curvy sides of my llips to make the
face a little bit narrower. Next, I'm going to work on
the central part of the face. And the very first thing I'm going to do
the central part. I'm going to make
sure that I'm back on my drawing assessed
layer and I'm going to divide each half into three
more or less equal parts. So I'm obviously
doing it on one side and automatically because
the Symmetry tool is on, it does the same
on the other side. So I've created like
eyeball type circles. Ideally, they should be just slightly below this
line that we've drawn, and they will sort of
represent our eyeball. Now I'm going to work on the
bottom half of the face. See this area I'm
gonna divide it into roughly get
into three parts. They don't have to be equal. You can always adjust it later. So the very top is going
to be tip of the nose, and the second one, the bottom one is going
to be the mouthline. So you can see that I've created circles to indicate
nose and mouth. Now I'm going to
put the eyebrows. It's all the guides.
Remember that we will adjust the facial
features later. And now I'm going to work with
the top half of the face, and I'm roughly dividing
it into four equal parts. And the very top line is
going to be the hairline. That's basically how
we find the hairline. And now I'm just trying to draw the
hairline approximately. And the ears will be
somewhere on the eye level. And I've just merged all the layers together
and I'm going to reduce the opacity because I've just created the guide
map for my face. It's not the face yet. Next thing on the new layer, what I'm going to do,
I'm just going to start drawing the actual face. I'm making sure that
the drawing assess the on the face is
equal on both part. And now I'm just defining the shape of
the face, the jawline. And now drawing the eyes
around the eyeballs. The eyeballs themselves So this is the tip
of the nose here. So I'm just going
to draw the bottom of the nose and two nostrils. And now I'm going to
draw the mouth line. It's basically the line between
the upper and lower lips. And now I'm going to draw the upper lip and the line of the lower lip and
a little bit of the chin. The eyebrows, the hairline and the top hairline
will be slightly above the circle to give it some volume and the ears
and that's pretty much it. Of course, I'm going to
draw the neck as well. In the next lesson,
we're going to look into face transformation based on facial expression,
ethnicity, and age.
6. Female Face: Important Things To Consider: Well, drawing a human face and the female face
in particular, it's important to keep
in mind a number of things that affect the
way your character looks. For example, the shape of
the face can dedicate age. The younger the person is, the fuller their
face tends to be. The eyes are bigger, the lips are fuller and the opposite. The older the person is, the thinner their face becomes, the eyes get narrower, the distance between the nose
and the polyp gets longer. Some wrinkles appear. Ethnicity is also important
to consider if you want your character to belong to a certain ethnical background. For example, Asian
women tend to have sharper jaw line and cat
like almond shaped eyes. Black women usually
have fuller lips, wider nose, and bigger eyes. South European and
Mediterranean women often have slightly lower
tips of their nose, large eyes, and fuller lips. While women from Scandinavia
tend to have round faces, turned up or snub noses
and rounder eyes. When it comes to my art, I find most inspiration in my
own background and culture. That's why my female
characters tend to be white faced and upturned nosed. Most of my characters are young girls from
preteens to early 20s. That's why they're
mostly fuller faced, have bigger eyes
and fuller lips. Facial expression is
another important thing to consider while
drawing your character. Anatomically, there
is a huge number of facial muscles responsible
for facial expression, but to change the expression in our character's face we only need to adjust
three features, the eyebrows, the
eyes, and the mouth. Let's have a look at
what we can do to change the neutral face to some
basic facial expressions. Slightly lifting the eyebrows, making the eyes a
little bit narrower, stretching the mouth in a smile will make our
character look happy. Turning the outer corners
of the eyebrows down, the outer corners of
the eyes down as well, and the corners
of the mouth down will make our
character look sad. Turning the inner corners of the eyebrows down closer
to the center of the face, narrowing the eyes and
turning the mouth corners right down will change the facial expression
from neutral to angry. Lifting the eyebrows right up, especially the center
parts of them, making the eyes
rounder and making the mouth rounder like an O shaped makes a character
look surprised. Lifting the inner corners
of the eyebrows up, making the eyes rounder, making the mouth
slightly opened, also in o shape, makes the character look scared.
7. Sketching & Composition: So I've started by creating
a new square canvas. Obviously, on a blank layer. I'm gonna start sketching the Queen's face with a
pencil from our main set. And, um, and the very
first thing I will do, I'll go to the range icon
Canvas, drawing assess, drawing guide, and I'm going
to select vertical symmetry. Same as we did when
we practiced when we talked about the face
building basics. And again, I'm going to create a new layer which does not
have drawing assessed on it, and I'm going to draw a
perfect circle on it, and I'm going to
place the circle right in the middle
of my canvas. Using the arrow two, I'm just going to slightly
squish the circle. And to draw a guide, I put the grade on, and I'm just going to draw the vertical and
horizontal guides, dividing my lips into two equal parts vertically
and horizontally. So now I've put the side vertical lines to isolate the curved
parts of the sides. And I've divided each side in the middle into three parts. That's for the eyeballs, and I've divided the bottom half into three parts for
the nose and the lips. And I've drawn the eyebrows. I've added the nostrils, and I've added the hairline by having divided the upper
half into four equal parts. And now I've merged all the
layers together and reduced the opacity to use
my map as a guide. And now I'm just going to
outline on the new layer with a drawing assist on creating
the actual facial features. So I've created the eyes The eyebrows. The bottom of the
nose, the nostrils, the sides of the
nose, the lpline, upper and lower lips, the neck, on the hairline, I've decided that my queen's
hair is going to be wavy. And now let's work on the facial expression
as we discussed before. So our queen is quite
contemptuous and arrogant, but childish at the same time. So we're going to narrow
her gaze, narrow her eyes. We're going to make the
mouth even more purse. And the eyebrows are already
quite angry looking, and I'm going to add a little bit more of
length to the hair. I'm going to add the collar of her royal cloak with
some love hearts on it, and I'm going to add the
crown on top of her head. And that's pretty much it. The sketch of the
Queen is ready. So I've sketched my queen, but it doesn't
mean that it's all set in stone and I'm not
going to adjust something. I'll probably use
some liquify tool to adjust some facial
features or I don't know, some placement of the features. But overall, I've sketched the
queen, the queen is ready. Now, I need to sketch the entire composition with
the queen in the center. So I'm going to
copy this sketch, and I'm going to create a
new canvas screen size, first thing I'm going to do, I'm going to paste the
sketch of my Queen here and I'm going to place her somewhere in the
middle, something like that. So obviously when we
talk composition, it means that there
is a group of elements that are
working together, creating a nice illustration. So I was thinking, What can I do for my queen? I decided that I'm not
going to place a lot of objects around her because
she already she's a person. She has personality, and I want the focal point to be her
and her face expression. That's why I rejected the idea of placing
some flying cards which is different ideas I was going through when I was
preparing for this class. However, I would like
to add some elements to to this illustration to
make it related to the story, which is obviously Alice's
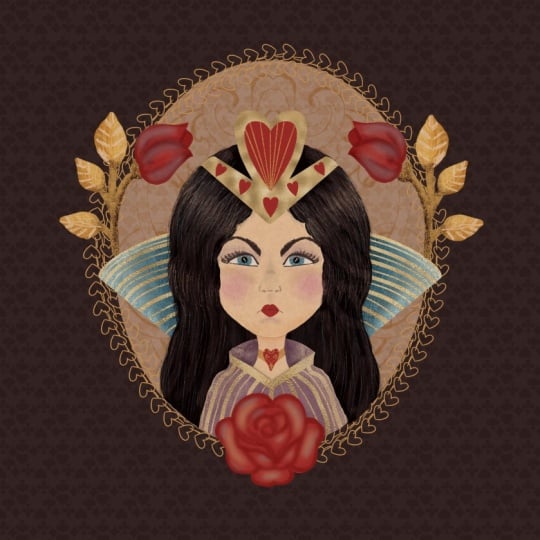
Adventures in Wonderland. That's why I'm going to show you what I suggest that we do. The Queen is in the center, and I'm going to add
a new layer and I thought that I was going to add a cameo on the background, same as we did with the
dormuse and the rabbit, just to keep it consistent, just to keep the illustration from the same story
from the same book. And basically, that's it. Remember, it's only
mapping the composition. So I thought maybe maybe
something like this. As I said, I don't want a lot of elements around the character. So I thought that I
just put a couple of roses around her because
first time in the story, we meet the Queen in the scene when Alice
sees that the soldiers or the gardeners are painting the roses
because by mistake, they had planted white roses, while the Queen wanted
them to plant red roses. So let's just put some
roses around her. For that, you will need
the stamp brushes, roses. And I'm just going to literally
stamp a couple of them. So I'm going to put one here. Something like this. And
then the new layer again, I have the room to maneuver, I'm going to just stamp one here so they see they are
slightly different. Also, I'm just going to put it maybe somewhere here,
something like that. Also, remember with stamps, you don't have to use
the stamp as it is. Feel free like let's
say this rose, you stamp it so not only you
can change the scale of it, you can make it really
small or you can make it, stretch it real big, but you can also get rid of the elements
that you don't need. For example, if you
want to use a rose without any stem or leaves, just feel free to play around, and I actually encourage that. So but I just so I'd put some leaves just for
the decoration purposes. When I start coloring the queen in one of
the next lessons, I'll probably make some
adjustments around the face. I'll probably make
this standing up color of her royal cloak, go beyond the cameo or I'll
make the cameo smaller. This is all adjustable. But at the moment, I'm quite
happy with the composition, and I think it's going to work, see you in the next lesson where we going to
color block our Queen.
8. Colour Blocking: So our composition is created, and now it's time to move
on to the actual coloring. But as always, as in the previous two classes about the character
from the story, we start with color blocking. We know already that since we're using the
same colour palette, as for the previous two, the
colors do work together. They create this nice fairy tale look and at the same time, they make the illustrations, set consistently
nicely together, making them obviously
belonging to the same story. However, color
blocking is the step that I don't recommend Tim
for the simple reason, you just see the
color balance because you need to make
sure that one color, for example, is not
overpowering other colors. What I mean by that is, this is the Queen of Hearts. So we need to emphasize that it's not just an
angry lady, girl. It's an actual win of
Hearts from the story, which means that there will
be some hearts present, and there will be
a fair amount of red color present in
your illustration, and it's going to be
obvious and vivid. Let's just experiment.
Let's try. As I said, we're moving on to the final artwork to the
stage of the final artwork. So what I'm going to do, I'm going to pinch this
composition together. I'm going to swipe
my three fingers and I'm going to copy the sketch. And now I'm going to
create an A four canvas. It's a high resolution canvas, and it will give you nice
quality of your illustration. And I'm going to immediately
paste the sketche here, and we can print capacity right down because the sketch is not going to be the
part of illustration, but we're going to use it
for the guidelines only. Since it's our
final illustration, to make it consistent
with the previous two, I recommend that you put the
paper layer, overlay on top. But as I said in the tools
and materials lesson, this is completely optional,
this is up to you. But I'm going to do
that because as I said, I want it consistent. I've placed my paper
layer on my Canvas, I'm just going to
stretch it to cover the entire canvas and I'm going to change the blending
mode to color burn, same as I did in the
previous classes with the rabbit and the mouse. Let's move the sketch
on top and let's create a new layer between the overlay and the background
and between these two. In the layer stack, this
is our area of coloring, adding details, et
cetera, et cetera. I'm going to start with
the queen herself. I'm going to start
with her face. So my queen, let's just
grab the brush first. I'm going to use the
filler brush because it's the most solid brush in the set, so I'm just going to block
the colors using this brush. Now to the colors, so as I said, previously, we're going to be using the
dormusmin colour palette, and we're going to
be using skin tones. I'm going to choose
this very pale color, and I'm just going to
coloring my queen. This is her face. Color
blocked her neck. You can always try to experiment
with different shades. That's probably the palest. That's probably the one
I'm going to stick to. Yeah. I think the skin tone I'm going to use is
this very first one. In the paler skin tone palette but also there is
medium and darker tone. So as I said, feel free to use. I think my queen is
going to have dark hair. I'm going to create a new layer, and we are going back to our dormouse main palette I think I'm just going to
use this dark gray color, which will look quite black, and I'm just going to color
block the hair like this. I'm going to
probably add some of the hair behind
her face and neck. I'll probably add
some more details when we come to the coloring. But for now for the
colour blocking purposes, I'm quite happy with that. Let's dress our
queen in something. Nice. Another trick for you. When I work with a sketch, very often I have to deal with lighter and
darker background, so you can see that
despite the fact that I sketched the piece of clothing
that my queen is wearing. I can't see it right now
because the sketch is dark. So what I usually do, I
duplicate the sketch. I go to the adjustment tab I choose saturation and I'm just going to turn the sketch
into something lighter. Then during the color
blocking or coloring process, I switch between the darker sketch and the lighter sketch. You can see now once I've
made my sketch lighter, I can now see the color
of the Queen's cloak. So I think that I'm going to make it purple because it's quite
a royal color. It's quite a noble
looking color, and also the fact
that I will have enough red with a sort
of crown type thing, with a necklace get her lips with love heart elements
on her cloak color. I think purple is
going to be nice. So what I'm going to
do, I'm going to create a new layer underneath the hair layer because
the hair waves going to fall on top of it. I'm going to choose the purple
color from the palette, and I'm just going to block And obviously, there
is a little bit of the dress color
behind the neck. I'm just going to create a new layer and paint
color behind the neck. Now, let's make the dress maybe slightly more interesting. I'm going to create a new layer. I might actually
clip it as a mask to this mean dress part of the front and I'm going to
grab this pure white colour, I'm just going to add a
little bit of white elements. I'm not quite sure that this
is the way it's going to go, but it might so
it's like that kind of pattern, quite like that. Let's color block the color, the clock color already
like royal cloak. It's obviously going to go behind the here and
behind everything else. So I'm going to
create a new layer. I'm going to put it right
behind everything else. I thought that's where
I add a little bit of the blue color that we used in the previous illustrations, and I'm just going to
create this type of big, maybe even over
exaggerated color, and that's where I'm going to
use this blue color just to make the illustrations more
consistent with each other. And now let's use some red, as we talked about, so don't be afraid to use
quite a lot of it. So I'm going to grab this
red color from the palette. And the first thing
I'm going to do, I'm just going to
add some color. Here there's this
necklace going on. There is obviously
going to be red lips. And I would add red
love hearts on h. Her clock color and obviously they will
be red and the roses. I'm going to add a little
bit of this yellow, which I'm going to turn into
gold later on or I want. I've not decided yet, so I think part of
the crown is going to have this golden element, part of the royal collar, cloak, I don't know, maybe something, something
like a part of the necklace, something like that,
maybe some of the dress, but I'm going to
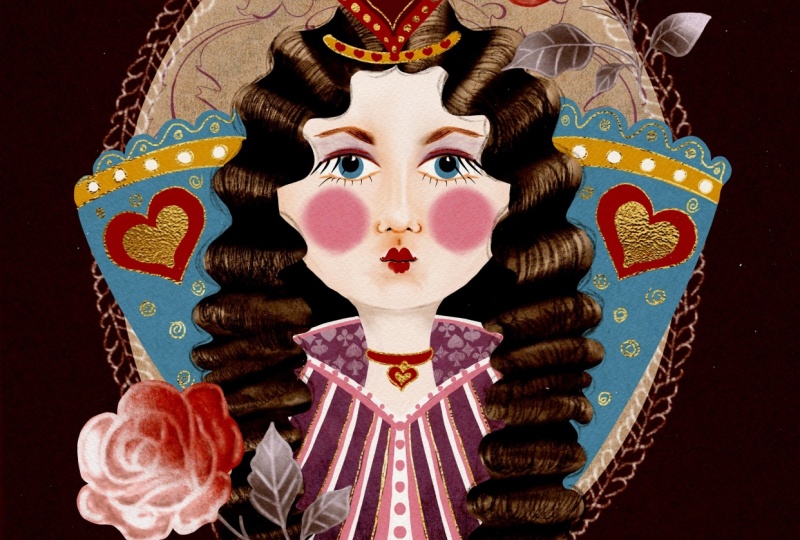
decide this later. And the eyes, I think
my queens going to have blue eyes just to make her appearance even more
striking dark hair, almost black hair, blue eyes. This winter type. And in terms of the leaves
of the roses, at the moment, I don't know yet because
in my main palette, I don't have green color and I absolutely have no intention to introduce it in
this illustration, but there are other
colors that I can be using without any issues, and that's why I'm just
going to hold on and decide because depending on the background and
different colors, that will determine the
color of the leaves. So now we have the background to fill
with color and the cameo. If you remember in
the previous classes, the dormuse and the rabbit, they had the dark cameo
with a light background. So with this particular illustration with
the Queen of Hearts, I've decided to
reverse the colors, which means that I
want the cameo to be light and the
background to be darker. The reason is that not only the Queen is quite
striking herself. She's not a whitel or
lighter colored animal. She is a woman with dark hair, with red love heart to
create the maximum contrast, I want to put lighter background just to make her
stand out even more. But at the same time, I want
the cameo to stand out. That's why I'm going to make
the background even darker, and the whole thing
will actually look like a play card
with a Queen of Hearts. Let's see how it's
going to work. We go to the background color. And from our palette, we are choosing this
dark chocolate color. Now we need to create a cameo, which is behind everything else. I'm going to create
a new layer and put it right on top of
the background color, which will make it
behind everything else. The color I'm going to use
is this light beige color. I'm just going to et cameo, fill it with color and
folia, here we go. That's the look I'm going for. Let's add some pink
color for the cheese, for the queen, just to
introduce some pink color. Now we can decide what color we're going
to use for the leaves. Obviously, it has to
be something lighter. I would say, which is going to create a new layer for the
sake of color blocking. I'm going to try and
use this gray color. Is the second from the
left on the top row. And let's see how
it's going to work. I can see that it's
a nice contrast. See, it's a nice contrast for both darker background and
lighter background here. But going forward when
we work on the roses, I might add maybe some darker shades to
these ones just to make it stand out or or I want. I'll decide later. That's it. That's a color
blocking part done, and I'm quite happy with that. Now we can move on to the actual coloring of cream and see you
in the next lesson.
9. The Queen's Face: We've done some color blocking, and I suggest that we put this away so we can move away
from the color blocking, and now I'm going to start
properly carefully coloring. So let's start with the face. With the filler brush and going back to the skin tones palette, I'm going to select
the lightest color for the face and neck, and I'm just going to carefully
fill the face and neck. Let's add the hair right away just so we know that we're
dealing with a human face, not just some sort of
mannequin or something. So I'm going to
create a new layer, and with the same brush, I'm going to go
back to the palette of dormasmi and I'm going to select this
dark grey colour. Now I'm just going to I'm going to put a new layer in, and I'm going to put
some of the hair behind. Let's put the dress on
right away as well. So on top of the
face and neck layer, but underneath the
hair layer top here, I'm going to choose
the purple brush. So that's it. So that's
our queen, color blocked. And I'm going to
probably switch on the camo I'm going
to drag it out of the color blocking just
to create the contrast. Between the queen
and the background. Now I can focus on
coloring in the face. That's what we're
going to start with. I'm going to create a new layer. I don't have to
clip it as a mask. I'm going to use the pencil to like this one
more pitchy color. I'm going to reduce the
opacity a little bit, and I'm going to work on the eye first
and other features. So let's switch the sketch off and see what we've got. Consider it mapping.
That's the way I draw faces to my characters. I map it with skin tone first, and now I can work on darker areas just
to emphasize them. And for that, I can keep
the sketch switched off. I don't need it right now. I'm going to create a
new layer on top of this mapped skin tone features. This time I'm going to change the blending mode to multiply. And because I want my lines
to be slightly more precise, I'm going to choose this brush, which is called fur details. If you remember we used it for the four of our animals
in the previous classes. But this time, it's
going to help us define the facial features
a little bit more. Let's see the colors we've got. For example, this
color is too light. I'm going to select this
maybe darker color. I'm going to reduce the
size, and this time, I'm going to make
the features where I need them slightly
more contrasted. For example, I'm going
to add a little bit of hairs on the eyebrow because
our queen is dark hair, so her eyebrows are
probably dark as well. I'm just going to add a
little bit of hairs here. I'm probably going to
even make her eyebrows slightly fluffier
because just to indicate her nature as a little bit of her
rageful cruel side. Now, I'm going to make the eyelid a little
bit more contrast. I can bring the size
up a little bit, opacity down and not
holding pencil like this, but with a side, I would just add a little bit more softer stroke
to the upper lid. I'm going to leave
the bottom lid probably as it is right now. Now, because nostril is
essentially a whole, it's going to be
naturally darker, deeper. I'm going to emphasize
this feature on here and I'm going to leave probably features
more so on the mouth. I'm going to switch
my skinch back on. This is the middle
line of the mouth. That's where the two lips
are joined together, and I'm going to make
it contrasted as well. Something like this. Now, let's work a little bit more on the
I so what I'm going to do, I'm going to probably pinch this together because I'm
quite happy with that. I'm going to create a
new layer underneath. And the very first thing
I would like to do, I would like to grab the
fellow brush and I'm going to go back to my main color
of the dormuse and as I said, will be using the
pure white color. I would like to cover the white of the eye
with a white color. To make the eye stand out more. Now, let's create a new
layer and clip it as a mask. We can switch back the sketch on to see where the
pupil and the iris are. I've clipped the layer
to the white, as I say, the color of the eyes of the
queen are going to be blue to create a maximum contrast between the hair and the eye. I've selected the blue color
with the same solid brush. I'm just going to add the eye. And let's add the pupil. Let's try and use this
darker color again. You see? And that's the eye. What else let's see shut off. I'm quite happy with that.
What else I would do? I would probably
add a little bit of purplish eye shadow
around the eye. Let's see how it's
going to work. Remember, it's a
digital artwork. If we don't like something, we just cancel the move or
we can just erase easily. That's why it's so much
easier in my opinion to paint digitally than with
traditional mediums. I'm going to take the texture
flufkin because I want something more smoky going on. I'm just going to select
this purple color. I'm going to create a new layer on top of
the features layer. I'm going to change color
the blending moden I burn. And let's see, I'm just going to probably increase the
opacity but reduce the size. And what I'm going to do, again, with the side of the pencil, these brushes, actually,
most of my brushes I create. They have this
different when you draw like this, from top, it's one effect when
you draw sideways, it's sort of like fluffy, more colored pencil effect. So what I'm going to
do, I'm just going to turn my pencil to the side, and I'm going to create
this sort of nice shade. To make the eye stand out, I can always grab them. I can always grab the smudge too and just smudge
a little bit. But look how nice the
contrast is also naturally, the eyelid will cast
a shadow on the eye. That's why I've just added to make the eye
just a little bit deeper. I quite like the effect, I would like maybe to use the same brush with
the same manner. But I'm going to go back
to the skin tones and I'm going to select probably let's choose
this color and see. That's quite light,
Let's choose. I think I'm just going to
choose the sechy color. I'm just going to
reduce the opacity, and I'm going to just add a little bit more contrast on the same layer with
the linear burn mode. I'm just going to
add a little bit of contrast here and there. Maybe reduce opacity even more, this transition is much lighter and just going
to smudge a little bit. And a little bit here. This area, the nose, just a tiny bit just to make a little bit more
contrast here and there, a little bit on the side here and a little
bit on the chin. And since we are here on the same layer because I just don't see any reason
to create a new one, I'm going to swap the
brush to pencil one and I'm just going to add a
little bit of the slide, making the face a little
bit more defined. I might just go back
to the neck and grab the erasor or two just to make
it a little bit more tidy. And remember, we're only drawing
half of the face because the other half we're
just gonna copy and mirror. So I'm just going to
take the smudge too, and smudge the lin little
bit, just a tiny bit. Something like
this and let's add the mouth one of the main
features of this face. I'm just going to
create a new layer. I'm going to switch
my sketch back on, and I think I'm just going
to grab the filler brush and I'm going to go back to my main palette and I'm
going to use this red color, let's just add reduce the size, and let's add one
side of the mouth. So it's quite a small mouth because the face
expression as we define it is already quite contempt. So something like this. The only thing the mouth will
go behind this mouth line. So we can see the line itself. Something like that,
and let's switch this sketch off, something like that. We obviously add a
little bit more touches. But now let's just
add the pink check. I'm just going to
create a new layer and I'm going to use
probably texture fluff again and I'm going to use our pink color from the
power, opacity around 50%. I'm going to put the
size to around seven. I'm just going to add
this blushy check. A let's switch the sketch
off, something like that. Let's see what we've
done, finally. What I usually do, all the symmetrical features
like one side of the face, we just painted. I've grouped it in one group, and I'm going to duplicate it. Quite like that. Look, that's quite more intense.
I quite like that. I'm going to leave
the separate features as a backup as a group, but it's the double layer
because it's more in contrast. And I'm going to
pinch it together. I've got the facial face
features on one side, and I'm going to duplicate it. I'm going to switch the sketch
back on and now I'm going to take the arrow two and I'm going to move it,
flip it horizontal, and I'm going to move it
and place it based on our sketch the same size side. And let's just work a little
bit on because I can see. Some areas are a little
bit too intense, and we don't want that. So for example, see the shades around the mouth and everything, we don't want them too intense. I've switched the sketch off. I can pinch this together, and I'm just going to
work a little bit on. I've just grabbed
the eraser two and I'm tiding the sides here. And I can see you see there
is this inconsistency, so I will have to go back and
tidy the face a little bit. But for now, I'm just
going to work with this. So this bridge of the
nose is way too intense, so I'm just going to
grab the smudge two, which is texture fluff. I'm just going to smudge it a little bit down just to
get rid of this harshness. I don't need such
contrasting lines. And also, let's take
the texture flouf too and just maybe
till get rid of this. We can add a little
bit of lighter area, working around it, making
sure it works well together. Just tiding it.
Now, I feel like I need to add a few
lines here and there. I'm just going to grab
the fur detail brush. I'm going to create a new layer and I'm going to
grab the darker. Color from the sketons
maybe this reddish brown, and I'm just going to add a
little bit, reduce epacity. I'm just going to add
a couple of lines. Yeah, I think maybe
something like this. And now I feel like I want to tidy the
face a little bit better. I'm just going to grab go back
to the face layer and I'm just going to grab
the razor or two. I'm just going to tide you
face a little bit better. I always when it
comes to the faces, I always experiment
with liquefy too. Oh, let's just smudge a little
bit over the chin as well because that's just
way too contrasted. Something like that. You can always add some highlights to her eyes so you can grab the filler brush and
the pure white color. You can add a little bit
of light if you wish so. Now I'm just going to
experiment with liquefy two, seeing that if there
is something I can do to improve the
face of the queen, I'm just going to
merge this together, and I'm going to
put the face and the neck in the same group. I always duplicate
it just to create the backup and I
flatten the face. Now I'm going to
go to adjustments, liquefy and I'm just going to play around
with liquefy too. By the way, let's make sure
that we do it consistently. We go to Canvas, we
switch on drone guide, and we create symmetry. Let's put all the
elements in the middle. The face on the medal
and using liquefy too, I'm just gonna play around the facial feature just going to reduce the
size a little bit. Maybe maybe just the cheek bones slightly or on the
contrary slightly wider, actually, quite like eyes
a little bit more open. I like the eyebrows quite low. Maybe the noise a little bit. See if you gently touch. That's basically it. I'm not going to do
anymore with the fish. I'm quite happy with that. Next thing we're going
to work on the hair.
10. The Queen's Hair: In this lesson, I'm
going to show you how I usually work on the
hair of my characters, which is basically the same
principle with any of them. So what I'm going to do, it's basically
creating contrast. So this is the face, and this is the hair. What I'm going to
do, first of all, I'm going to make the hair on the back darker
because naturally whatever object is close behind
it gets shade cast on it. I'm going to create a new layer. I'm going to clip it as
a mask and I'm going to turn the blending
mode into multiply, and I'm just going to
grab the filler brush, same color as the hair, and I'm just going to
increase the opacity and you can see that it's darker. So now with the mean here, and we can actually
pinch it together because there's no need to
keep all the layer separate. This is our mean front
foreground here. I'm just going to
create a new layer and I'm going to
clip it as a mask. And let's just quickly have a look how to create
this gloss on the here. There is a wave, so
you can see that if you look at the
here, at the volume. This is the dip between
the rise and fall. So where they fall is naturally
obviously going to be darker area and on the
sides where the wave rises, the top of it will hit the light and obviously
they will be lighter. That's all the basic rule. Let's create a contrast. I'm going to switch the
blending mode to multiply. And just to create
a nicer transition, I'm going to use
Pinter lip Brush, 100% opacity and the
same darker color. Let's see. I'm just going to it's probably easier
if it's a little bit. S. So this is where
the wave falls. That's why it's going
to be darker naturally. Usually darker here
closer to the root. I'm just going to
add a little bit of shading on the other side as well. That's the shading. And obviously, to make it
a little bit more natural, slightly more realistic,
what I'm going to do. I'm going to select
the fur details brush and I'm going to add some individual
hairs, just like that. With this kind of motion, indicating that this weave, it's more of a sphere
type and that's why we are arranging here,
like in the sphere. Just like that, like
nothing too complicated. Just adding a little bit
of detail to the here. And now, I would like to add some fly away here to
make it less flat. I can create actually
a new layer right underneath this
foreground layer. Keep it on the normal
blending mode, and with the same brush, what I'm going to do,
I'm just going to add a few flyaway heres
here and there. Not too messy because
it's green after all, you know, her hair is all
nice and sort of tidy. A lot of products probably
she's used on her hair. Just like to create less
of the flat effect. A little bit of, like, individual hairs here and there. Not a little bit here inside. Oh Now let's add some highlights, which is basically
the same principle. I'm going to create a new layer. I probably I'm going
to put it underneath this one because I still want to see the
dark individual hairs. Keeping on the normal
blending mode, I'm going to use
texture flouf brush and I'm going to use the
slightest beige color. I'm going to increase the size, reduce opacity because I
don't want too much contrast. I'm just going to gently add on top of the wave where the
light hits the top of it, I'm just going to
add a little bit of a high line just like this. And maybe I'm just going
to grab for detail brush. I'm going to choose a
darker beige color, and I'm just going to add
reduced opacity and add some white individual
hairs as well. That's here ready.
11. The Queen's Clothing: Now, let's add other elements
of our Queen's outfit. So I'll probably
start with the dress. So we've got behind the color behind the neck and I'm going to start
working on that one. I'm going to create a new layer. I'm going to clip it as a mask, and I'm going to change the
blending mode to multiply, and I'm going to take the
pottery brush and with the same purple color that
I used for the gown itself. I'm just going to reduce
opacity and I'm just going to add a little bit of shading. I'm going to play around the different scales of the brush. Now probably to make it
slightly more interesting, I'm going to create a new
layer, clip it as a mask. I'll probably move it between the shading and
the color itself, and I'm just going to
use the pattern brush. Let's say deck of cards just
to show that she's the queen of all suits not just
um not just heart. So I'm just going to
add some pattern there. I can play around
with the size of it. I kind of like the smaller
size, something like this. And you can always play
with the blending mode. So because it's a white color, you will need some
lighter blending mode. I think I'm going to
stick to overlay. So I'm just gonna leave
it as a test maybe reduce the opacity a little bit just to make sure that it looks like it's
on the background. So now let's work on
the front of the gown. We can pinch this together. So this is our gun. And let's add some shading. First of all, I'm going
to clip it as a mask and I'm going to turn the
blending mood to multiply. Just to stay consistent, let's use a pottery brush, same purple color as we
used for the gown itself. I'm going to increase the size, and I'm just going
to add a little bit of shading in the bottom. Maybe something near
the here xround with different just to add a little bit more
of color interest, you can always choose
different color. I can choose that blue one
and just add a little bit. O play around the different
brushes like texture fluff, for example, it will add a little bit more
solid coverage. So not going to dwell
too much on that. Now I would like to add some decorative
details to the gown. For that, I'm going to create a new layer and I'm going
to clip it as a mask. I'm also going to use
drawing access to make symmetry just to
save myself some time. I'm going to grab
the filler brush, and the color I'm going
to use is pure white. I'm just going to maybe
just slightly smaller size, 100% opacity, I'm just going to make
this contrasted color, and I'm going to
add a little bit of lines to the
design of the gown. Something like this. And let's just
create another one. I'm going to switch
on drawing assist, and I'm going to switch
on clipping mask as well, and I'm just going to
use the pink colour, reduce the size a little bit. I'm just going to add
some pink elements to the design of the gown. It's no right or wrong there. It's just up to you what you choose to do with your design. Let's play a little bit
with a blending mold. I think I quite like it normal. I like this combination
of pink white and purple. The only thing I might do, I'll just pinch these
lines together, and then I just put it between the shade and the
background of the color. Don't worry about this
because we're going to clip, the whole of the queen
to the cameo and it feels like I want to add clipping mask,
drawing assist. I want to add some light
line in the behind color. Something like this. And maybe
even change change there. Blending mode.
Something like this. Now I would like
to add the cloak, color this exaggerated
standing up color. I'm going to go
on the background above the cameo but
behind the whole pin, I'm going to use drawing
assessed as well, and I'm going to select
this blue color because that's in our color blocking, we've decided to use that. I'm just going to draw Let's make it just
slightly bigger. Beyond the cameo, we want it to be like,
really exaggerated. Well, let's draw Oops. Let's just, uh, make sure. This part of our design. And yeah, something like this. I don't know, we can play
around with the size of it. Maybe we don't want it that big, let's just decorate
it a little bit. I'm just going to add
the clipping mask. Again, I'm going to
change to multiply. I'm going to use some lighter,
lighter opacity brush. Or you see, I need to move a little bit shift a
little bit to the side. Sure. I'm just going to add a little bit of shading
here and there. You can mix in some
purple color to keep it consistent together
if you wish so. Let's add some design elements
to our queen's color. I probably would grab the flow brush again,
the blue color, and they might just um add a little bit of
decorative details just to make it a little
bit more interesting. Let's create the clipping mask. Let's do the drawing
assessed as well, and let's just use some of the
yellow cour just to create the line let's maybe add some of the white
detailing on it. Something like this. Now
let's add some love hearts. I've created another
clipping mask, but this time, I'm going
to use the red color. I'll probably just create
a love heart here. I'm going to make sure that I place it the
way I want it to be, something like this, and I'm
just going to duplicate it, and I'm going to splt
it horizontally, and I'm just going
to make sure that the designing is
consistent on both sides, something like that,
not being too precious. Now let's add the crown. So I would just probably flatten the color because
it's not a big deal, it's on the background. Now let's create the crown. For that, I would probably
flatten the here. I'm going to create a new
layer, and first of all, I'm going to create
the base of the crown, so I'm going to make yellow. I can always try and
move it a little bit. Let's create a big love heart. I can choose the
Symmetry tool to ren acess I'm just gonna Make sure that it's
nice and solid. I can play around with different size, but
something like that. I think I'm going to just complicate the
design a little bit. I've just duplicated
the lock heart. I made it smaller. I
put it in the center, and I'm just going to turn the blending mode to
multiply, just like that. And I'll probably
add a little bit of red love hearts on the
base of the crown. Something like this? And that's basically it. Also, we talked about. Remember at the beginning when we were talking about tools, wait forgot the necklace. So I'm going to add the
clipping mask on top of the layer with the neck
and with the red color, I'm just going to create
this sort of choker. And I'm going to make
love heart necklace, just to show that it's
a Queen of Hearts. That's it. Now the only thing that optionally
you can choose to do, you can add some gold elements. For that, I'm going to create
a new layer, by the way, you can check out my gold class if you want to master
the gold painting. But now I'm just going to quickly add a little bit of
gold because it's a queen. I'm not going to
dwell too much of it and it's completely optional. I've created a new layer
on top of everything, but obviously underneath
the paper texture. I'm going to create another
layer on this top layer, I'm going to add
my gold texture. So I've added the gold
texture on this layer. And what I'm going to do, I'm going to clip it as a mask. So you see, it's disappeared. So we go on the empty
layer underneath, and that's how we start
painting with gold. I'm going to be using the
filler brush because it's more solid and I want my
gold to be obvious. I'm just going to add some
gold details here and there. I'm not afraid to overdo
it because in my opinion, there is no such thing
as too much gold. I'm just going to
start with this crown, and I'm going to draw
little gold elements. That would actually help also if I create the drawing
assessed here. I've got a symmetry going on. I'm just going to add
some gold elements here and there and your
imagination is your limit. Mm And I think that's it. That's our Queen ready. In the next lesson, let's put some nice decorative
elements around her.
12. The Roses: Now I would like this
part of my queen to be clipped as a
mask to my cameo. For that, what I'm going to do, I'm going to duplicate
it to create the backup. But with this one, I'm going
to switch drawing asstof and I'm going to select
this lower part of it. And I'm going to
cut and paste it. And I'm going to clip
this part as a mask. In this case, we've got the
queen clipped to the cameo, but the color of her cloak
going beyond the cameo. Now, what we're going to do, we're going to add some
roses as we discussed. I'm going to go back
beyond the paper layer. I'm going to create a new layer. This time, I'm going to
be using my roses and I'm going to use one rose in the bottom and
the other on top. I'm going to use the white
color and I'm just gonna stamp one rose here.
Something like this. And I'm gonna stamp
the other one on top. Something like this. And that's basically
my sketches. I'm going to clip them together and I'm going to
reduce the opacity, now I'm just going to
color the roses in. I'm going to create
a new layer and let's fill these
roses with red color. I'm going to select
the filler brush. I'm going to choose red color. I'm just going to outline
the red part of the roses. Fill them with color. I'm just going to duplicate
it to make sure it's as solid as possible,
something like that. Now I'm going to fill
the leaves and stems. With colour, we agreed
to use this sort of bluish gray color
for the leaves. I've created a new layer
underneath the red roses layer. I'm just going to
coloring the stems. So we've colour
blocked the roses and so it occurred to
me that I would make the transition because
the roses were being painted in the story with
red paint from white to red. So the parts closer
to the queen will be red and the ones that go beyond will be white just to
show the transitioning. But let's just do
one step at a time. Now, I would like to add some symbolic shading
to the roses. I really wouldn't
want to focus too much on them because this
class is not about it. For reference, for guidelines, I'm going to switch the sketch off and I'm just going
to reduce the opacity. What I'm going to do,
I'm going to create a new layer and
I'm going to clip it as a mask and I'm going to change the blending
mod to multiply. I'm going to grab the filler
brush, the red color, and I'm just going to
make some parts shaded. I'm just probably
going to reduce the opacity a little bit. Obviously, the very
center will be shaded. And the bottoms of the
petals will be shaded, too. Something like this.
You can choose and use the smudge
tool texture cloth, just to smudge the shading
a little bit, if you want. That's what I sometimes do
when I just want to add a little bit of softness
around the edges. But I want the roses to be more graphic illustration
style rather than realistic, just to keep it in
consistence with the queen. Let's add some highlights, Clipping mask, keeping on
the normal blending mode, and I'll probably use texture
fluff and white colour with really low opacity just to add some highlights
here and there. That's what I'm going to do with the roses and I'm just going
to pinch them together. And now I'm just going to
quickly work on the leaves. I'm just going to
create a clipping mask, and I'm going to change
the blending mode to multiply with texture fluff, I'm just going to use this
gray color just to add a little bit of shading here
and there on the leaves. And also it occurred
to me that I quite like this white
outlining on the roses. I think it adds
this nice element onto the leaves as well. I've just decided that I'll
keep it as part of my design, and I'm just going to
bring it down here and I said that I was going to make
the transitioning between red and white. I'm just going to show you how I can choose to
execute this task. We're going to be
working with this red part of the roses. We've got red roses. Now
we need white roses. For that, I'm going to duplicate this layer
for the red roses. I'm going to switch the top one off and I'm going to
work on the bottom one. I'm going to go to
the adjustments, part of the menu and I'm going to choose huge
saturation and brightness. What I'm going to do, I'm going
to reduce the saturation, but I'm going to
increase the brightness. Actually, saturation maybe
15% and brightness is about 75 and the hue I'll
probably leave it as it was. At the moment, they
look like light pink. But in the contrast
with red one, red color, they will look white. You can also play around with
things like color balance. You can make them a
little bit more bluish. That will make
them appear white. Again, I would
like to go back to saturation to reduce
it a little bit. That's basically white roses. These are red roses and we want to create
this transitioning from white to red to make
our Queen of Hearts happy. What I'm going to do the
white roses underneath, the red roses on top. I'm going to add a mask
to the red roses layer. So we tap on the layer
and we select mask, and now I'm going to select
the texture, fluff, brush, and you can see
that the color is automatically black because for our masks, it's either black, white or shades of gray, and I'm going to increase the opacity to 100% size
and what I'm going to do. I'm going to switch
the roses back on, and now I'm going to mask parts of my red roses turning
them into white. Showing the transition, showing that they
used to be white. But because of our
Queen of Hearts, they turn to be red. If you feel like
you need to reveal more of the red roses that
you've masked too much, select the white colour. I'm just reveal a
little bit more. If you reduce the
opacity, obviously, the mask is going to be more opaque or transparent depends
on how you look at it. I'm quite happy with that. I think it's showing that
the roses used to be white. Now they are red to
make the queen happy, and that's basically
all the elements, accompanying elements, I would like to be around my queen. Let's do the finishing
touches in the next lesson.
13. Finishing Touches: For the finishing touches, the plan is the following. I would like to tidy the
illustration up a little bit, and I would like maybe to add some additional elements that this illustration
can benefit from. But again, it's all optional. If you choose to do it or not
to do it, it's up to you. So first of all, I
would like to tidy the roses because
you see the stems are a little bit untidy.
So what I'm going to do? I'm going to put
all the roses and the leaves and the
stems into one group. I'm just going to flatten it. And I'm going to take eraser to, and I'm just going to erase maybe this part, just like that. Probably I'm going to select
the texture flofF the eraser and I'm just going to
erase a little bit of this just making it disappear
on the background. I can see that there is just
a little bit of the cameo. I'm going to duplicate it to make it more solid and I'm just going to take the filler
brush and Smooth. This little bit. Now I would
like to work on the cameo a little bit because we
still can see some of it and we want it to be
a little bit less flat. And how we're going to do
that very, very simple. I'm going to create a
clipping mask on top of this cameo and I'm going to
change the blending mode to lineburn I'm going to
grab some texture brush like let's see the texture shader and I'm going to
select this beige color, increase the size of it. I'm just going to
add a little bit of texture. Here and there. You can experiment with different types of
textured brushes. There is plenty of them
here. There is painterly. Pottery is quite
a textured brush, so I'm just going to grab maybe blue color and just
add a little bit just to make the color
of the cameo less flat. And also, you can use
some decorative elements. Like, first of all, you can use some of the pattern
brushes here from our main brush set or I would probably
use one of the stamps. For example, in
Victorian element set, there is Victorian element six, and I've created a
new layer and I'm going to turn the blending
mode to multiply, and I'm just going
to maybe choose this purple color again and
see how the stamp works. I can put it in the center just above her crown
which is quite uh, quite nice. You can go further. You can use other elements
like this, for example, let's turn the blending mode to multiply and let's just maybe stamp here and you can
remember with stamps, you can experiment
with the sizes, you can erase whatever whatever
you feel is not needed. C I created this
aximetrical composition. You can reduce the opacity
of it if you want so. But that's basically
just to give you an idea that you can
create a lot of elements. Again, this type of
elements will unite, unify this illustration
of the queen with the illustrations of the
dorms and the rabbit, making them belong
to the same story. And the very last thing I would probably add again
completely option, the matter of sort of
personal preference, I would add a frame around it. I've created a new layer underneath the upper
part of the queen, and I'll probably I'm
going to choose the most royal out of all the elements like
the frame elements. I'm going to choose
Victorian element five and with pure white color. I'm just going to outline the cameo you can
also edit the lips. I'm just going to put it really close to the edges of the
cameo, making it look like. I really like it because it creates this sort
of lace effect, which is also part of the Victorian style of clothing
or interior or something. All these things like give out this Victorian vibe
in my humble opinion. That's basically pretty much it. I would like to add the finishing
touches, but obviously, you guys feel free to take it even further
because in my opinion, there is no such thing
as I said, as too much. My style is basically about
a lot at the same time. So I encourage you
just to experiment. Don't be afraid and
yeah, well done.
14. Final Thoughts: First of all, let
me thank you from the bottom of my heart
for taking this class and a special thank you
for my students who have been with me from the very start and who have taken
every class of mine. There are a few important
things I'd like to say. First of all, when it comes
to human face drawing, like with anything else in art, observation is the key. Pay attention to the faces of your family
members and friends. Watch discreetly
people on the train, your work colleagues, and
your street bussers by. Pay closer attention to people
on TV, actors, singers, TV personalities, celebrities of all kinds of ethnicity
backgrounds and ages. Observe how emotions
change facial features. Observe your own face while
doing makeup, for example, try to express emotions of happiness, sadness,
surprise, rage. All of the above will help you immensely in learning
to draw human faces. I would also like to apologize if some lessons are too long. There is so much information I'd like to share that sometimes it's virtually
impossible to squeeze it all in and buy size lessons. Feel free to adjust
the playback speed of my classes of my lessons to
make it go slightly faster. I won't be offended, I promise I don't mind at all. Although my classes
are quite long, still, I don't manage to fit in even a tenth part of what I like to share with
you guys in them. I give you absolute basics, and I encourage you
to work further on the basics to
elaborate on details, lighting, shading, color tones, et cetera, just to bring
it on a new level. At the same time, I don't want to become a daunting task for you because my whole point as a teacher is to make you
believe in yourselves. Prove to you that illustration doesn't have to be complicated. You can do it once you
switch your mindset from doing a chore of
drawing to a nice, relaxing, soul healing
time spending. So what I would kindly recommend after you've
done this class, don't just leave your
illustration behind and rush to move on to
the next illustration, to the next project of yours. Make yourself cozy. Pour yourself some
nice hot drink. Switch on your
favorite TV series on and open Procreate with your
illustration on your lap. And just let your hand draw. Let it add, let it cross hatch. Add, remove, experiment with colors without involving
your brain too much. Try it the promise magic will
happen. Thank you again. Please share your
illustrations with me either here in the discussion
section or on Instagram. At my underscore is underscore, tag me on Instagram. I hope to see you
in my next class.
 Irina Young, Busy May Studio