Transcripts
1. Introduction: In this class, also known as
an alcohol ink after party, it's all about you, your sketchbook and alcohol inks.
Hello, beautiful people. My name is Trena Brannon. I have a passion for color and a passion for
helping others. That's why I'm excited to be here teaching on
Skillshare with you. I have many identities. Among them, I'm a children's book Illustrator,
a surface designer. I license my artwork. I'm a multifaceted artist. I dig traditional and
digital creating. I'm also a founding contributor to the Alcohol Ink Art Society. I just love coloring. My favorite art supplies is
whatever I have in my hand. Truly, it is. In this class, I'll have alcohol ink.
And my sketchbook. This after party is targeted towards those of
you who are interested in jumping in your sketchbook to play with vivid fluid colors. This class is all about
you and your sketchbook, the way you like to make marks, doodle, the joy of being in
your sketchbook just for fun. Now it's quite possible you may learn some things. That's
just part of the fun. But there's no pressure,
there's no grade. There's no expectations
on improving. It's just all about play,
play in your sketchbook. In the class, I'll share how to safely use the inks and
what to watch out for, how to prep your
sketchbook to get the most out of the inks
unique features, some fun basic techniques
of using the inks and some encouragement for using your sketchbook in a
way that works for you. You are in total control
of your sketchbook. It's yours. For the project, you can share any page you
create in your sketchbook. It's not about
creating perfect art, it's about what brings you joy. Please do share
whatever page you want. I think you'll find the
play relaxing while giving your eyes and the coloring part of your brain plenty
to smile about. When you participate in class, you'll get to experience how the inks blend and
dance around together, and you will see how each
page will be unique. It will be fun and interesting to see what everyone is making. So let's get started. I'll see you in the
Alcohol Ink After Party.
2. Your Project: Hello. I'm glad you're here. Let's talk about your project. During the class, you'll be creating inside your sketchbook. Simply share one or more or all of your pages that
you create in class. If you have any questions, please post in the
discussion area. I'll be checking it often, as well as one of your
classmates may know the answer. This is a sharing
supportive community, one of the reasons
I love teaching, and I'm also a student
here on SkillShare. Up next, we are going to talk about supplies and
safety. See you there.
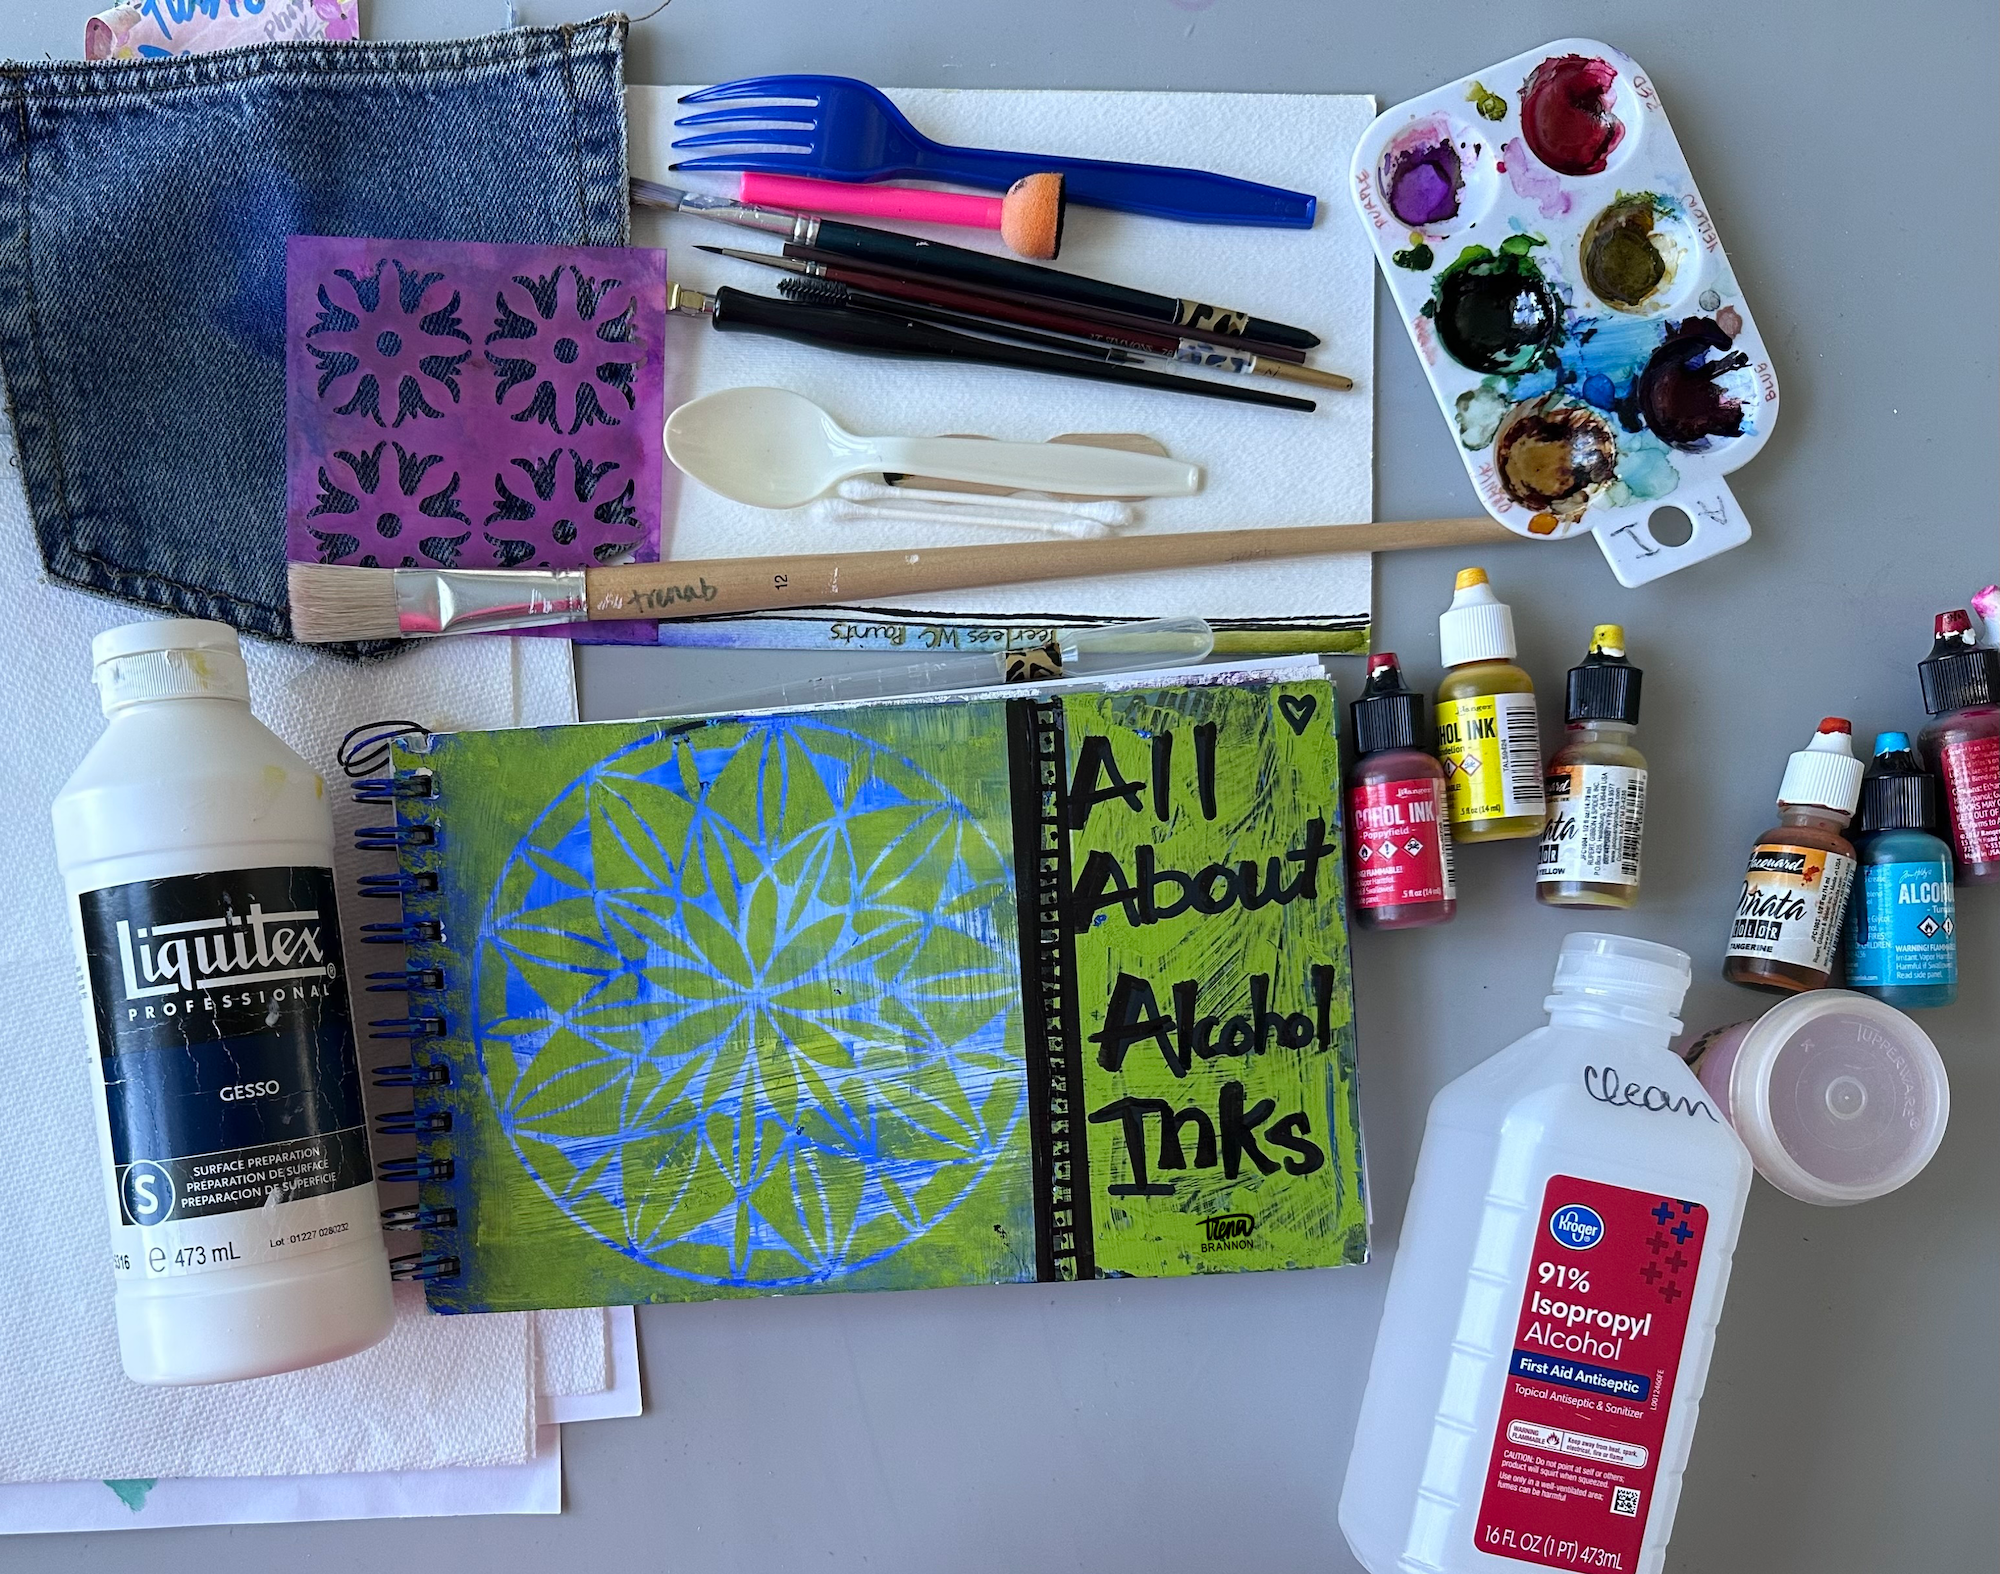
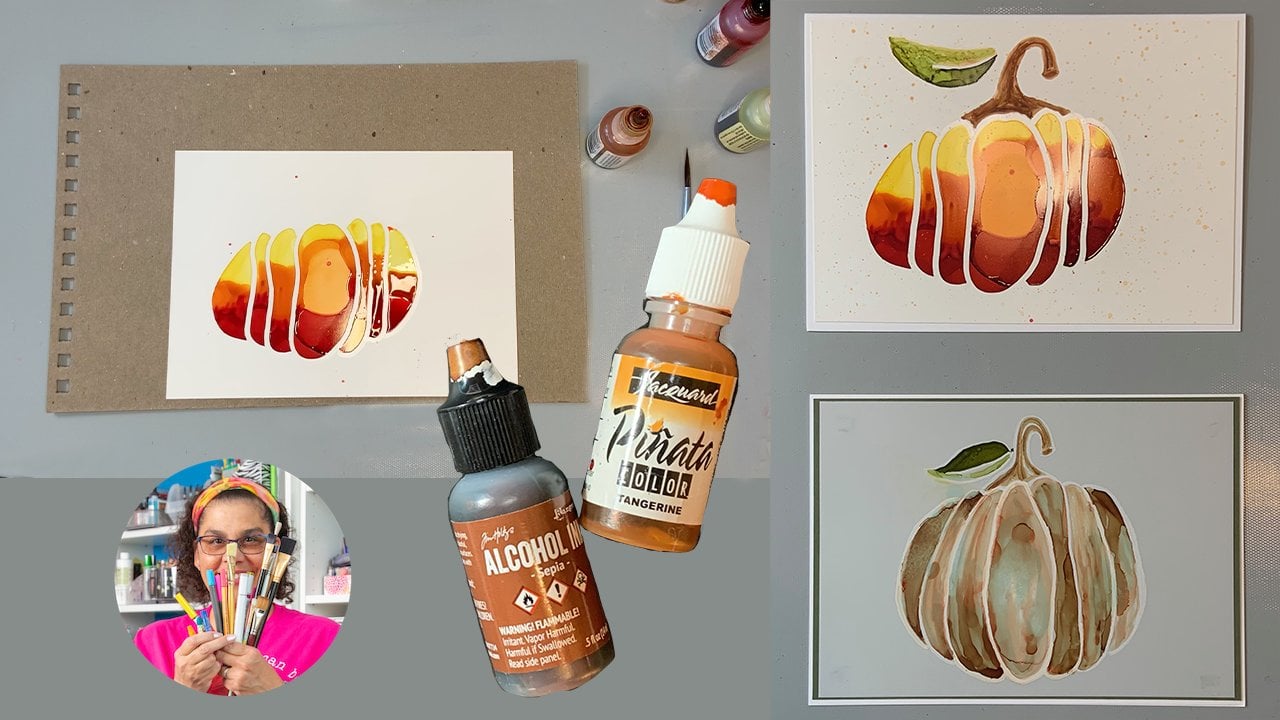
3. Supplies & Safety: Hello, and welcome back. In this video,
I'll be explaining the supplies used in class
and some safety practices. Let's talk about safety first. The smell of alcohol
inks and the isoprofil alcohol that we'll
use can sometimes be strong. So you'll want to work in
a well ventilated area, open a window or have
a fan in the room. The inks are very
pigmented and will stain. You want to wear old
clothes and also gloves to cover your hands
or use a barrier cream. Cover your work surface. I have a reusable
craft mat on my table. You could also use a
plastic table cover. When it's warm enough,
I set up a table in the garage and open
the garage door. For supplies, you need
some type of sketchbook. I have a Canson mixed
media sketchbook here, but you can use whatever
type you have available. The mixed media pages are a little bit thicker than
a regular sketchbook, so that's why I like to
use that as the base. This one I actually
purchased a nine by 12, and then I had it cut in half
at my local office store. You'll also need
some type of gesso. Whatever brand you have is fine. This is the brand that I use, and I usually put my gesso in a smaller bottle just
for ease of application. You'll also need
isopropyl alcohol, which is available in
the United States. It's available in most
stores grocery stores, pharmacies, places like that. I'll be using 91%. If you don't have that
available in your area, use whatever percentage
that you have. Just be aware that
the results may be a little different than
what you see from me, but you can still use whatever percentage you
have available to you. I also have some
smaller containers that I put my alcohol in. A spray bottle for some of the techniques we'll
be using some type of little container so
that you can dip your paint brush in and
a small applicator. If you don't have
these type of tools, you can just use whatever
you have to simulate the type of techniques that
we're going to be doing. I also have a little eyedropper to get just a small amount of isopropyl alcohol out of the container, the
larger container. Of course, we'll be
using alcohol inks. These are the two
brands that I have. You can use whatever
brand that you have access to or you
have in your stash. I have used a
variety of brands at different price points and
found that they act similar. They're all very
vivid and pretty. I'll be using a large
brush to apply my gesso. You could also use
something like an old gift card if you
want a smoother surface. I tend to like a more
textured surface, so I like using the brush. Some found objects around
your house for mark making. Also some cotton swab tips. I'll be using
specifically this size. Paper towels.
You'll need quite a few of these for
cleanup and also for absorbing any excess
color or alcohol. Some type of little container
to put the alcohol inks in. This is just a little inexpensive
one that has the wells. It's nice to have a reusable one so you can use this
over and over. We'll also use a stencil. This is a mylar stencil. You have something
similar that has some cutouts for one
of the techniques that we're going to do and
some fabric that has design to it or some
fibers that allow you to create texture in your pages. Remember, if you
have any questions, please post them in
the class discussion. I'll check it often. Next up, we're going to talk about
prepping your pages.
4. Prepare Your Pages: Hello, and welcome back.
The first thing we need to do is prep our pages
to receive the ink. In order for the
alcohol inks to be able to move naturally and
do their special thing, they need a non porous surface, a plastic like surface. The mixed media paper is absorbent and will
suck up all the color without mixing in
that beautiful way that the inks like to blend. So I have my scrapbook
here and a tip is to put a piece of scrap paper behind the
page as you just sew it. I have my gesso here, and I've opened up to two pages so that I can gesso two at the same time
and allow them to dry. I put my gesso in a smaller container
just for ease of use. So I'll put a little
on this page and near the edge and a
little on this page, near the edge and use a
paint brush to spread. So I will just use a
little bit to get started. It's easier to add more
than to have too much. So I'm going write up to the
edge and go ahead and go on my second page
because I may have some leftover that I can
use on the first page. I'm not sure if you can
tell on the camera, but I can see where the
gesso is spreading. It has a little bit of a yellow to it compared
to the white paper. So for me, I like
texture in my artwork. So in general, when
I spread onto paper, I will go back and forth, add a little bit more gesso. I will go back and forth to naturally create that texture. If you like a more
smooth surface, then you want to make sure
you use a light touch, and you could use something
like an old credit card or a gift card to get a smoother results on
your mixed media paper. So I'm not pushing too hard, and I'm just spreading
to the edge. Making sure on both pieces
that I have a good coating. Another option is you could
leave some blank spots in your gesso so you
can see how the inks work on the naked paper. This is your sketchbook. You
can do whatever you want. And we are just
playing and getting to know the inks a little better. So once I've finished, I allow this to dry
for at least an hour. Then I will turn
the page and turn another page so that
there's a blank page in between and
repeat this process. Once I am finished
gessewing the pages, I will set the book up
and spread the pages out so that they will dry
completely overnight. This is one way to do
several pages in a day, and then your book will be
ready for the next step. In the next lesson,
we are going to get started with splashing
some color. See you there.
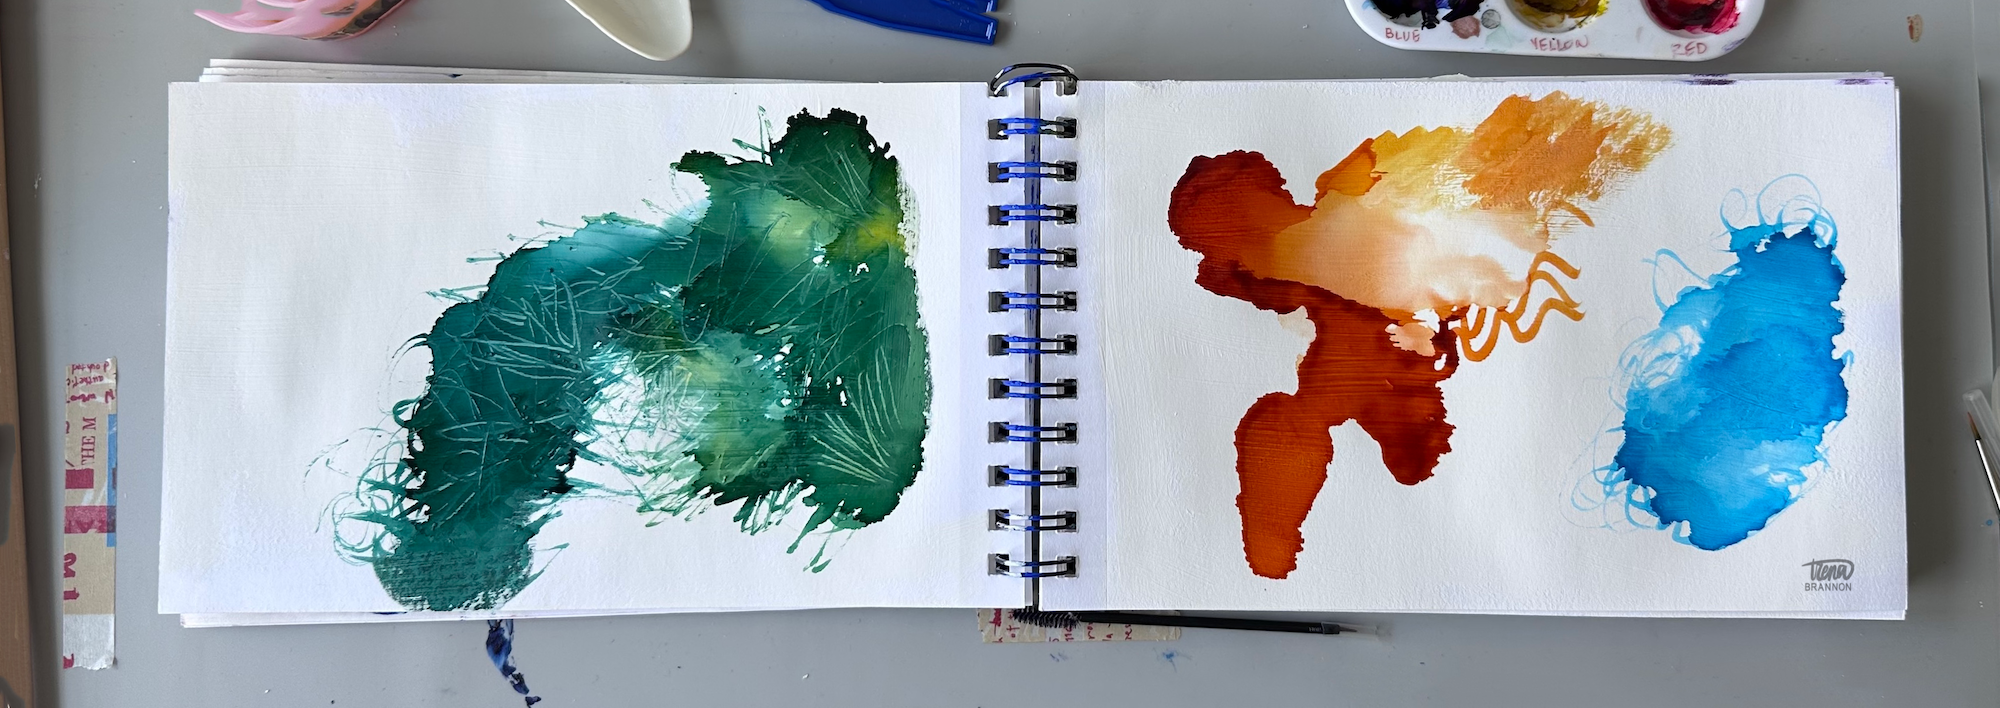
5. Making Marks: In this video, we
will be making marks. This is where you get
to know your inks better and where your style
really comes through. I have my window open, my gloves on, my
clothes are protected, my surface is protected. I've picked out a
few colors here and I have a variety
of mark making tools. I also have a little palette
here to hold my inks. In general, if you find you like to paint
from a certain direction. Feel free to move
your sketchbook. I'll try to keep mine straight here so it makes it
easier for you to see. Let's just have fun
in this after party. I'll show you some ways. I like to make marks, and you can jump in with me or go your own way
in your sketchbook. The goal here is to have
fun to really get in there, get to know your
inks and play with them and to get joy points. I've just picked
out three colors. I'm limiting my colors
and I picked out three colors that play well
together for bright colors. I'm not looking to get a
brown or black today or gray, so I have anagss colors that are close to each
other on the color wheel. My pages are Jess out and
I'm just going to jump in. I tend to shake up my inks a little bit and I take
the top off away from my pages so that I don't get
little crumbs on my pages. If you like crumbs, that could be part of the mark making, so I don't want to
discourage you from that. But I'm going to take
my tops off away from my artwork
from my sketchbook. Since the gesso is on there, they will move
around a little bit, so I'm just going to go straight onto the page to show you. You see how it spreads a
little bit. It's very fluid. Then I'll just add another
color and another color. Then one thing you
can do is just spread the colors together and you see that they mingle really nicely. You can also see that
I'm going nice and slow and spreading the
color a little bit, allowing for some
texture to show through. That's one way of
marking is just to take a brush or tool and make lines. You can also put some color into a palette and pick it up
with a pink brush. I have a smaller one this time. Then I'm going to dab it off on the side to just get some of that fluid out so that I have a little bit more control
over my mark making. They're more fluid, the
inks, the more they spread. As they dry, or you have a little less on your
brush or on your tool, you have more control over
the marks that you make. You can even draw
shapes really easily, and we're going to do that
some more in a future class. The way I clean
my brush off is I have a little cup
of alcohol here. I have a air tight top that I put on so I can use the
alcohol over and over and I just dip my brush in there and wipe off
the excess alcohol. I can use this over and over. Another way to make marks
is with a fountain tip pin. If you have one of
these dip pins, you can dip it into the ink, dip it off on the side a
little bit and just pull it. You can also use some
plastic utensils. I'll add another color and dip my fork in there
and just pull it across. M. And you get light and dark marks. Swish it around and
pull it through. I'm not trying to make art. I'm just trying to mark in my sketchbook and
see what I like. I think that's cool, there's some light marks and
there's some dark marks. Another idea is if
you have any kind of little brush. A dip that in. Little wooden panel. I am trying these in real time. So we're seeing
what they can do. Can also, again, put some ink right on there and pull it down
and see what it does. Add another color. Try a little Oh. That fell apart. I've had
that for a long time. What you can see here is that the ink is going into some of the gesso
strokes that were there. And that's part of the reason I love texture is I just
love how that looks. I think it's really cool. So I'm going to try
the other side. We'll see how this goes. This
one might fall apart, too. I'm just kind of
brushing it along and because it had actually
some old ink on there, it kind of picked up
that previous color. Okay, I think I'm
going to let this go. Oh, well, wait, maybe I'll try to see what this looks like. You can also put it in here. Use your finger and move across to make marks.
See how that looks. There are no rules. Just try different things and
see what you enjoy. Dip that in there to
see what you get. You can see all that beautiful
texture that's in there, and dry fingers are cool, too. You can, like, stamp
the color in there. Another little tool I
have is a little sponge. Let's see what kind
of mark that makes. Picks up. That's a coal mark. Basically, intuitively
just stamping in here and making marks
in here that I like. Now I think I need
another color. I'm going to put
in a pop of pink. And I'm not cleaning it off. I'm just going
right in and seeing what we get. Which makes sense. I was using blue. And
I get a purple color, which there was some
purple in that before, so it probably
reactivated that color. I'm going to rub
and swirl and just enjoy the process and the
fun of dropping color. There's some ideas for just
some general mark making. Now let's move to
the next lesson where we're going
to drip some ink, watch it mingle and even help
it mingle. See you there.
6. Drip and Mingle: Hi, and welcome back.
In this lesson, the inks are mingling. As you saw in the
previous lesson, a benefit of the inks is that they create
a natural texture and blend so you
don't have to work too hard to create
lovely colors, giving your eyes
some joy points. So a couple of ways. One, let's continue to drip from the bottle on the surface. So let's try some
different colors. We're going to drip
some orange on here and let's drip some yellow
into it and see what it does. Look, it's just spreading. That's because of the gesso. As you can see, when you drip a lighter color
into a darker color, you see where that
darker color moves. That's because there's
more alcohol binder in the lighter colors, and see how it's beautifully
moving right along. Let's help it mingle a little bit with the paint brush
and help it move out. You can see it spreading around the outside, creating
some texture. If you were to drip alcohol directly in
there and I'm just going to use my little dirty alcohol
here and an eyedropper, a little plastic dropper, pick up a little bit of
alcohol and drop it in there, see how it moves away. The ink that is still very fluid moves even faster
and moves further away. You see the ink that
started to dry because this was a thinner coat of ink, it slightly moved away.
I just got lighter. So many cool things
with these inks. That's why I love
playing with them. Over here, I have some
texture from where I spread the gesso
with my paint brush. I'm going to pull
some of that over there so you can see it,
so you can really see it. I'm going to dip in
here and pull some. If you like texture, you'll love this part of it and you can be even
more scratchy with your paint brush
when you lay down the prep coat so that
it's really textured. Another thing you can do to
get them to mingle is to lay down some isopropyl alcohol
and then drip color into it. That's what we're
going to do next. I just have some alcohol in this little bottle and I'm
going to put some down, and then I'm going
to drip color into it and you'll see how
it spreads even more. I love when it does that. Let me add a little bit more. And let's add a little bit of a different color,
a lighter color. And see how they
mingle together. You can even pick
up your book and just ever so gently
move it around. The bigger it's going to move on both sides because it's
still wet on the right. But the larger your surface
that you're working with, the more you can play, the more wide you can be with your movements and get
some really fun textures. But I think that is
really cool in here. That's one of the
amazing and fun things about the inks that are
a surprise for you. Let's do some more over here. I'm going to lay
down some alcohol and drip in this lighter
blue color Turquoise. You see how it's
almost like cells. It's like we're doing science here and just swirl it
around with my pipette. I was trying to think what
that real name was earlier. Moving around, give some really
cool images and textures. And over here on this side, I still have quite a bit of ink, so I can do something with that. I'm going to use same tip. I don't have to worry
about if it's gonna cause any colors that I don't like because they're both
in the cool family. So I don't feel I need
to clean off my tools. And just swirling around. I really like the
texture on that edge. It almost looks like some
type of land from up above. Lots of fun. I can add some more alcohol to make this
spread out a little more. You can drip in more ink. It's lots of choices
for what you want to do in your sketchbook and how
you want to work with it. The other beautiful
thing about working with the inks is after they dry, when you come back in later, if you have an idea
something you want to try, they will still move when
you add more inks to them or when you add
isopropyl alcohol. Or the blender that
comes with alcohol inks. So now I'm just having fun here. As the inks dry, they will move less and you can have more
control over them. So what I'm doing basically
is just scratching out color because
they're starting to dry, especially in the areas
where the ink was thin. In the areas where
I poured more ink, they're still pretty fluid. So when I move them,
they're not as playful and, like, I'm not able to remove the ink as easily because
it will fill back in. As it dries, the
ink stays in place. In the next lesson, we are
going to talk about how to create some
intentional shapes.
7. Swirls, Boxes, and Squares: Hello, and welcome
back. In this lesson, let's draw intentionally
making shapes. I am going to use a
couple paint brushes, and you can pick whatever
tool brings you joy. I have my dry palette
here where I've allowed the inks to dry totally because
the drier the inks are, the more control I have
over where I place them. I'll start with my
smaller paint brush. And what I'll do is I will
dip in some isoprofi alcohol. And for this technique, I am using clean alcohol to start with because I don't want to contaminate my colors. If you don't care
what colors show up, don't worry about changing your ink because the
results will be the same. I have a paper towel here
where I can clean off. Make sure my paint brush I'm starting with a
clean paint brush. And then I will dip in and slide my paint brush
on the side here to make sure that I get
off the majority of the isopropyl alcohol and then just pick up some
color along the side. So you see I have color
on the tip of my brush, and then I can paint a shape. So I can continue doing this putting just a little bit
of alcohol in there and then drying it off on the side so that I have more control
over where the ink goes. Now that I have a
little bit in there, I don't have to dip again. I can just use what's on the bottom and pick
up color on the side. And so I can use my whole
arm to make shapes. I can use my opposite
hand to make shapes. Just having fun, making
shapes, circles swirls. And then you can see where the color
kind of trails off and it gives this really
cool textural look. If I want it to be a
little bit more wet, I can add a little
bit more alcohol so that the color lasts
all the way around. I still tap off on the side because I don't
want it to be dripping wet. If it's dripping,
then chances are I won't be able to control
where the color goes. So I can do all kinds of marks depending on how much
alcohol ink I want on there, how deep I want the color, I can just make sure that I am choosing the
right consistency. And that just takes
a bit of practice. Just remember that
the drier it is, the more you'll get
this dry brush effect, as well as you can control it. If it's too wet, it will go where it wants to go. So it's a matter of
just playing with it. And then when you want
to change colors, wipe off wipe off the excess
color on a paper towel, dip into your rubbing alcohol, isopropy alcohol and just
kind of get that color off and then dip in
the alcohol again, tap off the excess on the side of the cup and
pick up your new color. And then tapping off a
little bit on the side, you can start your next color. Again, if you want
it a little bit more solid as opposed to that dry brush look at
a little bit more alcohol, just being mindful of how
much you have on there before you go to your surface. You can do organic shapes or whatever type of
shapes that you like. You can do the alphabet. Try a different brush. Make larger shapes. This one had some
color on it too. So I need to clean that off
before I go into a new color. I'm just cleaning it off on
my paper towel over here. I save these paper towels and
use them on other projects. They make really cool collage. So get some fresh
rubbing alcohol and go into a new color. And then I'm gonna
make a big circle. Skinny triangle. Close circle. Just all kinds of shapes. I encourage you to just
take this time to play with your inks in
your sketchbook, make different shapes, trying out the dry brush
look versus where you have more color on your
brush and pick up more ink to create something. Also try your opposite hand. That's a lot of fun and gives
you some different shapes. I could try a different tool being mindful of
how much alcohol, rubbing alcohol that
you're putting on your tool so that you get the
control look that you want. Or if you don't want to control look and you
just want to be messy, that's okay, too. This
is your sketchbook. I'm just giving you ideas
to get to know your inks. And just by happy accident, I got a two color mark. You never know what you might
get with the alcohol inks. That's one of the things that I love about working with them is that you'll get a
colorful surprise. In the next video,
I'll show you how to remove color. See you there.
8. Remove Color: Hello and welcome
back. In this lesson, I'll be explaining how to remove color with
the alcohol inks. To remove color, you'll use
your isoprofle alcohol. Depending on the percentage, you will get different results. The higher the percentage,
the better the results. But you can still go
over it with a couple passes if you have
a lower percentage and get good results. I use clean alcohol. I'm just going to
dip a Q tip into the alcohol and
get it pretty wet, not dripping wet,
but pretty wet. And then I will place it in the area where I want
to remove the alcohol, what you'll see is that the rubbing alcohol
pushes the color away. I started with the wet and
then I moved to the dry side, picking up that alcohol, absorbing it on this side, and you can see that
it's light in the color. I can do it again and
get even more color off. I will dip my cotton
swab in there. And rub it around to wet the area and then take the
other side to pull color out. As you can see, with each pass, it gets a little lighter. Depending on how much
color you want to remove, you can do this several passes. Another tool that works to remove the ink is a paper towel. You can get more
surface with this. I just get my paper towel wet, and then the area where I
want to remove some color, I can rub in that area. And what happens is it will
actually smear the color. So this is one way to remove and another way to
spread your color. So it's a tuf So here's
another way to spread color in your sketchbook or on your substrate because you've removed this color
from this area, and then of course,
it's still on the paper towel and you
can move it around. If you wanted to
just remove that, you'll want to make sure
that you're working in a very targeted area if you did not want
to move that around. So let's just finish this page. So I'm pouring a little
bit more alcohol on here. I did it off camera because
I really don't like to do it on top of my artwork. But just pulling
that color along, I can fill in all that space. And because this has
the gesso on it, the alcohol ink color moves
around really easily. I'm going to pick up the page so I can go to the edge of it. But here's another way
to play in your book. So I just wanted to show you that little tip if you want to remove in a certain spot or
you want to lighten an area, you can use the rubbing
alcohol and then you can spread the color
around if you choose to. More fun things to do
inside your sketchbook. I encourage you
to just play with this technique of removing
color and creating shapes with your removal and observe how the rubbing
alcohol moves the ink. Up next, I'll show
you how to add textures in a different
way. See you there.
9. Add Texture: Hello, and welcome back. In this lesson, I will be explaining different
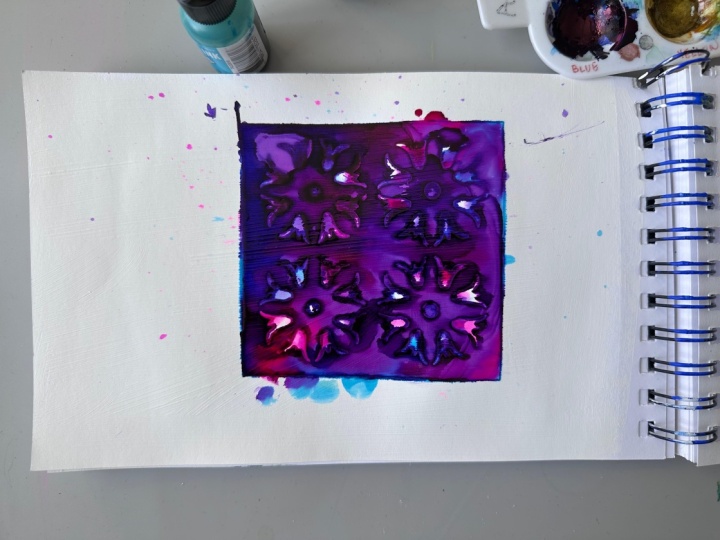
ways to make texture. Starting with a wet technique. I have a stencil here. For this technique, you simply lay the stencil
on your substrate, on your page, and then you drip ink into the openings
and around the stencil. What happens is, as it dries, it takes the form
of the stencil. This is a really fun technique and has a beautiful results. One thing you want to
make sure of is that your surface is as
flat as possible. I'm also going to spray a little isoprofil alcohol onto the stencil to
help the colors mingle. It's okay to put the
alcohol in a spray bottle, but never ever put the alcohol
inks in a spray bottle. They have resin in them and
that could hurt your lungs. I'm just going to
spray a little bit, and then I'm going to drip. Ink all around the
stencil and you'll see already that it's
starting to grasp pole of parts of the stencil. I pick two colors that will make a third color when they
mingle together that I like. So that's all you have to
do is to drip the colors. I'm going to add a
little bit more alcohol so that they spread around. I want to make sure
that there's color. You can also take your finger and help the colors
mingle a little bit. I don't want to do it too
much because I want it to be organic and look really cool. So then I'm going to stop. I have alcohol on my fingers, so I want to get that off
before I do the next technique. The next technique
involves dry ink. This ink, I dripped
earlier and I just use two colors, two blues, a light blue and a dark
blue and dripped it in this area and let
it dry completely. This technique works better
when you have a dark color. So you want to have a piece
of fabric that is textured. I have this denim packet from somebody's
genes in my family, and I'm going to spray isoprof alcohol on here
to dampen the area. And the way this
works is the alcohol, the rubbing alcohol
will absorb into the fabric and you have these hills and
valleys of the fabric. And then when you press it down onto the ink spot
here, the color, and lightly press, it will push that alcohol through the
texture onto the ink. And then when you pull it away, the alcohol remains
and it will develop. You'll see the texture
develop in the space. So sorry about that. I
got something on my page. Now I'm going to be careful. I'm going to spray this off camera because I don't want
to spray it over my artwork. But I lightly spray. I hold it back about this far. I did three sprays
because I want it to be moist but not soaking. Then I lay the fabric over my ink and press
lightly all around. I'm going to go around
a couple times I want that rubbing alcohol
to get in there. And then I'm gonna pull it away, and after a few moments,
the texture appears. So I'm gonna carefully bring this up so you can
see the close up. And I'll also take a
picture so you all can see. I want to be careful because my wet piece is working over here. After a few moments, I'll
be able to take this up, but I want to let
it dry before I remove it so that the color
does not fill back in. If you remember from
our earlier practicing, when you touch the color
when it's very fluid, it just fills right back
in and we want it to keep that shape. So I'll
be back in a moment. Okay, I'm back, and
I think it is dry, so let's check out
the big reveal. So I'm going to
slowly pull it up. And it wasn't quite dry, but this gives you
an idea of the type of texture that you
get with a stencil. And on this side, you can see that texture from
that denim pocket. So there are two techniques that give you texture that
you can have fun with. Next up, I'll wrap up with a
few comments. See you there.
10. Summary: Congratulations. You
have finished the class. I hope you experience many joy points playing in your sketchbook with
the alcohol inks. In the class, we covered how to safely use the inks and
what to watch out for, how to prep your
sketchbook to get the most out of the inks
unique features. So fun, basic techniques
in using the inks. And I hope that you found encouragement in using
your sketchbook in a way that works for you and
that it's all about you and how you enjoy
working in your sketchbook. It's really a joy to create in your sketchbook when
there's no pressure. You are in total control
of your sketchbook. It is yours. Kindly
leave me a review. I'd appreciate knowing what
you thought about the class, as well as it lets others
know what to expect. Also, follow me here on SkillShare so you'll hear
about my upcoming classes. If you post any of your
inkwork from the class, please tag me on Instagram. I'd love to share your
artwork with my followers. Thank you so much
for joining me. See you next time. Take
care and stay positive.
 Trena Brannon, advocates kindness inclusion positivity