Affinity Designer & Photo for iPad V2 | Create a Textured Image Brush | Tracey Capone | Skillshare

Playback Speed


1.0x


  • 0.5x
  • 0.75x
  • 1x (Normal)
  • 1.25x
  • 1.5x
  • 1.75x
  • 2x

Affinity Designer & Photo for iPad V2 | Create a Textured Image Brush

teacher avatar Tracey Capone, Illustrator, Photographer & Designer

Watch this class and thousands more

Get unlimited access to every class
Taught by industry leaders & working professionals
Topics include illustration, design, photography, and more

Watch this class and thousands more

Get unlimited access to every class
Taught by industry leaders & working professionals
Topics include illustration, design, photography, and more

Lessons in This Class

    • 1.

      Welcome to Class!

      0:56

    • 2.

      Textured Image Brushes in Affinity Creating the Brush Tracey Capone

      14:04

  • --
  • Beginner level
  • Intermediate level
  • Advanced level
  • All levels

Community Generated

The level is determined by a majority opinion of students who have reviewed this class. The teacher's recommendation is shown until at least 5 student responses are collected.

74

Students

4

Projects

About This Class

Textured Intensity Brushes... Solid Brushes... Image Brushes...  Is the brush pixel or vector?  Can I scale it infinitely?  How do I create my own??

There are tons of different brushes in Affinity Designer, which gives us lots of options when creating, but can also leave us with lots of questions, right? Don't worry, I've got you covered!

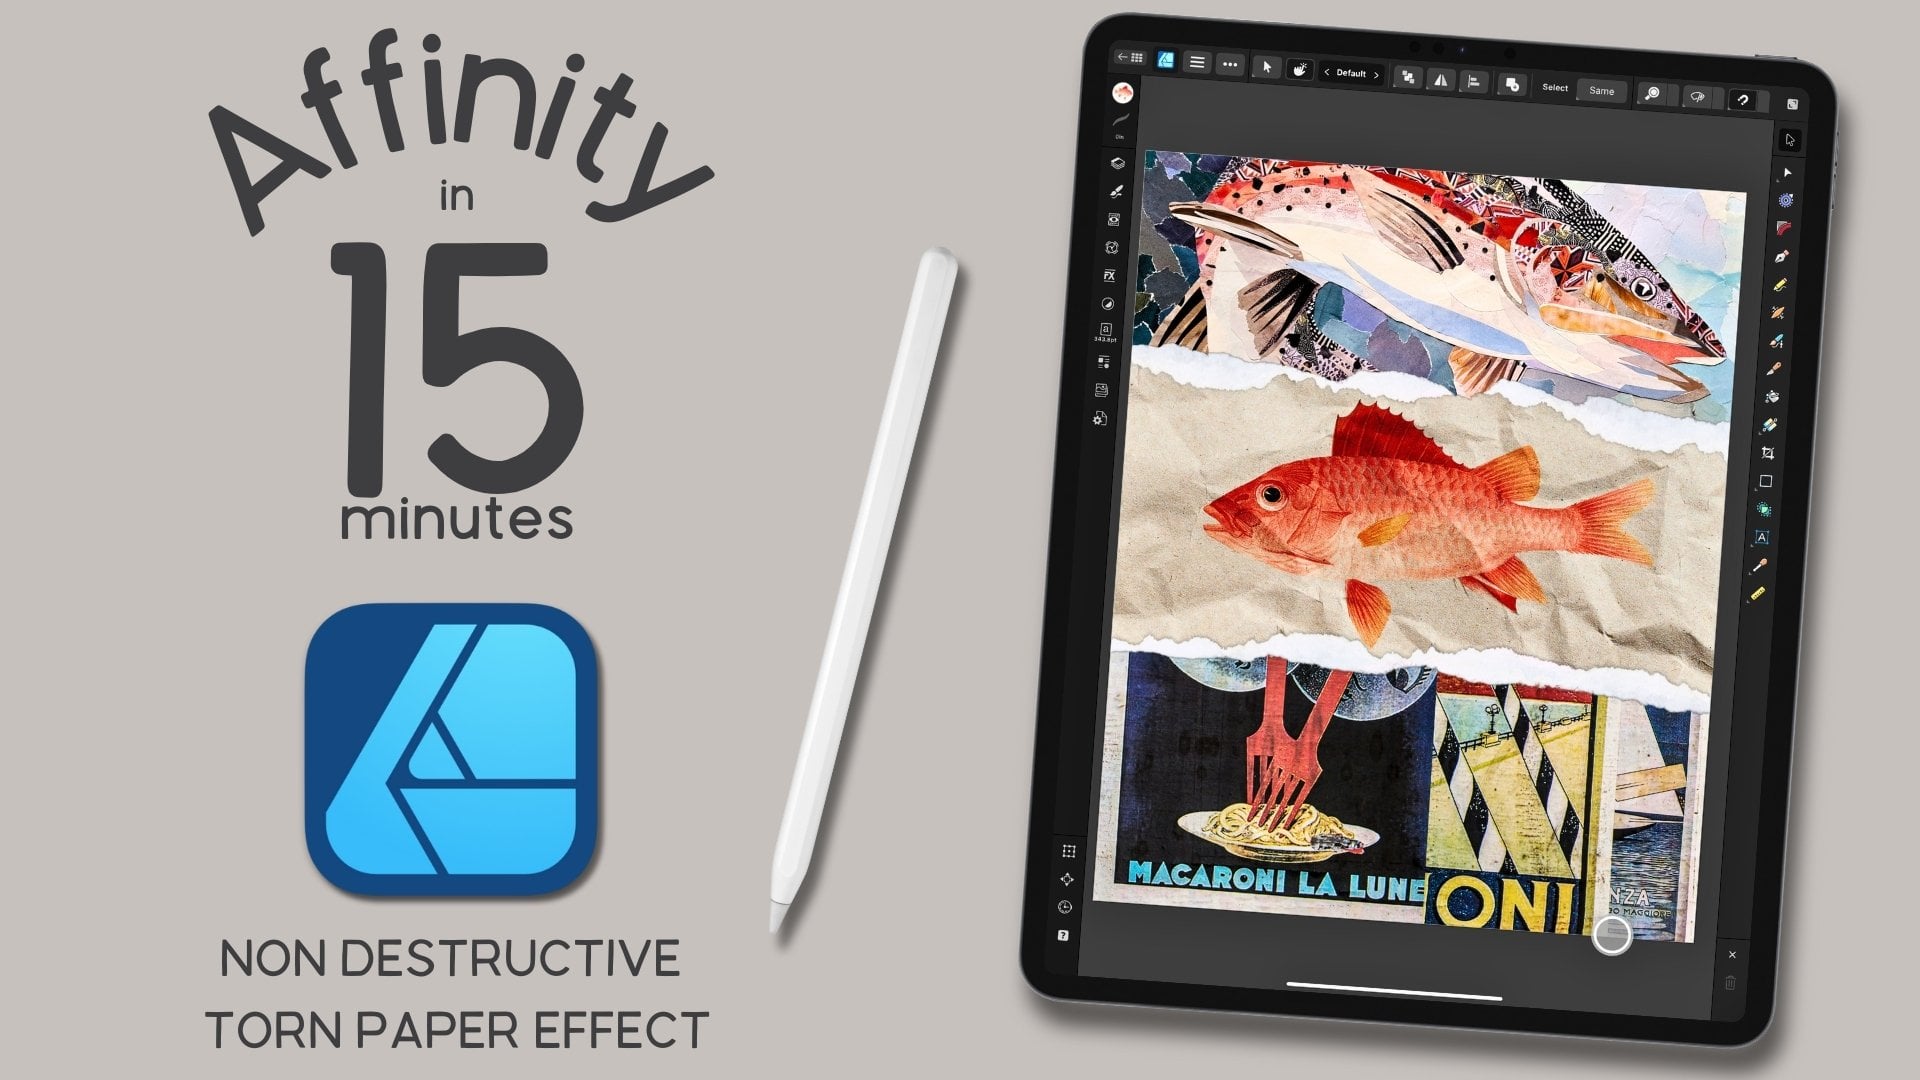
Hi there! I'm Tracey Capone, an artist, designer and Affinity pro, and, in this installment of Affinity in 15, I'm going to begin to demystify the various brushes available to you in Designer, starting with the Textured Image Brush. In under 15 minutes, I'm going to show you how to isolate an image, whether it's scanned or photographed, and turn it in to your own, one of a kind image brush.

Understanding how the various brushes work, and the components that make them up, will not only help you create amazing vector designs, you'll be able to create them more efficiently. Plus, knowing how to create your own brushes, allows you to create one of a kind designs that no one else can.

  • Things to consider when scanning in the subject for your image brush
    • From resolution to creating contrast, we'll cover some basic considerations that will help ensure your final brush is high quality.
  • How Affinity Photo's machine learning tool, Object Selection works
    • From making sure your iPad is ready to use the tool, to how to refine your selection, we'll run through the ins and outs of how this new, powerful tool works to help you make selections in a flash.
    • PLEASE NOTE: This feature is only available on iPads with silicon chips. If you are on an older iPad, I recommend following this lesson using the Selection Brush Tool. It does a great job, especially if you are working with a scan or image with good contrast. Once your selection is done, everything else is the same.
  • How to remove any leftover color casts and background bits and pieces from your isolated object and add depth with adjustments.
    • We'll look at how to use an HSL adjustment to pinpoint a particular color for removal and,
    • How to use the Levels adjustment to add a bit of depth in to your isolated image.
  • How to take your isolated image and turn it in to a unique vector brush
    • While not infinitely scalable, due to the texture, the great thing about these brushes is that you have the flexibility of using the various node and stroke tools to adjust the strokes you create with it.
  • And, finally, we'll look at a real use case for one of the image brushes
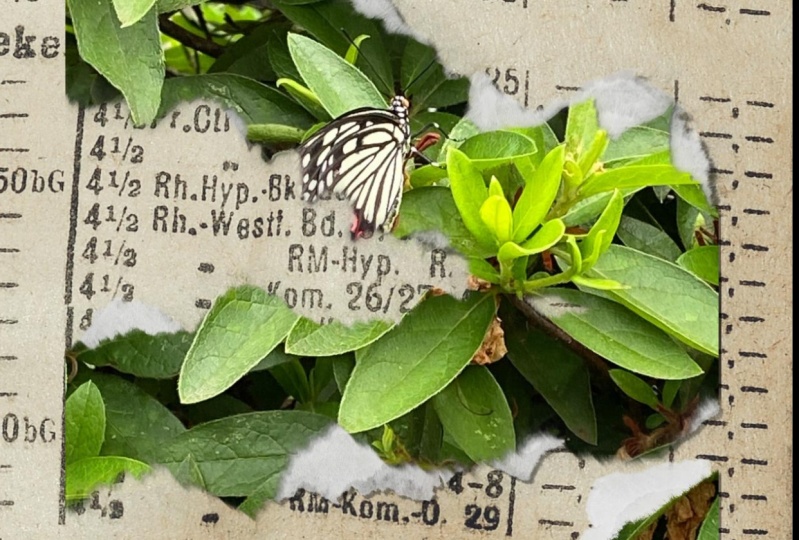
    • I'll show you how I use the torn paper brushes I create in the class to add a white paper pulp layer around an aesthetic collage.

When you've completed the class, you'll have the tools you need to create your own textured image brush from just about any scanned or photographed object.

This class is beginner friendly however it does assume familiarity with Affinity Designer and Photo for iPad as we will not be reviewing the interface. While all students are welcome, please note that concepts involve steps more suited to an intermediate user of the app.

  • Affinity Designer for iPad V2
  • Affinity Photo for iPad V2 
    • You must be on V 2.6.1 or higher as older versions do not have the Object Selection Tool
    • If you do not have Affinity Photo, I have provided a few samples of isolated torn paper shapes so that you can follow along with class.
    • PLEASE NOTE: The machine learning feature Object Selection is only available on iPads with silicon chips. If you are on an older iPad, I recommend following this lesson using the Selection Brush Tool. It does a great job, especially if you are working with a scan or image with good contrast. Once your selection is done, everything else is the same.
  • A scanner or phone with a scanning app
    • While I will be creating torn paper brushes using scans I've created, you are welcome to create yours out of any object you would like. 
    • In order to create the brushes, you will need the ability to scan your subjects at a resolution of 300 dpi or higher. 
    • In the downloads, I have provided a few samples of isolated torn paper scans so that you can follow along with class.

While I have created this class on the iPad version of the apps, you can follow along on the desktop apps, so long as you know where the tools are located.

Hi there! I'm Tracey. I'm an illustrator, designer, and  photographer located in the Chicagoland area. You can find more information about me, and my work in my full profile. (find the link above) I've been a full time artist for over a decade, after leaving the corporate world behind in 2011. In addition to teaching, I am a full time creator who sells my work on my own site, as well as print on demand sites like Spoonflower, Etsy and more. 

I've been using Affinity products for the last several years and love to learn as much as I can about the tools so I can not only use them the way they were intended to work but make them work for me; and I love sharing that knowledge with my students! I've had the privilege of being spotlighted by Serif, the company who created the app, twice as a go to teacher for their apps. You can find links to the spotlight articles, as well as a Creative Session I've created for their YouTube channel, on my profile page.

If you have any questions about the class, or would like feedback on your project, please feel free to let me know in the Discussion section of class, or by emailing me at hello@traceycapone.com.

I look forward to seeing you in class!

Music Credit: "String & Twine," by Jamie Stevens on audiio (license on file)

Meet Your Teacher

Teacher Profile Image

Tracey Capone

Illustrator, Photographer & Designer

Top Teacher

Hello and welcome to my Skillshare channel! I'm so happy you're here!

My name is Tracey. I'm an illustrator, photographer, teacher and self-proclaimed digital art nerd who loves all the apps, and sharing everything I know. Being able to help students understand more complex applications, like Affinity Designer, and hearing about that moment of clarity when everything came together for them is truly satisfying.

not just the how, but also the why... I believe understanding why I take certain approaches, or use particular tools, will help you absorb what you learn and better prepare you to work on your own later. to embrace the perfectly imperfect... in my mind, it's the best way to develop that sometimes elusive creative voice!

and finally... See full profile

Level: Intermediate

Class Ratings

Expectations Met?
    Exceeded!
  • 0%
  • Yes
  • 0%
  • Somewhat
  • 0%
  • Not really
  • 0%

Why Join Skillshare?

Take award-winning Skillshare Original Classes

Each class has short lessons, hands-on projects

Your membership supports Skillshare teachers

Learn From Anywhere

Take classes on the go with the Skillshare app. Stream or download to watch on the plane, the subway, or wherever you learn best.

Transcripts

1. Welcome to Class!: Hey, everyone, in this Affinity in 15, we're going to create a textured image brush for the vector persona and designer for iPad. We're going to start out with tips on scanning your shapes so that you don't run into pixelation with your final brush. Next, I'm going to show you how to take a scanned image and isolate your subject using Affinity Photos Object Selection tool. Finally, we'll head into Designer to create our final brushes. While they're not infinitely scalable because of their texture, have the benefit of being able to use nodes to adjust them, making them an efficient way to add certain textures. When you're done with this class, you'll have the tools you need to create an image brush out of just about any scanned object or image. Now, I'm on Photo and designer version two for iPad. However, you can easily follow along on the desktop apps as long as you know where the tools are located. Are you ready? Let's get started. 2. Textured Image Brushes in Affinity Creating the Brush Tracey Capone: While we're creating this brush on the vector side of designer, we'll need a raster nozzle to create it. In simpler terms, we need a textured shape to create our textured brush. As part of the downloads for the class, I've provided a few sample pieces of torn paper that I've scanned in, as well as some isolated PNGs. For those of you who don't have photo, you'll find everything in the projects and resources section of the class. Before we jump in and create our brush, let's talk quickly about some considerations when scanning your shapes. The first thing to remember is that textures involved, which means that you can easily run into pixelation if you're not careful. There's that old saying garbage in garbage out, and that applies here. Whether you're photographing your shape from the top down or using a flat bed scanner, make sure the resulting image of your shape is of a high quality. The better the scan, the better the final brush. You want an image that's at least 300 DPI, higher if you're able. The original scans that I provided, those that aren't yet isolated, were scanned in at 1,200 DPI. And then once I isolated them, I scaled them down so I'm not left with really large files to create my brush. Can scale down without issue, but scaling up can create muddy textures. So it's always better to start higher to capture as much detail as possible and then scale down the isolated shape when you export. Secondly, if you're trying to create a brush with something like torn paper or string or anything where the subject should be isolated and the only thing in the final brush, you want to make sure that you're using a transparent PNG. If not anything in that canvas, including a background, is going to become part of your image brush, and that's where photo is going to come in. Third, the color of your object and the resulting scan is going to determine the color of your brush. Image brushes aren't controlled by the color studio, but rather the image itself. So for example, if you want an image brush that creates a stroke with red yarn, make sure that you're either scanning a piece of red yarn or you're adding a red color overlay to your scan before exporting it. One final consideration is the higher the contrast between your subject and the background, the easier it will be to isolate and photo. I use a flatbed scanner and place green card stock behind my subjects, one that's pretty close to what they use for green screens. Unless I'm scanning something green, this not only provides the contrast I need, but it's also easier to remove using color adjustments than a black background would be. I never scan without something behind my subjects because the scanner bed itself can create extra shadows. Additionally, lots of scanners have a white background on their lid. If you're scanning something that's a lighter color, you're going to have a harder time isolating it. Now, you don't have to specifically use green card stock like I do, but I do recommend putting a solid background behind your object, one that isn't black, regardless of whether you're using a flatbed scanner or photographing your object from the top down. Object Selection is a machine learning tool that uses pre trained models not your data to allow you to easily select all or parts of your selection with a tap or drag of your pencil. Now, if this is the first time you're using it, you'll need to go to settings for Affinity Photo, and under machine learning, you want to make sure that you download segmentation and saliency. These are free to install, but they're necessary for the selection to work. Back in photo, and I've opened up one of the torn paper scans with the green background. I want to rotate this, so I'll go up to my documents menu and under orientation. I'm just going to rotate right. I'm going to select my object selection tool. Now, I should mention my screens flipped for a left handed person, so yours might be opposite of mine. I mentioned earlier, this works with either a tap or a drag of your pencil. Personally on the iPad, I find it a lot easier to drag across the subject. So I'm going to go to my layers panel, and the first thing I'm going to do is make sure that my layer isn't locked. So I'm just going to tap the lock. You can also swipe right and just hit unlock. And I want to get pretty close to the edge of my shape here, but I'm going to start up at the top and just drag across. And you can see I'm getting these blue hash marks inside of my shape. I want to make sure those stay inside of the paper tear and don't go outside of it. And as soon as everything looks good, I'm just going to release. And in a second, you'll see I'll get the marching ants. This looks like a pretty good selection. But I'm going to go up to the top and choose refine because I want to clean up the edges a little bit, because you can see I still have some green. There's two reasons for this. One, some of that is the actual green background showing through. The other is that the paper itself is taking on a green color cast from the background. Now, that we're going to take care of with an adjustment outside of this, but I want to take care of that solid background because the transparency of the edges of this torn piece of paper is what's going to lend to the overall effect of the brush. What I'm going to do is just big my pen a little bit bigger, my brush, and I'm just going to run it along the edges here. And when I do that, it's not going to pull out all of the green, but you can see I'm getting a lot more transparent either. What's left over is that color cast I mentioned, and we'll take care of that separately. So I'm just going to run my pencil. That's looking pretty good. But again, I want to get rid of the rest of that color cast. So I'm going to go to the top and I'll choose new layer. You can also choose new layer with mask if you prefer. And I'll click Apply. So I have this sort of blue green color cast at the very edges. And I'm going to get rid of that using an HSL adjustment. HSL adjustment can be found in the studio panels along the side here. And when you first click on it, you're going to get this long list, and this is the default. So this is going to give me a dialogue box that I can adjust from scratch. I can also tap inside here and choose HSL, and it's going to give me presets, including those I've created myself. I actually want to start with a default, and then I'll show you how to create a preset. When I tap on HSL, I'll get this dialogue box down here at the bottom, and I'm going to click into this color wheel. Now on the desktop version of the app, there's actually a color picker in here that would allow me to sample the color along the edge here and get a much more fine tuned selection of what I need to adjust. That doesn't exist on the iPad, but this is one of the benefits of using a specifically colored paper behind my shape. I noted it's going to be green, so I'm going to tap green here. And I also know that there's some blue in it. So I'm going to take this slider here and just kind of drag it into the light blue area there. I could also drag this into the yellow a bit because I have some yellow in the center. And then I'll take my saturation slider and I'm going to drag it down. That's taking care of the green and that blue, and it's done a really good job with that, but you can see that I still have some yellow there. I'm going to tap on yellow and do the same thing. I'm just going to bring my saturation slider down. I want to add another adjustment, but before I do that, let me show you how to save a preset. If you're doing a ton of the same kind of scan and you know that you're going to use the same adjustment, just tap the plus button here and you can name your preset. When you do. As I mentioned earlier, if you go into the specific category here, you'll see any presets that are already in place and those you created. So you can see that I already have a torn paper one. Right, I got rid of the color cast, but I feel like I need to add a little bit of depth to this just so that it shows up well in the brush. So I want to boost my midtones a bit. I'm going to go into the levels category here and choose darken. And when I first hit it, it's not doing much. So what I want to do is go to the gamma settings here. And again, I want to darken it a bit. I don't want to go too far, but I'm just going to bring this up to the right a touch until I see those edges kind of ing up a bit. And when I do that, you can see I'm also seeing the texture a little bit more easily. Alright, I think that looks good, so I'm all set to export this. I'm going to go up to the documents menu and choose Export. I want to make sure that I have P&G selected, and I'll just name this, let's see, torn, brush. Let's just name this 50. I need to change the size of this. Remember, I mentioned that I scan these in at 1,200 DPI, so you can see the width of mine is pretty high, and this is creating a brush that's almost 7 megabytes big, so I don't want to use that to create a brush. I'll go ahead and tap in width. And I'm going to change this to 2,400. That's still a lot more than I need. But I'm using textures, so I don't want to go too far. I'll go ahead and hit Okay, save my brush, and I'm all set to head into designer to create the final image brush. You don't need to start a new document to create the textured image brush and designer. I'm here in the designer persona, in the canvas, I'm going to use my final brush in, and I've opened up the brushes panel. Now, I already have a category set, but if you don't go to the burger menu at the top, choose Add category, name it, and save it. Once that's done, go into that same burger menu and choose this bottom most option, new textured image brush. Locate the file that you just exported, and it's going to pull up this dialogue box. You can see there's not much to this. And Dc, we're only going to change one setting. I'm not trying to create a tiled brush here, so I want to keep this as stretch rather than repeat. You can see it's trying to repeat the shape up at the top here. Change that back, I will be creating a separate class on building a seamless texture Image brush, so stay tuned. I'm going to leave everything else as is, but I am going to change the width. So I'll tap. And in this case, I've built these brushes enough for this particular torn paper that I know that 350 is going to work best. But it really depends on the object that you're using to create your brush. So I recommend trying out a variety of sizes for your image to see what works best. The easiest way to do that is go ahead and click Okay and just tap out a stroke. I'm going to use the pen tool to do that. You can use the vector brush pen or pencil tools with these image brushes, but if you use either the pen or the pencil, you can't select the brush up front. You need to place your stroke and then just tap the brush to select it. So I've gone ahead and done that, and when I zoom in, you can see that I have this nice textured brush that looks like my original scan, including that variation in the opacity along the edges. So it was well worth taking the time to get rid of that solid background that was showing through. Now, this looks fine to me, but if I wanted to, I could swipe right on the brush and open up the edit menu to adjust it. Reason I recommend testing various sizes of the image brushes is that some can look somewhat wonky at certain sizes. So, for example, if I change this to something like 80 and click Okay, and then just tap the brush to apply that, you can see that it looks really squished. It's not looking the way that my original scan did. So I'm going to swipe right and hit edit and change that back. You just need to tap to get it to come back. Let's wrap things up by talking about how to use the brush. The first thing that I want to mention is that you have the ability to use your node tools to adjust the shape that you create. So I can select my node tool and I can tap and add a node. I could even change this to a smooth one by double tapping it. And I can just drag that up, maybe add another one here and pull this down. If I want to reverse the texture but keep the shape that I just created, my node tooling gauge, I can go up to the top here and choose reverse. And that's going to reverse the direction of the starting and ending node and flip my texture. There are also a couple of ways that you can change the width of your stroke. I'm going to go to the Stroke Studio. Now, on the iPad version, if you've gone over the default of 100 on the slider, don't use that to adjust your stroke. In other words, I have mine set to 350 pixels. As soon as I start using that slider, you can see it knocks it down below 100 and my brush ends up looking funny. So I'm just going to bring that back. Instead, just run your pencil. Up and down from the Stroke Studio icon, and you can see it's changing. This is another way to test the size of your brush. Once you find one that you like, you can go back into the edit menu and change the size. In addition to the Stroke Studio, you can also change the pressure settings of the stroke. Using the Stroke Width tool, so I'll go ahead and select that. And I can just add a point here and use these handles to pull it in, if I want. I can add another one and maybe just drag it out a little bit. So I can adjust the original stroke and how it's looking just by using that stroke width tool. Want to add some torn paper to this collage behind this image, so I'm going to use my pencil tool to draw out a stroke and then select my brush. Again, you can use the pen, pencil or vector brush with these. I personally find the vector brush somewhat difficult to use, so I lean into using the pencil or pentils, but you should use whatever you're most comfortable with. I'm going to select my pencil tool. I have smoothing set pretty high, so it's automatically going to smooth out my stroke. And I want this to be behind this group here. So I'm going to go up to the edit menu and tap behind. And I'll just start drawing out my line. I could also place it and then move it down. I'm going to go to my brushes, and again, I need to set the stroke first and then tap to change it to the brush. From here, I can grab my node tool and I can drag this in, maybe add a node here and drag this out, pull this one up. I do want to note one thing about the end here. Mine is currently set to butt cap here in the stroke panel, but if yours is set to round cap, you might find that the image is outside of the node, making it a little bit difficult to move it around. Times I find changing it to Butcat makes it a little bit easier. So once I have that, please I could go ahead and do the other side. I'll just draw down a line, again, go in, select the brush, and then adjust it until I'm happy with it. Thank you so much for joining me here in this affinity in 15. There are many more to come and designer, photo and publisher so stay tuned. Let me know in the class discussion. What are you going to turn into an image brush? I'd love to see what you create, so please consider sharing your brush to the class projects and resources section. And if you have any questions, let me know in the discussion. Thanks again for joining me and happy creating.