Transcripts
1. Intro: Lattice Stitch: Hi, and welcome to
Advanced embroidery. In this class, we're going
to focus on a stitch called the threaded double
Harring bone stitch, or sometimes called
the lattice stitch. Hi. My name is Beca Ron, and I'm a full time
teaching artist, and I use a lot of
embroidery in my work, both on fabric and on paper. In many beginner
embroidery classes, you do a sampler of the
same kind of ten stitches. In this class, we're
going to take some of those basic stitches you
might have learned before, and we're going to put them together and build
on top of them. These advanced
embroidery stitches use the same materials that you've
used for other projects. So you just need some thread, some fabric, some
scissors, and a needle. This class focuses on a threaded double
herring bone stitch, which is kind of a mouthful. It builds on a basic
herring bone stitch. We double it up,
and then we twist a contrast and colored
thread through it. So it makes this complex kind of border that looks like more
than the sum of its parts. If you're ready to challenge yourself to some more
complex stitching, join me in the next lesson, and we'll start making a
threaded double herring bone.
2. Project & Materials: Your project for this class
is to just make a sample. The best way to learn these
stitches is to just practice. So that's what I want you to do. Anything you want to stitch, take a picture of
it really close up and post it in the project
section for this class. So we can all see all of
the different variations, depending on the colors and the sizes you choose
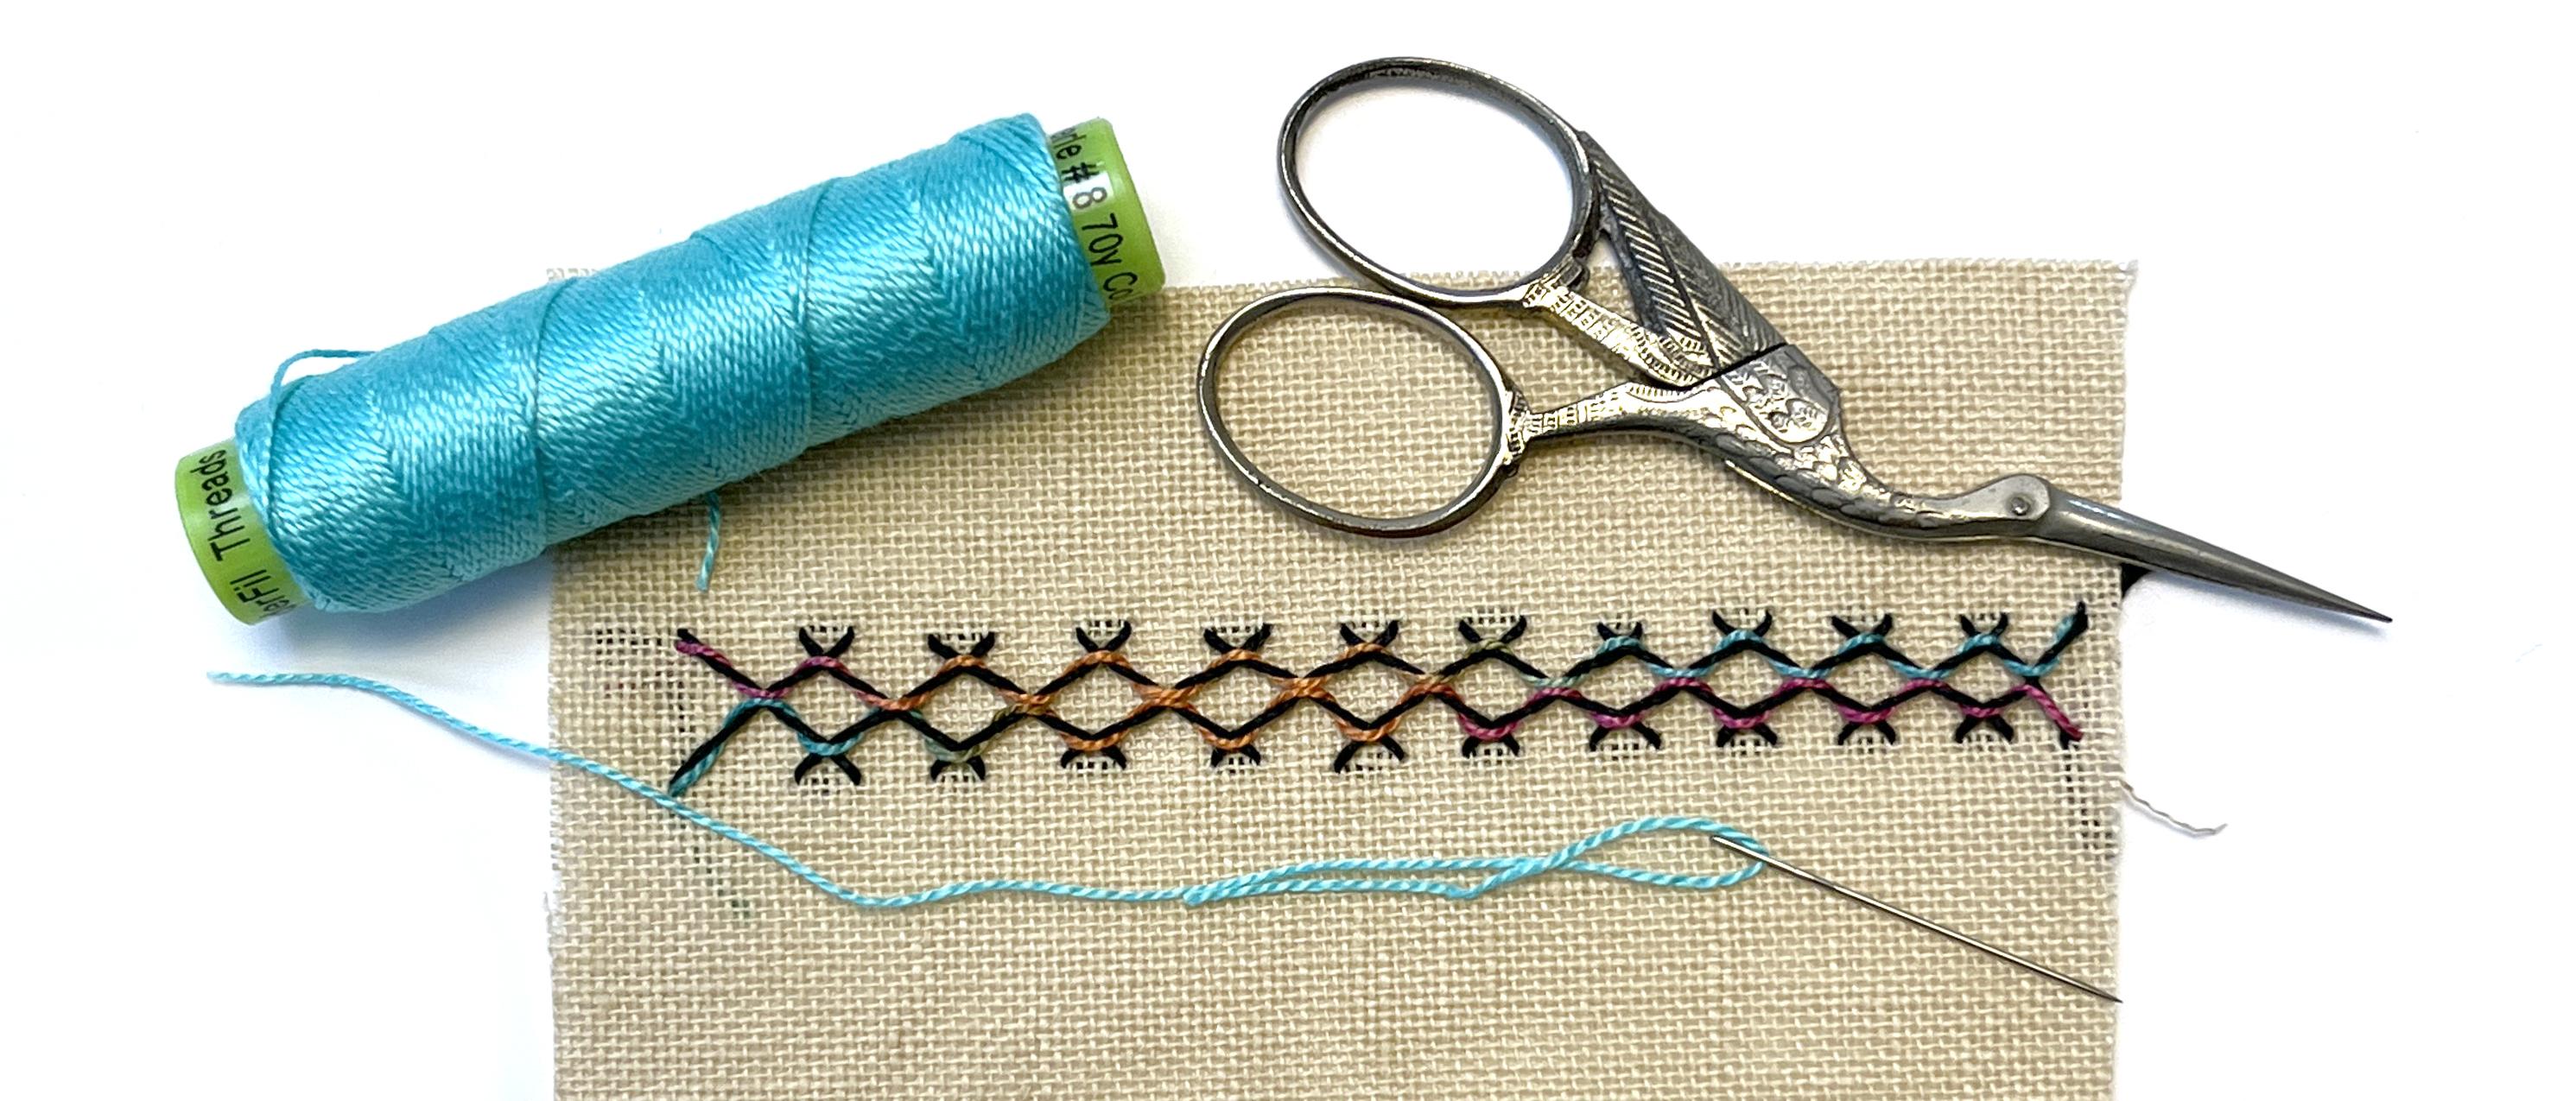
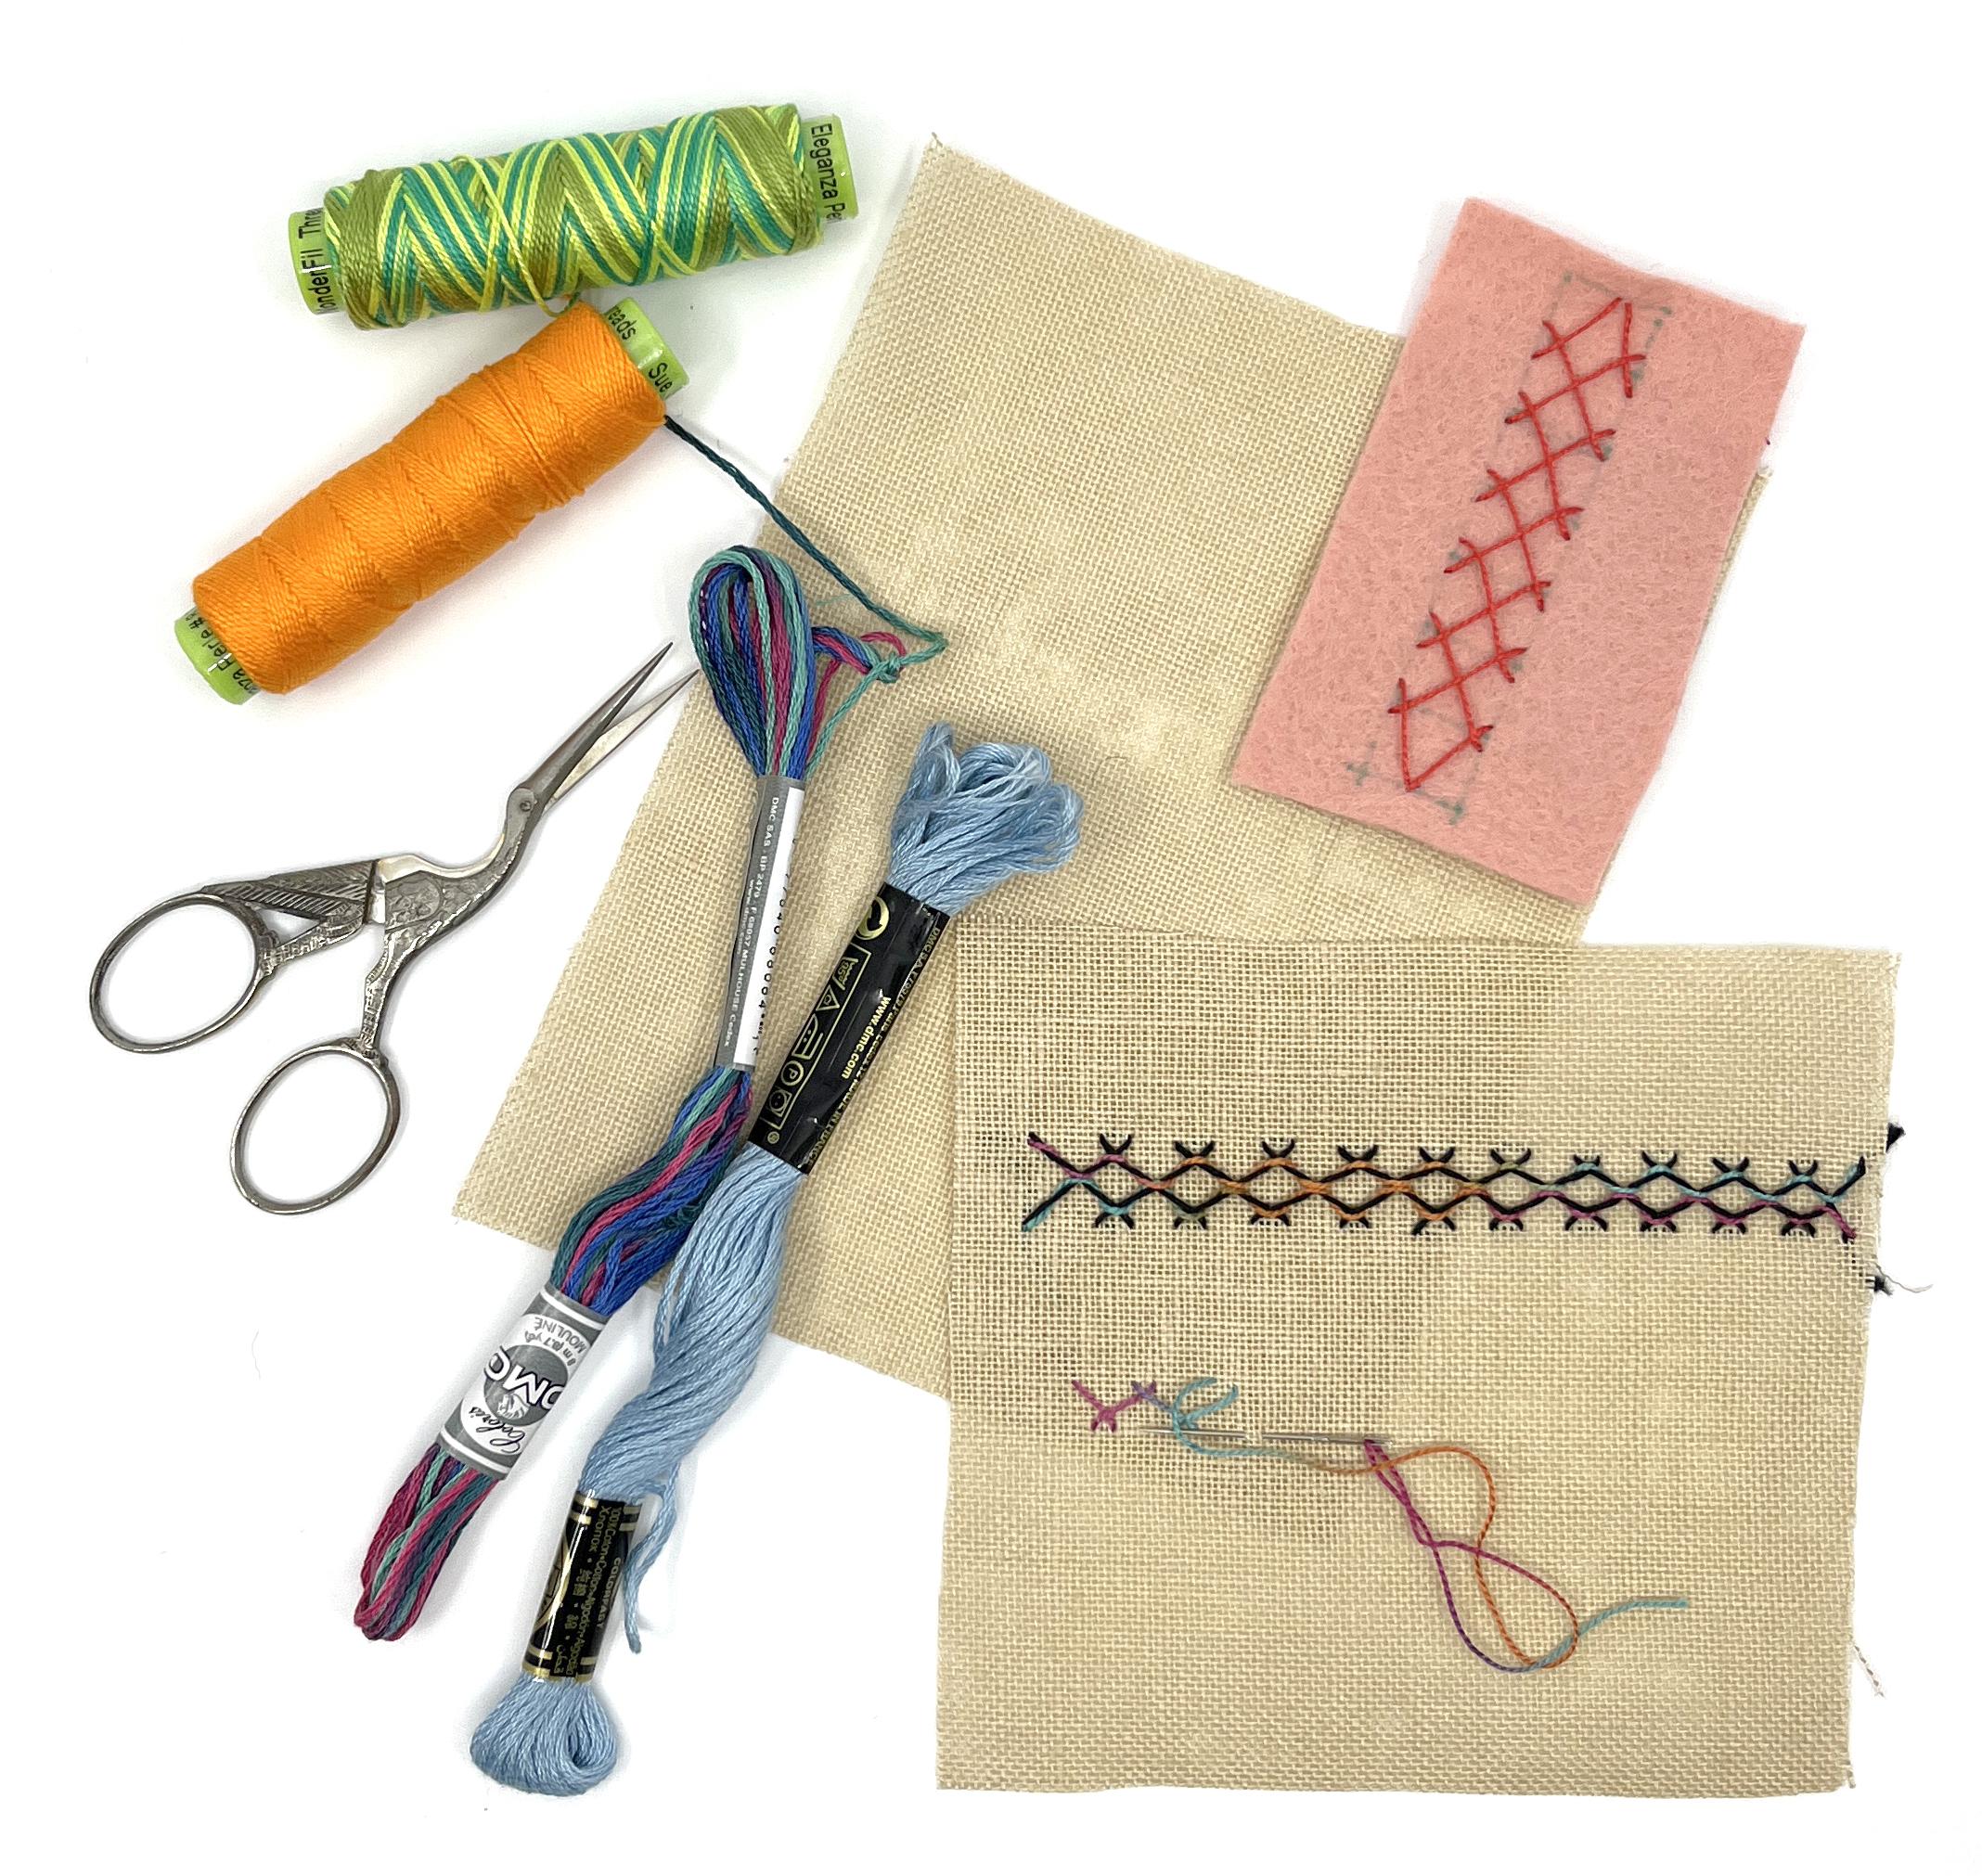
for this stitch. So the materials you'll
need to stitch your sample, starting out with a needle. My favorite needle for doing these sort of stitches
is a Chanel needle, and I'm holding it up
close to the camera there. Chanel needles have a large
eye and a sharp point, so they're easy to thread, and they work really well
for doing embroidery. C find chinle needles
in the craft section of your favorite craft store with the other sewing needles
and embroidery needles. You'll need a pair of scissors
for trimming your threads. Then you get to choose the thread you stitch
this stitch with. I think the double threaded
herringbone stitch or the lattice stitch looks
the best with two colors. This is a fun time
to experiment with combining colors to make
a really cool stitch. You can use a bunch of different kind of
thread for this class, and I'll talk about the
pros and cons for each one. The most common is a six
stranded embroidery thread, and I've definitely stitched
a few of the samples here with this thread.
These weren't great. For this stitch, you can use nearly any combination of
thickness of this thread. You can split this apart into three or six
different strands, and you can experiment
with different weights of this thread to do the
different parts of the stitch. So, six stranded embroidery
thread is a great option. Most of the samples I
stitched using pearl cotton. This is a size
eight pearl cotton, which is a small one. It also comes in a size five and size three pretty commonly, and those are just thicker
versions of the same thread. I love this one because you
use it all as one strand. I think it makes this stitch
look a little bit sharper, a little more distinct
when you use this thread that's a single strand versus the six stranded
embroidery thread. That's just a
personal preference. The pro cotton comes in
solid colors like this. You could try it with
a variegated color, and several of my samples I stitched up with a
variegated color. We'll talk about those. You also could try a novelty thread, a more advanced thread,
if you want to. I've got two great
examples here. This is a thread called dazzle, which is ron and metallic. That one is slippery. It is a little bit more
challenging to stitch with. The same thing would be
true of like a silk thread. Then this one is
called an eco Vita. This one is made from wool. This is a wool
embroidery thread. This would also work
great for this stitch. We've got our needle and thread. The next choice to make is the kind of fabric you're
going to stitch on. This one, I honestly
think is the easiest to stitch on something
like this top fabric here. This is an even weave linen. It's made to be an
embroidery fabric, and I find it in my fabric
store in the section with the crosstitch fabric
and those kind of things. It's got a little
stiffness to it, so it's really easy to
stitch without a hoop. That's my preference. I really don't like stitching
with an embroidery hoop. I like using a fabric
where I can have a little bit more
feel for the stitches than having it pulled
really tight in a hoop. Personal preference, you can absolutely use a hoop if you're more
comfortable with that. For this stitch, I think it's helpful to draw
some guidelines and that is easiest to do on a
smooth woven fabric like this. But If you like to stitch a
little bit more free form, then my favorite stitching
fabric for learning embroidery stitches is actually this wool and rayon blend felt. The reason I like felt is because it's got
a little bit of thickness and so it helps with the tension
of your stitches. It's really hard to pull
it too tight when you're working in felt because of
the thickness of the fabric. Two good options, you can choose whichever one makes
the most sense to you. I think for this
particular stitch, it is really helpful to have
a marking pen of some sort. The ones I like are
called friction by pilot, and this is a heat
sensitive inc. And so I can draw on my fabric, and then when I'm
done stitching, I can either iron the
backside of it or I can use my hair dryer
on a hot setting, and when the heat hits this
ink, it'll make it disappear. So I can draw all the guidelines I need and then make them
disappear at the end. For this stitch,
I would recommend having some a marking pen. All right. That's all of the materials you
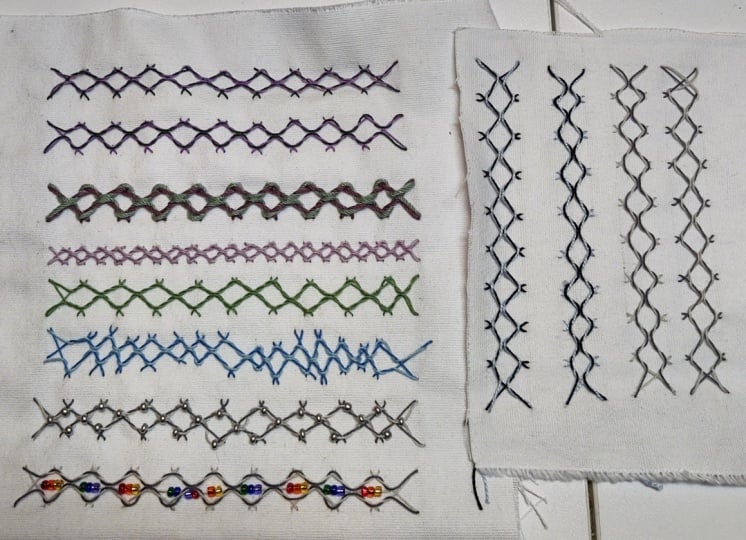
need to get started. I want to hold up my samples
a little bit closer to the camera and so we can talk through some of the
design choices here. If we start at the
top, that one is stitched with six snded
embroidery thread, and I think it looks a little bit messier than some
of the other versions. The rest on this page are
stitched with pearl cotton, and I think this
particular stitch works the best in pearl cotton. So I've done a small version
is the second stitch down there and the
threading section I did with a variegated color. You can see how the color
changes across the stitches. That's fun. So it's a solid color underneath and
then a variegated color. Same thing with the next
sample that's actually stitched in exactly
the same two threads. I just made the stitches bigger. You can see how if
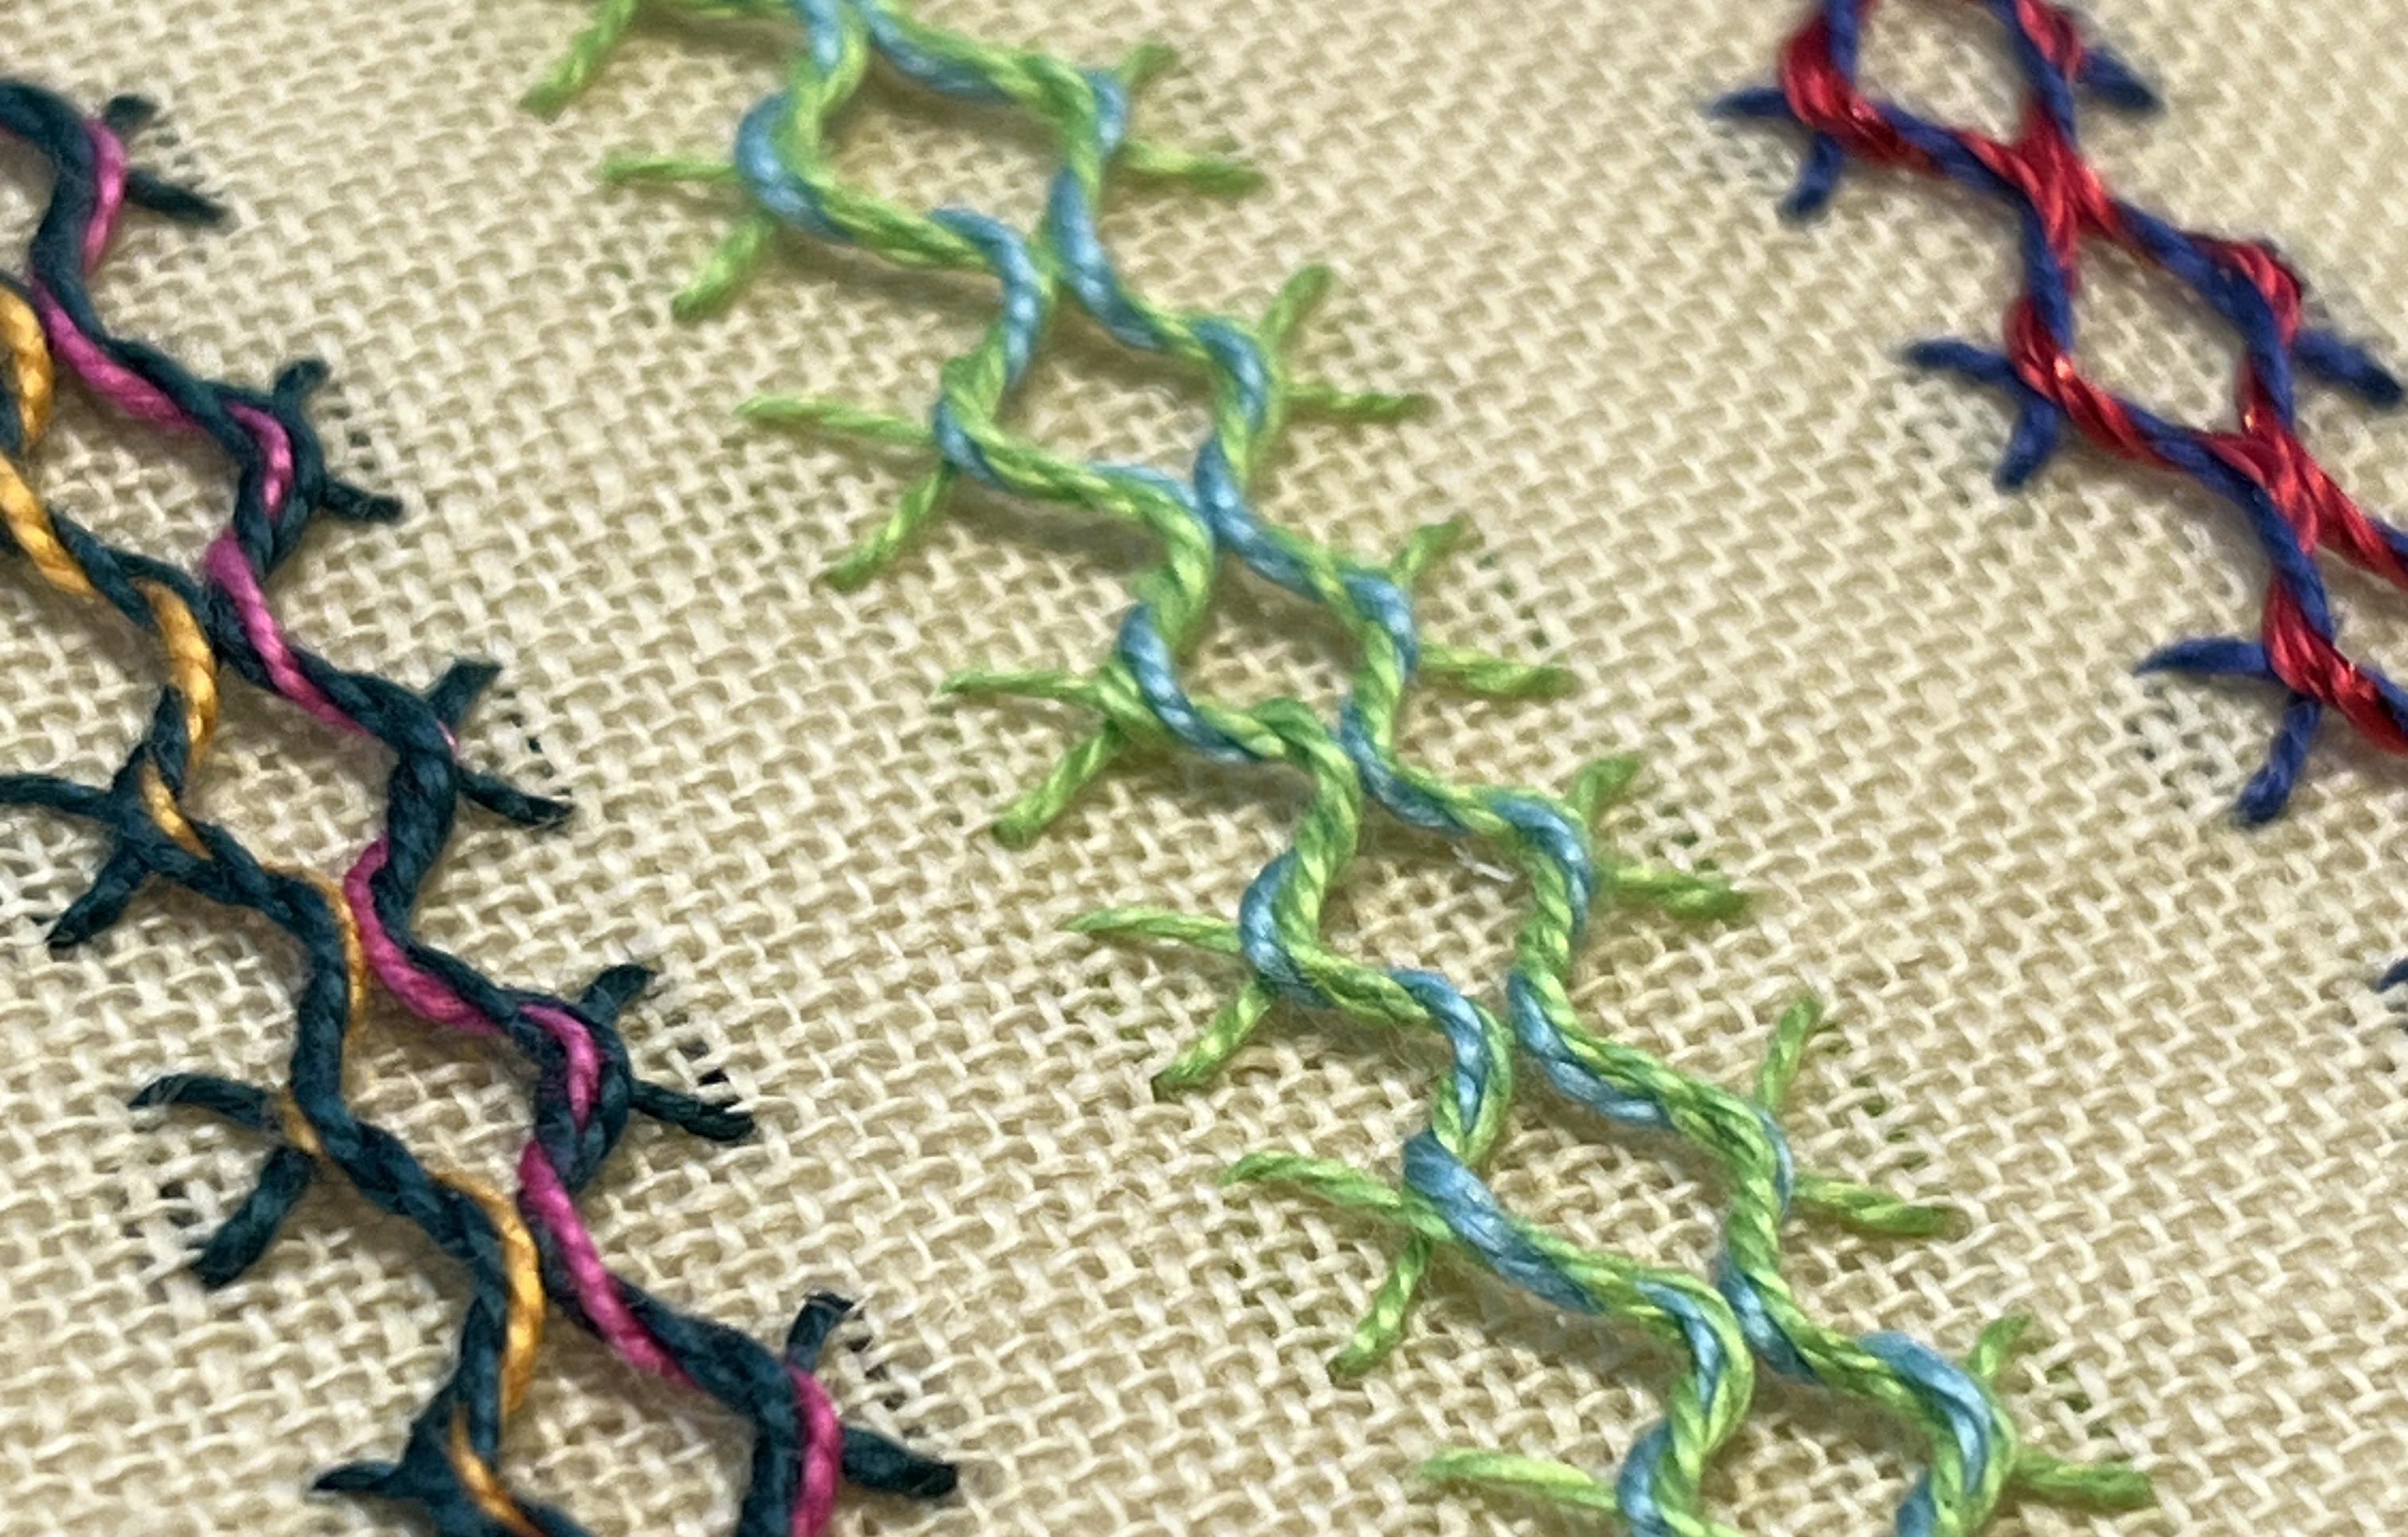
you spread it out, you get a different variation. Then there's a variation done in two very similar
colored threads, a green and a blue,
kind of an equal value. And then the bottom one has got a little bit of
a metallic thread in it. I don't know if you can see
a little sparkle in it, it's a navy blue and
then a red on top of it. So we'll talk a little more about these variations
at the very end. But if that helps you kind of think about what colors
you might want to combine to make this
stitch before we go on to the next lesson
and start our stitching.
3. Stitching Lattice Stitch: So the threaded double
herring bone stitch is based on a basic stitch that you might be familiar with, which is the herring
bone stitch. So we're going to start
out stitching a row of just plain basic
herringbone stitch. Then we're going to turn it
into a double herring bone, which means we go back
and do another set of herring bone stitches kind of in the gaps between stitches. Then the last pass we make, we're going to change colors, and we're going to do
a threading pattern where we're actually taking a thread and slipping it
under parts of the stitches, but not stitching through
the actual fabric. When you combine all of
these things together, it becomes the threaded
double arring bone stitch, or sometimes this one is
called the lattice stitch. Your first thing is to
make some color choices. This is going to
work in two colors. At least I think the stitch
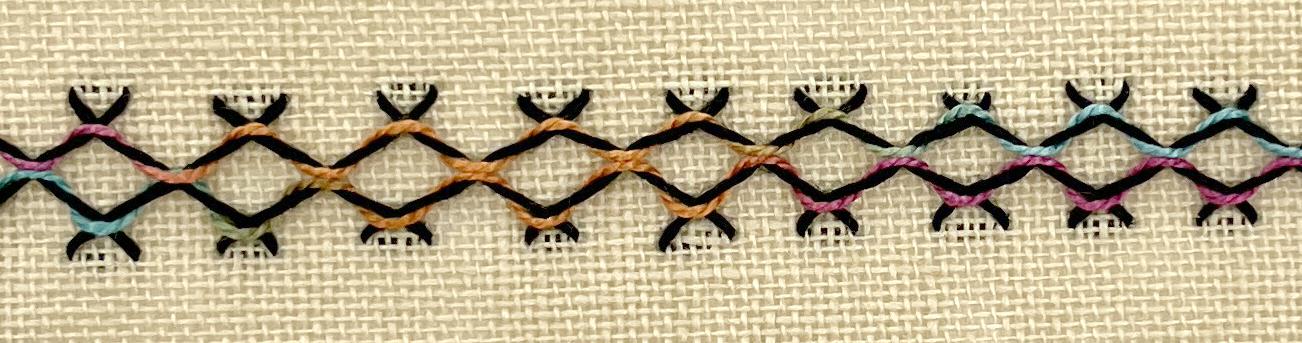
looks best in two colors. I decided I'm going
to do mine in a black for my arring
bone stitches, and then I'm going to use
this rainbow e variegated to do the threaded part of my stitch. You want
to pick out two. You can either choose ones that have a lot of
contrast like mine, or you can choose two that are very similar to each other, and that'll make a
very different look. I'm going to set
those aside for now. This stitch, I think
it's actually the most helpful to draw
yourself some guidelines. Herring bone stitch is I think
really difficult to stitch evenly and uniformly if
you're just free forming it. Here's the way that I draw out guidelines for my own stitches. I've got my erasable pen, the heat erasable pen,
and what I'm going to do is I'm just going to
draw one straight line. You could use a ruler or a straight edge for
this if you want to. Because I can see the threads on this fabric pretty easily, I just follow along one
of those thread lines. I've got a straight
line going across. Now I'm going to
make a line parallel to this and this is going to be the width of this
band of stitches. I'm going to make this
one big because I want it to be easy for you
guys to see on camera. I'm going to draw
this about a half an inch away and I'm
just going to make another line that's about
the same distance away. Mine look like they
get a little bit narrower at the
other end and I'm not going to worry
about this because we are learning this stitch. I've got two parallel lines. Now what I do is I
draw a series of vertical lines so
that I'm making squares. Here's what I mean. I'm going to put one
almost at the edge here, and then I'm going
to draw a line over and I'm going
to go over about the same width as these
two lines are apart so that I'm making
pretty much a square. I'm just going to keep
Go down, making squares. Again, if you are
more comfortable using a ruler or
a straight edge, instead of just eyeballing this, you are absolutely
welcome to do that. But I'm going with the
eye ball at method. This ends up looking
like a ladder. That's the shape, and
I think this is really helpful for doing my foundation
of hearing bone stitches. I'll be able to hit this with
the iron or my hair dryer at the end and that'll erase those marks and so we'll never
know that those are there. Now that I've got my marking in, I'm going to grab a
piece of thread that is in my foundation color. This will be the color that's underneath all of the stitches. I'm going to do this in black. This is an advanced class, so I'm not going to go real deep into basic
herring bone stitch. I'm going to assume you've
done a little bit before. But we're going to start out
by doing just a herringbone stitch all the way down this ladder stripe
that I drew in. I'm going to start
by hearing bone stitch down at this end. I'm going to bring
my needle up just below that bar
that's going across, my horizontal line here.
I'm going just below that. Then the way I use my
markings to make herringbone stitch is I'm going to make the next stitch on
the right hand side, and I'm basically going to
center that guideline I made in between where I put my needle for this
next part of the stitch. When I stitch hearing bone, I'm going to make a
little stitch and I'm going just above that line, the horizontal line,
and just below it. I'll just bring this up
close so you can see. So I've centered
my horizontal line in between where I've brought
my needle down and up, and you'll notice the needle
is pointing back towards me. Then I'm going to
pull that through. That makes one diagonal stitch. Now the next herring bone stitch or the next part of
the hearring bone stitch, I'm going to switch over
to the left hand side, and I'm going to
do that same thing on the next horizontal bar. I'm going to bring
my needle down just above it and out
again just below it. Again, needle pointing
back towards me. And we're starting to get
the little criss cross of a herring bone stitch. So I'm going to continue
that way all the way down my ladder, my marks. So I'm going to go
to the right side. Down and up. Move my thread out of the way. Pull that one. I skip up to the next one. You're only ever stitching
in one end of these stitches right now, these
horizontal marks. So the next stitch. We're making really whoops,
I went into the wrong one. We're making really
big herring bones here because we're going to come back and do another row of herring bone stitch
right in between these. I want big stitches. I almost skipped
up too far again. Trying to skip over a horizontal
line. Above and below. I want to make sure
that I have enough that I can see like
the little gap. Here that my two ends of the stitch aren't
too close together. Okay. And I'll finish
up here with one more. Okay. And then I'm just
going to finish this by coming back over to the right
side and stitching down. Okay. So there's one row of
nice herring bone stitches. I'm going to tie off my thread. Okay. So that's the very
first row basic stitches. Hopefully, you've
done a little bit of herring bone stitch before. Okay. I have tied a
knot. On the back side. Okay. Now, we're going to make this double hearring
bone stitch. What that means is, we're
going to come back and do another row of
exactly the same stitch, exactly the same herring bone, but we're going to alternate
it the other direction. So where this one went
to the right first, our next line of stitches is going to go to the left first, and it's basically
going to stitch in the gaps between our
first row of stitches, alternating back and forth. Okay. So I'm going to start it now, my last one started
on the left side. I'm going to start this
one on the right side. Oops. I pulled my knot
through. Try that again. Okay. So now I'm going to do my first stitch
over here to the left, and I'm going to go using the same guidelines,
the same way. We're kind of mirroring
what we did before. There's my first stitch. Now, one little variation
we do when we do the double herring
bone stitch is before I stitch this next
one on the right side, every time I go to the right, I'm going to first
slip my needle underneath that
stitch going across. This is helping to just weave the stitches together
a little bit. I go under that one going
across and now I make the rest of the herring bone
stitch just like normal. I stitch back towards myself. I don't slip under when I'm
going towards the left. I just do this one as regular. I caught on my fabric there. Now I'm going to slip
under before I go right. Finish my herring bone. No slip on the left. Slip under going
towards the right. Ops. I almost forgot. Slip under going
towards the right. No slip going towards the left. Okay. And I'm just going
to do the same thing. I'll just stitch this over to the other
side to finish it. All right. And I'm
going to tie a nut. So I have that end of the
stitches also finished off. All right. That is now a
double hearing bone stitch. Which is actually a
really cool stitch all by itself. That's got two together. This one's actually really
pretty if you stitch those two passes in two
different colors and all that. At this point, you could erase your marking lines because we have everything we
need from those. You could take a hot hair
dryer to these or iron on the back side so that you're
not squashing your stitches. I'm just going to
leave the marks for now and take them out at the very end because I don't want to take the
time to go and do that. The last pass or I guess, the last two passes is going to be the threaded
part of the stitch. We actually want
two switch colors. I am going to grab some
of my variegated thread. I think this will be
really fun because the color is going to
change as we stitch this. I'm going to thread, my
needle. And tie it up. All right. We're going to
work the threaded section of the stitch in two passes. I'm going to work first
on the bottom half of the stitches and I'm going to
go across the bottom edge, and then we're going
to turn around and go across the top edge. I'm going to bring
my thread up in the same place that my
herringbone stitch started. So in that same hole. Now we're going to slip this
contrasting color thread underneath each one
of the stitches, but it depends on which
direction the stitch is leaning, which way we move the needle. We're going to look at
each stitch one at a time. What I want you to do is we're going to work
from the left to the right and I want you to look at the direction the
stitch is going. If the stitch is going up. If I look at this
very first stitch, my thread is pointing up. As I'm going left to right. If it's going up, my needle
is going to go through the stitch facing up.
From bottom to top. I'm going to slip first
underneath this first stitch, going from bottom to top or
going up with my needle. I'm just slipping under the
thread and pulling through. It's just going to twist around, that's perfect for
this first one. Now we look at the next
thread we come to. The next thread is right here. And that one, as we're going left to right, is facing down. Now we're going to take the needle and
we're going to slip underneath that one right
here in the center, you go in through the
diamond shape here, and the needle is facing
down or towards me. So if the stitch slants down, the needle points down. You can see that's going to make this cool little loop that goes right over the x
part of the stitch. I'm just pulling that tight
enough so the loop lays down. So it's not slipping all the way to the bottom or
anything like that. We're just kind of
getting it so it lays just gently across
those other stitches. Okay. Now we move
to the next stitch. The next stitch is
this one right here. And it's pointing up. It's slanting up, so we're
going to slip under that one with the needle pointing
up or away from me. And again, I'm slipping underneath this
part of the stitch, kind of the center of it,
and my needle is coming out in that kind of diamond
shape in the middle of that. Okay. Pull that one through. And that's now made kind of
a loop around that bottom x. Now I just continue
working my way across. The next stitch
we're going to look at is this one right here. That slanting down. So my needle goes
down in the center of the diamond and kind of
out between the stitches. The next stitch is going up. So I'm going to slip underneath that part of the stitch
with my needle pointing up. This is just alternating
up down, up down, but I always find it easier to kind of analyze where
I am in the stitch. That way, if I put it
down and I look away, and I come back, I'm like,
Oh, no, where was I? Now I can look and see, Okay, I went under this one last, so this is my next stitch, and it's slanting down, so my needle goes down. Next stitch goes up,
M needle goes up. And I'm just going to
continue my way all the way across the bottom half
of those stitches. Needle goes down next, and then up. And down. And this is a fun part of
using a variegated color. If you have one, you
can see my my stitches started out kind of tie. Then they turned orange.
And now we're pink. Okay. I've got one more stitch
here to slip underneath. Okay. And then I'm
going to just finish off this by going down again, like we started by just
going into the same hole where that stitch started. Okay. Now I'm going
to hold this up close to the camera
so you can see. So now we've got this little
way line that's going in the bottom half of all of those stitches that we
made, those hearing bones. Okay. Now I'm going to go back the other direction and do
the top half of the stitches. And this is one where again, I find it's easiest
to do if I just spin my piece around so that I'm working the
same way I was before. I'm working in the bottom
half of the stitches. I just like to make it
repetitive like that, so I'm doing the same thing. Now I'm just going
to make a stitch over so that I'm
coming up again, right at where the
underlying stitch, the herring bone
stitches started. And we're doing the
same exact pattern. So our first stitch is going up as we are it's
leaning towards up, so my needle goes up
under that first stitch. Okay? And then down.
In the next one. Now, you might not
start going up. This is a good reason for you to pay attention to the
shape of your stitches. You might have started and ended your arring bone rose
differently than mine. Your stitch might be lying a different direction
than mine does. You have to look at your
stitch and what direction it's going and that will
tell you which way the needle is going
to go underneath it. Okay. So I'm continuing across, and you'll see this is making a mirror image of the
row that we did before. So there'll actually be kind
of two stitches sitting across the center that
lie side by side, and then there's one out on kind of the cross part of each
one of the herring bones. And I'm finishing that
off the same way, just going back down right in line with my
herringbone stitch. That is the two
lines of threading. I'm going to quick take
this over to my iron and just erase away the
guidelines that I drew in. Then I will come back so we can look at this up close
as our finished stitch. There is our finished row of threaded double
hearring bone stitch. In the next lesson, I'm
going to talk about some of the variations
that I've stitched and ways that you
can use this stitch, so you can try all kinds of
experiments on your own.
4. Variations & Wrap up: Alright, let's talk
about the differences in these different versions of the threaded double
hearing button stitch. So, as I mentioned before, this first version is stitched in six stranded
embroidery thread. And I didn't mark out
guidelines on it. So you can see, my stitches
are a little bit wobbly. I don't think that one's
the most awesome example, but I wanted to show that like, it still looks interesting, and you might be able to
do cool things with it, even if you don't mark
out the stitches. The next two variations are
exactly the same colors. It's a dark forest green as the foundation as the
Harring bone stitches, and then a variegated thread that's pink and
purple and orange. Now I stitch them
exactly the same. So that it's the dark color in the background and the bright variegated one doing
the threading. You can see how different it looks when you change the
size of the stitches. The Harring bone
stitches on the top one are a row that's about a
quarter of an inch wide. The ones on the bottom are
about a half an inch wide. When I put them closer together, you see more of the
threading color and less of the
foundation color. It's cool variation. I also made the stitches here a little bit
closer together. Instead of drawing squares, I drew a little bit
more rectangles. I did the same thing
here with this version. This one is two shades of color that are very
similar to one another, there's not as much
contrast there. I made these herring bone
stitches taller and narrower. Instead of drawing guidelines
that looked like squares, I drew ones that were
more of a tall rectangle. That also changes. You
see a little bit more of the thorn shapes sticking
out on the edge of this one versus say
this variation up here, where they're a little
bit more square. The last one, I used a
novelty, a special thread. You might be able
to see on camera just a little bit of sparkle. The thread that is doing
the threading part is a much heavier thread that has a little bit
of metallic in it. And so that gives
a different look. It doesn't pick up the
sparkle very much on camera, but that's a really
fun decorative stitch. You could try all kinds of other variations
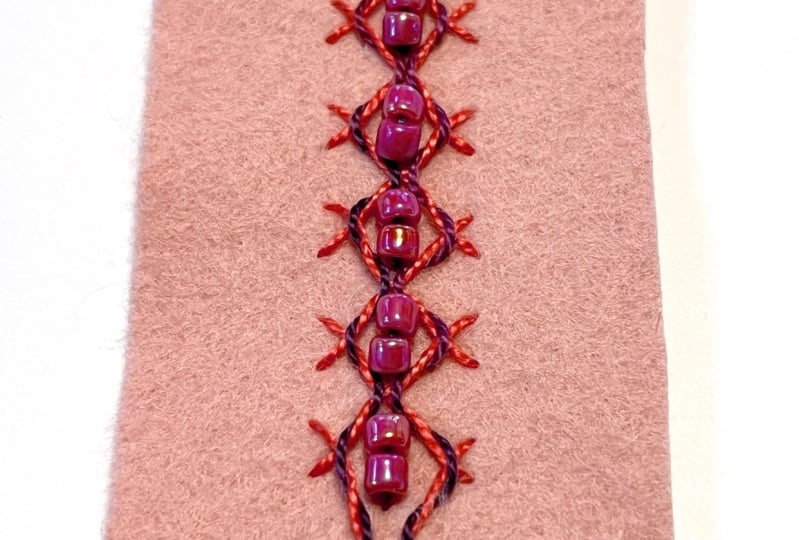
on this as well. This is another stitch that would look really
cool if you stitched a bead in the center of each of these openings that would give it another look completely. I'll try to stitch up
a sample of that and put it in the project
section for this class. Hopefully, you have some ideas. You want to try some different color variations
with this stitch. Don't forget to take a picture of your sample that
you've been stitching. Get really nice and close
up so we can see all of your stitches and post that in the project section
for this class. If you stitch it in a really
heavy or metallic thread, it looks great on things
like holiday decorations. You can use it on
home decor and match pieces of furniture or other
decorations in your house. As the edges of napkins or pillow cases, all kinds
of things like that. I also think this
one is great for stitching on clothing
or even costumes. When you want something
that looks like a really elaborate
embroidered trim. You can stitch
this in, you know, colored threads, shiny threads, add beads into the stitches as you're stitching
or in between, and make it look like you've got really rich trim on your
costume or your cos play. So, I hope you've
enjoyed stitching the threaded double
hearing bone stitch. And you'll come back and
try some more variations on advanced embroidery stitches with me and another class.
 Becka Rahn, Artist & teacher, paper & fiber art