Transcripts
1. Class Introduction: Hey, guys. Welcome to this Adobe Premiere
Pro master class. My name is Gabriel Shaare, and I'll be your facilitator in this high value
packed training. In this training, you're
going to be learning so much exciting
and creative things that you can do in
Adobe Premiere Pro. I'm going to be
showing you how to get started in Adobe Premier Pro. What the interface is all about, how to use the timeline, how to use the different
tools in Adobe Prime Pro, how to create a fast
and slow motion effect, how to cut and join your videos, how to add effect, how to use keyframes, how to track your videos
in Adobe Prime Pro, working with typography, adding subtitles to your video,
creating lower thirds, adding end credits to your
videos, when you're done, synchronizing audios together, freezing and reversing videos, creating a slideshow
in Premiere Pro, removing and editing
green screens, creating the twin effect, and how to export and
render your videos. This training is for all levels, whether you're a
beginner, intermediate or an advanced user. Okay? If you're ready,
then I'm ready. So let's get
straight into it and I'll see you on the other side. Is out.
2. Exercise Files: Hey, guys, welcome
to this video. In this video, I'm
going to be talking about the exercise files. The exercise files are
resources that will allow you to follow along
with me during the course. You should find the exercise
files below this video. Simply click on it to
download it to your device. Okay? Don't forget
it's a zip file, meaning that once you're
done downloading it, you have to extract
it with your PC. And to do that, you just simply double click on
it, and that's it. Okay? And you can open
the folder and begin to use those files to follow along with me
during the course. I'll see you guys
in the next video.
3. Getting Started in Adobe Premiere Pro: What's up, guys. Welcome to this first video of this
Adobe Premiere Pro training. In this video, we're going
to be talking about how to get started in Premiere Pro. So let's get straight
into it right now. Okay, so we're right here
in Adobe Premiere Pro, and to get started, we basically once we
launch Adobe Premiere Pro, it shows us this welcome screen, and we just need to click
on this new project. And by the way, I'm using
Adobe Premiere Pro, 2021. So if you're using 2020, 2019 and below, you can still follow along in this
training, right? We just have slight differences, which I will always
mention when I, you know, stumble across them. Okay? So to get started, you click on New projects. If you don't have
a welcome screen, you can just go to your
menu, click on file. And you see new,
and then you can choose new project right here. Okay? So let me just choose the one for my welcome screen, and, you know, that's going to give me this new project tab. And a couple of things I just want to do here is number one, give my project a name. I'm going to name this
Adobe master class, right? And the location
is the next thing. So if you don't want to save your premier pro project
in this default location, you can click on
Browse and then choose a folder that you're comfortable with maybe your
desktop documents, downloads, whatever it might be and save your
project right there. You can click on Choose and I'll save your project over there. I'm just going to leave
mine in the default. Okay. Now all of this, you want to leave them in the
default because it's fine. Alright. If you have a
graphics card on your system, you see all of these options. But if not, you just see mercury playback
engine software only, which is also fine because you don't have a graphics
card on your system. Alright, so every
other thing here should be left the default. The important thing here is
the name and the location at which your project
would be saved. So I'll click on
Okay. And that will create my new
project and open up Premiere Pro for me, okay? So that's just loading up, and you can see we are inside
Premiere Pro right now, and this is what it looks like. But you can see that
everything looks empty, right. And that's because
we don't currently have any sequence
in our project. Okay? So if you've done
the after effect training, there's something we've called composition in after effect, and that is similar to sequence
in Premiere Pro, right? So this sequence is also
similar to, you know, an artboard in Illustrator or maybe a document
in Photoshop. All right, we need this to start anything in Premiere Pro. So if you don't have a
sequence in Premiere Pro, you can't begin anything. And you can create this
sequence in two ways, right? You could decide
to create a blank, fresh sequence in Premiere Pro, or you could create a sequence from an
existing video. All right. So those are the two
ways of creating a sequence in Premiere Pro. You can either create it
by just going to file new, creating a new sequence, fresh sequence, blank sequence. Or you could do that by importing an existing video
and then from that video, create a new sequence, and Premiere Pro will use all of the settings it needs to extract it from the existing video and use that to create
a new sequence. Okay? So how do I create a new sequence fresh
without an existing video? All I need to do is
to go to my menu. I'll click on file,
and then on that file, I'll see new, and then
now I can see sequence. And the shortcut for
this is Command N on Mac or Control N on Windows. So if I click on that,
that's going to bring up my new sequence tab, okay? And then from here, I can choose the settings that I want. Okay? So these are
sequence presets. And like I used to say, the full meaning of preset simply means
predefined settings, meaning that if
you use a preset, you basically don't have
to do anything manually. It just helps you to, you know, do all of those things because the settings have been
predefined, alright? And using the preset
in Premiere Pro is very simple to create
your sequence. Okay? So we have
different folders here. Let me just close this. So you can see all
the different folders that we have right here, okay, in Premiere Pro. And let me just open
one, the DNx HD. And then on that
ds, you can see we have something like
1080, seven, 20. And then after that, we have
things like 50, 59, 23, 24. So what does all of this mean in choosing a preset
in Premiere Pro? And the reason why you should
also choose a preset in Premiere Pro is because videos generally have the
way they look. All right. If I ask you the
question, the videos look portrait or landscape, most of the time,
your answer will definitely be landscape
because, you know, we can see our laptops, our TV, most screens are built in a landscape format
because they are meant to play videos, right? So using a preset
is the best option. You don't as a beginner, you don't want to go enter
some wit and by yourself, and just choose any size that
you want for your video, and then your video ends
up not looking like, you know, every
other regular video. So using a preset is
the best way to go, especially as a
beginner, alright? So as you advance, you can then begin to enter your own sizes because you
now understand all of this. So now, what we have right
here is a preset name. So the preset name is DNx HD. Alright? So what does
this tenet P tenet I 720? So what do all of
this mean, okay? This is the size of the video. All right? This is the
size of the video. If I go to another
fold or DNxHR, we can see that we
are seeing two k, four K, UHD, and so on. And then if you go to
other ones, you know, we get to see more and more
different video sizes. This is 480, this is five, 76, so many other video
sizes right here, one K, four K, five K, you know, HD, four K, 720, and we have a lot of them there. So that's the
different video sizes that we have when
it comes to video. So let me open back the DNx HD. Okay? These are the
different video sizes. Okay? So the smallest video
size that we have is 144. Then after 144, we have 240. After 240, we have 360. After 360, we have 480. After 480, we have 576. After 576, we have 720. After 720, we have 1080. After 1080, we have
two K. After two K, we have four k. And we even
have the highest of today, which is eight K, right? So, four, 5k8k
simply means 4,000, 5,000, 8,000, and that's
what the K D stands for. So 1080 is like one K, Alright? So that's how videos, you know, sizes are being named
and mentioned, okay? So if, for example, I'm creating a video that
is that is maybe 720, okay? After creating that video, if I watch that video on my
tablet or my smartphone, that video will look really, really, really sharp, right? Even if I'm watching it on
my laptop on, you know, 13 " laptop and stuff, it really look very,
very sharp, okay? But if I take that
same 720 video and I play that video on, you know, some laptop with
big screens, you know, some TV, with very big screens, I'll begin to notice that that
video is not as clear as I thought it was when I was watching it on my
mobile phone, okay? And that's because what
determines your video size is basically the device that
your video will be played on. Okay. So if you know you're
creating a video that will be mostly played
on mobile devices, you know, laptops
that are, you know, not really big laptops
or just, you know, normal personal
computers and, you know, tablet and, you can
do a video with 720, and, you know, if's
going to look very clear and sharp,
nobody will complain. But if you know your
video is going to be played on TV screens, you know, big laptop screens, then you want to do
something like 1080, right, which is 1,000 pixel,
1080 pixel, right? And, you know, if you
play that kind of video on your laptop screen, on your TV, you know, it will look really, really,
really sharp, right? I will look really,
really sharp. So when you see most TV
stations saying, Oh, we are streaming in HD, they're actually
telling you that they're streaming in 1080. So all of those subscription
channels that we watch All right, and the right
HD in front of it, all of those channels
are streaming in 1080, and you can see how
clear they are. But if you take that
same 1080 video and you put it on
a cinema screen, all right, you'll
begin to notice that, oh, this video is not
really as clear as I thought it was when I was
watching it on my TV, on my laptop, right? Why? Because the
screen is now bigger. So the video has to stretch. And as the video stretches, you know, it begins
to lose quality. So that's why you see that
people in the movie industry, the minimum they shoot
nowadays or edit is four k because they really
want their video to stand out in the cinema
screen or to be really, really super clear on
the cinema big screen. Okay? So these are the different things that
will make you as the editor, decide what to do, what kind of size to use
for your project. Okay? So it is totally up to you to decide the size
that you want, right? Because the bigger the
size of your video, the bigger the file size
of your video also. So I can't imagine
myself creating a forki video for Instagram,
a 1 minute video, and then I'm ending
up with, you know, 700 megabytes for
my 1 minute video or maybe even one gig. And I'm trying to upload
that on Instagram, considering network
availability in my area. You know, I might spend
the whole day just trying to upload a 1 minute video, which is four K on Instagram. So I'd rather do a
tentative video. And upload easily on
Instagram, right, and know that people would still watch it and it's still going
to be really, really clear. Okay? So choosing the size of your video is
totally up to you, right, and the kind of
project you're working on. Okay, so that's what this is. Then the next value we
are seeing here, this 50, 59, 23, 24, 50, 60, and the likes is basically
the frame rate of your video, the frames per second of your
video, right, called FPS. Okay? What's the frames
per second of your video? Okay? Now, like I used to say, videos are actually made
up of steel images. Okay? So to put
that another way, videos are made up of pictures. Okay? Videos are
made up of pictures, and those pictures is what
we call frames. All right. Those steel images is what
we call frames. All right. So to explain that
further for you, if you remember, one of
your friends in school, back in the days, you know, who is an artist
that loves to draw, imagine he has a joa with him, and he draws you on the
first page of that jotter, maybe you were like this. And then on the second page, it draws you like this. And then on the third page,
it draws you like this, and it keeps repeating that for about 50 pages on the jotter. Alright? If you take that jotter and you
flip it really fast, like you flip it really
fast, what would you do? Actually notice that
it looks as if you're walking or you are running
depending on how fast, you're flipping that
Jota and the pages. Okay? And that's
the whole genesis of video, how video started. Okay? So you know, frames per second is the total number of
frames or images that you have in 1 second
of a video, right? So if I tell you to
count, for example, if I'm using this 25
year and I tell you to count one to 25 in
1 second, you know, it's going to be really tough
or difficult for you to do that as a human because
if I say, Okay, count one to 25 in 1
second, you'll be like, one to 225, and then 1
second is gone, alright? So that is the same, you know, process it is for your you know, video player when
playing a video, it has to show you 25
images in 1 second, okay? I show you 25
images in 1 second. So it has to show
you those images so fast that you don't even
see that they are images, and all you just see is a video. That's what goes on when
it comes to, you know, frame rates and how they come together to actually
form a video. So the higher the frame rate
of your video, the better, and the lower the frame
rate of your video, you know, it might
not really work. All right. So the
minimum recommended is about 23 frames per second. And the maximum is totally up to you because we
have video shot at, you know, 240 frames per second and even
higher than that. Okay. So but know that the
higher your frame rate, the higher your file
size of your video. And also, the kind of
camera the video camera you use also determines
the highest frame rate you can shoot with that camera. Remember I told you
that the other way of creating a sequence
in Premiere Pro is that you could import
an existing video and create a new sequence
from that video. So all of these settings
you are trying to choose right here
in Premiere Pro, they are also available
on a video camera, and you can set all of that. So if you are using
an existing video, Premiere Pro just
tell you, Okay, don't bother about all of this. I'll just extract it from
the video and then create a sequence using the exact
same settings of the video. Okay? So that is all about
four frames per second. And the reason why I said
that your frames per second should not be lesser than 23 is. Imagine if your frames per second is two frames per second. If I tell you to count one and two under a second,
you can do that. You just do one, two, one, two, and that's, you know, you're counting
to under a second. So what would happen if your video is two
frames per second is, you know, your video
will probably be C, C, C, C. And then people who
start seeing those images actually come together
to form the video, okay? So that is what FPS or frames
per second is all about. And my favorite is always
25 frames per second, okay? But like I said,
you can go higher, you can go lower depending
on what you are doing. You know, you can
really go higher. If you are going
to be doing a lot of slow motion in your video, then it's always
best that you go for a higher frame rate, right? And even when shooting
with your camera, it's always good
that you shoot at a higher frame rate because by the time you're trying to
make your video slow mow, you are actually reducing the
frames per second, right? So if you're shot at maybe one, 20 frames per second, by the time you are
doing slow mow, you're actually
maybe now reducing your video back to, you know, maybe 60 frames per second or 30 frames per second, right? So it's as simple as that. So the one I'm going
to choose here is this ten AT P 25, okay? And if you open that,
you can see we have different versions of that. And the one I'm going to
choose is this first one, DNx HQ ten ATP 25. And you can see the information of what I'm choosing right here. You can see this
is 1920 by 1080, 25 frames per second. Square pixels, you know, and everything looks good
the way it should be. Okay? So this is my
favorite preset in Premiere Pro for
making my videos. Another folder I usually
go to is this HDV folder. I can also find ten
ATP 25 right there. Okay? So if you want
something higher and you still want to
use this DNC DNx here. You can go to the
other DNx folder, which is this DNxHR, and you can see we have
higher video sizes here, like two K, four K, and UHT. Okay? So like I said, it's totally up to you. So now that you understand
what all of these things mean, you can actually choose the particular presets
that you want to use. So let's go back to our DNx HT, ten ATP, and then
DNx HQ, ten ATP 25. Alright? So this is
set I'm going to use. But just in case you find
yourself in a situation whereby you want to use
a custom settings, okay? You want to use your
custom settings. You can always come to the
setting tabs right here, click on that, and you
can see all of this. So all of the
settings that made up this sequence is now
available for us to, you know, edit here. But I won't be able to edit anything until I change
my editing mode from DNx tent P to custom
all the way at the top. So once I change this to custom, then everything here is
now editable for me. I can change my, you know, width or change my height. Okay? So this is
the 1920 by 1080. I can actually change
this to maybe 1080 also, and this will give
me a square video. Alright? So I do that a lot, usually when I'm
doing videos for Instagram and I want
my video to look like square or if I'm
doing a video for IGTV, I can change this to a portrait video and then
do 1920 on this side. So that gives me
a portrait video which is a flipped version of
my normal landscape video, flipping it to a portrait, and then that will be able
to fit into IGTV properly. Okay? So this is, you know, where you
come to if you like to, you know, change your settings
or do all of those stuff, you know, for your
video size, right? So if you just want
to use a preset, which is what I
usually recommend, you just come right
here, select it. Then you give your
sequence a name. So we're going to
name our sequence adobe master class once again. Alright, so your
sequence name can be the same as your
project name, okay? Sequence name adobe Master class and then I'll click Okay. And when I do that, you can
see now that things are now clickable in Premiere Pro, and you can see this
black screen here, which is the sequence
I just created. I can begin to drop videos into my timeline and begin to
edit in Premiere Pro. So that is how to create a
sequence in Premiere Pro, and T here, guys, and I'll see you in the
next video piece out.
4. Importing Files in Premiere Pro: Also, guys, welcome to another video in this Adobe
Premiere Pro training. In this video, we're going to be talking about how to import videos and other files
into Premiere Pro. So let's get straight
into it right now. So to import an existing
file into Premiere Pro, all I need to do is
to go to my menu, click on file, and
then the file, I'm going to see Import. The shortcut for that is Command I or Control I
if you're using Windows. So if I click on that, it's going to show me
my file explorer, and we can go to
the Exercise files. Don't forget that
you can download the Exercise files, okay, in the resource center on
the website and you can follow along with me
in this training. So in Premiere Pro, I can select a folder and
then click on Import, and that folder itself
will be imported. All right. On Windows, you might see a third button
here called Import folder. That's what you're
going to use. Or you can double click on
the folder to open it and you can select a file
and just import one file. Okay. Another option
is you can hold down Control and select
multiple files to import. Okay? That's another option. But basically, what we're
going to do is to just go back to the exercise files, click on the folder
itself and import that. Don't forget if
you're using Windows, you might see another button
called Import folder. That is what you use
to import a folder. So I'll click on Import and now we import my files and you can see that it immediately takes
me to my project panel. All right, if Premium Pro didn't take you to
your project panel, if you're still in libraries, you can simply just switch to your Project panel or
you could go to Window, and under Window, you
will see a project, and then you choose Adobe
Master class project. And that will switch you to this project right here, okay? And that is how you
import a folder or files into Premiere
Pro. All right. Now, this is a way of viewing
your files in Premiere Pro. Another way you can
actually view your files in Premiere Pro is that you can
click on this icon view, and it will change from a
list view to an icon view. So you can actually
see that you can see a Tom nail of your
videos right here. To open up my Exercise files, I'll just double click
on it and watch. It's going to open a new tab here with the name
Exercise files. So you have to
take note of that. So if I double click, you can see that there's
a new tab right here, which is a bin or a folder
called Exercise File. So anytime I want to go
back to the project, I can always come back here. And then if I want to go back to the videos
inside this folder, I can go to my Exercise files. And you can see, these
are all the video, audio and images that we've
imported into Premiere Pro. Alright? Is as simple as that. Now, how do I create a new sequence
from an existing video? I told you in the previous
video that you could actually create a new sequence
from an existing video. Okay? You could
create a new sequence from an existing video. And how do you do that? You
simply select the video, right click on it, and then choose new sequence from clip. New sequence from clip. That's all you need
to do to create a new sequence from
an existing video. Remember, if I go back to
my project, all right, we have an existing
sequence here, which is the Adobe
Master Class sequence. But right now, if I go back
to my exercise file, okay, I'm trying to create
a new sequence from this existing video
so I can right click and say new
sequence from clip. Boom. And that will
create a new sequence for me using the exact
settings of the video. So I don't need to bother
myself about DNx HD, DNx HR, HDV, tenet, 1920, all of those settings
that we were, you know, looking at in the
previous video when creating a sequence
from the preset. Okay? With this method, you don't need to bother
yourself about that. So if the video was
shot in tenety, automatically, your
sequence will be tenet. If the video was shot in 720, automatically your
sequence will be 720. Frame rate used when shooting the video was 30
frames per second, then automatically your sequence will be 30 frames per second. If the video was four
k when it was being shot and was shot at maybe
25 frames per second, then your video will be four K, and the frames per second
will be 25 frames per second. Okay? So that's how it works. So if I'm working with
an existing video, most of the time I just
like creating it this way, right click new
sequence from clip, and then it just gives me the exact same
settings of my video, and I move on with
my editing, okay? So, but in case
maybe you're curious about what settings
came with the video? What's the size of the video? What's the frame
rate and everything? You can just simply
go to your menu. You see sequence, and
then on that sequence, you're going to see
sequence settings. Alright? And when
I click on that, it's going to actually show me the settings that was used in creating the sequence
from that video. You can see that this video
is also 1920 by 1080, okay? And it's 25 frames per second and every other
thing like that. So this is giving you information
about your video and, you know, the settings
that came with that video. So in case you want to still
change it to something, you can always do that under
the sequence settings. Okay? So let me just click Counsel now because I don't want to
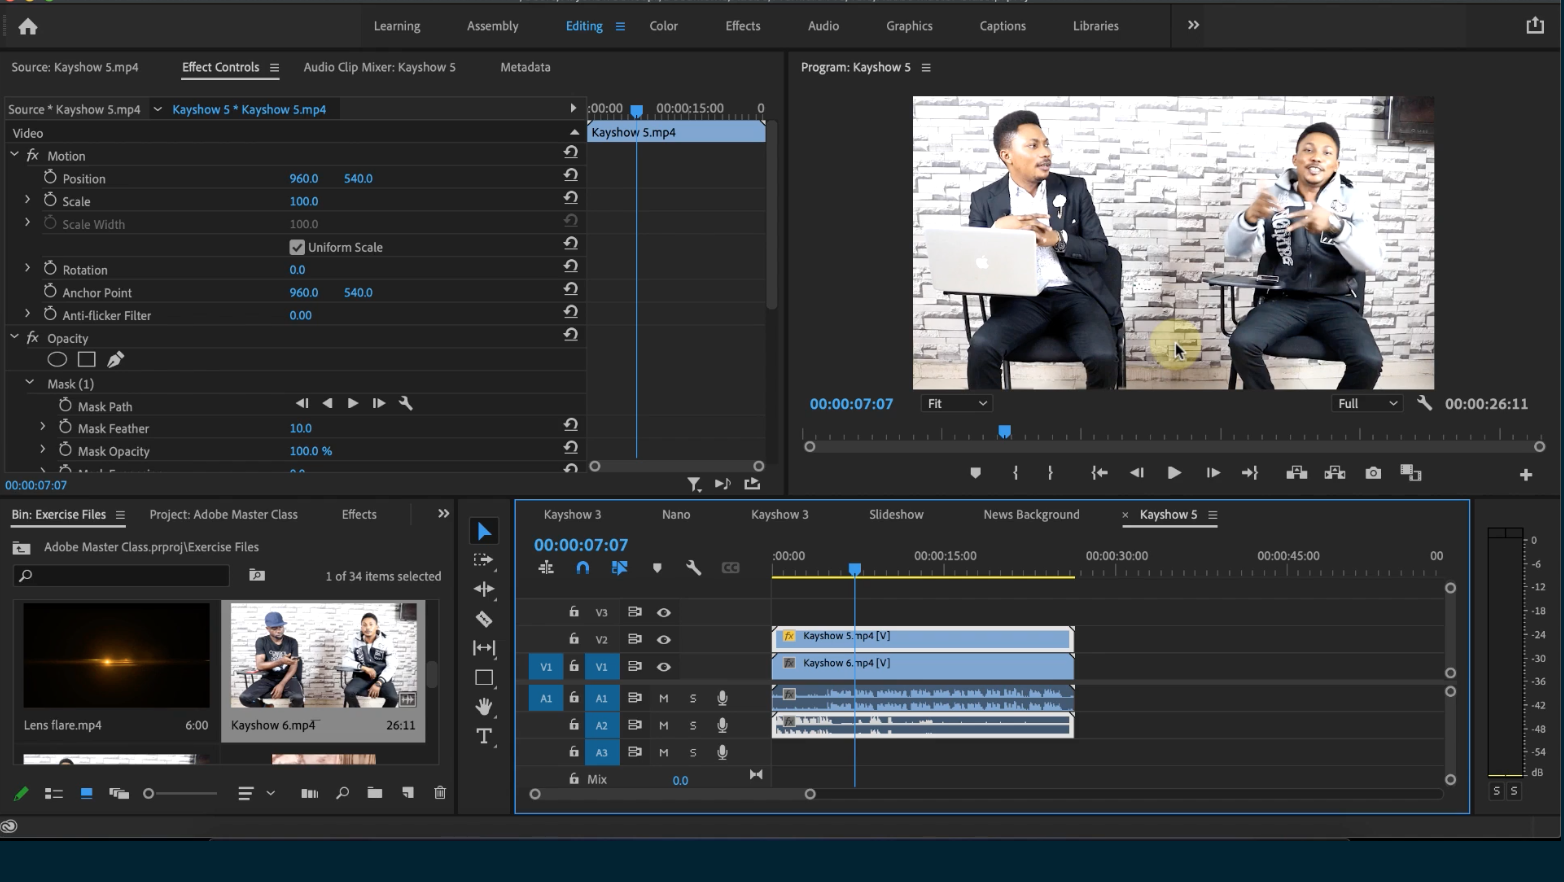
do anything to that. Now, if you look at
my timeline here, you can see that we
have Adobe Masterclass. If I click on that, it takes me back to the Adobe
Masterclass sequence. And then if I click
on this Cu three, it takes me to the
new sequence I just created with my video. Okay? Now, if I come back to this my Exercise
files tab here, you can see we have
Kho three here. If I scroll back all
the way to the top, you can see I also have
Kshot three here again. So what's going on here? What's going on here is that
this is the original video, and this is the sequence
created from that video. So most of the time,
when you create a new sequence from
an existing video, they always look
alike, you know, with the video, and then
you'll be wondering, so how will I know the
difference between the video and my sequence. It's very simple. All you need to look
at is this icon at the bottom, right, okay? This icon at the bottom right. You can see that this
icon we can see here is way different from this
icon we are seeing here. This icon tells us that
this is a video that has an audio and is currently
in a sequence, okay? And then this tells us
that this is an audio, this is an audio, okay. This tells us that this is
a video that has an audio, but it's currently not being
used in any sequence, okay? And this tells us that
this is an image. You can see the PNG. So every single thing here, it should be recognizable. You can see this that
video that has an audio, but we are not seeing
this second icon here because it is not being
used in any sequence. So the reason why this one
has this here is to tell us that this video is being
used currently in a sequence. Okay? So we don't
delete it mistakenly. This is a picture picture. All right. And then we're
back to the sequence. If I go back to my project, you will see that Adobe
Master class also has that same sequence icon. Okay? You can see
this icon here. This icon tells you that
this is a sequence. If I go to my exercise files, you can see that this
icon is the same as the icon we saw in the
Adobe Master class. So let you know that we have two sequences now
in our project. And in Premiere
Pro, you can have as many sequences as you
want in Premiere Pro. And, mind you, whatever
I do in this Keshu three sequence doesn't affect
Adobe Masterclass sequence. And whatever I do in Adobe
Masterclass sequence doesn't affect Keshu
three sequence. And I can export what I have under this
schedule three sequence as a video on its own. And I can also export
what I have under this Adobe Master
Class sequence as a video on its own, okay? So if I have up
to ten sequences, I can actually export ten
different videos, okay? So sequences are more like pages or artboard
in Illustrator, you know, or composition
in after effects. All right. So that
is how to create a new sequence from an
existing video. But before I In this video, let's talk
about offline files. Okay? Now, when you
import videos into Premiere Pro or files or images or whatever
it tells you import, it doesn't necessarily mean that the video is now living
in Premiere Pro, or the image or the audio
is living in Premiere Pro. If I go back to my
exercise files folder, the original place where it
was stored on my laptop, if I go there and I select an image and I delete it, okay? By the time I come
back to Premiere Pro, you can see that Premiere
Pro is telling me, Hey, missing media
for this clip. I cannot find this John
Fnada image again. Where is it? All right. And that's because
I just deleted it. So if you when you're
working in Premiere Pro, you don't want to delete
your source files. It is very important that
you remember this, right, or else you might get in
trouble for it, maybe editing, someone's video, and then you went ahead and
delete the source files. And then now you can't
edit anything in Premiere Pro because you
can't find it, okay? So you must be really, really careful when
doing this, okay? So you don't go and
delete your source files. Make sure you're done
with your editing. You have exported your
video and you like a video, there's no need for
you to edit anything again before you say you want
to delete the source files. But as long as you
feel like you still need to be editing the
video in Premiere Pro, you want to make sure that your source file are
not deleted, okay? And if you're also,
editing the video from an external hard drive
or maybe a USB flash, you want to make sure
that that external drive of flash is always connected to your laptop before you launch that
projects in Premiere Pro, right, so that Premiere
Pro can easily locate it, and then you can
continue working on it. Alright? So it is
very, very important. And it's not just deleting that, you know, makes this happen. Another thing that
causes this is when you rename the file name. So if I come here, let
me just change this to newscaster and
type anything there. Okay? Let assume I
type anything there, and I rename that. By the time I'm coming
back right here, if I cancel this, another
one will load up and say, Hey, I can't find
newscaster again. What happened? All right. So even as simple as renaming your video file,
it will also cause this. And another thing
again is if you change the folder of your image or
your video or your audio, all right, it's also
going to show you this, Hey, I can't find it again. Where are these files. So if all you've done is to rename or move it
to another folder, you still have a
solution for that. And I can come back here. Okay. And let me just undo that and come
back here and say, Hey, sorry about
that Premiere Pro. Let me locate it for you now. You click on Locate,
and then you go to the exact folder where you
have that you know file. And then you can see mine is
under the Exercise files. I can see the newscaster
I can say, Hey, I'm sorry I deleted it.
Here is a video now. Go ahead and replace it. Okay? So let me undo
my deleting again. And now I'll bring you my image. Okay? So it was in
my recycle bin. So I'll just come
here again and say, Hey, Premiere Pro, I'm sorry. Let's try and locate
this video again. All right, so I can
come to Link Media. That will bring me back here. I can say Locate, and that will bring me
back to the folder. Don't forget that if
you change the folder, you have to go and
locate that new folder, and then you click
Okay, and everything comes back and it
is linked together. Alright? So that is
that for offline files. Just have it at the back of reminder Things are not
really being imported. A link is only being created to that file on your laptop, okay? And that will save
you some, you know, stress if you take
that instruction. Thank you so much for
watching this video. Guys, I'll see you
in the next video.
5. Premiere Pro Interface: What's up, everybody. Welcome to another video in this Adobe
Premiere Pro training. In this video, we're
going to be talking about the interface of Adobe Premiere Pro and
some of the things that you need to note when
using Premiere Pro. So let's get straight
into it right now, and I'll show you just that. You. Okay, so right now
we're in Premiere Pro. Let's just talk
about the interface, you know, of Premiere Pro. So right here, we have
a menu at the top here, like we already know, okay? And then next to that is our
workspace is our workspace. Now, as a beginner, I would strongly recommend
that you don't come to this workspace for now because
a lot of people come here, select stuff, and then they think that Adobe Premiere
Pro is totally messed up. All right? This is
your workspace, meaning that if I change
this to any other thing, okay, it's going to rearrange everything and kind of make
my premiere pro scattered. So basically, what I'm using for this
training is editing, and that is what
you should also, you know, be on by default. If I change this to
effect, for example, you're going to see
the way it's going to totally rearrange
everything here. And then it's going to
look as see if my premiere pro is different
from your premiere P. You can see the way, you know, this is here,
this is here, this is here. If I change this to audio, it's going to rearrange
everything again, and you can see we
have this here, we have this here,
we have this here. So if you're seeing something
like this, you might think, Oh, my premium P is,
you know, broken. Don't know how to fix it. I
don't know how to fix it. Things are not working well. Even if you close this restart it, it's still
going to show this. Even if you restart
your system 100 times, you're still going
to end up here anytime you open
Premiere Pro, right? And the only solution to that is to just make
sure you come back to editing and that you always remain under editing. All right. But as you advance
in Premiere Pro, you could actually come
here and choose, you know, different workspace because now you understand what is going on. You can change it to maybe audio until still Premiere Pro. I want to focus on audio. So rearrange everything for me. You know, so I can see
my audio very well. All right. So but before then, always make sure that you
are under editing, okay, so that you can, you know, have your premier pro like this and
everything looks fine. So the next thing I
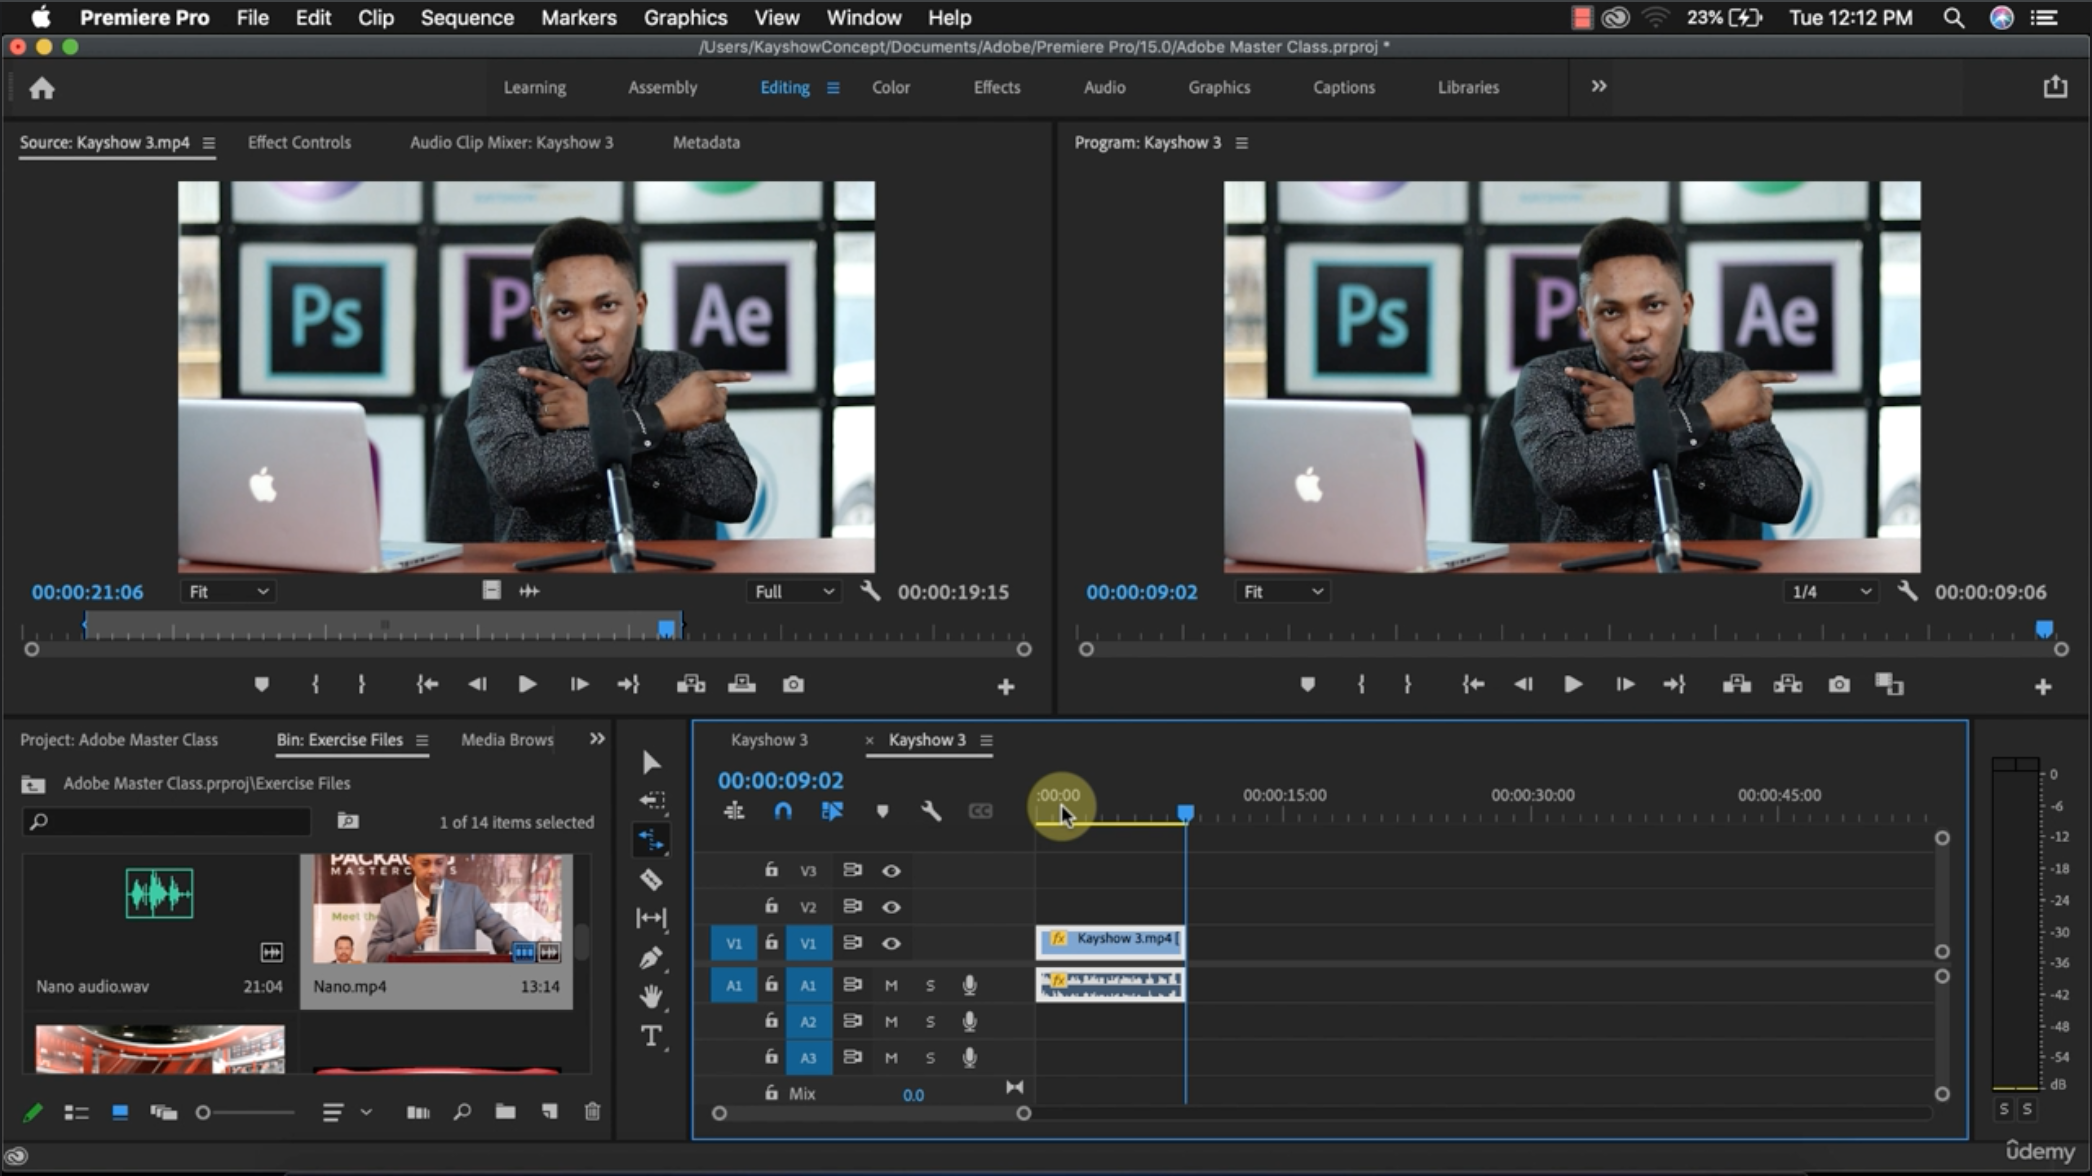
want to talk about here is the source monitor. This is the source monitor. Under the source monitor, you'll be able to preview your videos and also
trim your videos. Alright? So you can
see that we have nothing in the source
monitor for now. And that is because if I want to put a video in my
source monitor, all I need to do is to
double click on the video. So let me just double click on this right here and you can see that the video is being opened up in Premiere Pro. All right. So sorry, the video is being opened
up under my source monitor. And then from here, I can preview my
video. All right. So my video showing here
doesn't really mean that it is now part of
what I am working on. All right? What I'm working on is what is
showing right here. So this is called
the program monitor. Alright? So this is where
I see my life edit. This is where I see the things that I'm working on, right? Because what I'm
seeing here is based upon what I have in
my timeline, right? And if I move this,
you can see that the video is being
updated to that point. Where I have my playhead. Okay? So you must make sure and understand that this
is just for preview sake, wow this is for preview, but in this case, you're previewing what
you're editing live. So whatever you see
here is what you are going to get at
the end of the day when you export your video. Alright? And then next to
that is our audiometer, okay? If I press play now. Color of this to this. You can see my
audiometer was moving to show me the level
of my audio, okay? And then next to that, we
have our timeline, okay? We have the timeline. So this is where we see the
timing of our video. This is where we get to
drag the playhead around, and this is where
we get to also see some things right here that I'm going to be talking
about later on. Okay? Then moving
away from that, we have our to bar right here. So this is where we'll be
able to pick some tools to use in Premiere Pro later on. Then lastly, we come back to our exercise files or our
Bin or our project panel. So we have a lot of
panel stacked up here. We have the project v Ben,
media browser, libraries, info, effect, markers, history, and so on and so forth. I can use this double
arrow pointing forward to quickly switch between
the different panels here. I can go back to
my Project panel, or you can go to Window and just activate any
of those panel, and that will pop the panel up. Okay. Now, also, if you mistakenly scatter
things in Premiere Pro, so maybe I mistakenly grab my source monitor and then boom, I do notice, Oh, my source
monitor is now under net. Oh, I can't find
my timeline again. Oh, what's going on here? Oh, my project is now here. Oh, I can't see my
program monitor again. Oh, my program
monitor is now here. Oh, everything seems
scattered and I'm on editing. I don't know what is wrong. I'm not on any other after work space Mr. Kish
said I shouldn't go to. I'm on editing. So
what's going on? Please help, please help. Alright, don't you know,
stretch yourself out. Just simply come to Window. Since you're already on editing, you can also confirm that here. So you go to Window
Workspace editing, then you go to reset to
saved layout, right? So once I click on that, that will rearrange
everything back to the way it was before
I messed it up, okay? So that is that. And you can actually mess
things up intentionally, okay? You could arrange things,
you know, separately, move things up and down, say, Oh, this is the way I
like my own premiere pro. And what you could
basically do is to save this as a new workspace. And you can do that by going to Window workspaces and then
saying save as new workspace. It's going to ask
you what name do you want to save this workspace as, and then you can enter
the name and click Okay. So I'm going to cancel that
because I'm not saving this. So I'll go back to Window
Workspace and then choose Reset to save layout. And that will reset it
back to what it was. Before, okay? So that is that with the workspace of Premiere
Pro and its interface, thank you for
watching this video, and I'll see you guys in
the next video piece out.
6. The Source Monitor in Premiere Pro: Hey, guys. Welcome to another video in this Adobe Premiere
Pro training. In this video, we're
going to be talking about the source monitor, right, and how to use all of
those buttons underneath it. Alright, so let's get
straight into it right now, and I'll show you
how to do just that. Okay, so we're back right
here in Premiere Pro, and we want to focus on the source monitor right
now so you can see. And the source
monitor, I can easily press play to preview
and hear my video. Was, show. How you doing, man? Good to see you give
me you got now. Okay. All right, guys, so that is the source monitor
and how to use it to preview your video in
Premiere Pro, right? And it's as simple as that. So, let me go back to my exercise files
and let me put in this video in the source
monitor, alright? And when I come back here, press play, you can see
the video starts playing. What's up, everybody.
My name is. All right. And the first thing
we have under the source monitor right
here, markers, okay? Markers. Now,
markers allow me to add markers to my video
at specific points, okay? So there are times when editing that you want to add a
marker to your video, basically because of, you
know, a particular reason. Now, for example, if I go back to this video and
I double click, let's zoom, I want
to mark that place where I begin to pour, okay? So that point where
the, you know, juice begin to come out, I
can place this playhead here. You can see this is
a mini playhead. This is the main playhead. Alright? You can place
this mini playhead here, and then I can click
on this ad marker, and you can see this green
marker appear at this point. So what is marker? Maker is just like when you're
reading your Bible. And you find a
particular scripture that you're really
interested in. And then you grab a
marker and you just, you know, paint that
portion of the Bible. And you're painting it
because the next time you pick up your Bible and you're looking for that
particular verse, you want to make
it easy for you to locate because right now, as you flip through
the chapters, you can easily see
that marked portion and then say, Hey,
there you are. So the same thing
with Premiere Pro, you add markers to
your video to easily locate specific parts
of your video, right? So if you know, Oh,
I'm going to be needing this part of my video, you know, very soon or later on, you can set a marker
there so that the next time that you
want that part, it's going to be easy for
you to locate, right? So you can see I've
placed the marker there. So even if I, you know,
go somewhere else, I work on other things, do other stuffs in
Premiere Pro, okay? Oh, come on. Do other
stops in Premier Pro. If I come back to this video and I'm looking for that
point whereby, you know, the yoga starts pouring
out from the laptop, okay, I can easily
locate it now. Why? Because I can see the marker
is still right there. So if I had not
said this marker, I would have to play this
on the beginning again. You may, may. Okay, until I'm able
to locate that point. But with my marker, I can just simply click on this
green marker I have here and you can see it quickly switches to that
point and I can press Play. You can see, you know, you got pouring out
from the laptop screen. Okay? So that is how, you know, easy the marker makes
your life to look, okay? So I can set markers in different parts of
my video depending on different parts that I
want to quickly take note of. And the interesting
thing about markers is that if I double
click on a marker, it's going to open
this marker option and I can give the
marker a name. I can say, you know,
drink or something. And then I can even
choose a different color, maybe like blue, right? And then I can also click Okay. And you can see the
marker is now color blue. Oh. Let me know it's blue. Let me use something like
red, so it doesn't look like the same color of my playhead. All right, click on
that and you can see the color is now red, right? And when I put my mouse on it, it's going to show drink. So let them know that Oh,
this is the part where the drink starts
pouring out, right? So that's with markers. I can even double click
on my marker again, and then I'm going to
see delete. Alright. So you can delete a
marker if you're no longer interested in
using that marker, right? And that marker will disappear. And the good thing or yes, the good thing about markers is that if you don't
delete a marker, if I send a file to you, Okay, or you copy this same
video file for my laptop. Once you open a video
file in Premiere Pro, you will notice that you can
see the markers right there. So if I click on
this marker again, I can actually use this
marker to communicate to a fellow editor on some things that the person
can do in the video. All right. So without that we
have this comment section. I can say, Hey, please cut this part of the
video or something. Okay? And and once, you know, the other
editor, you know, downloads this video file or do whatever he
wants to do to it, copy from a flash or something. By the time he gets it,
he's able to see that, Hey, when he puts the mouse
here, he's saying, Oh, drink, please cut this
part of the video. And he said, Oh, he wants
me to cut this part, and then the editor can help
me to cut this part out. So you can actually
use it to communicate with an editor, you know, to, you know, do specific things at specific points in
your video, right? So that is the
essence of markers. Another essence of Maker is that you can actually use it to edit to you know,
the bit of a song. So if you have a song, you
can set markers on specific, you know, times of that song. For example, maybe set it
at the kicks of that song. And then when you
are now editing, you know that every
time you see a marker, that is where you have the
kick of the, you know, music, and then you can begin to
edit to follow that workflow. So makers have a lot of uses. It's just basically
something that allows you to grab a marker like in
real life and mark spots, you know, to know what to do
when you get to those spots. Okay? So if I don't
want this marker again, I'll just double click
and press delete, and I will remove the marker, and I can see that the
marker is now gone. So that's the essence
of markers, right? And the next one I have here
is my mark in and Marko. Okay? If you've done the
after effect training, this won't be new to
you again. All right. So mark in and Mo, this is what we use
to trim the video. All right? This is what
we use to trim the video. All right. So let me go back
to this su three video. Double click on
need to open it in my source monitor, press play. So you can see at this
part of my video, at the beginning
part, I was trying to get ready to begin with a shoot. Okay? So I was kind of adjusting myself What's up
everybody before I said, What's up, everybody, okay? So in my normal editing, we want to remove that part
and make it start from exactly the point where I'm about to say,
What's up, everybody. Okay? So that is important
for us to note. Okay? That is important
for us to note. So I can take my playhead, put it just before I say What's up everybody can see
somewhere around there. So you have to move
it gently, okay? Or you can use this
step backward or step forward one frame to move
gradually. You can see. I can tap this and you can see
I'm moving frame by frame. So remember that those pictures, I say, make up a video. You can see those
pictures right here. This is a picture.
This is a picture. This is a picture.
This is a picture. Because right now I'm
moving frame by frame, frame by frame, frame
by frame. All right. So let me take this back to
just the part before I start. Whats up everybody,
and you can see somewhere around here.
And what will I do? I'll come to this MAC in and click here and I've
told Premiere Product, I don't want everything from
this point to this point. I want my video to start
from this point, okay? And then I can go all
the way to the end. But show up tutorial. And in today's tutorial,
I'm going to show you. Okay. Intro. Simple.
But before then, intro. Alright, so you can
see that's where the video ended, okay? So I'll show you how to change
the color of this to this. Very simple. But
before then, intro. I'll pause it right there, so I'm using the space
bar to play and pause. Alright? That makes
it easier and faster. And, you know, I want to stop at that point where it says, before then, intro alright? Because that's where
actually ended the video. Then I can come right
here to my mark out. Tell Premiere Pro that
I don't want any, you know, part from here
to this point, right? So I don't want this
part to this part, so help me to remove that. So if I come to
Makot, click there, you can see that Premiere
Pro will now end the video at this point. Okay? Premiere Pro will now
end the video at this point. So if I come to this
timeline, I see this one, the timeline just has everything
from the partway I was still adjusting to all of this part to all of this
partway Im still adjusting. Let's get straight
into it. Okay? Before the and even
when I was trying to repeat that again and
all of that, you can see. So I can select this, press delete on my keyboard. And this one now that has been trimmed to
the exact and perfect, you know, way that we want it, I can put my mouse here, click and drag and drop
that into my timeline. So if I press play
in my timeline now, you will see that nobody will even know that at the beginning, I was trying to adjust my self, and then at the end, you know, it just stops where it's
supposed to stop perfectly. So let's play this back
and see what we have. What's up, everybody.
My name is Gabriel Sho, but you can call me Kisho. And welcome to another
Photoshop tutorial. And in today's tutorial, I'm going to show
you how to change the color of this to this. Very simple. But
before then, intro. Okay. Great. So you can see
what we have right there. You can see that this
is really perfect. Nobody will know
there's any mistake anywhere or some
adjustment anywhere before the start of the video and after the end of the video. Okay? So that's how you use your marking and
mako to trim out your video to the specific point that you want exactly, okay? And you can see that when
you're done with that, you simply drag
from here and drop. If I drag this and drop again, I will just have two versions
of this same video, okay? So I want you finish
playing just play again. Very simple. But
before then, intro. What's up, everybody?
My name is. Alright, so we don't
want that, so I'll just select that and delete that off. So you can see how
easy it is to use Premiere Pro to
trim your videos to the right portion and
then drop them into your timeline into the main
project you're working on. All right. So what is
this guy used for? And what is this guy used for? This is go to in and
this is go to Out. Right now, my point is
this point right here, and my out point is
this point right here. So if I click on Go to In, just take my playhead
and, you know, just make it jump
to this endpoint. So if I click on that now, you can see that my player
just jumps to the endpoint. And when I click on GTO, it just takes my player
to jump to this outpoint. All right. So very
simple. All right. And we already spoke
about the step back one frame to allow me
to move frame by frame. All right. So this is useful. If you're looking
for a specific point in your video and you
don't want to miss it, you can use frame by frame, step backward or frame
by frame, step forward. Okay? So instead
of dragging here. I'm dragging this way, I
might just keep that path. I might not be able
to get that part. But frame by frame, I can always get
the specific points that I'm looking for. Alright? So that is that. And we know what this is used
for. It's a playable thing. I very simple and then you
can stop it also right there. We can also use the
space bar to play. But before then
and to stop, okay? So that is how to use all
of these buttons here. Now, this insert and
overwrite, okay, allows me to also drag my video from here and
import into my timeline. So let me open
another video here. If, for example, No, I have this right
here, and I want to import this video
into my timeline. If I put my playhead
somewhere in the middle of this existing video
and I click on Insert, it's going to split this
video into two and drop this new video in between them because my playhead is
somewhere in the middle. So if I click on Insert now, you can see exactly
what I just said. You can see this is a video
that was there before, and this is the video
that was there before. And this is the new video
that has been inserted. And why did he split it up? I did that because my playhead was in the middle of the video. Before using the inset button. So if I undo that and I put my playhead somewhere after
the video and I click inset, you can see that it
just inserts it at the exact point where I had
my playhead before now. Okay? So that is inset. It allows you to import your
video into the timeline. So if I put my
playhead once again in the middle of the video and
I use overwrite this time. Now, if I use overwrite,
overwrite would not, you know, create space in the middle for
the incoming video. I will just clear everything
from here forward, right, meaning
that it's going to delete this part of the video. Okay. So the only part of
this video that I will have left is just this
part before the play. So if I click on overt, you can see that it just removes everything from this
point of the video away, and you can see it
has replaced it with this video that I
have right here. So if I play this now,
you can see from here, it will just switch
to this video. O tutorial, you may. Alright. So that is your
insert and override. But personally, what I love to do to import
my videos into the timeline is basically just put my mouse right
here on the video, click and drag, and I just drop it where
I want to drop it. I can drop it right there. If I undo that, if I click and I drop it on top of this video, it's going to do
the same override that the override
button does here. So personally, I just like
dragging from here and placing it where exactly
I want it to be. Okay. So that is that fourth. I can see what we
have right now. Now, the last thing I have
here is the export frame. So let's assume that part
where I had that drink. You can see now that
because I've removed the marker from this video, I'm finding it hard
to locate that part where the drink starts
pouring. All right. So as I s had my marker here, I would have easily
be able to locate it without me having to
scrub through my video. So now I have to
scrub through it. Okay, so it's right
somewhere here. So let's zoom I like
this and I want to take a screenshot of this, okay? Or I want to have a picture version of something like this.
What am I going to do? I'm going to simply come to my export frame
here, click on it, and it's going to ask me
what name do I want to name my image and what format
of image do I want? So I can choose JPEG, PNG and the likes. So I'm going to choose JPEG. I'm going to leave
it as the name of the video and then
it's asking me, Where do I want to save
this image? All right? I can click on browse, Choose document,
download or Dk stop. And then after choosing that, I can say choose, okay? And we have this
import into project. What that means is that if
I export this as an image, it will also help me
automatically import it into Premiere Pro as an image. So maybe I want the
screenshot in Premiere Pro. Maybe I want to use
it for something. Something like
that. Okay? So you can click on Import
into Project. So let me click on
Okay, and you will see that to export it
and also help us to automatically import it into
Premiere Pro as an image. So if I look here, I'm not seeing the image anywhere here. It is because this is my
Exercise files folder. Remember, if you
import anything new, it's going to be added
to your project panel. So you must be
conscious of the fact that this is just a folder. This is not your project panel. If you're looking for anything imported newly or created newly, always go to your project panel. All right? And when I go
back to my project panel, you can see that
image right here. So you can see that
this is not a video. This is an image, and I can use it for whatever
I want to use it for. If I also go to my
desktop or my laptop, okay, I'll see the
image right there. And the image quality totally depends on
your video quality. So if your video quality is low, your image quality
is also going to be low and vice versa. Okay? So I can use this to do whatever I want to do.
I'll just delete that. And I know that when I
come to Premiere Pro, it's going to tell me I
can't find the image again. I'll just cancel this and also delete this from
my Premiere Pro. Okay. So back to
our ExcesseFles, and that will open
up this again. So you can see what all
of these are used for. So before I leave
the source monitor, we still have some things here
that I need to talk about. Now, the time that we have here is your playhead position. That is your current time. So as I move this playhead, you can see that the time I
have here is also changing. Don't forget this is your hours. This is your minute.
This is your second, and this is your
frames per second. Alright? So to pronounce this, I would say that my
playhead is currently at 13 frames and four Sorry, I would say my
played is currently at 13 seconds and four frames. Okay? So do this here, my player is currently at
18 seconds and 21 frames. My played is currently at
4 seconds and 19 frames. So this is minutes
and this is hours. Okay? So that is what
we have for this time. And this time here shows you the total time of your video. So the total time
of this video is just 34 seconds and 14 frames. 34 seconds and 14 frames. Okay? So that is that for these two timings
that we have right here. And then this right here
is your Zoom level. Right now it set to fit. If I click that and I
change that to 10%, you can see that it has
zoomed out of my video. Okay? And if I
click on this drop down and I change it to 150%, you can see that it has
zoomed into my video, right? So you must take note of that. So if I want it to fit
back to my screen, I'll just click here and
change this back to fit. Okay? The next thing I
want to talk about here is this full here. Now, if you press play here. And for whatever
reason, you find out that your video is kind of, you know, joking or
it's kind of slow. That is because the
file size of the video you're trying to play
is really big, right? Or your system resources, talking about your
ram, your processor, and all cannot
accommodate that file, and that is why it
is kind of skipping. So in that scenario, you
might want to drop this from full to half or
cutter. All right? And even depending on your system resources and
how big the file size is, Premiere Pro might release
for you 18 and one 16th. All right. But, mind you, as I drop this to Cotter, it's also going to drop
the quality of my video. All right. So when I press play, you can see that the quality
is not really that clear. You can see that
when I press play, that the quality is
not really that clear. Ahead. Okay. All right. And that's
because I'm at COTA at this point. All right. So that doesn't mean that when you're ready
to export your video, that your video will be exported in this low quality. All right. By the time you're exporting, even though this is in Cotter, your video will automatically be exported as full resolution. Okay? So this is just for you to drop down the
quality so that you can preview your work
and edit faster. Alright? So that is that. And then the next thing I
want to talk about here. So let me change
this back to full. And then the next thing I
want to talk about here is my drag video only
and drag audio only. Now, if I go back to putting my mouse here and
I click and drag, you'll notice that
two things are being, you know, dropped
into my timeline. The one at the top is video. The one at the
bottom is the audio. And that's why when I
drop this and I play. Okay, show. My how
you doing, man? You can see that I can see the video and I can
hear the audio, okay? And that's because I am dropping
in both video and audio. Now, if I undo that and I
use this drag video only, and I click and drag on that
and I drop into my timeline. If I press play this time, you can see that there is
nothing like sound going on, but I can see my video. And that's because
I only have video. And you also notice
that we just have one, you know, layer coming in. I can do that again. And then if I do
drag audio only, you can see we only
have one layer also, and I can only drop it in this audio section and
not in this section. And once I drop that
and I press play now. Laptop. Okay. You can see now that
I can hear my audio, but I can't see my video, and that is how, you know, it works. So there are times
that when editing, all you need is just the video. You don't need the audio, right. In that case, you can
use drag video only. And there might be time
that you're editing, you like the audio
that came in the video and you want to use that
audio for your project also. You can actually
drag audio only, right, and just use
the audio alone. But if you want both
video and audio, you can just easily
drag from that place, and you get both your
video and audio. Good to see you. Alright. Great. So that is
that for the source monitor, and I'll see you guys in
the next video piece out.
7. The Timeline in Premiere Pro: What's up, everybody. Welcome to another video in this Adobe
Premiere Pro training. In this video, we're going to be talking about the timeline, how to arrange videos
as layers, how to, you know, put them together in the sequence
in which you want it, and how to create a
beautiful video out of it. Alright, guys, so let's get
straight into it right now, and I'll show you how
to do just that. Bill. Okay, so we're right here
in Adobe Premiere Pro, and let's focus on the
timeline right now. So right now we have two
videos in the timeline based on dragging from
here and dropping here. You know how we do that already. So but this is just one scenario with arranging your
video in the timeline. Okay. But before I talk
about arranging the video, let's talk about some of
the, you know, icons here. All right. This is
our video track one. This is our Video Track
two, Video Track three, and then we have our
Audio Track one, Audio Track two,
Audio Track three. Right now, our video is on Video Track one
and Audio Track one. All right. And that's why we
see that it's right here. And this second video is also on Video Track one and
Audio Track one. So we can actually drop
videos on Video Track two, Video track three, four, and so on and so forth. All right. So that's
what this means. And then this padlock icon
here is to lock your tracks. Okay? If for whatever reason, I want to lock this track, maybe I don't want to move it. You can see if I click now and
I move, things are moving. But if I log this track, you can see that I won't be
able to move this at all. I can also log the
audio track and I won't be able to move
anything here at all. So that's what your lock
is used for, right? So it's totally your preference. If you want to lock your
track, you can always do that. And to unlock it, I'll just
click here and click here, and that will
unlock both tracks. Okay? And then we have our
visibility right here. If I click here, I won't
be able to see my video, and if I click here, I'll be
able to see my video again. So if I click here, all
the videos on Video Track one would not be
visible again, right? And the same applies to
this mute that I have here. If I mute this track, all of the audio in this
track would not be, you know, audible
again, all right. So that is your visibility
and mute, okay? And then we have this
record icon here. For voiceover, right?
This is for voiceover. If I want to record
directly into Premiere Pro, I can actually do that. Okay? So let me quickly
do that recording with my laptop microphone. Okay. So to do that, I'm just
going to click right here. Okay. And when
you're doing this, if you're not using an earphone, like I'm doing right now, you might want to mute the audio or the speaker of your system so that
when you are recording, you don't get a hole back. Okay? So let me just put
my plate somewhere here. Click on this. It's
going to count three. Sorry, it's going to
count three, two, one, and that would start
recording my audio. Okay? So you can see, as I talk, the audiometer is
going up and down. And then when you're done,
you just stop it or you click on the record the voiceover
record once again, and that will stop
your recording. Okay? And when I play this back, you can see what we have. Stop recording my audio. Okay? So you can see, as
I talk the audio mix. Okay. So that's how you quickly record directly
into Premiere Pro. So you can connect
your system with a professional microphone so that I can get better quality, you know, and all of that. Okay? So that is that. And it will also add
this to your project. So if I go to my project panel, you can see that the audio
one wave is also right here. So I can use it
multiple times in my project for different
purples, okay? So that is that. Okay. Let me just delete it because I don't
need it again. It's going to say yes. That is going to tell me it's
currently in a sequence. Am I sure I want to delete it? I'll say yes, and that I'll
delete it from my project. Okay? So that's up to you
the voiceover record. Now, this voice over record, I think you would find it versions of Premiere Pro
from 2017 and above. Okay? So if you're using
something lower than 2017, you might not see this
voiceover record icon there. So just get a newer
version of Premiere Pro, and that would
solve the problem. Okay? So it's a new feature that came with a newer version. So that is that for the
things we have here. So now let's focus more
on the timeline itself. Now you will notice that when we're creating our sequence, Premiere Pro didn't asks what is the time
of our sequence? And that's because
in Premiere Pro, your time can just keep extending forever
and ever and ever. So right now, the total time of my project totally depends
on the last video I added. So right now you can
see that the total time is 54 seconds four frames. If I go to my
exercise files and I add another video,
okay, for example, you will see that it
has now changed from 54 seconds to 1 minute, 7 seconds, 18 frames. So the more I add videos to my timeline or
audio to my timeline, the longer my sequence
becomes, okay? So that's the way it works in Premiere Pro because Premiere
Pro is an editing software, and I believe you can
come here and edit, you know, videos of
3 hours, 5 hours, 10 hours, totally depends on you and what you're
trying to edit. Okay? So that is that. And you can see the way
I've been arranging my videos all this while, okay? This is like a
sequential arrangement. And what this simply
means is that as I move from one video to another
video to another video, that's the same way
I'm going to see it play in my program
monitor here. So by the time I get here, you will see that to switch from this video to this video. Intro. You may, may. And let me fast forward
that somewhere here, and you will see to switch from this to that other video also. So you can see, you know, how we've been arranging our
video and how it works now. Okay? So let me delete
this and delete this. Another way to arrange your
video in Premiere Pro is that I can actually you know, drag my video from here. So basically, it's not
always compulsory you put your video in the source monitor before you add it
to your timeline. I can basically drag
the video from here, okay, and those drop
in my timeline. So about this time, I don't
want to drop it this way. I want to drop it on top, okay? I want to drop it on top. Now, don't drop your
videos like this, okay? This doesn't really make
sense or this doesn't look like efficient because this
and this are the same result. Okay, so there's
no point dropping a video like this and say, Oh, I just want to put
it in video track two because this is
the second video. It doesn't make sense because
you're going to get you the same result of
after this video plays, the next video will play. Intro. You may. Okay, so instead of me
dropping it like this, I could have just dropped it immediately after
this video, right? So if you're planning on using Video Track two
or Audio Track two, it should be for
something like this. Alright? You should be so
for something like this, whereby you want to, you know, play the two
videos simultaneously. Now, if I play this
bat, see what we have. Come to another
photoshop tutorial, and in today's tutorial, it's going to show you you
can see that in this way, we can see one video, right, but we can
hear two audio. All right. So we are
seeing one video, and we are hearing two audios. Alright? So why is that? Is Because this
video in Video Track two has covered this
video in video track one. But since audio has
to do with listening, they don't really
disturb each other. And that's why we
can hear both audio, you know, even though we
can't see both videos. Okay? So it's as simple as that. Now, if I find myself in
this kind of scenario, another thing I could
do is I can undo this. And then this time when I
want to drag from here, I will just come to
drag video only and just drop the video
on Video Track two. And when I play this to
another Photoshop tutorial, and in today's tutorial, I'm going to show you
how can see one video, which is this video on top, but I can hear the audio of the video underneath it, right? So this is another
way of dropping it. So I'm just trying to show you different scenarios you might encounter trying to arrange your videos in the
timeline, right. So but something that would have really made more
sense with this is that Now that I've put this video at the top and I have a
video underneath it, I can come to this
video at the top, double click on it,
and that will give me this bounding box
around my video, and I can come to the edge. And when I put my
mouse in the edge, you can see where
my mouse turns to, okay, an arrow pointing
diagonally up and down. I can click and drag that to reduce the size of the
video on top, okay? And I can place this somewhere anywhere
around my you know, video, maybe put it
somewhere around here, okay? And this time when I play back, you'll see so but video me. You can see now that
I can see both video and I can hear only one audio, which makes more sense
than it was before. Hey show, and welcome to
another Photoshop tutorial, and in today's tutorial. So you can see what we
have right there, okay? So these are different scenarios where you want to arrange
videos in your premiere P, and you're thinking of
how to go about it. So that is simply that. Another thing I can do is I can even bring in more videos. I can double click this, put it drag video
only and drop again, and then double click this and reduce the size of my video. Okay, and maybe position that somewhere here
also. All right. So I'm just creating
something here. It doesn't really matter
whether it makes sense or not. So, oops, I'm still moving it. So let me just
reduce the size or more and just position
that also right here. And then you can see I
can see three videos now, but I can only hear one audio. Hey, but you can call me Kisho. And welcome to another
Photoshop tutorial. And in today's tutorial. So you can see that right there. So these are the
different scenarios you might encounter while
trying to arrange videos. It could even be an image
that I want to add here. You can come to any
of this image here. I can drag this,
drop it also now. You notice that when
we get to V three, there is no V four, right? There's actually this
empty space here. And to create V four
is pretty simple. All I need to do is to just
drag any video or image like I'm doing right now and just drop it in that empty area. And Premiere Pro
will automatically create V four or
Video four, okay? And the reason why I'm not
seeing it right in my, program monitor is because my playhead is not on
top of the image, right? So at this point, the image is not long enough
to this point. So you must always
take note of this. So don't drag stuff and say, Hey, I'm not seeing it. I don't know what happened,
blah, blah, blah, blah, blah. Just check your
playhead and say, Oh, okay, my playhead
is not on top of it. And when I move my
plate on top of the image, which is right here, you'll see that
the image will now reflect on my program
monitor, okay? So I don't know what's
going on. Oh, I think my system is acting up. Okay, so you can see is now
showing the image is really, really, really large, all
right, really, really large. To the extent that even
when I double click on it, I won't see the bounding box. So what I can do in this
case is that I can zoom out. I'll click on Fix and
change it to 10%. And then at 10%, I can begin to see
the bounding box, and then I can just reduce
the size of the image, right, so that I can see the entire
image and even reduce it further so that I can see
the video beneath it, right? And I can change this back
to fit and I can grab my image and also put it somewhere at the
corner right there. All right, so this image is
really, really large, right? It's taking toll on my
system resources already. Okay? And I'm running
a background app, which is also very large
with my premiere P, and, you know, that is what is
causing all of this. Okay? So if I press the
play button now, you see that everything
is now showing in my layer general show is what we have
right communication. So this is a video video. Not the shop to top. What we had at the top
right here is an image. Okay? So that is it, guys. That is how to arrange different videos and everything as layers in your premiere pro. Thank you for
watching this video, and I'll see you guys
in the next video
8. Premiere Pro Tools: What's up, everybody. Welcome to another video in this Adobe
Premiere Pro training. In this video, we're
going to be talking about the T bar and how to use the tools we have there to create awesomeness
in Premiere Pro. So let's get straight
into it right now. Whew. Okay, so we're back
right here in Premiere Pro, and it's time to talk
about the tools we have here and some of its usefulness. So let me just quickly come
back right here and just say, right click New
sequence from clip. And I will just create
a new sequence from that same video, okay? And this time without all of those other things I have in this previous
sequence, okay? So just know that we
have two versions of this sequence now, the one with all of the ones
I did in the previous video, and then this one is
just totally empty. What's up, everybody?
My name is Gabri. Alright. So the first tool I have here is called
the Selection tool, okay? The Selection tool. And the selection
tool is basically used for selecting stuff. So that's the tool we
have activated all this while while we were talking
about Premiere Pro. So I can click and
move this around. You can see that, okay. Another thing about the
selection tool is that it can also allow you to
trim in your timeline. So even after trimming
my video here, I can still, you know, trim it further
in my timeline if there is a need for that, okay? And how do I go about that? All I need to do is
to move my playhead somewhere close to the
edge of the video, and you see turn to this
red icon pointing backward. Meaning I can click and drag like this and trim
my video further. You can see I've
made it shorter. Okay? And I can also go to the edge at the
beginning of my video, and you can see that red
icon pointing forward, meaning I can click and drag and move that forward like this. And I would have successfully trimmed my video to
this small part. Okay? So if I take this
now and I press Play, you can see you can call
me it's not starting from the very beginning
and it's not going to end where it ended initially. This. Okay. And then we
have this black spot here. So when I press play,
you can see, we have a black spot for a while. But you okay. And when it gets
here, it started playing. So if I want to if I don't
want to this blank spot here, I can just click this drag to the beginning of my timeline, and then the very beginning
would not be blank again. I would just have my
video playing from there. But you can call me Kisho, and welcome to another Okay. So that is how to go about that, okay, in Premiere Pro. So that's a selection
too. It allows you to select stuff, trim stuff. Now, even though
I've trimmed this, I can also trim it back
to the very original. Okay you can see it's back
to the very original, even those part that
I've trimmed off here, they are now showing
here and everything. So that is your trimming option. So let me just undo it
back to what I trimmed here so that I get
the right video. Now the next thing I have here is my track select forward. Now, to use this
track select forward, I would need multiple
videos in my timeline. So I'll just, you
know, come here, maybe drag this video, drop this one here,
and drag another. Now you can see it
looks as if I don't have any space to drag
any video further. And that's because I am
zoomed in my timeline. Okay? So if I tap plus, I will continue zooming
into my timeline. Oops, sorry, I was stapping
that in the wrong place. So you can see this was a panel that was active when
I was tapping Plus. Alright, that's why I
was zooming into this. So make sure that this is a panel that is active
when you want to zoom in. So as I zoom in, you can see that it's even
zooming in further, and the second video is almost
looking like it's gone. And then if I continue that, you can see that
the video is even totally gone. And
when I press play. What's up, everybody?
My name is. You can see how this
is moving very fast because I'm totally
zoomed into my timeline. You can see this is
1 second, 15 frames. This is 1 second, 20 frames. I'm still in 1 second
up to this point. It is here I get to two second and I'm still in 2 seconds here. Also this is zoomed
all the way in. And if I tap minus, okay, you can see this is the
panel that was active while I was tapping minus. So it's not going to answer me. So make sure that you
click somewhere around here to make this panel active. And then when I tap minus, it will start zooming out. And you can see I can see
that video, I just added now. And I'll just keep tapping it until I see the
end of that video. So you can see that
I'm zoomed out now. I can see my first video here. I can see my second
video here, right? So I can come now, drag
in my third video. I can come again, drag
in another video, and you can see everything. So you can always
zoom in plus or zoom out minus in your timeline. Okay? Just make sure
your timeline is the active panel before you start tapping
your plus and minus, okay? So that is that. Now, my track select forward, what it does is that
it allows me to select my video
from here forward. Okay? It allows me to select
my video from here forward. So if I click on my track, select forward now, if I
click on this phase video, you select this phase video
and everything forward, you can see that, okay? So let me undo that this select select my
track select forward again. And this time, if I
begin from this video, it will ignore this
video behind it and select this particular
one and everything forward. So when I click, you can see
it selects this forward. So your track select forward is just a selection to
select your video. It doesn't do anything
special to your video. So it's just for selection. So after selecting my video, I can go back to
my selection I can move all of those selected
video together. All right. So the reason why you
might want to use your track select forward
is you want to select all your video and
maybe move all of them together or
delete all of them, or apply something to
all of them at once. Okay? So that is your
track select forward. We have another tool called
the Track select backward. For me to find that
I will need to click and hold on this
dropdown arrow here. But for those of you
that might be using an older version
of Premiere Pro, you'll find out that your
track select backward is actually just directly
underneath it here. So you won't see anything like this mini dropdown arrow
that we have here. Okay? I'll just
click and hold on that dropdown arrow and I'll
see Track select backward. Okay, I can click on that. And this time, this
Track Select Bacod will just do the opposite
of Track select forward. So if I come to this video here and I click on Track
Select Barcode with it, you can see that
that's the only video you select because there's actually no video backwards
of this particular one. So if I come to this very last one here and
I click this one, it will select this video
and everything backwards. So if I click, you can see the way it selects the
entire video from there. So Track select forward, select the video you select and everything
in front of that video. And Track select Bot,
when you click on it, it selects the video
you clicked on and everything behind that
video. All right. So that's how to use your
Track select Barcode. So basically, like I said, they are not doing
anything special. Like, they've not
added any effects to my video or anything here. It's just for
selecting my video. So I can go back to my
rackec my selection too, and I can move everything
together or maybe delete and I'll delete
everything together. So let me undo
that. Okay? And you can see my video is back. Alright? Great. So the next tool I have here is a
ripple edit tool, the Ripple Edit tool. Okay? Now, to explain
this ripple Edit tool, I would need to
arrange my video. So let me just delete
this video here, and I would need
to trim my video. So before you find yourself in a situation whereby you'll be
needing the ripple Edit to, your video must have
been trimmed, okay? So if your video is not trimmed, you won't be having any need
for your ripple Edit tool. So to be able to use
the Ripple Edit to, I'm just going to simply come
to this newscaster and trim this video come here and
trim the video, okay? And since this one is already trimmed, there is no problem. I'll just join it with you. So you can see that my
videos are trimmed. If your videos are not
trimmed, let me undo that. You'll be seeing something
like this white, you know, triangle at the video
and at the audio. And if you look at the end also, you will see that white
triangle right there, okay? So that's to let you know that
your video is not trimmed. So but when you trim your
video, so let me redo that. Once you trim your
video, you will see that those white triangles
are not showing again, and that tells you that your
video has been trimmed. So Once again, using
the ripple Edit tool is not compulsory in all of your project because
it is not all of your video that you will
need to trim every time. Alright? It is my duty here to teach you how
to use the tools, but it doesn't mean that you
must use them in your video. So don't go and say, I've not used the Ripple
Edit in this video. Mm, how will I use
the ipleEdit tool? You know, don't disturb yourself asking yourself those
kind of question. You only use the
particular tool that you need at every particular
time, alright? So let's talk about
the ripple Edit to. Now, before I even show you how to use the Ripple Edit tool, let me show you what
is how you can still do something that the
Ripple Edit to will do using your
selection tool. Okay? So I can come here
on my video here, I can click and trim this video and
when I trim this video, you can see there's
a space here. All right. In order for
me to avoid this space, I can click on this, drag it and join it back to
this right here. And that will join my
video to that one. Okay? And that's basically what the ripple Edit
tool does actually. So let me undo that and
grab my ripple Edi too. And what I did now, I will
just do my ripple Edi too. You can now use in
between your video. It has to be towards
the edge of your video. So I'll click drag and you can see that I'm
trimming my video here. But when I release my mouse, you can see that it leaves
no space right there. I automatically just joins
this video to that video. And that's exactly what I did initially with my selection too. So the ripple edit is
just like a faster tool to do what I did initially
with my selection tool, right? So that is how to use
the ripple Edit tool. Let me undo that and talk
about the rolling Edit tool. And for me to get
that, I will click and hold on the drop down
arrow I have right here, and I can see my rolling
Edit tool right here. Okay? So with my rolling
edit tool, I'll select that. But before I show
you how to use it, let me show you an example
with the Selection tool again. So with my selection tool, let's assume I want to trim this video like
this again, right? Now, instead of me
carrying this video and coming to join in with this to fill
up this blank space, all I would just simply
do is to also click on this video and extend it
or trim it to this point. Remember, we've trimmed
this video initially. So when I'm clicking like
this and I'm extending it, I'm only bringing back parts of the video that
I trimmed off initially. All right. And when I do that, you can see that this
one is now shorter and this one is longer, right? And that gives me
that, you know, cover of my blank
space here, okay? Now, what I just did
with my selection tool is actually what the rolling
Edit to does for you. So if I undo that, undo that, ok and I come to my rolling Edit to and I put it in between here. As I click and drag to the left to reduce
the first video, you can see that the second
video is getting longer. Alright? So when I
release my mouse here, you can see that this is now shorter and this is now longer. Alright. So rolling Edit two
is a faster way of doing what I did with my
selection to, okay? And that is that. Okay, guys, I'm going to
be stopping right here, and in the next video, we're going to be talking
about how to create slow motion and fast motion. See you in the next
video. Piece out.
9. How to Create Slow/Fast Motion in Premiere Pro: What's up, everybody,
and welcome to another video in this Adobe
Premiere Pro training. In this video, we're
going to be talking about how to create
slow motion and fast motion inside of Adobe Premiere Pro using
the Rate stretch too. So let's get straight
into it right now, and I'll show you
how to do just that. P. Okay, so we're right
here in Adobe Premiere Pro, and we stopped at the
Rolling Edit two. So right now, we're
going to talk about the Red stretch two,
the red stretch two. And before I talk
about that, let me just delete this
video right here. Or let me just undo that back to what it was
before and delete. And I just want to focus on I'm so tapping
plus to zoom in. So I just want to focus
on my video right here. What's up, everybody?
My name is abra. Alright. And with
my gtretch two, I can use that to create a slow motion or fast
motion on my video. So to use the agrech two, you can use it like somewhere
in between your video here. You have to use it at the
edge of your video, right? So if you put it
here, you can see that red sign telling us that we cannot use it
at that point, okay? So we'll just come
to the edge click. And when I drag
this to the right, what I'm actually doing
is stretching the video. All right. And when
I stretch something, I make it longer, and that would eventually
make the video slower. So if I press play now show me what you
can call can show. Can see how we easily create a slow motion in Premiere
Pro. I can undo that. Okay? And this time, if I click and drag to the left, I'm actually
compressing the video, and that would make
the video faster. So if I put my play then
I press Play. Prefer now. All right, so you can see how the video now plays super fast. So that's how to create
a simple slow motion in fast motion in
Adobe Premiere Pro. If I don't want it
to affect my audio, I would have just dragged
in video only, right, and then drag and
adjust slow motion of fast motion and to just be
applied to my video, okay? And so it totally
depends on how you want your slow motion of fast
motion in Premiere Pro. Piece out.
10. The Razor and Pen Tool in Premiere Pro: Hey, guys, welcome back. And in this video, we're going to be talking about the Razor two and the pin tool
in Premiere Pro. So let's get straight
into it right now. So we're back right
here in Premiere Pro, and this time, let's talk
about the Razor two, okay? Now, with the Razor two, the razor two allows me to cut my video into
any part, right? So this is one of my favorite
tool in Premiere Pro. If I put my sort here right
now and I just click, you can see that it just immediately splits
that video into two. I can click here, and then
it splits it there again. I can click here, and then it splits it again and
again and again. If I go back to my
selection to now, you can see that these videos are now separate
from each other. Okay? And one cool thing I
can actually use this to do is that if I grab my
razor two and I cut here, okay, I can actually use that to go back to
my stretch two. And this first one here, I can make this part of
my video first, okay? And then this part here, I can make it slow. So that when I play
my video back, it will go from fast motion
to slow motion, right? So let me press play. A how to change So you can see how
that went from fast motion and go
to slow motion. So when you use risotto to
cut your video in any part, you are indirectly, you know, separating that video from
the rest of the video. Okay? A another
thing I can actually do is that I can you know, quickly go to my effect. We're going to talk
about effect later on. Let me search for Tint, and then I'll just drag that, drop it on my video
on this part. It means that you can see that when I come to
this part of my video, it is black and white, and in this part of my
video is colored. Why is it not
affecting this part? It's because I've used my razor to cut this
video into two. So Premiere Pro
is seeing this as an independent video and this as another
independent video. So but we know that these two videos are
actually the same video. So when I press play
here, tutorial. And in today's tutorial, I'm going to show you how
to change the culture. So you can see how you went from color to black and white. And in today's tutorial, I'm going to show you Alright. So that's why the
razor tool is one of my favorite tool in Premiere Pro because I can just
use it to cut, cut, cut, cut, cut, cut, cut, and apply different effect to different parts of my video. So let's go straight
back to our, you know, project panel, right, and, you know, talk about
all of that right now. So another thing I want
to talk about now is the pin tool, the Pen tool. Alright, in order for
me to use the Pin tool, I have to make my video track and audio tracon bigger than
what it is now. And to do that, I will
just put my mouse in between video track
and Video Track two. You can see this
line right here. I'll just put my mouse there, and my mouse will change to this arrow pointing up and down, and I can click and drag
that up just a little bit, and you can see,
I'm beginning to see preview of my video here. Then I'll come to Audio Track
one and Audio Track two, put my mouse in between that, click and drag down, and then you can see that I'm seeing more of my audio wave, and I can zoom in some more
so I can see very well. Now, with my pen to, I can set key frames on this line right here
for my audio. Okay? And I can also do
that for my video. So but before then,
I can't seem to see the line the opacity
line for my video. And for me to see that
I can come to this et, right click under EX, and I'll see opacity, and then I'll see opacity here. So it looks as if it's selected, but I'll click on it again, and that will now bring
up my opacity line. And then this is my volume
or audio level line. Now, with my selection too, what I can simply do with my opacity line is I can
reduce the opacity here, and you can see that
the opacity of my video is dropping already
and dropping. When I take it all
the way to zero, I won't see my video again. So that is my opacity line. Then my volume line,
let me play this. What's up, everybody? My
name is Gabriel Show. So if I reduce that halfway, you can see that your
audio level is now low. So if you're looking to
reduce the volume of your audio or increase
the volume of your audio, you can actually do that
from this volume line, right, using your selection too. So if I take this all way up, it becomes very loud. And welcome to another pods. Okay. So that's how it
works in Premiere Pro. So by default, it's
always in zero. Okay, so I'll just change
that back to zero, and then this is always in 100. So but now with the pin two, I can actually set key frames on this line with my pen two. Now, what are key frames? Keyframes things in Premiere
Pro that allows me to animate my video or to cause certain changes to my video at certain
points in time. So what do I mean by that? If I come right here and I click on this
line with my Pinto, I will see a keyframe upe. You can see this blue
line right here. This blue thing that look
like a diamond right here. Okay? And I can come
to this point also and click and I'll see another blue diamond
appear right there. Now, what I can do is I
can actually create like a fade in effect on
my audio with this, you know, two key
frames I have here. Now, if I go back to this
first one here and I click and drag that blue diamond
stuff and I drag it down. Can you see the way that
this one stays where it was? And then as I drag this down, only this part is
being dragged down. And then you can see this
line going up right here, okay, based on
these two keyframe. Now, what that means is
that when I play from here, I will see that my audio will
go from low and go high. So giving it that
fade in effect. So if I press play now,
What's up everybody. My name is Gabriel Show. So you can see how that
went from low to high. Everybody, my name
is Gabriel Showa. Okay. And that's
simply what I can use my pen to do on my volume line. I can also replicate
the same thing on my opacity line to create
a fading for my video. So if I click this, you know, here for my opacity line
to set a keyframe there, I can also set a keyframe there, and then I can come to
this one and drag this down and you will
see that my opacity will also go from low opacity to a high opacity and that will
give me a fading effect. Let's play that and see
how that looks like. All right, so you can
see the way the video came in gradually, okay? So the same thing
was happening with the volume was coming
higher gradually, okay? Everybody. My name is Gable. So you can use your pen
tool to quickly do a fade in or fade out on your opacity and volume
line in Premiere Pro. Alright? If you don't
want to keyframe again, you can just select it and press delete or select
and press Delete. And that will just
remove the keyframe. Let me undo that to
just bring that back. Okay? Thank you so much
for watching this video, and that is how you use your
pen tool and your razor tool in Premiere Pro to
create amazing stuff. Alright, see you guys in
the next video. Piece out.
11. The Effect Control in Premiere Pro: What's up guys. Welcome to another video in this Adobe
Premiere Pro training. In this video, we're
going to be talking about the effect control and how to use all of the elements that we
have right there. So let's get straight
into it right now, and I'll show you how to do just there. You
know what I mean? Ha. Okay, so we're back where we left
off in Premiere Pro, and I just want to change my two back to the selection too. You can also come
here, click and drag this down again to
kind of minimize it back to the normal size
it was before when you're done with your opacity
line and volume line. So let's talk about the
effect controls now. Let's talk about the
effect controls now. So let me undo all I've done
in the previous video, okay? Just undo my cutting
and everything here. All right, so I'm back
to my normal video. What's up, everybody. My
name is Gabriel Shoal. Okay. Now I can go to
my effect controls. So if I come to my
source monitor here, I can see that there's
another tab here called the Effect Controls. Okay? The Effect Controls. If I click on that tab, you can see all of these plenty things
that I'm being shown. Okay, so let me minimize them. Let me click here
to minimize motion. Click here to minimize opacity, click care to minimize
volume. All right. So by default, these six things should be what you are
going to see right here. Okay? The first is motion. The second is opacity. The third is time remapping, and these three are under video. And then under audio, we have these three also volume, channel volume, and
Panner. All right. Now, if what you have selected in your
timeline is just an audio. All right, you only see these
three options right here. But if what you have selected in your timeline is a video, then you only see these
three right here. But if yours is
the same as mine, whereby we have a video
and audio selected, then you see the six
of them right here. So let me quickly show you
what I'm talking about. So apart from the fact
that we've brought in our video and audio
into our timeline, we can actually still separate
them inside the timeline. So even though we
didn't use drag video only or drag audio only, I can still separate this
my video from my audio because you will
notice that every single time I click any of them, both of them get selected. So if I click this, both
of them get selected. If I click this, both
of them get selected. So I can actually unlink them. How do I go about that? I can select right click and then I can come here
and choose on Link. And when I do that, anytime
I select the video, only the video gets selected. Anytime I select the audio, only the audio gets selected. Okay? And if your
Premiere Pro has been behaving like this
from the very beginning, then it means that this guy
right here is not on on you. So make sure that this is
on so that by default, when you drag a video
into Premiere Pro, they both stay linked
together, all right? Then if you want to link them, you can just simply right
click and choose on Link. Okay. So now you can see that
when I select the video, I'm only seeing these
three properties here, when I select the audio, I'm only seeing these
three properties for audio right here. So that's why I was trying to let you know the other time. And if I don't have
anything selected, when you come to the
effect controls, you're not going to
see anything. Okay? So for me to link this back, I'll just select both of them. I'll hold down Shift, select
the audio to right click, and then I'll come back
here and choose Link. And I'll link both my video
and audio back together. Okay? So when I
click on any part, both of them get selected. All right, so let's talk
about the effect control. So what's motion all about? What is motion all about? So let's click the drop down to see what we have on that motion. So when I click the
drop down here, you can see we have position, scale rotation, anchor
point, anti flicker filter. Now, those of you that have done the after effect training, this won't be new to you. You already know what
they mean, right? But for those of us who don't, this position is actually
what we can use to change the position of our
video in our project. Okay? And you can see that this position we have
two values there. We have this 960 and
we have this 540. The 960 is our X axis, and the 540 is our Y axis. So if you remember
when we were being taught graph in school, Okay. And they draw a, you
know, cross like this. This is our Y axis, right? And this is our X
axis. All right. So meaning, if I come here
and I adjust my X axis, I'll be moving my videos
position left and right. And then if I adjust the Y axis, I'll be moving my video
position up and down. All right. So that's
what it simply means. And to test that, I'm going to put my mouse
on this X, which is 960, and you can see showing me this sign of an arrow
pointing left and right, so I can click drag on that to the right and you can see my video is
moving to the right, drag to the left and you can see the video is
moving to the left. I can undo that and I'll
bring it back to the middle. If I put it on Y and
I click and drag, you can see if I take it to the right, the
video goes down. If I take it to the
left, the video goes up. So position here is used to change the position
of your video. Scale. Allows me to make my video either
bigger or smaller. So if I click here,
I can make the video bigger, if I take
it to the right. And when I take it below 100
by dragging it to the left, I make my video smaller. Okay? So that is your
scale. Let me undo that. Okay? And then next
we have rotation, which allows us to
rotate our video. If I click and drag, you can see that my
video is being rotated. And when I get to 360, we're going to see something
like one X up here. Okay, can you see that one X. That one X means one
time. All right. So if I go on that 360, I'm going to see that
one X return to two, which means two times or twice. And that simply means that my rotation is going to
occur twice, 360 degree. Okay? But if I don't want
it to rotate 360 degree, I can just rotate maybe 45 90 and just stop
where I want to stop. So if we take to the
left that's minus, we take to the right
that's plus, okay? That is your rotation too. Now, this ankle point
and antlifreker, I guess going to leave it and maybe talk about it in
the advanced class, right, because you don't
really need it for now. Okay. So the next
thing I want to talk about now is opacity, okay? Opacity. So I can close this motion and you can see we have opacity
standing on its own. Open that up and
we can see that we have our opacity
right here, okay? Now, the same opacity
we're adjusting at the bottom here is the same opacity that
we have right here. So if I click and drag
this to the left, I'll be reducing my opacity. When it gets to zero, I would not even see
anything at all. So that is the same opacity that we were doing
right here, okay? And under this same opacity, we have some extra
buttons there. We have this, you know, Ellipse Max, rectangular max, and we have this pen
tool right here. Now, if I click on this Ellipse
Max and I click on that, it automatically
creates a max for my video in the
form of a circle. Now, what are MAX? Max is basically telling
Premiere Pro that I want my video to be restricted
to this shape. All right? So when I drew that
circular mask, you can see that my
video is now restricted to this circular shape, and I can just come
to the edges here to adjust this circle to
fit into my video. So I can adjust it like this. I can grab this, take it
to the right, you know, just to kind of show
my face very well, and you can see what I now have. So the remaining
parts of this video, because this circle is
not covering those parts, we cannot see them. So it's only this
part which I drew the circle that will be
visible to people to see. All right? And we
have this thing. When you draw a max, you will
see max one will appear. And under that Mx one,
you have max feather. And then by default,
the max feather is ten. If I increase it above ten, instead of now, let me play this so you see
what it looks like. But you can call me K. So instead of having that
sharp edge around my circle, I can increase my max feather, and that will kind of
smoothen or feather out the edges of
that circle, okay? So that when I press
play this time, You can call me Kisho and watch. You can see how soft the
edges around that circle is and even making
this to look like maybe a keyhole or something. Come to another
photoshop tutorial, and in today's tutorial. Okay, so you can see that
nice effect right there. I can even go all the way in with my feather
just to, you know, give it that subtle look show you how to change the
color of Alright, something like a vignette
around my video. So you could do circle. You could do rectangle. I could do rectangle. You can see this gives me a rectangle. I can undo that or grab
my pen to and draw my own shape the way I want
it, and then join this. Okay? And when I join that, you can see what I have right now that my video
is only showing through this particular shape that I have right here, okay? And I can also feather it depending on what I
want to this Okay? So that is that. If you don't want any
max again in your video, you can press Odo a
couple of times or just select the Max one and
just press the delete button, and that will get rid of
the max from your video. Okay? And then the next
one I have here is blend mode, blend mode. Okay? So this blend mode
is basically you know, if you've done the Photoshop or the after effect training, you already understand what
blend mode is all about. If I open my exercise
files, okay, you can see all the
different things that we have right here. I'm trying to find you know, let me just drag something, maybe an image or something, drop it on my video and just extend it to
show across my video. All right. Now, I want to
reduce the size of this image. It's too big, so I can
select it, go to my motion, go to scale, and just
scale that down, right to fit my video. And you can see
what we have now. So what is blend mode? If I go to the blend mode of this image and come right now, you can see that by
default is a normal. Okay. But if I click on this normal here and I
change it to darken, you can see the way it blended on my video which is
underneath it, okay? I can choose lighting, and you can see how that blend. I can choose overlay, and you can see how that will mix with my video and stuff. Alright. So this particular
image I'm using as an example is not really
making sense at this point. So let me delete it.
Okay? Let me bring in something that would
really make sense to you. So I'll go to file,
I'll go to import. Okay, and just
quickly go to where I have that inside
my exercise file. And let's bring in something
like this lens flare. Okay? Click on Import, and that would import
it into Premiere Pro. If I drag this and I drop
it on Video two, okay? I press play brochure. You can see that it's covering my video with a
black background. But this is exactly what I need. So what do I do? I select this. I go to my motion. Oh sorry, I go to my opacity. Okay, and I go to blind mode. You can see that the blaind
mood right now is in normal. All right. Now everything from this dark in to
this darker color. When I use this option, this removes everything
white or light. And then this option
that I have right here, it gets rid of everything, you know, black or dark. And then the options here, this one gets rid of anything
gray in color, right? So these get rides of white, these get rid of black, and this gets rid of gray. So you can see that
what I have here is a black color, okay? It's a black color. So I'm
going to use options here. And the most popular
here is screen. All right, the most
popular here is multiply, and the most popular
here is overlay. So I want to use this
one that removes Black. Click on it, and you can see
that it removes the black, and I can only see
this, you know, lens flare showing on my, my name is Gabriel Shoale. Okay. So that is actually
how you use your blend mode. And not without example, I was using the image. You just try out
different stuff, okay? So that is that. So let me just delete this and
remove that from my image. So that's what plane
mode is all about, okay? So I'll close plane mode, and let's go to the next one, which is time remapping. Okay? Now, I'm not going
to talk about time remapping now because what time remapping allows me
to do is basically the same thing we can do with
our reach stretch tool and our result tool to
create slow motion and fast motion within
your video, right? And it's kind of
more complicated right now for a beginner. So I'm not going
to talk about it. We'll probably talk about it in the Advanced premiere pro class. Okay? So let's go
straight to audio. And the first thing I have
on that audio is volume. Okay? Volume. Now, if
I open up this volume, this level that we have here was that same
level that we were adjusting at the bottom here when we were trying
to use our pen tool. Okay? So if I press play now, you can call me Kisho. You can hear the
level of our audio. I can increase it 0-6 or whatever amount I can increase
it to and press play, and you will see that
it's now louder. You can call me Kisho. And then I can reduce that from zero to minus or something, and then you notice
that it is now lower. You can call me Kisho. Okay. And you can see
that this blue icon here we automatically
turned on, okay? And it was setting key
frames for me automatically. Now, if all you want
to do is to reduce the volume of your
audio generally, right? Without making one part
loud and one part blow, make sure you turn off this
keyframe by clicking on it. Alright, it's going to say, Oh, do you want to remove
your keyframe? Say, right. And that will
remove my keyframe. And when I play back now, you will see that the volume
is low generally across. But Okay. And then when I
increase the volume, the volume is also loud across. Tutorial. And in
today's tutorial. Okay. So that is
how it works, okay? So that is how to
use your level. You can also turn
off this one so that your keyframes are not, you know, active all together. All right? So that is that. Then we have the channel volume. You can see the keyframes are also highlighted by default, so I'll just turn everything
off so that everything I do applies to my
video generally. But let me change this back to zero so I can get
my normal volume. And what this channel volume simply means is that in audio, audio usually have two sides. We have the left and the right. So if I play this video, I'm going to show you
how to change the color. You can see here that we
have two things moving, one on the left,
one on the right. This two all right. So that means that my audio
is stereo. All right? My audio is stereo, meaning I have my left and
right channel. It's no mono. Okay? Now, if for
whatever reason I want to increase the volume or reduce the volume
of my left channel, I can do that in Premiere Pro. So if I reduce the volume of my left channel a little
bit and I press play, you'll notice that the
left channel will be, you know, smaller than
the right channel. And in today's tutorial, I can see what we
have right there. And then if I do the same
thing to my right channel, undo that and then reduce my right channel
and I press play. In today's tutorial, I'm
going to show you how. You can see that my
right channel is now lower than my left channel. So that's basically how
to use a channel volume. You can adjust your volume
based on left and right basis. Okay. And lastly, is
a Panner. All right. The stopwatch is also turned on, so I'll turn it off so that what I do applies
to everything. Now with my panner
basically, with my panel, I can take all my
audio to either the left or take all
my audio to the right. So if I click right now
and take it to negative, it means I'm trying to take
all my video to the left. So when I press play now, change the color of this. You can see that all my
audio is on the left side. And if I undo that and I take it all the
way to the right, you can see, Oh, sorry, turn off my key frame. Take it all the way to the
right, and I press Play. Very simple. You can see that all of my
audio is now on the right. So if I want it balanced, I'll always put it at zero. Okay? So that is it for
your effect control. Before I leave, let me just quickly dive into this
audio clip mixer. All right. It's something that
you'll be needing to know. If I press play Home K show, and welcome to can see this
audiometer going up and down, and this is called Audio One. Alright? Audio two
and Audio three has nothing moving there
because in my timeline, I have nothing on Audio Track
two and Audio Track three. Okay? So when I press Play,
only Audio one moves. Another Photoshop tutorial and into you feel like
reducing your volume from your effect control is kind
of tedious or reducing your volume from this
point is kind of tedious or adjusting
your volume from there. You can basically go to
your audio clip mixer and, you know, do your audio
mixing right there. So I can come here
and as I play this. I can reduce the volume
using this slide. I'm going to show
you how to change the color of this to this. I can also increase it. Intro. Alright, so you can see.
What's up, everybody. My vom is now
really, really loud. Am Gabriel Shoe but
you can call me Kho. And welcome to another
Photoshop Tutorial. Okay. So that's how
you can increase or decrease your volume under
your audio clip mixer. Alright, it's as simple as that. Thank you so much for
joining me in this video, and I'll see you guys
in the next video. Pooh.
12. How to use Keyframes in Premiere Pro: What's up guys. Welcome to another video in this Adobe
Premiere Pro training. And in this video, we're going to be talking
about key frames. Alright, so let's get
straight into it right now. But. Okay, so we're right here in Adobe
Premiere Pro, right? And let's just quickly
grab our video here again. You can call me Kisho. And welcome to Alright, so now let's talk
about key frames. So when I was talking
about the effect controls in the previous video, we spoke about motion,
opacity, volume, channel volume, and
panna and all of that. So let me open up
the motion again. Alright. So, but something we, left out in the other video, and that was key frames. Okay? So if you look
at these icons here, they look like a
stopwatch, right? And this stopwatch
is what you use to set key frames
in Premiere Pro. All right. So basically,
what are key frames? Keyframes are just
elements that allows you to animate your video inside
of Premiere Pro, right? So if you've gone through
the after effect training, you understand better
what key frames are because that's
actually where you do, you know, more of animating
than Premiere Pro. All right if you still want to animate your layers,
your, you know, items in Premiere Pro, you can use the stopwatch
available to you right here. So, let's just quickly
animate something. And let's take my video, my play head to the
very beginning. Let's assume at the
very beginning. I want my position of my
video to fly in, alright? Meaning I want the
video to just come in from outside of the
screen, inside the screen. So if I adjust my position now, you can see that I can
take my, you know, video all the way out and
I can want it to just come in like this into the
screen. Let me just undo that. All right. So that's
basically what I want to do. And I can do that with the help of my keyframe
because if I just adjust my position now and I play my video, What's
up, everybody? My name is You can
see nothing happens. It just stays at that position till the end of the video. So
let me undo that. What I can do is
to set key frame. So since I want it to happen
at the very beginning, I'll take my player to
the very beginning. Okay. Click on the Stopwatch
for position right here. Okay. And when I do that, a tiny keyframe
appear right here. Okay. So there's a mini
timeline here, right? And the essence
for this timeline here is because of key frames. So if you want to
see this very well, we can give this
some more space. I can just reduce that
come right here and just expand this right so that we can see
what we're working on. And I can also tap the
plus butts in here. And that will also expand
inside of this place. Alright, you can see the ways expanding the timeline
here and here. That's what we have right there. What I can now do is after setting this first
keyframe using this stopwatch, you can see there's a blue
keyframe appearing right here. Alright. So let me
just, you know what? Let me just undo that
and, you know, set it. You can see that as I
move this playhead here. The play EDA is also moving, and I can see my
video being updated here to the particular
time where my play ED. So this and this are
basically the same thing, but you're going to be focusing here when setting keyframes. So let me just put
this somewhere not at the very
beginning of my video, so you can see the
keyframe very well, and then click on my stopwatch. You can see the keyframe I'm
talking about now clearly. Looks like a diamond
shape, right? And that's a keyframe. Now, because I want
my video to come from outside the screen
into the screen, at this very keyframe, my video should be outside. So I'll come to my position, click and drag the X axis to the left so that that will take my video to the left side. You can see the way my video is going to the left as I do that. Okay? Let me just
minimize this a little bit so you can see some
part of the video more. So what I've done now
is that I've told Premiere Pro that at this
point of this keyframe, my video should
be outside, okay? Then I can, you know, press play. What's up? All right? So that part
where I said, What's up? I want to stop you right
there and then say, Hey, my video should come in
at this point. All right. So you can see for this second keyframe that
is showing here, I actually did not
click on this stopwatch to make this show
here. And why is that? That is because once you
set the keyframe for once you click on the stopwatch to set the first keyframe, your stopwatch remains
active. All right. So as long as my stop
patch remains active, as I move my player
to any point in time and I adjust the
value of my position, a keyframe will automatically
start appearing. So let me undo that
and show you again. So you can see for
this second keyframe, all I need to do is to adjust
the value of my position. And in this case,
we want to bring the video back to the screen. So I'll click and the
mite I start dragging, you can see a keyframe
appeared right there. Okay? So I'll click that
drag, drag and drag. So I think the value that
was here before was 940. So let me just type 940 there. And you can see that that
brings my video back to my, you know, screen, okay? And then there's
another keyframe here. So this keyframe tells Premiere Pro that my
video is outside. And this keyframe right here tells Premiere Pro that
my video is inside. So if I take this
to the beginning and I press play again. What's up, everybody, my name? You can see the way the video flew in from the left
into the screen, right? So that is how keyframes
work in Premiere Pro, right? So let's play that
again so you can see what I just did. Press play. What's up, everybody?
My name is. What's up, everybody, man. Alright, so very, very simple. Okay? Now, I can also go to the end and do the opposite
of what I did here. So I'll take my play head there. Remember, I've tapped the
plus to zoom in here, so I need to use my scrollbar
to move left and right. So I can go to the end,
click somewhere here. You can see that my play head also moved somewhere to the end. So this part where
I'm going out, I can just Intro. So this part where I said intro So just before I say intro, I want it to go out from there. So I'll just come to my
position again, alright. Now, I want to set a keyframe here to tell Premiere Pro that this video should remain
here at this point, okay? And our stopwatch is already on. So what I can simply do is you can see this box right here. Alright. You can see
add or remove keyframe. I can actually click on it
to add a new keyframe here. And this keyframe would just automatically use the current, you know, values of
my position here, which is exactly what I want, meaning that at this point, I want the video to be inside, then I can go to the end, okay? And what come to my position
and take the video outside. Okay? And I'll
take my video out. So what do this
keyframe mean again? This one says that premiere Pro, let my video be inside. And then this one
says Premiere Pro, let my video be outside. So when I play this in Intro. You can see everybody. So at the beginning, so
let me just tap minus to kind of zoom out
so we can see all our keyframe right you can see, at the beginning, this
is out, this is in. And then this is in
and this is out. So that's how to set keyframe. So come in and then go out. It's as simple as that. All right. So that is
how to set keyframe. Let's try out another
example with rotation. So let's assume maybe somewhere in the
middle of my video, I want to rotate my video. All right, I want
my video to rotate. Or let's say I want it to scale. Let's do scale. So maybe somewhere after my
video comes in. Okay. All right. So maybe this part what I said. Welcome to welcome. I just want you to
scale up and then scale down and then come
back to where it was before. So I can click on my
skill stopwatch here, and you can see that it sets the first keyframe
right here, right. And at this first keyframe, I want my skill to remain 100%, meaning I want to see my
video the way it is, right. Then I can move
forward a little bit. Welcome. That welcome to right.
I'll pose it right there. Okay. So basically you want to determine where you want all of these things
to happen, right? You want to determine what
type of animation you want, whether it's position, rotation, scale, whatever it is, okay? And that's the way it works. So I've set this
face scale here, which is normal 100%, meaning my video
should look like this. Then I move forward a little
bit that welcome too. And at that welcome to part, I want to increase my scale up. So I want it to kind of
zoom into my face, okay? I can see that. And what
do you notice here? You notice that
another key frame was automatically set at
this point, okay? And I will now move
forward again, t star play to another. So to another, I
want to scale down, so I'll just grab my scale
and scale it below 100. Okay. So I'm not even
checking the values here. I'm just looking here,
while scaling down to see if I like
what I have here. Okay? I can see another key
frame has been set there. Then I can move forward again,
let just start playing. 40 show. Photoshop, and I'll change
this back to 100, okay? And I will bring my video back to the normal size.
So what do I have here? This is 100 meaning normal size. This is above 100,
meaning scale up. This is below 100, meaning scale down, and
this is back to 100. All right? I want to play that that's exactly what
we're going to get. Taisho. And welcome to
another Photoshop Tutorial. All right. So you can
see how that worked. It scaled up, scaled down, and came back to normal. And welcome to another
Photoshop tutorial. All right. And you noticed that the animation was kind
of slow in my own eyes, okay, personally. It's
kind of slow to me. I would have wanted it to
be faster than that, okay? And what that means
is that the distance between two keyframes
determines the, you know, speed
of the animation. Okay, I'll repeat that again. The distance between
two keyframes determines the speed of
the animation, okay? So if I want this animation
to even be slower, I can grab these keyframes and just separate them further.
And what would I notice? Notice that when
I play this now, welcome to another
Photoshop tutorial. And in today's tutorial, I'm going to show you how
to change the color off. You can see that it
was even really, really slower, but I
really want it to be fast. I'll bring them very
close to each other, very close to each other and
very close to each other. Alright, so now that when I press Play, it
happens really fast. Hey show, and
welcome to another. Alright, so I see
every one faster, so I'll just select. So you can just click
on any queue frame to select the particular
queue frame you want. Okay? Drag that closer. So instead of me
struggling this way, I can actually just put
my playhead somewhere there and tap plus
to zoom in more. And you can see that I
don't have to struggle now. I can just easily drag
any keyframe and, you know, easily move
them close to each other. So when I press play now, and welcome to.
Wow. I like that. So welcome to. Just scales
up scales down. Okay? Call me Kshow and
welcome to another. Alright, so you can see
that effect right there. Call me K show. And
welcome to another. Okay, so pretty cool. So this is how you work with
keyframes in Premiere Pro. Alright, so let me just do one more example with rotation, and then that'll be
it for key frames. So let's come to rotation. So I want to set
rotation somewhere here. Show you how to change it. Nicola. I'm going to show
you today's tutorial. Alright, so today's tutorial, I'll just come right here,
click on my rotation. Okay. And a keyframe is there. And this keyframe information
says my rotation is zero, which is exactly what I
wanted at the beginning. I want my video to
look normal like this. Then press play. I'm going to show you how to I'm going to show you how to. Then I'll just
pause right there, and I can rotate my
video 360 degree. Alright? And that will
just give me one X. Okay? And that will rotate
my video 360 degree, and I have one X right there. So that's one time.
So let's play this back and see how fast or
slow our animation is. So well, I'm going
to show you how to change the color of this Okay, so you can see what
we have there. So if I wanted it faster, I can bring it
closer and tutorial, I'm going to show
you how to change. Okay. You can see how we
just created that. So this is how you work with
keyframes in Premiere Pro. And another thing you can
do with keyframes is that you could select multiple
keyframes at a time, move them all around together, or even delete if
you want to delete. So let me just undo that. Okay? And you can also
select them right click on your keyframe and you can choose the type
of keyframe you want. So Easy In simply means that towards the end
of your key frame. So you should always add easy. So what I actually meant to say here is that
you should add easy in to the end of your animation and ease out to the
beginning of your animation. And that will kind of smoothing your animation show you how to. Okay. You can see the difference
between what we have now and what was there before. I'm going to show
you how to. Okay. So you can see that
it kind of starts, you know, slow, becomes first, and then ends slow. So that's what it does. Okay? I can do that to my keyframes here
too for my position. The ending keyframe, go
to temporal interpolation and then choose ease in so I don't know why
Premiere Pro kind of, you know, made it. The last one is in, and the last one is out. So just have it at the back of your mind and
that's the way it works. So this is not in. This is
out. So the first one is out. The second one is
in. So when I press, see the way it came in
smoother than it was. What's up everybody abra So
without it, let me undo that. You see how What's
up everybody in. But with my easy Is
it and ease out. I can see smoother. So I'll just do the same
thing to this right here. This first one will be Ease out, and then the last one or the second one will
be ease in, okay? Then Intro. Alright, so that is how to work with key frames in
Adobe Premiere Pro. Alright. Thank you for
watching this video, and I'll see you guys
in the next video.
13. How to Add Effects in Premiere Pro: What's up, guys, welcome
to another video in this Adobe PremieP training. In this video, we're going to
be talking about how to add different effects to your
video inside of Premiere Pro. So let's get started right now, and I'll show you
how to do just that. Okay, so we're back right
here in Adobe Premiere Pro, and you can see our animation and
everything is still there. Everybody. My name
is Gabriel Shoale. Okay. Alright, so we're
just going to come here. And let me just right click
on this Kasha three again, new sequence from clip to create another Kashaw three
with a different video. So what I want to
do now is I don't want all of these my keyframes, rotation and everything
in this new video. So I just want it plain. What's up, everybody.
My name is Kip. All right. So with this, let's talk about the effect. How do I add effect to my
video in Adobe Premiere Pro. Okay? To simply do that, if I go to Window, under Window, I'll see effect. And I noticed that my effect
panel is already active, but I can't find it anywhere
looking around here. That's because it's a tab that
is somewhere around here. So if I click on
this media browser, then I can see something like
click on that or libraries, and then click on Info. And then after Info, I can now see effect. Okay? So basically what I do in
Premiere Pro is that I close all these other tabs because
I don't often need them. So what do I do? I just
go to Info close Panel. Libraries, close panel, media
browser, closed spanelo. And I always want to have
my project, my folder, and then effect so that
I can easily switch to my effects panel
anytime I need to add effect to my video, right? And that's how I
go about doing it. So you can see all of the effect available in
Premiere Pro, right, ranging from preset to
lumentary preset, audio effect, audio transitions, video
effect, and video transitions. Okay. And what I'm going to be doing is I'm going to
be opening each folder, and then I'll just talk
about one or two effect from that folder and then move
to the other folder, okay? Because obviously,
I won't be able to talk about every
single effect in Premiere Pro because
these videos might then take about 3
hours or so, okay? So what you're going to do is when I'm done with the effect, you want to take
your time on your own and go through
every single effect. Okay, and add them
to your video. The same way, I'm going
to show you how to, you know, add them to your
video and how to adjust them. Okay? So let's get
straight into it. So I'll open the first
folder called preset. And like I used to say,
preset simply means predefined settings,
predefined settings, right? So, meaning that there are settings that have
already been created, and one should use them on
your video or your audio, you don't have to basically
do any special thing. It does what the setting that was predefined there is
supposed to do. Okay? So if you look at this
preset, if you look at mine, you're seeing Kshow audio, Kshowblackout, color and stuff. These are presets that I have created personally
for myself, okay? And because presets are
predefined settings, it means you can also
predefine a setting in Premiere Pro and
save it as a preset. And that's why I have
all of the other preset. And there are some other presets I've also downloaded online, okay, and added to my
preset in Premiere Pro. But I'm sure the first thing you're going to be
seeing when you open up that preset is bevel
edges, okay, bevel edges. And under these bevel edges, you can see that
this is a folder, so I can click and
open the bevel edges. And you can see we have
two bevel edges there. We have the tick and thin. So let's say I like this preset and I want
to add it to my video, how do I go about doing that? All you simply need to
do is to click and drag. So I can come over here, click on this bubble edge stick, drag it and drop it
on my video here. So this preset doesn't
work with audio, so I won't be able to drop
it in my audio section, but only on the video section. So just drop it on
the video right here. And as I drop it here, watch over here and see what will happen. So let me drop it. Pooh you can see the bevel
edges around my video, kind of making my video
look like it's in a glass or in a three
D format and stuff. Okay? So that's the bevel edges. Now, what do you notice? Immedily I drop these
bevel edges on my video. My effect control automatically
shows me a lot of stuff. Okay? So apart from my motion, let me just close my motion. So apart from the
normal motion opacity and time remapping
that was here, we can now see another
layer has been added here, which is the bevel edges that
we just added to our video. Okay? You can see
what I have here. If I minimize this, you can see that it's just a
layer right here. So but when I open it I'll see some other settings that
are available for me here. So that's why this
place is called the Effect Controls,
because from here, you can actually control
your effect settings, or you can actually control the amount of your
effect on your video. Okay? For example, right here, I can see edge thickness. Okay? If I change this
to maybe 0.2, okay, you can see that
the thickness in my bevel edges is now
bigger than it was before. Okay? If I do a 0.3 or 0.4, you can see that that's almost
covering the entire video. So let's even do
something like 0.5, okay? And at 0.5, you can see what
it kinds of do to my video. So this could also be
another effect you could act to photo shop. Okay. So that is your thickness. So let me undo undo that, okay? Back to what it was. Then next
thing here is light angle. So you can see that the light is kind of reflecting
somewhere here, and you can see that's why this, you know, circle is
point -45 degree. But if I click and drag that, you can see that I can change
my light angle to whatever, you know, direction that
I want just by clicking and going around
with this slider. Okay? So that's my light angle. Okay, I can even change
the light color. I can change it from white. I'll click on this
white color and change that to maybe a red
color. All right? I can see that it
is now giving me this red effect around my video. I can even increase
the light intensity, okay, or reduce the light
intensity. All right. And you can see that just
by playing around with the same effect I've added to my video
in my feed control, I can get different results
with the same effect. That is why it is
important that anytime you add an effect to your
video in Premiere Pro, always go to the Fed
controls and check out all of the control
settings available for that effect
because from there, you can get ideas of
other things you could do with that same effect, okay? So even though
this was a preset, I can actually still
manually adjust some properties in it to give me exactly what I
am looking for. Okay? So that is that
for Bevel Edge steak. Now, if you don't want an
effect in your video again, you can simply press do
Control Z or Command Z or you can select the name of that effect in
your effect control, and you press the delete button. And that will remove your
effect from your video. Okay? So this is just one
effect under the preset. We have so many other
presets available. Okay, that you can choose from. So but basically, let
me undo what I've just done now and show you quickly how to create
your own preset. So, for example,
if I like the way my bevel edges look
like now, right? So let me just, you know,
adjust it a little bit. So let's say I like the
way it looks like now, and I want to save this as
a preset so that the next time I want to use
this same effect, I don't have to first out
the bevel edges stick, then come here and begin
to change the light angle and everything and begin
to do all of that stuff. I can just simply come
to this bev dge stick. Right, click on it, and
then in the options here, you can see that I
have something called safe preset, okay? Safe preset. So I can click on this
safe preset and then give these bevel edges maybe red. Okay? Bevel edges red, and then click Okay. All right. So the next time I come
to my preset right here, you can see that
under my preset, I now have bevel edges
red as part of my preset. So that's how I was able to
create all of this preset. So because there are
certain things I do in Premiere Pro, often, And I really want to save time instead of always doing
it over and over again. And that's what led me to
creating my own preset, okay? And some others have also
created their own preset and placed it online
for you to download. And that was how I
was able to download some other preset right here. Okay? So even if I go
to another video, Okay. Another video
entirely, I can simply grab this my bevel
edges red, for example, and just drop it on
this video here, and you can see that
it immediately adds that bevel edges to it with all of the
settings right there. Okay? So that's the
advantage of creating a preset or saving a preset
in Premiere Pro. All right. So let me just undo that
and go back to where I was. And then if you don't
want to preset again, you can simply delete it by just right clicking
on it in the preset. And then choosing the
delete button. All right. So if I click on
the delete button, ask me, am I sure, I say, and that removes the preset
from my list of preset. Okay? So basically, that is
all about that for preset. You can go check out
some other preset available here in
Premiere Pro. All right. Let me do do do do and do, and do and do do that to
get that off my video. So let me just try one more on that preset. We have 12 in. If I drag that and drop out
on my video, all right? I see nothing happened here. Okay. But from here, I can see that it has
automatically set some key frames for me at
the beginning of my video. So let's go to the beginning
of my video and I can see what the princess has actually done.
So if I press play. What's up, everybody. My name is Ke Okay, you
can see that, you know, it actually 12 in my video, like the name says 12 in. Okay? I could also add 12 out, and you can see
that that will add, you know, another key frame
towards the end of my video. So if I come to the
end of my video and I press play Intro. You can see the way
my video 12 out. Okay? So this is
how preset work. You can adjust them here. You can change the angle. You can even adjust the keyframe depending on how fast or
slow you want it to be. If I do it now, you see that
it's going to be faster. What's up, everybody. Okay? And so many other options available for you right here. So your effect and effect
control goes hand in hand. When you add an effect, you go to effect
control to manipulate it or control that effect. Alright, it's as simple as that. Uh, let me simply
just select that and press delete to remove that and then also select the
12 out and press delete to remove
that from my video. Okay? So that starts for preset. Let's go to the next folder, which is called um
preset lumetrPreset. So if I open up my lumenary
preset lummentary preset, the word lumetry itself means, you know, color settings
in Premiere Pro. So when you hear the
word lumetry it just simply means that is an
option that allows you to, you know, change
the color look and the color feel of your video. So this rumor preset are different color grading
or color correction, you know, settings that
have been saved for you. That's why the word
preset is in front of it. So you can see this
lumenary preset more like if you're trying to upload a video or
image on Instagram. Instagram always gives you
the options of filter, right? So you see those
different filters there. And when you click on a filter, you will see that immediately it affects your image
and the color of your image changes depending on the kind of filter
that you choose. So that's what, you know, this lumentary preset is
kind of what it does. So if I open it up, you can see I have different
folders underneath it. I have cinematic film stock, monochrome, speed
look, technical. So if I open up the cinematic, you can see the options I
have under the cinematic. I can drag in this Cinispace hundred and dropped
out of my video, and immediately, you
can see the way it affected the color of my video. I can do that and drop
in maybe Sinispace 25, and that will not
really be hash, like the cenispace hundred. Okay? You can see
what that does. And the good thing about this is that you can also still come. So let me just reduce the
size of this my key frame, since, you know, we
are kind of, like, done with it, so we can
concentrate more on the video. And the fat control. All right, so the beautiful thing like
I was saying is that after adding a lmentary color
preset to your video, you can come to the FED control, okay and still play with the
controls or the settings of that preset to get something better if you don't currently
like what you're saying. So I can come to basic
correction, open that up, and then under this
basic correction, we have so many things. We have imput lute. It's currently
none. Let's change it to something and
see what happens. You can see that that's more so many other different types of presets that I can also add to this to get some
different results. So let me just change
it to none, right? And then here we
have temperature. If I increase it, I'll get a more warm
look on my video. If I reduce it from zero, I get a more cool or
bluish look on my video. All right. So these
are the things that I use for color grading in movies. And then, that's why when
you watch a vampire movie, it always has this
bluish, greenish look. And just by you know, looking at that picture, you just want, Oh,
this should be a vampire movie or
something, right? And so we have different
color grading for different, you know, scenarios
and environment. So you can see how I
can easily just adjust my temperature and get
different results. I can undo that and go to tint. I can also adjust this
add some green or some reddish look on my video. And then I can also increase
my exposure if I feel like, Oh, my video is really dark. You can increase your
exposure to kind bring you back that
light in your video. Okay. And then you can
increase the contrast, right, to make the light areas lighter and the
dark areas darker. So that's what contrast
basically due to your video. I can increase my highlight or reduce my highlight
depending on what I want. So basically, I don't need
to adjust my highlight here. Okay. My white, also
you can increase everything that looks white or reduce everything
that looks white, depending on what
you're working on. So I'm going to leave that too. And the blacks, you can also increase or decrease
your blacks, depending on what
you're working on. And I'm going to
leave that also. So basically, I'll just come
to my tint and just add some little warm look to my video and maybe just
counter that with, you know, something
like that. Okay. So I have this, you know, look on my video. Let me just reduce
that to maybe two. Okay? So you can see how
I've improved on this. If I come up here, I can see these effects beside
the lumeary color. If I click on that,
that will show me what my video
looks like before, and I'll be able to
see the difference between what the video was before and what the
video looks like now. Before I do that, I
would like to come to this saturation open it and just increase the
saturation a little bit. And what the saturation does, it looks at everything
that has color and bring out more of
that color in that thing. So if I take it all the way, you can see how the colors of the logos here behind
are really popping up. So but I don't want to take
it all the way to this point. So let me undo that and just increase it a little bit to just bring out my
color some more. Okay? So let's check out
the before and after. If I click on this FX here, you can see my video looked like before and what my
video looks like now. You can see how better
my video is now, okay? So that's with your
lumetary preset. So I just dragged
in this Sini space 25 and then came to the
effect control and began to adjust it till I
have my desired result. Okay? So that's basically
how, you know, it works. So your effect and effect
control work hand in hand. All right. So let me just
select this and delete it. Uh oh. Yeah, so we don't want it because I have so
many effects to talk about. Okay, so let me talk about
one more on that the lumiary preset before I go
to the next folder, which is audio effect. So if I come to monochrome, you can see Monochrome is
just basically one color, meaning black and white. So I can drag this punch, drag it, monochrome punch, and I can see changes to black and white
with this effect. I can undo that. I can
go to normal contrast, use that and see how that
works on my video. Okay. You can see what I
have. I can drag the, you know, faded film. All right, making
it look like an old school video or something. So so many presets here, and you can still come to
the effect control and adjust it to your desired look. All right, so let
me just undo that. Now, let's leave monochrome
and leave lumary preset. And now let's talk
about audio effect. Let's talk about audio effect. Okay? Now, if I open
up audio effect, you can see we have
so many folders also under the audio
effect, right? And we can begin to open
them one by one and use. I think in the older
version of Premiere Pro, if that's what you're using, you won't see them
grouped in folders. You just see them listed
one after the other. But in the newer version,
they've kind of categorized those effects together so that you can easily locate them. So for example, if I'm
looking for echo or delay, I can open this folder. All right. We can
see analog delay, delay, multi tap delay. So I can drag this delay. Now, this time, I won't be
able to drop it on my video, but on my audio, and let's drop that there and
listen to what we have now. So you can see how, you know, it's kind of echoing
my voice and, you know, giving us
that sound. Okay? Let's try the analog delay. All right, so you can see
the slight difference between the two of them. Let's try the multi tape delay. All right, so you
can see how this really looks nice, okay? And, you know, that, you know, it is a simple effect. You've already gotten
something to make it look as, Oh, maybe I'm in a large, you know, room and
when I'm talking, you know, it's echoing
and all of those stuff. Okay? So that is that for echo. Let's go to another folder. Let's go to maybe Okay, so I have this noise
reduction slash restoration. Now, don't forget if you're
using an older version, all of this will
not be in a group. It should be listed out
one after the other. So what you want to
concentrate on is the name of the effect
I'm using. All right. So it is the name of the
effect that you want to concentrate on, okay? So that's what you use. So right now, under
this noise reduction, the noise, okay, the noise. So in the other older version, it was called Deniser. Okay? In the version, and that was just recently 2019, 2020, I think 2018 version, it was called adaptive
noise reeduction. All right. But now
in the 2021 version, it is now called the
noise, okay? The noise. So basically, just take note of these three
names the noise, adaptive noise reduction,
and the noiser. So whichever one you see it does the same thing.
And what does it do? It allows you to kind of
reduce your background noise. So if you listen to my own, you know, video here. Show A, but you can call me
K show, and welcome to it. So there's basically
no noise, yeah. And that's the way I like
to record my videos, okay? I basically turn off, you know, everything
that can create noise. Fans, you know, Okay, maybe I leave the AC on. Make sure my environment
is clean and clear. There's no, you know, jumping around or
somebody honking, you know, outside
and everything. So I just make sure I have a nice environment and I shoot. And then my mic also kind of help to kind of
reduce the noise. So but if you have
noise in your video, so I think I have a
video that has noise. Let's go to our exercise files. I think this video right here, you know, let's check
out this video. So I'll just drag that,
drop it into my timeline. Let me play this. So you can see that the
audio is kind of low, and that's because
this particular video, the audio on it is, you know, the audio
captured by the camera. So it's actually not
the audio captured by this Lapel mic, right? And later on, we're going
to be talking about on audio synchronization
and we'll get to that. So but since this is an
audio captured by, you know, camera's mic, and it's
kind of noisy and stuff, let's try out that
deniser on this. So first, let me increase the volume so that you
can hear more of it. So I'll go to the
audio clip mixer. Okay, and increase the volume. Now, disadvantage of using the audio clip mixer to increase
or decrease your volume is that I have now increased the volume of everything here. So if I go back to
this for the shop, you can see how loud
this is and then, this is also still not allowed. So that is the disadvantage of using the audio clip mixer
to increase your volume. So if all I add was this
video on Audio Track one, I could do that, right. But now I can because as I'm trying to increase
the volume of this, this will also get affected. So what do I do? I simply
go to effect control. Open up the volume for
this particular video, I can click on this
level to turn off the stopwatch first so that
it doesn't set key frames. So but as Zooming I wanted
to make some part of the video loud and some parts low, I could use my keyframe. So I don't want keyframes,
so I'll turn it off, and then I'll just come here
and increase it to about maybe ten to kind of
increase the audio of this. Okay, so let's take it to the highest 15 and see what we have. So you can see it's louder now, and I can now, go back to my effect, grab my denoise and drop it on it and see the
result we have now. So without it, you can see the denoise, let me
just turn it off. You see what we have without it. You can hear that, you know, ambient sound and, you know,
the surrounding sound. But we might the noise on, you won't hear that again. Okay. So you can see
that you can hear his particular voice very well. Okay? So even if, for example, this is all I have. If I had no Lapel mic to give the speaker or anything and I was using my, you know, sound recorded with
my camera mic, I can still use
something like this, the noise to kind of help me
make the audio better, okay? So let's play that again. So this time I'll
turn it on and off. And skill. So you can see, as I was
turning it off and on, you can see the difference
between the audio without the denise and
the audio with the noise. Okay? So that is how to
remove background noise. Not really remove, but
actually to reduce, okay? Because if your background
noise is really loud, Premiere Pro can't, you know, it's not a magician
that would totally know that this is noise
and then remove it. In fact, if the noise is louder than your own voice or
the speaker's voice, then Premiere Pro
will actually be trying to remove your
own voice because Premiere Pro is
going to think that your own voice is the
background noise. That's why it's
called background. Okay? There's a
difference between background noise and noise. Background noise
means, you know, just something, a noise
in the background. While noise means it is noise. So like taking over your own
speech and your own audio. Okay? So it's not
used to remove noise. It is used to remove
background noise. Okay, so when you're
recording in an environment, always make sure that you have less noise as much as possible. And if you can get a
professional Mike Lapel mic, it will make your
audio fantastic. Okay? So that is that. So let's just check out some other audio
effect right here. So let me just delete this video and just come back
to my own video. Tutorial, I'm going to show you. So let me add the noise on my
audio and see what happens. How to change the
color of this to this. So you can see it kind
of still improves it, you know, and made it better. Alright. So that is that. Uh, you know, change
that back to zero. This show up tutorial, and in today's tutorial, I'm going. Alright, great. So that is that. Alright. Let's move
on to something else. I've spoken about
reverb, modulation. Let's see. So there are
so many others here. Let's see special.
What do we have there? Mastering. So if you understand
audio very well, maybe a music producer
or something. I know you know how to
master sound and everything, you can drag in your
Mastering here. You know, come right here. You can see Mastering,
click on Edit, you know, and begin to
play with all of this. Alright. So if you're, you know, if this is overwhelming you, you can just use
some of the presets available for you right here. Club Master, dream
sequence, drum spreader, mid enhanced reducer,
stereotimno, subtle clarity,
warm Concert Hall. All right. So I think we should get
something different if you choose warm Concert
Hall. Let's play this back. Welcome to another
Photoshop tutorial, and in today's tutorial. So you can see that
it kind of makes it looks as if I'm in a hall, you know, and my voice
is kind of echoing. So anytime you're using any of these settings and you don't
really know how it works, you can basically use any of the presets available
for you here, and then Listen to it and
see if it's what you want or not. All right. So let me just delete
that mastering effect, and let's talk about
something else. Now, I'm looking for
a particular effect. Okay. Let's look for it. Pitch shifter all
right pitch shifter. So you can also search. If you're looking for
a particular effect, can just come to this
search and type the name of that effect and you can
see it the pitch shifter. So it's under time and pitch. All right. So let
me cancel this. Audio effect, we go
to time and pitch, open that up and you can see we have pitch
shifter right there. So what is the pitch
shifter used for? It is used to
change the pitch of my voice or the speaker's
voice or whichever voice. Okay? So if I drag this and I drop this on my audio, right? And welcome to another
Photoshop Tutorial. So you can see nothing
really happened. So when you drag an effect
to your video or your audio, and it seems as if
nothing happened, that is because you need
to go and, you know, touch I go to the
effect control, go to the effect itself and customize it the
way you want it. So right now, under
this speedShif I can see this edit here. I can click on that,
and that will show me my pitch shifter
editor, okay? And I can choose the one I want. Now, you can also
choose preset, okay? You can choose this dark load, and I'll make your
voice sound like, you know, your mega tron, or, you know, what's this guy, Magneto or somebody one wicked, you know, horror in a movie? All right, if I click on
this dark load, for example, if I press Play. True. All right, so let me just
change it back to the default, okay, and adjust it myself. Welcome. So to adjust it myself, if I take it to the left, that gives me that
bass voice, okay? So let me press play. Let me just take it somewhere
around minus six. Photoshop. You can see how that
makes my voice ticker, like one bad boss All right. I can also take it
up and that will give me a cheap monk
or feminine voice. Tutorial, and in
today's tutorial, I'm going to show you
how to change it. All right. I can
take it even higher. Color of this to this. Very simple. But before
then GoatoriaTutoria. All right, so you can see
how I'm able to manipulate my voice with my pit
shifter. All right? I can close that and then click on my Pit shifter and
just delete that. Okay? So I think I'm
going to be stopping here for audio effect, right? So you can check out the
remaining ones on your own, you know, and see how it works. So let's go to
audio transitions. Audio Transitions, okay? So for this, audio
transition kinds of allow me to add, like, a fade in or fade out on my audio without
me having to come here and use my pen to fade in and fade
out my audio. Okay? So quickly, let's just
see how that works. So if I open up my
audio transition, you can see we have
just one folder there. If I open up that folder, you can see we just have three audio transitions right there. And the one that you can use
for the fading and fade out in your audio is exponential
fade. All right? So I can drag this, drop it
at the beginning of my audio, okay, drag again, and also drop at the
ending of my audio. So if I press Play now,
what's up, everybody. My name is Gabro. Alright, so I'm sure you didn't hear that, but
it was actually there. So let me just zoom in, okay? What's up, everybody, my name? You can see the way
it came up gradually. But for me to allow you to
really hear it very well, I'm going to increase the timing of this exponential fade. So I'll click and
drag it to just maybe somewhere around here so you
can really see how it works. Alright, so let
me just take that to the beginning. Everybody. My name is Gabriel Shoe,
but you can call me. You can see how it
made the audio, you know, fade in
gradually, right? So that's the exponential fade. And towards the end also, I can also add that
make it look to let people know that I'm
about to end my video, and it's going to fade out. Very simple. But before then. Alright, you can see how
that faded out my audio. Okay? So that's how it works. You can drag at
the beginning and at the end of your video. Now, the way I was
adjusting is that when you put your mouse close to the
edge of your transition, it shows you this red stuff, and that tells you that you
can adjust your transition. So it's quite
different from this. Remember this one
is for trimming. Okay? So this is different
from this. All right? This is for transition. This
is for the video itself. All right. So that is how to add transition
to your video. A another thing
about transition is, let me just undo this last
one I added here and go back to my exercise file and drop in another
video right there. So let me just use this
video here beside it. Okay? And you can see what
I have here right now. Okay? I can add a
transition here so that this will kind of fade out and this
will kind of fade in. Okay? So if I go to my effect, go to exponential fade and I
try to drag my effect here, you'll see that
it's only trying to drop at one side of my video. Now, mind, if you are trying to drop yours if your video
is maybe longer than mine, and you're trying
to drop an effect, and you're not seeing
your transition, it is because you
are zoomed out. So you can just go to the
point where you want to add your transition ta plus
to zoom in very well. So that transition that looks really small there
all that time. If I try to drop it again now, you can see it's looking bigger. And even if I zoom in so
more and I do that again, you can see that
the transition is even now looking longer, but you can always
zoom in and out. So you can see if I zoom in out now and I try
this transition, I won't even see it at all. So if you're trying to drop in your transition and
I'm not seeing, just make sure that
you are zoomed in so you can see very well. So like I was saying, as I try to drop this
transition here, it's just dropping
on this video alone. Okay. And the main effect
I really want to do is that I want this one to fade out and I want
this one to fade in. So to achieve that effect, I would need the transition
to touch both videos. So if I drag again and
I'm trying to drop it, you can see it's only touching this particular video here. And the reason is because this particular video is
not trimmed in any way. You can see this white triangle here and this other white
triangle right here. Okay? And when your video
is not trimmed in any way, you will not be able to add a transition that will join
it with another video. Okay? So before you could be able to do
that kind of thing, you will need to trim
that particular video. And how do I trim it?
With my selection, too, I can just click here. Once I see this red, I
can click and drag, okay? And then I can come to this
ending to click and drag. And you can see that
those white triangles are not showing again. Letting me know that my
video is now trimmed. So I can drag this and put
it close to my video here. And this time when I drag
my exponential fade, you can see that it is
now touching both video. So you can see that you can drop it here it will
touch only this. If you drop it here,
it will touch on this, or you can drop it to
touch both of them now. Okay? And what will happen, it will simply fade out this
one and fad in this one. Intro. So what is All right, so you can see how that
entered in smoothly. Okay? So to make this let you see let me do
something that is longer. So let me trim this more, put this here, trim
this, put this here, and then drag my
exponential fade, drop it, and I can zoom in so I can see my exponential
fade very well. Okay? Then grab it and extend it so that you
can hear it more. So if I come here and I
press play this very simple. But before then, All right, so you can see how that
entered in smoothly. So that's how to add transition
either to a video or to an audio alone or
to touch two audio, and it will give you
a smooth transition between those two audio. Okay? So that is that for
your audio transitions. All right, this constant power
and constant gain simply means that if I drag and
put it in between here, it's going to make the
volume of two of them the same while the
transition is going on. Very simple. But before then, I drew So you can see the way kinds of when
this other video, while I was still
watching my video, I was already hearing
the sound of this video, and it had the same audio
level with my own audio. And that's why it does. So I
don't really use it because, you know, when it
comes to transition, then why would I want, you know, another to be
entering in at the same level when what is ideal is that
the first one should go down. All right, while the
new one is now rising, and that is what exponential
feed will give you. So my favorite is
exponential fed right here. Okay? So I'll just
minimize, minimize that. Then I'll go to video effect. So now let's talk
about video effect. So if I open up the
video effect folder, you can see I have a lot of effect right here that
I can add to my video. All right. So let's just open
up maybe blow and sharpen. For example, you can see we have channel
blow, compound blow, directional blow, Gaussian blow, and so on and so forth. So I can just come to this, you know, directional blow, drag that, drop it on my video. You can see nothing happens
to my video, all right. But if I come to my fight
control right here, you can see the direction
now blow right here, and you can see
that the direction and the blow length is
currently set to zero. That's why I couldn't
see anything. So if I grab my direction and
I increase oh, sorry, Yes, if I increase the direction, nothing also happens because I've not added any blur length. Alright. So by the time I start adding my blur length now, you can see what is
now actually happened. So the direction is actually what direction
of blo do I want? And you can see the
way it works, okay? So that is how this works. And guess what? I can
set key frames for this to kind of give me a
particular effect on my video. So let me undo undo, undo. Click on the stopwatch of my
direction and blow length. I can move forward. Okay, and adjust this, adjust this. Okay? And if I press play now
in today's tutorial, I'm going to show you how to
change the color of this. You can see what that does, and I can even move forward
and change this back to zero. And changes back to zero. And when I press plate tutorial. And in today's tutorial, I'm going to show
you how to change the color of this t
14. How to Track in Premiere Pro: What's up, everybody. Welcome to another video in this Adobe
Premiere Pro training. In this video, we're going to be talking about tracking, right? So let's get straight into
Premiere Pro and do your stab. Alright, so we're right
here in Adobe Premiere Pro, and let me just delete
this video right here, remove my transitions, you know, just kind of get, like,
the original video back. What's up, everybody? My
name is Gabriel Shoal. Now, what we're going to use
for this tracking example is we're going to blow I
want to blow my face, right? Like what you see on CNN, they're trying to
show someone and the person doesn't want
to reveal his identity. And then you see this blurriness around that person's face. And then it follows
that person's face everywhere the
person goes, right? So there's a way you
can do that very easy in Adobe Premiere Pro, right? So the first thing I
need to do is to go to my effect and then
on that effect, I'll go to video effect. And then on that video effect, I'll go to blow and sharpen. And then on that
blow and sharpen, I can add Gaussian blow. So I'll drag that,
drop that on my video, then head over to my
effect controls. Okay. Then for my effect control, I can see the Gaussian
blow right here, okay? And what I want to do is to increase the blurriness
size, right? And as I do that, you can see that my entire video
now looks blurry. But that is not the idea here. The idea is just to
make my face look blurry and not the entire video. All right. So how
do I go about that? Now, if you look closely here, you will see that this
Gaussian blow effect has a mark around it, okay? It has a circular rectangular
and my pain to max. Remember when we were talking
about max under opacity, if I open up opacity, you can see opacity
has its own mark. Now, this mark opacity applies to everything
in your video. You can see what I
have here. It applies to everything in my video. But if I undo this all right, close my opacity and apply the mark for this particular
Gaussian blow effect. You can see that it draws
a mark on that effect itself and is restricting the effect to the particular
marks that I have drawn. All right. And this is
not just a Gaussian blow. In short, let me even
delete the Gaussian blow. Let's add another effect. Let's go to maybe
black and white. Find out under color correction. And then under color correction, we're going to see
tint. All right. So tint is black and
white in Premiere Pro. I can drag that,
drop it on my video. I can see it makes the
entire tin black and white. But if I go to my
effect control, I can see that tint there. If I click on this
mark of the tint, you can see that
it is restricting that tint color to just
this area of this max. All right? I can even increase the size of
that and, you know, make a particular section of my video black and white
while the rest is colored. So you can see what
I have right here. I can even adjust
the max feather. Okay. And you can see if I press play you
can call me Kisho. Guys anyway, my face just
looks black and white. And welcome to another 40 show. Well, every other
thing is color. Tutorial. And in
today's tutorial, I'm going to show
you how to change the color of this to this. All right, so that is
the essence of Max. So Max comes with every single effect in
Adobe Premiere Pro. Alright, so no matter what kind of effect you're adding here, you can always draw a
max on it to restrict that effect to that particular
portion of the max, right? So I don't want this. I'll just go to my
tint and press delete. Alright? So let's go back to our Gaussian blow to do that, you know, blurriness on the face that we wanted
to do initially. So I'll drag my Gausia
b drop it on my video, and increase my
blurriness, right? So you can see that
everything now looks flurry. Then what will I do now? I will now create
a max, all right? And then I want to move this
to my face region, right? And I want to kind of
restrict that so that it only applies to just my face, alright and not
the entire video. So I'll just reduce
the size of that. Alright? So if I come here
now and I press play. Very simple. You can see it covers my face. But if I start from
the beginning. What's up, everybody? My
name is Gabriel Shae. But you so you can see that as my head is
moving and everything, my face is likely to show. So what if I want this to
follow the movement of my face? That is what is called
tracking, right? Can call me Kisho. And welcome to another. Ah, I saw him. I
saw him. I saw him. Alright. So if you don't
want that to happen, we have to find a way to track this blurriness on my face so that it follows my face
everywhere my face goes to. Alright. So somebody don't say, Oh, you said you blowed my face, where people were able to see my eyes and everything, okay? And you don't want
that to happen. So the manual way to go about
it is to actually start from the very beginning put
the, you know, marks there. And every single
time I move my face, I'm supposed to move this
along my face, alright? And meanwhile, I
would have clicked on this max part to
set a key frame. That will set a keyframe there. And every time I move,
I will move this. And as I move my max, okay, that would begin to set
multiple keyframes for me. And if I move like this
again, I move like this. If I move like this, I
move this like this, and then you can see setting
key frames at those points. So when I play back now, you can see that
What's up, everybody. My name is Gabriel
Shoal see that the max is now following
my face. Show me K show. Okay. And then I'll keep doing that on and
on and on and on. So if my video was
for 30 minutes, then I'll have just
eventually spent like maybe 8 hours trying to do this. So Premiere Pro has a
simpler way of doing this. So let me undo the key
frames I've set there, okay? Go back to the very beginning, put my Gaussian blow right on my face where I
want it to be Okay. So I can even click out to
see how nice that looks like. So it's covering my entire
face. Select my video back. And then under this max part, instead of clicking
this stopwatch and setting key
frames one by one, I have this selected
max forward. Alright? So because my plaid
is at the very beginning, I want to track it forward. Assuming my plaid
was at the very end, I can track backward. Okay? So track forward. So I'll click on this thing that looks like the play bottom. Click, and then I'll just relax, enjoy myself, and wait for Premiere Pro to finish
doing its thing. And then now, if you
watch this video, you can see it's
playing gradually, and then it will start
tracking my face as I move. Alright? So I'm just going to
wait for this to get done. And then by the
time we are done, you'll see that, you know, Premiere Pro would have
done its job perfectly. Okay, so we can see that
the tracking is done. And if you look here, you'll see the countless keyframes
that has been set here. If I zoom in, you actually see
that these are key frames, and you can see
so many keyframes set here by premiere profiles. So if I go to the beginner
and I press Play, you'll notice that this follows my face everywhere
my face goes to. What's up, everybody? My
name is Gabriel Shoe. But you can call me Kisho. And welcome to another
photoshop Tutorial. And in today's tutorial, I'm going to show you how
to change the color of this to this. Very simple. But before then, Alright, you can see how we've
been able to do that. So I don't know why
this guy is actually covering his face because
he just told us his name. So why is it covering his face? Hey, I know you,
man. You're Ksho. So why are you
covering your face, huh? Alright, never mind. So that's how you do your
tracking in Adobe Premiere Pro. Don't forget that this could
be any effect on your video. And if you want that
effect to kind of follow a particular movement
in the video, you can just track
that movement using this Max part in
Adobe Premiere Pro. Thank you for
watching this video, and I'll see you guys in the
next video. Cover my face.
15. Working with Text in Premiere Pro: What's up, everybody. Welcome to another video in this Adobe
Premiere Pro training. In this video, we're going to be talking about text, right? So we've neglected our brother text all this while, right? So where's Brother text? Let's find Brother text and talk about how to
use it in Premiere Pro. Okay, so we're right
here in Premiere Pro, and we want to talk
about text now. So to do that, let me just remove my, you know, mark my
deleting gaussian blow, and that removes the max and Ah. We're going to sees faves. Anyway, so how do we type
text in Adobe Premiere Pro? Okay? So here is another new
version, old version thing. In the new version, I think, starting from 2017,
thereabout to 2021. Okay? You see this text icon at the bottom here in your tuba. I can simply select that, click on my screen, and type. Okay. So I can come here
and just type K Show. All right. So you can
see that on my screen. And then when I'm done typing, I can go back to my selection too and then begin to adjust. So before I start talking about
adjusting and everything, in case you're using an older
version of Premiere Pro, and you can find this text at the bottom right
here, don't worry. All you need to do is to
look up at your menu here. All right, you're going to
see something called title. All right, title. So right now, I don't
have title here because my title has
been moved to my tuba. All right about you,
you're going to see something called title here. You click on that title, and you see new title. Okay. You click on New title, and it's going to show
you different options. And out of those options, you want to choose default
steel default still. When you select default still, it's going to bring up something that looks like this, right. And then what you
simply want to do here is to type in show, click Okay, all right. And I will show you
something like this. And then, allr, let me
just take my player a way. Oops. Oops Oops. Oops. Oops, I just messed
everything up now. So let me just go to
Window Workspace, reset to save layout. Okay, and then go
back to my text. Alright, so sorry. So once you are here, you see a video like this. So I'm talking to those
using the older version now. And in this screen here, you can simply click. You can see your
own C right here. So make sure it's selected, and click on your screen
and type the same show, and you're going to see
that you have your text. So basically, the
difference between the old and new version
is that you'll be doing your own on the older version, you'll be typing your text
in a different window, all right, in a
different window. And when you're done
typing your text, adjusting your font,
your phone style, your font size and everything, and you like the
way your text is, you just close this
window, right? So on Mac, our close
is here on Windows, your close is going
to be somewhere here. So you don't need to
save anything, close it. And then once it's closed, you will see a layer right here, then you drag that
layer and then just drop in your
timeline, right? And then when you put your
playhead on top of that, you will see your
text right there. Okay? So don't drop
it on the video. If you drop it on the video,
this is what you get. You will see that
your video does play, and then when it gets there,
you only see your text. This. And then until it passes that area before you begin
to see your video again. But if you want to see both
your text and your video, all right, those using
the old version now, you drag it from here and
you drop it above your text, maybe on Video Track two. If your video is on
Video Track two, you can drop it on
Video Track three, and then you can see
that both my video and text is now showing. Alright? So that's how to type
text in the older version. And you can see that
in the newer version, everything I've just done now, it just kind of does everything
for me at once, okay? You can see that mediately
I started typing it added a layer here and
then my text is already here, so I don't need to drop it on
top or any of those stuff. So you just try to make, typing easier in
the newer version, you know, than in the older version because
in the older version, I always have to
open that video, open that window, type there. Then when I'm done, drag it
from here and drop here, and, you know,
kind of stressful. So let me just
delete, delete that. So those using the
older version, so anytime you're typing, you just go through that method. And type your text and
add it to your video. Okay? So, but this isn't
the newer version. Let me even delete this
one I typed initially. You can put your plaid where
you like to type your text, grab the T, click on your
screen, and start typing. So I can just type Kshow. Then when I'm done typing, I can go to my text here. So those using the old
version, don't worry. I'm going to take
time to also go through how to edit
your text and stuff. So but now let's just concentrate
on the newer version. So I'll come here, click
on my selection two, and I can use that to
move my text around across my screen
the way I want it. Then to edit the
properties of my text, I'll select the text layer
in my timeline here. Go to Effect Controls, and then under Effect Controls, I'll see this my text,
right, the acaso. I'll click on the dropdown
to open all of this, and I can see all of the
properties for my text. Okay? I can even draw
a max for my text. All right, so we're
going to do that now. So this is the font type. I can change that from minion
to Montessorat, all right. I can change it
from the font style from thin to maybe bold. I can see how my text
is looking bold. Then what about the
size of my text? Okay. So for the
size of my text, you can see the font size.
It's currently in 100. I can click this
slide to increase it to the point where I
would like my text to be. So let's just do
something within here, and then just put that right there so you can see
my text is right here. And what else I
can align my text. So but now it don't really
make sense because I don't have any second line. So alignment will
really make sense. I can just click
and drag and move my text whichever way I want. All right. So we have all of these other settings here that I'll not waste
time talking about. I'll just go straight to color. Right now we're showing white, and that's because
my feel is white. I can click on this white
and change that to red. And that will
change the color of my text to red or click here, choose another color
like green or something, choose a darker green, lighter green and change
that to my color. If I want an outline color
of my text or stroke, I can click here to activate it. Okay? And then I can click here to choose the
color of my stroke. Let me choose red
so we can see it. You can see it's really,
really tiny right there. I can come here to increase the size of that stroke by clicking and
dragging to the right, and you can see I have a
red stroke around my text. If I want a background
on my text, I can click here and that will add a background
to my text. You can see the
background added here. You can see without
the background with the background, okay? And I can increase the
opacity of that background. I can change the color
of that background. Or increase the size of the background depending
on how I want it. Okay. I can see all I want. If I want to change the color of the background or click here, I can change it to
a white background. Okay, I can see it now on a
white background, you know, and so so many options here, I can change the
position of my text. I can change the
scale of my text. I can rotate my text, okay, I can change the
opacity of my text. I can do all I want to do with my text right here in
the effect controls. Okay? I can do all of that
in the effect controls. Okay? So that's how to work
with text in Premiere Pro. So let me just, you know, turn all of these
things to what I want. So let me change
the field to white. Okay? Let me change my stroke.
Let me just change that. Let me just cancel that.
Let me just remove it by turning it off,
remove my background. Okay? So I think I
like my text this way, and I'll just position
it right there. Okay? So you can see
that's how to easily add text in Adobe Premiere Pro. Alright, so this same text. Alright, let's talk about it
in the old way of typing. Alright, so let
them just move it. If I press play now,
you see that this is the size of my text.
But you can call me. When it gets to that
point, it shows, and when the played passes this point,
it's gonna disappear. Okay, so, and welcome to another Photoshop
Tutorial in toa. You can see the way
my text disappears. So let me just put
my played somewhere away from, you know, this. And let's talk about
the older version, for those who might be using an older version
of Premiere Pro. Once again, you go to your
menu, you click on Tit two. Then under tit two,
you choose new title. Under new title, you
choose default steal. All right, default steal. Okay? So when you do that, it's going to show
you something. So there's actually a way I can type the old way in
the newer version, and that was how I was able
to get there the other time. So if you're using a newer
version and you are used to the old way of typing and you
want to type that old way, you can go to File New, and choose legacy title. Okay? So this of using
the old version, you would have been here
already when you chose default steel and I can just name this Kshow as the
name of the layer. Then click Okay. And
then once this comes up, you can see that it shows
me all of this window here. I can click on the T here, then come to my screen, click and type K show. Okay? And then when I'm done, you first thing, go back
to your selection too. Then you can come to the right
here to adjust your text. So you can see the font
family is also here. I can change that
to Monticera again. So I'll just scroll
down gradually. Okay. Because sometimes
Premiere Pro crashes when you are trying to
load up this font in your, you know, old way of typing. So I'll come here, click
on this Montserrat, change it from thin to bold. So I'm doing exactly
the same thing I did using the new
version of typing, and then increase my font
size to something around, you know, this size, and then just place my
text right there. So you can move your text around depending on where
you want to place it. You can see that we also
have our color right here. I can choose red if I want red. For example, if I want my
outline color around my text, I can, you know, come to this stroke and say d. You can see at
a black stroke. I can change it
from a black stroke to maybe a white stroke. And then increase the
size of my stroke. All right. And you can see
how that happens there. And then I can
even add shadow if I want to add shadow to my text. I can change the
distance of my shadow, increase the opacity
of my shadow, so you can see how my shadow is, you know, being
added to my text. I can turn it off if
I don't want shadow. I can turn on background
if I want a background. I can see that the background in this old version just fills up the entire space instead
of just the text, okay? So if I drop this
text on my video, I won't see my video again because this now
has a background. So you want to
make sure that you don't check on this background, and you can see
how we can adjust everything just like in the
new way of typing. All right? Just that when you're done, you have to close this window. You don't need to save anything. Come here, close, and then go
back to your project panel. Okay. And then under
your project panel, you can see the text right
there or your tiles file, then I can drag it from here
and drop it above my video. Okay? And you can
see what we have. So they will both give you
the same result, right. So if you have a newer
version of Premiere Pro, you can type the new way. If you have the older way if you have the older
version of Premiere Pro, you can type the old way. All right. And the time in
which your text is going to show here totally depends on the length of your text here. So if I play this from here, to change the color
of this to this. Very simple. But before then. I can see that when it passes
that point, it disappears. If I want my text to show
throughout my entire video, I can increase the timing, you know, to the entire video. And you see that
throughout the video. Okay, so we remain
there. It's okay. Okay, so that's that. Alright. So there you have it. So depending on you
determines what you want. You can also reduce it if
you just want it to show for a little time and just
put it right there. Call me Kaso and you can
see how that plays out. Okay? So, guys,
that is how to type a default text in
Adobe Premiere Pro. In other videos, we're
still going to talk about text and how to do some
other things. Alright. See you in that
video. Piece out.
16. How to Subtitle in Premiere Pro: What's up guys. Welcome to another video in this Adobe
Premiere Pro training. In this video, we're going to be talking about subtitling. Alright, under text. So let's get straight
into it right now in Adobe Premiere Pro. Whoo. Okay, so we're right
here in Adobe Premiere Pro, and we want to talk
about subtitling, okay? So subtitling is not
really different from the way we just
typed our text right now. So once again, I'll just
come to T right here. Click on my video. But before then, let
me listen to my video. What's up, everybody. My
name is Gabriel Show A. Alright, so what's
up, everybody. My name is Gabriel Show A. That's what we have right
there. So let me just delete this text here so
it doesn't confuse me. So I'll click on my screen and then just type exactly
that. What's up? Everybody then I
can press Enter. My name is Gabriel Shaw. Okay. So you can see that Immily start typing that another
layer was added here. So before I start
adjusting everything here, let me just quickly go
back to my selection too, and I can drag that and
put that right here. You can see it's
aligned to the left. So I'll open up my
effect control, open up my text,
make it centered. Okay. So right now you can see the alignment makes sense because we have
two lines of text, and then I can
reduce my text size. To something, you know, very small like that. Okay, let's do maybe 57. And then the only thing
we need to do now is to just place this in the subtitle, you know, region of our video. And you can see what we have right there.
What's up, everybody. My name is Gabriel Shale. I think I should
make this medium. Alright. Yeah, better that way, sort of making it too bold. I can see that
subtitling right there. So but when I press play. What's up, everybody. My name is Gabriel Shoe. But you can. So everybody already
knows my name before I even hit Play button. Alright? So I'll grab this and move this to the exact point
where it should appear. What's up, everybody. So at that point where
I'm saying, What's up. I'll just move it to that
point. Press play again. What's up, everybody, M. Alright, so I think
it came in fast. So I'll just move it,
so it just for you to arrange it and make it
coming the right time. What's up, everybody. My
name is Gabriel Shoale. And you can see that at this
point, I'm done with this, so we trim it to
end at that point, okay? So if you play this now. What's up, everybody. My
name is Gabriel Shoale. But you can call me Kisho. Alright, so but you
can call me Kisho. So how do I create that?
But you can call me Kisho. Now, the fastest way
to go about that is to duplicate this
current text, right? And how do I do that easily? All I need to do is to hold down the O or option key
on my keyboard, all that's out on Mac, out on Windows, I mean, and then options on Mac. If I hold that down, click and drag this as if
I want to move it, you will notice that when
you release your mouse, it actually make an
extra copy of that. Okay? So if I put
this right here, I have the same text in both of them. I won't see
any difference. So what I can do now is
I can select this one, head over to my et control, okay, to check the settings. And then to change the text, I can easily just double
click on it on the screen. So the text I'm
currently seeing now is the text for this because
this is where my playhead is. So I'll make sure that my
playhead is on top right here. Then I can double
click on the screen to edit this text, okay? And I can change that to Okay, so forgot what I said there. But you can call me K Sho, and welcome to Alright, but you can call me Kisho. So I'll just come right here, select all and type, but you can call me Ksho. All right. And that's it. And then I go back to
my selection, too. So if I play from the beginning now, what's up, everybody. My name is Gabriel Shoal. But you can call me
Kho. And welcome to. Alright, so you can see
how that played out, okay? But you can call me Ksho and I want to make it
stops right here, okay, so that then I type the next day Come to
another Photoshop, Tutoria. Welcome to another
Photoshop, Tutoria. Click. Hold down O.
Click and Drag, okay? And it's as simple as that. Come over here, put
your play there. Double click here and just
type, and welcome two, another photo Photo shop total. Okay. Let me just bring
the another down, then bring this like this, okay? Yeah, welcome to another
Photoshop Tutorial. Okay? I can see how that is being done.
So I'll just go on. What's up, everybody. My
name is Gabriel Shoal. But you can call me K Show and welcome to another
Photoshop Tutorial. So it's supposed
to end right here. Okay? So I'm going to stop
right there with, you know, subtitling all of this because
I'm not going to subtitle everything on this video to
be longer than it should. Okay. So but you get
the idea behind it. You might be acting, Oh,
this is really stressful. This one I'm going to be
doing the entire video. Yes, that's what I'm going to
be doing the entire video. Okay? Although we have
some caption, you know, auto caption generator software
like YouTube, you know, I think Video and some
other software like that that can auto
generate captions. Okay? Even Facebook can do that. I think Instagram is now
doing that too, you know, they just listen to it and auto generate the subtitles
and everything. So but the reason why I'm teaching you this
is that there are some subtitles that you might
have to do yourself, okay? So maybe you are trying
to subtitle from one language to
another language. Alright, then all those auto subtitling software
can't do that. So YouTube can't subtitle from English to French for you, okay? You have to you want to
subtitle that yourself. So that is why you must
know how to subtitle. And yes, subtitle is so you have to do the
work if you want to, you know, get that perfect
video with your subtitle. Okay? So that is how
to go about that. And now, looking at my subtitle, I want to talk about
something again. Some people might find
it hard to maybe read, you know, some of
my text right here. And what I can do at that
point is that I can actually draw a rectangle here
to kind of create, you know, a border for my text. And how do I do that, okay? In the newer version,
I could simply make sure everything
is diselected because if I have this selected, it's going to be drawing the
rectangle inside this text. So for me to do this, I'll just make sure that
nothing is selected, right. And for you to know
that you can see that nothing is showing in
the effect control. I say no clip selected, right. So once you have
nothing selected, right here, you'll be
seeing your pen tool, okay? You want to click and
hold the dropdown of this pen tool to show
you your rectangle two. And with your rectangle two, you can come to your screen, click drag and draw
a rectangle, okay? Click drag and draw a rectangle. And you can see that that
automatically places the rectangle on
Video track three. Okay. But right now, what I want is
actually the opposite. I want this to be
on Video Track two, and then the text to be
on Video Track three. You can see that the rectangle
is covering the text, and that's because it's
on top of my text, okay? So I'll just move this to
the side, move all of these. I can select three
of them this way, move them to video track three, grab my rectangle and complace it underneath this way to
cover the entire thing. I can see that my text is
now above the rectangle. Okay? So I can still
adjust my rectangle. I'll just go back
to my selection to select my rectangle and just, you know, add some more height to my rectangle up and down. Okay? And I can select
my rectangle here, go to my effect control. Open this up and you can see
the color of my rectangle. I can change that to
a darker, you know, shade of gray. Okay. I can see that right there. And I can even scroll
down to opacity for this and reduce the opacity
to kind of give it like a transparent rectangle. Okay, so that people can
still see what I have, you know, in the
video at that point. I can do like 70, okay? And when I press play now,
what's up, everybody. My name? Okay, so you can see my
rectangle showing right there. So I need to just
adjust it to, you know, go out of the screen so
that people don't see that stuff right there.
So let's play that again. What's up, everybody. My
name is Gabriel Shoal. But you can call me K
Show and welcome to another Photoshop Tutorial in today's So I can just continue on and on
and on like that. I could just drag Oops, sorry. Let me close that. I could let me delete this. I could just drag my rectangle
and make sure it covers my entire video so that as
I keep placing different, you know, text here, they
keep showing along this area. So I'll just keep
doing my O drag, Ed detextO drag, Ed detext
until I'm done, subtitling. Alright. And that's
how to work with subtitles in Adobe Premiere Pro. All right, so let me
just change this. Just let me leap it
dip it right there. Yep. So everything can, you know, blend
together. All right. So that is how to subtitle
in Adobe Premiere Pro. Now for this is in
the old version, let me just quickly tell you it's still the same
process. You go to FLN. So you go to Tit two new
Title default Steel. So it new title default Stele. So let me just quickly go
to my legacy tit two here. Then you just call this
subtitle two, right? You can call this subtitle two. Click Okay. And basically, you are doing the same
thing we are doing. So let me just remove this
rectangle here because let's zoom because in
the older version, you would not see your
rectangle right here beside you won't see your rectangle to beside
your pen to here. So where you come to draw your rectangle in the older
version is right here. Okay? So if you look here, you can see there's a
rectangle two here. I can use that to
draw a rectangle, right, and I can just close
this and name this rectangle. All right, can name
this rectangle. So you don't type there
because if you type inside the same
rectangle inside here, then you won't be able to adjust the rectangle independent
from the text. All right? Don't
forget this is for those using the old
version. All right? You won't be able to
adjust all of that. So you want to make sure you
just draw a rectangle here, then you go back and
now type your text. So you type your text
separate from your rectangle, so I can call this
sub type one, okay? Press Enter and then
grab my T here. Click and now type. I can now type sub tie to one. Okay, change your
font and all of that. Okay? So I can change my font
and all of that right here. Let me just change it
to something simple. Okay, make it like that. Increase my phone size.
I'm just trying to create something fast here so that
we can end this video. You can see I have my subtitle one there.
I can close this. I can change the
color of my text to, you know, black since my
rectangle is already white. Okay, then close that. And you can see both rectangle and subtitle
one is now showing here. I can grab my rectangle, place my rectangle here,
can see my rectangle, then grab my text, drag it and drop it above
the rectangle, and I can see subtitle one. So I can just quickly double click this to edit
my subtitle one. Okay. And then reduce the size of my text so I can fit with
my rectangle right there. Okay. And that's it. Okay? And then you do
the same thing out drag to edit your subtitle two. So to edit your subtitle two, you just double
click on this and it will bring you
back here, okay? And then you can double click and change it
to subtitle two. Okay, close that, and you can
see we have subtitle two, and I'll just extend my
rectangle to cover up for that. So I have subtitle one, here, and subtitle two here, just the same way
we've created it in the newer version right here. So whether you're using the new version or
the old version, that is how to subtitle in
Adobe Premiere Pro. Piece out.
17. How to Create Lower-thirds in Premiere Pro: What's up guys. Welcome to another Adobe Premiere
Pro Tutorial. In this video, we're going to be talking about lower thirds, okay, how to create Lower
Thirds in Adobe Premiere Pro. So let's get straight into it right now and do just there. Okay, so right now we are
in Adobe Premiere Pro, and you can see I've done a
lot on this video right here. And simply what I'm
just going to do is just look for the
same video here. You can see this is the
sequence, not the video. So I don't want to drag this. I'll scroll all the way up. I can see the video right here. I'll just drag that,
drop it again, so give me another
version of this video. Gabriel, surely. All right, so I
can do what I want to do on this part of the video. All right, so lower thirds. What are lower
thoughts? Lower thirds. Is that, you know,
rectangle that comes at the bottom of
the screen showing you the person's name or the
person's portfolio while in an interview or maybe in a news or you're login
on YouTube and stuff. So let's just
quickly use that to create a lower though for myself here to tell people
my name and my portfolio. Okay? And to do that
is pretty simple. All I'll simply do is first
grab my rectangle tool. Don't forget Di rectangle tool is where you have your pen tool. If you've seen the
pen tool here, just make sure that you
click hold and you see dictangoT then once I
grab the rectangle tool, I'll just draw
something very simple. Okay. I'll just click drag click drag to draw
a rectangle. All right. You can see my rectangle
right here. All right. When I'm done, I'll go back
to my selection tool so that I can select my
rectangle and move it around. So I want to make sure that
part of this is off screen. Okay. Then I want to
draw another rectangle. Okay? So I'll go back
to my rectangle tool again and click and drag. Okay, click and
drag my rectangle. Okay. So I'll just go back to my selection tool and
adjust my rectangle. I'm trying to get that. Come on. Yeah, extend it like that. I move it up. Okay. But I want to change the color of this one to maybe a red, o, and just make it a little
bit bigger like that, put it on top of this
one change that color. So you can see
that because I had this same layer selected when I was drawing
the second rectangle, Premier Pro automatically
say, Oh, okay, so you want this rectangle and this rectangle
to be together. And it's going to automatically
draw them so you can see shape one and shape
two in the same layer. If I wanted it to be
on a separate layer, I would have
deselected everything before drawing another
rectangle, right? So, but this is
the way I want it. I want both of them to
be on the same layer. So I'll just select my layer, then go to my shape two, open it up and
change the color of that to a red color, okay? Right there, something
around this color. Click Okay. And I
can see what I have. So I'm trying to create
the rectangles for my lower sort, and
this looks good. All right. So the next
thing I want to do now is to type, okay? And because I want to
type and I don't want it to also be stored
in this same layer, I'm going to first deselect
and then click on my T, click on my screen so
that it will create a new layer for me and
I can type my name. So I'll just type
Gabriel, show lay Okay. Go back to my selection to and grab that and
put that right here. Okay? I can open up my text and just increase my
text size a little bit. Something like this is
really good. All right. Okay, so you can see that's
my name right there. And still with this
layer selected, I can type in another
text on my screen. Okay, you can see right
there, shape text too, and then I can just Oop, sorry, it's you know, adding
it to this layer here. So I'm going to do
that and make sure that this is the
one selected, okay? And then I'll type CEO
Ksho Concept Alright. And then go back to
my selection to come back to my text right
here, open it up. So you can see both texts are
in the same layer, right. So that's the way I want it. And I would just come over here and
reduce the sides. Okay? I could actually decide to put everything on
one single layer. You can also do that, okay? It's just that if you want
to separate your text from your rectangle in the future, you might not be
able to do that. So I'll drag this and
put that right here as my portfolio to let people
know what my portfolio is. I think I'm going to
reduce this some more. So maybe we'll do 36. Yeah. So that looks cool. Okay? And place
that right there. So you can see how I've
been able to quickly create this nice lower third
in Adobe Premiere Pro. Don't forget if you're
using the old version, you go to Title, new
title, default seal. You give you layer name. Once the panel opens up, you draw your shape and type
your text inside that place. And then when you're done,
you drag both layers from your project or
your exercise files and drop them on top of your video just the way
I have it right here. Okay? So this is how to create
a simple lower thought. So if I go back now
and I press play. What's up, everybody.
My name is. So I want you to come where
I'm about to say my name, so I'll select both layers
and just move it forward, okay? And press play again. What's up, everybody. My
name is Gabriel Shoale, but you can call me Kisho. I want it to end right there, so I'll just trim both of them. And we have this. So play again. What's up, everybody? My
name is Gabriel Shoale. But you can call me
K Show and welcome. Alright. And the cool
thing is I can go to my effect, okay? I don't know why this
opened up again. I think it was when I was
trying to reset my workspace. Okay? So I can go to effect and then go to video
transition and go to dissolve and add the
cross dissolve to the beginning of both layers and to the end of both layers. So they fade in and fade out. My name is Gabriel Shoal, but you can call me
Kho and welcome. All right, you can see
how nice that was done. Or I could remove
the fading fade out. Grab both of them, or sorry, grab them one after the other. Okay, and animate this. Okay? So I can come to
the position for this, set the keyframe
for the position at this beginning point,
move it outside. Okay. And you can see
that spin moved outside. Okay. And then
select this one too, and go too, sorry, I have to come to
shape two, shape one, open up shape one, and set the key frame for that to
position and move it outside. Okay? And then I have to do
the same thing for text. I'll come to ext text one. Ah, this is looking
so stressful. I should have just typed all
of them on one single layer. All right. And that would
have been way better. Oh, sorry, let me undo this. Instead of even editing
this one by one, I could just select this
layer of the shape. And instead of adjusting the position for
the text itself, okay, at the bottom,
you will see motion. So I can open up this
motion and adjust the position so to move
both layers together. So I'll click on my
position right here, okay? Click and take that outside. You can see both of them
is moving together now. Then I'll go to my text
also and do the same thing. Click on the stopwatch
for the motion position. And I'll move both
texts out together, then move forward a little bit. Okay, and bring back
my text in, okay, and then select my rectangle and bring the rectangle in also. Okay. And that's my animation. So if I press play now
name is Gabriel surely. And see how that came in, but that's so frequent slow. So I'll just reduce the space between these
two keyframes, all right? And then I'll go to
my text also and reduce the space between those two keyframes and
press explain them. Gabriel, show us. All right, so you can
see how that came in, and then I can do
my es in to the ending one and my es out to
the beginning key frame. I'll do the same thing here. Okay? Es out. Oh, sorry, is in, and then the first
one is out. First play. My name is Gabriel Surely. Can see how that
came in smoothly. So this is how to
create a lower third in Adobe Premiere Pro and begin
to create great stuff. Alright, I'm going to end
this video right here, and I'll see you guys in
the next video. Pull.
18. How to Create Text Alerts in Premiere Pro: What's up, everybody. Welcome to another video in this Adobe
Premiere Pro training. In this video, we're going to be talking about Alert, right? Those are the texts
that you see that scroll across your screen
while you're watching a video, trying to pass on
information to you. So let's talk about
how to create that inside of Premiere
Pro right now. So we're right here inside
of Adobe Premiere Pro, and let's talk about Alert. Okay? Let's talk about Alert. Now the thing about Alert is that to type that kind of text, you can only get it typing in the old way of typing
in Premiere Pro. So meaning that even though there isn't a newer
version of Premiere Pro, we have to go the
route of typing the old way to be able
to type that alert, you know, for our text. So how do I go about that? I'll simply go to file new
and select Legacy title. Now, those using the
old version, okay, remember when you want
to type your text, you come up here
and choose title. So when you click on that title, you're going to see
new title, okay? And then under new title, this time, you're going
to choose Crow left. Default Crawl, I mean, okay? You're going to
choose default Crowl rather than default steel. Okay? So those using
the old version, once again, you go to Title. New title, and then you
choose default Croll. While those of us using
the newer versions of Premiere Pro will go to
FL let me cancel this. We'll go to Fle New and
choose legacy title. Okay? So everybody
should be here now, whether you're using the
new or the old version. I'm going to come to my
name here and I'm going to type in Alert, okay? And then click Okay. And when I do that, you
can see we are back to our regular old way
of typing. All right. Now, those of using
the new version, in case when you get here, you are not seeing
something like this, maybe you are seeing
something like this, or you are seeing something like this or you're seeing
something like this. Just press the tiled key
on your keyboard, okay? The Tilda key is under the
escape key on your keyboard. Just press that and
it's going to show you your full window. All right. And if that is not working, you can simply go
to Window workspace and say reset to save layout. Make sure you're in
editing and then click on Reset to save layout. All right. That will close the panel, but you simply just
want to scroll down in your project panel and you will see that
alert you created. Double click on it, and this time it should show properly. Alright. So that's just that
in case you are in that fix. So now that we are
here for our alert, we're just going to
come to our screen. Make sure you have T selected, come to our screen, and then I'll just
type breaking news. Okay. Alright, so don't
bother yourself about this. That's how the font
behave. All right. So this is supposed to be
semi colom and not this. So I'm going to change
the font later. Anyway. Let's just keep typing. So what has happened?
Breaking news. Cornavirus has been defead. Okay? And let's type
something like that. Okay? And I can go back to my selection to go
to my font family. Go to my font. Let me just choose
something simple. Maybe use century goti. Then change the
font style to bold. Now, it's not all
font style that it's not all font family
that have font styles. Okay? So is regular. When you even click
here, the only thing you still see here is regular. Alright. So it depends
on the font you're using that will
determine the number of style you see here. Okay? So let me
change this to bold and just reduce the
stack size a little bit, maybe to this, and then I can grab that and just
place that right here. At on my screen. Okay? Now, as we
have typed this, okay, those are using
the old fashion, you will notice that
you already have a scroll by here because you've already told Premiere Pro
that you want to create an alert by choosing
that default Croll. But those of us using
the new version, we've not told Premiere Pro
that what we want to type is a default crow or alert text. All right, and we
need to do that. Okay? So I'll come to this
icon right here. Click on it. That icon is called the
olllas CrolOptions. All right. Those of us
in the old version. When you click there, you'll notice that you are
already on Crow left. So those of us using
the new version, we're just going to come
here and select Croweft. Okay. And that's that. But there's something we
all are going to do now, and that is to click on
this start off screen and click on this end off screen. Okay, so
what does that mean? That means that my text will come from outside the screen, come into the screen and then
go out of the screen again. So to give you the
effect of coming like that and then go
out of the screen. So we're going to click on Start off screen
and end off screen, and then click Okay. All right? And when I do that, those
of us in the new version, we can answer that we
also have a scroll by here to scroll left and
right in case you want to read and confirm our text if there are no typos
in it and stuff. Okay? And that's it. Okay? I can even double
click on this breaking news. So I did the text and
change the color of the breaking news
alone to red, okay? And you can see that, so that
calls people's attention. Okay? Now, once we are
done typing our text, I can simply close this, and that will close
my Alert text. And all I need to do
now is to drag it from my project panel and drop
it on top of my video. And when I play this
back, tutorial, and in today's tutorial, I'm going to show you how
to change the color of. We can see how it's playing
really, really fast. Okay? So to slow that down, all I need to do is to extend
it to give it more time. Okay? So this time
when I press play. Oreal. And in today's tutorial,
I'm going to show you. Okay. Come in. Let
me just drop this. Well, and in today's tutorial, I'm going to show
you how to change the color of this to this. Very simple. But
before then, Intro. All right, so you can
see what we have there. So that's how to
create your alert text in Adobe Premiere Pro. So but to make this cooler,
let me move this up. Go back to my file new
legacy title, okay? Those using the old
version, you go to Title, new title, and this time, you go to default Steel. Because what I want to do
is I just want to create a rectangle for that text scrolling across
the screen, okay? So I'll click Okay, and
that would open up here. And I want to put my
playhead on the text, so I can see the
text right here. And all I want to do now
is to just draw rectangle, click drag to draw rectangle. Oops, select my rectangle again. Click and Drag. Okay, so it's drawing now and draw
rectangle right there. Okay. I'll make the color of my rectangle
something dark gray. Okay, and also make
it transparent. So let me just expand this
so I can see this some more. So I'll come to the opacity of my color and just reduce that so that we
can see that right there. But right now, the rectangle is above the text. No problem. All I'll just do is close this, alright, because I'm done, and then I'll just
drag the rectangle, and when I'm placing it here, I can see I'm placing
it underneath it. So it's going to show
underneath my text. So if I press play tutorial, and in today's tutorial, I'm going to show
you how to change the color of this to this. Very simple. But
before then, Intro. Alright, so you can see
how nice that looks like. So this rectangle is just to
make the text more readable, right on that part of the layer. So that's how you create your alert text in
Adobe Premiere Pro. All right. Thank you for
watching this video, and I'll see you guys in
the next video. Piece out.
19. How to Create an End Credit in Premiere Pro: What's up, guys. Welcome to another video in this Adobe
Premiere Pro training. In this video, we're
going to be talking about end credit, right? So that's the text you see
after you're done watching a movie and it's
trying to show you the cast and crew and
all of those things. And the text just keep scrolling up and up across your screen. So let's get straight into Adobe Premiere Pro and talk
about how to create that. Oh. So right now I'm
in Adobe Premiere Pro, and let's create our end credit. So for this end credit, let me just take my playhead
all the way to the end because I want a black screen to show while I'm
typing my text. So to do this again, just similar to the alert
in the previous video, we have to do this
end credit by going the route of typing the old
way in Adobe Premiere Pro. So those of us using
the new version, we're going to go to File
New and select Legacy title, and they will name
this end credit. And if you're using
an older version of Adobe Premiere Pro, just simply go to
Title new title, default Role, okay,
default role. And then you should open up this and then type in
credit here and click Okay. Okay? So I'm right here. Let me just I don't
know I have to adjust this every single
time. All right. So you can see what
we have right here. Now, the reason I'm seeing
a black screen here is because my playhead
is not on any video. Once I put my played
on any video, you can see showing
me a video here. So I want it to be
somewhere at the end of my video so I can
see a black screen, like we see on a regular
movie or video after we see that black screen and we see the text move from
bottom and goes up. Okay. So when it
comes to end credit, we want to go to our T. But
before we type this time, instead of just
clicking and typing, you'll notice that
when I type here, it just keeps going on and on to the right
forever and ever. All right? It's not
wrapping up my text. And when it comes to
typing end credit, end credit is always a
very long text, okay? If you put them in pages,
you might have up to, like, maybe, you know, 50 pages sometimes depending
on the cast and crew. So before we type, so I'll undo this,
we're not going to type the regular way that
we know how to type. We'll select our T. But this time we're going to use our text to create a text box. Okay? We're going to use
it to create a text box. Alright, and how do you create a textbox with your text
to or your type two? All I need to do is we're going to use
this guideline here. So this is a guideline
in Adobe premiere Pro, and we're going to use this
inner guide for our textbook. I will come right here,
click and drag to kind of make it look as
if you're drawing a rectangle to fit
that guideline. And when you're done,
you release your mouse, and you'll notice
that there's now a cussle blinking inside here. So what we have
just created now is what is called a text box. Okay, or what is called
typing a paragraph text. And this time when I type, even without pressing Enter, once my text gets here, it automatically come down here to the new line. All right. And you can see that my text
is now being wrapped up rather than the other
time where it just keeps typing on and
on and on and on. And if I want you to
come to the next line, I have to press Enter. So in this case, I don't
need to press Enter. It just wraps my text
around this box right here. Okay? So let me control A
and delete all of this. And I have some text on
my notepad on my system, so I'm just going to
go and copy that text. So I have a dummy text
there on my notepad. So I'll just Control A to select all of
this and Control C. So you could also get any
dummy text from your laptop. If you have any text
or any document, you can just open it
up, copy the text. If you don't have any
text to copy anywhere, just come here and keep typing anything that you want
to type. All right? Uh oh. What did I press? Okay, so back here, you can just keep typing
anything you want to type here, and then you have so many texts. So let me paste that
text right here, Control V or Command
V to paste my text. And you can see it has pasted
the text from my notepad. Okay? So I can go back
to my selection tool. First thing I want
to do is to change the font to Century
Gothic again. Okay, make it bold. All right. And reduce
my phone size. So this is an end credit. I don't want my phone
size to be too big that people won't be able that it's going to cover
the entire screen. So let me do maybe
38 or something. All right, so that looks good. I can see my text right now. Okay? So one more thing
that we need to do. Alright, just like we did
when we're creating the laps, there's something that
we all need to do. We all need to come to
this icon right here. Which is a roll
and crawl option. Now, those of you
using the old version, you will see that you
are already on roll. So those of us using
the new version, we have to change
this to roll, okay? And then we all have to come
to this start off screen, click on it, end off
screen, click on it. Why so that it can start
from all the way bottom, come into our screen, and then also go off our screen. Alright, so we have
that effect like that. So you must check on your start off screen and end off screen. Now we click Okay. All right? And after doing that, you'll notice that I've
pasted my text here. Now, if your text is not
as much as mine, you know, maybe yours will stop somewhere
around here or so, okay? But you can see that
the text I copied is really a lot of text, okay? And when I come to Premiere Pro, I can see the text here. And I'm seeing this
plus sign here. And this plus sign is telling
me that, Hey, heads up. This is not all your text. Your text is way more than this, and the remaining of this text
is not showing. All right? For you to make this show, you have to get rid
of this plus sign. And how do I get rid
of this plus sign? I'll just come right here, put my mouth on this
small box here. You'll see my arrow
pointing up and down, and then I can click and
drag this down Okay. And you begin to see
all those hidden texts. And for me to see those texts
properly on the right here, there is now a scrollbar
that is available for me. I can click and
scroll that down, and I can see that there's
still a plus here. So I'll come here, click and drag to also show
the hidden text. Come back to my scrollbar. Scroll down. I can see
there's another plus. So I'll just keep
repeating this until I can't see any plus
right there again. So I'll scroll down drag again. So this text is really much. Now you can see there's
no plus here again, okay? So I'll just come up
here and just make this end somewhere
around here, okay? And you can see all of our
text now visible right here. So the last thing I want to
do is to center my text. So I'll come up
here and just click this center align to give you that Hollywood effect, okay? Hollywood effect. Alright.
So there we have it. You can see all that we
have right here, okay? Great. And the beautiful
thing about this is that you can even add images here, okay? Say, for example,
at this point here, let me just edit this text
here and break them into two. I'll just press Enter, Enter, Enter, then take my Coso
and put it somewhere. Now, let's assume how to add maybe a logo in the middle here. I can actually do that.
I'll just right click Okay. And right here,
I'll see graphic, and then another graphic,
I'll see insert graphic. So I'll click on that and it's going to load up my
file manager and ask me what type of graphic
do I want to import? So I can just go to
where I have my file. Okay. And then writer, you can see I have this logo
here in our exercise file. I'll select that, click Open. And you can see
that it brought in the logo into my stuff. So I'll go back to
my selection, too, so I can select the logo and
move it the way I want it. So I need a lot of space right here so I can
go back to my text. Okay, so you can see this is
the logo. This is the text. So you must do the difference
between the two of them. So I'll go back to my text. Double click on my text. Oops, sorry. You can see. So this thing is already
causing some confusion here. Go back to my selection,
double click on my text, okay? Use my cussle down to move
down and keep pressing Enter, Enter, Enter, Enter, Enter,
enter, Enter, Enter. I'll have enough space
to contain this logo, and I'll go back to my logo, drag it down, okay, and fit it right in that
empty space right there. So if I grab my scrollbar
and I scroll down, you can see I still
need some space here. So I'll go back to my
text, select my text. Okay. I'm trying to select text. Great. Double click and you can see my Cusso
blinking here. I'll press my Cusso up To get there and
press Enter, Enter, Enter, and you can see
this looks good now. Okay? So I've created space
for my logo right here. Okay? So you can do whatever
you want to do add images, edit your text,
change some colors, do some other thing, do some
alignment, all of that. By the time you're
done, all you need to do is to close this, okay? And you find out that your
end credit is right here, and I can drag that and drop
right here after my video. And when I press Play, it's going to be really fast. Okay, so we don't want it to be that fast. So what do we do? I'll just use this my scroll to scroll here
and then come here, make sure you are on
your selection too, and then click drag
to extend that, and I'll become slower. So if I press play this time, you can see still kind of fast, so I'll still extend
it some more. And you can see what
we have right here. Okay? So this is how to create an end credit in Adobe
Premiere Pro for your movie, your documentary,
your interview, whatever it is that you've
done in Adobe Premiere Pro. Okay? I can also come to my
project or my exercise files. I have an audio here, okay? I can drag this audio and just put it on the audio
section of my end credit. And what will happen
when I press play, I will hear the audio play
while the end credit goes on. All right, so you can see
how easy that was, okay? You can even be more creative
with your end credit. I mean, you could actually drag and drop it on an
existing video. For example, if I grab
this video, put it here, I can actually put
my end credit on top and I'll see that my video, and that is play
Yo. Simultaneously. What's up? Cake show. Okay. Or I can actually do something really
cool. All right. So I'll go to my video here, go to the effect control, select motion, and this gives
me this bounding box here. Or you could actually
get to this bounding box by also double
clicking the video. But when I do that,
you can see that the end credit is one
getting selected. So that's why I have to come to the effect Control and
click on this motion here, and then I can reduce the
size of my video, okay? Sorry. Click and drag to reduce the size of
my video. Okay? So let me just remove
this end credit and get it out of
the way for now, so I can just
concentrate on my video. So I'll just reduce the size and position that right here. Okay. I'm sure you already
seen where I'm going to, and now I need to go
and edit my end credit. Okay? So I would double click on this layer to open up
my end credit again. Okay? And once that opens up, I can come right here
and just collapse it to the side
like this halfway. Alright, so just to save time, I'm going to have to delete this logo because
I don't want to start rearranging it all
over the place again. And then after dragging
it to the side like that, I can align left so that
everything aligns to this part. I can move the entire
thing somewhere around there so that we have some
space here, and that's it. I can close this. So this is exactly what you see
at the end of a movie, and they're trying to
show the making or something on the side, okay? Yo, man. Yo. What's up? Show. How you doing, man? Good to see you. Okay, can even add my music there underneath it while the, you know, audio is going on. Okay. And I'll just
need to reduce the volume of my audio here. So I'll turn off the keyframe, reduce it to like minus. Let's do -20. T gums
on the background. Give me now. So you can see what we have. So that's it, guys. Ah, we're done for this video. And I'll see you. In the
next In next video. Alright.
20. How to Synchronize Audios in Premiere Pro: What's up, guys. Welcome to another video in this Adobe
Premiere Pro training. In this video, we're
going to be talking about audio
synchronization, right? So you have an audio here. You have an audio here, and you like to synchronize it. Maybe it was a
music video or you were recording your audio
separate from, you know, audio coming from the camera and you're just finding a way to synchronize your audio together
in Adobe Premiere Pro. That is what this
video is all about. So let's get straight
into it right now in Adobe Premiere Pro and talk
about how to do there. All right, so we're here
in Adobe Premiere Pro. And like I was saying
in previous video, we're going to use this video as an example to do our
audio synchronization. So I have this video
here. All right. Let me right click on that and say new sequence from clip. Okay? And I'll create a new
sequence from this video. Let me play this so
you can hear this. So All right, so you can see that
the audio here is, you know, it's really
bad, all right? We can hardly hear what
he's saying, you know, because at this point, the audio that came
with this video is the audio from the
camera, right? And there was no mic attached
to the camera or anything. So what's going on
here is that I hear him wear this Lapel mic, okay? And I had a recorder
in his pocket that was recording a better quality
audio right there. And if I come right here, in my exercise file, you can see I have an audio
here called nano audio. So this video is nano video, and this audio here
is Nano audio. In case you're seeing
something like this, just make sure to
come here and change your icon view to this
big one so you can see, you know, Tom nails of
your video and audio. So if I double click on this to open it in
the source monitor, I can play this and you hear how clear the audio is in this one. A lot of other things with
regard to here. Let's move on. So what is no technology? The fundamental concept of it is you're manipulating
something, and we talk about ski. Compared to this. So you can see the echo and
everything here. All right. So my goal
now is I want to synchronize this audio with this audio because
when you're recording, you know, by the time you
grab both audio and video, so let me just drag
this audio and drop it into my timeline. By the time I press play here, I'll find out, you know,
they are not synchronized. So what is now technology?
The fundamental concept? You can see it is all
over the place, right? The audio is going left. The video is going right. You know, it's not
synchronized at all. So probably I started the
recorder in his pocket on time, then I started the video. So that's why you can see that the audio is longer
than the video. So I started this earlier
before starting this. So this could be anything. This could be a music video
that you want to synchronize. And that's why I said
that when they are shooting the video for a music, you notice that they're playing
the sound there and they want to ensure that the sound is getting into the camera, right, so that they can use that sound that came with the camera to synchronize it with the audio that was gotten from the studio. That's the wave format or P
three format of the audio. Okay? So when you are now
listening to the music video, you won't be hearing the
sound that came in with the camera while the
video was being shot. But what you'll be hearing
is that you'll be hearing the audio from, you know, the one that was
exported in the studio, or you'll be seeing
the video being shot in the outside environment. So that's the exact thing we
want to do here. All right. You could also find
yourself in a situation like me whereby I most often do my recording
separate from my, you know, audio recording. So my video recording is always separate from my
audio recording, right, so I get a
better quality. So how do I synchronize them
when I get to Premiere Pro? All I need to do is to
select both of them. So I'll just put my video
and audio here and then put the audio alone
from the recorder here, select three of them together. All right, right click and
simply choose synchronize. Okay, and tell Premiere
Pro that I want to synchronize based on the
audio, based on the audio. Now, mind you, before
this can work, this audio that is in
the video has to be the same exact audio
that you have recorded. So you can see that while this Appel Mike
was recording his voice, my camera is also
recording the same audio. So that is when this will work. So if your audio
from the studio or your recorder is not the same audio with the
one in the camera, then this cannot work because what Premiere Pro will simply do is to look at those
two audio and see, you know, where they meet
and synchronize it for you. And that's it. Okay? So I'll say I want to synchronize from the audio and then I'll click Okay and wait for Premiere
Pro to do his thing. I can see that Premiere Pro
automatically helped me to move this video to
this point in my audio. So at this point,
let me expand this so you can actually see
the wave of the audio. All right, let me expand it. So you can see that if you
look at the wave here, it's similar to each other. So meaning that Premiere Pro has done a very good job of helping us to synchronize this because if Premiere Pro didn't
have this feature, what would have had to do
is to do this manually. So begin you know, move it across and all of that. And that's why I
see that in movies, we always have this, you know, clap at the beginning before starting recording so that
the editor will be able to, you know, synchronize
everything together. So we have that clapboard,
you know, at the beginning, when you see camera
rolling and action. Some people also do just clapping with their
hands, right? So, but with Premiere
Pro, I basically don't do that kind of thing
because Premiere pro just makes it easy for me. I just synchronize
does this thing, and I move on with
my project, okay? So that is that. So now,
when I play this pack, so let me just return the
stuff pack to normal. So let me play this back
you're manipulating something, and we talk about scale. So how big versus how small? And you see it's you can
see the fundamental concept of it is that it is perfectly
synchronized, right? As it's talking, I
can hear the voice, and both audios are, you know, synchronized together. So once again, let me play this. I'll mute this, and you will see that only the audio
here will be playing. And as it continues playing,
I'll also mute this. So you hear the
audio here alone. Technology. The fundamental
concept of it is you manipulate and
we talk about skill, so how big versus how small. And you see, it's a
manipulation of matter. So you can see the
difference right there. So it's always
good that you have a very good audio recording because people can forgive
you for poor video, but people won't forgive
you if you have bad audio. You can imagine if you're
listening to me right now and you can't hear me
very well, alright? You're not going to
forgive me for that. You're gonna be like, Oh, no, I couldn't get anything, right, because audio is kind of more important all right, the video, most of the time because people can overlook your
bad quality video, but as long as they can
hear you very well, they can still, you
know, enjoy your video. But when you have
a bad, you know, audio quality, you know, it just spoils
everything, right? So that's how to synchronize. What I can now do is
I can right click on this here and choose on Link. And what would that
do? That will allow me to select either of the two. I can select this and
press delete, okay? And then move this to the top. And then trim this to this point and then trim
this to this point. And I can select both now, right click and say Link. All right, so that these
two files are now one file, and the audio I have is the
quality audio right there. So if I press Play now, so what is now technology? The fundamental concept of it is you're manipulating
something, and we talk about scale, so how big versus how small? And you see, it's a
manipulation of matter. Alright, so you can
see how, you know, better this is than the initial one that
we had right here. Seeing something. The
fundamental concept of it is you're manipulating
something. Alright. So that is how to synchronize your audio
in Adobe Premiere Pro. I'm gonna see you guys
in the next video. You'll better be in the
next video or else. Hm, you're gonna see me
in front of your laptop, and you might not believe
what I'm gonna do to you. So jump right into the next
video right now and see.
21. How to Reverse a Video in Premiere Pro: What's up, everybody. Welcome to another video in this Adobe
Premiere Pro training. In this video, we're going
to be talking about how to reverse a video in
Adobe Premiere Pro. So let's get straight
into it right now. Okay, guys, so we're back right here in Adobe Premiere Pro, and we're just going
to quickly come here. Which video should we use? Okay, so let's use our
normal K show three. So let me look for
the video itself. This is a sequence. Where
is the video itself? Right here. So this is a video. So I'll right click New sequence from clip to create
another K three sequence. Alright. And you can see I
just have multiple of it. My name is Gabriel Shu. So let's just
reverse this video. So what I want to do is
that when it says intro, but before then, intro. I'll just reverse it all the way back to the
beginning at that point. So to simply reverse
a video is simple. You just select the video, you right click, and then you
choose speed and duration. And then just click on
this reverse speed here. Click Okay, and that's it. The video is now
reversed If I press play Oh, I didn't know that this
was gonna be really funny. Sounds like Chinese, man? I'm speaking Chinese
right here, man? Whoa. Oh, look, I see. I Alright, guys,
so let's move on. But you can see that I was able to successfully
reverse my video. But now it doesn't
really make sense. This is not what I'm trying
to do with my reverse. So let's do the right thing
now. So I'll undo that. So I get my video back. So, no more Chinese. I'm going to show you
how to change the color. Okay. So basically what I
want to do is at this point, when it says intro intro. I
want to pause it right there. I want to make sure
that the video stops at exactly that point, okay? Then I want to contro
see this, right? And I want to make sure
that my playhead is directly whether intro stopped. And I'll press ControV. So I just copied
and pasted this, right, copy and pasted. So people will see the
normal version of the video. Then Intro. What's up? So instead
of restarting again, this is the one I
want to now reverse. So it will start going
back to the beginning. So I'll just come to this
one right here, okay? Right, click and say
speed and duration, change it to reverse
speed and click Okay. So when I get here,
let's play this now. Simple. But before then, intro and I've started
my Chinese again. So, but again, this is not
what I'm still looking for. I want the reverse
to actually happen, you know, faster than it
was than it is now, okay? And to do that, what
I'm simply going to do is go back to that speed
and duration, okay? On this video, you can see that my reverse speed
is still checked on, and then this time, I will
come and increase the speed. So if I want to
increase the speed, I can increase the
speed like 300%, alright to really make it fast. I can see that trimmed
my video, to this point. So if I press play now,
when it gets to that point, it's going to reverse my video, but this time in a fast motion. But before then, Intro. Alright, so if I ever
want that to be faster, I can just, you know, right click and this time,
maybe let's do like 700%. You know, let's go crazy on it. 700, Enter. All right. And then press play. So it's just, you know, render. Intro. Fantastic. Alright? So this is how to
simply reverse a video. Now, if you don't
want your video your reverse to happen
in fast motion, you could just leave it at 100. But if you want it to really
happen in fast motion, then you can take it all the way up like I did on my own video. So let's play that
one more time. Very simple. But
before then, intro. Awesome. So that is how to reverse a video in
Adobe Premiere Pro. I'm gonna see you guys
in the next video piso.
22. How to Freeze a Video in Premiere: What's up, guys. Welcome
to another video in this Adobe Premiere
Pro training. In this video, we're going
to be talking about how to freeze your video. You know what I
mean. Okay, guys, so I'm right back here
in Adobe Premiere Pro, and let's talk about
freezing the video. So let me just
remove this mine or delete it this reverse that
we did in the previous video. And this time, let's
freeze our video. So maybe at that point
where I say intro, I'm just going to
freeze it right there. Well, then True. Just freeze me right there
and then we get that. So how do I freeze my video? Number one, you have to cut out the portion of the video
you want to freeze. So right now, the portion
of the video I want to freeze is this
portion right here, okay? And I want to cut it. And because this
is just a frame, a frame, remember a frame
is like a picture, right? Because this is just a frame, I will need to zoom
all the way in, so I'll be able to
cut out this frame. So I'll click leave
my playhead right there and tap the plus button
all the way to the end. Then I'll grab my razor
to click here to cut. Okay, then move one
frame forward so you can see that the remaining part I have here is just
the one frame left. Okay? So I don't need
to cut anything. So if I go back to my selection
so when I click here, I have my one frame
cut out right there. Okay? So that's the one
frame I want to freeze. So I'll just go back
to the beginning part so I can see my video
because at the ending part, you can see we are seeing black. So I'll just come back here
and I can see my video. So how do I freeze my video? I just click on that one frame
that I have cut out, okay? And you can see show me
motion of pasencyTmpping. This is not what I
expected to show me, and that's because I was right
clicking on this effects. So make sure that your mouse is somewhere away
from that effects. And then when you right click, you see all of these options. So here you want to
choose free mode option, and it's going to show you this, and all you want to do
here is to click Okay. And when I click Okay, this part right here has now been frozen. So if I play this back, let
me zoom out by tapping minus. But before then, intro. I'm like, Uh huh. This is not frozen. Yes,
I know it's not frozen. And that's because what we
did is we took a frame, some I taped plus
to zoom back in. We took a frame
which is a picture, and we froze that picture. And that's all. So
there's no difference between the picture and you freezing a picture
that is already frozen. So all we need to do now is to extend this frozen part so that we can actually
see it for a longer time, maybe a duration of 1 second
or two second or something. Alright? So this time
when I press play Intro. You can see that right
there. All right? Let me just go back there.
Let me extend that some more. Okay. And press play again. Oh, then Intro. You can see the wight,
I froze me there. But you can hear
that we are hearing some sound and some everything. So if I don't want
the sound there, I can just select this
right click on Link. Okay, select the audio
and press delete. I don't have any
sound at that point. But before then, Intro. All right, so you
can see that is how you freeze a video in
Adobe Premiere Pro. I could also make this
layer more interesting. Instead of just leaving it
like this, I can select it, go to the very beginning
of that layer, go to my Fat control and set
some key frames to this. So I can click on the
stop patch for position, scale, and maybe rotation. So I want to change the position of my
video, at the same time, change the scale of my
video at the same time, change the rotation
of my video, okay? Then I can move forward, and I can do some, you know, scaling up. I can do some position change. And I can do some rotation
if I want to. All right. And you can see
that right there. Okay? Rotate it some more
and place that there. If I play this now
on four then intro. You can see that. So if I
want this happening faster, I can just, you know, bring them closer to each other. Oh, then intro. Okay, bring it closer and you can see what
we have right there, and even select
this and take it, you know, further. Okay. Intro. Okay, so you can see that right? I can even go to my effects, search for Tint, drag that and drop on my video
to make it black and white. Intro. Alright, and you
can see that right there. Now, if you do a search
in effect, mind you, don't forget that you've
done effect a search on it because maybe I'm trying to get an audio transition
or audio effect. If I click this dropdown, you will notice that
nothing is showing a game. All right. And that's because
you have a search on. So when you do a search,
don't forget to always click this Xia to remove that search, and then you can always
see everything back. All right. So thanks so much for watching
this video, guys. That is how to freeze a
video in Adobe Premiere Pro. See you guys in the
next video. Peace.
23. How to Create a Slideshow in Premiere Pro: What's up guys. Welcome to another video in this Adobe
Premiere Pro training. And in this video, let's
talk about slideshows. Let's get straight into it. So I'm right here in
Adobe Premiere Pro, and let's talk about Slide Show. Okay? So slideshow is
basically, you know, a combination of
different images forming a video or creating a
video with multiple images. Alright, so in our
project panel, open up our exercise files, and we see that we have a
couple of images right here. So we're just going to
drag those images and quickly use that to
create a slideshow. Okay? So I have the first image here. Alright, the second ime. So when it comes to slide shows, you have to actually
create a new sequence because the images
have different sizes. So we want to have
a general size, which is the size of
our sequence that all other pictures will
now have to fit into. Okay? So depending on
the size of your image. So if your images
are small images, you want to create a sequence, which size is going to be
really small. All right. But if your images
are large images, then you can create
an HD sequence. So let's quickly go to File
New and then choose sequence. So we're going to
name this slide show. Okay. And for this example, we are still going to use
our DNx HD ten et P 25, DNH HQ tenet P 25 because
my image images are, you know, bigger and
above 2000 pixels. So you can see this
is 1920 by 1080. That's 1,900 by 1080. So my images are bigger
than this, so I can use it. So images are smaller than this, you might want to use
a smaller, you know, sequence size like 720, so you don't have to stretch your image and then
make them look blur. So I'll select this,
name it slide show, click Okay, and you can see the sequence
opened up right here. So I can now begin to
drag and drop my images, so I'll scroll up on
my project panel, drag my first image, drop it. You can see it's
looking really small, so I'll just sap the
plus button too. Zooming. So I can see
my image very well. Then the second image, drag and drop, and then the
third image, drag and drop. Alright? So you can see,
it's as simple as that. By default, Premier
Pro creates a five second long,
you know, image. So right now, my
total timing here is 15 seconds because I have
three images. All right. So but you can always trim that adjust that depending
on what you want. You can even go and change
the default by going to Premiere Pro preferences. Then I think on Windows, you have to go to Edit and under Edit, you see preferences. But on Mac, you go
to Premiere Pro and you see preferences. We can go to general Okay. And that will load up
the general preferences. Okay, so you go to timeline,
and on that timeline, you'll see we have still
image default duration. You can change that
from 5 seconds to whatever value that
you want. All right. So I'm just going to
leave mine in 5 seconds. So I'll click Count
and you can see what we have right there. Okay? So if I press play now,
I can see just goes from this image to this image, all right, and then to the
next image, right here. So let me just make sure that all of my image
are looking good. So this looks good. I like that. So but when we
come here, you can see his head is kind of cut off. So I'll select it, go
to my fret control, and adjust my scale. Remember the image is
bigger than the video, so I can just adjust my scale. Now when I adjust to this point, and I have a black you know, spot here, and I don't
want that to happen. So instead of me re
scaling it down, what I'm going to do is you just change the position down, right, and this looks better. And then I'll go
to the next image and do the same thing
for the next image. Straggle down by
using the Y position, click and drag to the left,
and I'll bring her down. So everything looks
good right now. You can see that Ar. So the next thing I need to
do now is to add transition. So I'll go to effect
video transitions. Okay, I like dissolve, so I'm just going to
add cross dissolve at the beginning in
the middle here, in the middle here, and
at the end right here. Okay? So if I press play, you can see the way it fits in. And then when it gets
here, it kind of fits into the next image
that way. Okay? And then this one also
fits into the next image, and then at the
end, it fades out. Okay? So that is what my transition has just
done for me, okay? And then another thing
I can do is I can add some key frames
to this, right? So I don't run away
from key frames. So what I can do is I
can select this here. So let me just remove
my transitions first so I can see
my images very well. I'll select this and I want to add some scaling
up and position. So I'll click on
position scale up, then move forward or move to the end of the
image right there. Okay, and scale up a little bit and just
adjust my position. All right. So if I play this from the beginning now
you can see the way it smoothly zooms
into the image. And I want to replicate
the same thing for all of my image here. So what I can quickly do is
I can save this as a preset. Okay? You can see
where preset comes in. I can quickly come to motion, right click on motion. So because if you
right click here, you won't be able to
save one as preset. So you go to motion, you right click on
that, save preset. Okay, and make sure
you choose ankle to endpoint so that your keyframe will also begin from the
beginning of your image. So I'll click on
ankle to endpoint. So endpoint is the starting,
outpoint is the end. So I'll just click on
ankle to endpoint. I'll save this as
Zoom K show Zoom. All right. So I know this is my own preset and
then click Okay. Now I can go to preset and just grag that Kho Zoom
and drop on this image. And when I come here, you
can see the way it is, zooming into my image, right? And then I can add it to
the third one, two here. And then when it
gets down on two, it zooms into the image. You can see very, very
easy at that point. So I just need to come
to this guy here. And make sure that the position. So I'll go back to the very
beginning and just come to the position and make sure
it's somewhere down here. All right. So then
it can now zoom in. So we have all of this here. I can go back and
add my transitions. I'll go to video
transitions, cross dissolve. So what I can
actually do is that this cross dissolve is actually my default transition now. That's why I can see
this blue box around it. Okay? So I can select all
my images, go to sequence. And on that sequence,
I'll see apply default transition to selection. When I click on that,
it automatically add the cross dissolve to everything instead of me adding it one after the
other. All right. And to make any transition,
your default transition, just right click
on that transition and say set as
default transition. But right now, our
cross dissolve is a default transition. So our press play,
you can see how nice this looks like
now than before. You can see the way it's
zooming in and panning and making it more interesting
as people watch. Okay? The final thing is
to add some audio here. So I'll go to my audio
drag once again and drop press my notes to zoom
out so I can trim my audio. Okay? So for my audio also, I want to add some transition,
the exponential fade. So I'll go to
effect, close this, go to audio transition,
go to cross fade, exponential fade, add
that at the beginning, and also add that at the end so it will
fade out my music. So if I press Play now, I have my lovely transition. Okay, sorry. Let me make this full so we can
see it in full. So I just put my mouse here
and press the Tilda key. That's what is allowing me to zoom into the program
monitor alone. All right, so play
that one more time, seeing the timeline now. You can see the way
everything is going. Alright, guys. So thank you so much for
watching this video. I'm going to see you inside
of the next video. Piece.
24. How to Edit/Remove Green Screens in Premiere Pro: Whats up guys. Welcome to another video in this Adobe
Premiere Pro training. In this video, we're
going to be talking about green screen or, like, some people like
to call it Cromer key. So let's get straight
into it right now in Adobe Premiere Pro, and I'll show you
how to do just that. So we're right here
in Adobe Premier Pro, and I'm going to go
to my exercise files, look for this videos right
here and this image here. So I have this news
background here. I'm going to right click on this and use that to
create a new sequence. Okay. And then if I play this, you can see this is a
nice news background, right, and gotten from online. So you could also search for different backgrounds to use. Then the next thing
I want to do is o, actually, I actually need
just the video of this. I just need the video of
this news background. So I'm going to right
click on Link T. Alright, so I'll be able to select
the audio and press delete. So I just have the video alone. Then I'll look for
this newscaster. So I'll come right here to my project panel and
look for the newscaster, and then this I'll drag and
drop on Video track two. Alright on top. Alright.
Because my goal here is to remove this green background and replace it with a
news background. So the news background
is underneath it already waiting for it. Okay? So how do I get rid of this green background
in Adobe Premiere Pro? Some of you wonder, why
is it green? Why green? It is green because that is the color that is furthest
from the skin color, right? So it's going to be very, very hard for you to find a human being that has
green color on their body. I said that person is an alien
or something. All right. So that's why the
color green was chosen because if I was to use
a black background, if I'm removing that
black background, I'm going to be
removing my hair, my eyebrow, my eyes, everything black in my body. All right? Or if I'm
using a white color, I'll be removing
my teeth, my eyes. So the color that you
can't easily find checking out the human skin
color is the color green. And the only alternative
to that is color blue. Alright, so green or blue, no other color, right? If it's any other color,
you're on your own. So that is why we
use that color. And then there are
some things that you must ensure that you do. Number one, make sure
that your subject is not putting on anything
green. All right? Because as I remove this green, if it puts on anything green, that will also get removed, and you don't want
that to happen. Then another thing
is that you should make sure that your
subject is not casting shadow on the green
because any shadow casted on this green
will make that uh, part black and not green again. So you don't want
that to happen, okay? Then also, make sure that you have uniform lighting on
your green background. So you can see that there's a uniform lighting on this
green background here. But when it came to
this green background, the way they light up this green background made the green hair different
from this green here. So that's going to
give us a bit of some, you know, trouble while
trying to remove this green. But there are still stuff
that we can do right here. I personally love removing green screens in
after effect, okay? Personally, I love
removing them in after effect because, you know, after effects, key lights, you know, is really, really good with dealing
with all of this. But there's a way to also remove green screen in
Adobe Premiere Pro, and I'm going to show
you that right here. So to do this, I would go to
my effect under my effect, I want to look for video effect, open up video effect, go to Kin, open up Kin and then under King I'm going
to see ultra key. I'll drag that ultra key and
drop it on the newscaster, not the news background, newscaster, and I'll add
that ultra key to this. All right. And I can
go to my Ft control, look for the ultra key and then check out the
settings I have there. Now, the first thing you
want to do here is to change your key color
to green. All right. And to change it to
this exact green, I can grab my eyedropper
or color pica e, use it to click on
this green right here, and you can see that instantly
it removes that green. Okay. And because of what
I told you the other time, you can see that some part
of this table is left. And if you look
around this body, you can see some funny
things around there. So let's talk about how to
clean up all of this mess in Adobe Premiere
Pro using Ultra key. So the first thing I want to do is to change my output from composite to Alpha channel.
And why am I doing that? I'm doing that so that I can see clearly what has not
been removed, okay? Because every other
thing is supposed to be black except the subject, which is the newscaster,
in this case. Alright, so missing the
seen Sindis tells me that all of this needs to become black or I need to
totally remove them. And to do that, after changing my output to Alpha channel, I'll go to MAT cleanup. Okay? I'll go to MAT cleanup. And under MAT cleanup,
the first thing I want to change here
is the contrast. Alright, so increasing
the contrast would make this green here look more
like this green here. So I'll just come,
increase my contrast, and I'll see that it will
start becoming black, like the regular or
the rest of the green, alright? And that is good. That is exactly what
I'm looking for. So I'll increase my
contrast all the way to 100 and that, you know, takes care of almost everything
except this guy hair, and then this guy here, okay? And then the next thing I
want to do is I want to go to spill
suppression, all right, spill suppression and just
increase that also, you know, go to spill suppression and increase the spill value also. So that will also help me
tidy up some few things. So I'll just click and
drag that right to 100 and that will help me
also tidy some things. And now I can go back to
my output and change it from Alpha channel
to composite, okay? And you can see
that I still have some things left here, okay? So let me go back to
my spill suppression, change it back to 50 let's
see what's going on here, my contrast, you can
see right there. Let's work on our
MAT generation. So there's a lot of
settings here that can help you with this, right? But in after effect, I'll just probably play with two settings and
I'm already done. Okay? But with Premiere Pro, you have to keep checking out so many settings until you get the right, you know, result. So I'll go to MAT generation, and then on that this let me
increase my pedestyle Okay, and increase that, and you
can see that helps me to take care of all of those
things remaining there. So the only thing I have left is just this tiny small part here. Let me change it back
to Alpha channel. You can see just this
tiny part right there. So change it back to composite. So for this tiny part here, there's really nothing I
can do to it because it is not green at all in the
first place, right? So there's nothing
I can do to that. So the only solution I'll
do to that is probably to just draw a max
around my image here. All right, to restrict the
video to this portion alone. And that's exactly
what I'm going to do. So I'll go up to my Opacity, open up the opacity and
I have my max here. I'll grab my pen to and then
click click click click. By the time I join this, I won't be seeing this
part of my video again. So I only see this part
where I drew the max. So I'll join this and you
can see that part is gone, and all I have
showing of my video is just this portion, right? And that's exactly what I want. So now that I'm done with removing the background
and cleaning things up, okay, I can now go back
to my exercise files. And bring in one more layer, which is this table here. I'll drag that and put it
on V three. All right. And by default,
this is a picture, so it gives you just 5 seconds. So I'll just come and extend it so that it will go through
all the entire video. All right, so you can see
my table right there. So I'll select it Okay. Double click on my table and just track it
somewhere down. Then I want to go to motion
and scale my table down. So I'll go to the scale and scale it down because I'm trying to fit everything
now to what I have, you know, based on
the background, the studio background
or the news background. All right. So my
table is now small. Let me reduce it some more. Something around
here looks fine. Okay. Then I'll select
the newscaster. I'll double click on him
to also reduce his size. So I'll go to scale
and reduce the size. Okay, and then come here and put him to align with the table. So let me make the
table a little bit bigger so to match
the newscaster, strike that something
right here. Okay. Awesome. So you can
see what we have right now. So from that green background, we've placed him here, making it look as he was
in this studio while, you know, the video
is being recorded. So if I play this, the level of excitement and
energy cannot be contained in this country as people all over the world
celebrated with enthusia. Okay, so I feel like
making the table bigger. So I'll come to scale
my table and just yep, make it a little bit
bigger like that and then just double click on
it to just position it. And come to my newscaster and just raise him up
higher, like that. So this looks perfect now. Okay? You can see that
this new spa ground is not as long as
the other ones, so I can just click on it, press Control C, and put my plaid at the
very end of it and press Control V to paste another copy of
that right there. So I can just end all
of my video right here. The single most. And that is how to work with green screens in
Adobe Premiere Pro. Thank you for
watching this video, and I'll see you in the
next video Peace Out.
25. How to Create a Twin Effect in Premiere Pro: What's up guys. Welcome to another video in this Adobe
Premiere Pro training. In this video, we're going
to be talking about how to duplicate yourself
in Adobe Premiere Pro. Or you can call it How to Twin yourself in
Adobe Premiere Pro. Yeah. So let's get straight
into it. Right now. Okay, so we're right here
in Adobe Premiere Pro, and for this project, let's open up the two
videos that we have here. Alright? So I have
this video of me, you know, Alright, so you can
see me right there, okay? And then we have the
other video here. Hey, guys, my name is Gabriel
Shoe and I'm the CEO. Okay, so I have two
video shot, right? And the goal is to twin myself
using these two videos. And I'm here to talk about
the Adobe master class. Alright. So it's
as simple as that. So some ground rules you
should obey while shooting the video is because sincerely, this twinning effect
is basically shooting. All right. If you get
it wrong in shooting, there's nothing Premiere
Pro can do for you, right? So you have to get it right
in the shooting itself. And some of the
things you should take note while
shooting is that, number one, make sure
that your camera is on a tripod and stable, right. So make sure your
camera is on a tripod. That is very, very
important so that there is no movement in your
camera while shooting. Number two, make sure that
your background is stationary. Make sure that your
background is stationary. You can see right here, this is a wall and a wall doesn't move, so my background is
stationary. All right. Number three, create an
imaginary divisible line between your twin, right? Right now, I created
an imaginary line somewhere here, right here. So what is the essence of the
imaginary divisible line? The essence is that when
you're acting this twin here, you want to make sure
that whatever you do, you don't pass that
line. All right. So I make sure that
all of my movement stays within this
area. All right. And in the other video, I also make sure that
all of my movement here stays within
this border, right? And you're going
to see the reason why you must create
an imaginary, you know, divisible
line while shooting. So you must be cautious of that line so that
whatever you do, you don't pass, you know, that particular
line in your video. Alright. So rule number
45 now, I'm not sure. Make sure you get a good actor, so you could come, you know, meet someone like
me to act for you. You know, I'll just charge
you per hour, you know, very easy, and you get
the job done, alright? So get a good actor, right? It's very, very, also key. In the success of
this twin in effect. So you can see that
most of these things I've mentioned has nothing
to do with Premiere Pro. It's basically in the
shooting. All right? That's why I said, you know, 80% of this is based
on what you shoot, and you just do
the remaining 20% in Adobe premiere P. Alright? And what is our goal
in Adobe premiere P? Our goal in Adobe
Premiere Pro is to cut this video into half Okay. And then replace
the remaining half here with me on this side. So remember this video, I'm on this side, this
video, I'm on this side. So the goal is to get
half of this right, for this side, and then get the remaining half
from this video. And putting those two together
would give me the two in effect because
I will now see me on this side and also
see me on this side. So why do I have this guy here, John, by the way, okay? Is here to help me
with my acting, right? He's basically here
to help me with my acting so that when
I'm looking here, he looks I can look straight
at a human being and, you know, be able
to act properly. Because if he wasn't here, it might be kind of difficult
for me to be able to act, you know, while I'm here, talking to an invisible nobody. Okay? But some other people
use something like a tripod. You can also play something
like a tripod here, the height of a human being, and you just look at the tripod. You know, you just
need something here to help you with
your acting, right? And that's why my guy here, John, is the one helping me out. Okay? So that is that. So now that we've gotten
all the ground rules, done, let's right click
on any of the video. And choose new
sequence from clip, and that will create a
new sequence from us. You can see we've created
so many sequences so far in this training, and each sequence is separate
from the other sequence. I can export them individually
as a video on its own. So don't forget
that. So right here, let me press play. Hey, guys. My name is So I do have
me on this side, okay? And the goal now is to cut
this into half. All right? And how do I cut this into half? I'm going to be needing my max. I'm going to be
needing to draw a max. So I'll select my video here, go to fret Control, go to pasity and then under our past I can see
the max tools there. I can grab my pen to
click somewhere here. Okay? Click somewhere here. So it must be close to the
video for you to use the Max. Then click somewhere here. Alright. Click and then remember that imaginary
divisible line. All right? That is the same area you want
to draw your max, right? So I'll come right
here, click here, okay, and then I'll click here. And when I do that, you can see that I have successfully cut or trimmed this video into half
using a max. All right? Remember, a max would restrict your video based on the
shape that you have drawn. So drawing this
rectangle here kind of restricts my video
halfway right here, okay? You can see that. So that's why I said that when you're recording or shooting, make sure you don't pass that
imaginary divisible line because if I pass there
now, what do you notice? You notice that the
hand will just cut off, and then people will be wondering
what is going on, okay? So make sure you do that. Then now I will go to
the remaining part, the other part of my video, right, and bring that in. Okay? So I have this
part of the video. I want to bring this part in. But I don't want to cut
this one into half. What I want to do
is I want to place this video under this video so that when I place
this under this, this part of me will
cover, you know, John right here, and the
remaining part I will see here will just be this
part of me talking here. So to create space for this
to come under this video, I will move this to Video two, Video Track two, and move the audio to Audio
Track two, Ar. So I just click and drag. So I now have space right here to put a video
under this video. So I'll just drag
this video from here, and then I'll just drop it
under the video right here. And you can see that instantly it just puts me on this side, right, and then I am right
there acting already. Okay? So if you
look closely here, you can see, it's even hard for you to see the
line here, right. But if you look
closely very well, you begin to see the
line that we have there. So what I can do is I can select this video here. Go
back to that max. Remember your max feather. I can increase the
max feather a little bit more to kind of
soften that line. And then at this point, you will notice that
you are not even seen. There's no way you want to
see any line here again. So basically what is going here what is going on here
is just common sense. Alright? Our background
is stationary. So when you take half
a stationary picture, half of another
stationary picture, and you put them together, it's going to synchronize perfectly that you
will not know that they're actually you different pictures
or different video. And that's why I said
that your background must be stationied because if
your background is moving, then people will begin to see something happen around here as your background
moves or shake, right? And that's why your camera
must also be on a tripod. And you can see, with that, I've been able to create my twin effect as
easy as this, okay? Can see what I have
here. I'm Gabriel Shu, and I'm the CEO of
K show Content. Nah, that's not roman. It's your boy K show. Oh, you I'm here to talk
about the Adobe master class. So you can see what we
have right here, okay? You can see it's
playing smoothly. Focus on teaching you graphics. Alright, so that is that. Of K show content. Nah, that's not roman. It's your boy, K show. So what is really helping
me here or what I did while shooting was that while I
was shooting this part, I had it recorded on my phone, and while I was
shooting this part, I was playing it back
in a very low sound, you know, in a very
low way, okay? So that you know, it soon enter into
my main recording, and I was just responding to it. Other people have
different methods of synchronizing their,
you know, twin effect. But that was how I was able to synchronize my you know,
while recording this, I recorded, and then
I was playing it back while I was
responding to it. And that gives me
a very perfect, you know, twin effect. Alright? So, guys,
that is how to create your twin effect
in Adobe Premiere Pro. I want you to go
out right there and begin to twin
yourself everywhere, alright, and create
amazing stuff. Stay creative and I'll see
you guys in the next video.
26. How to Export/Render in Premiere Pro: What's up, guys. Welcome
to another video in this Adobe Premiere
Pro training. And in this video,
we're going to be talking about how to export our videos or render our
videos in Adobe Premiere Pro. Stay tuned, and let's get straight into Adobe
Premiere Pro. Alright, guys, so I'm right
here in Adobe Premiere Pro, and let's talk about exporting. So to export my video, okay, so before Export,
let's talk about saving. So saving our video, you
go to File Save us, okay? Then you choose where
you want to save it. I can choose Desktop
or wherever I want to save my project
and then click on Save, okay, and make sure that you, you know, have that
saved somewhere, okay? And Eaving is, you know, I want to work on this later on. So I can save this, you know, post what I'm doing. Then at a later date, I can open it in Premiere
Pro and continue editing. But exporting is, I need a video file that I
can upload on YouTube, Instagram, Facebook,
or whatever it is. Okay? So how do I export? I'll go to FL and under file, I'll see Export, and then
under export, I'll see Media. File Export media. Shortcut is Command or Control. I'll click on that and
it's going to bring up my export settings. Okay? So you can see my
export settings is opened up right here. And basically, you will just want to come and
touch four things. The first is format. The second is preset. The third is output name, and then the last one is Export. Okay? So what is format? Format is where you choose the
codec you want. All right. And the codec we're
going to choose is h.264 because this codec
give us an MP four. Alright, so you can see MP four. Alright? So I want
to choose h.264. We have other codex here
and some other thing. You can even export MP three. You can export wave. You could export pictures. You could export,
you know, AIFF, MPEG two, MPEG four, P two movie, all of that. So but the one I use
personally is HD 264. Because that gives me P four. P four is the most
widely accepted video anywhere in the world
and across all devices. So I want my video to
be able to play on any platform or on any device. Okay? Then the next
thing is preset. So what you see
under this preset is basically determined
by your format. So if I change my format
to something else, maybe quick time or you
see that my preset had actually changed from what I was saying before to Apple ProRes, NT SCDV and stuff. So let me change
you back to 8264, and you see that what I'm
seeing on that preset now is different from
what I just saw now. Okay? So which of these
preset do I use? Alright? Personally, I use Mt sauce high bit rate or mat
sauce medium bit rate. But it doesn't mean you can't use any of these other ones. The reason why I use March
sauce is because I always want my video size to be the exact
same size of my sequence. So I don't want to create
a sequence that is 1080 and then come here and come and export in
four K. All right? That will kind of
just, you know, make my video
quality drop because a small video fit into a big
space would need to expand, and then your video
quality will have to drop. So I don't want to do
anything like that. Or I don't want to choose,
you know, you know, 1080 in my sequence and
then come here and do 720, which is something
smaller than my sequence. That will also make it drop, alright, except that
is what I want. Maybe I want a smaller version
of my video or something. Okay? So I always like
using march sauce, meaning match the exact
same settings of the sauce, which is my sequence, okay? So why do I choose high
or medium bitrate? I use high bitrate
if I really want the best quality for my video. So the best best quality, I use high bitrate. And when I use high bitrate, I'm not really concerned
about the file size. So if you look at
the bottom here, you can see estimated file
size is 34 megabytes, okay? So that is at high bitrate. But if I'm really concerned
about the file size, you can see this is just
a 26 seconds video. If I'm really concerned
about the file size, and I still want my
quality to remain, or I don't want too much
compromise on my quality, then I choose March
source medium bitrate. So when I click on
medium bitrate, you can see from 34 megabyte, we now have ten
megabyte, which is, you know, a reasonable
file size, okay? So that is what determines
which one I use yes. So right now, let me just
choose high bit rate because I'm not concerned about
the file size really much. Then the next thing is
outputs name. All right. You click here. So here, you'll probably be seeing
the name of your sequence. So I'll just click here
and it's going to ask me, where do I want to
save the final, you know, rendered video or
the final exported video. So I'll choose maybe Desktop. Then the name here, I'll just choose
twinning, all right. So I'll know that
that's that video and then click on
Save. All right. Then the last thing I
need to click on here is the Export button, Export. Now, remember, if you've done
the after effect training, I mentioned something in the
after effect training about, you know, when you're
exporting after effect, your file size is really huge. And I told you that you
can actually bring in that video into Premiere
Pro and reexport. So if you are reexporting
that same after effect video in Premiere Pro, you can use these same settings. And you will see that that same video that we
exported in after effect, it's going to give you a
really small file size here. Even something as small as maybe five or 10 megabytes or I think around that, it's
going to give you here. So you can use the same
settings to export export your video that you've
exported in after effect, okay, to get a
smaller file size, but a very good quality. So we're done with format,
preset, output name, and then we'll just
click on Export, and that will begin
the Export process. You can see showing
us 12 seconds left, and that will just go
all the way to 100%. And when it's done, I can go to my desktop to go and
check out the video, play it, send it to my phone, upload it on YouTube, upload it on
Instagram, Facebook, and the likes, and it's ready for the
whole world to watch. Okay, so let me just chill
for that to finish exporting, and I'll go and check
it on my desktop. All right, so I'll
go to my desktop. Pom. Then double click to open this and you can
see my video right there, and I can click
Play to watch it. Hey, guys, my name
is Gabriel Shoe, and I'm the CEO of
K Show Content. Nah now woman. It's your boy K show to talk
about the Alright, guys. So that's how it's being done, and that's the way to go. Alright now, if you go
back to Premiere Pro, don't forget that
for this exporting, you have to be in the right
sequence you want to export. So if I want to export
this slideshow, I'll make sure I
come to the slide show sequence first before going to file Export
media. All right. And I'll be exporting
this light show. So if I have up to ten sequences here and I want to export
the ten sequences, I have to export it
ten times. All right. But when you save, it saved the entire project all
together. All right. Thank you so much for
watching this video, and I'll see you guys
in the next video.
27. Conclusion: Yo Whats up, guys. I'm super excited
that you were able to complete this training
in Adobe Premiere Pro. I'm sure you've had
an amazing time and you've been able to
create amazing stuff. Alright, so if you're
asking me what next, you can rewatch this
video for a start, right? And that would make sure that it stays fresh in your memory, and you'll be able to remember everything I mentioned in the video, okay? Another thing you want to do is you
want to check out the advanced course
of Adobe Premiere Pro right here on the website. Or you can also check out other courses that we
have in Illustrator, photoshop, After Effect,
digital marketing, web design, and a
whole lot more. Okay, guys, don't forget
to keep on creating amazing stuff and stay creative. I will see you when I
see you. Piece out.
 Gabriel Showole