Transcripts
1. Class Introduction: Hey, guys. Welcome to this Adobe After
Effect master class. My name is Gabriel
Shoe, AKA, K Show. And I'm super excited
that you've chosen me as your instructor to guide you in this Adobe After effect journey. In this training, I'm
going to be showing you how to get started
in after effect. Understanding the
interface, working with tools and how to use the
timeline in after effect, how to set keyframes and animate objects inside
of after effect, how to create lower thirds, how to add effect
to your videos, how to create an intro video, how to remove and
edit green screens, how to use templates, and how to render and
export your videos. This training is for all levels, whether you're a
beginner, intermediate or an advanced user. Without wasting much time, let's get straight
into it and I'll see you inside the class. Bizar.
2. Exercise Files: Hey, guys, welcome
to this video. In this video, I'm
going to be talking about the exercise files. The exercise files are
resources that will allow you to follow along
with me during the course. You should find the Exercise
files below this video. Simply click on it to
download it to your device. Don't forget it's a zip file, meaning that once you're
done downloading it, you have to extract
it with your PC. To do that, you just simply double click on
it and that's it. And you can open the
folder and begin to use those files to follow along
with me during the course. I'll see you guys
in the next video.
3. Getting Started In After Effects: What's up, everybody. Welcome to this after effect training. And in this video, we're going to be
talking about how to get started in after effect. Alright, so let's get
straight into it right now and do just that. Piece out. So right now we are inside
of After effect and you can see once you
launch after effect, it just shows you
your recent project. And then at the left
here, you can see, we have new project or open
an existing project, okay? So basically, you can just
open a recent project or open a project that is not listed here
from your computer, or you can simply
create a new project. So if you click on this
create a new project, it basically doesn't
do anything. It just takes away
the welcome screen and brings you to
After Effect itself. Alright, because the new project is not basically the main
thing to get started. So a new project is compulsory for all of
your after effects. So but what is more important is creating a new composition. Alright, so to get
started in after effect, you basically need to
do one of two things. It's either you create
a new composition or you create a new composition
from an existing footage. Alright, footage simply means
video or an image, right, whatever it is that
after effect can, you know, allow you to import. Okay? So those are the two
ways of getting started. It's either you do this
or you do this, okay? So the most important
thing is that you must have a composition inside
after effect to get started. All right? It's like you're
trying to type something in Microsoft Word and you
don't have a document. There's no way you're
going to be able to type anything or create anything
in Microsoft Word. Alright? So the same
thing in after effect, to get started in after effect, you need to have a composition. And you can do that by
creating it afresh, or you can create it
from an existing video. Okay? So those are the two ways of getting
started in after effect. So right now, let's concentrate
on one of those ways, which is creating a new
fresh composition, right? And I can click here. But for those that are not using a newer version of After effect, you might not be seeing
this two right here. So let me just easily go to
where everyone can find it, which is going to the menu. And under the menu, you're
going to see composition. And then under composition, you're going to see
new composition. Okay. And the shortcut for
that is Command N on my Mac. And then for those
using Windows, the shortcut will be Control
N. So if I click on that, it's going to show me the
composition settings, asking me some
questions to fill out these details before
creating the composition. Alright? So before I, you know, move ahead with
that, number one, I'm using the Adobe After
Effect 2020 version. So if you're using
2021, 2019, 2018, 2017, and so on and so
forth, you know, you can still follow
along with this training. Alright? We just have slight
differences here and there, but anytime I stumble
on anything that's different between the newer version and the older version, I will always point
it out, okay? So you have no worries. And then, before
we move on also, let's talk about
what after effect is basically used for
because a lot of people, most of the time, you know, confuse after effect and Premiere Pro, you
know, together. So what is after
effect used for? After effect is used for motion graphics
and visual effect. After effect is used for motion graphics
and visual effect. So you want to ask what
is motion graphics, okay? The definition of motion
graphics is in its name, right? It is graphics in motion, okay? So when you're watching
a trailer, for example, and then you see
something like a text comes out, and then, you know, an image flies in, and then this comes in ph, and everything keeps going,
all around the screen, that is motion graphics. Okay, so I don't know how best to explain to
you better than that. Okay? I'm sure you've
seen an advert, an intro video, a
montage or something. You know, and you see a lot of graphics element, you know, going left and right, up and down, swinging
here and there. You know, that is what motion graphics is
all about, okay? It is graphics in motion, okay? And that is what you use
after effect to create. The second thing you
can use after effect to create is visual effect, okay? Visual effect or like some
people like calling it Vet. Okay? So what is Vec or
what is visual effect? The simple definition I'm
going to give this is that visual effect is
film tricks, okay? Everybody understand
what film tricks are. Okay? So you're
watching a movie like Avengers or superhero movie, you know, or any of
these action movies. And then you see
a car, you know, being exploded or
you see, you know, a house being destroyed, or you see somebody get shot, or you see fire here and there. And, you know, you
see all of these elements in your mind, you know they are not real, but when you're
watching the movie, it looks so real as if, you know, it
happened in reality. That is what visual
effect is all about. You're playing on
people's visuals, okay? You're playing on people's eyes. You're trying to make
people, you know, believe something, even though
that thing is not real. And that's what
we see in most of these movies that has
to do with destruction, you know, action, thriller, and all of those, okay? So that is another thing
that you use after effect to do to create visual effect. Okay? So don't forget
After effect is used for motion graphics
and visual effect. Okay? So if you're looking
to do video editing, meaning you want to
just cut your video, join it with another video, add it to this video. You know, just do some simple
stuff editing your video. Then after effect is not the software to use
for that, okay? That is where Premiere
Pro comes in, okay? That is where Premiere
Pro comes in. So you don't want to use, you know, after effect
for video editing, and you don't want
to use Premiere Pro for motion graphics
and visual effect. Okay? So use the right software for the right thing because
a lot of people, you know, kind of put Premiere Pro in
the place of after effect and after effect in the place of Premiere Pro and get
it all mixed up. And that's why I'm taking
my time to explain to you the difference between
the two softwares, okay? So you know what you
do in after effect, and then you know what
you do in Premiere Pro. Alright? So in the Premiere
Pro training, you know, you'll be learning how to do video editing using
the software. All right. But for now, in this after effect training, we're going to be focusing on motion graphics
and visual effect. Okay. So back to our
composition, right? Right here, you can see
saying our composition name. It's asking us to give
our composition a name. Default name there is comp one, and I'm going to change that to Adobe master class for the
sake of this training, okay? So in your future project, you can name this anything
you want to name it, right? So the next thing we have
here is preset, okay? Preset. So what are presets in
the composition settings? Alright? Before I
talk about that, let me just let you
know that preset simply means
predefined settings. Alright? So preset is a short word for
predefined settings. So anytime you see the word
preset in any software, it basically means that they have predefined
the settings for you. And then if you use
any of those preset, the settings that have been
applied to that preset will automatically be applied
to what you're doing. And then it means you don't
have to do anything manually. All right? So that's the
advantage of a preset. And when it comes to videos, it is important that
you use preset. Okay? It is important
that you use preset, especially as a beginner, right. Why? Because when you
talk about videos, there's a way video look like. So if I ask you now, how do videos look
like most often? Are they portrait or landscape? Yeah, I'm sure your answer
was landscape, okay? Because we all know that, oh, videos are meant to look
landscape and not portrait. So I can't be
watching a video on my TV set and then it's portrait
because my TV has been, you know, designed in such a way to accommodate landscape videos. All right? The same
thing with my laptop, the same thing with mobile
devices and stuff, okay? So videos generally
looks landscape. Alright, it's just
in rare cases, especially when it comes
to social media videos and stuff that you might want to do a portrait video or maybe
a square video, right? So, but most often, you're
going to be creating a landscape video because you
want your video, you know, to play smoothly
across all devices, okay, and across all platforms. So all platforms accept
landscape videos, right? But not all platforms
and devices Devices accept portrait or
square videos. All right. Even though they accept it,
they might, for example, if you play portrait video
on a landscape device, it might have some
black, you know, on the left side and the
right side of your screen. And you don't want
that when people are playing your video. Okay? So that's why it
is important that we use preset in this case, especially as a beginner
in after effect. So if I choose any preset here, it automatically
filling everything from this weight, height, the pixel aspe ratio and the frame rate because
I'm using a preset. For example, if I
click here and I change this to something
else, maybe this, you can see that the
settings that we have here have now changed. So if I click on this
drop down preset, what are all of these?
What are they about? Okay? What do they mean? Okay. Now, the first
thing you see is the name of the preset, right? The first thing you see is
the name of the preset. And then the second
thing you see. So let's just pick
some as examples. For example, this is this HDV, HDTV is the name of the preset. DVC Pro is the name
of the preset. HDTV is the name of the
preset in these cases, right? And then the next thing after that is the size of your video, is the size of your video. Alright? So this size is 720. This is 1080. This
is 720-10-1080. All right. So the next thing you see is the
size of the video. Then after that, we
can still see we have another value there. So what does that mean? That
is your frames per second. That is your frames per second. So this preset has a
frames per second of 29.97 frames per second. This has 25 frames per second. This has approximately
24 frames per second, all right, and so
on and so forth. So these three things explains to you what
you'll be choosing here. So if I'm choosing
this, for example, it means I'm choosing a preset, which name is DVC P, and then the size is 1080, and then the frame rate
is 25 frames per second. All right, so the name
is the name, right? So I'm not going to
focus on the name. But when you talk about sizes, how do you know video sizes? How do you know the
right size to choose? How do you know what size is best for your project and stuff? Alright? So before
talking about that, I would ask or I would say that you guys should totally
ignore everything from this NTSC DV to this PL DV one DV white
screen square pixels, right? Everything here, all of the preset here are
for old videos. Okay? So what do I mean by that? I mean that these are SD
standard definition, right? So nowadays, nobody creates a standard definition
video because, you know, nowadays, we even
have eight K videos that, you know, are super
sharp and clay. So if you're creating
a video, you know, in this present age and you're
using standard definition, then it means that you're probably creating
your video for, you know, something that is
not meant to last, okay? So you want to make sure that you just
ignore all of this. There they are small sizes. If I choose this, for example, you can see this is 576. This is a very small size. I don't want to
use something like that for my video, 486. It's too small, right? So maybe 20 years ago, this could have
been a good idea. Alright. But for now, you know, videos are not as small
as this again, right? Even now that we
have eight k video. So just ignore everything
from here to here. You can see there's a
demarcation line here to let you know that all of this here
are grouped together. Alright, so you
want to start from somewhere here downward, right? You can see all of the
settings we have here are HD, all right, high definition, which is a better, you know, video quality, which has a better video
quality than the SD, which is just a
standard definition. So HD is the way to go, and you can go all the way
to ultra HD, Sinon and film. Alright. So back to
my analysis on sizes, 720, 1080, four K, eight K, two K. What
do they all mean? They are the size of the video. And that tells you the amount of pixel on the width
of that video, the amount of pixel on
the width of that video. So if I choose this 720, for example, oh, sorry, the amount of pixel on
the height of the video, I'm sorry, the height of the
video and not the width. So you can see if
I choose 720 here, you can see that my height
is basically what 720. If I choose 1080 here, you can see my
height is what 1080. So this is how you measure
the size of your video. Now, to make you understand
better sizes of video, in case you are
new to, you know, video and their sizes, how they are being
measured and all, if, for example, you do a
video that is 720, right? Last 720 video, if you play that video on a mobile
device, right, your iPhone, your tablet, your, you know, Android phone, whatever
mobile device you're using, it's going to look super clear. Alright? It's going
to look at S, Oh, this video is really
clear, super sharp. Why? Because based on the
screen of that device, okay, 720 is kind of like a very, very good quality on that
mobile device, okay? But if you take that same
video, that 720 video, if you take that video
and you play it on a laptop that has a
very big screen, okay? And you look at that
video very well, looking at it,
comparing with the one on your mobile phone and
the one on your laptop, you begin to see that
really on your laptop, the video is not
really that clear and sharp as it is when you were watching it on
your mobile phone. Okay? Why? It's because
you are not trying to play that 720 video size
on a bigger screen. Okay? So the same way, if I create a video
that is tent, that video, you know, would look super sharp, super clear on my laptop screen, and even on my TV screen. Okay? So if you play that tenaty video on
your laptop screen, your TV screen is
going to look really, really, really clear, alright? You would even think
it's maybe like a very super sharp quality, not knowing that it's tenity. But if I take that same
tentative video and I take it to a cinema
screen, what happens? I begin to know that, Oh, this video is not
really as clear as I thought it was when I was
watching it on my laptop. What made it different? What, you know,
changed the video. It was a screen size, okay? So when we took it to
the cinema screen, the cinema screen
is like maybe times ten of my laptop
or my TV screen. And then we begin to see, Oh, this video is not
really that clear. We thought it was, you
know, really clear when we were watching it on
our, you know, laptop. Alright. But on that
same cinema screen, if I play a four
K video, alright, it's going to really look
super clear. Alright? It's going to really look
super clear and sharp. So four K simply means 4,000. 1080 simply means
1080, you understand. And then so on and so forth. So that lets you
understand why, you know, you want to choose what size
of video for your project. Okay. So if that's why I see, most people that are
doing movies nowadays, the minimum they want to shoot at is four k because they know that this movie is going
to be showing, you know, in the cinemas, it's gonna
be showing on big screens, and they want the quality to
remain as clear as possible. Without any compromise or without any damage on the video. So they shoot in four K. We even have some
that shoot in five K. We have some that are shooting
in eight K, you know, just to make sure that
whatever screen size the video is being played on, the quality remains
super sharp and clay. Alright? So, but, for example, I just want to do a
video for social media, maybe for YouTube or Instagram, and stuff, you know, I could just use my tenet
video because I know that tent really play on TVs, on laptops, or mobile
device and stuff. So you have to know when
to choose, you know, 108720, two K, four K, you know, depending on
what you're working on. Alright, I personally most of my videos are
for social media, right? And what do I do? I just simply use, you know, tent because I can't spend
the whole day uploading one, you know, video on Instagram. If I had chosen maybe four K or I shot my video in four K, and then I'm trying to upload a four K video on Instagram. And then with the network
situation in my area, I know, it's taking the entire
24 hours in a day to upload just one single
video on Instagram. Alright, because you must take note that the higher
your video size, the higher the file
size you're going to get when you're exporting
or rendering your video. Okay? So it is very
important that you understand all of these
things put together, okay? So don't say, Oh, I can make my video four k and everything. Well, there's no
problem. Just know that your file size will also be huge when exporting or
rendering your video. So you must understand
all of these things. And that's why I'm
taking my time to explain each and
every one of them so that you know the right
one to choose you know, depending on the
kind of project you are working on, okay? But don't bother yourself again if you have
an existing video. Like I told you when
we started that there's another way of
creating a composition. And that way is if you
have an existing video, you can just create
a composition from that existing video and
after effect would use all the settings from
that existing video to fill up all the settings that
we have right here, okay? It's as simple as
that. But if you are, you know, trying to
choose a setting here, it means you're trying to
create a particular form or size of video that you want your video to be
in at the end of, you know, your editing, okay? So let's move on. So for the sake of this class, my favorite preset that
I use most often is this HD TV 1080 HDTV 108025. So why do I use this?
Like I told you, most of my videos are
for social media. I just want to do something
I want to upload on YouTube or Instagram on
Facebook and stuff. So I use HDTV tenet because that gives me very clear
video that will be, super sharp and clear on all
of these platforms, right? And if you want to understand better the different
video sizes, head over to YouTube now, you know, play any
video on YouTube and then just go to the certain
spot of your YouTube. Okay. And then when you try to, you know, play a video there, you will notice that you see different qualities that you can choose from from
that settings icon, you see video quality, and then you can choose
you see the range of the smallest video size
you'll find there is 144. And then after
that, we have 240. After 240, we have 360. After 360, we have 480. After 480, we have 720, okay? After 720, we now have
1080 and after 1080, we have two K. After two K, we have four K. After four K, we have five k, six K, and now we have eight K. Okay? So currently now, eight K is the biggest video
size that we have. So that is all about the
different video sizes and all. And I'm going to come
here. I'm going to choose HD TV 1080, 25. I'll click on that and you
can see that it changes my wit and height to the
settings of this preset. And my frame rate is
25 because I chose 25. So what is frame rate? What is frame rate? Now, to make you understand what frame rates are in video, you have to understand
that videos are made up of steel images, okay? Or let me say videos are made up of pictures, different pictures. Okay? So if you are an
artist, for example, or you've seen an
artist who draw maybe on a piece of who draw
on a jotter, alright? A jotter that has maybe
like 50 leaves or so. And then draws a character, maybe draws you on the jotter. And then, you know, on the first page, you look like this with
your hand in front. Then on the second page, it draws you again, but this
time it plays you like this. And then on the third
page like this, fourth page like this, and it does that for like 50 pages. Alright. When you grab
that joa and you flip the, you know, Jota very fast,
what do you notice? Okay, yes, you notice that
it looks as if you're walking or depending on how fast you are
flipping the Jota, it looks as if you're
running, okay? And that is the
genesis of videos. That is the genesis of video. That was how video was
able to evolve. Okay? So when you grab your camera and you press
that record button, what your camera is actually doing is that it is recording multiple steel images so fast
that when you play it back, it looks like a video, right? And those multiple images
are called frames in video. They are called frames, right? So if I come to these
settings and I'm using 25 frames per second, what it means is that in
1 second of my video, 25 images are going to come together to form 1
second of my video. So if I have 10
seconds of video, it means in that ten
second of video, I'm going to have 250 images forming that ten
second of video. Alright, so you can see the reason why when
you're playing the video with your video player or you're watching it with any, you know, software
that plays back video, you don't see those
images coming together. Why? Because that's software, whether VLC, your
Window media player, your QuickTime player has 1
second to show you 25 images. So what will happen?
You'll find out that the player has to play
those 25 images so fast that you don't
even your eyes is not able to see too fast
to grab it and say, Oh, I can see the
images coming together, and all you just see
is a video play. Alright? Because if
I tell you to count one to 25 under 1 second, you're going to tell
me, oh, I can't. It's impossible. Yes, right? Because if I say one
to 25, just 125. So we won't even, you know, hear you say two or 24 because
to meet up the 1 second, you have to just want
to do 25, right? The same thing happens
with your video player when they're
playing the video, they have to play the
25 images so fast that you don't even see them
coming together, right? And all you see is
just a video, right? So that is what
frames are in video. So if I'm choosing 25
frames per second, it means that my video
is going to have 25 images in 1
second of my video. So it is recommended that
the minimum frame you should go is 23 frames
per second. All right? Because if you start
going below that, imagine if your video is
two frames per second. You practically see the images coming together to
form your video. Because if I tell you to count one and two under 1 second,
you can easily do that. You can just do one, two, one, two, one, two. So what does that mean it means, if I play my video with
two frames per second, I'm going to be seeing
something like Car car car, car moving like that. And then, you know, that would not be a good video. Alright? So the minimum
you should go to is 23 frames per second or
maybe 24 frames per second. Alright you can go
as high as you want. Just know that as you go
higher with your frame rate, your file size is going to be huge when you also
export or render. Alright, so the
frames per second I like using personally
for my project is 25 because it helps me with the best frame rate
and also helps me with the frames the right file size when I'm done
exporting my video. Okay? So with all of
this explanation, I'm sure you can come to
this preset and confidently choose any of these and then understand what you
are actually choosing, and then you can choose the
right thing for your project. So me choosing HDTV
108025 now doesn't mean that you also
have to choose that giving you the
reason why I choose this. So if your reason
matches my reason, you can actually
choose this one also. Alright, so you can see once
you've chosen a preset, it's just going to fill
up everything here. And then the next thing I
have here is resolution. Alright resolution. And I'm just going to
leave that in full. I'm going to explain
resolution later on. Alright? And then
my start time code. My start time code
should be in 000 so that my video can start
from the very beginning, and then your duration
totally depends on you. Alright. But this first zero
here is your hours, okay? And then this next one
here is your minute. And then this next one
here is your second. And then this one right here
is your frames per second. All right. So this guy, because I've chosen
25 will count 0-24, and then when he
wants to turn 25, he adds up 1 second to this guy. Alright. And then this
one will count 0-60. So 60 seconds we know makes
up 1 minute. All right. And then this will also count to 60 and 60 minute to make
up 1 hour. All right. So for the sake of
this, let's assume we want to do a video
for Instagram. We're just going to
make this 1 minute. Alright? You can
see, so 1 minute, so don't mistake this as your minute and
this as a second. This is your frame rate.
This is your second. This is your minute,
and this is your hour. Okay? And then the last thing I have here is the
background color. Okay, the background color. If I click on that, you can
see it's currently black, and I'm going to leave
it in black because the default color for
video it's black. So I don't like changing
it to any other color, but you can can just click here, choose any color you want,
and that will be fine. So right now, I'm just
going to click Okay, and that will do it for me. Thank you so much
for watching this getting started in
after effect video, and I'll see you in
the next video. Ooh.
4. How to import file in After Effects: What's up, guys, welcome to the second video of the
After effect training. In this video, we're going
to be talking about how to import images, videos, audio into after effect, and how you can also create a composition from
an existing video. So let's get straight
into it right now. Alright, guys, so we
are right here in after effect and to import an
existing footage of video, audio picture, whatever it is that you can
import into after effect. All you simply need to do is to go to your menu, and
then right there, you're going to see file, you choose file, and
then another file, you're going to see Import,
and then under Import, you're going to see file. And the shortcut for that is Command I or Control
I on Windows. Now, the reason why
I like aftereffect is Adobe product generally, is they always give
you the shortcut of things in your menu. So anytime you're picking
anything from your menu, don't always forget to check out the shortcuts
and remember that. So I go to File Import
File, click on that, and it's going to load up
my file explorer asking me the different files that I would like to, you know, import. So quickly, let me
just, you know, open up my after effect
exercise file, okay? You can see the
folder right there. Alright. Open that and you see all the different videos
that we have right here. Now, in after effect,
you can Import, you know, a folder like this. So if I select this
folder and I click Open, it's going to import
the entire folder with the folder
itself. All right. On Windows, I think
you're going to see an extra button here called
Import folder, right? But on Mac, you just have
open right here, okay? So, but if I double click
to open up the folder, I can select one of the video or the image in the folder
and click Open or Import. All right, I think it's
import on Windows. Okay? I'm not really sure now, but whatever name is there,
you understand what I mean. Okay? So we have the
video right there. I can also hold down Control and select multiple items, okay? And also import that, okay? Or I can do Command A or
Control A to select all, okay, which is what I'm
going to do exactly. And then I'll click Open. Or import on Windows. And that will bring in
all my files, okay? You can see that right there. So you can see all my
files have now been imported into the Project panel, okay, into the project panel. And if I scroll down up, you can see what I
have right here. Okay, so I have all
my file imported. So this is where I like working. In after effect, bringing all my files. I know
everything is here. So I cannot begin to take them one by one to do whatever I want to do in after
effect, okay? So that is that. Before we move on, let's talk about saving our work, right? So, in case our, you know, software or machine or whatever happens hangs and
is not loading, we can have our work saved. So how do I save my work? I go to file, and
then on that file, I'll see save us. And then on that save
us, I'll see save us. Alright, I like using Save
As because it will always ask me where do I want to save my work and what name do
I want to save it with? Okay? Sometimes when
you choose Save, it just saves and
then you don't know, doesn't ask you where you
want to save or anything, and then you begin to wonder
where it has saved it too. So I always save us. For the first time, I'm
saving you save us, and that will bring
up this asking me what name do I want to give
my project? All right? I can name it Adobe
Master Class or AMC. And then where do
I want to save it? Okay, Dkstop document pictures,
download, movies, music. Wherever I want to
save it, I can save it there and then click on Save. Okay? So if I choose Dkstop
and I click on Save, that'll save it on my Dk Stop. So I have my project saved now. So intermittently, I want
to be pressing Command S or Controls on my keyboard to update or save all
of my changes. Okay? So don't forget that. So even if you've saved
it the first time, you still need to
continue pressing Controls or Command S at
intervals to save your update. Okay? So that is how to save
your work in after effect. So the next thing I want
to talk about now is, how do I now create
a new composition from any of this existing
video that I've imported? How do I create a
new composition from any of this existing
video that I've imported? Now, after importing, you notice that everything
remains selected. Everything remains selected. So if I try to create a new composition from
any of this video now, it's going to create
it from the entire, you know, imported items. And I don't want that to happen. So I want to find a way to
deselect everything, right? And how do I do that? I'll just come to any of these areas here. Okay, so I'm just trying to
look for anywhere that is empty and just click the pump, and then you notice that it
has deselected everything. So nothing is basically selected
in my project panel now, okay? And what can I do? I can now select the
particular video, okay, that I would like to
create my composition from and then right
click on that video. And when I write
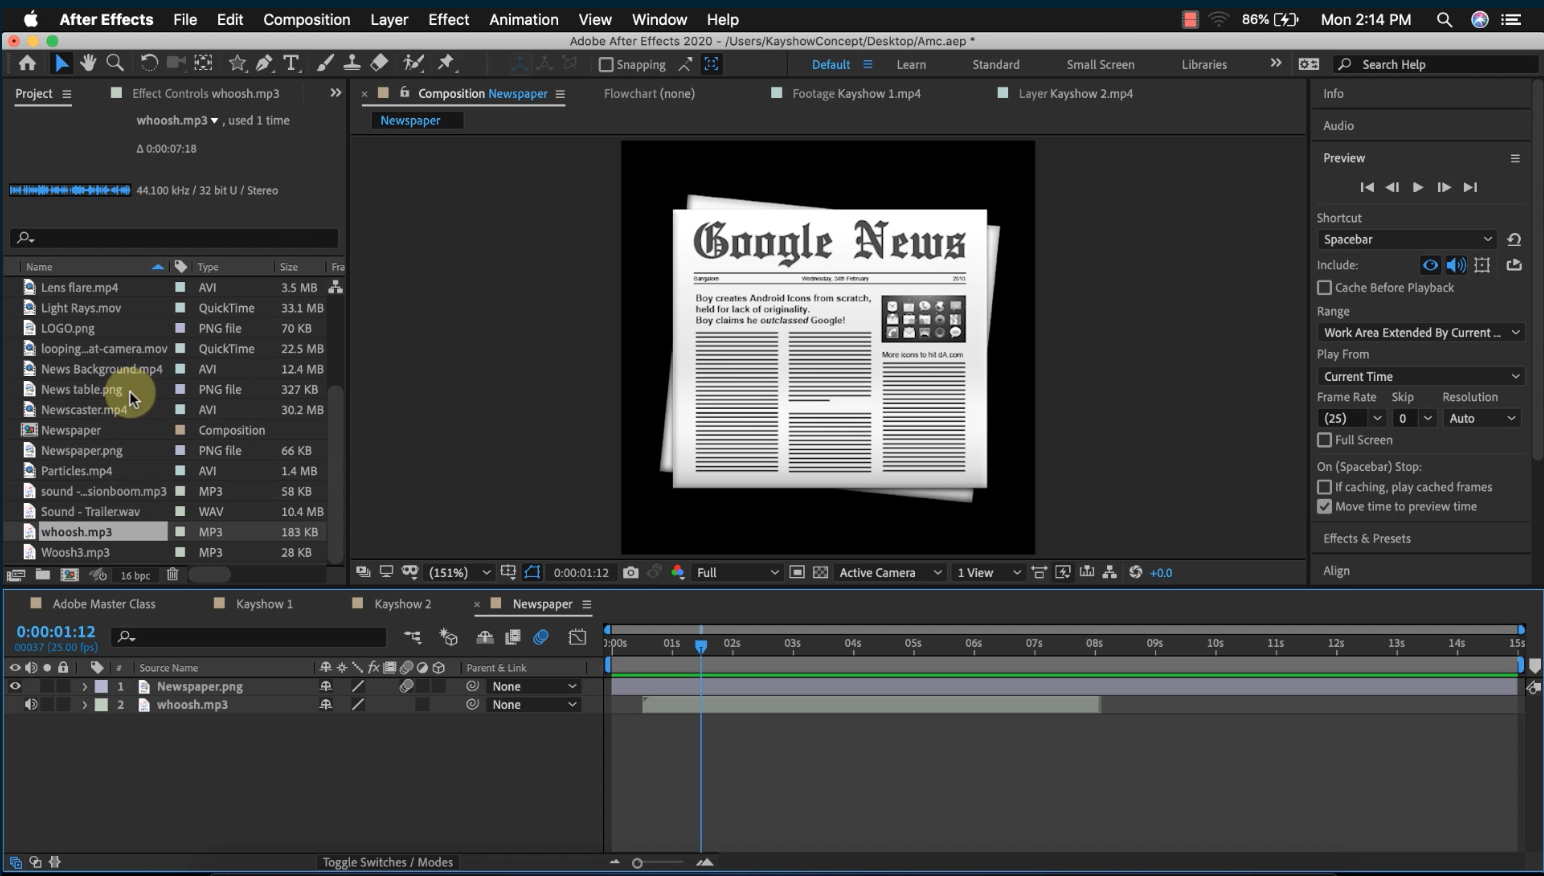
click on that video, I'm going to see an option called New Comp from selection. New comp from selection, okay? And when I click on that, after effect to automatically create a new composition from this existing video using the settings of
the existing video to create my composition. So if I click on New
comp from selection, you can see what I have. And it also immediately puts my video in the
timeline for me, okay? So you can see what we have now. Now, before I created that
composition for my video, I only had one video
called Ks one, right? But now I can see that this
Ks one is now in two places. So let me undo what
I just did now. You can see what we
had before, Ku one. But when I write click and create a new come
from selection, you can see that we
have a new you know, show one showing
here, and this is the composition that has been
created from this video. Alright? So how do I know that? I could easily tell
that by the icon I'm currently seeing
right here, okay? By the icon the icon I'm
currently seeing right here. So if you look at
this icon very well, it's actually similar to this Adobe master class
that we created initially, right, in the
previous video, okay? You can see it has this blue, green and red, you
know, icon around here. So what does that tell you? That tells you that
if anytime you see this icon beside any layer
in your project panel, that is a composition. That is a composition, okay? So right now, in this
after effect project, we currently have
two compositions, one that was created
from scratch, which is this Adobe
master class, and this second one, which was created from
this existing video. Okay. So it's as simple as that. So if I quickly come to my menu, click on this
composition and click on composition settings, okay? That will show me the settings that was used to create
this Cs one composition. Alright? So you can see it's similar to what we
heard initially because the settings that was
used to record this video was the exact same
settings I used for the Adobe master class,
you know, composition. Alright, you can see
that it's showing me HDTV 108025 here. Okay, you can see the frame
rate is 25. All right. But what makes it different
is this duration. All right. You can see that the
duration of this is 5 seconds, 19 frames. All right, 5 seconds, 19 frames. Why? Because all of
these settings here was extracted from the video. All of these settings here
was extracted from the video. So if you have a smaller video, imported into after effect, and you try to create a
new composition from that, you will notice that, you know, the width and height you're
going to have here is going to be smaller
than tenety know, and then your duration is
also going to be different. So when creating
a new, you know, composition from an
existing video, okay, after effect will
automatically extract all of the settings here
from the video. So if you look at your camera, assuming you're the one who shot this video that you're trying
to work on in after effect. You would have also
decided the settings. All right. You'd have decided the settings on your camera. So cameras also have, you know, whether I want to
shoot in tenety, 720, four K, you know, cameras also have the settings
for frame rate, right? And then depending
on when you click on the stop recording
on your camera, will determine the
length of the video. Alright. So that's why it's easy for after effect to create a new composition from
an existing video. So let me just cancel this
and you can see we have two compositions right now
in this project. All right. And in after effect,
you can have as many compositions
as you want to. Okay? You can have as many
composition as you want to. Right now, we
currently have two. I can have three,
four, five, ten, 20, hundred, 1 million, okay? As much compositions
that I want. And whatever I do in a composition does not
affect other compositions. So, for example, if you look
down here in my timeline, you can see I have adb
master class and K one. Okay, Adobe master
class and what? Show one. So under
Adobe Master class, you can see it's
empty because it was a composition I created from
the scratch, having nothing. And then under this Ka one, you can see I have
the video right here that was created that was used to create
that composition. So whatever I do in Kasha one does not affect
Adobe master class. So I can export what I have in Adobe Master class as
a video on its own, and I can also export
what I have in Kisha one as a video on its own. So it's more like pages or
artboards in Illustrator, if you know what
that means, okay? So it's like you're having multiple pages in after effect, but it's not called pages. It is just basically
called composition. Okay? So that is
that for creating a new composition from an
existing video in after effect. And I'm going to see
you in the next video.
5. The Interface of After Effects: What's up, guys. Welcome to another video of this
after effect training. In this video, we're
going to be talking about the general
interface of after effect and some
key things that we need to note when working
with after effect. So let's get straight
into it right now, and I'll show you all of that. Okay, so I'm inside of
After effect right now, and I just want to
tell you, you know, some important things
that you need to note when working with
after effect, okay? So one important thing that you should note is
that whenever you import, so all of these videos and audio and pictures we
brought into after effects, they are not actually, you know, really imported
into after effect, right? I don't know if you
understand that. But what is basically going on is that After Effect is creating a link to these files on your hard
drive or your laptop or your flash drive or your external drive
or wherever you have imported these videos from. So what does that mean?
That tells you that you should not delete these
files on your system. So after effect
doesn't work like Photoshop or
Illustrator, you know, whereby when you import images, you can go ahead and delete the source files from your system. And then when you
open it in Photoshop, it still opens the
way it's supposed to. So now quickly, let me go to my exercise files and
delete something here. All right. So let me delete
something here as an example. So if I delete this CD
cover or this newspaper, for example, press delete, and that's gone off my system, when I come back to
after effect, okay, you can see that immediately
after effect is telling me warning a file could
not be found, right? And it's showing me the paths, the link to that
file or my system. All right you can see
under the exercise folder, saying, I can't
find this newspaper PNG again. Where is it? So if I click Okay, alright, you notice that that
file will no longer be available to use
in after effect. And if I've used this
file in my project, in my video and everything, it's going to be
displaying this when it gets to that part of the video. And you don't want
that to happen, okay? So, you know, a lot of people when they finish
working on that video, they just go ahead and
delete the source file, then they come to
after effect and then you wonder what has
happened to their project. Okay. So don't
ever, ever do that. And it's not just
deleting your file. It also affects it when you
rename your file or when you, you know, move it to
another folder, right? So deleting is like no remedy. But when you rename and
move to another folder, you still have some, you know, kind of remedy to replace it or to bring it back
into after effect. So let me just undo what
I deleted now, okay? And I'll bring that from
my trash back to my file. And then to, you know, resolve this issue, if
you still have the file, all you need to
do is to write on that file and then choose
replace footage, okay? Replace footage, and
then you click on file, right, and that will bring you
back to our exercise file. And then I can tell
after effect, Oh, this is the file now
and then click Open, and that will just, you know, replace it everywhere in my
timeline, in my project, wherever I find that video, and everything will come
back to what it was before. All right. So it's very
important that you understand that your files could go offline when you
delete the source files, or you rename them or you transfer them
to another folder. So you want to make
sure that your videos are in the right folders
with the right name before you even import
them into after effect. Okay? So that is that for z. So the next thing I want
to talk about now is my layer panel and
footage panel, Layer panel and footage panel. Now, if you double
click on any item here, it's going to automatically
open in your footage panel. Alright? So if I double
click on this looping, particular camera, for example, you can see what happens. I automatically brings up
my footage panel, okay? And I can see the
video right there. So what is the footage
panel used for? It's basically to preview
your video, right? So you can see there's
a mini playhead here. I can just move that around
to preview my video. And I can also trim
my videos right here. I can also trim my
videos right here. So if there's a part of my
video that I don't want, I can trim it in
the footage panel before using it in the timeline. So if I put my playhead
somewhere around here, say, if I don't want from here
to this part of my video, okay, I could just click on this open bracket icon or set in points like
it's called after effect. Click on that, and
that will trim off all this part of my video. I can take this towards
maybe the end and I say, Oh, I want my video
to stop right here. I don't want everything
from here to this point. And what can I do? In that case, I can just
click on this, you know, close square bracket here, I'll click on setout point, and I'll click on that, and that will trim off the ending
part of my video. And what I have
of this video now is just from here to this point. So meaning I have shortened, you know, the time of the
video by trimming it. And then I can go ahead, drag that and drop it
into my timeline and use it for whatever I want to
use it to do. Or use it for. Okay? So that is what your
footage panel is used for. So let me just undo this
and take that away. Now, why am I taking my time to talk about the footage panel? I'm doing this because
most of the time you know, most of you guys are
just going to end up there mistakenly, right? Not intentionally. So how do you end up
there mistakenly? You end up there mistakenly
by double clicking anything here and you just
open it in the footage panel. And then the worst that can happen is that most most times you guys will double click what you currently
have here also here, and then you'll be in
the footage panel, and you'll be thinking you are still in your composition panel. And when this happens, you might be trying
to add an effect or doing some things
to your video. You'll find out that,
Oh, it's not working. I still have the
same video here. You know, and you're expecting that when I add this effect, I'm supposed to see
it apply to my video. I'm not saying it
apply to my video. That is because you are
in your footage panel. So by default, you should always be in your
composition panel. You should always be in
your composition panel. That is where you see
your life, you know, edit, your life effect, whatever you're doing
in after effect. So you should always be in
your composition panel. You can see the name is
right here, composition. You should not be in footage or flow charts or
whatever it is. You should always be
in composition panel. So if you're in footage panel, you should be there
consciously, alright, knowing that maybe you
want to preview your video or trim your video, okay? So by default, you should always you can write this
capital letter somewhere, your note or your note
pad, whatever it is. Make sure you are always
in the composition panel. Another mistake or another thing people do is that if I come to my timeline here and
I double click on this cshowO that I
have right here, okay? That's going to take me to
my layer panel. Alright? So we have two panels
now, footage and layer. All right. You can see
they look similar, okay? So your layer panel is also used to trim your video, right? But when you trim
your video here, you are trimming the video
already in the timeline. Okay? You're trimming the video already in the
timeline. All right. If I come here now
and I trim this, come here now and I click
here and I trim this, you'll notice that my video
is getting shorter in the timeline. Can you see that? Okay? So the difference between
the footage and layer is that the footage trims the
video in your project panel, right before everyone
gets to the timeline. While the layer panel, when you trim here, trims the video directly
in your timeline. So you can put a video
in the layer panel if it's not already in
the timeline, okay? So that is the difference
between the two of them. But once again, the reason why I'm explaining this is because most of you most of you will end up here
mistakenly, right? Alright? Not that you actually want to trim a
video because most of you you just like double
clicking on everything, okay? So you want to make
sure that if you're in your layer panel and you're trying to do stuff
it's not working, just look up here and
make sure that you are in your composition
panel, okay? You are in your
composition panel, not footage or layer panel. All right? I've seen a lot
of people struggle with this overnight just because they were in their footage
and layer panel, and they were adding some
effect, doing some other stuff. It was being applied here, okay? But because they were in
their footage or layer panel, they couldn't see it, you know, on their video, and they thought
it wasn't working. Okay. So make sure
that you are always in your composition panel
at all times, right? So that is your footage
and layer panel, but the most important one
is the composition panel. Now, a trick or something
that you always used to know if you're not your
composition panel is that when you get to footage, you start seeing this, you know, sea green color of
your timeline here. The same thing in layer. You
can see we have it here, but your composition
doesn't have that. Alright. So once you see
something green here, just know that you are
in the wrong place. Just quickly come back to your composition
panel. All right. So that is that for your footage and layer panel and also
your composition panel. So quickly, let me
just talk about the interface and some other
things you need to note. At the top here is our menu, right, like you already know. And then right here is
our to bar where we can pick different tools to
use in after effect. And then right here is our Almighty project panel that we've been talking
about all this while. Okay? This is where all
your videos, audio, whatever it is that you
import into after effect, this is where you
first learn before you now decide what you
want to do with them. Okay? And then right
here is our timeline. And in your timeline,
all your compositions are also available
for you to switch, you know, on and
off between them. So I can go to my Adobe
Master class composition or go to my Kasha one
composition, okay? And right here is my
composition panel, okay? So don't forget that you should also always be in
composition panel. And then on the
right here, Okay, we have different okay, we have different panels, okay, that are
available for us here. Now, if there isn't an older
version of After effect, yours might slightly look
different, you know, to mine. But all are the same. You'll be seeing your
preview opened up already. You'll be seeing your
info opened up already. You might not have audio here and all this other
stuff right here. So but like I used to say, if you're looking for any panel, so if you see any panel in mine, for example, you're wondering, Oh, this audio, I don't have it. Where is it? How can
I also bring it up in my own older version
of After Effects. Just simply go to your
menu, click on Window, and under this
window, you will see all of the panels available. So you can see audio
right here is checked, and that's because I
have it opened up here. For example, I don't
have brushes here. What happens if I
want to see brushes? I just click on
it, and I'll bring up the brush panel and I can do whatever I
want to do with my brush panel right here. So it doesn't matter what
version you're using, you're still going
to find all of these panels under window. Just look at the name,
then come over here, correspond the name here, and then click on it to activate that particular
panel, right? So that is that. So but quickly, if you want
to preview your video, you just simply go to
your preview panel okay, press the play
button right here, and that will allow you
to preview your video, and you can see your video
play in your timeline. So why am I saying
black all the way here is because at this
point in my video, I have trimmed it and my
video is now shorter, okay? So if I pause that and
I undo my trimming, if I press play now, I won't see any black or
call or show in my video because I can see
the entire video from the beginning to the end. It's no longer trimmed, okay? So that is how you preview your video in after
effect, right? So what else do we have here? And then right here, we
have your zoom level. Okay? So this is also important. Right here, we have
your zoom level. Right now, mine
is showing 66.7%. Yours might be showing
another value. All right, it just totally
depends on your screen size. So if I click this drop down
and I choose maybe 3.1, you can see how small my
video now looks like. Alright? It's not
actually small. It's actually zoomed out, okay? So I've zoomed out of my video, and then I can click
maybe 200 or 400%, and that will zoom
into my video. So this is your Zoom level. If I want it to fit
back to my screen, I'm just going to
click here and choose fit and that will fit
back to my screen. Okay? So in case you
use your, you know, scroll wheel on your
mouse to zoom in and out, you can always come
back here and choose fit to fit back to your screen. And then right here, this
shows you your current, you know, time where
you have your playhead. So this blue guy here
or maybe yellow, if you're using an older
version of After effect, okay? Is called your playhead. It's called your playhead. If I click and drag around it, you can see that
my video is also playing depending on
where my play head is. And as I also move it around, you can see the time
here is also changing. So right now, it's telling me that my play
head is currently at 1 second, 12 frames, okay? 1 second, 12 frames. And if I look at
my timeline here, you can see this is 0
seconds. This is 1 second. This is two, three, four, five, and then it's not
up to 6 seconds, but you can see that 19
frames left, right here. Okay? So that is to show you your current
time of your playhead. And then right
here, we have full. Now, when you press
the play button, in your preview panel. If you notice that your video
is dragging a lot, okay? That is because you have maybe a small ram size on your system, or your processor is
not really that fast, or your system resources is
not just capable of handling, you know, the workload of after effect when you are
previewing your video, you could simply stop it
and then drop it from full to something
like half right or cutter or if I change it to this or third or
if I change it to cutter what you will
notice is that it's going to reduce the
quality of my video. All right, when I do that,
you can see right now that my quality has dropped. But when I press play, it's going to play super fast
because right now it has dropped the quality so that it will match
my system resources, and then my video can play
very, very fast, okay? But don't worry, when
you are ready to export your video or
to render your video, your video is going to be
exported in full resolution. All right. So even
if you leave this at cutter while you are exporting, it's going to automatically
export in full. So this is just for you as the editor or the motion
grapher in After effect to quickly preview your
video faster and easy based on your
system resources, okay? So that is that for
this video right here, I'm super excited that you
were able to follow along, and I'll see you guys in
the next video. Piece out.
6. Using the Tools in After Effects: What's up, guys. Welcome to another video in this
after effect training. In this video, we're
going to be talking about the tools and how to use them. Okay? So let's get straight
into after effects, and I'll do just that. Okay, so we're right
here in after effect, and we can see that we have the tools at the top
right here, okay? So our first two here
is our selection tool. It's our selection tool, okay? And that is used for selection. That's where we've been
using all the while to click drag things around,
move things around. I'm just pressing Undo. So, mind you, shorts
cut for Undo, Control Z or Command Z, and then redo is Control Shift Z or
Command Shift Z. Alright. So don't forget that, okay? Those are your um, those are your shortcuts. And then for your timeline, you can zoom in and
out of your timeline. So right now, I'm
just seeing one, two, three, four, 5 seconds. What if I want to see, like, I'm on 1 second, 14 frames now. What if I want to see
that 14 frames or what if I want to see 13
frames? What do I do? I can tap plus on my keyboard. Okay. And you can see that
it's zooming in already. And once it zooms in, you will see a scroll
bar at the bottom here. You can scroll left and
right to see what you have. So you can see this
is still 1 second. And I can see 1 second, five frames, 1
second, ten frames, 15 frames, 20 frames, and then and then
2 seconds, right? And so on and so
forth, like that. So I can keep tapping this. And if I get to the
end, I can, you know, physically see frame
by frame, ten, 11, 12, 13, 14, 15, scroll all the way. And when I get to 24, instead of saying 25, it just turns to 2 seconds. And then 2 seconds,
one frame, 2 seconds, two frames, and so
on and so forth. So that's with my plus button. And if I type my minus button, I'll be able to zoom back out. So plus zooming minus zooms out. Okay? So those are important
shortcuts that you're going to be needing in after effect. Okay. So let's continue with our tools that we have
at the top right here. So I have my
selection tool here. All right. It's a default tool. So anytime you're done
using any other tool here, I usually recommend that you go back to your selection tool. All right. You go back
to your selection tool. Alright. So the next thing I
have here is my hand tool. But for me to use
this hand tool, let me first use the
Zoom to. All right. So if I grab my Zoom to, it allows me to
zoom into my video. It allows me to
zoom into my video. So maybe I want to
zoom to my nose. I can just click on my nose and I can see
it's zooming closer. I can click again
and again and again. Alright, and that
zooms into my nose. Now, if I hold down out on my keyboard or
options on MAC, Okay. If I click, I'll be
you can see tons to minus and I can zoom
back out, okay? And when I'm zoomed in, I can use my hand
to move left right up down to other
parts of my video. If I still want to
remain zoomed in, but I want to see some other
parts in my video. Okay? You can see all of
that right there. Okay? So that is how to use
your Zoom tool and hand tool. I can easily come back to
my Zoom level also here and change it to fit to kind
of fit back to my screen. So let me change this
back to full since my computer can handle it at full resolution so
that you can see what I'm working on
clearly. All right. Our next tool here is the
rotation tool. All right. So when I click this,
it allows me to click and rotate my video. So by clicking and dragging, I can rotate my video in after effect using this rotation tool. So I'll press Command
Z to undo that. Okay. And then the next
thing I have here is my pan behind or ankle 0.2,
okay? Ankle point. So I like calling the ankle 0.2. And it's basically used to
move this guy around, okay? It's basically used to
move this guy around. Now, let me show you
guys something, okay? So I have my phone
right here, okay? If I put my hand somewhere in the middle of my phone now and I try to rotate it,
what do I notice? If I try to rotate it, you can see it's rotating along the center where I
have my hand, okay? But if I move my hand from this point to this point, okay? What do you notice happen? You notice that when I
try to rotate my phone, it's now rotating along that ankle point or where I have my hand in this case. All right. So this point and
this point that I move my hand is what is
called the ankle point, and I can use the
ankle point to to change the ankle
point of my video. So with the ankle point, if I go back to my
selection too and I try to move this guy
in the middle here, he's going to be moving
the entire video, and I don't want to do that, so I'll undo this and then
go back to my ankle point. Okay? This time, if
I click on this, you can see that it's moving that center ankle point alone. If I put my ankle point
maybe somewhere here now, and I go back to my
rotation, too, Okay. And I try to rotate my video, can you see that my video is now rotating along that point? Okay? So the ankle point is kind of like where
you used to determine the center point or the concentration
point in your video. Maybe when you're trying
to rotate or zoom in to your video or do something
that has to do with, you know, concentrating
on a point in the video. So that's what the ankle
point is used for. So let me undo that to bring
my ankle point back to the center because I want
it to be at the center. Okay? Now, the next thing
we're going to talk about here it's
the rectangle two. It's the rectangle
two. All right. So with my rectangle two, okay, I can use it
to do two things. Okay? I can use my rectangle
two to either create a rectangular shape or I can use my rectangle two to
create a rectangular max. All right, Max as MASK. Okay? So I can use my
rectangle two to create a rectangular shape
or a rectangular max. So how does that
work? Okay? If I want to draw a
rectangular shape, meaning I just want
a regular rectangle. I want to draw a
rectangle shape. Maybe I want to add a
rectangle at the bottom here. All I need to do is
to make sure that my video is not selected
in my timeline. Alright, I want to make
sure that my video is not selected in my timeline. So how do I do that? I just click anywhere
that is empty. And when I do that,
you can see that my video is no longer selected. And with that, with
my rectangle, too, I can click and drag and draw
a regular rectangle, okay? And when I'm done, I can go
back to my selection too and use that to
move my rectangle around and put it anywhere. So you can see, I've drawn
a rectangle very easy. Maybe I want to use this
to pass type text on it to pass some information
in my video on stuff. That's how you draw
a regular rectangle. Okay? So if I look up here, you can see that I can actually change the color and the stroke. So the field is
the color itself. So if I click on that,
I can choose maybe, you know, sea green
color. Like this. And then if I click
somewhere here, I want you to see the outline. You can see it has a white
stroke outline around it. So if I select the
rectangle again, I can change it from white
to maybe red or something, okay, just for you
to see very well. And if I click out now,
you can see we have a red stroke around
my rectangle. Okay. So I can also
increase that. I can click here
and change maybe, you know, ten and press Enter. I can see it's now bigger
than it was before. Okay? So that is your fill and
stroke for your rectangle. So let me just change
it to the default. Let me change it to one and
then change it to like, All right, and leave
that at a default. Alright, so boy, if I don't
want an outline color, I can just change this to zero, and that will give
me no outline color on my shape at all. Okay? So that is that. So that's how to draw
a regular shape. You can draw a shape anyway you want it with
your rectangle, too. Alright, so let me delete this rectangle that
I drew here now. And how do I delete that? If you look at the timeline, remember what we had
here was just as one. But now after
joining a rectangle, we can now see shape layer one, meaning we now have two layers
in my composition, right? So if I don't want
this rectangle again, I can select this shape
layer one and press delete. Right there, and I will delete
that from my composition. And you can see that
the rectangle also disappears at that point, okay? So how do I draw a
rectangular mark, Mark as in nose maak
or facemx, okay? MSK. How do I draw
a rectangular max? To do that with my rectangle
tool selected, this time, I will make sure that my
video is selected, okay? I will make sure that my
video is selected, okay? So with my video selected, if I come here again and I try to draw that rectangle
that I drew the other time, you can see the results
we are getting. So the result we
are getting now is different from the
result we got initially. This is what is called a max. What is a max? A max
is restraining or restricting your video to the shape that you have drawn.
So what does that mean? It means that the only part
of my video that I will see is just this part that I
have drawn my rectangle. So if I undo this and
I draw it this way, you can see that I can
restrict my video and say, Oh, I only want this part
of my video to show. And when I press
the play button, you can see that
all the remaining parts of my video are not available because I draw
my max around this area. Okay? I can undo that. And you can see that will show
me my entire video again. I can even do just my face. Now take note when
drawing a max, when you click and you
are about to start, everything will disappear,
which is normal. And then when you
click and drag, you will begin to see
what you are drawing on. Okay? So you must have
an idea of, you know, the area you want to put your max before you start
clicking and dragging. So that when you click and drag, you know where you are
clicking and dragging and where you're going
to stop at, okay? So if I stop here now, you can see when I press Play, I have only this part
of my video showing, okay, which is just my face. Okay? That is how to use MAX
in you know, after effect. That's different between
rectangular shapes and marks, right? So we have shapes
and we have mass. To draw shapes, your video
would not be selected. And to draw marks, your video would be selected. Okay? So take note of that. You can write that boldly
in your notepad or your notebook or whatever
you are jotting with. Okay? So that is that. Now, if I look closely here, you will notice that
I have a drop down arrow just at the bottom
right of my rectangle two. And when I click
and hold on that, you can see that it reveals to me all the other types of
shapes that I have here. So, for example, if
I want a circle, I can use the ellipse to, right. And the same rule
that applies to your rectangle also applies
to the ellipse too. So if I select my video, okay, and I click and drag, I'll be drawing a circle, right? And if you want a
perfect circle, you can actually
hold down Shift, and I'll give you a
perfect circle, okay? And you can see
we have a circle. We can change the feel and
stroke once again and, you know, all of that stuff. If I undo this and this
time I select my video, I will actually be drawing a max instead of
drawing a shape. And you can see what
I have right here. So I can draw
something like this. And when I press play,
you can see the video is restricted to that point alone. But this time it's a circle
and not a rectangle. Okay? So the same thing
applies to everything. Now, let me show
you one cool thing, since you are in a
circle right now, whenever you draw a max, you will see that this max one will show at the bottom here. Let me undo it. You can see that there's nothing
like Max one now. But when I click and draw, you can see that immediately
Max one is showing, right? Now, what this Max one shows, if I click on the drop down
arrow beside the Max one, it's going to show
me some settings for my max and I can
see Max feather. One of those settings is
Max feather, alright? And the max feather is
currently zero. Okay. If I click and drag on any of
those values to the right, I'll begin to increase
my max feather. And as I increase
my max feather, can I see what's
happening to my video, you can see that it
is turning this from a straight hard line
to a soft line, to a soft line. And when I play my video back now you can
see that instead of having that hard or hh circle, and I have a soft circle,
making it look like, Oh, maybe this is a
keyhole or something, you know, just giving
it a nice effect. So when you add
feather to your mark, it softens the edges of that shape and makes it
look better. All right. So that is max and how
to use max feather. So without the max feather,
this is what I'll get. Okay? You can see
how hard this is. So people will know that
oh this is a circle. But with the max feather, okay? Let me redo that. Okay, so let me just come back here
and just recreate it. With the Max feather, you
can see it gives a soft, you know, nice look
on our circle. And it applies to any
other shape also. Okay? So that is how
to work with Max in after effect with your rectangle and
your ellipse, too. So we have star two here. I could do a star
mark or a star shape. You can see I'm drawing the Max now because I have
my video selected. If I undo that and I
diselect my video, I'll be drawing a shape, okay? So it's as simple as that. Before we leave
shapes and max alone, we are still going to talk about this particular pen
tool here. All right. So the pin tool is the same as the regular shapes and
everything we have here. The difference is that the pen
tool would allow me, okay, to draw my own the pent will allow me
to draw my own shape. So if my video is not selected, I'll be drawing a
shape, obviously. I can click here, click here, click here, click here, and then join
this and you can see that I have drawn a
shape with my pen too. Alright? I can undo this and
draw another type of shape. Okay, I can click
here, click here, click here, click here and
draw this. You can see. So when you click and drag
when using the pen tool, you'll be able to draw a curve, right, and that's
what we have there. So let me undo this again. And then this time,
select my video. And then if I click
here this time, click here, click here, click here and join this, I'll be drawing a max, Alright. And then if I open my marks and go to the feather
and I feather it, you can see how it makes
that soften out, okay? So that is how to
use your shapes and marks using the shape
tool and the pen tool, okay? It is as simple as that. Alright, guys, so
we're going to be ending this video right here, and I'll see you
in the next video. Piece out. We
7. Working with the Timeline in After Effects: What's up, guys. Welcome to another video in this
after effect training. In this video, we're going to be talking about the
timeline and how to arrange layers
in the timeline. So let's get straight
into it right now. Whoa. So we're back here
in after effect. So let's talk about the
timeline and how to arrange, you know, videos
in the timeline. So let me go back to
my selection too. And right now, I currently have just one
video in my timeline. And when I press Play, you
can see the video plays. Alright, so Alright, there's no sound here because
I didn't see anything. So if there was sound,
you would have heard me say something, right? Right there. So you can see
the video keeps playing. And I only have just
one video right here. Okay? So let's a Zoom. I want to add more
videos into my timeline. How do I go about that? Okay? You can see
let's go to Kisho two, and let's see what
we have right there. So if I drag this and I
drop this under Kisho one. So basically, to
add a video from your project panel to your timeline or to
your composition, all you need to do is drag
it from here and drop it. So this is different from you right clicking and saying
new come from selection. If you write click and say
new come from selection, what you're telling
After Effect is I want a composition
from this video. Okay. And I want it separate. So I want to start something different from what I'm
currently doing now. That's what you're
telling after effect. So as a minute I clicked
on new composition, you would have seen that we
have a new composition here. And if I look at my timeline, I only have Kisho two here. Alright. But when I undo that, you can see that when I dragged from here
and dropped here, I now have two videos in this same Kishu one
composition, right? So composition is like a
container for different layers, and that will determine
what we see at this point. Okay, so you can see that
when I drop my video here, right, and I press Play. Play, but you can call me Kisho. And what's up, everybody. My name is kaboch. You can see that I
can't see Qisho too. I dropped this video right here. I can't see it, okay? But I'm I'm still seeing
this Schedule one. But when I was
listening to the audio, I noticed that I was hearing the audio
because that other one, I was talking in that video, and that's why we were
hearing that video. While this one, I
wasn't talking there. If not, you would have
been hearing two audio. Okay, while that happened. So what is going on?
What exactly is going on is that this Cu two
is under Kash one, and KashwO is covering Kesw two. So if I want to see Ku two, the only option I
have is to drag this Cachu two and move it up. You can see this blue
line showing here. That blue line is telling me where it's going
to drop my video. So if I release it here, it's still going to be
under Kisha one. But when I release it here, it's going to drop
it above Kho one. So when I drop my
video right there, you can see that I'm no
longer seeing Kho one. I'm beginning to
see just Ku two. And when I press play again, Show A, but you
can call me Kisho. And what's up, everybody? My name is Gabriel Show. You can see now that I
can see Kishu two and I can hear the audio
in Kisho two, okay? And that is as simple as that. So what it simply means that when you have
something above, okay, that thing stays above. And when you have
something beneath, what is underneath would
not show because what is above it is covering what
we have right there. Okay? So it's as simple as that. Let me drag Kishu one back up. Now the options I
have are simple. If I want to see both video, then what I will need to
do is to actually extend my timeline so that I can have enough space to
accommodate this schedule two. Because if I grab
this Schedule two now and I click and
drag it this way, okay, all the way to the
end of this one, okay, you will notice that
even when I press play, I won't even hear the
audio of Cachu two again because I've dragged
it all the way to the end, but my the reason why I was
dragging it to the end was that I wanted to be able to
let this one play first. And then after this one finished playing, that one will play. But remember, this timeline, the timing of the
timeline was created based on the what's it called? Based on the timing
of this Ks one. That's why we remember we created it from
this su one video. So what it means is that if I want to accommodate
these two video, I have to find a way to
increase my timeline. And to do that is very simple. All I'll need to do is
to go to my composition, click on composition settings. Right now, the
duration is 5 seconds. So what I'm going to
do is to probably maybe make this
15 seconds, okay? So I will be adding ten
extra seconds to my video. And then when I
click Okay, alright, I've extended the time of my timeline. How do I know that? There was no, you know, scroll bar at the
bottom here before. But when I increased
it, I can announce that there's a scrollbar available
here. Let me undo that. You can see before now,
there's no scroll bar here. But when we went top
composition settings, and then I changed
this to 15 seconds. Okay? When I press Okay, now, watch out for this bottom part, you will see that
scrollbar up here. Okay. So when I click Okay now, you can see that immediately there's a scrollbar that is now showing
at the bottom here. So if I click and
drag like this, remember this video
I placed at the end. Now, it has a space to fit in. Alright, you can
see right there. There's now space
for it to fit in. So what will happen
now is that this my playhead will move
from this video, and when it gets here, it automatically go
to the next video. So let's play it out and
see what it looks like. What's up, everybody? My
name is Gabriel Shoe, but you can call me Kisho. And welcome to
another photoshop, Tutorial All right, so you can see what
we have right there. Now, if I don't want
to be scrolling left and right and I
want to see everything, remember that plus
and minus I told you, I could tap minus to zoom out, and that will show me the
entire thing in my timeline. But when you press
Plus, it will zoom in, and then you always need to use your scrollbar to
move left and right. So I'll tap minus to scroll out and you can see what
we have right here. So you can see that this
is the first video. Imrely gets here, the second video starts
playing. You can see that. If I delete this
second video now, by the time it gets here,
nothing will play here. You can see it's totally black because there's no video here. So whatever I am seeing here totally depends on
what my playhead, where my playhead
is in my timeline. So if I undo that and
bring my video back, you can see that after
this video plays, you just go straight
into the next video. And then when it gets here,
there's a bit of black here because there's
nothing at this point. Okay? So this is how to arrange
videos in your timeline. Let me undo, undo, undo, undo back to what I had before, just the Kach one video. Another thing I could have
done is after dropping this Kasha two
underneath Kasha one, I could actually reduce
the size of Kasha one. Okay? And how do
I go about that? You can see this
point here that here, I can reduce the size by
clicking and dragging on that. So if I come here, click
and start dragging, right? As I drag, I want to make
sure that I hold down shift so that will
maintain proportionality, when I release my mouse, you automatically see, Oh, you see, there's a mistake. I had K two selected
while I was doing that. So I was expecting that this my video here was supposed
to be getting smaller. But meanwhile, it was the one underneath it that
was getting smaller. And that's why I was not
seeing what was happening. So you have to really, really be careful and
know the layer you have selected before you start doing stuff right here. So
let me undo that. And then this time,
select K show one, then come here again
and start adjusting. Now, if I not press shift, I might distort my video. So you want to make
sure that you hold down shift while you're doing this so that as I reduce my video, it
maintains proportionality. And then when it
gets to this point, I can stop here and I can even place this
maybe right here. Alright? And you can see
now that in this scenario, even though I did not, you know, extend the time of
my composition, I can still see two videos because this one is now
smaller than this one here. So if I press play here,
what's up, everybody? My name is. You can see I'm seeing both videos and
I'm hearing the audio. Also, it's pre rendering. So you can see this green
guy here is until you finish gets into
everywhere before you can. The video can play
very well smoothly. So you can see what
we have right there. So you can see now that
my system is kind of struggling with playing this back because apart from this, I'm running some other
software behind the scene. So my system is already like, hey, hey, hey, I'm really
finding how to play this back. So I can just drop
this from full to cutter and press play. And this time, it will
not be dragging like it was I won't be dragging like
it was dragging before. Show. And what's up, everybody? Whats up, everybody. Hi. You can call me Kisho. And what's up, everybody. My name is Gabriel Shaare. So you can see it's
playing smoothly now because I've dropped it
from full to clutter. Alright. So also be mindful of that when working
in after effect. So I hope you're understanding
this arranging of layers. I could grab something else again from here.
Maybe this logo. If I drop it above Ku one, you can see that I've
added another one. And because this
logo is transparent, it's a PNG logo, alright? You can see that it's
not covering my video, and I can just drag it and position it anyway
I want to position. I can even reduce the size, okay, and say maybe
position it somewhere. I don't know, maybe
here and say, Oh, let my logo just hang around there while my video is playing. What's up, everybody? My
name is Gabriel Shoal. Or I could just position it somewhere here, and
that will be there. But you can call me Kisho. And what's up, everybody.
My name is bro. So you can see how I'm
arranging my layers and stuff. If I put this logo under, it won't show because this video now will
be blocking the, you know, image from showing. So the way you arrange
your video here, or your stuff here
determines what you see in your composition. That is very, very
important for you to note. One more thing I want to
explain here is that if I put my mouse towards
the beginning, or the end of my video, you will see that
my mouse is turning to this arrow pointing
left and right. And that simply means
that I can actually trim my video in my timeline. So apart from you trimming
your layer and footage panel, you could also trim directly in your timeline by
using this method. So if I put my playhead
somewhere at the end of this logo layer and I click and trim when I'm seeing that
arrow pointing left and right, and I trim it to
maybe 3 seconds. What happens? After 3 seconds, the logo will disappear. You can see that, huh? It disappears because
I have trimmed it so all this point right here,
nothing is going to show. So I go back to the
beginning, I press play. What's up After 3 seconds. Gibros. It's gonna disappear. Shoal. But you can
call me K Show. And what's up, everybody? My name is Gabro Shoal. So you can see that
right there, okay? So that's how you
trim your video. I can even trim the logo from the beginning part also, right? So when you want to
trim, make sure you see that arrow pointing
left and right before you start
clicking and dragging. Because if you don't see
that, if it's like this, you'll actually be moving
it instead of trimming. Alright? So this time
you want to trim. So if I trim like this
to maybe 2 seconds, alright, what does that mean? It means my video will
only show for 1 second, and that's between 2
seconds and 3 seconds. So if I press play now. What's up, everybody? My
name is Gabriel Shoal. You can see my logo appear
and disappears, okay? You can call me Kisho. And what's up, everybody? My name is Gabriel
Shoal. But you can. So you can see what
we have right there. So you want to make sure that, you know, you trim your
layers the way you want it. So if you don't want somebody to show from the
beginning to the end, you can always trim
it to the portion, you want to trim it too. And that would, you know, Make sure that that layer shows at that particular time alone. Alright. So thank you so much
for watching this video. I'm sure you now know how to arrange your videos
in your timeline. Don't forget that
if you want to add a video into an
existing composition, then all you need to do
is to just drag it from your project and drop it into your timeline
into that composition. But if you want to create
something different, something fresh, then
you can right click on that video and create
a new composition. So don't mix it all up together. Thank you for
watching this video, and I'll see you
in the next video.
8. More Tools in After Effects: What's up, everybody.
Welcome to this video. In this video, we're
going to be talking about some other tools
in After effect. So let's get straight
into it right now. Okay, so we're right
here in After effect, and let's talk about
some other tools. So we stopped at the pin tool in the last video when we're
talking about the tools. And right now we're going
into the text tool, right. So let's talk about how
to type in after effect. So I'll click on
this T right here, and immediately that
will chain my mouse to this cussle and I can click anywhere on
my screen to type. So if I click here, you
can see that red line there means that after effect
is ready for me to type. So I can type in K show, right? And you can see
what we have there, and I can go back to I used to say this even
in other softwares. Anytime you're done typing, the first thing
you should always do before you start
moving around, changing the color, changing
the font or whatever it is, make sure you go back
to the selection too. So I'll come to the
selection to click there, and now my text is now
movable and selectable. Alright. So don't forget that. So let me just place my
text somewhere here. An example, we have
show right there. So how do I change my font? How do I increase the size? How do I choose the style, color, and all of those things? Now, once you start typing, the character panel should
automatically pop up. But if it doesn't, you can go to Window and click on character, and you should see the
character panel pop up. So right here, it's
similar to Photoshop. If you've done the
Photoshop training, you can see we have
the font type here, we have the font style. We have color, we
have the font size. So let me increase
the font size first. Let's do like 100. Alright. You can see
it's bigger now, okay? And then I can change
my font by coming to that and choosing whatever
font I have right here. For example, if I choose
this just this year, you can see that it
has changed my font. So let me just change it back to full so you can see very well. Okay. I can choose
another type of font, ph, choose another type of font. So it totally depends on you and the project you're
working on that will determine what kind of font
you want to use. All right. And you could also go online to Google and download as
many fonts as you want. Okay, and install them. So installing a
font is very easy. You can check out
installing a font in the Photoshop training and you find out how
to install font. Okay? So it's pretty simple. Grab the font, install
it and it becomes available in
aftereffect Photoshop, Illustrator, Premiere Pro, or whatever software
that uses font. So when you install a
font to your system, it's made available across
all software that uses font. Alright, so we can see
all of this right here. Let me just choose this
back to black demo. I can see what I have right now. Okay? I can increase
my text size or more. Okay? You could also click inside here and type
in whatever value you want to type in or
use this drop down, okay? Or just put your mouse
on top of the value, click and drag left
or right to increase or decrease your
font size, right. So that is basically how you adjust your font
in after effect. I can also click here
to change my color. Now, mind you when
changing your color, make sure you click on this one above and not this
one underneath it. The one above, that's
your foreground color. So if I click that, okay, that would allow me
to change my color. I can change it to
red, for example, and you can see
that the color of my font has now
changed to red. Okay? So I think those are the
important things that we have right here in After effect
regarding our font. So let me undo that
back to white. I can see that's how to
type in after effect. Okay. And you can
see that when I put my text anywhere around
here, it goes behind. Why? Because if you look at
my layer or my timeline, you can see that
the text is just only above the show two,
which is this video. If I want my text to
be above everything, I can drag that and take it
all the way up and then it stays in front of anything
that it is being placed on. And you can see, I'm not
seeing my logo here. Why? Because my playhead is not currently anywhere
close to that layer. So if I put my playhead somewhere here by
just clicking here, then you can see
that the logo is now showing and everything
is now in showing. And when I put it here
the text also stays above the logo because it's
above every other thing now. So it depends on how you
want your stuff to look like determines how you arrange your stuff
in your timeline. Okay? So that is how to work
with text in after effect. All right, so let's talk about let's talk about
the brush to, okay? Alright, we have the brush tool, the clone stamp two, and the eraser two. The brush tool, the
clone stamp tool, and the eraser two. Okay? Now, these three tools
allows me to do, you know, special things on my
video in after effect, right, but I can't use them
on my composition panel. I can't use them on my
composition panel. All right. So if I come to my brush
tool, for example, and I click on my brush
tool and I try to just click on my screen
or do something here, it gives me a warning
that I can't use my brush tool on my
composition panel. I can only use my brush
tool on my layer panel. Okay? I can only use my brush
tool on my layer panel. So I'll just click Okay
and say, thank you. And then what do I do? I need to switch
to my layer panel. So the first question I
want to ask myself is, which of these layers do I want to paint on with my brush. So if I say, Oh, I want
to paint on this s two, which is this big video here with my brush, I
want to paint on it, then I'll come to Kach two, double click on it, and that would open up Kach two
in my layer panel. If I go back to my composition, as I double clicked on Logo, you can see that is the
logo that shows here. If I double click on the text, the text will just not go to the layer panel to just
make it editable for me. And if I double click on Q one, you can see that Kach one
will open in the layer panel. So depending on what
you want to use the brush to paint
on will determine the layer you double
click here to bring in into the layer panel. So I'll go back to
my composition, Double click on K two, which is this video here. That's the one I
want to paint on. I'll double click on that. That will open in
the layer panel. And now I can grab my brush to and immediately I
grab my brush too, you can see that
I have my paint, you know, my paint panel
automatically opened up, right? My paint panel or
comatically open up. If it doesn't, if you can't
find your paint panel yet, just go to window and you find paint there
and open it up. Okay? So with my paint
panel opened up, I can use that to determine
the size of my brush. Now, if I just click and drag, you can see how small my brush
is or tiny it is, right? And the color is red. So the reason why it's
tiny and the color is red is because that's
the satins I have here. The size of my brochure
is just 13, okay? And then the color of
my brochure is red. Okay? Size is 13. You can see 13 right here, and the color is red, okay? Now, sorry, let me go
back to the paint. Now, if I undo this and I
come here to change the size, once I click on this, it immediately takes me
to the brush panel. All right? If it
doesn't take you to the brush panel, you
can go to Window again. You see brushes, bring it up. It brings me to the brush panel. And under the brush
panel, I can see that same 13 here, which
is the diameter. So I can click inside here
and just change it to, like, maybe 100 to see
really become big. You can see how big
my brush is now. I can even do like, you know, 300 and take it all the way up. You can see how big my
brush now looks like. Okay. And then for the color, I'll go back to my paint, click on my paint,
and then I can change it from red to maybe
yellow or something. Click Okay. And
now, when I paint, you can see I have this yellow, big, soft round brush. You can see that my
brush is soft. Okay? How is it soft? If I click here, it takes
me back to the brush. Under this place,
you can see that the hardness is currently zero. If I take the hard
ness all the way to 100 and I try to paint again, you can see now that
my brush is now hard, alright, meaning
that it is not soft. So I personally like
the soft brush, so I'll just change that back to zero so that I
have a soft brush. And if I click just once, okay, you can see the
effect I have. All right. What I can even do is an idea
is coming to my head now, I can just fill up
this with this color. So if you look at my paint,
if I go back to paint, I have a color picker there
or an eyedropper, too. If I click on that eyedropper, I can use it to pick
a color in my video. You can see, as I move around, the color is showing me
right in this box, okay? So I can come pick
this color here. And that selects
that color for me, and I can use my soft brush to kind of just
paint around that. Maybe I'm trying to cover
something, you know, I don't want people to see, and I don't want it to be obvious. Oop, sorry, let me undo that. Undo. I'm trying to
reduce my brush size, so I'll go back to brushes, reduce the size, and click
and drag to the left. And I'll just try to cover
up everything I have here. And because my brush is
a soft brush, you know, it's going to be
difficult for people to actually know that I
covered something up there because I'm
using the exact color that was there initially. Okay? So you can see what I'm using
my brush to do now, okay? And it's giving me this results
that I have right here. Let me just clean
this up. All right. So it's not looking that
perfect or, you know, if I was doing this,
I would have zoomed in better and worked more on it. So you can see how
it just, you know, covers that up and people
won't even know that, you know, I had something
there before, right? So that's how to use the
brush too and just use it. You can just paint around. You can click ones or
paint around stuff, do whatever you want to do, and, you know, get your results
with your brush too. So that's how to use the brush. But meanwhile, don't forget
I'm still in my layer panel. So when you're done
using the brush, you have to remember
to go back to your composition because that is where you're doing
your main stuff. So if I click on composition, you can see that what I did in the layer panel automatically reflects in my composition,
right, right there. And I can see all my
text and my logo again. You can see that in
the layer panel, all of that was not shown
here because you're just trying to concentrate on this video here and
using your brush. But by the time I go back
to the composition panel, you can see that what
I did there still applies right here and I can see the remaining layer there. Okay? So it's as simple as that. And when I press play,
that is right there. Okay. So that is that. Okay? So let's double click again and go back
to the layer panel. And let's talk about
the clone stamp two, the clone stamp two,
the clone stamp two. So like the name says, clone stamp two,
what does that mean? It allows you to clone
a particular part. Of your video and stamp
it somewhere else. I can clone a particular part of my video and just stamp
it somewhere else. So how does that
work? I can grab it and don't forget
your clone stamp to, you can also only use
that in your layer panel. It's not going to work in
your composition panel. I'm not going to be
able to use it here, so I can only use it
in my layer panel. How do I go to my layer panel? I just double click
on the video. I want to use it on right here and it takes me to
my layer panel. Okay, I can increase
the size of my brush. Okay? Now to clone, I would hold down all all
options on my keyboard. So out on Windows, option on your MAC. All right. If I hold down out here, you can see that it turns
to this target sign, right? And I can use this
target sign to click any part of my
video that I want. Okay? For example, I can increase my bro size
to make it big a lot. Okay, maybe more let's
do like 300 again. And you can see it's
kind of covering this A E. I can hold down. Click once on the AE. So to clone any part, you hold down or
options O or option, click once on the AE or
wherever you want to clone, and then go to where
you like to stamp it, maybe here or wherever it
is and click and drag. Oops, sorry, click
and drag and you can see that it is stamping
that area into this place. Alright you can see that it's also stamping everything
around that part. Okay. He's also stamping
everything around that part. So if I wanted just the AE, I would just be careful to
make sure that I don't, you know, drag it beyond that. You can see how it's
stamping that part for me. So that is what the clone
stamp tool is used for. Let me do another example. Okay? Another example
is I can clone my face, all down, click here, then come here and just paint
my face again right there. So I have, you know,
two versions of that. So I can even come here,
okay, clone again. And then paint my
face there again. So to clone, you
just hold down up, click where you want to clone, then go to where you
like to stamp it and just click and
drag in that area. So when I press Play now, you can see right there. Cloned right there. So you can see my system is really struggling
to play this now. I will need to drop it to cutter if I want to see very well. But you get the gist, right? You can see what
I have right here with my clone stamp tool. Okay? So basically, the clone stamp tool is not used the way I'm using it now. What you'll be using it
to do most of the time in your video is that you
might have some part of your video that
maybe you want to cover up or you want
to do something to it and you don't want people to see that part or you
want to erase some part. That is where your
clone stem two will actually be making sense, okay? Say, for example, I can clone this black area and add
more of that black area. So let me just
reduce my brush size because it's too big for that. So I just want to be like
maybe the size of this. So let me reduce it
to like maybe 80. I want it to be the size
of this black stuff here. Okay, good. Click and hold, and then I can just come
here and add more of it. Okay? You can see
what's going on. And then clone again,
add more of it. And then you can see the
way I'm already trying to, like, build something
around there. Clone again, drag again, right? And do it in such
a way that maybe I don't be able to see
what I have there. And before I know
it, that part is covered up and everything, okay? So I could just clone again, cover this part up, you know, like that, like that, like that. And then I have something
like this there. So people really
know that, you know, there was white here before, and now I've just
cloned this and turned it to black and stuff. Alright. So that is that we using the clone
stamp, too, okay? And after effects. Let me just undo, undo that. Okay? And then the
eraser two, very simple. You also use the eraser
tool in your layer panel. So this brush, clone
stamp and eraser two, they are all used in
the layer panel, right? So what is the eraser
tool used for? You can see the
brush is very small. So let me just go to
the diameter here and increase it to
about maybe 200. Okay? Now, Eraser
to is very simple. It allows you to erase
part of your video off. So if I click here
and I do like this, I'm erasing my video, right? So I'm actually not
painting in black. I'm erasing my video. So for you to be for me to show you that I'm actually
erasing my video off, if I come to my
layer panel, now, mind you, as we were creating
all of those things, you see so many things
appearing under here. Don't bother yourself about it. Just come to this
drop down arrow here and minimize it, okay? So what I want to
do now is I want to drop a video under this video. And that would allow us
to see that what was actually done here is to erase this part and not make it black. All right? So let me
look for a video here. If I drop this video
and I drop this here, boom, can you see what
I have right now? Okay, you can see
that the video, let me expand the video. You can see that this
part is actually now transparent, okay? Because if you look at
this video I have here, it's just a video
that looks like this. So if I drop it under this, you can see that that
part I was erasing with my eraser tool was actually I was making
it transparent, okay? So if I double click this again, I come back here and
erase this part too. Of my video. All right. And I go back to my composition, you can see that
this part has also been erased off, right? So it is now transparent. So the eraser tool allows you to erase part
of your video off, and then that part will
now become transparent, and then you can use
it to do whatever it is you want to do with it. Alright, guys. So that is
where we are going to be stopping right here
in this video, right? And I'll see you guys in
the next video piece out.
9. The Transform options in After Effects: What's up, guys. Welcome to another video in this
after effect training. In this video, we're
going to be talking about the transform options
in after effect. So let's get straight
into it right now. Okay, guys, so we're back
right here in after effect. And what I want us to do
now is because we've done a lot to this current
composition here. You can see we've
added some layers, texts, logos and everything. Let us create a new composition from this same Kho one video. Don't forget this is the
composition. This is the video. So we want to come
to the video again, right click and say new
comp from selection. And what will happen
is that you can see that it creates
another composition called Kho two using
that same Ka one video. So after effect,
automatically just add two, three, four, five, depending on the number of
compositions that you have created using the
same video, okay? So that's what we
have right there. And the reason why we're doing
this is because I want us to have a clean video that we're going to use together
so that I'll be sure that we are on the
same page, okay? So I'll be sure that we
are on the same page. So now and don't forget
throughout this training, you can always pause this video whenever you want to pause it and then rewatch,
rewind forward. Totally depends on you. That's
why it's an online class, and that's why, you know, it's personal to you, okay? So you can always pause
try out your own pause, try out your own pause, try out your own and, you know, follow along in
the class that way, okay? Because it is practical. Everything that you learn here, you have to practicalize it. So always pause
practice, continue, pause, practice, and on
and on and on that way. Okay. So now that we
have a new composition, so now we can see that we
have three compositions. We still have our
Adobe master class, Kho one, Kho two,
everything right here. So you can see that this
Adobe master class. We didn't even use
it at all, okay? And that's to tell you that
you can start, you know, your project in after effect simply by just
importing and creating a composition straight up
without going to composition, new composition, and doing
all of those stuff. Okay. So that is that. So
now let's move on. I have Kaw one here.
So let's talk about the transform options,
transform options. Now, you will notice
that all our layers in the timeline usually have
this drop down arrow here. So if I go back to
cashew one here, you can see that each of
them has a drop down arrow. And that means that we have something that is hidden
inside this layer. And to reveal that, all I need to do is to click
on this drop down arrow, and it's going to show
me transform an audio. Okay? And that's because
this video has an audio. Okay. So if your video
doesn't have audio, all you will see here is
just transform. All right. So we are talking about
the transform option, so we're going to focus
on the transform option. So if I open this transform
option right here, because you can see that it
also has a dropdown arrow. So if I click on that arrow, it's going to show me
the transform options. So under the transform options, we have anchor point, position, scale, rotation,
and opacity, okay? Ankle point, position, scale,
rotation, and opacity. Now, all of these,
what do they mean? Now, for the sake
of this training, I'm going to want you to assume that this ankle point
doesn't exist here. Okay? Because there's a
way after effect just does it that when you try adjusting your ankle
point from here, it makes you look as if you're
adjusting your position. But meanwhile, you're not
adjusting your position. You're actually adjusting
this ankle point. If you remember this
ankle point when I was talking about
this ankle point too. So the best thing to do
is if you want to adjust your ankle point or do anything
with your ankle point, just come and use the ankle 0.2 and click and drag this around, move it the way you want it. So I will strongly
recommend that you don't adjust your
ankle point from here. So just ignore this
ankle point here. That's basically what I'm
trying to say. All right. And we'll be focusing
on position, scale, rotation, and opacity.
So what is position? Position simply
allows me to change the position of my video. All right. And if you look here, we have two values here. We have 96540. All right, 96540. So what is this 960
and what is this 540? Now, this simply
means your X and Y. So 960 is your X axis. 540 is your Y axis. All right? So if you go back
to the graph again, if I have something
like a cross, right here, drawing a graph. In the graph, this is
your Y axis, right? And then this is your X axis. Okay? This is your Y axis, and this is your X axis. So if I want my video
to move left and right, it means I will have to adjust
my video in the X axis. And if I want my video
to move up or down, then it means I have
to adjust my video in the Y axis is as simple as that. So if I come to my X axis, put my mouse on it, you can see showing white to let me
know that my mouse is on it. I can click and drag to the left and you can see the
video will move to the left, click and drag to
the right, and you see that the video will
move to the right. Okay? If I undo that, that's Command Z or Control Z. And I come to my Y axis, click and drag to the left, and you will see that
the video will go up, click and drag to the right, and then you see that
the video will go down. Okay? So that's the
way it works, X and Y. Then the next thing
is scale, scale. Scale also has X and Y, but X and Y are currently
linked together. They are currently
linked together, and you should always leave it linked together. So
what does that mean? If I drag either X or Y, both values will be increasing or decreasing
simultaneously. So if I put it on
X, for example, and I click and
drag to the right, that's to increase
it above 100%. And as I do that, you can see my video is scaling
up, all right? Meaning I'm making my
video look bigger. All right. And in that process, it scales up my video. Okay? And when I take it
to the left below 100, you see that I'm making my video smaller or scaling it down. Okay? You can see how
small my video is. And then you notice that
both the X and Y values are adjusting as I do this, okay? And I've explained
to you that is because they are both
linked together. Now, let me quickly unlink this. But don't unlink your own. Let me just show you what will happen when they are linked. If I unlink this
and I drag the X, you can see what my video
is turning into now, okay? You can see how
distorted it looks like. And then if I drag the Y, you can see what my video
is looking like now. All right? My video
is looking distorted. Okay? So you want to
make sure that they are always linked together, so that when you drag anyone, it scales up and scales
down proportionally. Okay? So that's scale. Then the next one I
have here is rotation. Okay, rotation. Now, this rotation, to use this, you can see we have
two values here also. We have zero X, and
we have 0.0 degree, zero X and 0.0 degree. Let me start from
this 0.0 degree. This 0.0 degree
allows you to change the angle of rotation
of your video. So if I click and drag
on this 0.0 degree, if I take it to the right,
I'll start increasing it. And as I increase it, you can see based on the
angle of rotation, my video is also rotating, okay? And we know that a full
complete rotation is 360. So if I take this
all the way to 360, all right, what happens
to that zero X? Okay, can you see that zero
X has turned to one X, okay? And that's because I have
rotated my video one time. So if I go another 360, it will turn to two X, meaning that rotate
my video two times. Then on and on three
X, that's three times. So if what I want
to do is actually just to rotate my
video two times, I can just come click on
that zero x and change it to two and press Enter, and that will give me two X, meaning that my video
will now rotate twice and come back to
this position. Okay? So this is useful if you want to do a full
360 degree rotation. And then this is useful. If you don't want to do a
full 360 degree rotation, maybe you just want to rotate
your video 45 degrees. Okay? You can rotate
it 45 degrees and it stays rotated 45 degrees. All right? So that
is your rotation. Let me undo that and go to the last one, which is opacity. Okay, Opacity. So with opacity, by default is always at 100. You can't take it above 100. The only thing we can
do now when it's at 100 is to reduce the opacity. So if I put my mouse here and I click and drag to the left, I'll begin to reduce the
opacity of my video, and you can see
that my visibility of the video is going down. And when it gets to zero, I won't even see my
video again at all. Okay? So that's opacity. So if I put my opacity, maybe somewhere around 50, okay, it looks as if the video
is faded, you know, out. But what I can do is, if I grab another video, okay, maybe this video, yeah, and I drop it under this video, can you see that the video is now actually transparent, okay? Or let me look for
another one again, drag that and drop. So you can see that this video
is actually transparent. So you can see this
video is small. So let me just make it big. I'll just select it. Go back to my selection too and make it
big so to cover the space. So you can see that my Kho one video is now
what transparent. If I take it all the way to
100, I won't see that video, as I begin to reduce my opacity, we can see that the
video underneath it is now what showing. And if I take it all
the way to zero, I won't see Kasha one again. I will only see the
video underneath it. So if you want to create a transparent effect
in your video, you can reduce your opacity, and it will just become transparent to the
video underneath it, and that will give
you that effect. Okay? So it's as simple as that. All right. So that is
how your opacity works. So let me just undo that undo, undo, undo, undo,
undo back to 100%. Okay? So that is your
transform option. So but quickly, let me
just talk about audio too. If I open up the audio here, basically what we
just have on there, this audio is audio level. All right. By default, your audio level is in zero. And when you take it to
the left to a negative, you reduce the volume
of your audio. And when you take it to the
right, which is a positive, you increase the
volume of your audio. So since I didn't talk in
this video much, okay? I can't use this
video as an example. So let me bring in the caso two. Let me just drag that and
drop that in my timeline. Okay. And now, when
I press play surely. We can see that there's audio, and you can see Kho two also
has its own dropdown arrow. So if I click on
that dropdown arrow, it's going to show me
transform and audio again. Then I'll go to audio. Then the audio level, I can take it to the left. And when I press play
now, Okay, press play. You can see that the
audio level is now low and when I take
it above zero, but you can call me Kisho. And what's up, everybody? My name is Gabriel Show. You can see that the audio
level is now very loud. Okay? So that is how you work with your audio level if you have audio in your video
in after effect. So that is that for your transform options and
all of that in after effect, I would see you guys
in the next video.
10. How to use Keyframes in After Effects: What's up, everybody. Welcome to another video in this
after effect training. In this video, we're going to be talking about keyframes, right, and how to use them for
creating motion graphics. Alright? So if you want to
understand motion graphics, understand what
keyframes are all about. So let's go straight
into it right now. Now show you how
to do just that. Okay, so we're back in
after effect, okay? And let me just delete
this schedu two. I was using it as an
example the other time. All right. And if you've messed around with your
transform option and everything, you can just click
this Reset button, and that will reset
all your properties. For example, if I had
moved this like this, rotated my video, douse this, do all of that, I can just
click on this reset here and just reset everything back
to what it was before. So let me just
minimize all of this, open this up again
and this time, I want to focus only on the
transform options. All right? Because we want to
talk about keyframes in this video, okay? Keyframes. And once you understand the concept
behind keyframes, you understand the concept
behind motion graphics. So you want to do motion
graphics in after effect, then you have to
really understand what key frames are. Okay. So let's go to my example here. This is my rotation here. When I rotate my video like
this, for example, right? And I press play.
What's my preview? Play. And I try
to play my video. You can see that even
though I rotated my video, what might be going on
in my mind is that, Oh, when I press play, I should see the video rotate, you
know, on its own. But that's not what's happening. What's happening now is that
I can see that my video just remains that way and it's not moving and it's
just playing that way. Alright? This is where your, um, your key frame comes in. All right? This is where
setting of keyframes. This is where it
comes in, right? And what we are going
to be doing now. So let me press
Undo to undo that. So what we're going
to be doing now with our rotation, when I press play, I want my video to
rotate like this, like this, and then come back
to where it started from. Okay? So once again, I want my video to
rotate like this, like this and then come back
to where it started from, which is so when I press play, I shot I'm like, ok. Alright, to begin to
animate my video. So let's try that out
now using keyframes. So if I come to my skill, you can see that we
have a stopwatch here, and you'll notice that this
stopwatch is also available for every transform option here. All right. And that
tells you that all the transform options
have stopwatches, and you can set key
frames for all of them. Okay? So the keyframe I
want to set now is for my rotation because I want my video remember how
to rotate this way, sorry, this way, this way, and then come back like this. So let's get started with that. So before I click on my
stopwatch to set a Keyframe, it is very important
that my playhead is at the position where I would
like that keyframe to appear. So this rotation thing
I want to do now. I want it to happen at the
very beginning of my video, at the very beginning of my video. And what
does that mean? That means that I have to find or I have to take my
playhead from wherever it is and put it at the
very beginning of my video before I click on this stopwatch to
set a keyframe. All right? Because
this keyframe looks at where my playhead is and puts the
keyframe right there. The my player is here and I want my rotation to
happen at the beginning, then I won't be
getting the result I want because it's going
to set the keyframe here, and that means that
that thing will happen somewhere
after 3 seconds. And that is not what I want. So I want my rotation to occur at the very beginning
of my video, so I'll drag my player
to the very beginning. And then once my play head
is in the right position, I can come to this
stopwatch her for rotation, click on it, and you will
see two things has happened. Number one, I can see this
diamond looking icon here, this blue diamond
looking icon here, where my keyframe is,
where my playhead is. All right. And that's why
I said that you must put your playhead where you
want to set the keyframe. You can see that it's
appearing at the exact point where I have my playhead. Then the other thing you
will notice is that you can see that this remains blue, meaning that this keyframe or this topwatch is still active. So when you click on this
stopwatch you set a key frame, those are the two
things you will see. If you're using an older
version of After effect, this might be color
yellow and not blue. So it's still the
same thing, right? So that is that. Now, after setting
my first keyframe, Okay, I would not do anything
to this first keyframe. So meaning I won't come here and rotate my video for
this first keyframe. Alright? Because
at the beginning, I want my video to look normal. I don't want it rotated
from the beginning, so I want it to look normal. So I'm going to leave
my video, you know, or my rotation the way it is now. And then what will I do? I can move my played five
frames forward, okay? And when I do that, how do I know that I'm
on the fifth frame? Because if I look at my
current time indicator here, you can see that it's
showing five year. So this tells me that I'm
currently on the fifth frame, right, which is way less
than 1 second, right? It's way less than 1 second. Later on, I'll explain to you why we are moving it
five frames forward. All right. So I'm going to
come to my rotation, okay? And then I can now come to the 0.0 degree because I don't want it to do
a full 360 degree. I wanted to just
rotate 45 degrees, and then rotate the
other way 45 degrees, and then come back to the
normal way it was before. So I'm not going to use the zero X. I'm going to use
this 0.0 degree, click and drag that, to the right and
rotate it 45 degrees. So when I get to 45, I'm
going to stop all right? And what do you notice? You notice that another keyframe automatically appeared
here in middle I started, you know, changing this value. So what does that
mean? That means that when setting keyframes, after clicking the stopwatch
to set the first keyframe, for the second, third, fourth, fifth, six, seven, eight, nine, ten, and forever, you don't need to come and
click the stopwatch again. If you click the Stopwatch
the second time, instead of adding
a second keyframe, is actually going to
remove all the keyframe. So if I click here
now, you can see that all my keyframes are gone, okay? So you must understand
that when you click on the stop patch to
set the first keyframe, you don't click on it again
to set the second keyframe. All you just need
to do is move your played and start changing
the values here, and other key frames will
be set automatically. So let me undo that. Undo that. Let me do it again. So you can see there's
no keyframe here. Immediately I start clicking and dragging this to the right. Boom, can I see a keyframe
appears there and I'll just drag it all the
way to what 45 degrees, and you can see the
keyframe is right there. Okay. Now the next
thing I'm going to do, don't forget you can pause
this video and, you know, follow step by step as
I move in this video so you can understand
better and practically. So I'm going to move my played
five frames forward again. So five plus five, that
should give me ten. So I'll move and go to ten. And then at the tenth frame, I'm going to add
the tenth frame, I'm going to add
another key frame. All right? Remember,
at this time, I want the video to
go the opposite way. So I'll come to my rotation, click and drag it to the left
and take that -45 degrees. Okay? So don't forget the
reason why we're using 45 degree is because
that is what we want. Alright? So when you are
setting your own keyframe, you don't have to use the
exact same settings I'm using. You could use whatever value
based on what you are seeing here and based on the fact that you like it that way. All right. So when it comes to keyframe, you are in charge, right? You are in charge,
not after effect, not me, but you are in charge. So you determine what you want, how you want the animation of the video to play out, okay? And that is why we are moving
step by step this way. So you can see now I've successfully done
the second animation. So the first animation was this. The second animation was this, right, which is what
we've just done now. So the third animation I want to do now is to bring it back to where it was before.
So what do I do? I move another five
frames forward, so that will land
me on 15 frames. So I'll just drag
that to 15 frames, and then I'll come back to my rotation and
change this to zero. So zero was the
default value there. Now, if I'm struggling
with getting that zero, I can just click inside it and type zero there and press Enter, and I'll take it back to zero. And you can see that
another key frame has been set right there. So so far so good, you can see that
we currently have four key frames in our timeline. This first one was
the video like this. This second one is
the video like this. This third one is
a video like this. And then this final one was the one that
brought the video back. So if you add all the
four key frames together, you have this, this,
this, and this. So one, sorry, so one, two, three, and four. Alright, so that's why we have four key frames right there. So the first one is to stay
stay with where you are. Then the second
one to the right, the third one to the left, and then the fourth one back
to where you were before. All right. So if I play
my video back now, that's exactly what
I'm going to get. So if I press play, you can see what happens at the
beginning of my video. You can see that, huh? Really cool. So we can see that the rotation
happened the way we, you know, thought
it in our mind. So that's how to set key
frames and to begin to animate your video or your
layers in after effect. Alright? So let's do
one more example. Okay, one more example, I'm going to go to
let's do scale now. Let's do skill. So for skill, let's think of what
we can do for skill. So let's as some I want my video to from the normal
size scale up, right, and then scale down and come back to
the normal size, right? So with scale, normal size, scale up, scale down, and come back to
the normal size. All right, so let's
actualize that now in after effect using
the key frames. Now, to set my
keyframe for scale, if I set it anywhere within this keyframe
and this keyframe, what I'll be telling after
effect is that I want both the scale and rotation
to happen simultaneously. All right. So meaning as
my rotation is happening, my scaling up and scaling
down will also be happening. So that is the result
I will get if I set my keyframe anywhere
between here and here. Okay. So but that's not
what I want right now. What I want right now is I want my rotation to
happen on its own. And then once my
rotation is done, I want my scale to now happen somewhere after
that point, okay? And to do that, I will have to take my
playhead somewhere away from these current
keyframes and I can also put it somewhere
around 1 second, right? So meaning after this, when the video gets to 1 second, then my scaling up and
scaling down would now occur. Okay? So you can see I'm
on 1 second right here. I will go to my scale, click on the stopwatch
for scale, okay? So once I click on the
stopwatch for scale, we can see that we have a
keyframe up here right there. So you can see that when we
clicked on the stopwatch, it added a keyframe for us where we had our playhead, okay? So it's always
important that you put your playhead at the
exact point where you want your animation to
take place or where you want your key frame
to appear. All right? So after clicking here, I can see my keyframe
is now set here. Now, because at
the initial stage, I want my video to remain
normal before scaling up. I am not going to
adjust this scale. I'm not going to
adjust this scale. I'm going to leave it
the way it is, okay? I'm going to leave
it the way it is. Then I can now move
five frames forward. So I'll look here and watch out when I get to five frames. And so once I get to 1 second, five frames, all right, I'm going to stop right there. Then I'll go to my scale, and then this time, I
can now scale it up. Okay? I can now scale it up. So if I click here and
I scale this up, right? So let's do maybe 150. So I can just click
inside here and type 150, press Enter, and you can see that my video is now scaled up or zoomed in. Okay? And then I can now go
to the next five frames. Okay? So I'll come
here move this forward to 1 second, sorry. So that'll be one
sec content frames. Okay, now, so after moving our playhead to one
sec content frames, I can come to my scale, and I want to scale
it down now, okay? So I can change it
from, you know, remember the default
value there was 100. So 150 made it scale up. So if I change it to 50,
that will scale it down. So I'll just click
here and type 50. And you can see
that it has scaled down my video, making it small. All right? Great.
And you can see another que frame has
been added right there. Then I can move five
frames forward again. So that will land me on 1
second, 15 frames, okay? And what do I want to
do now? Can you guess? Fantastic. Yes, I want
to scale it back to 100, which is a normal size. So I'll come to scale, click here and type 100, okay? Rs Enter, and that
would make my video come back to the normal
size it was before. So we have four key
frames here again. The first one means the
video should stay normal. The second one is
make the video big. The third one is make
the video small, and the fourth one is bring the video back to the
normal size, right? So that is what we
have right now. So if I go back now, from this point, let me put
my play here and press play. You see what we've just
done with our scale. Can you see that
now? Really cool. But when I take it all
the way to the beginning, the first thing I'm going
to see is the rotation. And then after the rotation, I'm going to see
the scale occur. So let me press play now. You can see what we
have right there, okay? So this is how you begin to animate stuff in
after effect, right? It's very, very, very simple. So I'm going to stop this
video right here, okay? And I'm going to give
you a classwork, okay? I'm going to give
you a classwork. And your classwork is to
animate this position. So for position, I want you
to animate the video to go I want you to animate the
video in this way, right? First, the video will
stay where it is. Then second, the video
will go to the right. Then, third, I want you to
make the video go to the left, and then fourth, I want
you to make the video come back to where it is before. Now take note. I said,
left and right, okay? I didn't say up and down. So I'm just giving
you a tip there. So you know which value to
adjust in your position. Alright? Okay, so the first one, the video stays where it was. The second one, it goes right. The third one, it goes left,
and then the fourth one, it comes back to where
it was initially. And then the second
classwork is opacity. With opacity, I want you to
make the video fade out. Okay? I want you to make
the video fade out. So somewhere towards
the end of the video, make the video fade out like it's the end of the movie
or something, right? So that is your classwork, and I'll see you
in the next video. In the next video, we're going to be
doing the correction. So that's why I'm pausing right now so that you can try it out. And then in the next video, you can see if you got
it right or wrong. See you in the next
video. Piece out.
11. Master Keyframes in After Effects: What's up, guys.
So let's go into the next video in this
after effect training. First, I'm going to be doing the correction to
your classwork, and then we'll talk
more about key frames. All right, so let's get
straight into it right now. Okay, so we're back right
here in Adobe After effect. And quickly, let
me just do the um, correction of the classwork I gave you in the
previous video. All right. So right now,
let me just do this. Remember I told you
that if you set any new keyframe within
an existing keyframe, it means you're telling
after effect that you want the new keyframe and
the existing one to happen simultaneously.
All right? There are situations whereby you would want that to happen. But for this case,
we just want it to happen after our
other key frame. So this is this, then this will
happen after this. And now the position I
want to do will also happen after the
scale. All right. So I'll just put my playhead
at 2 seconds, okay? And then I'll come
to my position. Click on the stop
watch for position, and that will add a
keyframe right there. Okay? And don't forget
for the position, the first one, you want to
leave it the way it is. Now, for those of you
that might have done a mistake of adjusting
this first one, let me show you what your
error would have been. So let me just move
this naturally, I'm not supposed to move
it because at this point, I want my video to remain
here so that I can actually see the video
going out, right. So if I adjust this now and say, Oh, move this to
the left, right? Move five frames forward, right, and move
this to the right. Some of you, this
is what you did, but let me just do
this so that you can see what the
video will look like. So you know the
difference between this and what I'm
going to do next. Then you move five
frames forward again and then that's 2
seconds frames, and then you bring
it back to this. So this was 960,
so those type 960, and you bring me
back to my video. Now, if I try to play this, you can see that because I moved this first key
frame to the left, even though I go back, back, back to my scale up, my scaling down, you
can see that the video, even at the very beginning where the rotation is occurring, that the video is already
on the right, okay? And this is not the
result you want. So you can see that it
just keeps the video to the right until the video gets here before
it comes back in. Alright? That is not the effect
that we have in our head, or is that is not the
animation we had in our head. So this is the error you get
if you do that, alright? And that's why I said
that this first keyframe, you always want to
leave it and not touch it because you want the video to remain like that before it starts animating
the way you want it. So let me undo that undo, undo, undo, undo, undo. So those of you that
made that mistake, I'm sure you've seen where you made that error,
and you can correct it. So it can also undo yours
until everything is gone. So I will come to my
position once again, click on the stopwatch, and this time, I won't do
anything to this keyframe. I will just move
five frames forward, and then I will now
take it to the left. Alright. So depending
on what I want to do, let me just take
it somewhere here. Then go five frame forward again and then take
it to the right. So when you are
dragging to the right, when I click and drag here, immediately my mouse
hits this point, I don't allow me to drag again. So what you just want to do
is to release your mouse, come back there,
click and drag again. Come back here, click
and drag again until, you know, you get to where
you want your video to be. Alright, so you can
see that we are dragging our X axis and not Y. If we have dragged our Y axis, our video will be
moving up or down, and that's not what
we intend to animate. We want to animate
it left and right. So I'll keep dragging this
until I like what I see. So maybe let me
just stop somewhere here, and that looks good. So I'll move five frames
forward again. All right. And then I'll bring my position back to
where it was before. I know that the value that
was here before was 960. So I'll just click inside
there and type 960, so I don't struggle
to bring it to the center of my
screen. All right. So you can see we have four
key frames here once again. The first one is the video
stays the way it is. The second one is take
the video to the right. The third one is take
the video to the left. The fourth one is bring
the video back to where it was before. All right. So if I play that back,
I'll click here to bring my plate somewhere at the
beginning of that keyframe. Press play, and then you can see how my video goes left
and right and stuff. And then from the beginning, we have our rotation,
our scale, and position. Okay. So you can see how
it's easy to just begin to animate things in after effects without,
you know, stress. So setting key frames
is very simple. Why? Because you are the one to determine what you
want to do? All right? That's what makes it simple because I'm the
one who's going to determine how I want my video to move or the kind of
animation I want. That is what makes
it simple, okay? So because you are in control, that gives you the
edge over after effect to use the
keyframe to kind of control the movement
of your layer or your video the way
you want it exactly. All right, so let's
do the last one, which is for opaquity. Okay? I can put that here. All right. Click on my
stop port for opacity. Okay. And that will set a key
frame for me right there. And then I will move
forward five frames, right? So basically, I'm not
going to do five frames, but let me just do
five frames since we've been doing five
frames all this while I'll show you the
result we get and why five frames will not really, you know, look good here. So put it at 3
seconds, five frames. And then some of you also, you might have come
here and say, Oh, let me first do maybe like 60. Then you move forward
again and say, Oh, let me do like 40
or 30 or something. And then move forward and
then now do zero, okay? And then you have
four key frames. All right, so what I've done
here is still exactly if I undo this and then from
this first keyframe, I would just come to the
second one and just type zero. All right. If I'm
counting 100, 70, 50, 30, ten, zero, it's the
same thing as 100 to zero. Alright, I could just use
two keyframes to finish up that instead of setting several key frames because it's opacity, right, and it's going to
be going down like that. So instead of doing
100, 90, 80, 70, I get to zero, I'm just
going to basically do 100 and then the
next one will be zero. So meaning that
it's going to fade out my video at that point. So some of you, you might
have done the opposite. Maybe you click the A, and then you went to
change this to zero. And then you moved
forward five frames, and then you went to
change this to 100. You've actually
done the opposite. So meaning that you are
telling after effect that all the way from
this point to this point, that your video should not show, and your video should only
show starting from this point. So if I go back here, I
can see that we are not seeing anything
when I press play, we're not going to see anything
until we get here, right? Because that's
exactly what you've told after effect to do. You've done the opposite of what you're supposed to do, right? So I'm going to undo that. And then click here again. This should be 100 and then I'll move here five
frames forward. And then change this to zero. So what happens is that
when I press play, I'll start seeing my
video show from here, do all of the stunts
and then fade out. Okay? Cool. So you can see what we have. So if this is what
you have done, give yourself a big round
of a plus you are the boss. Okay? All right. So, if this is not
what you've done, you could just correct yourself, and then now you
are the boss, okay? So that is that. But like I was saying
the other time, the space between this
hundred and zero for this opacity is
too small, right? It's too small. And that
will bring us to timing, and I would also explain the reason why we've
been using five frames, five frames all this while. The reason is because if I
undo this opacity again, if I click on this
100 and this time, instead of doing
just five frames, if I do all the way to maybe
the end, what will happen? If I come here and
change this to zero. It means after the keyframe, this is the hundred
and this is zero. It means it will
take this long time for my video to disappear. And what will happen,
that will make my fading off very slow and not as
fast as it was before. So, the further the key
frames are from each other, the slower your animation. And the closer the key
frames are to each other, the faster your animation. That is why I said you
should use 55 frames. The reason is because I wanted our animation to be fast, okay? I don't want it to
be slow because if I had chosen something
like maybe one 1 second, right, that would have
made our animation, you know, a little bit slow. And that's why I said, Let's do five frames so that
we can have our You know, animation occur
very, very fast, okay? And now for opacity, I don't want it to be fast. I want it to be slow so
that I can let people see that my video is actually
fading off gradually. So if I press Play
now, see what I have. And see how it took a long
time to fade out my video. Okay? So that is that. And if I come to my
what's it called, my rotation, let's
assume I grab this one, move it far away. Move that far away, grab
this, move this far away. Now let me just move them, push it very far from each other. You will see how slow it's
going to take my video, you know, to do this position. So if I press play
from the beginning, you can see the others are fast, but you can see the position. You can see how slow it is
now than it was before. Okay? So the further the
key frames from each other, the slower the animation. And the closer the key
frames are to each other, the faster the animation. So let me just undo, undo, undo, undo back to what I have. So this is what I want.
I want my position, rotation and scale to be fast, but I want my opacity
to be slow so that I fades off
gradually. Alright? So that is that. So quickly, let's talk
more on key frames, and let's talk about the easy and motion
blow at this point. Okay. But before I
talk about that, in case you want to
edit your keyframes. Now this is very important. You can see maybe this
position maybe I want to edit any part of this
keyframe for position. Don't just put your
played anywhere and come to position and start
adjusting the values here. If you do so, you'll
be indirectly adding another keyframe
that you were not aware of instead of
editing the keyframe. So if I come here and say, Oh, I want to adjust
this so more jar, I want to do this
like this and adjust. Can you see that it has
automatically added the keyframe there
without me knowing. And then when I press play now, I will see my video behaving in a way that is not
supposed to behave. And then I'll be wondering, Oh, why is my video
stopping like this? Why is it not stopping
in the middle again? I thought I placed it
to stop in the middle. Oh, what's going on? Oh, la, la, blah, blah,
blah, blah, blah. It is because you
were not conscious of the fact when you were adjusting your keyframe that your playhead
was in the wrong place. So if you want to
edit any keyframe, you can put your
play head directly on top of that
existing keyframe. And how do you know
your play head is directly on top
of that keyframe? If I look my position now, you can see that
this is not blue. But once I put my plate
on an existing keyframe, you can see that
this is now blue, letting me know that I'm on
top of an existing keyframe. And once I find that I'm on
top of the existing keyframe, I can come to my
position and adjust my position anywhere I want it. So maybe I want you
to go in some more. I won't be creating a new one. I would just be editing the
existing one. All right. So that's just another tip that you should
have at the back of your mind when it comes to keyframes and editing
them. All right. So if I press play now, I won't get any weird thing
happening to my video, it to look like the way
it's supposed to be. Okay? So that is that with
editing your key frames. Alright, it's not that hard. Great. So let's come back here. So I wanted to talk about
the easy es for keyframes. Now, for you to, you know, have smooth animations, it is always important that you
make your keyframe easy. It's always good you make
your keyframes, easy. And how do you change your
keyframe to an easy keyframe? It's very simple.
All you need to do is to right click
on any keyframe, and then in the options here, you will see keyframe assistant. And then under the
keyframe assistant, you will see Eazy E. So that will just help you to kind
of smoothen your animation. Alright. Though, when you change your keyframes to Eazy E, it's not really
visible to the eyes. You don't really
see the difference, but the difference is
there, trust me, okay? So always turn your
keyframes towards easy. So when I change this to EZ now, you can see that my key
frame has changed from looking like this
diamond icon to this, you know, sound of
time icon, right? And that's because I've changed
this keyframe to easy is. All right. So I want to change the
remaining keyframes to easy is. How do I go about that? I can just select
everything like that, okay, minus the one I've made
easy is already. All right. So how do I select? I just
click on Somewhere empty and drag and I'll see a line
beginning to show. All right. And I'll make sure
that line covers all my keyframe. All right. Without my keyframe selected, you can move your
keyframes, all right. So but that's not what
we want to do now. We just want to make it
easy E. I can write, click and then go to Keyframe
Assistant and choose easy E. And you can see the shortcut is F nine or function nine. So if I click on
that, you can see all my keyframes are now
easy is except opacity. So for opacity to I select, so o way to actually select
this, I can select this one, hold down Shift on my keyboard, and click on the next keyframe, and both of them will
remain selected. All right. And this time, I'm going to use the short cut, so I'll come to my keyboard
and just press F nine. But the way my own
keyboard is requires me to hold down the function key
before pressing F nine. So I'll do that and that
will just transform my keyframes to EZ. So when I press Play now,
the difference is there. You can see that the
animation is looking a little bit smoother than it
was before, right? So if you're not really
seeing the difference that much, don't worry yourself. Just know that the difference
is there. Trust me. Okay? So that is
how to add EZ as to your key frames in after effect. All right. And then
the final thing we are going to talk about in this section before we
move on is motion blow, motion blow, motion blow. Now, this is my
hand, right, okay? If I begin to move
my hand very fast. Can see what's going on, you can see that
it's looking blurry. And that's because I'm
moving my hand so fast that for you to even see my
fingers or count my fingers, it's going to be really, really
difficult for you, right? Now, that blurriness
you're seeing is what is called motion blow. So what that means is
that in real life, when things move really fast, there's always a
blurriness, okay? There's always a
blurriness attached to it. So right now, in my video, since I have some fast
movement like my rotation, my scale, my position, they're really moving fast. It's supposed to have that
blurriness also attached to it to make it look
more realistic, right? And that is why, you know, after effect has added the motion blow effect to its software to add
it to your animation, so that it will give you a
realistic fast movement. So take note, if your movement or your
animation is not fast, then there's no point
adding a motion blow because if I put my hand like this and I move it like this, there is no blurriness
occurring here. You can easily count
my hand or my fingers, I mean, and then you are
not seeing anything blurry. So if you if your
animation is now fast, then there's no point
adding motion blow because you're not going
to see the effect. So you only add motion
blow to first movement. And since we have
first movement here, we are going to do just that. So how do I add my
motion blow to my video? It's very simple.
At the top here, you can see the
motion blow icon. You can see enable motion
blow for all layers. So if I click here, it kind of enable motion
blow for all layers, right? But it's not going to
affect my video yet. Why? Because I have to still activate motion blow for that
particular layer. So if you look right here, you can see the same icon of
this motion blow right here, and you can see an empty
box under it right here. Now, just in case you're not seeing this boxes here or this, icons here, it means
you are in your mood. Okay, you are in
your mode section. So to tuggle between your
mode section and switches. So right now I'm in switches. That's why I can see
the motion blow. Well, if you're in mode, you
won't see your motion blow. So how do I go about that? At the bottom here, there's
a button that allows you to toggle between
switches and modes. So if I click here, you can see right now I'm
in my mode section. If I click again, right now, I'm in my switches section. Why is it called switches? It is because of these empty
boxes under right here. Alright? So, make sure
you're in switches. And then under this
motion blow icon for this my layer here. I can see an empty box there. If I click on that empty box, then I would have
activated Motion blow, and you can see it
immediately in my video. You can see that blurriness
now being applied. Without it, you can
see what I have. With the motion blow, you
can see what you have. So it gives you that first
realistic blurriness, it adds it to your video
and makes it look good. So the reason why you have
to activate it here and activate it here is because
if I go to this caso one, for example, I might want
to activate motion blow for this layer and not activate for this one,
this one, this one. So that's why I can
see that everything has its own box right here and I can click the motion blow for the
particular layer that I want. I can click it for everyone. Or just click it for
one layer alone. If that is the layer I want to add motion blow too. All right. So that's why after adding
your motion blow here, you also have to come and
click on it to activate it for the particular video right here. All right. So now if
I press play, right, so things might get
a little slow here, but you can see the
motion blow now being applied to my video. So I'm just going to wait
for this green guy to go all the way from the
beginning to the end. And that's when when I start playing from
the beginning again, that I will be able to see
my video play normally. So right now, it's doing
something called pre rendering. Alright. So because I've
added some effects to it, so you can see it's
taking time to play. If I wanted this to
have happened faster, I would have changed this
my full to quarter, right? So you can see the green
has covered everywhere now, and you can see my video
is playing smoothly now. And you can see the way
the motion blow has made it look really nice, okay? Awesome. So thank you so much
for watching this video, and I'll see you in the next
after effect video. Pooh.
12. More Keyframes Examples in After Effects: Whats up guys. Welcome to another video in this
after effect training. In this particular video, I'm going to be showing
you more examples of using your keyframes to create
motions in after effect. So let's get straight
into it right now. Alright, so we're
back in after effect. And for this example, let's come and use this. I have this newspaper
image right here. You can see this
newspaper image here. So let's right click on that and choose new comp from selection. New comp from selection. Alright. And that also tells you that you can actually create new composition
from images, too. Alright? So it's not just videos that you can
create compositions from. You can also create
compositions from images. And when you do that, the
time of your image would be the last time you use when creating a composition
in After Effects. So right now, it just gave me a 15 second long timeline because that was
what I chose last when creating my
composition, right? So now that I have this
image, if I press play, this is not going to play
anything because this is just an image, PNG file. So that's why I can say it's transparent, right,
and everything. So don't forget that anytime you see black in after effect, it doesn't mean that there's
a black color there. It simply means that this
is transparent. All right. If you're not comfortable with the black color,
in after effect, you can come and
click on this icon, this transparency grid, which is just beside
your active camera. You can click on it to
change your view from the black screen to the transparent screen
so that I can see that, Oh, this is actually
transparent. But since I know it's
already transparent, I don't need to see
my transparency grid. I can just click
here and need to fill it with a black color, but I know it's
actually transparent. Okay? So what I want
to do is I want to create something like we
saw in the Spider Man movie, you know, when they
went to announce that Spider Man is dead, alright, when they
thought he was dead and it wasn't really dead. You know, we had the
newspaper kind of rotates across the screen and then
just stays on the screen. Spider Man is dead, alright, as the front page
of that newspaper. So let's animate
something like that. Now, before we do that, let's break down the
animation in that, you know, Spider Man movie. Now, in that animation. We saw that when the
thing started playing, the newspaper was
initially small, okay? It was small, and then we noticed that it started
becoming what bigger. And as it's becoming bigger, we also noticed that it
was also rotating, right? So the animation was
a combination of, you know, rotating
and becoming big. All right? That was what
created the animation. Now, if you want to
replicate the same thing in After effect using
this newspaper image, right, what can we do? We can simply come to
the newspaper image. Click on this dropdown to open the transform option of this. You can see there's no audio here because this is an image. So that's why we're only
seeing transform here. I'll click on that to
open up my transform, and we can sell our position
scale rotation opacity. Now, based on the explanation of that animation we just did now. We notice that two
things are used there. Number one, we have scale. So scale was what we were able
to make the news scale was what we were able to use to make the newspaper small
and then grow big. And then the rotating there is obviously the rotation
transform option. Alright. So a combination
of scale and rotation should give us the animation that we want to work on here. So how do I go about that? I can just come right
here to my scale. Now, before I click, you can see where
my playhead is. I'll bring it and bring
it to the beginning because I want all of this to happen at the very beginning. In short, I want my animation
to occur within 1 second. So what I'll be
doing here is just 1 second of animation, right? So I'll make sure my player is at the right place, which is at the beginning. I'll click on scale because I want to set
key frame for scale. All right. And
I'll also click on rotation because in this case, I won't put the scale and rotation to happen
simultaneously. Okay? I want it to happen
simultaneously. All right. So I'll select both of them, and then you might say, Oh, the next thing is to go to 1
second and then adjust this. But there's something
we're missing at this first keyframe here. Now you can see that scale, our newspaper is already big, at the very beginning, I don't want my newspaper to be big. I want it to be small. What I'm going to do here is to actually come
to my scale on this first keyframe and reduce the size of my
newspaper to zero. I'll just come
here and type zero and that will reduce
it to the smallest. Why? Because when I press Play, I want to see the newspaper
become big as it's rotating. So if I undo this and I
leave it as big as it was, then I won't be able to
achieve that animation. So this first key
frame for scale, I'm going to click
on it and change it towards zero, right? So we can now go to
1 second, right? And then at 1 second, I can now increase my
scale to 100 Okay. And then I can
rotate my newspaper. So I want it to rotate twice
within 1 second. All right. So I'll just come to the zero X, which is the number of times
and type in two right there. So it means that it's going
to rotate 360 degree twice. Alright? I can see what
I have right there. So when I press play now, you can see what I have. Very, very simple. Now, if I had not set these
two keyframes simultaneously, let's assume maybe I did
my rotation after scale. So let me select the
rotation key frame, and I put that maybe somewhere
after my, you know, scale. If I press plate,
this is what I'll get. And this is
not what I want. So you can see that
the combination of the scale and rotation makes it, you know, gives
you the effect to rotate simultaneously
and get this result. Alright? So there we have it. All right. I like it. So don't forget your easy E. So we select
all our Q frames, function F nine to easy E. And then since this is
the first movement also, we activate our Motion blow. So I'll click on Motion
blow here and right here. So I can press play now. Can see the difference between what was
there before and now. Awesome. Whoa. So we're creating some Spider
Man right here. Alright, so you can see
motion graphics is not hard. You're the one in control. You're the one to decide how your movement is going to go. You're the one to
decide, you know, what's going to happen
with the animation, and then you just go ahead and create your awesome animation. I can even go ahead and add sound to this to give it more, you know, to make it
more interesting. I have this woosh here, right? So we have just two. We have
woosh three and just woosh. So the woosh, I can drag that, drop that into my timeline. Alright. And when I press play, you can hear that sound, right? But it's coming in too early. Okay, so what do I do? I just move this a little
bit forward and play again. Alright. Great. You can see how that
matches the animation now. Alright, you can see the sound stopping when the
newspaper also stops. So when it comes to
motion graphics, adding sound kinds of bring
your animation to life, you know, and gives it reading, and people can relate with it. And you can also make it
look as if people were in that same animation
environment when the whole thing was
happening with sound effect. So you can go online,
search on Google. There are various website
where you can download free paid sound effect, okay? So just search for
sound effect on Google. You're going to see so many
website to download from, right, and then you
can just download them and add them to your project. Okay. So let's do one more example before
we leave keyframes. All right, so let me just
go to my project panel. I have this CD cover or COL DVD cover image I did
for my church. All right. I can just right click on that say new come
from selection. I can see you can do something like this easily in Illustrator. You know, if you've gone through the illustrator training, this is clipping marks. This is some shapes here, and then you type your text, bring in your logo, add some transparency
here, and you're done. Okay? So I just created this for the CD cover in my church, alright, for pastor salmon. Now, I want to
make this roll and rotate and put in some music
and make it look as if, you know, we're listening
to the CD or something. Alright? To do that, I'll just go to my transform, open my transform, go
to rotation easily, make sure I'm at
the very beginning. Click on rotation, and
this is 15 seconds. So depending on how fast I
want this to be rotating, will determine the number of rotation that I'm going
to choose right here. Since this is 15 seconds, let's make this rotate
maybe seven times. All right, let's see how fast or slow that is going to be. I can see all the
way at the end, I have my second keyframe. I'll select both of them and right click
Keyframe Assistant, easy is, and that
makes it easy is. All right. So when
I press play now, you can see what I have, right? You can see the way it's rolling
and rolling and rolling. So to make this
more interesting, I can look for background
music or something. So let me just bring in
this island MBB and stuff, drop that into my project panel. Alright. So that's
another way of importing into your after effect project. Then I can drag it from
here and drop it on there. And now, when I press
the play button, Alright, so you can
see how it started, you know, a little bit slow, became fast, and
then it ended slow. And that's because we added that easy ease to it to give you that smoothness at the
beginning and at the end. Okay? So without the easy ease, you would have just
gotten, you know, normal, you know, speed from
the beginning to the end. Alright, so that is
start with key frames. So I want you to go
out there and begin to create amazing stuff. Thank you for
watching this video, and I'll see you
in the next video.
13. Creating a Lower-third in After Effects: What's up, everybody. Welcome to another video in this
after effect training. And in this video, let's
talk about creating a simple lower third
in after effect. So let's get straight
into it right now. Pop. All right, so we are
inside of After effect now, and I want to go to
Kao two this time, right click and create a new
composition from that video. What's up, everybody. My
name is Gabriel Show A. So other part where I said, my name is Gabriel Shoe. I want to create a lower
third that will just bring up my name right
and show right there. You can call me K
Show and welcome to. Alright and my portfolio. So that's basically what
lower thoughts are. Lower thoughts are those texts that comes at the
bottom of the screen, displaying somebody's name and the person's portfolio or
maybe doing a newscast, you know, you're trying
to just, you know, give people the
headline or something. That is what is
called a lower thud. So let's create a simple one. Inside of After effect using
our knowledge of keyframes. So to do that quickly, I'll go to my rectangle, too, right, and grab my rectangle, and I want to draw
a shape this time. So I want to make sure that
my video is not selected. So I'll click out
and click and drag, and I want to draw
something like this. Okay? You can see that right there. Okay? Grab my selection to just move that
up a little bit. And I want to make this red. Okay? So I want to do color red, but not a little bit
dark red in color. All right. Something like that. Okay. All right. Don't mind. I'm just trying
to select something cool. I'll click Okay. I have
one rectangle here. All right, and I can
draw another rectangle. All right. Still selecting
this shape layer one. I can click drag and that
will give me Rectangle two. Okay. This rectangle two, I'm going to come back
to my selection to change the color of
that to a gray color. All right. So to a gray color like that
and then click Okay, then we position it. I want it to be
somewhere around here. Just like that. Okay? So you can see what I have right here. And now the next thing I want to do is to
type in my text. So I'll go to T, click
and type Gabriel. Show a lay. Okay. Go back here and then come to my character panel,
and, you know, let's use something very simple like Montserrat or
century gothic. Let's use century gothic. Let's make that bold. Okay. And let's change
the color to white. Alright? Because I'm
trying to place it here. So I'll reduce the size also. Alright. And then
just drag it and still looking big,
reduce it some more. And just place that right here. All right, you can see that
looking good. All right. And I want to type in my
portfolio here so I can select my text in the timeline
Control C or Command C, which is copy, and then Command or Control
C, which is paste. So I have two of
these texts here. Don't forget that here please ed it directly on
the existing one. So if I click and
drag and move away, that's when I'll
see that there are actually two of them there. So I'll double click to edit my text type CO Ksho concept. All right. And then go back to my selection tool
and reduce the size, you know, so that I can
fit into this right here. All right. So put
that right there. You can see how we've
easily created this simple lower though right here. Okay, CK show concepts. Alright. And we have that there. So with the power of keyframes, I can come here and animate
this to come from outside and just fly in at that point
where I mentioned my name. So let's play this again. Up, everybody. My name is Ke oh. Hey, bro. Let's go back again. What's up, everybody?
My name is. My name is Posid all right. So meaning that this is where our key frame will begin from. Alright. So I'll select my text, the two texts and
the shape layer. All right. I need to select
the three of them together. Now, okay, let me deselect
and show you something. Now, if I want to
bring up position, instead of always, you
know, clicking here, going down down down down and bringing up position,
or if I click here, click here, go to transform, then I can see position, I can actually use shortcuts. So if I select a new layer and I press P to bring up position, if I press S, it
brings up scale. If I press R, it
brings out rotation. If I press T, all right, I guess you said zero or O. All right. It will
bring out opacity. T brings out opacity. T is basically transparency. That's why it's T, not O. All right. So that's that. So that's a short cut.
If I press T again, that will remove the opacity. So what I want to
do now is I want to set keyframe for all
of them together. All right. I don't want
to do it one by one. So I'm going to select
this, hold down shift, select this and select this, right, without selecting
the video itself. And then I'll press P, and I'll bring P for all
the layers, right? P for all the layers. And so anytime I click on the stop patch for one,
it affects the rest. All right. You can see that you set the keyframe
for the three of them. So this will make my work faster rather than having
to set the first text, the second text,
and then the shape, it would be really
tedious that way. Select everything, press
the position rotation scale or whatever you want for it and set keyframe for all
of them together. Okay. Now that I have
this keyframe here, at this point, this
should be outside, right? It should not be
visible to people yet. So before setting
the second keyframe, I'll make sure that
this first keyframe says that this is outside. So I'll come to the position X, click and take this outside, and you can see all of them
are being adjusted together. Alright? So it's outside
now. I'll press play. Gabriel, surely. All right. So up to this point
is where I want it to be, but I don't want it to take
this long for it to show. So I'll come back here
and I and say I want this to show between here
and somewhere here, so not too fast so
that it to be fast. Alright because I want
the animation to be fast. So I don't do somewhere here. So that's around 2 seconds. Let's do 2 seconds stem frames. All right. So you can follow
along with that. All right. Don't worry. If it's
too slow or too fast, we can still adjust it later on. So I'll come to position and then bring them
back inside, right? So somewhere, I'll
stop somewhere here. So let's see this place. What's up, everybody. My name
is Gabri Shoe. But you can. So you can see the
way it came in there. What's up, everybody.
My name is Gabri Shoal. So it's kind of slow to me.
I don't know about you. So I'll just grab all these
three key frames here. You can see they're
already selected. If they are not selected, you can select the first
one, hold down Shift, select, and select, and then
you can move them together. So I'll just move them
close to each other. Everybody your name
is Gabri Show. Alright, so I think
I like it now. Show. So it's coming
in very fast. So I'll select all my
key frames, F nine. Okay. And then motion blow. Pom? Pom. Alright, so you can see the advantage of having
everything selected together. It just allows you
to add it to one, and it applies to the
remaining ones, okay? So that is that. So if I come back now
and I press play. What's up, everybody. My
name is Gabriel Shoe. Whoa. You can see how
that came in really, really, really nice,
okay? So I like it. What's up, everybody. My
name is Gabriel Show Ai. Alright, you can see that blowinssTs making it to come in. And the easy is also helping
it out and everything. Gabri So Ai. Alright. But you? So
I like this, okay? And we want to make
this also disappear. So we don't want to stay all the way to the end of the video. So we're going to
set another keyframe for that. So when I press play. Gabriel Shoale. But you can call me Kisho. I want it to disappear somewhere here after saying
everything about my name. My name is Gabriel Sho,
but you can call me Kisho. So we'll come here again, three of them still selected. I'll press T for Opacity, right, because I
want it to fade off. So I'll click on the
Stopwatch right here. Alright. This first one,
I'm going to leave it in 100 because I want it to be
visible up to this point. Then I move forward. Okay. To maybe 6 seconds, 15 frames or so, so I to fade out slowly, and then I'll come to my
opacity and change out to zero. I can see everything
changed to zero. I'll do my, you know, easy ease again, alright. And play from the beginning. What's up, everybody. My
name is Gabriel Shoale. But you can call me Kho. And welcome to another
furnish shop Tutorial. What's up, everybody. My name is Gabriel Alright, Shoal. What you can call. Okay, so my after
effect is already trigging because of the
background as I'm running. Let me just drop it to, like, cutter and press play. So you should play fast
now after prerendering. Alright, so just chill while
the grain goes around. So you should play normal now. Real What's up, everybody. My name is abro Shoe. But you can call me Kisho. And welcome to another
Photoshop Tutorial. What's up, everybody. My name is Gabri Shoe. But you can call me Kisho. And welcome to another. Alright, so you can see how
we're able to create that simple lower third
in after effect. So in the advanced session of After effect
in this training, alright, which you'll
find on the website, I'm going to be, you
know, showing you some other fantastic
way of creating, you know, lower thirds
in after effect. So thank you so much for
watching this video. Go ahead and create wonderful
Lower thuds, you know, after effect for your videos, and I'll see you in the
next video. Piece out.
14. Applying Effects and Presets in After Effects: Whats up guys. Welcome to another after effect
training video. And in this session, we're going to be talking
about effects and presets. So we're going to be
talking about how to add different effects
to your video to get different results and
to make your video cooler. Alright, guys, so let's
get straight into it, and I'll show you
how to do unostat. Alright, so we're back
right here in After effect. And what I want to do
now is I want to go to Kho one again and right click and say new
come from selection. So that will give me a
new composition with a video inside to work with. Alright. And you can
see we have Kashw four. So so far so good, we have one, two, three, four, five, six, seven composition so
far. In after effect. And like I said, each of them doesn't disturb
each other, right? So I can export what I
have here as a video, export this as a video, export this as a video, export this as a video. And even this one
I'm about to work on as a video on its own, right? So you can have as many composition as
you want in after effect. So I want to talk about
effect and preset. So I want to come right here and I'll see effect and preset. If you can't find
out, you can go to Window and under Window, you see effect and preset. Alright, so the effect there are the different
effects I can add. While the preset, like I said at the beginning
of the training, the preset simply means
predefined settings, right? So you can also use preset, meaning that if you add
preset to your video, it's going to add
an effect that has already been made
for you, right. While if you add a normal
effect to it, you have to now, you know, manually create
it the way you want it. So let's start with preset. That's the animation preset
that we are seeing here. Now, obviously, I
won't be able to go through every single
effect in this video. So I'm going to touch
on some important ones. And what I want you to do
after watching this video, is to open every single
effect and try it out and see how it works in
your after effects, okay? So please don't forget
that try out everything. I'm just going to
touch on a few here to just show you how
to work around effect, how to adjust them
and everything. And then you can try
out the remaining on your own in your
own after effect. Alright, so let's
get back right now. So I'll open the
animation preset, and you can see we have a
couple of folders there, right? And these folders also
have a drop down arrow. Okay. For example, if I
open up, you know, sound, sorry, shapes, you can see
what we have for shape, but right now I don't
have any shape yet, so I can't use shapes, okay? We have sound effects, okay? If we drag that, for example, ringing, phone US, drop out, press play, you can see what we have there as it was ringing,
somebody is calling. Alright, so that's
just a sound effect. So we have just a
few of them here. You can try them out. But just mind you that when you
drop it on your video, it replaces the existing sound that was there with
that sound effect. So just something you
should take note of. Alright. So that's
for sound, okay? We have so many other ones here. Let me open up this transition. All right, let's do the
transition movement. We have this card wipe. If I drag that and drop out
of my video and I press play, you can see the way my
video transition inside. Alright? And my playhead was somewhere here
when I was adding it. So it means that it's going to start the animation from here. So let me undo that and pull my play head
at the beginning so that this can happen at the beginning of my video
and not in the middle. So when I press play now, you can see the way it comes in. All right, and you can see
how that is being added. Now, anytime you add a preset or effect to your
video in after effect, the Fed control tab would
automatically pop up. Okay? The Fed control tab
will automatically pop up. And inside this
effect control tab, you can see all of the settings for that
preset in this case, right, and you can still adjust it the way you might
want it, okay? So for example, you can
see what we have here, I can increase the scale, and you can see the way it's
making it bigger or smaller. So that's what you do
with effect control. It allows you to
control the effect in the magnitude that you would
like to have that effect. So if you're using a
preset, for example, and what it did for you
automatically is not, you know, what you want, you can still
come to the fat control and adjust the settings the way
you would want it to be. All right. So let me undo this. By pressing Control set
to remove that effect, you can see whatever that wants flight to inset.
So let's see that. You can see what happens. It just flies to that
position right there, and you can change the
position and everything by coming to the
effect control and adjusting different
parameters here to decide how you want yours
to look like, okay? So it's as simple as that. If you don't want
it again, press on do, and that will remove it. So let's leave
transitions alone. Until you have
other transitions. These are dissolved.
These are wipes. Alright the one we just
checked out is just movement. So I want to talk
about another one, which is for text. Don't forget that we are
still under animation preset. So for text, I don't
have any text here, so I won't be able to
show you an example. So for me to show
you example of text, let me quickly grab my T click here and just type
any text right here. So let me just type my name. Go back to my selection to and quickly go to the character panel,
increase my font. Let me make it big so you
can see it very well. Okay, let me just leave
the color as white. Alright and leave it that way. Then I can go back to
my effect and preset. Don't forget all of these
are panels that you can open up in window if
you can't find them. So I'll go back to my
effect and preset, okay? Now I can open up the text
for animation preset. I'm under animation preset. Open it up, and I can see a
couple of folders inside. Okay, so let's open
this first 23d text and see what it does for us. Let me just drag anyone
here and just drop. So to add it, you drag and drop
as simple as that. So when I press play now, let's see how it gives me, you can see that
nice cool effect. I added to my text right there. Okay. So I don't
need to animate this manually in after effect if
I'm using preset. All right? If I don't want it
again, I will undo that and I would remove
the animation. So let's leave this
three D text folder. Let's go to animate in. Let's just drag one randomly
from here and those drop. So let's see random fade up, okay? So press play. You can see the way it randomly faded up the letters. All right. So don't forget this only works with text, not with video. So you use the right preset
for the right layer. All right, so let's
leave animate in. Let's go to Animate out. So this would kind of take my text off the screen.
So let's play this. You can see the way
it takes it out. Alright. And you can
see I'm just trying out some and not all. All right. That's why I mentioned
at the beginning that you have to try every single thing on your
own in your after effect. So I'll go to the next
one blog jigging. Let's see what this one
would do. You can see the way you know,
jigging my text. Alright, so cool. So let's
go to another folder. I think probably
the last one now because I'm getting tired
of the text already. So we have Newton,
pinwheel, radio flare. Okay, let's try
this radio flair. You can see what it
does to my text. Alright? So are really funny. Some are really cool.
You can just go through everything and write down your favorite of them all, okay? So that is that. So let me
just close this do that. And just leave my
animation preset. So when you go to Animation
Preset, you see presets. I've told you preset are
predefined settings. So when you add these
predefined settings to your video or your text or
your shape or whatever it is, it will just automatically do something for you without
you having to do anything. But if you feel like you still want to adjust
some things in it, then you can go to
the Fed controls and adjust them right there. So let's leave animation preset. Let's go to you know, other folders that we have here. So everything from
underneath this animation preset downward are
just regular effects. So that's why it's called
effect and preset. So the preset there is
this animation preset. While the effects there
is everything from this three channel
down to utility. Alright? So let me just quickly
go to blow and sharpen. Alright, one of my favorite
grab Gotha blow from there. Drop that on my video, and you can see I was
expecting it to look blurry, but it didn't become blurry, and that's fine, okay?
And that's because And after effect, some effect
would want you to go to the ft control and adjust the magnitude of the effect or the settings of the effect. So right now you can see
that under my fat control, I can see my
gaussian blow there, and the blurriness is
currently zero, right? And that's why I'm not seeing
any blurriness on my video. So if I come to blurriness and I increase it now from zero, take it all the way up,
you can see that my video is now looking glory. All right. So I can determine the
amount of blurriness I want, whether, you know, just a
little or so much, okay? And that is that for that. Now, let me show you
guys one cool thing. Let me undo the
blurriness added to it. Now, if you come down here, remember this is our text. This is the video. If I open the transform
option for the video, instead of me to just
see transform and audio like I will normally see. I'm now seeing effect. And why is that? Because I have added an effect to my video. So if I open up this
effect drop down here, I'm going to see the
effect I have here. So sometimes you might
have multiple effects. All of those multiple effects
will also show down here. So I can see my Gaussian blow. I can open up the
Gaussian blow, right, and you can see the settings we have here right here also. And what makes it different
now or why after effect has added it in the
timeline is that I can also set key
frames for my effect. Wonderful, Abby. All right. Just like we set key frames
for position, rotation scale, opacity, we can also set
key frames for effect. So for example, this
blurriness now, if I want it to just, you know, apply to a certain
part of my video, I can actually use a
keyframe to determine that. Okay, I can use a keyframe
to determine that if I want my blurriness to
happen at a particular path. So for example, maybe
somewhere around 2 seconds. If I want my video
to look blow here, I'll just come to my blurriness, click on the stopwatch there, and you can see a key frame
has been added to that point. Then I can go forward. So I want it to be blowed
for about a second, and I'll go forward and
increase my blurriness. Okay? And you will see that my video will become
blur at that point, and you can see a key
frame has been set there. Okay? And then I can go
a second forward again. And then change my
blurriness back to zero and the key frame
will be added there. Alright, you can see. So what will happen now if
I press plays out here, my video looks normal, here, my video looks blurry. And here, my video
comes back to normal. So 2-4 seconds, my video will look
blurry and come back to the normal
way it was before. So let me play from
the beginning, and now you see what we have. All right. So assuming
you're trying to do, like, a flashback in
your movie, okay? You can easily set keyframe at that point when
you're about to do the flashback and
then transition to the next video showing
the flashback. All right. So we can see all
that we have right here. So you can also
set key frames for your effect and not just the
transform options alone. So that is that. So let me just minimize
this, minimize this. Now, anytime you are done with an effect and you don't
want the effect again, you can just select the effect
in your effect controls, right, and then you
press the delete button, and that will delete the effect. So the effect is no
longer on my video now. Okay. So let's go to further. So let's go to maybe
color correction is one of my favorite also. Now, in video, you want to be doing something called
color correction or color grading, right? And the tool that you're
going to use under this color correction
in after effect for color correction and
color grading is this lumor lumary color. So if I drag that and
I drop it on my video, not on the text, all right? The video Okay, I can see the lumary color right
here in my effect controls, and I can begin to
open up each of these folders one
by one and adjust the settings until I get my
desired color for my video. So if I open up my
basic correction, I can see things
like temperature. So if I take it to the right, it gives me warm
temperature or my video. If I take it to the
left, it gives me a cool temperature or my video. All right. We can
see how fast or quickly I'm already changing
the color look of my video. On that tint, I can give
you this, you know, color right here or tint it
in a green color. All right. Then my exposure, all right, I can increase my exposure
to make it brighter. I can reduce my exposure
to make my video darker. Contrast, I can increase
my contrast to make the light and dark areas
lighter and darker. As I increase that, you
see the light areas become lighter and the dark
areas become darker. You can see all the light
areas are becoming lighter and the dark areas are becoming
darker. That's contrast. Highlights to make the
light areas lighter, right. And then shadow, okay, to remove the dark areas
and make them lighter. But if you take it all
the way to the left, you actually make the
dark areas darker. And you can see so many
settings here in just, you know, color correcting
my image and everything. So what I would like to even
do here is to first increase my temperature a little
bit because I like it looking warm, alright. And then I'll come
to my exposure and just give it a
little brightness. All right. So maybe
0.4 looks good. And, you know, at this point, you might want to
do some make it full so you can see what
your video looks like. Then my contrast, I can take
that up a little bit to make my dark areas darker and the light areas,
you know, lighter. And I can, you know, go to my highlight and just drag that up a
little bit, okay? And saturation
saturation is for color. So if I want more of my
color to pop out more, I can increase my saturation. So I can click and drag that
and just take my saturation. If I take it all the way up, you can see how my colors are popping out, so I
don't want to do that. I just want to make
it, come up a little bit something around you
know, one like that. Okay? So my colors are
popping out some more now. So you can see the
way I'm already color grading and
color correcting my, you know, stuff right here. So if I want to see
my before and after, I can see this FX icon
here inside the box. If I click on that,
that will show me what I have without
my lumeary color. All right, you can
see what I have. My lumenary color, you
can see what I have. Okay? So maybe I'll just reduce the temperature
a little bit, right, so it's not too much. All right, so before after
before, after before, after. So you can see how
I've been able to use the lumear color
to do just that. If you take your saturation
all the way to the end, it's going to give you
a black and white. So if you want a
black and white, you can just take your
saturation to zero, and I will remove every
single color. Alright? So it's as simple as that. Okay? So that's your
lumenary color. So if I don't want it
again, I can delete it, but let me just leave it since it makes my video look better. Then I can you know, there are other ones
here. We have tritone. If you want to give your
video a three color tone, right, you can see
white, gray and black. I can change this
gray to other color, and you will see
that you can see how it affects my video right there. So that is that for that. Any effect you can
add to your video, you can also even
come down here, okay, you can see the tritone, open it and I can begin to set key frames for
it right here. For example, I can
say at the beginning, I want this blue color, okay? So I'll click on the stopwatch. Then I move forward, change it to another
color, maybe green, right. Then I move another
second forward, change this to blue, okay? All right, I think
it was blue before. So let me change that
to maybe this color. Then move forward again, change that to red, okay? And by the time I
press play now, you see the way the color
will begin to change. So you can see things
are really dragging now. Or you can see the way the
color is changing from one color to another
color to another color because now I have
set key frame for it and it's giving me this
variation of color in my video. Alright? So you can
see how that is easy. So after you fail, you
can do a whole lot. So you can see
things are dragging now because I've
added lutary color, Triton, my text, and
everything, and I'm on full. So want to make sure that
when you're doing your own, you can drop it to cutter
so that it will play fast. Okay? So let me just chill. It's going to get to the end very soon because
I want you to see it in real time. Okay, go. Nice. Nice. You can see the
way the colors were changing. Alright, so you could even
use it to do something scary or something
very, very cool. So that stats for
lumetric color. Let me just begin to delete
some of this effect so that my system will not play
faster and everything. So I've deleted those effects, I can go to another
folder right now. So let's go to generate. On that generator,
do we have here? We have CC LightSweep so I can add this CC light sweep
to my video right here, and you can see gives me this shining light
across my video. I can use this, you know, circular thing here
to move it around. Alright? So I can
actually set key frame to animate this to go from here to here and just gives my video that shining look,
alright, across that. I mean, so so many effect here, let me remove this and
add. We have lens flare. I can add a lens
flare. Oops, so. Added it to the text. I can add the lens flare to my video.
You can see right there. I have lens flare. I can
position it anywhere I want. I can even set key
frames for this, and it's going to
give me all of that. Okay? So that is that. Let me just talk about one more. It is very interesting.
We have simulation. Under simulation, we
have CC rainfall. Okay, WTC rainfall, I can drag that on my video
and make it rain, right, so you can see
it's raining already. So let me drop this to third or something so that
when I press play, you guys can see it very well. So you can see the rain
pouring down on me. So in real life, if you were to use this rain, you would have made
sure that, you know, the person, in this case, me, I would be pretending
as if it's raining. Then I would have
poured water on my whole body from top down, pour water on the floor, and just make it look
as if it's raining, even get some
thunder sound effect to add to my video so that, you know, you'll be
getting that go. While this rain is pouring down. So with this, I will also
shoot during the day. I would have shot
this in the evening stroke nine so that it
looks as if the weather is, you know, dark and everything. And then by the time
I add this rain, everything just blend
perfectly, right? And people believe it
was actually rain. So you don't have to wait
for the rainy season to shoot your rainfall scenes
in your movies, okay? You can just add them
in after effect. So I can increase
my number of drops to make it look like
a heavy rain, right? And when I press play I can
see the rain is pouring, I can grab my wind, change the direction
of my rain to make it look as if it's falling
from the other side. You know, you could
even change the color of your rain to maybe
red or something, and you can see, you know, it's dropping red
and everything. So that is that with
effect and preset. So time will not permit me to go through every
single thing, right. If I do that, maybe
this video will be like 3 hours
long or something. Alright. So but like I said, go home try out every single effect on your own because if you
don't try them out, you might be missing
out on some effects you saw on someone else's video
and you might be thinking, Oh, how did this person
get this effect? But it's just a simple effect
just add after effect, and then you get that effect. So try out every
single effect, right? And I'm going to
be stopping right here for this effect
and preset video, and I'll see you guys in
the next video. Post.
15. How to use Track Matte in After Effects: What's up, guys. Welcome to another after effect
training video. In this video, we're going to
be talking about track Mnt, right, and how to use
it to do amazing stuff. So let's get straight into
After effect right now, and I'll show you
how to do just that. Whew. Okay, so we are right
here in after effect, and we need to go back
to our Project panel because we ended up with
this effect control here. So if you can't see
your project panel like mine, you can see, I can see, you know, the city of that project panel. So I know it's right here.
I can just click on it to switch to my Project panel. Or you can go to Window and
you see Project right here. Click on it to activate it, and I'll pop up. Alright, you can also
use a shot called Command zero or Control zero. Okay, so I just
removed it again. So let me just add
it again. All right. So for this example, we are going to
want to use this, What is that explosion video? Um, where are you? All right, so I have this
explosion pack video I downloaded from your
website and you can see what we have here. Now, remember I told you
that when you double click on your video in
your project panel, it's going to open up
in your footage panel. So if I double click this here, it's going to open up here and I can preview what this
video looks like. All right. So let me
press the play button, go to Preview play. All right, so you can see
these are free, you know, explosion packs that I
can use for my project. All right. And you
can see we have different forms of explosion. Okay? We have different forms
of explosion. All right. So what I want to do here
is that the explosion I need is this one right here that we just,
you know, landed up. So this is around
2020 7 seconds, right, to about 30
seconds, right? So that's about 3
seconds of explosion. So I need this particular one. You can see we have so many, I think about 12 right
here that we can use. So but I need this
particular one here. So this is one advantage of
the footage panel, okay? So this time we are
in the footage panel consciously, right? We are here consciously because we want to
preview our video, and then we also
want to trim it. Alright? So I want to trim it to just this particular
explosion right here. So how do I go about that? Number one, we double click. You open this. Number two, you take your playhead. So you can see a mini playhead
here, a small one here. You take it to where
you like to trim. So this is the beginning
part of my explosion. You can see that, uh, right there. That's
the beginning part. So just before that
part is, oops, sorry. So you can see, once again,
this is the beginning part. If I go back a frame, you can see that there will be 27 seconds, four frames, right? And if I go forward,
you can see. So just before the explosion, 27 seconds four frames is
just before the explosion. I'll click on this
set end point or this open bracket to cut my video at this point so that all this part of the
video will not show. So I'll click and you can see it cuts the
video at that point. Then I'll press play and the
explosion plays and pus. Okay? So I'm using my space bar, okay, just in case
you didn't know. And pause right there. So the explosion ended somewhere around 30
seconds, 18 frames. So what do I do? I don't need the remaining part
of this explosion, so I'll come to this
set out point or this close a close square
bracket icon. Click on that and I will
remove this part of the video. And the part of the
video I have now is just the explosion
part. All right. So that's how you trim Adobe After effect in
the footage panel. So now I can go back to the explosion pack
in my project panel, right, click on it and say
new come from selection. And what will happen
is that it's going to create a new composition
using that video. And when I press play, I'm only going to see that
explosion that I just trimmed without the
other ones. All right. So that is why it
is good you use the footage panel
to trim your video before creating a
new composition or dropping the video in
your timeline, right? Because what you're going to have in your timeline will be the exact part of
the video that you have trimmed in
the footage panel. Okay? So let me stop
this and put that there. So what are we driving at? Where are we going
to? All right? You're going to know very soon. Now the next thing
I want to do is I want to bring in
this logo image. Alright, remember this
is our logo image here. So I'll drag that and I want to drop it above the explosion. Alright? I want to drop
it above the explosion, and you can see that it
drops above the explosion. If I drop it beneath
the explosion, I won't see it at all. So make sure that it is
above the explosion. Don't forget that
you can always pause this video at every point
and, you know, follow along. So don't mind me just talking
and talking and talking. Just press that pause
button and say, shut up. Let me do my own.
Then you do your own. Then can I say, continue. Then I will continue. Okay? All right.
So let's move on. So I have this and this here. So if I play this,
this is not bad. You know, I just gives
you a nice effect. Let me change this to full
so I can see it very well. When I play this, you can
see the effect I have. Alright, not really
that bad, but, you know, we could do
something better with this. So where the track
math is coming in is that I want to
create something, uh, I want to create
something in such a way that this explosion, will show only
inside this my logo. Alright, will show only inside this my logo and not like
the way it's showing now. So this is just, you know, very simple. Anybody
can do this. Just drop the two, you know, layers together and
get this result. So by my track map, I can make sure that this explosion is only showing inside
this my ego logo. And how do I do that?
Okay? That's where I need my track mat. So for you to get
your track mat, you have to be in mode
and not switches. So right now I'm in switches, right, and not mode. So I'll come down here, click here and change this to mode. I can see I'm in mode. And then beside that mode, I can see track mat,
Alright, Track mat. Now, what I want to simply do is that you can see that
under this track mat, under the explosion, we can
see none here. All right. All you simply need
to do is to change the track mat of this explosion
from none to Alphamat. But before I do that, right, for you to use alphamat, you must make sure that the
color of your image is white, right, or something light, okay? White or light. Alright, so white and light are the same thing
now, so, Abby. Yeah, so it has to be something light or something white
or else it will not work. Alright? So if you want to
create such effect like this, if you're the one who
created this logo or not, you can take it
to Illustrator or Photoshop and just
change it to plain white before bringing it into after effect and
doing this track mat. Okay? So since the color of our logo is white,
we are good to go. I'll come here and choose Alpha mat and the magic happens. Okay? So you can see my
entire explosion is gone, but only using so it's
now using this ego logo, as a max, okay,
for the explosion. So anywhere this
logo doesn't get to, you don't see the explosion. So you only see the
explosion through the logo, and it's as simple as that. Okay? Very, very simple. So if I played this
from the beginning, that's when you see the
coolness in it. Press play. Poom, just like that. All right. Really, really cool. So this is how to
use the track mat. So basically, what
you do is that the video is under
the image or text. So talk about some text example now can be above or any shape, anything white, right, can just be above while
the video is under. And then you just change
the track mat of the one under from none to Alpha mat and to use the image or
shape or whatever it is above as the mat for that video. Okay? And you get
this cool effect. Let's even add some
explosion to this. So I think I have Explosion, sound, sound, sound,
sound, explosion. Where are you? I think
this is it right here. So we have this sound. Let me give you some more room so
you can see sound explosion. Alright? So you see
that right there. Sound explosion. Let
me trim this back. Okay. I'll drag that, drop that underneath it, and then press play. Awesome. Well blows up here, man. Cool. All right. So that is how to
use your track man. So quickly, let's
just, you know, remove this logo, right? Or let me just do
the same thing, grab my explosion pack, create a new from the video
now, not the composition. The video, right
click New selection, new come from selection. Just type text and say, let's just type, you
know, PAST something. Capital letter. All right. And now I want to look for, you know, text, a font. Now, if you see something like this when working in a five fet, you can see saying
refresh disabled, release caps lock
to refresh view. So just make sure your caps lock is turned off and you'll be able to see your
text and all, okay? So I need a font that is really
fat and, you know, wide. So I'll come to my
character panel, and that font that can do that for us is impact. All right. Impact. So I'll go to I, I, I, I impact right there, right? So you can see this is very
fat and stuff so that we can see our video through
our text very well. And I also make the
text very big, right. So something like this
should work, alright? And you can see the
color is what white. So make sure it is white. And if I press play now, you can see my explosion just goes underneath it like that, and everything just
goes that way. Okay. So if you look at my
explosion at this point, it's not really coming
to where the B is. So I can select my explosion
and just move it, you know, a little bit so
that it can cover my entire text,
right? Like that. So, very simple. All I need to do now is go to the explosion, change the track mat
from non to Alpha mat, and you can see it
showing through my text right now,
just like that. Ha ha ha. I think this is like a rambo effect or something
in one of the movies, okay? So let's have our sound effect. I'm not gonna forget
that. Drag it, drop it, and Alright, so thank you so much for
watching this video. That is all for that
with trach mat. It works with text, shapes, anything that is white, you can just trach mat it to it, and you get the same effect. Go out there, be creative, try some awesome new stuff, and I'll see you in the
next video. Please out.
16. Creating an Intro video in After Effects: What's up, everybody. Welcome to another after effect training. In this video, we're
going to be talking about creating an intro video. Are you ready? Are you sure? Let's go. Alright, guys, so we're right here
in after effect. And to create this intro video, we're going to create
a new composition. So I'll go to composition
New composition. And under this, we're going
to name this intro video. Okay. And we're going to
use our preset HDTV 108025. All right, that works for us. If you're not on HD TV, just come right
here, HDTV 108025. Then our start time code zero. Our duration this time is
going to be 4 seconds. Okay, 4 seconds. And background color black, and we're going to click Okay. So this creates a new empty
composition for us, alright? And the reason why I'm doing
this is because I want everything I add into
this composition to maintain this size
and this timing. All right. So the reason why I made
it four second is because the intro video we
want to create now is just going to last
for 4 seconds, and I don't want it
to be more than that. Okay? So those are the factors that come together
that would make you determine if you want to
create a new composition or you want to
create a composition from an existing video, right? So let's get straight into it. The first thing
we're going to do here is to type our text. So I'll click on C here, I'll click on my
screen right here and I'll type MasterClass. Okay? MasterClass
right there. Okay? And I'll go back to
my selection too. I can reduce the
size of my text. So definitely, I'm not going
to be using this impact. Let me use something else. So I'll just come to impact
and change that too. Let's use something, you know, funky, like our
back to Black demo. Alright, so I'll just
select that right here. Okay. And let me make
my text 150. Okay. So 150 looks nice. Alright. And I'll just
put that right there. Now, the next thing I want
to do now is I want to change the color of my
text to a gradient color. So if I click here, I will only be able to change my text to just a one color, you know, color, whatever
that means, right? Okay? So, but I want to
change it to a gradient. And I've told you that
gradient allows you to add multiple colors or mix two
or more colors together. Okay? So how do I add
a gradient to my text? It's very simple. I would come to master class right here, right click on it, and
go to layer styles. All right, Layer Styles
under layer styles, I'll say gradient overlay. So if you remember
effcs in Photoshop, for those of you that have
done the Photoshop training, you will see that
all that we have here are the same
things that we have in efXUnder Photoshop, okay? So I'll click on the
gradient overlay right here, and by default, it gives me
a black and white gradient. So how do I edit this black and white
gradient to my own color? So the color I want to edit
it to now is that gold color, and that's the one that
will be able to mix orange, yellow and orange together. Okay? So I'll come straight
to my settings here. You can see Immily we
added that layer style. We can see layer style
up here under here. I'll open up the gradient over layer and then under
gradient overlay, I would see edit
gradient, edit gradient. When I click on Edit gradient, it is going to bring
up my gradient editor. Okay. And with my gradient
editor opened up, we can see that black
and white color that we currently
have on our text. So to edit this, I'll click
on this white color, okay? And you can see it's
currently in white, and I'll go to my orange color, and drag that and come
to the orange section. All right, orange section. Then I want to create orange, yellow and orange, but I
only have two right here. So how do I add a third one? Okay? To add a third one, all I need to do is to
just click an empty area right here and that will add
a third or fourth or fifth, so you can add as
many as you want. So but don't click on this guy. You click somewhere you
know, away from that. Once you see this hand pointing, you can click, and that will add another stop right there. So I can also move it somewhere
to the middle and then I'll click on it and change
this color to yellow. Alright, you can
see that right now. And then the last color
I have here is black. So I'll click on it and change
it from black to orange. You can see that even though
in my orange section, it's not changing it to orange, and that's because the circle is still in the black region. So I'll move it to the
orange section and you can see we have this nice
gold color right here. Okay? So after
changing my color, don't forget you can add as
many colors as you want. You can create your own
beautiful gradient colors. But for this class, we are doing this gradient color that gives us this gold color. And then we click
Okay. And that's it. You can see how I was able
to change my text color to a gradient color right
in after effect. So now that I'm done with all of these gradients of alley, I can minimize it by clicking
this drop down here, and that will minimize
everything back for me. Okay? Now, the next thing I want
to do is I want to animate my text in such a way that when I press play
at the beginning, all my text will be
squashed together. And when I press play, it will start expanding. So at the beginning, the text will be
squeezed together. And then when press play
is going to expand out. Okay? And to create that effect, I would need something
called tracking. I would need something
called tracking. So where can I get tracking
for text in after effect? I can come here. You see this
animate right here, okay? I can click on this, you know, icon that looks
like a play button. Click on that and that
will open up all of this. And in the list here, I can see tracking. All right. So I'll click on tracking, and that would open up
so many settings for my tracking animeor one
and the likes, okay? But what I'm really
concerned about here is the tracking amount, the tracking amount, okay? Right now is in zero. If I take it beyond zero, you can see my text
is spreading out. And if I take it below zero, you can see my text is
squeezing together. Alright? So what I want to create
is something like this, and it will spread
out like that, okay? So let me undo that. So to create that, we would
need to set keyframes, right, so that it can
happen on its own. So we need to set keyframe. I'll click on my stop patch
here for tracking amount. You will see that
tracking type will also get selected by default. That is fine, and you can
see what it creates here. Create a keyframe here and
this box keyframe right here. Okay? Now, with that, I can come to my tracking
amount at this very beginning. And squeeze my text by clicking and dragging to the
negative or to the left. And that will squeeze my text. And I want to do maybe 55, okay? -55. Now, depending
on your text size, the fonts you are using
and all other stuff, 55 might not work
for you, right? So just pay attention
to this and squeeze your text to
something like this, right? And whatever value it learns
on, doesn't really matter. What matters is
the effect that we have created with it, okay? And then now I can go. So I want this animation
to last from the beginning to the end of my
4 seconds video. So I'll take my period all
the way to four second, which is the end and then
come to my tracking amount. And drag to the right to expand my text to
the positive side. So I'm going to do maybe
25 right here. All right. So if I hit the play button now, you can see what we
have right here. You can see how the text is expanding throughout the
four second duration. All right, really looking good. So all of these things
opened up here. I don't really need them again. So what I'm just going to do is I'm just going to
minimize my animator one, minimize my layer style,
minimize my text, minimize the master
class text itself, and then you can see everything is collapsed back
to a single layer. But all of my effects
are still right there. So I just did that
to create space here so that we can
drop in other layers. But before I do that, I want
to duplicate my text, okay? I want to duplicate my
text. So how do I do that? I just select my text
here and then press Control C or Command C and then Control V or Command
V to copy and paste. So you can see I
have something like master class two, okay? So I know that the
text is right here, so I'll just click drag this up. So I can see both text. Okay? Now, I want to edit this
text to something else. So I'll double click
to edit my text. And then I'll type Adobe, okay, in Capital later. Then go back to
my selection tool to put that right there. Okay? So don't forget
once you see this error, release your caps log to show
you what you want to do. So I want to change the
fonts to something else. So I'll come to my
character panel, and let's change it to Montserrat Montserrat,
where are you? Where are you? Where
are you where are you? So select that, okay, and choose the medium option. Alright, that looks good,
and then I'll reduce the size right to maybe 100. Okay. And then, oops, 100. And then I'll drag that
and position it you know, at the center right there. Okay? So you can see what we
have for our text right now. So if I press play, you can see that both of them are
squeezed at the beginning, and then they expand together. Okay? They expand
together, okay? They expand together.
So that looks good. The reason why I
duplicated it is because I want to have the same effect in this master class applied
to the Adobe that I have at the top
right here, okay? So that is the whole
essence of duplicating. So when you add an
effect to a layer, you can duplicate
that text layer, change the text, and all
the effect you apply to the initial layer will also affect the duplicated version. Okay? So now, let's do some alignment because
most of the time, you guys might not get this. And yes, I remembered something. If your own is not
expanding like this, that's because your alignment
is set to align left. So let me quickly
bring up my paragraph and let me change
mine to align left. And when I change it to align
left and I play my video, you can see that
it's coming from the side instead of
from the center, okay? So the reason why mine is
coming from the center is because I have changed my
paragraph to the center. So in case, I'm sorry, if yours is doing like this and you're wondering
what's going on, just come and click on this center in this
paragraph here, and that will center your text. And when you check
out your tracking, you'll see that it's
coming out from the center and not
from the side. Okay? And also, let me scatter
these guys here, okay, so that I can use my
align to make sure that this is aligned to
the center of my page. So I'll open up a line. Don't forget all of this panel, if you can't find
them here, just go to Window and turn them on. So I'll go to a line I want
to click on this second one, which is align
horizontally. All right. So I'm doing that for claiming data with master class first. I'll click on this to
align horizontally first. So you can see it is
centered based on this area, and then I'll click on this one to center it based on this area. So if I click on this,
you can see that as automatically placed
my text at the center. And I'll do the same
thing to Adobe. I'll click on this and click on this and you can see it
has also centered that, but I will now move my Adobe up, hold down shift so
it will maintain that center and put
it right there. So you can see everything
is in the center and it looks good,
Adobe master class. Alright? So with that said, let's go into the next thing. The next thing we want
to do now is to start bringing in some backgrounds. And this time they are background
videos and not images. So I'll come to
my project panel. Under my project panel, I'll look for the
first background, which is looping
particle at camera, looping particles at camera. I'll drag that and drop
that underneath my text, not above, but under my text, you can see that blue line, letting me know where
it's going to drop it. So I'll drop that
there and you can see what I have
right here, okay? You can see what I
have right here, a nice video background. So this is a video background
because when I press play, you can see that the background
elements are moving, and that lets you
know that that's a video and not a picture. Alright, so looking good, so but one thing I want
to do is I want to reduce the opacity of this background because if I look
at my text now, they are not looking
sharp and clear like it was before when it
was on a black background. You can see how
the gold is really coming out on this
black background. But with this guy here, you can see that it's
kind of looking, the contrast level
is not high again. So what I'm going to
do is I'll select this press T to bring up opacity and just change
my opacity to 50%. Okay. And you can see that
I'm changing it to 50%. I didn't click on the stopwatch. And the reason why I'm not clicking on the
stopwatch is because I want to reduce the opacity
of the video generally. I don't want to make
one part 50 and another part zero or
another part 100. That is when I will need
my key frame, okay? So if you just want to reduce
the property of something, you don't need to
set keyframe for it, adjust the value, and that will affect everything
generally, okay? So it's not every
time you come to opacity or position that
you must set keyframe. You could actually just
adjust those values without setting keyframe and it will
affect the entire video. All right. So I don't
need opacity again. I'll press T, and that
will minimize my opacity. Okay? So you can see
that my text is now showing better than it was
when my opacity was high. You can see the difference. Okay? So that is that. Now the next thing I
want to do here is I want to bring in another
video background. And this time it is called
particles, particles, okay? So I'll drag that and
drop that not under, but above or everything. So I'll put it above this Adobe. Drop that and you can see
that it covers my video. So I can't see anything
again because this video you can see what
this particle does. They are just tiny white
particles that are dropping from the top down. Okay? But it came with a black background that is covering everything
I've done now. So if I drag this and I put
it under looping particle, I won't see the particles again. All right. If I put it
above the looping particle, I won't see the looping
particle again. So I want to drop
it on top, right, because I know that after effect has something called blend mode. Okay? It has something
called blend mode. So if you've gone through
the Photoshop training, you understand what
blend mode is. We talked about that in
the photoshop training. So where can I find the
blend mode in after effects? Okay? Remember when I was talking about mode and switches. So if you're in switches, you won't find your
blend mode there. You just click here and make sure that you are under mode. And under this mode, you
can see this normal, normal, normal normal
that we have here. This is where you can change the blend mode for each layer. So the layer we are
concerned about now is these particles, okay? And I want to change
the blend mode. And how do I go about that? I'll click on this
normal here and I'll see all the other options that
I have under this here. Okay? So like I used to say, like I said in the
photoshop training, everything from this dark
in to this darker color, you can see there's
a separating line between it grouping it together. Alright, everything from here
to here would help you to remove everything that
is white or light. Okay. And everything from this art to this lighter color would allow you to remove everything
dark or black, okay? And everything from
this overlay to this hard mix would allow you
to remove everything gray. So we have white, black and gray, okay? So these three are the
most important here. All these other ones are
just there for you know, fancy sake. But who knows? You might stumble on
the reason why you might need any of
this in the future. So, but my favorites are this, this and this because
this takes care of white. This removes black.
This removes gray. So based on this video
that we have here, what is the background color? Yes, you're correct.
Black, okay? And if you're not correct, just tell yourself
you're not correct. Alright. So I can change the
blending mode from normal. So by default, blend modes
are always in normal. It's only where you need them
that change from normal to whatever option would
work best for you. So here, I need to get
rid of the black, right, or the dark region
of my, you know, video, and I'll come here
and use any of this. Now, the most popular in
this one is multiply. The most popular in
this one is screen, and the most popular in this
region is overlay, right? So that is something you
should also take note of. All right. So I'll just
come here and use screen, and you will notice all
the black will disappear, but all these tiny
white particles remain. So you can just keep
your eyes focused on this particular guy here
while I click on that screen. And when I do that poop, you can see that it
is still right there. So all I have left are just those tiny white
particles of my video. The black is gone. So you can see all
those particles falling down to just
give my, you know, animation or my intro video that nice effect to make it look like it's in
the galaxy, okay? So that is that. Alright, so let's move on. The next thing we are going
to add now is our lens flare. So I'll come to my after effect and you can see
we have Lens flare. And by the way, all of
these background videos or images are things that
you can download online. So you can go to Google and just search for stock footage or background footage or after effect background and
all of those stuff. And you will see different
websites where you can download different
videos from. Some are free, and some are
paid like always, okay? So that was I was
able to get all of these backgrounds and I was able to use them in my project. So I'll come to this lens flare, drag that one, and
also drop it above. And when I do that, you can see that we have this
nice lens flare here. It's also a video. You can
see the lens flare moving. But it also came with
a black background. All right? But you already know what we
are going to do, right? We're going to
change it to screen. So I'll come to the blend mode, change it from normal and choose screen right because
that's our favorite. And that will remove
the entire black, and we have just our lens
flare left right here. Okay? Alright, so you can
see what we have so far. So if I press the
playbt in here, you can see the nice animation
we've created thus far. So just wait for this
green to complete and then it will play
our video smoothly. Alright, you can see that right
there adobe master class. Okay, so pause that and it's
time to add some sound. It's time to add some sound. So for my sound, I'll go straight down to sound, and another sound, I can
see this sound trailer. That's the sound
we're going to use. So I'm going to drag that
and drop that under. Alright, so sound doesn't come with video.
It's just sound. So it's something that
you just listen to. So it doesn't matter
where you drop it. It's not going to show
in the video, right. So but I like
dropping my sound at the very bottom in my composition so that when
I'm looking for my sound, I know I'll just go
straight down to the bottom and I'll find
my sound right there. So let's play this back and
see what we have so far. Really nice. Okay? So you can
see what we have thus far. But if you listen to that,
you know, sound trailer, you'll see that
at the beginning, we have this bang sound, okay? And it won't be nice if we don't animate something to
follow that bang sound, okay? So if I press play again, listen to the bang sound
at the very beginning. You can hear that bang at the very beginning of
my, you know, sound. So let's, you know, animate
something to kind of go with that bang sound so that it gives that effect and everything
just kind of blends together. So what I'm going to do is I'm going to adjust the scale of my Adobe master class text to make it small at
the very beginning. And when I press play,
it just becomes big and then just follows that bang
sound at the beginning. Okay? I'm scaring you right now. Alright, guy, so let's continue. So I'll just do that now, okay? So, but I want to
listen to, you know, I know the bank sound starts
from the very beginning, but I want to know
where it ends. So I'll quickly play
and pause my, you know, video so I can get that
exact point where it's, you know, the sound
that bang sound ended. So you can see that
bank sound is like, ending somewhere around
the fifth frame. If I press play now, you can see that that's exactly
where it's ending. Let me press play
and pause it again. Alright, so you can see
now showing me six frames. So but let's just
maintain that, you know, five frames because I think
that is where I was really fast at the at the initial one. Okay. So I'll bring up my
Adobe, select my Adobe, select my master class and press to bring out
scale for both of them. And I'll take this to
the very beginning. And at the very beginning here, I'll click on my stopwatch
to set a keyframe Oops. I mistakenly selected them. So I'll select them again
and select this again. Then I'll click
on the stopwatch. Now my plates at
the very beginning. Click on the
stopwatch for scale. Okay? And then reduce scale
to zero at the beginning, then go to that five
frames, where the bank, end and then change
that back to 100%. And you can see that
my text is back, you know, to 100%. So if I play this now, can you see the way it just
jumped in right at us, following the sequence of
that sound. I love it. Okay. Awesome. So I love
what we just created now. So let me do my easy
es. That's F nine. Okay? And then add my motion blow because this
happened really fast, okay? So I'll grab my motion
blow, select it here, and then I need to go back
to my switches, right? Remember, we're in mode now. So I'll click here takes
me back to switches, click my motion blow
for both of them. I can see that motion blow
being applied to my text now. Okay? And let's play
this back again. Okay, so you can
see it's dragging now because I've added
some motion blow to it. So motion blow really
takes a lot of, you know, draining of
resources on your laptop. So I'll just wait for it
to go and play smoothly. Awesome. Okay. I also have one more video I
want to add to this, which is this spark, okay?
This spark right here. I'm going to just click drag
that and drop it above. Okay. So it's a
very short video. So it just kind of, you know, add more impact
that beginning to that beginning sound of
that bank at the beginning. You can see what
it does. It just gives you that
spark right there. So let me press play
and see what we have. Awesome, awesome, awesome. And there you go, guys. That is how to create an
intro video in after effect. I hope you enjoy yourself. Take care of yourself, and I'll see you in the
next video piece out.
17. Editing Green Screens (Chroma Key) in After Effects: What's up, guys. Welcome to another video in this
after effect training. And in this video, we're
going to be talking about the Almighty green screen. Alright? So call it Croma chy, but I'll prefer to
call it green screen. Okay? So let's get
straight into it and talk about how to
remove green screens and how to make them look neat and replace them with
another background. P. Okay, guys, so we are right here in after
effect where we left off, and we want to talk
about green screen now. So um, what we want to do is, if we look right here, we have this newscaster
footage, right? We're going to right
click on that and say, new come from selection. And we can see that we
have this newscaster on green background, you know, reading the news. And that is what you see
in most news studios or, you know, if you're watching
a movie like Avengers, if you've seen
behind the scenes, you see they're in
this big giant studio full of grain, alright? And the goal is to remove that
grain and replace it with buildings bridges and
so many things and then mix everything together to make everything look real, okay? So the same thing with this example we want to
do for this newscaster, we want to make him look
like he's in a big studio, a big newsroom, where he is
reading this news from, okay? And that is what we're
going to use as an example right here to remove
the green background. So how do we remove green
screens in after effect? Okay? How do we remove green
screens and after effect? Before I do that, we're going to drop in the news
background, okay? Remember this video right
here, the new spaground. This is what we're going
to use as this spaground. I'll go back to my composition, drag that from here,
and drop it under him. Alright? So we are doing that because when we are done
removing this green, we should see this
background behind him. Okay? So that is the goal. So how do we remove green
screens in after effect. Before I talk about
that, let me give you some tips to shooting a good green screen
footage. Okay? Number one, make sure that the character is not
putting on anything green. So the reason why we use
green in the first place is that green is the color that green is a color that
you cannot easily find on the normal human
skin color, right? So if you use a
color like black, your hair, your beard, your eyes, all of them
are black already. So if you're removing
that black background, you also removing the hair, the beards, the eyes, and everything black, okay? And then if you use a color like white as your background, for example, you'll be
removing the eyes, too. You'll be removing, you know, the teeth, everything white
in the human body, okay? So that's why green is a color
that is most preferable. And the other option that is available is color blue, right? So if you find yourself in a situation whereby you don't
want to use green, the other option available
to you is green, is blue, I mean, right? So those are the two
colors used industry wise. So make sure you also use those colors when shooting
your green screen footage. Then number two, make sure
that the character is not putting on anything green because as you
remove this green, it's going to remove
every single thing green in this video. Okay. Then make sure that the character is not casting
shadow on the green. That is also very
important because if it casts its shadow on
this green background, then that part of that
shadow is no longer green. It's now black, and
it's going to be pretty difficult for you to remove
that in after effect. Okay? Another thing you should also take note is that you have uniform lighting on
your green background so that the color of your
green stays the same. Alright? So, but you can see that in this
particular footage, you can see that the green
here is way you know, darker than the green here because they have
different lighting. All right? So that is
something you want to avoid when shooting
your own green screen. Be very soon now you're going to see the problem
that we're going to encounter just because
of that, okay? So those are the tips I have for you when shooting
green screen footage, you know, apply them
and you always get the best result when it
comes to removing green. Backgrounds. Okay? So how do I remove the
green background? All I need to do is to add an effect inside
of After effect. Alright? So I'll go to my
effect and preset panel, okay? And under it, I'll
look for a folder called key in. Key in. All right, I'll open
up that folder, and then I'll see the different options
that we have there. And the one I want to use is key light 1.2, key light 1.2. That is the favorite
keer in after effect to remove
green screen footage or blue screen footage. So I'll drag that
and drop that on my video and you expect that the green
will disappear, right? Nah, it's not going
to disappear. It's just going to open
up my effect control, and I have to decide some
settings here before or after I effect to make his decision whether
to remove it or not. And that first decision is a
screen color. Screen color. So after I've asked him, what's my screen color? By default, it's
showing black here. I'll say, nope, it's not black. I'll grab my color picker or
eyedropper to click on it, and then use it to come and
pick this green right here, so it would use this exact
green I have in my video. Because if you say
you want to come here and choose green here, it's not going to
you might really not get this exact green here. So it's best to use
your colo picker. You come right here and
you pick this green. Now, I don't want
to pick this one because this one is
different from this one. You know, I told you that
your green should have uniform lighting. So
that's a problem. So I want to choose this one
because this one is more popular and you can
see it everywhere. So I'll just click
somewhere here, oom, and it removes the
background instantly. And immediately we are already seeing our news background which is underneath the
newscaster video. All right. But there's
a problem, right? If you look at the
shoulder right here around all of this place, you can see we have some
things still showing there. Okay? If you look here, you can see that
this place is not really transparent like that. And if you look here,
obviously, that table, you can see that
we can still see some elements of that
table right here. And this is not
what we want, okay? And that's why I said that
once you follow those rules, you won't have issues like this. But thank God, this
is after effect. There's nothing you cannot
do in after effect. So there's a way we can get
rid of this right here, okay? And to do that, I will
need to come to my screen mat settings right here so you can see just click on the
drop down for the screen mat, and it will show you all
of these settings here. But before I begin to adjust
my screen mat settings, I will also need to
change the view of my video to a screen mat
so I can see it clearly. So if you look at my view here, it's currently in final result. I want to click on
that final result and change that to screen mat. Okay? Change that to screen mat. And when I do that to just basically change everything
to black and white. Which is exactly
what we want, okay? Because at this black
and white view, we can see things
clearer, right? We can see things clearer because at this black
and white view, everything that is black are the things that
have been removed, and everything white are
the things that are left. So no wonder we can still see this table because
you can see that this table is not black. It's supposed to be totally.
But it's kind of gray. And then if you look
here, you can see that this place is not
totally black also. It's kind of looking gray and, you know, so many parts here. And those edges around his body, you can see they are not
really white and everything. So what we are supposed
to have here is that every single
thing here is supposed to be black except this
character or the newscaster. And the newscaster is supposed
to be totally white and not having any form of
black around his body. Okay? So that is the goal
for this screen mat. So I'll come back to the
screen mat settings, and I want to just change
two settings here. I want to change
two settings here. The first setting I want to
change is this clip black, and the second one
is this clip white. Okay? I'll adjust the clip black to make everything that is
supposed to be black black. And then I will adjust
this clip white to make everything
that is supposed to be white white, right? So let's go ahead with that. So by default, your
clip black is zero, and the only thing you
can do is to increase it. And as I increase my clip black, you can watch you begin to watch and monitor
all those things that are supposed to be black. You will begin to see them
get you know, darker. But the downside to it is that as I increase
my clip black, this newscaster will also
begin to become darker, right? So that is why as
I'm increasing this, I want to be watching here, and I want to stop at
the exact point where everything that is supposed
to be black is black. I don't want to go beyond that point because
if I go beyond, then I'm going to be affecting
the newscaster the more. So I'll come here, click
and drag to the right. You can see things
that are supposed to be dark and now looking dark. You can see the table,
it's becoming darker, it's becoming darker,
it's becoming darker. Oh yes. But what I get to
this point, 60. Alright? At this 60 level, everything is dark, except just this little one right here. Okay? If I keep
increasing this and say, Oh, I want to remove it finally, let's take the clip black
all the way to the end, and I keep increasing that, increasing that, increasing
that, increasing that. You can see the guys
also becoming black. And by the time I
remove it totally, most of the guy or the newscaster is
already black, right, which is a serious problem
because by the time I go to Clip White and I try to
make him white again, he's just going to
give me this result, which is the doom. Okay? Because right now, I expect everything here to be black and everything
here to be white. But now I have the
exact opposite of what I am looking for, right? So I'm going to undo, undo that, and I'm going to stop at
that 60 at my clip Black. Alright, because we have another way to take care
of this guy, right? And I'm going to be talking
about that later on. So let's go to the
clip White, right? I will begin to
reduce my clip white. Now, you can see that as
I'm reducing my clip white, the newscaster is becoming
brighter and whiter. At this 0.84 he
is totally white, which is exactly
what I want, okay? And you can see that
this little guy here even became whitter, right? So there's nothing we can do about this using the clip
black and clip white except to use something
like our eraser to erase it off or to draw a
max around this guy. Okay? So those are the two options that
we currently have. Alright, so I'll prefer drawing a max rather than
using the eraser to. So at Clip Black 60
and clip white 83, we have the perfect result
that we are looking for. But before I switch
back to final result, let's take care of
this guy right here. So I'm going to draw
a max for this. So I'll go to my shape two here. Select a rectangle. And remember I told you that
if you want to draw a max, you make sure that your you
know, video is selected. So I want to draw a mac
somewhere around here, and if I do that, I'm telling after
effect that I only want this part of
the video to show. I don't want any part
of this other video that is not within
this region to show. And now help me get
rid of this guy here. So with my rectangle tool
selected, I will just click. And once you start clicking, it looks as if
everything disappeared, but don't get scared.
Just click dragging. And as you keep
dragging, you will see that it's coming back. So I don't want to
drag it all the way to this point again because I
don't want this guy to show. So I'll just stop
somewhere here, okay? And that ends it. So all these remaining part
here won't show in my video. So you can see I have a very
perfect result right here. Now, the reason why we're
able to draw a max is because the newscaster
is in a position, right? So he's not moving around
or dancing around. He's just right there reading the news and not really moving
his body except his hand. Okay? So that's why
we're able to do this. But if this was a
footage whereby you had the character moving
left and right and move to that area of the
table that we cut off. You're going to have a
problem because if he moves anywhere outside
of this max now, it's going to cut off
that part of him. Alright? So if you find
yourself in that situation, there is really
nothing you can do. You just have to
leave that part of your green screen inside
your video that way. And that's why I gave you
those tips to follow so that you don't make any mistake in your own
green screen footage. You get a very good result, and then you don't have
to stretch yourself in after effect trying
to remove what is there. Okay? So that is that. So now, finally, we can
come back to our view. Let me go back to my
selection, too, first. Come back to my view
and change this from screen mat and change
it to final result, which was always there before. And then when I do that, I
can now see my newscaster. I can see how clean
and cripsy you know, the edges of his body is, and the table is
totally gone and everything is looking
really, really good. Okay. So that is that I can, you know, come here, minimize this so that I can have
enough space here. Don't worry about this line. When you export your video or render your video, it's
not going to show there. But while you're working
in after effect, it will always show just
to let you know that you drew a max
right there, okay? So I need to go back to my project panel
because I want to go and bring in the table, okay? I want to bring in the table. So I'll go back to my
project panel by going to Window Projects and I'll
pop up my project panel. Supposed to be on
this side, okay? And right there, we
can see new stable. So this is another image I downloaded from a
stock image site, and then you can get
that from there. I can drag this and
drop it above, okay? Above. You can see my table. It's above because that's
where I want it to be. If you drop it under behind him, the table can be behind him, so you drop the table above. Alright. So the next thing we want to do now is
just arrange this, and that's what's called
compositing, right, to arrange it the way it's supposed to look
like in real life, and then we'll be done with
our green screen footage. Okay? So the first thing I want to do is to reduce
the size of the table. So with my table layer
selected, I'll press S, and I'll bring up skill and I can reduce the size of my table. Okay, very small. All right. And then I'll drag
that and bring that down o to somewhere around here. So obviously, we're
not going to leave the newscaster like this
because this is going to be a giant newscaster with this small table,
which is not fair. So I'll select the
newscaster, also press, and reduce his size also to
match the size of the table. Okay? And then I'll
drag that and put that on my table right there. Okay? So you can see what
we have right there, okay? My newscaster is being
reduced to this state. And the reason I'm
reducing him to this site is because this is
a very big studio. So if this was real life, it's supposed to be
somewhere around this area to match
the background. Okay? And that's it, guys, when I press the
play button now, we see everything plays
accordingly, okay? Hello, and welcome to
the political Truth, where we separate fact from
fiction in American politics, and I'm your host, Tuvoa McColl. Alright, you can see
that right there, okay? So this is as Concept studio. You can come visit
our studio anytime you have some
recordings to do, okay? Inside of After effect. Alright, so that's the
green screen footage. You can see that
this news background is kind of shutter
than everything, so I can just copy and
paste it and then drag the duplicated version towards this and then to
fill up that space. So we still have
some small one here. I can copy and paste again, and I'll just grab that to
fill up that small space. Okay? So throughout my footage, you can see my background
is right there showing on the table
and everything. Alright? So I'm supposed
to end it here. You can see that when it
stood up, and went away. We can't see him because
we drew a max there. You can remember that
max I was telling you. Alright? So you don't
want to you want to make sure that people don't see
the way he was standing up. So maybe we will end
everything here. So I can even delete this
extra copy and paste here. I can also trim everything
to end right there, okay? And trim my composition to also end right
there. All right. That's it, guys. And
that's how to remove green screen footage from
your video in After Effect. You can go online, search
for behind the scenes of different movies
like Game of Trones, Avengers, you know, all of
these superhero movies. You'll see a lot
of green screen, you know, played out there, and you begin to understand
this concept behind the green screen and how you can also use it for your
future project. Thank you so much for
watching this video. In the next video,
I'll be talking about how you can export your videos or
render your videos in after effect. Piece out.
18. How to use Templates in After Effects: What's up, guys. Welcome to another video in this
after effect training. In this video, I'm
going to be showing you how to use templates. Alright? Templates would
make your life easy. Alright? So let's get
straight into After effect, and I'll show you how
to do your third. Q. So you could go online and download free
and page templates, right? Just go online search. You see several website
to download free after effect templates or page
after effect templates. Alright, so the one I have
here is a paid template. So paid templates are always, you know, more attractive
than the free ones, you know. So if I open up this, you can see it has an
help file footage, and we have the after effect
file right here, okay? So to open this up, I will just double click on that, okay? And it's telling me
this project must be converted to this
and this and this. So sometimes the
person who created the template created it with a different version
of After effect. Okay? And that's when you
get this notification. So I can just click
Okay, and then it's going to load
up that template. It's telling me
that, Oh, we can't find a particular
font and stuff. I'll say, Okay, just open it up. It's showing me the
name of the fonts. Alright. If I want,
I could go online, search for this font and download and install them
and then reopen this, and it won't show me
this issue again. So I'll just click Okay, and
I will load up the template. So basically, in this video, I just want to show you
how to use this template. I just want to show you
how to use this template. So you can see this
template right here. If I scrub through
with my playhead, you can see the nice way it's
just been reviewed, okay? So you can see what it does. So what makes template easy to use is that you don't
have to do all of this, you know, animation, this motion graphics,
and after effect. Somebody has taking
time to do all of this. And that's why most templates
that are as good as this, you have to pay to
be able to download them because you need to
reward that person, okay? So we have this template
right here, okay? And you can see
how smooth it is. So all I need to
do with template is I don't need to do
all this animation. I just need to go and
look for this text and find a way to change
this nova reaction, new project to my
own text, okay? So you can see the project
panel and how everything is being arranged here.
So I just need to go. You can see. So some
templates, you know, some creators are
really good with, you know, naming things and
making it easy for you. While some templates are just so annoying and you don't know
where to even go to edit. You can see this
one says Edit me. So I can easily open this
up and I can see scene one. Really, really arrange nicely. Open up scene one, and then I can see
scene one and text one. Okay, scene one and text one. So I want to change this
text, Nova reaction. Let me double click
this text one, and you will see
that I need to open up my text one, right? Now this is Zoomed
in, so I can come to this 100% and change it to fit so I can see
the entire thing. And then from here,
you can see that it's going to be easy
for me to now edit this. I can just simply
double click on this space that says
your text and change that to you know,
AMC or something. And then this Nova reaction, I also want to
double click on it. But before I double click on it, I'll go back to my selection too so I can select it
and then double click on it and say Adobe
Master okay class. You can see that's too long. So what I want to do is to go back to my selection to then go to my character panel
and reduce the size. Okay? So even though
this is a template, you can still, you know, arrange it and, you know, make some changes to
it because you have an understanding of how to
use after effect, okay? And then this last one
here, I'll select it, double click on it and say online make it that capital
letter online class. Okay? You can see that, so I'm just typing
anything here. I don't even know
what I'm typing. Okay? And successfully, we've been able to
change text one, right? Now, if you want to
see what it looks like in the main composition
where we were coming from. So we're here before we double clicked on text one
and brought us here. So I'll go back to my main comp, and you can see showing
me this release caps. I'll just turn off my caps. And if I come back to
this beginning here, you can see that it has replaced my text with what
I now have here. And we successfully
changed that. And that's how you
go on and on and on. So let's just quickly do another one. Let's
go to scene two. Now, in scene two,
you can see we have an area for an
image and for text. So for the image, it's
called Place Oder One. I'll just double click on that. Okay? Quickly import an image. I'll go to File,
Import file, right. And I can just look for
an image right here, open up an image,
so I can just scrap this image right
here, any image. So maybe this image, or
let me use this image. Click open, and I'll import the image here into my project. I can click and drag that, drop it into my composition. You can see that we have their own picture there
and my own picture. I can select this
their own picture, your media and delete it. So I have just my picture
alone right here. And I'll come to
this 100% and 50 so I can see what
I'm working on. If I go back to my
main composition, you can see my picture is
already showing inside here. So I can go back to
my place with that one and just move
this a little bit to this side so that I can
see his face very well. You can see how
easy it is to just, you know, edit this template. I can go back here
and change text, open up text too,
and type Frank. Okay? Just type Frank there. I'm just going to
leave the rest. You know how to do all of that. Go back to my selection to go back to my main
cup and you can see that this has
changed to Frank, okay? And then by the time I'm done editing scene one scene two
all the way to scene 17, I can export by going
to file export at to render Q and follow my
exporting instruction. So this is how you
can easily use templates in Adobe After Effect. Thank you so much for
watching this video, and I'll see you guys in
the next video piece out.
19. How to Export/Render Videos in After Effects: What's up, everybody,
and welcome to this video of this
after effect training. And in this video, I'll be talking about how to export your videos
in after effect. All right, so let's get
straight into it right now. So we're right here where we
left off in after effect, and I just want to go to my intro video composition and use this as my exporting
because this is just 4 seconds. So I want something that
will happen really fast. So how do I export this as
a video that I can use on other application or watch on my laptop or do some
other stuff with? O? I can easily come to my menu, I'll see file, and under
file, I'll see export. And under export, I'll
see ad to render Q. So you might want to write
this down so you don't forget. Fl export add to render Q, okay? And then you can also go to composition and
under composition, you will see add
to render Q, okay? So file export, A to render Q. And then, mind you,
when you are exporting, or adding to render Q, you don't export
everything at once, okay? It is only when
you save that you actually save
everything together. So if you save your project, all your composition and
everything are saved together. But when it comes to exporting, you have to export
each composition one after the other, okay? You have to export each
composition one after the other. So if I'm on intro
video and I go to file, export to render Q, it will only be exporting
this particular composition. And you can see that when
you select to render Q, it replace your timeline
with this render Q tab. You can see my timeline has been replaced with this
render Que tab. All right. So what are the settings here and
what do I need to choose? So these render settings, you leave it at best
settings, all right? Then the output
module is lotless, but you click on that
Lot less, right? And then it will load up
this output module settings. Okay. So basically, you don't
want to do anything here. You just want to ensure if
you're using a MacBook, you want to make sure that
your format is in QuickTime. If you're using Windows, your format should be
showing AVI here, right? So it's just a Mac
Windows thing, right? Format for MAC, QuickTime format for
Windows, AVI, Alright. We have that ones here. But the kind of not relevant
to what we want to do now. But you can see that you can
actually export MP three. That's an audio wave audio. You can export a picture, JPEG sequence, photoshop
sequence, PNG sequence. And what I would
do it would just convert your entire
video into images. All right? Remember, I told you images come together
to form a video. So if you have the 4
seconds, you know, intro video, it would automatically change
out to four times 25. I would change out to 100, you know, JPEG images. All right, which
forms up this video. So those who need it
know why they need it. So but right now, we
just want to choose QuickTime or on Windows,
you choose AVI. Now, one important thing
I want to talk about here is these
channels. All right. By default, it's in algebra, and Algeb is fine, okay? But if you feel like there's something you've
done in after effect, say, maybe, for example, you did a lower thought in
after effect, okay? And you want to take
that lower thought to another application
like Premiere Pro in your video editing. So you want to use it in your video editing
in Premiere Pro. And if you export it normally, you'll notice that when you bring in that video and you
import it into Premiere Pro, you'll notice that that video
came with a background. So meaning, if I
drop the lower third on an existing video
in Premiere Pro, it's going to cover
that video up. Okay? There's something called LGB plus Alpha under
these channels. If I choose Al gB plus Alpha, I'm telling After
effect that, Hey, I have some transparency
in my video, and I want you to retain
those transparency. Okay? I want you to retain them. So meaning that after
creating a lower third, and you created it on a
transparent background, and you export it
using lgBPlus Alpha. It means when you bring in
that video into Premiere Pro, it's also going to look
transparent, okay? It's not going to
have any background. So when you drop it on a video, you don't cover the video, you just see it on top
of the video, okay? So that's AlgBPlus Alpha. So it's very similar to
Photoshop when you are trying to export JPEG
and PNG. All right? If you export a JPEG, it means you don't have any
transparency in your image. But when you're exporting a PNG, you're trying to tell Photoshop, Oh, I have transparency
in my image, and I want to maintain
that transparency, and PNG is a format that
can maintain transparency. Okay? So that's the
same thing with Al GB and Al gB
plus Alpha, okay? So there is no transparency
in our intro video. You can see nothing
is transparent here. So I'm not going to
choose RGB plus Alpha. I'll just leave it at
default, which is RGB. Okay? And then when I'm
done with all of this, I'm going to click Okay. Alright. And you can see it's now showing Custom QuickTime. On Windows, it should
be showing Custom AVI. Now the next thing
I want to click on here is the output two, okay? And output two showing me
introvideo one dot mV. All right. On Windows or some other version
of after effect, you might be saying
something like, not yet specified
here. All right? Is that you see two things here. Is that you see the name
of your composition here or you see
not yet specified. So whatever it is,
just click on it, and that will allow you to give your video a name. All right. I can say AMC intro video. Okay. Oops, AMC intro video. Then I can save that
on my desktop, right? And you can see my format
remains QuickTime. Okay? And then I'll
click on Save and that will rename it to that and is going to save
it to my desktop. So after clicking on Save, it doesn't mean that
your video is ready. It doesn't mean that
you go to your desktop and go and check
your video there. No, you have to now
render your video. Okay? You have to render your video. And how
do you do that? You can see we have a
render button here. Okay? So I'm going
to click on that and now we start
rendering my video. You can see that
line moving across. By the time it's done, you
hear a chime sound to let you know that your
after effect is done. So you can hear that
sound right there. Okay? And I can go to my
desktop, select desk stop, and you can see the
AMC intro video right here ready for me to play. Now, if I check the
file size of this, my four second video, you can see it's
about 524 megabytes. And you're like, Whoa, 4 seconds, 524 megabytes. What the heck?
Alright? And that's the way after effect
just renders, okay? There's no After effect
doesn't have, you know, formats that you could render to in small format like MP four, that could be small
and everything. Be when after effect
was being built, it was built with the mind whatever you're doing in after effect is
not the final result. You probably want to
take your video from After Effect, take
it to Premiere Pro, finish up some things there, or take it to cinema for,
do some other stuff there. So after effect, when
doing your video, we render it in the best
quality that it can, you know, so that when you take that video to another software, okay, the quality that you are
getting on your video in that software is still
the best quality. All right. So that's
how Adom Adobe After Effect is being built, okay? So we have different
options if you want a smaller file size of your video with a
very good quality. And number one option is, I usually take my video
to Premiere Pro and, you know, go and re export it. Okay. And most of the time, I still have some editing to still do on the video
in Premiere Pro. So that's why I just like
taking it to Premiere Pro. So most of the time, I
take it to Premiere Pro, add some more sound effect, you know, do some
cutting and joining. Maybe I want to do a voiceover. I'll lay the voice
over on it also in Premiere Pro, do all
of those things. And when I'm done, I export it. But if Everything is finished
in after effect already. All I do is take it
to Premiere Pro. I don't do anything to
it. I just re export it in Premiere Pro using, you
know, some settings there. If you have gone through
the Premiere Pro class or the Premiere Pro training, then you should understand the settings I've
given you there, and then you can use
that settings to export. But if not, you can check out
the Premiere Pro training on the website and then just
go to the Exports, you know, section and check out how
to export in Premiere Pro, and then you can reexport your, you know, after effect
video in Premiere Pro. And this 4 seconds video can be something like 2 megabytes, you know, in Premiere Pro, using the settings
I gave you there. Okay? So that's how I work. The second option is to
use another software called Adobe Media Encoder,
Adobe Media Encoder. So if you have the
Master collection, for, you know, Adobe suit, you have the Adobe
Media Encoder, and you can say file
export exports, sorry, add to Adobe
Media Encoder Q. All right, so I don't
currently have it installed on this system, okay? I don't have the package
installed on this system, so that's why it's
grade out, right? It's not even allowing
me to choose it. So if you have it installed, you will see that it's
available here as an option. You can click on it and it will start opening Adobe
Media Encoder, and you can now use Adobe Media Encoder to
export it to a smaller site. So there are so many setting like we have in Premiere
Pro on Adobe Media Encoder, and you can use that
same exact settings I showed you in Premiere Pro in Adobe Media Encoder and
reexport to a smaller version. But don't worry if you don't
have Adobe Media encoder, you can just use Premiere Pro to reexport to a smaller file size. Okay? So that is that with exporting your video and saving your project in after effect. Thank you so much for
watching this video, and I'll see you in the
next video piece out.
20. Conclusion: Yo, I'm super excited that
you guys made it this far. Yes, you just concluded the
Adobe After effect training. Alright? And this
particular training is for beginners and
intermediates, okay? And I'm sure you're
already filled and fired up to do great and
amazing things using after effect.
Alright, guys. So thank you so much for joining me from the very
first video of this training. Straight down to
this last video. You are the champion, okay? So if you want to learn more, you can browse other
courses on the website, especially you want to browse the after effect advanced class. So you can move to the next
level if you feel like you're fired up
and you're pumped up to go deeper
into after effect. But if you feel like, Oh, I send need to learn
more right here, you can start this course all the way from the beginning
again and go through everything again until
you feel like you are satisfied with what you
have learned, okay? So I'm super excited
to have you guys here. You can check out other courses like web design,
digital marketing, photoshop, Premiere
Pro, you know, Illustrator, all on the website. It's been an amazing
time with you guys. And I will see you
in the next video. It's your boy K show, and I'm signing out. Pooh.
 Gabriel Showole