Transcripts
1. Introduction: Hi, I'm Jake and
motion designer. This class is really special. First of all, we will
cover the easiest way to add a portal affect
either your videos. I'll show you creative
compositing techniques to blend the portal effect
with your footage even better. This part is great
for beginners, even if you've never opened
Adobe After Effects before. It takes only four videos
of this class and they'll give you all information so
you can get the best result, which you can see on
your screen right now, this list is special
because for the first time, I'm not only providing footage
on which you can practice, but this time I also
include and share with you a professional made template
which allows you to add a portal effects
into any shot. You'll need just to film any footage using
your phone or camera. And we're using this template. You'll be able to add a fully 3D dimensional
portal into your videos template to use. Part of this class will
take only 15 minutes. It's very easy to use. Just strike your camera
enabled draft mode, so it will run faster, apply animation to the
portal and adjust the look, lay something inside
of the portal and you'll get a really
cool final result. And finally, in the advanced
part of this class, I'll show you how to create a 3D portal effect from nothing using truck
that particular, I'll take my time to explain
every step which I make. So it would be easy
to understand even if you are new to
Adobe After Effects, this less is well-organized
and you can see words like beginner template and addressed
entitled to each video. So you can easily navigate between the videos
of this class. You can always ask questions
on any parts of this class. I'll be happy to answer
and an interested to check your class projects
as well as give you helpful tips to
improve your work. And four main class project, you need to composite these portal effects
into your own footage, or a footage which I provided
for you to practice on. Feel free to follow me
here on Skillshare. I post Adobe After Effects
classes every week. And now, let's get started.
2. BEGINNER - Adding Portal: Okay, so I'm using Adobe
After a face 2021, but you can use any version. It will be fine. Even
free version of After Effects will work for this
beginner type of effect. So first of all, I'm
using standard layout. So you can click here and
you should be able to see the same panels which
you can see on my screen. If for some reason you
cannot see some of the panels which you can see on my screen, for
example, character. You can go to Window and enable it from here,
character, character. So let's import our
footage to work with. Let's go to file, import file. So this foolish
will be available in resource step to this class. And to create new composition, we can click here or on
this icon right here. In our case, we can just
left mouse click here, click and hold, drag here or here on timeline to
create new composition. It will create composition
with exact same time as this forage and exact same
resolution which is fully GD. You can also write
multiple hear and see a composition
settings which is full HD 1920 by 1030 frames per second and 20th,
three seconds long. Let's click Okay. First of all, I want to
give you some tips on how you need to fill your footage
to get the best results. For this beginner
type of effect, it's better to film your
footage from tripod, as you can see in
all of these shots, camera doesn't move at all. But later in this class
I'm going to show you how you can
create this portal from scratch has
also how to place your portal effect in
3D space like this. And you can even shoot your footage where
you jump into it. But it's more complex technique, which I'll explain
later in this class. Once again, for the beginning
of type of this effect, we need to fill in our
footage from tripod. And now let's import
footage must go to file, import file. This portal effect
footage you can also find in resource
after this class. You can download it and also
import in your project. And as you can
see, I've rendered fuel shots of portal effect. It would have variety. We will be able to jump from
one environment into other. But if you look closely, you can see that camera is
pretty low to the ground. So make sure to film your
footage and set your camera about one meter high from the ground or three feet
tall from the ground. Because in this case, when you will drop your
footage of portal effect, just like this and set
mode to screen here. By the way, if you
cannot see the moles, you can just look here. You'll see all the
properties which we can get four layers and set
this mode to screen. In this case, you can see that if we will change to normal, we don't have any background. And with the screen, we are
applying on our footage. As you can see, if you will film your footage from one meter
high or three-fifths, all this portal effect
will fit grade, and also make sure that
nothing is in foreground. This is our fourth step. So our next step will be to film ourselves inside of the portal. It should look
something like this. Let me disable this
portal effect. And here at the end of
this beginner footage, which I provided, you can find this photo and also
this footage of myself. You can also shoot yourself at home or in other environments. Also set your camera
on the waist level, about meters high or
three-fifths all. And you can make some
motion like you open in the portal,
something like this. So let's cut this footage. I can just find the moment
where my footage starts. It's about here. And to split this layer, we can use shortcut, which is Control Shift D. As you can see, I
press Control Shift D. You can also go to Edit
and go to Split layer. As you can see, the shortcut
is Control Shift D. Once you've dropped your
footage into your composition, you can scale it down. To scale down your footage, you need to select
your footage with yourself in other environments. Press S on keyboard to see the
scale and make it smaller. Now you can see scale
and by changing this value to lower value, we can make it smaller. Also, we need to go here
two rectangle tool. And if your left
mouse click and hold, it will allow us to change to any other tool we want
to use Ellipse tool. Let's click on it. Here from center, we
can just leftmost leak and drag to the right or to the left to create a circle. But if you will hold
Control on keyboard, it will create this
circle from the center. And if you will press
Shift and hold, it will create a perfect circle, which is exactly what we want. So let's create a circle which is inside of borders
of our forage. Basically something like this, where we can see
ourselves inside. Let me select the
selection tool. So we basically don't want to
have these kinds of parts, whereas cut enough, by the way, if you click something wrong, you can always press Control
Z to undo previous action. And now we can just
leftmost leak and adjust the position of this
mask which we've created. So let's make sure that
we are in the center, something like this
worst rate there. Select your footage and
press F on keyboard. It will allow us to
change mask feather. Here we can feather the edges. By the way, very tangy
shortcut is Control Shift H, which allow us to disable all the borders of all layers
so we could see it better, which we are working on. With this mask feather. We want to feather the
edge just a little bit so it will blend better
with our portal effect. And by the way, move yourself
inside of this mask. You can also use this
pan behind tool. Let's try it out. You would know how
to work with this. You can click on this
pen behind tool, select your footage, then
just leftmost click and drag. And now, as you can see, we can move ourselves
inside of this mask, which is also really
handy if you want to adjust position
inside of this mask. So let me press Control Shift H, and I'm going to click
here to see our mask. You can see that I am
moving my footage inside of this mask to make sure that we are in the center
of this circle. Okay? Now, let's match ourselves to this portal effect
which we have here. Let's enable it. By the way, the order
of these layers matter. So basically if I
am going to change this portal footage
below our mask, you can see that it's behind of our footage with our mask. So make sure to
place your portal effect voltage here on top. Now we can just
disable ourselves this layer with ourselves and with the mask and
select this portal effect. Let's close it here so
it will not distract us. And with the selection
tool, we can basically just select the layers
which exactly what we want. So I'm gonna select this
portal VFX footage. We can press S on keyboard
to change the scale. In my case, I want to make it
a lot bigger so it will be easier to see myself
inside of this portal. So at this point, you can choose any value which you want, which works better
with your idea. My idea was to have this wide shot where this
portal is quite small. So I'm gonna set this scale to 150 AM and place
it here lower. And now I can just enable
this footage with our mask. And if I'm going to
press S on keyboard, we can scale it down, move it just like this. By the way, you can also
press P on keyboard to see the position and move
these values for S axis, as you can see, it's
moving and x-axis. And this is for a
y-axis which is up and down x-axis, left to right. Here you can put exact
numbers if you want. In my case, I just want to match my footage
inside of this portal. So it looks like 49 words, good. By the way, you can
just left mostly here. And then with arrow keys, press down or up to
change the values by 1. You can also select your footage by selecting this layer and press arrow keys to move
it also on your screen, left or right or up and down. I think it matches pretty well. And if you want to have
even more portal Effects, you can just select
this portal effect and press Control
D to duplicate it. And move this one a
bit to the right. Just select this layer
and move it to the right. You would have this
bright part here. And bright part here is you
can see it as a moving. I'm trying to tie this
bright part here. So in this way, hold the portal will be as bright as we want. This is optional and
you don't have to do this because with one
portal effect is worse, pretty great as well. So let's delete this
one I just showed you. So you would know that you can duplicate and use more than one.
3. BEGINNER - Animating Portal Size: So now here at the
beginning you can see that we are completely visible and we can animate few properties to make ourselves
visible from the center. Basically about here, where portal is
completely generated. We can click here to
zoom-in in this timeline. And we can press S
to C, our scale. And with this pen behind tool, we can also change
this anchor point. So click here to select
this pen behind tool and change this anchor point
to metal of our layer. Just like this, if you have
your anchor points like here, Here's a cool handy shortcut. You can press Control Alt Home, and it will place
it in the center. You can move it to
the left if you feel like it's more
towards the center. But basically you want to have this anchor point and center because when we will
change this size, you can see that it will
change from this point. So if I'm gonna move
it here and change it, you can see that it
goes to this point. This is why we want to have this anchor point in the center. So let's set it to 48 as it was. And we can click here to create a keyframe. What is key-frame? Basically, keyframe
is a point in time. We should remember the
value of certain property. In our case, this keyframe, this point in time,
which is 19th frame. It remembers this point in time. It remembers this value, which is 48 of this
property scale. If we will go in
this point in time, which is the beginning
of our video, to 0 seconds, we can change this value and take a look
at this time coarser. Once we will change this value to a smaller value,
Lake maybe 30. You can see that it is automatically created
and our keyframe. So basically when
you're creating your first keyframe by
clicking on the stopwatch. Next keyframes will be graded automatically if we will
change the property. So in our case, we've
created this first keyframe, which is 48, and this one at
the beginning, which is 30. So now what happened? Basically, we've told
to after effects that we want to have this
layer at the beginning, a 30% of the scale, then it needs to go to 48. And basically, if we
will scroll through, you can see that it
scales up just like this. If you don't have
any keyframes next, it will stay at the last
value which you've said, which is basically 48. So basically we've said 30, then it goes to 48, and then it stays at 48 until we will not change
to any other value. In this case, it
will go further. But we don't want to do this. I'll delete this keyframe. And this basically how we can create animation using scale. By the way, the same we
can do with this portal. So let's select
this portal effect. Press S on keyboard and create a keyframe by clicking
on this stopwatch. So basically we've created
keyframe as we did here. Now we can move
this keyframe here. We want to make sure
that our anchor point is center of our portal. So when we will
change the scale, it will go from center,
just like this. And not from any other point because it will not look great. Let's make sure that
we've said this to the center. Here
at the beginning. We will set this scale to 0. It goes from the center
and appears bigger. By the way, you can always click here on this solo bottom, which is next to
any of the layers. For example, if I'm going to
click on this solo button, solo only this layer of bottle. So now it's easier to
see what we are doing. Let's exit this solo mode to see all of these layers
which we have here. You might be wondering
why we did not make this footage with
ourselves also go from 0. Well, basically because this
portal effect works great, not with the scale, but with the mask
expansion property. Let's delete this
scale animation. To delete all of
these keyframes, you can just left most leak, select all of them and press
Delete to delete them. Or also you can just click on this stopwatch to delete all the key frames
just like this. Make sure that you set
your previous value. In my case, it's 48. Now let's press M on my
keyboard while selecting this layer and open
this mask in here, we have fewer cold
things which we can use. First of all, we can add a lot more interesting animation with this mask expansion. If we will change
this mask expansion, you can see that it cuts out our footage and
not scaling down. And it looks more
like in a movie. So let's set this
mask expansion to 0, which is default value. And let's create a keyframe. Also, let's create a
keyframe for mask feather. And we can also set the mask
opacity keyframe as well. And here towards the beginning, we will set this time cursor
here towards the beginning. We can change this mess, especially to a smaller value. For example, minus 200. We can change this mask feather so we will not see
this rough edge. So let's crank it a bit up, maybe even to 300. And we can also
change this opacity. So it will fade completely. But before we will
change this opacity, we can even change this mask
expansion even further. Let's set this opacity to 0. Basically, if we will
set this to solo mode, we can see that we've created
a three types of animation. First of all, we have
said this feather, which is feathering the edge. The second animation is opacity. As you can see here
is it's almost transparent and then
it's becoming clear. And Mask Expansion,
which is basically the animation which goes from the center outwards like this. I think it's the best way to
animate this kind of effect. Let's exit this solo mode and
see how it looks together. Let's zoom out here on timeline. And I want to basically by
changing this work area, we can preview all this
part of our video. And if you will press 0 or
Notepad, we can preview this. Now as you can see, a
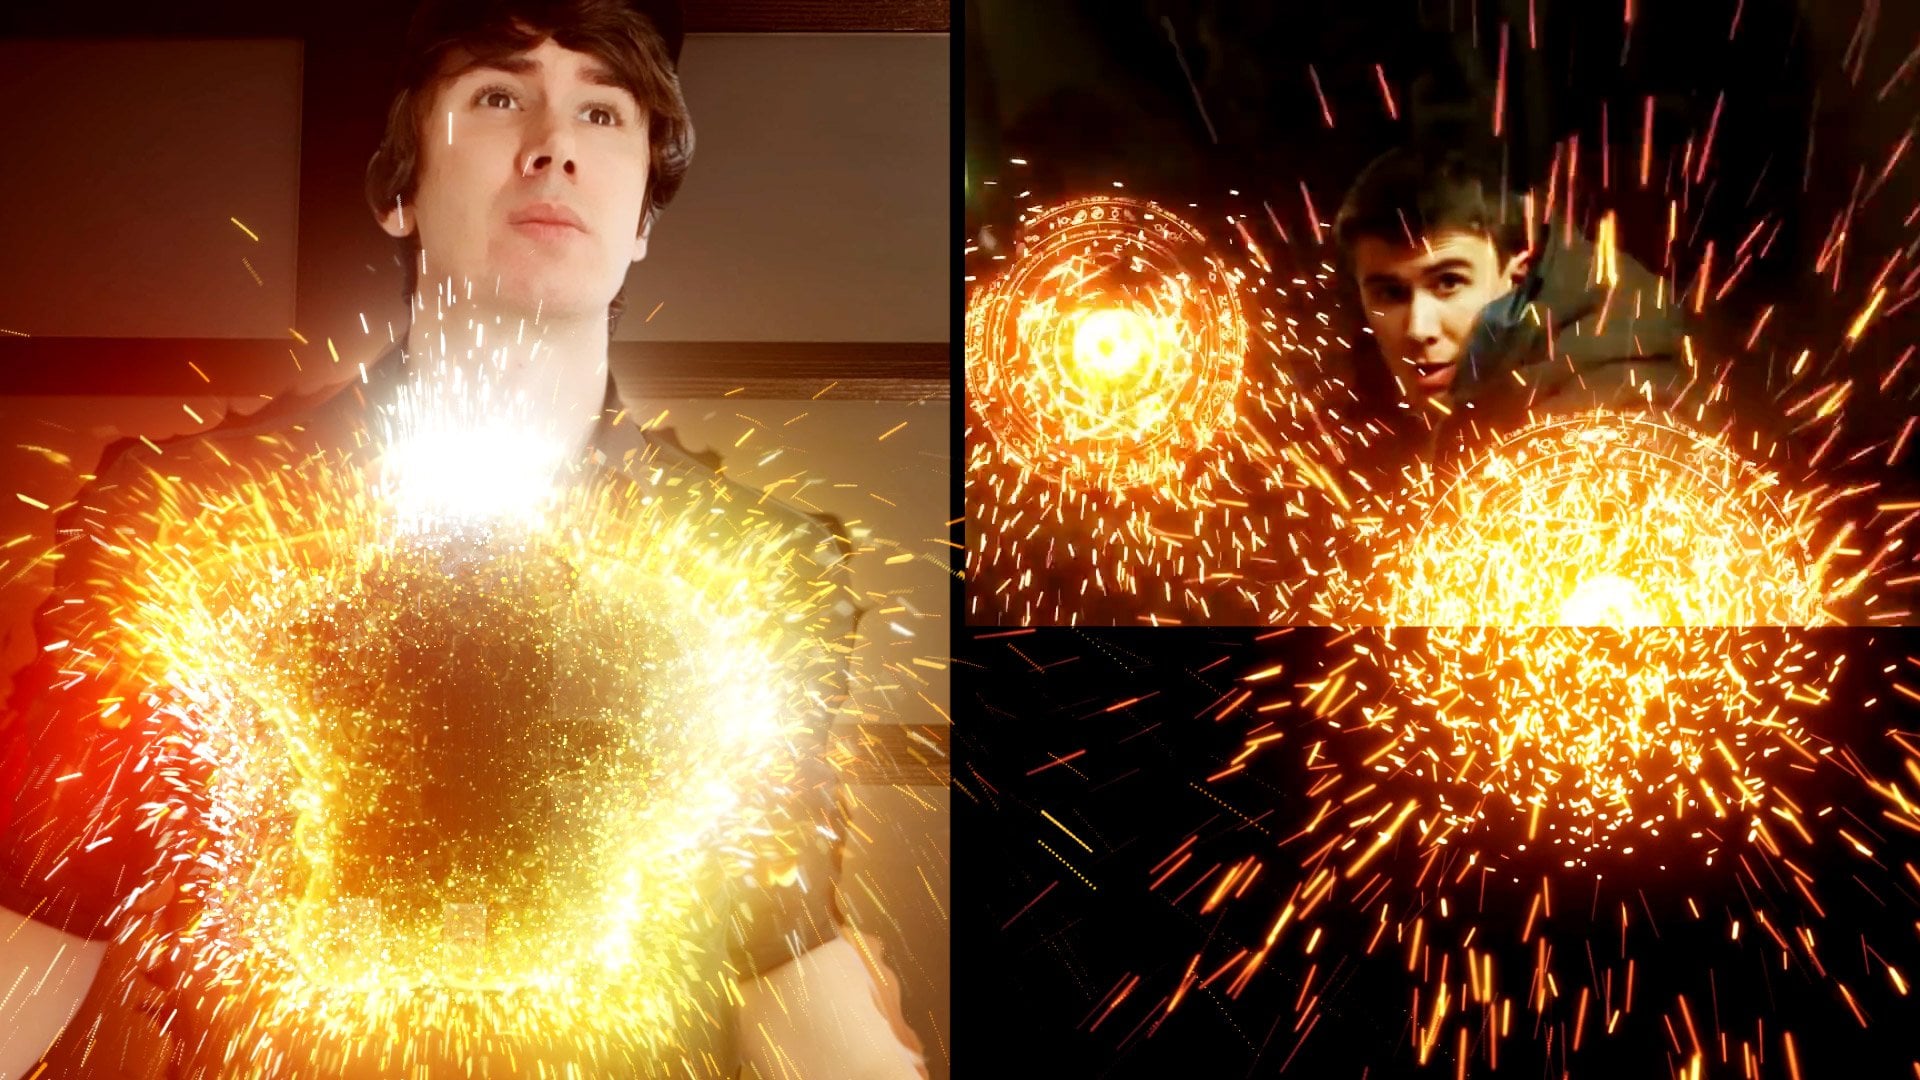
week of really cool. And the next video, I'm gonna show you how you can work with this effect and other VFX shots. See you in the next video.
4. BEGINNER - Challenging Rotoscoping Shot: In a previous video, we've created this
portal with ourselves, which looks pretty cool. And as you can see,
it's pretty easy to do the best part that it gets even easier with the next shots, basically because here we have this animation from
the center outwards. So let's cut this footage and this footage of
ourselves and portal. We can just hold Alt and
close square bracket. As you can see, I've
clicking here Alt and square bracket to cut all of
this footage to this moment. Because in the next moment, you can see a bit
other kinds of shots. But it's much easier
because here we can just place our footage as we did before and just create
a mask and federal adult. Then you can just
double-click on this footage to preview this,
just double-click here. It will open and foolish viewer. And you can just prove it is. For this shot. It will work better with this close-up shot
of portal VFS. By the way, this VFS portal
is part of my VFX bundle, which includes a bunch
of their effects. So feel free to check out on MJ.gmail.com if you want to use more effects,
which I've created, this shield effect or Firefox, or even lighting effects, as well as it has templates
for creating a logo reveals. And for this class, I've shared this for footages for free, and you can just
double-click on it and choose which works
better for our forage. This first one works great. Soldiers drag and drop here
and also change the screen. Then press S on
keyboard to change the scale and a match
with your footage. This is basically how
easy it is to use. And now you don't
need to worry about any animation because
the shots like this, you just need to cut your
footage to your shot. You can even duplicate
it once again by clicking on this pen behind tool and selecting
this second one, you can click on this
layer and scroll through. And in this way you can
change the timing of your portal to get even
more violent effect. So let's get both of these
footages to this moment. I'm going to press Alt
square bracket and is again, guess I did the same
with this shot as well. And to not waste too much
time on the repeating myself, I'm gonna show it a
bit more quickly. And you just selected
this fifth one. Drag into my composition, cut it where I
want it to appear. Myocardium, this layer. And let's set it
to screen as well. And basically we want to
match with our footage, which we also can cut
with our ellipse tool and feather the edge and then just
select this portal effect, scale it up and match
better with your footage. And this is the basically
the only shot where we want to feel in yourself
from pad level. For this portal effect to work. That's easier and
as you can see, it's exactly the same. But now let's see the more complex shot
which we have later. Here. Basically we want to jump
out from the portal. And this shot is more
challenging than before. Why this shot is cool
to have in your video. So basically, if we will find the footage which we
want, which is this 1, third 1, and drag and drop into our composition
and set it to Screen. Press S on keyboard
and make it bigger and set it here to
roughly match ourselves. You now can see why we have
a little bit challenge here, because we are jumping out. But this footage is goes
on top of ourselves. In this way, we would
need to wrote a scope ourselves on top of our portal. And let me show you
how you can do this. You just need to
duplicate your forage, your original footage
where we have all yourself jumping
out of the portal, then press Control D to
duplicate it and drag it on top. So it would be on
top of this portal, just on top of all
of the layers. With this footage, we want
to wrote a scope ourselves, but before Let's go to file and save our project
because from time to time, Adobe After Effects can crash. So let's go to File, Save As and save it
wherever you want. We've saved it. Now we need just to set
this resolution to full, left double mouseClicked on
our footage, just like this. And with the wheel on the mouse, we can zoom in on our footage. And if we will, middle
click and drag, we can move around our
footage, suggest like this. Or you can just press and hold spacebar and leftmost leak
to move around your footage, which is really handy when
you are zoomed in like this. So let's zoom in a bit. You can also press tilde
key on the keyboard, which is this bottom. It will allow us to
open in full-screen, whichever panel our
mouse is hovering on. So basically if
I'm hovering with my mouse here and
press the Tilde key, it will open and full-screen. We need to use this
runner brush tool. Let's click on it. With this rather brush tool, we want to select ourselves. By the way, to change the
scale of our brush tool, you can hold Control. Left mouse click and drag to the left or to the
right, as you can see, by holding Control
and left mouse click and dragging to
the left and right, we can change this
brush tool sites. Let's make it a bit
smaller like this. And let's leftmost
click and drag. Just left mouse click and
drag to draw on ourselves. You just want to select only yourself without the background. Release it. Now we have our first
draft of our mask. And to refine our edges, we need to hold Alt key on
keyboard, leftmost lake. Now it draws with the red one. It means that it's
subtracting from our mask, which we've created and
release it little by little, we can just adjust our mask domain that
it stays only on us. And by the way, if you will release Alt key on a keyboard, you can add more details to
our mask, just like this. Okay, so once we've
created our mask, you need to hold
Control and press one time on right
arrow on the keyboard. It will allow us to
jump to next frame. As you can see, a way of
jumped to this frame. And now we can just add to our mask because it
lost our foot here. Just like this frame by frame, you can write a SCOP yourself. So once again, I
hold it in control, right arrow key on my keyboard
to go to the next frame. And I'm making sure that
I'm adding details. Or if you will have
something like this, you would need to
hold Alt key on a keyboard and subtract
and wanted areas. I'm going to press Control
Z to undo the steps. If you will press Tilda Q, once again, you will exit
this full-screen mode. And by the way, with this button next frame, previous frame, you can also skip
frames and make sure that your mask
is stays on you. In our case, we want to wrote a scope ourselves
here at the beginning. Because here at the
beginning we are jumping from the portal. Let me go this process
a little bit faster. And as you can see,
I've created this mask, which discovers
here, you can keep going if you will,
on your footage. And in my case, these few frames for teaching purposes,
worse, fine. Once you'll get your mask done. And to save your process, makes sure that you
change these edges of this effect only to the parts where you've
checked yourself, so it will not save
unwanted parts. So I'm gonna cut to
this moment and about here because I don't want to waste more time of this class. So I'm going to cut it here and then click
on this button. It will save our progress. Okay, great. Now it's
saved our progress. And now we can go to
Composition window. If we will scroll up
here and close it here. We have ourselves started out. And to demonstrate this, I'm going to click
on this solo button. And as you can see, I have all the Myself and this footage. So let me show you why
this is important. Because if I'm going to
un-solo this button, we can see our footage, our background and ourselves can see it looks more
like I'm jumping out from this portal and not
just behind of this portal, which is really crucial
to sell this effect. And let me cut this
footage of myself. I am going to cut this footage. Let's un-solo. You can see it
looks much more believable. But once again, we
need to have inside of this portal some
other environment. So let's fix these two issues. We need to fix the
color gradient on ourselves so we would blend better with this shot and it will look
more believable. And we need to change
inside of this portal. And exactly this we will
do in the next video. See you in the next video.
5. BEGINNER - Final Compositing: Now let's fix these two issues. We need to play something in the portal itself,
other environment, and we need to blend
ourselves better, jumping out from this frame. First of all, I'm going
to click here to close all the steps so it
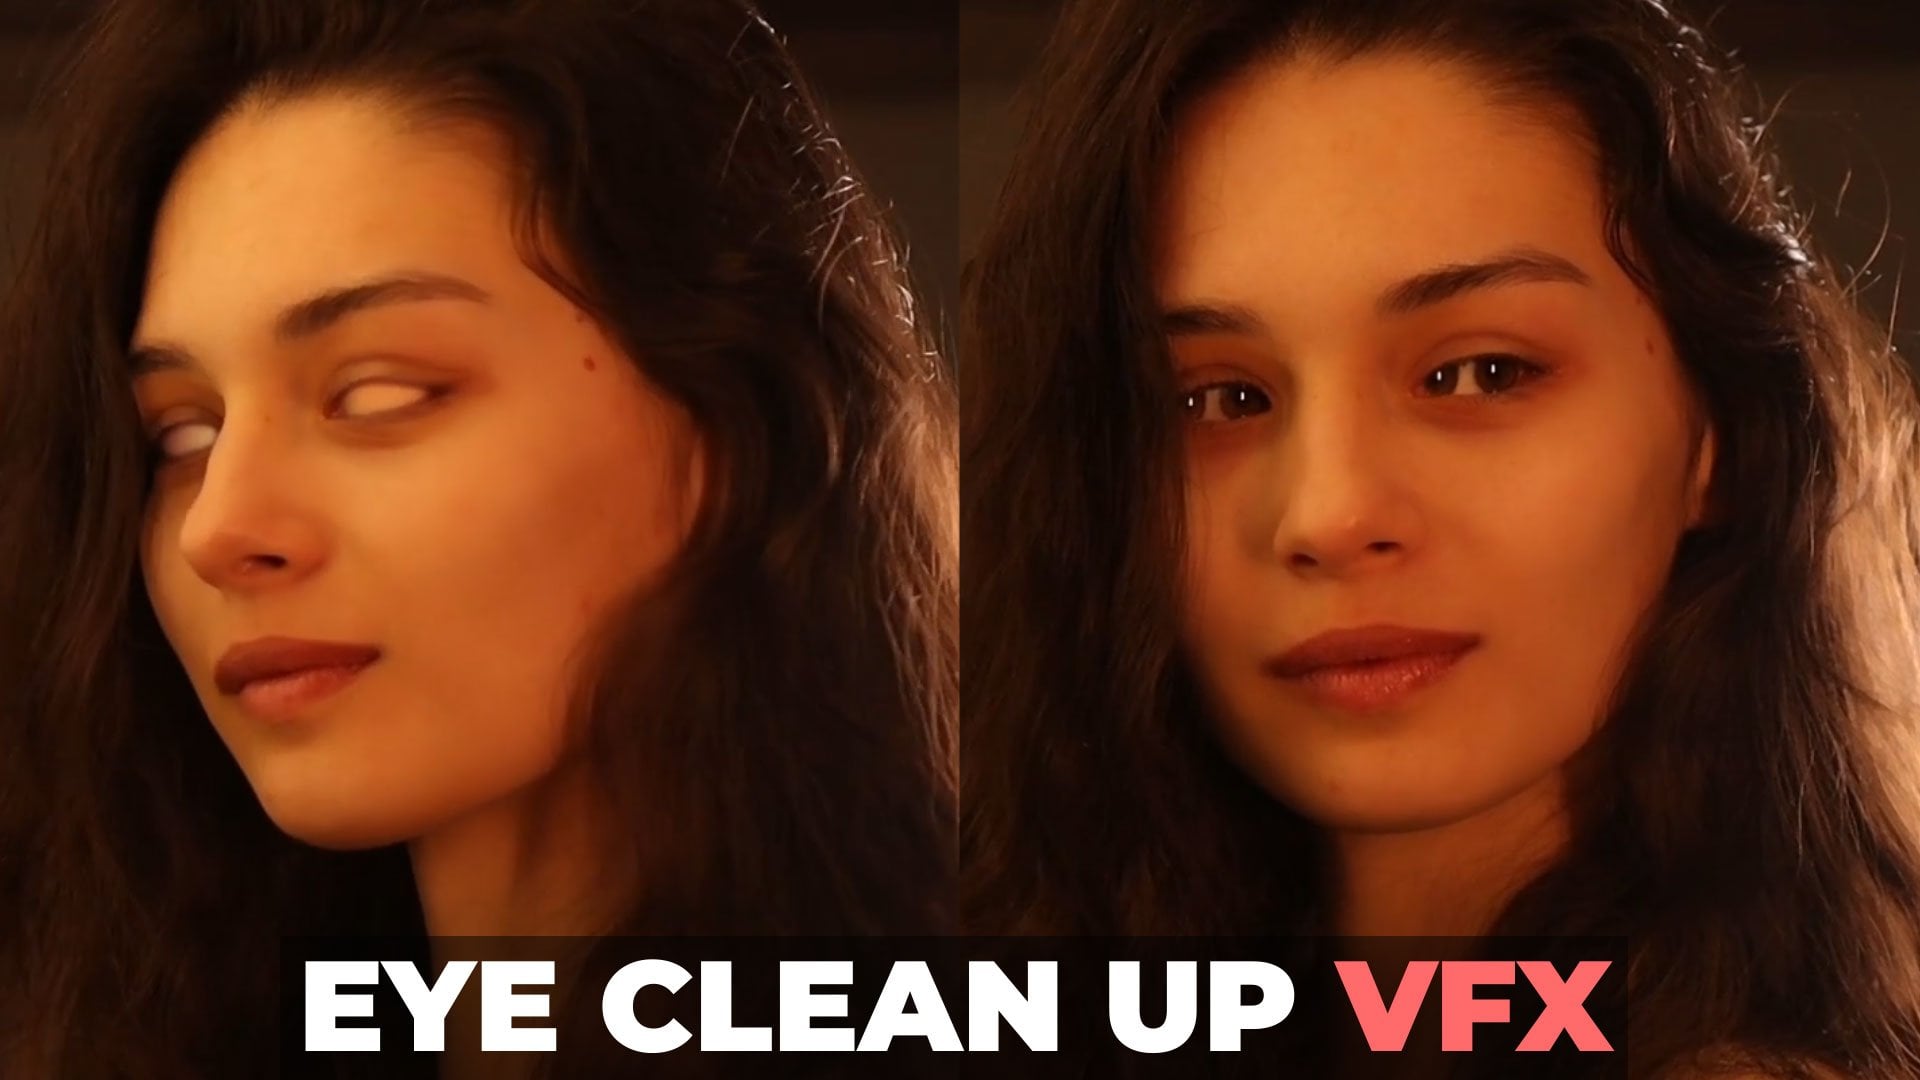
will not distract us. And let's select this footage where we wrote a
script ourselves. Let's make sure that we got an out ourselves more properly. We can just go to
Effect Controls panel. And if you cannot
see this panel, you can go to Window and
liabilities from here, Effect Controls and
here we can just adjust these properties which will allow us to cut
ourselves out even better. For example, we can change
this better. About 15. It will feather the
edge a bit more. We can reduce the contrast which will feather
this edge even more. So let's change this
conscious value to lower value like 70. We want to cut this edge
even more in an ourselves. If I'm going to scroll wheel on the mouse to zoom in to
show you better this edge. And now we can see that if I'm changing my contrast to 100, we get this clear edge. And if it will set to 70, lower value, we will
feather it out even more. And now I want to shift edge leftmost lift and
shift to the left. You can see I'm cutting
out myself even more. In this way, it gives
more transparency, but it also blends
better with our footage. Basically went to
it was like this. You can clearly see
the summit edge, which is looks not that great. Now let's set to minus 100
to get better results. If we can just click here on this checkbox next
to use motion blur. It also will add this
natural blending, as you can see it here on
the hair or here on my body. Now is you can see this looks even better and blends
better with our footage. And a final thing
which we can do, we can add a curves effect. We can go to effects and
presets and type here curves. Selected leftmost
click, and drag onto our footage which were
routers kept ourselves. Really sit here. And as you can see, we've
added this chorus effect. We can click here on this
stopwatch to create a keyframe. And if we will press
U on keyboard, you can see this keyframe
here at the beginning. We can change this curse effect. And basically it will
go from changed curves effect to this default values. So basically now here at the
beginning of this layer, we can just add more brightness
to our seemed like this. It would look like
this portal is lighting myself bit more. So basically with
the curve like this, we can add lighting
in ourselves. And if I'm going to click here, you can see a before and after. You can see it sells even more. This effect like this
portal is illuminated us and are basically from
this keyframe of this curve, it will go back to
our default values, which is basically
to our footage. And it will blend better
with this champion effect. If we will not add this
router brush composition, it will not look as cool
as it looks with this. And finally, let's add something
inside of this portal. For this, we can use
beginner and raw footage. We can just double-click on it. And if we will scroll
here till the end, you can find this photo
of the door which I am using inside of the portal. And basically, you
can just cut it this footage to this moment and then just left mouse click and drag it inside here in UDL to place it just
below of our rotoscoping. Let's select this be reportage. And if you will leak
on the square bracket, as you can see,
I'm clicking here. On open square bracket. It will stick this footage
to this time coarser. And now I can see this
photo and I can use this ellipse tool and once
again, create a mask. So I would have something
inside of the portal. Then I can change to the selection tool,
select this footage. I can name it inside just by pressing Enter on
keyboard to rename it. Let's move it here
and press S on keyboard to see the
scale and scale it down. So this is looks about right, and I can click
on this point and click on this point of the mask, adjust the mask itself. And as you can guess, we want
to set this inside portal below of our portal
effect, just like this. And now it's blends altogether. Here is again see it's
disappearing because we need to freeze this footage. We can right mouse
click on this photo, go to time, freeze frame
and extended this photo. In this case, it will
stay longer on our frame. As you can see how important
this broader brush, because now it gives
these few frames, which makes this shot
even more believable. Because without it, we
couldn't make it possible. So just spent a
little bit more time, draws cap yourself in. And as you can see,
it's worth it. Exactly the same
thing you need to do here at the end
where you jump in n. But I don't want to waste
any time because it's exactly the same method
as here at the beginning. And finally here at the end, I've just used this footage, which also will be available to download and resource
after this class. Basically is the
footage of this portal which is closing down like this. And we can say to the screen, and it's basically closing
down moment of this portal. For the beginner
part of this class, it looks really cool and
I really encourage you to film your own footage and create on top of
your own footage. It will be more fun than
using just my footage. I'm checking all
the class projects wish you can do and submit, and I'll give you some
tips if you want. You can also ask questions and comments
section to this class. But you might be a noticed that this portal looks
a bit different. Starting from the next video, I'll be showing you how
you can use this portal. What is cool about this portal? This portal can be
placed fully in 3D. You can even use your
camera and walk around it, which was impossible in this beginner's
type of the class. Because as you remember, we've used tripod and
by using this template which I created exclusively
for this class, you'll be able to place this portal in any moving
shot which you like. The next video I'm gonna
show you how to use this template which
I've created for you. By the way, if you are
beginner and not sure if you are going to watch advanced
part of this class. Feel free to follow me
here on Skillshare. I have a lot of
glasses for beginners, including this one which
takes only 12 minutes. But you'll get really
interested in results, as well as animation
for beginners, motion graphics and
even logo animation. So feel free to follow
me here on Skillshare. I create places every week.
See you in the next video.
6. TEMPLATE USE: So beginning or type of
the effects we've done. And now I am going
to show you how to use my After Effects template, which I created for you. In this video, we
are going to place our portal and real-life feel foolish, just
like this one. Let us go to File Open Project, and let's save this project. We should create it in
resource set to this class, you'll be able to find
this 3D Portal template. You can also find 3D
Portal template big, which means that enzyme cases of tracking
of your footage, you might find that this
portal is too small. I hope you have the plugin which called trap
codes particular. You can go to Effect
and go to red giant trap goat particular. It's a paid plugin which
you need to install, or you can download free version to work with this template. You can go to maximum
that net and click on try if you are not ready
to purchase this plug-in. If you do have this
tripod particular plugin, this template will work fine. What is cool about
this template? Basically, it's already
created total effect. And if you are interested how to create this portal effect. Later in this class, I'm going to show you as well. But for those of you who
doesn't have anytime and one just to use this
portal effect in 3D space, you can just open this
3D Portal template, or let's maybe open
the bigger one, 3D Portal template big. Let me show you how
easy it is to use. First of all, I
recommend you to go to Auto so it will change the resolution to
more proper for your system which you're
running for your computer bar, just go to water. It will render faster. But if you want to see
the original color, which you will get, you will
need to go to the full. And here you will see the colors which you will
get after the render. So I've created a
pretty easy controller. Basically, with this controller, you can control all many
fissures which this portal has. Basically, if you will go
to effects and controls, you can change this
particle amount. And as you can see,
it's already animated because I've created
this animation where this portal is going from the center outwards,
which is pretty cool. To see this animation,
you can just select this controller and
press U on the keyboard. And as you can see, just
by changing the scale of this controller and this particle amount slider,
which is this one. You can create this animation. Let me delete these keyframes. You can see how it is easier
to create from scratch. For example, I want to change this particle amounts,
which is here. Lower number like 2 thousand. And let's change
this full resolution to quarter so it
will work faster. This is good idea if you
have not so powerful computer to change this
value to lower values, maybe even to 500. Just to get an idea
of how it looks, if you will press 0 numpad, it will render a lot faster
than if we will have the full amount and standard amount which
I've used as 12 thousand. As you can see, it's
renders a bit faster. Also, you can change the position of this
portal and even rotation. If I'm going to press
R on keyboard and rotate this portal
on the y-axis, you can see that I'm
changing the rotation and it's fully 3D portal. So if I'm gonna set
this 50 degrees, and if I'm gonna change
this particular amount to 5 thousand CMR particles, you can see that it's fully 3D dimensional, which
is really cool. And basically with
this template, you can create a bunch of different angles of this portal. You can even press P
on the keyboard to see a deposition and
change the position. You can push it farther away
by changing this z-axis. So as you can see, if I'm
going to set to 7 thousand, I can place this portal
effect further down. Let's set it to 4
thousand what it was. Let's go to rotation by pressing R and change it to
default, which is 0. As you can guess, by
changing the scale, we can shrink down our portal. So I'm gonna set to 150. You can see it's
becoming smaller. And you can animate it. Even to one. It will be really, really small like this. You can animate the scale
property if you want, and default is 250. Also, what is cool about this template that
you can change the floor position by changing this value is you can
see it's about here. And if I'm gonna change
it to 2 thousand, you can see that it
goes even lower. And if I'm going
to bring up 10000, as you can see, it's even
intersects with our portal, which is not great. I'm gonna set to
my default value. But it's really handy if you don't want to have any ground. So basically you can just
change this value to a really high value,
like 5 thousand. In this case, you can place your portal in the air
by changing this to really high value and
this smaller value Lake maybe 150 and rotate, maybe an x-axis to 45. You can create
this footage lake. It's on the ground
or on the wall. As you can see, it's
parallel to the ground. And I can say 70. And basically you can just
place it wherever you want. So let's go back to the
original values, which is 250. And let's set it
our floor again. And just before placing this portal inside of
real-life footage, I'm going to show you
the most Fannius thing, which I think I've graded in
this template that you just can click here on this stopwatch and
change to draft mode. And as you can see, it's
basically a circle. But it's really handy because
now it's faster than ever. And you can change
all of these values. And then press R
and angle it as you like and create any kind of animation and see
it much faster. And then just toggle here. And it's basically a, remember, all of these animations
which you will apply. And as you can see,
it works exactly, is in a draft mode. Which is really handy. Okay, So this is our draft
mode, which is really cool. And I'm using this a lot because
now it runs really fast. So now let's import
some real-life footage. Let's go to file import file. This raw footage is also available in resource
step for you to download. And we will use as a practice. Let's drag into this to
render foolish decomposition. You just need to place
it below this met later. I'm going to explain it
why we have this mad also. As you can see and draft
mode, it works really, really fast, which is really great because now we need
to track our camera. Let's select our footage and go to animation track camera. And by the way, the
better result of this 3D camera tracker
is basically to film your footage
without really shaking camera and nothing in your
shot should be moving. This way, this 3D camera
tracker will work rate. So make sure that it's nothing
in your shot is moving. And in the case, if you want
to jump in into portal, make sure that you don't
cover too much of your shot. Maybe it's just like this
portion of the shot, then it will be great
and make sure that your camera movement
is steady like this. In this case, you can see that this 3D camera
tracker worked well. Anybody the way you can
also go to Advanced and click here on this checkbox
for detailed analysis. If you're still
getting some errors and if you have more
questions about camera tracker asked me in the
garments and I'll be happy to answer them and help
you with your tracking. We have this footage
and as you can see, a tracker went well. And let's imagine where we
want to have our portal. And in my case, I want
to have it about here. As you can see,
I'm just selecting these for points which
represents our ground. And I want to write more
split on one of the points. And then I'm just going to
click create null and camera. Here. What you need to do next, you need to copy it. This 3D camera which we've created and paste in each of
these three compositions. Let's select this
3D camera tracker, press control C to copy, then go to portal core. And basically these
three compositions are representing
this one portal. If I'm going to select
this controller and click on this draft
mode to disable it. You can see that
this portal effect contains this Intel Core. These particles, flyways
and portal floor. So now what we want to do, we need to select this
3D camera tracker, press control C to copy it, and then press Control V to paste in each of these
portal compositions. So let's place it here, control V to place it here. And Control V to paste it here. And let's go back to
render a full HD. Let's also go to controller
and enable it draft mode. So it would be faster
and as you can see, it already in 3D space. But it's not exactly
where we want it. So what we can do, we can select this track null
and press P on keyboard. Then select this position
and press control C to copy. And then select this controller. Press beyond
keyboard, and select this position and press
Control V to paste it. So basically we are
pasting this data of district null
into our controller. And our controller is
controlling our portal. So by changing this
position of the controller, we are changing the position of the portal so that our portal will be at exact same
position as this track null. So let's select this strike null Position Control C to copy. And here I've selected
this position of controller and press
Control V to paste it in. Now it's basically at the proper place where
we want it to be. But now, by changing this
second value of y axis, we can drag it up. Now basically we can just
delete this check null and we can just work with this
draft mode of this controller. Basically I can move it
up so it would be more in the ER and then press S on keyboard and make it
even bigger if you want. In my case, I want
it even bigger. So I am going to set it to 375. I'm going to press
P for position, move it up and then
are to see rotation. And I can change this
y rotation to angle. The proper way is
I want it to be. So basically this is how
you could easily change it and place it in
your Anya footage. By the way, I forgot
to mention in the case if this portal
size is too big, you can always select your footage where the
camera tracker on it, and select this camera
tracker and just select Other points and you'll get not that too small
or too big portal. So make sure to select your points to get this
kind of circle size. Because if this circle
will be into small, you'll have to change
your controller to a bigger size and it
will not look that rate. So if you'll get some issues, you can always select other points to create null and camera and
repeat the process. What I love to do is to
switch off this draft mode. And I can change the particle amounts to
whichever number I want. For example, I would want to have a lot more
of the particles. So it would look more
dramatic and as you can see, it will take much more time. So this is why it's
really good to make any kinds of
animations in draft mode. And we didn't dash
this particle size, which is really handy
because as you can see here are particles
are too small. So let's try to set it
to 12 instead of seven. And as you can see,
just like that, you can make it a
lot brighter by changing the particle size. And in my case, maybe something like ten
would work even better. And let's set it to full so I'll make sure that it looks
just like I wanted to look. Okay, so this is
a full resolution and this is exactly the effect, how it will look at the result
I've created my animation. Finally, only thing that I
would love to do is to click here to switch off
this drive mode and render this footage. So I am going to press
0 or non-profits to get this little preview. So now we can see
that I've applied to this animation and
it works great. The way I have almost
forgot to show you this matte layer we
should really handy. So let's import
some Polish lake. This photo right here. What is cool about this? You can just scale it
down this photo and use it like it's something
inside of this portal. Let's place it here
and let's make it 3D. Now it's automatically is in 3D. And what do we want
to do is to push out even more in
position in Z space. So it wouldn't be a farther
away and then scale it up. And this is what is cool about this template that you just said it below this matte
layer and set this, this track matte to alpha matte. Now we can see how easy it is to play something inside
of this portal effect. This saves a lot
of time and makes gradient these portal
effects a lot easier. Finally, we can just go to controller and exit
this draft mode. So now it's never
been easier to create these portal effects and applying in the
real-life footage. So make sure to
follow me here on Skillshare if you want to stay up-to-date with the PFAS and templates which I am going
to create in the future. By the way, if you want
to support my efforts, you can purchase VFX bundle. It already has this
template as well, as well as other
kinds of animations. I am keeping,
adding more effects and templates just
like this one. So feel free to use it and post the class project so I could
see what you come up with. And in case if you
want to get to the advanced plus kind of
part of this class. And the next few videos, I'm going to create
this portal from scratch using
trenchcoat particular. And in this case you'll
get the knowledge how to create this portal from scratch, which I've created
for this template is really advanced
part of the class. So even if you are a
beginner to After Effects, I'll try to explain
everything in details. And this is not that
hard to understand. So don't be afraid. And I'll see you
in the next class.
7. ADVANCED - Portal Path: So now we know how to
use this template. And starting with this video, I'm going to show you how to
create this from scratch. So I'm gonna create new project. Now let's create new
composition by clicking here. We can make it maybe
12 seconds long, leash, 30 frames per seconds. Let's call it final portal. Because as you remember, it contains three
parts of portal. So let's click. Okay. So first of all, we need
to create new solid. This will be our portable core. So I'm going to name it
portal color and click. Okay, now let's apply our
trip got particular. Here. Nfa simply says panel. Let's type it particular. Select this red giant
target particular, and drop it on portal for. Now, as you can see by default
is particle generator. And let me import
some portal voltage. So we would have as a reference. Another case, this portal effect is the basically the
particle emitter, which emits particles and
it goes in the circle. Let us go back to this
final portal effect. Now let's go to
Effect and controls. Here we have our
emitter is you can see it has its own position. If it will change,
you can see that we can change the position emitter. Basically, what we
want to do is to make this position
go and the circle, just like our portal effect. And the easiest way
is to create mole. So let's click here
on Create null. Basically, as you can see, it created this null object. And if we will change
this null object, this emitter will stick
to this null object. And to create this
circular motion, it's not that intuitive. So first thing, what do
we want to do is to make these particles to shoot or not in all directions like this, but in one single direction, we can just change this
direction, two directional. Now let's change this
velocity bigger value so it would be more
visible what we are doing. So I am going to set to 1500. This value is so we
can set it to 0. Basically what we've did, we've set our emitter to emit particles only
in one direction. And as you remember
with this null object, we are controlling the position
and rotation properties of this particle emitter. If I'm going to select
this null object and press R on keyboard, we can see a rotation and rotate it to the left or to the right. And as you can see by changing
this rotation to minus 90, now we can clearly see
that these particles shoots out from
this null object, opposite direction
of this blue arrow. This is our first step. The next step will be to make this emitter go
in the circle and these particles to shoot out all the time in
different directions. And to explain it better, I'm gonna create a
new shape layer. Let's disable these layers so it will be easier
for me to explain. And this part of this class
you don't need to repeat. I just want to
explain how it works. So basically, let me
draw this arrow and this represents the particles which emits particles and
that direction, as you remember, we
have this emitter, we shoot outs
particles to the left. Next step is to make this
emitter go and circle. To make this emitter
go in circle, we need to create a path. And it's really easy to do. So if I'm going to
disable this shape layer, we can select this portal core. Select this ellipse tool. You can lift more split and hold to choose
this ellipse tool. Let's enable this for a second. And from center left mouse click and drag to create
a perfect circle. You need to hold also
Control and Shift. As you can see, I'm here
holding Control and Shift. It allows me to create this perfect circle from
the center like this. Release it, create this mask on portal core and then disable it. Because we don't need
really this mask. We need this kind of path
which goes in circle. And if we will open this
mask one, we can copy it. Now this path, you need
to select this mask path, press Control C, then go to this particle null and
press B to C, our position. And let's set this time
course or about here, and then select this position
and press control V. Now as you can see,
our particle emitter goes in a circle. Now it looks a bit confusing. This is why I going to continue explaining on this shape layer. So it would be easier
to understand. And by the way,
everything which I do on shape layer you
don't need to repeat. And everything that I do on this layers you need to repeat. Let me also place on this shape layer
Control V to this path. Let's disabled this layer, and I'm going to
enable this layer. You can see that we've added this path and it
works perfectly. And our particles
shoots to the left. This is basically what
is happening right here. If I'm going to time it, these Keyframes together like this. You can see that these
particles shoots out to the left like this and goes
in the circle just like this. Here's the problem. That's not exactly what we want. We don't want these particles to shoot only to the left side. We just want to shoot
along this path. Here. How we can do this. If I'm going to select
this shape layer, I'm going to set it in 3D. So it would be as 3D
as these particles. And what I want to do is to change this rotation
just like this. I want to tell to my emitter, it will change constantly the rotation where to
shoot these particles. And it might give, I want to shoot these particles
along this path. And it's pretty easy to do
because all the thing which I need to do is to create a
keyframe for the rotation, then go entire
circle and also make this full rotation
the same direction of this movement to
the left like this. So basically by changing
this to a minus one here, it adds full rotation
counterclockwise. Now, if I'm going
to scroll through, you can see that I've added
this rotation to z like this. And now emitter will shoot
just along this path. Let's apply exactly that
to our portal core. And to apply it, we once
again need to select this null object because
it controls our emitter. And we can press R on keyboard
to see this rotation. We have already
said it's minus 90. So it will shoot to the left. By the way, to add this
rotation which I've applied to my arrow and not mess up the direction where these particles are shooting
at, which is to the left. We can set the direction using
NAT, this wire rotation. Let's set it to 0. But we will use orientation basically by changing
this value to 270. It also gives us the
direction to the left. And this is important
because if we will start rotate in diameter, it will rotate in every direction, which
is unpredictable. But if we will set one kind of direction and
orientation like this, this rotation will
work on its phone. And this orientation will have the direction on
its own as well. So think of it like we have different kinds of systems
with the orientation. We've turned our emitter not to shoot towards us,
but to the left. And with this x rotation, we are going to
apply this rotation which will go along the path, just like we did
with this arrow. So let's do exactly that. Let's create a keyframe
for our x or Dacian. Here at the young, Let's set
this rotation to minus one. In this case, we are adding exactly the
motion which we want. Hopefully by using
this shape layer, you can get the better
idea what we've did with this animation
of null object, how we've applied
this circular path, and why we are rotating
this X rotation. So our emitter will face
the right way all the time. So now we can just delete this shape layer and continue
working with our ammeter. We can also press U on the keyboard to see
all of the keyframes. Select all of them. Then hold the Alt key on keyboard and select
this last one. Just squishing them together. Let's set it here at the
beginning, just like this. And as you can see, and now
it's really fast motion. And what exactly what we want. By the way, now we can
change this particles per second to a bigger value to
see what we are working with. So let's set to 5 thousand, so it will be more visible
what we are doing. In the next video,
we are going to make more changes
to this portal. So it would look
more like a portal. And as you can see here, it stops and we will deal with this and the next video.
See you next video.
8. ADVANCED - Portal Core: So basically we already have
this circular motion and we can clearly see that
is shoots right way. By the way, we can
change this direction, spread the 30, it will spread
it a bit more in 3D space. If I would have the camera here. And if I would rotate it
like this in 3D space, as you can see, With
this direction spread, you can control how much
is spreading in 3D. So basically if I'm
gonna set to one, you can see that it's pretty flat and it's shoots
only in one direction. If I'm gonna set to 15, is spread it out more, and 30, it spreads even more. So let me deal stable
this camera because I've used just for
explaining purposes. Now let's deal with
this animation because we want to have it continuously
going in a circle. And it's pretty easy to do. You just need to select
your null object, press U on keyboard and
hold alt key on a keyboard. And leftmost click on this
stopwatch up position. Here you can just type, loop out like this, or just double-click here
to apply this expression. Select it and press
Control C to copy it. Because we also want to
use it on this X rotation. Now it's going in a circle. But our rotation of particles
doesn't keep up with this. If we will hold Alt key on
keyboard as I'm pressing here, let me click on this stopwatch and Control V to paste
it, this expression. It will continue
this motion forever. As you can see, which
is exactly what we want to make it look
more like a portal. We can enable this motion blur. But the final thing which
we need to do is to press U on keyboard and
select these keyframes. We need to zoom in and to our timeline by clicking here
and make it even faster. Once again, select all
of these keyframes, hold Alt key on keyboard, and click on the last keyframe. One of them just left
most liquid and drag it to make it literally
one frame long. Now, we are getting this
portal core of our effect. As you can see, it's
really easy to do. At this point. This effect is almost done, but we need to add more details. First of all, we need to
select our portal core, solid, go to particle. And here we can change
life per second. And as you remember,
this is our portal core, this is our center
kind of particles. We don't need them to stay
too long on the screen because we will use this solid
as hot spot in the middle. And let's cut the
life per 2.3rd two. So basically we will get only this score farther
we want to set to 0. So these particles will be
more visible like this size. We can change it to maybe 24. So basically here,
you can always change the size of
it if you want. By the way, if you want to have this circle a bit smaller, you can just go to global controls here and
the world transform. We can offset in z space, so it would be closer or
further away from ourselves. This is how it's easy to
create a portal core. Next thing which I
wanted to show you, how you can create the
particles which are showing up on the ground
and flies away even more. So at this point
we can just select these both layers and go
to layer pre-compose. Let's call it portal core. And click OK. So now we have our portal core. Let's go to the project. As you can see, we have this
compositional portal core and we can just
duplicate it here. So select it and press
Control D to duplicate it. Basically, when you
are duplicating compositions here in
project panel is creating an another copy and it will not affect original copy,
which is really cool. Once we've duplicated by selecting and
pressing Control D, We can press Enter and
rename it particle floor. Let's pop in it. With this composition
of particle floor, we will introduce some floor and exactly this we will
make in the next video. See you in the next video.
9. ADVANCED - Finalizing Portal VFX: Let's introduce our floor. We can go to layer new solid
and let's call it floor. Color doesn't matter. Or maybe let's make it white and click OK. And by the way, let's save our project in case if Adobe After Effects crashes. We've created our floor. We need to make it a 3D layer. To see this 3D icon unit, just need to click here to expand all of these properties. And let's make it in 3D. And then let's press
R on keyboard. We can rotate it this solid
as you can see in 3D space. Let's set it to minus 90, which is entirely flat. And by clicking on this arrow or by pressing P
on the keyboard, we can change the
second value like this and place it
below about here. Basically it will
represent our floor. Then we need to select
our portal for. And let's close this emitter. Let's close this
particle and this, and let's go to environment. First of all, what I want
to add is a gravity, so it will fall on our floor. So let's set gravity to 250. As you can see, it's
already shifted a bit. Here's the physics simulation. We want to apply some bounds. Let's click here to enable the bounce and go to bounce one. Here we can select our
floor involves layer one. We can set it to floor,
which we've created. At this point. We can just disable our floor, so we would not see it. But we can select
it and press P on keyboard and always change
the position of it. So basically I can just
move it lower like this if I want my
floor to be lower. And now let's go back
to a portal core. I don't want to really
these sparks to bounce. So I'm going to set it
to five bias random. I will leave it at 30. So basically they will not be so bouncy and would look
more like as parks. And now what I want to do
is to make these particles, we can go to particle life, make 1 second, So they
will hang around more. We would be able to see
them just like this. We can go to emitter and we can change
this velocity random. With this velocity random. If I'm going to set it to 100, we can get this more
randomized kind of look, which looks pretty cool. And if you want, we can even add more velocity like
to 2 thousand. And as you can see,
it should this out even more violently, or maybe just leave it at 1500. The main thing which
you need to remember that with this you can just control how much violent it will shoot out in all directions. One cool thing which
you can do is to go to size over life and maybe
apply this preset, which basically will make a
small particles at the start, later video frames a bit bigger. And towards the end
of these particles, it will get smaller. And in this way you
can increase the size. So it will be much more
visible or you can increase the amount of the particles per second, maybe 27 thousand. This is how you can
create the portal floor. And now if we will go
to our final portal, we can go to Project
panel and drop this portal floor here on
top and set it to Screen. And as you can see with
this tool effects, we are getting even
more cool look. And our final step will
be really fast and easy is to add these flyways. Basically with this, we will introduce a bit more
of a windy conditions, which will make this portal
effect even more interesting. Let me show you how
easy it is to do. Basically you just
need to select this portal floor and duplicate it here
and project panel, let us call it portal flyways. And let's lift double
mouse click to open it. Here, how it is easy to do, just select this portal core, go to Effect Controls
and scroll down. Here under the bounce
and lower here, you can see this Mender. And you'll be
surprised that just by clicking on this checkbox and by association this effect
direction 250 and affects PS25. We are studying
getting somewhere. But what we also need to do is to change
this gravity to 0, so it will fly away
wherever it wants. And finally, we can
always increase this velocity to 3 thousand
or even 4 thousand. If you want to see more flyways here at the edges
of your screen. If I only here where we have created our
size of our life, we can adjust how it will appear just by selecting these
points and pressing Delete. You can delete these points because we don't need
so much of them. And create something
like this shape. If we will press 0
number to pivot, as you can see that we've
created these particles, which adds even more
complexity to this effect. And looks even more interesting. And as you can see,
it also falls here on the floor and reacts with it, which also looks pretty cool. Now as you can see,
we have this kind of random animation, which you can also control here, and effect direction and meter. Maybe I'm going
to set it to 300. Finally, we can go to a
final portal and drop it this flyways here and
set it to Screen. Basically with all of these
three types of effects, we are getting this complex
and really cool effect. Finally, let's add
adjustment layer to add some colors to this effect. We can use effect
called color Rama because it's easier way to add some fire kind of
look just left mostly and apply it to this adjustment
layer and go to output. Here, choose fire. And then just left mostly on these points and
drag it out like this to reduce some
of these points because we don't want
to have all of them. Then by changing this graph
to this kind of look, by going to Layer New Solid. Let's call it background,
BG for background. And set it to black. Click Okay, and
set it here below, you can see that
we are starting to introduce in these kind of fire. They kind of look by
playing around with this graph and change into
other colors which you want. You can introduce any color which you want to your effects. Finally, you can add some simple glow here
by stylized low. For example, we can just
reduce the threshold to maybe 22 radius set to bigger value. We would get overall
glow and intensity. Let's set it to something
small so it will be settled like 0.3 and then duplicate this effect
by pressing Control D. With the second one, we can set threshold
to maybe 33, radius set even a
bigger maybe 2375. And let's increase a
bit intensity 2.5. And finally, we can
duplicate once again. And with this less low, we can change the radius to really big amount
like 9040 intensity, and let's set it to 0.6. And with this threshold,
we can actually introduce some
colors for reduce. And as you remember with
this color Rama effect, we can always add a bit more of red or any kind of colors which you want to
introduce into your effect. Basically, you can even change
to any colors you want, even to bluish tones. If you want to have
some blue portal and get this unique kind of
portal with new color. Once you edit all
of these effects, you can open all of these compositions and just crank up the number
of the particles, just selecting the issue of the particles layer and select this particle per
second and set to bigger value to get the
most of this effect. And this is how you
can get a really violent in interesting
kind of result. You can even add some curves
effect with this RGB curve. Add even more
conscious if you want. Okay, so now you know
how you can create this portal effect from scratch just by using
trap got particular. It once again, feel free
to use my template which makes grading portal
effect much easier. And also feel free to
support me by checking MJ.google.com and
purchase this VFX bundle, which has a lot more effects and templates for you to use. It is constantly
updating and this is the list of what
it already has. Also feel free to follow
me here on Skillshare. I have a lot of
tutorials on VFX, as well as tutorials for
beginners to After Effects, Motion Graphics, and
even logo animation. And maybe check this place. It's only takes 12 minutes and you'll get this
really cool result. I create places every week. Thank you for watching.
 M Jake, Lets Create VFX & Cool Stuff Together