Transcripts
1. Introduction & Class Project: Hi, I'm Slee Ha. And
welcome to the first in my bite sized Adobe
Illustrator series. Well, I'll be taking you through the
fundamentals of one of my favorite illustrator
tools. Ship build up. I'm a professional
graphic designer, and I use this tool
constantly to create enlarge all kinds of
different shapes and motifs in Adobe Illustrator. I'll show you the basics
of how to use it, and you can follow
along to apply it to create your very own
nature based logo. The class is only
10 minutes long, and while Frier experience
would be helpful, I'll be taking you
through everything step by step, so you
can follow along. And I'll also be
supplying you with some handy shortcuts and
tit pits along the way. So let's get started.
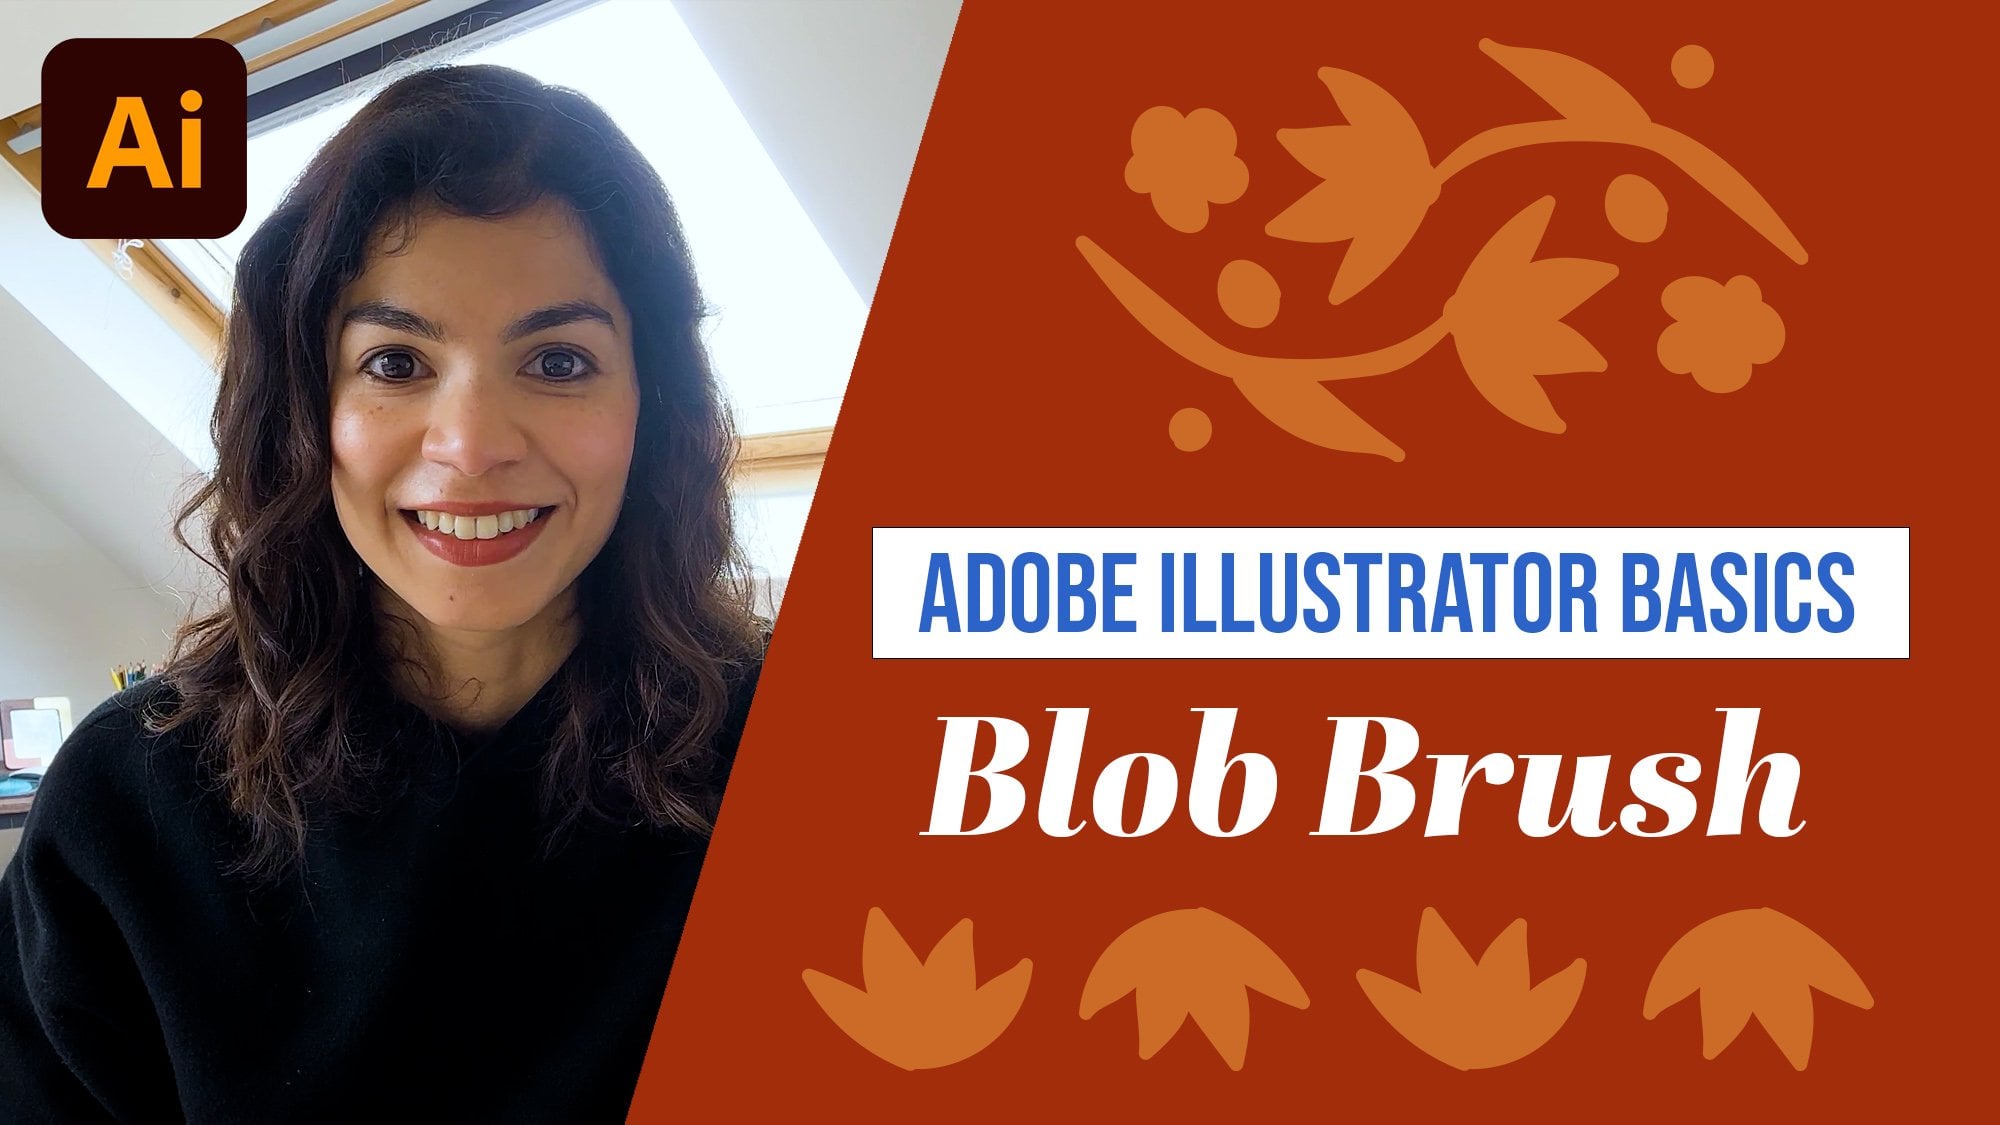
2. Tool basics: Let's begin by opening
a new document. By the way, if you don't
have a subscription to Adobe Creative Cloud, you can grab a seven day trial. I've got the link for you
in the Cloud description. I'm going to click on Web
and choose Web Large. The shape tool can be found
in the menu on the left here. The shortcut for this
is shift plus M, and it's one that I
use all the time. And I recommend you two as well. But before we can use it, we're going to need some
shapes to use it on. I'm going to click on
the rectangle tool here and draw a free
form rectangle. You'll notice that I have a
color fill and no stroke. Now, let's duplicate it by selecting it with
the selection tool, holding down option and
clicking and dragging. Now, there are three main uses
of the shape builder tool. Merge, separate, and subtract. So let's start with merge. I'm going to move the
rectangle here so that it overlaps with
the one on the left, and I want to combine them. I first select them both
with the selection tool. Then I switch to the
shape builder tool. Remember, you
always have to have your shapes selected to
use the shape builder. It won't work otherwise. So to merge the two shapes, all you have to do is click
on your starting point. You'll see the cursor has a little plus sign
next to it and drag it across both shapes.
And there you have it. It's one big shape
now instead of two. In this case, both the
shapes were the same color. If your shapes happened
to be different colors, the final shape will take on the color of the shape
that's in the front. Now that we know how to merge, let's look at separating shapes. I'm going to quickly draw
two rectangles again. Let's make them overlap again. And I'm going to press shift
and to get shape builder up. Now, if I hover over them, you'll see the shaded area, which tells you what
the individual shapes will be if you were
to break it up. The overlapping shape
essentially works as a sencil. So if I click on each
individual area, We end up with three
different pieces. The intersection of the shapes
and the remaining shapes. You can now work with
all of these separately, and it's really handy to create custom shapes using
this approach. The final use we're
going to look at is subtracting
using shape builder. So let's create two rectangles again and make them overlap. I'm going to press Shift plus to get shape builder up again. So unlike last time when
we created three shapes, let's say we don't want
this middle bed here. Instead of clicking on it, we hold down Option or all
that you're on windows. See how the plus sign next to the cursor
changes to a minus. This means that it will do anything that is hovering over. So let's click here. The middle shape has
now been deleted and we're left with the
two remaining parts. So there we have it. Three different uses
with the same tool. Why not spend a few minutes
getting familiar with it? It's deceptively simple to
use but incredibly versatile. Once you've gotten used to it, let's use it to create
a fun little nature inspired logo in
the next lesson.
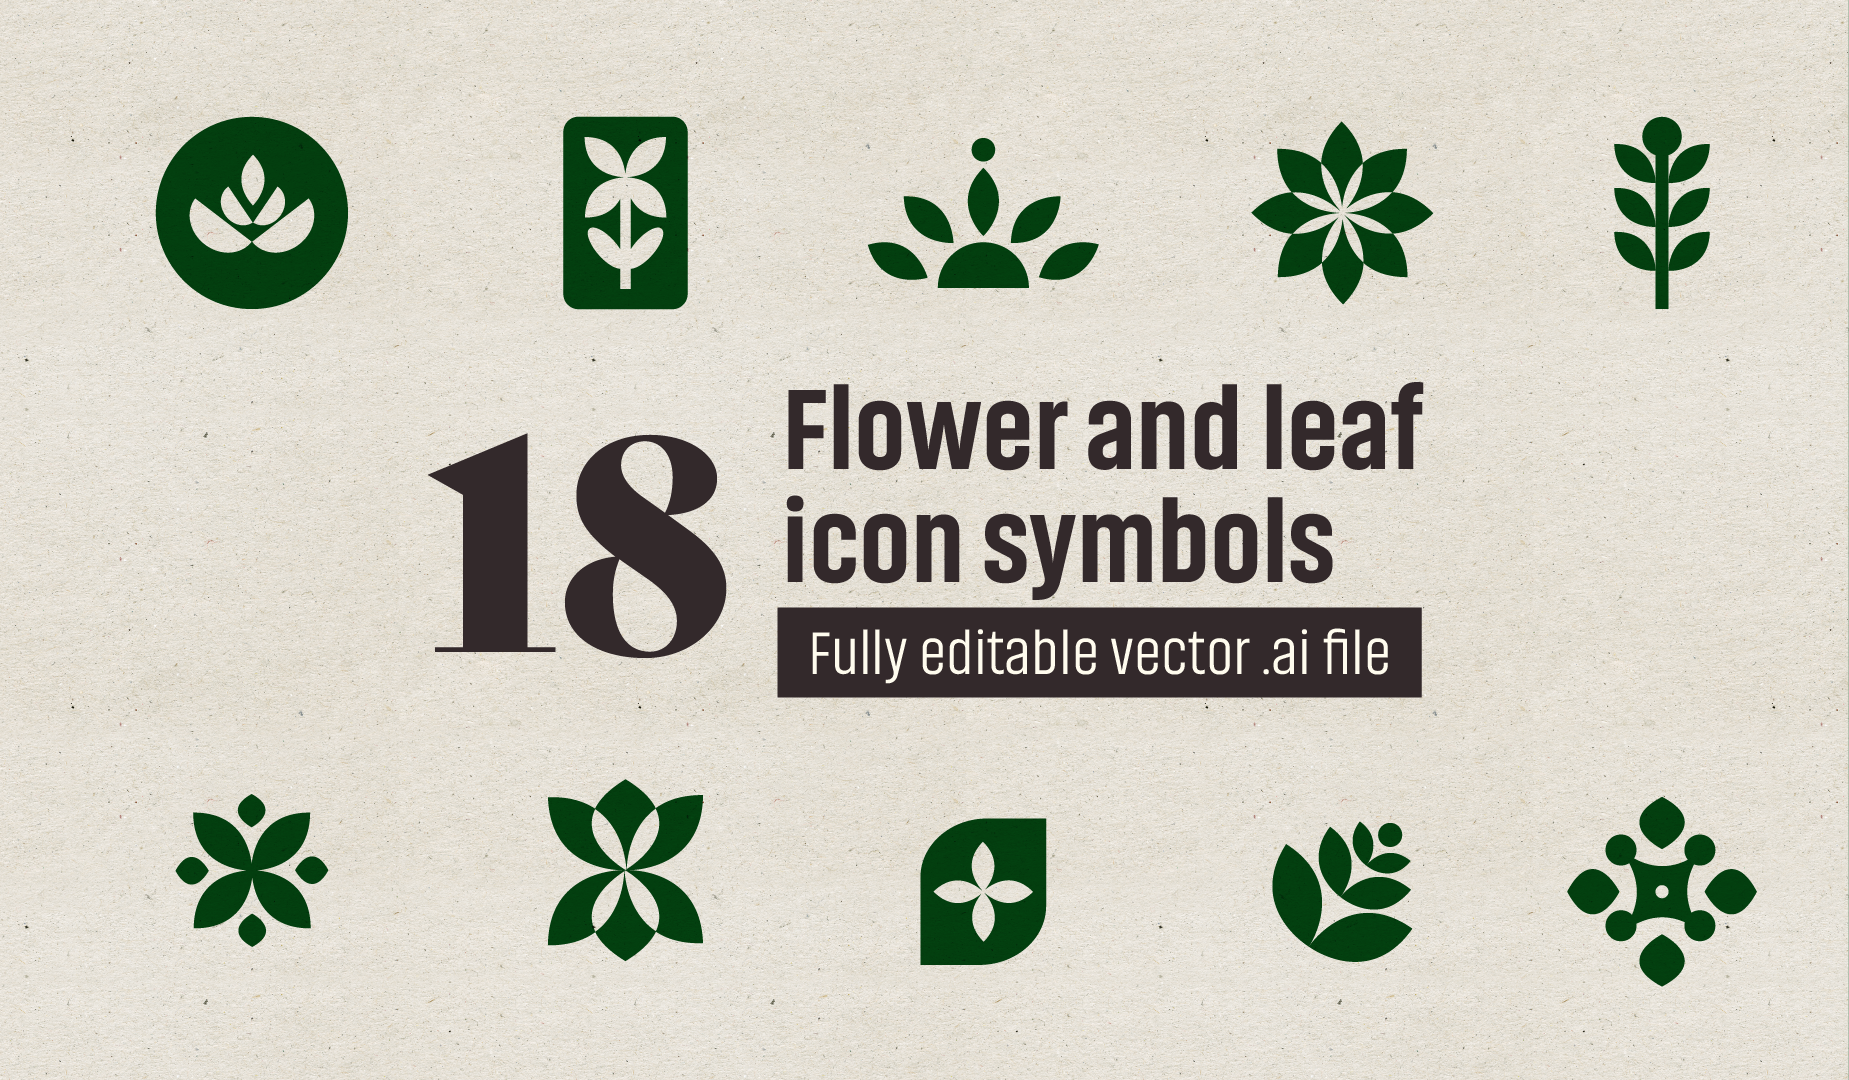
3. Design a logo: Now it's time to
put everything we learned in the previous
lesson into practice. We're going to design a logo
for a nature based brand, and we're going
to use the merge, separate and subtract functions of the shape builder
tool to do it. Let's start by drawing
an oval shape. Select the ellipse
tool, click and drag. Now, I only want
half of this shape. So we're going to use the subtract feature
of shape builder. Draw a rectangle and
drag it above the oval. The lines should guide you. Basically, you want
to buy sec the oval. Select them both and
activate shape build up. Hover over them, hold down option and click on the
pieces you don't want. We've now got the
base of the flower. Now I want to add the
ridges at the top. I'm going to draw a small circle and place it above the ridge. I'll then hold down option to duplicate and place
it next to it. And here's a handy shotgun. To replicate exactly
what you've just done, hold down control plus
d. I'd like five ridges, so I'm going to do
this three times. I'm now going to adjust
the width of the flowers, so it all fits nicely. Can you see how all of
these are separate shapes? I'm going to combine them
by selecting them all, activating shape builder, and then drawing
over them to merge. Hala. We now have
one big flower. I'd like to add some details, so I'm going to do so
using the ellipse tool. I'd like these to
appear as cutouts. So I'm going to draw
a circle first. I'll also change the
color of it so I can see what I'm doing
a little bit better. And then I'm going to place it in the center of the flower. I think that's a little too big. Let me just make it a little bit smaller. There we go. Now, I want this to
appear as a cutout. So I'm going to
select everything. Switch to shape builder, and I'm going to use alt
to cut out the shape. So now, you can't see it because it's on
a white background, but essentially, there isn't anything in the middle there
because it's been cut out. Finally, I'm going to add
the stem and the leaves. So I'm going to select the
rectangle tool and then just draw a thin box. Now, I want to center it. And if you've never
used align before, this is a really handy feature. So you just select the shape that you've got and the shape
you want to align it to. Click on the shape you
want to align it to again, and then press
horizontal align center. So this makes sure that
it's perfectly centered. So that's the stem, and
then I want to draw a leaf. So I'm going to use
the ellipse tool to draw a very
simple oval shape. Then I'm going to
select it and rotate it about 45 degrees and
place it on the stem. I want the leaf mirrored
on the other side. So with it selected, I'm going to click and then
go to transform and reflect. Vertical is what I want, and
then I'm going to hit copy. And then drag it
to the other side. If I select all of them, you'll see again how we've got
this big shape at the top, but these are all
separate shapes, so let's merge them again. Select shape builder, and
then just run it all over. Sometimes you might find that you are using the
shape builder tool, but the shapes aren't merging. And that's probably because
even though you can't see it, there might be a gap
between your elements, because shape builder only works on elements that
are overlapping. So if I zoom in, there is a tiny gap here, so I'm just going to move this So I'm just going to move this bit a
little bit more on top, so now they're
properly overlapping, and it should work. Again, if I do
this, there we go. So now this is one big shape. All that's left to do now is to place the flower on
top of a colored circle. So I'm going to use a
different colored circle. Right. So now, all
that's left is to get the flower on top of it. And the way you do that is
you cut a little paste, and then that should
make sure that the flower sits on
top of the circle, and then I'm going to use the align tool to
center align it. Um, I think that looks nice. So this is this is our
logo pretty much done. As a fun finishing touch, I'm going to type out the
name of a fictional company. So let's select the text
tool and then type the name. So I'm going to call
this one green leaf. Organics because
why not be literal? Let's just make this
a little bit bigger. Align it to the
center of the circle. There we go. The
logo is complete.
4. Final Thoughts: Thanks for watching my class. I hope you're excited
about using Shape builder. It's an easy tool to
get to grips with, but it has so much potential. Once you get
comfortable with it, you can create all kinds
of fun and complex shapes. This class is going
to be the first in a series of white sized
adobe illustrator classes. So follow me if you'd like to be notified about when I
aplod the next one. And if you found
this class useful, I'd really appreciate
you letting me know by leaving a review. Thanks again and see you
in the next one. Aye.
 Sneha Kadaba, Illustrator and Designer