Transcripts
1. Welcome to Class!: Hi, and welcome to this
gouache for beginners class, but I'm going to teach
you how to paint a colorful and vibrant flower
bouquet quickly and easily. I'm a designer and illustrator based and also share in the UK. And I have a passion
for all things to do with art and
creative expression. I work as a creative head
for last grow the business. And I also teach classes
here on Skillshare. This is a fun class, is suitable for a wide
range of skill levels, starting with the
absolute beginner, painting is an incredibly rewarding and relaxing exercise. It's a great way to have fun
express your creativity. I can be a great
jumping off point to even a career
in art and design. I'll be showing you what we
do is we need to get started. Tips and tricks on painting
techniques to use. And also step-by-step
instructions on how you can follow along. You'll end up with a beautiful painting
that you made yourself. You'll also be able to take these techniques
and apply them for any future paintings
that you might be feeling inspired to
produce at the end. So come join me and let's bring together. See you in class
2. Class Project: For your class project,
you're going to be painting a colorful
flower bouquet. I'm going to need a
few art supplies, namely paint, paper,
brushes, and a ballot. I go into a little bit more
detail in the next class, but it's nothing to be worried about and it's
nothing that can't be found in your local art
supply or stationary shop. You can follow
along with me as I paint or just watch the
class through to the end. And then start
painting yourself. Just do whatever works for you. Beginners and experienced
artists are welcome. I talk you through everything step-by-step so that you
can follow along easily. So let's jump in and take a look at the materials
you're going to need
3. Materials Needed: If you're just starting
out with gouache and are confused about
where to begin. Don't worry. First of all, you don't have to
spend a whole lot of money in order to get started. There are plenty of
options available at your local art supply or stationary shop that will
do the job just fine. Once you start painting more and you want to start exploring, there's a whole world
of paint and paper and different kinds of
suppliers just waiting for you. And it's all very exciting. But for the purpose
of this class, Here's what you're going
to need to get started. Let's start with paper. Now being does obviously
a very wet mediums, so you're going to
need a paper that can withstand that water. So look for Sketchpad. So I'd say that
they're suitable for watercolor or mixed media. This will make sure that
they don't buckle under the water that you're going to put on it when you're painting. Something else that you're
going to want to take into account is the
texture of the paper. Personally, I prefer
paper that is a little bit more
texture because I like the effect
that it produces. I've got some
handmade paper here. As you can see, it is very, very textured and
that just gives a much rougher effect to the pain that you
put on top of it. So it really is a
matter of preference. Just see what you have to hand and what you can get
a local supply shop, and that would be just fine. You can also try something
like watercolor paper. This should be available at most art supply shops and has
a weight of about 300 GSM, which would be fine for gouache. Now let's move on to paint. Gouache paint most
commonly comes in tubes or little glass bottles, are teaser and Winsor and Newton are a couple of
pretty good brands, but really just grab
any brand that you can find your stationery shop
if you're a beginner, I don't really have any
supplies to begin with. I'm going to be
using my artists are set and I actually
have a set of 60, but you don't need
anywhere near as much. Just make sure that you've got two colors for the flowers. One green and one white or pale yellow
color if you habitat. Now let's move on
to being brushes. This is an area where you really don't need to spend much at all. Paintbrushes are often
pretty inexpensive and I don't really care about what brand
of paint brush I buy. Full purpose of this project, see if you can get
a big paintbrush. So for example, I have a size 12 being rushed
that I'm going to be using along with two or
three medium paint brushes. So I've got a size nine, a size seven, and a size eight. Smaller brushes are good for
details and smaller strokes. And the larger brushes, It's obviously good for
filling in larger areas. You're also going to need a
pallet to mix your paints. You can go for ceramic one or a plastic one depending
on your preference. If you're on a bit of a
pinch and don't have those, you can either grab
something like a stainless steel plate or maybe even a thick
piece of cardboard. For your water, you're
going to need to Tumblr, I like this one from
Faber-Castell because collapses, which makes for easy storage, but really just grab any Tumblr that you
have laying around. A lot of the time I like
to work with to tumblers. One for when I'm dipping my light-colored been brushing and the other ones for my dogs. But you can get away with just
using one just as long as you change the water out frequently so that it
doesn't get too muddy. Also, make sure to
grab a paper towel as well to wipe your brushes
on as you're painting. And finally, you
need a sketchbook, and that's everything. Let's get started.
4. Colour Mixing and Techniques: Before we jump in
and start painting, I just want to talk a little
bit first about mixing. Gouache is very
versatile medium. This means that
you'll be able to get opaque or semi-opaque
and even slightly transparent finishes
depending on the amount of water
that you use. For the purposes of this class, I want things to be
as big as possible. There's just
something about rich, saturated colors that
I absolutely love. In the previous lesson, I said that you don't
need a big set of paints in order to get
a really good painting. And I stand by that. That's because you can mix a
limited number of colors to get a wide range of shapes
and use for your painting. So let's grab our paints. Palette, brush and water. Start off by squeezing a little bit of paint
onto the palette. So I'm going to be
using the thing. So can you see how
it's all taken? Gloopy, what water this down. So dunk your brush into the water and then just
mix it in with the paint. Now, it starts to get
smoother as you mix. For me, the ideal consistency is something like double
cream or custard. This ensures that you get
a nice opaque finish but the paint isn't so take that
it's hard to work with. At this point, you can either decide to use the color as is, or you can create a custom
shade by mixing other colors. So let's say I want
to make this pink a little bit warmer in tone. I will add in some orange
and then mix it in. I'll add a little bit
more pink because I think the orange
was very strong. It's also a good idea to consistently test the
color as you create it. So I'm just going to
grab a piece of paper. I'm just going to
see how it looks. So just kind of paint strokes with it and you'll
see how the colors looking. So remember with gouache paints, dark colors always look
lighter once they dry. Light colors always look
a little bit darker. So now that we know
how to mix paint, I'm going to show you
some basic brushstrokes that you'll be using to
create your painting. So let's look at petals first. We're going to be painting
some nice big flowers. So grab your big brush. This is the biggest one
that I'm going to be using and dip it into the water to make it
it'll make it a little wet and then swirl
it around the pin. So for our first brush stroke, start by pressing the
tip down and then apply a bit of pressure for the middle of the brush
and then lift it up. This is your basic petal shape. So if we were to use
the same approach, we can basically
create an entire, you'll see how it's
very similar to the actual shape of
the brush bristles. This is where you're just using the shape of the brush
to your advantage. I also feel free to
move around your, your paper as you work, because that will just help. Give you a little
bit more leverage. Feel free to practice this a few times until you
get the hang of it. Don't worry about making
each petal the same. We're not going for precision. There is a certain
beauty and making things look irregular
and perfect. Mixing. Another petal shape that you can do is
using multiple strokes. So for this one, you keep
each stroke fairly thin, but you make them
stick together. So you end up with
one petal string, with one petal at the end of it. The look you get with
it will vary if you're using a thinner brush. So now you can see once if you're starting
to run out of paint, you'll actually start
to see the person walks on the beach. Sometimes this can be
a nice look to go for. Other times you might want
to just dip your pain, your brush back into the paint or use a little bit more water. I've just grabbed a sap green that I've squeezed
onto the palette here. Feel free to use whatever
grade you got on hand. And I've also got a smaller brush as well
because I wanted to show you how the size
of the brush can affect the kind of strokes
that you end up getting. So I'm just going to do what I did with the pink and orange. I'm going to just dunk my
brush and some water and then mix it with the green. And the technique
is similar to what we used for the first
flower petals that we drew. So you start off with the tip
of the brush and then you press down gently in the middle section and
they lifted backup. Leaves and petals can look
quite similar really. You can make them slightly longer if you want to
make it into a leaf. So again, start off small
press down in the middle, and then lift back up. And then you've got your leaf. Another thing that you can do is create bunches of
leaves together or leaves that run down
a central stem. You can also create one leaf with multiple brush strokes
like I did with the petals. It's also a good idea to look at references
at this point. So if you've got books or images that you find online of leaves and flowers,
take a look at them, see the kinds of
shapes that you like and try to recreate them using the painting technique to just experiment a
little bit and how fun, because if you're not having fun, then what's
the point, right? So now that we know how to
paint leaves and petals, we'll look at some other
decorative elements that we'll be using
in our paintings. So this is a great
way to fill up gaps and generally make things look prettier and more colorful. Decorative elements tend
to be smaller in size. So I'll be using
a smaller brush. A really nice, easy, decorative element that
you can use to fill up your painting is just
doing little circles. They don't even have
to be perfect circles. Mine never are small,
irregular, spherical shapes. And they can look quite
nice when they're just kind of been dispersed in
the middle of your painting. You can also combine
them together. So for example, you can have a circle like this and then you can have
another one on top. You can also create
things like little buds. So it's sort of similar to
the battleship, but much, much smaller with the
tip of your brush, you can also create small
dots or irregular shapes. So right now we've got
a good selection of different strokes and shapes as a reference sheet
for our final painting. Before we move on
to that though, we just need to map out
a rough composition. So we will do that
in our next lesson.
5. Sketching: When you're creating painting
like a big floral bouquet, you want the end result will
look nice and balanced. This means that you should have a good variety of
different elements, shapes, and sizes in there. A good way to make sure that
this happens is to create a rough composition sketch that you can refer
to as your beat. So I've got my sketchbook
here and I've got my pencil. And I'm first going to draw a thumbnail box that will represent the whole
of the beach. Now, this exercise is about
the placement of elements, not the elements themselves. So I'm going to be using
so close and similar shapes represent the
flowers and the leaves. I always like to start off with placing the biggest
elements first. I think a painting
like this should have maybe three big flowers. So I'm going to draw three big circles to map
out where they would go. Then let's take a look
at medium-sized flowers. I'm thinking maybe five of them. So let's place them in and
around the big flowers, ensuring that they
cover the beach evenly. So we can have one
here, another one. Maybe here. You can
squeeze em and then one. Alright? Now that we've got a rough idea of where
the flowers are going, let's draw the stems. So this is one big flowers. Fetal stem would
be somewhere here. And this one, all
the stems I liked, I liked the stems to converge in at a single
point necessarily, but I like them all to be
moving in one direction. And then kinda
throwing out again. So something like this. And now let's add in the leaves. I like to have a
lot of leaves and I like them to be
overlapping as well. I have some here. Then finally, we
will end with it smattering of little
elements to fill things out. So these are the little dots and irregular shapes that I
had mentioned earlier. So they would just
be floating in and around this bond, right? I think I'm happy with this. Feel free to move
things around and make multiple thumbnail
layouts if you want, but don't spend too
much time on these. Elements will inevitably move around once you actually
put the brush to paper. And that's okay.
This is simply meant to be a rough guide to help
you when you're painting. So let's move on to
the next lesson to get started with actually
painting up, okay?
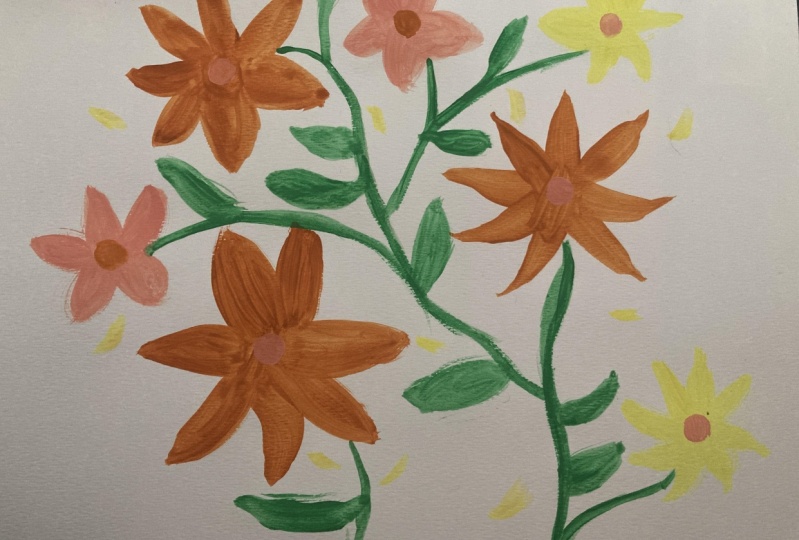
6. Painting: Part One: Okay, So we're now ready
to start painting. I am just going to grab my big brush because I'm going to be starting with
the lightest flowers first. And the big brushes makes
sense to draw the big petals. I've got my paper here
and I've got my palette. So I've mixed up a little bit of the orange reference
image to hand. I'm going to be using
that as a guide when it comes to flower placement. Placement of any, of
any elements really. So I'm going to begin with
the largest flowers first. So we've got three large flowers that we've got to work with. And according to my
reference sketch, this should be placed
one will be around here, another one would
be about there. And then there's
one at the bottom. I know I definitely want the one on the top left to be orange. I wouldn't make this
one orange juice because there'll be
too close together. So instead what I'm
going to do is I'm gonna make this big one orange. And then I'm going to
make the one below it orange because then that will be broken up by the medium
flowers in the middle. So let's give this a go. I'm going to start by
doing the petals according to the techniques I showed
in the previous lessons. Where I press down the
brush and then just allow the shape of the brush to be the shape of the
petals essentially. So let's begin. You can create, you can
see how this has just created a lovely, better shape. Now the thing to
bear in mind is you can sketch in advance if
you think that will help. I tend to not do that
because then you're left with lines that you need to erase out and things like that. But absolutely
nothing wrong with sketching if you feel like
that would make it easier. You can start off by doing one circle for the inside
and one circle for the outside just to help to keep your patrons contained, right? I've done one now and I'm
just going to do the rest. Feel free to dip your brush in the paint
and often as you need. And some people like to tape the papers down
just to make sure, you know, stuff
doesn't move around. But because I
literally moved move my paper as I faint, taping
it down, it wouldn't be. But for me, this is my first large flower. As you can see, I have left a
bit of a gap in the middle, which I am going to fill
in with pink in a bit. But before that, I'm just
going to smooth out some of the edges so that the oldest
look a little bit neater. I do like a texture brush look. I think on this occasion much so I just wanted to make sure that those are
filled in a little bit. This is my first big flower. Now, the second
flower is going to, like I said, be over here, but that one is not
going to be in orange. So I'm not going to worry
about that for now. I'm going to move on
to the third one, which would roughly
be around here. This one, I think I'm going
to make the petals a little bit thicker and wider. So rather than the kind of long and narrow ones
that I've done over here. So instead of using the brush shape to dictate
the shape of the petal. I'm actually going
to be painting the petals in by now. You see they're both very
different looking flowers. I knew all to see
that they're not beautiful, but that's fine. I really liked the sort of scattered, missing
local flowers. I don't really go for
precision because I think when you look at the whole thing altogether,
it just looks a lot. It looks a lot more
modern compared to having flowers
that app, perfect. Now I've got two
large orange flowers and now I need to
have a big thing, Q1, which is going
to go around here. I think the pink one, I probably make it
similar to that one. So I'm going to just do it
like I did before where I just press the brush down
and lift it up. Now I'm going to also be
using the pink to fill in the middle of
the orange flowers
7. Painting: Part Two: I like to get the big
flowers out of the way first because I think that
the foundation of it. But past that point, I like to intersperse, going in with some
leaves and stems, adding in some flowers, going into few mornings, adding in some more flowers and things like that because
they're smaller elements, there are a lot more
easier to place. Whereas if you left the big
flowers for the very end, it might be a bit of an
issue because you wouldn't really have room for them. Now, I have this green
that I mixed up earlier. But it's very, very bright and I want to tone
it down a little bit, so I'm going to squeeze a little bit more of the green
onto the palette. But I'm also going to just, like I said, tone it down. I don't want to tone
it down with a white, but I've got this, it's
called Naples yellow. But if you have a pale yellow, that can be a good way to tone down the green and
just make it a little bit more muted because you've got
so much going on. The oranges so bright, the pinker, so bright. So if you had really
bright green as well, it might get a bit much. So I've got that. I'm going to just draw the stems of these large flowers towards
the bottom of the page, sort of following how
my thumbnail looks. I'm just going to draw
a few days before I move on to doing
the medium flowers. So I will again use
the same technique of just pressing lightly, then pressing it down a bit, and then taking it out. And then you end up with a
really nice, lovely long leaf. So for the medium flowers, the first of which is
going to go around that. I want to use the orange, but I also want to just dial it down a little bit
like we did with the green. So I'm going to mix it in
with this ocher color. Just have to create a
little bit of variation between what's already there on the beach and helped keep things a little
bit more interesting. I've been adding more
green stems and leaves. I'm not, again, not strictly
sticking to the thumbnails. So because things just
developed organically, so just wherever you see gaps, wherever you think it
makes sense to add leaves, go ahead and do that for me. I just like to fill things up. I like things to look very
full and really pretty so. Just do whatever you feel
makes sense for you. I'm also going to just
bury my green as well, but to take that
ocher color from before and just use
mixed in with the green. Now it's quite a strong color, so I'm not going to
use too much of it. Now you can really see how the whole thing started
to come together. You've got the flowers in place, we call the leaves
and the stems. Now we need to add in the
decorative elements and also add in the middle
of the flowers as well. You can also see how I've
loosely follow the thumbnail. There have been some deviations, like reducing the number
of medium flowers and just when it comes to sort
of leaf and stem placement. But that was always
going to happen. And that's absolutely fine. Now we can also start adding the decorative elements as well. So I'm just going to
swap my brush around. Here. It doesn't really
matter which colors you use because the decorative
elements are so small that you
don't have to worry about demonstrating focus
or anything like that, like you would with
a larger elements. I think if you're
new to painting, sometimes there is a tendency to be a bit hesitant when it
comes to adding more things. I know I used to be like that. Sometimes I still
am. I'm like, Oh no, I don't want to add too much
because I might ruin it. But the truth is, honestly, you're very rarely
ruin something. You might add in something
where you're not 100% happy about it, but chances are it's probably
only visible to you. So just don't, don't be
hesitant to add more. I think, especially when it
comes to paintings like this, you can be free and you can
be loose and just add things. With abandon. My point is experiment, and what's the worst
that could happen? Probably not as
bad as you think. One tip that I can
give you is if you are struggling to figure out
where you want to stop, where you feel like
it has been enough. Good thing is to half close your eyes and just
look at your painting. There are any spaces
or jump out to you. And then I can usually
have to fill things in. So if I half close my eyes, everything looks pretty
well spaced out. I would say there is
a bit of a gap here. So I might just do like green dot and maybe
just a leaf there. I think that's looking
fine, To be honest. I'm happy with that. We've got a finished
painting. That is all. That's all done. I hope you I hope you-all also really happy with
what you've done as well.
8. Final Thoughts: Thanks for watching my class. I hope that you're happy
with your painting and I feeling inspired to create more art using the tips and the techniques
that you've picked up here. Now that you know how
to mix your paints, there is a whole world of wash
is waiting to be explored. I would love to see
what you've created. So please feel free
to share your project in the project gallery
so I can take a look. And if you liked
this class and would like to know when I
release a new one, please follow me on
Skillshare so you can be notified anytime I
upload in class, I wish you all the best on your creative journey and I
will see you soon. Thanks
 Sneha Kadaba, Illustrator and Designer